

Quick Instruction Guide
Type HD8768 - HD8885
READ THIS GUIDE CAREFULLY BEFORE USING THE MACHINE.
FOR COMPLETE INSTRUCTIONS DOWNLOAD USER MANUAL FROM WWW.SAECO.COM/SUPPORT
EnglishItalianoDeutschFrançaisEspañolPortuguês
Register your product and get support at
www.saeco.com/welcome
Welcome to Philips Saeco! Register on WWW.SAECO.COM/WELCOME and you will receive tips
EN
and updates on how to take care of your machine. This booklet contains quick instructions on how
to operate and descale your machine properly.
For complete instructions go to www.saeco.com/support to download the latest version of the
user manual (refer to the type number listed on the cover page).
Benvenuti nel mondo Philips Saeco! Registratevi sul sito WWW.SAECO.COM/WELCOME per rice-
IT
vere consigli e aggiornamenti sulla manutenzione. In questo libretto sono riportate le istruzioni in
breve per il corretto funzionamento e la decalci cazione della macchina.
Consultate il sito www.saeco.com/support per scaricare l’ultima versione del manuale d’uso
(fare riferimento al numero di modello indicato sulla copertina).
Herzlich Willkommen in der Welt von Philips Saeco! Registrieren Sie sich auf der Internetseite
DE
WWW.SAECO.COM/WELCOME und erhalten Sie Hinweise und Aktualisierungen zur Wartung. In
diesem Heft werden die Hinweise für den korrekten Betrieb und das Entkalken des Geräts in Kurzform dargestellt.
Auf der Webseite www.saeco.com/support kann die aktuellste Version der Bedienungsanleitung heruntergeladen werden (dabei ist auf die auf dem Deckblatt angegebene Modellnummer Bezug zu nehmen).

Bienvenue dans le monde Philips Saeco! Enregistrez-vous sur le site WWW.SAECO.COM/WEL-
FR
COME et retrouvez les conseils et les mises à jour concernant l'entretien de votre appareil. Ce mode
d'emploi fournit de brèves instructions pour le bon fonctionnement et le détartrage de la machine.
Consulter le site www.saeco.com/support pour télécharger la dernière version du mode d'emploi (se référer au numéro du modèle indiqué sur la couverture).
¡Bienvenido al mundo Philips Saeco! Regístrese en la página WWW.SAECO.COM/WELCOME para
ES
recibir consejos y actualizaciones sobre el mantenimiento. En este manual encontrará las instruc-
ciones resumidas para el correcto funcionamiento y la descalci cación de la máquina.
Consulte la página www.saeco.com/support para descargar la última versión del manual de
uso (haga referencia al número de modelo indicado en la portada).
EnglishItalianoDeutschFrançaisEspañolPortuguês EnglishItalianoDeutschFrançaisEspañolPortuguês
Bem-vindo ao mundo Philips Saeco! Registe-se no site WWW.SAECO.COM/WELCOME para rece-
PT
ber conselhos e actualizações relativas à manutenção. Neste livrete estão indicadas, de forma re-
duzida, as instruções para o funcionamento correcto e para a descalci cação da máquina.
Consulte o site www.saeco.com/support para descarregar a última versão do manual de utilização (consulte o número do modelo indicado na capa).

EN - CONTENT
SAFETY INSTRUCTIONS ........................................................................................................................................................................................6
FIRST INSTALLATION.......................................................................................................................................................................................... 10
MANUAL RINSE CYCLE........................................................................................................................................................................................ 12
FIRST ESPRESSO / COFFEE .................................................................................................................................................................................. 13
MY FAVORITE ESPRESSO .................................................................................................................................................................................... 13
CHANGING COFFEE BEANS ................................................................................................................................................................................. 14
ADJUSTING THE CERAMIC COFFEE GRINDER .......................................................................................................................................................16
FROTHING MILK ................................................................................................................................................................................................ 17
HOT WATER........................................................................................................................................................................................................ 19
DESCALING ........................................................................................................................................................................................................ 20
ACCIDENTAL INTERRUPTION OF THE DESCALING CYCLE ......................................................................................................................................24
BREW GROUP CLEANING .................................................................................................................................................................................... 25
AUTOMATIC MILK FROTHER CLEANING ...............................................................................................................................................................26
CLEANING OF THE COFFEE BEAN HOPPER, THE TRAY AND THE COMPARTMENT ....................................................................................................30
WARNING SIGNALS YELLOW COLOUR ...............................................................................................................................................................31
WARNING SIGNALS RED COLOUR .....................................................................................................................................................................32
MAINTENANCE PRODUCTS .................................................................................................................................................................................33
IT - INDICE
NORME DI SICUREZZA .......................................................................................................................................................................................... 8
PRIMA INSTALLAZIONE ...................................................................................................................................................................................... 10
CICLO DI RISCIACQUO MANUALE .........................................................................................................................................................................12
PRIMO ESPRESSO / CAFFÈ ..................................................................................................................................................................................13
IL MIO ESPRESSO IDEALE ...................................................................................................................................................................................13
SOSTITUZIONE CAFFÈ IN GRANI .......................................................................................................................................................................... 14
REGOLAZIONE MACINACAFFÈ IN CERAMICA ....................................................................................................................................................... 16
COME EMULSIONARE IL LATTE............................................................................................................................................................................ 17
ACQUA C ALDA ....................................................................................................................................................................................................19
DECALCIFICAZIONE ............................................................................................................................................................................................20
INTERRUZIONE ACCIDENTALE DEL CICLO DI DECALCIFICAZIONE .......................................................................................................................... 24
PULIZIA DEL GRUPPO CAFFÈ ..............................................................................................................................................................................25
PULIZIA MONTALATTE AUTOMATICO .................................................................................................................................................................. 26
PULIZIA DEL CONTENITORE CAFFÈ IN GRANI, DEL VASSOIO E DEL VANO CAFFÈ ....................................................................................................30
SEGNALI DI AVVISO GIALLO ............................................................................................................................................................................. 31
SEGNALI DI ALLARME ROSSO ...........................................................................................................................................................................32
PRODOTTI PER LA MANUTENZIONE ....................................................................................................................................................................33
DE - INHALT
SICHERHEITSHINWEISE .....................................................................................................................................................................................34
ERSTE INBETRIEBNAHME .................................................................................................................................................................................. 38
MANUELLER SPÜLZYKLUS..................................................................................................................................................................................40
ERSTER ESPRESSO / KAFFEE ...............................................................................................................................................................................41
MEIN LIEBLINGSESPRESSO ............................................................................................................................................................................... 41
WECHSEL KAFFEEBOHNEN .................................................................................................................................................................................42
EINSTELLUNG KERAMIKMAHLWERK .................................................................................................................................................................. 44
MILCH AUFSCHÄUMEN ....................................................................................................................................................................................... 45
HEISSWASSER ................................................................................................................................................................................................... 47
ENTKALKEN ....................................................................................................................................................................................................... 48
UNBEABSICHTIGTE UNTERBRECHUNG DES ENTKALKUNGSZYKLUS .....................................................................................................................52
REINIGUNG DER BRÜHGRUPPE .......................................................................................................................................................................... 53
REINIGUNG AUTOMATISCHER MILCHAUFSCHÄUMER .......................................................................................................................................... 54
REINIGUNG DES KAFFEEBOHNENBEHÄLTERS, DER SCHALE UND DES KAFFEEFACHS ............................................................................................58
HINWEISSIGNALE GELB ................................................................................................................................................................................... 59
ALARMSIGNALE ROT ....................................................................................................................................................................................... 60
PFLEGEPRODUKTE............................................................................................................................................................................................ 61

FR - TABLE DES MATIÈRES
CONSIGNES DE SÉCURITÉ ...................................................................................................................................................................................36
PREMIÈRE INSTALLATION ..................................................................................................................................................................................38
CYCLE DE RINÇAGE MANUEL ............................................................................................................................................................................... 40
PREMIER CAFÉ EXPRESSO/CAFÉ ........................................................................................................................................................................ 41
MON CAFÉ EXPRESSO IDÉAL ............................................................................................................................................................................... 41
REMPLACEMENT CAFÉ EN GRAINS ...................................................................................................................................................................... 42
RÉGLAGE DU MOULIN À CAFÉ EN CÉRAMIQUE .....................................................................................................................................................44
COMMENT ÉMULSIONNER LE LAIT ...................................................................................................................................................................... 45
EAU CHAU DE ......................................................................................................................................................................................................47
DÉTARTR AGE ..................................................................................................................................................................................................... 48
INTERRUPTION ACCIDENTELLE DU CYCLE DE DÉTARTRAGE ................................................................................................................................. 52
NETTOYAGE DU GROUPE DE DISTRIBUTION ........................................................................................................................................................53
NETTOYAGE DU MOUSSEUR À LAIT AUTOMATIQUE .............................................................................................................................................. 54
NETTOYAGE DU RÉSERVOIR À CAFÉ EN GRAINS, DU PLATEAU ET DU LOGEMENT À CAFÉ ....................................................................................... 58
SIGNAUX D'AVERTISSEMENT JAUNE ................................................................................................................................................................. 59
SIGNAUX D'ALARME ROUGE .............................................................................................................................................................................60
PRODUITS POUR L'ENTRETIEN ............................................................................................................................................................................ 61
ES - ÍNDICE
NORMAS DE SEGURIDAD ....................................................................................................................................................................................62
PRIMERA INSTALACIÓN .....................................................................................................................................................................................66
CICLO DE ENJUAGUE MANUAL ............................................................................................................................................................................ 68
PRIMER CAFÉ EXPRÉS / CAFÉ ..............................................................................................................................................................................69
MI CAFÉ EXPRÉS IDEAL ....................................................................................................................................................................................... 69
SUSTITUCIÓN DEL CAFÉ EN GRANO .....................................................................................................................................................................70
REGULACIÓN DEL MOLINILLO DE CAFÉ DE CERÁMICA .......................................................................................................................................... 72
CÓMO ESPUMAR LECHE ...................................................................................................................................................................................... 73
AGUA CALIENTE .................................................................................................................................................................................................75
DESCALCIFICACIÓN ............................................................................................................................................................................................76
INTERRUPCIÓN ACCIDENTAL DEL CICLO DE DESCALCIFICACIÓN ...........................................................................................................................80
LIMPIEZA DEL GRUPO DE CAFÉ ...........................................................................................................................................................................81
LIMPIEZA DEL MONTADOR DE LECHE AUTOMÁTICO .............................................................................................................................................82
LIMPIEZA DEL CONTENEDOR DE CAFÉ EN GRANO, DE LA CUBETA Y DEL COMPARTIMENTO DE CAFÉ ...................................................................... 86
SEÑALES DE AVISO AMARILLO ......................................................................................................................................................................... 87
SEÑALES DE ALARMA ROJO .............................................................................................................................................................................. 88
PRODUCTOS PARA EL MANTENIMIENTO .............................................................................................................................................................89
EnglishItalianoDeutschFrançaisEspañolPortuguês
PT - ÍNDICE
NORMAS DE SEGURANÇA ...................................................................................................................................................................................64
PRIMEIRA INSTALAÇÃO ...................................................................................................................................................................................... 66
CICLO DE ENXAGUAMENTO MANUAL................................................................................................................................................................... 68
PRIMEIRO EXPRESSO / CAFÉ ............................................................................................................................................................................... 69
O MEU EXPRESSO IDEAL ..................................................................................................................................................................................... 69
SUBSTITUIÇÃO DE CAFÉ EM GRÃOS ..................................................................................................................................................................... 70
AJUSTE DO MOINHO DE CAFÉ EM CERÂMICA .......................................................................................................................................................72
COMO EMULSIONAR O LEITE...............................................................................................................................................................................73
ÁGUA QUENTE .................................................................................................................................................................................................... 75
DESCALCIFICAÇÃO ............................................................................................................................................................................................. 76
INTERRUPÇÃO ACIDENTAL DO CICLO DE DESCALCIFICAÇÃO .................................................................................................................................80
LIMPEZA DO GRUPO CAFÉ ..................................................................................................................................................................................81
LIMPEZA DO BATEDOR DE LEITE AUTOMÁTICO ....................................................................................................................................................82
LIMPEZA DO RECIPIENTE DE CAFÉ EM GRÃOS, DA BANDEJA E DO COMPARTIMENTO DE CAFÉ ............................................................................... 86
SINAIS DE AVISO AMARELO ..............................................................................................................................................................................87
SINAIS DE ALARME VERMELHO ........................................................................................................................................................................88
PRODUTOS PARA A MANUTENÇÃO...................................................................................................................................................................... 89

Safety instructions
6
Norme di sicurezza
www.saeco.com/support
EN SAFETY INSTRUCTIONS
This machine is equipped with safety devices.
Nevertheless, read and follow the safety instructions carefully and only use the machine
properly as described in these instructions to
avoid accidental injury or damage due to improper use of the machine. Keep this user manual for future reference.
Warnings
• Connect the machine to a wall socket with
a voltage matching the technical speci cations of the machine.
• Connect the machine to a earthed wall socket.
• Do not let the power cord hang over the
edge of a table or counter, or touch hot surfaces.
• Never immerse the machine, the mains plug
or power cord in water: Danger of electrical
shock!
• Do not pour liquids on the power cord connector.
• Never direct the hot water jet towards body
parts: Danger of burning!
• Do not touch hot surfaces. Use handles and
knobs.
• Remove the mains plug from the wall socket:
- If a malfunction occurs;
- If the machine will not be used for a long
time;
- Before cleaning the machine.
Pull on the mains plug, not on the power cord.
Do not touch the mains plug with wet hands.
• Do not use the machine if the mains plug,
the power cord or the machine itself is damaged.
• Do not make any modi cations to the machine or its power cord. Only have repairs
carried out by a service centre authorised by
Philips to avoid any hazard.
• The machine should not be used by children
younger than 8 years old.
• The machine can be used by children of 8
years and upwards if they have previously
been instructed on the correct use of the
machine and made aware of the associated
dangers or if they are supervised by an adult.
• Cleaning and maintenance should not be
carried out by children unless they are more
than 8 years old and supervised by an adult.
• Keep the machine and its power cord out of
reach of children under 8 years old.
• The machine may be used by persons with
reduced physical, sensory or mental capabilities or lacking su cient experience
and/or skills if they have previously been
instructed on the correct use of the machine
and made aware of the associated dangers
or if they are supervised by an adult.
• Children should be supervised to ensure
that they do not play with the machine.
• Never insert ngers or other objects into the
co ee grinder.
Cautions
• The machine is for household use only. It is
not intended for use in environments such
as canteens, sta kitchens of shops, o ces,
farms or other work environments.
• Always put the machine on a at and stable
surface.
• Do not place the machine on hot surfaces,
directly next to a hot oven, heater units or
similar sources of heat.

www.saeco.com/support
Safety instructions
Norme di sicurezza
7
• Only put roasted co ee beans into the co ee
bean hopper. If ground co ee, instant coffee, raw co ee beans or any other substance
is put in the co ee bean hopper, it may
damage the machine.
• Let the machine cool down before inserting
or removing any parts.
• Never use warm or hot water to ll the water tank. Use only cold non-sparkling drinking water.
• Never clean with scrubbing powders or
harsh cleaners. Simply use a soft cloth
dampened with water.
• Descale your machine regularly. The machine indicates when descaling is needed.
Not doing this will make your appliance
stop working properly. In this case repair is
not covered under your warranty!
• Do not keep the machine at temperature
below 0 °C. Residue water in the heating
system may freeze and cause damage.
• Do not leave water in the water tank if the
machine is not used over a long period of
time. The water can get contaminated. Use
fresh water every time you use the machine.
Disposal
electrical and electronic equipment, as well as
waste disposal”.
This product complies with EU Directive
2002/96/EC.
The
symbol on the product or on its packaging indicates that this product may not be
treated as household waste. Instead, it shall be
handed over to the applicable waste collection
point for the recycling of electrical and electronic equipment.
By ensuring this product is disposed of correctly, you will help prevent potential negative
consequences for the environment and human
health, which could otherwise be caused by inappropriate waste handling of this product. For
more detailed information about recycling this
product, please contact your local city o ce,
your household waste disposal service or the
shop where you purchased the product.
This Philips appliance complies with all the applicable standards and regulations relating to
the exposure to electromagnetic elds.
EnglishItaliano
- Packaging materials can be recycled.
- Appliance: unplug the appliance and cut the
power cord.
- Deliver the appliance and power cord to a
service centre or public waste disposal facility.
In compliance with art.13 of the Italian Legislative Decree dated 25 July 2005, no. 151 “Implementation of the directives 2005/95/EC,
2002/96/EC and 2003/108/EC on the restriction
of the use of certain hazardous substances in

Safety instructions
8
Norme di sicurezza
www.saeco.com/support
IT NORME DI SICUREZZA
La macchina è dotata di dispositivi di sicurezza.
È tuttavia necessario leggere e seguire attentamente le indicazioni per la sicurezza descritte
nelle presenti istruzioni d’uso in modo da evitare danni accidentali a persone o cose dovuto
all’uso scorretto della macchina. Conservare
questo manuale per eventuali riferimenti futuri.
Attenzione
• Collegare la macchina a una presa a muro
adeguata, la cui tensione principale corrisponda ai dati tecnici dell’apparecchio.
• Collegare la macchina a una presa a muro
dotata di messa a terra.
• Evitare che il cavo di alimentazione penda
dal tavolo o dal piano di lavoro o che tocchi
super ci calde.
• Non immergere la macchina, la presa di
corrente o il cavo di alimentazione in acqua:
pericolo di shock elettrico!
• Non versare liquidi sul connettore del cavo
di alimentazione.
• Non dirigere il getto di acqua calda verso
parti del corpo: pericolo di scottature!
• Non toccare super ci calde. Utilizzare i manici e le manopole.
• Rimuovere la spina dalla presa:
- se si veri cano delle anomalie;
- se la macchina rimarrà inutilizzata per
lungo tempo;
- prima di procedere alla pulizia della
macchina.
Tirare dalla spina e non dal cavo di alimen-
tazione. Non toccare la spina con le mani
bagnate.
• Non utilizzare la macchina se la spina, il cavo
di alimentazione o la macchina stessa risul-
tano danneggiati.
• Non alterare né modi care in alcun modo la
macchina o il cavo di alimentazione. Tutte
le riparazioni devono essere eseguite da un
centro assistenza autorizzato da Philips per
evitare qualsiasi pericolo.
• La macchina non è destinata all’uso da parte
di bambini con età inferiore a 8 anni.
• La macchina può essere utilizzata da bambini
di 8 anni di età (e superiore) se precedentemente istruiti riguardo ad un utilizzo corretto
della macchina e coscienti dei relativi pericoli
o sotto la supervisione di un adulto.
• Pulizia e manutenzione non devono essere
eseguite da bambini, a meno che non abbiano più di 8 anni e siano supervisionati da
un adulto.
• Tenere la macchina e il suo cavo di alimentazione lontano dalla portata dei minori di 8
anni.
• La macchina può essere utilizzata da persone con ridotte capacità siche, mentali,
sensoriali o con mancanza di esperienza
e/o competenze insu cienti se precedentemente istruite riguardo ad un utilizzo corretto della macchina e coscienti dei relativi
pericoli o sotto la supervisione di un adulto.
• I bambini devono essere sorvegliati per assicurarsi che non giochino con l’apparecchio.
• Non inserire le dita o altri oggetti nel macinaca è.
Avvertenze
• La macchina è prevista per il solo uso domestico e non è indicata per l’utilizzo in ambienti quali mense o zone cucina di negozi,
u ci, fattorie o altri ambienti lavorativi.
• Posizionare sempre la macchina su una su-
www.saeco.com/support
Safety instructions
Norme di sicurezza
9
per cie piana e stabile.
• Non posizionare la macchina su super ci
calde, in prossimità di forni caldi, riscaldatori o analoghe sorgenti di calore.
• Immettere nel contenitore sempre e
soltanto ca è tostato in grani. Ca è in
polvere, solubile, ca è crudo, nonché altri
oggetti, se inseriti nel contenitore ca è in
grani, possono danneggiare la macchina.
• Lasciare ra reddare la macchina prima di
inserire o rimuovere qualsiasi componente.
• Non riempire il serbatoio con acqua calda o
bollente. Utilizzare solo acqua fredda potabile non gassata.
• Per la pulizia, non utilizzare polveri abrasive o detergenti aggressivi. È su ciente un
panno morbido inumidito con acqua.
• E ettuare la decalci cazione della macchina
regolarmente. Sarà la macchina a indicare
quando è necessario procedere alla decalci cazione. Se questa operazione non viene
svolta, l’apparecchio smetterà di funzionare
correttamente. In questo caso la riparazione
non è coperta da garanzia!
• Non tenere la macchina a una temperatura
inferiore a 0°C. L’acqua residua all’interno
del sistema di riscaldamento può congelare
e danneggiare la macchina.
• Non lasciare acqua nel serbatoio se la macchina non verrà utilizzata per un lungo periodo. L’acqua potrebbe subire delle contaminazioni. Ogni volta che si usa la macchina,
utilizzare acqua fresca.
tagliare il cavo di alimentazione.
- Consegnare l’apparecchio e il cavo di alimentazione a un centro assistenza o a una
struttura pubblica per lo smaltimento dei
ri uti.
Ai sensi dell’art. 13 del Decreto Legislativo 25
luglio 2005, n. 151 “Attuazione delle Direttive
2005/95/CE, 2002/96/CE e 2003/108/CE, relative alla riduzione dell’uso di sostanze pericolose
nelle apparecchiature elettriche ed elettroniche, nonché allo smaltimento dei ri uti”.
Questo prodotto è conforme alla Direttiva europea 2002/96/CE.
Il simbolo
riportato sul prodotto o sulla
confezione indica che il prodotto non può essere
trattato come ri uto domestico, ma deve essere
consegnato al centro di raccolta competente per
poterne riciclare i componenti elettrici ed elettronici.
Provvedendo al corretto smaltimento del prodotto, contribuite a salvaguardare l’ambiente
e le persone da possibili conseguenze negative
che potrebbero derivare da una gestione non
corretta del prodotto nella sua fase nale di vita.
Per maggiori informazioni sulle modalità di riciclo del prodotto vi preghiamo di contattare l’uf cio locale di competenza, il vostro servizio di
smaltimento ri uti domestici oppure il negozio
presso il quale avete acquistato il prodotto.
EnglishItaliano
Smaltimento
- I materiali d’imballaggio possono essere riciclati.
- Apparecchio: staccare la spina dalla presa e
Questo apparecchio Philips è conforme a tutti
gli standard e le normative applicabili in materia di esposizione ai campi elettromagnetici.

Instructions
10
Istruzioni
www.saeco.com/support
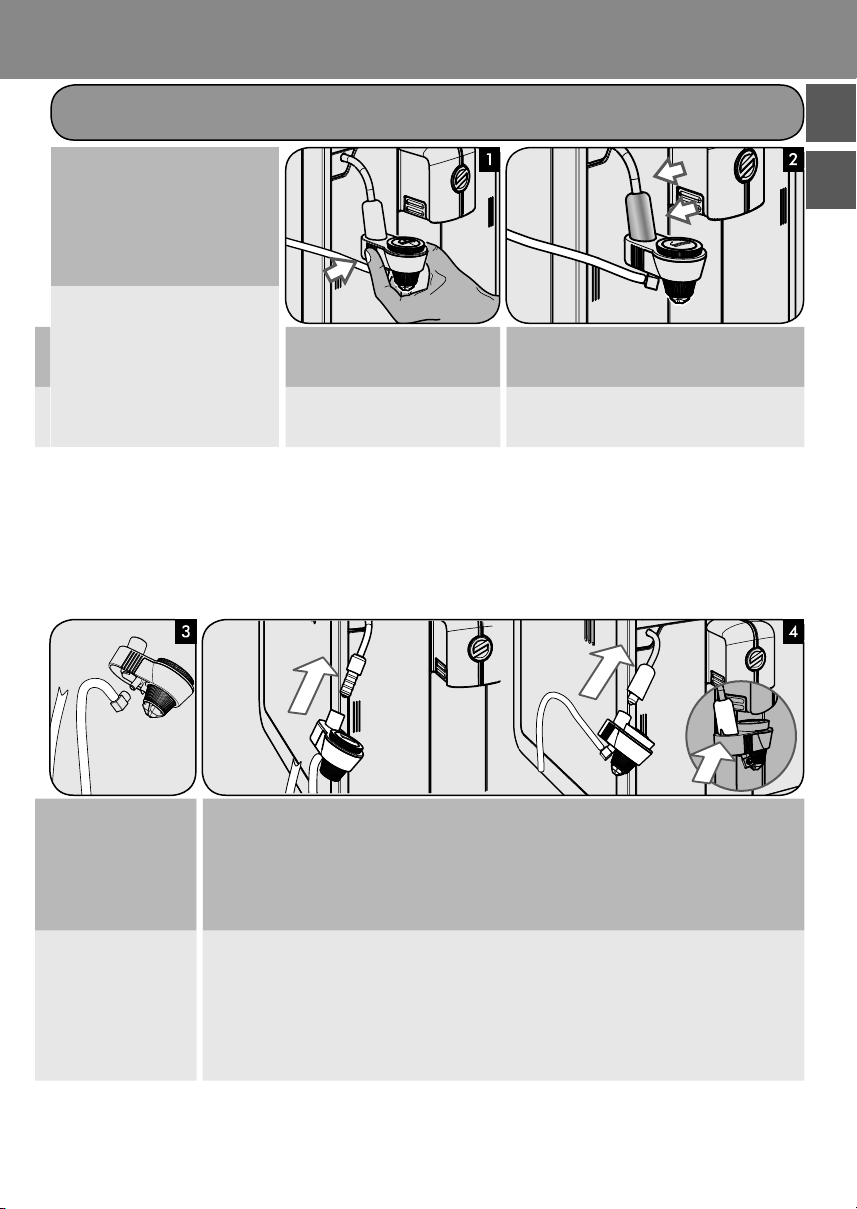
FIRST INSTALLATION
PRIMA INSTALLAZIONE
1
Insert the drip tray with grill into the machine. Make sure it
EN
is fully inserted.
Inserire la vasca raccogligocce con griglia nella macchina.
IT
Veri care che sia inserita completamente.
MAX
Rinse and ll the water tank with fresh water up to the MAX
level and slide it back into the machine.
EN
Riempire il serbatoio dell'acqua no al livello MAX con acqua fresca e reinserirlo nella macchina.
IT
Push gently on the edge of the water tank door to release
the handgrip.
Premere delicatamente sul lato dello sportello del serbatoio dell'acqua per far uscire l'impugnatura.
Always carry the full water tank as shown in the
Remove the co ee bean hopper lid. Slowly pour the co ee
beans into the co ee bean hopper. Place the lid back.
picture.
Quando è pieno, il serbatoio dell'acqua deve
Togliere il coperchio dal contenitore ca è in grani. Versarvi lentamente il ca è in grani e riposizionare il coperchio.
essere trasportato come
mostrato in gura.
Remove the water tank by
pulling the handgrip.
Estrarre il serbatoio dell'acqua tirando l'impugnatura.
Insert the plug into the socket located on the back of the
EN
machine.
Inserire la spina nella presa di corrente posta sul retro della
IT
macchina.
Insert the plug on the other end of the power cord into a wall
socket .
Inserire la spina all’estremità opposta del cavo di alimentazione in una presa di corrente a muro.
Switch the power button
to “I”.
Portare l’interruttore su “I”.
www.saeco.com/support
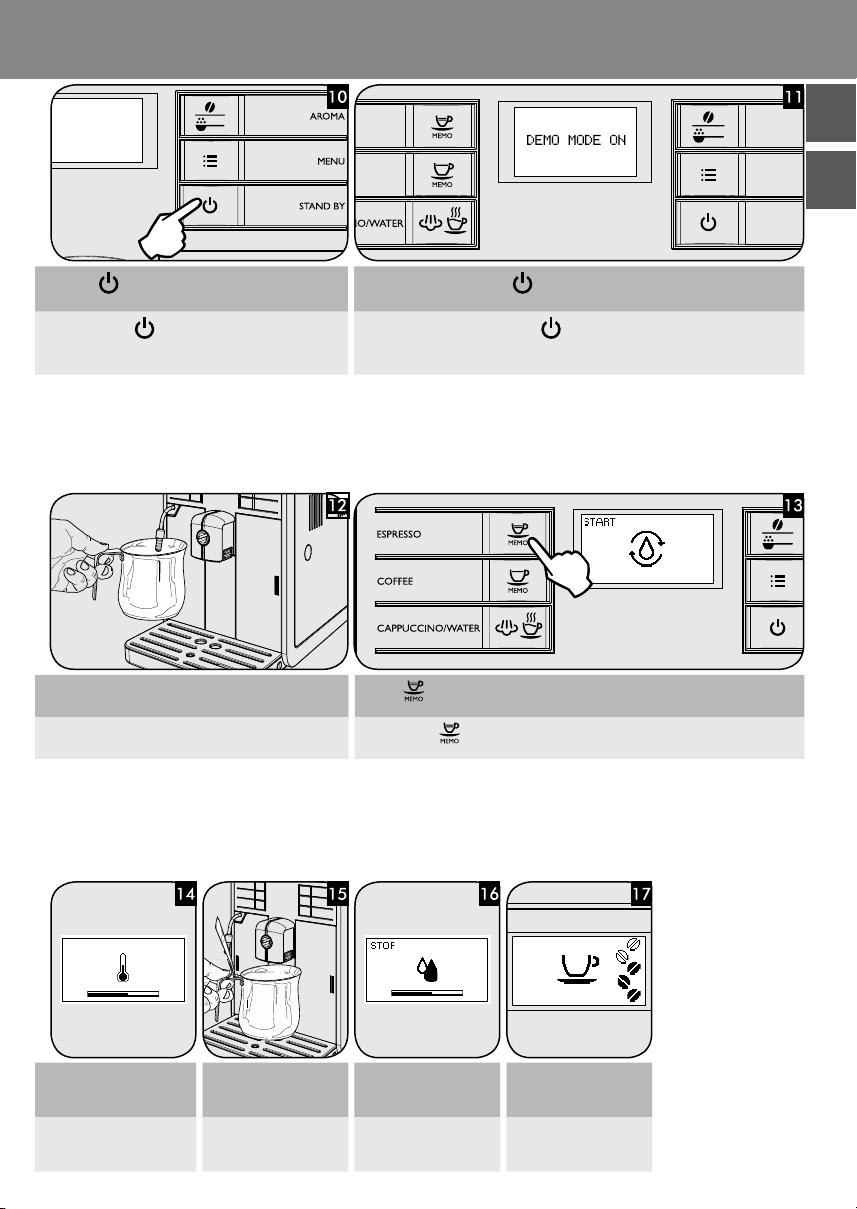
Press the button to turn on the machine. Note: If you keep the button pressed for more than 8 seconds the machine en-
EN
Premere il tasto per accendere la macchina.
IT
ters the demo mode. To exit unplug the power cord and turn the machine on again.
Nota: Tenendo premuto il tasto
per più di otto secondi la macchina entra
nel programma demo. Per uscire dalla demo,scollegare il cavo di alimentazio-
Instructions
Istruzioni
ne e riaccendere la macchina.
11
EnglishItaliano
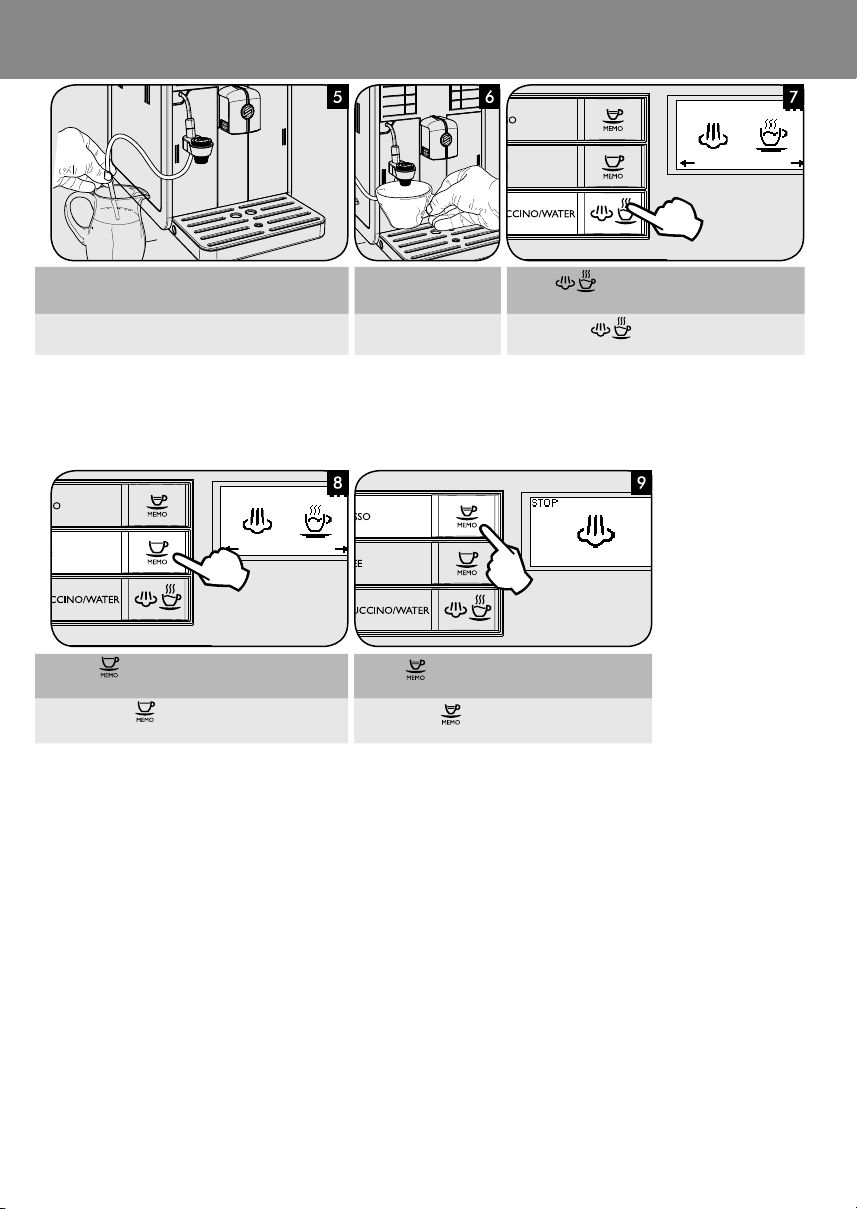
Place a container under the steam wand.
EN
Posizionare un contenitore sotto il tubo vapore.
IT
When the process is completed the machine starts
EN
warming up.
Al termine del processo la
macchina inizia la fase di
IT
riscaldamento.
Thereafter place the container under the co ee dispensing spout.
Al termine del riscaldamento posizionare un contenitore sotto l'erogatore.
Press the
Premere il tasto
button to start priming the circuit.
per avviare il ciclo di caricamento del circuito.
The machine performs an
automatic rinsing cycle.
La macchina esegue un ciclo
di risciacquo automatico.
The machine is ready for the
manual rinse cycle.
La macchina è pronta per il
ciclo di risciacquo manuale.
Instructions
12
Istruzioni
www.saeco.com/support
MANUAL RINSE CYCLE
CICLO DI RISCIACQUO MANUALE
1
2
Place a container under the
EN
co ee dispensing spout.
Posizionare un contenitore
IT
sotto l'erogatore del ca è.
1
3
Repeat step 1 to step 3 twice,
then continue with step 5.
EN
Ripetere le operazioni dal
punto 1 al punto 3 per due
IT
volte, quindi passare al
punto 5.
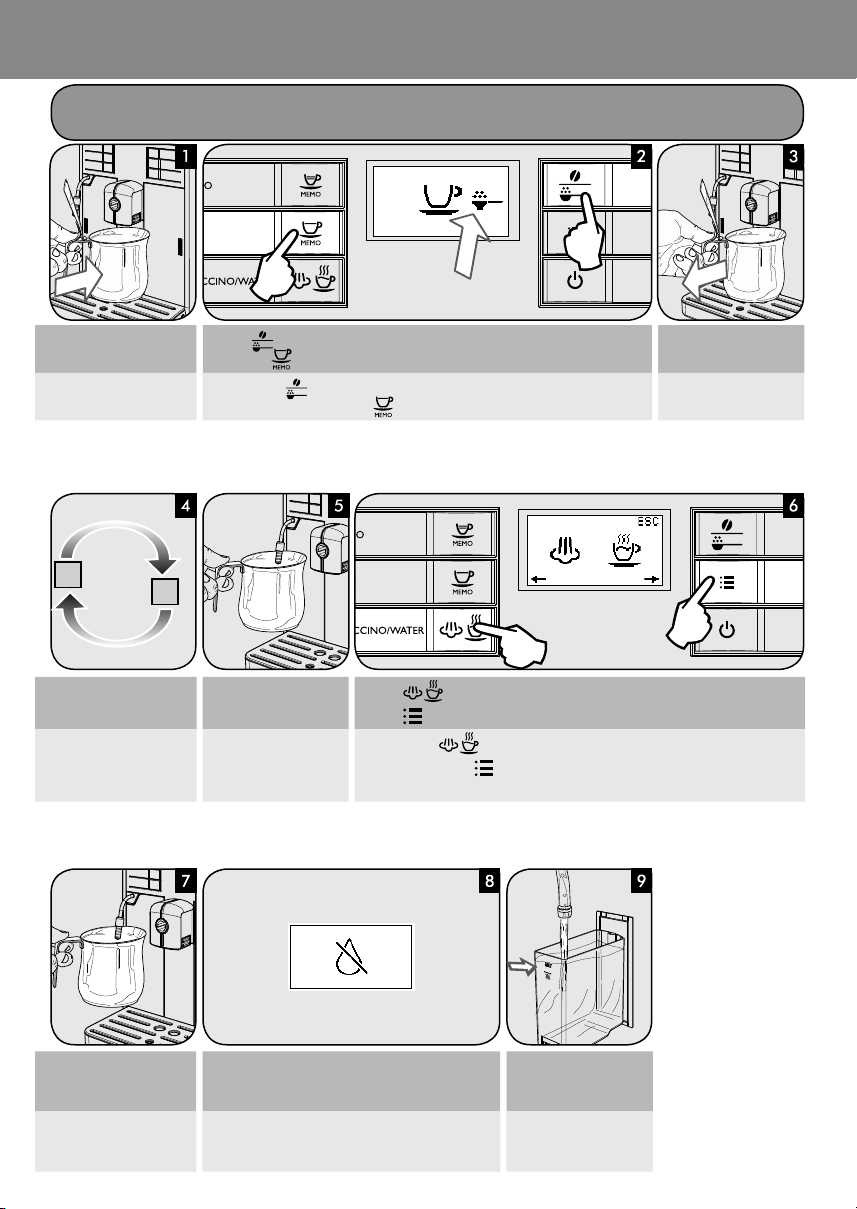
Press the
fee. Press the
Premere il tasto
fè pre-macinato. Premere il tasto
Place a container under the
steam wand.
Posizionare un contenitore
sotto il tubo vapore.
button to select the pre-ground co ee function. Do NOT add pre-ground cof-
button. The machine starts dispensing water.
per selezionare la funzione ca è pre-macinato. NON aggiungere caf-
. La macchina inizia ad erogare acqua.
1
Press the button. The machine shows this display.
Press the
Premere il tasto
Premere il tasto MENU
MENU button to start dispensing hot water.
. La macchina visualizza il simbolo in alto.
per avviare l’erogazione di acqua calda.
When the dispensing has nished, empty the container.
Al termine dell'erogazione,
vuotare il contenitore.
2
Once the water has been
dispensed, remove and
EN
empty the container.
Dopo aver erogato l'acqua,
rimuovere e svuotare il
IT
contenitore.
Repeat step 5 to 7 until the water tank is empty and the no
water icon appears.
Ripetere la procedura dal punto 5 al punto 7 no a quando
il serbatoio dell'acqua è vuoto ed appare il simbolo mancanza acqua.
MAX
At the end, ll the water tank
again up to the MAX level.
Al termine, riempire nuovamente il serbatoio dell'acqua no al livello MAX.
www.saeco.com/support
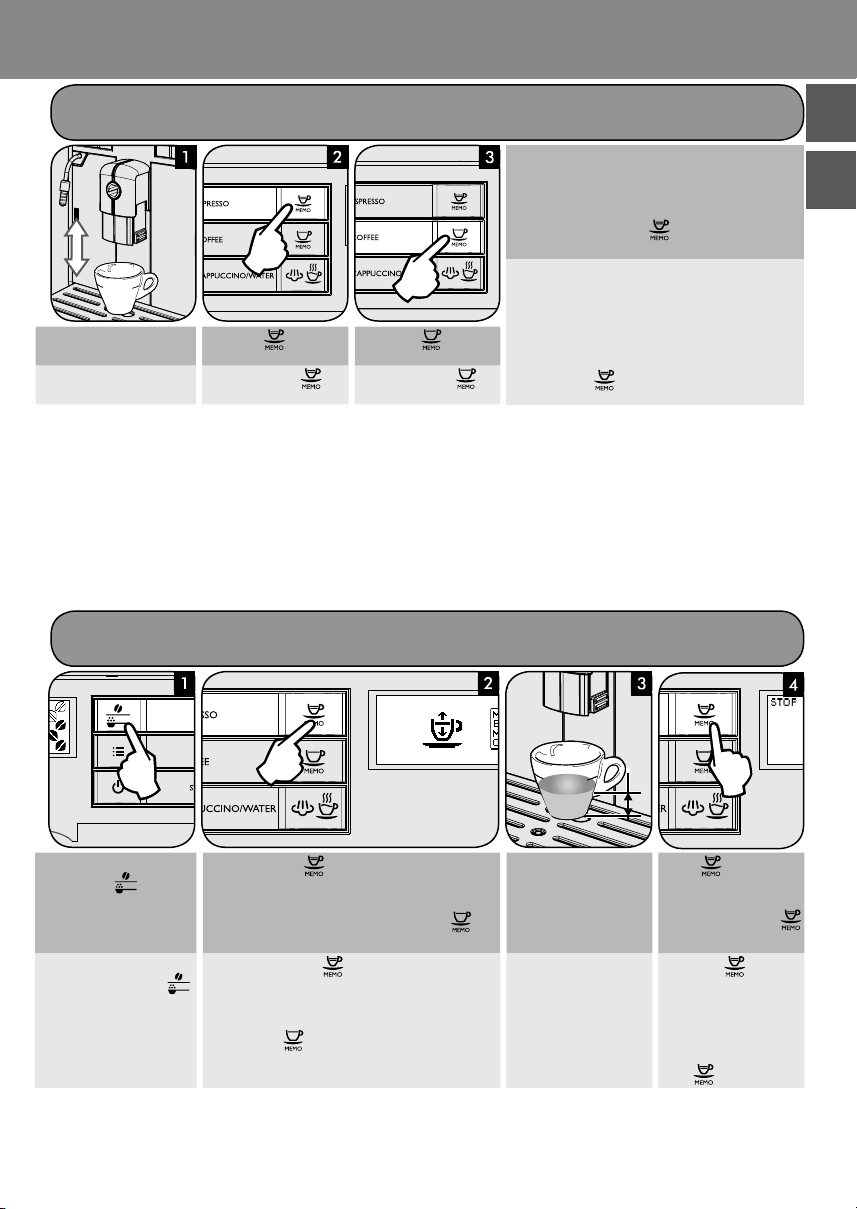
Adjust the dispensing spout.
EN
Regolare l’erogatore.
IT
Press the
brew espresso or...
Premere il tasto
erogare un espresso o...
FIRST ESPRESSO / COFFEE
PRIMO ESPRESSO / CAFFÈ
Note:
To brew two cups of espresso or co ee, press the desired button twice consecutively.
Co ee brewing automatically stops when the preset
level is reached; press the
Nota:
Per erogare due espressi o due ca è, premere il tasto desiderato due volte consecutive.
button to
per
...press the
brew co ee.
...premere il tasto per
erogare un ca è.
L’erogazione del ca è si interrompe automatica-
button to
mente quando viene raggiunto il livello impostato;
è tuttavia possibile interromperla in anticipo premendo il tasto
Instructions
Istruzioni
button to stop it earlier.
.
13
EnglishItaliano
Select the desired aroma by
pressing the
EN
Selezionare l'aroma desiderato premendo il tasto
IT
button.
MY FAVORITE ESPRESSO
IL MIO ESPRESSO IDEALE
Press and hold the
played. The machine is programming.
Note: To program co ee, press and hold the
ton until the MEMO icon is displayed.
Tenere premuto il tasto
.
lo MEMO. La macchina è in fase di programmazione.
Nota: per programmare il ca è lungo, tenere premuto il tasto
zata a display l’icona MEMO.
button until the MEMO icon is dis-
no a quando appare il simbo-
no a quando non viene visualiz-
Wait until the desired
amount of co ee has been
dispensed.
but-
Attendere no al raggiungimento della quantità di
ca è desiderata.
OK
... press
Stored!
Note: to stop programming
for co ee, press the
button.
... premere
rompere il processo.
Memorizzato!
Nota: Per interrompere
la programmazione del
ca è lungo premere il
tasto
.
to stop.
per inter-

Instructions
14
Istruzioni
www.saeco.com/support
CHANGING COFFEE BEANS
SOSTITUZIONE CAFFÈ IN GRANI
Removing the cof-
EN
fee bean hopper
Estrazione con-
IT
tenitore ca è in
grani
Inserting the cof-
EN
fee bean hopper
Switch the selector to the position.
It may happen that the selector can not be switched
as it is blocked by co ee beans. In this case move the
selector back and forth until the beans are released.
Posizionare il selettore in posizione .
È possibile che il selettore non possa essere posizionato, perché bloccato da qualche chicco di ca è. In
questo caso muovere il selettore avanti ed indietro
no a rimuovere il chicco di ca è bloccato.
Switch the selector to the
position.
Posizionare il selettore in
posizione
.
Remove any beans from the
co ee bean hopper compartment.
Rimuovere i chicchi di ca è
dal vano contenitore ca è.
Lift the sides of the co ee bean hopper with both hands.
Sollevare il contenitore ca è in grani impugnandolo ai lati
con entrambe le mani.
Insert the co ee bean hopper into the compartment.
Inserire il contenitore ca è
in grani nel vano.
Switch the selector to the
position.
When you change co ee
blend and switch to decaffeinated co ee, still some
ca eine traces might be
present even after having
run the emptying cycle.
Posizionare il selettore in
posizione
.
Inserimento
IT
contenitore ca è
in grani
Cambiando il tipo di caffè in grani e passando a
un ca è deca einato è
possibile che siano ancora presenti tracce di caffeina anche dopo il ciclo
di svuotamento.
www.saeco.com/support
Instructions
Istruzioni
15
EnglishItaliano
Co ee bean
EN
selection
Selezione del
IT
ca è in grani
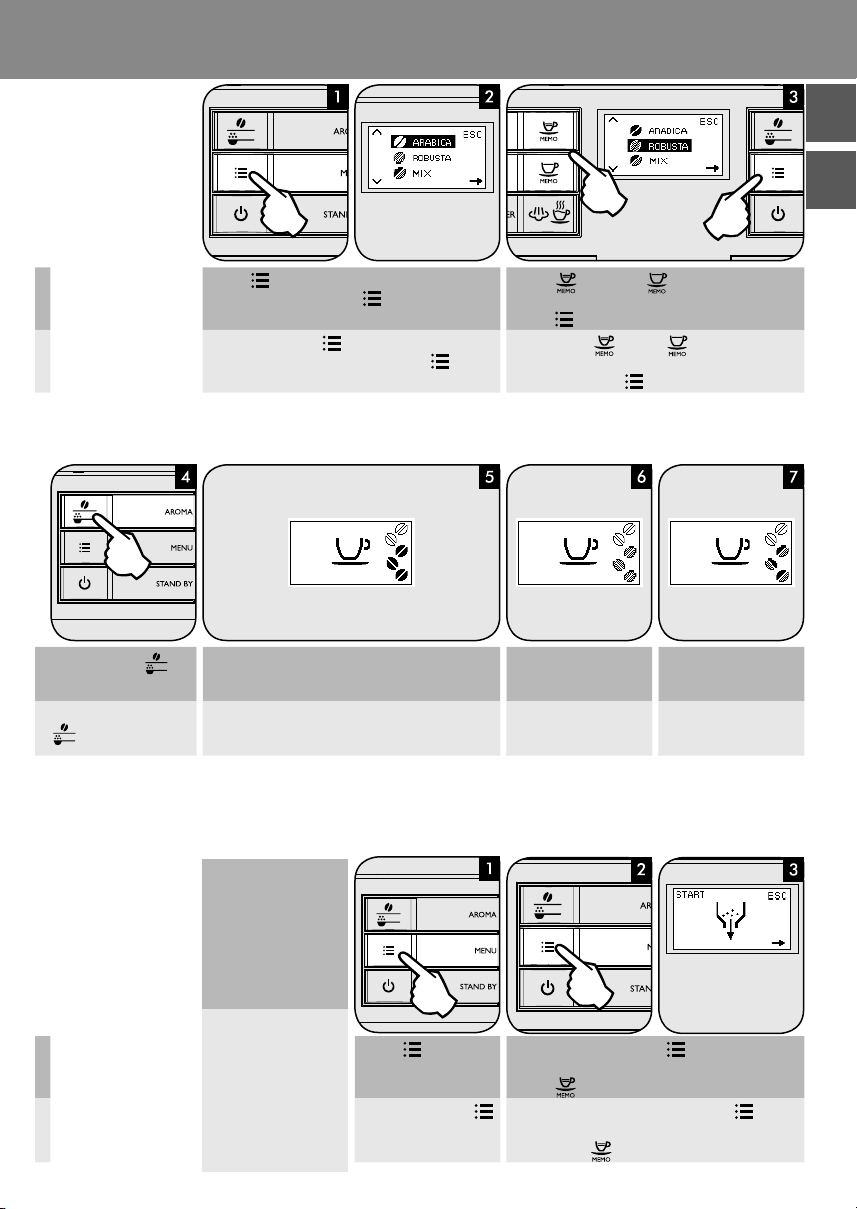
To exit, press the but-
EN
ton.
Per uscire, premere il tasto
IT
.
Press the MENU button.
Scroll the pages by pressing the
icon shown above is displayed.
Premere il tasto MENU .
Scorrere le opzioni premendo il tasto MENU
sualizzare il simbolo in alto.
The display shows the type of co ee beans chosen when the
machine is ready for brewing.
For “ARABICA” co ee beans;
Il display mostra il tipo di ca è in grani scelto quando la
macchina è pronta per l'erogazione.
Per ca è in grani di tipo "ARABICA";
MENU button until the
no a vi-
Press the
co ee beans in the co ee bean hopper.
Press the
Premere il tasto
di chicchi di ca è presente nel contenitore ca è in grani.
Premere il tasto MENU
for “ROBUSTA” co ee beans; for a “MIX” of co ee beans.
per ca è in grani di tipo
"ROBUSTA";
button or the button to select the type of
MENU button to con rm the setting.
o il tasto per selezionare il tipo
per confermare l'impostazione.
per ca è in grani di tipo
"MISTO".
Co ee emptying
EN
cycle
Ciclo di svuota-
IT
mento ca è
When you change co ee
beans we recommend to
empty the co ee duct and
grinder. In this way you
will taste the full aroma
of the new co ee beans.
Quando si procede a
cambiare il tipo di ca è
in grani, consigliamo di
vuotare il condotto caffè ed il macinaca è. In
questo modo sarà possibile gustare appieno
l’aroma del nuovo ca è
in grani.
Press the MENU button. Scroll the pages by pressing the MENU button until the
Premere il tasto MENU . Scorrere le opzioni premendo il tasto MENU no a vi-
icon shown above is displayed.
Press the
sualizzare il simbolo in alto.
Premere il tasto
button.
.
Instructions
16
Istruzioni
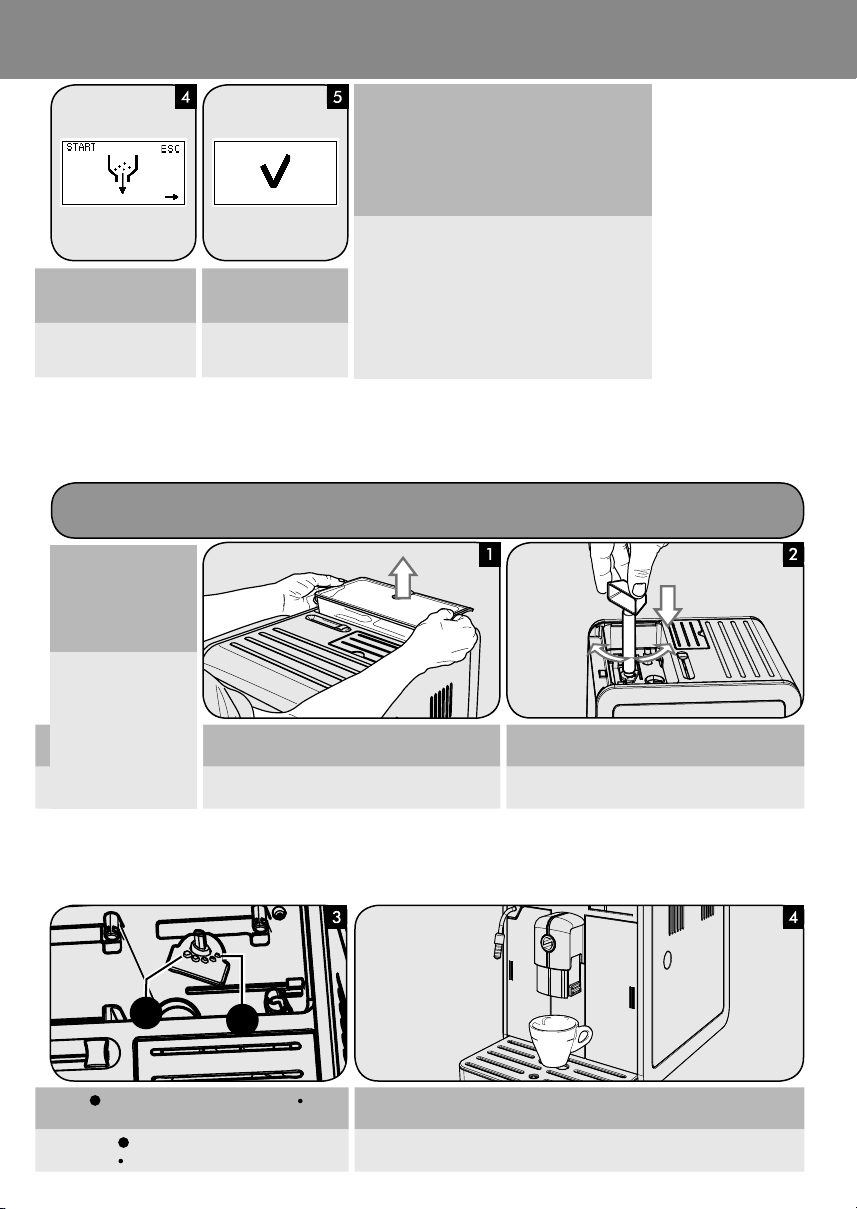
The machine performs two
grinding cycles without
EN
brewing co ee.
La macchina e ettua due
cicli di macinatura senza
IT
erogare ca è.
Do not turn the grinder
more than 1 notch at the
time to prevent damage.
www.saeco.com/support
If you have not emptied the co ee duct and grinder, you
need to brew at least two co ees before you can taste the
new co ee beans.
When you change co ee blend and switch to decaffeinated co ee, still some ca eine traces might be
present even after having run the emptying cycle.
Se il condotto ca è ed il macinaca è non sono stati vuotati, sarà necessario erogare almeno due ca è prima di poter
When the grinding cycles
have been nished, the icon
shown above is displayed.
Terminati i cicli di macinatura, la macchina visualizza il
simbolo in alto.
gustare appieno il nuovo tipo di ca è in grani.
Cambiando il tipo di ca è in grani e passando a un
ca è deca einato è possibile che siano ancora presenti tracce di ca eina anche dopo il ciclo di svuotamento.
ADJUSTING THE CERAMIC COFFEE GRINDER
REGOLAZIONE MACINACAFFÈ IN CERAMICA
Per evitare danni alla
macchina, non ruotare
il macinaca è per più di
uno scatto alla volta.
EN
IT
1
Select ( ) for coarse grind - milder taste. Select ( ) for ne
EN
grind - stronger taste.
Selezionare ( ) per macinatura grossa - gusto più leggero.
IT
Selezionare (
) per macinatura ne - gusto più forte.
Remove the co ee bean hopper. Press and turn the grinder adjustment knob one notch at a
Estrarre il contenitore ca è in grani. Premere e ruotare di uno scatto alla volta la manopola di
2
time.
regolazione della macinatura.
Brew 2-3 co ees to taste the di erence. If co ee is watery or is brewed slowly, change the co ee
grinder settings.
Erogare 2-3 ca è per gustare la di erenza. Se il ca è è acquoso o fuoriesce lentamente, modi care le impostazioni del macinaca è.
www.saeco.com/support
COME EMULSIONARE IL LATTE
Depending on the machine version the
Automatic Milk Frother comes with or
without chrome cover.
Danger of scalding! Dispensing may be
preceded by small jets of hot water.
A seconda del modello di macchina il
Montalatte Automatico viene fornito
con o senza copertura cromata.
EN
Pericolo di scottature!
All’inizio dell’erogazione possono veri carsi brevi spruzzi di acqua calda.
IT
FROTHING MILK
The Automatic Milk Frother must be handled only as indicated in the image.
Il Montalatte Automatico deve essere
movimentato solo utilizzando l’apposita
impugnatura zigrinata in plastica.
Instructions
17
Istruzioni
Warning! When steam is used, the steam tube and the
crome cover (if supplied) may reach high temperatures.
Attenzione! Quando si utilizza il vapore, il tubo vapore e la copertura cromata (se presente) possono
raggiungere temperature elevate.
EnglishItaliano
Insert the suction tube into
the Automatic Milk Frother.
EN
Inserire il tubo di aspirazione nel Montalatte Automatico.
IT
For Automatic Milk Frother without chrome cover.
Insert the Automatic Milk Frother in the steam wand seat.
Per Montalatte Automatico senza copertura cromata.
Inserire il Montalatte Automatico nella sede del tubo vapore.
For Automatic Milk Frother with chrome cover.
Insert the Automatic Milk Frother in the steam wand seat.
Make sure that it is positioned correctly. If you cannot insert
it, rotate the chrome cover.
The Automatic Milk Frother is assembled correctly when the
tooth ts into the slot.
Per Montalatte Automatico con copertura cromata.
Inserire il Montalatte Automatico nella sede del tubo
vapore. Veri care che sia correttamente posizionato. Se
non si riesce ad inserire il Montalatte Automatico si deve
ruotare la copertura cromata. Il Montalatte Automatico è
montato correttamente quando il dente s’inserisce nella
scanalatura.
Instructions
18
Istruzioni
www.saeco.com/support
Insert the suction tube in the milk container. Place a cup under the Auto-
EN
Inserire il tubo di aspirazione nel contenitore del latte. Posizionare una tazza sotto
IT
Press the button to start frothing the milk.
EN
Premere il tasto per iniziare ad emulsionare il latte.
IT
matic Milk Frother.
il Montalatte Automatico.
Press the
button to stop when the desired quantity of
frothed milk has been dispensed.
Premere il tasto
per interrompere il processo quando
è stata erogata la quantità di latte emulsionato desiderata.
Press the
Premere il tasto
in alto.
button. The machine shows this display.
. La macchina visualizza il simbolo
www.saeco.com/support
Danger of scalding! Dispensing may be preceded
by small jets of hot water.
Pericolo di scottature!
All’inizio dell’erogazione
possono veri carsi brevi
spruzzi di acqua calda.
EN
IT
Remove the Automatic Milk
Frother from the steam
wand. Place a container underneath.
S lare il Montalatte Automatico dal tubo vapore.
Posizionarvi sotto un contenitore.
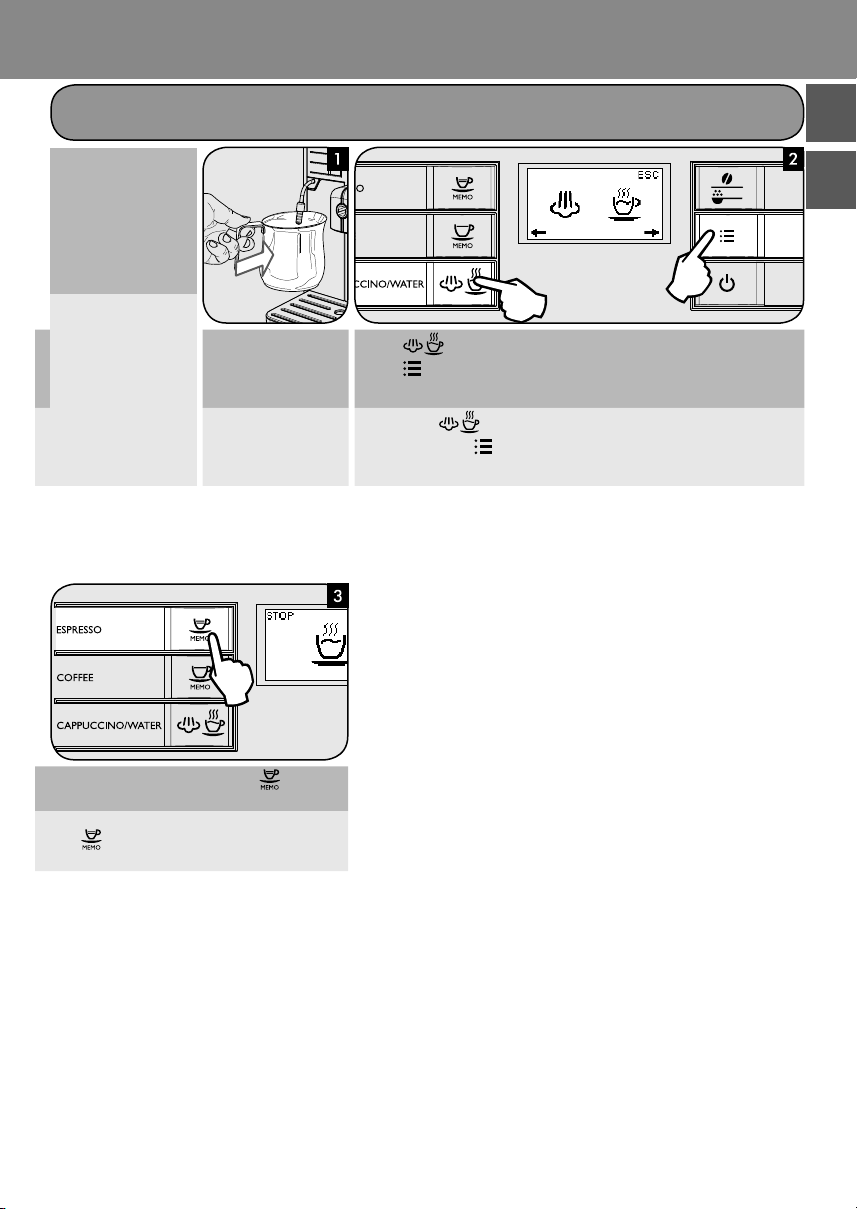
HOT WATER
ACQUA CALDA
Press the
Press the
Premere il tasto
Premere il tasto MENU
button. The machine shows this display.
MENU button to start dispensing hot water.
. La macchina visualizza il simbolo in alto.
Instructions
Istruzioni
1
per avviare l’erogazione di acqua calda.
19
EnglishItaliano
2
To stop the hot water dispensing press the button.
EN
Remove the container.
Per interrompere l’erogazione di acqua calda premere il
tasto
.
IT
Rimuovere il contenitore.
Instructions
20
Istruzioni
www.saeco.com/support
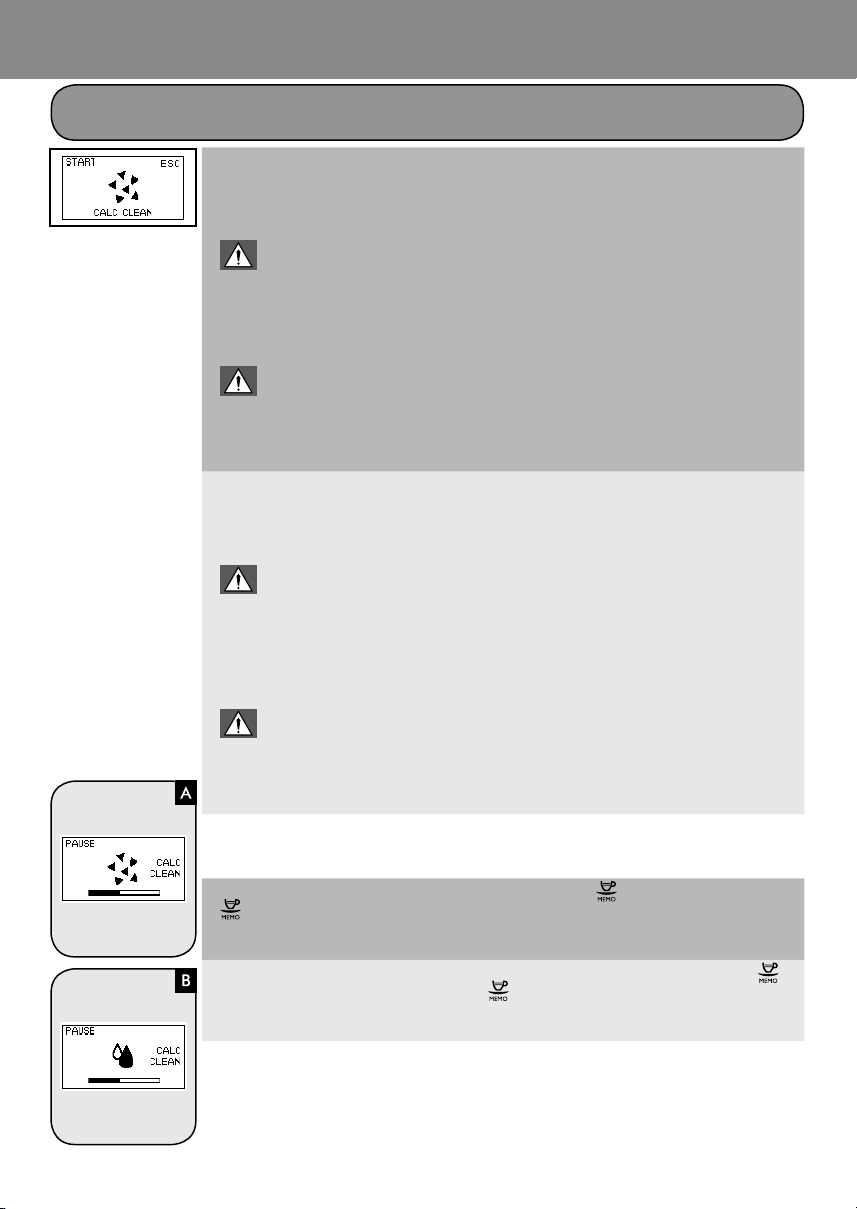
DESCALING - 30 MIN.
DECALCIFICAZIONE - 30 MIN.
When the “CALC CLEAN” symbol is displayed, you need to descale the machine.
The descaling cycle takes approx. 30 minutes.
Not doing this will ultimately make your machine stop working properly. In this case repair is NOT covered
by your warranty.
Warning:
Use the Saeco descaling solution only. Its formula has been designed to ensure better machine per-
formance. The use of other descaling solutions may damage the machine and leave residues in the water.
EN
The Saeco descaling solution can be purchased separately. For further details, please refer to the maintenance products
page in this manual.
Warning:
Never drink the descaling solution or any products dispensed until the cycle has been carried out to
the end. Never use vinegar as a descaling solution.
Note: Do not remove the brew group during the descaling process.
Quando viene visualizzato il simbolo “CALC CLEAN” è necessario procedere alla decalci cazione.
Il ciclo di decalci cazione richiede circa 30 minuti.
Se questa operazione non viene eseguita, la macchina smetterà di funzionare regolarmente; in tal caso
la riparazione NON è coperta da garanzia.
Attenzione:
Usare esclusivamente la soluzione decalci cante Saeco appositamente formulata per ottimizzare le prestazioni della macchina. L’utilizzo di altri prodotti può causare danni alla macchina e lasciare
residui nell’acqua.
IT
La soluzione decalci cante Saeco è in vendita separatamente. Per maggiori dettagli consultare la pagina relativa ai
prodotti per la manutenzione nelle presenti istruzioni per l’uso.
Attenzione:
Non bere la soluzione decalci cante ed i prodotti erogati no al completamento del ciclo. Non
utilizzare in nessun caso l’aceto come decalci cante.
Nota: Non estrarre il gruppo ca è durante il processo di decalci cazione.
The descaling cycle (A) and the rinse cycle (B) may be paused by pressing the button. To resume the cycle, press the
button again. This allows the container to be emptied or the machine to be left unattended for a short time.
EN
Il ciclo di decalci cazione (A) ed il ciclo di risciacquo (B) possono essere messi in pausa premendo il tasto . Per
proseguire con il ciclo, premere nuovamente il tasto
IT
per un breve periodo.
. Questo consente di vuotare il contenitore o di assentarsi
www.saeco.com/support
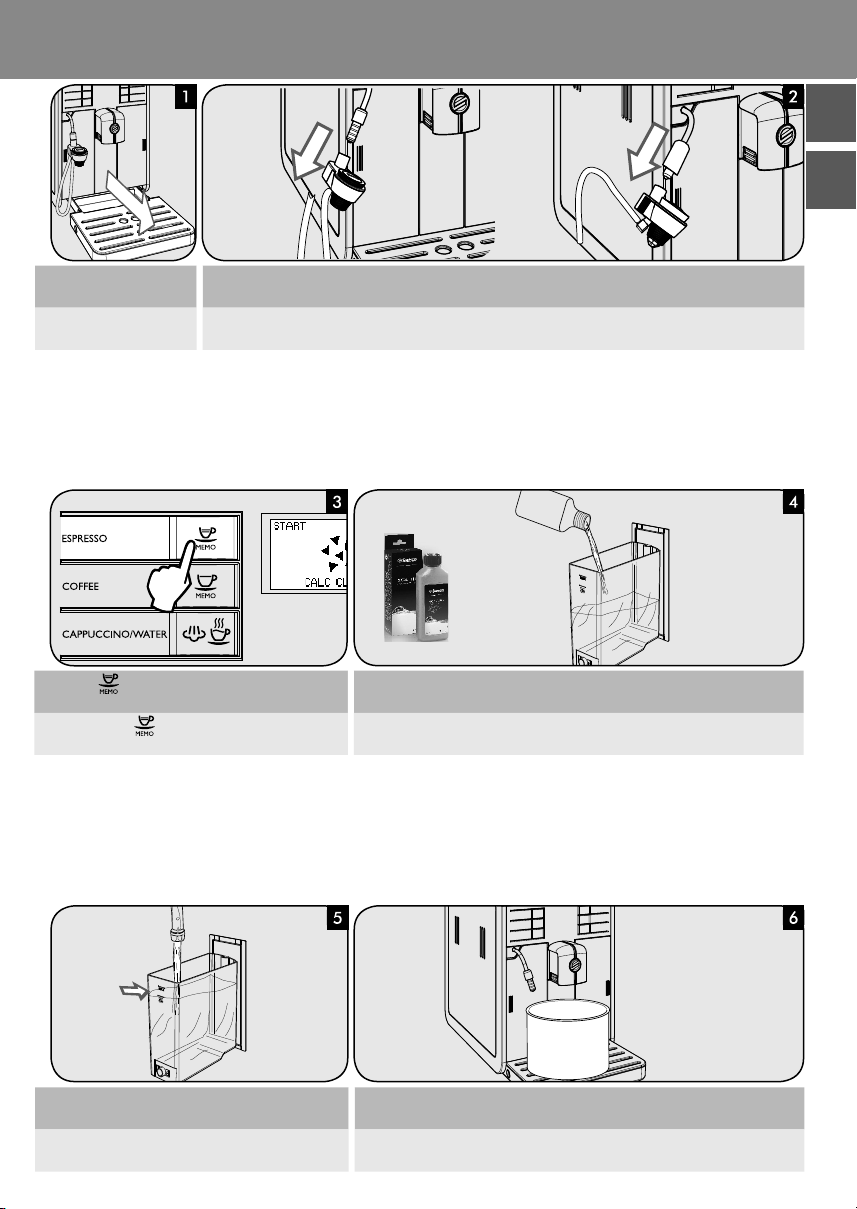
Empty the drip tray. Remove the Automatic Milk Frother from the hot water/steam wand.
EN
Vuotare la vasca raccogli-
IT
gocce.
S lare il Montalatte Automatico dal tubo vapore/acqua calda.
Instructions
Istruzioni
21
EnglishItaliano
Press the button.
EN
Premere il tasto .
IT
CALC
CLEAN
Fill the water tank with fresh water up to the calc clean level
EN
and place it back into the machine.
Riempire il serbatoio dell'acqua con acqua fresca no al
IT
livello calc clean e reinserirlo nella macchina.
Remove the “INTENZA+” water lter from the water tank if it was installed and replace it
with the small white original one. Pour the entire descaling solution in the water tank.
Estrarre il ltro acqua “INTENZA+” (se presente) dal serbatoio dell’acqua e sostituirlo con
il ltrino bianco originale. Versare tutta la soluzione decalci cante nel serbatoio acqua.
Place a large container (1,5 l) under both the steam/hot water wand and the co ee dispensing
spout.
Posizionare un contenitore capiente (1,5l) sotto il tubo vapore/acqua calda e sotto l'erogatore.
Instructions
22
Istruzioni
www.saeco.com/support
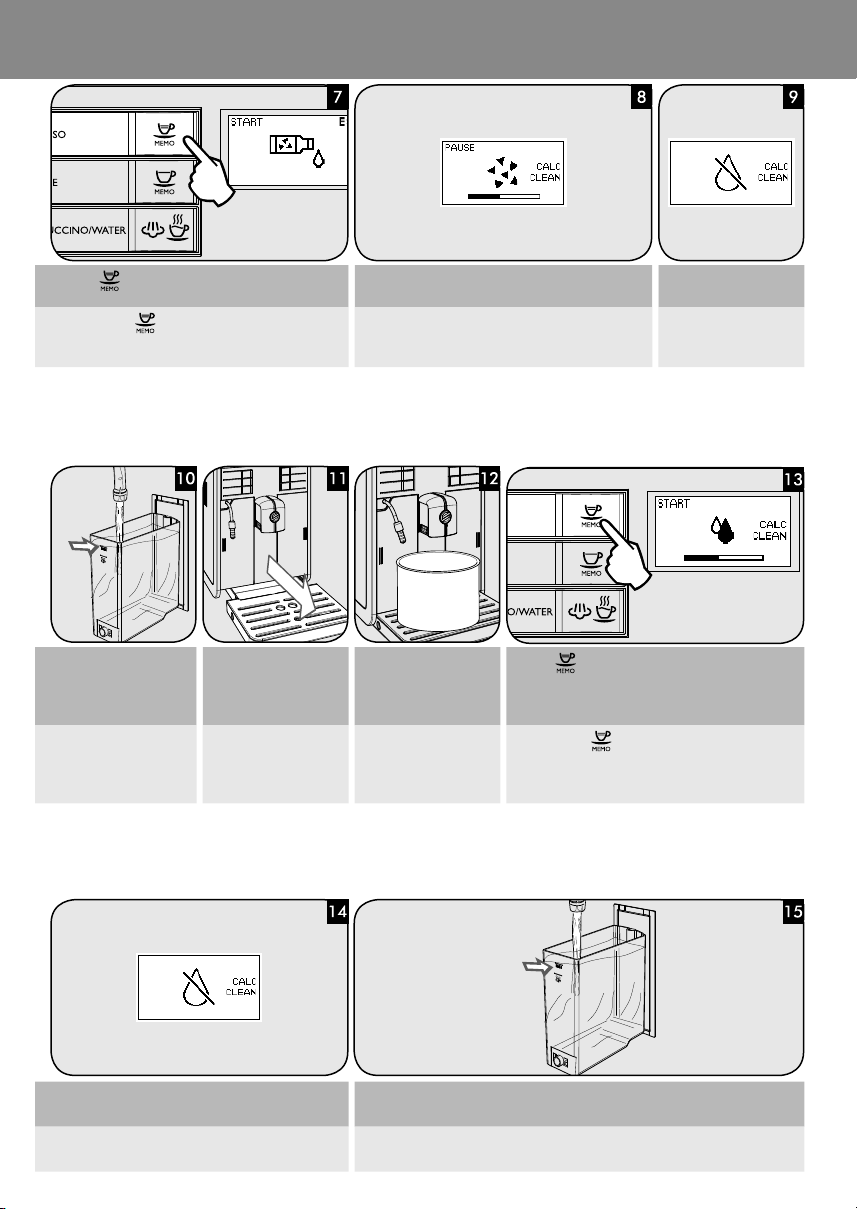
Press the button to start the descaling cycle.
EN
Premere il tasto per av viare il ciclo di decalci cazione.
IT
MAX
Rinse the water tank and ll
it up to the MAX level with
EN
fresh water. Place it back into
the machine.
Risciacquare il serbatoio e
riempirlo con acqua fresca
IT
no al livello MAX. Reinserirlo nella macchina.
Empty the drip tray and
place it back.
Vuotare la vasca raccogligocce e reinserirla in posizione.
The descaling solution will be dispensed at intervals (this
takes about 20 min).
La soluzione decalci cante sarà erogata a intervalli regolari (durata: circa 20 min).
Empty the container and
place it back.
Vuotare il contenitore e
reinserirlo in posizione.
Press the
Premere il tasto
button to start the rinsing cycle.
per avviare il ciclo di risciacquo.
When this icon is displayed,
the water tank is empty.
Quando viene visualizzato
questo simbolo, il serbatoio
dell'acqua è vuoto.
MAX
When this icon is displayed, the water tank is empty. Rinse the water tank and ll it up to the MAX level with fresh water. Place it back into the
EN
Quando viene visualizzato questo simbolo, il serbatoio
IT
dell'acqua è vuoto.
machine. Repeat step 13.
Risciacquare il serbatoio e riempirlo con acqua fresca no al livello MAX. Reinserirlo nella
macchina. Ripetere il punto 13.
www.saeco.com/support
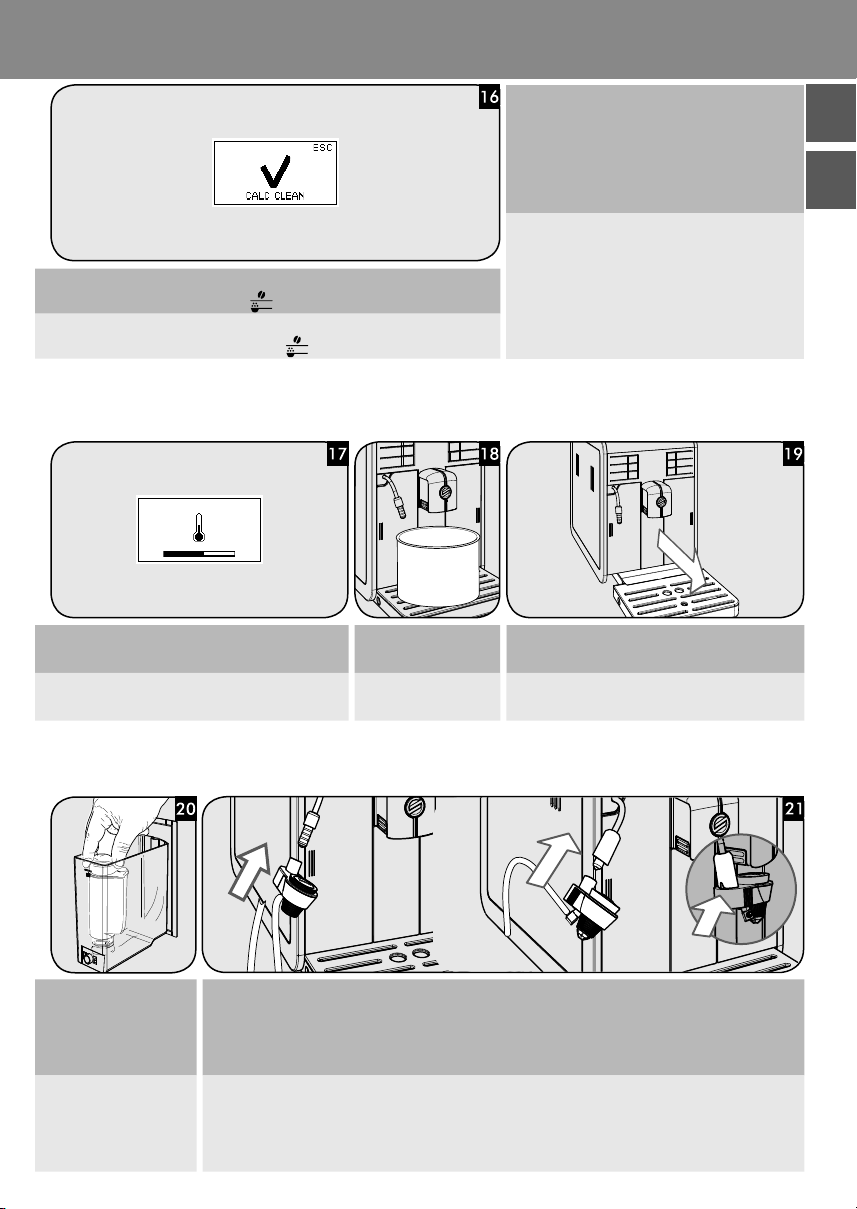
When the amount of water needed for the rinse cycle has been completely dispensed, the
EN
icon shown above is displayed. Press the
Quando l’acqua richiesta per il ciclo risciacquo è stata completamente erogata, la macchi-
IT
na visualizza il simbolo in alto. Premere il tasto
button to exit the descaling cycle.
per uscire dal ciclo di decalci cazione.
Instructions
23
Istruzioni
Note: If you had not lled up the water tank to MAX
level, the machine might require to re ll the tank to
complete the rinsing cycle.
Re ll the water tank and repeat from step 13.
Nota: Se il serbatoio dell’acqua non viene riempito no al livello MAX la macchina può richiedere di
riempire nuovamente il serbatoio per terminare il
ciclo di risciacquo.
Riempire il serbatoio dell’acqua e reinserirlo nella
macchina.
Ripetere dal punto 13.
EnglishItaliano
The machine warms up and performs an automatic rinse
EN
cycle.
La macchina esegue il di riscaldamento ed di risciacquo
IT
automatico.
Remove the small white
water lter and place back
the “INTENZA+” water lter
EN
into the water tank if it was
For Automatic Milk Frother without
chrome cover.
Put back the Automatic Milk Frother.
installed.
Rimuovere il ltrino bianco
e riposizionare il ltro acqua
“INTENZA+” (se presente)
IT
Per Montalatte Automatico senza copertura cromata.
Inserire il Montalatte Automatico.
nel serbatoio dell’acqua.
Empty the container. Once the rinse cycle has been completed, empty the drip tray
and place it back.
Vuotare il contenitore. Al termine del ciclo di risciacquo vuotare la vasca raccogli-
gocce e riposizionarla.
For Automatic Milk Frother with chrome cover
Put back the Automatic Milk Frother. Make sure that it is positioned correctly. If you cannot insert it, rotate the chrome cover. The Automatic Milk
Frother is assembled correctly when the tooth ts into the slot.
Per Montalatte Automatico con copertura cromata
Inserire il Montalatte Automatico. Veri care che sia correttamente posizionato. Se non si riesce ad inserire il Montalatte Automatico si deve
ruotare la copertura cromata. Il Montalatte Automatico è montato correttamente quando il dente s’inserisce nella scanalatura.
Instructions
24
Istruzioni
www.saeco.com/support
Wash the brew group. for further guidance, see the “Brew
EN
Group Cleaning” chapter.
Pulire il gruppo ca è. Per ulteriori indicazioni, vedere il capi-
IT
tolo “Pulizia del gruppo ca è”.
The machine is ready to brew co ee.
La macchina è pronta per l’erogazione di ca è.
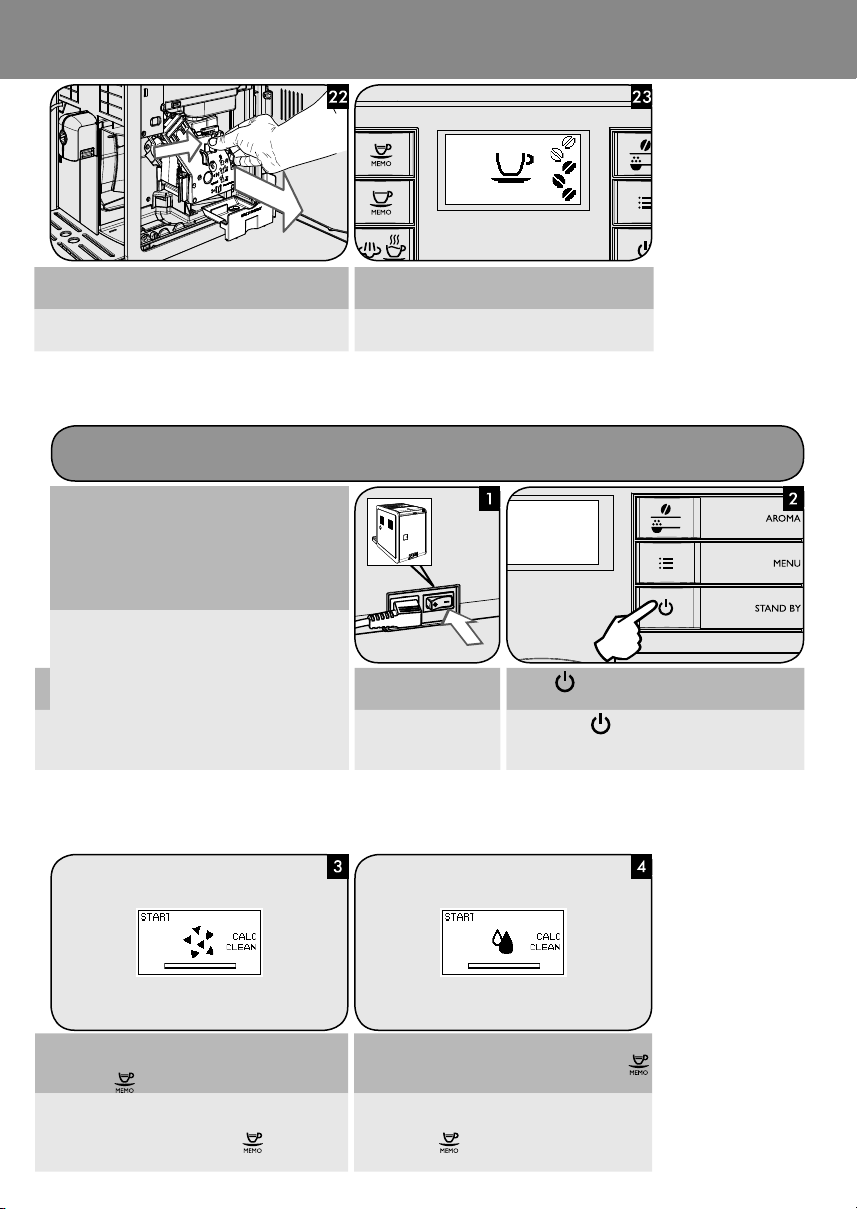
ACCIDENTAL INTERRUPTION OF THE DESCALING CYCLE
INTERRUZIONE ACCIDENTALE DEL CICLO DI DECALCIFICAZIONE
Once you have started the descaling cycle, you must
complete it till the very end without turning o the
machine.
If the descaling process is accidentally interrupted
(for example due to power failure or if you have unplugged the power cord), follow the steps below.
Una volta avviato il processo di decalci cazione
è necessario completarlo evitando di spegnere la
macchina.
Se il processo di decalci cazione viene interrotto ac-
EN
cidentalmente (interruzione della corrente elettrica o accidentale scollegamento del cavo di alimentazione) seguire le istruzioni indicate.
IT
Make sure that the power
button is on “I”.
Veri care che l’interuttore
sia su “I”.
Press the
button to turn on the machine.
Premere il tasto
per accendere la macchina.
The descaling will be resumed from point 8 of the “Descaling” chapter if it had been interrupted during descaling.
EN
Press on the
button to restart the cycle.
Il ciclo di decalci cazione riprenderà dal punto 8 del capitolo “Decalci cazione” se è stato interrotto durante la fase
IT
di decalci cazione. Premere il tasto
per riattivare il
ciclo.
It will be resumed from point 13 of the “Descaling” chapter
if it had been interrupted during rinsing. Press on the
button to restart the cycle.
Riprenderà invece dal punto 13 del capitolo “Decalci cazione” se è stato interrotto durante la fase di risciacquo.
Premere il tasto
per riattivare il ciclo.
www.saeco.com/support
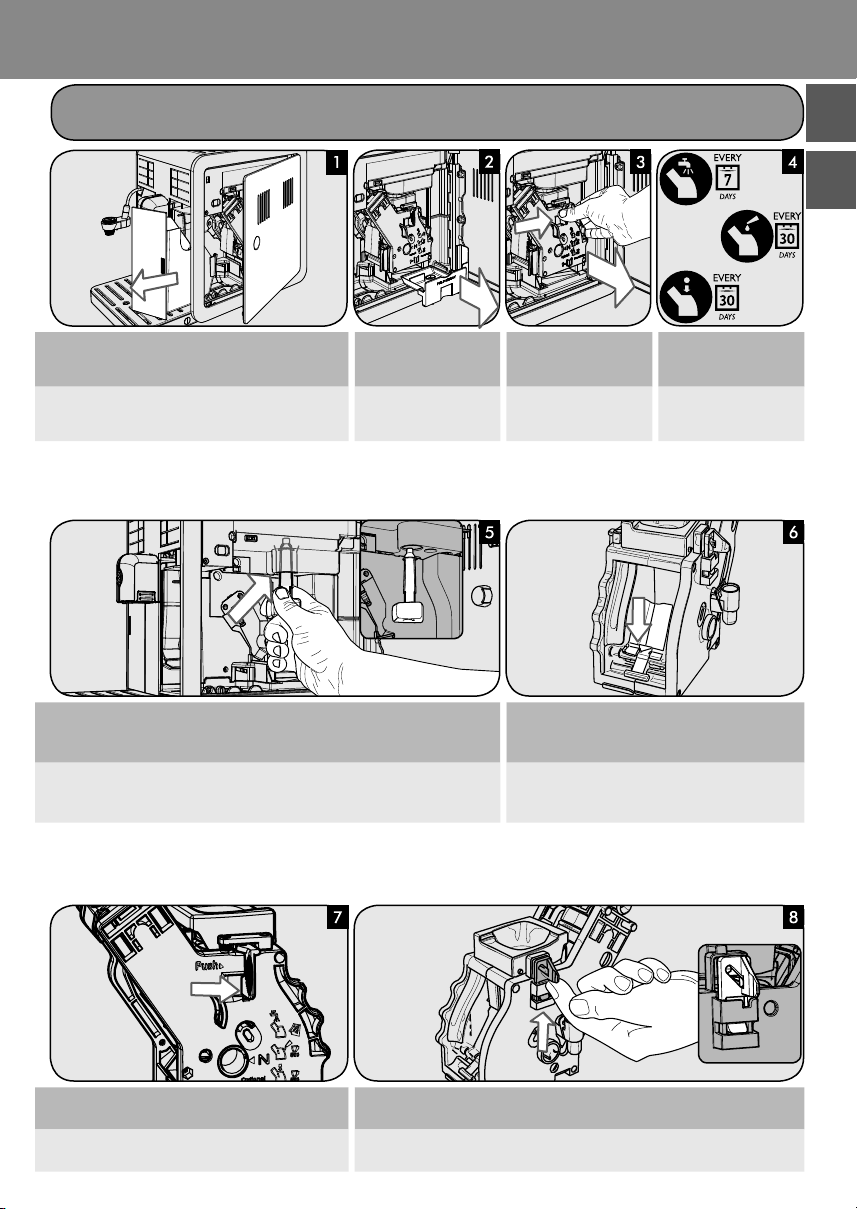
PULIZIA DEL GRUPPO CAFFÈ
BREW GROUP CLEANING
Instructions
Istruzioni
25
EnglishItaliano
Turn o the machine and unplug the power cord.
Remove the co ee ground drawer and open the service door.
EN
Spegnere la macchina e scollegare il cavo di alimentazione.
Rimuovere il cassetto raccoglifondi ed aprire lo sportello
IT
Remove and clean the co ee
residues drawer.
Estrarre il cassetto raccogli
ca è e pulirlo.
di servizio.
Clean the co ee outlet duct thoroughly with the cleaning tool provided with the machine or
with a spoon handle.
EN
Make sure you insert the cleaning tool as shown in the picture.
Pulire a fondo il condotto di uscita del ca è con l’apposito utensile per la pulizia fornito in
dotazione con la machina, o con il manico di un cucchiaino. Assicurarsi di inserire l’appo-
IT
sito utensile per la pulizia come mostrato in gura.
To remove the brew group,
press the «PUSH» button and
Carry out maintenance to the
brew group.
pull it by the handle.
Per estrarre il gruppo ca è
premere il tasto «PUSH» ti-
Eseguire la manutenzione
del gruppo ca è.
rando la maniglia.
Check that the lever on the back is fully pushed down.
Veri care che la leva sul retro del gruppo sia completamente abbassata.
Firmly press the “PUSH” button. Make sure that the hook which locks the Brew Group is in the correct position. If it is still in
EN
Premere con forza il tasto “PUSH”. Assicurarsi che il gancio per il blocco del gruppo ca è sia nella posizione corretta. Se è
IT
the downward position, push it upwards until it locks correctly into place.
ancora in posizione abbassata spingerlo verso l’alto no ad agganciarlo correttamente.
Instructions
26
Istruzioni
www.saeco.com/support
Insert the brew group in its seat again until it locks into place
EN
without pressing the “PUSH” button.
Introdurre di nuovo in sede il gruppo ca è no ad aggan-
IT
ciarlo senza premere il tasto “PUSH”.
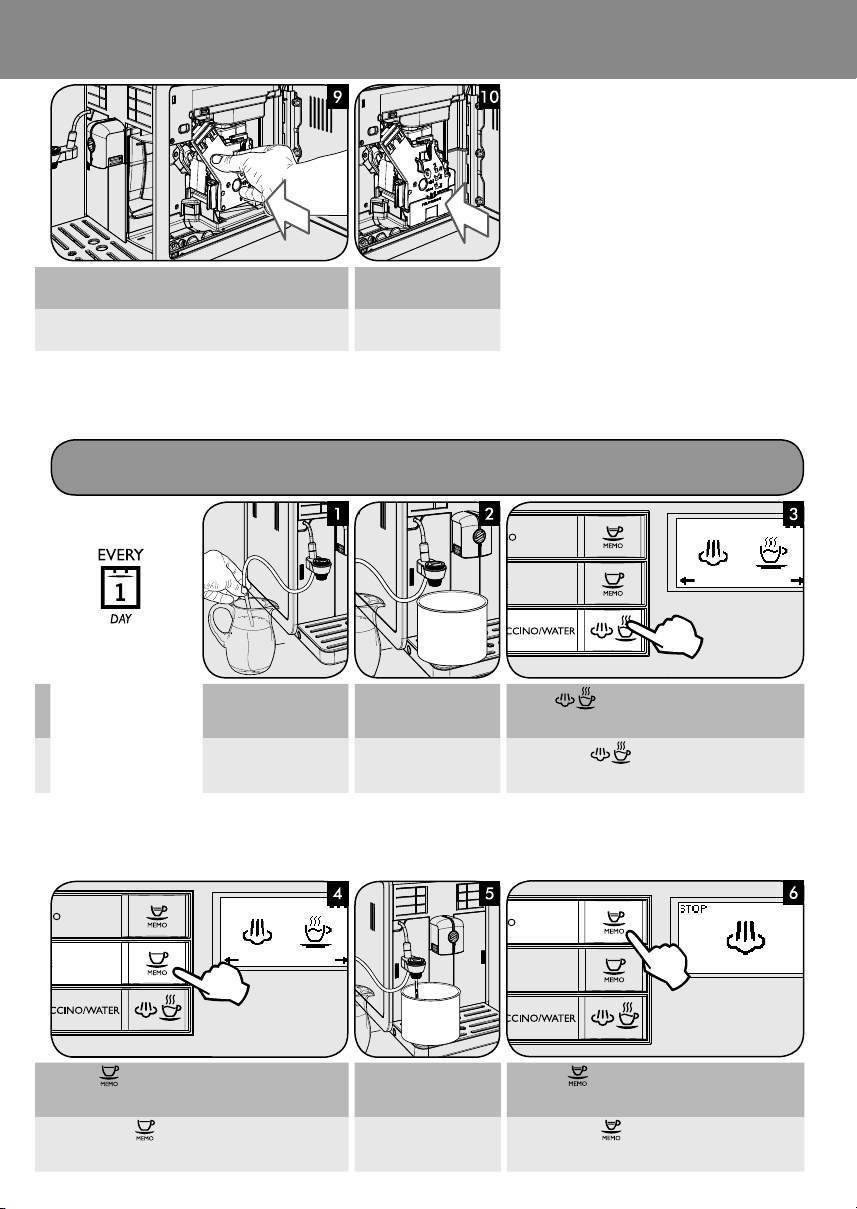
AUTOMATIC MILK FROTHER CLEANING
PULIZIA MONTALATTE AUTOMATICO
Insert the suction tube in a
EN
IT
Quotidiana
Daily
container lled with fresh
water.
Inserire il tubo di aspirazione in un contenitore pieno
di acqua fresca.
Insert the co ee residues
drawer.
Inserire il cassetto raccogli
ca è.
Place an empty container
under the Automatic Milk
Frother.
Posizionare un contenitore
vuoto sotto il Montalatte
Automatico.
Press the
Premere il tasto
in alto.
button. The machine shows this display.
. La macchina visualizza il simbolo
Press the button to start dispensing steam.
EN
Premere il tasto per avviare l’erogazione di vapore.
IT
When clear water is dispensed from the Automatic
Milk Frother...
Quando l'acqua in uscita
dal Montalatte Automatico
risulta pulita...
... press the button to stop dispensing.
...premere il tasto per interrompere l'erogazione.
www.saeco.com/support
Instructions
Istruzioni
27
EnglishItaliano
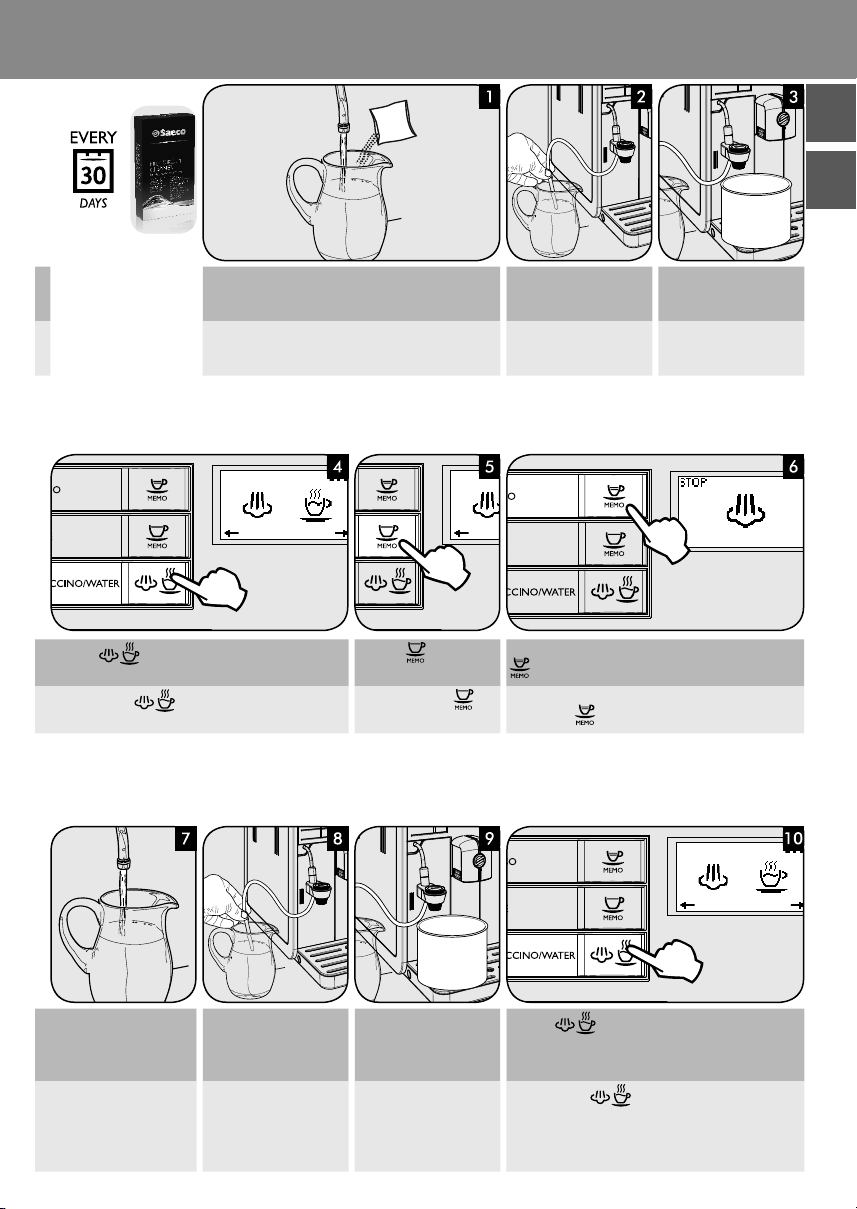
Pour the “Saeco Milk Circuit Cleaner” into a container. Add ½
EN
Monthly
l of lukewarm water and let it dissolve completely.
Versare il "prodotto per la pulizia del circuito latte Saeco"
IT
Mensile
Press the button. The machine shows this display.
EN
Premere il tasto . La macchina visualizza il simbolo
IT
in alto.
in un contenitore. Aggiungere ½l di acqua tiepida e attendere che il prodotto si sciolga completamente.
Press the
button to dis-
pense steam.
Premere il tasto
erogare vapore.
Insert the suction tube in the
container.
Place an empty container
under the Automatic Milk
Frother.
Inserire il tubo di aspirazione nel contenitore.
Posizionare un contenitore
vuoto sotto il Montalatte
Automatico.
When the solution has been completely dispensed, press the
button to stop dispensing.
Quando la soluzione è stata completamente erogata, pre-
per
mere il tasto
per interrompere l'erogazione.
Rinse the container thoroughly and ll it with ½ l of
EN
fresh water to be used for the
rinsing cycle.
Risciacquare a fondo il contenitore e riempirlo con ½l
di acqua fresca che sarà
IT
utilizzata per il ciclo di risciacquo.
Insert the suction tube in the
container.
Inserire il tubo di aspirazione nel contenitore.
Empty the container and
place it back under the Automatic Milk Frother.
Vuotare il contenitore e riposizionarlo sotto il Montalatte Automatico.
Press the
Premere il tasto
in alto.
button. The machine shows this display.
. La macchina visualizza il simbolo
Instructions
28
Istruzioni
www.saeco.com/support
Press the button to dispense steam.
EN
Premere il tasto per
erogare vapore.
IT
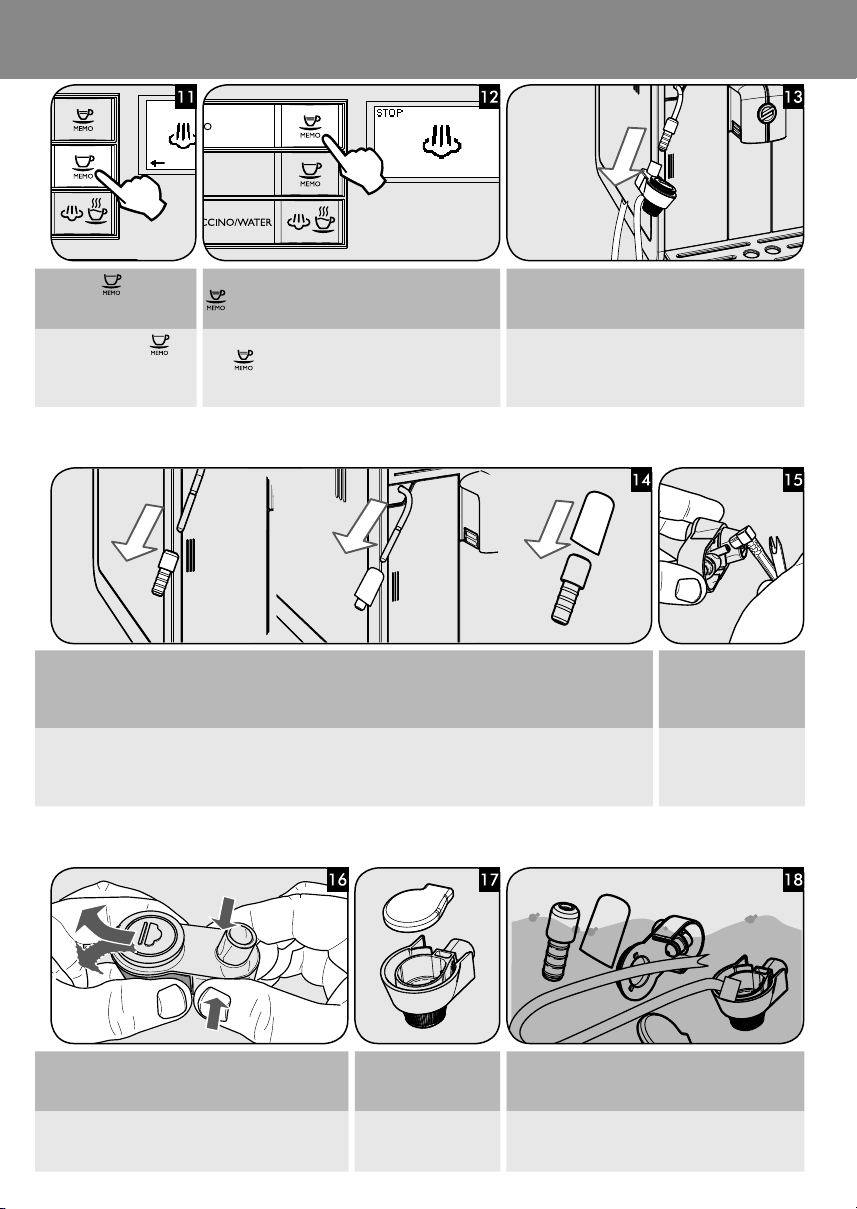
When the water has been completely dispensed, press the
button to stop dispensing.
Let the steam wand cool down for a few minutes.
Quando l'acqua è stata completamente erogata, premere il
tasto
per interrompere l'erogazione.
Attendere qualche minuto per far ra reddare il
tubo vapore.
For Automatic Milk Frother without
chrome cover.
EN
Remove the rubber tting from the steam
wand.
Per Montalatte Automatico senza copertura cromata.
IT
Rimuovere la protezione in gomma dal
tubo vapore.
Remove the Automatic Milk Frother from the machine.
Estrarre il Montalatte Automatico dalla macchina.
For Automatic Milk Frother with chrome cover.
Remove the chrome cover along with the rubber tting. Remove the tting
from the cover.
Per Montalatte Automatico con copertura cromata.
Rimuovere la copertura cromata con la protezione in gomma. Estrarre la
protezione in gomma dalla copertura.
Remove the suction tube.
Rimuovere il tubo di aspirazione.
To detach the Automatic Milk Frother, press the sides and
remove it by applying light lateral movements as shown in
EN
the gure.
Per smontare il Montalatte Automatico premere ai lati ed
estrarre eseguendo dei leggeri movimenti laterali come
IT
mostrato in gura.
Remove the rubber cover. Wash all the components with lukewarm water.
Rimuovere il coperchio in
Lavare tutti i componenti con acqua tiepida.
gomma.
 Loading...