

SAB xFinder 2 User Manual

1
CONTENTS
1. SAFETY ............................................................................................................................................................ 3
2. INTRODUCTION ............................................................................................................................................ 3
3. FEATURES ....................................................................................................................................................... 4
4. REMOTE CONTROL ..................................................................................................................................... 5
5. FRONT PANEL ............................................................................................................................................... 6
6. REAR PANEL .................................................................................................................................................. 8
7. CONNECTING YOUR SYSTEM .................................................................................................................. 8
8. BASIC OPERATIONS .................................................................................................................................. 11
8.1 TURN ON XFINDER......................................................................................................................................... 11
8.2 POWER ........................................................................................................................................................... 11
8.3 CHANNEL UP/CHANNEL DOWN ..................................................................................................................... 11
8.4 VOLUME UP/VOLUME DOWN ........................................................................................................................ 11
8.5 NUMBER ........................................................................................................................................................ 11
8.6 MUTE ............................................................................................................................................................ 11
8.7 PAUSE ............................................................................................................................................................ 11
8.8 AUDIO ........................................................................................................................................................... 11
8.9 INFORMATION ................................................................................................................................................ 12
8.10 EPG ........................................................................................................................................................... 12
8.11 TV/RADIO ................................................................................................................................................ 13
8.12 CHANNEL LIST ........................................................................................................................................... 13
8.13 PAGE UP/PAGE DOWN ............................................................................................................................... 14
8.14 TXT ........................................................................................................................................................... 14
8.15 SUBTITLE ................................................................................................................................................... 14
8.16 ZOOM ......................................................................................................................................................... 14
8.17 MENU ......................................................................................................................................................... 14
8.18 VIDEO FORMAT .......................................................................................................................................... 14
8.19 EXIT ........................................................................................................................................................... 15
9. FINDER........................................................................................................................................................... 15
9.1 SATELLITE INSTALLATION ............................................................................................................................. 15
9.2 AUTO INSTALLATION ..................................................................................................................................... 18
9.3 TERRESTRIAL INSTALLATION ........................................................................................................................ 18
9.4 CABLE INSTALLATION ................................................................................................................................... 18
10. ANGLE(SATELLITE GUIDE) .................................................................................................................... 19
11. CONSTELLATION ....................................................................................................................................... 20
12. SPECTRUM ................................................................................................................................................... 20
13. SERVICE ........................................................................................................................................................ 22
13.1 ORGANIZING SERVICE ................................................................................................................................ 23
13.2 ORGANIZING FAVOURITES ......................................................................................................................... 24
13.3 EPG ........................................................................................................................................................... 25
13.4 CA SETTING ............................................................................................................................................... 26
14. MEDIA ............................................................................................................................................................ 27
14.1 FILE LIST ................................................................................................................................................... 27
13.1.1 Record Files .............................................................................................................................................. 27
13.1.2 MP3 Files .................................................................................................................................................. 27
13.1.3 Image Files ................................................................................................................................................ 28
13.1.5.Software .................................................................................................................................................... 30
13.1.4All ............................................................................................................................................................... 30
14.2 STORAGE INFORMATION ............................................................................................................................ 30
14.3 PVR SETTING ............................................................................................................................................ 31
14.4 USB SPEED TEST ....................................................................................................................................... 31
14.5 REMOVE USB DEVICE SAFELY! ................................................................................................................. 31
15. SYSTEM ......................................................................................................................................................... 31

2
15.1 INFORMATION ............................................................................................................................................ 31
15.2 BATTERY INFORMATION ............................................................................................................................ 32
15.3 DEFAULT SETTING ..................................................................................................................................... 32
15.3.1 Default Value: ........................................................................................................................................ 32
15.3.2 Delete All Channel: ............................................................................................................................... 32
15.3.3 Save default value .................................................................................................................................. 33
15.4 SOFTWARE UPGRADE ................................................................................................................................. 33
15.4.1 Upgrade by RS232: ................................................................................................................................... 33
15.4.2 Upgrade By USB .................................................................................................................................... 33
15.4.3 Backup to USB ....................................................................................................................................... 33
15.4.4 Http Upgrade ............................................................................................................................................ 34
15.4.5 FTP Upgrade ............................................................................................................................................ 34
15.4.6 Upgrade By Satellite ................................................................................................................................. 34
15.4.7 Upgrade By Terrestrial ............................................................................................................................. 34
15.4.8 Upgrade By Cable ..................................................................................................................................... 34
15.5 LANGUAGE ................................................................................................................................................ 34
15.6 A/V CONTROL ........................................................................................................................................... 35
15.7 ETHERNET SETTING ................................................................................................................................... 36
15.8 TIME SETTING ............................................................................................................................................ 36
15.9 TIMER ........................................................................................................................................................ 37
16. NEW FEATURES .......................................................................................................................................... 38
16.1 TIME SHIFT ................................................................................................................................................ 38
16.2 RECORD ..................................................................................................................................................... 38
17. APPLICATION .............................................................................................................................................. 39
17.1 YOUTUBE ......................................................................................................................................................... 39
17.2 RSS READER .................................................................................................................................................... 39
17.3 WEATHER FORECAST ....................................................................................................................................... 39
17.4 GOOGLE MAPS ................................................................................................................................................. 40
17.5 FTP .................................................................................................................................................................. 40
17 TROUBLE SHOOTING ................................................................................................................................ 41
18 SPECIFICATIONS ........................................................................................................................................ 42

3
1. SAFETY
This HD Xfinder has been manufactured to satisfy the international safety standards.
Please read the following safety precautions carefully.
MAINS SUPPLY: 100 - 240V AC 50/60Hz
OVERLOADING: Do not overload wall outlet, extension cord or adapter as this may result in fire or
electric shock.
LIQUIDS: Keep liquids away from the HD Xfinder. The apparatus shall not be exposed to dripping or
splashing and that no objects filled with liquids, such as vases, shall be placed on the apparatus.
CLEANING: Disconnect the HD Xfinder from the wall outlet before cleaning .Use a light damp cloth
(no solvents) to dust the HD Xfinder.
VENTILATION: The slots on top of the HD Xfinder must be left uncovered to allow proper airflow to
the unit. Do not stand the HD Xfinder on soft furnishings or carpets. Do not expose the HD Xfinder to
direct sunlight or do not place it near a heater. Do not stack electronic equipments on top of the HD
Xfinder.
ATTACHMENTS: Do not use any attachments that are not recommended as these may cause
hazard or damage the HD Xfinder.
CONNECTION TO THE SATELLITE DISH LNB: Disconnect the HD Xfinder from the mains before
connecting or disconnecting the cable from the satellite dish.
FAILURE TO DO SO CAN DAMAGE THE LNB.
CONNECTION TO THE TV: Disconnect the HD Xfinder from the mains before connecting or
disconnecting the cable from the satellite dish.
FAILURE TO DO SO CAN DAMAGE THE TV.
EARTHING: The LNB cable MUST BE EARTHED to the system earth for the satellite dish.
LOCATION: Place the HD Xfinder indoor in order not to expose to lightening, rain or sunlight.
2. INTRODUCTION
Thank you for purchasing the HD Xfinder.
This HD Xfinder can fast spectrum analysis with 950 ~ 2150 MHz frequency span. Support
Constellation Chart. it has a High resolution 7"TFT LCD and a lithium battery can work at outdoors. It
has a 2GB of U disk , so you needless schlep hard disk when it work at outdoors. And also use as a
DVB-S+T/C Xfinder on a TV.
This HD Xfinder is fully compliant with the international DVB standard and thus transmits digital
images, sounds, information guides and teletext directly to your TV or Xfinder through the satellite
broadcasting.
Now you can comfortably see and receive digitally transmitted music, news, movie and sports satellite
broadcasts in your office or at your home.
In service search section, both the automatic service search method and the manual search mode
are provided. Also it supports DiSEqC 1.0, 1.2 and USALS, enabling you to move your antenna in
order to focus preferred satellite. You can save up to 6000 TV and Radio services and work around
with the favorite, Lock, Delete, Move and Sort functions.
The menu is very modern and supports multiple languages. All functions can be carried out using the
remote control and some of the functions can also be carried out using the front panel. The HD

4
Xfinder is easy to use and adaptable for future advances. Please be aware that new software may
change the functions of the HD Xfinder.
If you have any difficulties concerning the operation of your HD Xfinder, please refer to the relevant
section of this manual, including the ‘Troubleshooting’. This Manual will provide you with useful
information on using the HD Xfinder.
3. FEATURES
z MPEG-Fully DVB-S / DVB-S2 HD compliant
z DVB-T/DVB-T2/DVB-C
z Fast spectrum analysis
z Support Spectrum information save, load and compare.
z Data parsing of frequency Selected
z Constellation Chart
z High resolution 7"TFT LCD
z Large lithium battery capacity (5500mAh)
z Auto Calculate Angle of AZ ,EL
z 6000 channels (TV and Radio) programmable
z Multilingual menu text support
z Channel switching time less than 1 second
z Channel list editing
z Favorite channel list editing
z True-color On-Screen Display (OSD)
z Full Picture In Graphic (PIG) function
z Electronic Program Guide (EPG) for on screen channel information
z Subtitle supported
z Teletext supported by VBI insertion and software emulation
z Program and Channel information transfer from Xfinder to Xfinder
z DiSEqC 1.0, 1.1, 1.2 and USALS
z HDMI HD Video/Audio Output
z Easy upgrading by Ethernet & USB &RS 232 Port
z USB 2.0 Host
z Built in U disk (4GB)
z LAN 10/100Mbps Ethernet
z RTC (Real-Time-Clock)
z Time Shift
z Video Recording
z Recording one channel and Time Shifting another channel
z One key to start or stop recording of TS stream
5
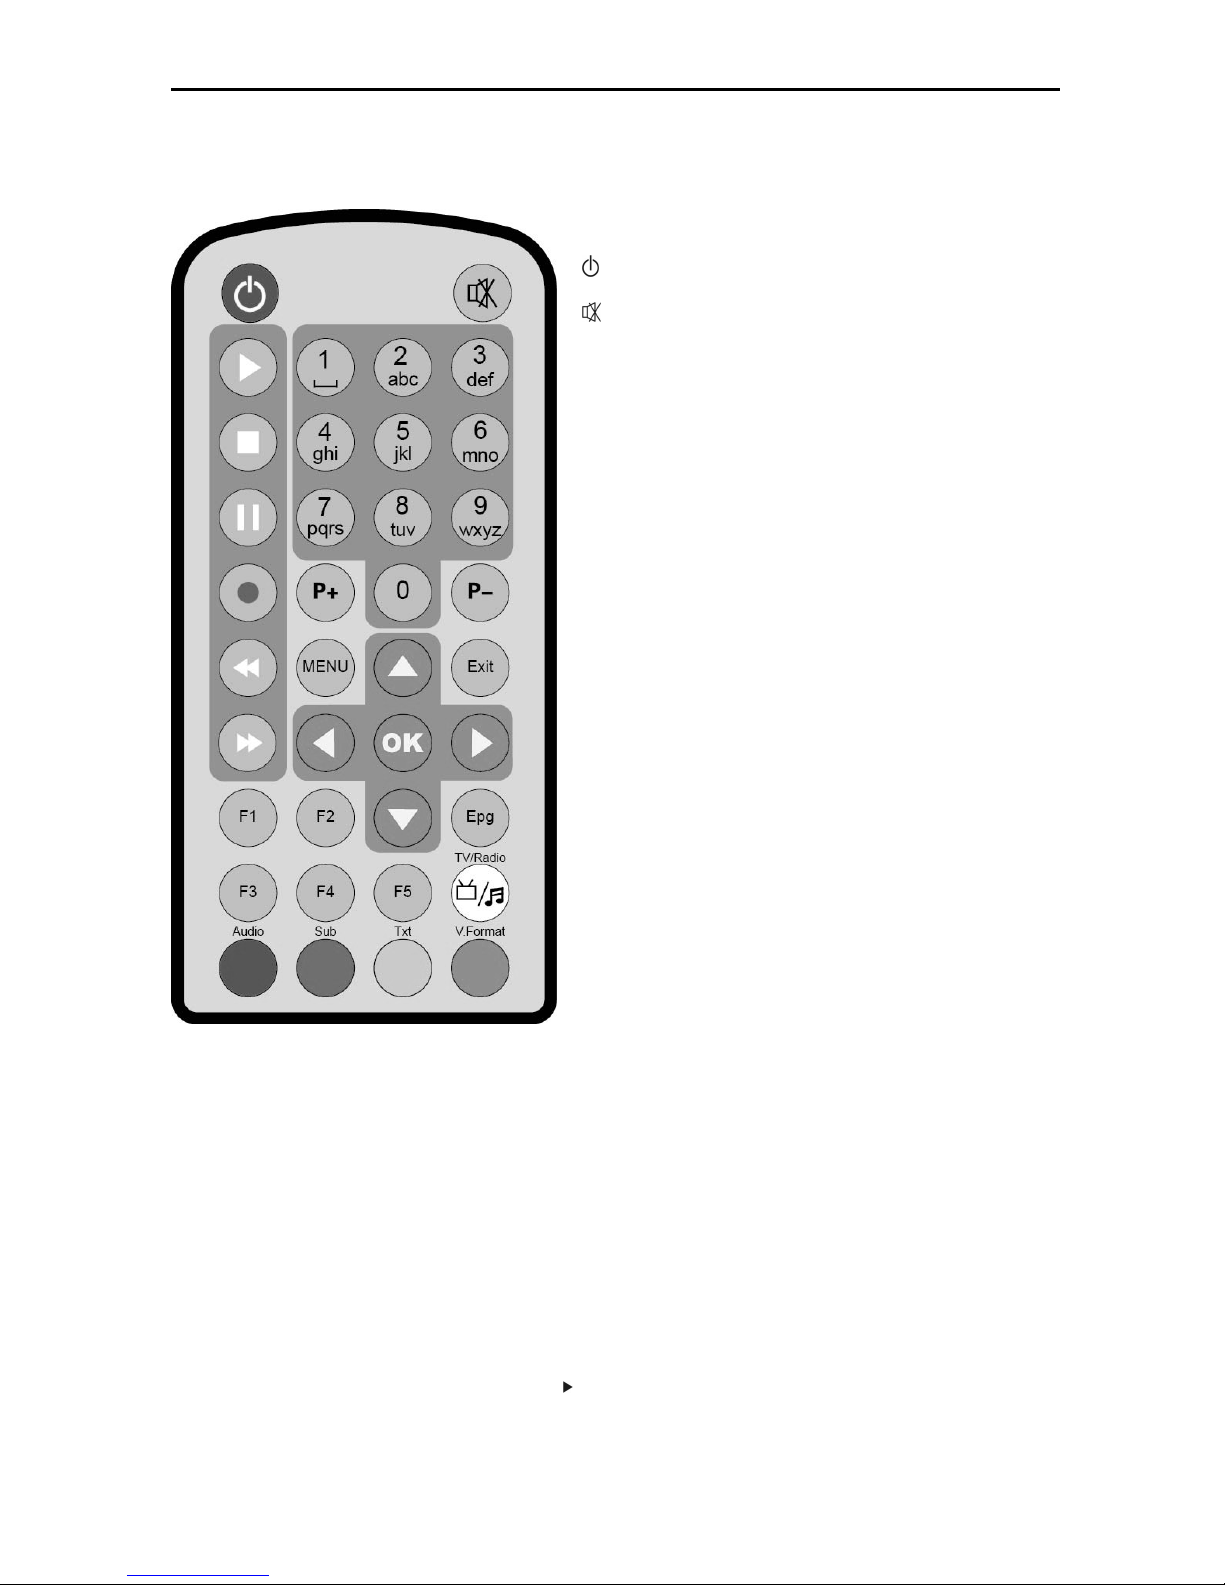
4. Remote Control
You can power on/off the Xfinder, operate on screen
menu, and use a variety of hot key function.
POWER
To switch the Xfinder power on/off
MUTE
Used to enable or disable the audio
NUMERIC KEYS
Used to select channels or enter programming parameters
TV / RADIO
Xfinder switches between TV and Radio mode.
0 (ZOOM)
Press 0 key select zoom times, from X1 to X16.
AUDIO
Audio channels setup, to select audio mode; Left, Right , Stereo,
Mono.
F1
To
switch LCD on/off
F2
To
switch fan on/off
F3
To start or stop recording of TS stream
F4
To display channel status or various program information of
current service.
F5
To switch AV output/input
EPG
Display the Programs guide on screen when available.
MENU
Displays the Main Menu on the screen, or return to the previous
menu or status.
EXIT
Cancel the user selection and return to the viewing mode from a
menu.
OK
To select menu option, or to updated on entry.
<,> KEY
To adjust volume level, or to move cursor left or right in the
menu.
^,v KEY
To change channels, or to move cursor up or down in the menu.
PAGE+/PAGE-
To move up the cursor to the next or previous page
in the menu or channel list.
●REC
To start the recording.
Red Key
Has different functions per menu.
TXT(YELLOW KEY)
Shows teletext information of the current channel supports.
Subtitle(Green KEY)
Subtitle Display.
V.FORMAT (blue Key)
Press V.FORMAT button to switch the display mode among
"Auto","ByNativeTV"720p_50","720p_60"”,”1080i_50”,”1080i_60",
”1080p_50” and "1080p_60".
Play
To play the MP3, JPEG, or Record files.
6
Stop
To stop the Time Shift, recording, or MP3/JPEG player.
PAUSE
Used to select the freeze function.
Press once to freeze the screen picture.
FB
To start Fast Backward function.
FF
To start Fast Forward function.
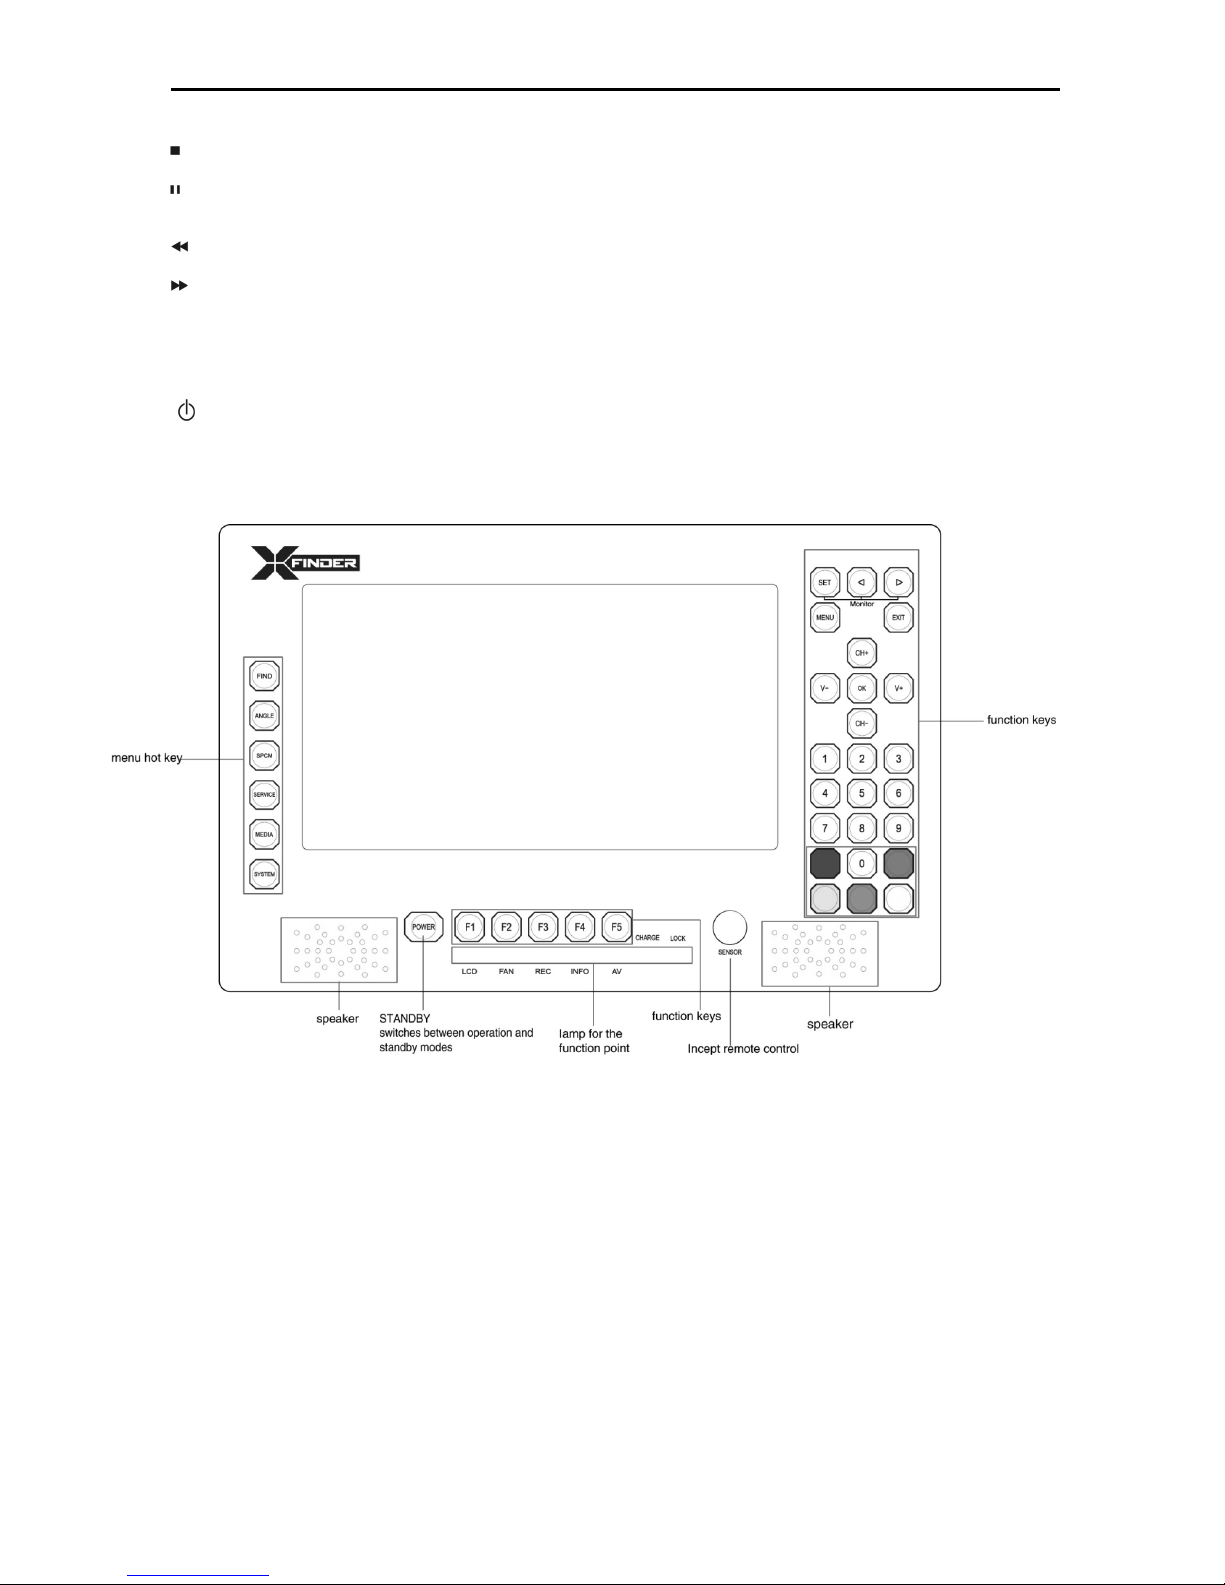
5. Front panel
POWER
To switch the Xfinder power on/off
NUMERIC KEYS
Used to select channels or enter programming parameters
0
(ZOOM)
Press 0key select zoom times, from X1 to X16.
FIND
shortcut key enter to Xfinder menu.
ANGLE
shortcut key enter to Angle menu.
SPCM
shortcut key enter to Spectrum menu.
SERVICE
shortcut key enter to Serice.
MEDIA
shortcut key enter to Media menu.
SYSTEM
shortcut key enter to System menu.
F1
To
switch LCD display on/off
F2
To
switch fan on/off

7
F3
To start or stop recording of TS stream
F4
To display channel status or various program information of current service.
F5
To
switch AV output on/off
MENU
Displays the Main Menu on the screen, or return to the previous menu or status.
EXIT
Cancel the user selection and return to the viewing mode from a menu.
OK
To select menu option, or to updated on entry.
V-,V+ KEY
To adjust volume level, or to move cursor left or right in the menu.
CH+,CH-KEY
To change channels, or to move cursor up or down in the menu.
PAGE+/PAGE-
To move up the cursor to the next or previous page
in the menu or channel list.
AUDIO(Red)
Audio channels setup, to select audio mode; Left, Right , Stereo, Mono.
Red Key
Has different functions per menu.
TXT(YELLOW KEY)
Shows teletext or subtitle information of the current channel supports.
Subtitle(Green KEY)
Subtitle Display.
V.FORMAT (blue Key)
Press V.FORMAT button to switch the display mode among
"Auto","ByNativeTV"720p_50","720p_60"”,”1080i_50”,”1080i_60",”1080p_50” and "1080p_60".
FUN
To select brirhtness,contrast and colour of LCD screen.
<,> KEY
To adjust brirhtness,contrast and colour of LCD screen.

8
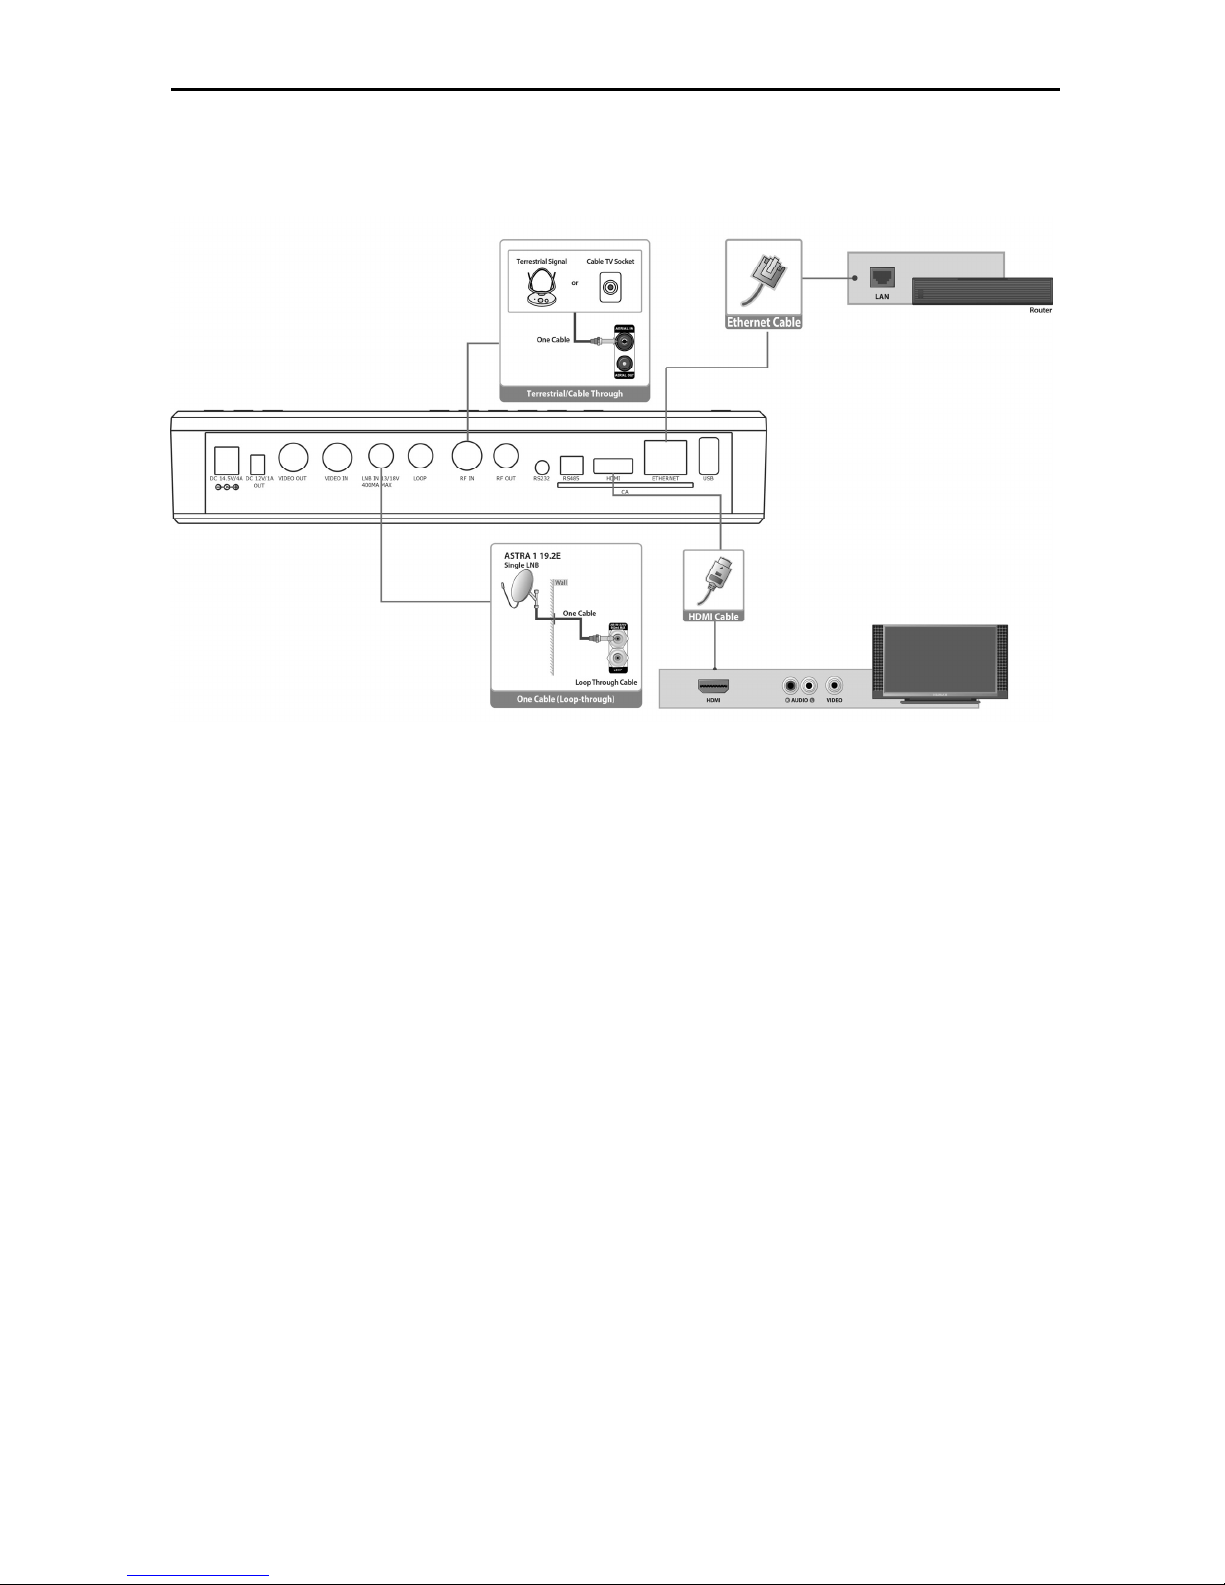
6. Rear Panel
Please refer to the diagram above for all possible connections of your Xfinder
Do not connect the unit to the mains socket until all other connections have been made and checked.
Your configuration can vary depending on model
DC 12V: Connect the external power supply(DC 14.5V/4A) .
RF OUT: This enables the connection of another Xfinder.
RF IN: This port is to connect the coaxial cable from terrestrial antenna/cable antenna
LOOP: This enables the connection of another Xfinder.
LNB IN 13/18V 300mA MAX: This port is to connect the coaxial cable from LNB of your Dish.
HDMI: Audio and Video output socket for TV set with HDMI Input Jack only.
RS 232: SERIAL PORT: This is used to connect your Xfinder to a computer through a serial cable
Ethernet: Network port, you can get a new software updates from this port.
USB: USB 2.0 Host, connect to USB hard disk, or flash disk.
CA: One slot CA Interface for Conax.
7. Connecting Your System
This section describes how to connect your product to match your particular devices setup and to gain
optimum signal quality. The product provides various interfaces to connect to the TV, VCR or other
devices. Select the most appropriate depending on the device you have.
Warning: Connect all components before plugging any power cords into the wall outlet.
Always turn off the product, TV and other components before you connect or disconnect any cables.
9
Note: If you encounter any problems setting up your product, please contact your local retailer
helpline.
7.1 Connecting the Antenna
1. Connect one or two satellite coaxial cable from the wall to LNB IN.
2. Connect a cable/terrestrial coaxial cable to AERIAL IN.
Note: Cable and terrestrial can't concurrence.
Connecting the TV
1. TV with the HDMI connector:
For the best picture quality, connect the product and TV using an HDMI cable.
·
Note:
1. Connecting your TV directly to the audio/video output of the product will assure a more vivid
picture and enhance your viewing enjoyment.
Connecting to the LAN:
Connect one end of the Ethernet cable to the product and the other end to the LAN router.
TV with Motorized System (DiSEqC 1.2)
Connect one end of your coaxial cable to the LNB IN connector on the Xfinder and the other end to
the REC or Xfinder connector on the DiSEqC 1.2 motor.
Connect the coaxial cable from the LNB to the LNB connector on the DiSEqC 1.2 motor.
All our Xfinders are designed to be DiSEqC 1.0 and DiSEqC 1.2 compatible.
This allows multiple antennas to be connected to the Xfinder at the same time.

10
If you have two or more fixed antennas or LNBs, then we recommend you use a DiSEqC 1.0
switch.
Connect the coaxial cable from the first LNB to the LNB 1 or LNB A input connector of the DiSEqC
switch.
Do the same for any other LNBs that you have.
Connect one end of a coaxial cable to the RF output connector of the DiSEqC switch,
connect the other end to the LNB IN socket on the Xfinder.
To the digital Xfinder, you can connect either a single satellite antenna directly or LNB of
multi-feed equipment.

11
8. Basic Operations
8.1 Turn on Xfinder
First, press the Device’s Main [Power] button to
turn on the unit. When the Xfinder is first used,
there will play the first channel from the default
Channel List. If the Xfinder is not first used,
Xfinder will play the same channel as last time
before turning off.
? Frequently Asked Question
Q: The power of my Xfinder has been turned
on and not in Standby mode, but the TV
screen showed nothing:
A: Make sure the TV set has been set to the
correct video input (not the TV channels). For
example, if you have connected the unit with the
Video1 input of the TV set, the TV set has to be
switched to Video1.
Q: The power of my Xfinder has been turn on
and not in Standby mode, but the TV
screen showed nothing except one box
with “No Signal” image.
A: That means the channel, which you select, is
no signal. It could be several causes:
1 The channel which you select is not in your
allocate satellite. The simply solution is to
change channel.
2 The signal of current TV channel is too
weak. You can try to change channel to
other strong signal channels. If the
problems still exist, please consult your
local dealer or other professionals for
technical service.
3 You use the Dual LNB, and you need
Modify LNB Type
8.2 Power
1 Press [Power] Key can enter the Standby
state
2 In Standby state, press [Power] Key again
can call back the unit and go on play the
previous channel
3 User can also disconnect the device’s main
power to end the Standby state.
8.3
Channel Up/Channel Down
In full screen, press [CH+/CH-] to change
channel.
8.4 Volume Up/Volume Down
In full screen, press [VOL+/VOL-] to adjust
volume.
8.5 Number
In full screen, use number key and press [OK]
on the Remote Control Unit to change channel.
8.6
Mute
1 Press [MUTE] key to mute the sound and
the screen will show up mute OSD.
2 Press [MUTE] key again to restore sound.
8.7
Pause
1 In playing mode, press [Pause] key, the
picture will be paused, but the sound of the
channel will still continues.
2 Press [Pause] key again, the screen’s
picture will skip over to the current playing
picture, and the sound of the channel will
correspond playing.
.
8.8
Audio
1 In full screen, press [AUDIO] key can open
the “Audio” window on the screen.
12
2 You can modify the audio track by press
[CH+/CH-] key and modify the audio
mode by press[VOL+/VOL-] key.
3 Mode: Left/Right/Stereo/Mono
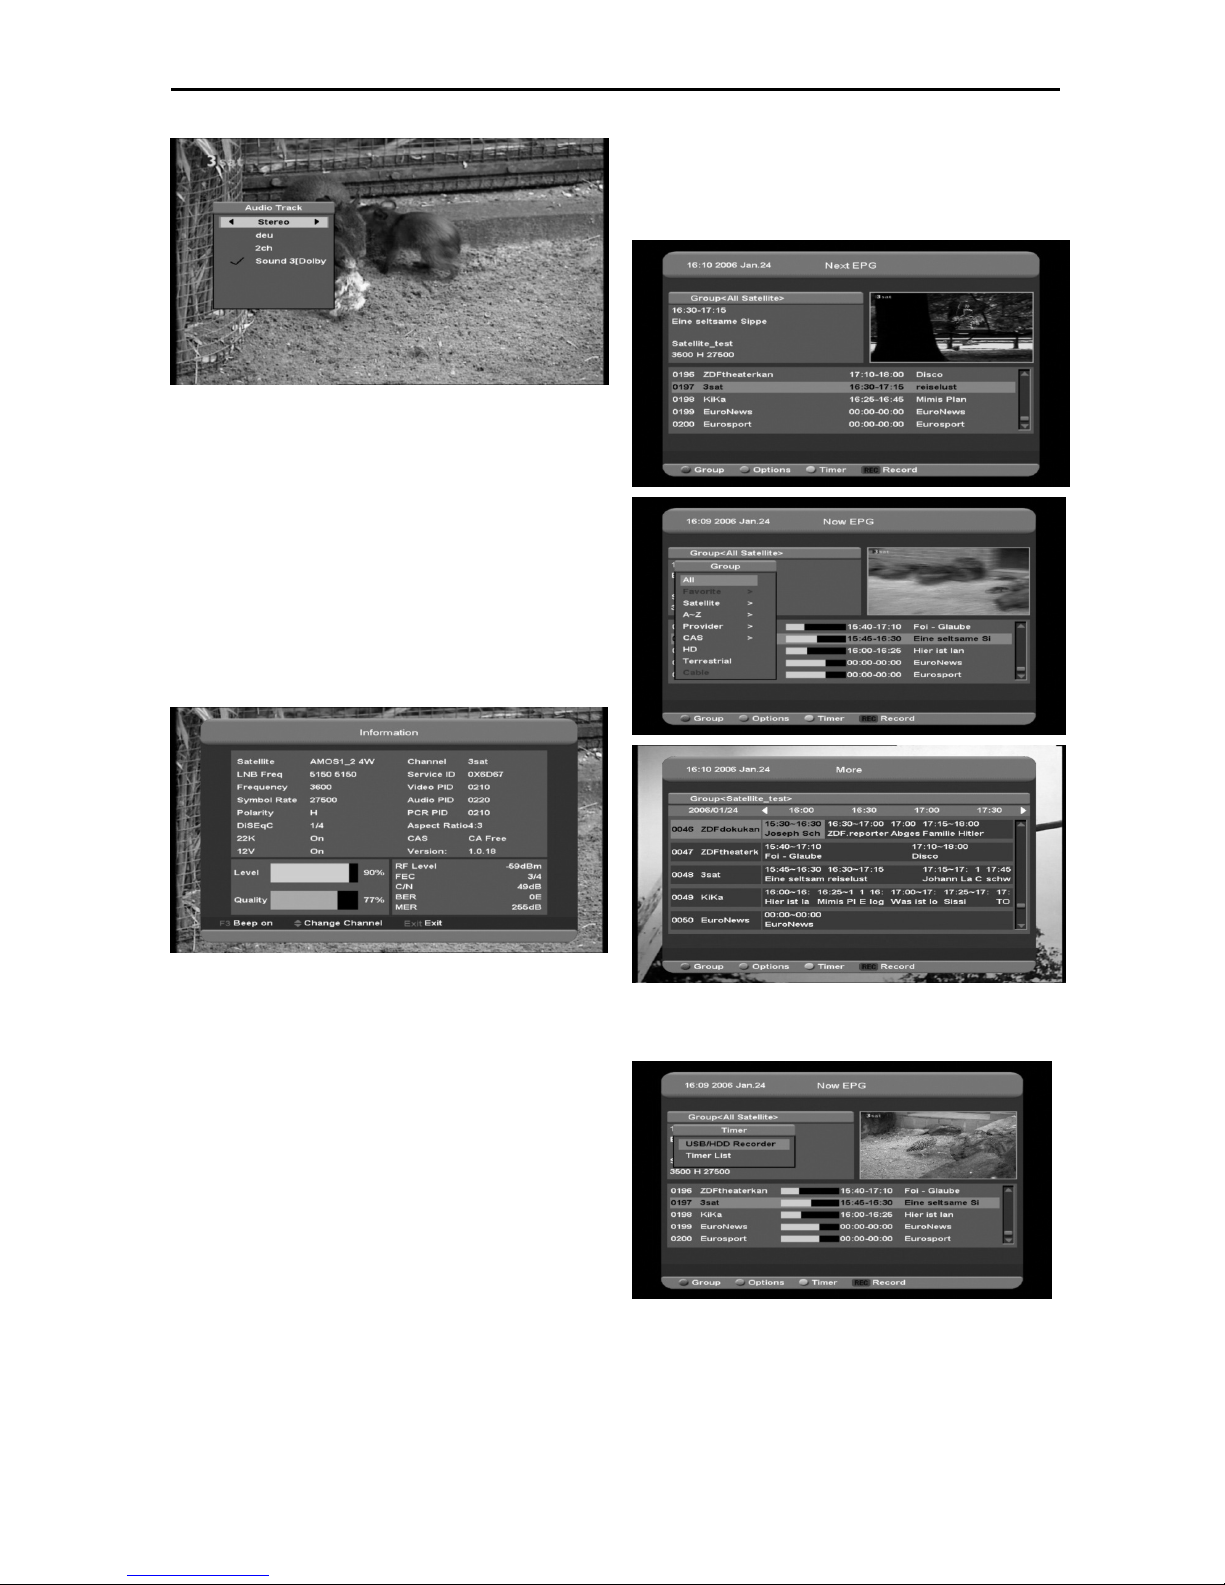
8.9 Information
In full screen, press [F4] key can open
information screen, in the window shows the
parameters of current channel.
8.10
EPG
1 The Xfinder has an Electronic Program
Guide (EPG) to help you navigate channels
through all the possible viewing options.
The EPG supplies information such as
channel listings and starting and ending
times for all available channels.
Press [EPG] key to display EPG screen.
2 Press [Red] key can select the channels by
different group, such as by Favorite
/Satellite /Provider /CAS etc.
3 Press [Green] key to select different display
mode among Now EPG, Next EPG, More
and Schedule, like the following picture:
4 Press [Yellow] key in EPG menu can set
one record timer or go to Timer List menu.
5 In EPG menu, when you select one event
by high light item, you can set this event to
record timer list directly by press [REC]
button.

13
6
In EPG menu, press [Exit] to close EPG
screen.
8.11
TV/RADIO
In TV mode, pressing [TV/RADIO] key can
switch to Radio mode. In Radio mode, press
[TV/RADIO] key to switch to TV mode.
8.12
Channel List
1 In full screen, press [OK] key can enter
“Channel List”.
2 Press [CH+/CH-] key to change the
different group. Which you can watch like
below
3 Press [Red] key to display details
information for EPG Now.
4 Press [Green] key you can change the
current channel’s property, such as FAV/ Lock/
Skip/ Delete/
Rename
5 Press [Yellow] key can open the “Find”
window like below. You can press
[Up/Down/left/right] keys to move highlight
and press [OK] key to input the letter.
Select OK and press [ok] button to find you
want.
6 Press [Blue] key can open the “Sort”
windows like below. There are five kinds of
sorting ways. You can press [Ch+/Ch-] key
to move highlight and press [OK] key to
confirm you
selection.
 Loading...