

Saab 9-5 2006 Owner Manual

Owner’s Manual
Saab 9-5, Model Year 2006
Safety 11
Security 43
Instruments and controls 57
Saab 9-5 Audio System 1111 90
Interior equipment and trunk 113
Starting and driving 141
Car care and technical information 191
Customer Assistance and Information 253
Specifications 259
Index 273
1
1
Saab Automobile AB 2005
Service Readiness, Saab Automobile AB, Trollhättan, Sweden
Printed in Sweden
2
Introduction
This manual provi des practical guida nce on
driving and caring f or your Saab.
Although this man ual de scrib es the most
important differences betwee n mod el vari ants, it does not include precis e specifications of the differ ent va riants. Some differences also occ ur to m eet s pecia l lega l
requirements in diffe rent co untries .
Importation and distri bution of Saa b auto mobiles, spare p arts an d acc essor ies a re
handled exclusive ly by Gen eral M otors o f
Canada Limited in Cana da an d by Sa ab
Cars USA, Inc. in the U.S.A.
We recommend that you re ad thro ugh the
manual before taking the car out for the first
time and that you k eep it in the ca r for future
reference.
To find a specific item , use the ov erviews
given on pages 3–6. A list of con tents i s
given at the beginning of each section of the
manual, and there is also a compre hensive
index at the back of the book.
Supplied with the car is a Warranty and Service Record booklet and a ti re warran ty
folder which specif ies the re gular mainte nance to be carr ied out. The book also contains important warranty condi tions.
WARNING
WARNING texts warn again st the danger
of injury if the specified instructio ns are
not followed.
NOTICE
NOTICE texts warn of potent ial dama ge
to the car if the recommendations are not
followed.
Since the polic y at Sa ab is one of continua l
improvement, we retain the right to incorporate modifications and to alter specifications
during production without prio r notice.
1 Asterisk means: equi pment not fitted in all
cars (can depend o n model variant, engine
variant, market specification, options or
accessories).
If you have any questi ons c oncer nin g your
car, its equipment, the warran ty co nditio ns
or the like, your Saab dea ler will be pleased
to help.
Best wishes,
Saab Automobile AB
Saab Automobile AB does not accept liability for
any damage caused by the fitting of spare parts,
exchange parts or accessories that are not
approved by Saab Automobile AB.
The specifications, design particulars and illustrations included in the manual are not binding.
3
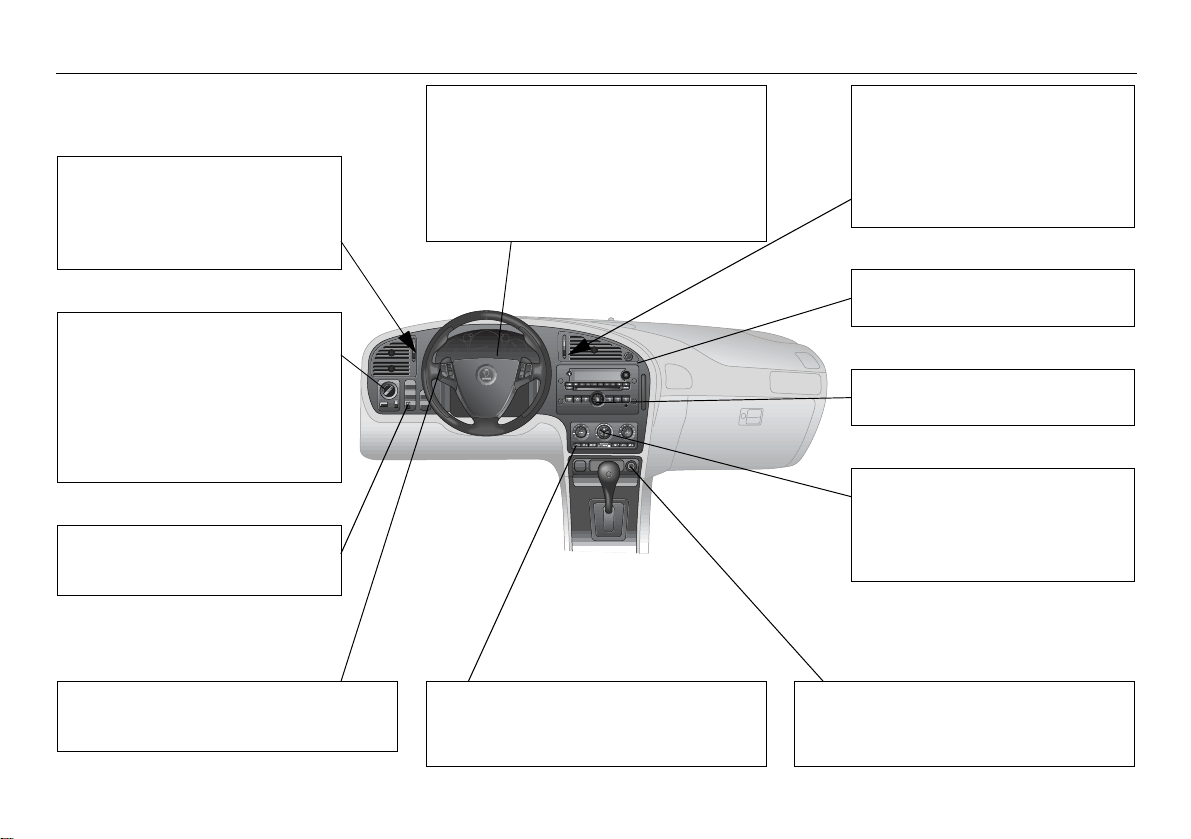
Instrument panel
9242662362562
423456789 75
4669 73
94582798 1 161
694247 73
486 73
6749224247 73
12792744267482 75
6242 207
69847 74
1 72
9827847 1 76
1 72
1234567896236924247 58
3879 65
387962379479 64
6 65
96796 65
66128967482461 68
4962369 77
69423849 1 78
64224249 1 77
69 206
4962369 205
66936924247 76
663487 1 90
7942582798 1 91
7867455467582798
79
4958234748242 246
IB3830
7942582798 1 91
279824562683 1 158
673982767 1 87
639796427 21
796 1 126
46977479 1 126
4
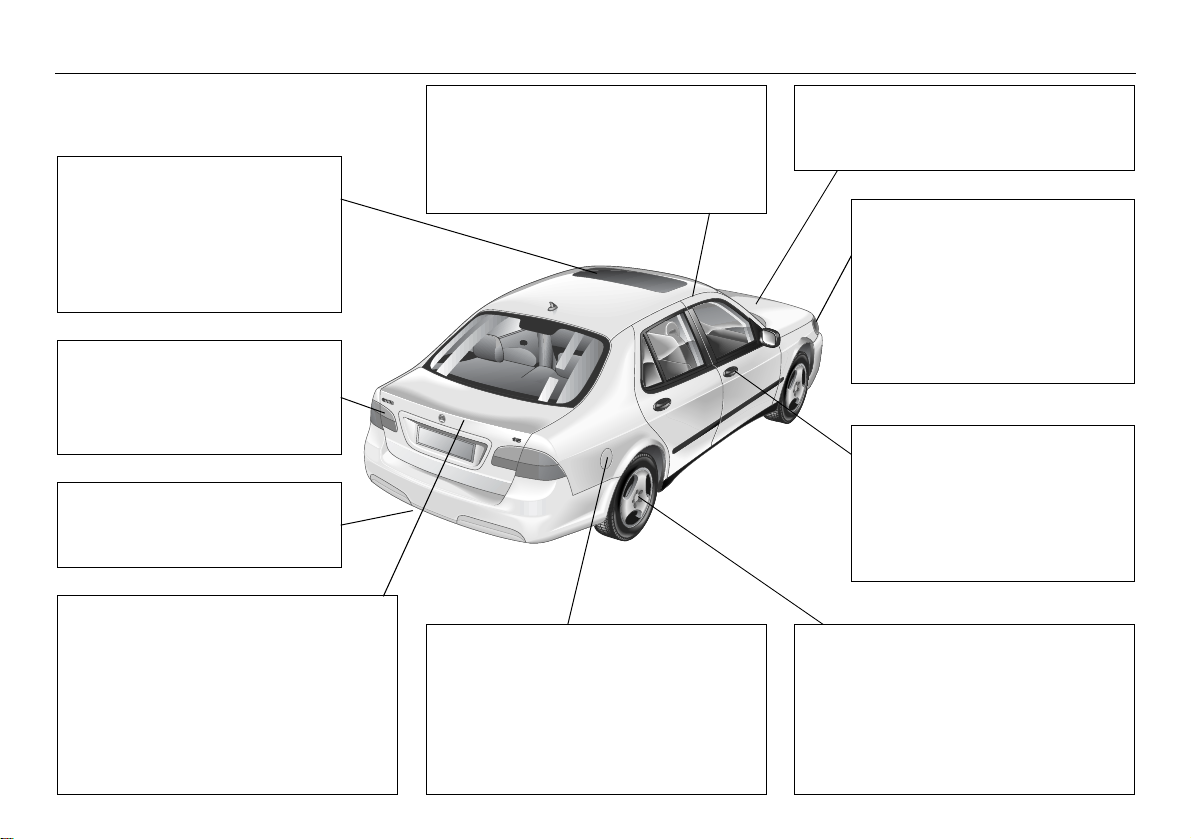
Exterior
882988 1 123
6427569 244
6426238442 245
854276427 245
27458998482796727 248
6347 73
6947579 362 211
6947579
89784 213
6242 207
842679649 1 176
8427569 185
697842 186
92 130
8342796967 362 130
8342796967
89784 133
926623 139
9442476694773 185
865769749 237
9442476988965863 181
477427988569949 1 362
623897844787988
964 181
64988863 260
69449989 118
6 65
42 148
5828456878942 172
262
883 192
2425869727642 245
6347 73
486 73
9242662362562
423456789 75
634769 1 77
6242 207
27968542 44
924385362 47
646789784 48
436785 47
69669 1 50
IB3831
b
4999 269
623749 268
9642 162
944242583679 174
865769749 237
62426 239
5
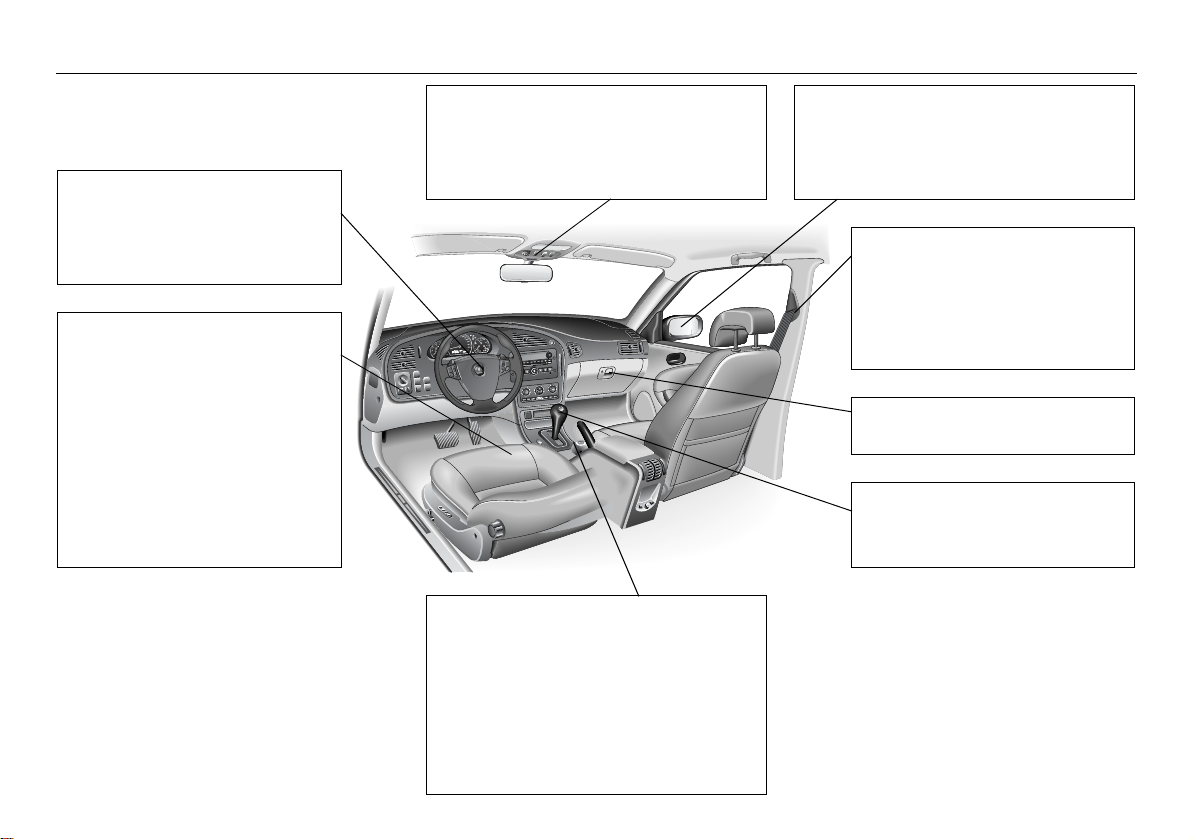
Interior
794263727 114
496 29
89794243 201
7942582798 1 91
279824562683 1 158
67 18
673982767 1 87
639796427 1 21
677 12
4367 22
8342796967
362 130
8342796967
89784 133
879623794 243
436496 36
12794894742 124
882988 1 123
8479827 217
579454238 115
1247482475 142
7697427242 143
24296129483 152
94424287679 175
944242583679 174
6942 168
69449989 116
88949989 116
2489 125
677 12
496 29
4367 22
436785 47
67764272625 242
85869727 127
62679624482 152
78674579624482 1 153
IB3832

6
Engine compartment
692426 7
129 270
24229 270
69829 270
889583 270
4962386342128967482
6 234
89794243 201
79427524563676 267
1247482475 142
947 204
69 265
676745582979 147
242 196
542784 196
624224284 197
24284544567482 263
9642 162
96 163
9662357543 199
967 267
9663 267
219
62426 221
6 223
68 219
96796 65
94424287679 175
944242583679 174
88627 198
88627566547 262
IB3636
4962369 77
69 206
697 206
1897627582439674828939442 146
98247 193
2427524563676 262
62679624482 152
78674579624482 1 153
78674579624482
7524563676 266
6266987524563676 266
769742 188
6779 202
69429654276779 203
7
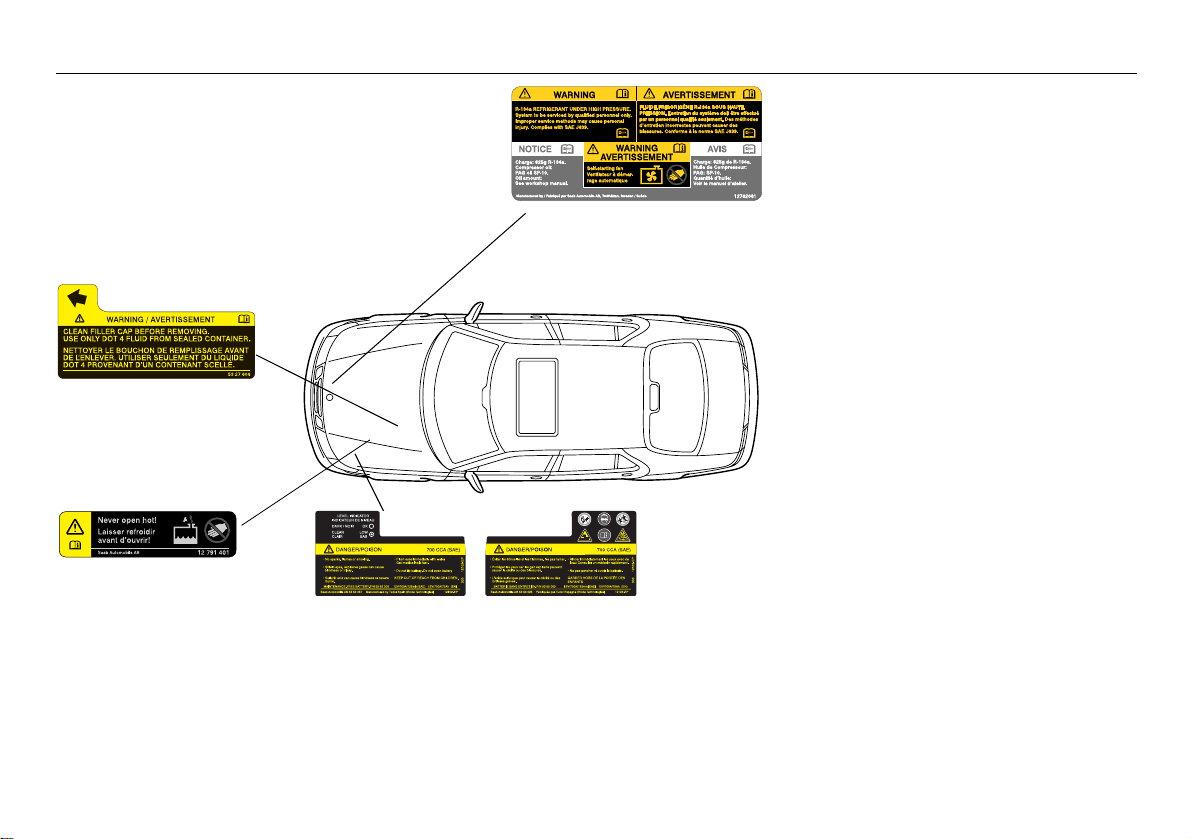
Warning labels
Brake fluid
CLEAN FILLER CAP BEFORE
REMOVING. USE ONLY DOT 4
FLUID FROM SEALED CONTAINER.
Coolant:
Never open when engine hot!
Radiator fan
Radiator f a n ma y s t ar t a t
any time.
Battery
• No sparks, fl ames or sm okin g.
• Shield eyes, explosive gases can cause blindness or injury.
• Sulphuric acid can cause blindness or severe burns.
• Flush eyes immediately with water. Get medical help fast.
• Do not tip battery. Do not open battery.
KEEP OUT OF REACH OF CHILDREN
A/C system
Refrigerant at high pressure.
Do not loosen or remove the A/C system fittings before
discharging the A/C system. Improper service methods
may cause personal injury. System to be serviced by
authorized personnel only. For instructions consult
workshop manual.
The A/C system complies with SAE J639.
Charge: 82 5 g of R13 4a.
Compressor o i l: P A G oi l S P- 10 al t.
Saab oil 4759106
Oil amount: See workshop manual.
IB336
• AV OID SPARKS AND OPEN FLAMES,
NO SMOKING
• WEAR EYE PROTECTION
• KEEP OUT OF REACH OF CHILDREN
•ACID
• SEE OWNER’S MANUAL
• FLAMMABLE GA S
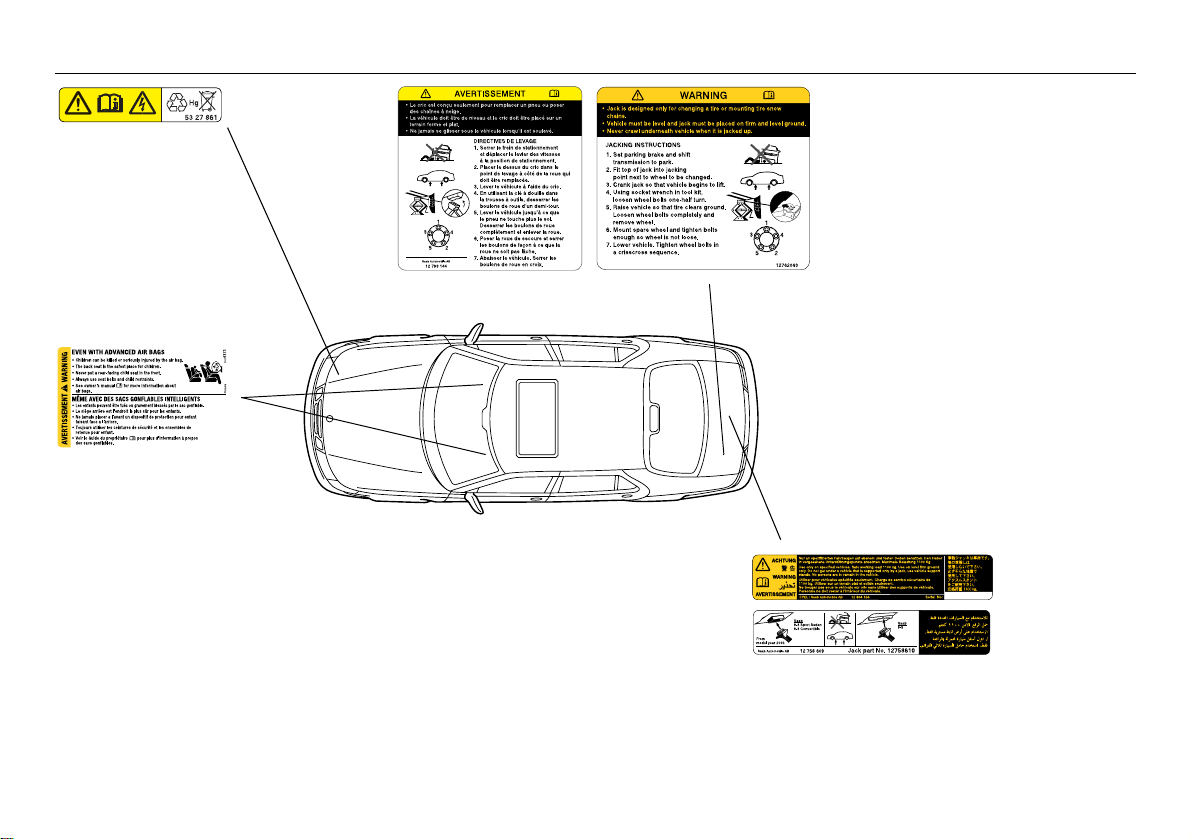
8
Contact a Saab dealer if a
xenon headlight requires
replacement.
This label is only found on
cars with xenon headlights.
WARNING
EVEN WITH ADVANCED AIR BAGS
• Children can be killed or seriously
injured by the air bag.
• The back seat is the safest place for
children.
• Never put a rear -facing child seat i n
the front.
• Always use seat belts and child
restraints.
IB336
Jack
• Jack is designed only for changing a tire or
mounting tire snow chains.
• Vehicle must be le v e l and the jac k mu st be
placed on a firm and level ground.
• Never crawl underneath vehicle when it is
jacked up.
JACKING INSTRUCTIONS
1 Set parking brake and shift transmission to
park.
2 Fit top of jack into jacking point next to wheel
to be changed (See illustration).
3 Crank jack so that vehicle begins to lift.
4 Using socket wrench in tool kit, loosen wheel
bolts one-half turn.
5 R aise vehicle so that tire clears groun d.
Loosen wheel bolts completely and remove
wheel.
6 Mount spare wheel and tighten bolts enough
so wheel is not loose.
7 Lower vehicle. Tighten wheel bolts in a criss-
cross sequence.
Jack
Use only on specified vehicles. Safe working load 1100 kg. Use
on level firm ground only. Do not get under a vehicle that is supported only by a jack, use vehicle support stands. No persons
are to remain in the vehicle.
For more information see your owner´s manual.
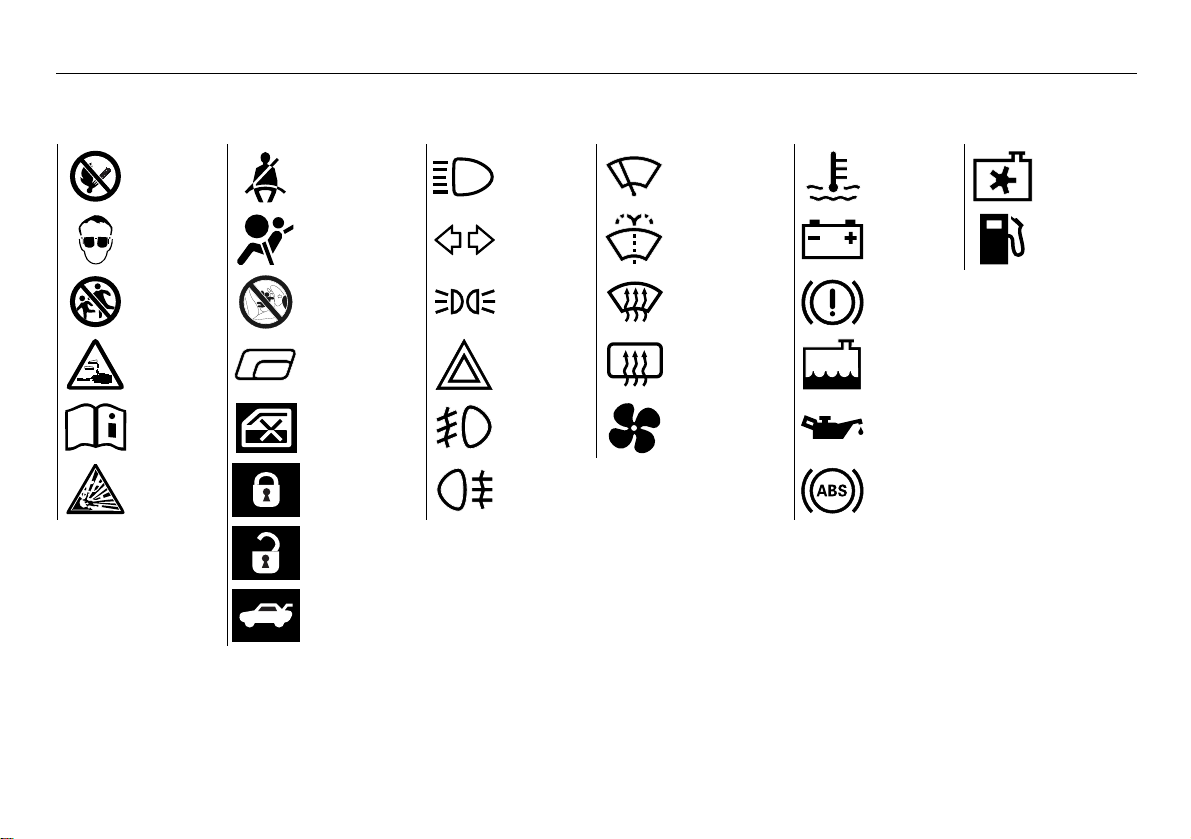
Examples of symbols that can be found in your car
9
No sparks,
flames or
smoking.
Use protective
goggles
Keep out of
reach of
children.
Battery acid
contains
sulfuric acid.
Refer to the
Owner’s
Manual.
Risk of
explosive gas.
.
Buckle up
Airbag
Never pl ace a
rear-facing
child seat in
this seat.
Electric
windows
Deactivating
of rear win dow
switches
Central
locking, lock
Central
locking,
unlock
Trunk
lid/tailgate,
opening
Headlights
Direction
indicators
Parking lights Defroster
Hazard
warning lights
Front fog
lights
Rear fog
light
Windshield
wipers
Windshield
washers
Rear window
heating
Ve nt i la tion fan
Coolant
temperature
Battery
charging
Foot brake
Coolant l e vel
Engine oil
pressure
ABS brakes
Radiator fan
Fuel

10
(This page has been lef t blan k)
11Safety
Safety
Seats _______________ 18
Head restraint ________ 21
Safety belts __________ 12
Child safety __________ 22
Airbag_______________ 29
1
Asterisk means: equipment not fitted in all cars
(can depend on model variant, engine variant,
market specification, options or accessories).
IB3835
12 Safety
WARNING
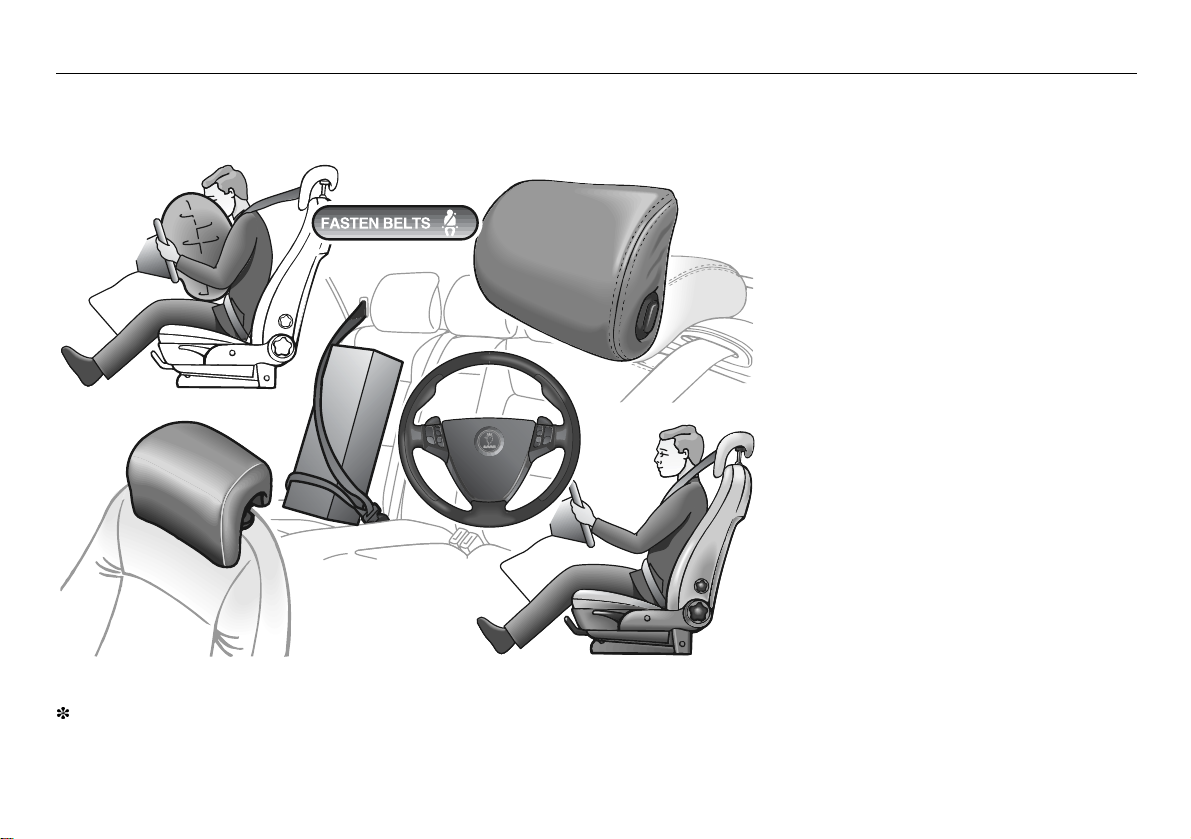
Safety belts
• Buckle up and adjust y our safet y belt
before driving off so tha t you can p ay
full attention to the traffic.
• Safety belts must be worn at al l times
by all car occupan ts.
• Child safety, see page 22.
• Check that the loc king ton gue is properly locked in the belt lock.
• In the event of a crash, the rear-seat
passengers not we aring a seatbelt will
be thrown forward agai nst the
front-seat backrests. The stresses
imposed on the f ront seat passe ngers
and belts are multipli ed and can result
in needless injury or ev en death for all
car occupants.
Three-point inertia-re el safety b elts are p rovided for all seats.
The results of studies show tha t it is equally
important to wear safety belts in the rea r
seat as in the front seats .
Bear in mind that in certain states/provinces
it is a legal requirement for all occupants of
the car to wear a safety belt.
FASTEN BELTS
IB3838
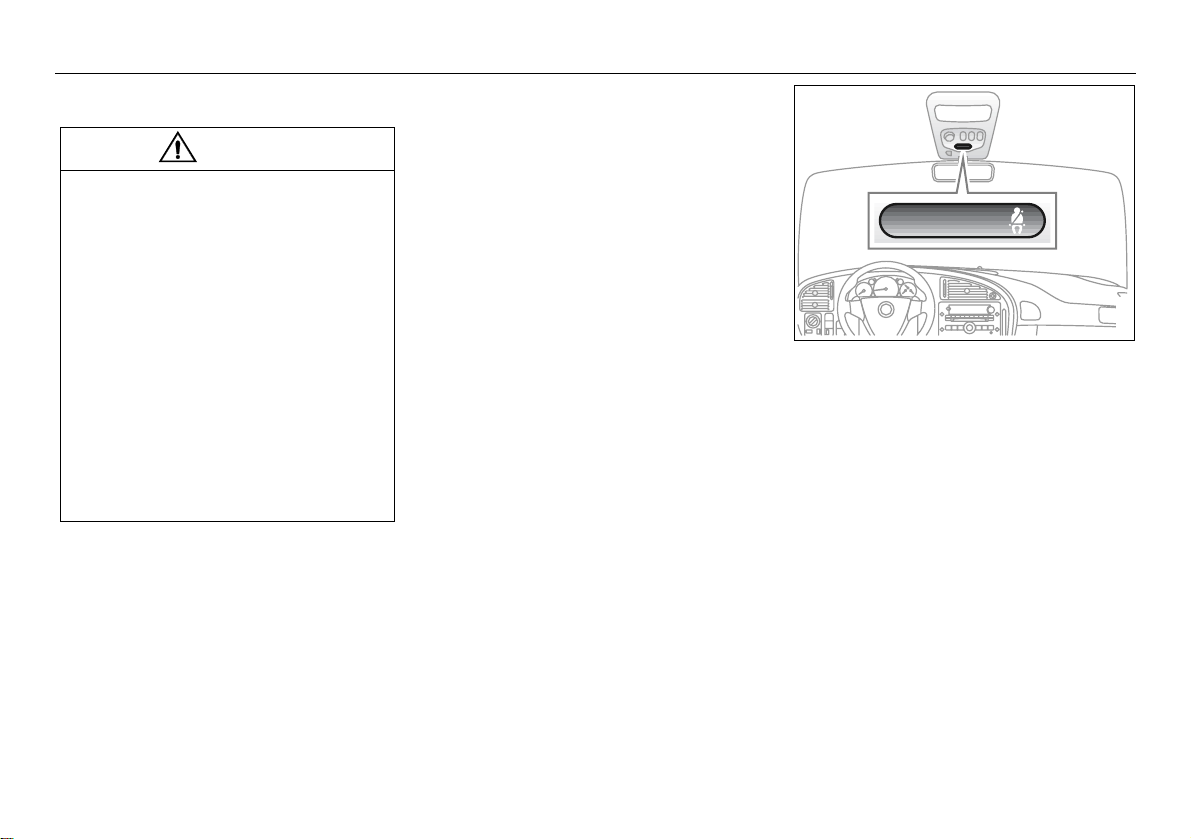
Safety belt reminder
When the ignition is switc hed on , the ”F ASTEN BELTS” reminder will light up until the
driver fastens the safety belt. I n addition an
audible signal sounds for 6 seconds, or until
the driver fastens his belt.
13Safety
WARNING
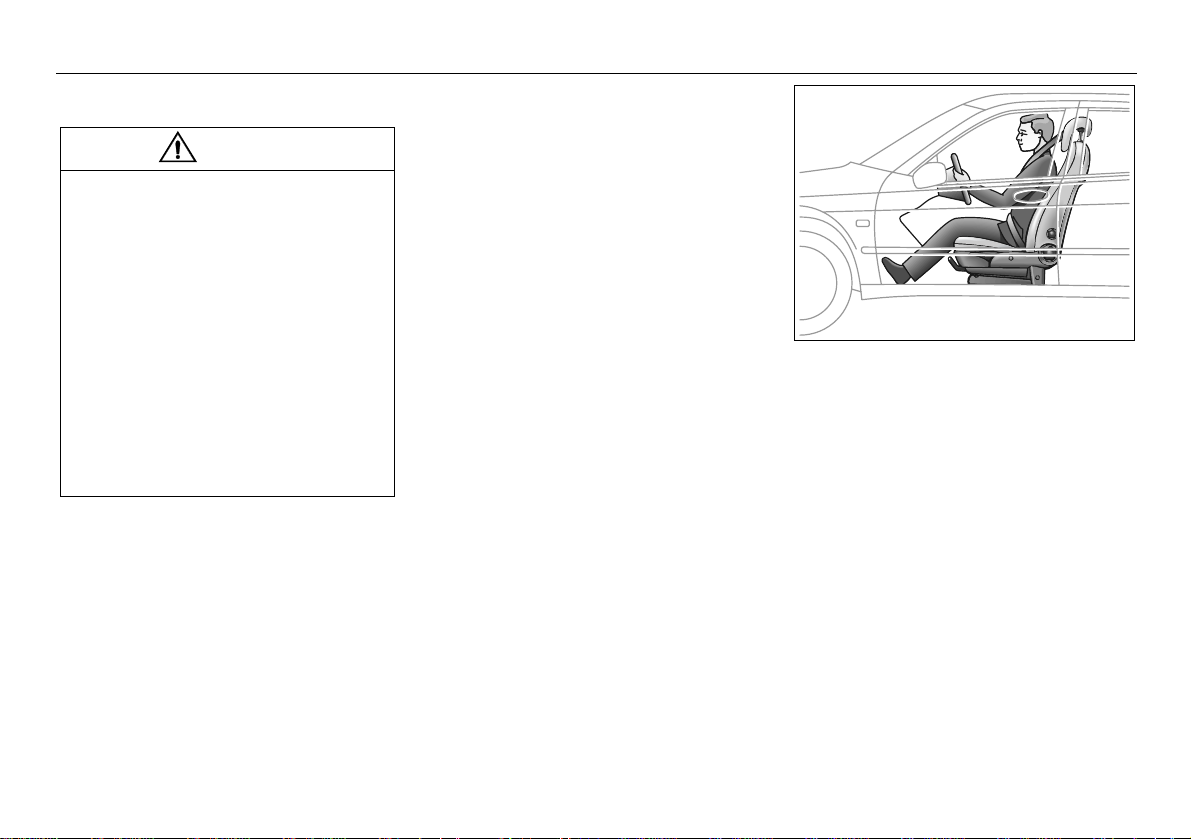
Correct position for safety belt
Proper positioning of the safet y belt is
extremely important.
• An out of position safety belt can result
in the occupant sliding underneath the
belt in a crash (sub ma rining ) and
injury can result fro m the lap po rtion
cutting into the a bdome n.
• Never fasten the safety belt with the
shoulder belt behind the b ody o r pu ll
the belt off the s houlder and under t he
arm.
• If two people share a belt, they risk
injury by being crushed together in the
event of a crash.
• Positio n the l ap str a p snug ly an d l ow
across the hips so t hat it just to uches th e
thighs. The shoulde r strap m ust be as f ar
in on the shoulder as po ssible.
• Check to ensure that the belt is not twisted
or rubbing against a ny sharp edges .
• There should not be any slack in the belt.
Pull the belt tight – particularly important
when thick out er clo thing i s wo rn. It
is advisable to remov e t hic k it ems of
clothing.
• Refrain from tilting the ba ckrest more than
necessary, as the safety belt pro vid es
better protection when the s eat is in a
more upright position.
• Only one person per safety belt!
• For most of t he time a sa fe ty belt is w orn,
the retractor will all ow the wearer freedom
of moveme nt. The retractor locks up au tomatically if the belt is jerk ed or withdr awn
sharply, the car tilts, the brak es a re
applied hard or a c rash occurs .
• Children up to 6 y ears of age must alw ays
be seated in a ch ild se at. Saa b re commends the use of a child s eat fo r children
up to the age of 10.
• Children who have grown out of a child
seat should be res trai ned b y the ca r’s
standard three-point belts . Make sure that
the shoulder belt is not in contact with the
neck or throat. If it is , a booster seat/cus hion may be nece ssary.
IB410
Correctly positioned safety belt

14 Safety
IB411
To fasten the belt
Belt height adjustment
The front safety be lts an d the outsid e belt s
in the rear (9-5 Sedan) ar e e quippe d with
automatic height adjus tment.
After fastening the belt, g rasp i t at ch est
height, pull it out an d, witho ut let ting go,
allow the slack t o be ta ke n up b y the reel.
Make sure that the belt is well in on the
shoulder.
IB412
Press the red button to release the belt
Front safety belts
Fasten the belt by pulling the belt and inserting the tongue in the buckle. Chec k that it is
securely fastene d.
Grasp the shoulder belt clo se to the bu ckle
and pull the belt towards the sh oulde r to
tighten the lap be lt part.
Then grip the belt at the shoulder, pu ll it out
and, without lettin g go, allow the slack to b e
taken up by t he reel. Make sure that the belt
is well in on the sh oulder.
Because the lower belt -ancho rage po int s
are on the seat, th e belt buckle follow s the
movement of the se at d uring sea t ad justment.
To release the belt, pr ess the red b utton on
the belt buckle, a s illu strate d.
See page 242 for the check ing o f belt function, cleaning, etc.
15Safety
IB414
Safety belt use during
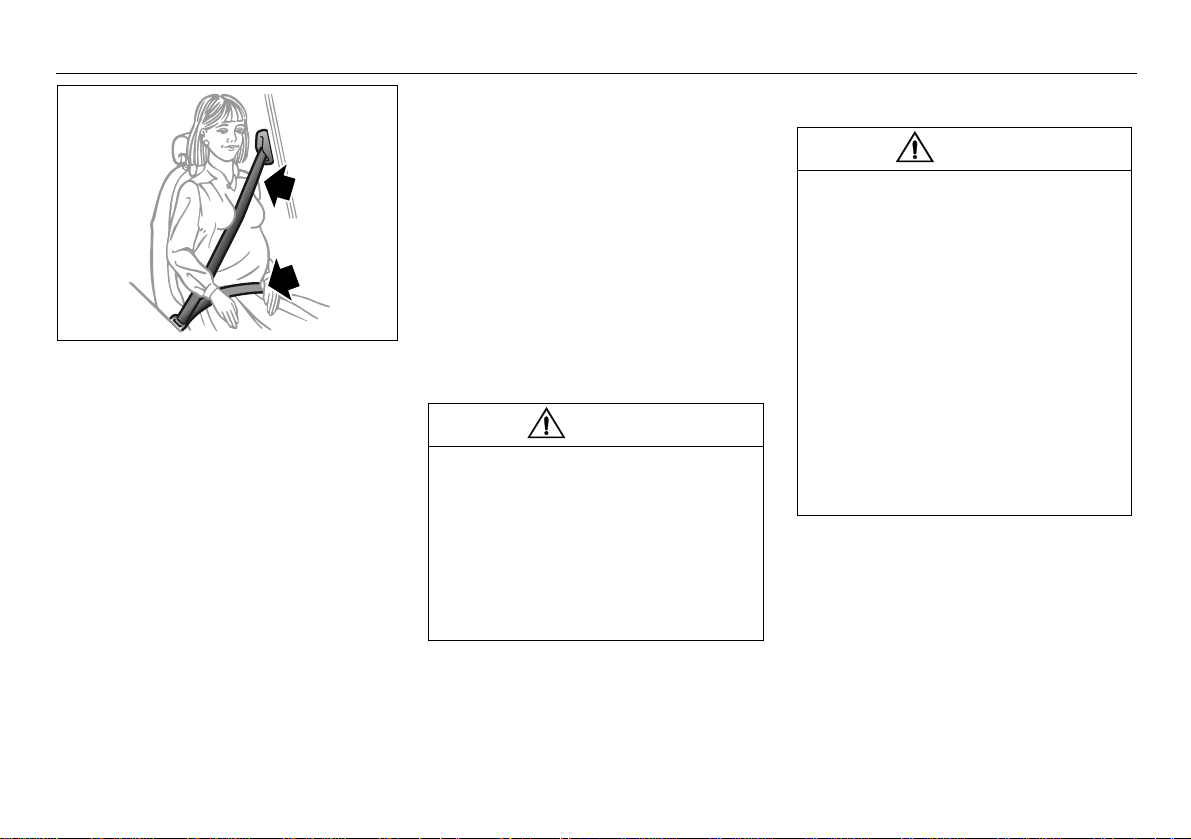
pregnancy
Pregnant women mus t always wear a
safety belt to protec t both thems elves and
the unborn child.
The lap belt shou ld be place d low, a cross
the hips and over th e uppe r thigh s.
Safety belt pretensioners
The belts of the fron t seat s are f itted wi th
automatic pretensi oners and force li miters.
These are activated i n the event of a severe
frontal or rear-end crash and a side-on collision, provided that the safety belts are
being worn.
The pretensioners serv e to re duce t he forward movement of the body by tens ioning
the belt. The force l imiters reduce belt loads
on the body by "loosening " the safety belt to
absorb the body’s ki net ic ene rgy as g radu ally as possibl e.
The safety belt pret ensio ners ar e not a ctivated by vehicle rollover.
WARNING
If the car is invo lved in a crash, t he safety
belts, belt pretens ioners an d ot her co mponents must be i nspec ted by an a uthorized Saab dealer and replaced as neces sary.
Never make any alteration s or repairs to
the safety belt yo urself . Visit an au thorized Saab dealer fo r any neces sary
repairs.
Safety belt, rear seat
WARNING
• Make sure that the belt does not
become trapped wh en the backrest is
folded down or raise d (see page 130) .
• If cargo has to be plac ed on a seat , it
must be properly secu red with the
safety belt. This reduces the ris k of the
cargo being thrown about du ring hard
braking or a cras h, which co uld cause
personal injury.
• Check that the belt i s not tw isted or
lying against shar p e dges.
• Make sure you use the correct safety
belt buckle. The buckles for the center
and left-hand rear s eats are cl ose
together.
16 Safety
Three-point safety belt s are provided for all
three rear seat passengers.
Fasten the belt by pulling ou t the strap carefully and inserting the ton gue in the l ock.
Check that it is securely fastened.
Then grip the dia gonal part of the strap near
the lock and pull th e bel t up wards to wards
the shoulder to tighte n the lap strap. The lap
strap should lie low ov er the h ips.
The diagonal part sho uld lie as fa r in on the
shoulder as poss ible.
To release the belt, pre ss the red bu tton on
the belt lock.
See page 242 for the checki ng of belt fu nction, cleaning, etc.
IB???IB415
Safety belt, rear seat
Securing an item on the rear seat
IB416
WARNING
• Safety belts are designe d to bear upon
the bony structure of the bo dy, an d
should be worn low acros s the front of
the pelvis or the pelv is, ch est a nd
shoulders, as a pplicabl e; wearing the
lap section of the b elt ac ross the
abdominal area m ust b e avoi ded.
• Safety belts should be adjus ted as
firmly as possible, consiste nt with
comfort, to provide t he pr otection for
which they have been designed. A
loose belt will g reat ly redu ce th e pr otection afforded to th e wearer.
• Care should be taken to avoid contamination of the webbing with poli shes,
oils and chemica ls, an d parti cularl y
battery acid. Cleanin g may safel y be
carried out using mi ld soap and water.
The belt should be replaced if webbing
becomes frayed, conta minat ed o r
damaged.
• It is essential to repl ace th e enti re
assembly after it h as been worn i n a
severe impact eve n if da mage to the
assembly is not obvious.
17Safety
• Each belt assembly must o nly be used
by one occupant; it is da ngerous to put
a belt around a chi ld bei ng ca rried o n
the occupant´s lap .
• No modifications or ad di tions shoul d
be made by the user which will either
prevent the safety bel t adju sting
device from operat ing to remov e
slack, or prevent the safety belt
assembly from bein g adju sted to
remove slack.
• Belts should not be worn with straps
twisted.
18 Safety
WARNING
Seats
The seats are actuated by powerful
motors. Bear this in mind when adjusting
the seat, and make s ure that nothing gets
caught and dama ged. En sure th at noth ing can be trappe d when adjus ting th e
seat.
Bear in mind that c hildren can be in jured
if they play with the electricall y-operated
seats.
Always remove the ignition key when you
leave the car. Th is pre vents pe rsonal
injury caused by the electrically adjustable seats, for e xampl e, due to ch ildren
playing.
Both front seats are el ectric ally operate d.
On certain models the driver´s seat is
equipped with a memory function.
To facilitate getting into t he car, bo th seat s
can be adjusted when either of the front
doors is open.
For safety reasons, if the door is closed , the
seat can only be adjusted whe n the ignition
is ON.
Note, however, that both seats can b e
adjusted for 30 seco nds a fter both d oors
have been close d.
The following seat a dju stmen ts ca n b e
made to achieve a c omforta ble dri ving
position:
• height
• legroom
• backrest rak e a ngle
• lumbar support 1
• head-restraint height
We recommend that adjustme nts to the
driver’s seat be perfor med in th e foll owing
order:
1height
2 legroom
3 seat tilt angle
4 backrest rake angle
Lastly, adjust the steeri ng w heel (s ee
page 114).
WARNING
Never adjust the driver’s seat except
when the car is stat ionary.
Side airbags
(see page 36).
Head restraint
(see page 21).
IB3225
Height
To raise the seat, li ft the l ower co ntrol
straight up.
To lower the seat, p ress t he lowe r co ntrol
down.
The same control can be us ed to adjust the
height of the front and rear edges of the seat
independently.

19Safety
IB3226
Legroom adjustment
To adjust the legr oom, pus h the l ower control forward or back.
Backrest rake angle
To adjust the backrest, m ove the upper control forward or back.
WARNING
The backrest should be upri gh t durin g
driving, so that the safe ty belt, airbag and
backrest can prov ide optimum protection
in the event of em ergenc y brak ing o r a
crash and in particular a rear-end
collision.
IB3227
Lumbar support 1
Turn the smaller wh eel fo r stepl ess a djust ment of the lumbar support.
1
11
IB1161
20 Safety
IB404
Memory driver’s seat 1
In certain models the driver´s seat is
equipped with a programmab le memory
function. This functio n als o inc ludes the
door mirrors.
Adjust the seat and door mirrors.
To save the settin gs, pre ss and h old th e M
button and, at the s ame ti me, pr ess o ne of
the preselect buttons (1, 2 or 3). The Saab
Information Disp lay ( SID) wi ll ch ime to co nfirm that the setting s have been s aved.
1
11
To recall the progr ammed settings , pr ess
and hold the appro priate preset button ,
whereupon the seat and m irrors wi ll be
adjusted automatically.
To change the se ttings stored in a preset
button, adjust the seat and mirrors as before
and save the new s etting s by press ing M
and the appropriate preset button .
To facilitate reversi ng, the pa ssen ger si de
door mirror can be til ted down au tomati cally, e.g. to sh ow the c urb. To do th is,
select reverse and press the smal l grey
button adjacent to the door-m irror c ontrol.
When you desele ct reve rse, th e mirr or wil l
automatically return to its origi nal se tting
(see page 116).

Head restraint
WARNING
• Adjust the head restraint so th at you r
head is optimally suppo rted and t he
center of the head restraint is at ear
height, thus reducing th e likelihood of
neck injury in a crash.
• Raise the head restraints in th e seat
that are occupied .
The front seats in the Saab 9-5 are
equipped with Saab Active Head Restraint s
(SAHRs). These reduce the risk of whiplash
injury if the car is hit from b ehind .
In the event of a rear-end crash, the body is
forced back agains t the b ackres t. Thi s, in
turn, causes the me chani sm to press the
head restraint forward and upward, thus limiting the backw ard mo veme nt of th e h ead.
The SAHR is a mechan ical syst em, ac tuated by body weight. The mechanism is built
into the top of the backrest, where it is connected to the head restra int.
Therefore, the SAHR do es not n eed to be
replaced after a minor rea r-end c rash.
The head restraint can be raised or low ered
and is adjustable in va rious posit ions.
• Raising: grasp the hea d restraint on bo th
sides and pull i t str aight u p.
• Lowering: press the catch on the left-hand
side of the attaching poi nt and press down
the head restrain t.
Rear-seat head re straints
IB400
9-5 Sedan: The rear he ad res traints ha ve
three adjustment positions for passenger
comfort.
They can also be folded down to increase
the driver’s rearward vision when the seat is
unoccupied.
9-5 SportCombi: The height of the rear
head restraints can be adj usted by depressing the catch on the le ft-hand colla r in th e
same way as the fron t head restrai nts.
21Safety
IB460
22 Safety
WARNING
Child safety
• Children must always be s uitabl y
restrained in the car .
• ALWAYS use SAFETY BELTS and
CHILD RESTRAINTS.
• NEVER put a rear-facing ch ild sea t in
the front.
• DEATH or SERIOUS
INJURY can occur.
• Children 12 and under or
shorter than 55 inches
(140 cm) can be killed by
the airbag.
• Sit as far back as possible from the airbag.
• The BACK SEAT is the SAFEST place
for children.
Car safety tips
WARNING
• Never leave children un attend ed in a
car, even for a sho rt time .
– Children can suffer heat stro k e – pe r-
haps die – in a mat ter o f min utes .
– Children can put the car into gear a nd
hurt themselves or othe rs.
• At gas stations, take the ke ys from the
car while filling th e tank .
• Never allow children to climb on top of
– or under cars.
• Always look for children before backing your car out of a gara ge or d rive way.
• To avoid carbon monoxid e poisoning,
never let a car idle in an enc lose d
garage.
• Supervise young childre n a round
buckets of water whil e wa shing your
car. Small children c an drown in a
short time in less tha n an inch of water.
WARNING
Protect children from getting
trapped in the trunk of a car
• Teach children not to play i n or around
cars.
• Watch children when loading or
unloading the ca r so th ey don’t ge t
locked in by m istak e.
• Always lock the doors and trunk of
your car, and kee p the keys out o f children´s sight and reac h.
• Keep the rear fold-down seats closed
to help prevent kids from getting into
the trunk from insid e the car.
For Trunk Release Ha ndle inform ation see
page 48 and 139.
23Safety
The same attention m ust b e giv en to c hild
safety in the ca r as is give n to a dults.
Saab recommends rea rward facing chil d
restraints.
Children travel most safely whe n prop erly
restrained, but restrai nts must be su itable
for the size of the c hild. Always follow t he
child seat/booster cushion manufacturer´s
instructions whe n installing these device s in
your vehicle.
Make sure you are ac quainted with th e
legal requirements fo r seating childr en
in the car.
Make sure that it is po ssib le to f it a c hild
restraint in acco rdance with the manu facturer’s child seat instructions.
When fitting child seats in cars you mu st
always read the in structions supplied by
the manufacturer.
Lower Anchorages and Top
Tethers for Children (LATCH
System)
Your vehicle has the LATCH system. T here
are LATCH anchors for th e outbo ard seating positions of t he sec ond ro w, an d a to p
tether anchor on the center position .
This system, desig ned to make in stalla tion
of child restraints ea sier, d oes not u se the
vehicle's safety b elts. Inst ead, i t uses veh icle anchors and child restraint attachm ents
to secure the restraints. O nly use the attachments and straps p rovid ed wi th the child
restraint.
If you have any ques tions regarding LATCH
anchors, please cont act y our Saab deale r.
WARNING
If a LATCH-type child restra int is no t
attached to its anchor points, the res traint
will not be able to protect the child correctly. In a cras h, the child coul d be s eriously injure d or ki lle d. Ma ke su re t hat a
LATCH-type child res traint i s properl y
installed using the a nchor p oints , or us e
the vehicle's safety belts to secure the
restraint, following the i nstruct ions that
came with that res traint, and al so the
instructions in this man ual.
WARNING
Child top tether anchorag es are designed
to withstand on ly those loads impo sed by
correctly fitted child restraints.
Under no circumst ances a re th ey to be
used for adult sa fety b elts.
24 Safety
IB1684
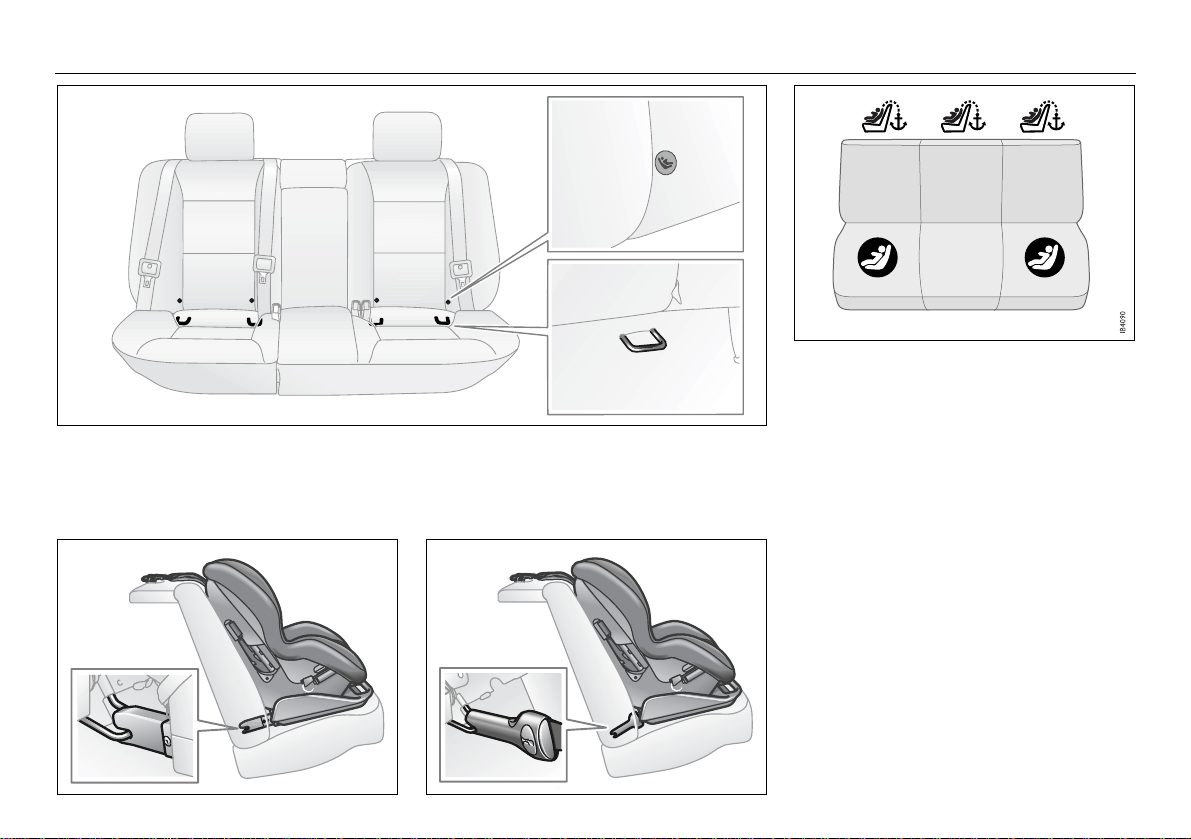
Location of lower anchors
Lower anchor and top tether anchor locations.
IB3839
Rigid 2-point lower attachment with top
tether
Semi-rigid 2-point lower attachment with
top tether
IB1685
25Safety
Securing a Child Restraint
Designed for the LATCH
System
9-5 SportCombi:
Before installation , plea se rea d throu gh
these instruction s and the c hild re strain t
installation instructions.
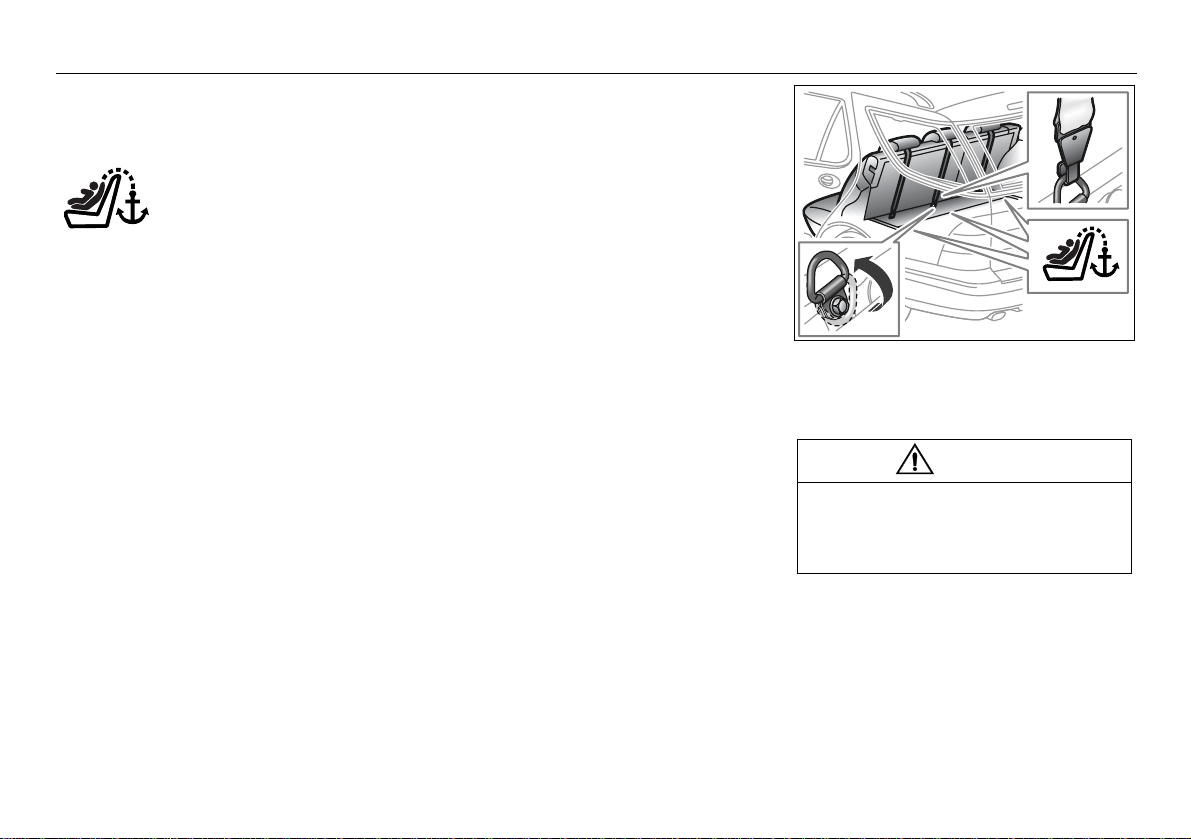
1 The top tether anchor is located on th e
cargo floor by the re ar seat ba c krest's
lower part (see picture). To access the
top tether anchor, unlock the rear sea t
backrest (see p age 1 33 for detailed
instructions), and f old it slightly forw ard.
Note! Backrest onl y, not the seat cushion.
2 The top tether anchor is originally
rotated downward s. T o use it, it has to be
rotated upwards (s ee arro w in pict ure).
Use the top tether an chor right be hind
the seating posit ion y ou wan t to us e .
3 Raise the vehicle head rest rain t to its
highest position (see page 21 for
detailed instructions ).
4 Put the child restraint on the seat.
5 If you are using a single tether, route the
tether under the vehicle hea d restra int,
and attach the tether h ook to the to p
tether anchor . If y ou are usi ng a d ual
tether, route th e tethe r aro und th e v ehi-
cle head restraint, an d attach the tether
hook to the top tether anch or. The c hild
restraint instructions will s how y o u
how.
6 Reposition the rear seat bac krest, and
make sure it l oc ks properly. Check t he
indicator on top of the b ackr est that it is
locked.
7 Find the lower anchors f or the s eatin g
position you w ant to use. The lo we r
anchors are located w here the bottom of
the seatback meets the back of the seat
cushion. Abov e each low er anchor,
there is a label indic ating its lo catio n
(see picture on page 24).
8 Attach and tighten the lower a nchor
attachments on the chi ld restraint to the
vehicle lo w er anc hors. If y our child
restraint does not hav e the low er attachments, you will be using the lap-shoulder belt to secure the child restraint. The
child restraint instructions will sho w
you how .
9 Tighten the top tether strap acco rding to
the child restraint instructions.
10 Push and pull the child restr aint in diff er-
ent directions to be sure it is secured at
the lower ancho rs/safety belt and the top
tether anchor. The child restraint shall
be firmly attached to the v e hicle.
IB4113
Child tether anchorages, Saab 9-5 SportCombi
WARNING
Make sure the child restraint ancho rages
are folded all the way up or dow n ot herwise it can obstr uct lock ing th e re ar sea t
backrest.

26 Safety
Securing a Child Restraint
Designed for the LATCH
System
9-5 Sedan:
Before installation , plea se rea d throu gh
these instruction s and the c hild re strain t
installation instructions.
1 Find the lower anchors f or the seati ng
position you w an t to us e. The lo w er
anchors are locate d where the bottom of
the seatback meets the bac k of the seat
cushion. Above each lower anchor,
there is a label i ndica ting i ts locati on
(see picture).
2 Put the child restraint on the seat.
3 Attach and tighten the lowe r anch or
attachments on the ch ild restraint to th e
vehicle lower anchors. If your child
restraint does not have the lower attach-
ments, you will be us ing th e lap-s houl-
der belt to secure th e child restraint. The
child restraint instructions will sh ow
you how.
4 The top tether anchor is located on to p
of the parcel shelf. Use the top tether
anchor right behind the seating positi on
you want to use. Open the top tether
anchor trim cov er to exp ose the anchor .
Snap the cov er to l oc k in open positi on.
5 Raise the vehicle head restraint to its
highest position (s ee pa ge 21 f or
detailed instructio ns) .
6 If you are using a single tether, route the
tether under the v e hicle head restr aint,
and attach the tether hook to the top
tether anchor. If you are using a du al
tether , route the tether around the vehicle head restr aint, a nd attac h the te ther
hook to the top t ether an chor. Tighten
the top tether s trap. The c hild restraint
instructions will sho w y ou h ow.
7 Push and pull the child restraint in differ-
ent directions to be sure it is secured at
the lower ancho rs/safety belt and the top
tether anchor. The child restraint shall
be firmly attached to the v e hicle .
IB1698
Child tether anchorages in parcel shelf,
Saab 9-5 Sedan
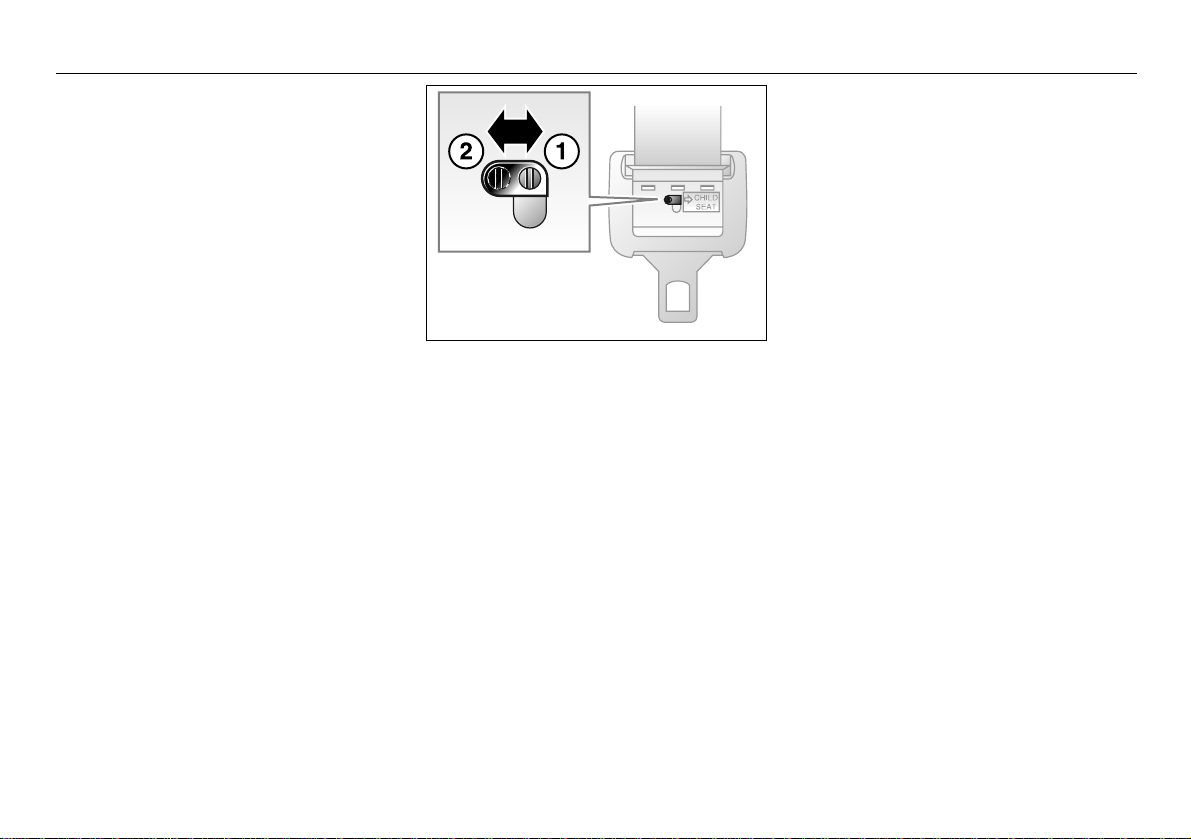
Lockable latch plate
In fitting a child seat that is inten ded to be
secured in position by the lap portion of the
safety belt, make u se of the locking functi on
of the latch plate . This funct ion is avai lable
on all seats in the second row.
Locking the lap portion of the belt l esse ns
the risk that the sea t wil l work loose while
the car is in motion .
The button for the locking fu nction is located
on the back of th e latch p lat e.
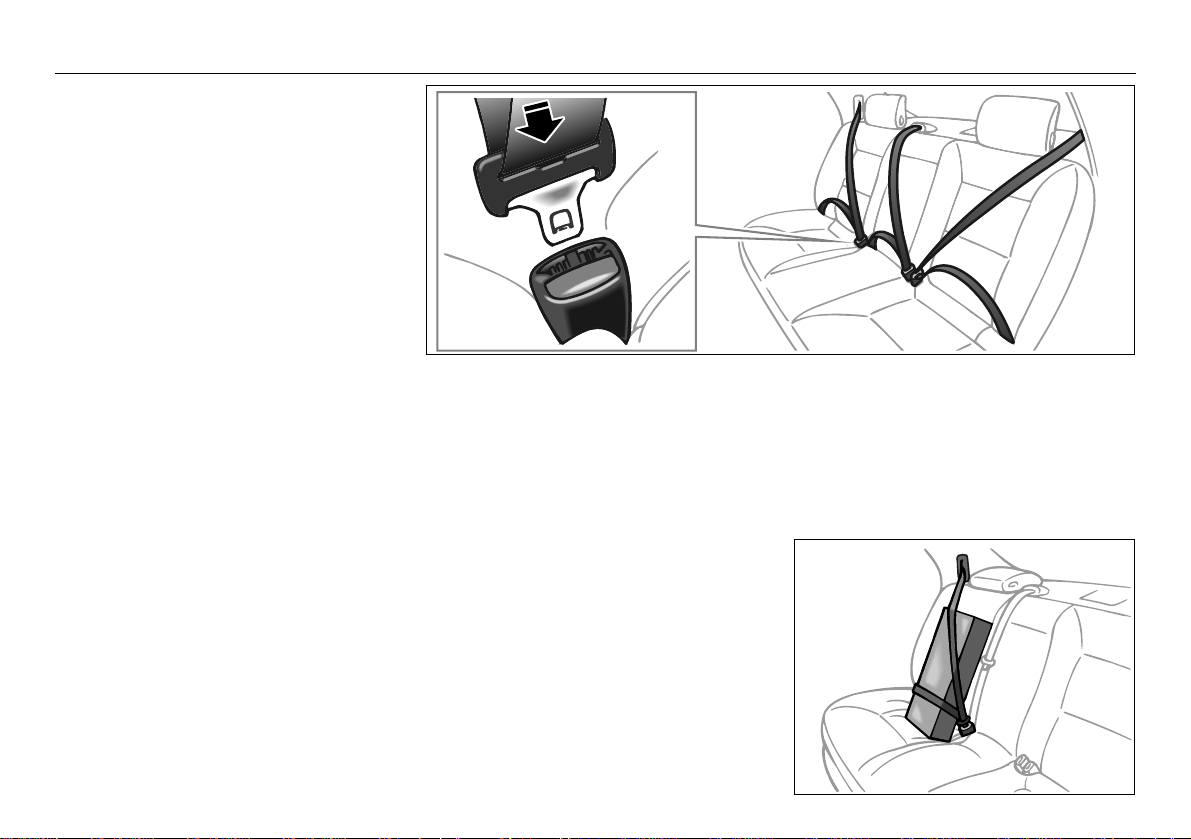
1 Put the child restraint on the rea r se at.
2 Pick up the latch plate, and run the lap
and shoulder portions of the v ehi cle' s
safety bel t throug h or aro und th e
restraint. The child restraint i nstruc-
tions will show you how.
3 Buckle the belt. Make sure the release
button is positioned so y ou wo uld be
able to unb uckle the saf ety belt quickly i f
you ev er had to.
4 Tighten the safety belt. You m a y f ind it
helpful to use you r knee to push down on
the child restrai nt as you tighten the be lt.
5 While holding the safety belt ti ght, ac ti-
vate the loc kin g fu nction o f th e latch
plate by moving the button from position
2 (unlocked ) to posi tion 1 (loc k ed).
6 Push and pull the child restraint in differ -
ent directions to be sure it is secure. The
child restrain t shall be fi rmly attached to
the vehicle .
To deactivate the l ocking function, move the
button to position 2.
27Safety
IB822
Locking the lap belt
1 Locked
2 Unlocked
28 Safety
WARNING
Installation of rear facing child restraints
Child restraints that are approved for rear
facing installat ion in the rea r s eat ca n be
positioned in an y of th e three rea r seati ng
positions.
Failure to follow all the manuf acturer’s
instructions on the us e of th is ch il d
restraint sys tem c an cau se yo ur chi ld to
strike the vehicle ´s i nterio r during a
sudden stop or c rash.
WARNING
A special accessor y is avail able fo r lock ing the center armrest so tha t a child seat
can be installed in the midd le seat. Se e
your Saab dealer for detail s.
When a rear-facing chi ld sea t is f itted i n
the center positio n of the rear s eat in the
Saab 9-5 Sedan the center armres t must
be secured in place with this strap . If this
is not done, the c enter a rmrest could
swing down in the event of a frontal crash
and cause injury to the ch ild.
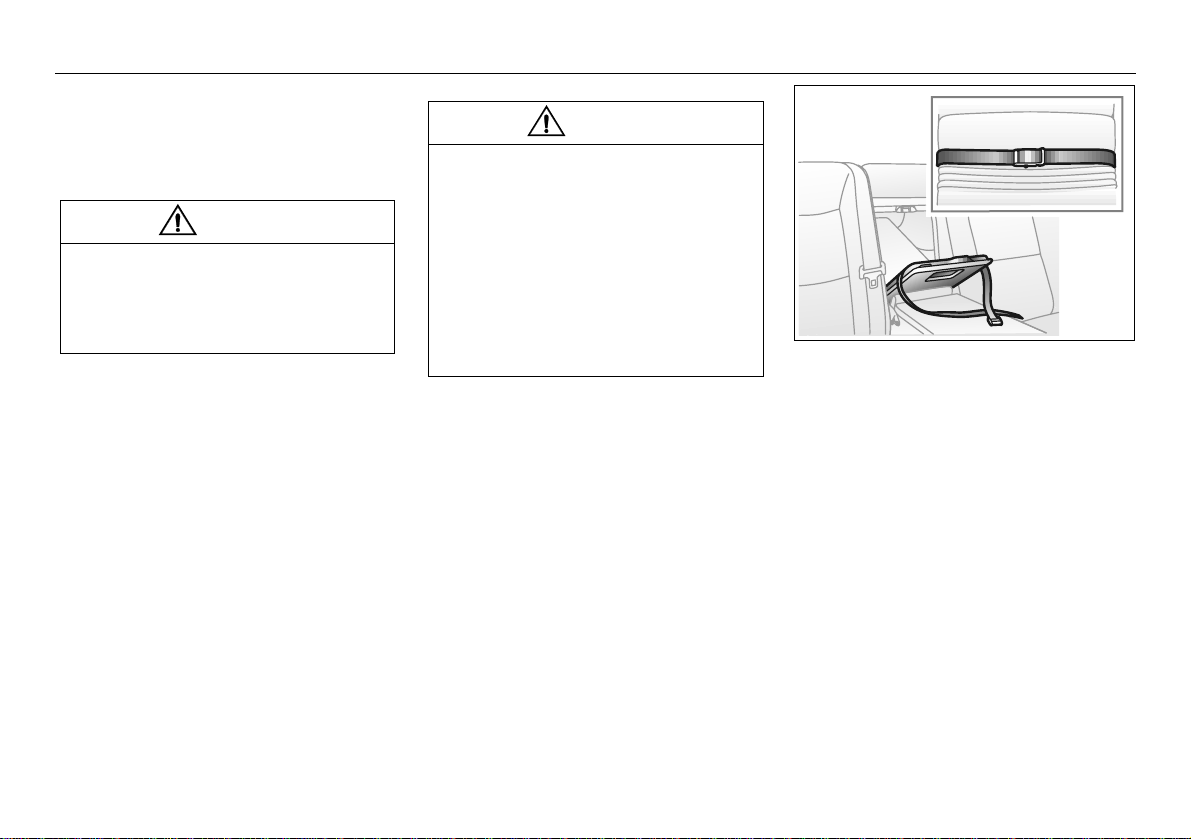
IB1204
Fitting the locking strap on the center armrest, Saab 9-5 Sedan (not needed on
SportCombi).
29Safety
WARNING
Airbag
To reduce risk of injury :
• Always wear your safety belt.
• Always adjust your seat so th at you
are as far back as possible but still
able to operate the peda ls and reach
the steering wheel and c ontrols comfortably.
• Children 12 and under or shorter tha n
55 inches (140 cm) should always
travel in the rear seat as the car is fitte d
with a passenger a irbag.
• Never fit a child seat in fron t of the pas-
senger airbag.
The AIRBAG system comp rises an airbag in
the steering wheel , a front passenger airbag
and side airbags in the front seats.
The system supple ments the pr otecti on
provided by the safety belts to furth er
enhance the safe ty of t he occ upant s.
If a fault is detected in th e AIRBAG, the
AIR BAG warning light on the main instrument panel will c ome on (s ee pa ges 61
and 37).
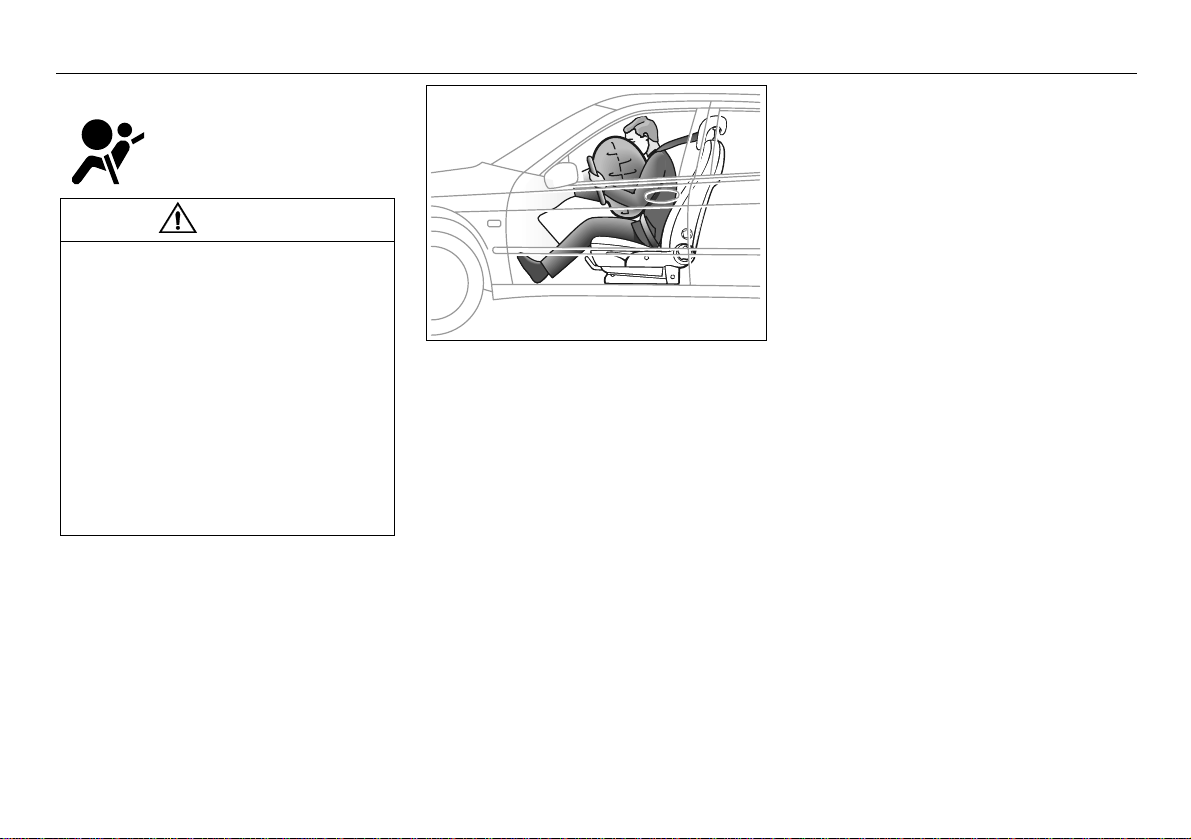
Inflated airbag (driver side)
Inflation and deflation together take less than
0.1 second.
When the system is triggered by impact of a
frontal crash, the airbags in the steering
wheel and passenger si de of the dash board
are inflated, after which th ey deflate through
vents in the back of the bags .
The entire process takes less than
0.1 second – literally, faster than the blink ing of an eye.
The driver and passenger airbags are
referred to as ‘smart ’ airba gs. This mean s
that the system compensates for factors
such as the force of the colli sion.
Note:
The sensor reacts diffe rently depend ing on
whether or not the fron t sea tbelts on the
driver’s and passen ger si des a re used. Si tuations can therefore aris e where o nly one
of the airbags inf lates.
It is also possibl e for on ly th e seat belt pr etensioners to be act ivated and f or the a irbags to remain unin flat ed.
These airbags are tri ggered onl y by mo derate to severe frontal or near-fro ntal crashes.
They will not be activated by minor front-end
IB419
impacts, rear-end or side im pacts, or by the
car rolling over.
30 Safety
WARNING
IB420
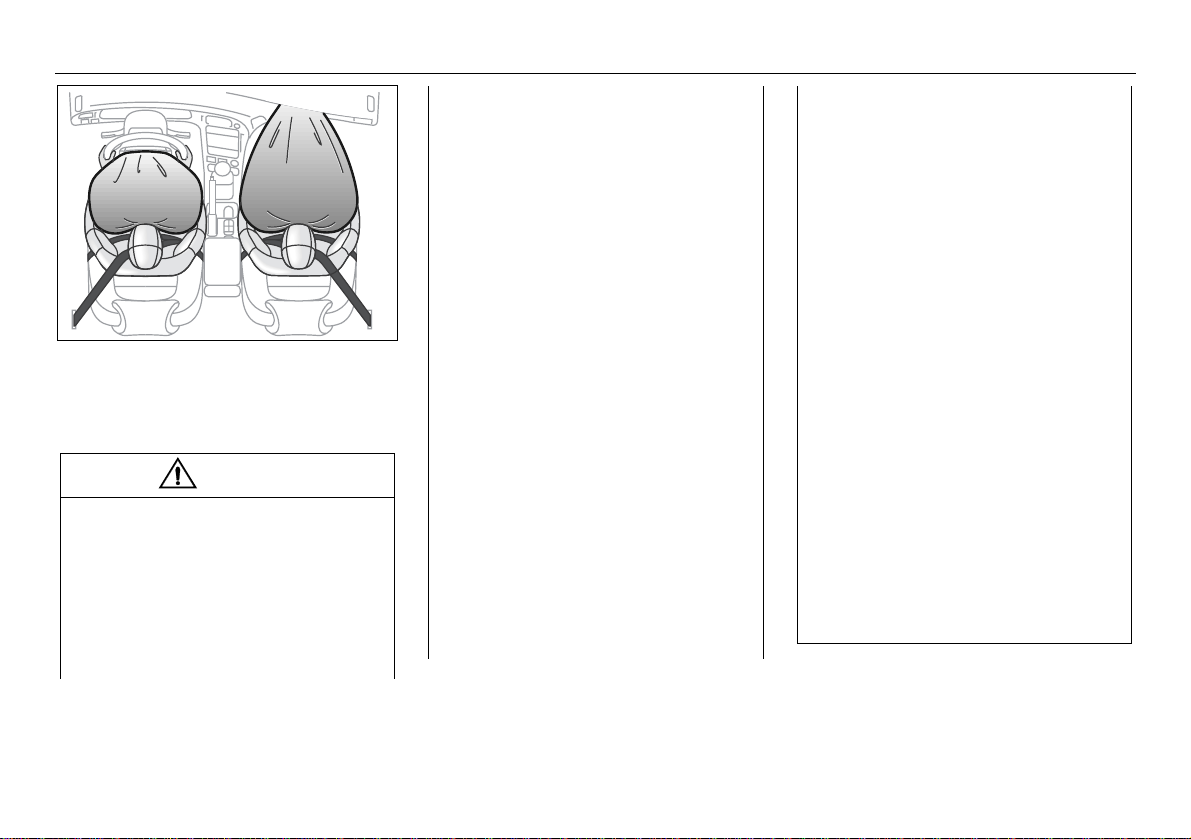
Passen ger airba g and driv er’s airbag both
inflated
• Even if the car is equi pped w ith AI R-
BAG, safety belts must still always be
worn by all occupants.
• Note that because an airbag inflates
and deflates extr emely ra pidly , it w ill
not provide protec tion a gainst a
second impact oc curring in the s ame
incident. Always use your safety bel t.
• Always sit with the whole of your back
in contact with the backre st of the seat,
and with your seat a s far b ack as is
practical. Otherwise you will be thrown
back against the backrest when the
airbag inflates whic h could cau se you
injury or death. The ai rbag ne eds
room in which to in flate.
• Never attach anything to the st eering
wheel or passenger sid e of th e ins trument panel, as thi s cou ld res ult in
injury if the airbag should inf late. T he
same applies to anythi ng yo u mig ht
have in your mou th, such as a pipe, fo r
instance.
• Some components of the airbag will
be warm for a short time . In so me c ircumstances the a irbag can c ause
minor burns or abrasions to the body
when the airbag inflates/deflates.
• To reduce the risk of hea d inju ries i n
the event of a crash, the headliner and
pillar trims incorp orate energy absorbing material. These a reas must not be
modified in any w ay. Work o n thes e
areas must only b e carri ed ou t by an
authorized Saab dealer.
• Fumes are generated by t he chemical
reaction that inflate s the a irbag.
Because the dust /fumes c an, in certain cases, cause irrit ation to the skin,
the following mea sures sh ould b e
taken:
Skin surfaces that sh ow signs of i rritation should be wa she d with clean
water and a mild soap as soon as possible.
In the event of eye i rritatio n, flus h the
eyes thoroughly wit h clean water for at
least 20 minutes.
In case of persistent irritation, consult
a doctor.
• Never rest your hands or fore arms on
the steering-wheel center pad ding.
• If the AIR BAG warning light does not
extinguish after the car ha s been
started, or comes on or fla shes while
driving, have the c ar checked immedi ately by a wo rksho p. We reco mmen d
that you contact an authori zed Sa ab
dealer. The warning light could signify
that the airbags may not i nflate in a
crash, or they co uld ev en in flate w ithout a crash. See p age 61 .
 Loading...