

Saab 9-5 2002 Owner Manual

Owner’s Manual
Saab 9-5, Model Year 2002
Safety 11
Security 37
Instruments and controls 49
Saab 9-5 Audio System 83
OnStar - Telematics 105
Interior equipment and trunk 117
Starting and driving 145
Car care and technical information 187
Maintenance and owner assistance 243
Specifications 247
1
©
Saab Automobile AB 2001
Service Readiness, Saab Automobile AB, Trollhättan, Sweden
Printed in Sweden
Index 261
2
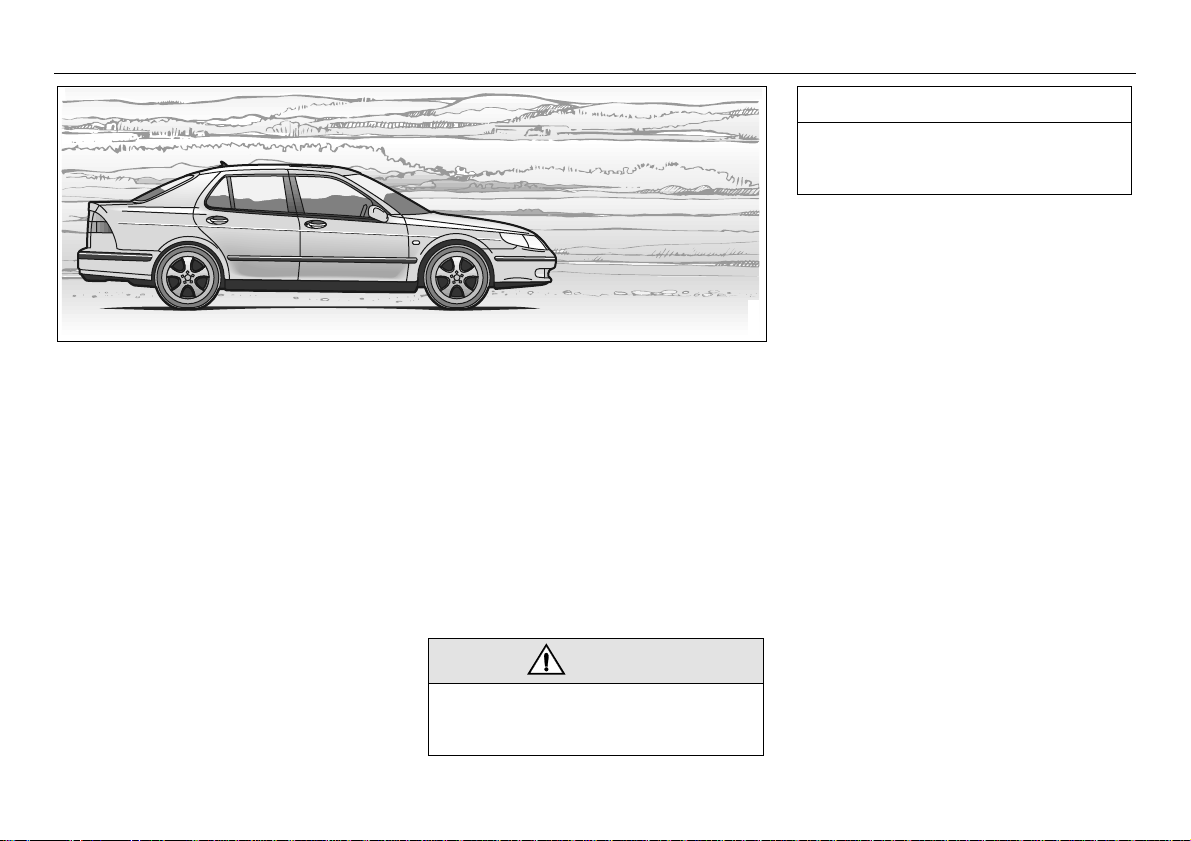
Introduction
This manual provi des practical guida nce on
driving and caring f or your Saab.
The Saab 9-5 is available with the following
engine variants:
• 2.3t Ecopower.
• 2.3 Turbo Ecopower.
• 3.0t V6 Ecopow er .
Although this man ual de scrib es the most
important differences betwee n mod el vari ants, it does not include precis e specific ations of the differ ent va riants. Some differences also occ ur to m eet s pecia l lega l
requirements in diffe rent co untries .
Importation and distri bution of Saa b auto mobiles, spare p arts an d acc essor ies a re
handled exclusive ly by Gen eral M otors o f
Canada Limited in Cana da an d by Sa ab
Cars USA, Inc. in the U.S.A.
We recommend that you re ad thro ugh the
manual before taking the car out for the first
time and that you k eep it in the ca r for future
reference.
To find a specific item , use the ov erviews
given on pages 3-7. A list o f conte nts i s
given at the beginning of each section of the
manual, and there is also a compre hensive
index at the back of the book.
Supplied with the ca r is a Warranti es an d
Service Record booklet and a tire warranty
folder which specif ies the re gular mainte nance to be carr ied out. The book also contains important warranty condi tions.
WARNING
WARNING texts warn again st the danger
of injury if the specified instructio ns are
not followed.
NOTE
NOTE texts warn of potential damage to
the car if the recommendations are not
followed.
Since the polic y at Sa ab is one of continua l
improvement, we retain the right to incorporate modifications and to alter specifications
during production without prio r notice.
If you have any queries c oncerning your car,
its equipment, th e warrant y con dit ions o r
IB1734
the like, your Saab dealer will be pleased to
help.
Best wishes,
Saab Automobile AB
Saab Automobile AB does not accept liability for
any damage caused by the fitting of spare parts,
exchange parts or accessories that are not
approved by Saab Automobile AB.
The specifications, design particulars and illustrations included in the manual are not binding.
3
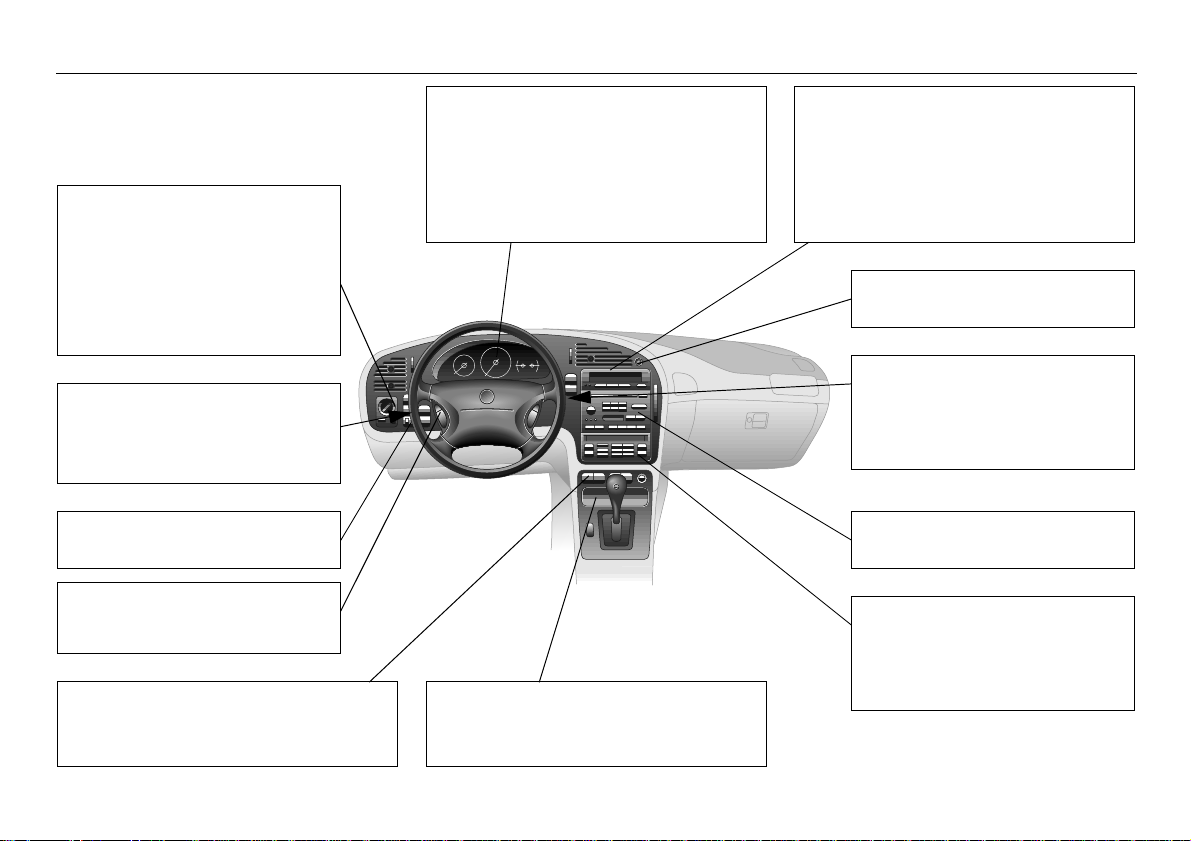
Instrument panel
Parking light s ______ _____ _ 65
High/low beam ____ __ ____ 65
Daytime running li ghts _____ 65
Rear fog ligh t ____________ 66
Instrument illuminati on_____ 67
Changing bulbs _________ 204
High/low beam contro l sta lk 65
Turn signal and lane chang e
indicator _______________ 67
Cruise control __________ 164
Front fog lights __________ _ 68
Audio syst em s t eering-wh eel
controls____________ ___ 100
Seat heating control s __________ 121
V ent ilated front s eats ___________ 121
Indicator and w arning li ghts ______ 50
Speedometer _________________ 57
Odometer and trip meter ________ 56
Fuel gauge ______ ______ _____ _ 57
Engine temperature gau ge ______ 57
Ashtrays (acc esso ry) __________ 128
Cigarette lighter s oc k et_________ 129
Trip computer
(Saab Information Displa y, SID) __ 59
Night panel ________ ______ ____ 63
Clock _______________________ 64
Traction Control (TCS) Switch 55, 167
OnStar switc h________________ 106
Hazard warning lights _____ 6 8
Wipers and washe rs ______ 70
Rear wiper______________ 71
Washer flu id ___________ 20 2
Replacing wiper b la des __ 202
Audio system ___________ 83
Steering-wheel controls___ 100
Climate control syste m:
automatic _____________ 72
Air conditioning: simple
IB1080
fault diagn osis _________ 231
4
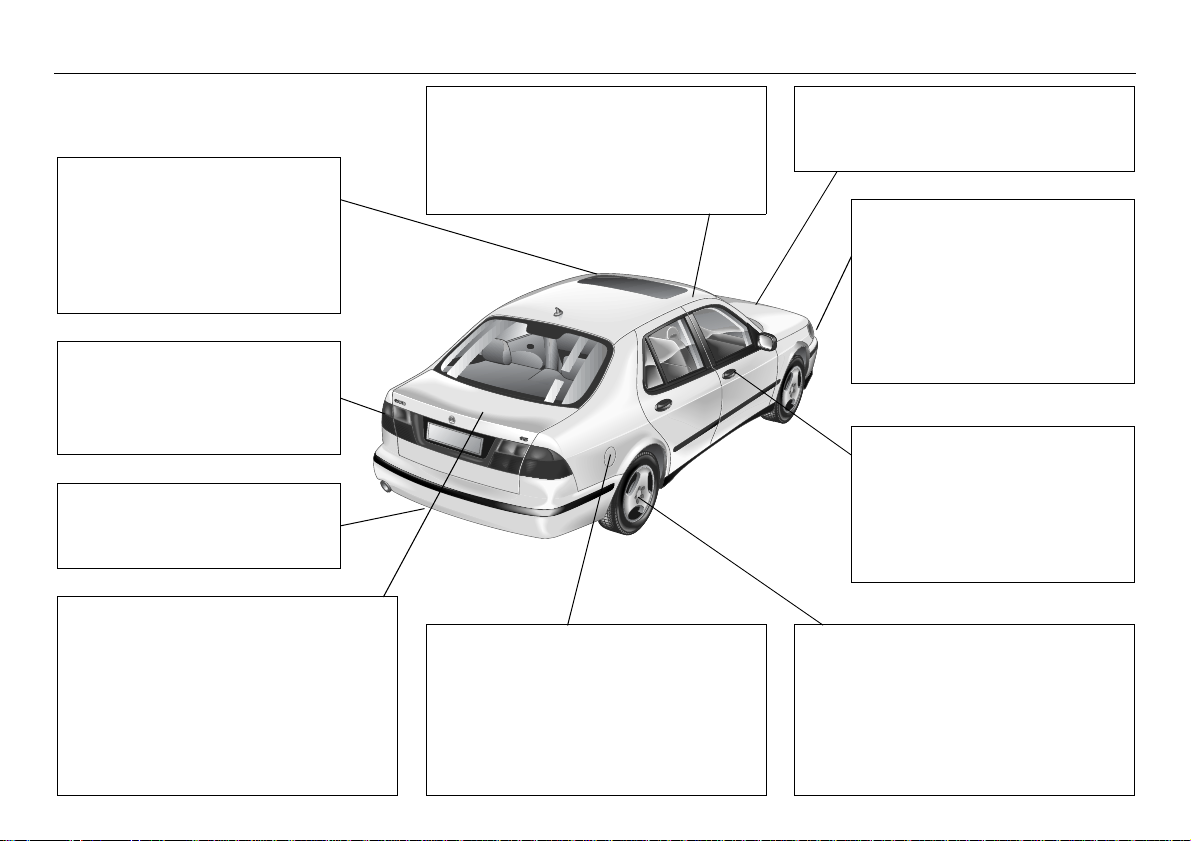
Exterior
Sunroof _______________ 126
Washing the ca r ________ 233
Waxing a nd pol ishin g ____ 233
Touching-up of paintwork _ 235
Anticorrosion treatment ___ 235
Light switches ___________ 65
Changing bulbs _________ 204
• Taillights _____________ 209
• Stop lights ___________ 209
Driving with a trail er ______ 173
Towing ________________ 180
Towrope attachment eye __ 180
Luggage compartment _________ 132
Folding do wn th e rear s eat,
9-5 Sedan___________________ 132
Folding do wn th e rear s eat,
9-5 Wago n __________________ 135
Trunk _______________________ 132
Tool kit ______________________ 142
Spare wheel _____________ 142, 179
Jack ________________________ 227
Roof-rack l oad _______________ 176
Mounting holes for roof rack ____ 176
Maximum loads ______________ 248
Rearview mirrors _____________ 123
Fuel gauge __________________ 57
Fuel filler flap ________________ 152
Refueling ___________________ 152
Fuel econom y _______________ 170
Fuel grade __________________ 250
Economical motoring __________ 170
Hood ______________________ 188
Engine compartment: wash ing __ 233
Front ligh ts ______ ______ _ 65
Headlight sw itch _________ 65
High/low beam
control stalk ____________ 65
Turn signal &
lane change indi cators ___ 67
Headlight wash ers _______ 70
Changing bulbs ________ 204
Central lock ____________ 38
Interior locking b u ttons ____ 40
Child safety loc k c atch ____ 41
Trunk/tailgate lid loc k _____ 41
Car alarm (anti-theft alarm) 43
IB1736
Tire pressure ___________ back cover
Wheel and tire speci ficati ons ____ 256
Brakes and brak ing ___________ 165
Winter driving _______ ______ ___ 171
Wheels and tires _____________ 222
Wheel changing ______________ 227
Spare wheel ______________ ___ 179

5
Interior
Steering-wheel adjust ment 122
Airbag (SRS) ____________ 28
Pow er st eering _________ 198
Audio system
steering-wheel control s___ 100
Seat adjustment ________ 118
Seat heating ___________ 121
Ventilated front seats _____ 121
Safety be lts _____________ 12
Child seats _____________ 19
Folding do wn th e rear s eat,
9-5 Sedan_____________ 132
Folding do wn th e rear s eat,
9-5 Wago n ____________ 135
Upholstery: cleaning _____ 232
Side airbags (SRS) _______ 32
Interior lighting _______________ _ 69
Sunroof ____________________ 126
Interior lighting: cha nging b ulbs __ 213
Electric windows _____________ 125
Ignition s witch _______________ 146
Starting the engine ___________ 147
Break-In period_______________ 155
Driving in hot weathe r _________ 173
Driving in winter ______________ 171
Parking ____________________ 185
Internal rearview mirror ________ 123
Door mirrors _________________ 123
Sun visors________________ ___ 128
Safety belts ______ _______ 12
Airbag (SRS) ___________ 28
Child seats _____________ 19
Child safety loc k c atch ____ 41
Safety belt c are ________ 232
Glove c ompartment _____ 129
Manual transm issi on ____ 156
Automatic tr an smissi on __ 157
IB581
6
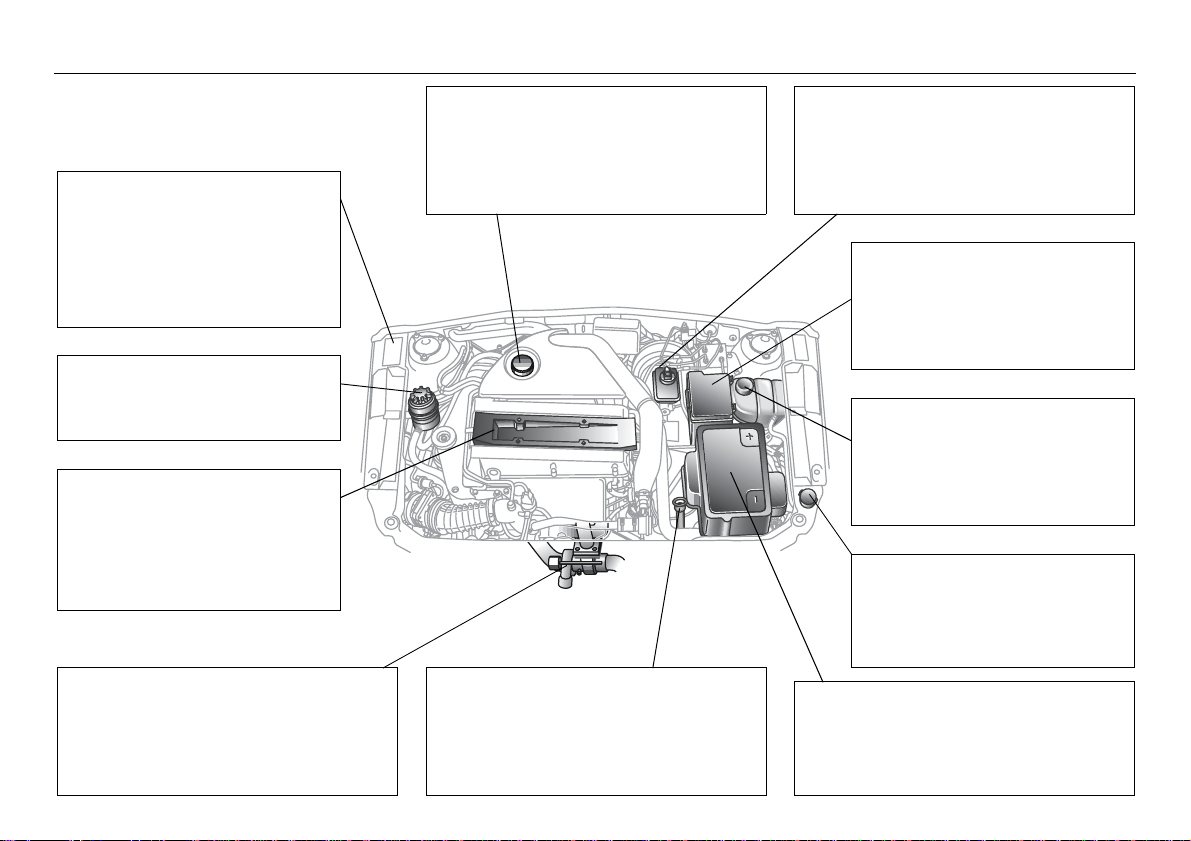
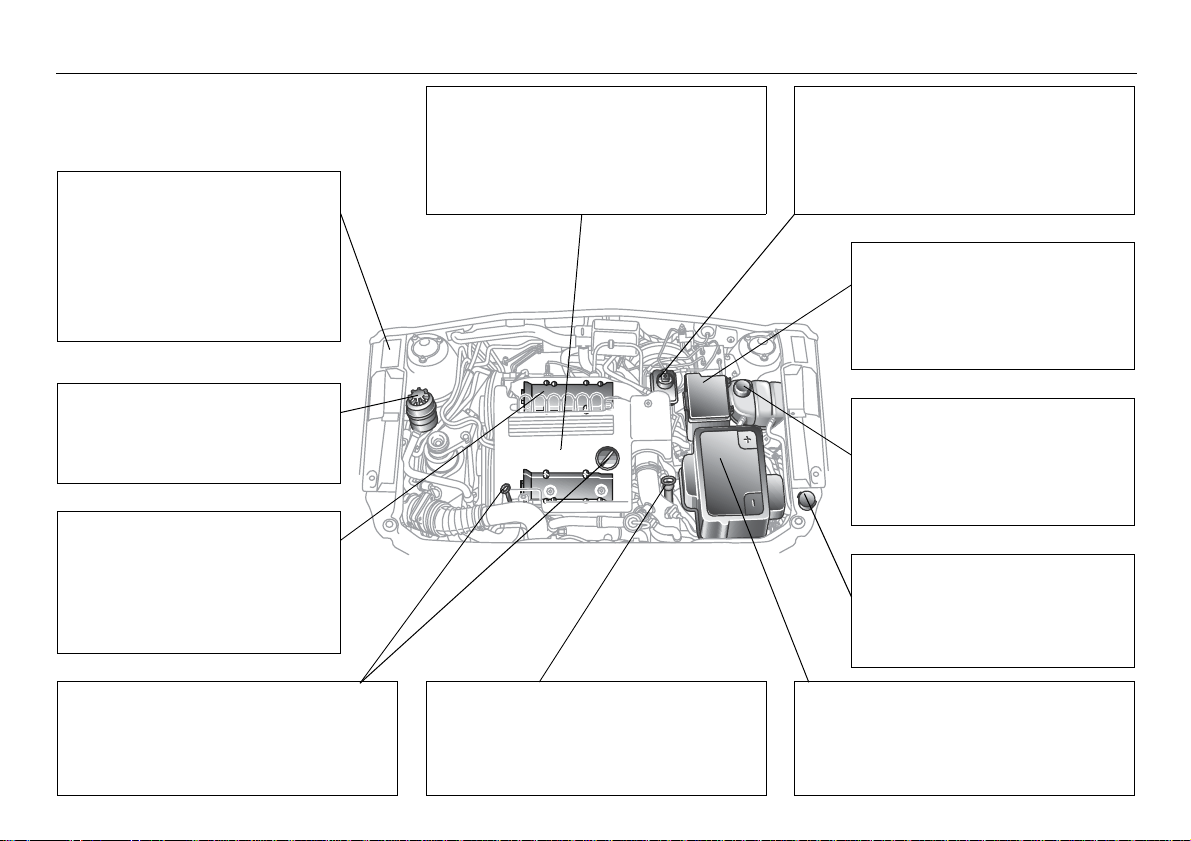
Engine compartment, 4-cyl engine
Warning labels ___________ 8
V.I.N. number __________ 257
Engine number _________ 257
Gearbox nu mber ________ 257
Color code _____________ 257
Pow er s teering__________ 198
Steering fluid: grad e _____ 198
Ignition system _________ 146
Drive belts _____________ 201
Spark plugs ____________ 253
Catalytic con v erter ______ 150
Engine: description ___________ 192
Engine oil le v e l: che c king ______ 193
Engine oil: chan ging __________ 194
Engine oil spec ificat ion ________ 251
Brakes and brak ing ___________ 165
ABS brakes _________________ 165
Brake system ________________ 197
Brake fluid _______________ ___ 255
Brake pads ____ ________ ______ 255
Fuse panels ___________ 216
Changing a fuse ________ 216
Table of fuses __________ 218
Relays _______________ 219
Temperature gauge ______ 57
Driving in hot weather ____ 173
Driving in winter_________ 171
Coolant _______________ 196
Cooling-system capac ity _ 250
IB1737
Wiper/washer control stalk _ 70
Washer flu id: top ping u p __ 203
Washer je ts ___________ 203
Important considerations
for driving ___________________ 149
Turbo unit ___________________ 189
Engine: technical dat a __________ 250
Manual transm ission __________ 156
Automatic trans mis sion ________ 157
Manual trans miss ion o il ________ 254
Automatic trans mis sion f luid ____ 254
Jump starting ________________ 182
Battery _____________________ 199
Battery charge ____________ ___ 199
7
Engine compartment,
3.0t V6
Warning labels ___________ 8
V.I.N. number __________ 257
Engine number _________ 257
Gearbox nu mber ________ 257
Color code _____________ 257
Pow er st eering _________ 198
Steering fluid: grad e _____ 198
Ignition system _________ 146
Drive belts _____________ 201
Spark plugs ____________ 253
Catalytic con v erter ______ 150
Engine: description ___________ 192
Engine oil le v e l: che c king ______ 193
Engine oil: chan ging __________ 194
Engine oil spec ificat ion ________ 251
Brakes and brak ing ___________ 165
ABS brakes _________________ 165
Brake system ________________ 197
Brake fluid _______________ ___ 255
Brake pads ____ ________ ______ 255
Fuse panels ___________ 216
Changing a fuse ________ 216
Table of fuses __________ 218
Relays _______________ 219
Engine temperature gauge _ 57
Driving in hot weather ____ 173
Driving in cold climate____ 171
Coolant _______________ 196
Cooling-system capac ity _ 250
IB1738
Wiper/washer control stalk _ 70
Washer flu id: top ping u p __ 203
Washer je ts ___________ 203
Important considerations
for driving ___________________ 149
Turbo unit ___________________ 189
Engine: technical dat a __________ 250
Automatic trans mis sion ________ 157
Automatic trans mis sion f luid ____ 254
Jump starting ________________ 182
Battery _____________________ 199
Battery charge ____________ ___ 199
8
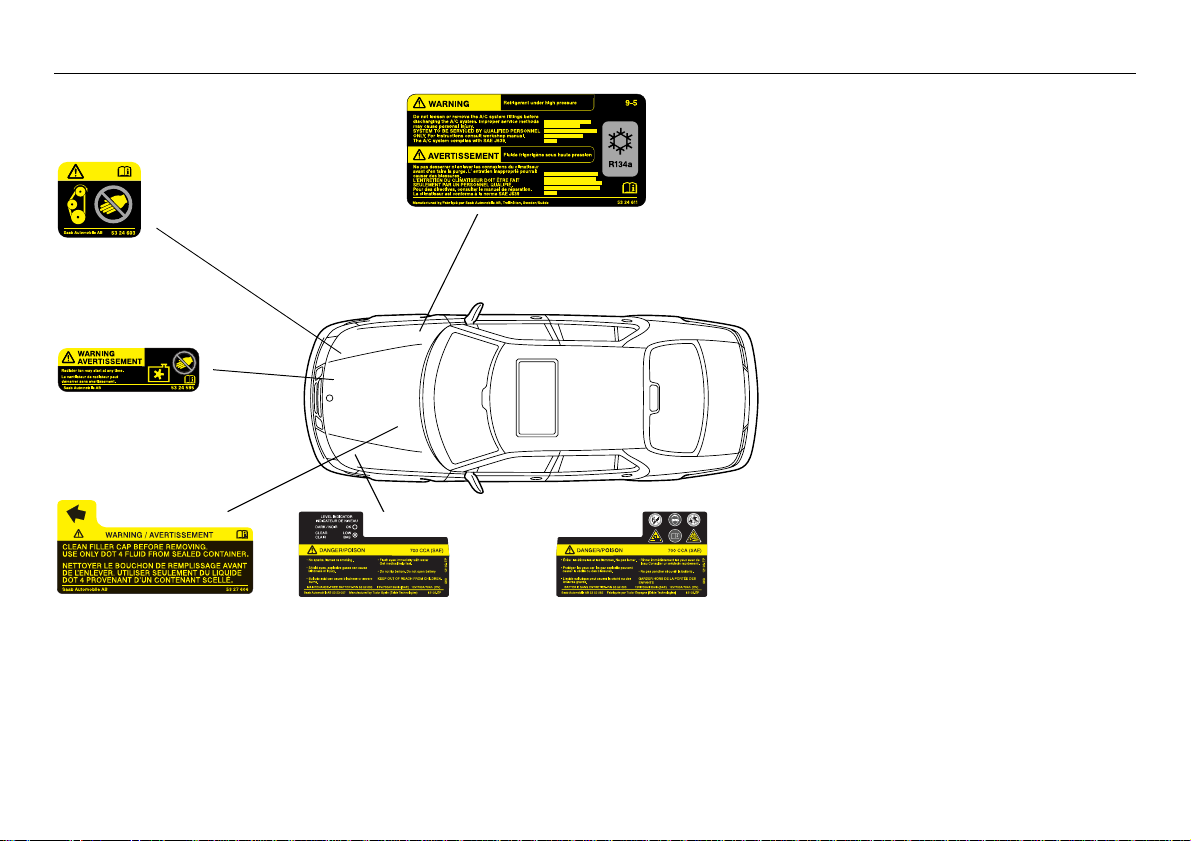
Warning labels
Drive belt
Moving belt. Do not
touch while engine running.
Radiator fan
The radiator fan can cut in even
after engine has been switched
off.
Brake fluid
CLEAN FILLER CAP BEFORE
REMOVING. USE ONLY DOT 4
FLUID FROM SEALED CONTAINER.
Battery
• No sparks, flames or smoki ng.
• Shield eyes, explosive gases can cause blindness or injury.
• Sulphuric acid can cause blindness or severe burns.
• Flush eyes immediately with water. Get medical help fa st.
• Do not tip battery. Do not open battery.
KEEP OUT OF REACH OF CHILDREN
A/C system
Refrigeran t a t h ig h pr es su re .
Always drain the A/C system before undoing any connections. Failure to
follow prescribed procedures can result in injury. System to be serviced by
authorized pers on ne l on l y. See Workshop Service Manual for correct procedures.
The A/C system complies with SAE J639.
Refrigerant: 875 g of R134a.
Refrigeration oil: 145 cc of PAG ND-8 oil or Saab 4319752 SK 20 oil
IB336
• AVOID SPARKS AND OPEN FLAMES ,
NO SMOKING
• WEAR EYE PROTECTIO N
• KEEP OUT OF REACH OF CHILDREN
•ACID
• SEE OWNER’S MANU AL
• FLAMMABLE GAS
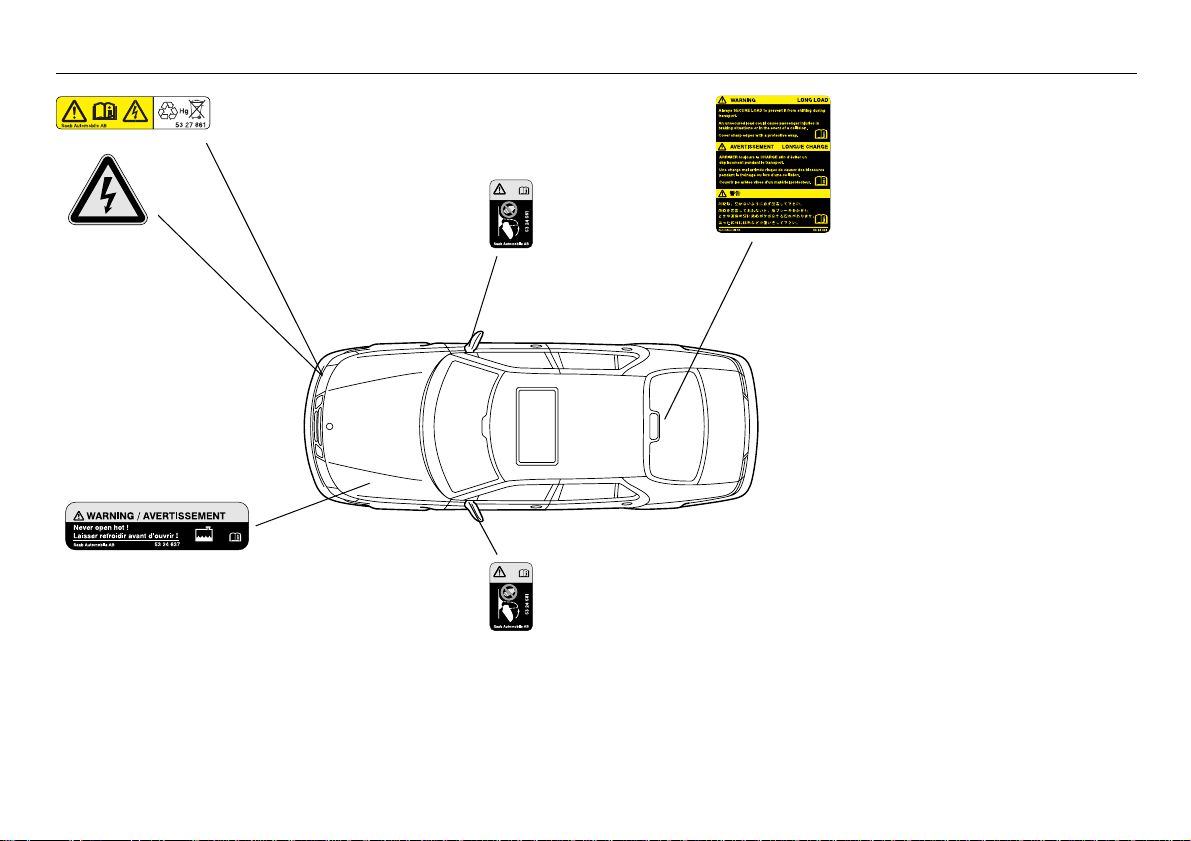
Contact an authorized
Saab workshop if a
Xenon headlight requires
replacement. (Only cars
with Xenon headlights.)
Door mirrors
Do not trap
your finger s
when folding
out the mirrors
IB336
Long loads
Always SECURE LOAD to prevent it from shifting during transport.
An unsecured load could cause passenger
injuries in braking situations or in the event of a
crash.
Cover sharp edges with a protective wrap.
9
Coolant:
Never open when engine hot!
Door mirrors
Do not trap
your fingers
when folding
out the mirrors
10
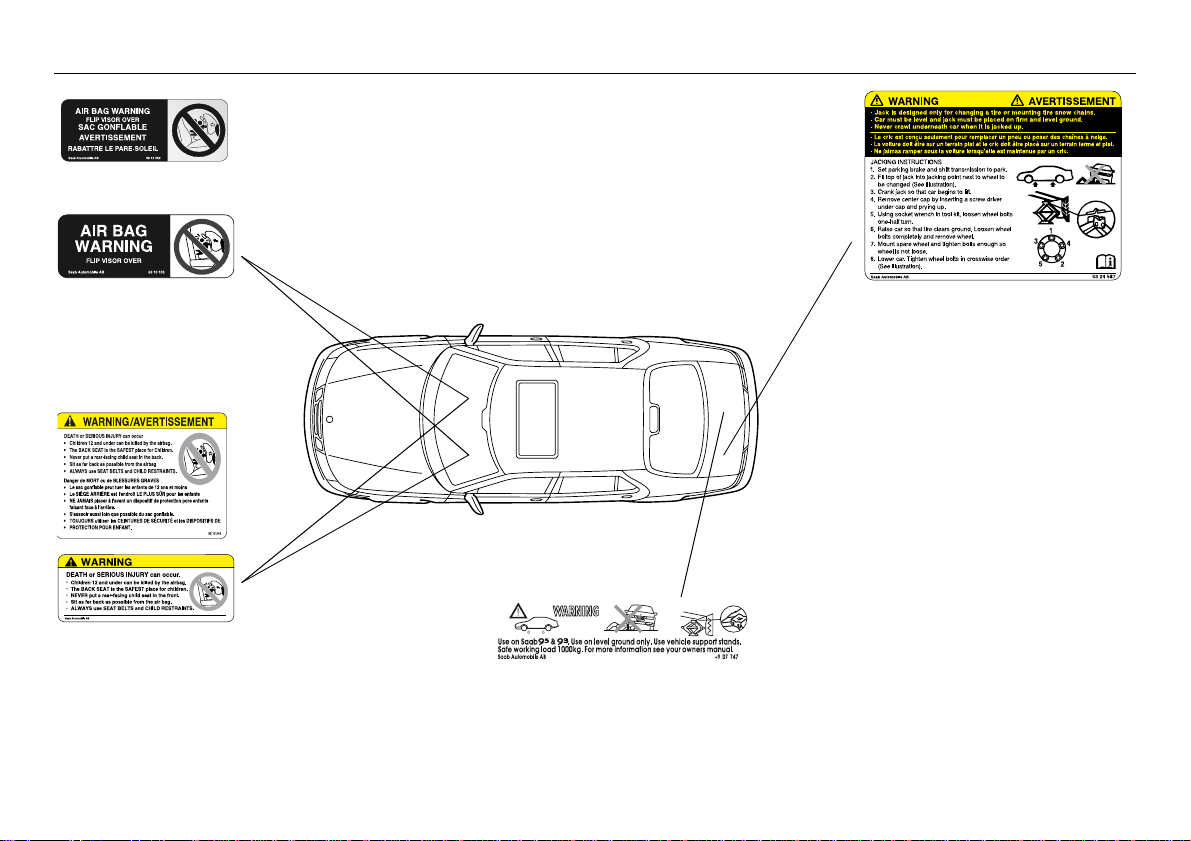
CANADA
IB1195
USA
AIR BAG
WARNING
Flip visor over
CANADA
USA
50 10 111
WARNING
DEATH or SERIOUS INJURY can occur.
• Children 12 and unde r c a n be ki ll e d by the air b a g.
• The BACK SEAT is the SAFEST place for children.
• NEVER put a rear-facing ch ild seat in the front.
• Sit as far back as possible from the air bag.
• ALWAYS use SEAT BELTS and CHILD RESTAINTS .
IB336
IB994
Jack (Text printed on jack)
Use on Saab 9-5 & 9-3.Use on level ground only.
Use vehicle support stands. Safe working load
2000 lbs. ( 1,0 00 k g). Fo r mo re information s ee
your owner´s manual.
(This label on ly u s ed i n so me c oun tr i es)
Jack is designed only for changing a tire or
mounting tire snow chains.
Car must be level and the jack must be placed
on a firm and level ground.
Never crawl under the car when it is jacked up.
Jacking Inst r uct i ons
1 Set parking brake and shift transmission to
park.
2 Fit top of jack into jacking point next to wheel
to be changed (See illustration).
3 Crank jack so that car begins to lift.
4 Remove center cap by inserting a screw
driver under cap and pryi ng up.
5 Using socket wrench in tool kit, loosen wheel
bolts one-half turn.
6 Raise car so that tire clears ground. Loosen
wheel bolts completely and rem ove wheel.
7 Mount spare wheel and tighten bolts enough
so wheel is not loose.
8 Lower car. Tighten wheel bolts in cross wise
order. (See illustration)
Observe max. speed limit for spare tire.
Safety
Safety belts. .............. .. ........ 12
Head restrai n t............. .. ...... 18
Child safety......................... 19
Airbag (Supplemental
Restraint System "SRS"). 28
IB1740
11Safety
12 Safety
Safety belts
WARNING
Safety belts must be worn at all times by
all car occupants.
Child safety, see pa ge 19.
Check that the l ocking tongue is properly
locked in the b elt loc k.
Three-point inertia-reel sa fety belts are provided for all seats.
Research has estab lished th at it is dan gerous for rear seat pass engers not to wear
their safety belts.
WARNING
In the event of a crash, the re ar-seat passengers can be th rown forw ard ag ainst
the front-seat backrests, impos ing much
higher stresses on the front-seat passengers and belts and result ing i n need less
injury to everyone in the car.
WARNING
Adjustments of the safety belt sh ould b e
done when the car is stati onary so tha t
attention to traffic is n ot red uced.
Bear in mind that in certain states it is a le gal
requirement for all occ upants o f the c ar to
wear a safety belt.
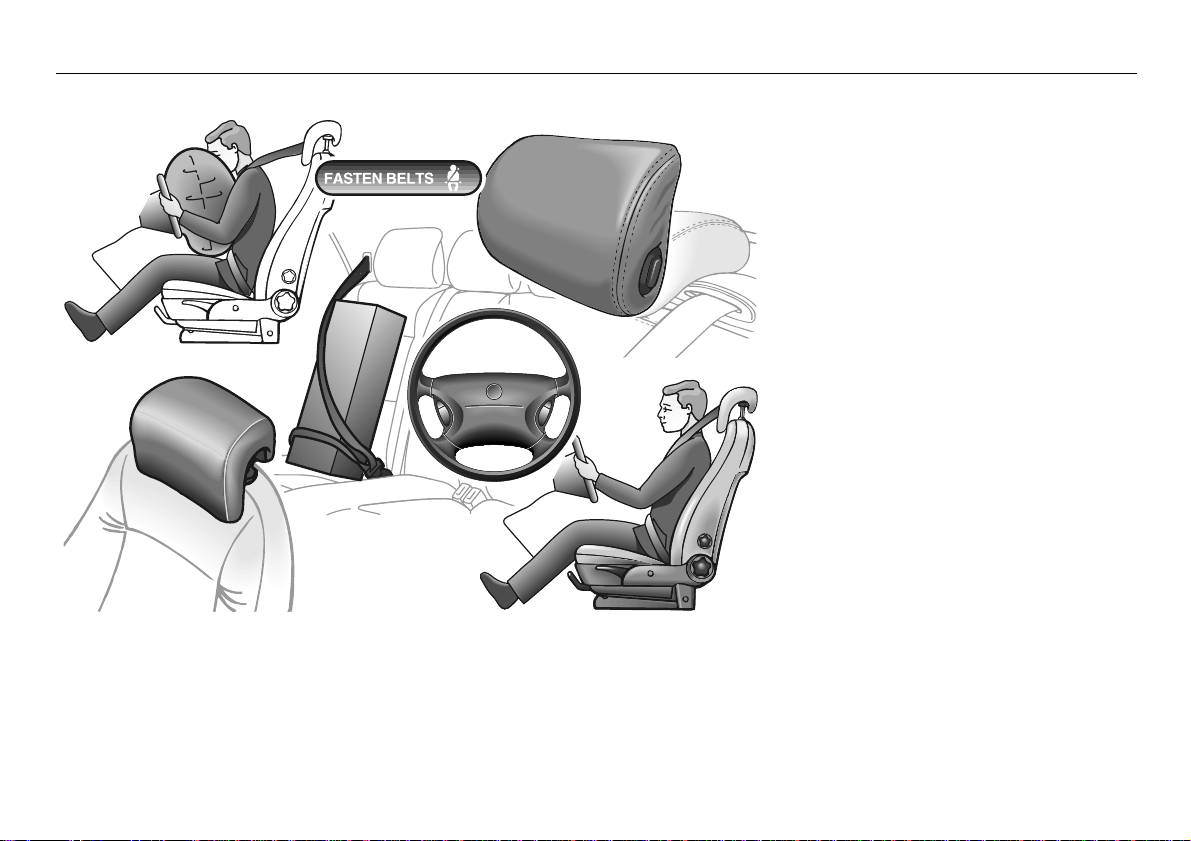
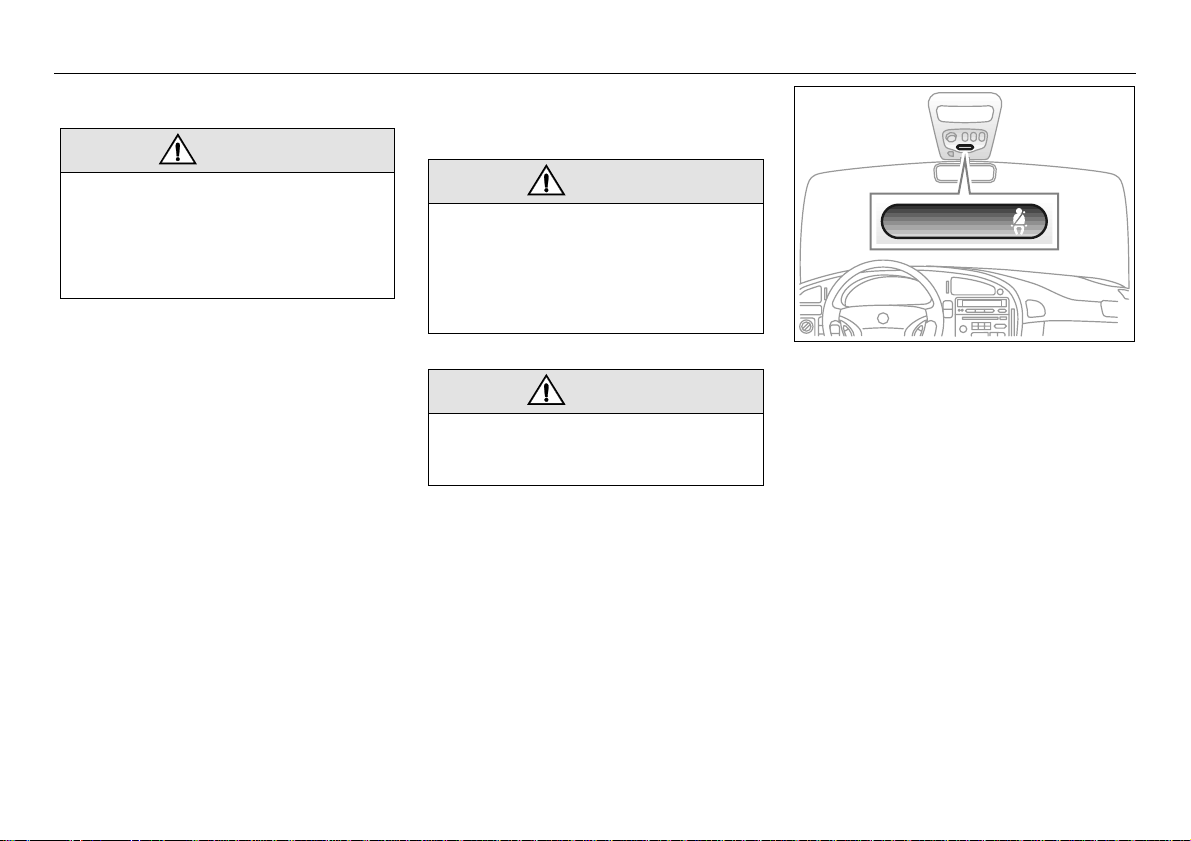
FASTEN BELTS
IB409
Safety-belt reminder
When the ignition is switc hed on, the ”fasten
belts” reminder wil l ligh t up un til th e driv er
fastens the safety belt . In ad dition an au dible signal sounds fo r 6 seconds, or until the
driver fastens his belt.
Safety belt pretensioners
The belts of the front seats are fit ted w ith
automatic pretensio ners, whic h are a ctivated in the event of a severe frontal or
rear-end crash, provid ed that the s afety
belts are being worn. They s erve to redu ce
the forward moveme nt of th e b ody by t ensioning the belt.
The safety belt pretensione rs are not activated by vehicle ro llove r.
The belt pretensio ners do n ot acti vate in
less severe frontal or rear-end crashe s.
WARNING
If the car is involv ed in a crash, the safety
belts, belt preten sione rs and other c omponents must be insp ected by an aut horized Saab dealer and replaced as necessary.
Never make any a lterati ons or repairs to
the safety belt you rself. Visit a n authorized Saab dealer for any nece ssary
repairs.
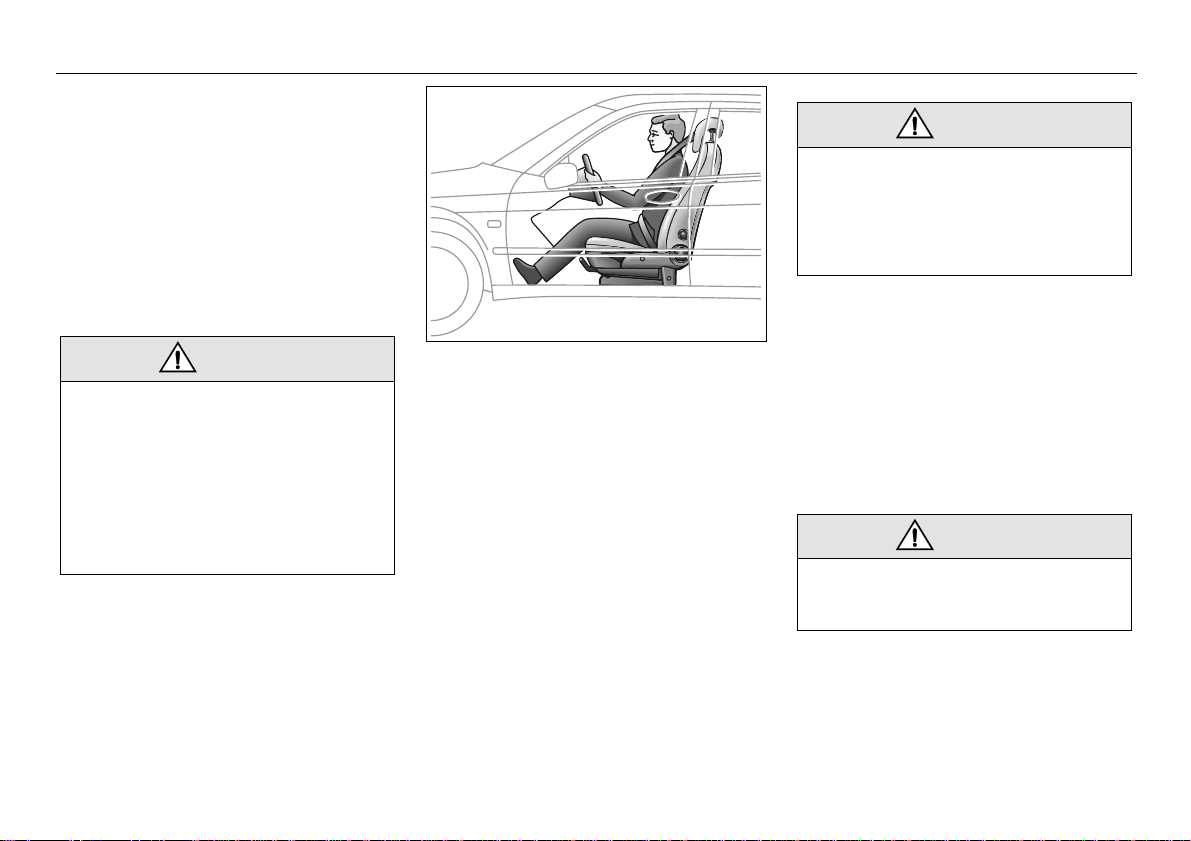
Correctly positioned safety belt
Correct position for safety belt
• The lap portion of the b elt s hould be
pulled as tightly as com f ortable and as
low as possib le ac ross the hips, so that i t
is just touching the top of the thigh s. The
shoulder belt shou ld be well in on the
shoulder but n ot touc hing the neck.
WARNING
Proper positioning of the safet y belt is
extremely important. An out of posit ion
safety belt can result in the wearer sliding
underneath the belt in a crash (submarining) and injury can result from the lap portion cutting into the ab domen .
• Check to ensure that the belt is not twisted
or rubbing against an y sha rp edges.
IB410
• There should not be any sla ck in the belt.
Pull the belt tight – particularly important
when thick outer clothing is worn.
• Refrain from tilting the backrest more than
necessary, as the safety belt provides
better protection when the seat is in the
more upright position.
• Only one person pe r s af ety belt!
WARNING
If two people share a be lt, they risk inj ury
by being crushed together in the event of
a crash.
13Safety
• For most of the time a saf ety be lt is worn,
the retractor will al low the wearer freedom
of movement . The retractor locks up automatically if the be lt is jerk ed or withdr awn
sharply, the car tilts , the b rak es are
applied hard or a cr ash occ urs .
14 Safety
• Children who ha v e gro wn out of a chi ld
seat should be re stra ined b y the c ar’s
standard three-point belts. Make sure that
the shoulder belt is not in conta ct with the
neck or throat. If it is , a booster seat/cu shion may be nec essa ry.
WARNING
Never fasten the safety belt with the
shoulder belt beh ind th e body or pu ll the
belt off the shoul der an d unde r the ar m.
To fasten the belt
IB411
Press the red button to release the belt
IB412
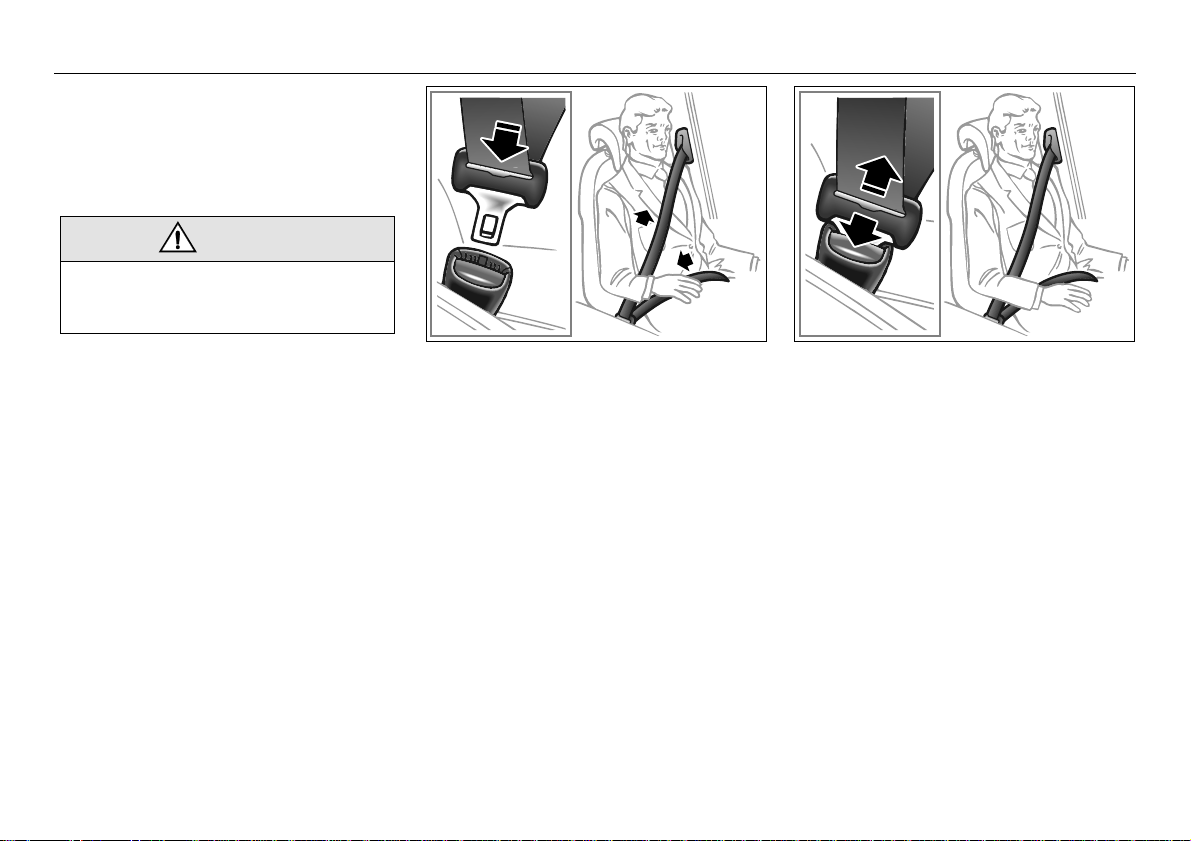
Front safety belts
Fasten the belt by pulling the belt and i nserting the tongue in the buckle. Ch eck that it is
securely fastened.
Grasp the shoul der belt cl ose to the buckle
and pull the belt to wards th e sho ulder t o
tighten the lap bel t part.
Then grip the belt at the shoulde r, pull it out
and, without letting go, allow the slack to be
taken up by the reel. Make sure that the belt
is well in on the s houlde r.
Because the lower be lt-anch orage points
are on the seat, the belt buckle follows the
movement of the s eat du ring se at adj ustment.
To release the belt, pre ss the red bu tton on
the belt buckle, as illustrated.
See page 232 for the checking of belt function, cleaning, etc.
Belt heig ht ad jus tme nt
The front safety be lts an d the outsid e belt s
in the rear (9-5 Sedan) ar e e quippe d with
automatic height adjus tment.
After fastening the belt, g rasp i t at ch est
height, pull it out an d, witho ut let ting go,
allow the slack t o be ta ke n up b y the reel.
Make sure that the belt is well in on the
shoulder.
15Safety
IB414
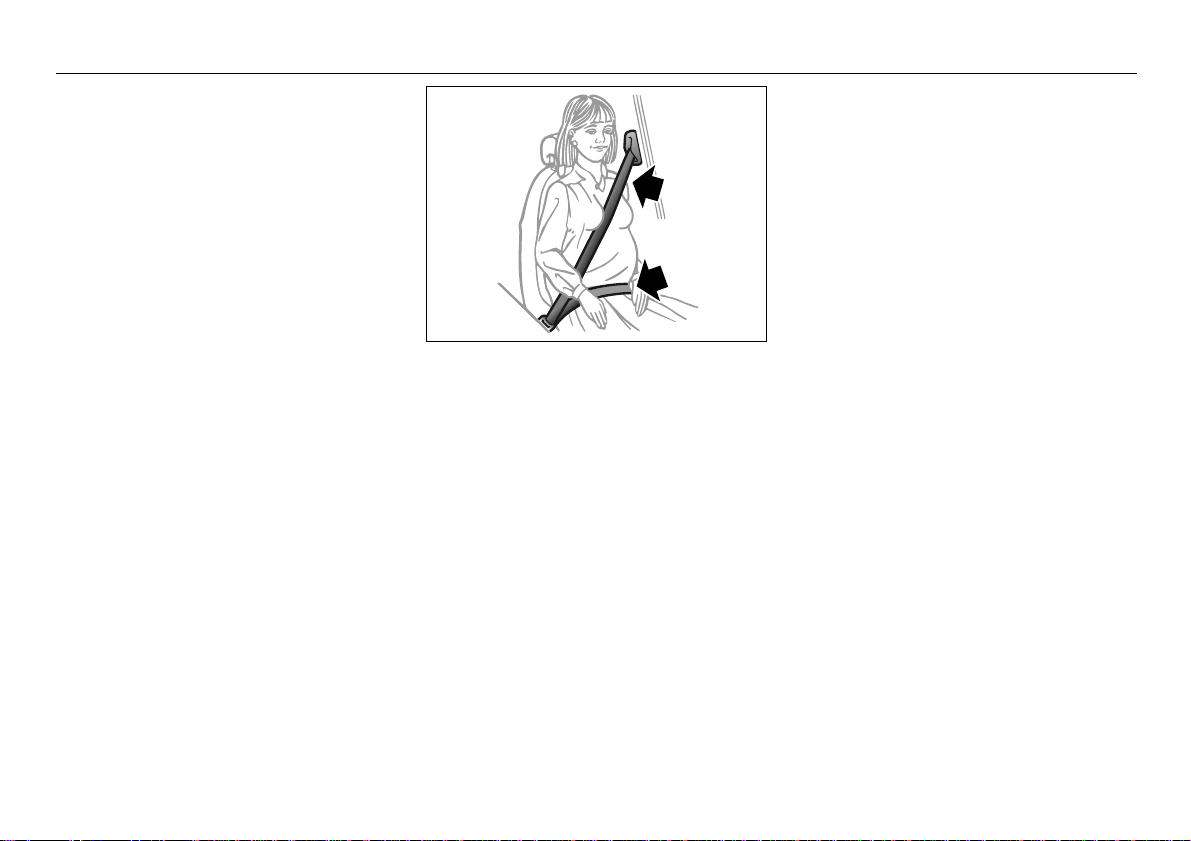
Safety belt use during pregnanc y
Pregnant women must always wear a
safety belt to prote ct both them selves and
the unborn child.
The lap belt shoul d be plac ed lo w, ac ross
the hips and over the upper thighs.
16 Safety
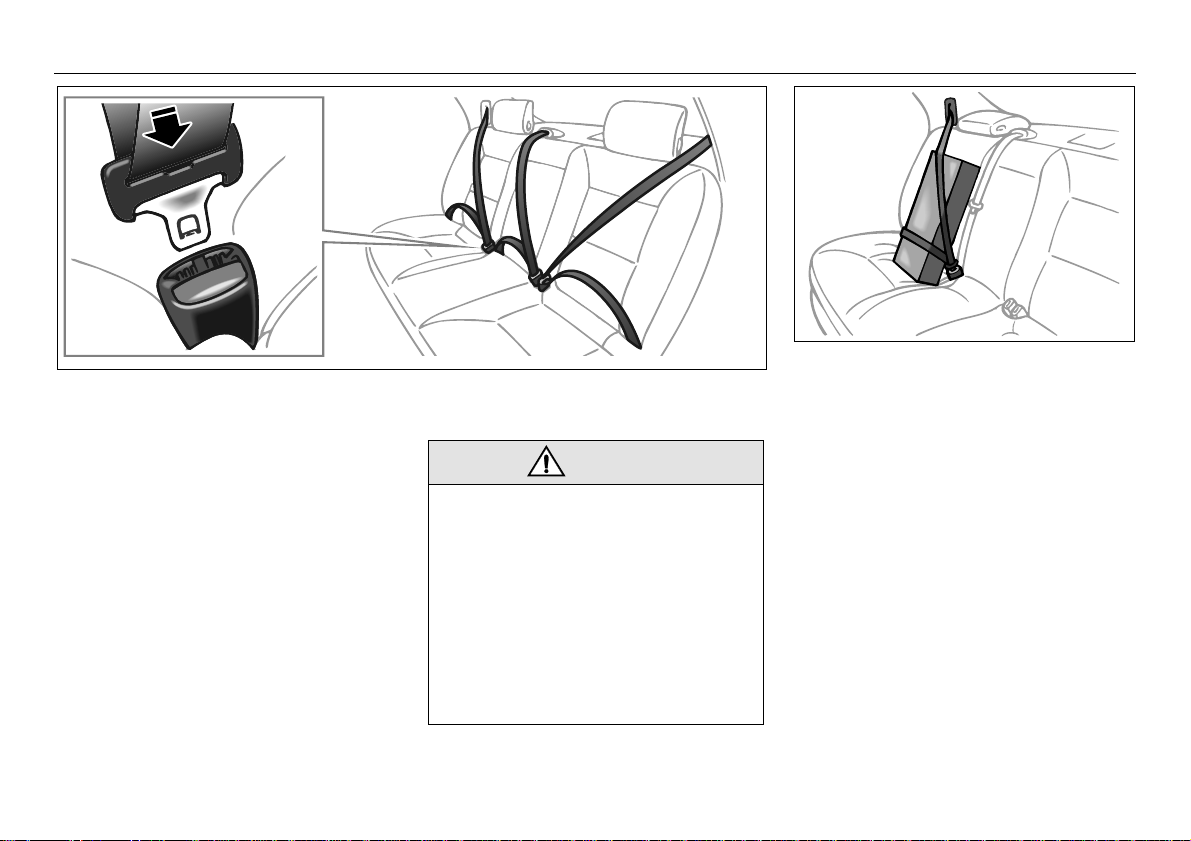
Safety belt, rear seat
Safety belt, rear seat
Three-point safety belt s are provided for all
three rear seat passengers.
Fasten the belt by pulling ou t the strap carefully and inserting the ton gue in the l ock.
Check that it is securely fastened.
Then grip the dia gonal part of the strap near
the lock and pull th e bel t up wards to wards
the shoulder to tighte n the lap strap. The lap
strap should lie low over th e hips .
The diagonal part sho uld lie as fa r in on the
shoulder as poss ible.
To release the belt, pre ss the red bu tton on
the belt lock.
See page 232 for the checking of belt function, cleaning, etc.
WARNING
• Make sure that the belt does not
become trapped when the backrest is
folded down or raised (see page 13 2).
• If a cargo has to b e plac ed on a sea t,
it must be properly secured with the
safety belt. This reduce s the risk o f
the cargo being thro wn abou t durin g
hard braking or a po ssib le cra sh,
which could caus e perso nal i njury.
• Check that the belt is no t twiste d or
lying against sharp edges.
IB???IB415
Securing an item on the rear seat
IB416
WARNING
Safety belts are des igned to bear upon
the bony structure of the body, and should
be worn low across the f ront of the pe lvis
or the pelvis, c hest and sh oulders, as
applicable; wearing the lap portio n of the
belt across the abdominal ar ea must be
avoided.
Safety belts should be adj usted as firm ly
as possible, consistent with comfort, to
provide the protection for which they have
been designed. A loose belt wi ll gre atly
reduce the protection af forded t o the
wearer.
Care should be taken to avoid contami nation of the webbing w ith polishes, oils and
chemicals, and pa rticul arly b attery acid.
Cleaning may s afely be carrie d out us ing
mild soap and wa ter. The belt s hould be
replaced if webbing becomes frayed,
contaminated or damag ed.
It is essential to repla ce the entire assembly after it ha s bee n worn in a se vere
impact even i f damage to t he assembly is
not obvious.
17Safety
Each belt assembly mus t only be used by
one occupant; it is dangerous to p ut a belt
around a child being ca rried on the o ccupant´s lap.
No modification s or a dditio ns shoul d be
made by the user w hich will either prevent
the safety belt adjus ting device from operating to remove sl ack, or prev ent the
safety belt assemb ly from being adjuste d
to remove slack.
Belts should not be worn with straps
twisted.
18 Safety
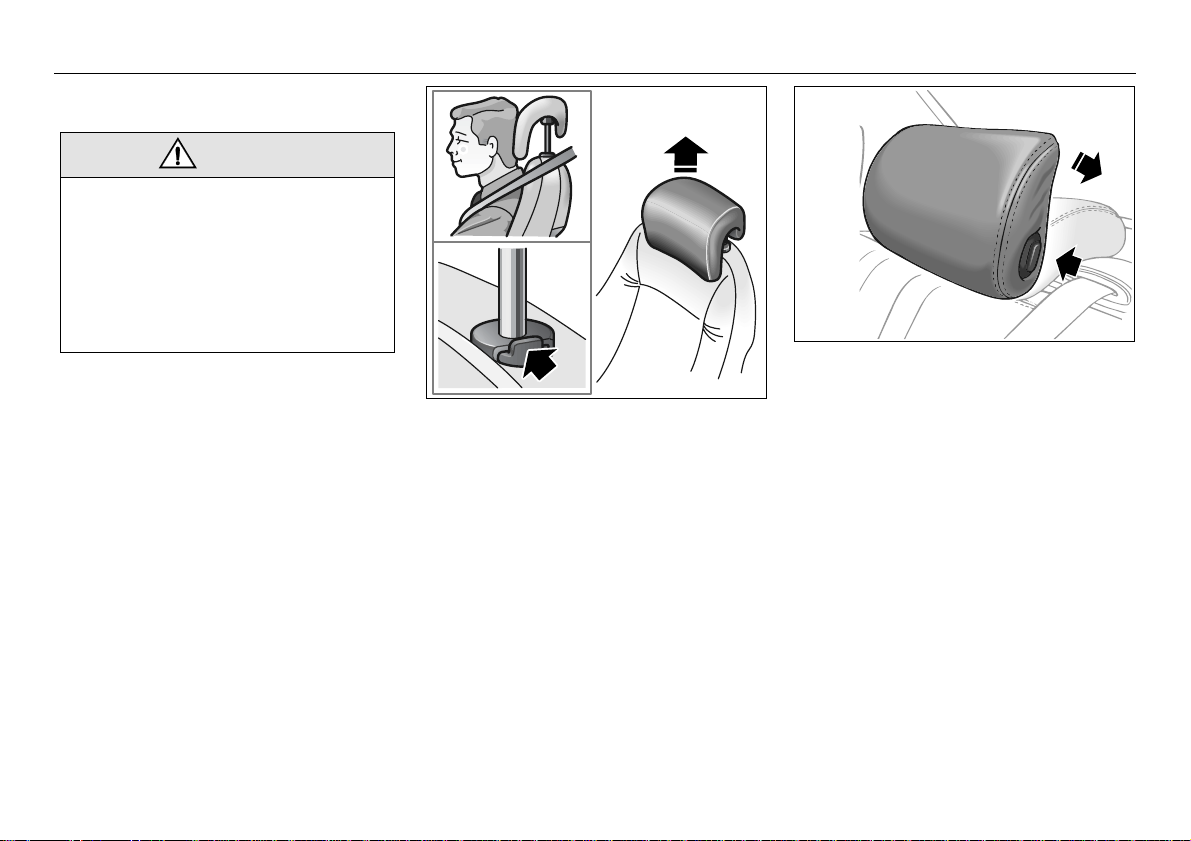
Head restraint
WARNING
• Adjust the head restra int so th at the
head is well supp orted and the center
of the head restraint is at ear height ,
thus reducing the like lihood of ne ck
injury in a crash.
• The rear head restraint should not be
folded down when the s eat is occu pied.
The front seats in the Saab 9-5 are
equipped with Saab Active Head Restraint s
(SAHRs). These reduce the risk of whiplash
injury if the car is hit from b ehind .
In the event of a rear-end crash, the body is
forced back agains t the b ackres t. Thi s, in
turn, causes the me chani sm to press the
head restraint forward and u pwards, thus
limiting the backw ard m ovement of the
head.
The SAHR is a mechan ical syst em, ac tuated by body weight. The mechanism is built
into the top of the backrest, where it is connected to the head restraint.
Therefore, the SAHR do es not n eed to be
replaced after a minor rea r-end c rash.
The head restraint can be raised or low ered
and is adjustable in va rious posit ions.
• Raising: grasp the head restrain t on both
sides and pull i t str aight u p.
• Lowering: press the catch on the left-hand
side of the attaching poi nt and press down
the head restrain t.
Rear-seat head restraints
9-5 Sedan: The rear head restrai nts have
IB400
three adjustment positions for passenger
comfort.
They can also be folded down to increase
the driver’s rearward vision when the seat is
unoccupied.
9-5 Wagon: The heigh t of th e rear h ead
restraints can be ad justed by de pressing
the catch on the l eft-hand collar in th e same
way as the front he ad rest rain ts.
IB460
19Safety
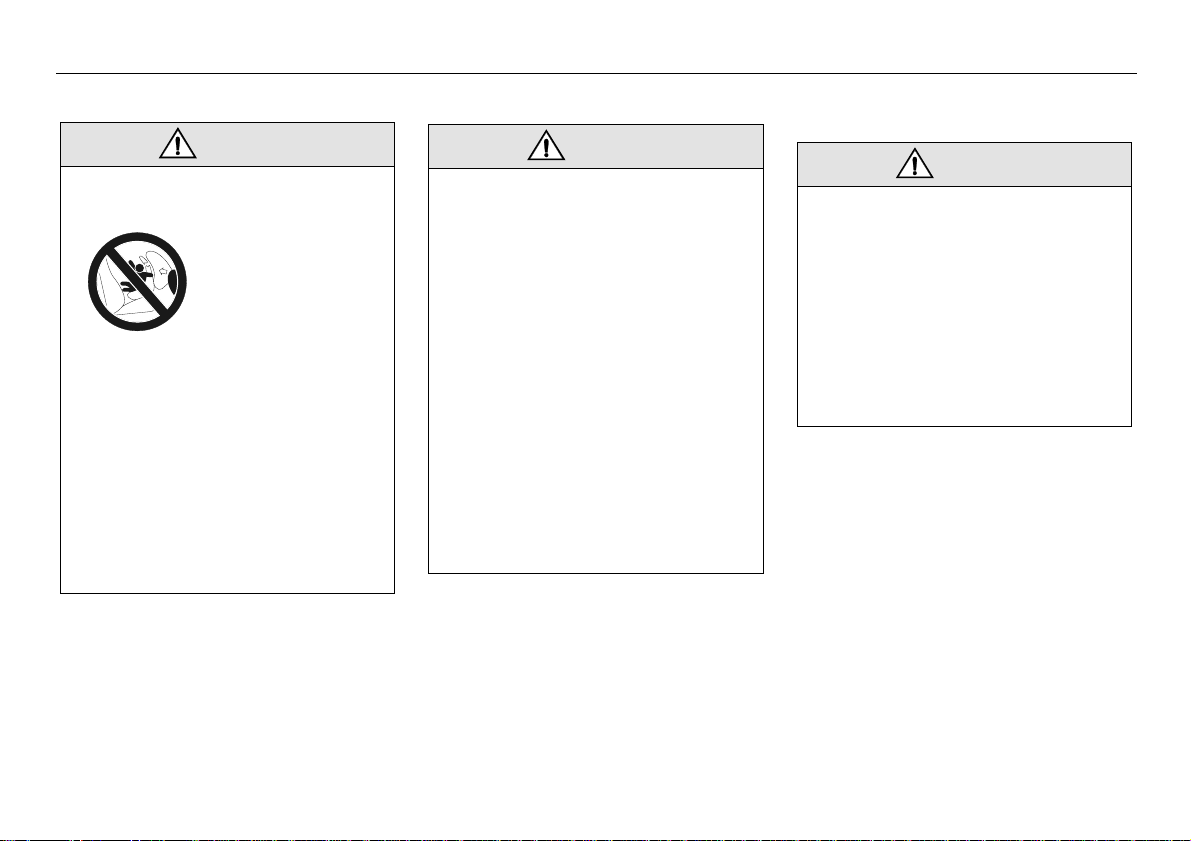
Child safety
WARNING
• NEVER put a rear-facing child s eat in
the front.
• Children must
always be suitably
restrained in the car.
All child restrain ts and
booster seats are
designed to be
secured in ve hicle
seats by the lap belt of a lap-shou lder
belt or LATCH. If the c hild restr ain t is
not properly secured, a child can be
injured in a crash.
• Children 12 and under c an be killed by
the airbag.
• According to cras h stat istic s, the
BACK SEAT is SAFER for properly
restrained children than the front seat.
• Sit as far back as possible from the air
bag.
Car safety tips Protect your children from getting
trapped in the trunk of a car
WARNING
WARNING
• Never leave y our c hildre n unatt ended
in a car , e ven for a s hort time.
– Children can suffe r heat strok e - per-
haps die - in a matt er of m inut es .
– Children can put the car into ge ar and
hurt themselves or othe rs.
• At gas stations, take the k e ys fro m the
car while filling t he tank .
• Never allow children to climb on top of or under motor v ehicl es .
• Always look for children bef ore backing
your motor vehicle out of a garage or
driveway.
• To a voi d carbon mono xid e poisoning,
neve r let a car id le in the gar age .
• Supervise young children around b uckets of water wh ile w ashi ng y our car.
Small children can drown in seco nds in
less than an inch of water.
• T each y our kids not to pla y in or around
cars.
• Watch y our c hildre n when loa ding or
unloading the car so they don´t get
locked in by mistake.
• Always lock the do ors and trunk of yo ur
car, a nd keep the k eys out of chil dren´s
sight and reach.
• Keep the rear f old -do wn s eats clos ed
to help pre v ent kid s from gettin g into
the trunk from inside the c ar.
For Trunk Releas e Handle info see p age 42
and 141.

20 Safety
The same attention m ust b e giv en to c hild
safety in the ca r as is give n to a dults.
Saab recommends rea rward facing chil d
restraints.
Children travel most safely whe n prop erly
restrained, but restrai nts must be su itable
for the size of the c hild. Always follow t he
child seat/booster cushion manufacturer´s
instructions whe n installing these device s in
your vehicle.
Make sure you are ac quainted with th e
legal requirements fo r seating childr en
in the car.
Make sure that it is po ssib le to f it a c hild
restraint in acco rdance with the manu facturer’s child seat instructions.
When fitting child seats in cars you mu st
always read the in structions supplied by
the manufacturer.
IB1832
LATCH
LATCH (Lower Anchorages & Top tethers
for CHildren) consists of top tether and
lower anchorage (“ISOFIX”) for c hild
restraints in two outb oard th e rear s eats.
ISOFIX are lower atta chmen ts lo cated
where the seat and ba ck c ushio ns co me
together. Top tether are upper attach ments
located between be lt beam and parcel shelf,
see page 23 and 24.
Saab recommends rearw ard fa cing child
restraints for children 3 and under.
21Safety
LATCH installation
To facilitate the prop er fitti ng of n ew spe cially-designed c hild re strain ts rigid l ower
anchorages (ISOFIX) have been installed to
the vehicle that shall be us ed with the to p
tether anchorages in the tw o outboa rd rear
seating positions. Th ere is an additio nal top
tether anchorage for t he center rear seating
position that is to b e used to gether wi th the
safety belt.
LATCH is a U.S./Canadi an gov ernme nt
standard for an uniform method of fitting
child restraints wi thout using the st andard
safety belts. On ly certain child restrain ts are
equipped to utilize thes e rigid lower anchorages behind where the se at cus hion and
seat back come tog ether. LATCH c hild
seats also utilize a top teth er stra p that is
found on some ne wer chi ld sea ts tha t stil l
require installatio n with the stand ard safety
belts.
There are two bars attached to the car bod y
for each special ly de sign ed L ATCH ch ild
restraint. A small label is lo cated on the seat
back just above the o uter attach ment bars
to facilitate installin g the child restrain t. The
label contains a c ircle and a rearward faci ng
child restraint.
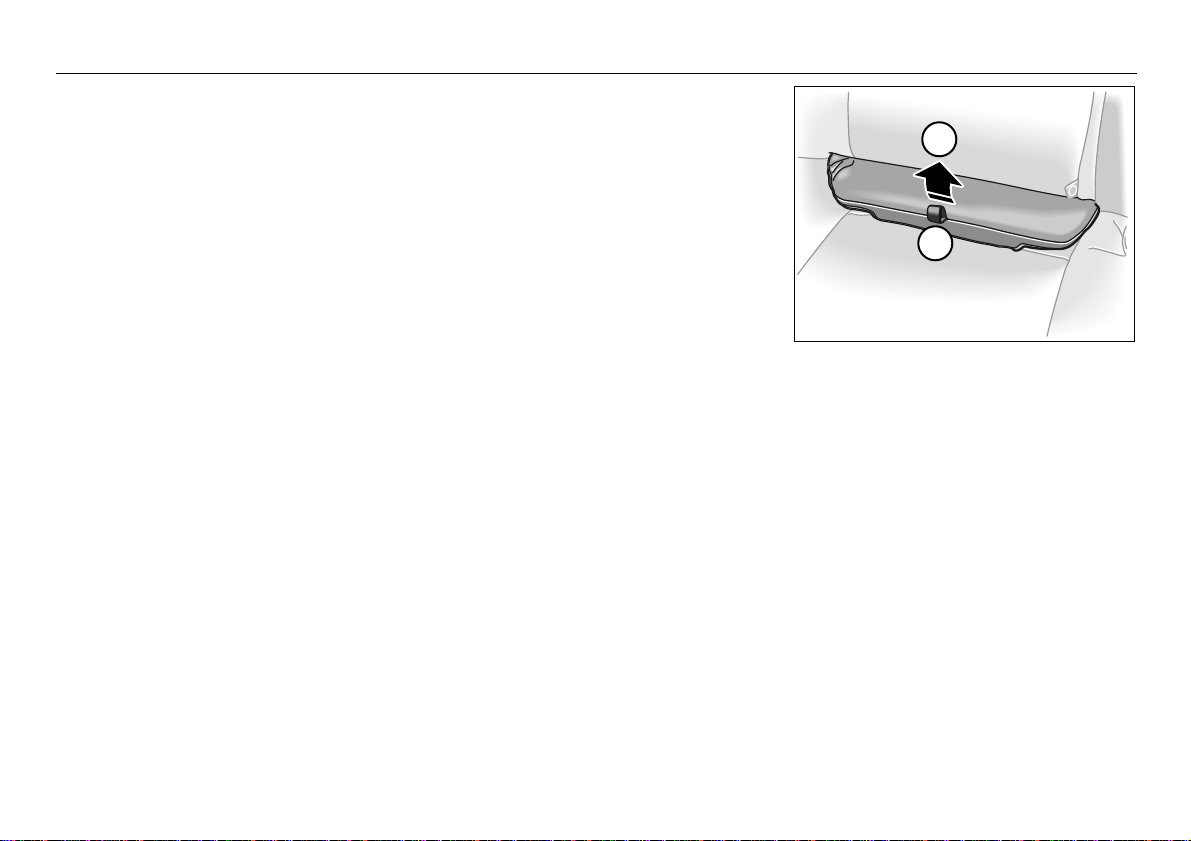
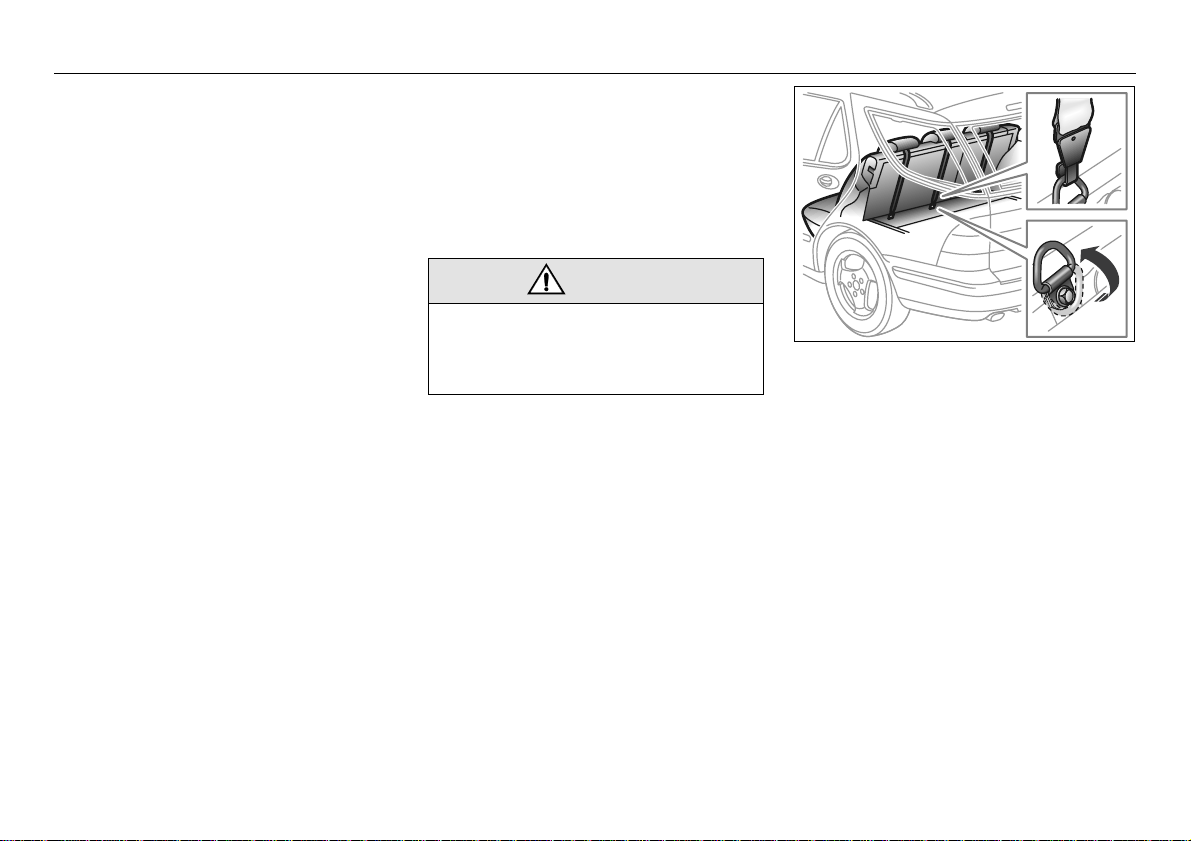
1 Open the LATCH (ISOFIX)- lid (1) on
one of the designated outboa rd rear
seating positio n b y pu lling the str ap
located on the lid and rot ate (2) t he lid
upwards. See illustration.
2 Place the child restraint on the s eat
cushion.
3 Press the child restraint rearw ard in to
the opening betw een th e lid and the
cushion, lining u p the re str aint a ttach ment arms with the labe ls .
4 Follow the child restr aint instructio ns to
confirm that both restraint arms are
properly attached to the ba rs.
5 Attach the top tether strap to the in -car
anchorage and tigh ten according to the
restraint instructi ons , see page 23 and
24.
6 Pull the child restraint to ma ke a second
check that restr aint is securely atta ched
at both the lo wer an chor ag e bars and
the top tether strap .
2
1
IB1938
Open the LATCH-lid.
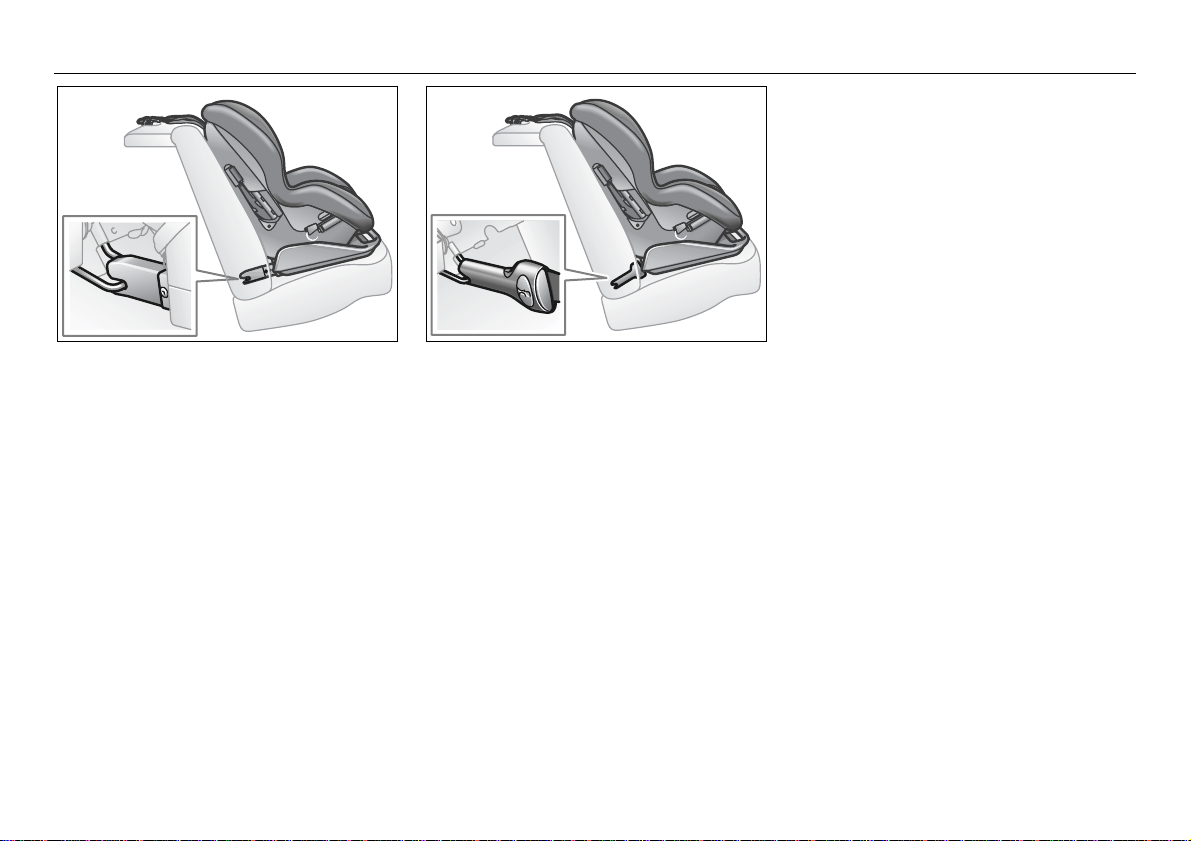
22 Safety
Rigid 2-point lower attachment with top
tether
For the top tether, o nly use the str ap s upplied with the chi ld restrai nt.
Always follow the i nst allati on ins tructio ns
supplied with the child restrai nt.
The availability of LATCH ch ild rest raints
may be limited.
When fitting child seats in cars you mu st
always read the in structions supplied by
the car seat manufacturer.
IB1684
Semi-rigid 2-point lower attachment with
top tether
IB1685
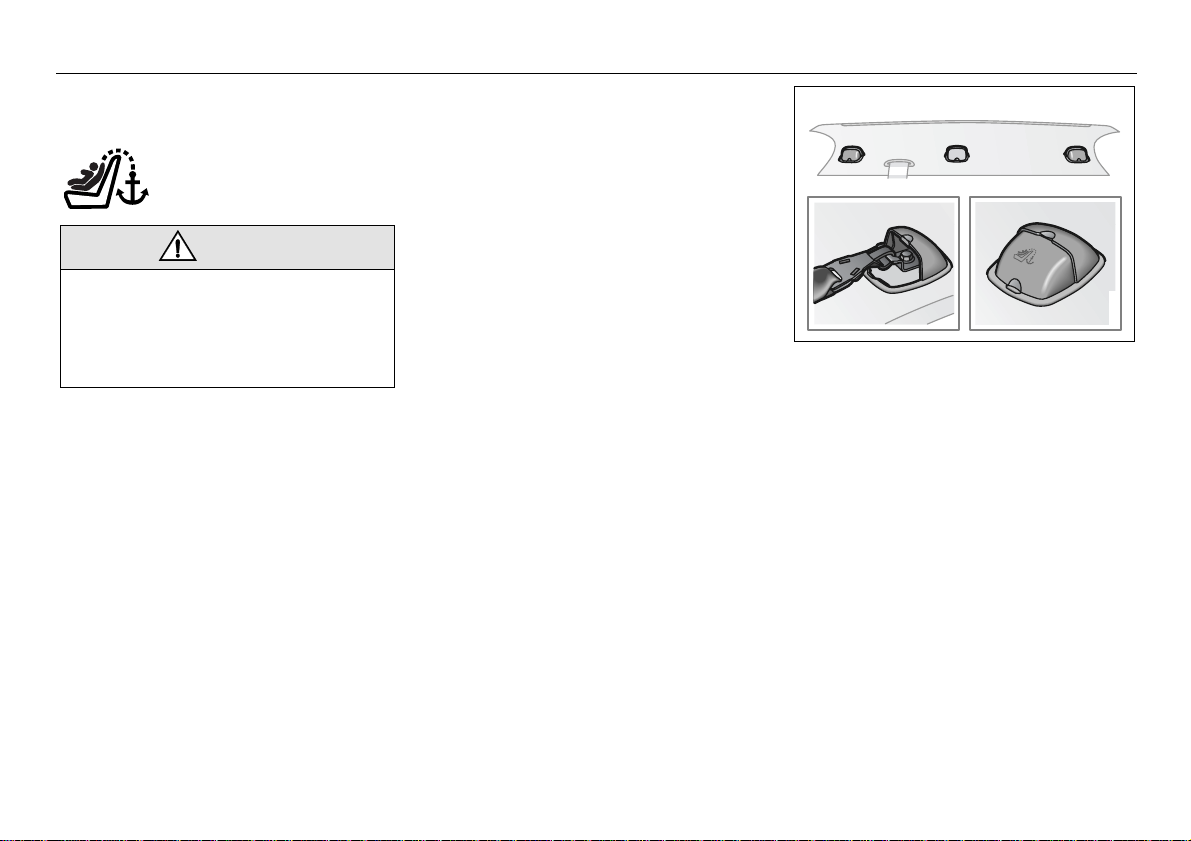
23Safety
Child tether anchorages for forward facing child car seats
WARNING
Child tether anchorages are des igned to
withstand only th ose lo ads i mpos ed by
correctly fitted child restraints.
Under no circumstanc es a re they to be
used for adult safety belt s.
Child restraints with a tether s trap m ust be
anchored accordi ng to Ca nadian and U SA
laws.
If you have any questi ons re gardin g chil d
tether anchorages pleas e cont act your
Saab dealer.
9-5 Sedan:
1 Open the cover tha t is right behin d the
child restraint. Make sure it locks.
2 Place the child restraint in the rear seat .
3 Secure the lower part of the child
restraint b y me ans of the lo w er a nchor-
ages (ISOFIX) or the saf e ty bel ts as
described in the child restraint mounting
instruction.
4 Route the tether under the headres t.
5 Attach the tether to the anch orag e.
6 Tighten the tether so that the back of the
child restrain t is p resse d hard agains t
the backrest.
7 Pull the child restraints to mak e a
second chec k that the res train ts are
securely attached at both the l ow er
anchorages ba rs and the to p tethe r
strap.
IB1698
Child tether anchorages in parcel shelf,
Saab 9-5 Sedan
24 Safety
9-5 Wagon:
1 Fold the backrest of the rear seat f or-
ward, see page 1 32.
2 Fold the anchor that is right behind the
child restraint to its upright po sitio n.
3 Place the child restraint in t he rear seat.
4 Raise the head restraint to its uppe r
position and then rou te the tether under
the head restraint.
5 Attach the tether to the anchor.
6 Raise the backrest of the rear seat.
Make sure i t loc ks prope rly.
7 Secure the lower part of the child
restraint by means of t he safety belt or
lower anchor ages (ISOFIX) as
described in the child res traint mounting
instruction on the previ ous page .
8 Tighten the tether so that the back of the
child restrain t is p resse d hard agains t
the backrest.
9 Pull the child restraints to mak e a
second chec k that the res train ts are
securely attached at both the l ow er
anchorages ba rs and the to p tethe r
strap.
WARNING
Make sure the ch ild-restraint anchora ges
are folded all the way up or down otherwise it can obstruct locking the rear seat
backrest.
It is not possible to route the te ther thr ough
the cargo net (access ory), i f one i s fitted.
Instead we recommend a cargo guard
(accessory).
IB1352
Child tether anchorages, Saab 9-5 Wagon
Lockable belt tongue
In fitting a child seat that is inten ded to be
secured in position by the lap portion of the
safety belt, make u se of the locking functi on
of the buckle.
Locking the lap portion of the belt l esse ns
the risk that the sea t wil l work loose while
the car is in motion .
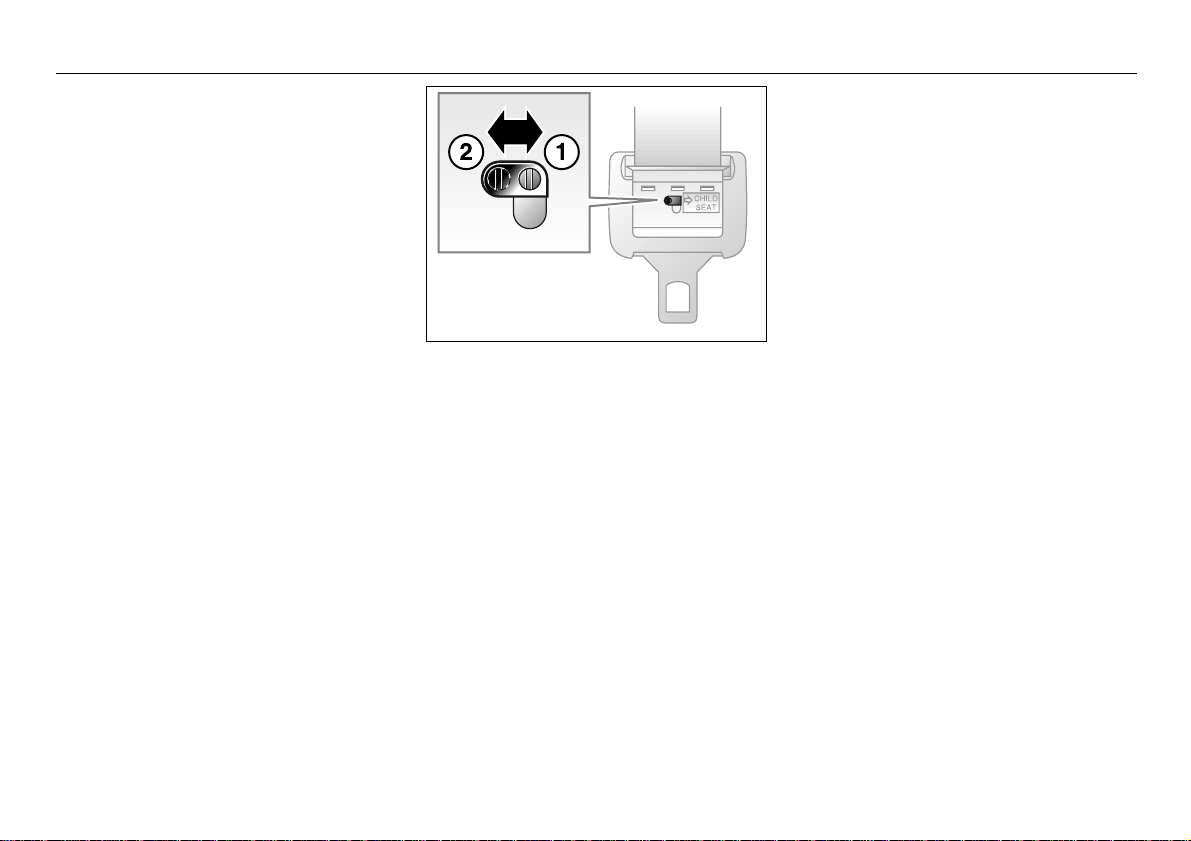
The button for the locking fu nction is located
on the back of th e buck le.
1 Position the chi ld seat in th e back of the
car.
2 To ac tiv ate the loc king functi on, mov e
the locking b utto n on th e t ongue of the
belt to the positi on ma rked
”CHILD SEAT” (item 1 in the figure) in
order to activat e the l ock ing fu nction .
3 Secure the base of the child s eat w ith
the lap portion of the saf ety belt in accor-
dance with the ins tallati on in structions
accompanyin g the chi ld se at.
4 Grasp the shoulder part of the saf ety belt
and pull it upwards to tighten the lap por-
tion against the chi ld se at.
5 Check for correct locki ng function b y
pulling on the lap po rtion of the belt. The
belt must not unree l.
25Safety
IB822
Locking the lap belt
1 Locked
2 Unlocked

26 Safety
Installation of child rest raint using the
standard safety belt
Child restraint that are approved for rearward facing installation in the rear seat can
be positioned in any of the three rear places.
If you intend to instal l another make of child
restraint make su re that it is po ssible to fi t it
in accordance with the manufacturer’s
instructions.
WARNING
Failure to follow a ll the manuf acturer’ s
instructions on the us e of th is ch il d
restraint sys tem c an cau se yo ur chi ld to
strike the vehicle ´s i nterio r during a
sudden stop or c rash.
Saab recommends rearward fa cing child
restraints up to 3 year s.
WARNING
A special accessor y is avail able fo r lock ing the center armrest so tha t a child seat
can be installed in the midd le seat. Se e
your Saab dealer for detail s.
When a rear-facing chi ld sea t is f itted i n
the center positio n of the rear s eat in the
Saab 9-5 Sedan the center armres t must
be secured in place with this strap . If this
is not done, the c enter a rmrest could
swing down in the event of a frontal crash
and cause injury to the ch ild.
IB1204
Fitting the locking strap on the c ent er a rmrest, Saab 9-5 Sedan (not needed on
Wagon).
The locking str ap is sta nda rd equi pm ent
in cer tain markets.
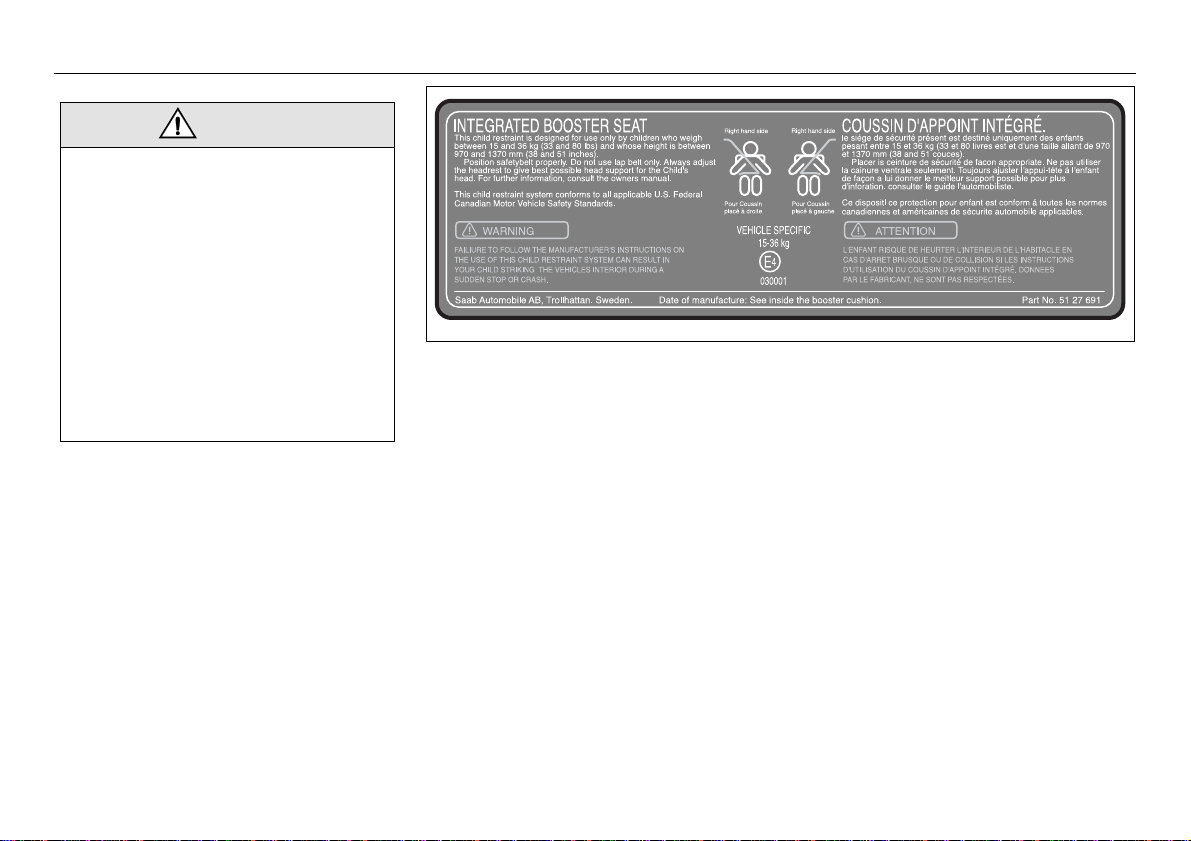
Integrated booster seat
(accessory)
The integrated boos ter se at in the bac k is
intended for child ren wei ghing 33-80 l bs.
(15-36 kg) and betw een 38 and 54 in ches
(97 and 137 cm) tall.
When seated in th e integrated booster seat,
the child must w ear the standard three-point
safety belt.
Whatever the age or weigh t of the child, it is
vital that the safety belt be wo rn corr ectly .
The seat should alwa ys be kept clean and
intact to ensure that it continu es to f unction
as intended.
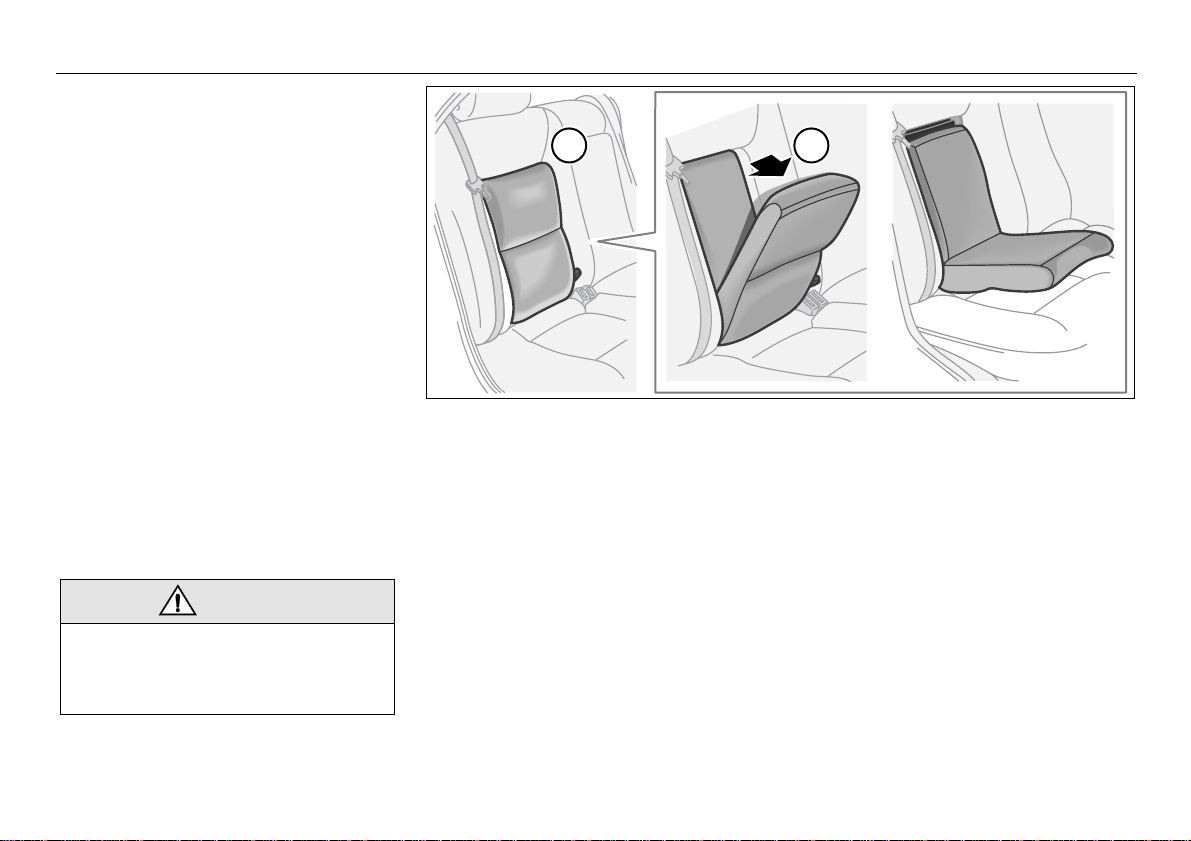
Folding down
1 Pull the opening strap on the side of the
booster seat outw ards to re lease the
catch securing the seat.
2 Fold down the booster seat c ushi on b y
grasping the upper edge and pul ling out-
wards.
Fastening the safety belt
WARNING
Never wear a safety belt with the diago nal
strap positioned behin d you r back or
slipped off the sho ulder a nd und er you r
arm.
1 2
• Seat the child wel l bac k in the seat, sn ug
against the bac kres t.
• Pull out the saf ety belt smoot hly a nd
insert the tongue in the lock. Chec k that it
is securely f as tened.
• Ensure that the lap str ap is positioned low
across the hips and that th e diag onal
strap is well i n on t he should er, although
not touching the neck or in a position that
creates discomfort.
27Safety
IB1915
• For optim um pr otection, the saf e ty bel t
should be snug aga inst the body . Pull the
diagonal strap tow ards the s hould er to
take up any slack.
• After fastenin g the belt, grasp the str ap at
the shoulder , pull it out and, without let ting
go, allo w th e sla c k t o be ta k en up b y the
reel. Make sure that the str ap is well in on
the shoulder.
• Check that th e belt runs freely betw een
the reel and the l ock .
To fold the seat away
Fold back the seat and ensure that it is
locked in posit ion.
28 Safety
WARNING
• Use only the veh icle’ s lap and shou lder belt system w hen res traini ng the
child in the boo ster s eat.
• The seat must not be modified or
changed in any way.
• Never leave a child unattende d.
• The car’s regular hea d restrain t mus t
always be turned 180° back to its original position af ter the integra ted
booster seat is folded away .
• Check to ensure th at the belt i s not
twisted or rubbing a gains t any sh arp
edges.
Label in integrated booster seat

29Safety
Airbag (Supplemental Restraint System "SRS")
WARNING
To reduce risk of injury :
• Always wear your safety belt.
• Always adjust your seat s o that you
are as far back as possible but still
able to reach the steering wheel and
controls comfortabl y.
• Children 12 and under or shorte r than
140 cm (55 inches) should always
travel in the rear as the ve hicle is
equipped with an a irbag o n the passenger side.
The supplementary res traint system (SRS )
comprises an airbag in the steering wheel,
a front passenger airbag and side airbag s in
the front seats.
The system supple ments the pr otecti on
provided by the safety belts to furth er
enhance the safe ty of t he occup ants.
If a fault is detected in th e SRS, the
AIR BAG warning light on the main instrument panel will come on (see pages 52 and
34).
When the system is triggered by impact of a
frontal crash, the airbags in the steering
wheel and passenger si de of the dash board
are inflated, after which th ey deflate through
vents in the back of the bags .
The front airbags a re inflated in two s tages.
The first stage proces s is a les s severe ,
softer inflation of the airbag. This sta ge is
used in lower force crashes, or if the seat is
positioned close to the st eeri ng whee l or
dashboard. The secon d stag e p rocess i s a
more forceful and quicker inflation of the airbag. This stage is used in more severe
crashes and/or when th e seat adjustment i s
back a significant di stance from the steering
wheel or dashboard.
The entire process takes less than
0.1 second – literally , fas ter than the bl inking of an eye.
These airbags are t riggered o nly by mod erate to severe frontal or near-fron tal crashes.
They will not be activated by minor front-end
impacts, rear-end or side impact s, or by the
car rolling over.
WARNING
• Even if the car is equi pped wi th SRS
(airbag), safety belts m ust still always
be worn by all occupants.
• Note that because an airbag inflat es
and deflates extr emely ra pidly , it w ill
not provide protection against a
second impact oc cur ring in the s ame
incident. Always use y our safety belt.
• Always sit with the whole of your back
in contact with the ba ckrest of the seat,
and with your seat as fa r ba ck as i s
practical. This is to reduce the risk of
injury from contact with the backrest of
the seat when the a irbag inflate s and
also because th e airbag need s space
in which to inflate.
• Never attach anyth ing to the s teering
wheel or passenger side of the instru ment panel, as this c ould re sult i n
injury if the airbag should inflate. The
same applies to anyt hing y ou mi ght
have in your mout h, such as a pipe, for
instance.
• Some components of the airba g wil l
be warm for a short time. In some circumstances the ai rbag c an ca use
minor burns or abrasi ons t o the b ody
when the airbag inflates/defl ates.
30 Safety
• Never rest your hand s or forearms on
the steering-wheel center pad ding.
• If the AIR BAG warning light re mains
on after the car ha s been starte d or
comes on while you are driving, hav e
the car checked im medi ately by an
authorized Saab dealer. The warning
light could signify that the airbags may
not inflate in a cr ash, or they could
even inflate witho ut a c rash. Se e
page. 52.
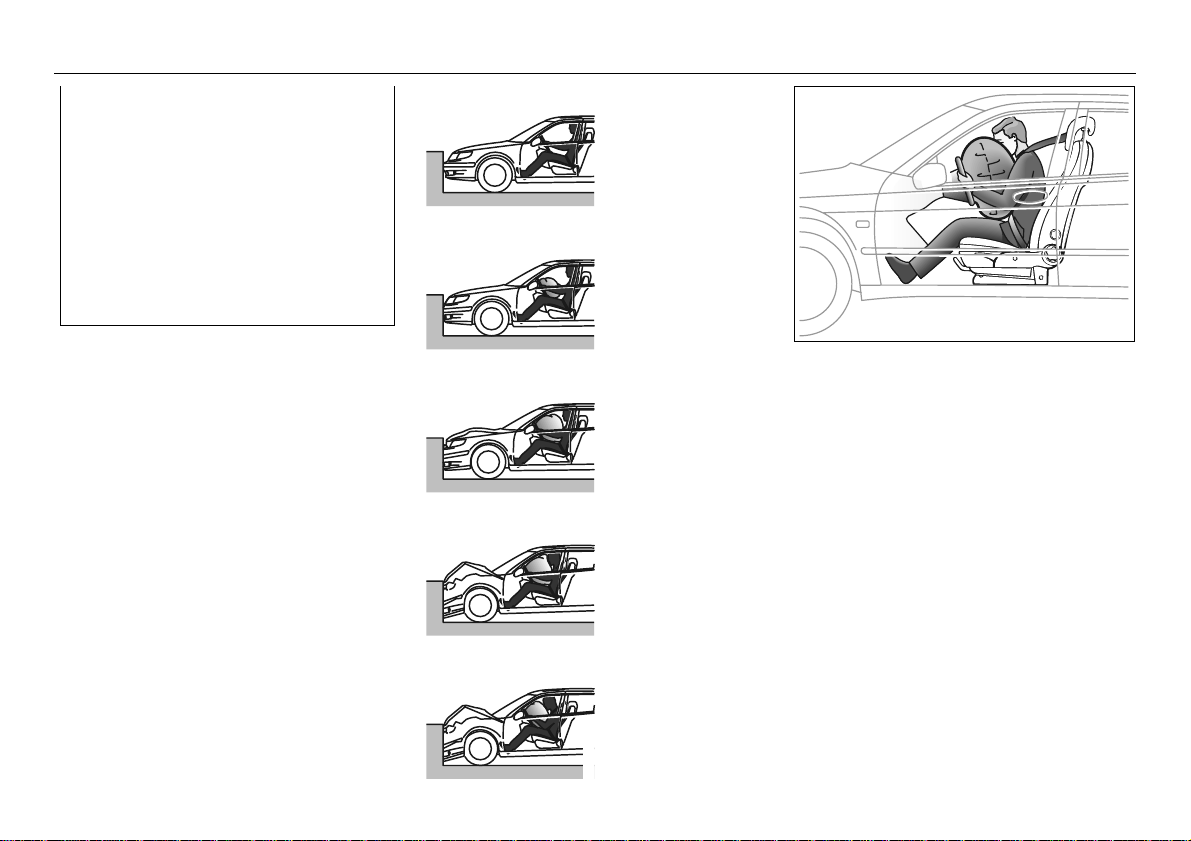
Moment of impact.
Sensor detects deceleration and sends a
signal via the control
module to a gas generator that inflates the
airbag.
The inflating airbag
cushions the driver.
Airbag now fully
inflated.
IB419
Inflated airbag (driver side)
Inflation and deflation together take less than
0.1 second.
The airbag starts to
deflate.
IB417
 Loading...