

Saab 9-3 2004 Owner Manual

Owner’s Manual
Saab 9-3 M2004
Safety 10
Security 39
9-3 Convertible 53
Instruments and controls 73
Interior equipment 115
Starting and driving 139
Car care 191
Customer Assistance and Information 261
T echnical data 267
1
© Saab Automobile A B 2003
Service Readiness, Saab Automobile AB, Trollhättan, Sweden
Printed in Sweden
Index 283
2
Introduction
This manual provi des practical guida nce on
driving and caring f or your Saab.
The Saab 9-3 will be available with the following engine vari ants:
• 2.0t 175 hp
• 2.0 Turbo 210 hp
Although this man ual de scrib es the most
important differences betwee n mod el vari ants, it does not sp ecify the eq uipme nt or
features included on in divid ual m odels.
Importation and distri bution of Saa b auto mobiles, spare p arts an d acc essor ies a re
handled exclusiv ely by Saab Cars USA, Inc.
in the United States a nd by General M otors
of Canada Limit ed in Canada.
We recommend that you re ad thro ugh the
manual before taking the car out for the first
time and keep it in th e car for futu re reference.
To find a specific item , use the ov erviews
given on page 3–6. A li st of content is g iven
at the beginning of e ach section of the manual, and there is al so a comp rehens ive
index at the back of the book.
Supplied with the ca r is a Warranti es an d
Service Record booklet whic h con tains
important warranty informati on and specifies the regular ma intena nce to be ca rried
out. Also included is a Quic k Refere nce
Guide, an Infotainment Syste m manual, tire
warranties and (U.S. cus tomers) , a de aler
directory with Roadside Ass istance Program information.
WARNING
Failure to heed warn ings may c ause
personal injury.
NOTICE
NOTICE texts warns of poten tial damage
to the car if th e recommendat ions are not
followed.
Since the polic y at Sa ab is one of continua l
improvement, we retain the right to incorporate modifications and to alter specifications
during production without prio r notice.
If you have any questions c oncer ning y our
car, its equipment, the warran ty conditions,
etc., your Saab dealer will be pl eased to
help, or you may call the Saab Customer
Assistance Center in the U.S. at 1-8 00-9559007 or email them at saabcrm@saabusa.com . In Can ada , plea se
contact the Saab Customer Assistance
Center at 1-800-263-1999.
Enjoy the road ahead!
Saab Automobile AB
Saab Automobile AB does not accept liability for
any damage caused by the fitting of spare parts,
exchange parts or accessories that are not
approved by Saab Automobile AB.
3
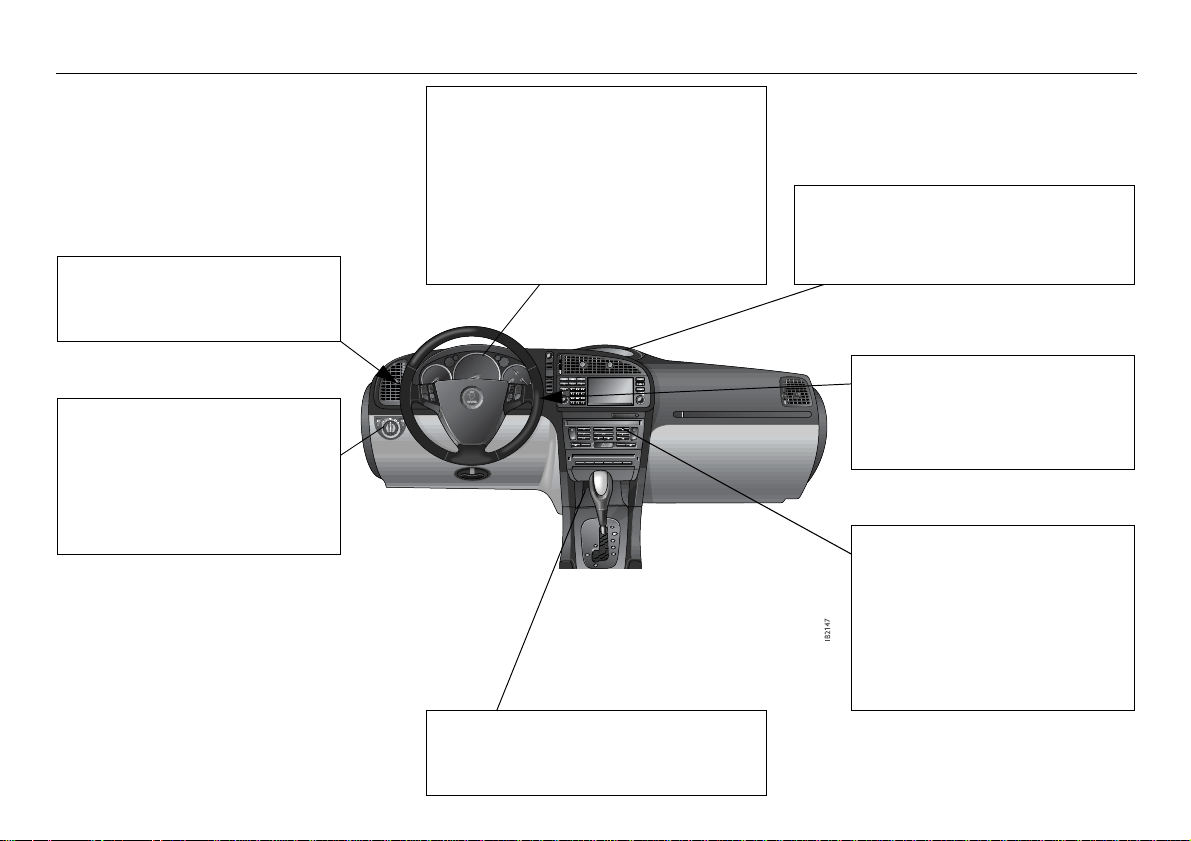
Instrument panel
Cruise Control___________ 159
Direction indicators_______ 93
High/low beam control stalk 92
Changing bulbs__________ 208
Front fog lights___________ 93
Headlight le v e lling________ 91
High/low beam __________ 92
Parking ligh ts____ ___ _____ 91
Rear fog l ight____________ 93
Fuel gauge ____ ___ ______ _____ 81
Odometer and trip mete r________ 79
Speedometer ________________ 79
Tachometer__________________ 78
Temperature gauge____________ 80
Turbo gauge _______________ __ 80
Warning and ind icator lights _____ 74
Clock _______________________ 88
Profiler________________ ______ 83
Saab Information Displ a y (SI D) ___ 83
Replacing wiper b lade s ___ 206
Washers and w ipers______ 95
Washer fl uid______ ______ 206
Automatic climate control __ 103
Car care and maintenan ce_ 255
Hazard warning light s_____ 94
Manual climat e cont rol____ 98
Seat heating____________ 102
Seat heating, ACC _______ 111
Ashtray _____________________ 126
Cigarette lighter_______________ 126
4
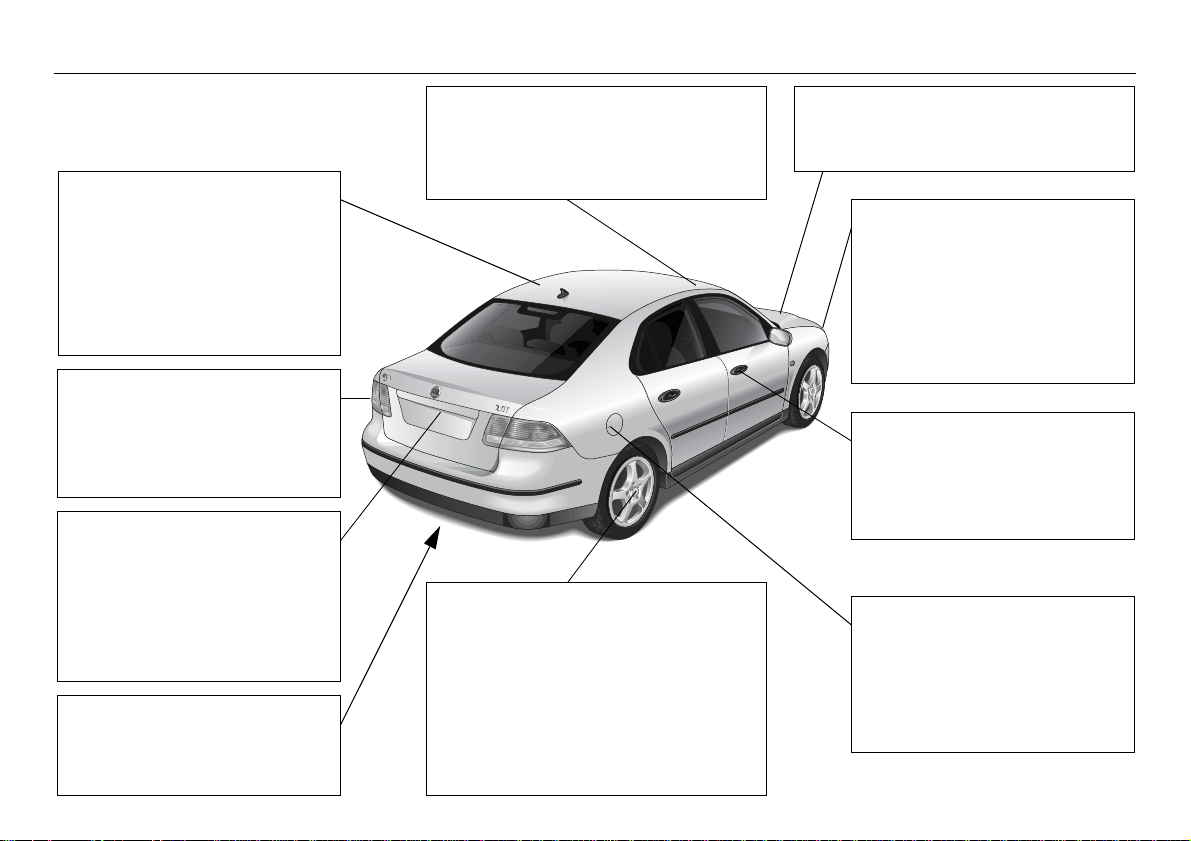
Exterior
Anti-corrosion treatment ___ 253
Body __________________ 251
Service program _________ 262
Sunroof_____________ ___ 120
Touching up paintwork ____ 251
Washin g _______________ 250
Waxing and p olish ing _____ 251
Brake lights_____________ 215
Changing bulbs__________ 208
Light switc hes ___________ 91
Taillights _______________ 215
Folding do wn th e rear seat _ 134
Lighting_____________ ___ 215
Load-through hatch_______ 136
Spare wheel _______ _____ 138
Tools _______________ ___ 138
Trunk_____________ _____ 134
Towing_________________ 184
Towing hook ey es ________ 184
Towing a trailer __________ 178
Maximum loads__________ _____ 268
Mounting holes f o r roof c arriers___ 182
Roof load____________________ 182
Braking ___________________ __ 160
Changing wheels______________ 245
Spare wheel _________________ 243
Tire pressure ________________ 277
Tire pressure monitor __________ 229
Tires _______________ ________ 231
Wheels _____________________ 275
Winter driving ________________ 175
Hood ____________________ ___ 192
Washing the en gine b a y_________ 249
Changing bulbs _________ 208
Dipswitch ______________ 91
Direction indicators____ ___ 93
Front lights_____________ 210
Headlight lev elli ng (Bi-
Xenon) _______________ 91
Headlight swi tches_______ 91
Headlight washers _______ 206
Central lock ing__________ 40
Child safety loc ks________ 44
Lock bu ttons____________ 40
Trunk lock______________ 43
Economical motoring_____ 173
Fuel filler door __________ 147
Fuel gauge_____________ 81
Fuel grade _____________ 271
Refueling ______________ 147
5
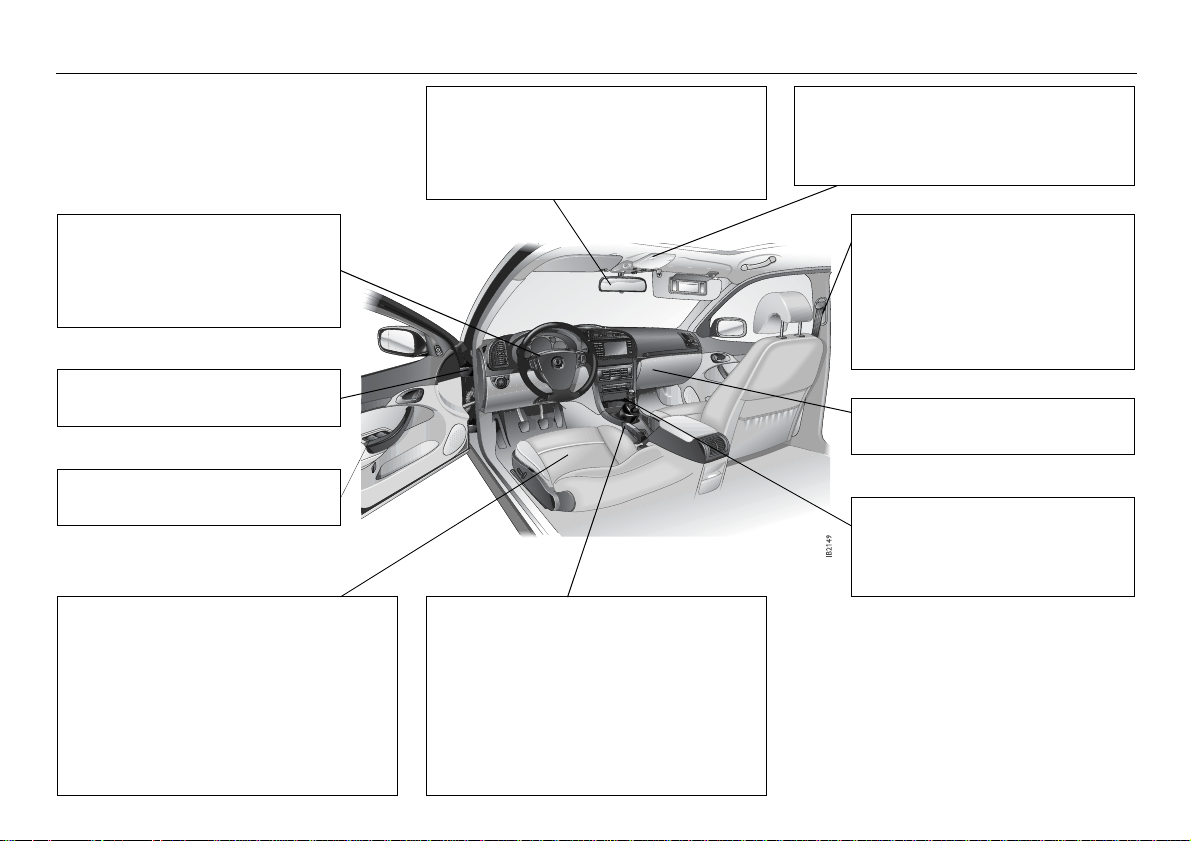
Interior
Airbag _________________ 28
Steering wheel adjustm ent _ 116
Steering _______________ 273
Fuses _________________ 222
Electric windows _________ 117
Child seats _____________ 21
Folding do wn th e rear s eat _ 134
Rear seat ______________ 134
Safety belts_____________ 11
Seat adjustment _________ 16
Seat heating ____________ 102,
111
Upholstery care__________ 249
Interior rearview mirror _________ 129
V anity mirror _________________ 124
Door mirrors_____________ _____ 128
Ashtray and c igarette ligh ter _____ 126
Break-In Pe riod _______________ 151
Driving in hot/cold climates ______ 175
Ignition s witch ________________ 140
Parking br ake______ _________ __ 167
Parking _____________________ 167
Starting the engine ____________ 142
Interior lighting: cha nging b ulbs___ 220
Interior light s wit ches___________ 123
Sunroof _______________ ______ 120
Airbag_________________ 28
Child safety loc ks________ 44
Child seats__________ ___ 21
Safety belt c are _________ 248
Safety belts ____________ 11
Glove c ompa rtment ______ 126
Storage compartments____ 126
Automatic tr ans mission ___ 153
Changing gears _________ 152
Manual transm iss ion _____ 152

6
Engine bay
Color code______________ 278
Engine number __________ 278
Gearbox nu mber_________ 278
Warning labels __________ 7
V ehicle ide ntificati on number 278
Alternator ______________ 205
Drive belt_______________ 205
Exhaust emission c ontrol __ 145
Ignition system __________ 272
Simple troubl eshoot ing
(A/C, ACC)_____________ 255
Spark plugs_____________ 272
Turbo gauge ____________ 80
Engine oil: chec ki ng level __ 196
Changing engine o il____________ 197
Engine: description ____________ 193
Engine: technica l data__________ 270
Important consideration s f or driving 144
Oil grade a nd vi scos ity__________ 270
Coolant: checking/topping-up ____ 199
Driving in hot clima tes__________ 177
Radiator_____________________ 270
Temperature gauge______ ______ 80
ABS brakes_______ ___ ___ 160
Brake pads_____________ 200
Brake system ___________ 274
Brake fluid________ ______ 200
Changing a fuse_________ 222
Fuse table _____________ 227
Fuses_________________ 222
Relays __________ ______ 227
Topping-up fluid _________ 206
Wash/wipe stalk switch____ 95
Washer fl uid______ ______ 206
Washer je ts ____________ 207
Automatic t ra nsmiss ion_________ 153
Transmission: technic al data_____ 272
Manual trans mission_________ __ 152
Po we r steering________________ 201
Fluid: chec king/ toppin g up_______ 201
Battery________________ ______ 202
Battery charge________________ 202
Jump starting________ _________ 187
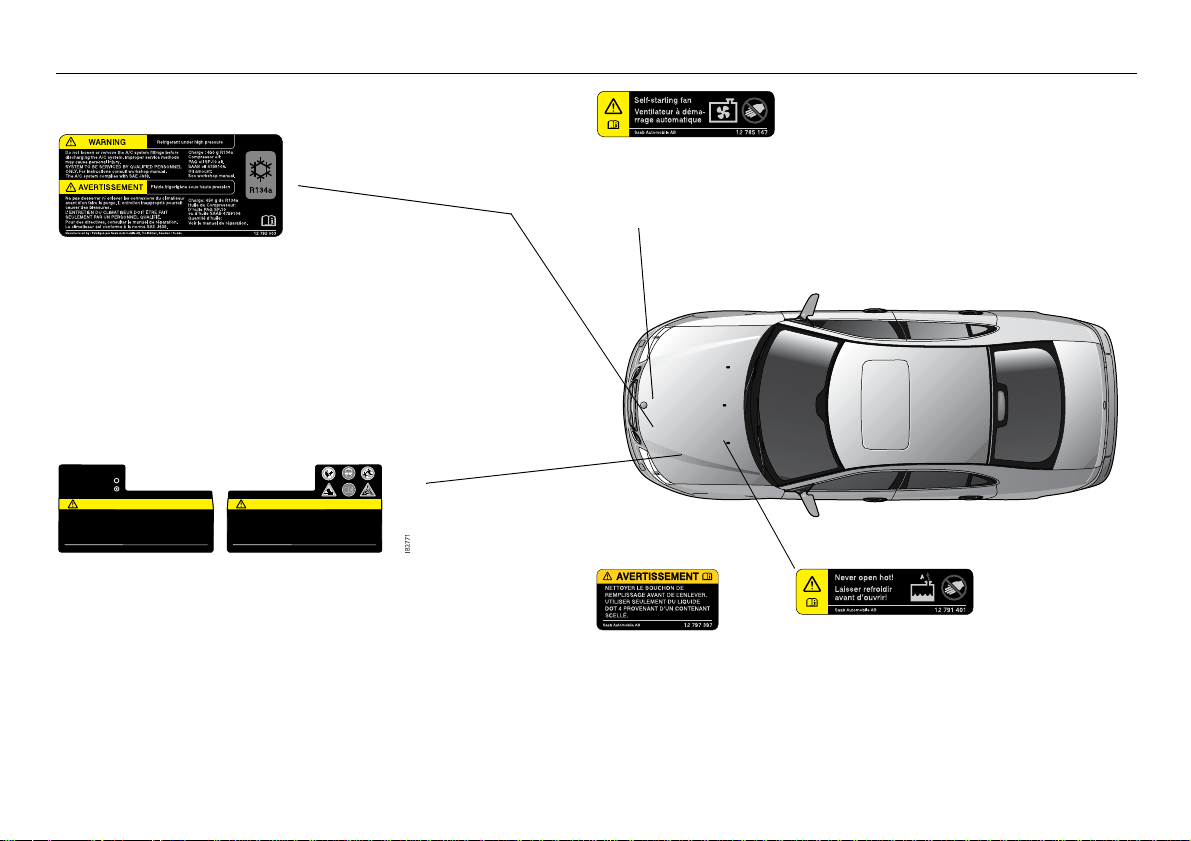
Warning labels
A/C system:
Refrigerant at high pressure.
Do not loosen or remove the A/C system fittings before discharging the A/C
system. Improper service methods may cause personal injury.
serviced by qualified personnel only. For instructions consult dealer manual.
The A/C system complies with SAE J639.
Charge: 680 g R134a.
Compressor oil: 150 cc PAG oil SP-10 alt.
Saab oil 4759106
LEVEL INDICATOR
INDICATEUR DE NIVEAU
DARK / NOIR
OK
CLEAR
LOW
CLAIR
BAS
DANGER/POISON 700 CCA (SAE)
• No sparks, flames or smoking. • Flush eyes immediatly with water
• Shield eyes, explosive gases can cause
blindness or injury.
• Sulfuric acid can cause blindness or severe
burns.
MAINTENANCE-FREE BATTERY-P/N 53 52 000 12V/700A/125min(SAE) 12V/700A/70Ah (EN)
Saab Automobile AB 53 53 057 Manufactured by Tudor Spain (Exide Technologies) 12102-EP
Get medical help fast.
• Do not tip battery. Do not open battery
KEEP OUT OF REACH FROM CHILDREN.
DANGER/POISON 700 CCA (SAE)
• Éviter les étincelles et les flammes. Ne pas fumer. • Rincer immédiatement les yeux avec de
• Protéger les yeux car les gaz explosife peuvent
causer la cécité ou des blessures.
• L'acide sulfurique peut causer la cécité ou des
brûlures graves.
000 12102-EP
BATTERIE SANS ENTRETIEN-P/N 53 52 000 12V/700A/125min(SAE) 12V/700A/70Ah (EN)
Saab Automobile AB 53 53 085 Fabriquée par Tudor Espagne (Exide Technologies) 12103-EP
l'oau Consulter un médecin rapidement.
• Ne pas pencher ni ouvrir la batterie.
GARDER HORS DE LA PORTÉE DES
ENFANTS
Battery:
• No sparks, fl ames or sm okin g
• Shield eyes, explosive gases can cause blindness or injury
• Sulphuric acid can cause blindness or severe burns
• Flush eyes immediately with water. G et me dic a l h e l p f a s t
• Do not tip battery. Do not open battery
• NO SP ARK S , FLAMES OR SMOKING
• SHIELD EYES
• KEEP OUT OF REACH FRO M CHILDREN
•ACID
• SEE OWNER’S MANUAL
• EXPLOSIVE GAS
Syst em to be
000 12103-EP
Radiator fan:
Radiator fan may start at any
time.
CANADA
NETTOYER LE BOUCHON
DE REMPLISSAGE
AVANT DE L’ENLEVER.
UTILISER SEULEMENT
DU LIQUIDE DOT 4 PROVENANT D’UN CONTENANT SCELLÉ.
7
Coolant:
Never open when engine hot!
8
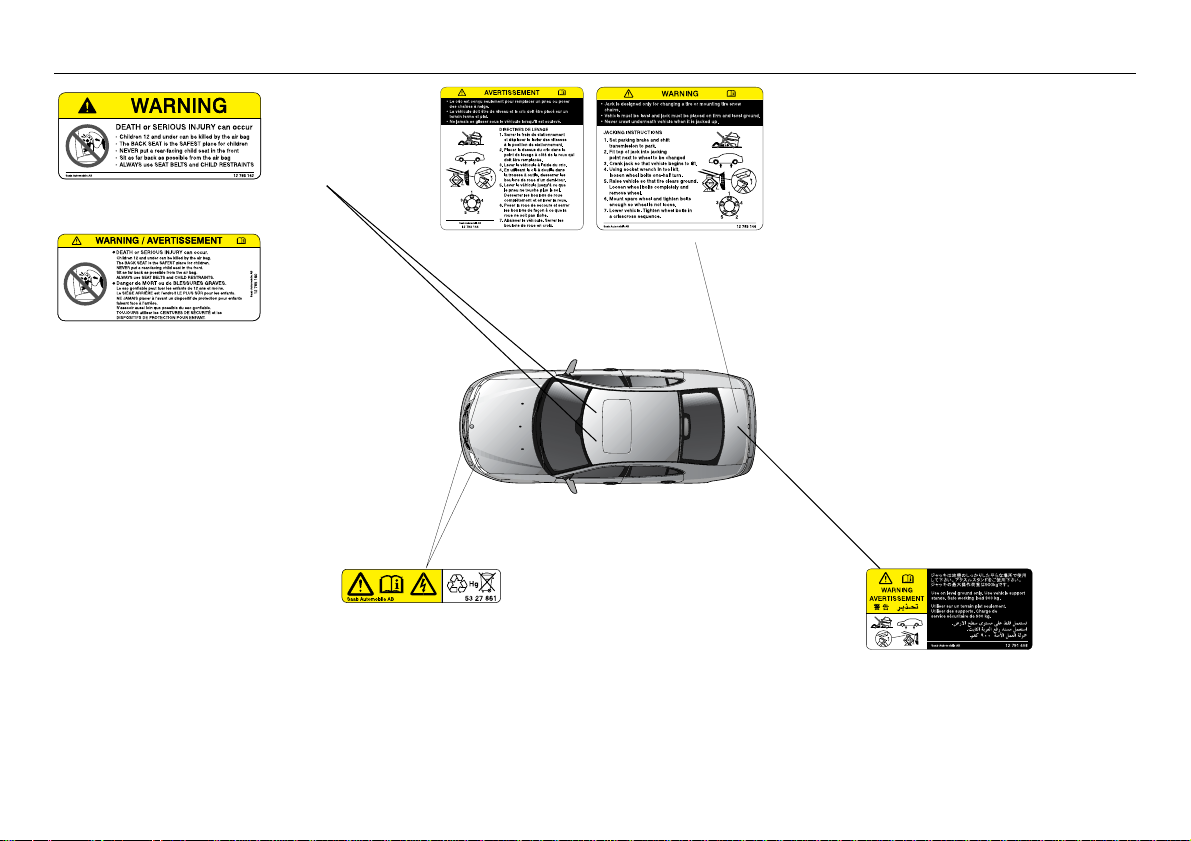
USA
CANADA
DEATH or SERIOUS INJURY can occur
• Children 12 a nd un de r ca n be k il le d by the air bag
• The BACK SEAT is the SAFEST place for children
• NEVER put a rear-facing child seat in t he f ront
• Sit as far back as possible from the air bag
• ALW A YS use SEA T BELTS and CHILD RESTRAINTS
Contact a Saab dealer if a
xenon headlight requires
replacement.
This label is only found on
cars with xenon headlights.
Jack
• Jack is designed only for changing a tire or mounting
tire snow chains.
• Vehicle must be level and jack must be placed on firm
and level ground.
• Never cra wl unde rneat h v ehi cl e when i t is j ac ke d up .
JACKING INSTRUCTION
1 Set parking brake and shift transmission to park.
2 Fit top of jack into jacking point next to wheel to be
changed.
3 Crank jack so that vehicle begins to lift.
4 Using socket wrench in tool kit, loosen wheel bolts
one-half turn.
5 Raise vehicle so that tire clears ground. Loosen
wheel bolts completely and remove wheel.
6 Mount spare wheel and tighten bolts enough so
wheel is not loose.
7 Lower vehicle. Tighten wheel bolts in a crisscross
sequence.
Changing wheels:
Use on level ground only. Use vehicle
support stands. Safe working load
1980 lbs. (900 kg).
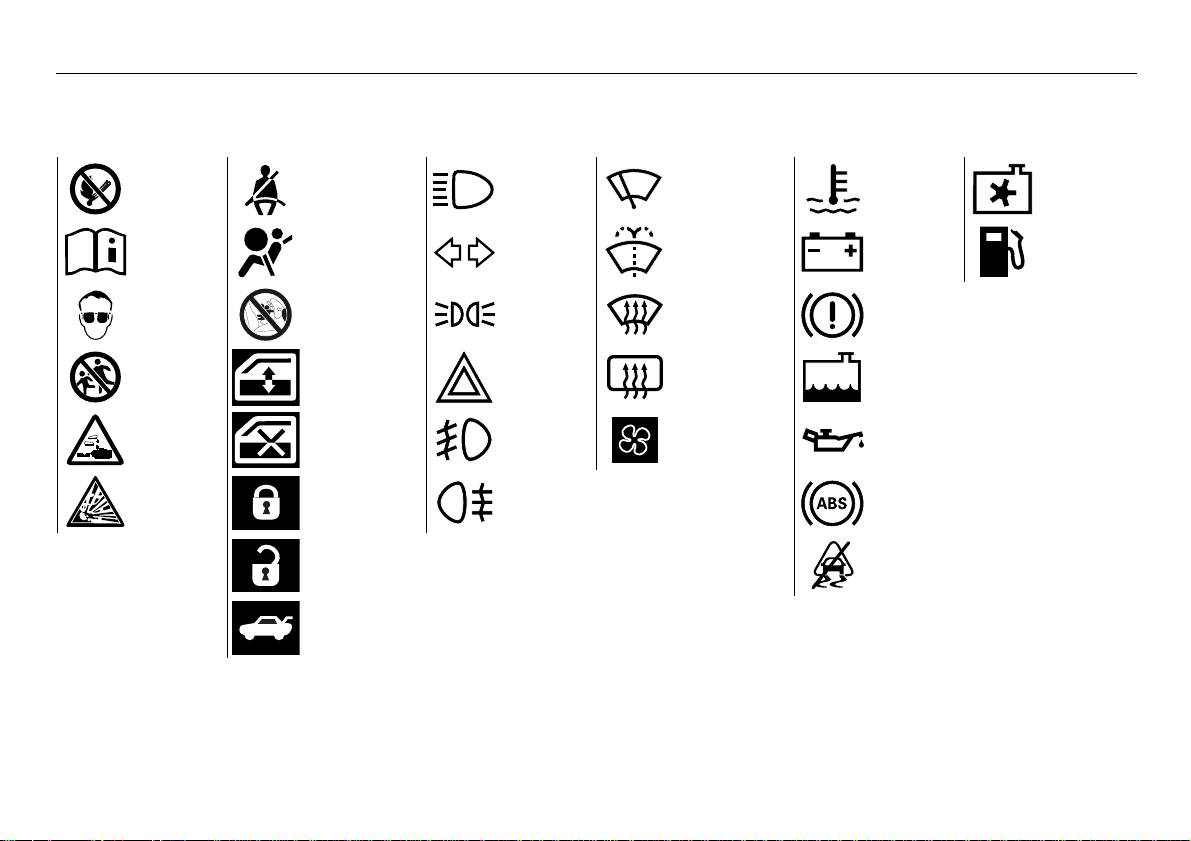
Example of symbols that can be found in your car
9
No sparks,
flames or
smoking
Refer to
the Owner’s
Manual
Shield eyes
Keep out of
reach of
children
Battery acid
contains s ulphuric acid
Risk of
explosive gas
Buckle up
Airbag
Never place a
rear-facing
child seat in
this seat
Electric
windows
Deactivating
of rear win dow
switches
Central
locking, lock
Central
locking,
unlock
T runk lid,
opening
Headlights
Direction
indicators
Parking lights Defroster
Hazard warning lights
Front fog
lights
Rear fog light
Windshield
wipers
Windshield
washers
Rear window
heating
Cabin fan
Coolant t em perature
No charge to
battery
Foot brake
Coolant l e vel
Engine oil
pressure
ABS brakes
Electronic
Stability
Program
Radiator fan
Fuel

10 Safety
Safety
Safety belts ___________ 11
Seats ________________ 16
Head restraints ________ 20
Child safety ___________ 21
Airbag________________ 28
11Safety
Safety belts
WARNING
• Buckle up and adjus t you r safet y belt
before driving off so tha t you can p ay
full attention to the traffic.
• Safety belts must be worn at all time s
by all occupants.
• Child safety, see pa ge 21.
• Check that the loc king ton gue is properly locked in the belt lock.
• In the event of a cra sh, a r ear-sea t
passenger not wear ing a saf ety be lt
will be thrown forward against the
front-seat backrests. The stresses
imposed on the f ront seat passe ngers
and belts are multipli ed and can result
in needless injury or ev en death for all
car occupants.
Three-point inertia-reel s afety belts are
provided for all seats .
The results of studies show tha t it is equally
important to wear safety belts in the rea r
seat as in the front seats .
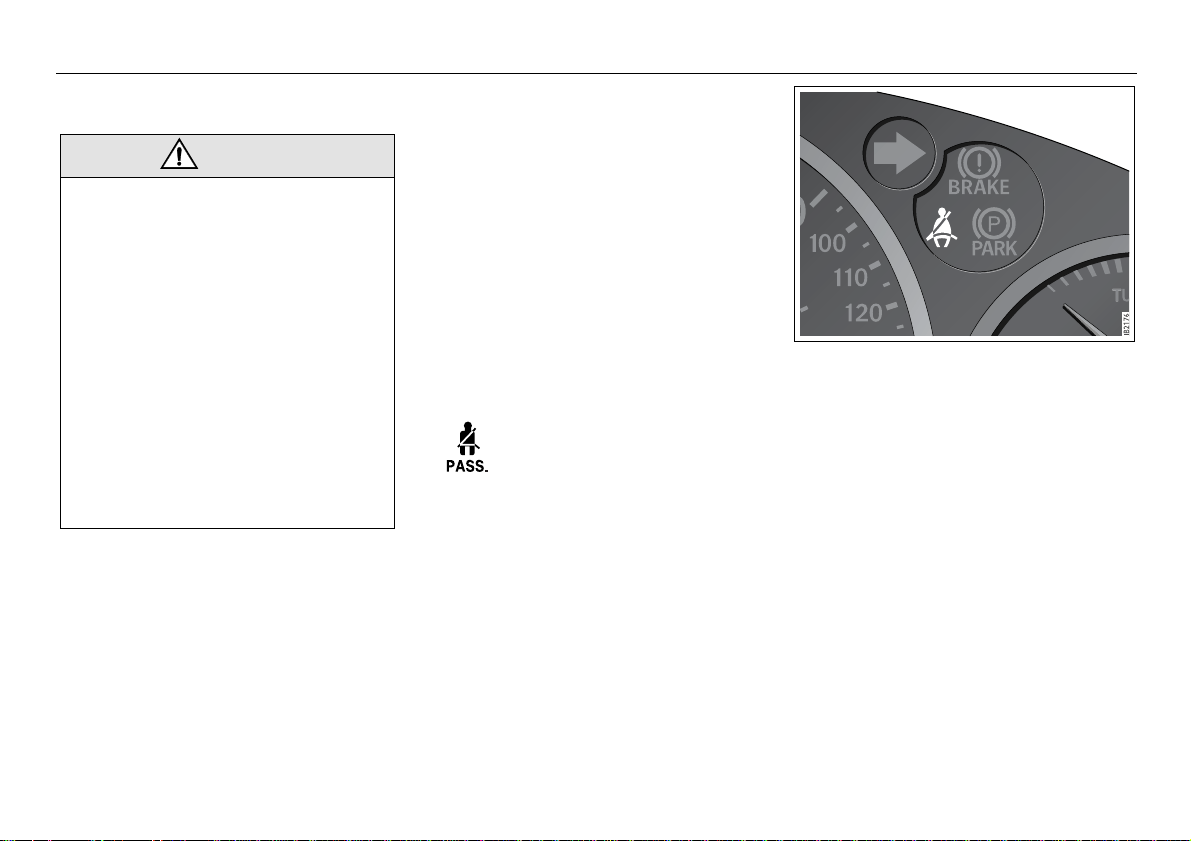
Safety belt reminder
When the ignition is switched on, the safety
belt reminder in the main instru ment panel
will come on if t he driver has not buckled up.
In addition an audi ble s ignal sound s for 4 –
8 seconds, or unti l the d river fa st ens hi s
belt.
The front seat pass enger i s remind ed to
buckle up by the Saab In formati on Disp lay
(SID).
Use your seatbelt.
Driver seat safety belt reminder
12 Safety
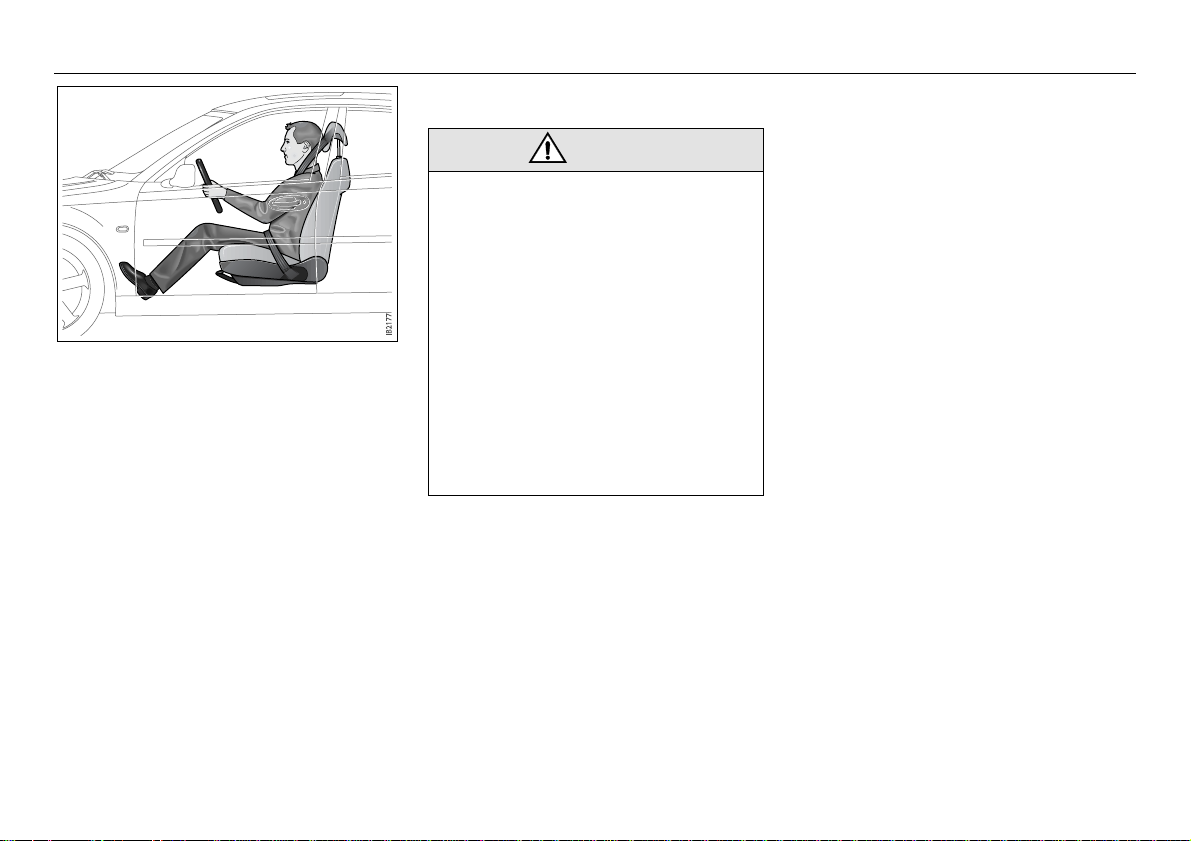
Correct seating position
Correct position for safety belt
WARNING
Proper positioning of the safe ty be lt is
extremely important.
• An out of position safety be lt can result
in the wearer slidin g unde rnea th the
belt in a crash (subm arinin g) and
injury can result from the lap portion
cutting into the ab domen .
• Never fasten the safety belt wit h the
shoulder belt behind the body or pull
the belt off the sh oulder and under th e
arm.
• Two people must never share one
safety belt. In the event of a c rash
those sharing a belt risk being crushed
together and injured.
Consider this:
• Positi on the lap s tr ap sn ugl y and low
across the hips so that it just tou ches the
thighs.
The shoulder str ap m ust be as f ar in on
the shoulder as pos sible.
• Check to ensure that the belt is not twisted
or rubbing again st an y sha rp edges .
• There should not be any sla ck in the belt.
Pull the belt tight – particularly important
when thick outer cloth ing is worn. It
is advisable to remov e th ic k ite ms of
clothing.
• Refrain from tilting the backrest more than
necessary, as the safety belt provide s
better protection when the seat is in the
more upright positio n.
• Only one person per s af ety belt!
• For most of the time a saf ety be lt is worn,
the retractor will al low the wearer freedom
of movement . The retractor locks up automatically if the be lt is jerk ed or withdr awn
sharply, the car tilts, the bra k es are
applied hard or a cr ash occ urs .
• Children up to 6 years of age m ust always
be seated in a chil d sea t. Saab recom mends the use of a child sea t f or children
up to the age of 10.
• Children who ha v e gro wn out of a chi ld
seat should be r estra ined b y the c ar’s
standard three-point belts. Make sure that
the shoulder belt is not in conta ct with the
neck or throat. If it is , a booster seat/cush ion may be neces sary.
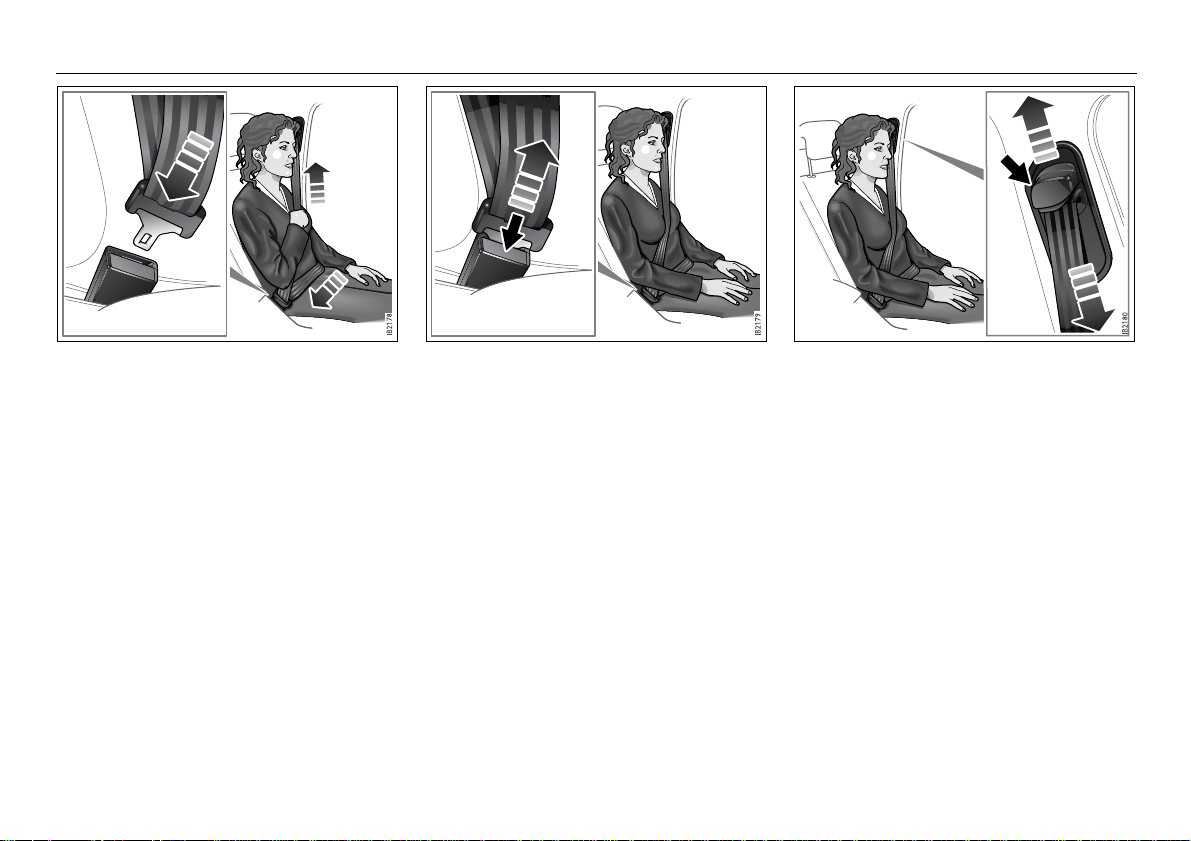
To fasten the belt Press the red button to release the belt The belt guide on door pillar
13Safety
Front safety belts
Fasten the belt by pulling the belt and inserting the tongue in the buckle. Chec k that it is
securely fastene d.
Position the lap part low across the hips.
Grasp the shoulder belt clo se to the bu ckle
and pull the belt towards the sh oulde r to
tighten the lap belt p art.
The belt must be as far i n on the shoulder as
possible.
Press the red button on the belt buckle to
release the belt.
The front safety belts have their lower
anchorage points o n the sea ts. The s afety
belts follow the sea ts w hen th e legro om is
adjusted.
Refer to page 248 for how to che ck the function of the safety belts, cleaning, etc.
Belt height adjustment, Sport Sedan
The belt guide on the door pillar for the fr ont
safety belts can be set at different heights.
The front belt guide in the Convertible is not
adjustable due to belt in sea t.
Adjust the belt s o that it is as high up as possible without rubbing again st the neck. To
avoid chafing in the ca se of a short per son,
the guide can be lowered until the be lt
comes about an inch (a few centime tres)
from the throat but still provides safe
restraint.
Raise the belt gu ide by pushing it upward to
the desired posi tion. To lower it, depress the
catch release button while lowe ring th e
guide. Check that the gu ide locks in its new
position.
14 Safety
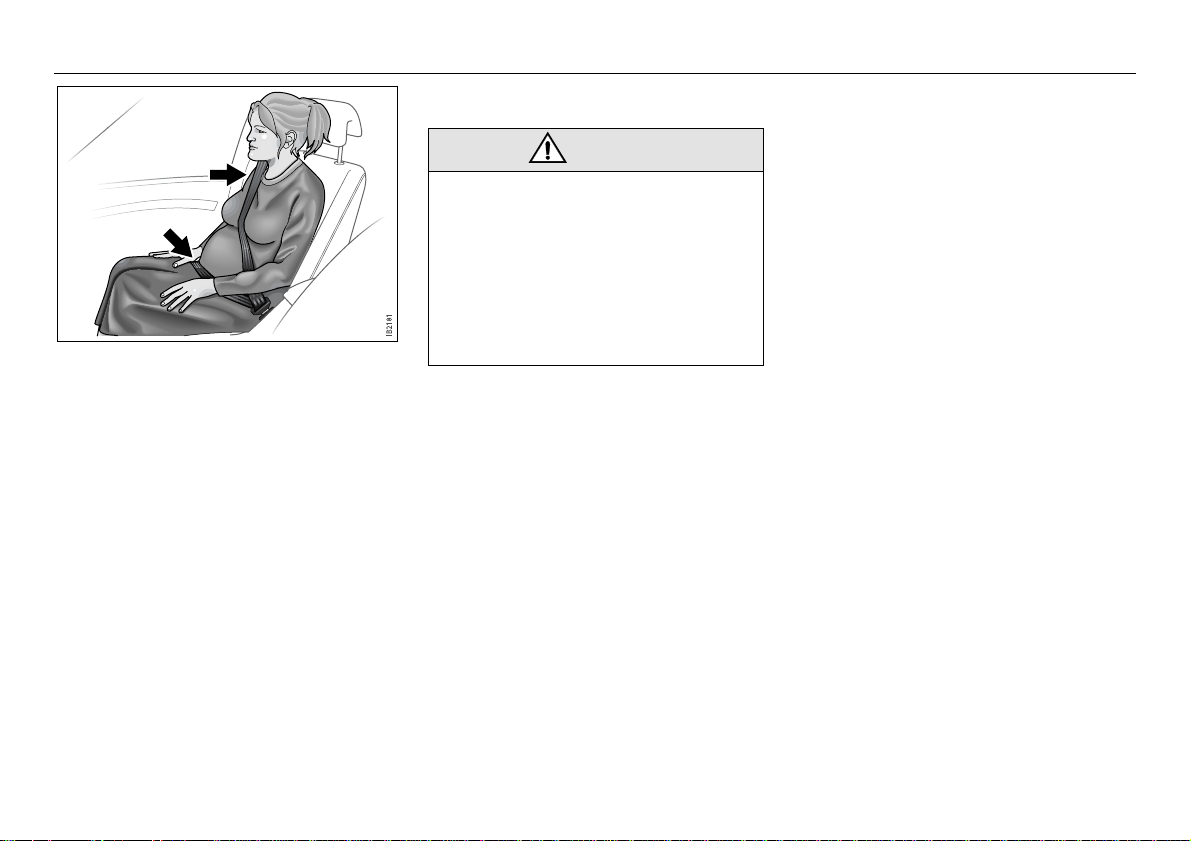
Safety belt use during pregnancy
Pregnant women mus t always wear a
safety belt to protec t both thems elves and
the unborn child.
The lap belt shou ld be place d low, a cross
the hips and over th e uppe r thigh s.
Safety belt pretensioners
WARNING
If the car is invo lved in a crash, t he safety
belts, belt pretension ers an d othe r
components mus t be in spect ed by an
authorized Saab dealer and repla ced as
necessary.
Never make any alteration s or repairs to
the safety belt yo urself . Visit an au thorized Saab dealer fo r any neces sary
repairs.
Sport Sedan: The front sa fety b elt s are
equipped with pretensio ners and force limiters. The pretensio ners a re acti vated in the
event of a violent frontal or side-on crash.
The safety belt pretensione rs are only activated if the safety belt in question is in use
but not activated shoul d the car rol l ove r.
The safety belt p retensi oners serve to
reduce the forward m ovement of t he bod y
by tensioning the b elt. Th e force limi ters
reduce belt loads on th e body by "sl acken ing" the safety b elt sl ightly to ab so rb the
body’s kinetic energy as gradually as possi ble.
Convertible: The front and rear safe ty belts
are equipped with p rete nsion ers an d force
limiters. The p retensi oners ar e act ivated in
the event of a vi olent f rontal or sid e-on
crash. The front sa fety b elt pre ten sione rs
are only activated i f the s afety belt i n ques tion is in use.
The safety belt p retensi oners serve to
reduce the movemen t of the body by te nsioning the belt inc l. a ro ll ov er cras h. The
force limiters redu ce belt load s on the body
by "slackening" t he safety belt sligh tly to
absorb the body’s kinetic energ y as gradually as possib le.
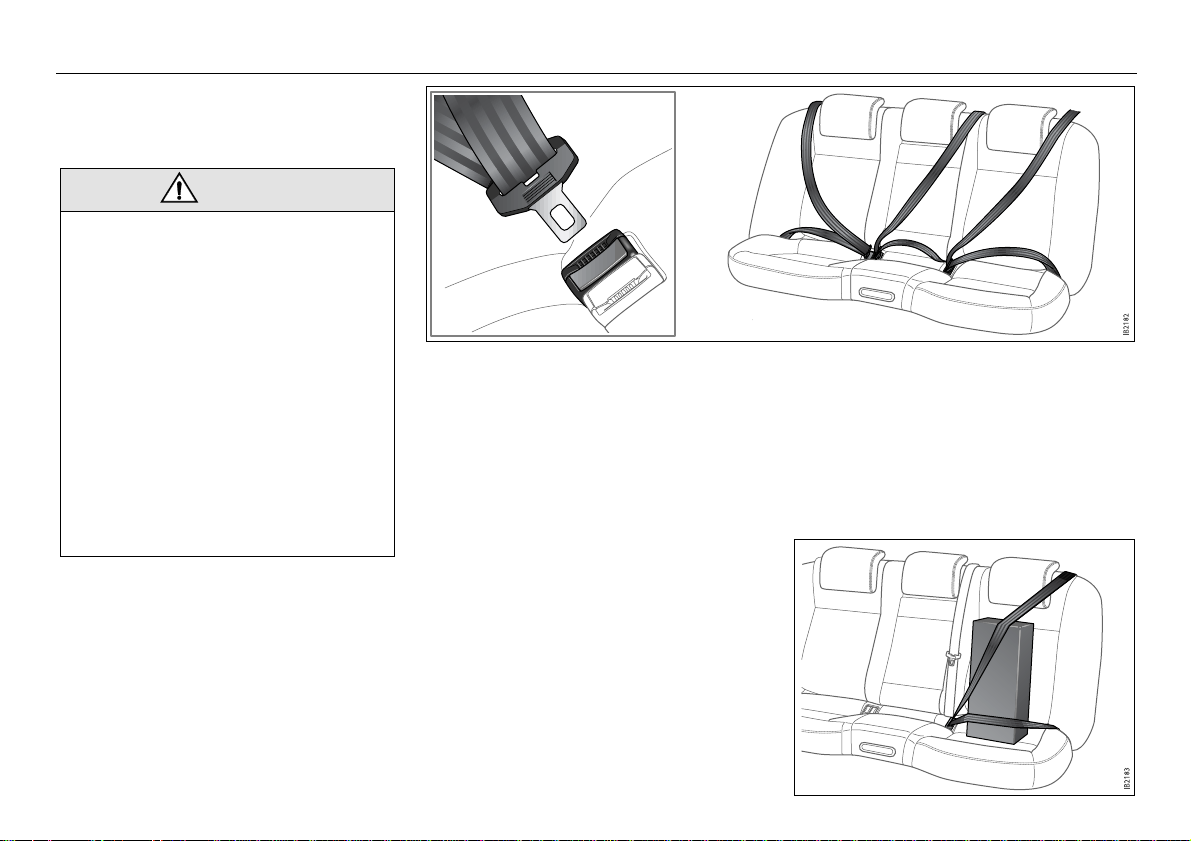
Safety belts, rear seat
Safety belts rear seat, Convertible,
see page 67
WARNING
• Make sure that the belt do es not
become trapped wh en the backrest is
folded down or raise d (see page 134) .
• If a cargo has to be placed on a seat,
it must be properl y se cured wi th the
safety belt. This reduces the ris k of the
cargo being thrown about du ring hard
braking or a crash, which could cause
personal injury.
• Check that the belt i s not t wisted or
lying against shar p e dges.
• Make sure you use the correct safety
belt buckle. The buckles for the center
and left-hand rear s eats are cl ose
together.
The three rear seats all have t hree-poi nt
safety belts with inertia reels.
Fasten the belts by pulling the bel t across
you and inserting the tongue in to the buckle.
Check that it is securely fastened.
Grasp the shoulder belt clo se to the bu ckle
and pull the belt towards the sh oulde r to
tighten the lap belt p art.
The belt must be as far in on the shoulder as
possible.
15Safety
Rear safety belts
Press the red button on the buckle to
release the belt.
See page 248 for the check ing o f belt function, cleaning, etc.
Securing an item on the rear seat
16 Safety
Seats
WARNING
Never adjust the d river’s seat except
when the car is s tationa ry.
Manually adjusted front seats
The following seat adjus tment s c an be
made to achieve a comfortable driv ing
position:
• Height
Sport Sedan - driver’ s se at
Convertible - passeng er s eat s
• Legroom
Sport Sedan - both seats
Convertible - pass enger seats
• Backrest rake angle
Sport Sedan - both seats
Convertible - pass enger seats
• Lumbar support firmness
Sport Sedan - driver’ s seat
Convertible - only electrically adjustable
front seats
• Head restraint height
Sport Sedan - both seats
Convertible - pass enger seats
We recommend that adjustme nts to the
driver’s seat be perfor med in th e foll owing
order:
1Height
2 Legroom
3 Backrest rake angle
4 Head restraint height
Lastly, adjust the posi tion of the steer ing
wheel (see page 116) .
Electrically adjustable front seats
See page 18.
Electric heating, front seats (option)
See pages 102 and 1 11.
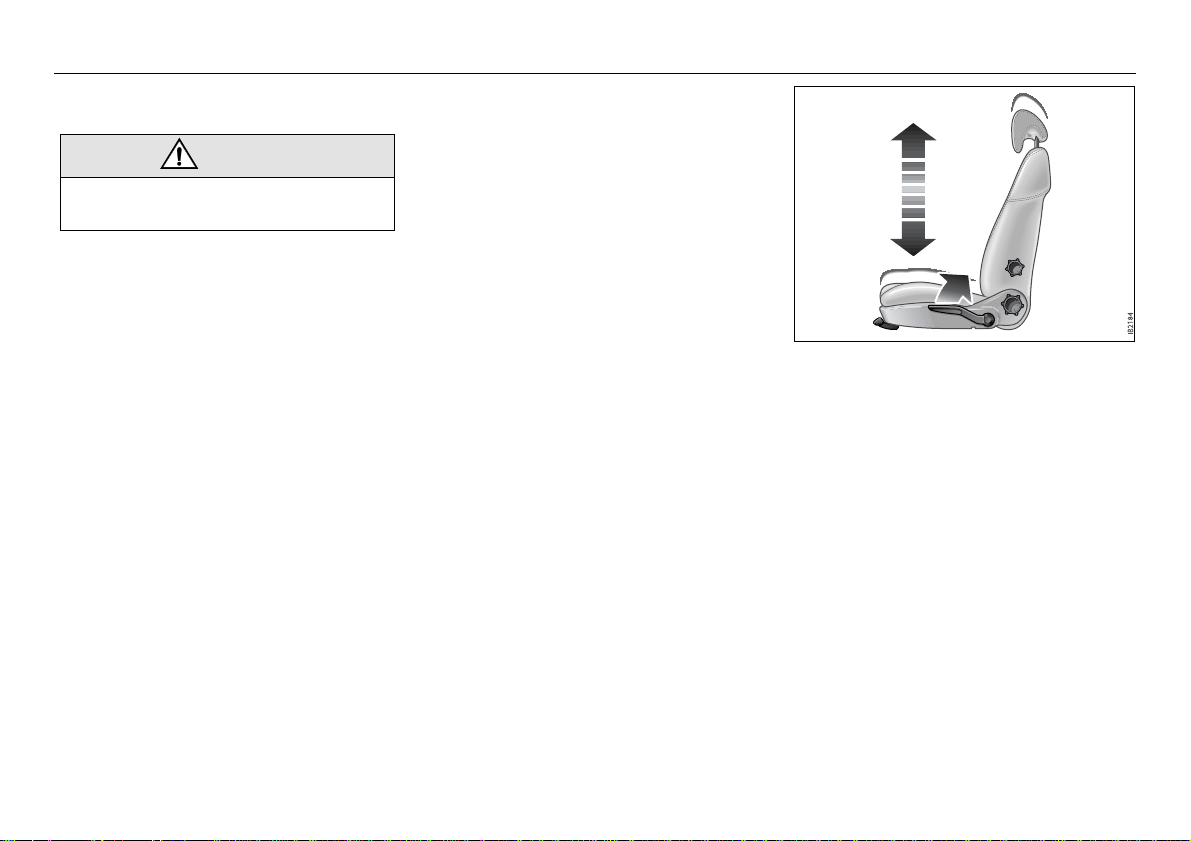
Height adjustment
Sport Sedan, driver’s seat
Convertible, both front s eats
Lift the lever to rais e the s eat. T he lever i s
spring-loaded to return to its neutra l position. Repeated lifting of the lever will
increase the heig ht in steps .
Press down the lever to lower t he seat.
Repeated downwar d pres ses of the l ever
will lower the seat in steps.
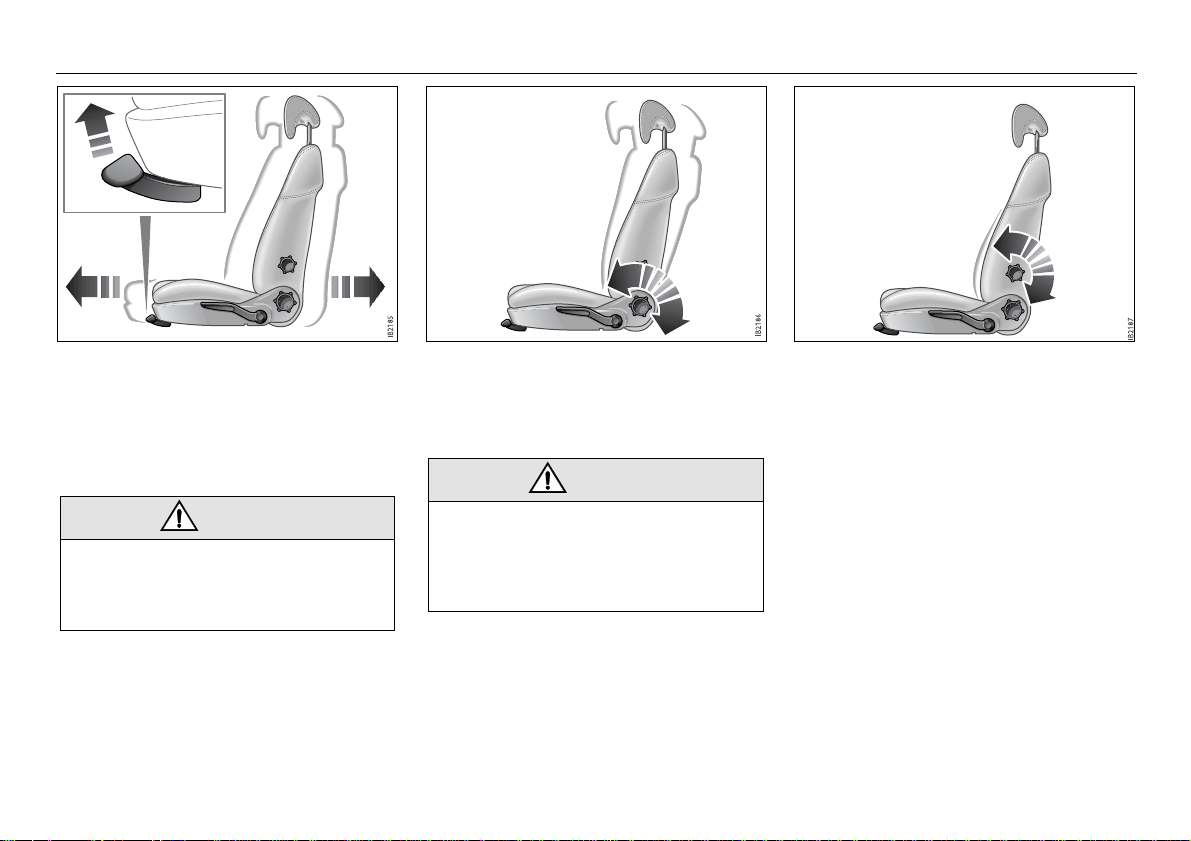
Adjusting the backrestAdjusting the legroom Adjusting the lumbar supp ort
17Safety
Legroom adjustment
Lift the lever under the front of th e seat and
slide the seat to the de sired posit ion.
WARNING
Check that the se at is locked i n t he new
position. If not , it may m ove whil e the car
is being driven an d it could res ult in injur y
to the occupant in t he ev ent of a cras h.
Backrest rake angle
WARNING
The backrest should be upri gh t durin g
driving, so that the safe ty belt, airbag and
backrest can prov ide optimum protection
in the event of em ergenc y brak ing o r a
crash, in particul ar a rea r-end c rash.
To find the most com fortable posi tion, t urn
the knob to provide stepless adj ustment of
the backrest.
Lumbar support, Sport Sedan
Adjust the firmness of the lu mbar support by
turning the knob.
18 Safety
Electrically adjustable front seats (option)
WARNING
• The seats are actuated by powerful
motors. Bear this in min d when adjusting the seat, and make sure tha t nothing gets caught an d damaged. Ensure
that nothing can be trappe d behind the
seat when adjusti ng it .
• Bear in mind that children can be
injured if they play w ith the electricallyoperated seats.
• Always remove the remote control
when you leave th e car to p revent
personal injury caused by the electrically adjustabl e sea ts, for exam ple,
due to children p laying. E lec trically
adjustable front seats with memory
function, see page 19 .
With the doors closed th e seats can only be
adjusted when the igniti on is ON.
However, there are two exception s:
• T o fac ilitate getting into the car, both s eats
can be adjusted w hen ei ther of the fro nt
doors is open.
• The seats can be adjusted up to
2 minutes after bo th door s ha v e been
closed (applicable only to cars without
window and sunro of pin ch pro tection).
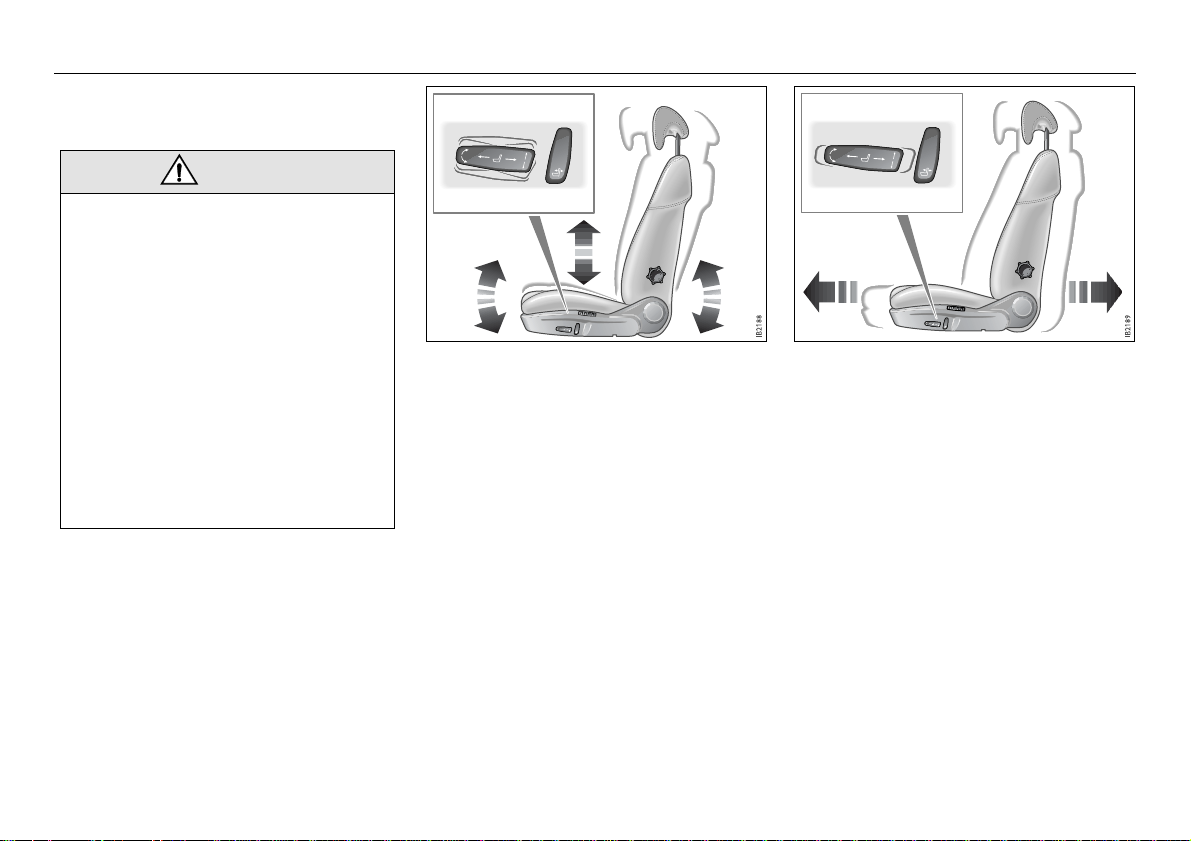
Adjusting the height and angle Adjusting the legroom
Height adjustment and seat angle
Adjust the height of the seat with the rear
section of the front le ver.
Adjust the angle of the seat with the front
section of the front le ver.
Legroom adjustment
Adjust the legroom wit h the fr ont lev er.
19Safety
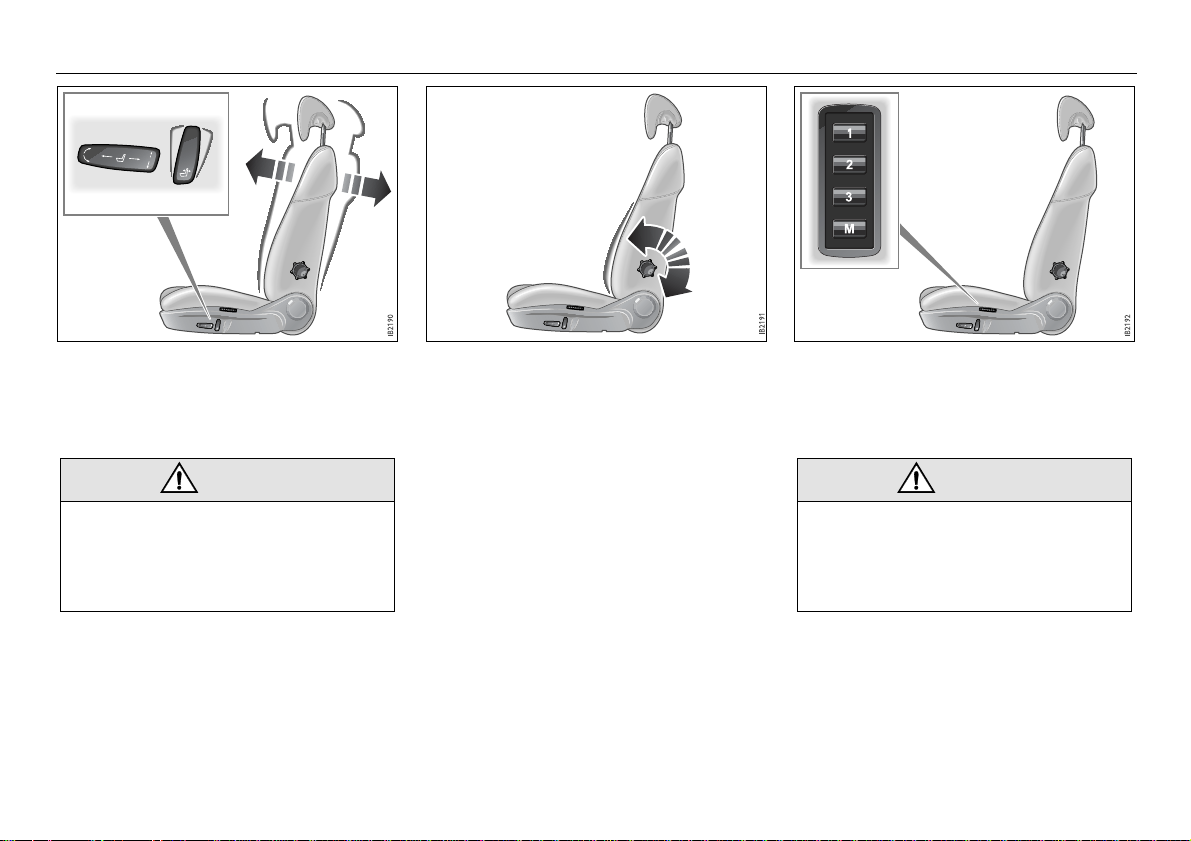
Adjusting the rake angle Adjusting the lumbar support
Backrest rake angle
WARNING
The backrest shoul d be u pright during
driving, so that the safety belt, airbag a nd
backrest can pr ovide optimum protection
in the event of emergency braking or a
crash, in particular a rear-e nd cra sh.
Adjust the rake an gle of the ba ckrest with
the rear lever.
Driver’s seat in Sport Sedan
Lumbar support, driver’s seat
Adjust the firmness of the lum bar support by
turning the knob.
Memory function buttons
Memory function (option)
WARNING
The legroom of the elec trically operate d
driver’s seat ca n alway s be adjus ted,
whether or not a front door i s ope n and
irrespective of the position of the ign ition
switch.

20 Safety
When the ignition is ON , all sea t setti ngs
can be adjusted. When the door is open and
before the remote cont rol has been inserted
into the ignitio n switch, a ll seat s ettings ca n
be adjusted for up to 20minutes.
The memory also in clude s the door m irror
settings.
Storing and restoring settings
1 Adjust the seat and the door mirrors .
The lumbar support is not i ncluded b y
the memory function.
2 Press and hold the M-button an d then
press one of the preselect b uttons (1, 2
or 3). A chime will sou nd to confirm that
the settings have been saved.
To recall programmed setti ngs, p ress a nd
hold the desired memor y butto n unti l the
seat and door mirrors adopt their p rogrammed positions. The memory function
also includes t he doo r mirror se ttings .
To facilitate reversi ng, the pass enger-s ide
door mirror can be ang led do wn, refer to
page 128.
Head restraint s
Sport Sedan
Head restraint, Convertib le, see page 66.
WARNING
• Adjust the head restrai nt so that the
head is optimally sup port ed a nd the
center of the head re strain t is a t ear
height, thus reduc ing the likelih ood of
neck injury in a cra sh.
• Raise the head restraints in the seat s
that are occupied.
The front seats are e quipp ed wi th Saab
Active Head Restraints (SAHRs). T hese
reduce the risk of neck i njury if the car is hit
from behind.
The SAHR is a mech anica l syst em, a ctuated by body weight. The m echanism is built
into the top of the b ackrest, where it is connected to the head res traint.
In the event of a rear-end crash, t he body is
forced back against the backr est. This, in
turn, causes the m echan ism t o pres s t he
head restraint forward a nd upward, thus limiting the backwar d movem ent of the head.
Therefore, the SAHR do es not n ormall y
need to be replaced or repaired after a rea rend crash.
The front and rear he ad res traints c an be
raised and lowered to a number of positions.
• Raising: gra sp the head restr aint on both
sides and pull it str aight up.
• Lowering: Press the h ead re strai nt
forward an d do wnw ard.
The rear head restraints can be lo wered
fully to improve rearward vision when the
rear seats are unoc cupi ed.
21Safety
Child safety
WARNING
• Children must always be suit ably
restrained in the car .
• DEATH or SERIOUS
INJURY can occur
• Children 12 and under or
shorter than 55inches
(140 cm) can be killed by the
airbag
• The BACK SEAT is the SAFEST place
for children
• NEVER put a rear-facing child s eat in
the front
• Sit as far back as p ossible from th e
airbag
• ALWAYS use SAFETY BELTS and
CHILD RESTRAINTS
WARNING
• Never leave c hild ren una tten ded in a
car, even for a short time.
– Children can suffer h eat stro k e,
perhaps die, in a matte r of mi nute s .
– Children can put the car into ge ar and
hurt themselves or othe rs.
• At gas stations, ta k e the r em ote
control out of th e car wh ile fi lling the
tank.
• Never allow children to climb on top of
or under motor v ehic les.
• Always look for childr en before backing your car out of a garage or driveway.
• T o a v oid carb on mono xide poisonin g,
never let a car idle in the ga rage.
• Supervise young childre n arou nd
buckets of w ater w hile was hing y our
car. Small children can drown in a
short time in less than an inch of wa ter.
WARNING
Protect children from getting
trapped in the trunk of your car
• T each chi ldren not to pla y in or arou nd
cars.
• Watch children when loading or
unloading the ca r so they don´t get
locked in by mistake.
• Always lock the doors and trunk of
your car , and k eep the ke ys out of chil dren´s sight and reac h.
• Keep the rear fold-down seat closed to
help prevent children from getting into
the trunk from insid e the car.

22 Safety
General information on child safety
The same attention m ust b e giv en to c hild
safety in the ca r as is give n to a dults.
Children travel most safely whe n prop erly
restrained. However, the typ e of restra int
must be appropriate for the size of the child.
Always consult your Saab de aler before
fitting a child seat, child restrai nt or booster
cushion.
Make sure you are ac quainted with th e
legal requirements fo r seating childr en
in the car.
Make sure that it is po ssib le to f it a c hild
restraint in acco rdance with the manu facturer’s child restrain t inst ructio ns.
When fitting child restr aints in car s yo u
must always read the instructions supplied by the child restrai nt manufacturer.
Saab recommends the u se o f a rear facing child seat for as long as this is
possible - a minimum for all ch ildren
under the age of 3 (approx. 15kg). Use a
child seat approved for the weight of the
child.
Saab recommends the us e of a booster seat
for children up to the ag e of 10 .
LATCH
LATCH (Lower Anchorages & Top tethers
for CHildren) is a US/Ca nadian s afety sta ndard for a uniform method of fitting child
restraints without using the standard s afety
belts. Only certain child restrai nts ar e
equipped to utiliz e the L ATCH s ystem .
The LATCH system is installe d in the car to
facilitate proper fit ting of chil d restra ints
designed for and eq uippe d with L ATCH
attachments.
The LATCH system c onsists of top tether
and lower anchorages (also called ISOFIX).
In this vehicle, LATCH is installed at the two
outboard seating positions in the rear seat,
and there is a top tether on the rear cente r
position (not Conv ertible ). The top tethers
are located on top of the parcel shelf
(Convertible: behin d the h ead res traints ),
see page 25. They are co vered by a lid with
a child seat anc hor sy mbol. Th e l ower
anchorages are lo cated where th e seat
cushion and sea t back com e toge the r.
There is a label above the in ner lowe r
anchorage, see picture on next p age. Label
consists of a symbol of a chil d restrained in
a seat inside a circle .
When fitting child rest raints in cars you must
always read the instruct ions supplied by the
child restraint manu facture r.
If you have any q uestions regarding LATCH
please contact you r Saab d ealer.
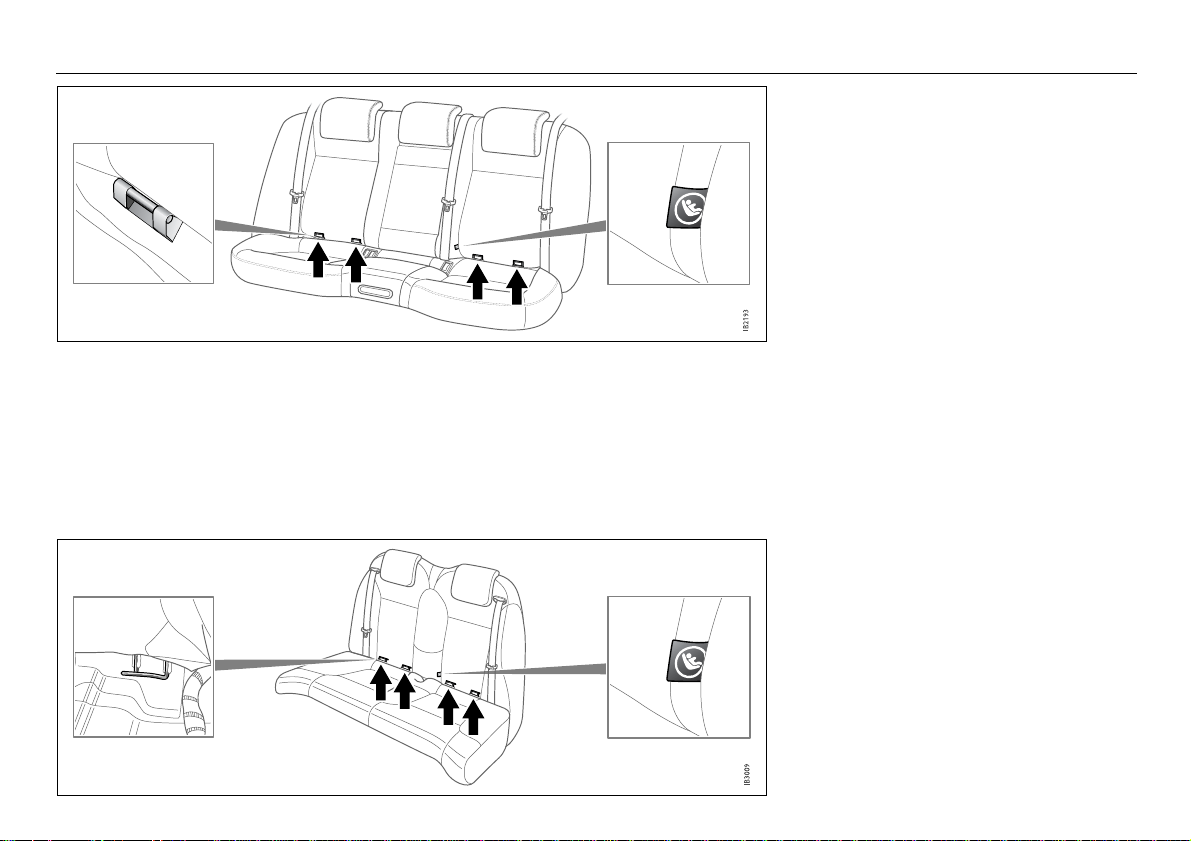
Lower anchorages (ISOFIX) in the rear seat, Sport Sedan
Lower anchorages (ISOFIX) in the rear seat, Convertible
23Safety
24 Safety
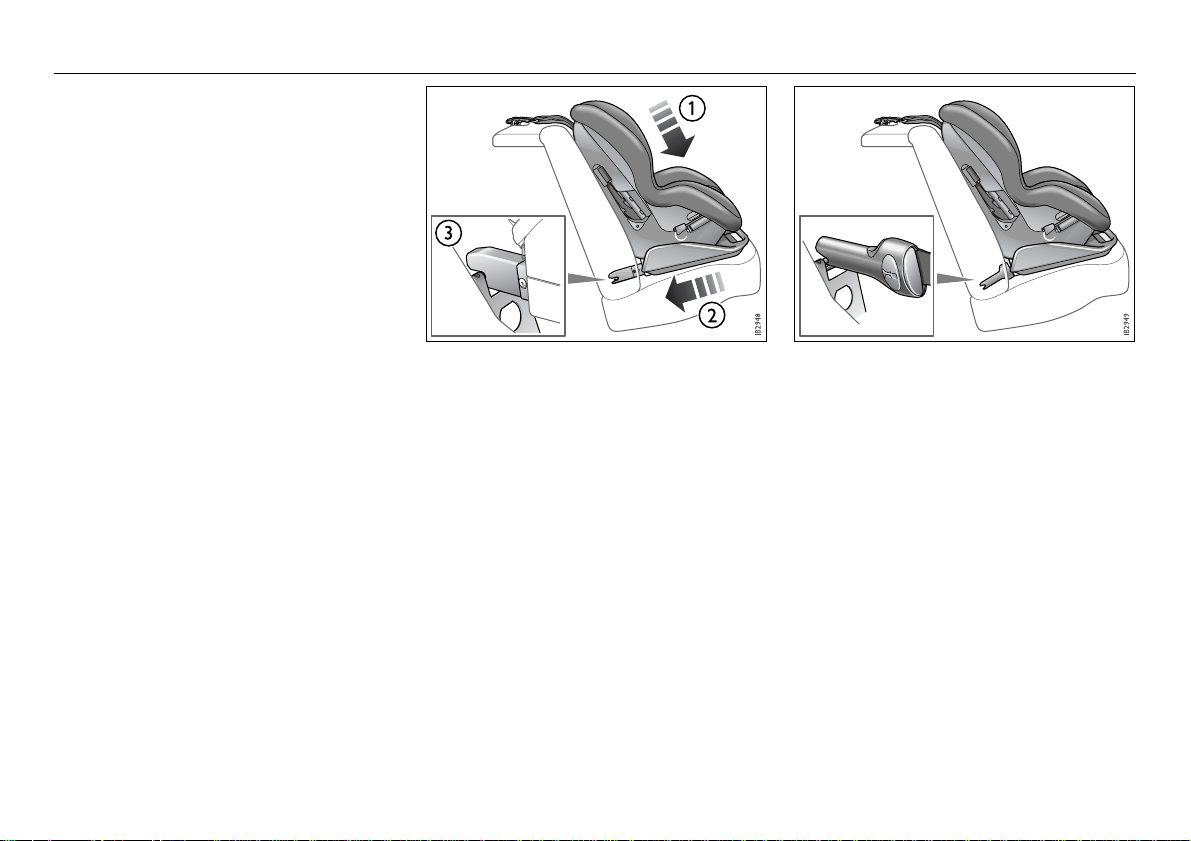
LATCH child seat insta llation
Before starting the ins tallation, pl ease read
through this instr uction , a nd the child se at
installation instruction.
1 Place the child restraint on one of the
designated outboa rd rear s eat c ushions.
2 Slide the attachment on the child
restraint in between the seat cushion
and backrest.
3 Press the child restraint down on the
seat, 1 in illustration.
4 Press the child restraint rearward, l ining
up the inner restrain t attac hmen t arm
with the label, 2 in il lustr ation .
5 Connect the restraint attachme nt arms
to the anchorages 3 in il lustr at ion.
6 Follow the child res train t in struction s t o
confirm that both restr aint at tachm ent
arms are properly attached to th e bars .
7 Attach the top tether strap to the i n-car
anchorage and tighten a ccording to the
restraint instructio ns, see page 25 and
26.
8 Pull the child restraint to mak e a second
check that t he rest rain t is s ecurely
attached at both th e lo wer anchor a ge
bars and the top te ther st rap.
Only use the belt supplied with the child
restraint.
For the top tether, o nly use the str ap s upplied with the chi ld restrai nt.
The availability of LA TCH child restraints is
limited.
Rigid 2-point lower anchorage with top
tether
When fitting child restraints in cars you
must always read the i nstructions supplied by the child restraint manufacturer.
Semi-rigid 2-point lower anchorage with
top tether
Child tether anchorages for forward facing child seats
Sport Sedan
Convertible, see page 26
WARNING
Child top tether anchorag es are designed
to withstand on ly those loads impo sed by
correctly fitted child restraints.
Under no circumstanc es a re they to be
used for adult sa fety b elts.
Child restraints with a tether s trap m ust be
attached accordi ng to Ca nadian and U .S.
safety standards.
If you have any questi ons re gardin g chil d
anchorages please con tact you r Saa b
dealer.
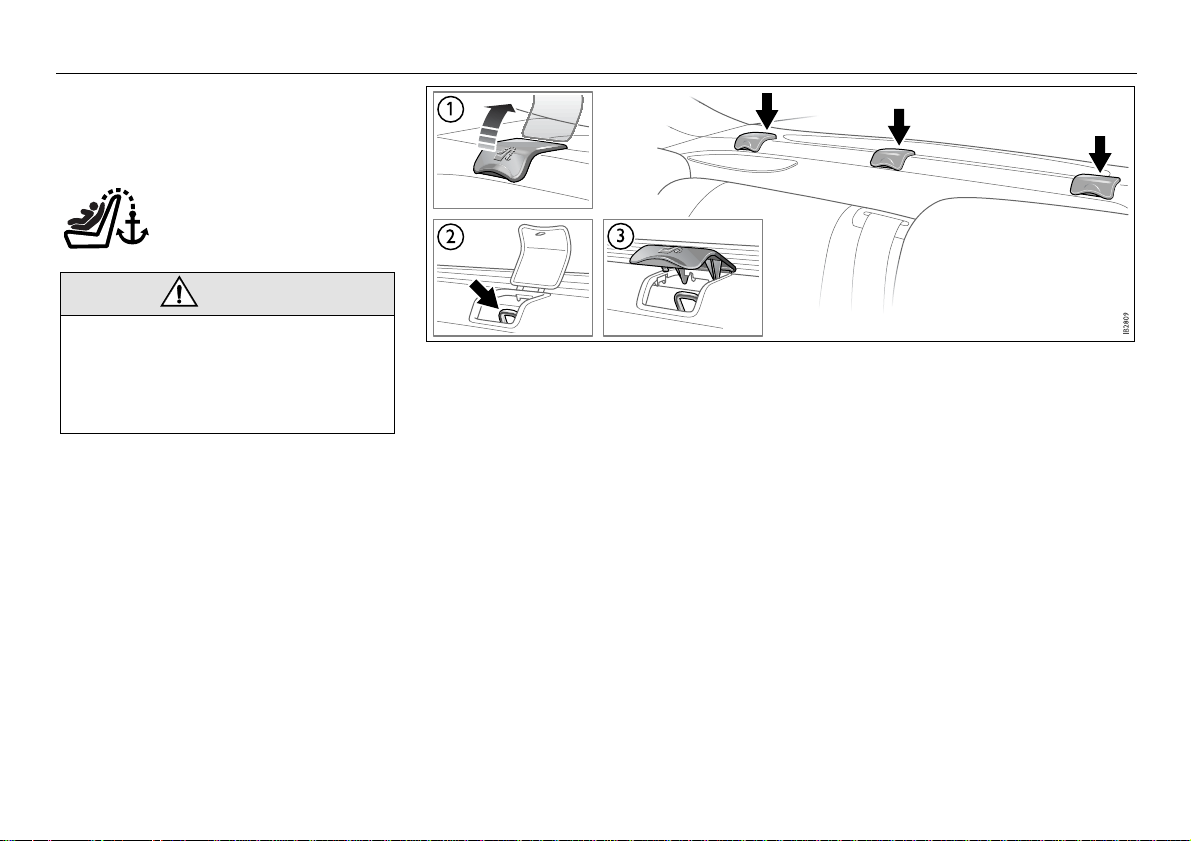
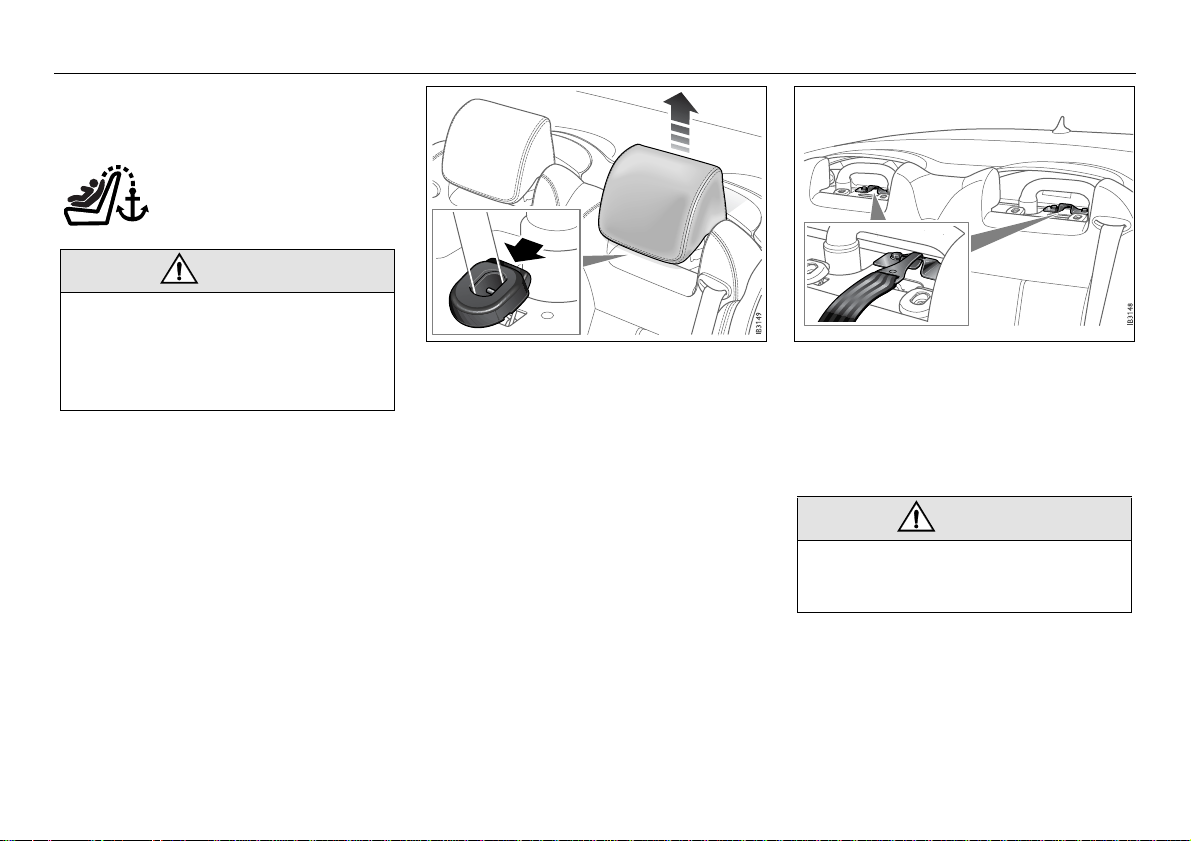
Child tether anchorages in parcel shelf, Sport Sedan
The car is provided with three top tether
anchorages. Use the one that is right behind
the child restraint and attac h the restraint as
follows:
1 Open the cover that is right beh ind th e
child restraint, 1 in illustration.
2 Place the child restraint in the rear seat.
3 Secure the lower part of the child
restraint b y me ans of the lo w er a nchor-
ages (ISOFIX) or the saf e ty bel ts as
described in the chil d restr a int insta lla-
tion instruction.
4 Lower the headrest and route th e tether
over it.
5 Attach the tether to the anchor age , 2 in
illustration.
6 Close the cover to the middle pos ition, 3
in illustration.
7 Tighten the tether so that the back of the
child restraint is pre ssed hard ag ainst
the backrest.
8 Pull the child restraint to mak e a second
check that t he rest rain t is s ecurely
attached at both th e lo wer ancho rages
bars on the safety belts and the top
tether strap .
25Safety
26 Safety
Child tether anchorages for forward facing child seats
Convertible
WARNING
Child top tether anchorag es are designed
to withstand on ly those loads impo sed by
correctly fitted child restraints.
Under no circumstanc es a re they to be
used for adult sa fety b elts.
Child restraints with a tether s trap m ust be
attached accordi ng to Ca nadian and U .S.
safety standards.
If you have any questi ons re gardin g chil d
anchorages please con tact you r Saa b
dealer.
The car is provided with two top tether
anchorages. Use th e one that is right behind
the child restraint and attach the restraint as
follows:
1 Remove the head restrai nt on the seat-
ing position where the ch ild re strai nt
shall be fitted.
2 Place the child restraint in the re ar seat.
3 Secure the lower part of the child
restraint by m eans of the l ow er ancho r-
ages (ISOFIX) or the safety belts as
How to take away the head restraint
1 Raise the head restraint
2 Push the catch forward and pull the head
restraint straight upward
described in the chil d restr a int ins talla -
tion instruction.
4 Attach the tether to the anchor age .
5 Tighten the tether so that the b ack of the
child restrain t is p resse d hard agains t
the backrest.
6 Pull the child restraint to ma ke a second
check that the res tr aint i s se curely
attached at both the lower anchorages
bars on the saf ety belts and th e top
tether strap.
7 Put the head restraint back on and mak e
sure it is sucure mounted. Adjust it in its
highest position.
Top tether anchorages in the rear seat
WARNING
If the size of the chil d restra int mak es it
impossible to put the head reatrain t back
on, place it in t he trun k.
27Safety
Installation of child restraint using the standard safety belt
WARNING
Failure to follow all the manuf acturer’s
instructions on the us e of th is ch il d
restraint sys tem c an cau se yo ur chi ld to
strike the vehicle ´s i nterio r during a
sudden stop or c rash.
Child restraints that are approved for rearward facing installation in the rear seat can
be positioned in any of the three rear places.
Make sure that it is possi ble to fit it in acco rdance with the man ufactu rer’ s instruc tions .
When fitting child restr aints in car s yo u
must always read the instructions supplied by the child restrai nt manufacturer.
If fitting a child rest raint that is intended to be
secured in position by the st andard safety
belt, make use of the lo cking function of the
belt.
Locking the belt l essens the ris k tha t the
seat will work loose while the car is in
motion.
1 Position the child re st raint in the bac k
seat.
2 Route the belt in the restraint according
to the installati on instructi on of t he
restraint.
3 Pull out the belt completely until it stops .
Then let the belt sl owly pu ll in the slac k.
Clicking s ound i ndica tes th at the l oc k
function is in work.
4 Pull the shoulder belt tight to secure the
child restraint in position.
5 Check for correct loc king fu nction b y
pulling on the belt. The belt must not
unreel.
The safety belt locki ng function will be deac tivated when the safet y bel t is re tracted .
1 Disengage the safety b elt latch from the
buckle.
2 Disengage the safety belt fro m the child
restraint, accordin g to the in st ructions
from the child restraint manufacturer.
3 Let the safety belt retrac t until the cli c k-
ing sound ceases .
28 Safety
Airbag
WARNING
To reduce risk of de ath or s eriou s inju ry:
• Always wear your safety belt.
• Always adjust your seat so th at you
are as far back as possible but still
able to operate the peda ls and reach
the steering wheel and c ontrols
comfortably.
• Passengers 12 and unde r or sh orter
than 55 inches (140 cm) must always
travel in the rear seat as the car is fitte d
with a passenger a irbag.
• Never fit a child seat in fron t of th e
passenger airbag.
Airbag system components
• Airbag in steering wheel
• Airbag in instrumen t panel in fro nt of
passenger seat
• Side airbags in fron t seat bac kre sts
Convertible: The side airbags help
protect the head al so.
• Inflatable curtains along leng th of headlining (from front to rear roof pi llars)
(Sport Sedan only)
• Safety belt p retension ers f o r front s eats
and outer rear seats.
The airbag system supple ments the protection provided by the s afety be lts to further
enhance the safety of occup ants taller than
55 in. (140 cm).
When the system is activ ated at the moment
of impact, the airbag inflates and then
deflates through hol es in the b ack. T he
whole operation take s roug hly 0. 1 second,
quicker than the bl ink o f an ey e.
The steering wheel and passeng er airbags
are so-called smart airba gs. The driver and
passenger airbag sys tem comp ensates f or
safety belt us age and the force of th e crash
at the moment of impact.
Note:
The sensor reacts diffe rently depend ing on
whether or not the front safety belts on the
driver’s and passen ger si des ar e used. Si tuations can therefore aris e where o nly one
of the airbags infl ates. It is al so possible for
only the safety belt pret ensioners to be activated and for the airb ags to remain u ninflated.
If only Stage I is a ctivated at the m oment of
impact, Stage II w ill a utoma ticall y be activated later to neutralize th e gas generator in
the airbag.
Inflation and deflation of airbag takes
approx. 0.1 s
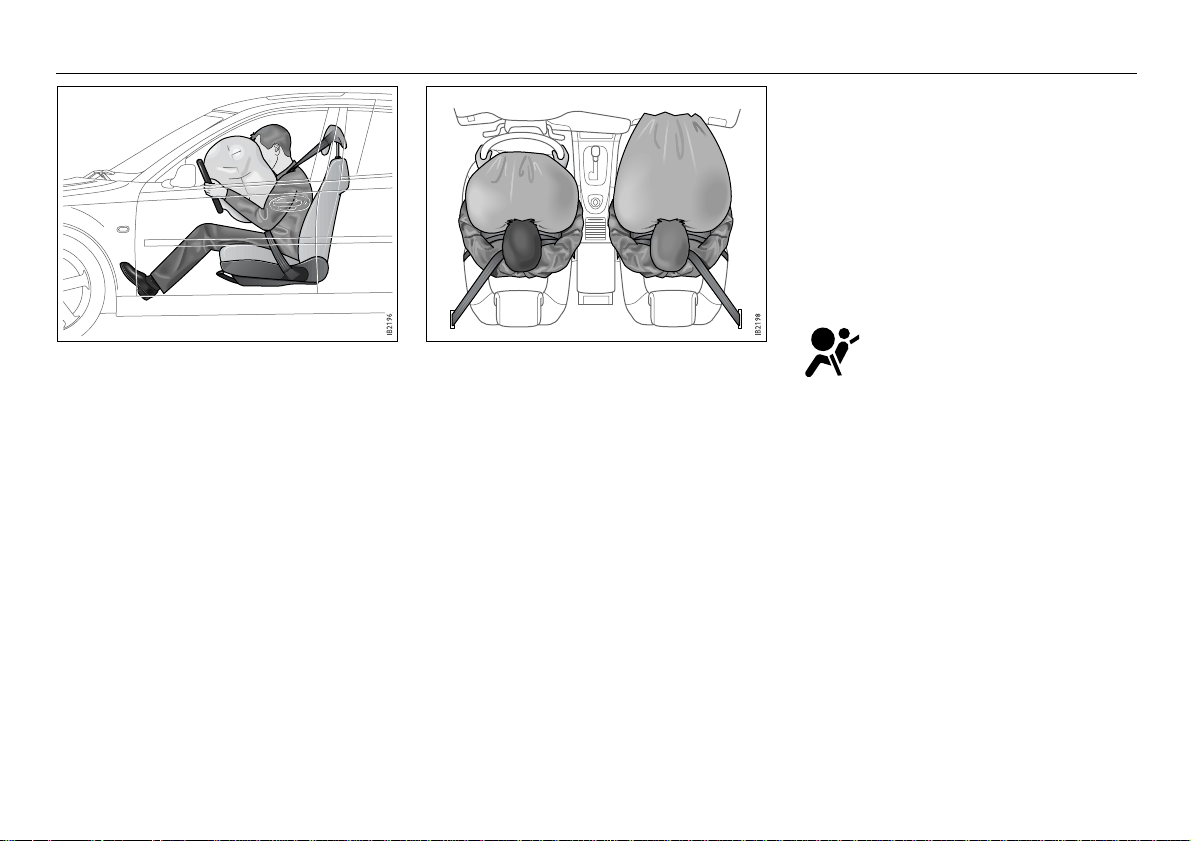
The driver and p assenger fro nt airbags are
triggered by violent f ront-end crashes. They
are not activated by m inor fron t-end
impacts, if the car ov erturns or by r ear- and
side-impacts.
Both front airbags inflatedInflated airbag (driver’s side).
There are two impact sensors on the fron t
bumper, under the la cquere d she ll. Very
soon after the moment of imp act, t hese
register that the car is invo lved in a c rash.
Using this informat ion an d data from th e
central sensor in t he co ntrol m odule , the
control module determ ines whether or not to
inflate the airbags. The control mo dule also
controls whether othe r comp onents o f the
airbag system are to be deployed: safet y
belt pretensioners, inf latable curtains (Sport
Sedan) and roll over bars (Co nvertib le).
Which airbag syst em co mp onents are
deployed depends on a num ber of factors ,
such as the force of the crash and the angle
of impact.
29Safety
If the airbag system regis ters fo rces e quivalent to a high-speed c rash (airbags inflated
to Stage II), the infl atable curtai ns wil l also
be activated (Sport Sedan) se e page 34.
If the airbags are deploy ed, th e posi tive
terminal of the battery will be disconnected,
See page 204.
If a fault arises in t he airb ag sy stem during
a journey, the airb ag w arning lamp on the
main instrument panel w ill come on and the
Saab Information Displa y (SID) will displ ay:
Airbag malfunctio n.
Contact Saab dealer.
The car is equipped as st andard with
a passenger airbag.
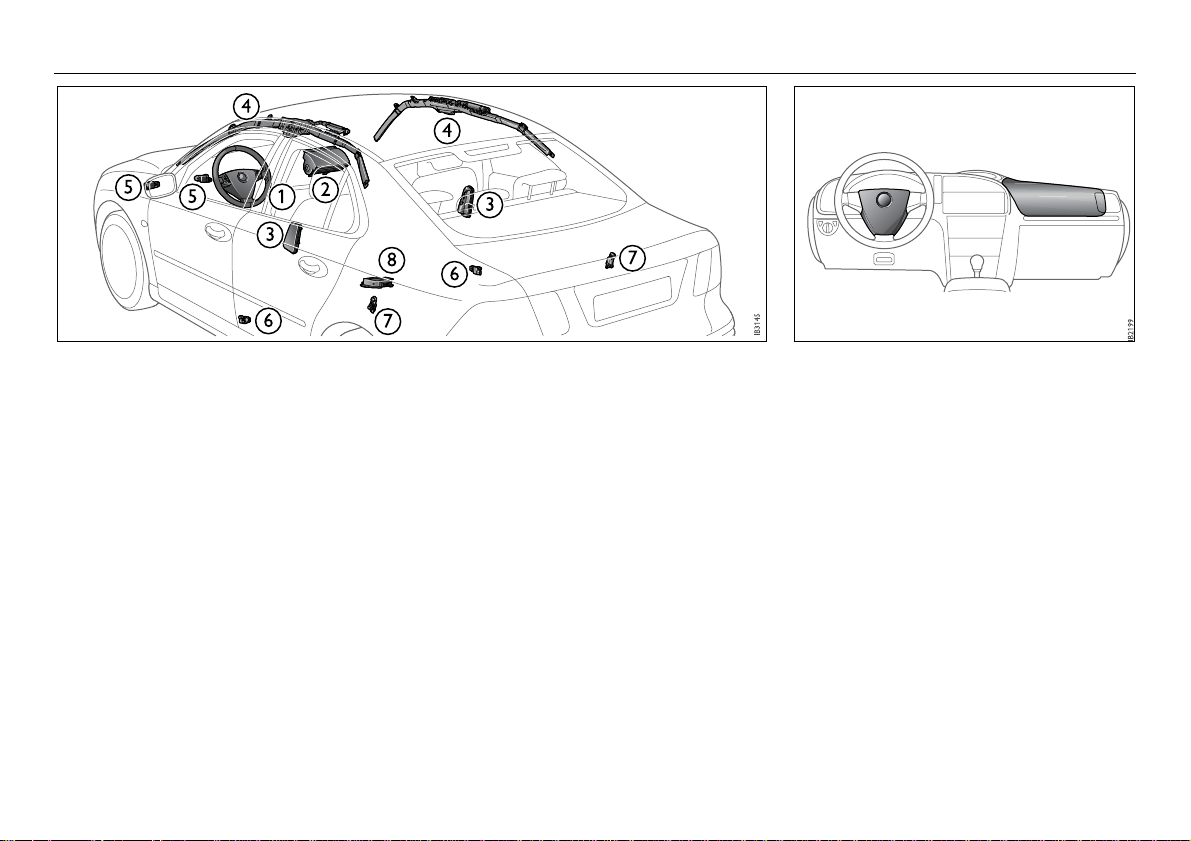
30 Safety
Airbag syste m
1 Steering wheel with integral airbag
2 Passenger airbag
3 Side airbag
4 Inflatable curtain (Sport Sedan only)
5 Sensors in front bumper
6 Sensor, side-impact protection
7 Sensor, side-impact protection (Sport Sedan only)
8 Electronic control module and central sensor (SDM)
Accessories and other equipment must
not be fitted to the surfaces marked as
these are where the airbags inflate in the
event of a crash.
 Loading...