


S1IPBTDB12E / S1IPBTDW12E
Speaker with Docking for iPhone/iPod/iPad
and Bluetooth® Technology
Høyttaler med dokking for iPhone/iPod/iPad
Högtalare med dockning för iPhone/iPod/iPad
Kaiutin, jossa iPhone-/iPod-/iPad-telakka
Højttaler med doc til iPhone/iPod/iPad
Instruction Manual
GB
Instruksjonsmanual
NO
og Bluetooth®-teknologi
Instruktionsbok
SE
och Bluetooth®-teknik
Käyttöopas
FI
ja Bluetooth®-teknologia
Brugervejledning
DK
og Bluetooth® teknologi
Návod K Použití
Reproduktor se základnou pro iPhone/ iPod/ iPad
a s technologií Bluetooth®
Návod S Pokynmi
Reproduktor s dokovaním pre iPhone/ iPod/ iPad
a technológiou Bluetooth®
CZ
SK
iPhone, iPod and iPad not included


Contents
GB
Innhold
NO
Safety Warnings ........................................................................................ 7
Unpacking ............................................................................................... 11
Product Overview ................................................................................... 12
Main Unit.......................................................................................................................12
–Front View .............................................................................................................12
–Rear View .............................................................................................................. 12
–Top View ................................................................................................................13
Remote Control ..........................................................................................................14
Removing the Plastic Strip from the Remote Control..........................16
Battery Replacement for the Remote Control ......................................16
–Handling the Battery ........................................................................................ 16
–Handling the Remote Control ....................................................................... 17
Remote Control Operation Range ......................................................... 17
Connecting the Aerial ............................................................................18
Power Source ..........................................................................................18
Mains Power.................................................................................................................18
General Operation .................................................................................. 19
Switching ON / OFF ...................................................................................................19
Selecting Modes .........................................................................................................19
Auto Setting the Clock .............................................................................................19
Manually Setting the Clock ....................................................................................20
Sleep Function ............................................................................................................20
Adjusting the volume ...............................................................................................20
Adjusting the Sound Eect ....................................................................................20
Dimming the display ................................................................................................20
DAB Operation ........................................................................................ 21
DAB Auto Scan ............................................................................................................21
Secondary Services ................................................................................................... 21
Manual Tuning ............................................................................................................21
Programming radio stations ..................................................................................21
DAB Display Modes ...................................................................................................22
Selecting a stored radio station ............................................................................22
Listening to the Radio ............................................................................ 24
FM Station Scanning Setup ....................................................................................24
Audio Mode .................................................................................................................24
Programming radio stations ..................................................................................24
Selecting a stored radio station ............................................................................24
FM Display Modes......................................................................................................25
Docking an iPod / iPhone/ iPad ............................................................. 26
iPod / iPhone / iPad Operation ..............................................................27
Inserting the iPod / iPhone / iPad ........................................................................27
To Play / Pause music ................................................................................................27
Skipping and searching tracks ..............................................................................28
Random Playback ......................................................................................................28
Repeat Playback .........................................................................................................28
Charging your iPod / iPhone / iPad .....................................................................28
Video Out Function ...................................................................................................28
Bluetooth® Audio ....................................................................................29
AUX IN Operation ...................................................................................30
Maintenance ........................................................................................... 30
Cleaning the Unit .......................................................................................................30
Hints and Tips.......................................................................................... 31
Specications .......................................................................................... 31
Sikkerhetsadvarsler ................................................................................. 7
Pakke opp ................................................................................................32
Produktoversikt ...................................................................................... 33
Hovedenhet .................................................................................................................33
–Sett forfra .............................................................................................................. 33
–Sett bakfra ............................................................................................................ 33
–Sett ovenfra..........................................................................................................34
Fjernkontroll ................................................................................................................35
Fjerne isoleringsteipen fra ernkontrollen .......................................... 37
Skifte batteriet i ernkontrollen ........................................................... 37
–Behandle batteriet ............................................................................................ 37
–Håndtere ernkontrollen ................................................................................ 38
Fjernkontrollens virkeområde ..............................................................38
Koble til antennen .................................................................................. 39
Strømkilde ............................................................................................... 39
Strømnett ......................................................................................................................39
Generell bruk .......................................................................................... 40
Slå PÅ/AV .......................................................................................................................40
Velge modus ................................................................................................................40
Stille klokken automatisk ........................................................................................40
Stille klokken manuelt..............................................................................................41
Utkoplingstimer .........................................................................................................41
Justere lydstyrken ......................................................................................................41
Justere lydeekten ....................................................................................................41
Dempe skjermen ........................................................................................................41
Bruk av DAB ............................................................................................42
Autosøk i DAB ..............................................................................................................42
Sekundære tjenester ................................................................................................42
Manuelt søk..................................................................................................................42
Programmere radiostasjoner .................................................................................42
Velge en lagret radiostasjon. .................................................................................43
DAB-visningsmoduser .............................................................................................43
Lytte til radioen.......................................................................................45
Oppsett for søk av FM-stasjoner ...........................................................................45
Lydmodus .....................................................................................................................45
Programmere radiostasjoner .................................................................................45
Velge en lagret radiostasjon. .................................................................................45
FM-visningsmoduser ................................................................................................46
Forankre en iPod / iPhone/ iPad ............................................................47
iPod/iPhone/iPad-betjening .................................................................. 48
Sette inn iPod/iPhone/iPad ....................................................................................48
Spille av/pause musikk ............................................................................................48
Hoppe over og søke spor ........................................................................................49
Vilkårlig avspilling ......................................................................................................49
Gjenta avspilling .........................................................................................................49
Lade iPod/iPhone/iPad ............................................................................................49
Video ut-funksjon ......................................................................................................49
Bluetooth®-lyd ........................................................................................ 50
Bruk av ekstrautstyr ............................................................................... 51
Vedlikehold .............................................................................................51
Rengjøre enheten ......................................................................................................51
Råd og tips .............................................................................................. 52
Spesikasjoner ....................................................................................... 52

Innehålls
SE
Sisältö
FI
Säkerhetsföreskrifter ............................................................................... 8
Packa upp ................................................................................................ 53
Produktöversikt ...................................................................................... 54
Huvudenhet .................................................................................................................54
–Vy framifrån ......................................................................................................... 54
–Baksida................................................................................................................... 54
–Vy ovanifrån ......................................................................................................... 55
Fjärrkontroll .................................................................................................................56
Ta bort isoleringsremsan från ärrkontrollen...................................... 58
Batteribyte i ärrkontrollen ..................................................................58
–Hantera batteriet ............................................................................................... 58
–Hantering av ärrkontrollen .......................................................................... 59
Fjärrkontrollens operationsområde .....................................................59
Ansluta antennen ................................................................................... 60
Strömkälla ............................................................................................... 60
Nätspänning ................................................................................................................60
Allmän hantering ....................................................................................61
Slå PÅ/ stänga AV .......................................................................................................61
Välja läge .......................................................................................................................61
Automatisk inställning av klockan .......................................................................61
Manuell inställning av klockan .............................................................................62
Insomningstimer ........................................................................................................62
Justera volymen .........................................................................................................62
Justera ljudeekter ....................................................................................................62
Dunkla displayen .......................................................................................................62
DAB-hantering ........................................................................................ 63
DAB automatisk sökning .........................................................................................63
Sekundära tjänster ....................................................................................................63
Manuell inställning ....................................................................................................63
Programmera radiostationer .................................................................................63
DAB visningslägen .....................................................................................................64
Välja en sparad radiostation...................................................................................64
Vid lyssning på radion ............................................................................66
Inställning av FM-stationssökning .......................................................................66
Ljudläge .........................................................................................................................66
Programmera radiostationer .................................................................................66
Välja en sparad radiostation...................................................................................66
FM visningslägen .......................................................................................................67
Dickning av en iPod/iPhone/iPad .......................................................... 68
iPod/iPhone/iPad hantering ..................................................................69
Isättning av iPod/iPhone/iPad ...............................................................................69
Spela/pausa musik ....................................................................................................69
Hoppa över och söka efter spår. ...........................................................................70
Slumpvis uppspelning .............................................................................................70
Upprepa uppspelning ..............................................................................................70
Ladda iPod/iPhone/iPad ..........................................................................................70
Video ut-funktion .......................................................................................................70
Bluetooth®-ljud ....................................................................................... 71
AUX IN hantering .................................................................................... 72
Underhåll................................................................................................. 72
Rengöra enheten .......................................................................................................72
Tips och råd ............................................................................................. 73
Specikationer........................................................................................ 73
Turvavaroitukset ...................................................................................... 8
Pakkauksesta purkaminen .................................................................... 74
Tuotteen yleiskatsaus ............................................................................75
Päälaite ..........................................................................................................................75
–Näkymä edestä ................................................................................................... 75
–Näkymä takaa ..................................................................................................... 75
–Näkymä päältä .................................................................................................... 76
Kaukosäädin ................................................................................................................77
Eristävän nauhan poistaminen kaukosäätimestä ...............................79
Kaukosäätimen pariston vaihto ............................................................ 79
–Paristojen käsittely ............................................................................................ 79
–Kaukosäätimen käsittely ................................................................................. 80
Kaukosäätimen toiminta-alue ............................................................... 80
Antennin liittäminen .............................................................................. 81
Virtalähde................................................................................................ 81
Verkkovirta ...................................................................................................................81
Yleinen käyttö ......................................................................................... 82
Kytkeminen PÄÄLLE/POIS .......................................................................................82
Tilojen valinta ..............................................................................................................82
Kellon automaattinen asettaminen ....................................................................82
Kellon asettaminen manuaalisesti .......................................................................83
Uniajastin ......................................................................................................................83
Äänenvoimakkuuden säätö ...................................................................................83
Äänitehosteen säätäminen ....................................................................................83
Näytön himmentäminen .........................................................................................83
DAB-käyttö .............................................................................................. 84
Automaattinen DAB-haku ......................................................................................84
Toissijaiset palvelut ...................................................................................................84
Manuaalinen viritys ...................................................................................................84
Radio-ohjelmien ohjelmointi ................................................................................ 84
Tallennetun radioaseman valitseminen ............................................................85
DAB-näyttötilat ...........................................................................................................85
Radion kuunteleminen .......................................................................... 87
FM-asemahaun asetus .............................................................................................87
Audiotila ........................................................................................................................87
Radio-ohjelmien ohjelmointi ................................................................................ 87
Tallennetun radioaseman valitseminen ............................................................87
FM-näyttötilat ..............................................................................................................88
iPodin/iPhonen/iPadin telakointi..........................................................89
iPod/iPhone/iPad-käyttö .......................................................................90
iPodin/iPhonen/iPadin paikalleen asettaminen .............................................90
Musiikin toistaminen/keskeyttäminen ..............................................................90
Raitojen ohittaminen ja hakeminen ...................................................................91
Satunnaistoisto ...........................................................................................................91
Uudelleentoisto ..........................................................................................................91
iPodin/iPhonen/iPadin lataaminen .....................................................................91
Videolähtötoiminto ...................................................................................................91
Bluetooth®-audio.................................................................................... 92
AUX IN -käyttö.........................................................................................93
Kunnossapito .......................................................................................... 93
Laitteen puhdistaminen ..........................................................................................93
Vihjeitä ja vinkkejä ................................................................................. 94
Tekniset tiedot ........................................................................................94

Indholdsfortegnelse
DK
Obsah
CZ
Sikkerhedsforanstaltninger .................................................................... 9
Udpakning .............................................................................................. 95
Produktoversigt ...................................................................................... 96
Hovedenhed ................................................................................................................96
–Set forfra ............................................................................................................... 96
–Set bagfra ............................................................................................................. 96
–Set oppefra........................................................................................................... 97
Fjernbetjening ............................................................................................................98
Fjernelse af isoleringsstrimlen på ernbetjeningen ......................... 100
Udskiftning af batterierne i ernbetjening........................................ 100
–Behandling af batteriet................................................................................. 100
–Behandling af ernbetjeningen ................................................................ 101
Fjernbetjeningens virkningsafstand .................................................. 101
Tilslutning af antenne ..........................................................................102
Strømkilde .............................................................................................102
Strømforsyning ........................................................................................................ 102
Generel betjening .................................................................................103
Tænd og sluk.............................................................................................................103
Sådan vælges funktionerne ................................................................................ 103
Automatisk Indstilling af uret ............................................................................. 103
Manuel indstilling af uret ..................................................................................... 104
Dvalefunktionen ..................................................................................................... 104
Sådan justeres lydstyrken .................................................................................... 104
Justering af lydeekter ......................................................................................... 104
Dæmpning af skærmen ........................................................................................ 104
DAB betjening .......................................................................................105
DAB autom. søgning .............................................................................................. 105
Sekundære tjenester ............................................................................................. 105
Manuel indstilling ................................................................................................... 105
Sådan gemmer du radiokanalerne ................................................................... 105
DAB skærmfunktioner ........................................................................................... 106
Sådan vælger du en gemt radiokanal ............................................................. 106
Sådan bruger du radioen ..................................................................... 108
Konguration af scanning af FM-kanaler ....................................................... 108
Lydtilstand ................................................................................................................. 108
Sådan gemmer du radiokanalerne ................................................................... 108
Sådan vælger du en gemt radiokanal ............................................................. 108
FM skærmfunktioner ............................................................................................. 109
Dock til din iPod / iPhone/ iPad ...........................................................110
Betjening af iPod/iPhone/iPad ............................................................111
Isætning af din iPod/iPhone/iPad ..................................................................... 111
Sådan afspiller/pauser du musikken ................................................................ 111
Sådan springer/spoler du frem og tilbage i numrene ............................... 112
Vilkårlig afspilning .................................................................................................. 112
Gentagelse af afspilning ....................................................................................... 112
Opladning af din iPod/iPhone/iPad ................................................................. 112
Video-ud funktionen ............................................................................................. 112
Bluetooth® lyd.......................................................................................113
Brug af AUX indgangsstikket ..............................................................114
Vedligeholdelse ....................................................................................114
Rengøring af enheden .......................................................................................... 114
Gode råd ................................................................................................ 115
Specikationer...................................................................................... 115
Bezpečnostní upozornění ........................................................................ 9
Vybalení ................................................................................................116
Přehled výrobku ................................................................................... 117
Hlavní jednotka ....................................................................................................... 117
–Pohled zpředu .................................................................................................. 117
–Pohled zezadu.................................................................................................. 117
–Pohled shora ..................................................................................................... 118
Dálkový ovladač ...................................................................................................... 119
Odstranění izolačního pásku z dálkového ovladače .........................121
Výměna baterie dálkového ovladače.................................................. 121
–Manipulace s baterií....................................................................................... 121
–Manipulace s dálkovým ovládáním ......................................................... 122
Dosah dálkového ovládání ..................................................................122
Připojení antény ...................................................................................123
Napájecí zdroj .......................................................................................123
Síťové napájení ........................................................................................................ 123
Obecné používání ................................................................................. 124
Zapnutí a vypnutí ................................................................................................... 124
Výběr režimů............................................................................................................. 124
Automatické nastavení hodin ............................................................................ 124
Ruční nastavení hodin ........................................................................................... 125
Časovač Slep ............................................................................................................. 125
Nastavení hlasitosti ................................................................................................ 125
Nastavení zvukového efektu .............................................................................. 125
Ztlumení jasu displeje ........................................................................................... 125
Používání DAB.......................................................................................126
Automatické vyhledávání DAB .......................................................................... 126
Sekundární služby .................................................................................................. 126
Ruční ladění .............................................................................................................. 126
Programování stanic rádia ................................................................................... 126
Vyvolání uložené stanice ...................................................................................... 127
Režimy zobrazení DAB .......................................................................................... 127
Poslech rádia .........................................................................................129
Nastavení vyhledávání stanic FM ...................................................................... 129
Režim zvuku .............................................................................................................. 129
Programování stanic rádia ................................................................................... 129
Vyvolání uložené stanice ...................................................................................... 129
Režimy zobrazení FM ............................................................................................. 130
Dokování iPodu/iPhonu/iPadu ............................................................131
Ovládání iPodu/iPhonu/iPadu .............................................................132
Vložení přístroje iPodu/iPhonu/iPadu .............................................................132
Přehrávání/pozastavení hudby ..........................................................................132
Přeskočení a převíjení stop ..................................................................................133
Náhodné přehrávání .............................................................................................. 133
Opakované přehrávání ......................................................................................... 133
Nabíjení iPodu/iPhonu/iPadu ............................................................................. 133
Funkce výstupu videa............................................................................................ 133
Bluetooth® Audio ..................................................................................134
Využití vstupu AUX IN ..........................................................................135
Údržba ................................................................................................... 135
Čištění přístroje ........................................................................................................ 135
Tipy a triky .............................................................................................136
Specikace ............................................................................................ 136

Obsah
Bezpečnostné výstrahy .......................................................................... 10
Vybalenie ..............................................................................................137
Prehľad výrobku ................................................................................... 138
Hlavná jednotka ...................................................................................................... 138
–Pohľad spredu .................................................................................................. 138
–Pohľad zozadu ................................................................................................. 138
–Pohľad zhora..................................................................................................... 139
Diaľkový ovládač ..................................................................................................... 140
Odstránenie izolačného pásika z diaľkového ovládača ....................142
Výmena batérie v diaľkovom ovládači................................................142
–Narábanie s batériou ..................................................................................... 142
–Manipulácia s diaľkovým ovládaním ....................................................... 143
Prevádzkový dosah diaľkového ovládača ..........................................143
Pripojenie antény .................................................................................144
Zdroj napájania ....................................................................................144
Napájanie zo siete ................................................................................................... 144
Bežná prevádzka .................................................................................. 145
Zapnutie/vypnutie ................................................................................................. 145
Voľba režimov...........................................................................................................145
Automatické nastavenie hodín .......................................................................... 145
Ručné nastavenie hodín ....................................................................................... 146
Časovač vypnutia .................................................................................................... 146
Nastavenie hlasitosti .............................................................................................. 146
Nastavenie zvukového efektu ............................................................................ 146
Stmavenie displeja ................................................................................................. 146
Prevádzka DAB .....................................................................................147
Automatické vyhľadávanie DAB ........................................................................ 147
Doplnkové služby ................................................................................................... 147
Manuálne ladenie ................................................................................................... 147
Programovanie rozhlasových staníc ................................................................ 147
Režimy zobrazovania DAB ................................................................................... 148
Voľba uloženej rozhlasovej stanice ..................................................................148
Počúvanie rádia ....................................................................................150
Nastavenie vyhľadávania rozhlasovej stanice FM. ......................................150
Zvukový režim .......................................................................................................... 150
Programovanie rozhlasových staníc ................................................................ 150
Voľba uloženej rozhlasovej stanice ..................................................................150
Režimy zobrazovania FM ...................................................................................... 151
Používanie zariadenia iPod/iPhone/iPad ...........................................152
Používanie zariadenia iPod/iPhone/iPad ...........................................153
Vkladanie zariadenia iPod/iPhone/iPad.......................................................... 153
Prehrávanie/pozastavenie prehrávania hudby ............................................ 153
Preskakovanie a vyhľadávanie skladieb ......................................................... 154
Náhodné prehrávanie ........................................................................................... 154
Opakované prehrávanie ....................................................................................... 154
Nabíjanie zariadenia iPod/iPhone/iPad .......................................................... 154
Funkcia výstupu obrazového signálu .............................................................. 154
Zvuk pomocou rozhrania bluetooth® .................................................155
Používanie vstupu AUX IN ...................................................................156
Údržba ................................................................................................... 156
Čistenie zariadenia ................................................................................................. 156
Rady a tipy .............................................................................................157
Technické parametre ............................................................................ 157
SK

Safety Warnings
GB
Sikkerhetsadvarsler
NO
• Read all the instructions carefully before using the unit and keep them for future
reference.
• Retain the manual. If you pass the unit onto a third party make sure to include
this manual.
• Check that the voltage marked on the rating label matches your mains voltage.
Damage
• Please inspect the unit for damage after unpacking.
• Do not continue to operate the unit if you are in any doubt about it working
normally, or if it is damaged in any way - switch o, withdraw the mains adapter
and consult your dealer.
Location of Unit
• The unit must be placed on a at stable surface and not subjected to vibrations.
• Do not place the unit on sloped or unstable surfaces as the unit may fall o or
tip over.
• The mains socket must be located near the unit and should be easily accessible.
• This unit is designed for indoor use only.
Temperature
• Avoid extreme degrees of temperature, either hot or cold. Place the unit well away
from heat sources such as radiators or gas / electric res.
• Avoid exposure to direct sunlight and other sources of heat.
Naked Flames
• Never place any type of candle or naked ame on the top of or near the unit.
Moisture
• To reduce the risk of re, electric shock or product damage, do not expose this unit
to rain, moisture, dripping or splashing. No objects lled with liquids, such as vases,
should be placed on the unit.
• If you spill any liquid into the unit, it can cause serious damage. Switch it o at the
mains immediately. Withdraw the mains plug and consult your dealer.
Ventilation
• To prevent the risk of electric shock or re hazard due to overheating, ensure that
curtains and other materials do not obstruct the ventilation vents.
• A minimum distance of 5cm around the unit should be maintained to allow for
sucient ventilation.
• Do not install or place this unit in a bookcase, built-in cabinet or in another
conned space. Ensure the unit is well ventilated.
Safety
• Always disconnect the unit from the mains supply before connecting /
disconnecting other devices or moving the unit.
• Unplug the unit from the mains socket during a lightning storm.
• In the interests of safety and to avoid unnecessary energy consumption, never leave
the unit switched on while unattended for long periods of time, e.g. overnight,
while on holiday or while out of the house. Switch it o and disconnect the mains
plug from the mains socket.
Mains Adapter Cable
• Make sure the unit or unit stand is not resting on top of the mains adapter cable, as
the weight of the unit may damage the cable and create a safety hazard.
Mains Adapter
• The mains adapter will continue to draw electricity from the mains supply when
plugged in the mains socket. In the interests of safety and to avoid unnecessary
energy consumption, never leave the adaptor plugged in the mains socket while
unattended for long periods of time. Disconnect the adapter from the power
supply.
Interference
• Do not place the unit on or near appliances which may cause electromagnetic
interference. If you do, it may adversely aect the working of the unit, and cause
a distorted sound.
Batteries
• Batteries used in the unit are easily swallowed by young children and this is
dangerous.
• Keep loose batteries away from young children and make sure that the battery
holder tray is secure in the unit. Seek medical advice if you believe
a cell has been swallowed.
• Please dispose of batteries correctly by following the guidance in this manual.
• Do not expose the battery to direct sunlight or sources of excessive heat.
Supervision
• Children should be supervised to ensure that they do not play with the unit.
• Never let anyone especially children push anything into the holes, slots or any other
openings in the case - this could result in a fatal electric shock.
CAUTION
RISK OF ELECTRIC SHOCK
DO NOT OPEN
The lightning flash with arrowhead symbol, within an equilateral triangle, is
intended to alert the user to the presence of uninsulated “dangerous
voltage” within the unit’s enclosure that may be of sufficient magnitude to
constitute a risk of electric shock.
The exclamation point within an equilateral triangle is intended to alert the
user to the presence of important operating and maintenance (servicing)
instructions in the manual accompanying the unit.
Service
• To reduce the risk of electric shock, do not remove screws. The unit does not
contain any user-serviceable parts. Please leave all maintenance work to qualied
personnel.
• Do not open any xed covers as this may expose dangerous voltages.
Maintenance
• Ensure to unplug the unit from the power supply before cleaning.
• Do not use any type of abrasive pad or abrasive cleaning solutions as these may
damage the unit’s surface.
• Do not use liquids to clean the unit.
• Les alle instruksjoner nøye før du bruker enheten og oppbevare dem for fremtidig
referanse.
• Ta vare på bruksanvisningen. Hvis du overdrar enheten til en tredjepart sørg for å
ta med denne håndboken.
• Kontroller at spenningen som er angitt på merkelappen samsvarer med
nettspenningen.
Skade
• Inspiser apparatet for skader etter oppakking.
• Du må ikke fortsette å betjene enheten hvis du er i tvil om det fungerer normalt,
eller hvis den er skadet på noen måte – slå av og trekk ut støpselet og ta kontakt
med forhandleren.
Plassering av enheten
• Enheten må plasseres på et att stabilt underlag og må ikke utsettes for vibrasjoner.
• Ikke plasser enheten på skrå eller ustabile overater slik at apparatet kan falle ut
eller velte.
• Stikkontakten må være i nærheten av enheten og bør være lett tilgjengelige.
• Denne enheten er beregnet for innendørs bruk.
Temperatur
• Unngå ekstreme temperaturer, enten varm eller kald. Plasser enheten godt unna
varmekilder som radiatorer eller gass / elektriske branner.
• Unngå direkte sollys og andre varmekilder.
Levende lys
• Plasser aldri noen form for lys eller åpen ild på toppen av eller i nærheten av
enheten.
Fuktighet
• For å redusere risikoen for brann, elektrisk støt eller produkt skade, må ikke utsettes
denne enheten for regn, fuktighet, drypp eller sprut. Ingen gjenstander fylt med
væske, for eksempel vaser, må plasseres på apparatet.
• Hvis du søler væske i enheten, kan det forårsake alvorlige skader. Slå den av
umiddelbart. Trekk ut støpselet og ta kontakt med forhandleren.
Ventilasjon
• For å unngå fare for elektrisk støt eller brann på grunn av overoppheting, pass på at
gardiner og annet materiale ikke hindrer ventilasjon.
• La det være minst 5 cm luft rundt apparatet for å sikre tilstrekkelig ventilasjon.
• Ikke installer eller plasser denne enheten i en bokhylle, innebygd skap eller i et
annet trangt sted. Sørg for at enheten er godt ventilert.
Sikkerhet
• Koble alltid apparatet fra strømnettet før du kobler til / fra andre enheter eller ved
ytting av enheten.
• Koble enheten fra stikkontakten i tordenvær.
• Av hensyn til sikkerhet og for å unngå unødvendig energiforbruk, la aldri enheten
stå uten tilsyn i lengre perioder, for eksempel over natten, mens du er på ferie eller
mens du er ute av huset. Slå den av og koble strømadapteren fra stikkontakten.
Strømadapterkabel
• Kontroller at enheten ikke hviler på toppen av strømadapterkabelen. Vekten av
enheten kan skade strømadapterkabelen som kan føre til en sikkerhetsrisiko.
Adapter
• Adapteren vil forsette å bruke elektrisitet fra veggkontakten når den står i. Med
hensyn til sikkerhet og for å unngå unødvendig strømforbruk, skal ikke adapteren
sitte i veggkontakten når den ikke er under oppsyn over en lenger periode. Trekk ut
adapteren fra strømtilførselen.
Forstyrrelser
• Ikke plasser enheten på eller i nærheten av apparater som kan forårsake
elektromagnetisk interferens. Hvis du gjør det, kan det påvirke ytelsen og driften av
enheten, og forårsake et forvrengt bilde eller lyd.
Batterier
• Batteriene som brukes i enheten kan svelges av små barn og dette er farlig.
• Hold løse batterier borte fra små barn og sørge for at batteriholderen er sikret i
enheten. Oppsøk lege dersom du tror at en battericelle er svelget.
• Vennligst kast batteriene på riktig måte ved å følge veiledningen i denne
bruksanvisningen.
• Ikke utsett batteriet for direkte sollys eller høye temperaturer.
Tilsyn
• Barn bør holdes under oppsyn for å sikre at de ikke leker med apparatet og
ernkontrollen.
• La aldri noen spesielt ikke barn skyve noe inn i hullene, spilleautomater eller andre
åpninger i saken - dette kan resultere i dødelig elektrisk støt.
CAUTION
RISK OF ELECTRIC SHOCK
DO NOT OPEN
Lynsymbolet med pilspiss i en likesidet trekant, er ment å varsle brukeren
om uisolert “farlig spenning” innenfor enhetens kabinett som kan være av
tilstrekkelig til å utgjøre en risiko for elektrisk støt.
Utropstegnet i en likesidet trekant er ment å varsle brukeren om viktige
drifts- og vedlikeholdsinstruksjoner i håndboken som følger med enheten.
Service
• For å redusere risikoen for elektrisk støt, ikke ern skruene. Enheten inneholder
ingen deler som kan repareres av brukeren. All vedlikehold skal foretas av kvalisert
personell.
• Ikke åpne noen faste deksler som kan avdekke farlige spenning.
Vedlikehold
• Sørg for å koble apparatet fra stikkontakten før rengjøring.
• Ikke bruk noen form for slipemiddel eller slipende rengjøringsmidler da disse kan
skade enhetens overate.
• Bruk ikke væsker til å rengjøre enheten.

Säkerhetsföreskrifter
CAUTION
CAUTION
SE
Turvavaroitukset
FI
• Läs alla instruktioner noggrannt innan du använder enheten och behåll dem för
framtida behov.
• Behåll manualen. Om du ger bort enheten till tredje person se till att inkludera
den här manualen.
• Kontrollera att spänningen markerad på märkplåten matchar din strömförsörjning.
Skada
• Kontrollera enheten efter uppackning.
• Fortsätt inte att använda enheten om du tvivlar att den fungerar normalt, eller
om den är skadad på något sätt – stäng av, dra ur kontakten och rådgör med din
återförsäljare.
Placering av enheten
• Enheten måste placeras på en plan stabil yta och bör inte utsättas för vibrationer.
• Placera inte enheten på en sluttande eller instabil yta eftersom den kan falla ner
eller stjälpa.
• Huvudkontakten måste placeras nära enheten och bör vara lätt att nå.
• Den här enheten är endast designad för inomhusbruk.
Temperatur
• Undvik extrema temperaturer, oavsett varm eller kall. Placera enheten borta från
värmekällor såsom element eller gas/elektriska spisar.
• Undvik att utsätta enheten för direkt solljus och andra källor av värme.
Nakna ammor
• Placera aldrig någon typ av ljus eller andra eldammor ovanpå eller i närheten
av enheten.
Fuktighet
• För att reducera risken för att enheten tar eld, utsätts för elektrisk chock eller
produktskada, exponera den inte för regn, fuktighet, droppande eller plaskande
vatten. Inga objekt fyllda med vätska, såsom vaser, bör placeras på enheten.
• Om du spiller någon vätska på enheten, kan det förorsaka allvarlig skada. Stäng av
huvudströmmen omedelbart. Dra ur sladden och rådgör med din återförsäljaren.
Ventilation
• För att förhindra risk för elektrisk chock eller eldsvåda p.g.a. överhettning, se till att
gardiner och andra material inte täcker over ventilerna på apparaten.
• Ett avstånd på minst 5 cm bör bibehållas runt enheten för att möjliggöra tillräcklig
ventilation.
• Installera inte eller placera inte den här enheten i bokyllan, i ett inbyggt skåp eller
på annat fast område. Se till att enheten har bra ventilerad.
Säkerhet
• Koppla alltid ur enheten från huvudströmmen innan du ansluter/kopplar ur andra
enheter eller yttar på apparaten.
• Dra ur enheten från huvudkontakten under åskväder.
• För att vidta hög säkerhet och för att undvika onödig energikonsumtion, låt aldrig
enheten vara påslagen då den inte är under uppsikt under längre tidsperioder, som
t ex över natten, medan du benner dig på semester eller medan du inte är hemma.
Stäng av den och dra ur nätadaptern från vägguttaget.
Nätadapterkabel
• Se till så att enheten inte vilar på nätadapterkabeln, då vikten på enheten kan
orsaka skada på nätadaptern och skapa risk för säkerheten.
Nätadapter
• Nätadaptern kommer att ta elektricitet från huvudströmmen när den sätts i
uttaget. För säkerhet och för att undevika onödig energikonsumtion, lämna aldrig
adaptern isatt i uttaget utan observation under längre tid. Dra ur adaptern från
huvudströmmen.
Störning
• Placera inte enheten på eller nära andra apparater som kan förorsaka
elektromagnetisk störning. Om du gör så, kan den i motsats påverka funktionen på
enheten, och förorsaka en felaktig bild eller ljud.
Batterier
• Batterier som används i enheten kan enkelt sväljas av små barn och det är farligt.
• Förvara lösa batterier borta från små barn och se till att batterifacket är säkert
stängt. Sök läkare om du tror att ett cellbatterier har svalts av ett barn.
• Släng batterier korrekt enligt instruktionerna i den här bruksanvisningen.
• Utsätt inte batterierna för direct solljus eller källor som utger överdrivet med värme.
Ledning
• Barn bör få information så att de inte leker med enheten och ärrkontrollen.
• Låt aldrig någon person, och särskilt barn peta in något i hålen, springorna eller
andra öppningar i apparatens hölje – det här kan resultera i elektrisk chock.
RISK OF ELECTRIC SHOCK
DO NOT OPEN
Blixten med pilsymbol, inom en liksidig triangel, är till för att få användare
uppmärksamma på förekomsten av oisolerad “farlig spänning” inom
enhetens hölje som kan vara av tillräcklig styrka för att förorsaka en
elektrisk chock.
Utropstecken inom en liksidig triangel är tänkt att uppmärksamma
användare att det finns viktiga användar- och underhålls (service)
instruktioner I bruksanvisningen som medföljer enheten.
Service
• För att minska risken för elektrisk chock, lösgör inga skruvar. Den här enheten
innehåller inte några delar möjliga att reparera. Lämna allt underhållsarbete till
kvalicerad personal.
• Öppna inte fastsskruvade skydd eftersom det här kan förorsaka exponering av
farlig spänning.
Underhåll
• Se till att dra ur enheten ur huvudkontakten innan rengöring.
• Använd inte någon typ av skrubbande rengöringssvamp eller rengöringsmedel
eftersom de kan skada ytan på enheten.
• Använd inte vätskor för att rengöra enheten.
• Lue kaikki ohjeet huolellisesti ennen kuin alat käyttää laitetta ja säilytä ohjeet
myöhempää käyttöä varten.
• Säilytä käyttöopas. Jos myyt tai annat laitteen kolmannelle osapuolelle ole hyvä ja
anna tämä käyttöopas laitteen mukana.
• Varmista että laitteen etikettiin merkitty volttimäärä vastaa verkkovirtasi
volttimäärää.
Vahingot
• Ole hyvä ja tarkista laite vahinkojen varalta heti pakkauksesta purkamisen jälkeen.
• Älä jatka laitteen käyttöä jos epäilet että se ei toimi normaalisti tai jos se on millään
tapaa vahingoittunut - käännä se pois päältä, irrota verkkovirrasta ja ota yhteyttä
jälleenmyyjääsi.
Laitteen sijainti
• Laite täytyy sijoittaa vakaalle ja tasaiselle pinnalle eikä siihen saa kohdistua tärinää.
• Älä aseta laitetta kaltevalle tai epävakaalle pinnalle koska laite saattaa pudota
tai kaatua.
• Verkkovirran pistokkeen täytyy sijaita laitteen lähellä ja siihen tulee päästä helposti
käsiksi.
• Tämä laite on tarkoitettu vain sisäkäyttöön.
Lämpötila
• Vältä äärimmäisiä lämpötiloja, sekä kuumia että kylmiä. Aseta laite kauas
lämpölähteistä kuten pattereista ja kaasulla tai sähköllä toimivista takoista.
• Vältä altistamista suoralle auringonvalolle ja muille lämpölähteille.
Avoimet liekit
• Älä koskaan aseta minkäänlaisia kynttilöitä tai muita avoimia liekkejä laitteen
päälle tai lähelle.
Kosteus
• Alentaaksesi tulipalon tai sähköiskun vaaraa tai vahinkoa laitteelle, älä altista tätä
laitetta sateelle, kosteudelle, pisaroille tai roiskeille. Laitteen päälle ei saa asettaa
mitään nesteellä täytettyjä astioita, kuten maljakkoja.
• Nesteen läiskyttäminen laitteeseen saattaa aiheuttaa vakavia vaurioita.
Katkaise verkkovirta välittömästi. Vedä verkkovirtajohto seinästä ja ota yhteyttä
jälleenmyyjääsi.
Ilmankierto
• Estääksesi ylikuumenemisesta johtuvaa sähköiskun tai tulipalon vaaraa, varmista
että verhot tai muu materiaali ei estä ilmankiertoventtiileitä.
• Laitteen ympärille on jätettävä vähintään 5 cm vapaata tilaa riittävän tuuletuksen
varmistamiseksi.
• Älä asenna tai aseta tätä laitettä kirjahyllyyn, sisäänrakennettuun hyllystöön tai
muuhun suljettuun paikkaan. Varmista laitteelle riittävä ilmankierto.
Turvallisuus
• Irrota laite aina verkkovirrasta ennen kuin liität/irrotat muita laitteita tai liikutat
laitetta.
• Irrota laite verkkovirtapistokkeesta ukkosmyrskyjen ajaksi.
• Turvallisuutta silmälläpitäen ja tarpeettoman energiankulutuksen estämiseksi, älä
koskaan jätä laitetta vartioimatta päällekytkettynä pitkiksi ajanjaksoiksi, esim. yön
yli, lomien ajaksi, tai jos lähdet ulos. Käännä se pois päältä ja irrota verkkolaturi
verkkovirrasta.
Verkkolaturin johto
• Varmista että laitetta ei ole asetettu verkkolaturin johdon päälle, koska laitteen
paino voi vahingoittaa verkkolaturin johtoa ja aiheuttaa turvallisuusriskin.
Verkkovirtasovitin
• Verkkovirtasovitin jatkaa sähkövirran vetämistä sähköverkosta niin kauan kuin se on
liitettynä verkkovirtapistokkeeseen. Turvallisuuden ja turhan energiankulutuksen
välttämiseksi, älä koskaan jätä sovitinta verkkovirtaan kytketyksi kun laite on
käyttämättömänä pitkiä ajanjaksoja. Irrota verkkovirtapistoke sähköverkosta.
Häiriöt
• Älä aseta laitetta sellaisten laitteiden lähelle jotka voivat aiheuttaa
sähkömagneettisia häiriöitä. Tämän tekeminen saattaa vaikuttaa haitallisesti
laitteen toimintasuoritukseen, ja aiheuttaa vääristynyttä kuvaa tai ääntä.
Paristot
• Lapset voivat helposti nielaista tässä laitteessa käytettäviä paristoja ja tämä on
vaarallista.
• Pidä irtonaiset paristot pois pienten lasten ulottuvilta ja varmista että paristotarjotin
on tukevasti laitteessa. Hae lääkärin apua jos uskot että paristo on tullut niellyksi.
• Ole hyvä ja hävitä paristot oikeaoppisesti seuraten tässä käyttöoppaassa olevia ohjeita.
• Älä altista paristoa suoralle auringonvalolle tai voimakkaille lämpölähteille.
Valvonta
• Lapsia kuuluu valvoa, jotta he eivät leikkisi laitteella ja kaukosäätimellä.
• Älä koskaan anna kenenkään, erityisesti lapsien, työntää mitään laitteen koloihin,
reikiin tai mihinkään muihin avoimiin kohtiin - tämä saattaa johtaa kuolettavaan
sähköiskuun.
RISK OF ELECTRIC SHOCK
DO NOT OPEN
Nuolenpäällä varustettu salaman kuva, sijoitettuna tasasivuiseen kolmioon,
varoittaa käyttäjää eristämättömästä “vaarallisesta volttimäärästä” laitteen
sisällä, mikä saattaa olla tarpeeksi suuri aiheuttamaan sähköiskun vaaran.
Tasasivuiseen kolmioon sijoitettu huutomerkki ilmoittaa käyttäjälle tärkeistä
toimintaan ja huoltoon (palveluhuolto) liittyvistä ohjeista laitteen mukana
tulevassa käyttöoppaassa.
Palveluhuolto
• Pitääksesi sähköiskun vaaran alhaisena, älä poista ruuveja. Laitteessa ei ole mitään
käyttäjän korjattavaksi sopivia osia. Ole hyvä ja jätä kaikki huoltotyöt pätevälle
henkilökunnalle.
• Älä avaa mitään kiinteitä kansia koska saatat paljastaa vaarallisen korkeita
volttimääriä.
Huolto
• Varmista että laite on irrotettu verkkovirrasta ennen puhdistusta.
• Älä käytä minkäänlaisia hankaavia sieniä tai hankaavia pesunesteitä koska ne
saattavat vahingoittaa laitteen pintaa.
• Älä käytä nesteitä laitteen puhdistukseen.

Sikkerhedsforanstaltninger
CAUTION
CAUTION
DK
Bezpečnostní upozornění
CZ
• Læs alle instruktionerne grundigt, før du tager enheden i brug og gem dem til
senere.
• Gem manualen. Hvis du overdrager enheden til tredje person, skal du inkludere
denne manual.
• Check at spændingen på ratingmærkatet matcher spændingen i dit område.
Skade
• Inspicér enheden for skade, når du har pakket den ud.
• Fortsæt ikke med at bruge enheden, hvis du er i tvivl, om den virker, som den skal,
eller hvis den er beskadiget – sluk, tag stikket ud af stikkontakten og henvend dig
hos forhandleren.
Placering af enhed
• Enheden skal placeres på en ad og stabil overade, som ikke ryster.
• Placér ikke enheden på en skrå eller ustabil overade, hvor enheden kan falde af
eller vippe ud over kanten.
• Enheden bør placeres tæt på en stikkontakt, som er let at komme til.
• Denne enhed er beregnet til indendørs brug.
Temperatur
• Undgå ekstreme temperaturer, hverken varme eller kolde. Placér enheden langt
væk fra varmekilder så som radiatorer eller gas/elektriske komfurer.
• Undgå direkte sollys og andre varmekilder.
Åben ild
• Placér aldrig stearinlys eller åben ild ovenpå eller tæt på enheden.
Fugt
• Risikoen for brand, elektrisk stød eller beskadigelse af produktet mindskes, hvis
du ikke udsætter enheden for regn, fugt, dryp eller plask. Der bør ikke sættes
væskefyldte ting, så som vaser, ovenpå enheden.
• Hvis du spilder væske ind i enheden, kan det beskadige den. Tag straks stikket ud af
stikkontakten. Kontakt din forhandler.
Ventilation
• Risikoen for elektrisk stød og brand pga. overophedning undgås ved at sørge for, at
gardiner og andre ting ikke obstruerer enhedens ventilationsaftræk.
• Der bør som minimum være 5cm luft omkring enheden for at opnå tilstrækkelig
ventilation.
• Placér ikke denne enhed i en reol, et indbygget skab eller et andet lukket sted. Der
skal være plads til ventilation af enheden.
Sikkerhed
• Tag altid stikket ud af stikkontakten, før du tilslutter/frakobler andre apparater eller
ytter enheden.
• Tag stikket ud af stikkontakten ved tordenvejr.
• For en sikkerheds skyld og for at undgå energispild, bør enheden slukkes, når den
ikke bruges i længere tid, f.eks. over natten, når du er på ferie eller ikke er hjemme.
Sluk enheden og tag stikket ud af stikkontakten.
Strømadapterkabel
• Sørg for at enheden ikke står ovenpå adapterkablet, da enhedens vægt kan
ødelægge kablet og være en potentiel fare.
Strømadapter
• Strømadapteren vil trække elektricitet fra stikkontakten, så længe stikket er isat.
For en sikkerheds skyld og for at spare på strømmen, bør stikket ikke sidde i
stikkontakten i længere tid. Fjern adapterens stik fra stikkontakten.
Interferens
• Placér ikke enheden på eller i nærheden af apparater, der kan forårsage
elektromagnetisk interferens. Dette kan ødelægge enhedens præstation og give
forvrænget billede eller lyd.
Batterier
• Batterierne i enheden kan sluges af små børn, hvilket er meget farligt.
• Batterier bør opbevares utilgængeligt for små børn, og lågen til batterirummet bør
sidde godt fast. Hvis et batteri er blevet slugt, skal du straks søge læge.
• Batterier smides væk i henhold til instruktionerne i denne manual.
• Batteriet må ikke udsættes for direkte sollys eller ekstrem varme.
Opsyn
• Børn bør være under opsyn for at sikre, at de ikke leger med enheden eller
ernbetjeningen.
• Lad aldrig børn eller andre putte noget ind i huller eller andet i enheden – det kan
give dødbringende elektrisk stød.
RISK OF ELECTRIC SHOCK
DO NOT OPEN
Tegnet med lynet med pil i en trekant viser, at der findes uisoleret ”farlig
spænding” indeni enheden, som kan give elektrisk stød.
Udråbstegnet i en trekant viser, at der findes vigtige betjenings- og
vedligeholdelsesinstruktioner i den vedlagte manual.
Service
• Risikoen for elektrisk stød mindskes ved, at du ikke erner skruerne. Enheden
indeholder ikke dele, som skal serviceres af bruger. Overlad venligst al
vedligeholdelse til autoriseret personale.
• Fjern ikke fastsiddende dele, da du kan blive udsat for farlig spænding.
Vedligeholdelse
• Sørg for at tage stikket ud af stikkontakten, før enheden rengøres.
• Brug ikke skuremidler, da de kan ridse enhedens overade.
• Brug ikke væsker til rengøring af enheden.
• Před použitím zařízení si přečtěte veškeré pokyny a uschovejte je pro budoucí
použití.
• Uschovejte tento návod. Předáváte-li zařízení třetí straně, nezapomeňte předat
také tento návod.
• Zkontrolujte, zda napětí uvedené na typovém štítku odpovídá napětí ve vaší
elektrické zásuvce.
Poškození
• Po vybalení zařízení zkontrolujte, zda není poškozeno.
• Přístroj nepoužívejte, pokud máte pochybnosti o jeho funkci nebo pokud je jakkoli
poškozeno - vtakovém případě jej vypněte, odpojte síťový adaptér a obraťte se
na prodejce.
Umístění zařízení
• Přístroj musí být umístěný na rovné a stabilní ploše, která není vystavena vibracím.
• Nestavte zařízení na šikmý nebo nestabilní povrch, hrozí převrácení nebo pád.
• Elektrická zásuvka musí být v blízkosti zařízení a musí zůstat snadno dostupná.
• Zařízení je určeno jen k použití v místnosti.
Teplota
• Zařízení chraňte před extrémním chladem a horkem. Zařízení umístěte dostatečně
daleko od zdrojů tepla, jako jsou radiátory nebo přenosná topidla.
• Zařízení chraňte před přímým sluncem a dalšími zdroji tepla.
Otevřený oheň
• Na zařízení a do jeho blízkosti nestavte svíčky ani jiný otevřený oheň.
Vlhkost
• V zájmu omezení rizika požáru, zásahu elektrickým proudem nebo poškození
zařízení nevystavujte zařízení vlhkosti, dešti, kapající nebo stříkající vodě. Na
zařízení nestavte předměty naplněné kapalinami, například vázy.
• Pokud dojde k polití zařízení kapalinou, může dojít k vážnému poškození. Okamžitě
zařízení odpojte od elektrické zásuvky. Vytáhněte koncovku napájecího kabelu ze
zásuvky a obraťte se na prodejce.
Větrání
• V zájmu prevence rizika požáru nebo zásahu elektrickým proudem v důsledku
přehřátí zajistěte, aby nebyly ventilační otvory blokovány závěsy a dalšími materiály.
• Zajistěte okolo přístroje volné místo 5 cm k zajištění dobrého větrání.
• Zařízení neinstalujte do knihovničky, vestavné skříňky nebo jiného stísněného
prostoru. Zajistěte dostatečné větrání.
Bezpečnost
• Před přesunem nebo před připojováním/odpojováním dalších zařízení vždy
odpojte zařízení od elektrické zásuvky.
• Odpojte zařízení od elektrické zásuvky během bouřky.
• V zájmu bezpečnosti a úspory energie nenechávejte přístroj dlouhodobě zapnutý,
pokud jej nebudete používat (například v noci, o dovolené nebo když nebudete
doma). Vypněte zařízení a odpojte zástrčku napájecího kabelu od elektrické
zásuvky.
Kabel síťového adaptéru
• Přístroj nebo stojan přístroje nesmí spočívat kabelu síťového adaptéru, protože
hmotnost přístroje by mohla kabel poškodit a způsobit ohrožení.
Síťový adaptér
• Síťový adaptér odebírá ze zásuvky proud vždy, když je k ní připojen. V zájmu
bezpečnosti a předcházení zbytečnému odběru energie nenechávejte adaptér
připojený k zásuvce, pokud přístroj delší dobu nepoužíváte. Adaptér odpojte od
napájecí zásuvky.
Rušení
• Zařízení neumísťujte do blízkosti jiných zařízení, která mohou vyvolávat
elektromagnetické rušení. Vopačném případě nemusí přístroj fungovat správně a
může dojít ke zkreslení zvuku.
Baterie
• Nebezpečí - malé děti mohou snadno spolknout baterie používané v tomto
přístroji.
• Baterie, které nejsou vloženy v dálkovém ovladači, uchovávejte mimo dosah dětí a
kontrolujte, zda je držák baterie bezpečně zasunut v přístroji. Pokud se domníváte,
že došlo ke spolknutí baterie, vyhledejte lékařskou pomoc.
• Baterie likvidujte přesně podle pokynů v návodu.
• Baterii nevystavujte přímému slunečnímu záření nebo zdrojům nadměrného tepla.
Dohled
• Dohlédněte, aby si s přístrojem nehrály děti.
• Nezasouvejte cizí předměty do otvorů vkrytu a zejména zabraňte v tom zabraňte
dětem - hrozí smrtelný zásah elektrickým proudem.
RISK OF ELECTRIC SHOCK
DO NOT OPEN
Symbol blesku se šipkou v rovnostranném trojúhelníku upozorňuje
uživatele na přítomnost neizolovaného „nebezpečného napětí“ pod krytem
zařízení, jehož velikost může představovat riziko zásahu elektrickým
proudem.
Vykřičník v rovnostranném trojúhelníku upozorňuje uživatele na důležité
pokyny k používání a údržbě v návodu k zařízení.
Servis
• V zájmu omezení rizika zásahu elektrickým proudem nedemontujte šrouby. Zařízení
neobsahuje součásti, které by uživatel mohl sám opravit. Veškerou údržbu svěřte
kvalikovaným osobám.
• Nerozebírejte kryty, hrozí zásah nebezpečným napětím.
Údržba
• Před čištěním odpojte přístroj od zdroje napájení.
• Nepoužívejte abrazivní houbičky ani čistící roztoky, hrozí poškození povrchu
zařízení.
• K čištění zařízení nepoužívejte tekutiny.

Bezpečnostné výstrahy
SK
• Dôkladne si prečítajte všetky pokyny pred tým, ako začnete používať toto
zariadenie auschovajte ich, aby ste si ich mohli pozrieť neskôr.
• Uschovajte návod na použitie. Ak dáte toto zariadenie tretej osobe, nezabudnite jej
odovzdať aj tento návod.
• Overte si, či sa napätie označené na štítku s menovitými hodnotami zhoduje s
napätím vašej siete.
Poškodenie
• Po vybalení skontrolujte, či zariadenie nie je poškodené.
• Toto zariadenie nepoužívajte, ak máte pochybnosti o jeho normálnej prevádzke,
alebo keď je akokoľvek poškodené - zariadenie vypnite, sieťový adaptér vytiahnite z
elektrickej zásuvky a poraďte sa so svojim predajcom.
Umiestnenie zariadenia
• Toto zariadenie sa musí umiestniť na pevnú rovnú plochu a nesmú naň pôsobiť
vibrácie.
• Toto zariadenie neklaďte na naklonené alebo nestabilné plochy, pretože by mohol
spadnúť alebo sa prevrátiť.
• Stenová zásuvka musí byť umiestnená blízko zariadenia a musí byť k nej ľahký
prístup.
• Toto zariadenie je určené len na používanie v interiéri.
Teplota
• Zabráňte pôsobeniu extrémnym teplotám buď vysoko nad, alebo pod nulou. Toto
zariadenie umiestnite dostatočne ďaleko od tepelných zdrojov, ako sú radiátory
alebo plynové/elektrické pece.
• Toto zariadenie nesmie byť vystavené priamemu slnečnému žiareniu alebo iným
zdrojom tepla.
Otvorený oheň
• Na zariadenie alebo do jeho blízkosti nikdy neklaďte zapálené sviečky.
Vlhkosť
• Aby sa zabránilo nebezpečenstvu požiaru, úrazu elektrickým prúdom alebo
poškodeniu tohto výrobku, nesmie byť vystavené dažďu, vlhkosti, kvapkajúcej
alebo striekajúcej vode. Na toto zariadenie sa nesmú klásť žiadne predmety
naplnené vodou ako sú vázy.
• Ak sa na zariadenie rozleje nejaká tekutina, môže to spôsobiť vážnu poruchu.
Zariadenie okamžite vypnite a odpojte od zdroja napájania. Zo zásuvky vytiahnite
zástrčku napájacej šnúry a poraďte sa s predajcom.
Vetranie
• Aby sa zabránilo úrazu elektrickým prúdom alebo požiaru z dôvodu prehriatia,
žiadne predmety, ako sú záclony a iné materiály nesmú blokovať vetracie otvory.
• Dodržujte okolo zariadenia minimálnu medzeru aspoň 5 cm, aby bolo zaručené
dobré vetranie.
• Toto zariadenie neinštalujte ani neklaďte na knihovničku, vstavané skrinky alebo do
iného obmedzeného priestoru. Zabezpečte správne vetranie zariadenia.
Bezpečnosť
• Pred pripájaním/odpájaním iných zariadení alebo premiestňovaním tohto
zariadenia vždy vytiahnite zástrčku napájacej šnúry zo stenovej zásuvky.
• Počas búrky vytiahnite zástrčku napájacej šnúry zo stenovej zásuvky.
• V záujme bezpečnosti a zabráneniu zbytočnej spotreby elektrického prúdu
zariadenie nenechávajte zapnuté dlhšiu dobu bez dozoru, napríklad cez noc, počas
dovolenky, alebo keď ste mimo domu. Zariadenie vypnite a zástrčku napájacej
šnúry vytiahnite zo stenovej zásuvky.
Kábel sieťového adaptéra
• Uistite sa, že zariadenie alebo jeho stojan nie je položený na kábli sieťového
adaptéra, pretože zariadenie môže svojou hmotnosťou poškodiť tento kábel a
ohroziť tým bezpečnosť.
Mains Adapter
• The mains adapter will continue to draw electricity from the mains supply when
plugged in the mains socket. In the interests of safety and to avoid unnecessary
energy consumption, never leave the adaptor plugged in the mains socket while
unattended for long periods of time. Disconnect the adaptor from the power
supply.
Rušenie
• Zariadenie neklaďte na alebo do blízkosti spotrebičov, ktoré môžu vytvárať
elektromagnetické rušenie. V opačnom prípade to môže nepriaznivo vplývať na
prevádzkovú výkonnosť tohto zariadenia a zvuk môže byť skreslený.
Batérie
• Batérie, ktoré sa v tomto zariadení používajú, môžu malé deti prehltnúť, čo je veľmi
nebezpečné.
• Keď sa batérie vyberú, uchovávajte ich mimo dosahu detí a uistite sa, že držiak na
batérie je do zariadenia riadne vložený. Ak máte podozrenie, že došlo k prehltnutiu
batérie, vyhľadajte lekársku pomoc.
• Batérie likvidujte správnym spôsobom a dodržiavajte pokyny v tomto návode.
• Batériu nevystavujte priamemu slnečnému žiareniu alebo zdrojom nadmerného
tepla.
Dozor
• Vprípade detí je treba dohliadať na to, aby sa so zariadením nehrali.
• Nedovoľte nikomu, obzvlášť deťom, aby do otvorov, slotov alebo iných otvorov v
kryte nič nevkladali - mohlo by dôjsť k úrazu elektrickým prúdom.
CAUTION
RISK OF ELECTRIC SHOCK
DO NOT OPEN
Symbol blesku v rovnostrannom trojuholníku upozorňuje používateľa na
prítomnosť neizolovaného „nebezpečného napätia“ v kryte zariadenia, ktoré
môže mať vysoký potenciál rizika úrazu elektrickým prúdom.
Výkričník v rovnostrannom trojuholníku upozorňuje používateľa na
prítomnosť pokynov týkajúcich sa prevádzky a údržby (servisu) v tomto
návode, ktorý je k tomuto zariadeniu priložený.
Servis
• Na zníženie rizika úrazu elektrickým prúdom neodskrutkúvajte skrutky. Toto
zariadenie neobsahuje žiadne používateľom opraviteľné diely. Všetky údržbárske
činnosti zverte kvalikovaným odborníkom.
• Neodmontúvajte žiadne pevné kryty, pretože by ste sa mohli vystaviť
nebezpečnému elektrickému napätiu.
Údržba
• Pred čistením nezabudnite zariadenie odpojiť od zdroja napájania.
• Nepoužívajte žiadne drsné utierky alebo brúsne čistiace prostriedky, pretože môžu
poškodiť povrch zariadenia.
• Na čistenie tohto zariadenia nepoužívajte tekutiny.

GB
Thank you for purchasing your new Sandstrøm Wireless speaker with
docking for iPhone / iPod / iPad.
We recommend that you spend some time reading this instruction manual in order
that you fully understand all the operational features oered. You will also nd
some hints and tips to help you resolve any issues.
Read all the safety instructions carefully before use and keep this instruction
manual for future reference.
Unpacking
Remove all items from the packaging. Retain the packaging. If you dispose of it please do so
according to local regulations.
The following items are included:
DAB
AUXFM
MODE
PAIR
MENU
ENTER
INFO
CLASSIC
POPROCK
DIM
JAZZ
FLAT
SLEEP
RECALL STORE
Mains Unit
Remote Control
Instruction ManualMains Adapter FM/DAB Aerial
* Images are for indication only; please refer to your individual item for details.
11

GB
Product Overview
Main Unit
Front View
1. iPod / iPhone / iPad dock
2. Remote control sensor
3. Display
4. Speakers
1
2
3
4
Rear View
5. DC IN socket
6. AUX IN socket
5 6 7 8
DC IN AUX IN VIDEO OUT FM/DAB
7. VIDEO OUT Socket
8. FM/DAB aerial socket
12
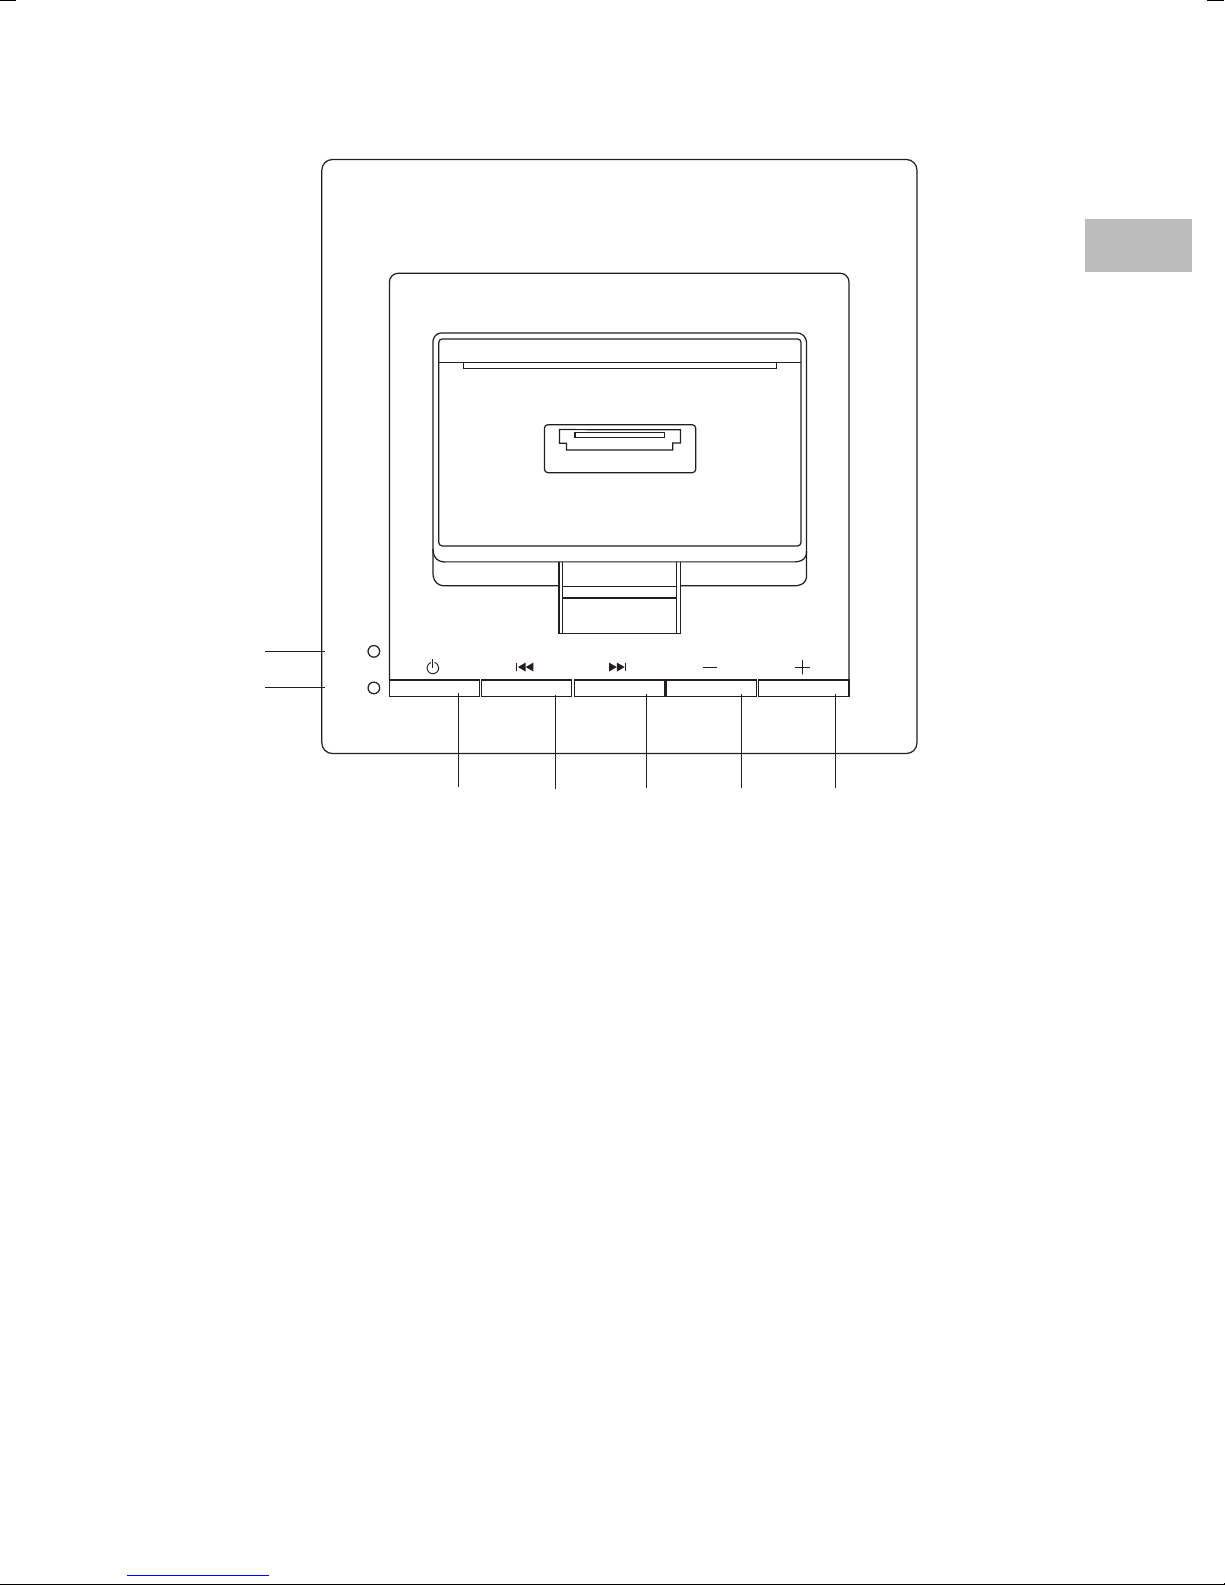
GB
Top View
1
2
Pairing
Status
SOURCE PAIR
3 4 5 6 7
1. Pairing indicator
Flashes to indicate Bluetooth pairing
status.
2. Status indicator
• Lights up GREEN when the unit is in
iPOD mode.
• Lights up AMBER when the unit is
in AUX mode.
• Lights up RED when the unit is in
DAB mode.
• Unlit when the unit is in FM or
STANDBY Mode.
• Flashes to indicate the unit is in
MUTE mode.
• Press to skip back to the beginning
of the track or to the previous track.
• Press and hold to fast reverse the
current track.
• Press to search for a radio station
going backward through accessible
radio frequencies.
5. FORWARD SKIP Button
• Press to skip to the next track.
• Press and hold to fast forward the
current track.
• Press to search for a radio station
going forwards through accessible
radio frequencies.
3. SOURCE Button
Switches between modes: iPod /
Bluetooth - AUX - DAB - FM STANDBY.
4. PAIR Button / BACKWARDS SKIP
button
• Access Bluetooth function to pair
with Bluetooth device.
6. VOLUME – Button
Press to decrease the volume.
7. VOLUME + Button
Press to increase the volume.
13
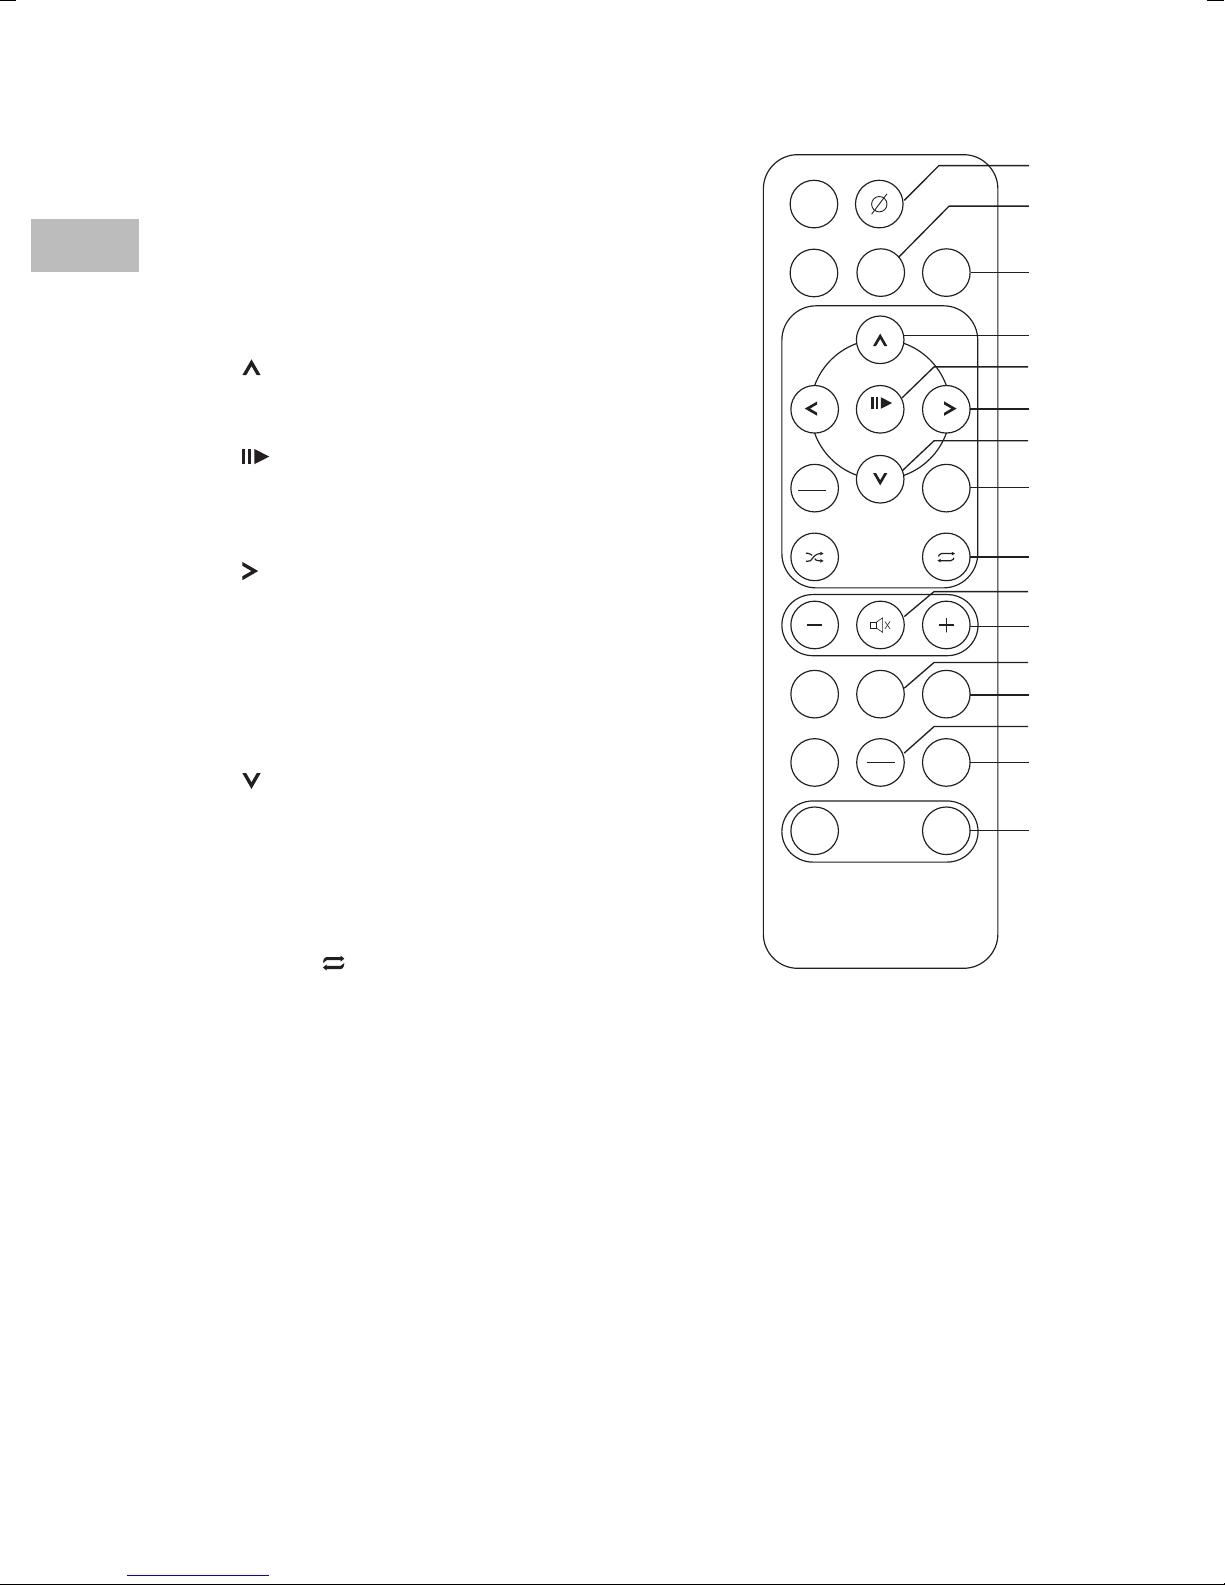
GB
Remote Control
1. STANDBY Button
Switches the unit between ON and
STANDBY modes.
2. FM Button
Switches to FM mode.
3. AUX Button
Switches to AUX mode.
4.
Button
Press to scroll up menus or
programmed radio stations.
5.
/ PAIR Button
Press to play or pause a track in iPod
mode. Press and hold to pair to a
Bluetooth device.
6.
Button
• Press to skip to the next track.
• Press and hold to fast forward the
current track.
• Press to search for a radio station
going forwards through accessible
radio frequencies.
7.
Button
Press to scroll down menus or
programmed radio stations.
DAB
DOCK
PAIR
MENU
INFO
POPROCK
JAZZ
RECALL STORE
DIM
SLEEP
AUXFM
ENTER
CLASSIC
FLAT
1
2
3
4
5
6
7
8
9
10
11
12
13
14
15
16
8. ENTER Buttons
Conrms the selection on a menu
screen.
9. REPEAT
Button
Press once to repeat the track that is
playing. Press again to repeat all the
tracks. Press again to switch repeat
o.
10. MUTE Button
Press to mute the volume.
11. VOLUME + Button
Press to increase the volume.
12. POP Button
Press to listen to music in a preset
POP sound eect.
13. CLASSIC Button
Press to listen to music in a preset
CLASSIC sound eect.
14. DIM / SLEEP Button
• Press to adjust brightness level.
• Press to enable / disable sleep timer.
15. FLAT Button
Press to listen to music in a preset
FLAT sound eect.
16. STORE Button
• Press to store radio stations.
• Press and hold to setup the clock.
14

GB
17. DAB Button
Switches to DAB mode
18. DOCK Button
Press to select IPOD or Bluetooth
mode
19.
Button
• Press to skip back to the beginning
of the track or to the previous track.
• Press and hold to fast reverse the
current track.
• Press to search for a radio station
going backward through accessible
radio frequencies.
17
18
19
20
DAB
DOCK
MENU
INFO
AUXFM
PAIR
ENTER
20. MENU/INFO Button
• Press to scroll back through menus.
• Press to display information in DAB
or FM mode.
21. SHUFFLE
Button
Press to listen to tracks in a random
order.
22. VOLUME – Button
Press to decrease the volume.
23. ROCK Button
Press to listen to music in a preset
ROCK sound eect.
24. JAZZ Button
Press to listen to music in a preset
JAZZ sound eect.
25. RECALL Button
Press to select preset radio stations.
21
22
23
24
25
CLASSIC
POPROCK
JAZZ
RECALL STORE
DIM
SLEEP
FLAT
15

GB
Removing the Plastic Strip from the Remote Control
Remove the protective plastic strip from the battery if the
battery is being used for the rst time. It is located at the
bottom side of the remote control.
Battery Replacement for the Remote Control
The remote control requires a CR2025, 3V Lithium battery.
1. Slide and hold the battery release tab in the direction
of the arrow. (If you are having diculty with the tab,
use a paper clip to squeeze the tab.)
2. Pull out the battery holder and remove the old
battery.
3. Replace with a new battery. (Ensure the + polarity
faces up.)
4. Insert the battery holder back into the remote control.
It will close with a click.
Handling the Battery
• Improper or incorrect use of batteries may cause corrosion or battery leakage, which
could cause re, personal injury or damage property.
• Install the battery correctly in the battery compartment. Normally the battery’s positive
polarity (+) will face up.
• When the battery is exhausted, the remote control will not function.
• Only use the battery type indicated in this manual.
• Do not dispose of the used battery as domestic waste. Dispose of it in accordance with
local regulations.
• Small button cell batteries such as the one used in the remote control are easily
swallowed by young children and this is dangerous. Keep loose button cells away from
young children and make sure that the battery is secure in the remote control. Seek
medical advice if you believe a battery cell has been swallowed.
16

GB
Handling the Remote Control
• If you are having diculty removing the battery cover, use a paper clip to squeeze the
battery tab before pulling out the battery cover. Remove the battery.
• Do not drop the remote control.
• Do not allow anything to impact the remote control.
• Do not spill water or liquid on the remote control.
• Do not place the remote control on a wet object.
• Do not place the remote control under direct sunlight or near sources of excessive heat.
• Remove the battery from the remote control when not in use for a long period of time,
as corrosion or battery leakage may occur and result in physical injury, and/or property
damage, and/or re.
Remote Control Operation Range
• The remote control sensor on the front unit is
sensitive to the remote control’s commands up
to a maximum of 5 metres away and within a
maximum of a 60° arc.
• Please note that the operating distance may vary
depending on the brightness of the room.
30° 30°
Within about 5m
DAB
AUXFM
MODE
PAIR
MENU
ENTER
INFO
CLASSIC
POPROCK
DIM
JAZZ
FLAT
SLEEP
RECALL STORE
17

GB
Connecting the Aerial
Insert the aerial into the FM/DAB socket and tighten the nut.
Extent and angle the aerial to get the best reception.
Please use only the FM/DAB aerial
supplied with this unit.
Power Source
Mains Power
• This unit operates with a DC 18V/1.5A mains adapter (included).
• Connecting the unit to any other power source may damage the unit. Unwind the mains
adapter to its full length. Connect the mains adapter to the DC socket on the rear of the
unit and a mains socket. Make sure the mains adapter is fully inserted into the mains
socket. The unit is now connected and ready to use.
• To switch the unit o completely, unplug the mains adapter from the mains socket.
18

GB
General Operation
Switching ON / OFF
• When you rst connect the unit to the mains socket, the unit will be in STANDBY mode.
‘00:00’ will ash on the display.
• Press the SOURCE
control to turn the unit on.
• To switch the unit back into standby, press the SOURCE
or press and hold the STANDBY button on the unit.
• Disconnect the mains adapter from the mains socket if you want to switch the unit o
completely.
If the unit volume is close to mute or idle for 20 minutes, it will automatically switch to standby mode, the
LED indicators will ash for 5 minute before it switches to standby. Press any buttons to extend the time.
button on the unit or press the STANDBY button on the remote
button on the remote control
Selecting Modes
• Press the SOURCE button repeatedly on the unit to switch to iPod/Bluetooth, AUX,
DAB, or FM mode. The status indicator will light up green, orange, red or remain unlit
depending on mode selected.
• Press the DOCK button on the remote control to select iPod/Bluetooth mode. (Status
indicator will light up green (iPod mode) or ash blue (Bluetooth mode).)
• Press the DAB button on the remote control to select DAB mode. (Status indicator will
light up orange.)
• Press the FM button on the remote control to select FM mode. (No status indicator.)
• Press the AUX button on the remote control to select AUX mode. (Status indicator will
light up red.)
Auto Setting the Clock
The clock can be update automatically if you can receive DAB signal in your location. In
order to synchronise to the current local time you must leave it on the DAB station for a
short period of time.
19

GB
Manually Setting the Clock
In STANDBY mode:
1. Press and hold STORE.
2. Press
3. Press ENTER to conrm.
4. Repeat steps (2) and (3) until you have nished setting the clock.
• In STANDBY mode, press STORE to switch between 12-hour and 24-hour format.
• If you have selected 12-hour time mode, the unit will display “AM/PM” at the appropriate hour.
to adjust the time.
Sleep Function
You can switch the unit to standby after a set time.
1. Press the DIM/SLEEP button to scroll through the sleep times when the unit is
switched on.
The times are as follows:
SLEEP 5 SLEEP 10 SLEEP 15 SLEEP 20 SLEEP 30
SLEEP OFF SLEEP 90 SLEEP 60 SLEEP 45
2. When the sleep timer is set if you press DIM/SLEEP the remaining time will be
displayed.
3. To cancel the SLEEP function, press and hold DIM/SLEEP until the display shows
“SLEEP OFF”.
Adjusting the volume
• Press the VOLUME + or - buttons to increase or decrease the volume level.
• Press the MUTE
ash. Press the MUTE button again to resume audio listening.
button to turn the sound o. The status indicator and display will
Adjusting the Sound Eect
Press the POP, JAZZ, ROCK, CLASSIC or FLAT buttons on the remote control to select a
desired music mode.
Dimming the display
When the unit is in standby press the DIM/SLEEP button. The unit has 3 display light
setting, repeatedly press the DIM/SLEEP button to scroll through the settings.
20

GB
DAB Operation
DAB Auto Scan
The auto scan will search for all DAB Band III channels. After the scan has nished, the rst
alphanumerically found station will be automatically selected.
Full auto scan will not replace the DAB stations in the memory. If you want to remove all
the previously scanned stations, a system reset is required.
1. To activate auto scan, rst press and hold the MENU/INFO button to enter the DAB
Menu. Then press the buttons to select the “FULL SCAN”, and then press the
ENTER button to conrm. This may take a few minutes, depending on the number of
stations found.
2. All the stations that have been found will be stored automatically. To explore the found
stations, press the
buttons to select.
Secondary Services
• Press the button to access the station’s secondary services if available.
• Press the
button again to skip to the next the station’s secondary services if available.
Manual Tuning
As well as the auto tune function, you can manually tune the receiver. This can help you
when aligning your aerial or when adding stations that were missed while auto tuning.
1. Press and hold the MENU/INFO button and then press the
Manual tune, the display will now show Manual. Press the ENTER button to conrm
the selection.
2. Press the
5A to 13B.
3. After your desired channel number is selected, press the ENTER button to conrm.
4. Press and hold the MENU/INFO button to exit.
buttons to cycle through the DAB channels, which are numbered from
buttons to select
Programming radio stations
You can store up to 10 DAB radio stations in your units memory.
1. When you have found a radio station that you would like to store press the STORE
button.
2. Press the
3. Press the ENTER button to store the radio station.
or buttons to select a programme position number 1-10.
21

GB
Selecting a stored radio station
Press the RECALL button or the buttons to scroll through the stored stations.
The stored stations will be saved into the memory and power o will not erase it. Storing a new station in
a preset location will erase the previously stored station in that location.
DAB Display Modes
Every time you press the MENU/INFO button, the display will cycle through the following
display modes: Service Name, DLS, Signal Strength, Programme Type, Ensemble Name,
Frequency, Signal Error, Birate, Mode, Time, Date.
Service Name
Date
Time
Mode
DLS
Signal Strength
Programme Type
Ensemble Name
Frequency
Birate
22
Signal Error

GB
Service Name
Describes the type of service the station provides, e.g. news.
DLS (Dynamic Label Segment)
Dynamic label segment is a scrolling message that the broadcaster may include with their
transmissions. The message usually includes information, such as programme details etc.
DAB – unlike normal radio, groups together several radio stations and transmits them on
one frequency.
Signal Strength
The display will show a slide bar to indicate the signal strength, the stronger the signal, the
longer the bar will be from left to right.
Programme Type
This describes the “Style” or “genre” of music that is being broadcast e.g. “Rock” or
“Classical”.
Ensemble Name
A Ensemble/multiplex is a collection of radio stations that are bundled and transmitted on
one frequency. There are national and local multiplexes. Local ones contain stations that are
specic to that area.
Frequency
The frequency of the present station will be displayed.
Signal Error
A number showing the error rate. If the number is 0, it means the signal received is error
free and the signal strength is strong. If the error rate is high, it is recommended to reorient
the radio aerial or reposition the unit.
Birate
The display will show the digital audio bit rate being received.
Mode
The display will show the radio mode.
Time and Date
The broadcaster (Radio station) provides clock and date information automatically so there’s no need to
manually set this information. If the information is not available, the display will show the incorrect time
or date.
23

GB
Listening to the Radio
Extend the FM aerial to receive the best FM reception.
1. Press the FM button on the remote control to select FM mode.
2. Press and hold the
station.
3. To ne tune a station press the
0.05MHz.
or button to automatically search for the next available radio
or button. Each press will adjust the frequency by
FM Station Scanning Setup
1. Press and hold MENU/INFO on the remote control, then to select “SCAN”. Press
ENTER to conrm.
2. Press
3. Press and hold the MENU/INFO to exit.
to select “STRONG” and “WEAK”, then press ENTER to conrm.
Audio Mode
1. Press and hold MENU/INFO on the remote control, then to select “AUDIO”. Press
ENTER to conrm.
2. Press
3. Press and hold the MENU/INFO to exit.
to select “STEREO” and “MONO”, then press ENTER to conrm.
Alternatively, press the MO./ST. button to toggle between the Auto or Mono selection.
• The unit will automatically switch between stereo and mono in auto mode, but you can override
this and switch this function manually. This is helpful when receiving poor signal reception.
Programming radio stations
You can store up to 10 FM radio stations in your units memory.
1. When you have found a radio station that you would like to store press the STORE
button.
2. Press the
3. Press the ENTER button to store the radio station.
or buttons to select a programme position number 1-10.
Selecting a stored radio station
Press the RECALL button or the buttons to scroll through the stored stations.
The stored stations will be saved into the memory and power o will not erase it. Storing a new station in
a preset location will erase the previously stored station in that location.
24

GB
FM Display Modes
Every time you press the MENU/INFO button, the display will cycle through the following
display modes: Service Name, Radio Text, Programme Type, Frequency, Audio Mode,
Time/Date.
Service Name
Describes the type of service the station provides,
e.g. news.
Radio Text
As with DAB, the broadcaster can include a
scrolling text that displays information about the
current program.
Programme Type
This describes the “Style” or “Genre” of music that
is being broadcast e.g. “Rock” or “Classical”.
Frequency
This shows the frequency of the current station.
e.g. 89.80 MHz.
Audio Mode
The display will show if the station being received
is in mono or stereo.
Time/Date
Service Name
Radio Text
Programme Type
Frequency
Audio Mode
Time
Date and Time will show on the display.
Date
25

GB
Docking an iPod / iPhone/ iPad
1
2
3
26

GB
iPod / iPhone / iPad Operation
Using the iPod/iPhone/iPad dock you can use the unit to play music les stored on your
iPod/iPhone/iPad.
This unit can support the following iPod/iPhone/iPad models.
Type Support Model
iPhone • iPhone
• iPhone 3G/3GS
• iPhone 4/4S
iPod
(with 30-pin dock
• iPod touch 1
st/2nd/3rd/4th
• iPod nano 1st/2nd/3rd/4th/5th/6th Generation
Generation
connectors)
iPad* • iPad
• iPad 2
• iPad 3
Inserting the iPod / iPhone / iPad
1. The iPod / iPhone / iPad battery will automatically charge when docked with the unit
until the battery is fully charged.
2. Press the DOCK button your iPod/iPhone/iPad with start to play automatically.
3. Press the MENU button to go back through the menus.
4. Press the
or buttons to move up and down the menus.
5. Press the ENTER button to select a menu option.
• The unit does not show any music information from your iPod / iPhone / iPad. Please view the music
information on your iPod / iPhone / iPad display.
• To avoid damaging your iPod / iPhone / iPad or the unit, please take care when inserting and removing
your iPod / iPhone / iPad from the dock.
• To use the remote control to operate the menus of the iPod touch series, iPhone series and iPod nano
th
6
generation, you need to enter the music menus on your iPod / iPhone / iPad rst.
• This manual provides the basic instructions of menu navigation on iPod / iPhone / iPad. For advance
operations, please refer to the instructions that accompanied your iPod / iPhone / iPad.
To Play / Pause music
• Press the / PAIR button on the remote control pause playback.
• To resume playback, press the
• Press and hold the
/ PAIR button to send the iPod /iPhone / iPad into sleep mode.
/ PAIR button on the remote control again.
27

GB
Skipping and searching tracks
• Press the buttons on the remote control to skip forwards to the next track.
• Press the
the previous track.
• Press and hold the
buttons on the remote control to skip back to the beginning of the track or to
or during playback to search forwards and backwards.
Random Playback
All the tracks on the disc can be played in a random order.
• During playback, press the
• After all the tracks have been played once, the playback will stop automatically.
• To cancel the random playback, press the
RANDOM playback. Normal playback will resume.
button on the remote control.
button on the remote control during
Repeat Playback
• Press the button once on the remote control. The unit will play the current track
repeatedly.
• Press the
• Press the
button twice. The unit will play all tracks repeatedly.
button once more to cancel the repeat function.
Charging your iPod / iPhone / iPad
1. Your iPod / iPhone / iPad has an internal non-removable battery, the battery may need
to be charged if it has not been used for a while.
2. You can automatically charge the iPod / iPhone / iPad through the unit when it is
docked.
• If you charge the iPod / iPhone / iPad while playing music, it may take longer than normal to fully
charge the battery.
• At any time, you can control the iPod / iPhone / iPad player itself directly.
st
• 1
, 2nd & 3rd generation iPods cannot be charged.
• The charging function will only work with the mains adapter connected.
• The iPod / iPhone / iPad can be charged with this unit in either ON or Standby mode.
Video Out Function
When any iPod / iPhone / iPad model with video playback function is plugged into the unit,
videos / photos can be viewed on another display screen.
1. Connect a TV or display screen using the Video Out socket via the video connection
cable (not included).
2. Set your TV to the correct input.
3. Choose the video / photo le you would like to play / display and the iPod / iPhone /
iPad will automatically play / display the le on the desired video display.
28

GB
Bluetooth® Audio
The unit has a Bluetooth function that can receive a signal within 10 metres.
To pair the unit with a Bluetooth device to listen to music:
1. Press the SOURCE
button repeatedly on the unit or press the DOCK button on the
remote control to select iPOD/Bluetooth mode.
Make sure the dock is empty.
2. Press and hold the / PAIR button until you hear 2 “beeps”. The pairing indicator will
ash blue. The system has entered pairing mode and can be found.
3. Activate your Bluetooth device and select the search mode.
4. “S1IPBTDX12E” will appear on your Bluetooth device list.
5. Select “S1IPBTDX12E” and enter “0000” for the password if necessary.
6. When pairing is successful, the Bluetooth indicator will light up blue and stop ashing.
7. When switched on, the unit will automatically reconnect with the latest connected
Bluetooth device.
8. If the unit’s Bluetooth connection is lost, press
/ PAIR to reconnect with the latest
connected Bluetooth device.
9. If the power is cut o from a device that your speaker is connected to, it may not
automatically reconnect when the power resumes. You may have to pair the speaker
again.
• If the signal strength is weak, your Bluetooth receiver may disconnect, but it will re-enter pairing
mode automatically.
• The unit supports pairing for up to 8 Bluetooth devices.
• While in Pairing Mode (the LED will ash blue) press the
each time) to clear all pairing settings. If successful, you will hear 2 beeps.
/ PAIR button 2 times (1 second apart
29

GB
AUX IN Operation
1. Before connecting to the mains socket, use a 3.5mm AUX IN cable (not included) to
connect your audio device through the AUX IN socket at the rear of the unit.
2. Connect the mains adapter to the unit and then the mains socket.
3. Press the AUX button on the remote control to switch to AUX mode. The status
indicator will light up orange.
4. Press the VOL +/– buttons to adjust the volume to your desired level.
5. In AUX mode, operate your audio device directly for playback features.
Maintenance
Cleaning the Unit
Ensure the unit is fully unplugged from the mains socket before cleaning.
• To clean the unit, wipe the case with a slightly moist, lint-free cloth.
• Do not use any cleaning uids containing alcohol, ammonia or abrasives.
• Do not spray an aerosol at or near the unit.
30
 Loading...