

Page 1
OPERATOR’S MANUAL
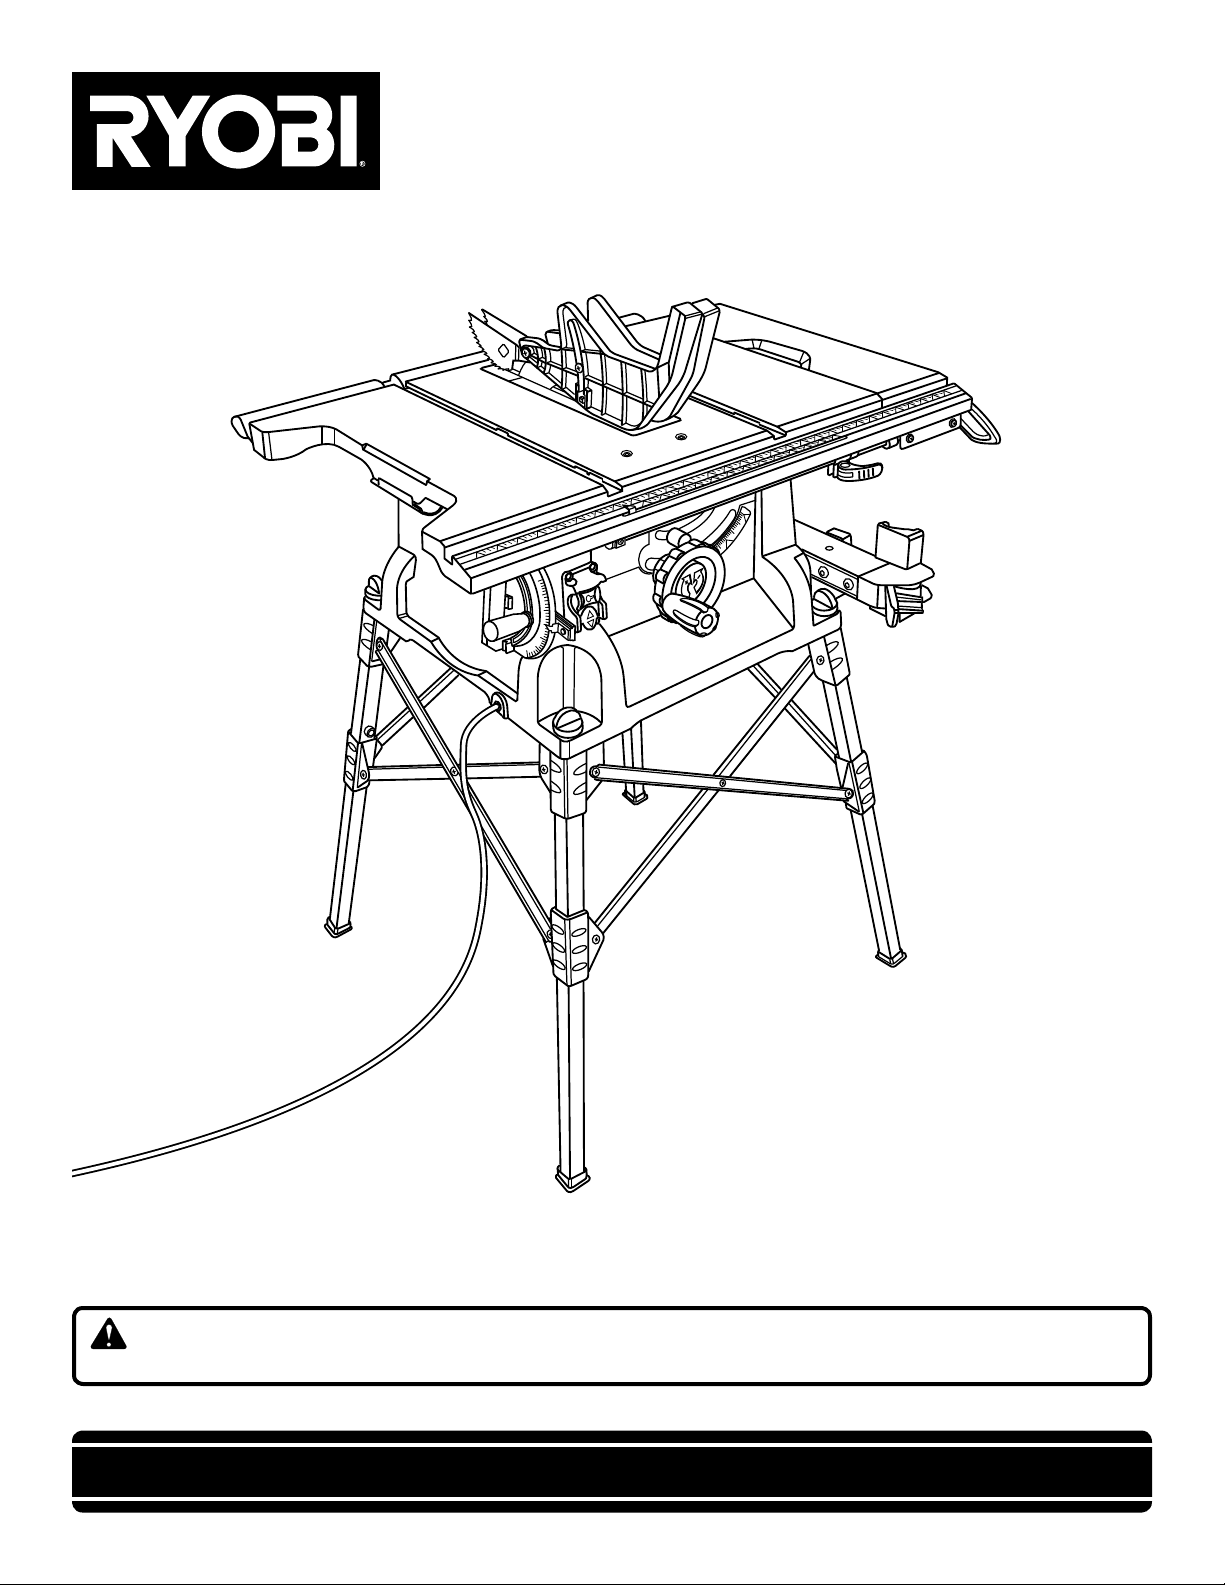
10 in. TABLE SAW
RTS21/RTS21G
Your table saw has been engineered and manufactured to our high standard for dependability, ease of operation, and
operator safety. When properly cared for, it will give you years of rugged, trouble-free performance.
WARNING: To reduce the risk of injury, the user must read and understand the operator’s manual before using
this product.
Thank you for your purchase.
SAVE THIS MANUAL FOR FUTURE REFERENCE
Page 2

TABLE OF CONTENTS
Introduction ......................................................................................................................................................................2
Warranty ...........................................................................................................................................................................2
General Safety Rules .................................................................................................................................................... 3-4
Specific Safety Rules .................................................................................................................................................... 4-5
Symbols ............................................................................................................................................................................6
Electrical ...........................................................................................................................................................................7
Glossary of Terms .............................................................................................................................................................8
Features ...................................................................................................................................................................... 9-12
Tools Needed .................................................................................................................................................................12
Loose Parts ....................................................................................................................................................................13
Assembly .................................................................................................................................................................. 14-20
Operation .................................................................................................................................................................. 21-34
Adjustments .............................................................................................................................................................. 35-37
Maintenance ...................................................................................................................................................................37
Accessories ....................................................................................................................................................................38
Troubleshooting ........................................................................................................................................................ 38-39
Parts Ordering/Service ..................................................................................................................................... Back Page
INTRODUCTION
This tool has many features for making its use more pleasant and enjoyable. Safety, performance, and dependability have
been given top priority in the design of this product making it easy to maintain and operate.
WARRANTY
RYOBI® POWER TOOL - LIMITED THREE YEAR WARRANTY AND 90 DAY EXCHANGE POLICY
One World Technologies, Inc., warrants its RYOBI® power tools with the following conditions:
90-DAY EXCHANGE POLICY: During the first 90 days after date of purchase, you may either request service under this
warranty or you may exchange any RYOBI® power tool which does not work properly due to defective workmanship or
materials by returning the power tool to the dealer from which it was purchased. To receive a replacement power tool
or requested warranty service, you must present proof of purchase and return all original equipment packaged with the
original product. The replacement power tool will be covered by the limited warranty for the balance of the three year
period from the date of the original purchase.
WHAT THIS WARRANTY COVERS: This warranty covers all defects in workmanship or materials in your RYOBI® power
tool for a period of three years from the date of purchase. With the exception of batteries, power tool accessories are
warranted for ninety (90) days. Batteries are warranted for three years.
HOW TO GET SERVICE: Just return the power tool, properly packaged and postage prepaid, to an Authorized Service
Center. You can obtain the location of the Service Center nearest you by contacting a service representative at One
World Technologies, Inc., P.O. Box 1207, Anderson, SC 29622-1207, by calling 1-800-525-2579 or by logging on to
www.ryobitools.com. When you request warranty service, you must also present proof of purchase documentation, which
includes the date of purchase (for example, a bill of sale). We will repair any faulty workmanship, and either repair or replace
any defective part, at our option. We will do so without any charge to you. We will complete the work in a reasonable time,
but, in any case, within ninety (90) days or less.
WHAT’S NOT COVERED: This warranty applies only to the original purchaser at retail and may not be transferred. This
warranty only covers defects arising under normal usage and does not cover any malfunction, failure or defects resulting
from misuse, abuse, neglect, alteration, modification or repairs by other than Authorized Service Centers. One World
Technologies, Inc. makes no warranties, representations or promises as to the quality or performance of its power tools
other than those specifically stated in this warranty.
ADDITIONAL LIMITATIONS: Any implied warranties granted under state law, including warranties of merchantability or
fitness for a particular purpose, are limited to three years from the date of purchase. One World Technologies, Inc. is not
responsible for direct, indirect, or incidental damages, so the above limitations and exclusions may not apply to you. This
warranty gives you specific legal rights, and you may also have other rights which vary from state to state.
2
Page 3

GENERAL SAFETY RULES
WARNING:
Read and understand all instructions. Failure to follow
all instructions listed below, may result in electric shock,
fire and/or serious personal injury.
READ ALL INSTRUCTIONS
KNOW YOUR POWER TOOL. Read the operator’s
manual carefully. Learn the saw’s applications and
limitations as well as the specific potential hazards related
to this tool.
GUARD AGAINST ELECTRICAL SHOCK BY
PREVENTING BODY CONTACT WITH GROUNDED
SURFACES. For example, pipes, radiators, ranges,
refrigerator enclosures.
KEEP GUARDS IN PLACE and in good working order.
REMOVE ADJUSTING KEYS AND WRENCHES. Form
habit of checking to see that keys and adjusting wrenches
are removed from tool before turning it on.
KEEP WORK AREA CLEAN. Cluttered areas and
benches invite accidents. DO NOT leave tools or pieces
of wood on the saw while it is in operation.
DO NOT USE IN DANGEROUS ENVIRONMENTS. Do
not use power tools in damp or wet locations or expose
to rain. Keep the work area well lit.
KEEP CHILDREN AND VISITORS AWAY. All visitors
should wear safety glasses and be kept a safe
distance from work area. Do not let visitors contact
tool or extension cord while operating.
MAKE WORKSHOP CHILDPROOF with padlocks and
master switches, or by removing starter keys.
DON’T FORCE TOOL. It will do the job better and safer
at the feed rate for which it was designed.
USE RIGHT TOOL. Don’t force the tool or attachment to
do a job it was not designed for. Don’t use it for a purpose
not intended.
USE THE PROPER EXTENSION CORD. Make sure
your extension cord is in good condition. Use only a
cord heavy enough to carry the current your product
will draw. An undersized cord will cause a drop in line
voltage resulting in loss of power and overheating. A wire
gauge size (A.W.G.) of at least 14 is recommended for an
extension cord 25 feet or less in length. If in doubt, use
the next heavier gauge. The smaller the gauge number,
the heavier the cord.
DRESS PROPERLY. Do not wear loose clothing, gloves,
neckties, or jewelry. They can get caught and draw you
into moving parts. Rubber gloves and nonskid footwear
are recommended when working outdoors. Also wear
protective hair covering to contain long hair.
ALWAYS WEAR SAFETY GLASSES WITH SIDE
SHIELDS. Everyday eyeglasses have only impact-
resistant lenses, they are NOT safety glasses.
SECURE WORK. Use clamps or a vise to hold work when
practical. It’s safer than using your hand and frees both
hands to operate tool.
DON’T OVERREACH. Keep proper footing and balance
at all times.
MAINTAIN TOOLS WITH CARE. Keep tools sharp
and clean for better and safer performance. Follow
instructions for lubricating and changing accessories.
DISCONNECT TOOLS. When not in use, before
servicing, or when changing attachments, blades, bits,
cutters, etc., all tools should be disconnected.
AVOID ACCIDENTAL STARTING. Be sure switch is off
when plugging in any tool.
USE RECOMMENDED ACCESSORIES. Consult the
operator’s manual for recommended accessories. The
use of improper accessories may risk injury.
NEVER STAND ON TOOL. Serious injury could occur if
the tool is tipped or if the cutting tool is unintentionally
contacted.
CHECK DAMAGED PARTS. Before further use of the
tool, a guard or other part that is damaged should be
carefully checked to determine that it will operate properly
and perform its intended function. Check for alignment
of moving parts, binding of moving parts, breakage of
parts, mounting and any other conditions that may affect
its operation. A guard or other part that is damaged must
be properly repaired or replaced by an authorized service
center to avoid risk of personal injury.
USE THE RIGHT DIRECTION OF FEED. Feed work into
a blade or cutter against the direction of rotation of blade
or cutter only.
NEVER LEAVE TOOL RUNNING UNATTENDED. TURN
THE POWER OFF. Don’t leave tool until it comes to a
complete stop.
PROTECT YOUR LUNGS. Wear a face or dust mask if
the cutting operation is dusty.
PROTECT YOUR HEARING. Wear hearing protection
during extended periods of operation.
DO NOT ABUSE CORD. Never yank cord to disconnect
from receptacle. Keep cord away from heat, oil, and sharp
edges.
WHEN OPERATING A POWER TOOL OUTSIDE, USE
AN OUTDOOR EXTENSION CORD MARKED “W-A”
OR “W”. These cords are rated for outdoor use and
reduce the risk of electric shock.
KEEP BLADES CLEAN, SHARP, AND WITH
SUFFICIENT SET. Sharp blades minimize stalling
and kickback.
KEEP HANDS AWAY FROM CUTTING AREA. Keep
hands away from blades. Do not reach underneath work
or around or over the blade while blade is rotating. Do not
attempt to remove cut material when blade is moving.
3
Page 4

GENERAL SAFETY RULES
BLADE COASTS AFTER BEING TURNED OFF.
NEVER USE IN AN EXPLOSIVE ATMOSPHERE.
Normal sparking of the motor could ignite fumes.
INSPECT TOOL CORDS PERIODICALLY. If damaged,
have repaired by a qualified service technician at
an authorized service facility. The conductor with
insulation having an outer surface that is green with
or without yellow stripes is the equipment-grounding
conductor. If repair or replacement of the electric cord
or plug is necessary, do not connect the equipmentgrounding conductor to a live terminal. Repair or replace
a damaged or worn cord immediately. Stay constantly
aware of cord location and keep it well away from the
rotating blade.
INSPECT EXTENSION CORDS PERIODICALLY and
replace if damaged.
GROUND ALL TOOLS. If tool is equipped with three-
prong plug, it should be plugged into a three-hole
electrical receptacle.
CHECK WITH A QUALIFIED ELECTRICIAN or service
personnel if the grounding instructions are not completely
understood or if in doubt as to whether the tool is properly
grounded.
USE ONLY CORRECT ELECTRICAL DEVICES: 3-wire
extension cords that have 3-prong grounding plugs and
3-pole receptacles that accept the tool’s plug.
DO NOT MODIFY the plug provided. If it will not fit the
outlet, have the proper outlet installed by a qualified
electrician.
KEEP TOOL DRY, CLEAN, AND FREE FROM OIL AND
GREASE. Always use a clean cloth when cleaning. Never
use brake fluids, gasoline, petroleum-based products, or
any solvents to clean tool.
STAY ALERT AND EXERCISE CONTROL. Watch what
you are doing and use common sense. Do not operate
tool when you are tired. Do not rush.
DO NOT USE TOOL IF SWITCH DOES NOT TURN IT
ON AND OFF. Have defective switches replaced by an
authorized service center.
USE ONLY CORRECT BLADES. Do not use blades with
incorrect size holes. Never use blade washers or blade
bolts that are defective or incorrect. The maximum blade
capacity of your saw is 10 in. (254 mm).
BEFORE MAKING A CUT, BE SURE ALL ADJUSTMENTS
ARE SECURE.
BE SURE BLADE PATH IS FREE OF NAILS. Inspect for
and remove all nails from lumber before cutting.
NEVER TOUCH BLADE or other moving parts during
use.
NEVER START A TOOL WHEN ANY ROTATING
COMPONENT IS IN CONTACT WITH THE
WORKPIECE.
DO NOT OPERATE A TOOL WHILE UNDER THE
INFLUENCE OF DRUGS, ALCOHOL, OR ANY
MEDICATION.
WHEN SERVICING use only identical replacement parts.
Use of any other parts may create a hazard or cause
product damage.
USE ONLY RECOMMENDED ACCESSORIES listed
in this manual or addendums. Use of accessories that
are not listed may cause the risk of personal injury.
Instructions for safe use of accessories are included with
the accessory.
DOUBLE CHECK ALL SETUPS. Make sure blade is tight
and not making contact with saw or workpiece before
connecting to power supply.
SPECIFIC SAFETY RULES
FIRMLY BOLT THE SAW TO A WORK BENCH OR LEG
STAND at approximately hip height.
NEVER OPERATE THE SAW ON THE FLOOR.
GUARD AGAINST KICKBACK. Kickback occurs when
the blade stalls rapidly and workpiece is driven back
towards the operator. It can pull your hand into the blade
resulting in serious personal injury. Stay out of blade path
and turn switch off immediately if blade binds or stalls.
USE RIP FENCE. Always use a fence or straight edge
guide when ripping.
SUPPORT LARGE PANELS. To minimize risk of blade
pinching and kickback, always support large panels.
REMOVE ALL FENCES AND AUXILIARY TABLES
before transporting saw. Failure to do so can result in an
accident causing possible serious personal injury.
ALWAYS USE BLADE GUARD, RIVING KNIFE, AND
ANTI-KICKBACK PAWLS on all “through-sawing” op-
erations. Through-sawing operations are those in which
the blade cuts completely through the workpiece as in
ripping or cross cutting. Keep the blade guard down, the
anti-kickback pawls down, and the riving knife in place.
ALWAYS SECURE WORK firmly against the rip fence or
miter gauge. NEVER use the rip fence during the same
operation as the miter gauge.
WHEN MAKING NON-THROUGH RIP CUTS, always
use a push stick, push block, and/or featherboard so your
hands do not come within 3 inches of the saw blade.
WHEN RIPPING NARROW STOCK, always use a push
stick, push block, or featherboard.
4
Page 5

SPECIFIC SAFETY RULES
NEVER perform any operation “freehand” which means
using only your hands to support or guide the workpiece.
Always use either the rip fence or miter gauge to position
and guide the work.
NEVER stand or have any part of your body in line with
the path of the saw blade.
NEVER reach behind, over, or within three inches of the
blade or cutter with either hand for any reason.
MOVE THE RIP FENCE out of the way when cross cut-
ting.
DO NOT USE THE MITER GAUGE AND RIP FENCE
during the same operation.
NEVER use rip fence as cutoff gauge when cross
cutting.
NEVER attempt to free a stalled saw blade without first
turning the saw OFF and disconnecting the saw from the
power source.
PROVIDE ADEQUATE SUPPORT to the rear and sides
of the saw table for wide or long workpieces.
AVOID KICKBACKS (work thrown back toward you)
by:
a) Keeping blade sharp.
b) Keeping rip fence parallel to the saw blade.
c) Keeping riving knife, anti-kickback pawls, and
blade guard in place and operating.
d) Not releasing the work before it is pushed all the
way past the saw blade using a push stick.
e) Not ripping work that is twisted or warped or
does not have a straight edge to guide along the
fence.
IF THE POWER SUPPLY CORD IS DAMAGED, it must
be replaced only by the manufacturer or by an authorized
service center to avoid risk.
AVOID AWKWARD OPERATIONS AND HAND
POSITIONS where a sudden slip could cause your hand
to move into the cutting tool.
USE ONLY RECOMMENDED ACCESSORIES listed
in this manual or addendums. Use of accessories that
are not listed may cause the risk of personal injury.
Instructions for safe use of accessories are included with
the accessory.
MAKE SURE THE WORK AREA HAS AMPLE LIGHTING
to see the work and that no obstructions will interfere with
safe operation BEFORE performing any work using the
table saw.
ALWAYS TURN OFF SAW before disconnecting it, to
avoid accidental starting when reconnecting to power
supply.
ONLY USE BLADES within the thickness range stamped
on the riving knife.
THIS TOOL should have the following markings:
a) Wear eye protection.
b) Use saw blade guard and riving knife for every
operation for which it can be used, including all
through sawing.
c) Keep hands out of the line of saw blade.
d) Use a push stick when required.
e) Pay particular attention to instructions on reducing
risk of kickback.
f) Do not perform any operation freehand.
g) Never reach around or over the saw blade.
h) Never operate saw on floor or below waist height.
NEVER CUT MORE THAN ONE PIECE OF MATERIAL
AT A TIME.
SAVE THESE INSTRUCTIONS. Refer to them frequently
and use to instruct other users. If you loan someone this
tool, loan them these instructions also.
5
Page 6
SYMBOLS
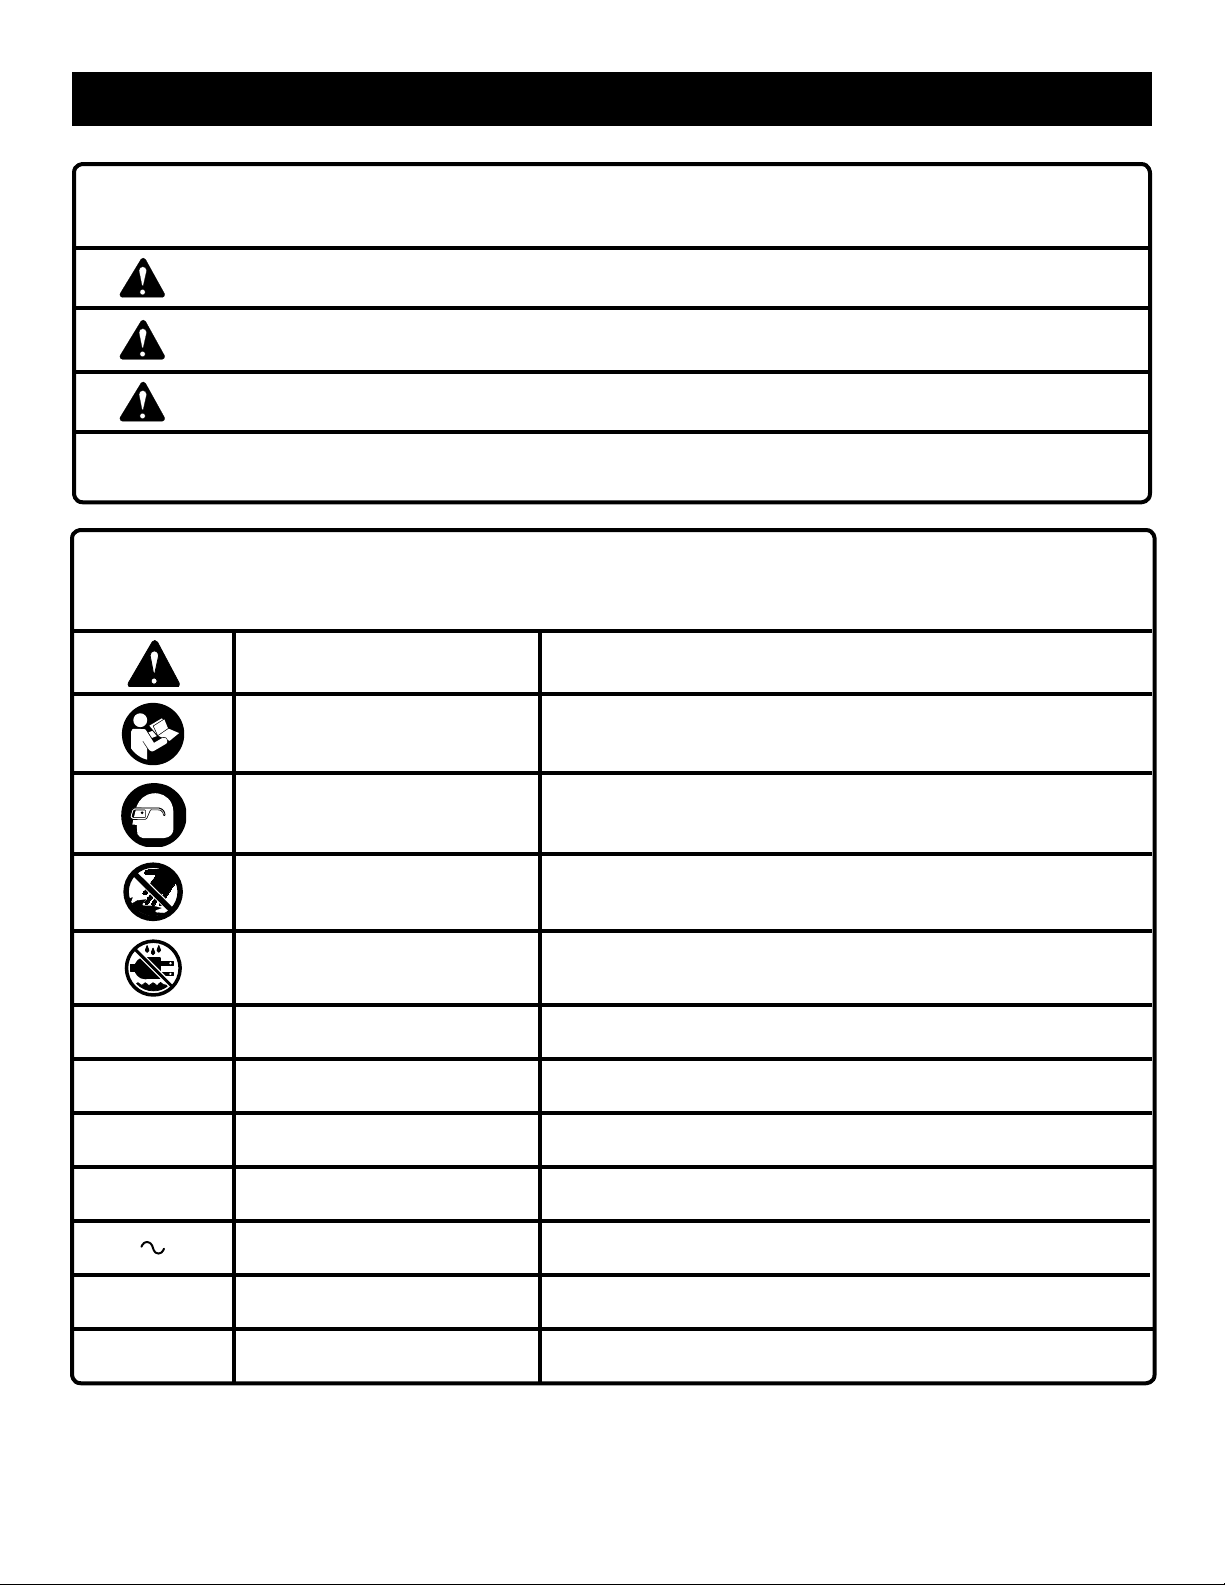
The following signal words and meanings are intended to explain the levels of risk associated with this product.
SYMBOL SIGNAL MEANING
DANGER:
WARNING:
CAUTION:
NOTICE:
Some of the following symbols may be used on this tool. Please study them and learn their meaning. Proper
interpretation of these symbols will allow you to operate the tool better and safer.
SYMBOL NAME
Safety Alert Indicates a potential personal injury hazard.
Read Operator’s Manual
Eye Protection
Indicates an imminently hazardous situation, which, if not avoided, will result
in death or serious injury.
Indicates a potentially hazardous situation, which, if not avoided, could result
in death or serious injury.
Indicates a potentially hazardous situation, which, if not avoided, may result in
minor or moderate injury.
(Without Safety Alert Symbol) ) Indicates important information not related to an
injury hazard, such as a situation that may result in property damage.
DESIGNATION/EXPLANATION
To reduce the risk of injury, user must read and understand operator’s manual before using this product.
Always wear eye protection with side shields marked to comply
with ANSI Z87.1.
No Hands Symbol
Wet Conditions Alert Do not expose to rain or use in damp locations.
V Volts Voltage
A Amperes Current
Hz Hertz Frequency (cycles per second)
min Minutes Time
Alternating Current Type of current
n
o
.../min Per Minute Revolutions, strokes, surface speed, orbits, etc., per minute
No Load Speed Rotational speed, at no load
Failure to keep your hands away from the blade will result in
serious personal injury.
6
Page 7
ELECTRICAL
EXTENSION CORDS
Use only 3-wire extension cords that have 3-prong grounding plugs and 3-pole receptacles that accept the tool's plug.
When using a power tool at a considerable distance from the
power source, use an extension cord heavy enough to carry
the current that the tool will draw. An undersized extension
cord will cause a drop in line voltage, resulting in a loss of
power and causing the motor to overheat. Use the chart
provided below to determine the minimum wire size required
in an extension cord. Only round jacketed cords listed by
Underwriter's Laboratories (UL) should be used.
**Ampere rating (on tool faceplate)
0-2.0 2.1-3.4 3.5-5.0 5.1-7.0 7.1-12.0 12.1-16.0
Cord Length Wire Size (A.W.G.)
25' 16 16 16 16 14 14
50' 16 16 16 14 14 12
100' 16 16 14 12 10 —
**Used on 12 gauge - 20 amp circuit.
NOTE: AWG = American Wire Gauge
When working with the tool outdoors, use an extension cord
that is designed for outside use. This is indicated by the
letters “W-A” or “W” on the cord’s jacket.
Before using an extension cord, inspect it for loose or
exposed wires and cut or worn insulation.
SPEED AND WIRING
The no-load speed of this tool is approximately 5,000 rpm.
This speed is not constant and decreases under a load or
with lower voltage. For voltage, the wiring in a shop is as
important as the motor’s horsepower rating. A line intended
only for lights cannot properly carry a power tool motor. Wire
that is heavy enough for a short distance will be too light for
a greater distance. A line that can support one power tool
may not be able to support two or three tools.
GROUNDING INSTRUCTIONS
This product must be grounded. In the event of a malfunction or
breakdown, grounding provides a path of least resistance for
electric current to reduce the risk of electric shock. This tool is
equipped with an electric cord having an equipment-grounding
conductor and a grounding plug. The plug must be plugged
into a matching outlet that is properly installed and grounded
in accordance with all local codes and ordinances.
Do not modify the plug provided. If it will not fit the outlet,
have the proper outlet installed by a qualified electrician.
WARNING:
Improper installation of the grounding plug can result in
a risk of electric shock. When repair or replacement of
the cord is required, do not connect the grounding wire
to either flat blade terminal. The wire with insulation having an outer surface that is green with or without yellow
stripes is the grounding wire.
WARNING:
Keep the extension cord clear of the working area. Position the cord so that it will not get caught on lumber, tools
or other obstructions while you are working with a power
tool. Failure to do so can result in serious personal injury.
WARNING:
Check extension cords before each use. If damaged
replace immediately. Never use product with a damaged
cord since touching the damaged area could cause
electrical shock resulting in serious injury.
ELECTRICAL CONNECTION
This product is powered by a precision built electric motor.
It should be connected to a power supply that is 120 V, AC
only (normal household current), 60 Hz. Do not operate
this product on direct current (DC). A substantial voltage
drop will cause a loss of power and the motor will overheat.
If the saw does not operate when plugged into an outlet,
double check the power supply.
Check with a qualified electrician or service personnel if the
grounding instructions are not completely understood, or if
in doubt as to whether the tool is properly grounded.
Repair or replace a damaged or worn cord immediately.
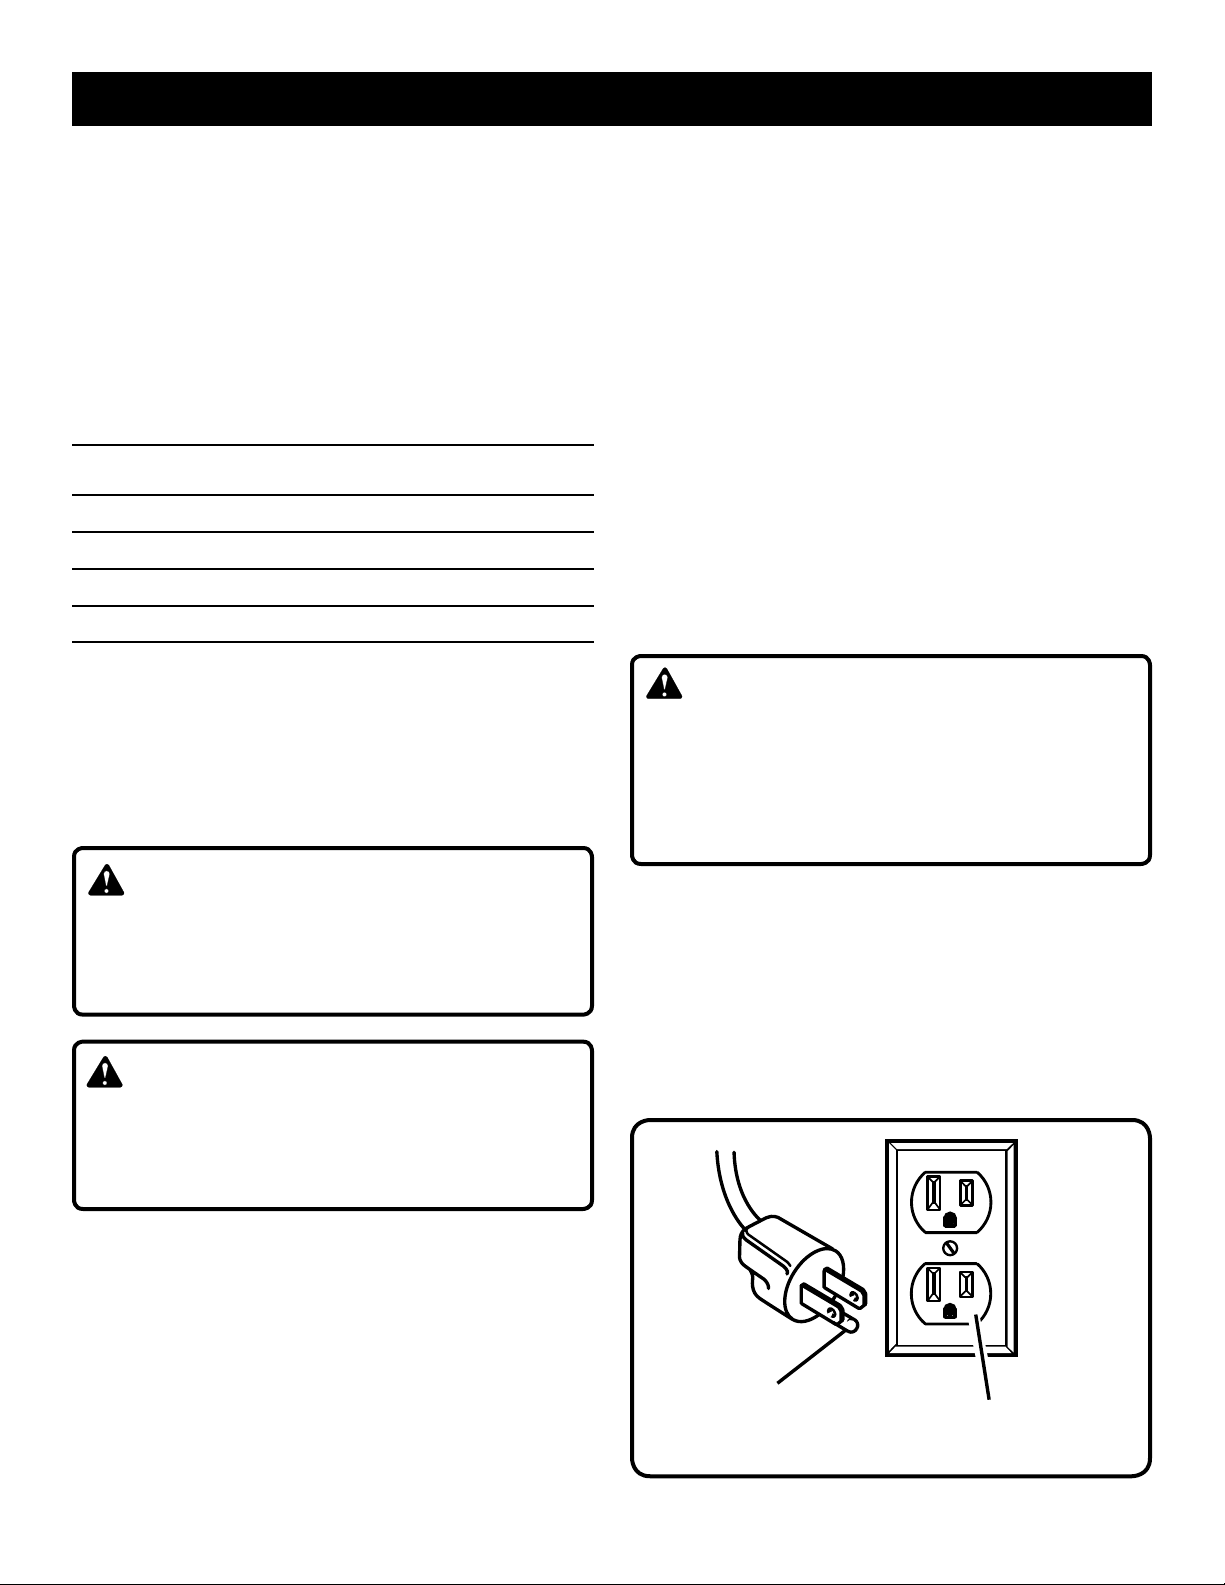
This product is for use on a nominal 120 volt circuit and
has a grounding plug similar to the plug illustrated in figure 1. Only connect the product to an outlet having the same
configuration as the plug. Do not use an adapter with this
product.
GROUNDING
PIN
120 V GROUNDED
OUTLET
Fig. 1
7
Page 8

GLOSSARY OF TERMS
Anti-Kickback Pawls (radial arm and table saws)
A device which, when properly installed and maintained,
is designed to stop the workpiece from being kicked back
toward the front of the saw during a ripping operation.
Arbor
The shaft on which a blade or cutting tool is mounted.
Bevel Cut
A cutting operation made with the blade at any angle other
than 90° to the table surface.
Compound Cut
A cross cut made with both a miter and a bevel angle.
Cross Cut
A cutting or shaping operation made across the grain or the
width of the workpiece.
Cutterhead (planers and jointer planers)
A rotating cutterhead with adjustable blades or knives. The
blades or knives remove material from the workpiece.
Dado Cut
A non-through cut which produces a square-sided notch or
trough in the workpiece (requires a special blade).
Featherboard
A device used to help control the workpiece by holding
it securely against the table or fence during any ripping
operation.
FPM or SPM
Feet per minute (or strokes per minute), used in reference
to blade movement.
Freehand
Performing a cut without the workpiece being guided by a
fence, miter gauge, or other aids.
Gum
A sticky, sap-based residue from wood products.
Heel
Alignment of the blade to the fence.
Kerf
The material removed by the blade in a through cut or the
slot produced by the blade in a non-through or partial cut.
Kickback
A hazard that can occur when the blade binds or stalls,
throwing the workpiece back toward operator.
Miter Cut
A cutting operation made with the workpiece at any angle
to the blade other than 90°.
Non-Through Cuts
Any cutting operation where the blade does not extend
completely through the thickness of the workpiece.
Pilot Hole (drill presses)
A small hole drilled in a workpiece that serves as a guide for
drilling large holes accurately.
Push Blocks (for jointer planers)
Device used to feed the workpiece over the jointer planer
cutterhead during any operation. This aid helps keep the
operator’s hands well away from the cutterhead.
Push Blocks (for table saws)
Device used to hold the workpiece during cutting operations. This aid helps keep the operator’s hands well away
from the blade.
Push Sticks (for table saws)
Device used to push the workpiece during cutting operations.
A push stick should be used for narrow ripping operations.
The aid helps keep the operator’s hands well away from
the blade.
Resaw
A cutting operation to reduce the thickness of the workpiece
to make thinner pieces.
Resin
A sticky, sap-based substance that has hardened.
Revolutions Per Minute (RPM)
The number of turns completed by a spinning object in one
minute.
Ripping or Rip Cut
A cutting operation along the length of the workpiece.
Riving Knife/Spreader/Splitter (table saws)
A metal piece, slightly thinner than the blade, which helps
keep the kerf open and also helps to prevent kickback.
Saw Blade Path
The area over, under, behind, or in front of the blade. As it
applies to the workpiece, that area which will be or has been
cut by the blade.
Set
The distance that the tip of the saw blade tooth is bent (or
set) outward from the face of the blade.
Snipe (planers)
Depression made at either end of a workpiece by cutter
blades when the workpiece is not properly supported.
Taper Cut
A cut where the material being cut has a different width at
the beginning of the cut from the the end.
Through Sawing
Any cutting operation where the blade extends completely
through the thickness of the workpiece.
Throw-Back
The throwing back of a workpiece usually caused by the
workpiece being dropped into the blade or being placed
inadvertently in contact with the blade.
Workpiece or Material
The item on which the operation is being done.
Worktable
Surface where the workpiece rests while performing a
cutting, drilling, planing, or sanding operation.
8
Page 9
FEATURES
PRODUCT SPECIFICATIONS
Blade Arbor .............................................................. 5/8 in.
Blade Diameter .......................................................... 10 in.
Blade Tilt ................................................................. 0˚ - 45˚
Rating ...............................................120 V, AC only, 60 Hz
Input .....................................................................15 Amps
No Load Speed ....................................5,000 r/min. (RPM)
Cutting Depth at 0˚ ...................................................... 3 in.
Cutting Depth at 45˚ ..............................................2-1/2 in.
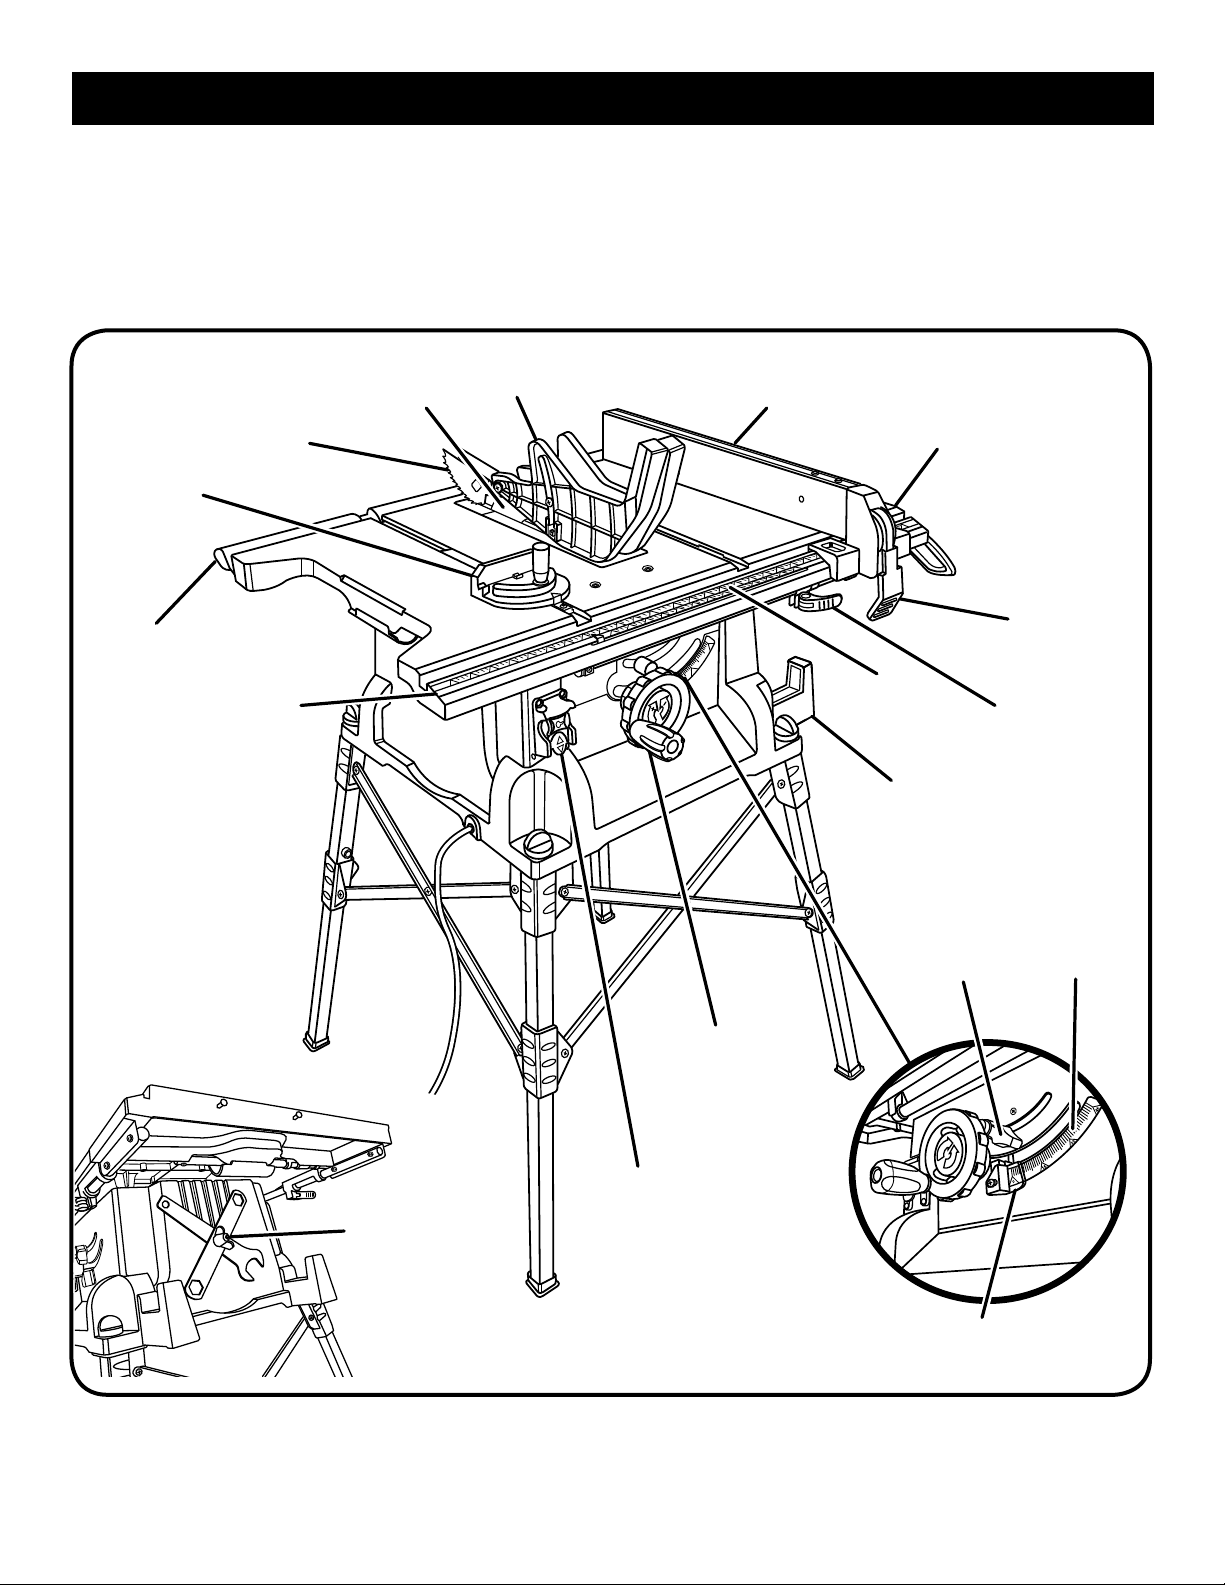
MITER
GAUGE
OUTFEED
SUPPORT
ANTI-KICKBACK
PAWLS
FRONT
RAIL
RIVING
KNIFE
BLADE
GUARD
RIP
FENCE
SLIDING TABLE
EXTENSION
SCALE
STORAGE
BRACKET(S)
BEVEL
LOCKING
LEVER
LOCKING
LEVER
TABLE
LOCKING
LEVER
BEVEL
SCALE
BLADE
WRENCH
STORAGE
HEIGHT/BEVEL
ADJUSTING
HANDWHEEL
SWITCH
BEVEL
INDICATOR
Fig. 2
9
Page 10

FEATURES
KNOW YOUR TABLE SAW
See Figure 2.
The safe use of this product requires an understanding of
the information on the tool and in this operator’s manual as
well as a knowledge of the project you are attempting. Before
use of this product, familiarize yourself with all operating
features and safety rules.
ANTI-KICKBACK PAWLS - Kickback is a hazard in which
the workpiece is thrown back toward the operator. The teeth
on the removable anti-kickback pawls point away from the
workpiece. If the workpiece should be pulled back toward
the operator, the teeth dig into the wood to help prevent or
reduce the possibility of kickback.
BEVEL SCALE - The easy-to-read scale on the front of the
cabinet shows the exact blade angle.
BLADE - This saw is provided with a 24-tooth, 10 in. carbide
blade. The blade is raised and lowered with the height/bevel
adjusting handwheel. Bevel angles are locked with the bevel
locking lever.
WARNING:
Do not use blades rated less than the speed of this tool.
Failure to heed this warning could result in personal injury.
BLADE GUARD - Always keep the removable blade guard
down over the saw blade for through-sawing cuts.
BEVEL LOCKING LEVER - This lever, placed just under
the saw table surface on the front of the cabinet, locks the
angle setting of the blade.
HEIGHT/BEVEL ADJUSTING HANDWHEEL - Located on
the front of the cabinet, use this handwheel to lower and
raise the blade for height adjustments or blade replacement. This handwheel also makes the adjustment for bevel
angles easy.
MITER GAUGE - The miter gauge aligns the wood for a
cross cut. The easy-to-read indicator shows the exact angle
for a miter cut.
MITER GAUGE GROOVES - The miter gauge rides in the
grooves on the saw table.
OUTFEED SUPPORT - This table extension at the back of
the tool gives the operator additional support when cutting
long workpieces.
RIP FENCE - A sturdy metal fence guides the workpiece
and is secured with the locking handle.
RIVING KNIFE - A removable metal piece of the blade
guard assembly, slightly thinner than the saw blade, which
helps keep the kerf open and prevent kickback. When in the
through sawing, or “up” position, it is higher than the saw
blade. When in the non-through sawing, or “down” position,
it is below the saw blade teeth.
SCALE - Located on the front rail, the easy-to-read scale
provides precise measurements for rip cuts.
SLIDING TABLE EXTENSION - Located on the right side
of the saw table, this table extension gives the operator additional support when cutting wide workpieces.
SWITCH ASSEMBLY - This saw has an easy access power
switch located below the front rail. To lock the switch in the
OFF position, remove the switch key from the switch. Place
the key in a location that is inaccessible to children and
others not qualified to use the tool.
10
Page 11
FEATURES
OPERATING COMPONENTS
The upper portion of the blade projects up through the table
and is surrounded by an insert called the throat plate. The
height of the blade is set with a handwheel on the front of the
cabinet. Detailed instructions are provided in the Operation
section of this manual for the basic cuts: cross cuts, miter
cuts, bevel cuts, and compound cuts.
The rip fence is used to position work for lengthwise cuts.
A scale on the front rail shows the distance between the rip
fence and the blade.
It is very important to use the blade guard assembly for
all through-sawing operations. The blade guard assembly
includes: riving knife, anti-kickback pawls, and plastic blade
guard.
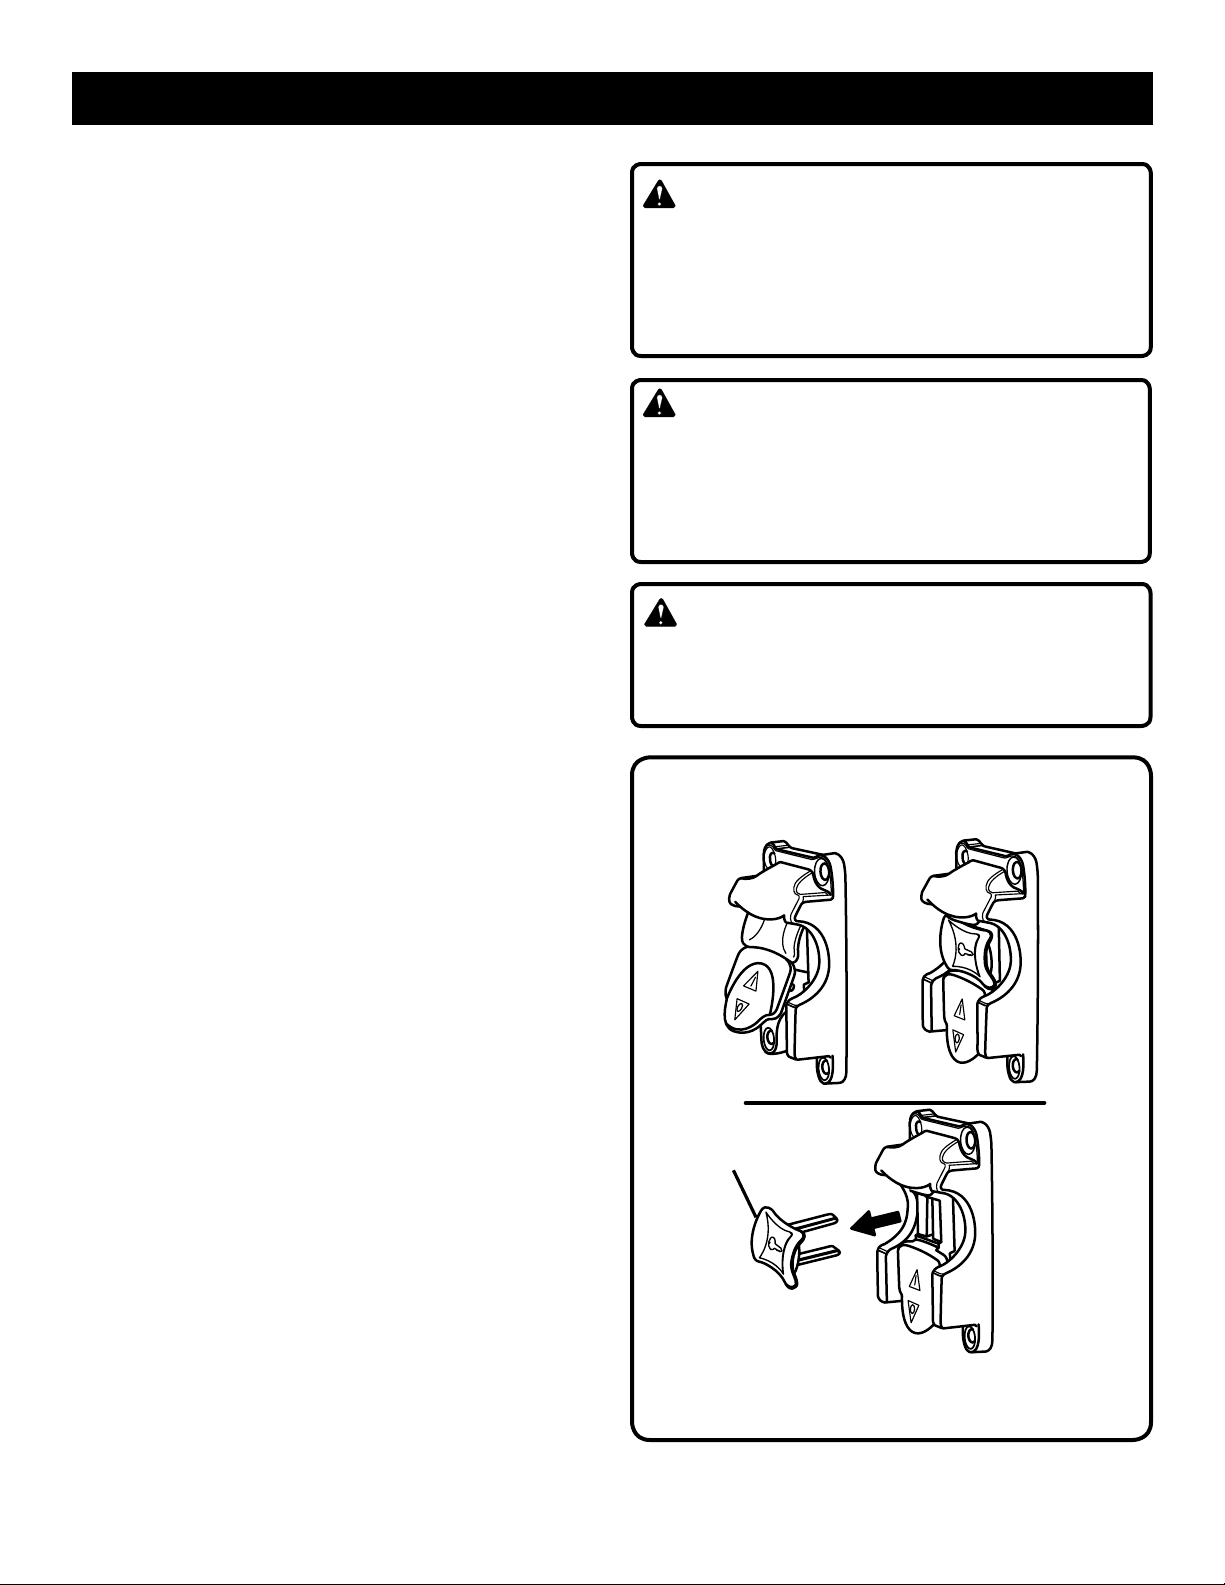
SWITCH ASSEMBLY
See Figure 3.
This saw is equipped with a switch assembly that has a
built-in locking feature. This feature is intended to prevent
unauthorized and possible hazardous use by children and
others.
TO TURN YOUR SAW ON:
With the switch key inserted into the switch, lift the switch
to turn on ( l ).
WARNING:
ALWAYS remove the switch key when the tool is not in
use and keep it in a safe place. In the event of a power
failure, turn the switch off ( O ) and remove the key. This
action will prevent the tool from accidentally starting
when power returns.
WARNING:
ALWAYS make sure your workpiece is not in contact with
the blade before operating the switch to start the tool.
Failure to heed this warning may cause the workpiece to
be kicked back toward the operator and result in serious
personal injury.
WARNING:
To reduce the risk of accidental starting, ALWAYS make
sure the switch is in the off ( O ) position before plugging
tool into the power source.
TO TURN YOUR SAW OFF:
Press the switch down to turn off ( O ).
TO LOCK YOUR SAW:
Press the switch down.
Remove the switch key from the switch and store in a
safe, secure location.
SWITCH
SWITCH KEY
ON
SWITCH
OFF
11
SWITCH IN LOCKED POSITION
Fig. 3
Page 12
FEATURES
BLADES
For maximum performance, it is recommended that you use
the 24-tooth, 10 in. carbide-tipped combination blade provided with your saw. Additional blade styles of the same high
quality are available for specific operations such as ripping.
Your local dealer can provide you with complete information.
Kerf width must be within the limits stamped on the riving
knife.
WARNING:
Do not use blades rated less than the speed of this tool.
Failure to heed this warning could result in personal injury.
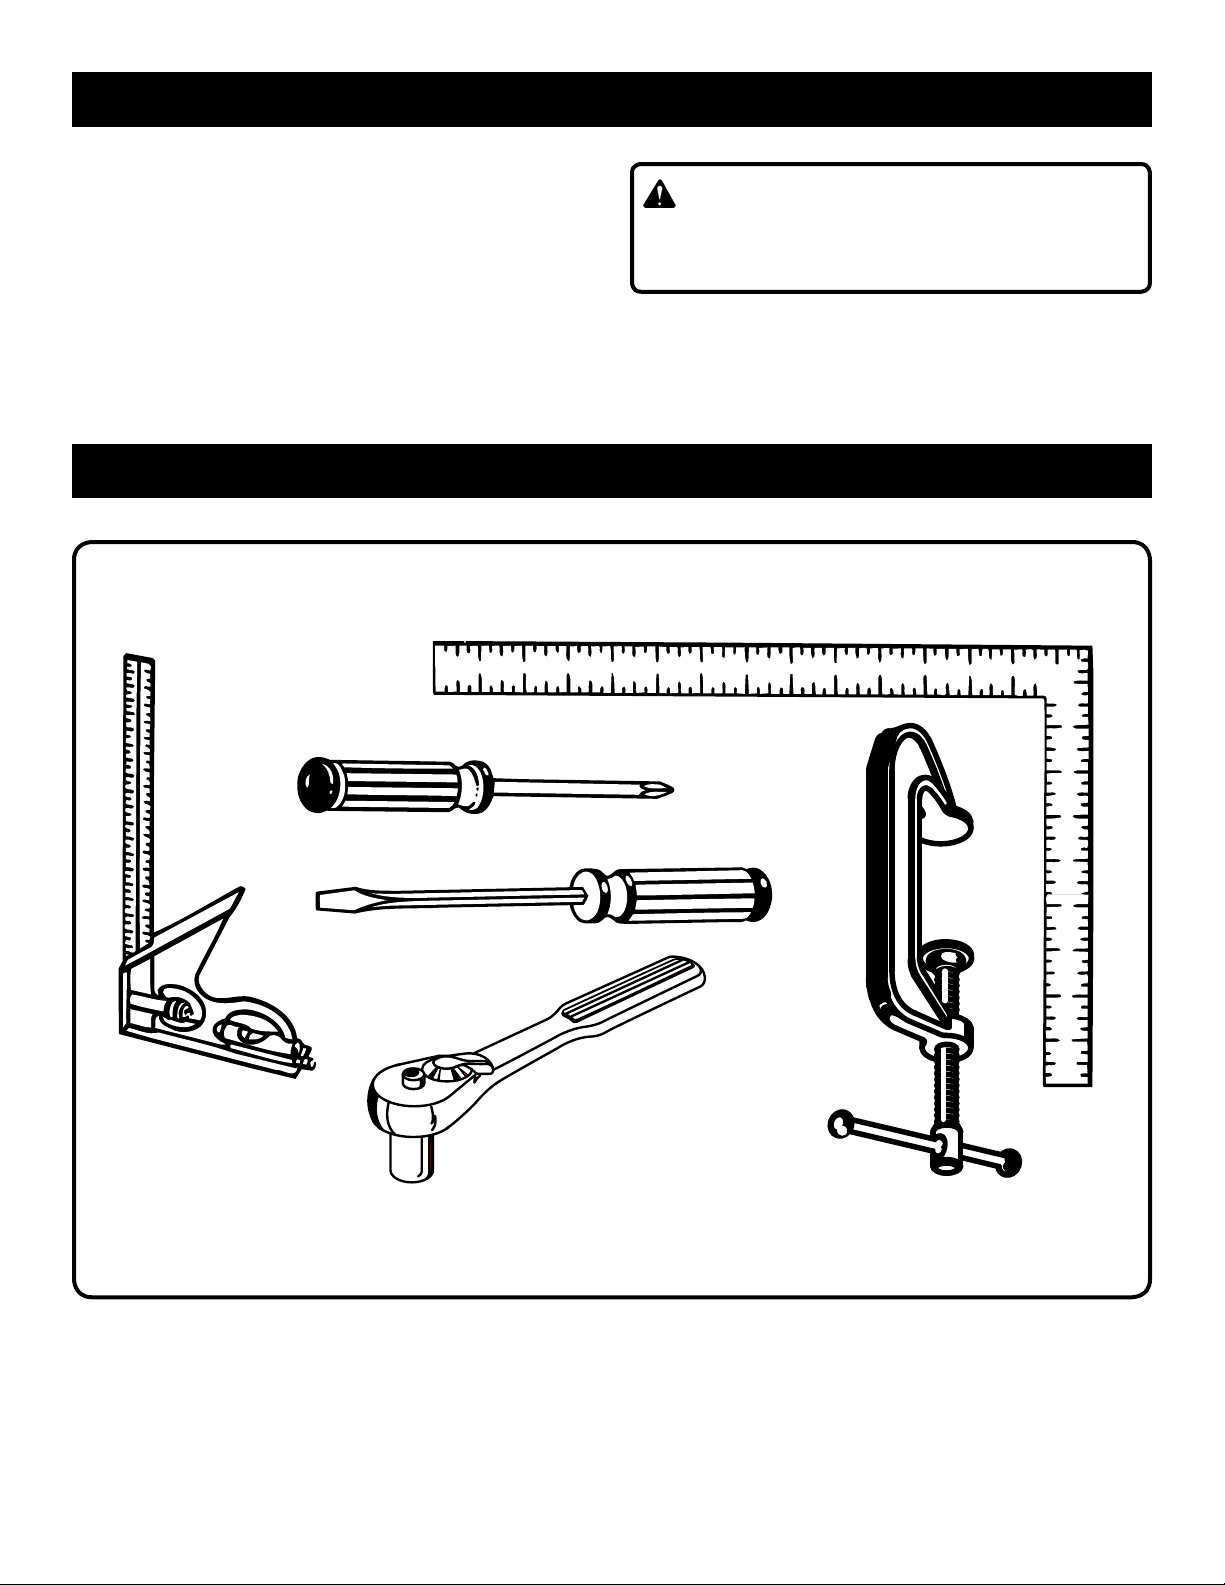
TOOLS NEEDED
The following tools (not included or drawn to scale) are needed for assembly and making adjustments:
COMBINATION
SQUARE
FRAMING SQUARE
PHILLIPS
SCREWDRIVER
FLATHEAD
SCREWDRIVER
SOCKET WRENCH
AND 8 mm SOCKET
C-CLAMPS
Fig. 4
12
Page 13
LOOSE PARTS
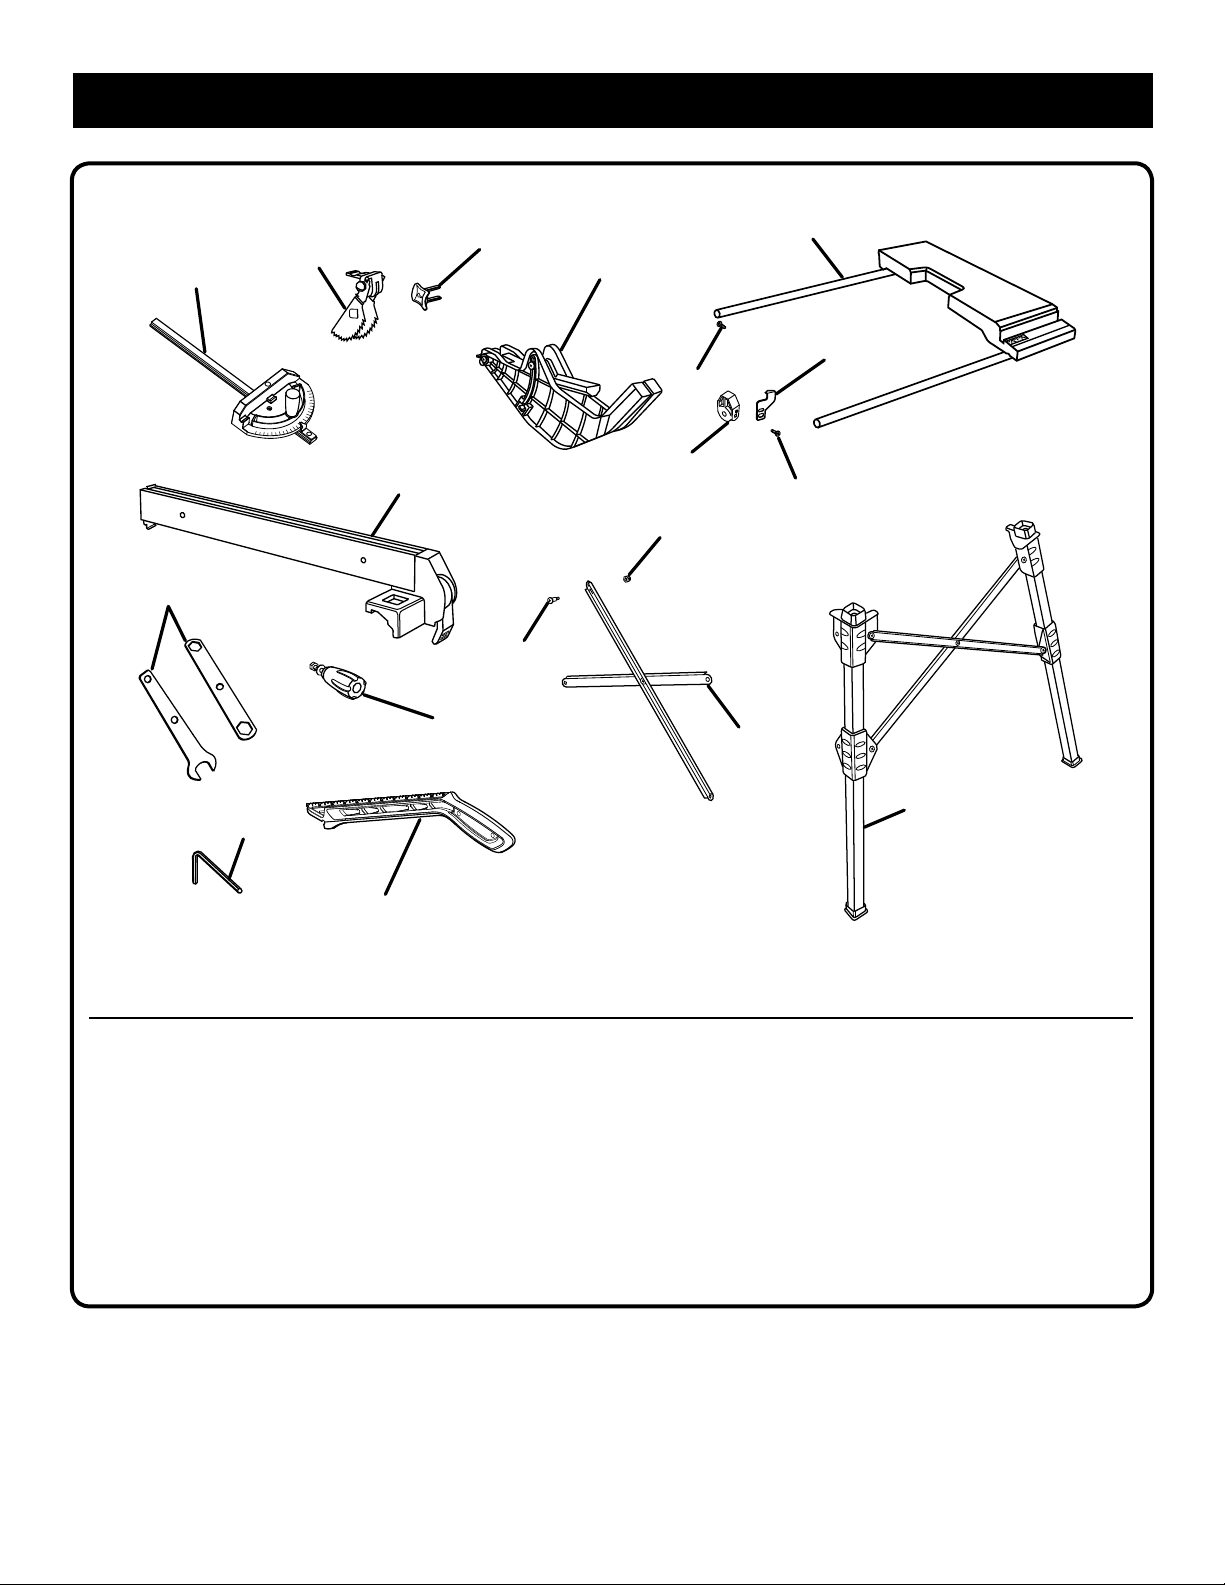
The following items are included with your table saw:
N
C
A
F
D
P
E
B
I
L
Q
K
H
I
O
M
G
A. Anti-Kickback Pawls ............................................... 1
B. Blade Guard ............................................................ 1
C. Miter Gauge ............................................................. 1
D. Blade Wrench .......................................................... 2
E. Handle Assembly .................................................... 1
F. Rip Fence ................................................................ 1
G. Push Stick ............................................................... 1
H. Indicator ...................................................................1
J
Fig. 5
I. Screw .......................................................................2
J. Stand Legs ...............................................................2
K. Sliding Table Assembly ............................................1
L. End Cap ...................................................................1
M. Hex Key ....................................................................1
N. Switch Key ...............................................................1
O. Leg Brace ................................................................. 2
P. Screw .......................................................................8
Q. Lock Nut ................................................................... 8
13
Page 14
ASSEMBLY
UNPACKING
This product requires assembly.
Carefully lift saw from the carton and place it on a level
work surface.
NOTE: This tool is heavy. To avoid back injury, keep your
knees bent and lift with your legs, not your back, and get
help when needed.
WARNING:
Do not use this product if any parts on the Loose Parts List
are already assembled to your product when you unpack
it. Parts on this list are not assembled to the product by
the manufacturer and require customer installation. Use
of a product that may have been improperly assembled
could result in serious personal injury.
Inspect the tool carefully to make sure no breakage or
damage occurred during shipping.
Do not discard the packing material until you have
carefully inspected the tool, identified all loose parts, and
satisfactorily operated the tool.
NOTE: Remove the foam block from between the saw’s
housing and the motor by first beveling the blade (see
page 25).
The saw is factory set for accurate cutting. After
assembling it, check for accuracy. If shipping has
influenced the settings, refer to specific procedures
explained in this manual.
If any parts are damaged or missing, please call
1-800-525-2579 for assistance.
WARNING:
If any parts are damaged or missing, do not operate
this tool until the parts are replaced. Use of this product
with damaged or missing parts could result in serious
personal injury.
WARNING:
Do not attempt to modify this tool or create accessories not recommended for use with this tool. Any such
alteration or modification is misuse and could result in a
hazardous condition leading to possible serious personal
injury.
WARNING:
Do not connect to power supply until assembly is
complete. Failure to comply could result in accidental
starting and possible serious personal injury.
WARNING:
Do not lift the saw without help. Hold it close to your body.
Keep your knees bent and lift with your legs, not your
back. Ignoring these precautions can result in back injury.
WARNING:
Never stand directly in line with the blade or allow hands
to come closer than 3 in. to the blade. Do not reach over
or across the blade. Failure to heed this warning can
result in serious personal injury.
WARNING:
To avoid serious personal injury, always make sure the
table saw is securely mounted to a workbench or an
approved leg stand. NEVER operate the saw on the floor.
MOUNTING HOLES
The table saw must be mounted to a firm supporting surface
such as a workbench or leg stand. If bolted to a workbench,
remove the four locking knobs. Four bolt holes have been
provided in the saw’s base for this purpose. Each of the
four mounting holes should be bolted securely using 3/8 in.
machine bolts, lock washers, and hex nuts (not included).
Bolts should be of sufficient length to accommodate the
saw base, lock washers, hex nuts, and the thickness of the
workbench. Tighten all four bolts securely.
Carefully check the workbench after mounting to make sure
that no movement can occur during use. If any tipping, sliding, or walking is noted, secure the workbench to the floor
before operating.
TO ASSEMBLE THE QUICKSTAND
See Figures 6 - 7.
NOTE: Do not use this leg stand with other equipment or
for other purposes. The arrows on the leg brace identify the
top end (short end) of the leg brace.
Match arrows on the top end of the leg brace with the
arrows on the top of the stand leg as shown in figure 6.
Place the upper holes on the left side leg brace over the
upper holes on the leg assembly. Secure in place with a
screw and lock nut.
Place the upper holes on the right side leg brace under
the upper holes on the second leg assembly. Secure in
place with a screw and lock nut.
Repeat above steps for the second leg assembly and leg
brace.
NOTE: Only mount the saw when the stand is completely
opened.
®
14
Page 15
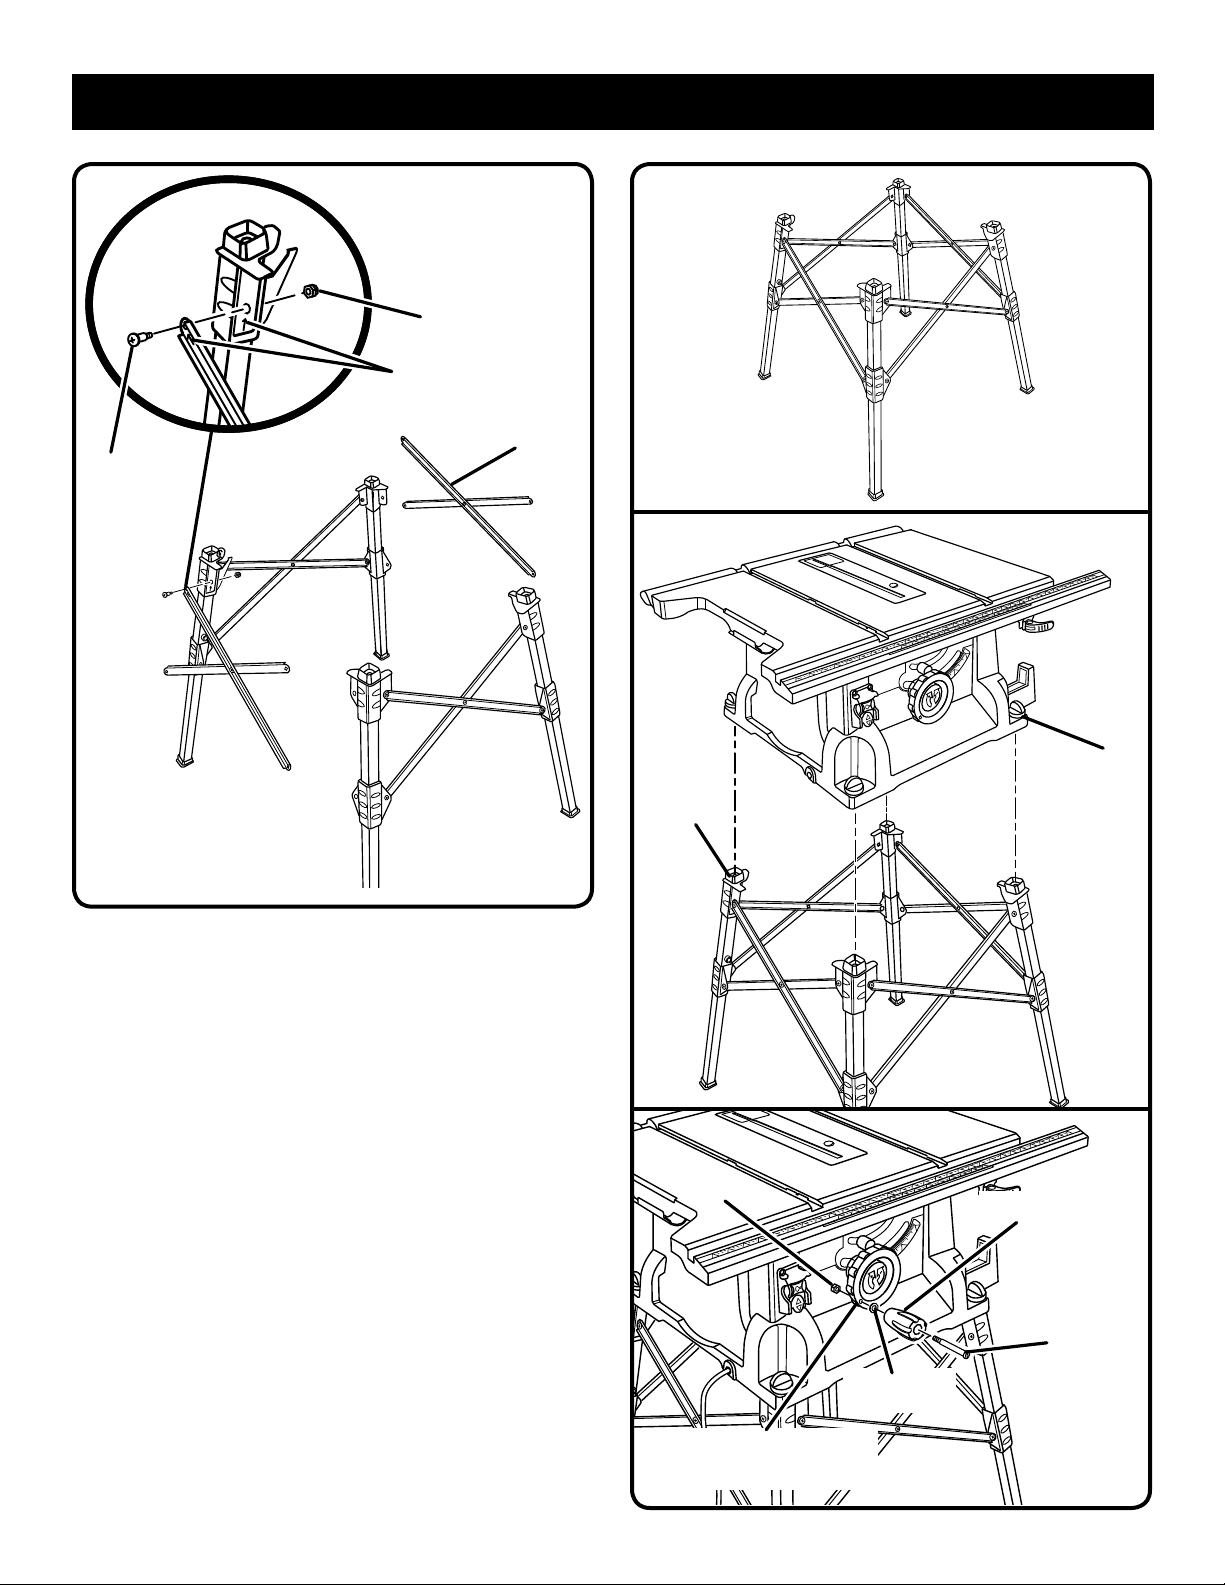
SCREW
ASSEMBLY
LOCK NUT
ARROWS
LEG BRACE
Fig. 7
Fig. 6
MOUNTING THE TABLE SAW BASE TO THE
QUICKSTAND®
See Figure 8.
Place the table saw base on the leg stand. Position the
locking knob over the holes in the top of the leg stand.
Insert the screw on the locking knob into the hole and
turn the locking knob clockwise to secure the table saw
base to the leg stand.
Repeat with the other three locking knobs.
TO INSTALL THE HANDLE
See Figure 9.
Hold the nylon nut securely and turn the screw counter-
clockwise to remove the nut completely.
NOTE: Do not remove the screw from the handle.
Place the nylon nut into the recessed hole on the back
of the height/bevel adjusting handwheel and hold in
place.
Slide the handle and screw into the hole on the height/
bevel adjusting handwheel.
Using a flathead screwdriver, turn the screw clockwise
and tighten in place.
LOCKING
KNOB
HOLE
Fig. 8
NUT
HANDLE
SCREW
WASHER
HEIGHT/BEVEL
ADJUSTING HANDWHEEL
Fig. 9
15
Page 16
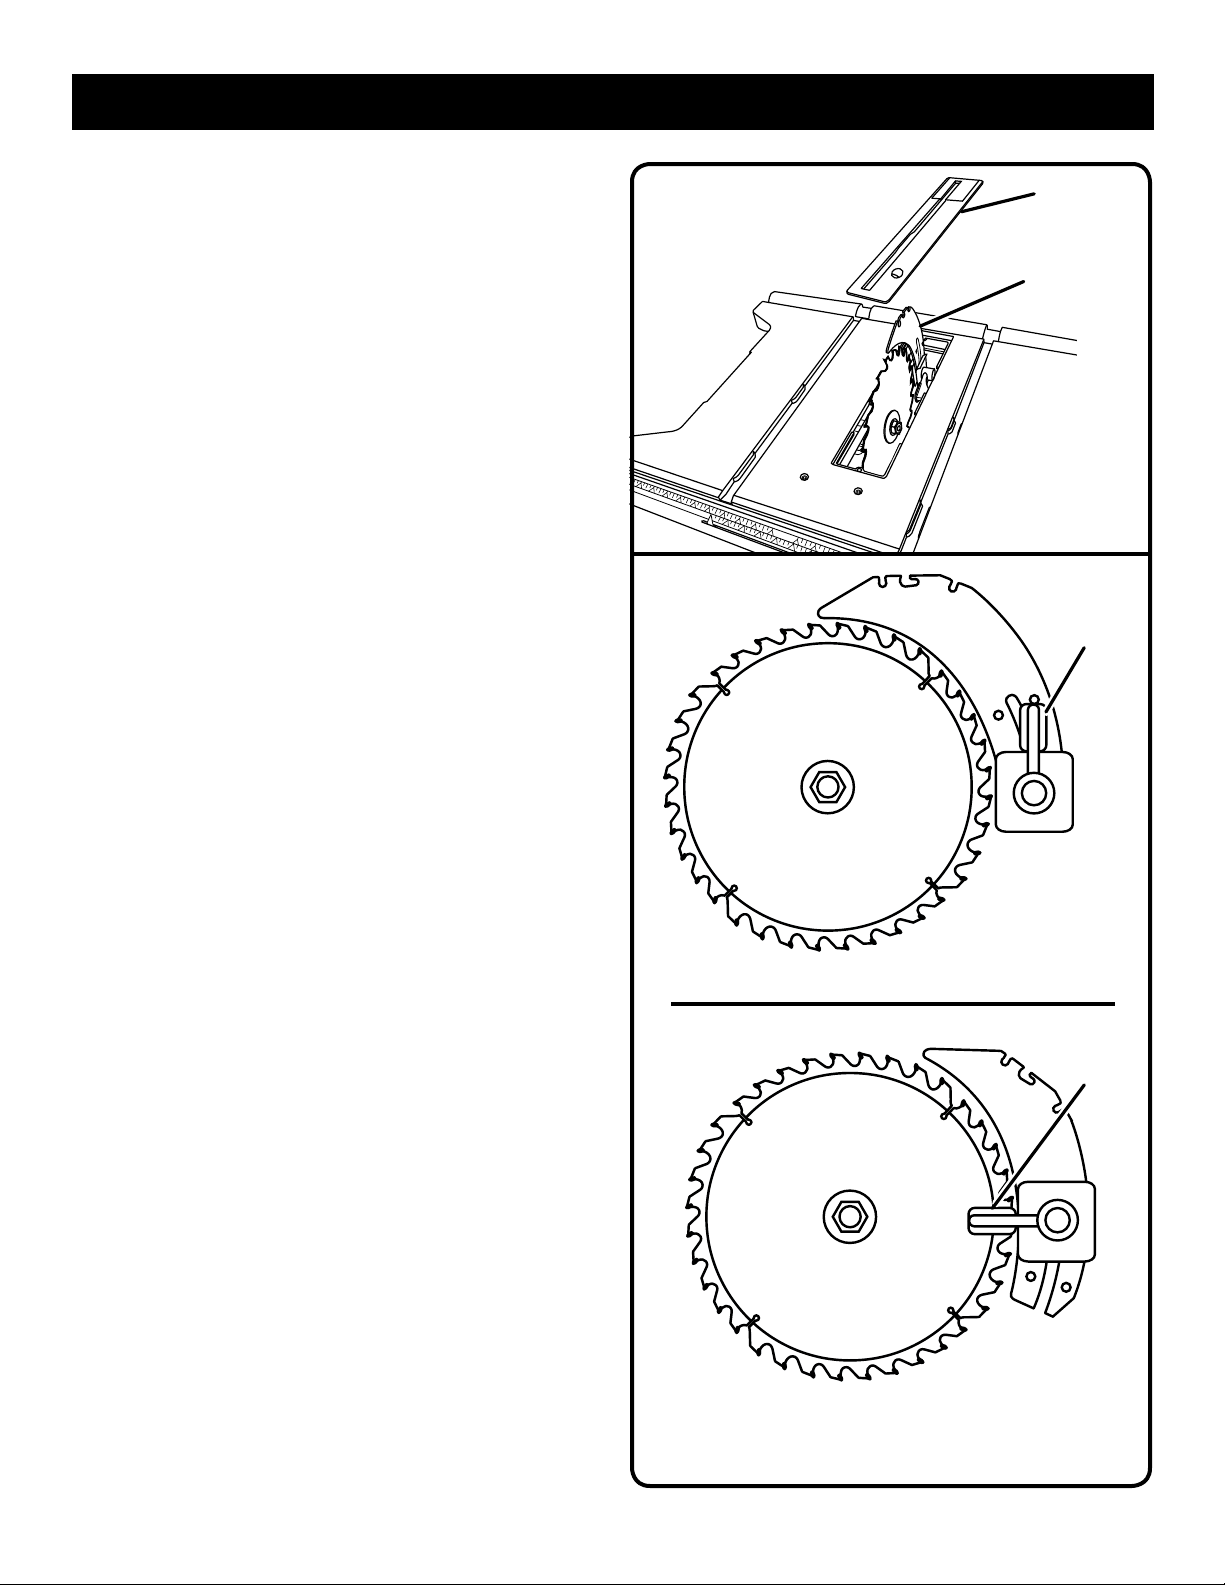
ASSEMBLY
TO REMOVE/REPLACE THE THROAT PLATE
See Figure 10.
Lower the blade by turning the height/bevel adjusting
handwheel counterclockwise.
To remove the throat plate, place your index finger in
the hole and lift the front end pulling the throat plate out
toward the front of the saw.
To reinstall the throat plate, first slip the tab into the slot
at the back of the saw and then push down to secure in
place.
TO CHANGE RIVING KNIFE POSITIONS
See Figure 11.
This saw is shipped with a riving knife that should be placed
in the “down” position for non-through cutting and must be
placed in the “up” position for all other cutting operations.
Unplug the saw.
To place in the “up” position for all through cutting:
Remove the throat plate.
Raise the saw blade by turning the height/bevel adjusting
handwheel clockwise.
Unlock the release lever by pulling it up.
Grasp the riving knife and pull it towards the right side of
the saw to release the riving knife from the spring-loaded
riving clamp.
Pull the riving knife up until the internal pins are engaged
and the riving knife is above the saw blade.
Lock the release lever by pushing the lever down.
Reinstall the throat plate.
To place in riving knife “down” position for all nonthrough cutting:
Remove the throat plate.
Raise the saw blade by turning the height/bevel adjusting
handwheel clockwise.
Unlock the release lever by pulling it up.
Grasp the riving knife and pull it towards the right side of
the saw to release the riving knife from the spring-loaded
riving clamp.
Push the riving knife down until it is below the saw blade.
Pull the riving knife up until the internal pins are engaged
and the riving knife is above the saw blade.
Lock the release lever by pushing the lever down.
Reinstall the throat plate.
THROAT
PLATE
RIVING
KNIFE
RELEASE
(UNLOCKED)
IN “UP” POSITION FOR THROUGH CUTTING
RELEASE
(LOCKED)
Fig. 10
Fig. 11
LEVER
LEVER
16
IN “DOWN” POSITION FOR NON-THROUGH CUTTING
Fig. 11
Page 17
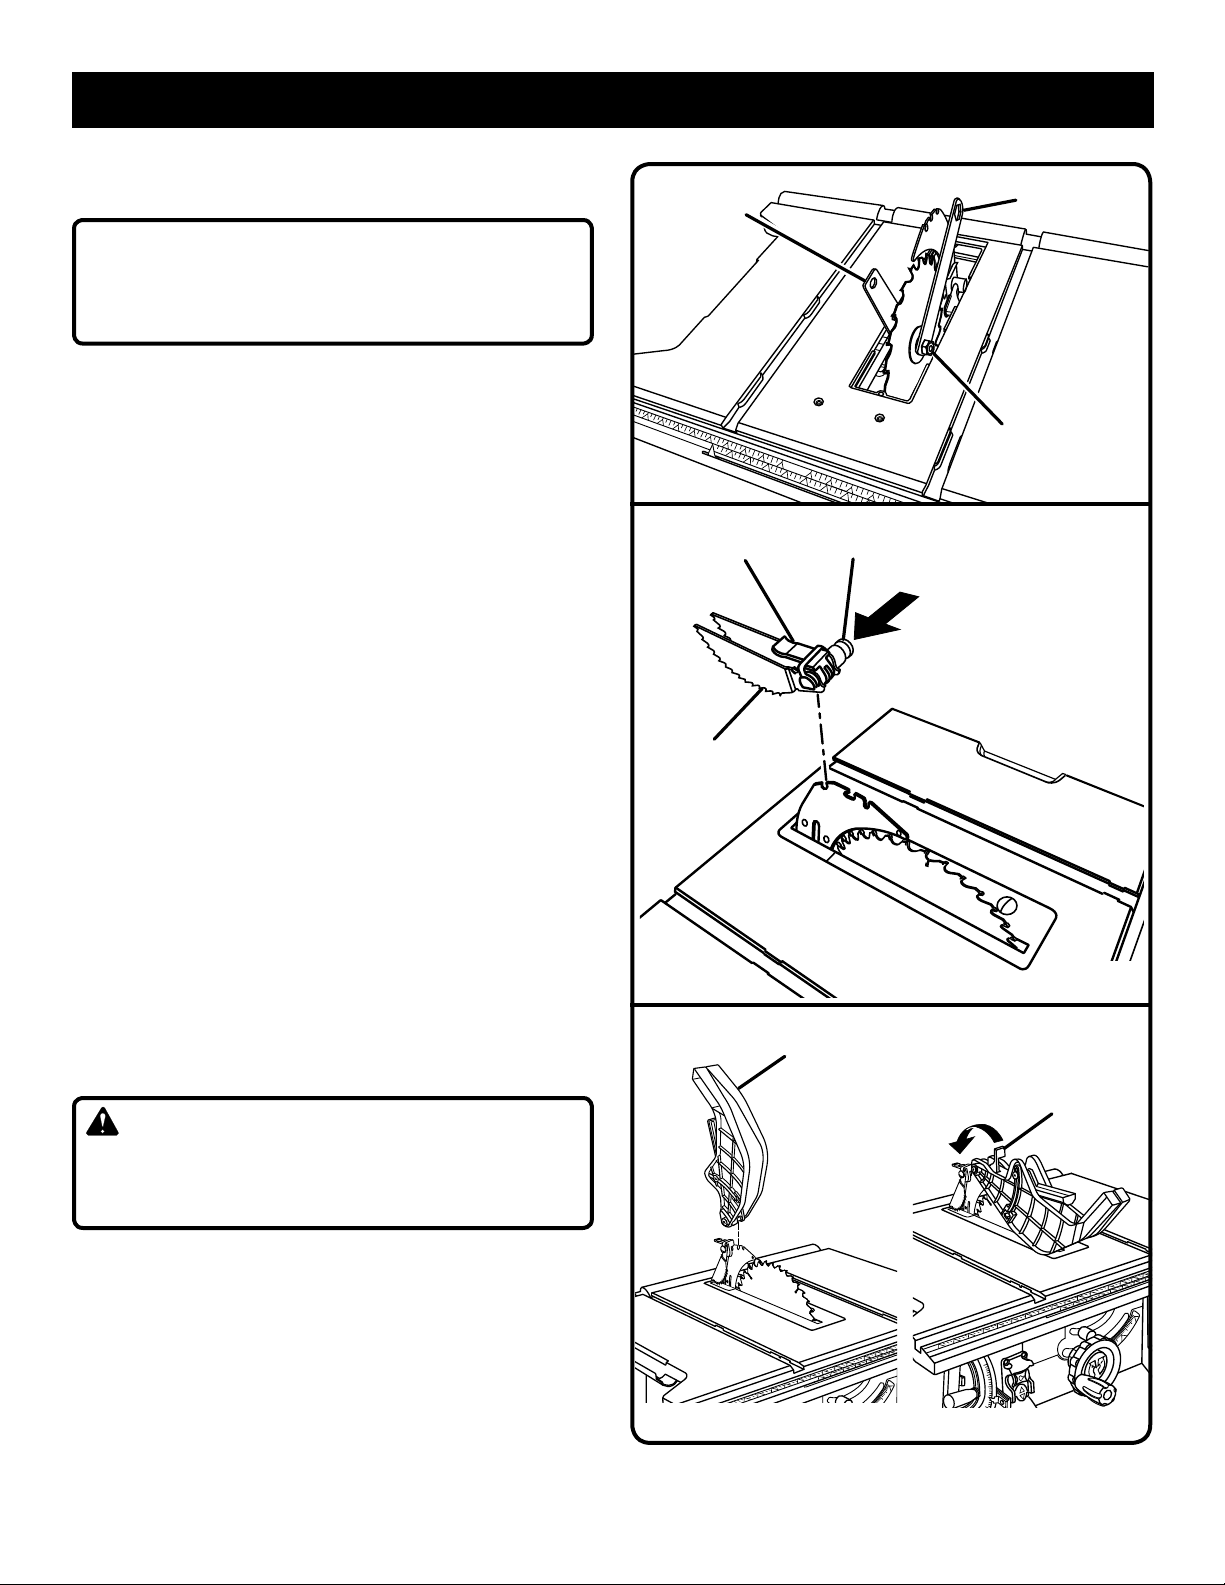
ASSEMBLY
TO CHECK SAW BLADE INSTALLATION
See Figure 12.
NOTICE:
To work properly, the saw blade teeth must point down
toward the front of the saw. Failure to do so could cause
damage to the saw blade, the saw, or the workpiece.
Unplug the saw.
Lower the saw blade and remove the throat plate.
Make sure the bevel locking lever is securely pushed
to the left, see figure 29. Raise the saw blade to its full
height by turning the height/bevel adjusting handwheel
clockwise.
Place riving knife in “up” position.
To loosen the blade:
Remove the blade wrench from the blade wrench storage
area.
Using blade wrenches, place the flat open end of a blade
wrench on the flats on the arbor shaft.
Insert the closed end of the blade wrench over the blade
nut. Holding both wrenches firmly, pull the wrench (right
side) forward to the front of the machine.
To tighten the blade:
Using the blade wrench, place the flat open end into the
flats on the arbor shaft.
Insert the closed end of the blade wrench over the blade
nut. Holding both wrenches firmly, push the wrench (right
side) to the back of the machine. Make sure the blade nut
is securely tightened. Do not overtighten.
Reinstall the throat plate.
Check all clearances for free blade rotation.
BLADE
WRENCH
PAWL
HANDLE
ANTI-KICKBACK
PAWLS
BLADE
WRENCH
BLADE
NUT
Fig. 12
BUTTON
Fig. 13
TO INSTALL THE ANTI-KICKBACK PAWLS AND
BLADE GUARD
See Figures 13 - 15.
WARNING:
Replace dull or damaged anti-kickback pawls. Dull or
damaged pawls may not stop a kickback increasing the
risk of serious personal injury.
Anti-kickback pawls should only be installed for through
cuts.
Unplug the saw.
Raise the saw blade by turning the height/bevel adjusting
handwheel clockwise.
Place riving knife in “up” position.
Reinstall the throat plate.
BLADE
GUARD
GUARD
LEVER
Fig. 14
17
Page 18
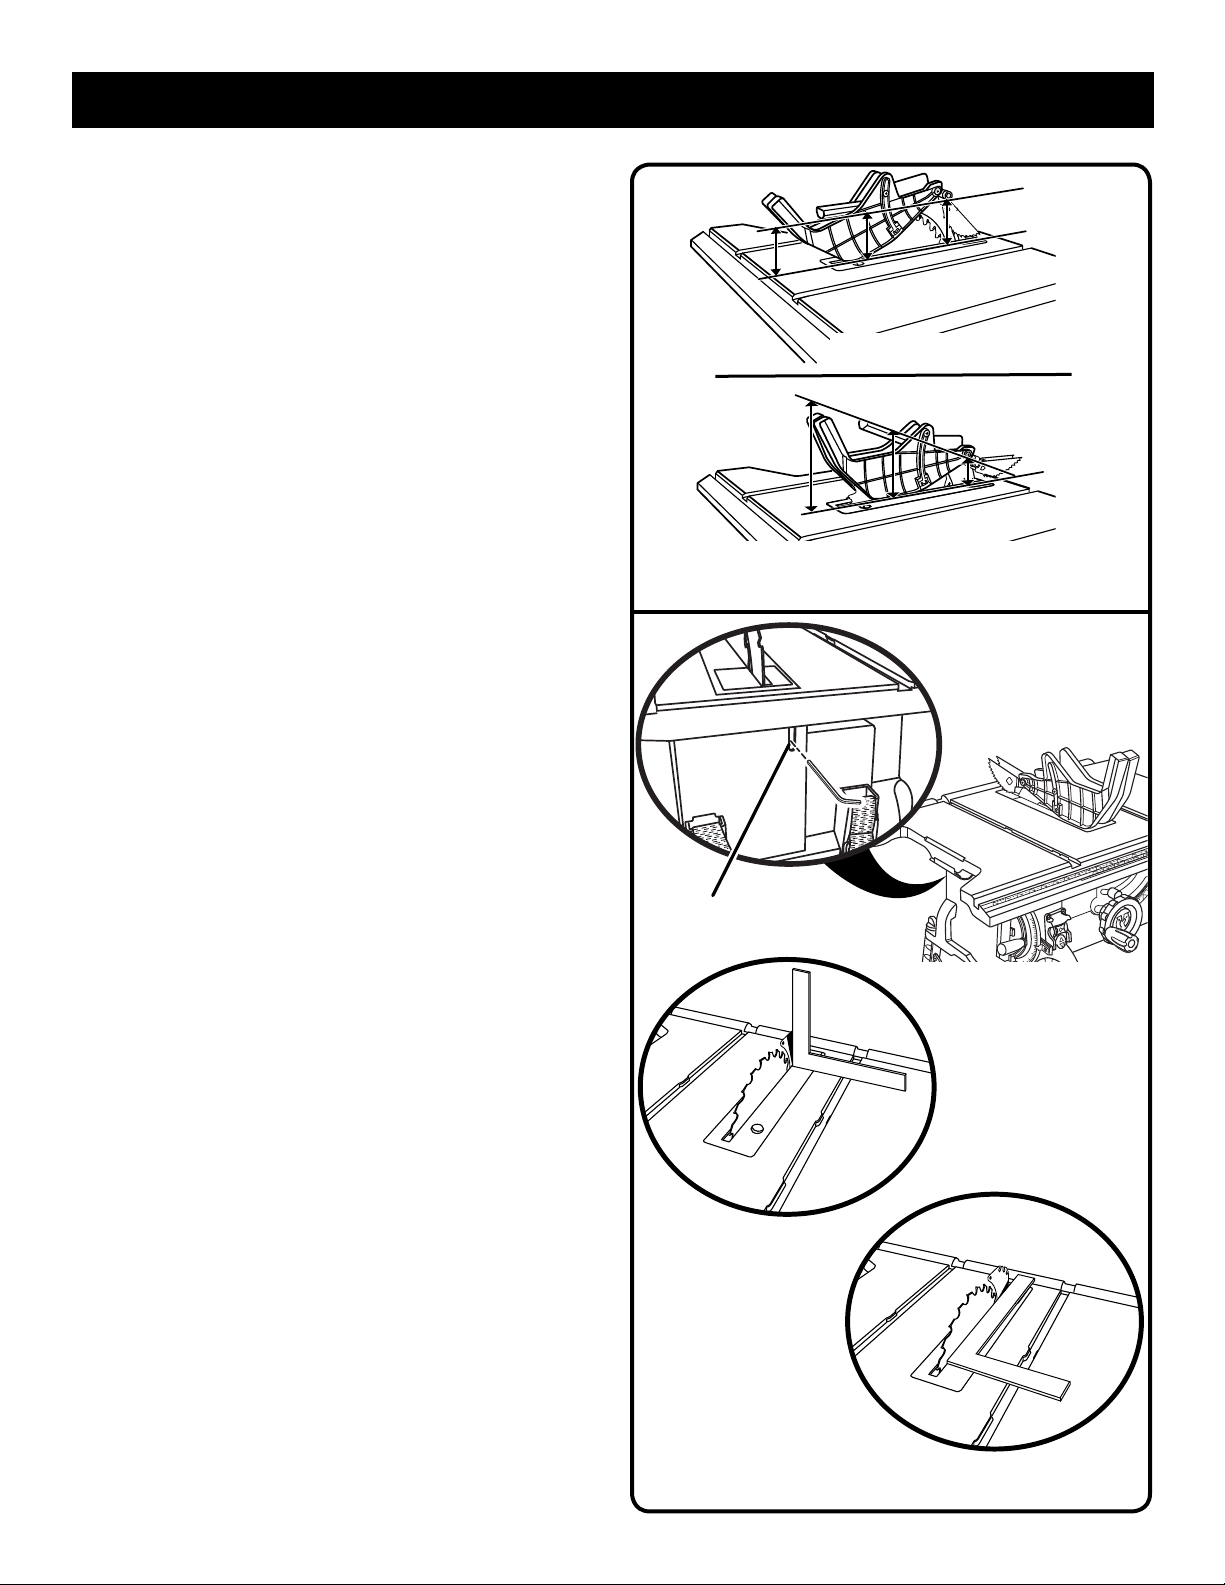
ASSEMBLY
To install anti-kickback pawls:
Press and hold the button on the right side of the anti-
kickback pawls.
Align the slot in the pawls over the rear hole in the riving
knife.
Push the pawl handle down snapping them into place
and release the button.
NOTE: Pull on the pawl handle to make sure pawls are
securely locked.
To install blade guard:
Lift the guard lever up to unlock.
With the front of the blade guard raised, lower the back
of the guard into the middle hole of the riving knife. Push
the front of the guard down until it is parallel to the table
(see figure 15). If the blade guard is not parallel to the
table, the riving knife is not in the “up” position.
Lock the guard in place by pushing the guard lever down.
NOTE: Blade alignment can be adjusted for different blade
widths. Refer to: To Check and Align the Riving Knife and
Saw Blade. Check the blade guard assembly for clearances
and free movement.
CORRECT
INCORRECT
Fig. 15
TO CHECK AND ALIGN THE RIVING KNIFE AND
SAW BLADE
See Figure 16.
To check alignment of the riving knife:
Unplug the saw.
Raise the saw blade by turning the height/bevel adjusting
handwheel clockwise.
Remove the anti-kickback pawls and blade guard
assembly. Place a framing square or straight edge against
both the saw blade and the riving knife.
NOTE: Place framing square between carbide teeth and
measure from blade. This step will insure framing square
is square against blade from the front to back of blade.
The saw blade and riving knife are aligned when the
framing square contacts both the blade and riving knife
evenly with no gaps.
If the riving knife is out of alignment with the saw blade,
adjustment is needed. The riving knife must be in alignment
front to back (horizontally) and top to bottom (vertically).
To adjust (horizontally and vertically):
Remove the anti-kickback pawls and blade guard
assembly.
From the back of the saw, loosen the screws holding the
mounting bracket.
Reposition the riving knife left or right as needed to align
the riving knife with the saw blade.
Once properly aligned, securely retighten all screws.
Check again for squareness and continue to adjust if
needed.
SCREWS
VERTICAL
ADJUSTMENT
HORIZONTAL
ADJUSTMENT
Fig. 16
18
Page 19
ASSEMBLY
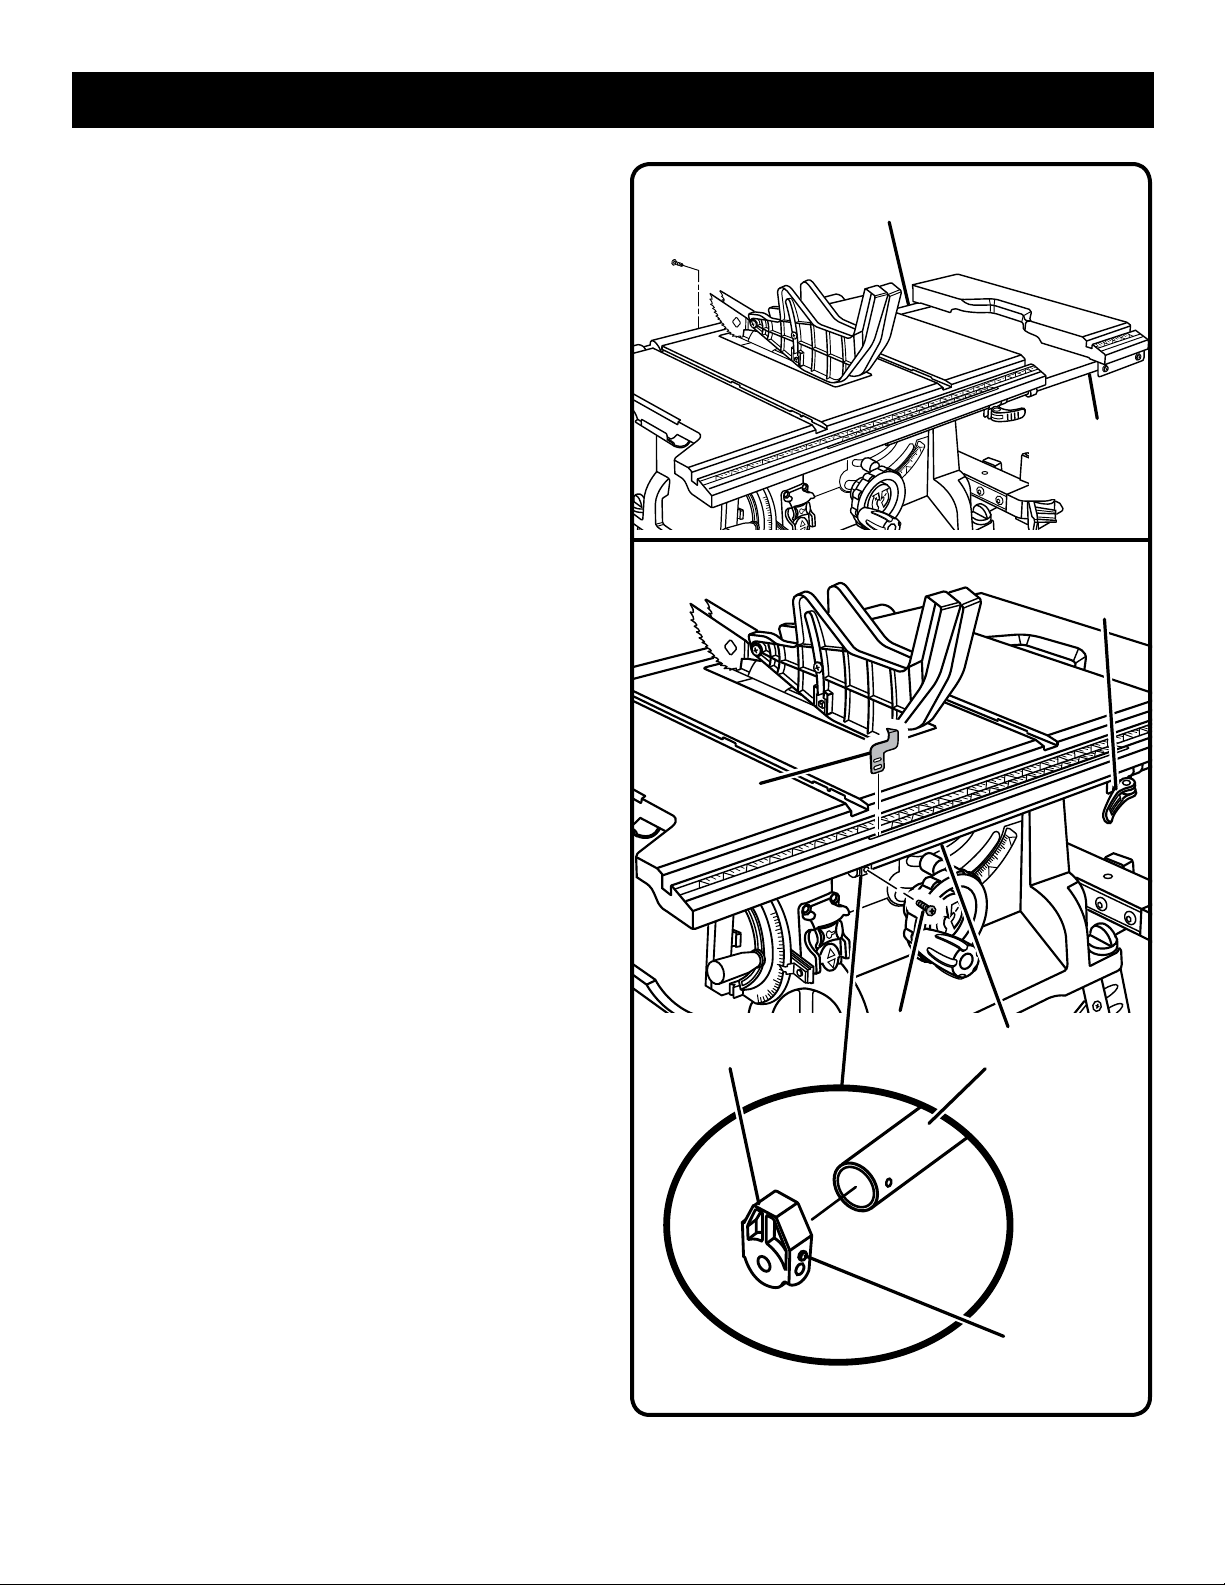
TO ASSEMBLE THE SLIDING TABLE
ASSEMBLY
See Figures 17 - 18.
To install sliding table assembly:
Locate the sliding table assembly.
Unlock the front and back table locking levers.
Insert sliding table assembly into table locking levers.
Push the table assembly until it rests against the saw
table and is completely closed.
Install phillips head screw into hole on the bottom of the
rear extension rod to hold sliding table assembly into
locking levers.
Lock the front and back table locking levers.
To install indicator:
Press the end cap over the front extension rod as shown
in figure 18.
Locate the indicator.
Slip the indicator in the slot on the front rail.
Fit the top slot in the indicator over the detent on the end
plug and the bottom slot over the screw hole on the end
plug.
Insert a screw into the bottom slot of the indicator, the hole
in the end plug and the extension rod. Tighten securely,
but do not overtighten. Overtighting may crush extension
rod ends.
REAR
EXTENSION ROD
SLIDING
TABLE
ASSEMBLY
Fig. 17
TABLE
LOCKING
LEVER
INDICATOR
19
END CAP
SCREW
EXTENSION
ROD
DETENT
Fig. 18
Page 20
ASSEMBLY
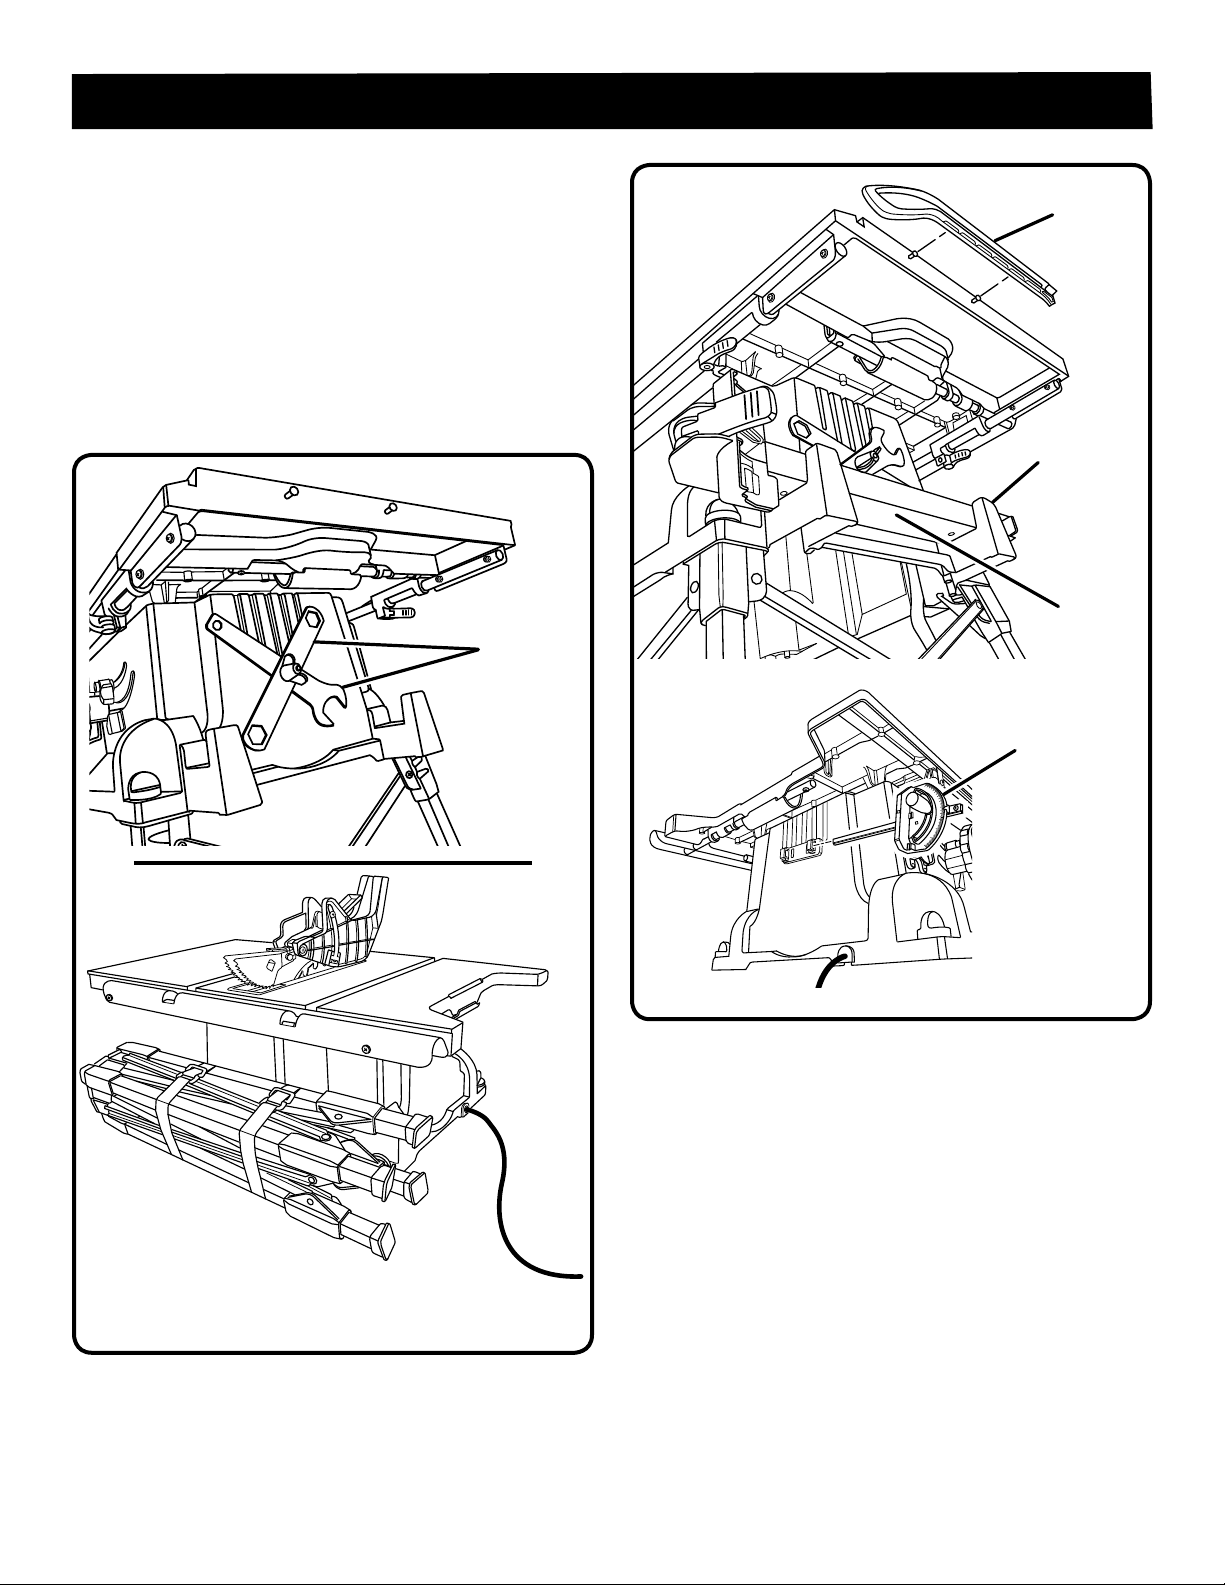
TO STORE THE TABLE SAW ACCESSORIES
AND LEG STAND
See Figures 19 - 20.
The table saw has two convenient storage areas (one on
either side of the saw cabinet) specifically designed for the
saw’s accessories.
When not in use, store the accessories securely by snapping
each accessory in place.
To store the leg stand, close the stand and secure in back
of saw cabinet using hook and look straps.
PUSH
STICK
STORAGE
HOOK
BLADE
WRENCHES
RIP
FENCE
MITER
GAUGE
Fig. 20
Fig. 19
20
Page 21
OPERATION
WARNING:
Do not allow familiarity with tools to make you careless.
Remember that a careless fraction of a second is sufficient to inflict severe injury.
WARNING:
Always wear eye protection with side shields marked to
comply with ANSI Z87.1. Failure to do so could result in
objects being thrown into your eyes, resulting in possible
serious injury.
WARNING:
Do not use any attachments or accessories not
recommended by the manufacturer of this tool. The use
of attachments or accessories not recommended can
result in serious personal injury.
WARNING:
Although many of the illustrations in this manual are
shown with the blade guard removed for clarity, do not
operate the saw without the blade guard unless specifically instructed to do so.
APPLICATIONS
You may use this tool for the purposes listed below:
Straight line cutting operations such as cross cutting,
ripping, mitering, beveling, and compound cutting
Dado with optional accessories
Cabinet making and woodworking
NOTE: This table saw is designed to cut wood and wood
composition products only.
BASIC OPERATION OF THE TABLE SAW
The 3-prong plug must be plugged into a matching outlet
that is properly installed and grounded according to all local
codes and ordinances. Improper connection of the equipment can result in electric shock. Do not modify the plug if
it will not fit the outlet. Have the correct outlet installed by
a qualified electrician. Refer to the Electrical section in this
manual.
CAUSES OF KICKBACK
Kickback can occur when the blade stalls or binds, kicking
the workpiece back toward you with great force and speed. If
your hands are near the saw blade, they may be jerked loose
from the workpiece and may contact the blade. Kickback can
cause serious injury. Use precautions to avoid the risks.
Kickback can be caused by any action that pinches the
blade in the wood such as:
Making a cut with incorrect blade depth
Sawing into knots or nails in the workpiece
Twisting the wood while making a cut
Failing to support work
Forcing a cut
Cutting warped or wet lumber
Using the wrong blade for the type of cut
Not following correct operating procedures
Misusing the saw
Failing to use the anti-kickback pawls
Cutting with a dull, gummed-up, or improperly set
blade
AVOIDING KICKBACK
Always use the correct blade depth setting. The top of
the blade teeth should clear the workpiece by 1/8 in. to
1/4 in.
Inspect the work for knots or nails before beginning a
cut. Knock out any loose knots with a hammer. Never
saw into a loose knot or nail.
Always use the rip fence when rip cutting. Use the miter
gauge when cross cutting. This helps prevent twisting
the wood in the cut.
Always use clean, sharp, and properly-set blades. Never
make cuts with dull blades.
To avoid pinching the blade, support the work properly
before beginning a cut.
When making a cut, use steady, even pressure. Never
force cuts.
Do not cut wet or warped lumber.
Use extra caution when cutting some prefinished or
composition wood products as the anti-kickback pawls
may not always be effective.
Always guide your workpiece with both hands or with
push sticks and/or push blocks. Keep your body in a
balanced position to be ready to resist kickback should
it occur. Never stand directly in line with the blade.
Use of a featherboard will help hold the workpiece securely
against the saw table or fence.
Clean the saw, blade guard, under the throat plate, and any
areas where saw dust or scrap workpieces may gather.
Use the right type of blade for the cut being made.
Always use the riving knife for every operation where it
is allowed. The use of this device will greatly reduce the
risk of kickback.
21
Page 22
OPERATION
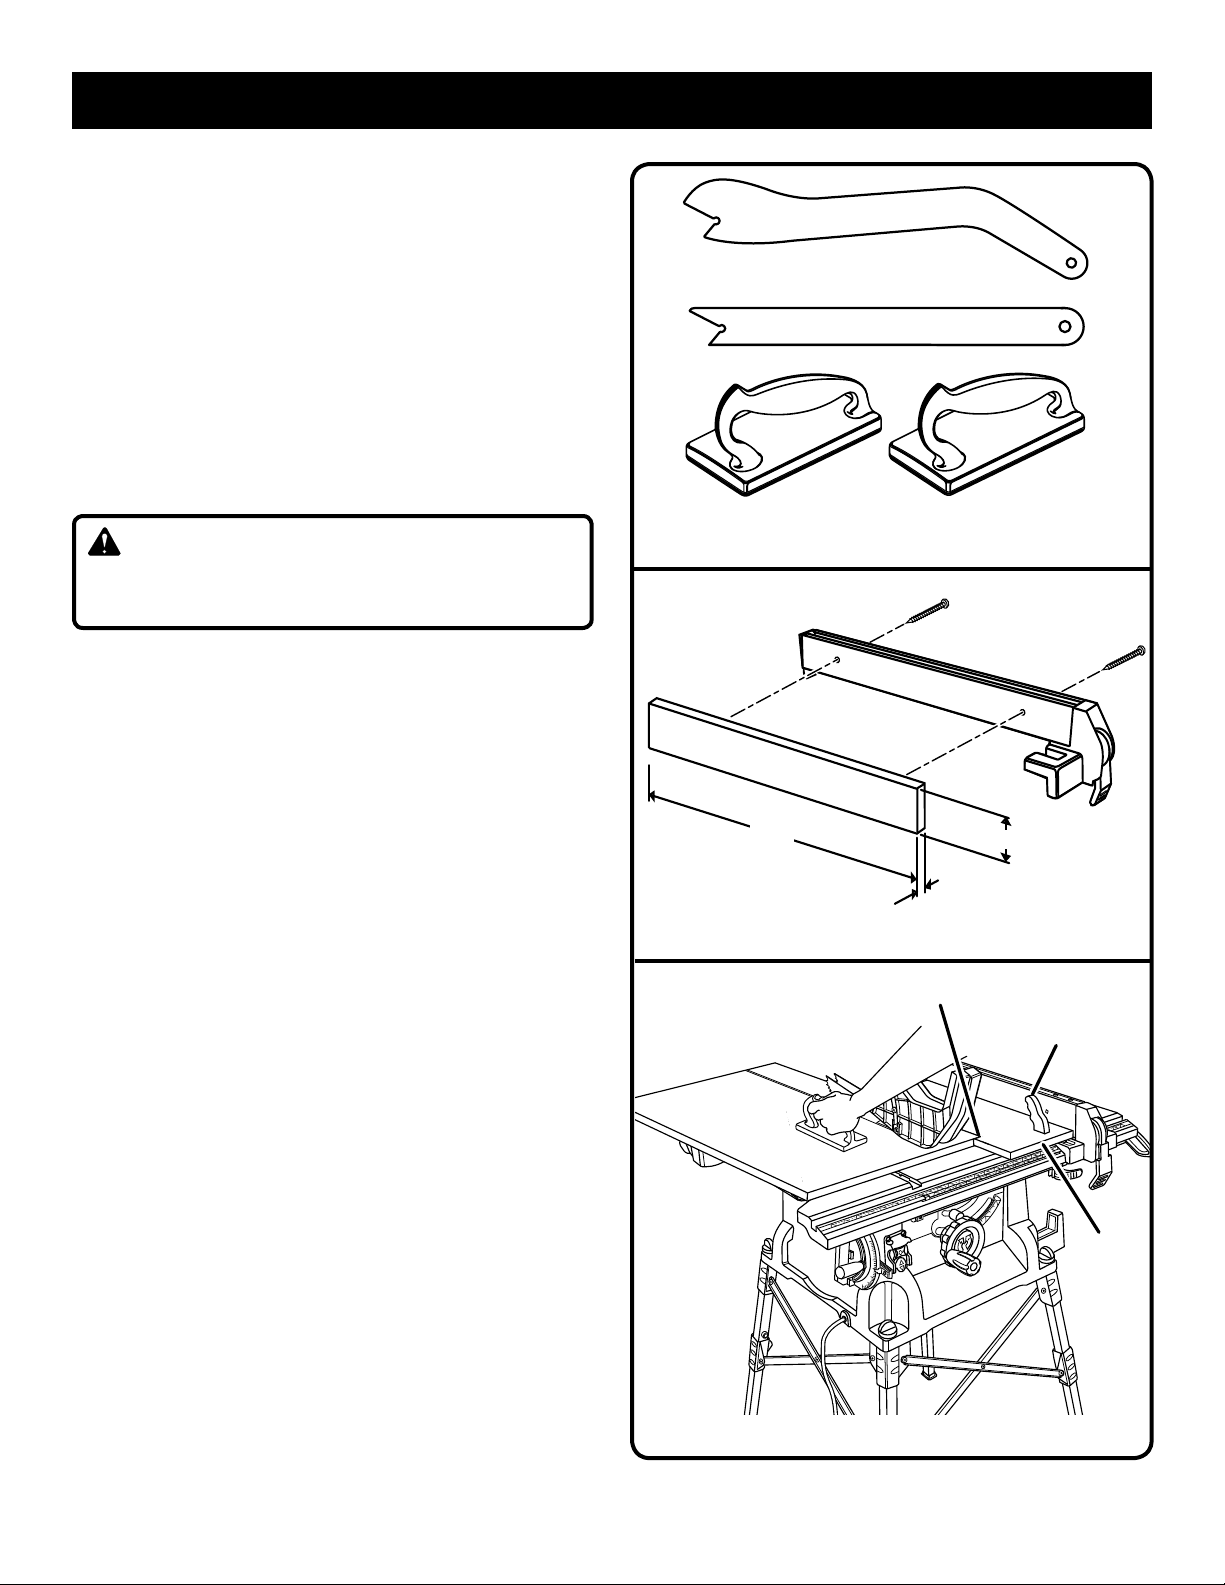
3/4 in.
3 1/2 in.
21 in.
CUTTING AIDS
See Figure 21.
Push sticks are devices that may be used for pushing a
workpiece through the blade in any rip cut. When making
non-through cuts or ripping narrow stock, always use a
push stick, push block, and/or featherboard so your hands
do not come within 3 inches of the saw blade. They can be
made in various sizes and shapes from scrap wood and
used in a specific project. The stick must be narrower than
the workpiece, with a 90˚ notch in one end and shaping for
a grip on the other end.
A push block has a handle fastened by recessed screws
from the underside. Use push blocks for narrow cuts and
all non-through cuts.
PUSH STICKS
PUSH BLOCKS
CAUTION:
Be sure the screws in a push block are recessed to avoid
damaging the saw or workpiece.
AUXILIARY FENCE
An auxiliary fence is a device used to close the gap between
the rip fence and the saw table. Always make and use and
auxiliary fence when ripping material 1/8 in. or thinner.
HOW TO MAKE AND ATTACH AN AUXILIARY
FENCE (FOR RIP CUTTING THIN
WORKPIECE)
See Figure 22.
Rip fence holes are used to secure an auxiliary fence which
requires a piece of wood 3/4 in. thick, 3-1/2 in. wide, and
21 in. long to make.
To attach the auxiliary fence to the rip fence:
Place the wood against the rip fence and resting firmly
on the saw table.
From the back side of the rip fence, secure the wood to
the fence using 1-3/4 in. wood screws.
HOW TO MAKE A JIG (FOR RIP CUTTING
NARROW WORKPIECE)
See Figure 23.
If ripping a narrow workpiece places the hands too close to
the blade, it will be necessary to make and use a jig.
To make a jig:
Attach a handle to a long, straight piece of wood and
secure from the underside using recessed screws.
Cut an L-shaped stop in the side of the jig.
To use a jig:
Position the workpiece flat on the table with the edge
flush against the jig and against the stop.
Holding the jig handle and using a push block and/or push
stick, make the rip cut as described on page 30 later in
this section.
22
Fig. 21
Fig. 22
STOP
JIG
HANDLE
JIG
Fig. 23
Page 23
2-1/2 in.
3/4 in.
1/4 in.
1/8 in.
1-1/16 in.
12 in.
70°
OPERATION
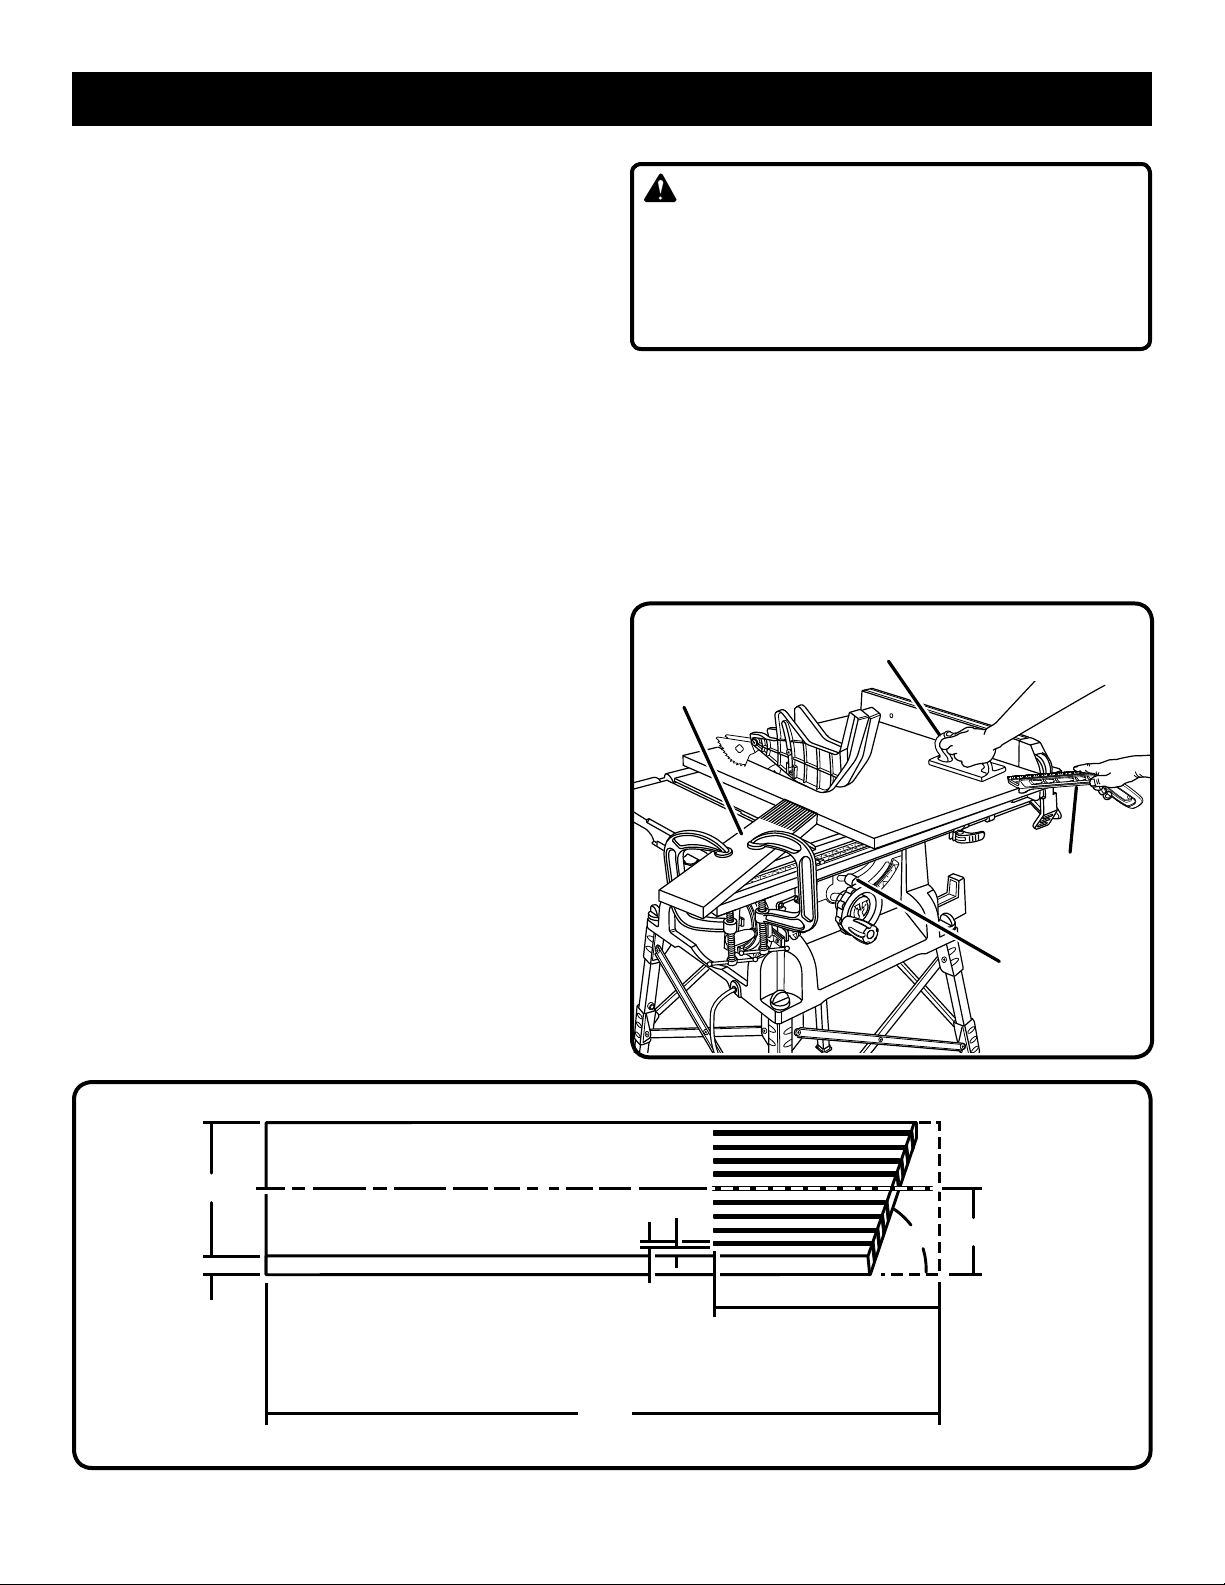
FEATHERBOARD
A featherboard is a device used to help control the
workpiece by holding it securely against the table or fence.
Featherboards are especially useful when ripping small
workpieces and for completing non-through cuts. The end
is angled with a number of short kerfs to give a friction hold
on the workpiece and locked in place on the table with a
C-clamp. Test to ensure it can resist kickback.
HOW TO MAKE A FEATHERBOARD
See Figure 24.
The featherboard is an excellent project for the saw.
Select a solid piece of lumber approximately 3/4 in. thick,
2-1/2 in. wide and 12 in. long. Mark the center of the width
on one end of the stock. Miter the width to 70° (see page
30 for information on miter cuts).
Prepare the saw for ripping as discussed on page 30. Set
the rip fence to allow approximately a 1/4 in. “finger” to be
cut in the stock. Feed the stock only to the mark previously
made at 6 in. Turn the saw OFF and allow the blade to completely stop rotating before removing the stock. Reset the
rip fence and cut spaced rips into the workpiece to allow
approximately 1/4 in. fingers and 1/8 in. spaces between
the fingers.
WARNING:
Mount the featherboard in front of the saw blade. If
positioned improperly, kickback can result from the
featherboard pinching the workpiece and binding the
blade in the saw kerf. Failure to heed this warning can
result in serious personal injury.
HOW TO MOUNT A FEATHERBOARD
See Figure 25.
Completely lower the saw blade. Position the rip fence to
the desired adjustment for the cut to be performed and lock.
Place the workpiece against the fence and over the saw
blade area. Adjust the featherboard to apply resistance to
the workpiece just forward of the blade. Attach C-clamps to
further secure the featherboard to the edge of the saw table.
PUSH
BLOCK
FEATHER-
BOARD
PUSH
STICK
BEVEL
LOCKING
LEVER
Fig. 25
Fig. 24
23
Page 24
OPERATION
TYPES OF CUTS
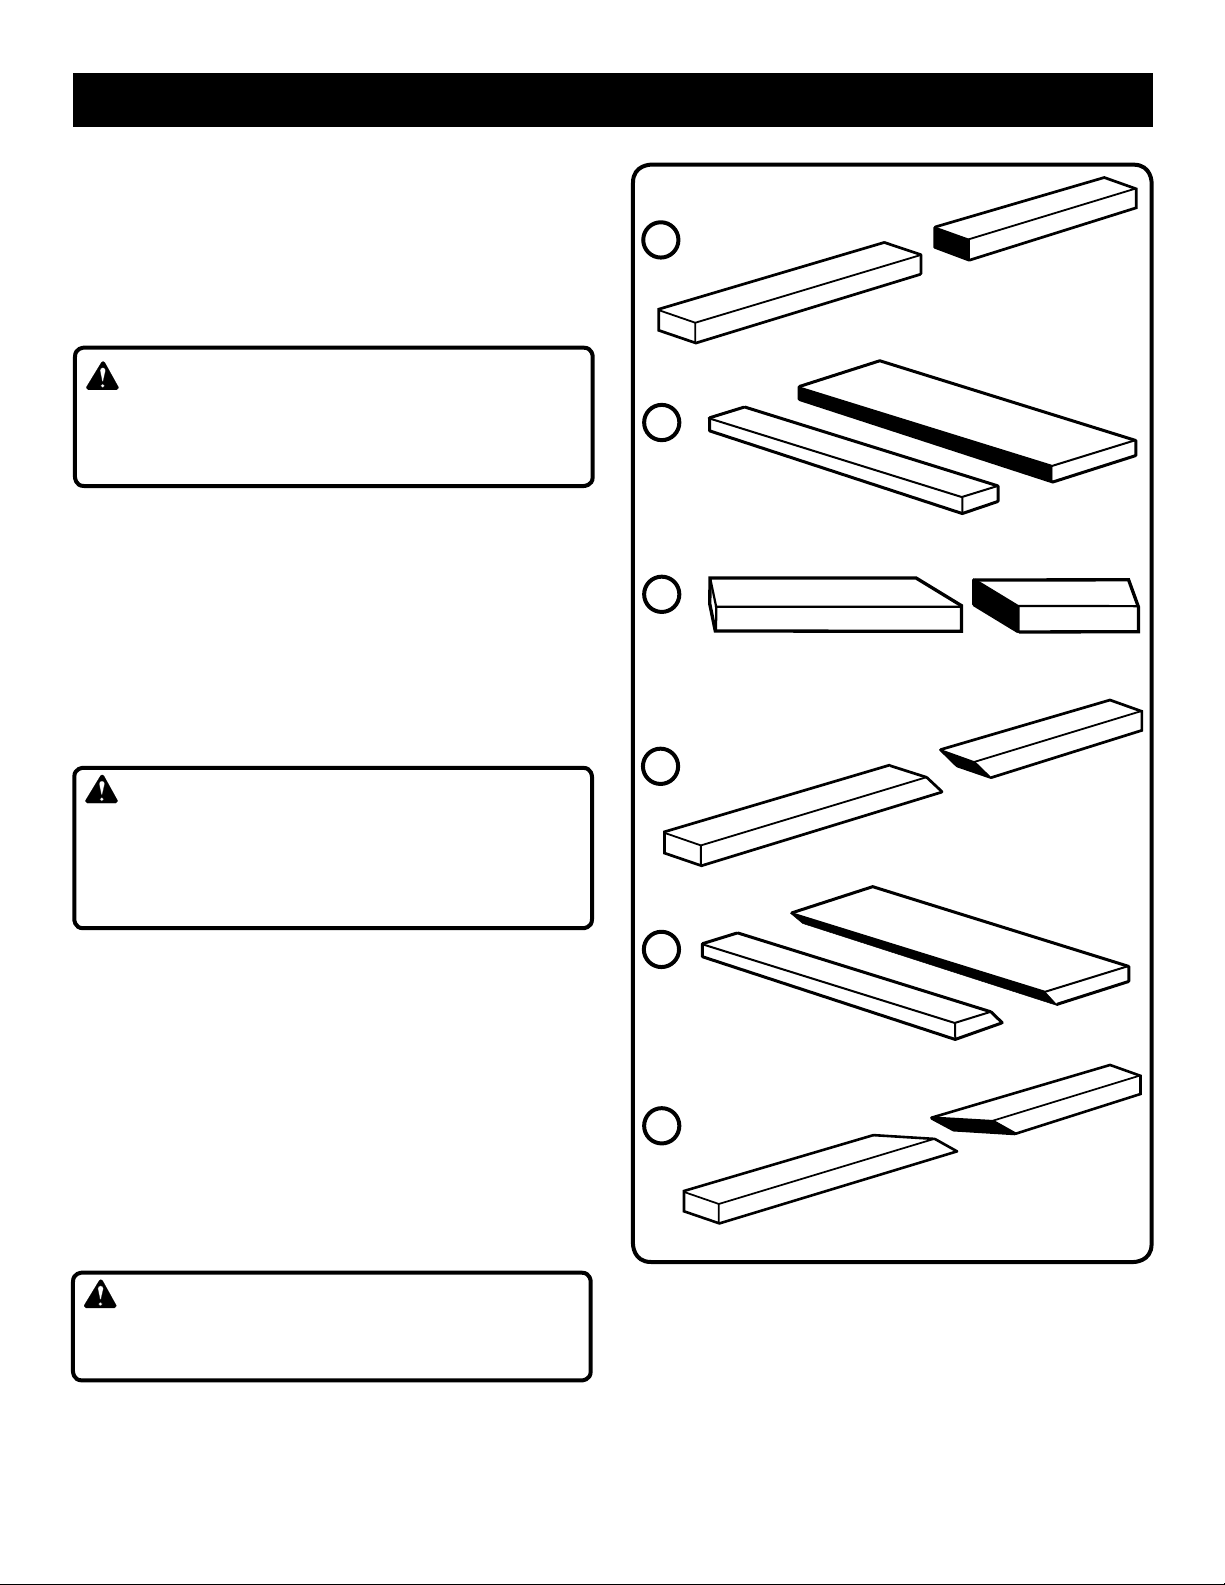
See Figure 26.
There are six basic cuts: 1) the cross cut, 2) the rip cut, 3)
the miter cut, 4) the bevel cross cut, 5) the bevel rip cut, and
6) the compound (bevel) miter cut. All other cuts are combinations of these basic six. Operating procedures for making
each kind of cut are given later in this section.
WARNING:
Always make sure the blade guard and anti-kickback
pawls are in place and working properly when making
these cuts to avoid possible injury.
Cross cuts are straight 90° cuts made across the grain of
the workpiece. The wood is fed into the cut at a 90° angle
to the blade, and the blade is vertical.
Rip cuts are made with the grain of the wood. To avoid
kickback while making a rip cut, make sure one side of the
wood rides firmly against the rip fence.
Miter cuts are made with the wood at any angle to the
blade other than 90°. The blade is vertical. Miter cuts tend
to “creep” during cutting. This can be controlled by holding
the workpiece securely against the miter gauge.
WARNING:
Always use a push stick with small pieces of wood, and
also to finish the cut when ripping a long narrow piece
of wood, to prevent your hands from getting close to the
blade.
1
CROSS CUT
2
RIP CUT
3
MITER CUT
4
BEVEL CROSS CUT
Bevel cuts are made with an angled blade. Bevel cross cuts
are across the wood grain, and bevel rip cuts are with the
grain.
Compound (or bevel) miter cuts are made with an angled
blade on wood that is angled to the blade. Be thoroughly
familiar with making cross cuts, rip cuts, bevel cuts, and
miter cuts before trying a compound miter cut.
CUTTING TIPS
Dado and rabbet cuts are non-through cuts which can be
either rip cuts or cross cuts. Carefully read and understand
all sections of this operator’s manual before attempting any
operation.
WARNING:
Do not use blades rated less than the speed of this tool.
Failure to heed this warning could result in personal injury.
The kerf (the cut made by the blade in the wood) will be
wider than the blade to avoid overheating or binding.
Make allowance for the kerf when measuring wood.
5
BEVEL RIP CUT
6
COMPOUND (BEVEL) MITER CUT
Fig. 26
Make sure the kerf is made on the waste side of the
measuring line.
Cut the wood with the finish side up.
Knock out any loose knots with a hammer before making
the cut.
Always provide proper support for the wood as it comes
out of the saw.
24
Page 25
OPERATION
TO CHANGE BLADE DEPTH
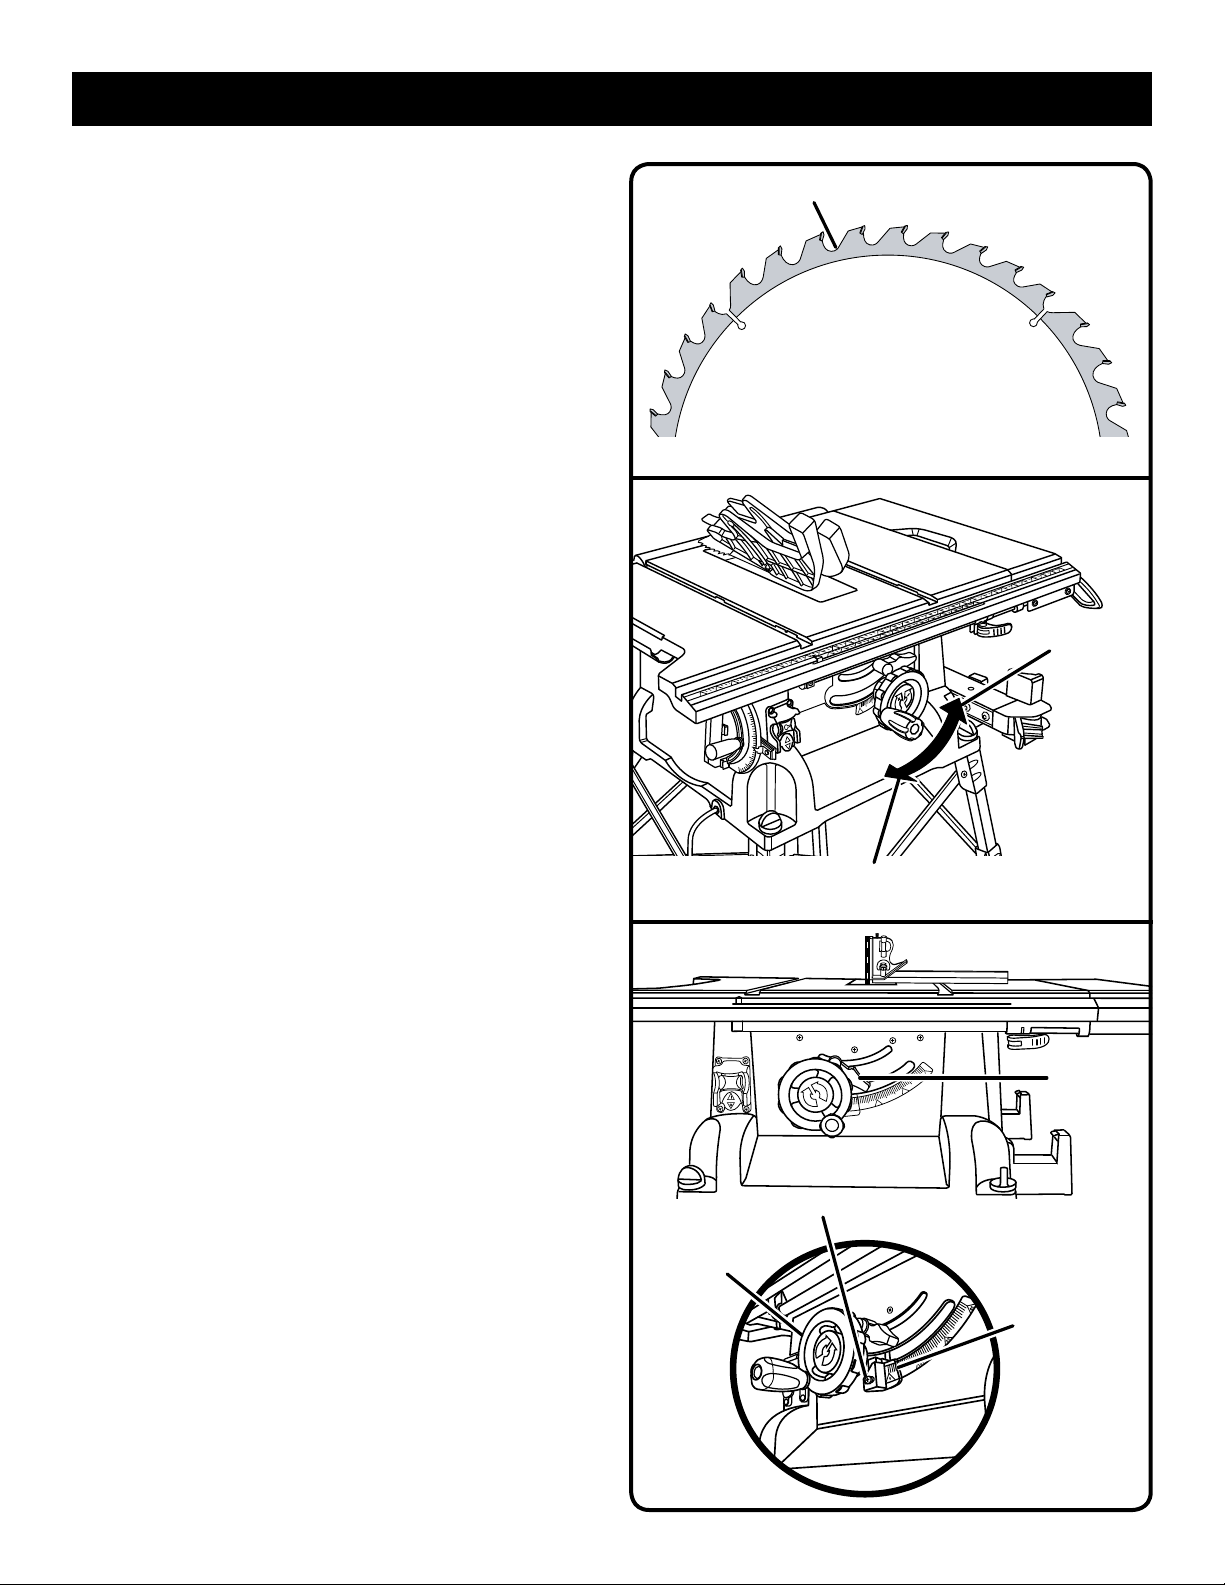
See Figure 27.
The blade depth should be set so that the outer points of
the blade are higher than the workpiece by approximately
1/8 in. to 1/4 in. but the lowest points (gullets) are below
the top surface.
Raise the blade by turning the height/bevel adjusting
handwheel clockwise or lower it by turning the handwheel
counterclockwise.
TO CHANGE BLADE ANGLE (BEVEL)
See Figured 28 - 29.
NOTE: A 90° cut has a 0° bevel and a 45° cut has a 45°
bevel.
Unplug the saw.
Loosen bevel control by pulling the bevel locking lever
up.
Tighten bevel control by pushing the bevel lock lever
down.
TO ADJUST THE BEVEL INDICATOR
See Figure 29.
If the bevel indicator is not at zero when the saw blade is at
90°, adjust the indicator by loosening the screw and setting
it at 0° on the bevel scale. Retighten the screw.
GULLET
Fig. 27
TO INCREASE
ANGLE
HEIGHT/BEVEL
ADJUSTING
HANDWHEEL
TO DECREASE
ANGLE
SCREW
Fig. 28
BEVEL
LOCKING
LEVER
BEVEL
INDICATOR
25
Fig. 29
Page 26
OPERATION
WARNING:
To reduce the risk of injury, always make sure the rip fence
is parallel to the blade before beginning any operation.
TO USE THE RIP FENCE
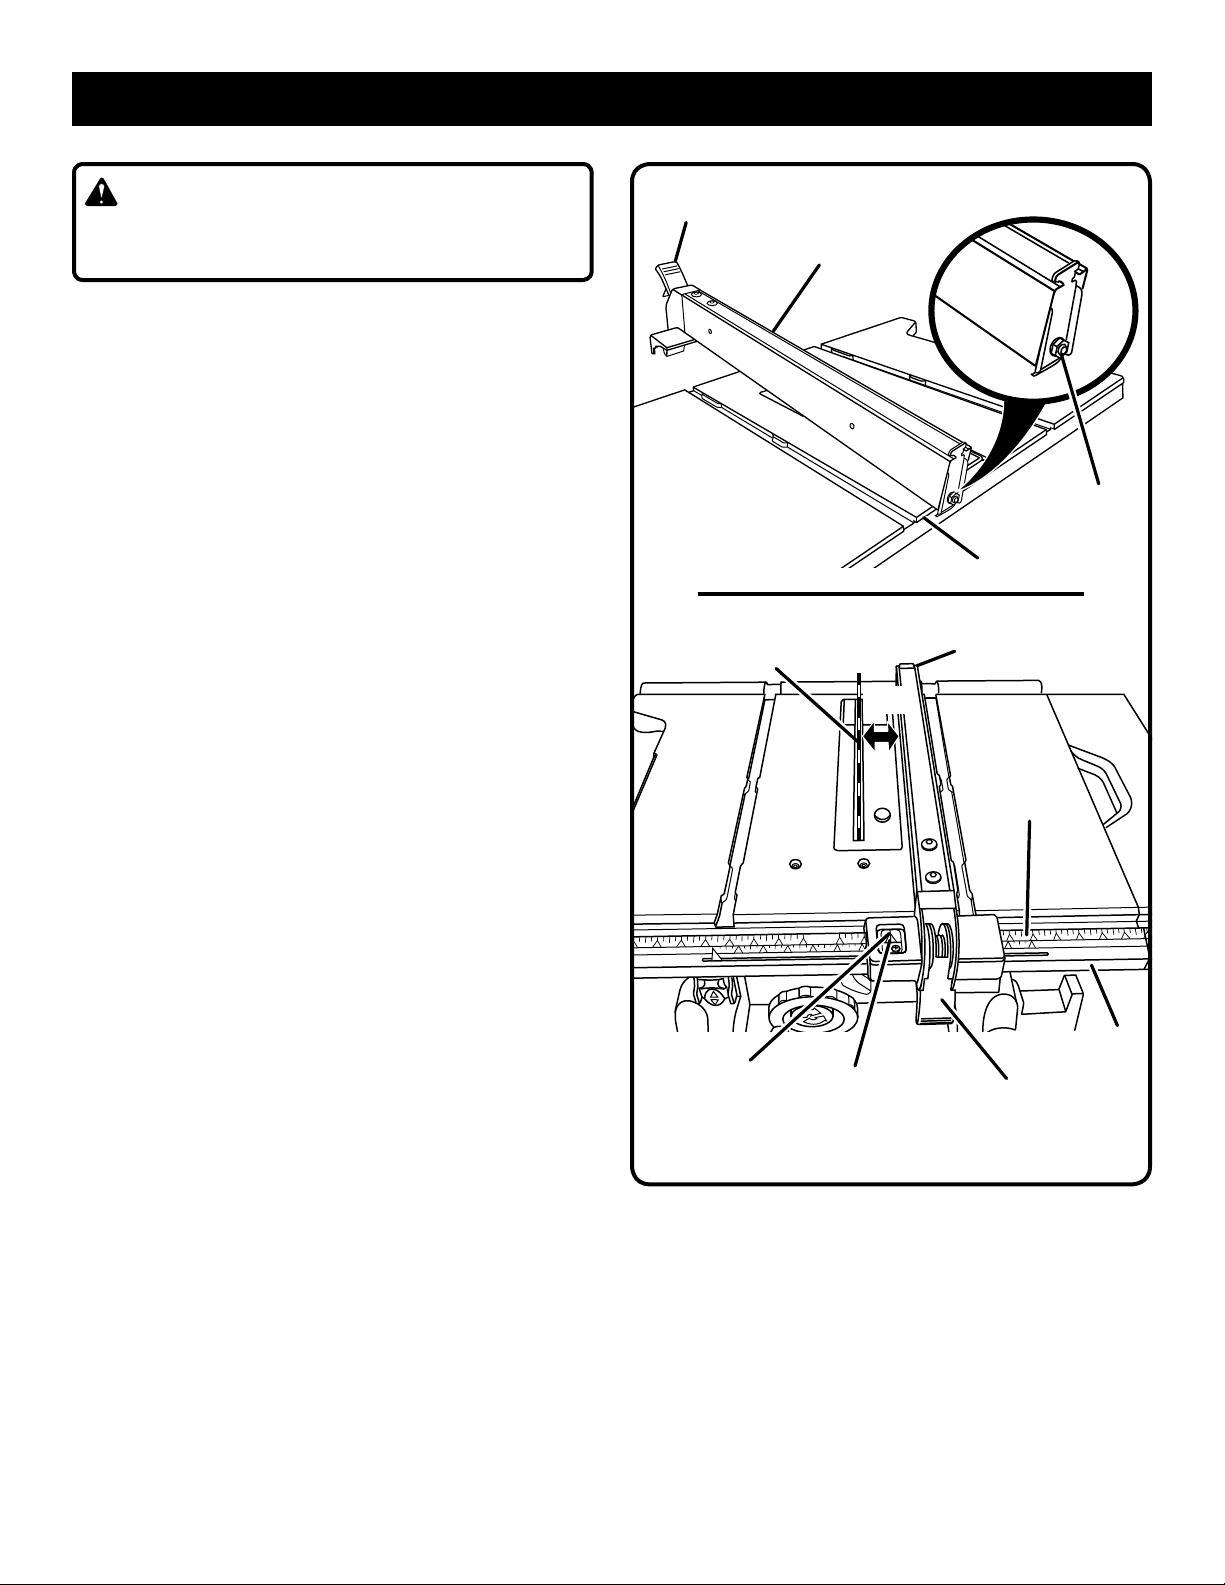
See Figure 30.
Place the rear lip on the rear of the saw table and pull
slightly toward the front of the unit.
Lower the front end of the rip fence onto the guide
surfaces on top of the front rail.
With the rip fence flat on the saw table, push the fence
towards the front rail to align the fence to the saw
table.
Push the locking lever down to align and secure the
fence.
Check for a smooth gliding action. If adjustments are needed,
see To Check the Alignment of the Rip Fence to the Blade
in the Adjustment section of this manual.
Make two or three test cuts on scrap wood. If the cuts
are not true, repeat the alignment process.
NOTE: The rip fence must be secure when the locking
handle is engaged. To increase the grip of the rip fence
on the rear lip of the table, tighten the clamp screw on
the rear of the rip fence by turning it clockwise.
LOCKING
LEVER
BLADE
RIP
FENCE
CLAMP
SCREW
REAR
LIP
RIP
FENCE
2 in.
SCALE
TO SET THE RIP FENCE SCALE INDICATOR
TO THE BLADE
See Figure 30.
Use the indicator on the rip fence to position the fence along
the scale on the front rail.
NOTE: The anti-kickback pawls and blade guard assembly
must be removed to perform this adjustment. Reinstall the
blade guard assembly when the adjustment is complete.
Begin with the blade at a zero angle (straight up).
Unplug the saw.
Loosen the rip fence by lifting the locking lever.
Using a framing square, set the rip fence 2 in. from the
blade tip edge.
Loosen the screw on the scale indicator and align with
the 2 in. mark as shown.
Tighten the screw and check the dimension and the rip
fence.
2 in.
MARK
SCALE
INDICATOR
FRONT
RAIL
LOCKING
LEVER
Fig. 30
26
Page 27
OPERATION
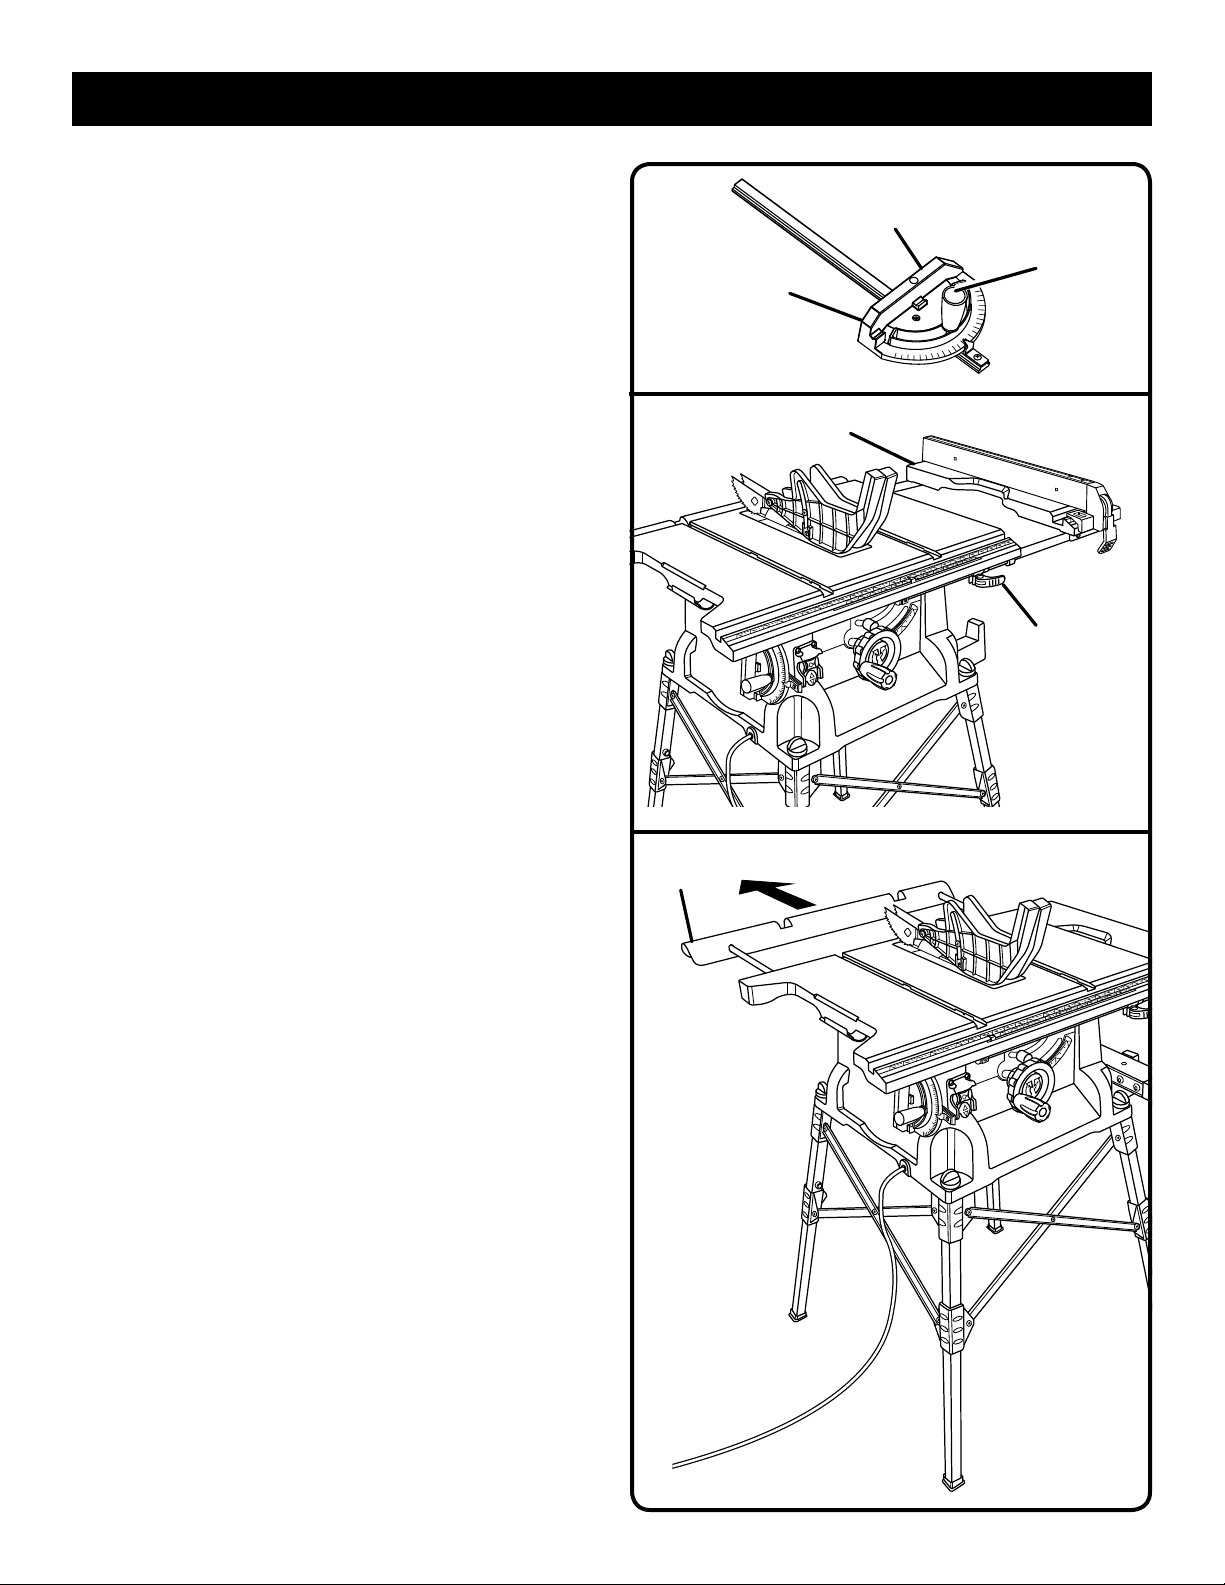
TO USE THE MITER GAUGE
See Figure 31.
The miter gauge provides greater accuracy in angled cuts.
For very close tolerances, test cuts are recommended.
There are two miter gauge grooves, one on either side of
the blade. When making a 90° cross cut, you can use either
miter gauge groove. When making a beveled cross cut (the
blade tilted in relation to the table) the miter gauge should be
located in the groove on the right so that the blade is tilted
away from the miter gauge and your hands.
The miter gauge can be turned 60° to the right or left.
Loosen the lock knob.
With the miter gauge in the miter gauge groove, rotate the
gauge until the desired angle is reached on the scale.
Retighten the lock knob.
TO USE THE SLIDING TABLE EXTENSION
See Figure 32.
Increase the length of the saw table by using the table
extension.
Set the rip fence to 14 in.
Pull the front table locking lever toward you to unlock the
lever. Repeat with the back lever.
Slide the table extension to the desired width.
NOTE: Use the scale on the front rail when a specific
width is desired.
Once the extension table are set to the desired width,
relock the front and back locking levers by pushing the
levers back towards the saw base.
OUTFEED
SUPPORT
MITER
GAUGE
SLIDING TABLE
EXTENSION
MITER
GAUGE BODY
LOCK
KNOB
Fig. 31
TABLE
LOCKING
LEVER
Fig. 32
TO USE THE OUTFEED SUPPORT
See Figure 33.
The outfeed support slides to give the operator additional
support for cutting long workpieces.
With the table saw in the OFF position, stand behind the
saw.
Grasp the outfeed support with both hands and pull it
until it is fully extended.
Fig. 33
27
Page 28
OPERATION
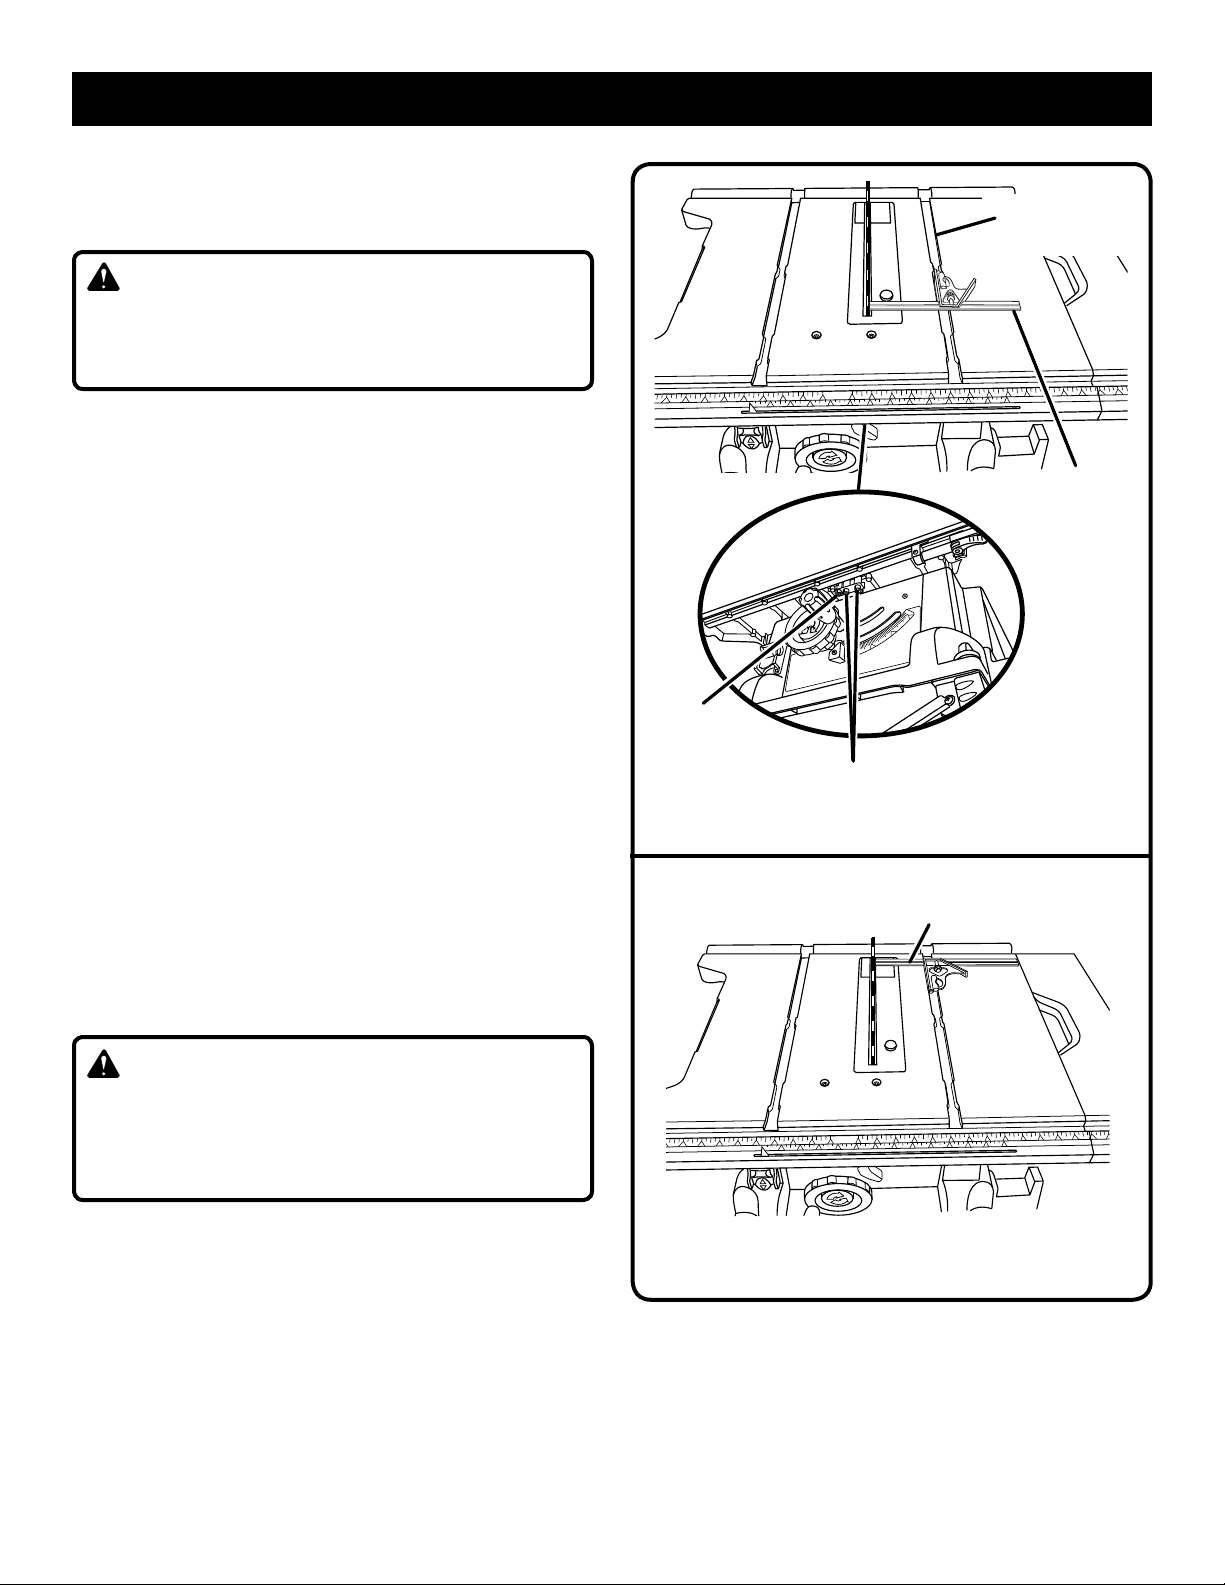
HEELING (PARALLELING) THE BLADE TO THE
MITER GAUGE GROOVE
See Figures 34 - 35.
WARNING:
The blade must be parallel to the miter gauge groove so
the wood does not bind resulting in kickback. Failure to
do so could result in serious personal injury.
Do not loosen any bolts for this adjustment until you have
checked with a square and made test cuts to be sure adjustments are necessary. Once the bolts are loosened, these
items must be reset.
Unplug the saw.
Remove the blade guard and anti-kickback pawls.
Mark beside one of the blade teeth at the front of the blade.
Place a framing square even with the front of the saw
table and the side of the saw blade as shown in figure 34.
Turn the blade so the marked tooth is at the back.
Move the combination square to the rear and again
measure the distance. If the distances are the same,
the blade is square.
If the distances are different:
Extend the extension table, see page 27.
Place riving knife in “down” position.
Loosen the locking bolts by turning towards the left.
NOTE: The bolts are located above the height/bevel
adjusting handwheel and under the saw table in the
front of the saw.
Turn adjusting bolt left or right until the blade is square.
Tighten the locking bolts. Check again for squareness
and continue to adjust if needed.
RIGHT MITER
GAUGE GROOVE
COMBINATION
SQUARE
ADJUSTING
BOLT
LOCKING
BOLTS (2)
Fig. 34
COMBINATION
SQUARE
WARNING:
To reduce the risk of injury from kickback, align the rip
fence to the blade following any blade adjustments.
Always make sure the rip fence is parallel to the blade
before beginning any operation.
SAW BLADE OUT OF ALIGNMENT
Fig. 35
28
Page 29
OPERATION
MAKING CUTS
This table saw can perform a variety of cuts that are not all
mentioned in this manual. DO NOT attempt to make any cuts
not covered here unless you are thoroughly familiar with the
proper procedures and necessary accessories. Your local
library has many books on table saw usage and specialized
woodworking procedures for your reference.
The blade provided with the saw is a high-quality combination blade suitable for ripping and cross cut operations. Carefully check all setups and rotate the blade one full revolution
to assure proper clearance before connecting saw to power
source. Stand slightly to the side of the blade path to reduce
the chance of injury should kickback occur.
WARNING:
Do not use blades rated less than the speed of this tool.
Failure to heed this warning could result in personal injury.
Use the miter gauge when making cross, miter, bevel, and
compound miter cuts. To secure the angle, lock the miter
gauge in place by twisting the lock knob clockwise. Always
tighten the lock knob securely in place before use.
NOTE: It is recommended that you place the piece to be
saved on the left side of the blade and that you make a test
cut on scrap wood first.
CROSS CUT
PLACE RIGHT HAND ON
MITER GAUGE HERE
SWITCH
ON
Fig. 36
SWITCH
OFF
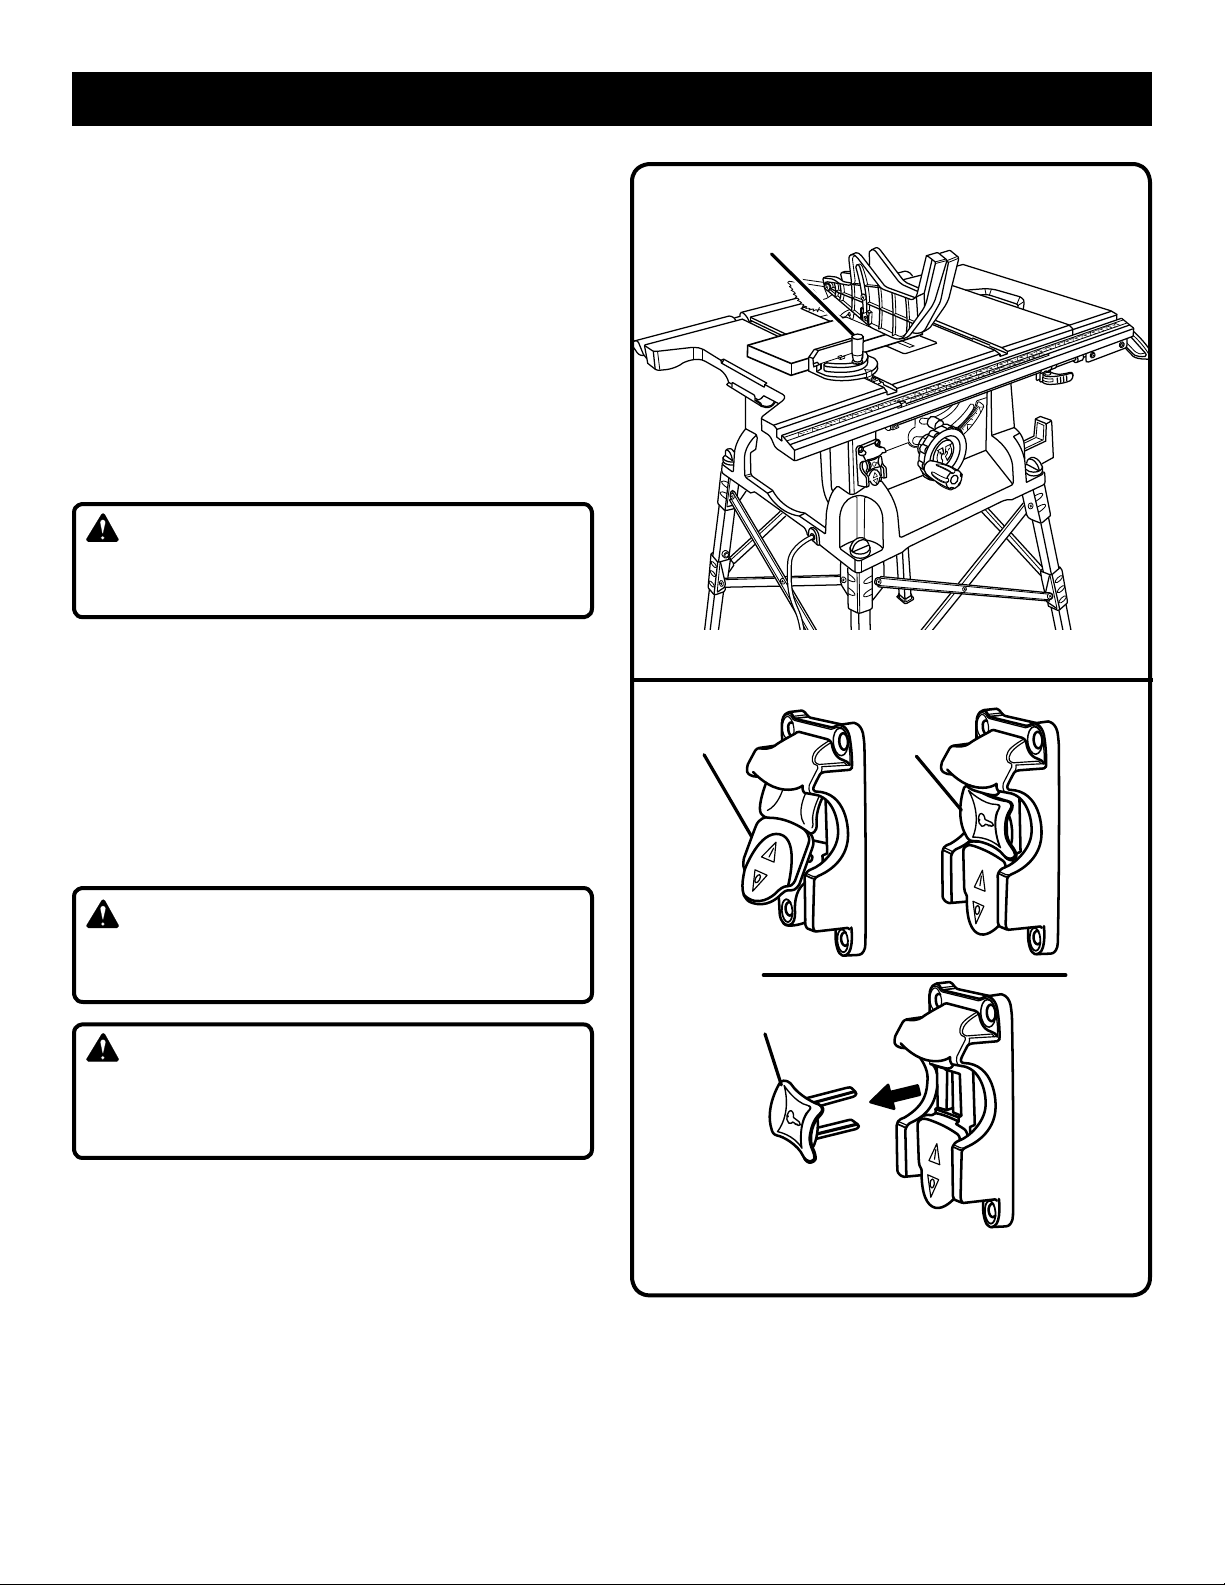
TO MAKE A CROSS CUT
See Figures 36 - 37.
WARNING:
Make sure the blade guard assembly is installed and
working properly to avoid serious possible injury.
WARNING:
Using the rip fence as a cutoff gauge when cross cutting
will result in kickback which can cause serious personal
injury.
Remove the rip fence.
Set the blade to the correct depth for the workpiece.
Set the miter gauge to 0° and tighten the lock knob.
Make sure the wood is clear of the blade before turning
on the saw.
To turn the saw on, lift the switch button.
To turn saw off, press the switch button down.
NOTE: To prevent unauthorized use, remove the switch
key as shown in figure 37.
Let the blade build up to full speed before moving the
workpiece into the blade.
SWITCH KEY
SWITCH IN LOCKED POSITION
Fig. 37
Hold the workpiece firmly with both hands on the miter
gauge and feed the workpiece into the blade.
NOTE: The hand closest to the blade should be placed
on the miter gauge lock knob and the hand farthest from
the blade should be placed on the workpiece.
When the cut is made, turn the saw off. Wait for the
blade to come to a complete stop before removing the
workpiece.
29
Page 30
OPERATION
MAKING A RIP CUT
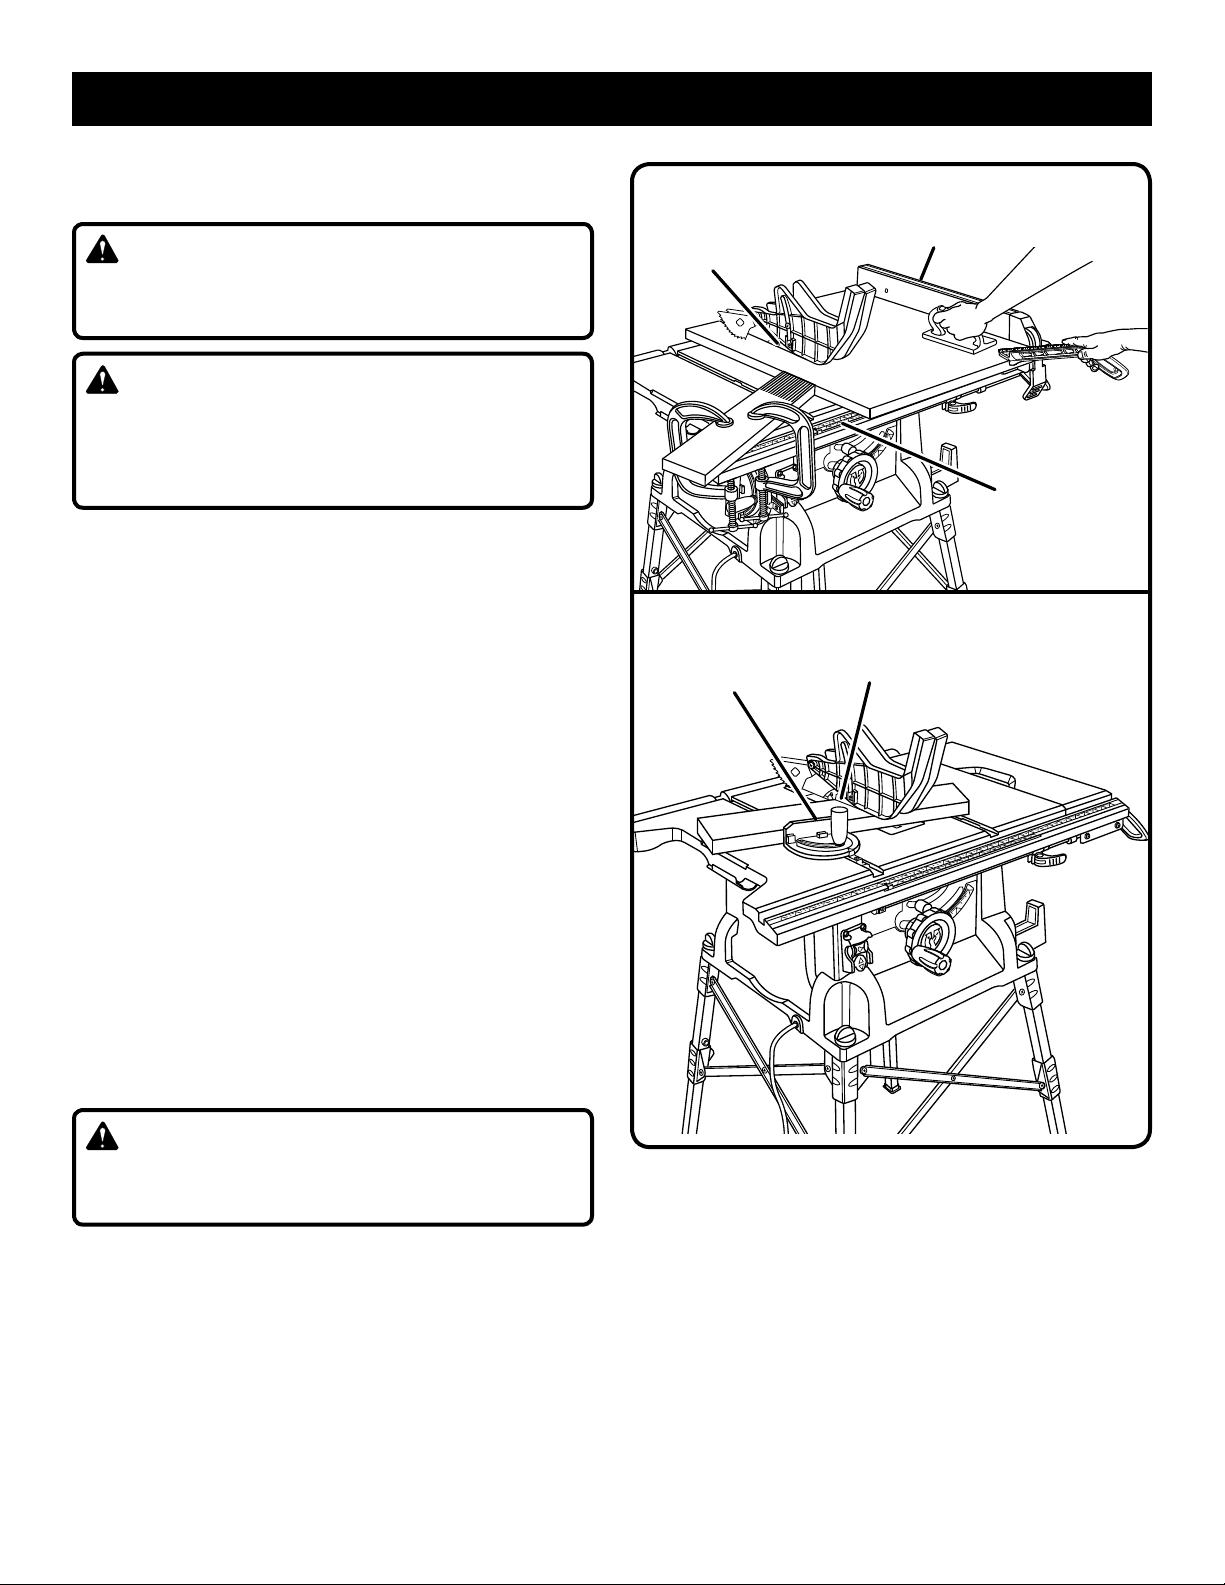
See Figure 38.
WARNING:
Make sure the blade guard assembly is installed and
working properly to avoid serious possible injury.
WARNING:
Taper cuts must only be made with a special jig, which is
commercially available. Do not attempt a free hand taper
cut on this saw. Failure to follow these instructions could
result in serious personal injury.
Set the blade to the correct depth for the workpiece.
Position the rip fence the desired distance from the blade
for the cut and securely lock the handle.
Make sure the wood is clear of the blade before turning
on the saw.
When ripping a long workpiece, place a support the same
height as the table surface behind the saw for the cut
work.
Turn the saw on.
Position the workpiece flat on the table with the edge
flush against the rip fence. Let the blade build up to full
speed before feeding the workpiece into the blade.
Once the blade has made contact with the workpiece, use
the hand closest to the rip fence to guide it. Make sure
the edge of the workpiece remains in solid contact with
both the rip fence and the surface of the table. If ripping
a narrow piece, use a push stick and/or push blocks to
move the piece through the cut and past the blade.
When the cut is made, turn the saw off. Wait for the
blade to come to a complete stop before removing the
workpiece.
BLADE
MITER GAUGE
ANGLED
RIP CUT
RIP
FENCE
SCALE
Fig. 38
MITER CUT
BLADE
STRAIGHT
MAKING A MITER CUT
See Figure 39.
WARNING:
Make sure the blade guard assembly is installed and
working properly to avoid possible serious injury.
Remove the rip fence.
Set the blade to the correct depth for the workpiece.
Set the miter gauge to the desired angle and tighten the
lock knob.
Make sure the wood is clear of the blade before turning
on the saw.
Turn the saw on.
Fig. 39
Let the blade build up to full speed before moving the
workpiece into the blade.
Hold the workpiece firmly with both hands on the miter
gauge and feed the workpiece into the blade.
NOTE: The hand closest to the blade should be placed
on the miter gauge lock knob and the hand farthest from
the blade should be placed on the workpiece.
When the cut is made, turn the saw off. Wait for the
blade to come to a complete stop before removing the
workpiece.
30
Page 31
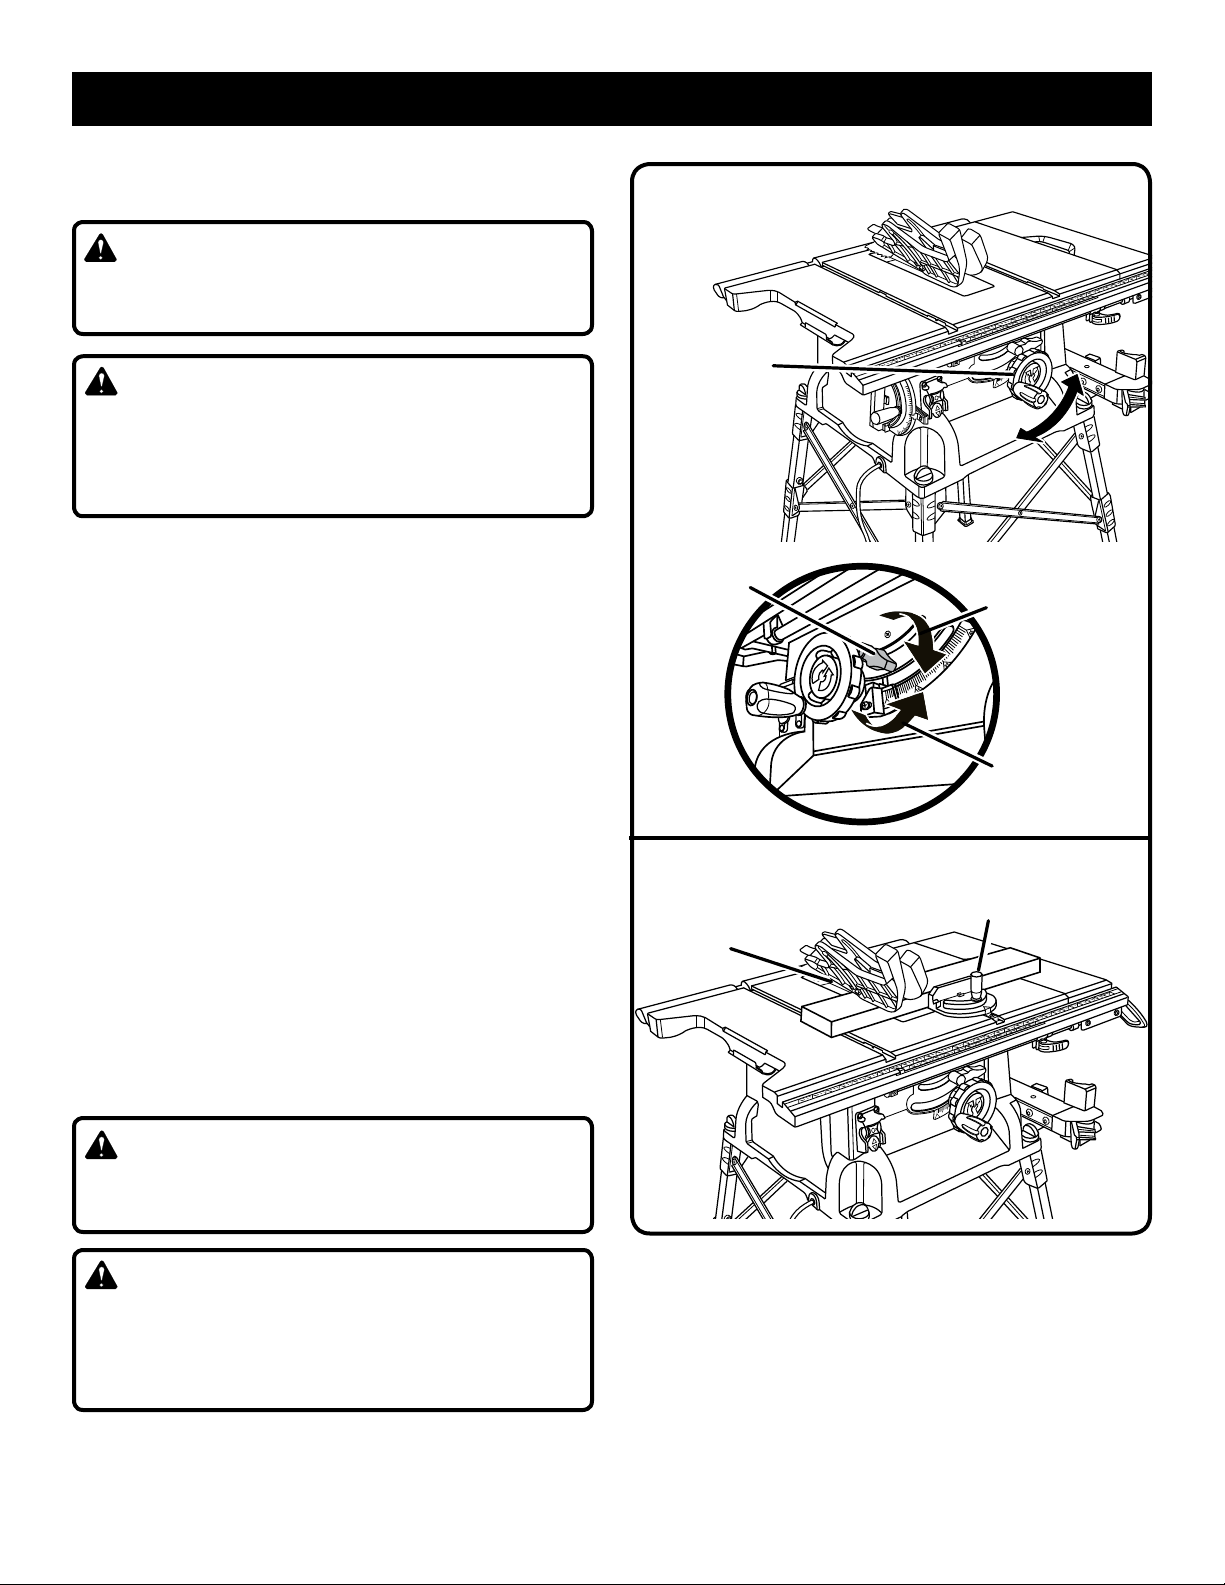
OPERATION
MAKING A BEVEL CROSS CUT
See Figures 40 - 41.
WARNING:
Make sure the blade guard assembly is installed and
working properly to avoid possible serious injury.
WARNING:
The miter gauge must be on the right side of the blade to
avoid trapping the wood and causing kickback. Placement of the miter gauge to the left of the blade will result
in kickback and the risk of serious personal injury.
Remove the rip fence.
Unlock the bevel locking lever.
Adjust the bevel angle to the desired setting.
Lock the bevel locking lever.
Set the blade to the correct depth for the workpiece.
Set the miter gauge to 0° and tighten the lock knob.
Make sure the wood is clear of the blade before turning
on the saw.
Turn the saw on.
Let the blade build up to full speed before moving the
workpiece into the blade.
Hold the workpiece firmly with both hands on the miter
gauge and feed the workpiece into the blade.
NOTE: The hand closest to the blade should be placed
on the miter gauge lock knob and the hand farthest from
the blade should be placed on the workpiece.
When the cut is made, turn the saw off. Wait for the
blade to come to a complete stop before removing the
workpiece.
VIEWED FROM THE FRONT, BELOW THE TABLE SAW
HEIGHT/BEVEL
ADJUSTING
HANDWHEEL
BEVEL
LOCKING
LEVER
BEVEL CROSS CUT
MITER GAUGE
STRAIGHT
BLADE
ANGLED
TO
TIGHTEN
TO
LOOSEN
Fig. 40
MAKING A BEVEL RIP CUT
See Figure 42.
WARNING:
Make sure the blade guard assembly is installed and
working properly to avoid serious personal injury.
WARNING:
The rip fence must be on the right side of the blade to
avoid trapping the wood and causing kickback. Placement of the rip fence to the left of the blade will result in
kickback and the risk of serious personal injury.
Remove the miter gauge.
Unlock the bevel locking lever.
Adjust the bevel angle to the desired setting.
Fig. 41
Lock the bevel locking lever.
Set the blade to the correct depth for the workpiece.
Position the rip fence the desired distance from the blade
for the cut and securely lock the handle.
Make sure the wood is clear of the blade before turning
on the saw.
When ripping a long workpiece, place a support the same
height as the table surface behind the saw for the cut
work.
Turn the saw on.
31
Page 32
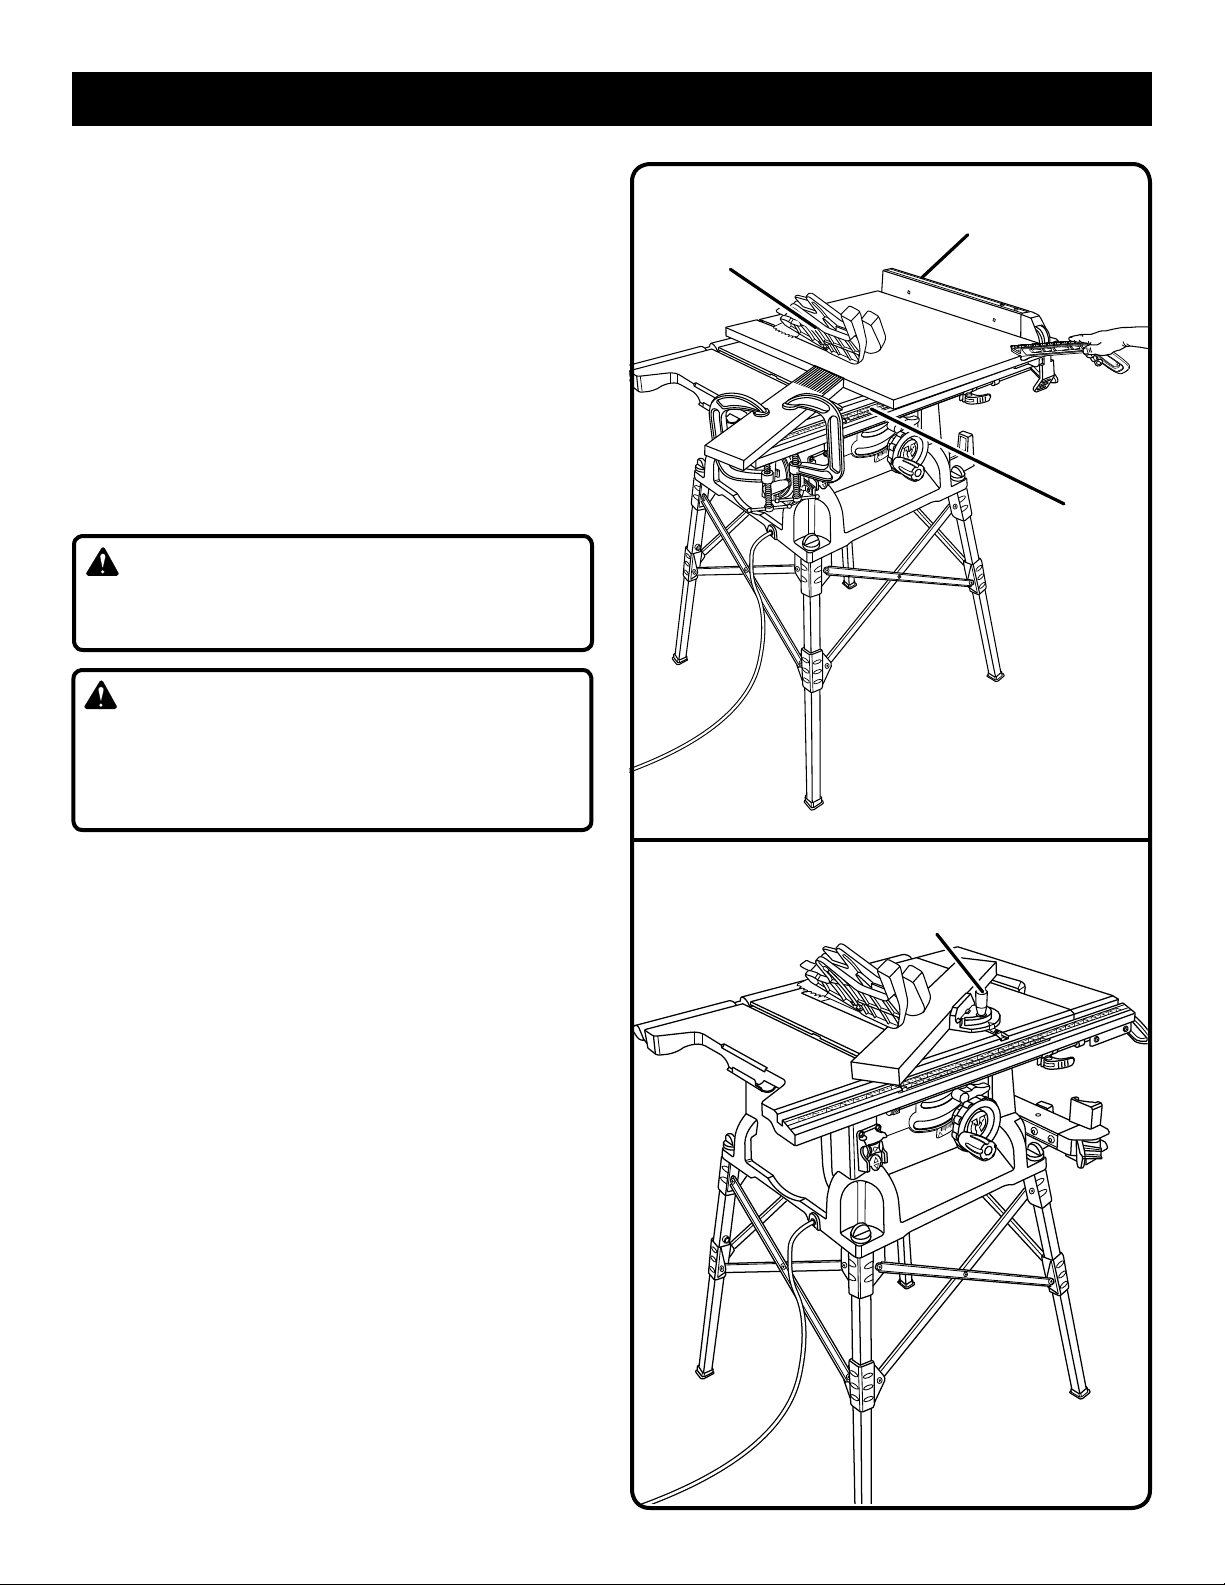
OPERATION
Position the workpiece flat on the table with the edge
flush against the rip fence. Let the blade build up to full
speed before feeding the workpiece into the blade.
Once the blade has made contact with the workpiece, use
the hand closest to the rip fence to guide it. Make sure
the edge of the workpiece remains in solid contact with
both the rip fence and the surface of the table. If ripping
a narrow piece, use a push stick and/or push blocks to
move the piece through the cut and past the blade.
When the cut is made, turn the saw off. Wait for the
blade to come to a complete stop before removing the
workpiece.
MAKING A COMPOUND (BEVEL) MITER CUT
See Figure 43.
WARNING:
Make sure the blade guard assembly is installed and
working properly to avoid possible serious injury.
WARNING:
The miter gauge must be on the right side of the blade to
avoid trapping the wood and causing kickback. Placement of the miter gauge to the left of the blade will result
in kickback and the risk of serious personal injury.
BEVEL RIP CUT
RIP FENCE
BLADE
ANGLED
SCALE
Fig. 42
Remove the rip fence.
Unlock the bevel locking lever.
Adjust the bevel angle to the desired setting.
Lock the bevel locking lever.
Set the blade to the correct depth for the workpiece.
Set the miter gauge to the desired angle and tighten the
lock knob.
Make sure the wood is clear of the blade before turning
on the saw.
Turn the saw on.
Let the blade build up to full speed before moving the
workpiece into the blade.
Hold the workpiece firmly with both hands on the miter
gauge and feed the workpiece into the blade.
NOTE: The hand closest to the blade should be placed
on the miter gauge lock knob and the hand farthest from
the blade should be placed on the workpiece.
When the cut is made, turn the saw off. Wait for the
blade to come to a complete stop before removing the
workpiece.
COMPOUND (BEVEL) MITER CUT
PLACE LEFT HAND ON MITER
GAUGE HERE
32
Fig. 43
Page 33
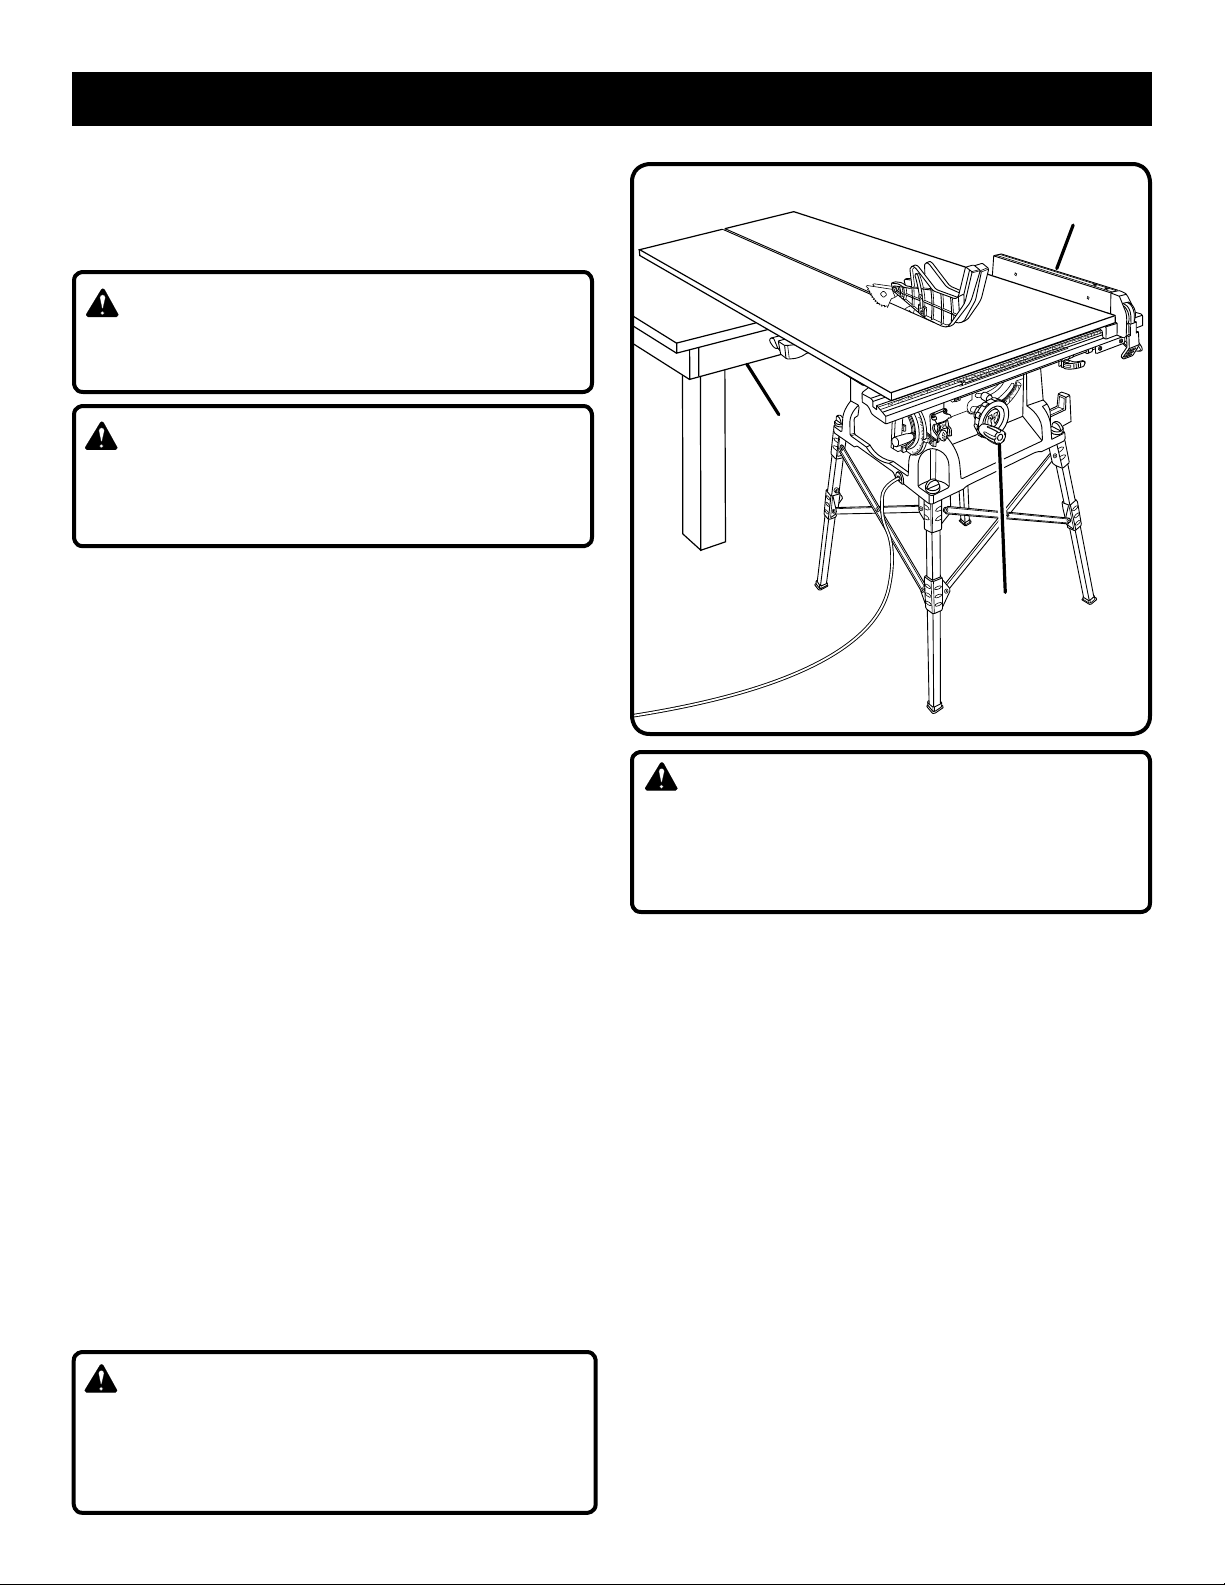
OPERATION
MAKING A LARGE PANEL CUT
See Figure 44.
Make sure the saw is properly secured to a work surface to
avoid tipping from the weight of a large panel.
WARNING:
Make sure the blade guard assembly is installed and
working properly to avoid possible serious injury.
WARNING:
Never make freehand cuts (cuts without the miter gauge
or rip fence). Unguided workpieces can result in serious
injury.
Place a support the same height as the top of the saw
table behind the saw for the cut work. Add supports to
the sides as needed.
Depending on the shape of the panel, use the rip fence
or miter gauge. If the panel is too large to use either the
rip fence or the miter gauge, it is too large for this saw.
Make sure the wood does not touch the blade before
you turn on the saw.
Turn the saw on.
Position the workpiece flat on the table with the edge
flush against the rip fence. Let the blade build up to full
speed before feeding the workpiece into the blade.
Use a push stick to move the piece through the cut and
past the blade.
When the cut is made, turn the saw off. Wait for the
blade to come to a complete stop before removing the
workpiece.
MAKING A NON-THROUGH CUT
See Figure 45.
Non-through cuts (made with a standard 10 in. blade) can be
made with the grain (ripping) or across the grain (cross cut).
The use of a non-through cut is essential to cutting grooves,
rabbets, and dadoes. This is the only type cut that is made
without the blade guard assembly installed. Make sure the
blade guard assembly is reinstalled upon completion of this
type of cut. Read the appropriate section which describes
the type of cut in addition to this section on non-through or
dado cuts. For example, if your non-through cut is a straight
cross cut, read and understand the section on straight cross
cuts before proceeding.
WARNING:
When making a non-through cut, the blade is covered
by the workpiece during most of the cut. Be alert to
the exposed blade at the start and finish of every cut to
reduce the risk of personal injury.
LARGE PANEL CUT
RIP FENCE
SUPPORT
HEIGHT/BEVEL
ADJUSTING
HANDWHEEL
Fig. 44
WARNING:
Never feed wood with your hands when making any
non-through cut such as rabbets or dadoes. To avoid
personal injury, always use push blocks, push sticks,
and featherboards.
Unplug the saw.
Remove the blade guard and anti-kickback pawls.
Place riving knife in “down” position.
Unlock the bevel locking lever.
Adjust the bevel angle to 0°.
Lock the bevel locking lever.
Set the blade to the correct depth for the workpiece.
Depending on the shape and size of the wood, use
either the rip fence or miter gauge.
Plug the saw into the power source and turn the saw
on.
Let the blade build up to full speed before moving the
workpiece into the blade.
Always use push blocks, push sticks, and/or feather-
boards when making non-through cuts to reduce the
risk of serious injury.
When the cut is made, turn the saw off. Wait for the
blade to come to a complete stop before removing the
workpiece.
Once all non-through cuts are completed:
Unplug your saw.
Reinstall the riving knife in the “up” position then install
the blade guard and anti-kickback pawls.
33
Page 34
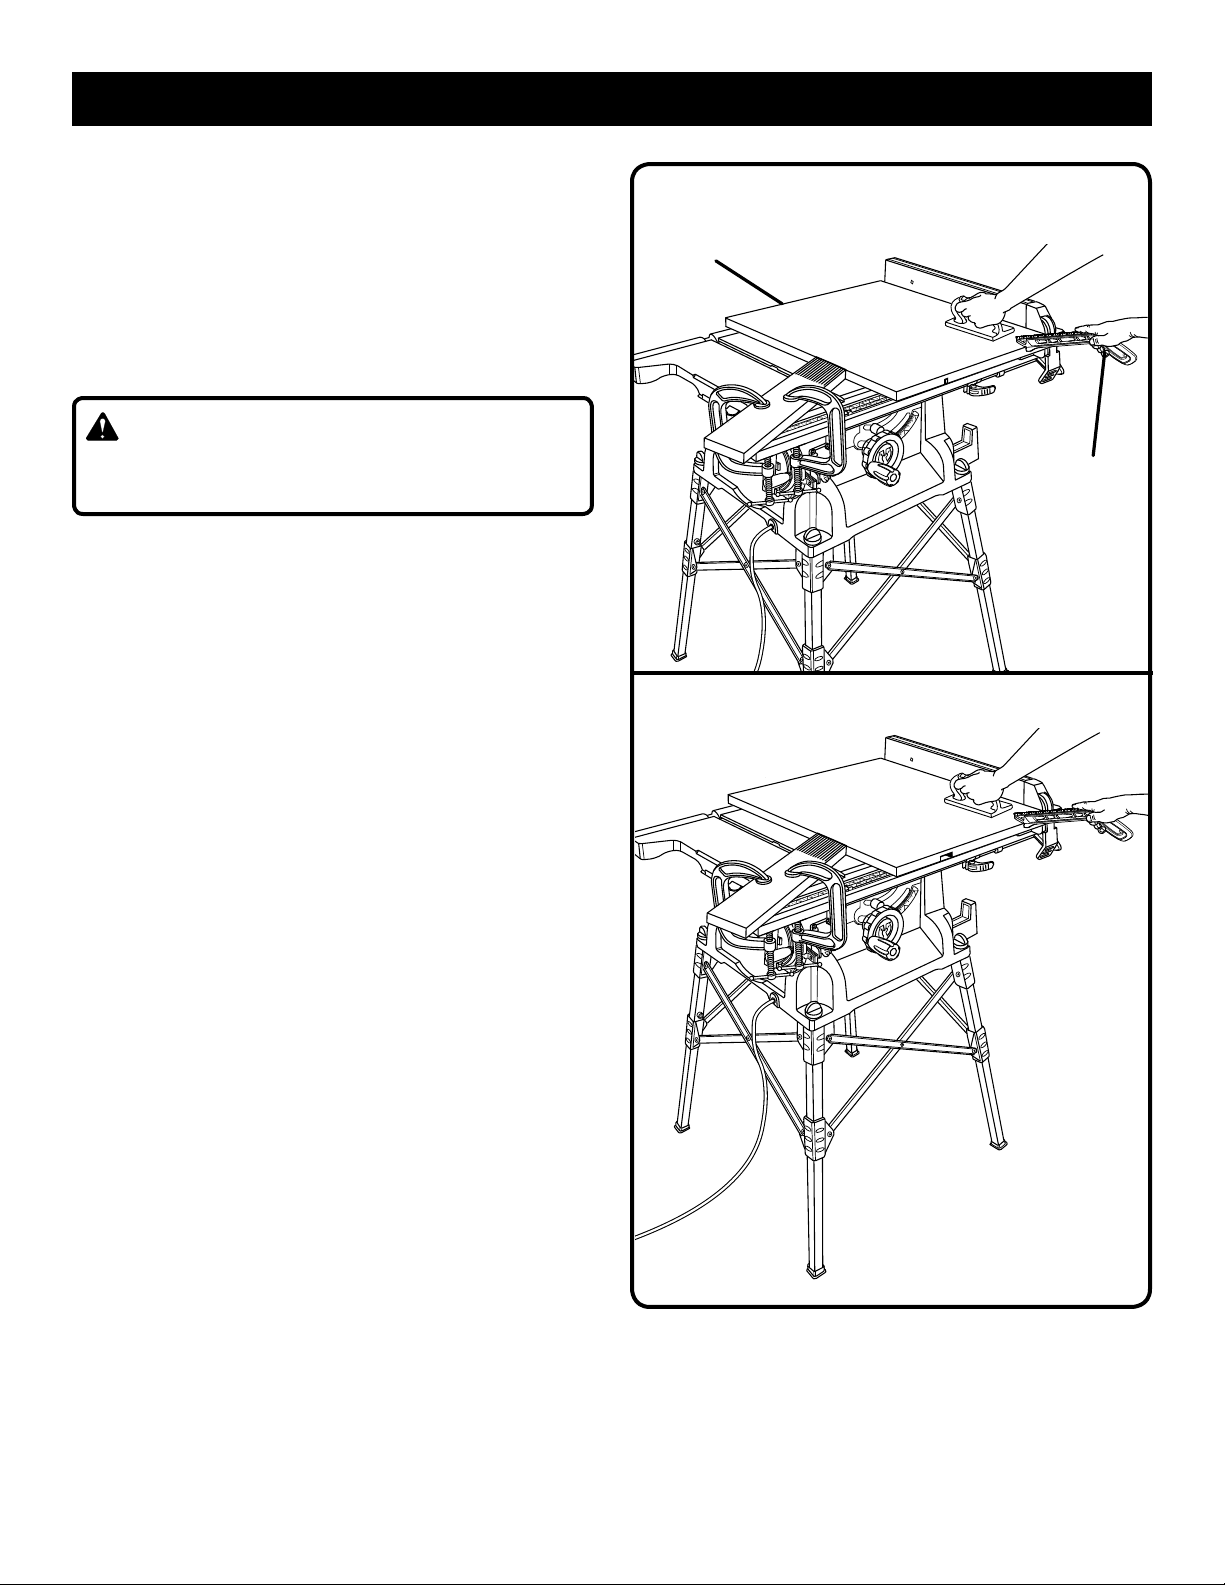
OPERATION
MAKING A DADO CUT
See Figure 46.
An optional dado throat plate is required for this procedure
(see the Accessories section of this manual and check with
the retailer where the table saw was purchased). All blades
and dado sets must not be rated less than the speed of this
tool. This saw is designed for use with a 6 in. stack dado
(up to width of 1/2 in.). Do not use an adjustable dado or
molding cutters on this saw.
WARNING:
Always use push blocks, push sticks, and/or featherboards
when making dado cuts to avoid the risk of serious injury.
Unplug the saw.
Remove the blade guard, anti-kickback pawls, throat
plate, and riving knife.
Remove the blade nut, blade washer, and saw blade.
NOTE: Always store the blade washer and throat plate
in a secure location.
Mount the dado blade, according to manufacturer
instructions, using the blade and chippers appropriate
for the desired width of cut.
Reinstall the blade nut.
NOTE: The blade washer may be used provided the arbor
shaft extends slightly beyond the arbor nut.
Make sure the blade nut is fully engaged and the arbor
extends past a securely tightened blade nut.
Place release lever in locked position.
Install the dado throat plate and rotate the blade by hand
to make sure it turns freely then lower the blade.
Depending on the shape and size of the wood, use either
the rip fence or miter gauge.
Turn the saw on.
NOTE: Make sure the wood does not touch the blade
before you turn on the saw. Let the blade build up to full
speed before feeding the workpiece into the blade.
Position the workpiece flat on the table with the edge
flush against the rip fence or miter gauge and hold firmly
against the saw table.
Use a push block or push stick to move the wood through
the cut past the blade. Never push a small piece of wood
into the blade with your hand, always use a push stick.
The use of push blocks, push sticks, and featherboards
are necessary when making non-through cuts.
When the cut is made, turn the saw off. Wait for the
blade to come to a complete stop before removing the
workpiece.
Once all dado cuts are completed:
Unplug your saw.
Reinstall the riving knife in the “up” position then install
the blade guard and anti-kickback pawls.
NON-THROUGH CUT
BLADE GUARD
REMOVED
PUSH
STICK
Fig. 45
DADO CUT
Fig. 46
34
Page 35
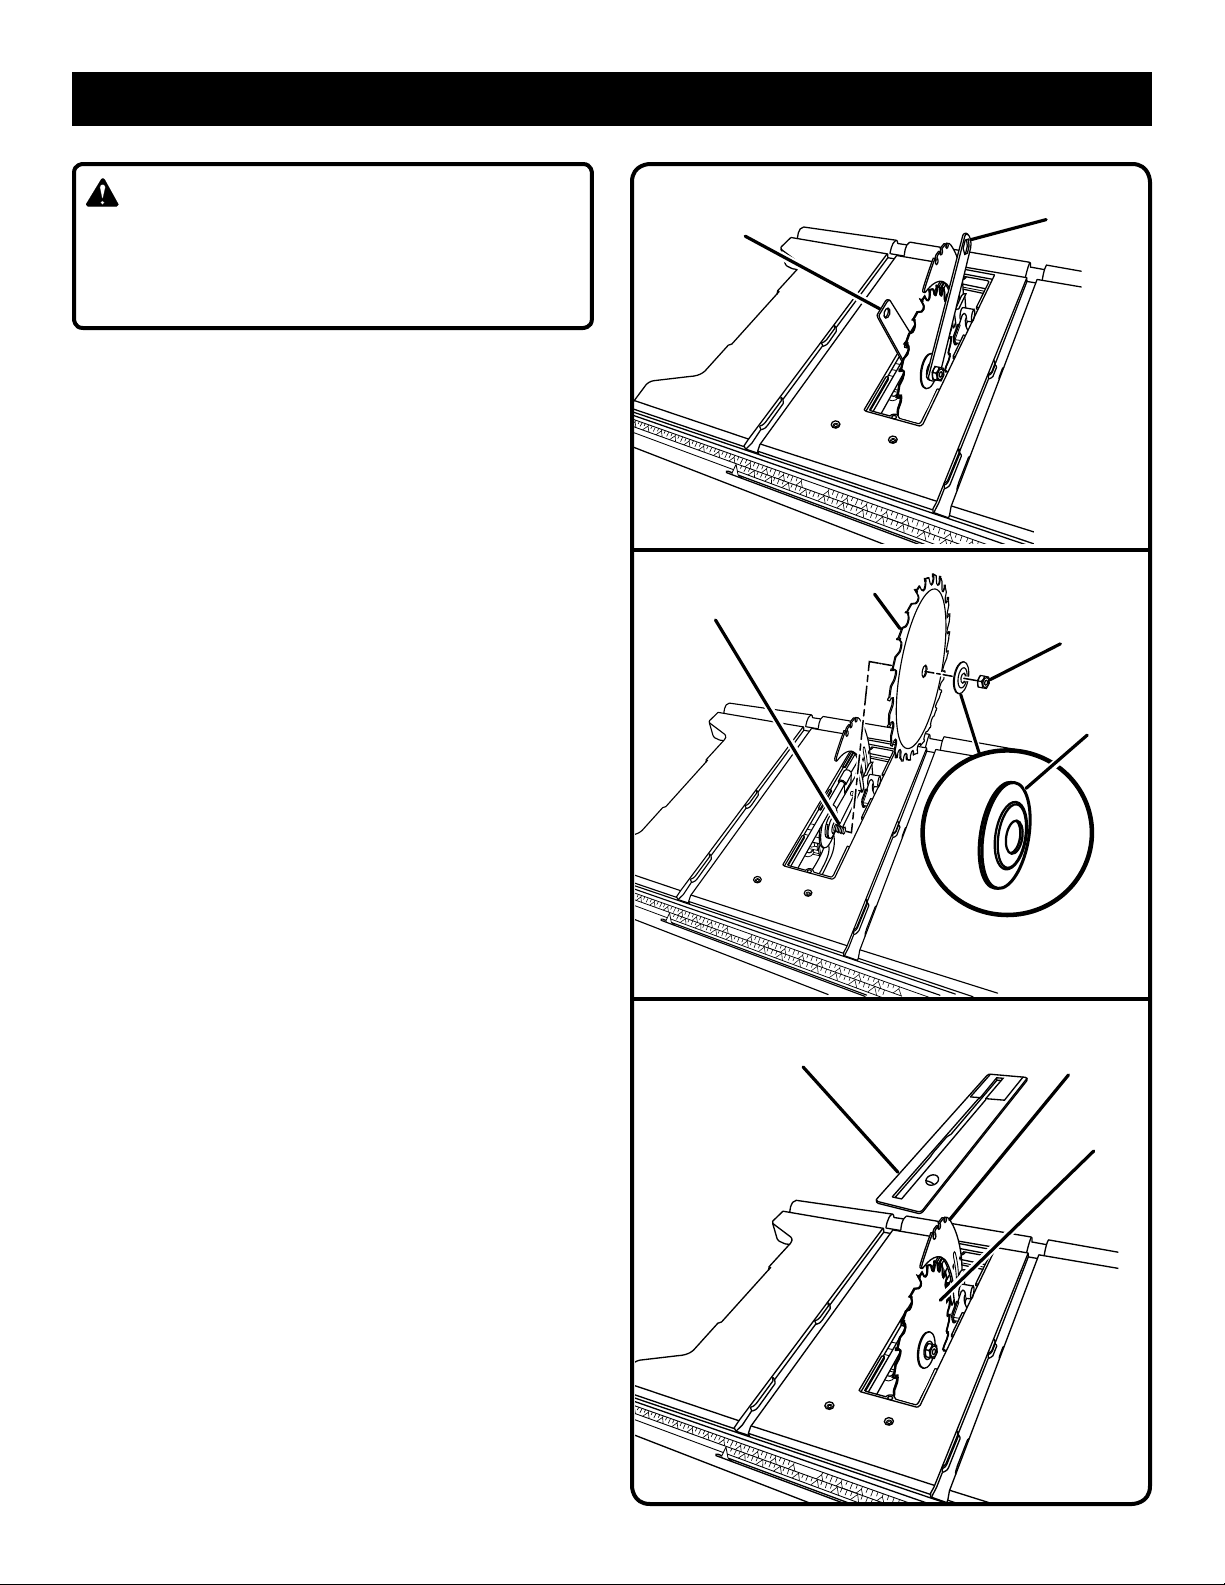
ADJUSTMENTS
WARNING:
Before performing any adjustment, make sure the tool is
unplugged from the power supply and the switch is in the
OFF position. Failure to heed this warning could result in
serious personal injury.
The table saw has been adjusted at the factory for making
very accurate cuts. However, some of the components might
have been jarred out of alignment during shipping. Also,
over a period of time, readjustment will probably become
necessary due to wear.
To avoid unnecessary set-ups and adjustments, a good practice is to check your setups carefully with a framing square
and make practice cuts in scrap wood before making finish
cuts in good workpieces. Do not start any adjustments until
you have checked with a square and made test cuts to be
sure adjustments are needed.
TO REPLACE THE BLADE
See Figures 47 - 49.
Blade kerf width must be within the limits stamped on the
riving knife.
Unplug the saw.
Remove the blade guard and anti-kickback pawls.
Lower the saw blade and remove the throat plate.
Make sure the bevel locking lever is locked.
Raise the saw blade to full height.
Insert the open end of the blade wrench onto the flats on
the arbor shaft.
Insert the closed end of the blade wrench over the blade
nut. Holding both wrenches firmly, pull the outside wrench
(right side) forward while pushing the inside (left side) to
the back of the saw. Remove the blade nut and blade
washer.
Unlock the release locking lever and remove the blade.
To install a standard blade:
Place the new blade on the arbor shaft (the teeth
must point down toward the front of the saw to work
properly).
Place the blade washer and the blade nut over the arbor
shaft. Be sure the flat side of the blade washer faces
the blade and that all items are snug against the arbor
housing. Make sure the blade nut is securely tightened.
Do not overtighten.
Lock the release lever.
Rotate the blade by hand to make sure it turns freely.
Lower the saw blade and reinstall the throat plate.
NOTE: To replace the blade with an accessory blade, follow
the instructions provided with the accessory.
BLADE
WRENCH
ARBOR
SHAFT
THROAT
PLATE
BLADE
WRENCH
Fig. 47
BLADE
BLADE
NUT
BLADE
WASHER
Fig. 48
RIVING
KNIFE
BLADE
35
Fig. 49
Page 36
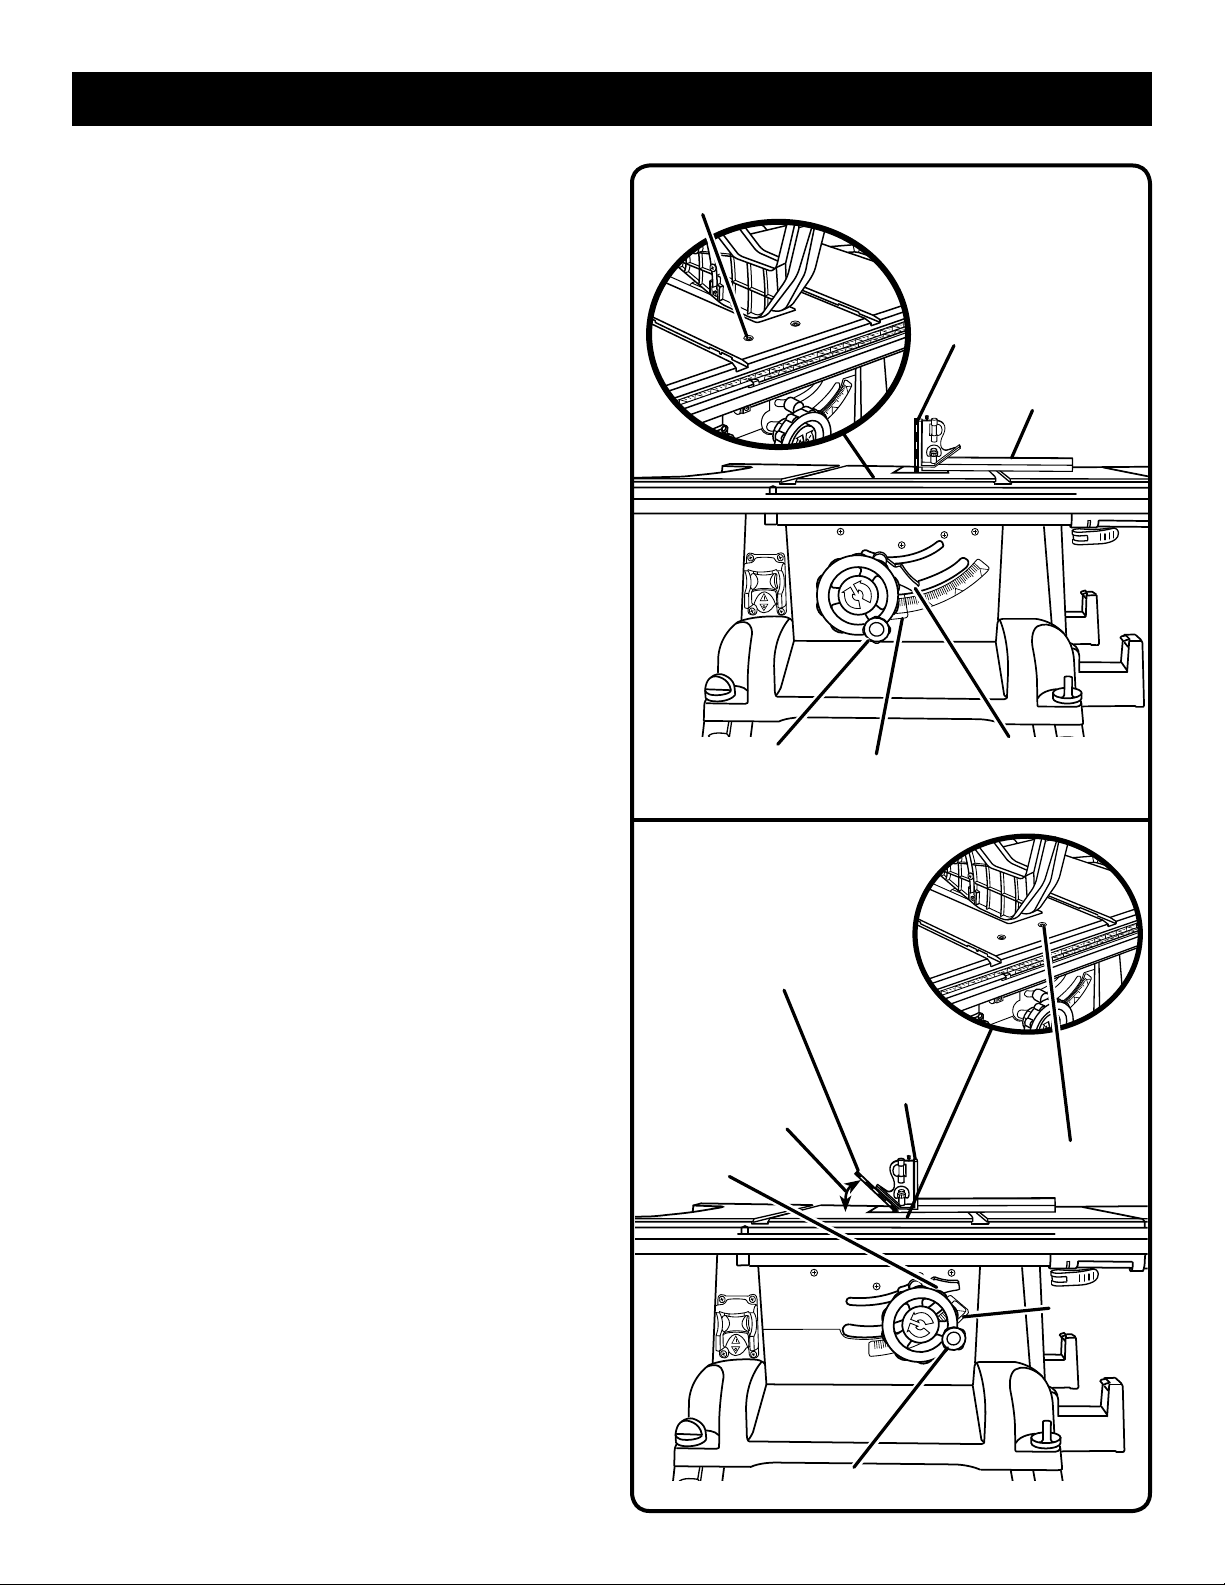
ADJUSTMENTS
TO SET THE BLADE AT 0° AND 45°
See Figures 50 - 51.
The angle settings of the saw have been set at the factory
and, unless damaged in shipping, should not require setting during assembly. After extensive use, they may need
to be checked.
Unplug the saw.
Raise the blade.
Remove the blade guard assembly.
If the blade is not perfectly vertical (0°):
Unlock the bevel locking lever.
Loosen the 0° adjustment screw.
Place a combination square beside the blade on the
right. The edge of the square and the saw blade should
be parallel.
NOTE: Make sure that the square contacts the flat part
of the saw blade, not the blade teeth.
Lock the bevel locking lever.
Tighten the adjustment screw. Check again for
squareness and continue to adjust if needed.
If the blade is not an exact 45°:
Unlock the bevel locking lever.
Loosen the 45° adjustment screw.
Place a combination square beside the blade on the
right. The edge of the square and the saw blade should
be parallel.
NOTE: Make sure that the square contacts the flat part
of the saw blade, not the blade teeth.
Lock the bevel locking lever.
Tighten the adjustment screw. Check again for
squareness and continue to adjust if needed.
If needed, adjust the bevel indicator to 45°.
Make a test cut.
The adjustment screws must be below the saw table surface
so the workpiece doesn’t catch on uneven edges. If unable
to make this adjustment, take the product to an authorized
service center.
0° ADJUSTMENT
SCREW
HANDLE
BLADE
BEVEL
LOCKING
LEVER
45°
BEVEL
INDICATOR
COMBINATION
SQUARE
BLADE
COMBINATION
SQUARE
BEVEL
LOCKING
LEVER
45° ADJUSTMENT
Fig. 50
SCREW
36
HANDLE
BEVEL
INDICATOR
Fig. 51
Page 37
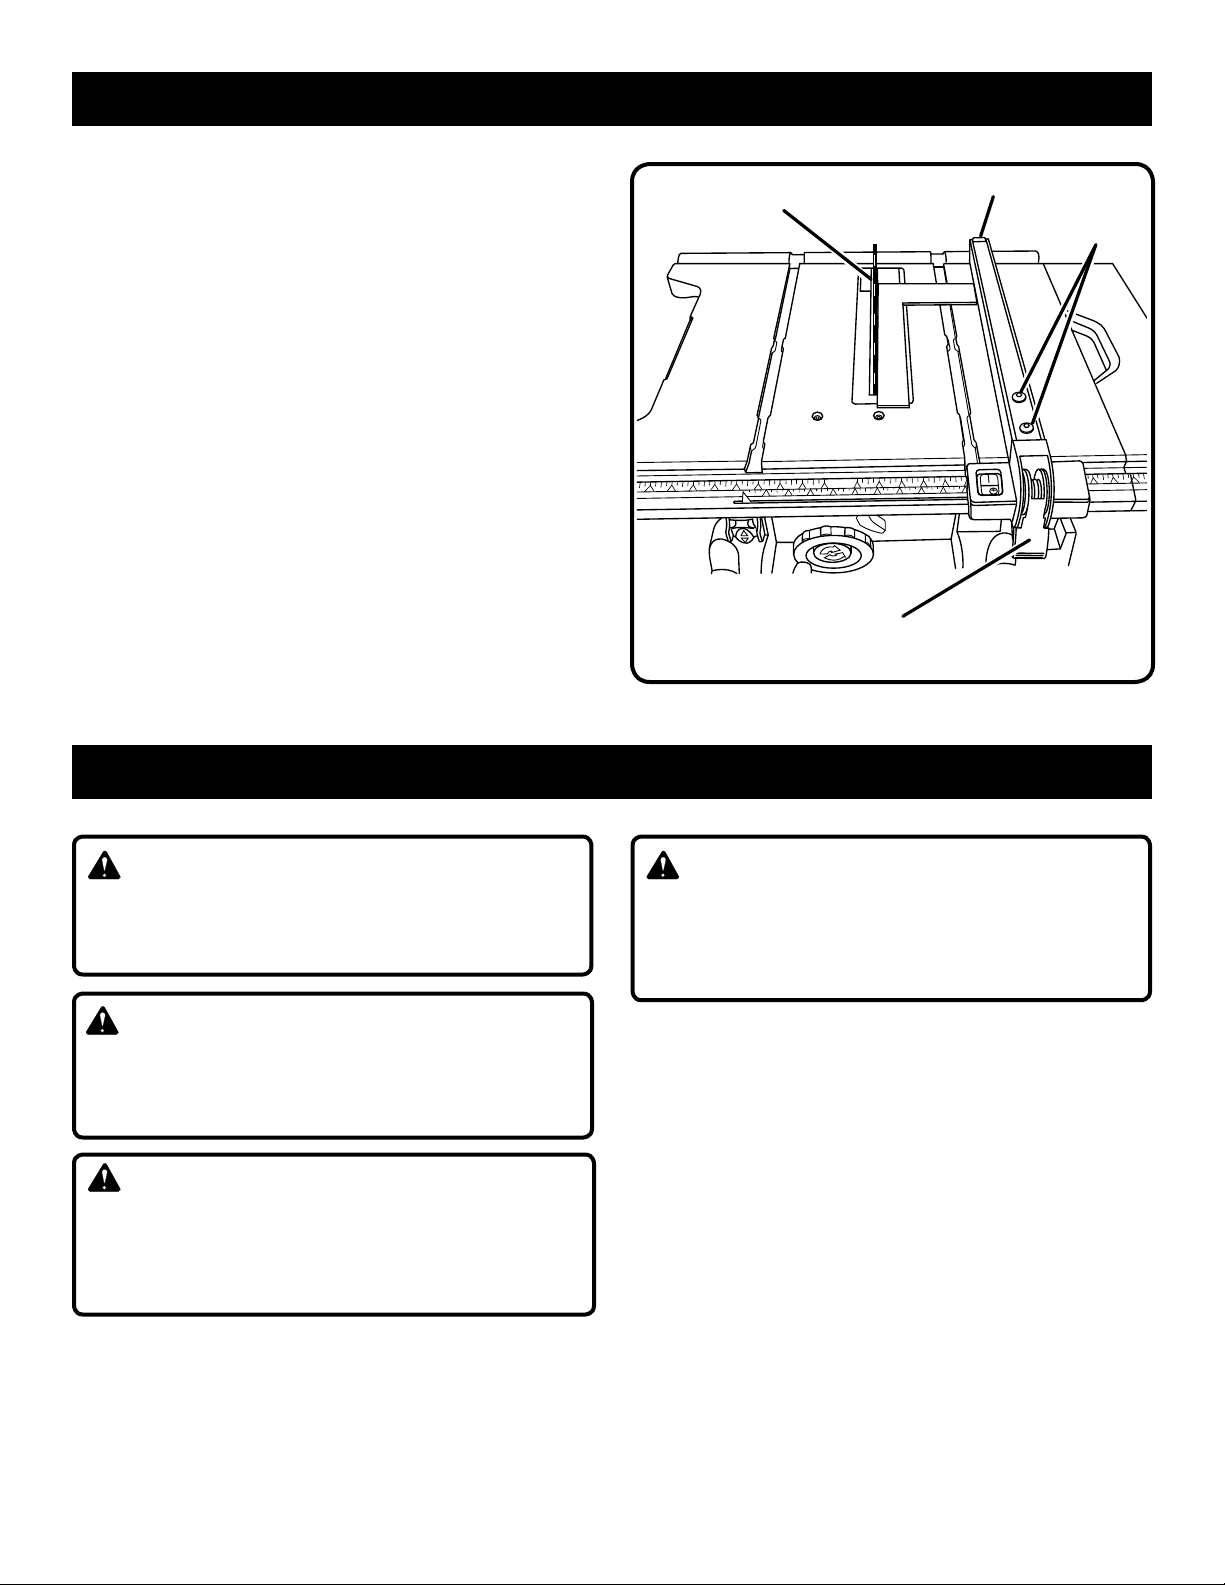
ADJUSTMENTS
TO CHECK THE ALIGNMENT OF THE RIP FENCE
TO THE BLADE
See Figure 52.
Unplug the saw.
Raise the locking lever to permit the rip fence to be
moved.
Place a framing square beside the blade and move the
rip fence up to the square. Take the dimension on the rip
scale.
Move the fence back and turn the framing square 180°
to check the other side.
If the two dimensions are not the same, loosen the two
bolts on the fence and align it.
Retighten the two bolts.
Make two or three test cuts on scrap wood. If the cuts
are not true, repeat the process.
BLADE
RIP FENCE
BOLTS
LOCKING
LEVER
Fig. 52
MAINTENANCE
WARNING:
When servicing, use only identical replacement parts.
Use of any other parts may create a hazard or cause
product damage.
WARNING:
Always wear eye protection with side shields marked
to comply with ANSI Z87.1 during product operation. If
operation is dusty, also wear a dust mask.
WARNING:
Before performing any maintenance, make sure the tool
is unplugged from the power supply and the switch is in
the off ( O ) position. Failure to heed this warning could
result in serious personal injury.
GENERAL MAINTENANCE
Avoid using solvents when cleaning plastic parts. Most
plastics are susceptible to damage from various types of
commercial solvents and may be damaged by their use. Use
clean cloths to remove dirt, dust, oil, grease, etc.
WARNING:
Do not at any time let brake fluids, gasoline, petroleumbased products, penetrating oils, etc., come in contact
with plastic parts. Chemicals can damage, weaken, or
destroy plastic which may result in serious personal injury.
Periodically check all clamps, nuts, bolts, and screws for
tightness and condition. Make sure the throat plate is in
good condition and in position.
Check the blade guard assembly.
To maintain the table surfaces, fence, and rails,
periodically apply paste wax to them and buff to provide
smooth functioning.
Protect the blade by cleaning out sawdust from
underneath the table and in the blade teeth. Use a resin
solvent on the blade teeth.
Clean plastic parts only with a soft damp cloth. DO
NOT use any aerosol or petroleum solvents.
LUBRICATION
All of the bearings in this tool are lubricated with a sufficient
amount of high grade lubricant for the life of the unit under
normal operating conditions. Therefore, no further lubrication is required.
37
Page 38
ACCESSORIES
The following recommended accessories are currently available at retail stores:
089037011021 Dado Throat Plate
WARNING:
Current attachments and accessories available for use with this tool are listed above. Do not use any attachments or
accessories not recommended by the manufacturer of this tool. The use of attachments or accessories not recommended
can result in serious personal injury.
TROUBLESHOOTING
PROBLEM CAUSE SOLUTION
Excess vibration.
Rip fence does not move
smoothly.
Rip fence does not lock at
rear.
Cutting binds or burns work.
Blade is out of balance.
Blade is damaged.
Saw is not mounted securely.
Work surface is uneven.
Blade is warped.
Rip fence not mounted correctly.
Rails are dirty or sticky.
Clamp screw is out of adjustment.
Clamp screw is out of adjustment.
Blade is dull.
Replace blade.
Replace blade.
Tighten all hardware.
Reposition on flat surface.
Adjust legs of optional stand.
Check saw blade installation. Replace blade if
necessary.
Remount the rip fence.
Clean and wax rails.
Adjust clamp screw counterclockwise.
Adjust clamp screw clockwise.
Replace or sharpen blade.
Wood edges away from rip
fence when ripping.
Blade is heeling.
Work is fed too fast.
Rip fence is misaligned.
Wood is warped.
Riving knife is out of alignment.
Blade not properly sharpened or set.
38
See page 28 on "Heeling the Blade".
Slow the feed rate.
Align the rip fence.
Replace the wood. Always cut with convex side
to table surface.
See “To check and align the riving knife and saw
blade” in the Assembly section.
Resharpen or set blade.
Page 39
TROUBLESHOOTING
PROBLEM CAUSE SOLUTION
Saw does not make accurate
90˚ or 45˚ cuts.
Height/bevel adjusting handwheel is hard to turn.
Saw does not start.
Blade makes poor cuts.
Positive stops inside cabinet need
adjusting (Bevel Cuts).
Miter gauge is misaligned (Miter
Cuts).
Gears or screw post inside
cabinet are clogged with saw
dust.
Motor cord or wall cord is not
plugged in.
Circuit fuse is blown.
Circuit breaker is tripped.
Cord or switch is damaged.
Blade is dull or dirty.
Blade is wrong type for cut being
made.
Blade is mounted backwards.
Adjust positive stops.
Adjust the miter gauge.
Clean the gears or screw post.
Plug in motor cord or wall cord.
Replace circuit fuse.
Reset circuit breaker.
Have the cord or switch replaced at your
nearest authorized service center.
Clean, sharpen, or replace blade.
Replace with correct type.
Remount blade.
Blade does not lower when
turning height/bevel adjusting
handwheel.
Motor labors in rip cut.
Locking lever is not at full left
position.
Blade not proper for rip cut.
Move locking lever to left.
Change blade; rip blade typically has fewer
teeth.
39
Page 40
OPERATOR’S MANUAL
10 in. TABLE SAW
RTS21/RTS21G
WARNING:
Some dust created by power sanding, sawing, grinding, drilling, and other construction activities contains
chemicals known to cause cancer, birth defects or other reproductive harm. Some examples of these
chemicals are:
• lead from lead-based paints,
• crystalline silica from bricks and cement and other masonry products, and
• arsenic and chromium from chemically-treated lumber.
Your risk from these exposures varies, depending on how often you do this type of work. To
reduce your exposure to these chemicals: work in a well ventilated area, and work with approved
safety equipment, such as those dust masks that are specially designed to filter out microscopic
particles.
• PARTS AND SERVICE
Prior to requesting service or purchasing replacement parts, please obtain your model
and serial number from the product data plate.
• MODEL NUMBER
• SERIAL NUMBER
• HOW TO OBTAIN REPLACEMENT PARTS:
Replacement parts can be purchased online at www.ryobitools.com or by calling
1-800-525-2579. Replacement parts can also be obtained at one of our Authorized
Service Centers.
• HOW TO LOCATE AN AUTHORIZED SERVICE CENTER:
Authorized Service Centers can be located online at www.ryobitools.com or by calling
1-800-525-2579.
• HOW TO OBTAIN CUSTOMER OR TECHNICAL SUPPORT:
To obtain Customer or Technical Support please contact us at 1-800-525-2579.
RYOBI is a registered trademark of Ryobi Limited and is used pursuant to a license granted by Ryobi Limited.
988000-930
12-6-13 (REV:04)
ONE WORLD TECHNOLOGIES, INC.
1428 Pearman Dairy Road, Anderson, SC 29625
Phone 1-800-525-2579
www.ryobitools.com
 Loading...