

Page 1
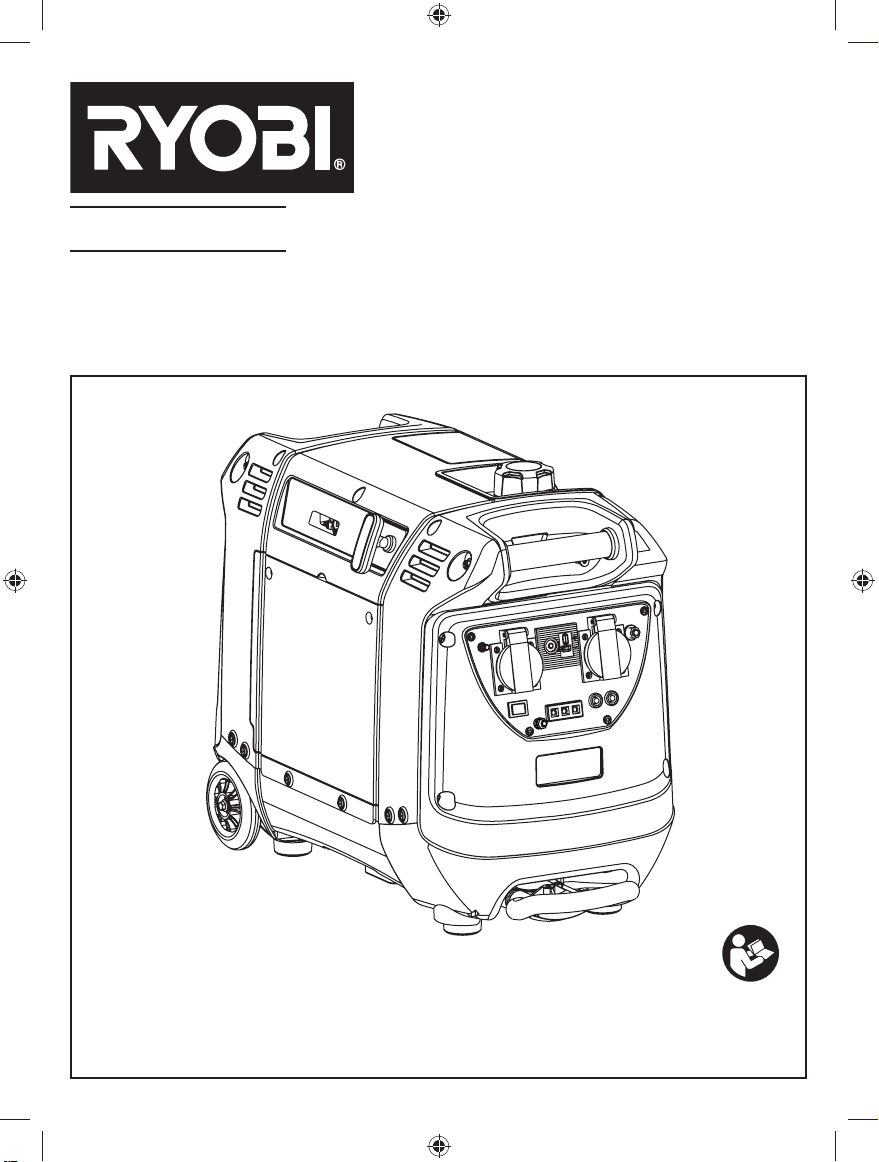
RIG2000PC
DIGITAL INVERTER GENERATOR
OPERATOR'S MANUAL (ORIGINAL INSTRUCTIONS)
Important! It is essential that you read the instructions in this manual before
assembling, maintaining and operating this machine.
Subject to technical modifications.
Page 2
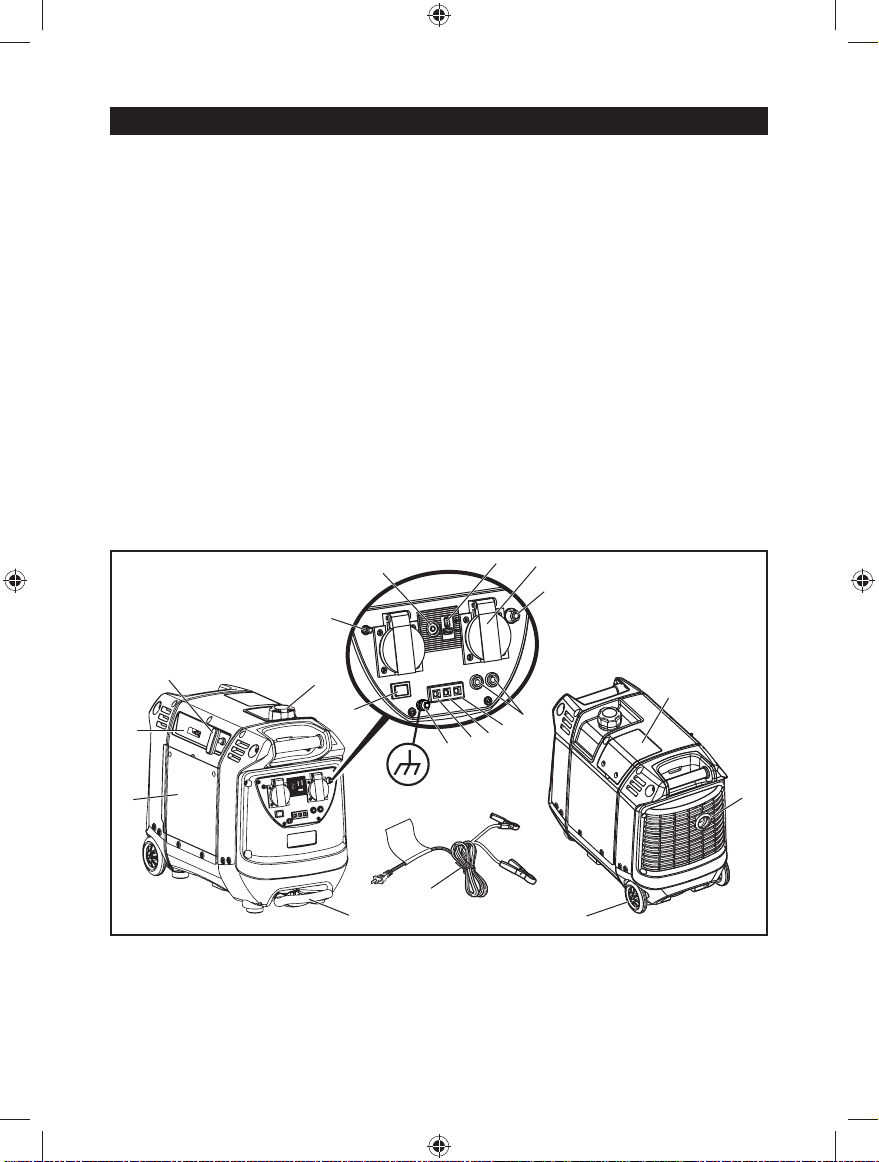
DESCRIPTION
1. Engine cover
2. Engine/choke lever/on-off switch/fuel valve lever
3. Starter grip and rope
4. Fuel cap
5. Parallel kit terminal
6. 10 Amp, AC circuit breaker
7. 240 Volt AC, 15 Amp receptacles
8. DC circuit breaker
9. 12 Volt DC receptacle
10. Auto idle switch
11. Power indicator
12. Overload indicator
13. Low oil indicator
14. Reset button
15. Ground terminal
16. Retractable handle
17. Battery charging cable
18. Spark plug cover
19. Muffl er with spark arrestor screen
8
14
3
2
4
10
20. Wheel
21. Funnel
22. Oil cap/dipstick
23. Off
24. On
25. Engine/choke lever in off position
26. Cold start position
27. Run position
28. Battery
29. Screw
30. Washer
31. Air fi lter cover
32. Filter element, large
33. Filter element, small
34. Container
35. Spark plug cap
36. Spark plug
37. Carburetor drain screw
9
7
6
5
13
12
11
15
18
1
17
16
20
19
Fig. 1
1
Page 3
21
22
13
12
Fig. 2
11
21
4
Fig. 3
23
Fig. 4
25
26
27
24
10
Fig. 5
3
Fig. 6 Fig. 7
2
Page 4
9
17
29
30
28
Fig. 8
Fig. 9
32
31
1
29
33
Fig. 10
3
Fig. 11
Page 5
18
35
36
30
29
34
4
22
Fig. 12
34
Fig. 14
Fig. 13
37
Fig. 15
4
Page 6
INTRODUCTION
This product has many features for making its use
more pleasant and enjoyable. Safety, performance, and
dependability have been given top priority in the design
of this product, making it easy to maintain and operate.
DANGER
GROUNDING THE GENERATOR (See Figure 1)
In Australia and New Zealand, grounding of portable
generators is not recommended or required. Consult
with local electricians to determine grounding
requirements before operating with a ground
connection.
IMPORTANT SAFETY INSTRUCTIONS
DANGER:
Carbon Monoxide. Using a generator indoors
can kill you in minutes.
Generator exhaust contains high levels of carbon
monoxide (CO), a poisonous gas you cannot see
or smell. If you can smell the generator exhaust,
you are breathing CO. But even if you cannot
smell the exhaust, you could be breathing CO.
Never use a generator inside homes, garages,
crawlspaces, or other partly enclosed areas.
Deadly levels of carbon monoxide can build
up in these areas. Using a fan or opening
windows and doors does NOT supply enough
fresh air.
Only use a generator outdoors and far away
from open windows, doors, and vents. These
openings can pull in generator exhaust.
Even when you use a generator correctly, CO
may leak into the home. ALWAYS use a batterypowered or battery-backup CO alarm in the
home.
If you start to feel sick, dizzy, or weak after the
generator has been running, move to fresh air
RIGHT AWAY. See a doctor. You could have
carbon monoxide poisoning.
WARNING:
Read and understand all instructions. Failure
to follow all instructions listed below may result
in electrocution, fire, and/or carbon monoxide
poisoning, which will cause death or serious
injury.
WARNING:
Before using the ground terminal, consult a
qualified electrician to comply with the intended
use of the generator.
SAVE THESE INSTRUCTIONS
This manual contains important instructions that should
be followed during installation and maintenance of the
generator and batteries.
Do not connect to a building’s electrical system unless
the generator and transfer switch have been properly
installed and the electrical output has been verifi ed by
a qualifi ed electrician. The connection must isolate the
generator power from utility power and must comply
with all applicable laws and electrical codes.
Do not allow children or untrained individuals to use
this unit.
Do not start or operate the engine in a confi ned space,
building, near open windows, or in other unventilated
space where dangerous carbon monoxide fumes can
collect. Carbon monoxide, a colorless, odorless, and
extremely dangerous gas, can cause unconsciousness
or death.
Never start or run the engine inside a closed or partially
enclosed area. Breathing exhaust fumes will kill you.
Wear eye protection as well as hearing protection when
operating this equipment.
Keep all bystanders, children, and pets at least 3 m
away.
Wear sturdy and dry shoes or boots. Do not operate
while barefoot.
Do not operate the generator when you are tired or
under the infl uence of drugs, alcohol, or medication.
Keep all parts of your body away from any moving parts
and all hot surfaces of the unit.
Product users in some states, must comply with fi re
prevention regulations. This product is equipped
with a spark arrestor in accordance with Australian
requirements.
Do not touch bare wire or receptacles.
Do not use the generator with electrical cords which
are worn, frayed, bare, or otherwise damaged.
Before storing, allow the engine to cool and drain fuel
from the unit.
Do not operate or store the generator in rain, snow, or
wet weather.
Store the generator in a well-ventilated area with the
fuel tank empty. Fuel should not be stored near the
generator.
Empty the fuel tank, turn the engine/choke lever to the
off position and restrain the unit from moving before
transporting in a vehicle.
Allow engine to cool for fi ve minutes before refuelling.
To reduce the risk of fi re and burn injury, handle fuel
with care. It is highly fl ammable.
Do not smoke while handling fuel.
Store fuel in a container approved for gasoline.
5
Page 7
Position the unit on level ground, stop engine, and allow
to cool before refuelling.
Loosen fuel cap slowly to release pressure and to keep
fuel from escaping around the cap.
Tighten the fuel cap securely after refuelling.
Wipe spilled fuel from the unit.
Never attempt to burn off spilled fuel under any
cir cum stanc es.
Use only authorised replacement parts and accessories
and follow instructions in the Maintenance section of
this manual. Use of unauthorised parts or failure to
follow Maintenance instructions may create a risk of
shock or injury.
Maintain the unit per maintenance instructions in this
Operator’s Manual.
Inspect the unit before each use for loose fas ten ers,
fuel leaks, etc. Replace damaged parts.
Generators vibrate in normal use. During and after the
use of the generator, inspect the generator as well as
extension cords and power supply cords connected to
it for damage resulting from vibration. Have damaged
items repaired or replaced as necessary. Do not use
plugs or cords that show signs of damage such as
broken or cracked insulation or damaged blades.
For power outages, permanently installed stationary
generators are better suited for providing back-up
power to the home. Even a properly connected portable
generator can become overloaded. This may result in
overheating or stressing the generator components,
possibly leading to generator failure.
Use only authorised replacement parts and accessories
and follow instructions in the Maintenance section of
this manual. Use of unauthorised parts or failure to
follow maintenance instructions may create a risk of
shock or injury.
Maintain the unit as per the maintenance instructions
in this operator’s manual.
Inspect the unit before each use for loose fasteners,
fuel leaks, etc. Replace damaged parts.
SPECIFIC SAFETY RULES
WARNING:
When this generator is used to supply a
building wiring system: the generator must be
installed by a qualified electrician and connected
to a transfer switch as a separately derived
system in accordance with Australian Wiring
Rules. The generator shall be connected through
a transfer switch that switches all conductors
other than the equipment grounding conductor.
The frame of the generator shall be connected
to an approved grounding electrode. Failure to
isolate the generator from power utility can result
in death or injury to electric utility workers.
Do not use this generator to provide power for
emergency medical equipment or life support
devices.
Exhaust fumes contains poisonous carbon
monoxide, a colourless, odourless gas. Breathing
exhaust fumes can cause loss of consciousness and
can lead to death. If running in a confined or partiallyenclosed area, the air may contain a dangerous
amount of carbon monoxide. To keep exhaust
fumes from building up, always provide adequate
ventilation.
Always use a battery-powered carbon monoxide
detector when running the generator. If you begin to
feel sick, dizzy, or weak while using the generator,
shut it off and get to fresh air immediately. See a
doctor. You may have carbon monoxide poisoning.
Place the generator on a flat, stable surface with a
slope of no more than 4°.
Operate outdoors in a well-ventilated, well-lit
area isolated from working areas to avoid noise
interference.
Operating the generator in wet conditions could
result in electrocution. Keep the unit dry.
Keep the generator a minimum of 1 m away from all
types of combustible material.
Do not operate the generator near hazardous
material.
Do not operate the generator at a petrol station.
Do not touch the muffler or cylinder during or
immediately after use; they are hot and will cause
burn injury.
This generator has a neutral floating condition.
This means the neutral conductor is not electrically
connected to the frame of the machine.
Do not connect to a building’s electrical system
unless a transfer switch has been properly installed
by a qualified electrician.
Do not allow the generator’s gas tank to overflow
when filling. Fill to 25 mm (1") below the top neck
of the gas tank to allow for fuel expansion. Do not
cover the fuel tank cap when the engine is running.
Covering the fuel tank cap during use may cause
engine failure and/or damage to the tool.
Do not smoke when filling the generator with
gasoline.
Allow the engine to remain in a shut-down condition
for at least five minutes before adding unleaded fuel
6
Page 8
or oil.
Do not remove the oil dipstick or the fuel tank cap
when the engine is running.
Pay close attention to all safety labels located on the
generator.
Keep children a minimum of 3 m away from the
generator at all times.
The product operates best in temperatures between
-5°C and 40°C with a relative humidity of 90% or
less.
Operating voltage and frequency requirement of
all electronic equipment should be checked prior
to plugging them into this generator. Damage may
result if the equipment is not designed to operate
within a ±10% voltage variation, and ±3 Hz frequency
variation from the generator name plate ratings.
The product is for outdoor use only.
Operation of the generator at altitudes above
1,000 m may require retuning. Consult a qualified
service technician.
When using extension lines or mobile distribution
networks the total length of lines for a cross section
of 1.5 mm2 should not exceed 60 m; for a cross
section of 2.5 mm2 this should not exceed 100 m.
The generating set must not be connected to other
power sources except another RIG2000PC with the
RIGPC1000 Parallel Cable (sold separately).
Save these instructions. Refer to them frequently and
use them to instruct others who may use this tool. If you
loan someone this tool, loan them these instructions
also.
7
Page 9
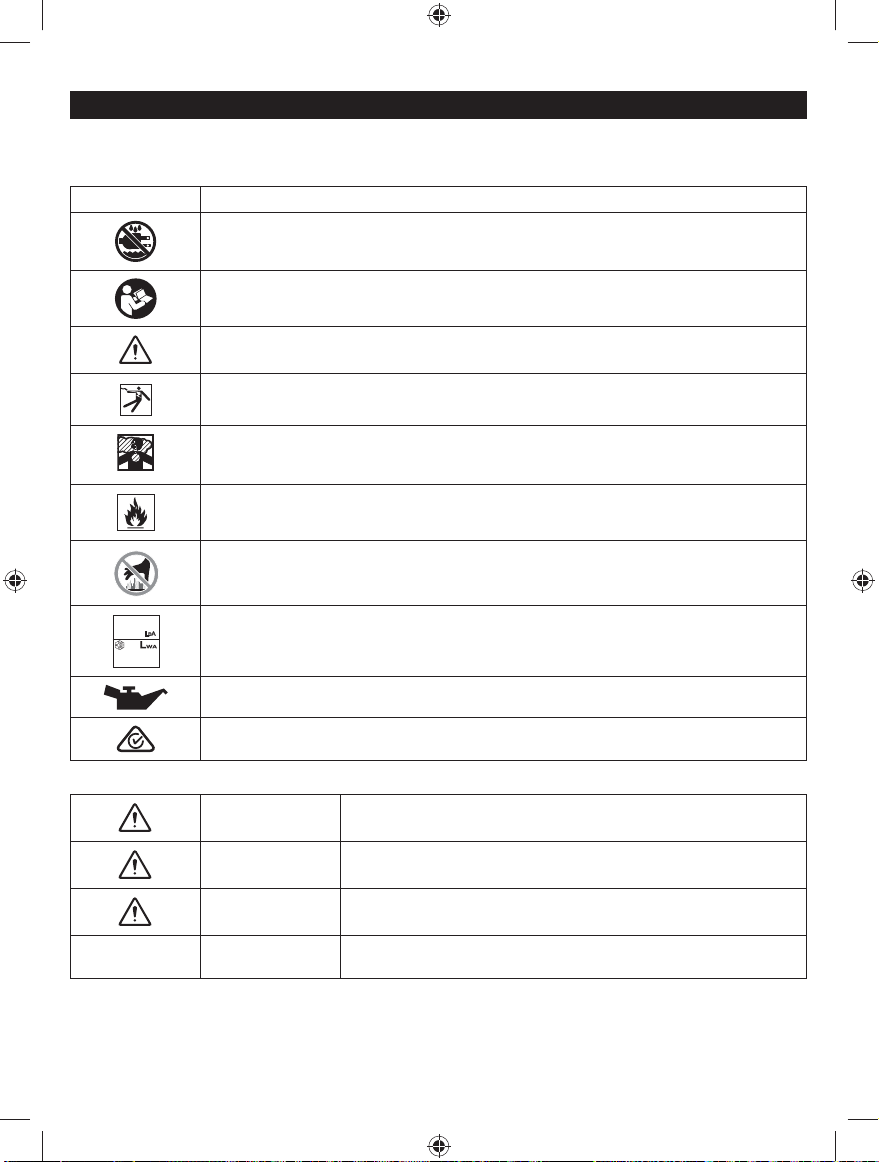
SYMBOLS
Some of the following symbols may be used on this tool. Please study them and learn their meaning.
Proper interpretation of these symbols will allow you to operate the tool better and safer.
SYMBOLS DESIGNATION/EXPLANATION
Do not expose to rain or use in damp locations.
To reduce the risk of injury, the user must read and understand the operator’s manual before
using this product.
Precautions that involve your safety.
Failure to use in dry conditions and to observe safe practices can result in electric shock.
Running the generator gives off carbon monoxide, an odourless, colourless, poison gas.
Breathing carbon monoxide can cause nausea, fainting, or death.
Fuel and its vapours are extremely fl ammable and explosive. Fire or explosion can cause
severe burns or death.
To reduce the risk of injury or damage, avoid contact with any hot surface.
67 dB
82 dB
Guaranteed sound power level is 82 dB.
Add oil.
Regulatory Compliance Mark (RCM). This product meets applicable regulatory requirements.
The following signal words and meanings are intended to explain the levels of risk associated with this product.
DANGER Indicates an imminently hazardous situation, which, if not avoided, will
WARNING Indicates a potentially hazardous situation, which, if not avoided, could
CAUTION Indicates a potentially hazardous situation, which, if not avoided, may result
CAUTION (Without Safety Alert Symbol) Indicates a situation that may result in
result in death or serious injury.
result in death or serious injury.
in minor or moderate injury.
property damage.
8
Page 10
SERVICE
Servicing requires extreme care and knowledge and should be performed only by a qualifi ed service technician. For service,
contact your nearest authorised service centre for repair. When servicing, use only original manufacturer’s replacement
parts, accessories and attachments.
WARNING:
Observe all normal safety precautions related to avoid electrical shock.
DANGER:
To avoid death or serious personal injury, do not attempt to operate this product until you read thoroughly and
understand completely the operator’s manual. If you do not understand the warnings and instructions in the operator’s
manual, do not use this product. Call your nearest authorised service centre for assistance.
WARNING:
The operation of any products can result in foreign objects being thrown into your eyes, which can result in
severe eye damage. Before beginning power tool operation, always wear safety goggles or safety glasses
with side shields and, when needed, a full face shield. We recommend Wide Vision Safety Mask for use over
eye glass es or standard safety glasses with side shields. Always wear eye protection.
SAVE THESE INSTRUCTIONS
9
Page 11
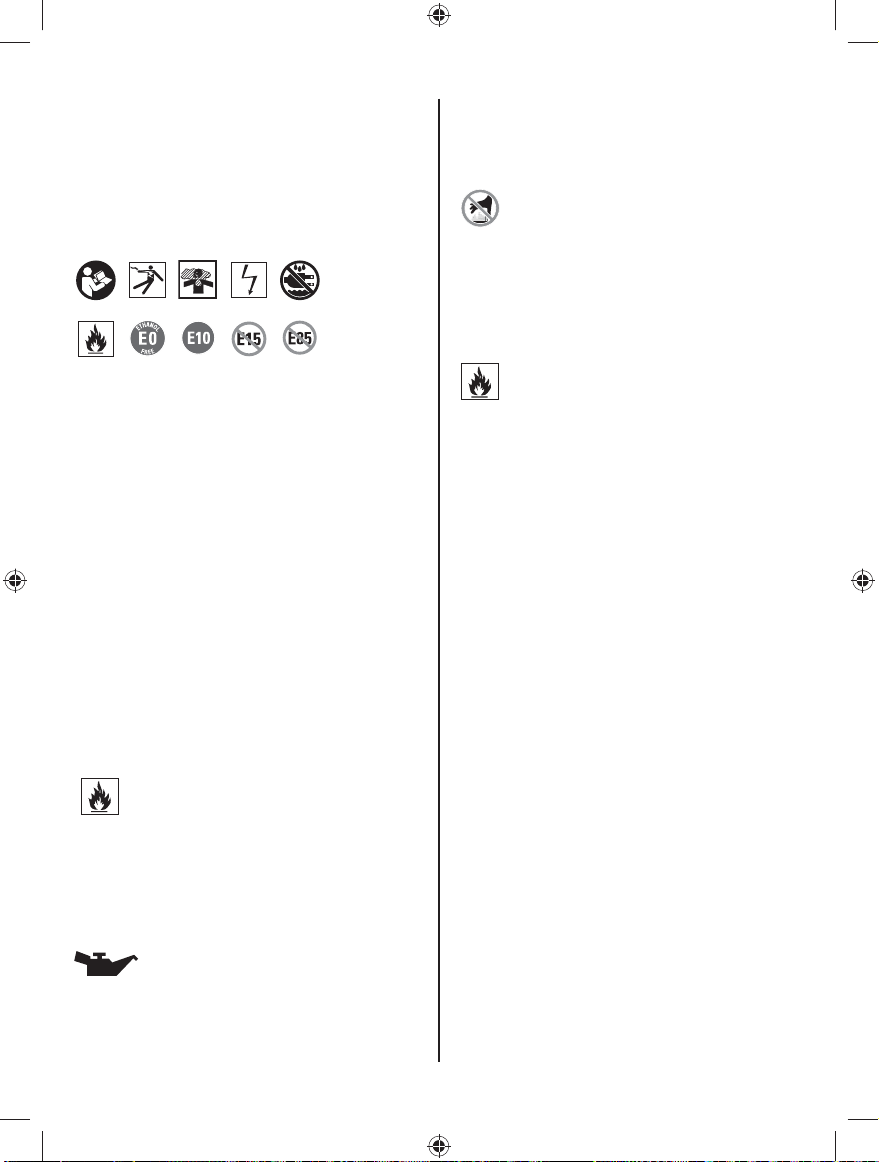
SAFETY LABELS
The information below can be found on the generator.
For your safety, please study and understand all of the
labels before starting the generator.
If any of the labels come off the unit or become hard
to read, contact the authorised service centre for
replacement.
■ You will be killed or seriously hurt if you do not follow
the operator’s manual instructions.
■ Risk of Fire. Do not add fuel while the product is
operating.
■ Generator is a potential source of electric shock. Do
not expose to moisture, rain, or snow. Do not operate
with wet hands or feet.
■ Exhaust contains poisonous carbon monoxide gas
that can cause unconsciousness or death. Operate
in well-ventilated, outdoor areas away from open
windows or doors.
■ Do not expose to rain or use in damp locations.
■ Using a generator indoors can kill you in minutes.
Generator exhaust contains carbon monoxide. This is
a poison you cannot see or smell.
■ Never use inside a home or garage, even if doors and
windows are open.
■ Only use outside and far away from windows, doors,
and vents.
■ Do not use E15 or E85 fuel (or fuel containing greater
than 10% ethanol) in this product.
FUEL WARNING
will automatically shut off the engine if oil level falls below
a safe limit.
HOT SURFACE WARNING
Do not touch the muffler or aluminium cylinder of the
engine. They are very HOT and will cause severe burns.
Don’t put any flammable or combustible materials in the
direct path of the exhaust.
CLEARANCE WARNING
While operating and before storing a hot unit, keep at least
1 m of clearance on all sides of this product, including
overhead. Allow a minimum of 30 minutes of “cool down”
time before storage. Heat created by the muffl er and exhaust
gases could be hot enough to cause serious burns and/or
ignite combustible objects.
No smoking when fi lling with unleaded fuel. Do not overfi ll.
Full level is 25 mm below the top of the fuel neck. Stop the
engine for fi ve minutes before refuelling to avoid the heat
from the muffl er igniting fuel vapours.
ENGINE LUBRICANT WARNING
You must add oil before first operating the generator.
Always check the oil level before each operation. The oil
level should always register within the hatched area on
the dipstick. The unit is equipped with an oil sensor which
10
Page 12
ELECTRICAL
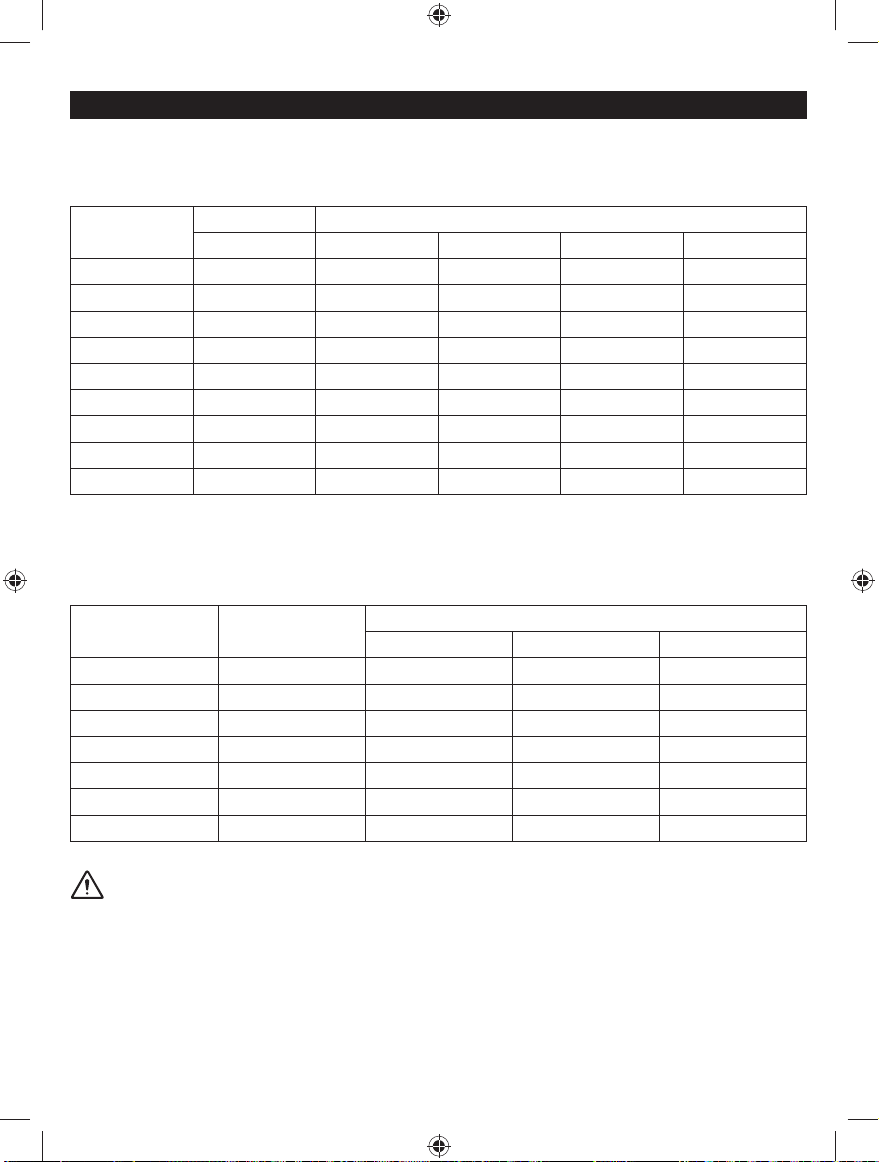
EXTENSION CORD CABLE SIZE
Refer to the table below to ensure the cable size of the extension cords you use are capable of carrying the required load.
Inadequate size cables can cause a voltage drop, which can damage the appliance and overheat the cord.
Current in
Amperes
2.5 600 300 m 180 m 120 m 75 m
5 1200 150 m 90 m 60 m 40 m
7.5 1800 100 m 60 m 40 m 30 m
10 2400 75 m 45 m 30 m 15 m
15 3600 45 m 30 m 20 m
20 4800 40 m 20 m
25 6000 30 m
30 7200 20 m
40 9600
ELECTRICAL MOTOR LOADS
It is characteristic of common electric motors in normal operation to draw up to six times their full load running current
while starting. This table may be used to estimate the watts required to start electric motors; however, if an electric motor
fails to start or reach running speed, turn off the appliance or tool immediately to avoid equipment damage. Always check
the requirements of the tool or appliance being used compared to the rated output of the generator.
Motor Size (H.P.) Running Watts
1/8 275 N/A 850 1200
1/6 275 600 850 2050
1/4 400 800 1050 2400
1/3 450 950 1350 2700
1/2 600 1000 1800 3600
3/4 850 1200 2600 -
1 1100 N/A 3300 -
Load in Watts Maximum Allowable Cord Length
At 240 V 6.0 mm² Wire 4.0 mm² Wire 1.5 mm² Wire 1.0 mm² Wire
Watts Required to Start Motor
Universal Capacitor Split Phase
CAUTION:
Operating voltage and frequency requirement of all electronic equipment should be checked prior to plugging
them into this generator. Damage may result if the equipment is not designed to operate within a ±10% voltage
variation, and ±3 Hz frequency variation from the generator name plate ratings. To avoid damage, always
have an additional load plugged into the generator if solid state equipment (such as a television set) is used. A
power line conditioner is recommended for some solid state applications.
11
Page 13
ELECTRICAL
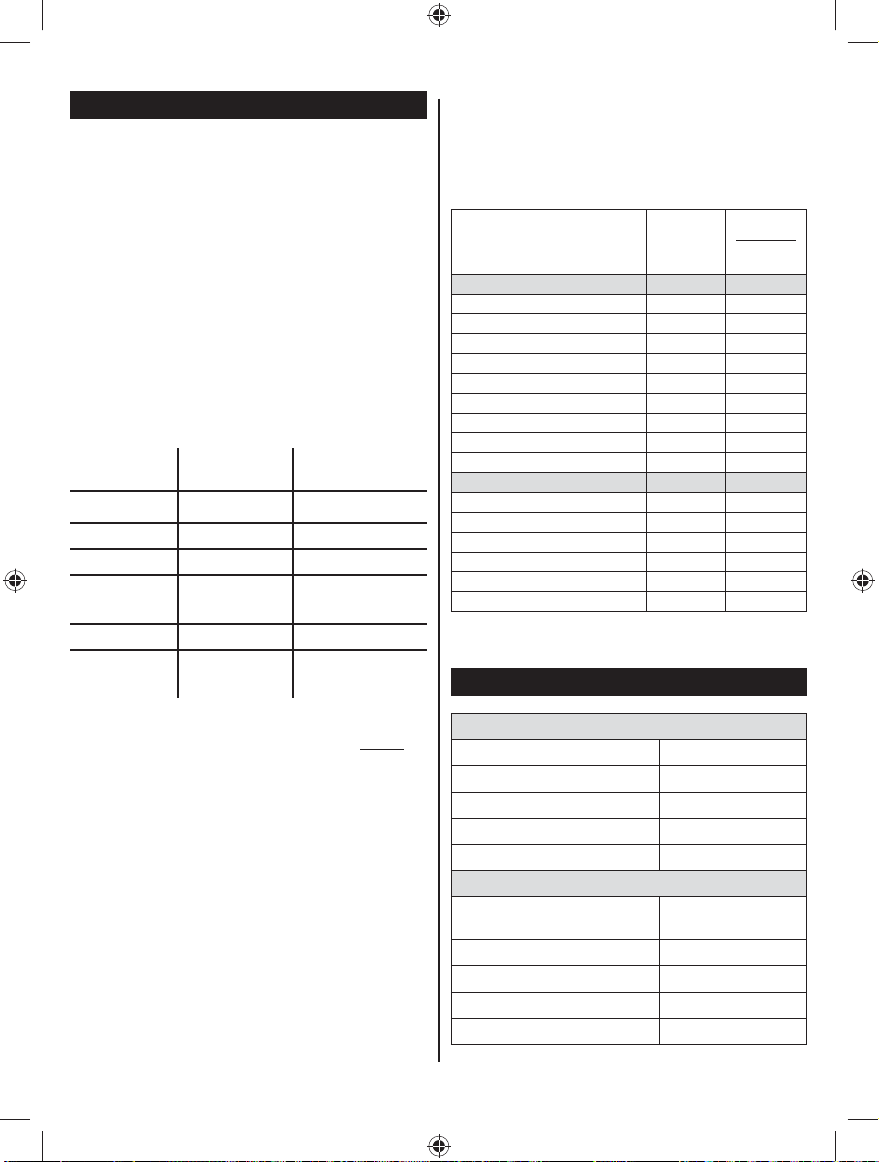
GENERATOR CAPACITY
Make sure the generator can supply enough continuous
(running) and surge (starting) watts for the items you will
power at the same time. Follow these simple steps.
1. Select the items you will power at the same time.
2. Total the continuous (running) watts of these items.
This is the amount of power the generator must
produce to keep the items running. See the wattage
reference chart at right.
3. Estimate how many surge (starting) watts you will
need. Surge wattage is the short burst of power
needed to start electric motor-driven tools or
appliances such as a circular saw or refrigerator.
Because not all motors start at the same time, total
surge watts can be estimated by adding only the
item(s) with the highest additional surge watts to the
total rated watts from step 2.
Example:
Tool or
Appliance
Refrigerator 700 1350
Portable fan 40 120
Laptop 250 250
46" fl at panel
television
Light (75 Watts) 75 75
Running Watts* Additional Starting
Watts*
190 190
1255 total
Running watts
1350 highest start-
ing watts
Never add more loads than the generator capacity. Take
special care to consider surge loads in generator capacity
as previously described.
CAUTION:
Do not overload the generator’s capacity. Exceeding the
generator’s wattage/amperage capacity can damage the
generator and/or electrical devices connected to it.
Application/Equipment
Emergency / Home Standby
Lights (qty. 4 x 75 W) 300 300
Refrigerator 700 1350
46" fl at panel television 190 190
Satellite receiver 250 250
Portable fan 40 120
Heater 1300 1300
Laptop 250 250
Slow cooker 270 270
Radio 50 50
DIY/Job Site
Electric drill − 10 mm (3/8") 600 1000
Quartz halogen work light 1000 1000
Reciprocating saw 960 1920
Circular saw − 184 mm (7-1/4") 1400 2300
Mitre saw − 254 mm (10") 1800 1800
Airless sprayer − 1/3 HP 600 1200
*Wattages listed are approximate. Check tool or appliance for actual wattage.
Estimated
Starting
Watts*
Estimated*
Additional
Starting
Watts
PRODUCT SPECIFICATIONS
Total Continuous (Running) Watts 1255
Plus Highest Additional Surge Watts +1350
Equals Total Generator Output Required 2605
POWER MANAGEMENT
To prolong the life of the generator and attached devices,
it is important to take care when adding electrical loads to
the generator. There should be nothing connected to the
generator outlets before starting its engine. The correct and
safe way to manage generator power is to sequentially add
loads as follows:
1. With nothing connected to the generator, start the
engine as described later in this manual.
2. Plug in and turn on the first load, preferably the largest
load (highest wattage) you have.
3. Permit the generator output to stabilise (engine runs
smoothly and attached device operates properly).
4. Plug in and turn on the next load.
5. Again, permit the generator to stabilise.
6. Repeat steps 4 and 5 for each additional load.
Product weight and dimension
Product weight (kg) 23.5
Width (mm) 300
Height (mm) 450
Length - Handle retracted (mm) 550
Length - Handle extended (mm) 1050
Engine
Engine type Single overhead
cam (SOHC)
Spark plug NGK CR6HSA
Lubricant type SAE 10W 30
Engine lubricant volume 400 ml
Fuel type Unleaded fuel
12
Page 14
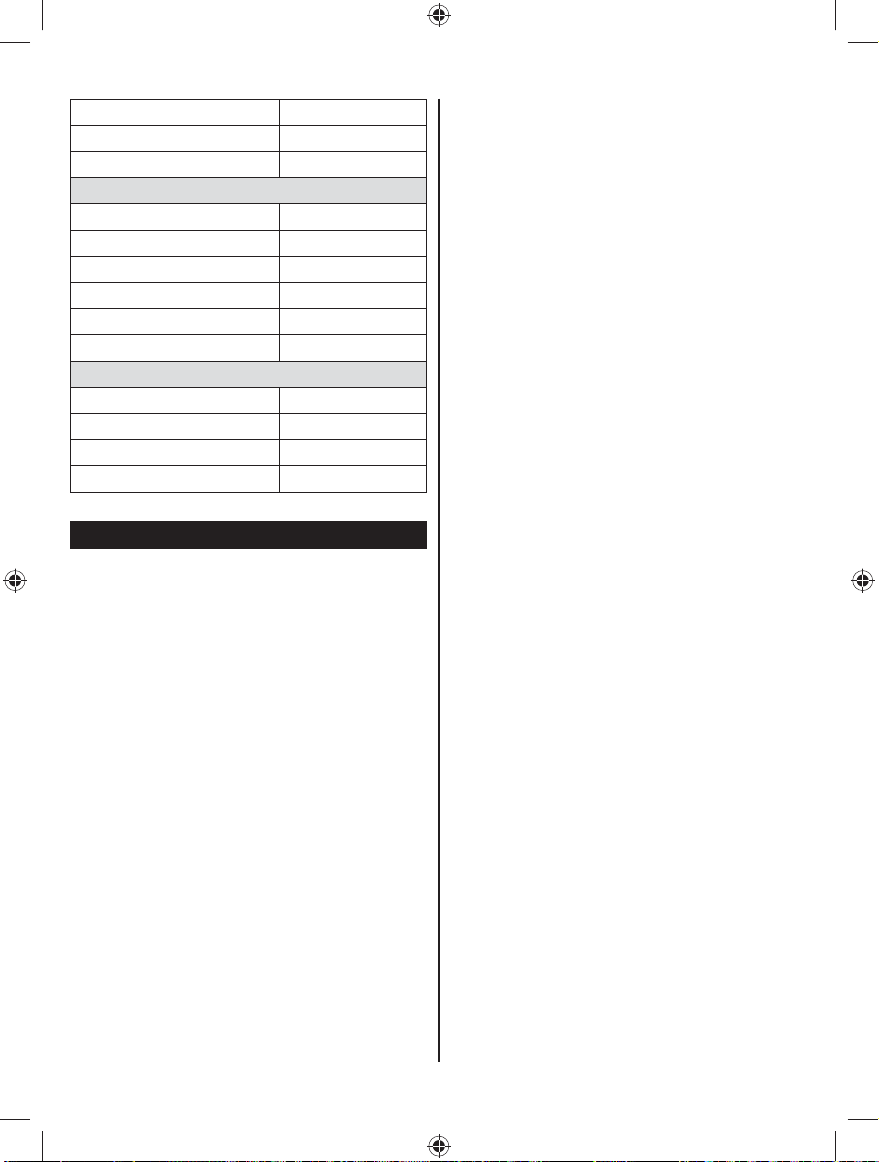
Fuel tank volume 3.8 L
Run time (half load) 5 hours
Run time (full load) 3 hours
Generator
Rated Voltage 240 V AC/12 V DC
Rated Amps 6.67 A AC/7.5 A DC
Rated Running Watts 1,600 W
Starting Watts 2,000 W
Rated Frequency 50 Hz
Floating neutral Yes
Noise specifi cations
Uncertainty (dB) 2
Noise level (4m) LpA dB (A) 72
Noise level (7m) LpA dB (A) 67
Noise level LwA dB (A) 82
FEATURES
KNOW YOUR GENERATOR
See Figure 1.
The safe use of this product requires an understanding of
the information on the product and in this operator’s manual
as well as a knowledge of the project you are attempting.
Before use of this product, familiarise yourself with all
operating features and safety rules.
240 V AC RECEPTACLES
Your generator has two single phase, 50 Hz outlets that are
240 Volt AC, 15 Amp receptacles. These can be used for
operating appropriate appliances, electrical lighting, tools,
and motor loads.
AIR FILTERS
The air fi lters help to limit the amount of dirt and dust drawn
into the unit during operation.
AUTO IDLE SWITCH
The auto idle switch is used to control the speed of the
engine and conserve fuel. When the switch is in the ON (I)
position and no appliances are connected to the unit, the
engine will idle. If an appliance is added, the engine speed
will increase to power the item. If the appliance is removed,
the engine will return to idle.
BATTERY CHARGING CABLE
The battery charging cable makes it easy to charge 12 Volt
lead acid batteries with the generator.
NOTE: Only use battery charging cable to charge vented
wet lead acid batteries.
CARRY HANDLES
The generator is equipped with two carry handles for easy
transport. Both handles should be used to carry the generator.
DC CIRCUIT BREAKER
The circuit breaker is provided to protect the generator
against electrical overload.
DC RECEPTACLE
Your generator has a 12 volt, 7.5 Amp DC receptacle for
charging lead acid batteries.
ENGINE/CHOKE LEVER/ON-OFF SWITCH/FUEL
VALVE LEVER
The engine/choke lever/ on-off switch/fuel valve lever is used
when starting, stopping, and running the engine.
FUEL TANK
The fuel tank has a capacity of 3.8 L.
GROUND TERMINAL
The ground terminal is used to assist in properly grounding
the generator to help protect against electrical shock.
Consult with a local electrician for grounding requirements
in your area.
LED DISPLAY
LEDs provide feedback to indicate whether the generator
is in use, overloaded, or in need of lubricant.
OIL CAP/DIPSTICK
Remove the oil fi ll cap to check and add oil to the generator
when necessary.
PARALLEL KIT TERMINALS
The non-polarized parallel kit terminals are used with a
parallel kit (sold separately) that will allow generators to
be linked together to increase output.
NOTE: Read and understand the parallel kit’s instructions
prior to use. Kit is for usage with this unit only.
RESET BUTTON
The reset button is used to restore power if an overload
occurs. To restore power, depress the reset button.
RETRACTABLE HANDLE
The generator is equipped with a retractable handle that
can be adjusted for storage and transportation.
STARTER GRIP AND ROPE
The starter grip and rope is used (along with the engine/
13
Page 15
choke lever) to start the generator’s engine.
ASSEMBLY
UNPACKING
This product has been shipped completely assembled.
Remove one end of the box and carefully slide out the
generator and any accessories.
NOTE: The generator is heavy. If you must lift the unit
out of the box, get another person to help you and lift
with your legs, not your back.
Inspect the unit carefully to make sure no damage
occurred during shipping.
Do not discard the packing material until you have
care ful ly inspected and satisfactorily operated the
product.
If any parts are damaged or missing, please contact
your nearest authorised service centre for assistance.
PACKING LIST
Generator
Battery charging cable
Engine lubricant (SAE 10W 30) (355 ml)
Screwdriver
Paper funnel
Spark plug wrench
Operator’s manual
WARNING:
If any parts are damaged or missing do not
operate this product until the parts are replaced.
Failure to heed this warning could result in
serious personal injury.
WARNING:
Do not attempt to modify this tool or create
accessories not recommended for use with
this tool. Any such alteration or modification
is considered as misuse and could result in a
hazardous condition leading to possible serious
personal injury.
OPERATION
DANGER:
Carbon Monoxide. Using a generator indoors
WILL KILL YOU IN MINUTES.
Generator exhaust fumes contains high levels of carbon
monoxide (CO), a poisonous gas you cannot see or smell.
If you can smell the generator exhaust fumes, you are
breathing CO. But even if you cannot smell the exhaust
fumes, you could be breathing CO.
Never use a generator inside homes, garages,
crawlspaces, or other partly enclosed areas. Deadly
levels of carbon monoxide can build up in these
areas. Using a fan or opening windows and doors
does NOT supply enough fresh air.
ONLY use a generator outdoors and far away from
open windows, doors, and vents. These openings
can pull in generator exhaust fumes.
Even when you use a generator correctly, CO may leak
into the home. ALWAYS use a battery-powered or batterybackup CO alarm in the home.
If you start to feel sick, dizzy, or weak after the generator
has been running, move to fresh air immediately. See a
doctor. You could have carbon monoxide poisoning.
WARNING:
Do not allow familiarity with tools to make you
careless. Remember that a careless fraction of a
second is sufficient to inflict serious injury.
WARNING:
Do not use any attachments or accessories not
recommended by the manufacturer of this
product. The use of attachments or accessories
not recommended can result in serious personal
injury.
APPLICATIONS
This generator is designed to supply electrical power for
operating compatible electrical lighting, appliances, tools,
and motor loads.
BEFORE OPERATING THE UNIT
Only use outdoors and far away from windows, doors,
and vents.
Never use inside a home or garage, EVEN IF doors
and windows are open.
Always position the generator on a flat firm surface.
SPECIAL REQUIREMENTS:
Please consult a qualifi ed electrician, electrical inspector,
or the local agency having jurisdiction:
In some areas, generators are required to be
registered with local utility companies.
If the generator is used at a construction site,
there may be additional regulations which must be
observed.
LED DISPLAY
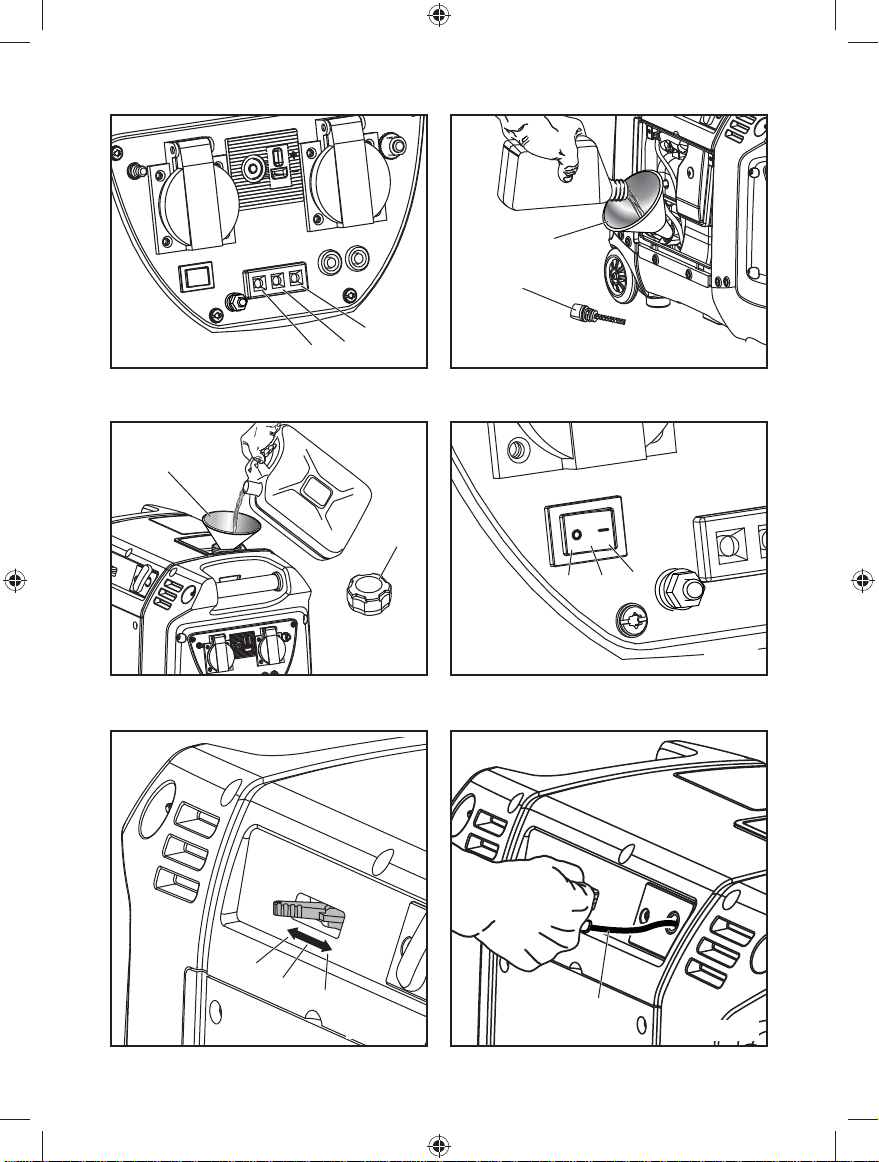
See Figure 2.
Power:
The power indicator will light when the generator is on and
the receptacles are operational.
NOTE: If the generator is overloaded, the power indicator
light will go off.
14
Page 16
Overload:
The overload indicator will light if the generator’s wattage/
amperage capacity is exceeded. To reset the generator,
remove all loads from the generator and press the reset
button (see fi g. 1). Add loads back to the generator one at
a time being careful not to exceed the generators wattage
rating.
Lubricant:
The oil indicator will light and the engine will automatically
shut off whenever the lubricant level in the engine becomes
low. The engine may not be restarted until suffi cient engine
lubricant has been added to the generator.
NOTE: It is normal for the indicator lights to illuminate and/
or blink each time the engine is started. Once the engine
warms up, the lights should default to the pattern above.
CHECKING/ADDING LUBRICANT
See Figure 3.
CAUTION:
Attempting to start the engine before it has been
properly filled with oil will result in equipment
failure.
Engine lubricant has a major influence on engine
performance and service life. For general, all-temperature
use, SAE 10W-30 is recommended. Always use a 4-stroke
motor lubricant that meets or exceeds the requirements for
API service classifi cation SJ.
NOTE: Non-detergent or 2-stroke engine lubricants will
damage the engine and should not be used.
Loosen the screws at the side of the engine cover.
Remove cover and set aside.
Unscrew the oil cap/dipstick and remove.
Wipe dipstick clean and re-seat in hole; do not
re-thread.
Remove dipstick again and check lubricant level.
Lubricant level should fall between the minimum and
maximum marks on the dipstick.
If level is low, add engine lubricant until the fluid level
rises between the minimum and maximum marks on
the dipstick.
Replace and secure the oil cap/dipstick.
USING FUEL STABILISER
Fuel gets old, oxidizes, and breaks down over time. Adding
a fuel stabilizer (not included) extends the usable life of fuel
and helps prevent deposits from forming that can clog the
fuel system. Follow fuel stabilizer manufacturer’s directions
for correct ratio of stabilizer to fuel.
Mix fuel stabilizer and gasoline prior to filling the tank
by using an approved fuel container and shaking
gently to combine.
NOTE: To control the amount of fuel stabilizer being
added to the engine, always mix fuel stabilizer with
gasoline before fueling the tank rather than adding
fuel stabilizer directly into the generator’s fuel tank.
Replace and secure the fuel tank cap.
Start and run the engine for at least 5 minutes to
allow stabilizer to treat the entire fuel system.
OXYGENATED FUELS
CAUTION:
Do no use E15 or E85 fuel (or fuel containing
greater than 10% ethanol) in this product. It is a
violation of federal law and will damage the unit
and void your warranty.
Fuel system damage or performance problems resulting
from the use of an oxygenated fuel containing more than
the percentage of oxygenates stated below are not covered
under warranty.
Ethanol. Gasoline containing up to 10% ethanol by volume
(commonly referred to as E10) is acceptable. E15 and
E85 are not.
CHECKING/ADDING FUEL
See Figure 4.
WARNING:
Gasoline and its vapours are highly flammable
and explosive. To prevent serious personal injury
and property damage, handle gasoline with
care. Keep away from ignition sources, handle
outdoors only, do not smoke while adding fuel,
and wipe up spills immediately.
When adding fuel to the generator, make sure the unit is
sitting on a fl at, level surface. If the engine is hot, let the
generator cool before adding fuel. Always fi ll the fuel tank
outdoors with the machine turned off.
Remove the fuel cap.
Fill the fuel tank to 25 mm below the top of the fuel
neck.
Replace and secure the fuel cap.
NOTE: Always use unleaded gasoline with a pump octane
rating of 91 or higher. Never use old, stale, or contaminated
unleaded fuel, and do not use an oil/fuel mixture. Do not
allow dirt or water into the fuel tank. Do not use E85 fuel.
STARTING THE ENGINE
See Figures 5-7.
CAUTION:
On a level surface with the engine off, check the
lubricant level before each use of the generator.
NOTE: If location of generator is not level, the unit may not
start or may shut down during operation.
To start generator the fi rst time:
Your new inverter generator is equipped with a mechanical
fuel pump. The initial start up will require additional pulls of
the recoil starter to prime the fuel system.
15
Page 17
Add engine lubricant per the Operator’s Manual
instructions.
Turn the ENGINE/CHOKE LEVER to the CHOKE
position.
Fill the fuel tank per the Operator’s Manual
instructions.
Pull the engine recoil five (5) times to prime the fuel
system.
Press the AUTO IDLE SWITCH to the OFF position.
Pull the recoil starter until the engine starts.
Move the CHOKE LEVER to the RUN position.
For quieter more efficient operation, place the AUTO
IDLE switch in the ON position.
To start subsequent times:
NOTE: Subsequent starting should only require 6 pulls
maximum.
Unplug all loads from the generator.
Place the auto idle switch in the off position.
Slide the engine/choke lever to the start (centre)
position.
NOTE: When the engine/choke lever is in the start
(centre) position, the fuel will flow from the fuel tank to
the engine. If engine is warm, move the engine/choke
lever right to the run (restart) position.
Pull the starter grip and rope until the engine runs (a
maximum of 6 times).
NOTE: Do not allow the grip to snap back after
starting; return it gently to its original place. Initial
starting of the unit may require additional pulls to
prime the fuel system.
Allow the engine to run for 15-30 seconds, then move
the engine/choke lever right to the run position.
STOPPING THE ENGINE
See Figures 5-6.
Remove any load from the generator.
Place the engine/choke lever in the off position.
To stop the engine in an emergency situation:
Put the engine/choke lever in the off position.
WARNING:
While operating and before storing a hot unit,
keep at least 1 m of clearance on all sides of this
product, including overhead. Allow a minimum of
30 minutes of “cool down” time before storage.
Heat created by the muffler and exhaust gases
could be hot enough to cause serious burns and
/or ignite combustible objects.
USING THE BATTERY CHARGING CABLE
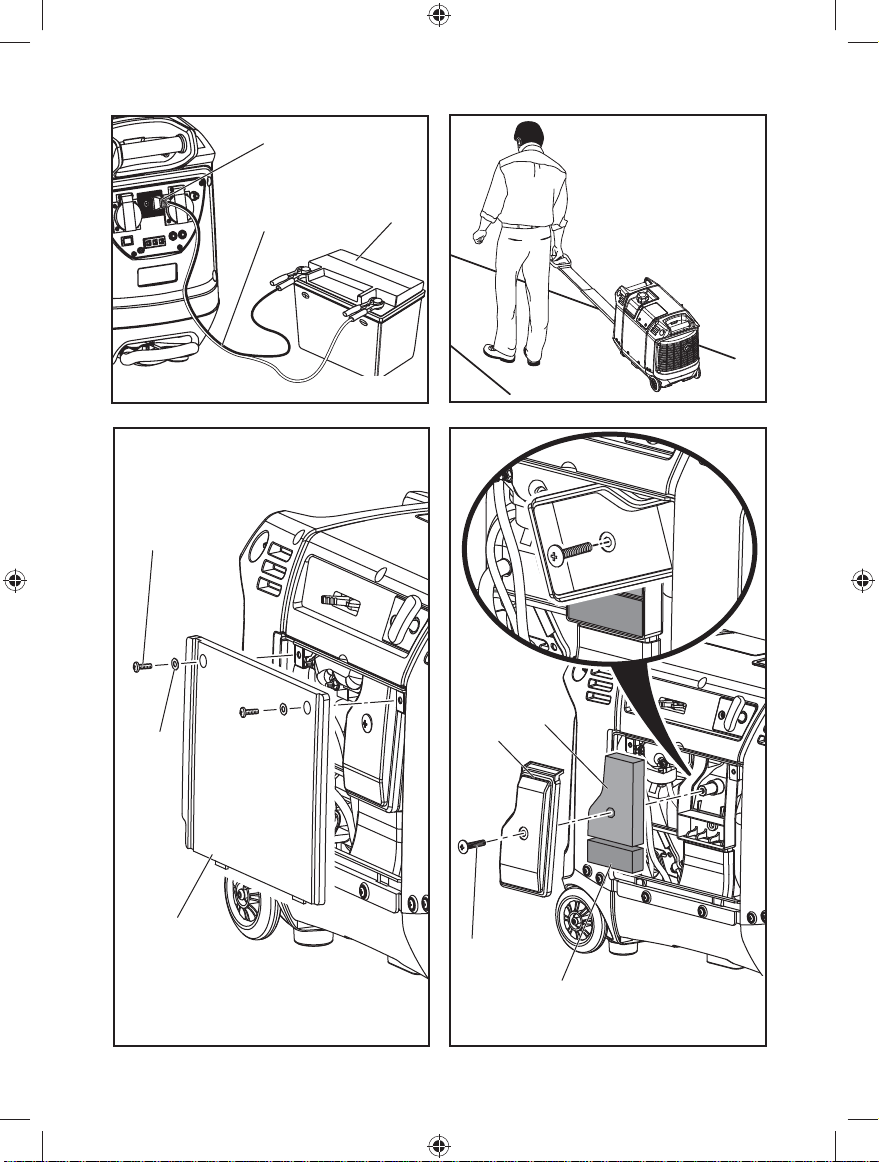
See Figure 8.
WARNING:
The 12 V DC receptacle is designed to charge
vented wet lead acid batteries only. Other types
of batteries could burst, causing personal injury
and damage.
CAUTION:
The 12 V DC receptacle provides continuous
charge. Do not overcharge battery or leave
battery unattended. Doing so may cause
damage to the battery.
CAUTION:
Do not use the generator to jump start vehicles.
Doing so could result in damage to the vehicle or
it’s electrical components.
Place the auto idle switch in the OFF position.
Using the battery clamps, connect the battery
charging cable assembly to the battery terminal.
Connect the red wire to the positive (+) terminal
first, then connect the black wire to the negative (–)
terminal. Make sure all connections are secure.
NOTE: Be careful not to short across the terminals
when installing. Shorting the terminals together can
cause sparks, damage to the battery or generator, or
even burns or explosions.
NOTE: To prevent short circuit, keep away from a
metal surface during clamp connection.
Connect the battery charging cable assembly to the
12 V DC receptacle.
Start the generator.
NOTE: The AC receptacles can be used while the DC
receptacle is in use.
■ The battery will become slightly warm to the touch
while charging. This is normal and does not indicate
a problem.
NOTE: Only use battery charging cable assembly to
charge vented wet lead acid batteries.
■ When batteries become fully charged, disconnect the
battery charging cable assembly from the battery.
Disconnect the negative (black) wire first, then the
positive (red) wire, being careful not to short across
the terminals. Always abide by the safety warnings
provided with the battery.
NOTE: Most batteries will be completely charged after
30 to 120 minutes. However, it is highly recommended
that you refer to your battery manufacturer’s instructions
for specific charge times.
■ Unplug battery charging cable assembly and store for
later use.
USING THE GENERATOR
Connect devices to be powered by generator by following
the steps below:
■ Make sure the generator can supply enough
continuous (running) and surge (starting) watts for
16
Page 18
the items you will power at the same time. See the
Electrical section for how to calculate total amount of
power needed.
■ Start the generator with nothing connected.
■ Plug in and turn on the first load, preferably the largest
load (highest wattage) you have.
■ Permit the generator output to stabilise (engine runs
smoothly and attached device operates properly).
■ Plug in and turn on the next load.
■ Again, permit the generator to stabilise.
■ Repeat previous two steps for each additional load.
WARNING:
Never add more loads than the generator
capacity. Take special care to consider surge
loads in generator capacity.
MOVING THE GENERATOR
See Figure 9.
■ Place the auto idle switch in the off position.
■ Place the engine/choke lever in the off position.
■ Allow 30 minutes of “cool down” time before storing
the machine.
■ Pull the retractable handle out or carry by the carry
handles.
■ Facing the front of the generator, grasp the folding
handle firmly with one hand.
■ Lift the generator toward you until it balances on the
wheels.
■ Turn around and pull the unit along behind you to the
desired location.
■ Lower the generator until it sits securely on a flat
surface.
HIGH ALTITUDE OPERA TION
The product is not designed for high-altitude operation
(altitudes greater than 1,500 m above sea level). Operating
the product in higher altitudes may increase the engine’s
emissions, decrease fuel economy and performance and
reduce the generator life.
MAINTENANCE
WARNING:
When servicing, use only identical replacement
parts. Use of any other parts could create a
hazard or cause product damage.
WARNING:
Always wear eye protection with side shields
marked to comply with ANSI Z87.1. Failure to do
so could result in objects being thrown into your
eyes, resulting in possible serious injury.
Only the parts shown on the parts list are intended to be
repaired or replaced by the customer. All other parts should
be replaced at an authorised service centre.
GENERAL MAINTENANCE
Keep the generator in a clean and dry environment where it
is not exposed to dust, dirt, moisture, or corrosive vapours.
Do not allow the cooling air slots in the generator to become
clogged with foreign material such as leaves, snow, etc.
Do not use a garden hose to clean the generator. Water
entering the fuel system or other internal parts of the unit can
cause problems that will decrease the life of the generator.
To clean the unit:
Use a soft bristle brush to loosen and remove dirt and
debris.
Clean air vents with low pressure air that does not
exceed 25 psi.
Wipe the exterior surfaces of the generator with a
damp cloth.
CHECKING/CLEANING AIR FIL TER
See Figures 10-11.
For proper performance and long life, keep air fi lters clean.
■ Loosen the screws on the side of the engine cover.
Remove cover and set aside.
■ Loosen the screw in the centre of the air filter cover
and turn the cover 1/4 turn clockwise, pull the cover
down and off the unit. Remove air filter cover and set
aside.
■ Remove both the large and the small air filters.
■ Wash the air filters with warm, soapy water. Rinse and
squeeze to dry.
■ Reinstall the air filters.
NOTE: Make sure the fi lters are seated properly inside
the generator. Installing the filters incorrectly will allow
dirt to enter the engine, causing rapid engine wear.
■ Reinstall the air filter cover. Tighten screw to secure.
■ Reinstall the engine cover. Tighten screws to secure.
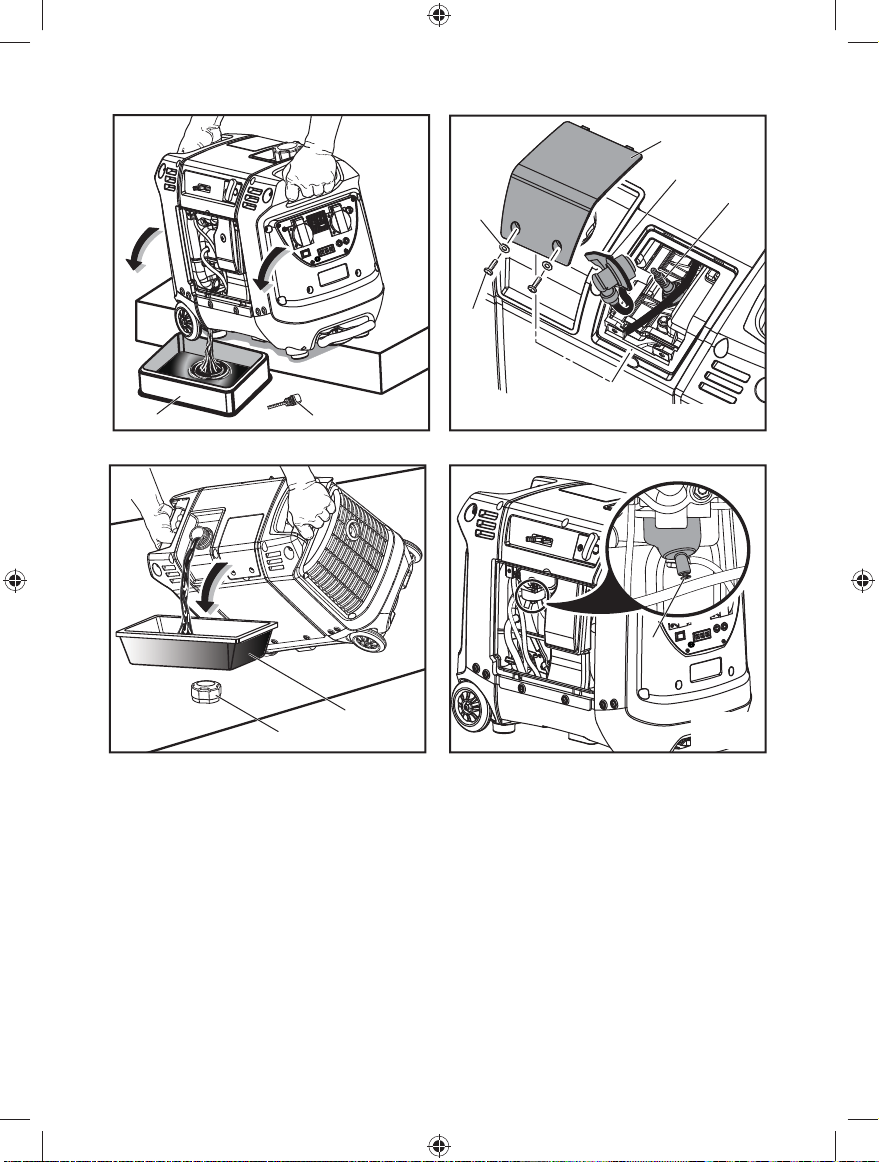
CHANGING ENGINE LUBRICANT
See Figure 12.
For best performance, engine lubricant should be changed
after every 100 hours or 6 months of operation.
■ Loosen the screw at the top of the engine cover.
Remove cover and set aside.
■ Remove the oil fill cap/dipstick.
■ Tilt the generator to the side and allow lubricant to
drain from the oil fill hole into an approved container.
NOTE: Drain the lubricant while the engine is still warm
but not hot. Warm lubricant will drain quickly and more
completely.
WARNING:
Do not change engine lubricant while it is hot.
Accidental contact with hot engine lubricant
could result in serious burns.
■ Return the generator to an upright position and
17
Page 19
refill with lubricant following the instructions in the
Checking/Adding Lubricant section previously in this
manual. For amount of lubricant needed to refill, see
Specifications earlier in this manual.
■ Replace and secure the oil cap/dipstick.
■ Reinstall the engine cover. Replace the screw and
tighten securely.
NOTE: Used lubricant should be disposed of at an
approved disposal site. See your local retailer for more
information.
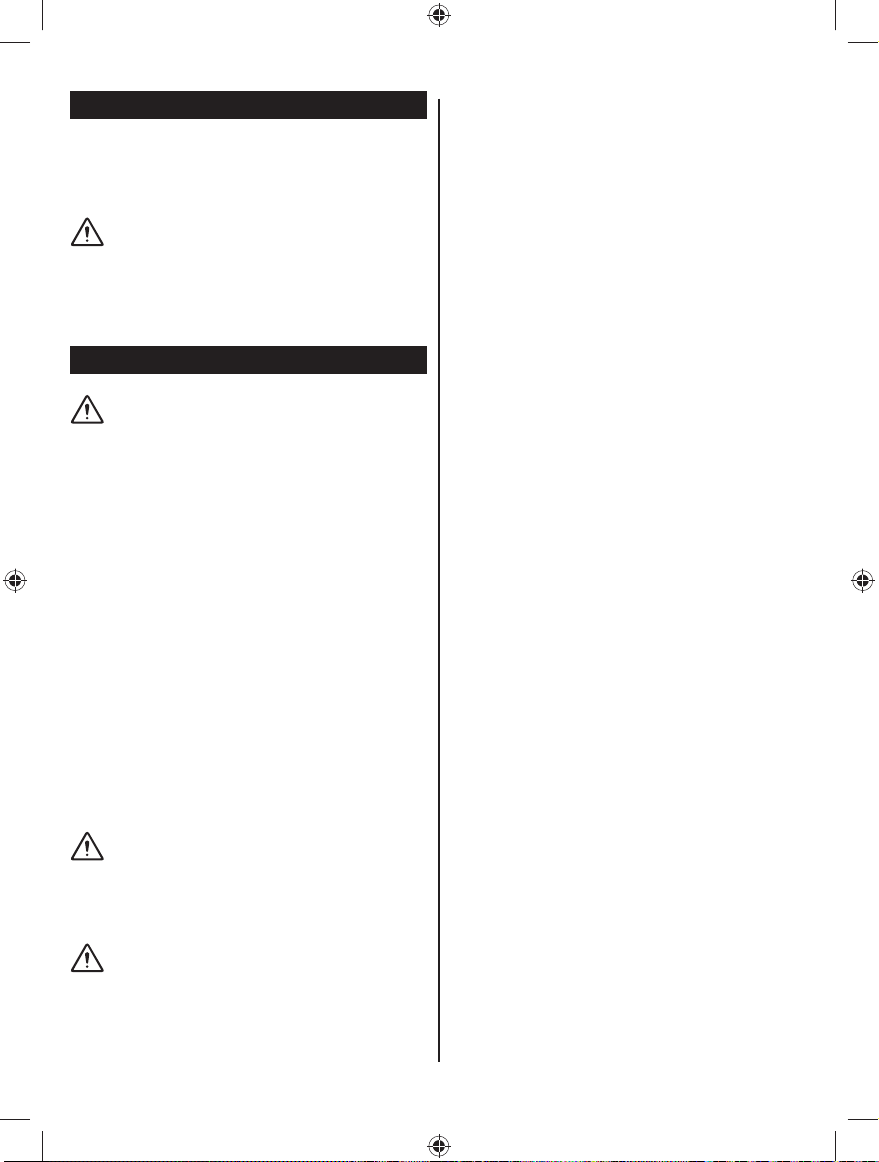
SPARK PLUG REPLACEMENT
See Figure 13.
The spark plug must be properly gapped and free of deposits
in order to ensure proper engine operation. To check:
■ Remove the spark plug cover.
■ Remove the spark plug cap.
■ Clean any dirt from around base of spark plug.
■ Remove spark plug using spark plug wrench.
■ Inspect spark plug for damage, and clean with a
wire brush before reinstalling. If insulator is cracked
or chipped, spark plug should be replaced. For
replacement spark plug, see Product Specifications
earlier in this manual.
■ Measure plug gap. The correct gap is 0.60-0.70 mm
(0.024−0.028"). To widen gap, if necessary, carefully
bend the ground (top) electrode. To lessen gap, gently
tap ground electrode on a hard surface.
■ Seat spark plug in position; thread in by hand to
prevent cross-threading.
■ Tighten with wrench to compress washer. If spark plug
is new, use 1/2 turn to compress washer appropriate
amount. If reusing old spark plug, use 1/8 to 1/4 turn
for proper washer compression.
NOTE: An improperly tightened spark plug will become
very hot and could damage the engine.
CAUTION:
Be careful not to cross-thread the spark plug.
Cross-threading will seriously damage the
product.
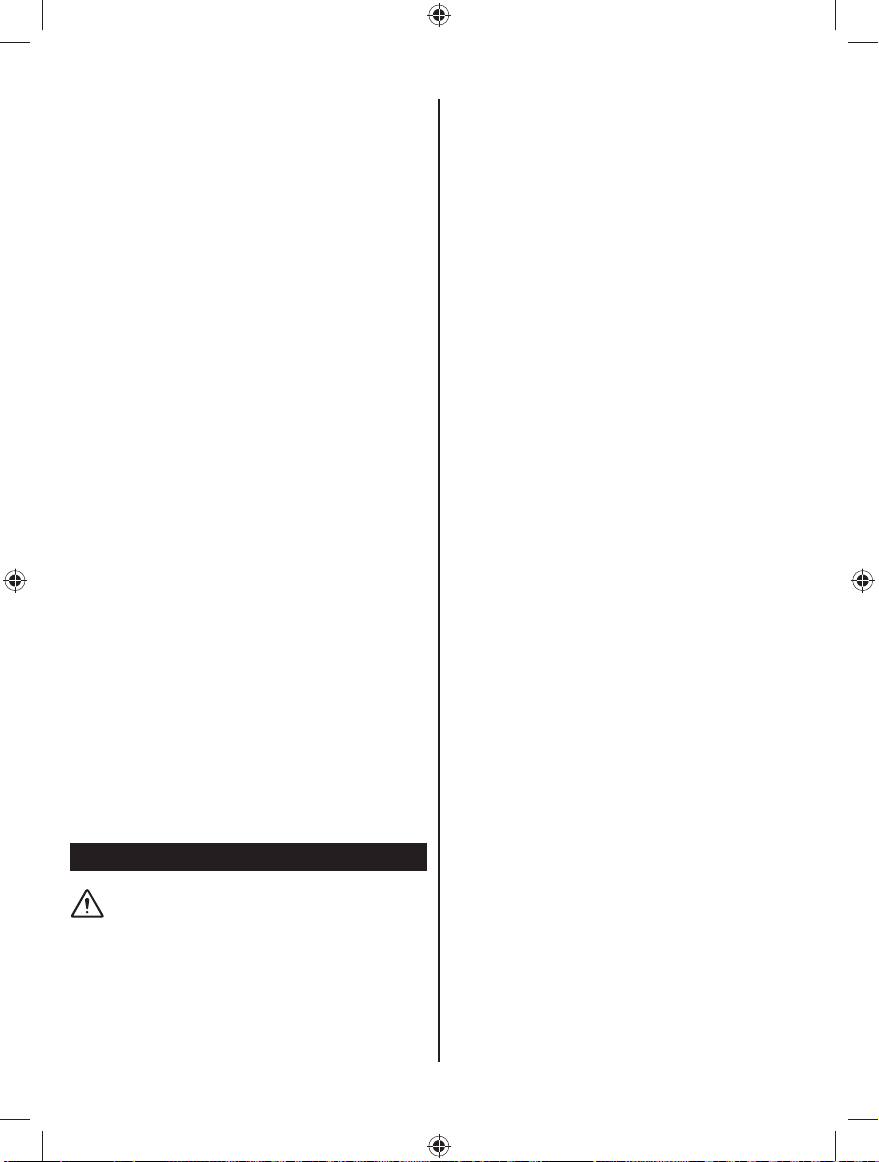
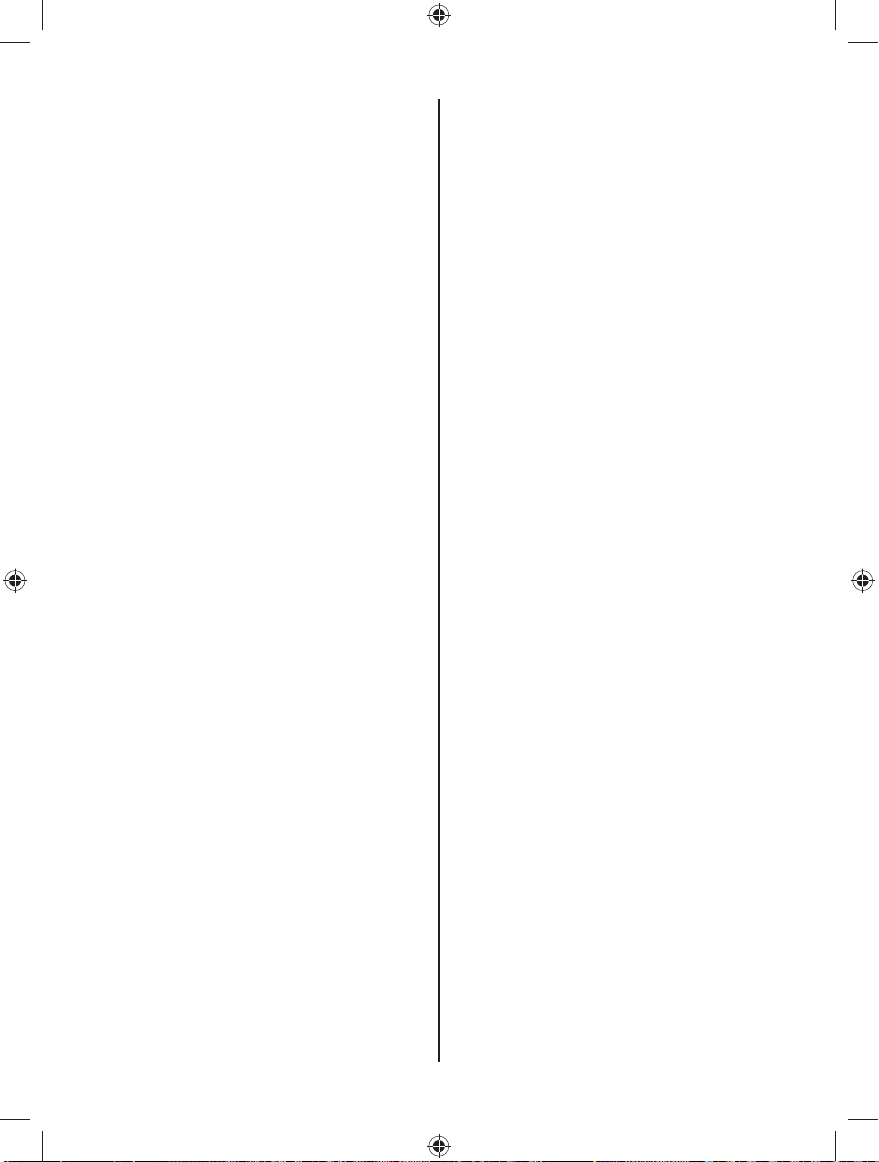
DRAINING FUEL TANK/CARBURETOR
See Figures 14-15.
To help prevent gum deposits in the fuel system, drain the
fuel from the tank and carburetor before storing.
DRAINING THE FUEL TANK
CAUTION:
Remove all lubricant from the unit before
draining the fuel tank. Failure to do so could
cause damage to the unit.
■ Remove the fuel cap.
■ Tilt the generator and allow fuel to drain from the fuel
tank into an approved container.
■ When the fuel has drained from the tank, replace the
fuel cap.
DRAINING THE CARBURETOR
■ Loosen the screws at the top of the engine cover.
Remove cover and set aside.
■ Place the engine/choke lever in the run position.
■ Position a suitable container under the carburetor
drain screw to catch fuel; loosen the screw.
■ Allow fuel to drain completely into container.
■ Retighten drain screw securely.
■ Place the engine/choke lever in the off position.
NOTE: Consult hazardous waste management guidelines
in your area for the proper way to dispose of used fuel.
TRANSPORTING
■ Place the engine/choke lever in the off position.
■ Make sure engine and exhaust of unit is cool.
■ Keep unit level to prevent fuel spillage.
■ Do not drop or strike unit or place under heavy objects.
STORING THE UNIT
When preparing to store the generator, allow the unit to cool
completely, then follow the guidelines on the next page.
18
Page 20
MAINTENANCE
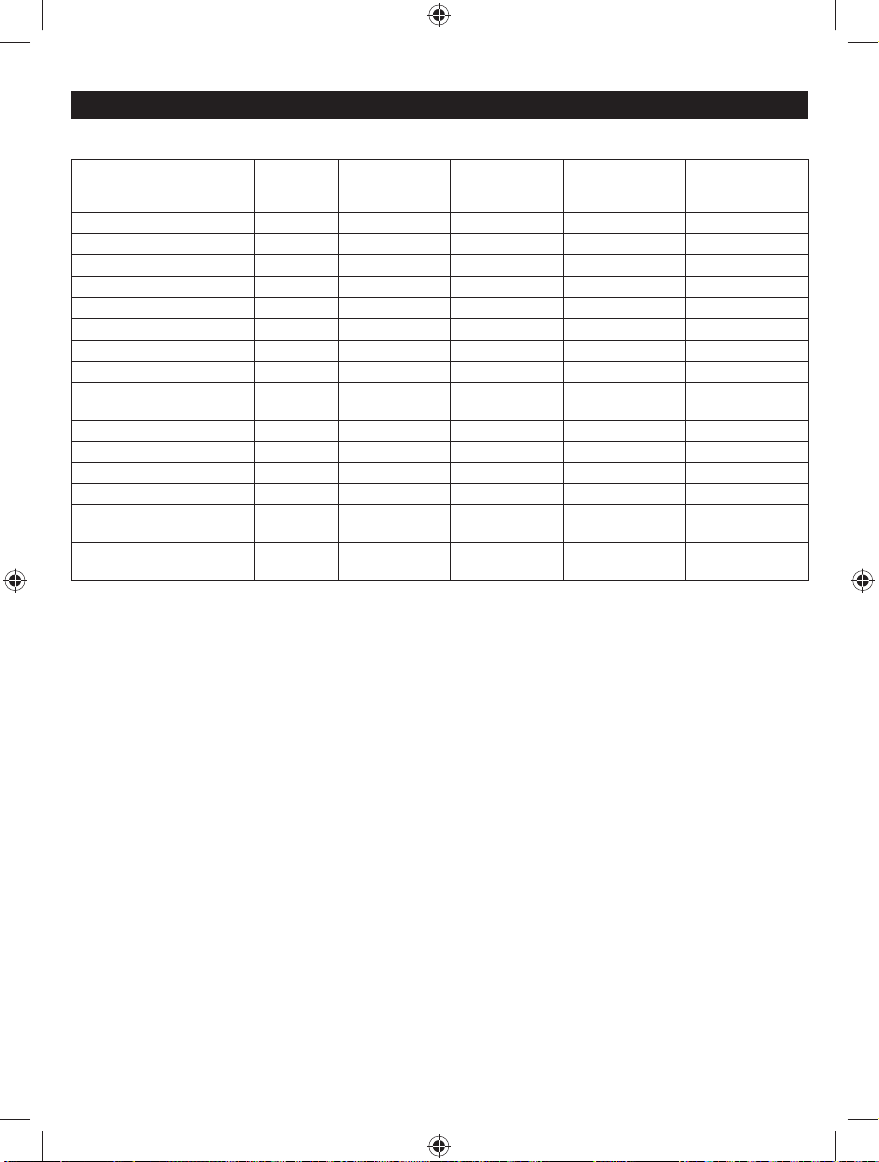
MAINTENANCE SCHEDULE
Before
each use
Check engine lubricant
Change engine lubricant
Check air fi lter
After 1st month
or 20 hours of
operation
Clean air fi lter
Change air fi lter
Check/adjust spark plug
Replace spark plug
Check/adjust idle speed
Check/adjust valve
clearance
Clean fuel tank and fi lter
Check fuel hose
Fuel fi lter
Check all hose connections
Inspect fuel tank vapor vent
(if equipped)
Inspect carbon canister
(CARB models only)
1
1
Inspect
1. These items should only be carried out by an authorised service centre.
NOTE: Maintenance should be performed more frequently when generator is used in dusty areas.
When generator has exceeded the maximum figures specified in the table, maintenance should still be cycled
according to the intervals of time or hours stated herein.
Every 3 months
or 50 hours of
operation
Every 6 months
or 100 hours
of operation
Every year or
after 300 hours
of operation
Replace
19
Page 21

TROUBLESHOOTING
PROBLEM POSSIBLE CAUSE SOLUTION
Engine will not start. Engine/choke lever is in run position.
No fuel.
Stale gasoline or water in gasoline.
Lubricant level is low.
Spark plug faulty, fouled, or improperly
gapped.
Engine stored without treating or draining
gasoline, or refueled with bad gasoline.
Dirty fuel fi lter.
Engine is hard to start. Water in gasoline.
Weak spark at spark plug.
Engine lacks power. Engine stored without treating or draining
DC receptacle does not work. Circuit protector engaged
AC receptacle does not work. Item plugged in is defective.
Generator makes a “spark
knock” or “pinging" noise.
If problem persists after trying the above solutions, contact your nearest authorised service centre for assistance.
The following symptoms may indicate problems that will affect the emissions level of the unit:
■ Hard starting or stalling after starting
■ Rough idle
■ Misfiring or backfiring under load
■ Afterburning (backfiring)
■ Black exhaust smoke or high fuel consumption
If you encounter any of these symptoms, have the unit inspected and repaired by the nearest authorised service centre.
gasoline, or refueled with bad gasoline.
Dirty air fi lter.
Item plugged in is defective.
Generator is overloaded.
An occasional light “knocking” or “pinging”
under heavy load is not a cause for concern.
However, if the knocking or pinging occurs
under normal load at a steady engine
speed, the problem may be with the brand of
gasoline being used.
Move engine/choke lever to start
position.
Fill the fuel tank.
Drain entire system and refi ll with
fresh fuel.
Check engine lubricant level and fi ll,
if necessary.
Replace spark plug.
Drain fuel and carburetor. Refuel with
fresh gasoline.
Replace fuel fi lter or contact
authorised service centre.
Drain entire system and refi ll with
fresh fuel.
Contact authorised service centre.
Drain fuel and carburetor. Refuel with
fresh gasoline. If problem continues,
contact your nearest authorised
service centre.
Clean or replace as needed.
Remove any load from the generator.
Turn the auto idle switch to off, then
depress the DC circuit breaker.
Try a different item.
Try a different item.
Remove loads and press the reset
button.
Switch to a different brand of
gasoline, making sure that the octane
rating is 91 or higher. If problem
continues, contact your nearest
authorised service centre.
20
Page 22
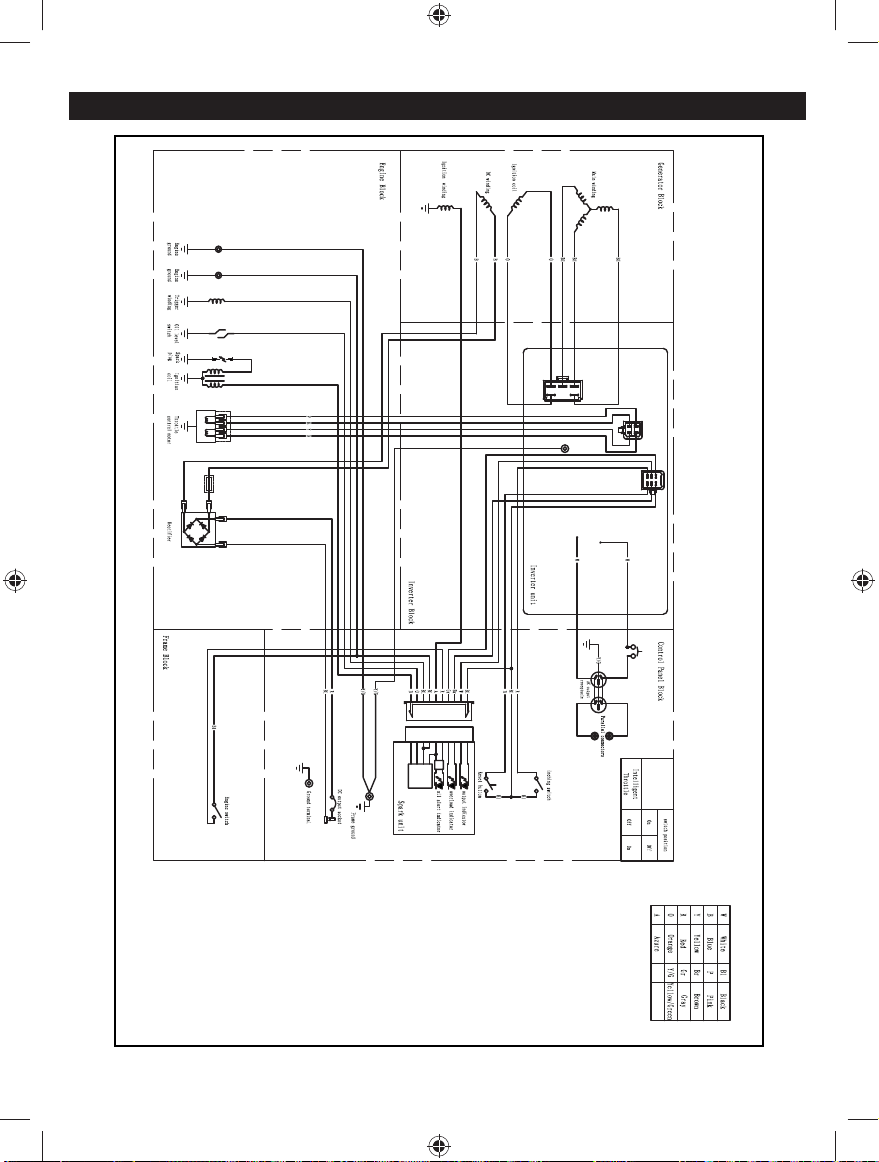
Fuse (10A)
WIRING DIAGRAM
+
-
20150408v3
21
Page 23
Page 24
Techtronic Industries (Australia) Pty. Ltd.
Level 1, 660 Doncaster Road
Doncaster, VIC 3108, Australia
Techtronic Industries New Zealand Ltd.
$PHOLD(DUKDUW$YHQXH
MDQJHUH, Auckland , New Zealand
20150408v3
 Loading...