

Page 1
OPERATOR'S MANUAL
CORDLESS DRILL-DRIVER
MODEL NOS. R10511/R10521/R10531
THANK YOU FOR BUYING A RYOBI CORDLESS DRILL-DRIVER.
Your new cordless drill-driver has been engineered and manufactured to Ryobi’s high standard for dependability, ease of
operation, and operator safety. Properly cared for, it will give you years of rugged, trouble-free performance.
CAUTION: Carefully read through this entire operator’s manual before using your new cordless drill-driver.
Pay close attention to the Rules for Safe Operation, Warnings, and Cautions. If you use your cordless drill-driver properly
and only for what it is intended, you will enjoy years of safe, reliable service.
Thank you again for buying Ryobi tools.
SAVE THIS MANUAL FOR FUTURE REFERENCE
Page 2
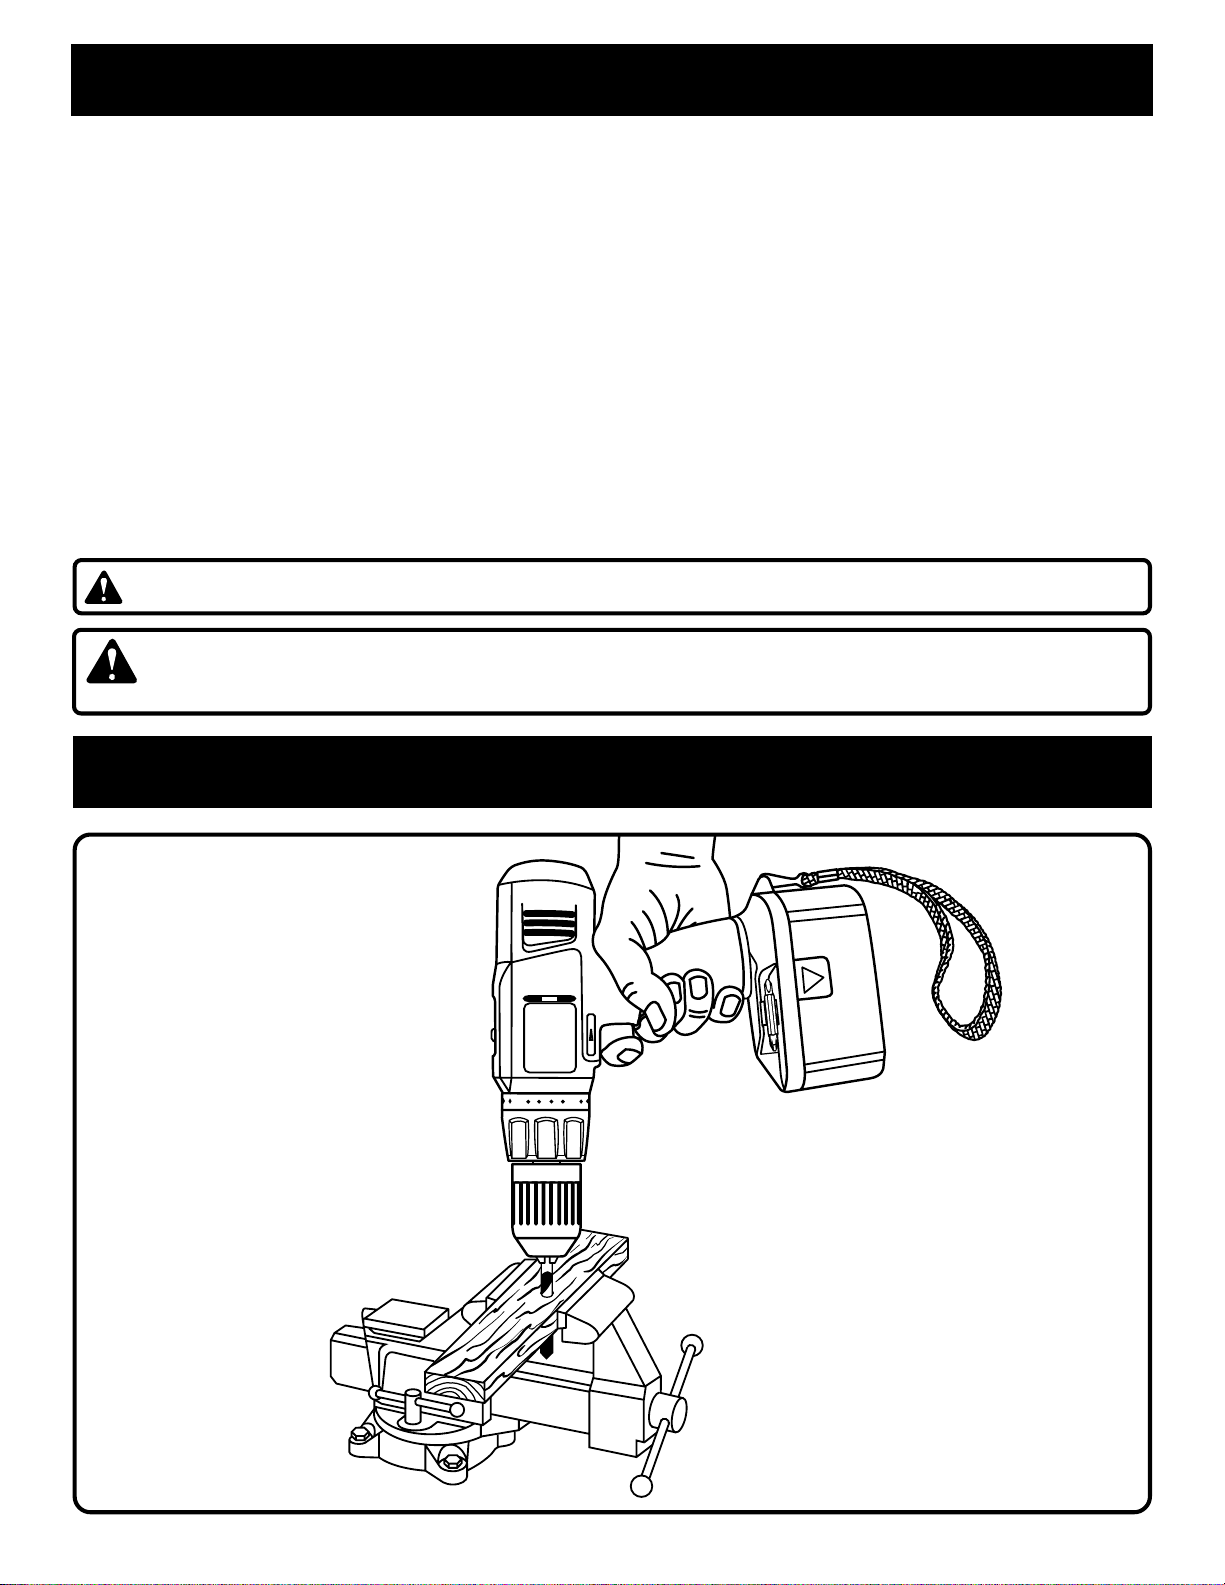
TABLE OF CONTENTS
■ Table Of Contents/Typical Applications. ................................................................................2
■ Rules For Safe Operation...................................................................................................3-5
A. Precautions On Using Your Cordless Tool.......................................................................4
B. Important Safety Instructions For Charger....................................................................4-5
C. Precautions Regarding The Use Of Charger And Battery ...............................................5
■ Specifications ........................................................................................................................6
■ Important Information For Recharging Hot Batteries.............................................................6
■ Operation..........................................................................................................................7-12
■ Maintenance........................................................................................................................13
■ Disposal Of The Exhausted Battery ....................................................................................13
A. Battery Pack Preparation For Recycling........................................................................13
■ Service Information .............................................................................................................14
CAUTION: Carefully read through this entire manual before using your new drill-driver.
Look for this symbol to point out important safety precautions. It
means attention!!! Your safety is involved.
TYPICAL APPLICATIONS
15
20
DRILLING
Page 2
Page 3
RULES FOR SAFE OPERATION
The purpose of safety symbols is to attract your attention to possible dangers. The safety symbols, and the
explanations with them, deserve your careful attention and understanding. The safety warnings do not by
themselves eliminate any danger. The instructions or warnings they give are not substitutes for proper accident
prevention measures.
SYMBOL MEANING
SAFETY ALERT SYMBOL:
Indicates danger, warning, or caution. May be used in conjunction with other symbols or pictographs.
DANGER: Failure to obey a safety warning will result in serious injury to yourself or to others. Always
follow the safety precautions to reduce the risk of fire, electric shock, and personal injury.
WARNING: Failure to obey a safety warning can result in serious injury to yourself or to others. Always
follow the safety precautions to reduce the risk of fire, electric shock and personal injury.
CAUTION: Failure to obey a safety warning may result in property damage or personal injury to yourself
or to others. Always follow the safety precautions to reduce the risk of fire, electric shock and personal
injury.
NOTE: Advises you of information or instructions vital to the operation or maintenance of the equipment.
KNOW YOUR CORDLESS TOOL
Safe operation of this cordless tool requires that you read
and understand this Operator's Manual and all labels affixed
to the tool. Learn its applications and limitations as well as
the potential hazards related to a cordless tool. Keep this
manual readily available for future reference.
IMPORTANT
Servicing of a tool requires extreme care and knowledge of
the system and should be performed only by a authorized
service technician. For service we suggest you return the
tool to your nearest Ryobi Authorized Service Center for
repair. When servicing, use only identical Ryobi replacement
parts.
WARNING:
Do not attempt to operate this tool until you have read
thoroughly and understand completely all instructions,
safety rules, etc. contained in this manual. Failure to
comply can result in accidents involving fire, electric
shock, or serious personal injury. Save this operator's
manual and review it frequently for continuing safe
operation, and instructing others who may use this tool.
WARNING:
When using power tools, basic safety precautions should
always be followed to reduce the risk of fire, electric
shock, and personal injury, including the following
precautions.
READ ALL INSTRUCTIONS
1. KEEP THE WORK AREA CLEAN. Cluttered work
areas and work benches invite injuries.
2. CONSIDER WORK AREA ENVIRONMENT. Keep
work area well lit. Do not use tool in presence of
flammable liquids or gases.
3. GUARD AGAINST ELECTRICAL SHOCK BY
PREVENTING BODY CONTACT WITH
GROUNDED SURFACES. For example: Pipes,
radiators, ranges, refrigerator enclosures.
4. KEEP CHILDREN AND VISITORS AWAY. All
visitors should wear safety glasses and be kept a
safe distance from work area. Do not let visitors
contact tool or extension cord.
5. STORE IDLE TOOLS. When not in use tools
should be stored in a dry and high or locked-up
place - out of the reach of children.
6. DON'T FORCE TOOL. It will do the job better and
safer at the rate for which it was designed.
7. USE RIGHT TOOL. Don't force small tool or
attachment to do the job of a heavy duty tool. Don't
use tool for purpose not intended - for example - A
circular saw should never be used for cutting tree
limbs or logs.
8. WEAR PROPER APPAREL. Do not wear loose
clothing or jewelry that can get caught in tool's
moving parts and cause personal injury. Rubber
gloves and nonskid footwear are recommended
Page 3
Page 4
RULES FOR SAFE OPERATION (Continued)
when working outdoors. Wear protective hair
covering to contain long hair and keep it from being
drawn into nearby air vents.
9. ALWAYS WEAR SAFETY GLASSES. Everyday
eyeglasses have only impact-resistant lenses; they
are NOT safety glasses.
10. PROTECT YOUR LUNGS. Wear a face mask or
dust mask if operation is dusty.
11. PROTECT YOUR HEARING. Wear hearing
protection during extended periods of operation.
12. SECURE WORK. Use clamps or a vise to hold
work. It's safer than using your hand and it frees
both hands to operate tool.
13. DON'T OVERREACH. Keep proper footing and
balance at all times. Do not use on a ladder or
unstable support.
14. MAINTAIN TOOLS WITH CARE. Keep tools sharp
at all times, and clean for best and safest
performance. Follow instructions for lubricating
and changing accessories.
15. REMOVE ADJUSTING KEYS AND WRENCHES.
Form habit of checking to see that keys and
adjusting wrenches are removed from tool before
turning it on.
16. AVOID UNINTENTIONAL STARTING. Do not
carry the tool with your finger on the switch. Be
sure switch is off when installing battery pack.
17. STAY ALERT. Watch what you are doing and use
common sense. Do not operate tool when you are
tired. Do not rush.
18. CHECK DAMAGED PARTS. Before further use
of the tool, a guard or other part that is damaged
should be carefully checked to determine that it will
operate properly and perform its intended function.
Check for alignment of moving parts, binding of
moving parts, breakage of parts, mounting, and
any other conditions that may affect its operation.
A guard or other part that is damaged should be
properly repaired or replaced by an authorized
service center unless indicated elsewhere in this
operator's manual.
19. DO NOT USE TOOL IF SWITCH DOES NOT
TURN IT ON AND OFF. Have defective switches
replaced by an authorized Ryobi Service Center.
20. DRUGS, ALCOHOL, MEDICATION. Do not
operate tool while under the influence of drugs,
alcohol, or any medication.
21. INSPECT FOR and remove all nails from lumber
before drilling.
22. DO NOT CHARGE BATTERY TOOL IN A DAMP
OR WET LOCATION.
PRECAUTIONS ON USING YOUR
CORDLESS TOOL
This product contains Nickel-Cadmium batteries which
must be disposed of properly.
1. Be aware that this tool is always in an operating
condition, because it does not have to be plugged
into an electrical outlet.
2. First, charge the battery.
3. Be sure the battery is snapped in place.
4. When not in use, lock the switch.
5. When operating at a high place, be aware of things
below you.
6. Before drilling into walls, ceilings, or floors, make
sure that there are no concealed power cables
inside.
WARNING:
Drilling into electrical wiring in walls can cause
drill bit and chuck to become electrically live.
Do not touch the chuck or metal housing when
drilling into a wall; grasp only the insulated
handle(s) provided on the tool.
IMPORTANT SAFETY INSTRUCTIONS FOR
CHARGER
1. SAVE THESE INSTRUCTIONS. This manual
contains important safety and operating instructions
for charging the battery with the following
components:
MODEL BATTERY CHARGER
R10511 1400652 1400666/1400677
R10521 1400655/1400671 1400656/1400677
R10531 1400672 1400667/1400677
2. Before using battery charger, read all instructions
and cautionary markings on (1) battery charger, (2)
battery, and (3) products using battery.
WARNING:
To reduce risk of injury, charge only nickelcadmium type rechargeable batteries. Other types
of batteries may burst causing personal injury
and damage.
3. Do not expose charger to rain or snow.
4. Use of an attachment not recommended or sold by
the battery charger manufacturer may result in a
risk of fire, electric shock, or injury to persons.
Page 4
Page 5

RULES FOR SAFE OPERATION (Continued)
5. To reduce risk of damage to electric plug and cord,
pull by the plug rather than the cord when
disconnecting charger.
6. Make sure cord is located so that it will not be
stepped on, tripped over, or otherwise subjected
to damage or stress.
7. An extension cord should not be used unless
absolutely necessary. Use of improper extension
cord could result in a risk of fire and electric shock.
If extension cord must be used, make sure:
a. That pins on plug of extension cord are the
same number, size and shape as those of plug
on charger.
b. That extension cord is properly wired and in
good electrical condition; and
c. That wire size is large enough for AC ampere
rating of charger as specified below:
Cord Length (Feet) 25 ft. 50 ft. 100 ft.
Cord Size (AWG) 16 16 16
Note: AWG = American Wire Gage
8. Do not operate charger with damaged cord or
plug. Replace immediately.
9. Do not operate charger if it has received a sharp
blow, been dropped, or otherwise damaged in any
way; take it to a Ryobi Authorized Service Center.
10. Do not disassemble charger; take it to a Ryobi
Authorized Service Center when service or
repair is required. Incorrect reassembly may result
in a risk of electric shock or fire.
11. To reduce risk of electric shock, unplug charger
from outlet before attempting any maintenance
or cleaning. Turning off controls will not reduce
this risk.
PRECAUTIONS REGARDING THE USE OF
CHARGER AND BATTERY
1. Do not charge battery when temperature is below
50° F (10° C) or above 95° F (35° C).
2. Never attempt to connect two chargers together.
3. The charger is designed to operate on standard
household electrical power. Do not attempt to
use it on any other voltage.
4. Consecutive charging may cause overheating. If
you need to recharge batteries consecutively,
wait for about 15 minutes to allow charger to cool.
5. Do not insert foreign matter into the hole for the
battery in charger stand.
6. Do not charge by means of an engine generator
or DC power source.
7. Do not disassemble the battery.
8. Do not store the tool and battery in locations
where the temperature may reach or exceed
104° F (40° C), such as outside sheds or metal
buildings in summer.
9. Do not incinerate the battery, even if it is severely
damaged or completely worn out. The battery
may explode in fire.
10. Battery leakage may occur under conditions of
extreme usage or temperature. If liquid comes in
contact with skin, wash quickly with soap and
water, then with lemon juice or vinegar. If liquid
gets in your eyes, wash with water for at least 10
minutes and seek medical attention immediately.
11. Do not short-circuit the battery.
WARNING:
Some dust created by power sanding, sawing, grinding,
drilling, and other construction activities contains
chemicals known to cause cancer, birth defects or
other reproductive harm. Some examples of these
chemicals are:
• lead from lead-based paints,
• crystalline silica from bricks and cement and other
masonry products, and
• arsenic and chromium from chemically-treated lumber.
Your risk from these exposures varies, depending on
how often you do this type of work. To reduce your
exposure to these chemicals: work in a well ventilated
area, and work with approved safety equipment, such
as those dust masks that are specially designed to filter
out microscopic particles.
WARNING:
The operation of any power tool can result in foreign objects being thrown into your eyes, which
can result in severe eye damage. Before beginning power tool operation, always wear safety
goggles or safety glasses with side shields and a full face shield when needed. We recommend
Wide Vision Safety Mask for use over eyeglasses or standard safety glasses with side shields.
SAVE THESE INSTRUCTIONS
Page 5
Page 6
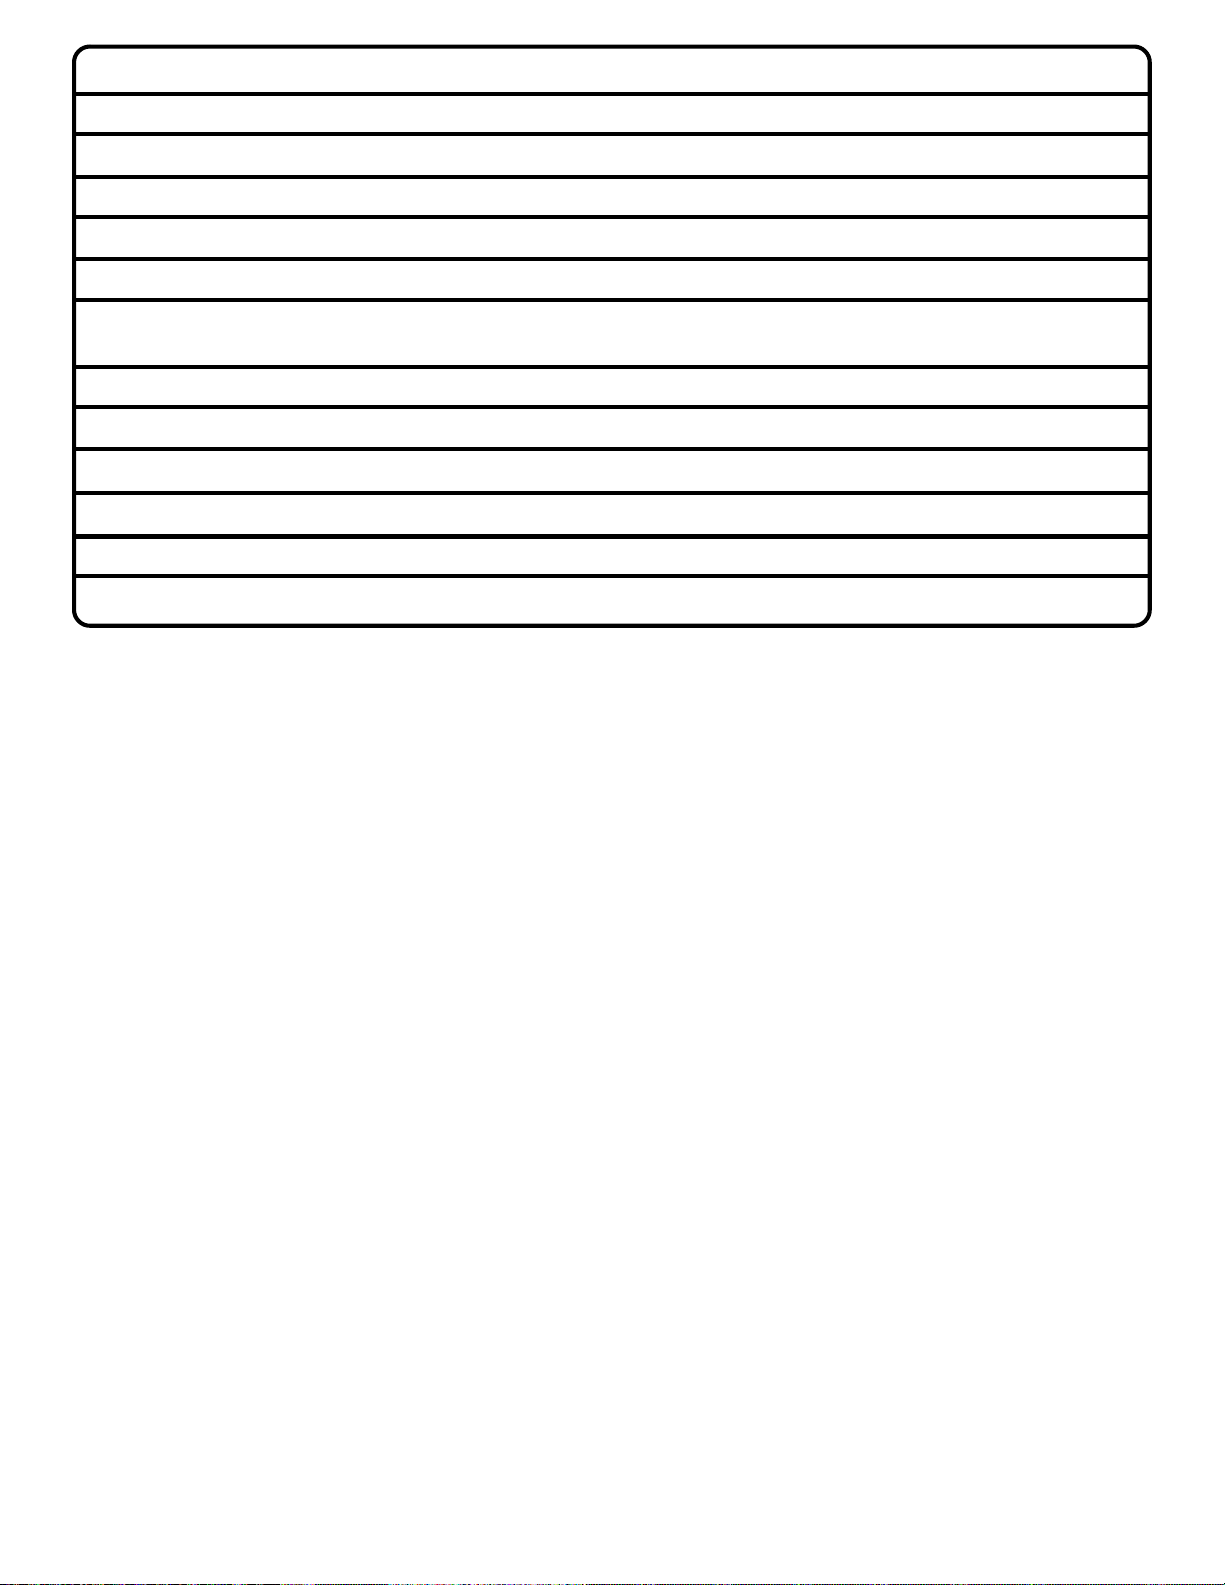
SPECIFICATIONS:
DRILL-DRIVER R10511 R10521 R10531
Chuck 3/8 in. Keyless 3/8 in. Keyless 1/2 in. Keyless
Motor DC Motor 12.0 V DC Motor 14.4 V DC Motor 18.0 V
Gear Train Two Speed Two Speed Two Speed
Switch Variable Speed Variable Speed Variable Speed
No Load Speed 0-400 RPM (Low) 0-400 RPM (Low) 0-400 RPM (Low)
0-1400 RPM (High) 0-1400 RPM (High) 0-1400 RPM (High)
Clutch 24 Positions 24 Positions 24 Positions
Maximum Torque 250 in./lbs 350 in./lbs 400 in./lbs
CHARGER 1400666/1400677 1400656/1400677 1400667/1400677
Input 120 V, 60 Hz, AC only 120 V, 60 Hz, AC only 120 V, 60 Hz, AC only
Charging Voltage 12.0 V 14.4 V 18.0 V
Charge Rate 1 Hour 1 Hour 1 Hour
OVERLOAD
(For Model R10531 only)
Y our drill has a built-in overload protector to protect the motor during overloading or prolonged use. The overload protector
automatically activates to break the circuit. When this occurs, allow your drill to cool a few seconds before resuming
operation.
IMPORTANT INFORMATION FOR RECHARGING HOT BATTERIES USING CHARGER PART
NUMBER 1400677
When using your drill-driver continuously, the batteries in your battery pack will become hot. You should let a hot battery
pack cool down for approximately 30 minutes before attempting to recharge. When the battery pack becomes discharged
and is hot, this will cause the red light on your battery charger to flash. When battery pack cools down, red light will glow
continuously indicating fast charging mode, 1 hour charge time. Once the battery pack cools down, it will recharge battery
pack in fast charging mode as normal.
IMPORTANT INFORMATION FOR RECHARGING HOT BATTERIES USING CHARGER PART
NUMBER 1400666, 1400656, OR 1400667
When using your drill-driver continuously, the batteries in your battery pack will become hot. You should let a hot battery
pack cool down for approximately 30 minutes before attempting to recharge. When the battery pack becomes discharged
and is hot, this will cause the yellow and green lights on your battery charger to come on instead of the red light. The yellow
and green lights indicate soft start mode and will switch to green only, indicating slow charge mode. The red light indicates
fast charge mode, 1 hour charge time. The green light indicates slow charge mode, requiring overnight charging for
batteries to reach full charge. If the green light comes on after letting battery pack cool down, remove it from charger for
additional cooling.
Once the battery pack cools down, it will recharge battery pack in fast charging mode as normal.
Do not leave a hot battery pack in charger until it cools down. The green light will not go off when battery pack cools. If fast
charge mode is desired, you must physically remove a hot battery pack from the charger, let it cool, then place it back in
charger after it has cooled down. Once the battery pack cools down, it will recharge battery pack in fast charging mode as
normal.
NOTE: This situation only occurs when continuous use of your drill-driver causes the batteries to become hot. It does not
occur under normal circumstances. Refer to "CHARGING YOUR DRILL-DRIVER" for normal recharging of batteries.
If the charger does not charge your battery pack under normal circumstances, return both the battery pack and charger to
your nearest Ryobi Authorized Repair Center for electrical check.
Page 6
Page 7
OPERATION
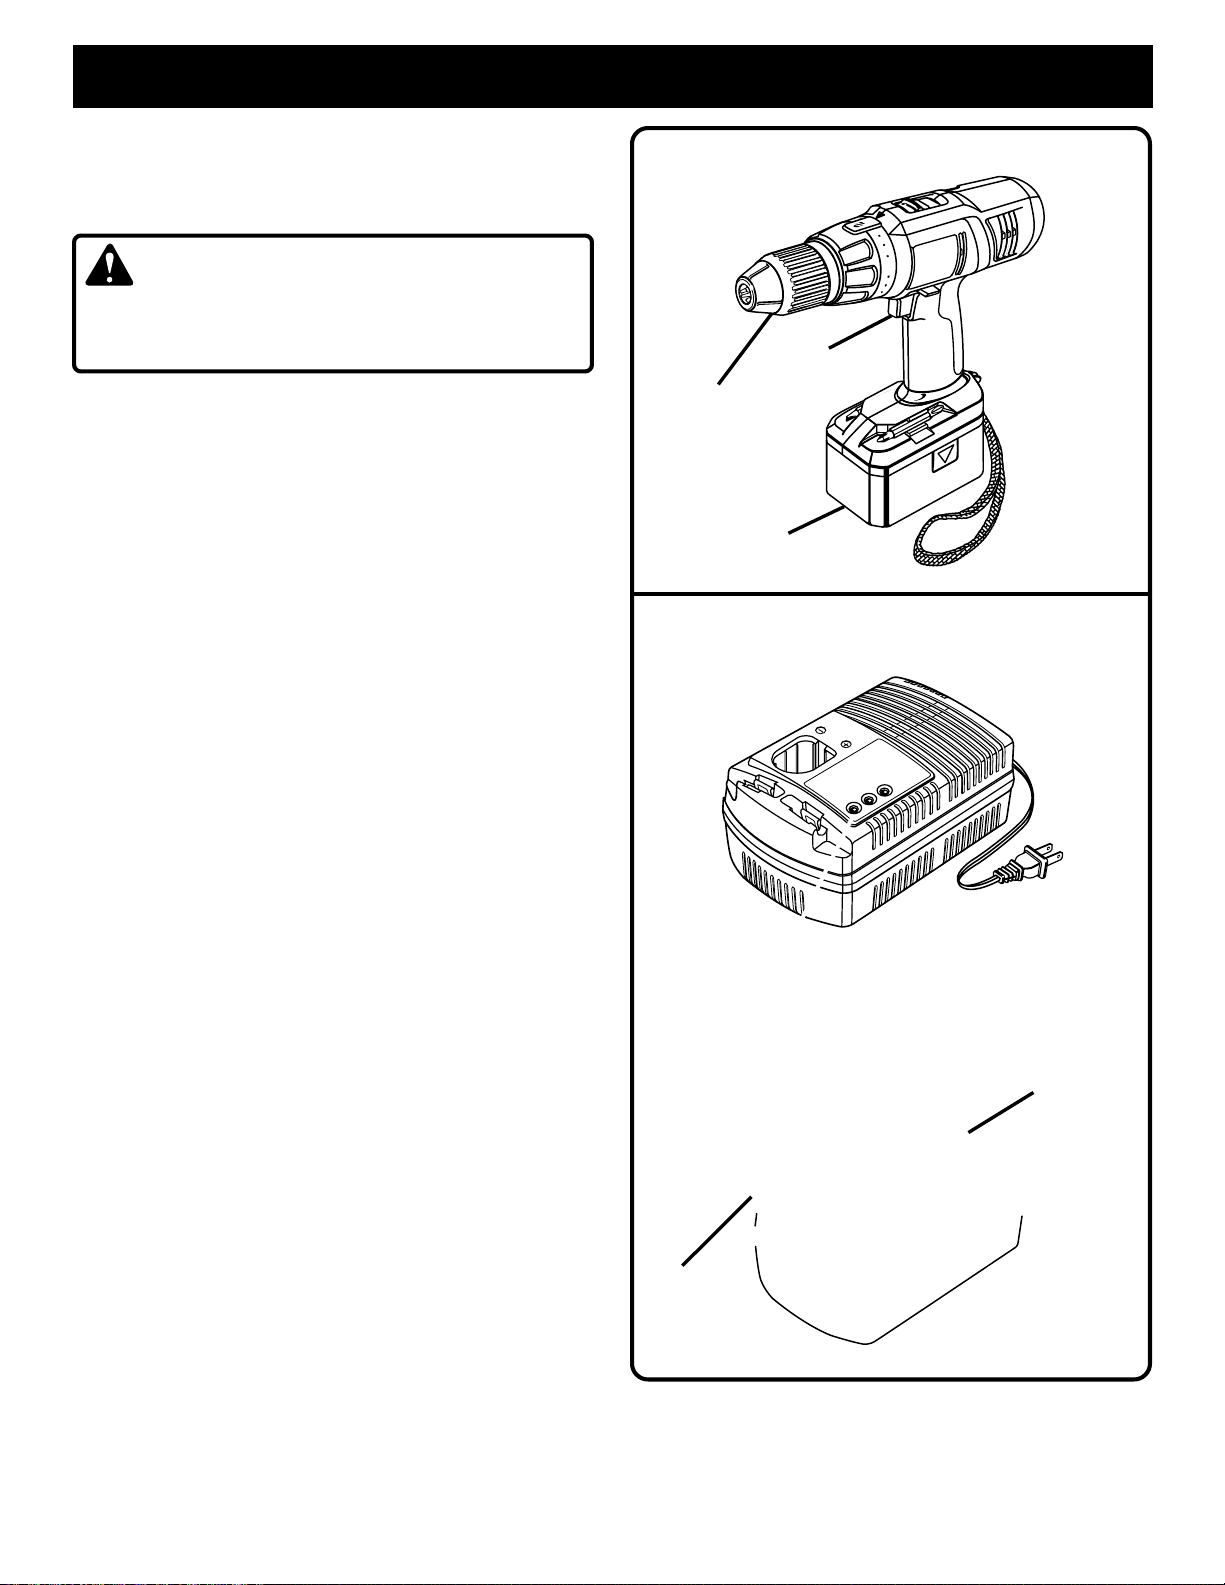
KNOW YOUR DRILL-DRIVER
See Figure 1.
Before attempting to use any tool, familiarize yourself with all
operating features and safety requirements.
W ARNING:
Do not allow familiarity with tools to make you careless.
Remember that a careless fraction of a second is sufficient
to inflict severe injury.
Note: A bit storage is located on the bottom of your drill and
also on the charger.
CHARGING YOUR DRILL-DRIVER
The battery pack for this tool has been shipped in a low
charge condition to prevent possible problems. Therefore,
you should charge it prior to use.
Note: Batteries will not reach full charge the first time they are
charged. Allow several cycles (drilling followed by recharging)
for them to fully charge.
TO CHARGE
■ Charge battery pack only with the charger provided.
■ Make sure power supply is normal house voltage, 120
volts, 60 Hz, AC only.
■ Connect charger to power supply.
■ Place battery pack in charger aligning raised rib in charger
with groove in battery pack.
■ Press down on battery pack to be sure contacts on battery
pack engage properly with charger contacts. When properly
connected, red light will turn on.
■ When your battery pack becomes fully charged, the red
light will turn off and the green light will turn on.
■ After normal usage, 1 hour of charge time is required to be
fully charged. A minimum charge time of 1-1/2 hours is
required to recharge a completely discharged tool.
■ The battery pack will become slightly warm to the touch
while charging. This is normal and does not indicate a
problem.
■ DO NOT place charger in an area of extreme heat or cold.
It will work best at normal room temperature.
■ When the batteries become fully charged, unplug your
charger from power supply and remove the battery pack.
CHARGING WITH CHARGER 1400677
See Figure 2.
If red light is flashing, this indicates battery pack is deeply
discharged or hot.
If battery pack is hot, red light should become steady after
battery pack has cooled down.
If battery pack is deeply discharged, red light should become
steady after voltage has increased, normally within 30
minutes.
If after one hour red light is still flashing, this indicates a
defective battery pack and should be replaced.
See Figures 1 and 2.
TORQUE
ADJUSTMENT
RING
TRIGGER
KEYLESS
CHUCK
BATTERY
PACK
GREEN LIGHT "ON"
INDICATES FULLY CHARGED
OR IN SLOW CHARGING MODE
YELLOW LIGHT "ON" AND RED LIGHT
FLASHING INDICATES DEFECTIVE
BATTERY PACK
BATTERY
PACK
BIT STORAGE
TWO SPEED GEAR TRAIN (LO-HI)
24
20
SWITCH
✒
DIRECTION OF
ROTATION
SELECTOR
BIT
STORAGE
Fig. 1
BATTERY
CHARGER
BATTERY
CHARGER
Fig. 2
Page 7
Page 8
OPERATION
LED FUNCTION OF CHARGER 1400677
LED WILL BE LIGHTED TO INDICATE STA TUS OF CHARGER AND BA TTERY PACK:
■ Red LED Lighted = Fast Charging Mode.
■ Green LED Lighted = Fully Charged Or In Slow Charging Mode To Maintain Battery Pack Charge.
■ Red LED Flashing = Hot or Deeply Discharged Battery Pack. Also Defective Battery Pack After 1 hour.
■ Yellow LED Lighted and Red LED Flashing = Defective Battery Pack.
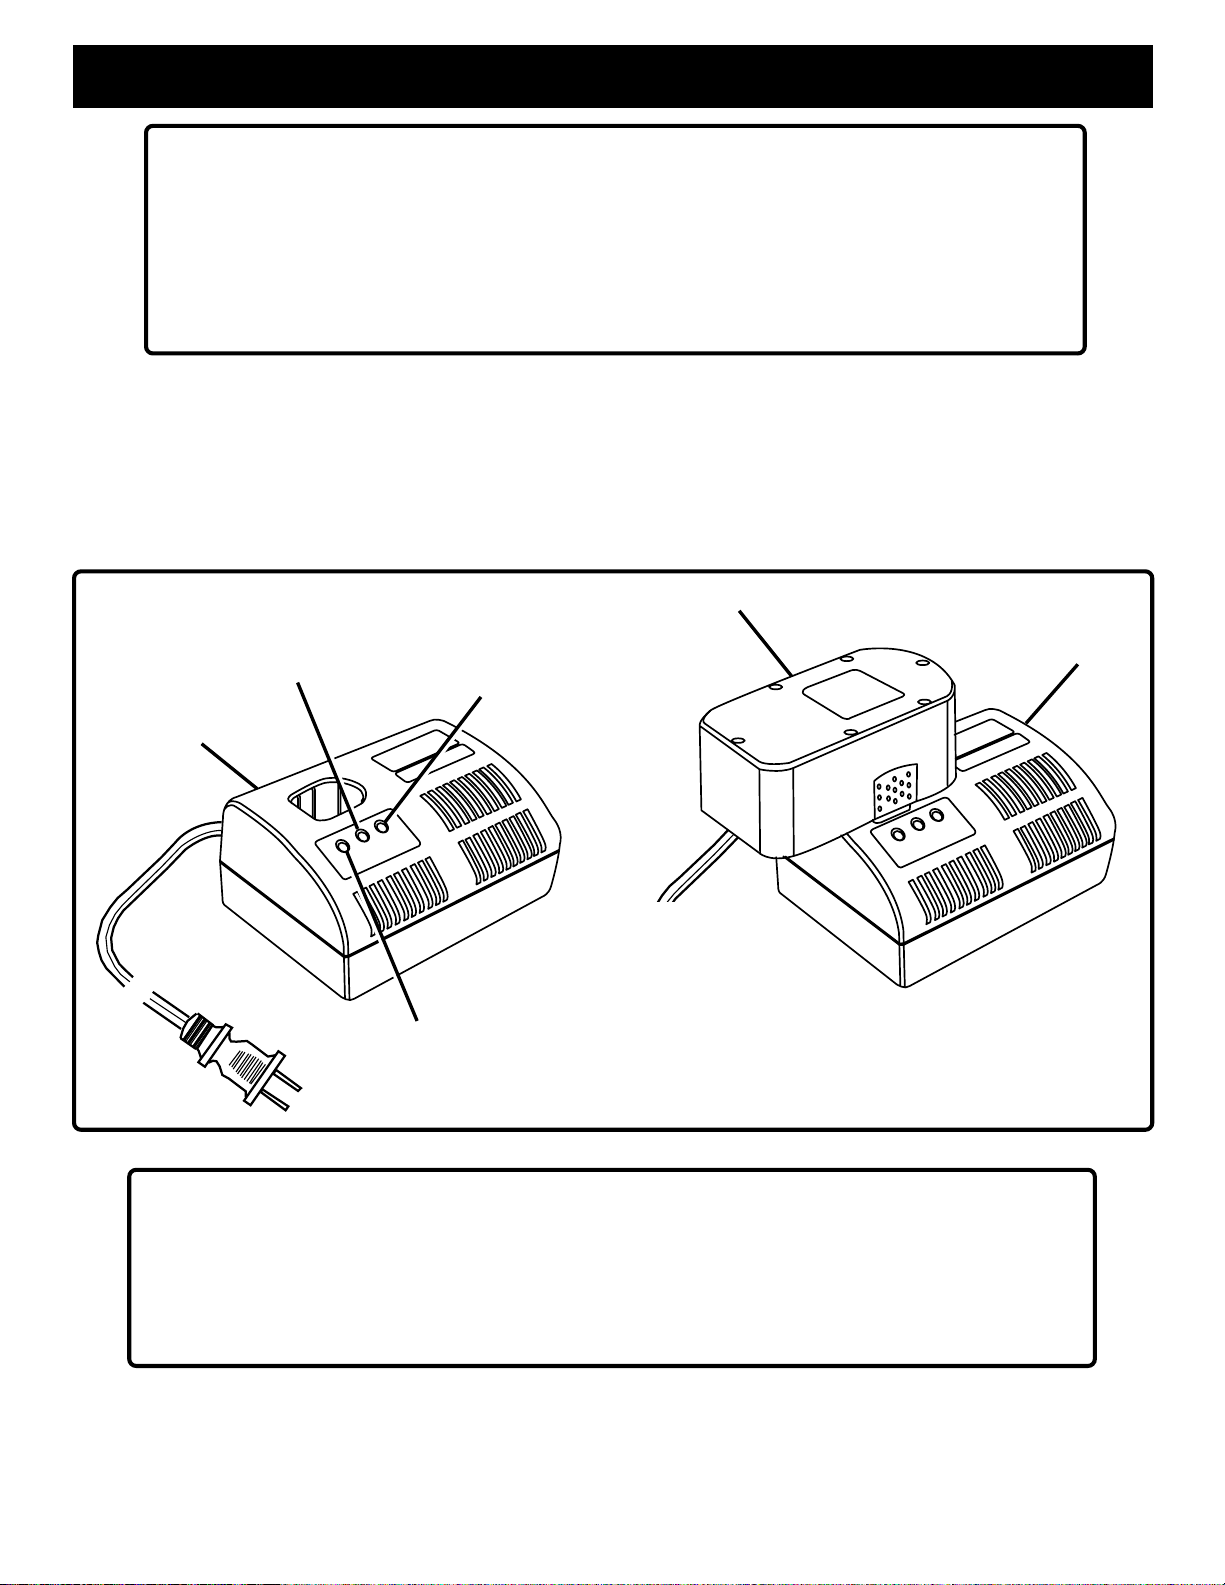
CHARGING WITH CHARGER 1400666, 1400656, OR 1400667
See Figure 3.
■ Normally, the yellow and green lights on charger will come on. This indicates charger is in control charge mode and
should switch to fast charge mode within 5 minutes. When charger is in fast charge mode the red light will come on. If
after a period of 15 minutes the yellow and green lights remain on, remove battery pack, wait 1 minute and reinsert
battery pack in charger. If the yellow and green lights continue to remain on after an additional 15 minutes, the battery
pack is damaged and will not accept a charge.
GREEN LIGHT "ON"
INDICATES FULLY CHARGED
OR IN SLOW CHARGING
MODE
CHARGER
YELLOW AND GREEN LIGHTS
INDICATE SOFT START MODE
RED LIGHT "ON"
INDICATES FAST
CHARGING MODE
BATTERY PACK
CHARGER
Fig. 3
LED FUNCTION OF CHARGER 1400666, 1400656 AND 1400667
LED WILL BE LIGHTED TO INDICATE STATUS OF CHARGER AND BATTERY PACK:
■ Red LED Lighted = Fast Charging Mode.
■ Green LED Lighted = Fully Charged Or In Slow Charging Mode To Maintain Battery Pack.
■ Y ellow and Green LED Lighted = Soft Start Mode Or After 1/2 Hour Equals Hot Or Defective Battery Pack.
Page 8
Page 9
✒
20
24
OPERATION
WARNING:
If any parts are missing, do not operate tool until the
missing parts are replaced. Failure to do so could result
in possible serious personal injury.
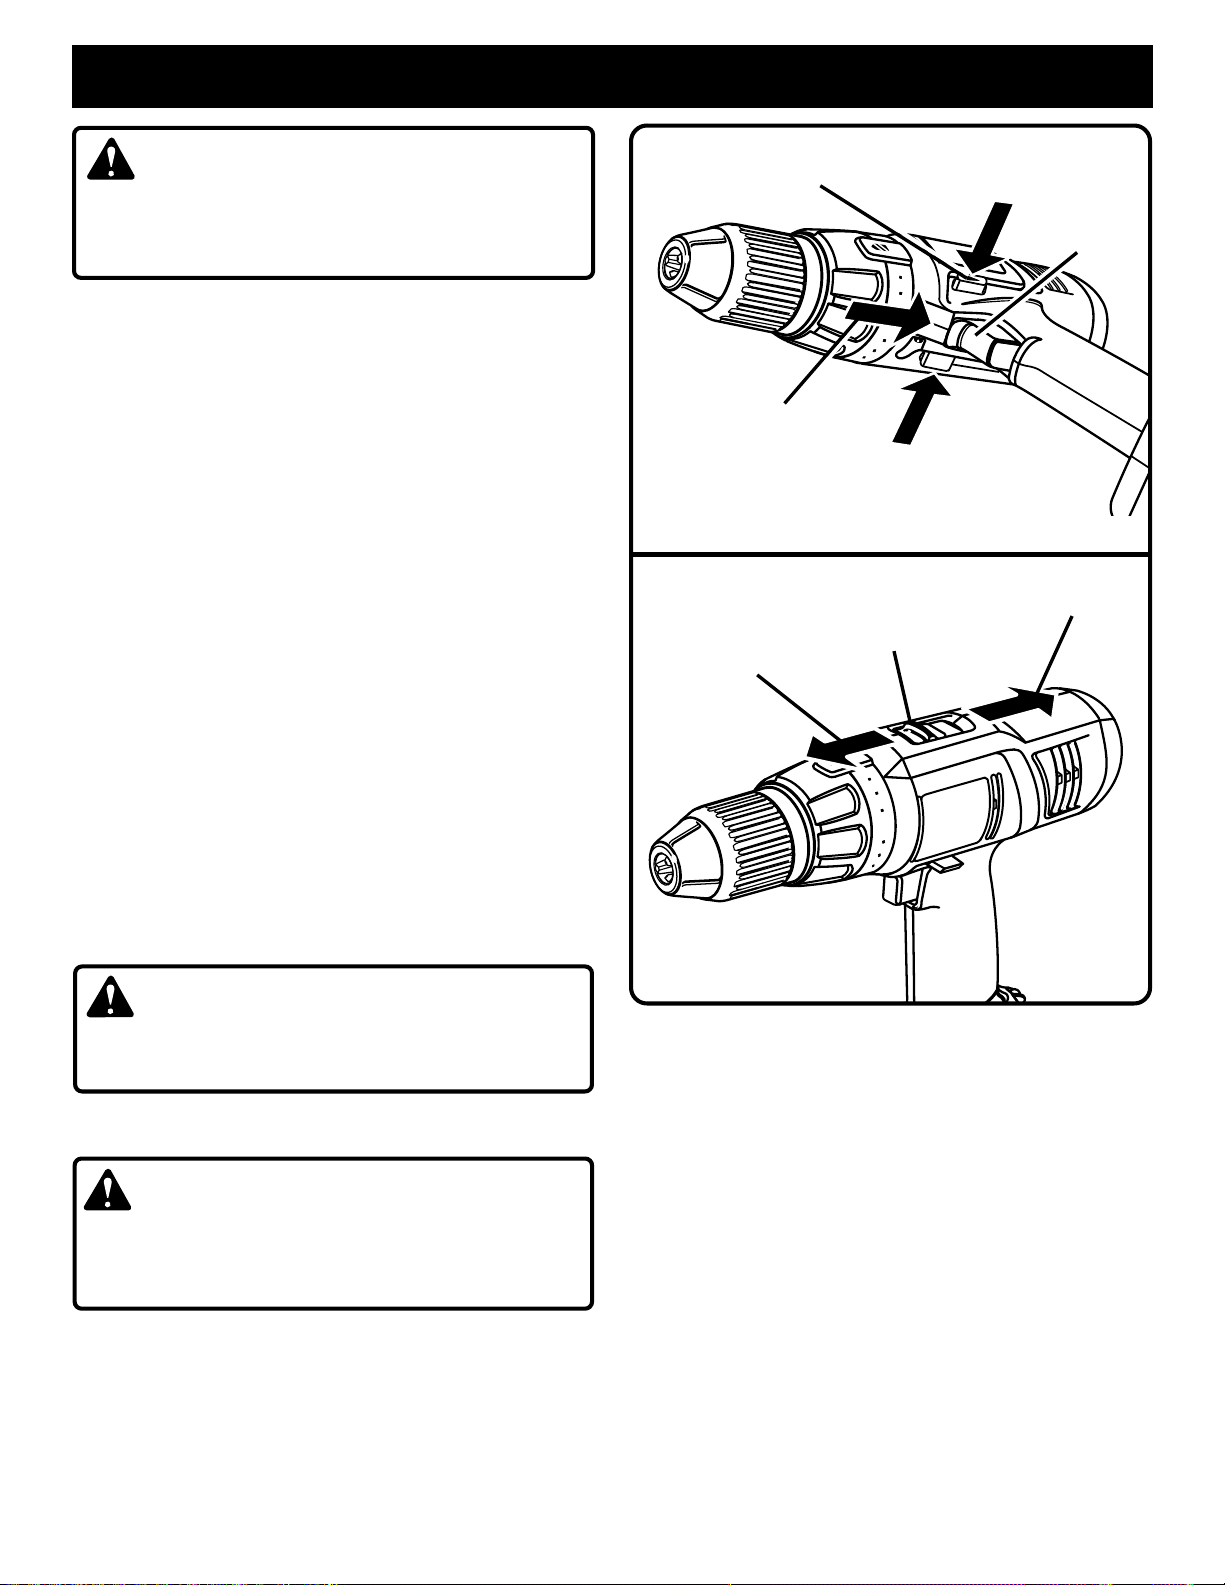
SWITCH
See Figure 4.
Your drill starts and stops by depressing and releasing the
switch trigger. Release the switch trigger to turn drill OFF.
VARIABLE SPEED
See Figure 4.
Your drill has a variable speed feature in the switch. The
switch delivers higher speed and torque with increased
trigger pressure. Speed is controlled by the amount of
switch trigger depression.
SWITCH LOCK
See Figure 4.
The switch trigger can be locked in the OFF position. This
feature helps reduce the possibility of accidental starting
when not in use. To lock the switch trigger, place the direction
of rotation selector in the center position.
DIRECTION OF
ROTATION SELECTOR
CENTER POSITION
(LOCK)
FORWARD
TWO SPEED
GEAR TRAIN
HI (2)
4
2
20
(LO-HI)
REVERSE
SWITCH
TRIGGER
Fig. 4
LO (1) SPEED
REVERSIBLE
See Figure 4.
This tool is reversible. The direction of rotation is controlled
by a direction of rotation selector located above the switch
trigger. With the drill held in normal operating position, the
direction of rotation selector should be positioned to the left
of the switch for drilling. The drilling direction is reversed
when the selector is to the right of the switch. When the
selector is in center position, the switch trigger is locked.
CAUTION:
To prevent gear damage, always allow chuck to come to
a complete stop before changing the direction of rotation.
To stop, release switch trigger and allow the chuck to come
to a complete stop.
WARNING:
Battery tools are always in operating condition. Therefore,
switch should always be locked when not in use or when
carrying at your side.
Fig. 5
TWO SPEED GEAR TRAIN
See Figure 5.
Your drill has a two-speed gear train designed for drilling or
driving at LO (1) or HI (2) speeds. A slide switch is located
on top of your drill to select either LO (1) or HI (2) speed.
When using drill in the LO (1) speed range, speed will
decrease and unit will have more power and torque. When
using drill in the HI (2) speed range, speed will increase and
unit will have less power and torque. Use LO (1) speed for
high power and torque applications and HI (2) speed for
fast drilling or driving applications.
Page 9
Page 10
Page 10
Page 11
OPERATION
INSTALLING AND REMOVING BITS
■ Place the direction of rotation selector at the center
position. This will lock the switch trigger in the off
position.
■ Open or close the chuck jaws to a point where the
opening is slightly larger than the bit size you intend to
use. Also, raise the front of your drill slightly to keep the
bit from falling out of the chuck jaws.
■ Insert your drill bit into the chuck the full length of the
jaws.
See Figure 8.
■ Tighten the chuck jaws on the drill bit. To tighten, grasp
and hold the drill with one hand, while rotating the chuck
sleeve with your other hand.
Note: Rotate the chuck sleeve in the direction of the arrow
marked CLOSE to tighten the chuck jaws. DO NOT use a
wrench to tighten or loosen the chuck jaws.
WARNING:
Do not insert drill bit into chuck jaws and tighten as shown
in figure 9. This could cause drill bit to be thrown from
drill resulting in possible serious personal injury or
damage to the chuck.
24
20
Fig. 8
REMOVING BITS
See Figure 8.
■ Place the direction of rotation selector at the center
position. This will lock the switch trigger in the off position.
■ Loosen the chuck jaws from drill bit
■ To loosen: grasp and hold the drill with one hand, while
rotating chuck sleeve with your other hand.
Note: Rotate chuck sleeve in the direction of the arrow
marked OPEN to loosen chuck jaws. DO NOT use a
wrench to tighten or loosen the chuck jaws.
■ Remove drill bit from chuck jaws.
.
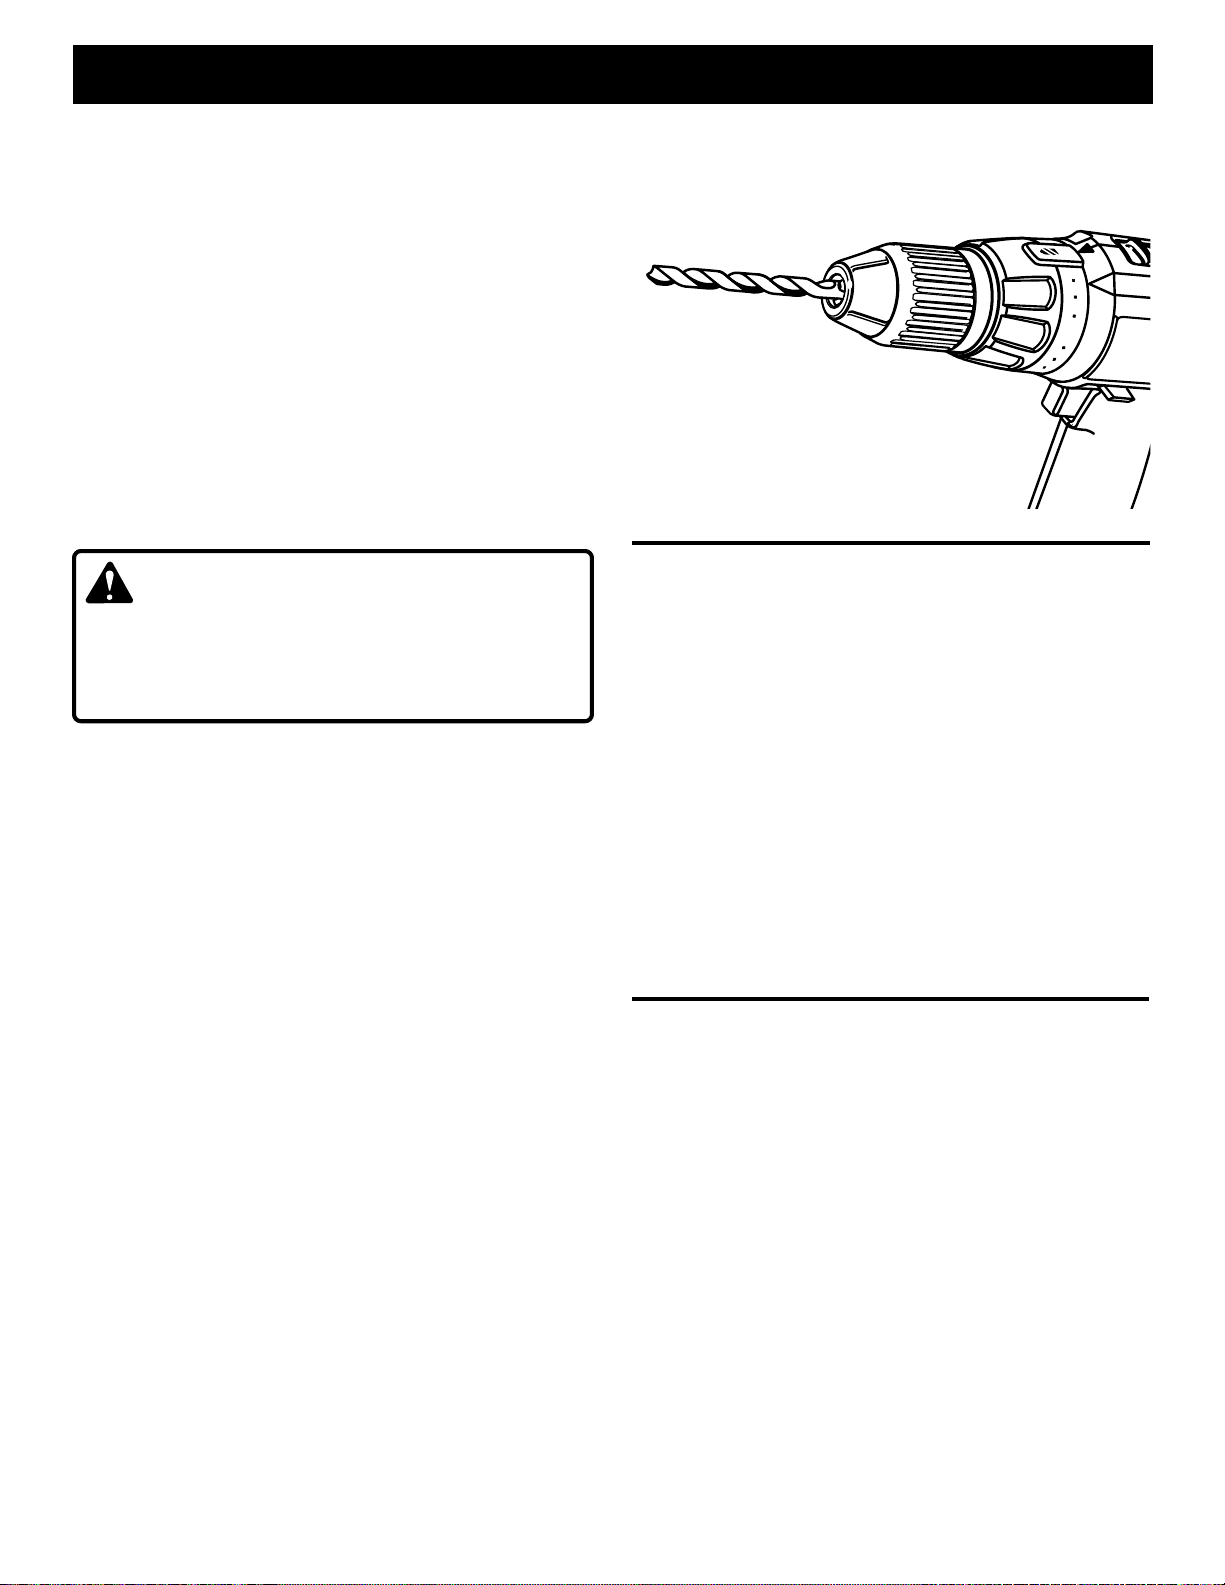
DRILLING
See Figure 10.
Page 11
Page 12
✒
20
24
OPERATION
WARNING:
Be prepared for binding or breakthrough. When these
situations occur, the drill has a tendency to grab and kick
in the opposite direction, and could cause loss of control
when breaking through material. If you are not prepared,
this loss of control can result in possible serious injury.
When drilling metals, use a light oil on the drill bit to keep it
from overheating. The oil will prolong the life of the bit and
increase the drilling action.
If the bit jams in workpiece or if the drill stalls, release switch
trigger immediately . Remove the bit from the workpiece and
determine the reason for jamming.
SCREWDRIVING
TORQUE ADJUSTMENT
(Driving power of your drill-driver)
When using your drill-driver for various driving applications,
it becomes necessary to increase or decrease the torque in
order to help prevent the possibility of damaging screw
heads, threads, workpiece, etc. In general, torque intensity
should correspond to the screw diameter. If the torque is too
high or the screws too small, the screws may be damaged or
broken.
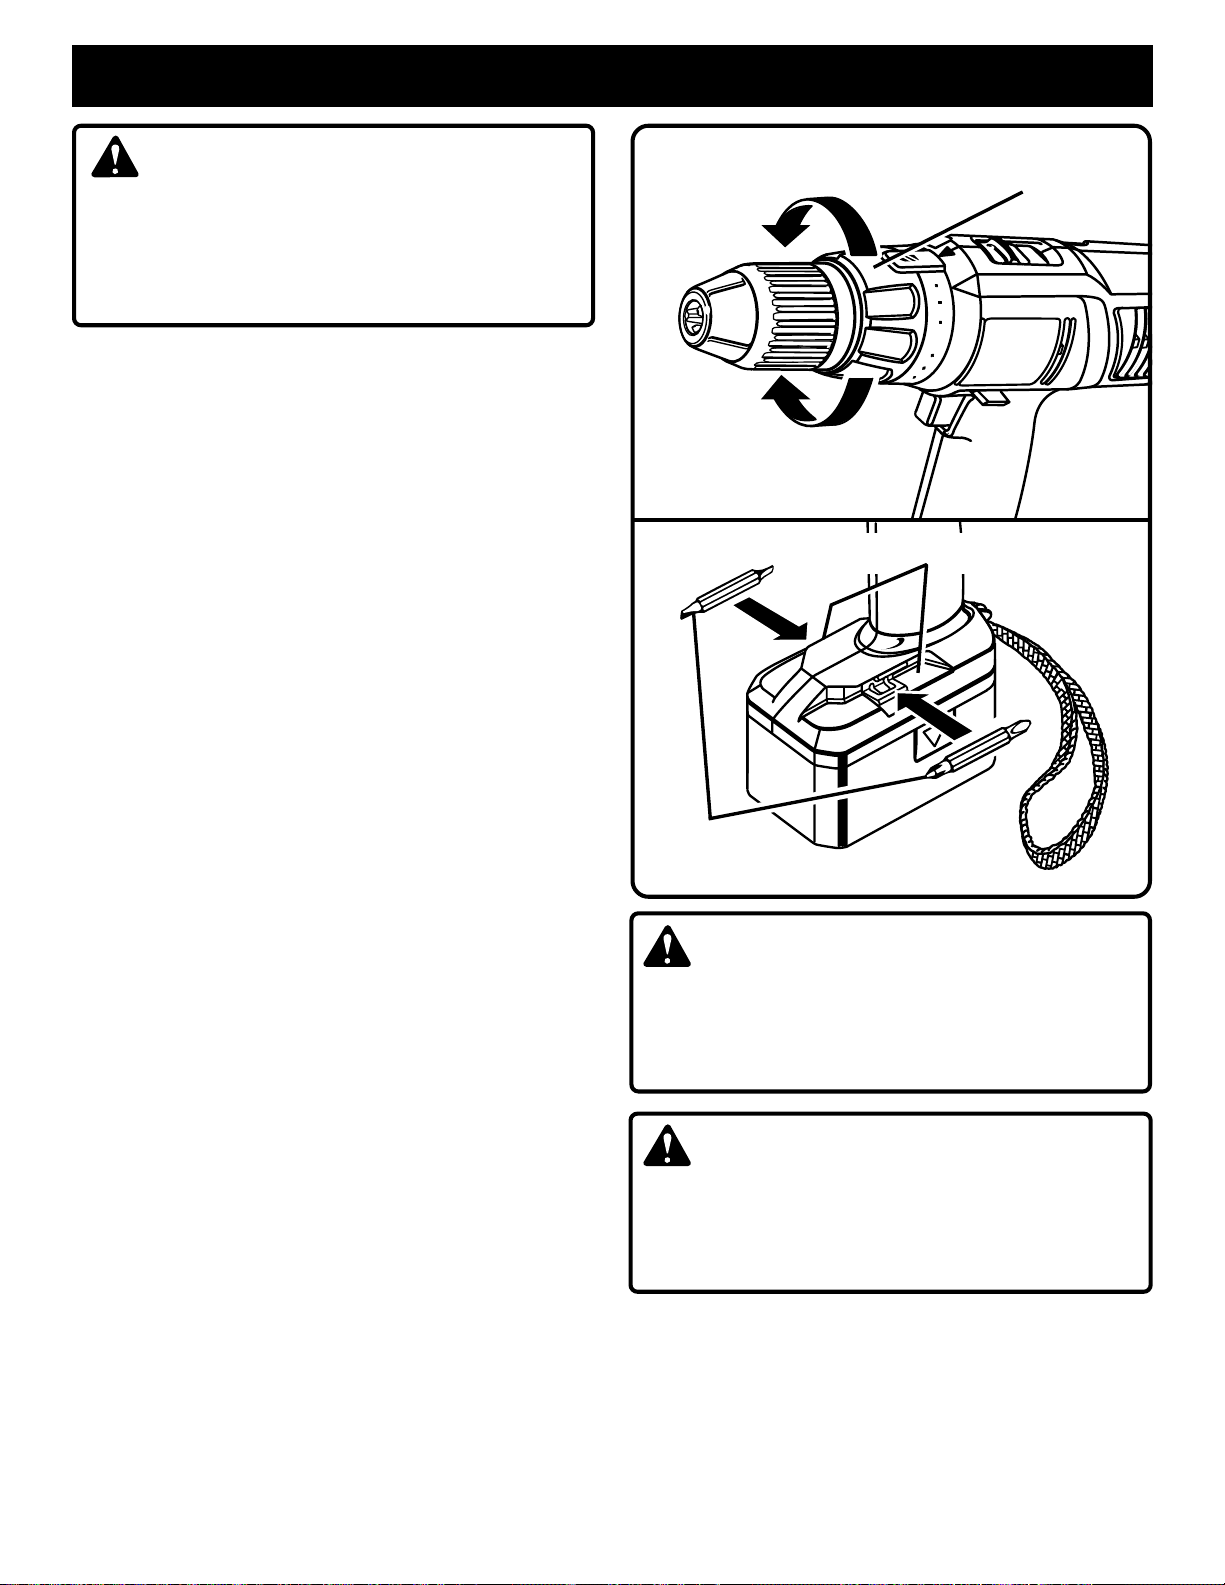
The torque is adjusted by rotating the torque adjustment ring.
See Figure 11.
ment ring is set on a higher setting. The torque is less when
the torque adjustment ring is set on a lower setting.
The proper setting depends on the type of material and the
size of screw you are using.
The torque is greater when the torque adjust-
SCREWDRIVER
BITS
TO DECREASE
TORQUE
TO INCREASE
TORQUE
BIT STORAGE AREA
TORQUE
ADJUSTMENT RING
Fig. 11
Fig. 12
TO ADJUST TORQUE
■ Identify the twenty four torque indicator settings located
on the front of your drill.
■ Rotate adjustment ring to the desired setting.
• 1 For driving small screws.
• 1 - 5 For driving screws into soft material.
• 5 - 10 For driving screws into soft and hard
materials.
• 10 - 15 For driving screws in hard wood.
• 15 - 20 For driving large screws.
• Drill For heavy drilling.
See Figure 11.
BIT STORAGE
See Figure 12.
When not in use, bits provided with your drill can be placed
in the storage area located at the bottom of your drill as
shown in figure 12.
WARNING:
Always wear safety goggles or safety glasses with side
shields when operating tool. Failure to do so could result
in objects being thrown into your eyes, resulting in
possible serious injury.
CAUTION:
Do not attempt to remove or tighten the chuck on your
drill. This will damage the spindle lock inside the drill. To
remove or tighten the chuck, we suggest you return the
tool to your nearest Ryobi Authorized Service Center.
Page 12
Page 13
MAINTENANCE
WARNING:
When servicing use only identical Ryobi replacement
parts. Use of any other parts may create a hazard or cause
product damage.
Avoid using solvents when cleaning plastic parts. Most
plastics are susceptible to damage from various types of
commercial solvents and may be damaged by their use. Use
a clean cloth to remove dirt, oil, grease, etc.
DO NOT ABUSE POWER TOOLS. Abusive practices can
damage the tool, as well as the workpiece.
WARNING:
Do not attempt to modify this tool or create accessories
not recommended for use with this tool. Any such
alteration or modification is misuse and could result in a
hazardous condition leading to possible serious personal
injury.
WARNING:
Do not at any time let brake fluids, gasoline, petroleumbased products, penetrating oils, etc., come in contact
with plastic parts. They contain chemicals that can
damage, weaken, or destroy plastics.
BATTERIES
Your drill's battery pack is equipped with Nickel-Cadmium
rechargeable batteries. Length of service from each charging will depend on the type of work you are doing.
The batteries in this tool have been designed to provide
maximum trouble-free life. However, like all batteries, they
will eventually wear out. Do not disassemble the battery
pack and attempt to replace the batteries. Handling of
these batteries, especially when wearing rings and jewelry,
could result in a serious burn.
To obtain the longest possible battery life, we suggest the
following:
CAUTION:
Any repairs requiring disassembly should only be
performed by a Ryobi Authorized Service Center. For
the repair center nearest you, call 1-800-525-2579.
■ Store and charge your batteries in a cool area.
Temperatures above normal room temperature will
shorten battery life.
■ Never store batteries in a discharged condition. Wait for
battery to cool and charge immediately.
■ All batteries gradually lose their charge. The higher the
temperature, the quicker they lose their charge. If you
store your tool for long periods of time without using it,
recharge the batteries every month or two. This practice
will prolong battery life.
DISPOSAL OF THE EXHAUSTED BATTERY
Y
C
C
L
E
R
RBRC
1
.
8
Consult your local waste authority for information regarding
available recycling and/or disposal options.
For more information on battery recycling call 1-800-
8BATTERY.
Cd
Ni
0
0
.
.
8
2
2
To preserve natural resources, please
E
recycle or dispose of properly.
This product contains nickel-cadmium
batteries. Local, state or federal laws may
7
prohibit disposal of nickel-cadmium
3
8
8
batteries in ordinary trash.
WARNING:
Do not attempt to disassemble the battery pack. Fire or
injury may result.
Page 13
BATTERY PACK PREPARATION FOR
RECYCLING
WARNING:
Upon removal, cover the battery pack's terminals with
heavy duty adhesive tape. Do not attempt to destroy or
disassemble battery pack or remove any of its
components. Also, never touch both terminals with metal
objects and/or body parts, as short circuit may result.
Keep away from children. Failure to comply with these
warnings could result in fire and/or serious injury.
Page 14

 Loading...