

Page 1

OWNER’S OPERATING MANUAL
100mm (4”) ANGLE GRINDER
SPECIFICATIONS :
Input ............................1000 watt
Grinding Wheel ........... 100 mm (4”)
Spindle Thread ............ M10 x 1.5
No Load Speed ........... 11,000 r.p.m.
Disc Bore Size ............ 16mm (5/8”)
Net Weight .................. 1.6 kg
MODEL EAG1006
DOUBLEDOUBLE
DOUBLE
DOUBLEDOUBLE
INSULATEDINSULATED
INSULATED
INSULATEDINSULATED
THANK YOU FOR BUYING A RYOBI ANGLE GRINDER
Your new grinder has been engineered and manufactured to Ryobi's high standard for
dependability, ease of operation, and operator safety. Properly cared for, it will give you years of
rugged, trouble free performance.
CAUTION: Carefully read through this entire owner's manual before using your
grinder.
Pay close attention to the Rules for Safe Operation, Warnings, and Cautions.
If you use your grinder properly and only for what it is intended, you will enjoy years of safe,
reliable service.
Thank You again for buying Ryobi tools.
SAVE THIS MANUAL FOR FUTURE REFERENCE.
Page 2

RULES FOR SAFE OPERATION
The purpose of safety rules is to attract your attention to possible
dangers. The safety symbols and the explanations with them,
require your careful attention and understanding. The safety
warnings do not by themselves eliminate any danger . The
instruction or warnings they give are not substitutes for proper
accident prevention measures.
SAFETY ALERT SYMBOL. Indicates caution or
warning. May be used in conjunction with other
symbols or pictures.
WARNING: Failure to obey a safety warning can
result in serious injury to yourself or to others.
Always follow the safety precautions to reduce the
risk of fire, electric shock and personal injury.
WARNING: Do not attempt to operate this tool until
you have read thoroughly and understood
completely, safety rules, etc. contained in this
manual. Failure to comply can result in accidents
involving fire, electric shock or serious personal
injury. Save owners manual and review frequently
for continuing safe operation and instructing others
who may use this tool.
The operation of any tool can result in
foreign objects being thrown into your
eyes, which can result in severe eye
damage. Before beginning power tool
operation, always wear safety goggles
a full face shield when needed. We recommend Wide Vision
Safety Mask for use over eyeglasses or standard safety
glasses with side shields.
1. KNOW YOUR POWER TOOL. Read owners manual carefully.
Learn its applications and limitations as well as the specific
potential hazards related to this tool.
2. GUARD AGAINST ELECTRICAL SHOCK BY PREVENTING
BODY CONTACT WITH GROUNDED SURFACES . For
example, pipes, radiators, ranges, refrigerator enclosures.
3. KEEP WORK AREA CLEAN. Cluttered areas and benches
invite accidents.
4. AVOID DANGEROUS ENVIRONMENT. Don't use power tools
in damp or wet locations or expose to rain. Keep work area
well lit.
5. KEEP CHILDREN AND VISITORS AWAY. Visitors should
wear safety glasses and be kept a safe distance from work
area. Do not let visitors contact tool or extension cord.
6. STORE IDLE TOOLS. When not in use, tools should be stored
in a dry and high or locked-up place, out of reach of children.
7. DON'T FORCE TOOL. It will do the job better and safer at
the rate at which it was designed.
8. USE RIGHT TOOL. Don't force small tool or attachment to
do the job of a heavy duty tool. Don't use tool for purpose not
intended.
9. DRESS PROPERLY. Do not wear loose clothing or jewellery.
They can be caught in moving parts. Rubber gloves and nonskid footwear are recommended when working outdoors. Also
wear protective hair covering to contain long hair.
or safety glasses with side shields and
10. ALWAYS WEAR SAFETY GLASSES. Everyday eyeglasses
have only impact resistant lenses, they are not safety glasses.
11. PROTECT YOUR LUNGS. Wear a dust mask if operation is
dusty.
12. PROTECT YOUR HEARING. Wear hearing protection during
extended periods of operation.
13. DON'T OVERREACH. Keep proper footing and balance at
all times. Do not use tool on a ladder or unstable support.
Secure tools when working at elevated levels.
14. MAINTAIN TOOLS WITH CARE. Keep tools sharp and clean
for better and safer performance. Follow instructions for
lubricating and changing accessories.
15. REMOVE ADJUSTING KEYS AND WRENCHES. Form a
habit of checking to see that keys and adjusting wrenches
are removed from tool before turning it on.
16. NEVER USE IN AN EXPLOSIVE ATMOSPHERE. Normal
sparking of the motor could ignite fumes.
17. KEEP HANDLES DRY, CLEAN AND FREE FROM OIL AND
GREASE. Always use a clean cloth when cleaning. Never
use brake fluids, gasoline, petroleum based products, or any
strong solvents to clean your tool.
18. STAY ALERT AND EXERCISE CONTROL. Watch what you
are doing and use common sense. Do not operate tool when
you are tired. Do not rush operation of tool.
19. CHECK DAMAGED PARTS. Before further use of the tool,
a guard or any other part that is damaged should be carefully
checked to determine that it will operate properly and perform
its intended function. Check for alignment of moving parts,
binding of moving parts, breakage of parts, mounting and
any other conditions that may affect its operation. A guard or
any other part that is damaged should be properly repaired
or replaced by an authorised service centre.
20. DO NOT USE TOOL IF SWITCH DOES NOT TURN IT ON
AND OFF. Have defective switches replaced by authorised
service centre.
21.DO NOT OPERA TE THIS TOOL WHILE UNDER THE
INFLUENCE OF DRUGS, ALCOHOL OR ANY
MEDICATION.
22. THE APPLIANCE IS NOT INTENDED FOR USE BY YOUNG
OR INFIRM PERSONS WITHOUT SUPERVISION. YOUNG
CHILDREN SHOULD BE SUPERVISED TO ENSURE THAT
THEY DO NOT PLAY WITH THE APPLIANCE.
SAVE THESE INSTRUCTIONS
FOR FUTURE REFERENCE
Due to continued product
refinement policy, product features
and specifications can and will
change without notice. Check
current features and specifications
with your retailer.
Page 3
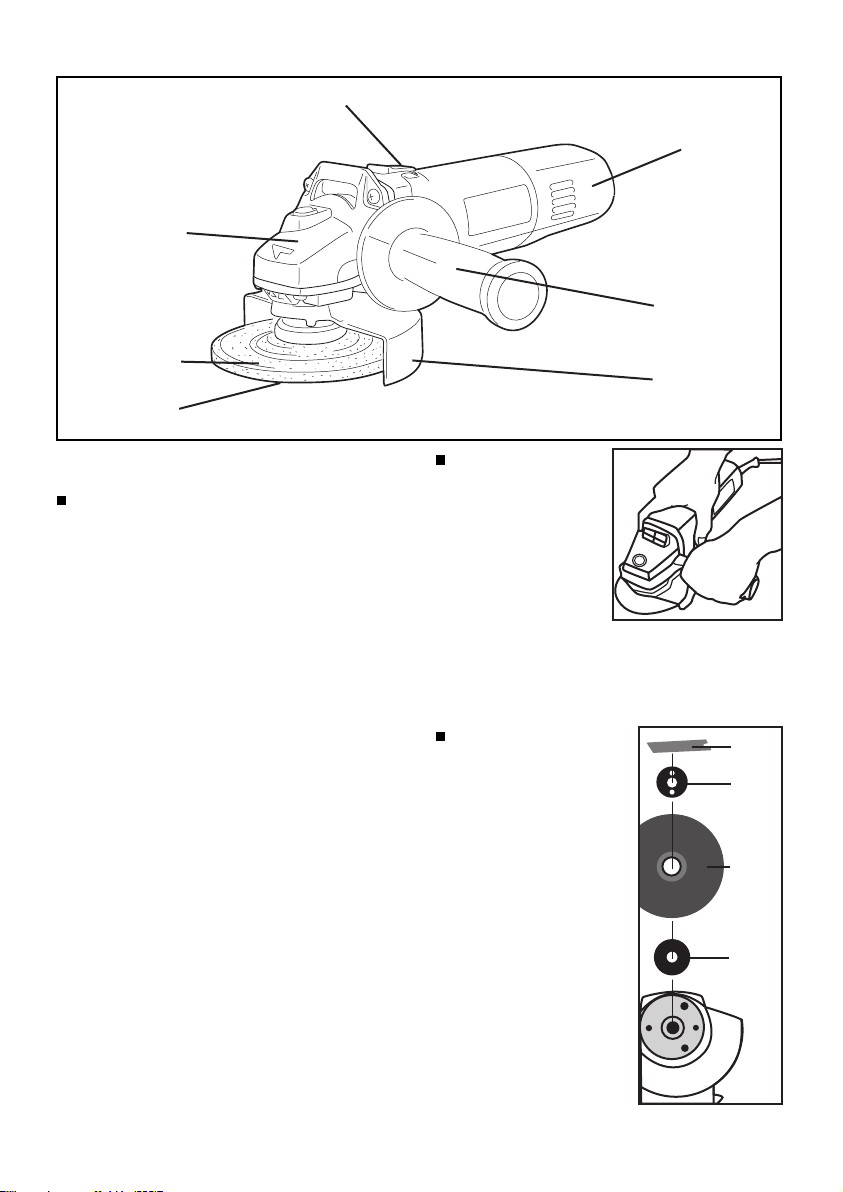
Spindle Lock
Spindle Lock
Button
Button
Grinding
Grinding Wheel
Wheel
Grinding Wheel
Grinding
Clamp Nut
Wheel Clamp Nut
On/ Off Switch
Carbon
Carbon Brush Cap
Brush Cap
On/Off Switch
Auxiliary Handle
Auxiliary Handle
Wheel Guard
Wheel Guard
DO NOT STAND IN FRONT OF A NEWLY FITTED GRINDING
WHEEL.
GRINDER SAFETY PRECAUTIONS
1. Grinding wheel must be securely attached as described in
the operation manual before connecting the grinder to a
power supply.
2. Grinding wheels must be free of fissures and cracks. Before
use, test for normal operation with grinding wheel facing in
a safe direction, i.e. away from people or objects. Fissures
and cracks can cause a grinding wheel to shatter resulting
in possible serious injury.
3. Grip the gringer securely with both hands while grinding.
One hand on the auxiliary handle and the other on body of
the grinder, with the thumb or finger touching the on/of f
switch (see below)
4. Never place the grinder on the floor or other surface while
it is running.
5. Use this grinder only for approved applications. Never use
coolants or water or use the tool as a fixed grinder.
6. Use only approved grinding wheels and only use the normal
grinding surface. Never use the side or upper surfaces for
cutting. Never use the grinding wheel for cutting of f
purposes. Only use an approved cutting off wheel.
7. Make sure a tool is only connected to the voltage marked
on its name plate.
8. Never use a tool if the cover or any bolts are missing. If the
cover or bolts have been removed, replace them prior to
use. Maintain all parts in good working order.
9. Always secure tools when working at elevated positions.
10. Never start a tool when its rotating component is in contact
with the workpiece.
11. Do not touch the sanding disc or work piece immediately
after operation.
SWITCH
This tool starts by pushing the
switch forward. Always place
the thumb of finger on the
switch when operating so that
the grinder can be switched
off quickly in case of
emergency.
INSTALLATION OF GRINDING
WHEEL
To assemble the grinding wheel,
attach the disc flange, grinding
wheel and the clamp nut to the
spindle shaft. Be sure the disc
flange is properly seated on the
spindle shaft. Depress the spindle
lock button located on top of the
gear case. Use the spanner to
tighten the clamp nut in a clockwise
direction.
Spanner
Clamp
Nut
Grinding
Wheel
Disc
Flange
Page 4
CHECK CAREFULLY TO SEE WHETHER THERE ARE
CRACKS IN
IMMEDIATELY.
OPERATING
The key to efficient operating is controlling the pressure and
surface contact between the disc and the work piece. Flat
surfaces are ground at an acute angle, usually 10 to 20 degrees
with the work piece. Allow the disc to reach full speed before
starting to grind. Too great an angle causes concentration of
pressure on a small area which may gouge or burn work
surface.
CAUTION: Never cover air vents since they must always be
operated for proper motor cooling.
THE WHEEL. REPLACE
WARNING: Keep safety guards in place to
avoid possible serious injury.
A CRACKED WHEEL
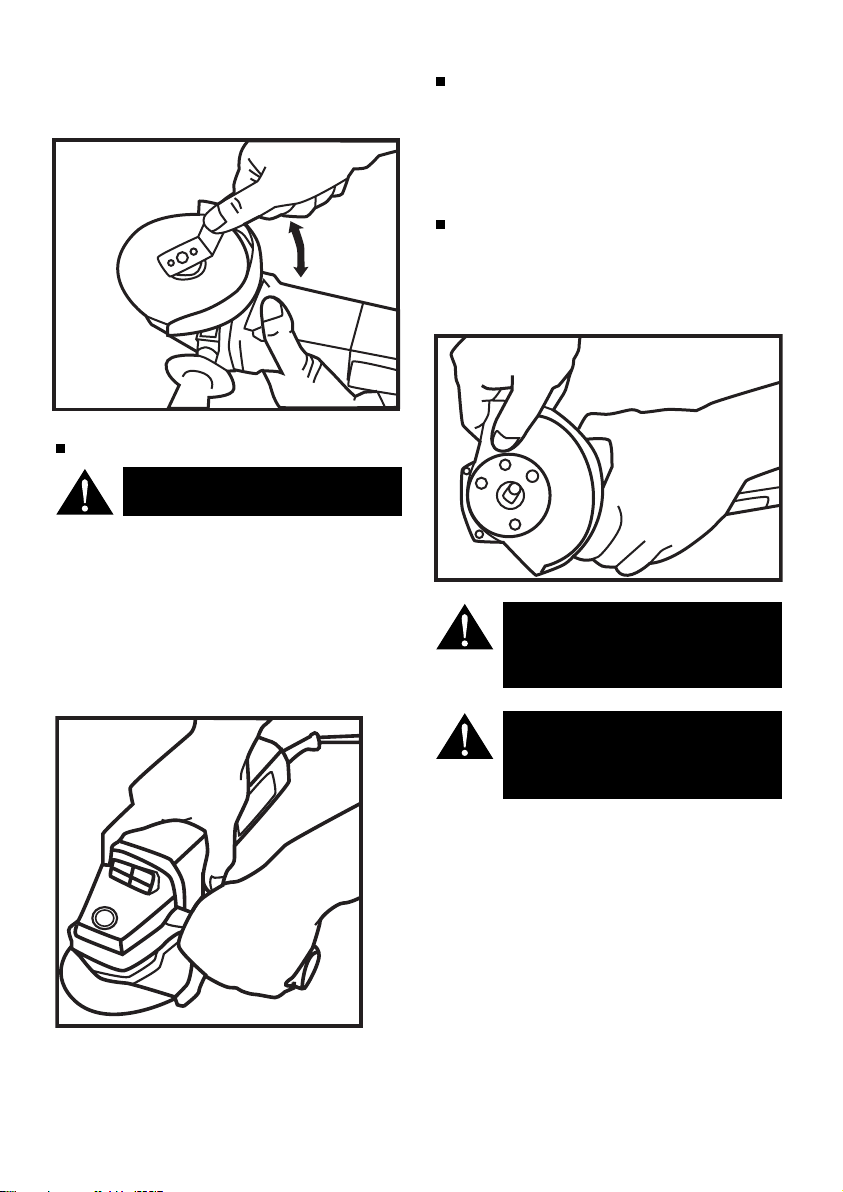
HOW TO ADJUST THE WHEEL COVER
In awkward grinding positions you may wish to direct sparks in
a certain direction. This can be achieved as follows:
1. Loosen the hexagon screw.
2. Adjust the wheel cover.
3. Tighten the hexagon screw.
MAINTENANCE
After use, check tool to keep it in top condition clean out
accumulated dust.
DO NOT MAKE ANY ADJUSTMENT WHILE THE MOTOR IS
IN MOTION.
WARNING: Always remove the electric cord
from the power source before changing
grinding wheel, brushes, lubricating or when
working on the unit to avoid possible serious
injury.
WARNING: This electric tool is in accordance
with the relevant safety requirements. To
assure safety and reliability, all repairs
should performed by an Authorised Service
Centre.
Page 5
RYOBI TECHNOLOGIES AUSTRALIA PTY. LTD.
GUARANTEE
Subject to the guarantee condition below, this Ryobi tool
(hereinafter called “the product”) is guaranteed by Ryobi
(hereinafter called “the Company”) to be free from
defects in material or workmanship for a period of 24
months from the date of original purchase covering
both parts and labour. Under the terms of this
guarantee, the repair or replacement of any part shall
be the opinion of the Company or its authorised agent.
Should service become necessary during the warranty
period, the owner should contact the Authorised Ryobi
Retailer from whom the Product was purchased, or the
nearest Company Branch Office. In order to obtain
guarantee service, the owner must present the sales
docket and Guarantee Certificate to confirm date of
purchase. This product is sold by the dealer or agent as
principal and the dealer has no authority from the
Company to give any additional guarantee on the
Company’s behalf except as herein contained or herein
referred to.
Guarantee Conditions
This guarantee only applies provided that the Product
has been used in accordance with the manufacturer’s
recommendations under normal use and reasonable
care (in the opinion of the Company) and such
RYOBI TECHNOLOGIES AUSTRALIA PTY. LTD.
A.B.N. 98 002 277 509
SYDNEY: 359-361 Horsley Road, Milperra, N.S.W. 2214.
Contact during normal business hours.
Tel: (02) 9792 9888 - Fax: 1800 807 993 - Email: [email protected]
BRISBANE: All enquiries Tel : 1300 361 505
TOWNSVILLE: All enquiries Tel : 1300 361 505
MELBOURNE: 960 Stud Road, Rowville,Vic. 3178
Tel : (03) 9764 8655
guarantee does not cover damage, malfunction or
failure resulting from misuse, neglect, abuse, or used
for a purpose for which it was not designed or is not
suited and no repairs, alterations or modifications
have been attempted by other than an Authorised
Service Agent. This guarantee will not apply if the tool is
damaged by accident or if repairs arise from normal
wear and tear.
The Company accepts no additional liability pursuant to
this guarantee for the costs of travelling or
transportation of the Product or parts to and from the
service dealer or agent - such costs are not included in
this guarantee.
Certain legislation, including the Trade Practices Act,
1974 (as amended) and other state and territorial laws
give rights to the buyer and impose liability on the seller in
certain circumstances. Nothing herein shall have the effect
of excluding, restricting or modifying any condition,
guarantee, right or liability imposed, to the extent only
that such exclusion, restriction or modification
would render any term herein void.
HOBART: All enquiries Tel : 1300 360 216
ADELAIDE: All enquiries Tel : 1300 360 216
PERTH:
33-35 Sorbonne Cres., Canning Vale,W.A. 6155.
Tel : (08) 9455 7775
Tel: (09) 573 0230 - Free Call: 0800 279 624 - Fax: (09) 573 0231 - Email: [email protected]
AUCKLAND: 503 Mt Wellington Highway, Mt Wellington, N.Z.
RYOBI NEW ZEALAND PTY. LTD.
Contact during normal business hours.
This Guarantee Form Should Be Retained By The Customer At All Times
For your record and to assist in establishing date of purchase (necessary for in-guarantee service)
please keep your purchase docket and this form completed with the following particulars.
Purchased From
Address Of Dealer
Date Model No Serial No
Present This Form With Your Purchase Docket When Guarantee Service Is Required.
 Loading...