

Page 1
CRH1801
18V SDS ROTARY HAMMER DRILL USER’S MANUAL 1
GB
PERFORATEUR SDS 18V MODE D’EMPLOI 5
FR
18V SDS-PLUS AKKU-BOHRHAMMER BETRIEBSANLEITUNG 9
DE
TALADRO PERCUTOR DE 18V CON SISTEMA SDS MANUAL DE USUARIO 13
ES
TRAPANO DEMOLITORE SDS DA 18V MANUALE D’ISTRUZIONI 17
IT
18V SDS HAMERBOORMACHINE GEBRUIKSAANWIJZING 21
NL
18V SDS MARTELO PERFURADOR MANUAL DE OPERAÇÃO DO UTILIZADOR 25
PT
18V SDS HAMMERBOR BRUGEVEJLEDNING 29
DK
18V SDS-BORRHAMMARE ANVÄNDNINGSMANUAL 33
SE
18V SDS ISKUPORAKONE KÄYTTÖOHJE 37
FI
18V SDS SLAGBOR EIERENS BRUKERMANUAL 41
NO
18 SDS 45
RU
MŁOTOWIERTARKA SDS 18V INSTRUKCJA OBSŁUGI 49
PL
PŘÍKLEPOVÁ VRTAČKA SDS 18 V UŽIVATELSKÁ PŘÍRUČKA 53
CZ
18 VOS SDS ÜTVEFÚRÓ KEZELŐI KÉZIKÖNYV 57
HU
CIOCAN ROTOPERCUTOR SDS DE 18V MANUALUL DE OPERARE AL UTILIZATORULUI 61
RO
18 V SDS PERFORATORS ĪPAŠNIEKA LIETOŠANAS PAMĀCĪBA 65
LV
18 V SDS KALAMASIS GRĄŽTAS VARTOTOJO INSTRUKCIJA 69
LT
18 V SDS PUURVASAR KASUTUSJUHEND 73
EE
BUŠAĆI ČEKIĆ 18V SDS PRIRUČNIK ZA KORISNIKE 77
HR
UDARNI VRTALNIK 18V SDS PRIROČNIK ZA UPORABNIKE 81
SI
18V SDS ROTAČNÉ VŔTACIE KLADIVO NÁVOD NA POUŽITIE 85
SK
18V SDS ΣΦΥΡΟΤΡΥΠΑΝΟ ΕΓΧΕΙΡΙΙΟ ΧΡΗΣΗΣ 89
GR
18 V SDS DARBELI MATKAP KULLANIM KILAVUZU 93
TR
ORIGINAL INSTRUCTIONS FR TRADUCTION DES INSTRUCTIONS ORIGINALES DE ÜBERSETZUNG DER ORIGINALANLEITUNG ES TRADUCCIÓN
GB
DE LAS INSTRUCCIONES ORIGINALES
DAS INSTRUÇÕES ORIGINAIS
ALKUPERÄISTEN OHJEIDEN SUOMENNOS NO OVERSETTELSE AV DE ORIGINALE INSTRUKSJONENE RU ПЕРЕВОД ОРИГИНАЛЬНЫХ ИНСТРУКЦИЙ PL TŁUMACZENIE
FI
INSTRUKCJI ORYGINALNEJ CZ PŘEKLAD ORIGINÁLNÍCH POKYNŮ HU AZ EREDETI ÚTMUTATÓ FORDÍTÁSA RO TRADUCEREA INSTRUCŢIUNILOR ORIGINALE LV TULKOTS NO
ORIĢINĀLĀS INSTRUKCIJAS LT ORIGINALIŲ INSTRUKCIJŲ VERTIMAS EE ORIGINAALJUHENDI TÕLGE HR PRIJEVOD ORIGINALNIH UPUTA SI PREVOD ORIGINALNIH NAVODIL
DK OVERSÆTTELSE AF DE ORIGINALE INSTRUKTIONER SE ÖVERSÄTTNING AV DE URSPRUNGLIGA INSTRUKTIONERNA
SK PREKLAD POKYNOV V ORIGINÁLI GR μΕΤΑΦΡΑΣΗ ΤΩΝ ΠΡΩΤΟΤΥΠΩΝ ΟΔΗΓΙΩΝ TR ORIJINAL TALIMATLARIN TERCÜMESI
IT TRADUZIONE DELLE ISTRUZIONI ORIGINALI NL VERTALING VAN DE ORIGINELE INSTRUCTIES PT TRADUÇÃO
Page 2
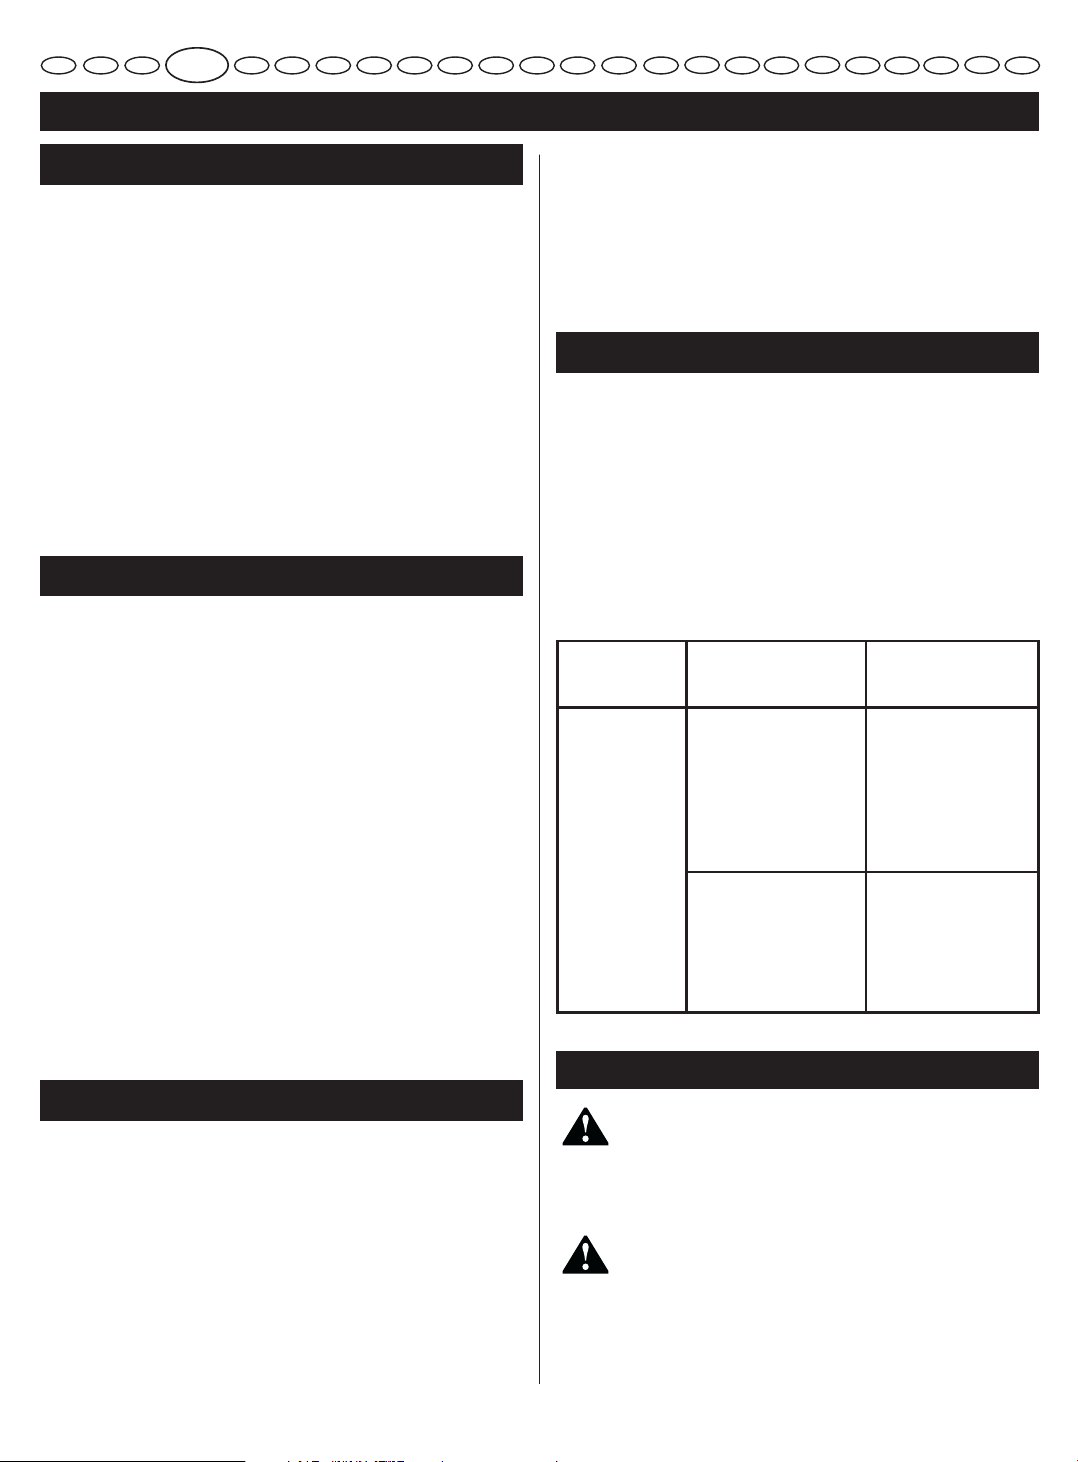
8
1
2
3
7
6
5
10
4
9
Fig.1 Fig.2
8
13
8
11
12
14
7
Fig.3 Fig.4
Fig.5
15
6
16
17
18
19
5
3
1717
3
Fig.6
Page 3

Important!
Attention !
Achtung!
¡Atención!
Attenzione!
Let op !
Atenção!
OBS!
Observera!
Huomio!
Advarsel!
It is essential that you read the instructions in this manual before operating this machine.
Il est indispensable que vous lisiez les instructions contenues dans ce manuel avant la mise en service
de l’appareil.
Bitte lesen Sie unbedingt vor Inbetriebnahme die Hinweise dieser Bedienungsanleitung.
Es imprescindible que lea las instrucciones de este manual antes de la puesta en servicio.
Prima di procedere alla messa in funzione, è indispensabile leggere attentamente le istruzioni contenute
nel manuale.
Het is van essentieel belang dat u de instructies in deze gebruiksaanwijzing leest vooraleer u dit toestel
in gebruik neemt.
É indispensável que leia as instruções deste manual antes de utilizar a máquina.
Denne brugsanvisning skal læses igennem inden ibrugtagning.
Det är nödvändigt att läsa instruktionerna i denna bruksanvisning innan användning.
On ehdottoman välttämätöntä lukea tässä käyttöohjeessa annetut ohjeet ennen käyttöönottoa.
Det er meget viktig at du leser denne brukerveiledningen før du tar maskinen i bruk.
ÇÌËχÌËe! иee‰ Т·УНУИ Л Б‡ФЫТНУП ЛМТЪЫПeМЪ‡ МeУ·ıУ‰ЛПУ ФУ˜eТЪ¸ ЛМТЪЫНˆЛЛ ЛБ М‡ТЪУfl˘e„У
ÛÍÓ‚Ó‰ÒÚ‚‡.
Uwaga!
Dśležité upozornėní!
Figyelem!
Atenŏie!
Uzmanību! Svarīgi, lai jūs pirms mašīnas darbināšanas izlasītu instrukcijas šajā rokasgrāmatā.
Dėmesio! Prieš pradėdami eksploatuoti šį prietaisą, svarbu, kad perskaitytumėte šiose instrukcijose pateiktus
Tähtis! Enne trelli kasutama hakkamist tuleb käesolevas juhendis esitatud juhised kindlasti läbi lugeda.
Upozorenje! Neophodno je da proĀitate ove upute prije uporabe ovog ureāaja.
Pomembno!
Dôležité! Pre prácou s týmto zariadením je dôležité, by ste si prečítali pokyny v tomto návode.
ƥǂǁDŽǁLjƱ!
Dikkat!
Przed przystćpieniem do uŧytkowania tego urzćdzenia, naleŧy koniecznie zapoznaþ siĕ z zaleceniami
zawartymi w niniejszym podrĕczniku.
Nepoužívejte tento pʼnístroj dʼníve, než si pʼneĀtete pokyny uvedené v tomto návodu.
Feltétlenül fontos, hogy a jelen használati útmutatóban foglalt elŃírásokat az üzembe helyezés elŃtt
elolvassa!
Este esenŏial są citiŏi instrucŏiunile din acest manual înainte de operarea acestui aparat.
nurodymus.
Pred uporabo tega stroja, obvezno preberite navodila iz tega priroĀnika.
ƚƲƿƴƼ ƴƴǂƴƲDžƺDžǁ ƿƴ ƷƼƴƵƯDŽƸDžƸ DžƼǃ DŽdžDŽDžƯDŽƸƼǃ DžNJƿ ǁƷƺƶƼǏƿ ƴdžDžǏƿ ǂƼƿ ƽƴƼ Džƺ ƻưDŽƺ DŽƸ
ƾƸƼDžǁdžǂƶƲƴ.
Cihazn çalütrlmasndan önce bu klavuzda bulunan talimatlar okumanz zorunludur.
Subject to technical modifications / Sous réserve de modifications techniques /Technische Änderungen vorbehalten /
Sujeto a modificaciones técnicas / Con riserva di eventuali modifiche tecniche /Technische wijzigingen voorbehouden /
Com reserva de modificações técnicas / Med forbehold for tekniske ændringer / Med förbehåll för tekniska ändringar /
Tekniset muutokset varataan / Med forbehold om tekniske endringer /
Z zastrzeŧeniem modyfikacji technicznych / Zmėny technických údajś vyhrazeny / A mŝszaki módosítás jogát fenntartjuk /
Sub rezerva modificaŏiilor tehnice /
Tehnilised muudatused võimalikud /
Technické zmeny vyhradené / ƩǍ Džƺƿ ƸƼLJǎƾƴǀƺ DžƸLjƿƼƽǏƿ DžǂǁǁǁƼƱDŽƸNJƿ / Teknik deùiüiklik hakk sakldr
Paturam tiesības mainīt tehniskos raksturlielumus / Pasiliekant teisę daryti techninius pakeitimus /
Podloæno tehniËkim promjenama /TehniĀne spremembe dopušĀene/
åÓ„ÛÚ ·˚Ú¸ ‚ÌeÒeÌ˚ ÚeıÌ˘eÒÍËe ËÁÏeÌeÌËfl /
Page 4

GB
FR DE ES IT NL PT DK SE FI NO RU PL CZ HU RO LV LT EE HR SI SK GR TR
English
SPECIAL SAFETY RULES
Q Use auxiliary handle supplied with the tool. Loss of
control can cause personal injury.
Q Wear ear protectors with impact drills. Exposure to
noise can cause hearing loss.
Q Wear a face mask or dust mask if the drilling
operation generates dust.
Q Hold power tool by insulated gripping surfaces,
when performing an operation where the cutting
accessory may contact hidden wiring. Cutting
accessory contacting a «live» wire may make exposed
metal parts of the power tool «live» and could give the
operator an electric shock.
INSTRUCTIONS FOR SAFE HANDLING
Q Make sure that the tool is only connected to the
voltage marked on the name plate.
Q Never use the tool if its cover or any bolts are missing.
If the cover or bolts have been removed, replace them
prior to use. Maintain all parts in good working order.
Q Always secure tools when working in elevated
positions.
Q Never touch the blade, drill bit, grinding wheel or other
moving parts during use.
Q Never start a tool when its rotating component is in
contact with the work piece.
Q Never lay a tool down before its moving parts have
come to a complete stop.
Q ACCESSORIES : The use of accessories or
attachments other than those recommended in this
manual might present a hazard.
Q REPLACEMENT PARTS : When servicing use only
identical replacement parts.
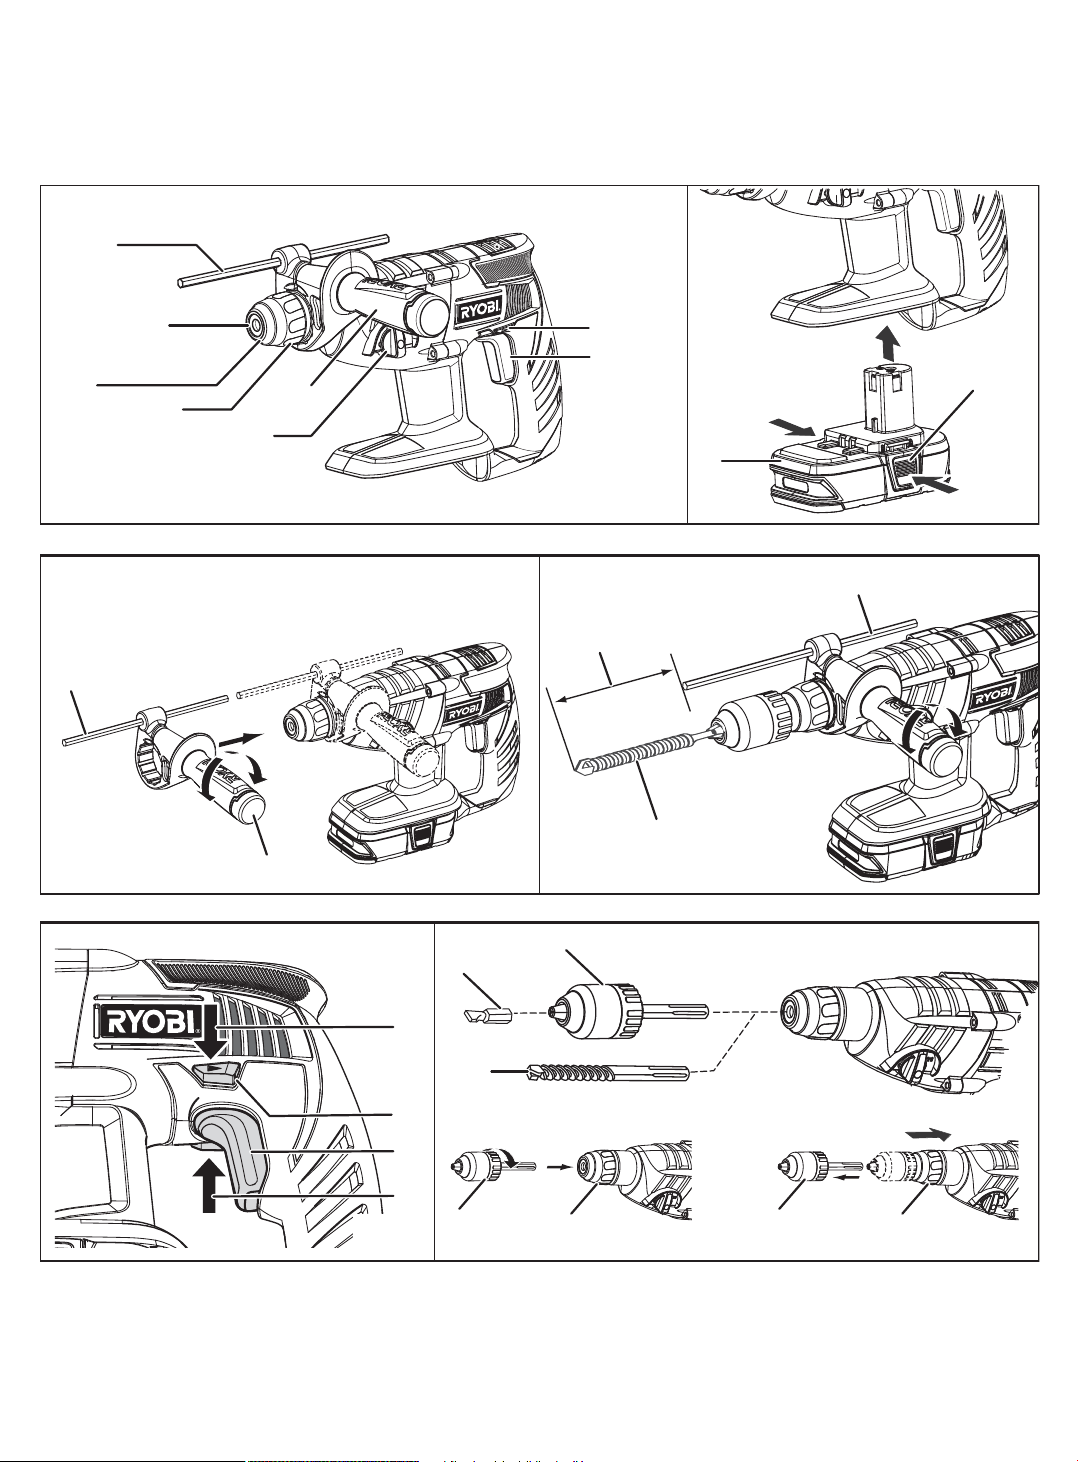
DESCRIPTION
1. Dust Protection Cap
2. SDS Chuck
3. Clamp Collar
4. Mode Selector
5. ON / OFF Switch
6. Rotation Selector
(Forward / Reverse / Center lock)
7. Auxiliary Handle
8. Depth Gauge Rod
9. Battery Pack (not included)
10. Latches
11. To Tighten
12. To Loosen
13. Drilling Depth
14. Drill bit (not included)
15. Reverse Rotation
16. Forward Rotation
17. 35mm Chuck Adaptor (not included)
18. Screwdriver Bit (not included)
19. SDS Bit (not included)
SPECIFICATIONS
Voltage 18 V
No load speed 0-1000 minHammer blows ( Blows per Minute) 0-4000 minImpact energy 1.5J
Maximum Drill Capacity:
Wood 16 mm
Steel 13 mm
Concrete (hammer drilling) 12 mm
Recommended hammer drilling range 4-12 mm
Bit Connection type SDS-plus
Weight - not incl.battery pack (Kg) 2.2
MODEL BATTERY PACK
(not included)
BPP-1815M
BPP-1817M
BPP-1815
BPP-1817
CRH1801
BPL-1815
BPL-1820
BPP-1815
BPP-1817
BPP-1815M
BPP-1817M
CHARGER
(not included)
BCL-1800
BCS618
BCL1418
BC-1815S
BC-1800
BCA180
1
1
OPERATION
WARNING
Do not allow familiarity with products to make you
careless. Remember that a careless fraction of a
second is sufficient to inflict serious injury.
WARNING
Always wear safety goggles or safety glasses with
side shields when operating products. Failure to do
so could result in objects being thrown into your
eyes, resulting in possible serious injury.
1
Page 5

GB
FR DE ES IT NL PT DK SE FI NO RU PL CZ HU RO LV LT EE HR SI SK GR TR
English
OPERATION
WARNING
Do not use any attachments or accessories
not recommended by the manufacturer of this
product. The use of attachments or accessories
not recommended can result in serious personal
injury.
APPLICATIONS
You may use this product for the purposes listed below:
Q Drilling in all types of wood products (lumber,
plywood, panelling, composition board, and hard
board)
Q Drilling in ceramics, plastics, fiberglass, and laminates
Q Drilling in metals
Q Hammer Drilling in concrete
This product will accept Ryobi One+ 18 V lithium-ion
battery packs and Ryobi One+ 18 V nickel-cadmium
battery packs.
WARNING
Always remove battery pack from your drill
when you are assembling parts, making adjustments, assembling or removing bits, cleaning,
or when not in use. Removing battery pack will
prevent accidental starting that could cause
serious personal injury.
BATTERY PROTECTION FEATURES
Ryobi 18 V lithium-ion batteries are designed with
features that protect the lithium-ion cells and maximize
battery life. Under some operating conditions, these
built-in features may cause the battery and the tool it is
powering to act differently from nickel-cadmium batteries.
During some applications, the battery electronics may
signal the battery to shut down, and cause the tool to
stop running. To reset the battery and tool, release the
trigger and resume normal operation.
NOTE: To prevent further shut down of the battery, avoid
forcing the tool.
Q Insert the battery pack into the product as shown.
Q Make sure the latches on each side of the battery
pack snap in place and that battery pack is secured in
the product before beginning operation.
TO REMOVE BATTERY PACK
Follow these steps to remove the battery pack:
Q Depress the latches on each side of the battery pack.
Q Remove the battery pack from the drill.
WARNING
Battery products are always in operating
condition. Therefore, the switch should always be
locked when not in use or carrying at your side.
ADJUSTING THE AUXILIARY HANDLE
See Figure 3.
Follow these steps to adjust the auxiliary handle:
Q Loosen the auxiliary handle by turning the knob
counterclockwise (12).
Q Rotate the auxiliary handle to the desired location.
Q Tighten the auxiliary handle securely by turning the
knob clockwise (11).
ADJUSTING THE DEPTH GAUGE ROD
See Figure 4.
Follow these steps to adjust the depth gauge rod:
Q Lock the trigger switch by placing the rotation selector
in the center position.
Q Loosen the auxiliary handle by turning the knob
counterclockwise (12).
Q Adjust the depth gauge rod so that the drill bit extends
beyond the end of the rod to the required drilling
depth.
Q Tighten the auxiliary handle by turning the knob
clockwise (11).
SWITCH
See Figure 5.
To turn the drill ON, depress the switch trigger. To turn it
OFF, release the switch trigger.
If releasing the trigger does not reset the battery and
tool, the battery pack is depleted. If depleted, the battery
pack will begin charging when placed on the lithium-ion
charger.
TO INSTALL BATTERY PACK
See Figure 2.
Follow these steps to install the battery pack:
Q Place the rotation selector in the centre lock position.
SWITCH LOCK
See Figure 5.
The switch trigger can be locked in the OFF position.
This feature can be used to prevent the possibility of
accidental starting when not in use. To lock switch trigger,
place the rotation selector (Forward / Reverse Selector)
in center position.
Note: When selector is in center position, switch trigger
is locked.
2
Page 6

GB
FR DE ES IT NL PT DK SE FI NO RU PL CZ HU RO LV LT EE HR SI SK GR TR
English
OPERATION
REVERSIBLE
See Figure 5.
This tool has the feature of reversible rotation, that is
controlled by a selector located above the switch trigger
(6).
Q Clockwise rotation: set the selector lever to left
position (16).
Q Anti-clockwise rotation: set the selector lever to right
position (15).
MODE SELECTOR (4)
Q For drilling, place the selector in the position.
Q For hammer drilling, set to .
The switch-over can best be performed at a standstill.
Only after the switch is actuated and the machine starts
does the gear box shift to the selected mode.
Note: Hammer drilling mode will damage the tool’s
mechanism when used for fastening or drilling by nonSDS plus bit. Select the drill mode only on such purpose.
When hammer drilling, use exclusively bits with hard
metal and SDS-Plus shaft only. The use of commercially
available masonry bits with cylindrical by means of the
drill adapter is impossible.
HAMMER DRILLING
When hammer drilling, you do not need to apply
too much pressure. The performance is not
increased in this manner. Too much pressure will
place unnecessary load on the motor.
Q Check that bit has locked by pulling on it.
REMOVING THE BIT FROM THE SDS-PLUS
SYSTEM
Pull back the clamp collar and remove the bit.
35mm CHUCK ADAPTOR(NOT INCLUDED) (17)
See Figure 6.
For drilling work in metal , wood and plastic with drill
bits that have Non SDS Plus shaft, the drill adaptor is
available.
PRACTICAL TIPS
Do not drill hidden electrical lines or gas and water
pipes. Check the area to work with a metal detector, for
example, before starting.
SLIP CLUTCH
If the tool becomes jammed or gets caught, the slip clutch
releases.
Remove the load from the machine immediately by
pulling back the drilling tool.
Always hold the machine tightly with both hands
and assume a secure stance.
MAINTENANCE
WARNING:
When servicing, use only identical Ryobi
replacement parts. Use of any other parts may
create a hazard or cause product damage.
Check the drill bits regularly. Re-sharpen or
replace the blunt drill bits.
For hammer drilling, work only with protective glasses,
hearing protection and the auxiliary handle.
FITTING AND CHANGING SDS BITS
See Figure 6.
This tool is equipped with an SDS-plus connection
system.
Q Clean the bit and grease it with machine grease
before inserting it into the chuck (2).
Q Pull back the clamp collar (3) and hold it.
Q Push and rotate the dust-free tool into the bit holder
as far as it will go.
Q Release the clamp collar to lock the bit.
Avoid using solvents when cleaning plastic parts. Most
plastics are susceptible to damage from various types of
commercial solvents and may be damaged by their use.
Use clean cloths to remove dirt, dust, oil, grease, etc.
WARNING
Do not at any time let brake fluids, gasoline,
petroleum based products, penetrating oils, etc.,
come in contact with plastic parts. Chemicals can
damage, weaken or destroy plastic which may
result in serious personal injury.
WARNING
Do not abuse power tools. Abusive practices can
damage tool as well as workplace.
3
Page 7

GB
FR DE ES IT NL PT DK SE FI NO RU PL CZ HU RO LV LT EE HR SI SK GR TR
English
MAINTENANCE
WARNING
Do not attempt to modify this tool or create
accessories not recommended for use with this
tool. Any such alteration or modification is misuse
and could result in a hazardous condition leading
to possible serious personal injury.
ENVIRONMENTAL PROTECTION
Drilling mode
Hammer drill mode
CE Conformity
Please read the instructions carefully before
starting the machine.
Recycle raw materials instead of disposing
as waste. The machine, accessories and
packaging should be sorted for
environmentally-friendly recycling.
SYMBOLS
Safety Alert
V Volts
-1
min
Revolutions or reciprocations per minute
Direct current
Wear ear protection
Wear eye protection
Recycle unwanted
Waste electrical products should not be
disposed of with household waste. Please
recycle where facilities exist. Check with your
Local Authority or retailer for recycling advice.
4
Page 8

GB
FR
DE ES IT NL PT DK SE FI NO RU PL CZ HU RO LV LT EE HR SI SK GR TR
Français
RÈGLES DE SÉCURITÉ PARTICULIÈRES
Q Utilisez la poignée auxiliaire fournie avec l’outil.
Une perte de contrôle peut entraîner des blessures.
Q Utilisez une protection auditive avec les
perforateurs. L’exposition au bruit peut provoquer des
pertes d’audition.
Q Portez un masque facial ou un masque anti
poussières si le perçage produit de la poussière.
Q Lorsque vous effectuez une opération où
l’accessoire de coupe risque d’entrer en contact
avec un câble électrique caché, maintenez l’outil
par ses surfaces isolées. Un accessoire de coupe
qui entre en contact avec un câble «sous tension» est
susceptible de véhiculer le courant électrique vers les
parties métalliques de l’outil et de provoquer un choc
électrique à l’opérateur.
INSTRUCTIONS POUR MANIPULER L’OUTIL EN
TOUTE SÉCURITÉ
Q Assurez-vous que la tension du secteur corresponde à
la tension indiquée sur la plaque signalétique.
Q N’utilisez jamais l’outil si un de ses carters ou l’une de
ses vis manquent. Si un carter ou une vis ont été retirés,
remplacez-les avant utilisation. Conservez toutes les
parties de l’outil en bon état de fonctionnement.
Q Sécurisez toujours les outils lorsque vous travaillez en
hauteur.
Q Ne touchez jamais de lame, foret, meule ou tout autre
élément en mouvement.
Q Ne mettez jamais en marche un outil dont les éléments
rotatifs sont en contact avec la pièce à usiner.
Q Ne posez jamais un outil avant que toutes ses parties
mobiles ne se soient complètement immobilisées.
Q ACCESSOIRES: L’utilisation d’accessoires autres que
ceux recommandés dans ce mode d’emploi présente
un danger.
Q PIÈCES DÉTACHÉES: N’effectuez les réparations
qu’à l’aide de pièces détachées identiques.
16. Rotation en Sens Normal
17. Adaptateur Mandrin 35mm (non compris)
18. Embout de Vissage (non compris)
19. Foret SDS (non compris)
CARACTÉRISTIQUES
Tension 18 V
Vitesse à vide 0-1000 min
Fréquence de burinage
(Coups par Minute) 0-4000 min
Energie d’impact 1.5 J
Capacité Maxi de Perçage:
Bois 16 mm
Acier 13 mm
Béton (avec burinage) 12 mm
Diamètres recommandés pour le
perçage avec burinage 4-12 mm
Type de Queue de Foret SDS-plus
Poids – sans pack batterie (Kg) 2.2
MODÈLE PACK BATTERIE
(non fourni)
BPP-1815M
BPP-1817M
BPP-1815
CHARGEUR
(non fourni)
BCL-1800
BCS618
BCL1418
BPP-1817
BPL-1820
CRH1801
BPL-1815
BPP-1815
BPP-1817
BPP-1815M
BC-1815S
BC-1800
BCA180
BPP-1817M
UTILISATION
-1
-1
DESCRIPTION
1. Cache anti poussières
2. Mandrin SDS
3. Bague de Verrouillage
4. Sélecteur de Mode
5. Interrupteur MARCHE / ARRÊT
6. Sélecteur de Sens de Rotation
(Avant / Arrière/ Verrouillage central)
7. Poignée Auxiliaire
8. Butée de Profondeur
9. Pack Batterie (non compris)
10. Languettes
11. Pour Serrer
12. Pour Desserrer
13. Profondeur de Perçage
14. Foret (non compris)
15. Rotation en Sens Inverse
AVERTISSEMENT
Ne laissez pas l’habitude de l’utilisation des
outils amoindrir votre vigilance. Rappelez-vous
qu’une fraction de seconde d’inattention suffit à
provoquer de graves blessures.
AVERTISSEMENT
Portez des lunettes de sécurité étanches ou des
lunettes de sécurité avec écrans latéraux lorsque
vous travaillez avec des outils électriques. Vous
éviterez ainsi que des objets soient projetés vers
vos yeux, occasionnant des blessures graves.
AVERTISSEMENT
N’utilisez pas d’accessoires dont l’usage sur cet
outil n’est pas recommandé par le fabricant. Cela
pourrait occasionner de graves blessures.
5
Page 9
GB
FR
DE ES IT NL PT DK SE FI NO RU PL CZ HU RO LV LT EE HR SI SK GR TR
Français
UTILISATION
APPLICATIONS
Cet outil peut être utilisé pour les applications suivantes:
Q Perçage dans tous types de matériaux à base de
bois (planches, contreplaqué, lambris, panneaux de
particules et bois dur.
Q Perçage dans la céramique, le plastiques, la fi bre de
verre et le stratifi é.
Q Perçage dans le métal.
Q Perçage avec burinage dans le béton
Cet outil accepte les packs batterie 18 V Lithium-Ion Ryobi
One+ et les packs batterie 18 v Cadmium-Nickel Ryobi
One+.
AVERTISSEMENT
Retirez toujours le pack batterie de votre
perceuse lors des assemblages, ajustements,
lorsque vous installez ou retirez des forets,
lorsque vous la nettoyez ou lorsque vous ne
l’utilisez pas. Le retrait de la batterie évitera toute
mise en marche accidentelle qui pourrait causer
de graves blessures.
DISPOSITIFS DE SÉCURITÉ DE LA BATTERIE
Les batteries 18 V Lithium-Ion Ryobi comportent des
protections destinées à protéger les éléments Lithium-Ion
et maximiser leur durée de vie. Sous certaines conditions
d’utilisation, ces protections peuvent amener la batterie et
l’outil qu’elle alimente à se comporter différemment que
dans le cas d’une batterie Cadmium-Nickel.
Durant certains travaux, l’électronique de la batterie peut
l’amener à se déconnecter, ce qui entraîne l’arrêt de
l’outil. Pour remettre à zéro la batterie et l’outil, relâchez la
gâchette et reprenez votre travail normalement.
NOTE: Pour éviter de nouvelles mises en protection de la
batterie, évitez de forcer sur l’outil.
Si le fait de relâcher la gâchette ne suffi t pas à remettre à
zéro la protection, alors la batterie est déchargée. Dans ce
cas, elle se rechargera une fois placée sur son chargeur.
MISE EN PLACE DU PACK BATTERIE
Voir Figure 2.
Suivez ces étapes pour mettre en place le pack batterie:
Q Mettez le sélecteur de sens de rotation en position
centrale de verrouillage.
Q Insérez le pack batterie dans l’outil comme illustré.
Q Assurez-vous que les languettes de verrouillage situés
de chaque côté de la batterie se mettent bien en place
et que la batterie est bien verrouillée dans l’outil avant
de commencer à travailler.
RETRAIT DU PACK BATTERIE
Suivez ces étapes pour retirer le pack batterie:
Q Appuyez sur les languettes de verrouillage situés de
chaque côté de la batterie.
Q Retirez la batterie de la perceuse.
AVERTISSEMENT
Les outils alimentés par batterie sont toujours
prêts à l’emploi. Leur interrupteur doit donc
toujours être verrouillé lorsqu’ils ne sont pas
utilisés ou lorsqu’on les porte à la ceinture.
RÉGLAGE DE LA POIGNÉE AUXILIAIRE
Voir Figure 3.
Suivez ces étapes pour régler la poignée auxiliaire:
Q Desserrez la poignée auxiliaire en tournant le bouton
dans le sens inverse des aiguilles d’une montre (12).
Q Faites pivoter la poignée auxiliaire dans la position
désirée.
Q Serrez fermement la poignée auxiliaire en tournant le
bouton dans le sens des aiguilles d’une montre (11).
RÉGLAGE DE LA BUTÉE DE PROFONDEUR
Voir Figure 4.
Suivez ces étapes pour régler la butée de profondeur:
Q Verrouillez la gâchette-interrupteur en mettant le
sélecteur de sens de rotation en position centrale.
Q Desserrez la poignée auxiliaire en tournant le bouton
dans le sens inverse des aiguilles d’une montre (12).
Q Réglez la butée de profondeur afi n que le foret
dépasse de la butée de la longueur correspondant à la
profondeur de perçage requise.
Q Serrez fermement la poignée auxiliaire en tournant le
bouton dans le sens des aiguilles d’une montre (11).
GÂCHETTE-INTERRUPTEUR
Voir Figure 5.
Pour mettre la perceuse en MARCHE, appuyez sur la
gâchette. Pour l’ARRÊTER, relâchez la gâchette.
FONCTION DE VERROUILLAGE
Voir Figure 5.
La gâchette peut être verrouillée en position "arrêt".
Cette fonction permet d’éviter les démarrages involontaires
de votre perceuse-visseuse lorsque vous ne l’utilisez pas.
Pour verrouiller la gâchette, placez le sélecteur du sens de
rotation (sens vissage / dévissage) en position centrale.
Remarque : Lorsque le sélecteur est en position centrale,
la gâchette est bloquée.
RÉVERSIBILITÉ
Voir Figure 5.
Cet outil a la possibilité d’inverser son sens de rotation,
grâce au sélecteur situé sous la gâchette-interrupteur (6).
6
Page 10
GB
FR
DE ES IT NL PT DK SE FI NO RU PL CZ HU RO LV LT EE HR SI SK GR TR
Français
UTILISATION
Q Rotation dans le sens des aiguilles d’une montre:
positionnez le levier du sélecteur à gauche (16).
Q Rotation dans le sens inverse des aiguilles d’une
montre: positionnez le levier du sélecteur à droite
(15).
SÉLECTEUR DE MODE (4)
Q Pour percer, mettez le sélecteur sur la position .
Q Pour percer avec burinage, mettez-le sur la position .
Le changement de mode est plus facile à l’arrêt.
Le changement mécanique de mode ne s’effectue qu’une
fois l’outil mis en marche.
Note: L’utilisation en mode burinage endommagera le
mécanisme de l’outil s’il est utilisé pour visser ou pour
percer avec des forets non SDS plus. Sélectionnez le
mode de perçage simple pour ce genre d’opération.
Pour percer en utilisant le burinage, utilisez
exclusivement des forets en métal renforcé à queue
SDS-Plus. L’utilisation de forets béton du commerce
à queue cylindrique avec l’adaptateur mandrin est
impossible.
Q Tirez sur le foret pour vérifi er qu’il a bien été
verrouillé.
RETRAIT DU FORET DU SYSTÈME THE SDS-PLUS
Tirez la bague de verrouillage vers l’arrière puis retirez
le foret.
ADAPTATEUR MANDRIN 35mm (NON COMPRIS) (17)
Voir Figure (6)
Pour percer dans le métal, le bois et le plastique avec
des forets non SDS Plus, l’adaptateur mandrin est
disponible.
CONSEILS PRATIQUES
Ne percez pas dans les fi ls électriques ou conduites
d’eau et de gaz cachés. Vérifi ez leur absence à
l’aide d’un détecteur de métal, par exemple, avant de
commencer.
DÉBRAYAGE DE SÉCURITÉ
Si l’outil se coince ou se bloque, le débrayage de sécurité
se déclenche.
Soulagez immédiatement l’effort transmis à la machine
en tirant sur le foret.
Tenez toujours l’outil des deux mains et gardez
un bon appui.
PERÇAGE AVEC BURINAGE
Il n’est pas nécessaire d’exercer une forte
pression lorsque vous percez avec la fonction
burinage. L’efficacité n’en est pas meilleure.
L’application d’une trop forte pression fera forcer
le moteur de façon inutile.
Vérifiez régulièrement les forets. Réaffûtez ou
remplacez les forets émoussés.
Lors de l’utilisation du burinage, ne travaillez qu’avec
des lunettes de protection, une protection auditive, et
la poignée auxiliaire. Avant l’opération, vérifi ez que le
bouton de sélection est bien verrouillé en place.
MISE EN PLACE ET CHANGEMENT DES FORETS SDS
Voir Fig. 6
Cet outil est équipé d’un mandrin de type SDS-plus.
Q Nettoyez le foret et graissez-le à l’aide de graisse pour
machine avant de l’insérer dans le mandrin (2).
Q Tirez sur la bague de verrouillage (3) et maintenez-la.
Q Poussez et faites tourner le foret dépoussiéré aussi
profond que possible dans le mandrin.
Q Relâchez la bague de verrouillage pour verrouiller le
foret.
ENTRETIEN
AVERTISSEMENT
Seules des pièces de rechange Ryobi d’origine
doivent être utilisées en cas de remplacement.
L’utilisation de toute autre pièce peut présenter un
danger ou endommager votre outil.
N’utilisez pas de solvants pour nettoyer les pièces en
plastique. La plupart des plastiques sont susceptibles d’être
endommagés par l’utilisation de certains solvants vendus
dans le commerce. Utilisez un chiffon propre pour nettoyer
les impuretés, la poussière, l’huile, la graisse, etc.
AVERTISSEMENT
Les éléments en plastique ne doivent jamais entrer
en contact avec du liquide de frein, de l’essence, des
produits à base de pétrole, des huiles pénétrantes, etc.
Ces produits chimiques contiennent des substances
qui peuvent endommager, fragiliser ou détruire
le plastique, ce qui pourrait causer des blessures
corporelles graves.
7
Page 11

GB
FR
DE ES IT NL PT DK SE FI NO RU PL CZ HU RO LV LT EE HR SI SK GR TR
Français
ENTRETIEN
AVERTISSEMENT
N’en demandez pas trop à vos outils. Les utilisations
abusives peuvent endommager votre outil ainsi que la
pièce à usiner.
AVERTISSEMENT
N’essayez pas de modifier cet outil ou d’ajouter
des accessoires dont l’utilisation avec cet outil
n’est pas recommandée. De telles transformations
ou modifications relèvent de l’utilisation abusive
et risquent de créer des situations dangereuses
pouvant provoquer des blessures corporelles
graves.
PROTECTION DE L’ENVIRONNEMENT
Recyclez les matières premières au lieu de les
jeter aux ordures ménagères. Pour protéger
l'environnement, l'outil, les accessoires et les
emballages doivent être triés.
Recyclez les machines électriques hors d’usage
Les produits électriques hors d’usage ne
doivent pas être jetés avec les ordures
ménagères. Recyclez-les par l’intermédiaire des
structures disponibles. Contactez les autorité
locales pour vous renseigner sur les conditions
de recyclage.
SYMBOLEMBOLS
Alerte de Sécurité
V
min
Volts
-1
Tours ou coups par minute
Courant continu
Conformité CE
Mode de perçage
Mode perçage avec burinage
Veuillez lire attentivement le mode d’emploi
avant de démarrer la machine
Portez une protection auditive
.
Portez une protection oculaire
8
Page 12

GB
DE
ES IT NL PT DK SE FI NO RU PL CZ HU RO LV LT EE HR SI SK GR TRFR
Deutsch
SPEZIFISCHE SICHERHEITSVORSCHRIFTEN
Q Benutzen Sie den mit dem Werkzeug
mitgelieferten Zusatzhandgriff! Ein Kontrollverlust
über das Werkzeug kann zu Verletzungen führen.
Q Tragen Sie bei der Arbeit mit Elektrowerkzeugen zu
Ihrer eigenen Sicherheit immer einen Gehörschutz!
Lärm kann zu Gehörverlust führen.
Q Tragen Sie eine Gesichts- oder Staubmaske, wenn
die Bohrarbeiten Staub verursachen sollten.
Q Halten Sie das Werkzeug bei Arbeiten bei denen
der Schneidaufsatz in Kontakt mit versteckten
Drähten geraten könnte an den isolierten
Griffteilen fest. Ein Schneidaufsatz, der mit einem
unter Strom stehenden Draht in Kontakt gerät kann
bewirken, dass freiliegende Metallteile des Werkzeugs
ebenfalls unter Strom stehen, was dem Benutzer
einen Stromschlag versetzen könnte.
ANWEISUNGEN ZUM SICHEREN GEBRAUCH
Q Verwenden Sie ausschließlich Ryobi Akkupacks,
welcher der auf dem Typenschild angegebenen
Spannung entsprechen (siehe hierzu auch Tabelle
auf der rechten Seite).
Q Benutzen Sie das Gerät nicht mit mit beschädigtem
Kabel, sichtbaren Schäden etc. Stellen Sie ebenfalls
sicher, dass alle beweglichen Teile freigängig sind.
Lassen Sie alle beschädigten Teile durch eine
autorisierte Werkstatt ersetzen. ab, wenn Sie in
hohen Arbeitsbereichen arbeiten.
Q Berühren Sie niemals das Einsatzwerkzeug (Bohrer,
Sägeblatt, Schleifteller etc) oder andere bewegliche
Teile während des Betriebs.
Q Starten Sie niemals ein Werkzeug, wenn das
Einsatzwerkzeug das Werkstück berührt.
Q Legen Sie niemals ein Gerät ab, bevor die
beweglichen Teile nicht komplett zum Stillstand
gekommen sind.
Q ZUBEHÖR: Benutzen Sie ausschließlich
Zubehörartikel und Ersatzteile, welche vom Hersteller
empfohlen wurden.
Q ERSATZTEILE: Benutzen Sie beim Service nur
Original Ersatzteile.
7. Zusatzhandgriff
8. Tiefenanschlag
9. Akkupack (nicht im Lieferumfang enthalten)
10. Laschen
11. Festziehen
12. Lösen
13. Bohrtiefe (abhängig vom verwendenten Bohrer)
14. Bohrer (nicht im Lieferumfang enthalten)
15. Linkslauf
16. Rechtslauf
17. SDS-Plus Universaladapter mit Bohrfutter
(nicht im Lieferumfang enthalten)
18. Einsatzwerkzeug (z.B Bit)
(nicht im Lieferumfang enthalten)
19. SDS-Plus Bohrer (nicht im Lieferumfang enthalten)
TECHNISCHE DATEN0
Spannung 18 V
Leerlaufdrehzahl 0-1000 min
Hammerschläge (Schläge pro Minute) 0-4000 min
Einzelschlagenergie 1,5J
Maximale Bohrleistung:
Holz 16 mm
Stahl 13 mm
Beton 12 mm
Empfohlener Einsatzbereich in Beton 4-12 mm
Werkzeugaufnahme SDS-plus
Gewicht – ohne Akkupack (kg) 2.2
MODELL AKKU
(nicht im Lieferumfang)
BPP-1815
BPP-1817
BPP-1815M
BPP-1817M
BPL-1820
CRH1801
BPL-1815
BPP-1815
BPP-1817
BPP-1815M
BPP-1817M
LADEGERÄT
(nicht im Lieferumfang)
BCL-1800
BCS618
BCL1418
BC-1815S
BC-1800
BCA180
-1
-1
BESCHREIBUNG
1. Staubschutzkappe
2. SDS-Plus Werkzeugaufnahme
3. Verriegelungsring
4. Wahlschalter für die Betriebsart (Hammerbohren /
Schlagstop)
5. EIN / AUS Schalter
6. Wahlschalter für Drehrichtung
(vorwärts / rückwärts / Mittelstellung Arretierung)
BETRIEB
WARNUNG
Erlauben Sie sich keine Unachtsamkeiten.
Denken Sie immer daran, dass eine kleine
Unachtsamkeit genügt um schweren Schaden
entstehen zu lassen.
9
Page 13
GB
DE
ES IT NL PT DK SE FI NO RU PL CZ HU RO LV LT EE HR SI SK GR TRFR
Deutsch
BETRIEB
WARNUNG
Tragen Sie immer eine Schutzbrille mit
Seitenschutz wenn Sie dieses Produkt benutzen.
Sollten Sie dies nicht einhalten, können Objekte
in Ihre Augen geschleudert werden und dies
kann zu schwerem Schaden führen.
WARNUNG
Benutzen Sie kein Zubehör und keine Ersatzteile,
welche nicht vom Hersteller empfohlen werden.
Die Nutzung solcher Zubehör– und Ersatzteile
kann zu gefährlichen Situationen und Schäden
führen.
ANWENDUNGEN
Sie können dieses Produkt für folgende Anwendungen
nutzen:
Q Bohren in alle Holzarten (Bauholz, Sperrholz,
Täfelung, Setzbrett und Hartfaserplatten)
Q Bohren in Keramik, Kunststoffen, Glasfasern und
Laminate.
Q Bohren in Metall
Q Hammerbohren in Beton
Sie können dieses Produkt mit Ryobi One+ 18 V LithiumIon Batterien und Ryobi One+ 18 V Nickel-Cadmium
Batterien betreiben.
WARNUNG
Entfernen Sie immer den Akkupack wenn Sie
das Einsatzwerkzeug wechseln, das Gerät,
säubern, oder wenn Sie es nicht gebrauchen.
Das Entfernen des Akkupacks verhindert
den unbeabsichtigten Start des Geräts. zu
gefährlichen Situationen und Schäden führen.
AKKU-SCHUTZEINRICHTUNG:
ithium-Ionen Akkus sind mit einem Schutzsystem
ausgestattet, welches die Lithium-Ionen Zelle
überwacht und im Falle einer möglichen Überlastung
schützt.
In diesem Fall stoppt das Gerät . Der Stromfl uss ist
unterbrochen. Durch Drücken des Ein/Ausschalters
wird die Akkuzelle wieder freigegeben und das Gerät ist
wieder einsetzbar.
Zudem ist die Akkuzelle mit einem Tiefenentladeschutz
ausgestattet. Diese verhindert ein vollständiges entladen
der Akkuzelle.
Q Stellen Sie den Schalter für Rechts-/Linkslauf auf die
mittlere Position.
Q Legen Sie den Akku in das Produkt ein wie
abgebildet.
Q Stellen Sie vor der Verwendung des Werkzeugs
sicher, dass die Sperrlaschen auf beiden Seiten
des Akkus richtig eingerastet sind und der Akku
einwandfrei fi xiert ist.
ENTFERNEN DES AKKUS (nicht im Lieferumfang)
Befolgen Sie zum Entfernen des Akkupacks die
folgenden Schritte:
Q Drücken Sie die Entriegelungsklemmen an beiden
Seiten Des Akkus.
Q Entfernen Sie das Akku von der Bohrmaschine.
WARNUNG
Produkte mit Akku sind immer betriebsbereit.
Daher sollten Sie den Betriebsschalter immer
ausschalten bevor Sie das Gerät tragen oder es
nicht gebraucht wird.
EINSTELLEN DES ZUSATZHANDGRIFF
Siehe Abbildung 3.
Befolgen Sie zum Einstellen des Zusatzhandgriff die
folgenden Schritte:
Q Lösen Sie den Zusatzhandgriff durch Drehen des
Knopfs gegen den Uhrzeigersinn (12).
Q Drehen Sie den Zusatzhandgriff in die gewünschte
Position.
Q Befestigen Sie den Zusatzhandgriff durch Drehen des
Knopfs im Uhrzeigersinn (11).
EINSTELLEN DES TIEFENANSCHLAGS
Siehe Abbildung 4.
Befolgen Sie zum Einstellen des Tiefenanschlags die
folgenden Schritte:
Q Stellen Sie den Schalter für Rechts-/Linkslauf auf die
mittlere Position.
Q Lösen Sie den Zusatzhandgriff durch Drehen des
Knopfs gegen den Uhrzeigersinn (12).
Q Stellen Sie den Tiefenanschlag so ein, dass der
Bohrer mit der gewünschten Bohrtiefe(13) über das
Ende des Tiefenanschlags hinausreicht.
Q Ziehen Sie den Zusatzhandgriff durch Drehen im
Uhrzeigersinn wieder fest.(11).
SCHALTER
Siehe Abbildung 5.
Um die Bohrmaschine EIN zu schalten, betätigen Sie den
EIN / AUS Schalter. Um die Maschine AUS zu schalten,
lassen Sie den EIN / AUS Schalter wieder los.
Diese Funktion erhöht die Einsatzzeit (Lebensdauer) des
Akkus.
EINSETZEN DES AKKUS (nicht im Lieferumfang)
Siehe Abbildung 2.
Befolgen Sie zum Einsetzen des Akkupacks die folgenden
Schritte:
EIN / AUS SCHALTER SPERREN
Siehe Abbildung 5.
Der EIN / AUS Schalter kann in der Position "Aus"
gesperrt werden. Diese Funktion ermöglicht es, ein
unbeabsichtigtes Einschalten Ihres Geräts zu vermeiden,
wenn Sie das Gerät nicht verwenden. Hierzu stellen Sie
den EIN /AUS Schalter auf die mittlere Position.
10
Page 14

GB
DE
ES IT NL PT DK SE FI NO RU PL CZ HU RO LV LT EE HR SI SK GR TRFR
Deutsch
BETRIEB
Hinweis: Wenn sich der EIN / AUS Schalter in der
mittleren Position befindet, ist dieser gesperrt.
LINKSLAUF
Siehe Abbildung 5.
Dieses Werkzeug kann auch mit umgekehrter Drehrichtung
(Linkslauf) eingesetzt werden. Die Drehrichtung wird
über einen Wahlschalter über dem Wahlschalter (6)
eingestellt.
Q Drehrichtung im Uhrzeigersinn: Den Wahlschalter auf
die linke Position (16) stellen.
Q Drehrichtung gegen den Uhrzeigersinn: Den
Wahlschalter auf die rechte Position (15) stellen.
WAHLSCHALTER FÜR DIE BETRIEBSART (4)
Q Stellen Sie den Wahlschalter zum Bohren ohne
Schlag auf die
Q Stellen Sie den Wahlschalter zum Hammerbohren auf
die
Position.
Das Umschalten ist ausschließlich im Stillstand möglich.
Stellen Sie sicher das der Wahlschalter hörbar
eingerastet hat.
Bitte beachten: Die Betriebsart Hammerbohren sollte
ausschließlich in Verbindung mit SDS-Plus Werkzeug
verwandt werden. Für Bohr-& Schraubarbeiten unbedingt
die Betriebsart Bohren ohne Schlag verwenden.
Verwenden Sie beim Hammerbohren ausschließlich
Werkzeuge Bits mit SDS-Plus Schaft. Die Verwendung von
zylindrischen Schlagbohrern mit Hilfe eines Bohradapters
ist nicht möglich.
HAMMERBOHREN
Position.
Q Reinigen und fetten sie eden SDS-Plus Schaft bevor
Sie es in dei Werkzeugaufnahme (2) einsetzen.
Q Ziehen Sie den Verriegelungsring (3) zurück und
halten Sie ihn fest.
Q Drücken und drehen Sie das staubfreie Einsatzwerkzeug
soweit es geht in die Werkzeugaufnahme.
Q Lassen Sie den Verriegelungsring zum Verriegeln des
Einsatzwerkzeugs los.
Q Vergewissern Sie sich durch Ziehen am
Einsatzwerkzeug, dass dieses fest sitzt.
SDS-PLUS EINSATZWERKZEUG ENTFERNEN
Ziehen Sie den Spannring zurück und entnehmen Sie
das Bit.
SDS-PLUS UNIVERSALADAPTER MIT BOHRFUTTER
(NICHT IM LIEFERUMFANG ENTHALTEN) (17)
Siehe Abbildung 6.
Zum Bohren (ohne Schlag) in Metall, Holz und Plastik
verwenden Sie bitte einen handelsüblichen SDS-Plus
Universaladapter und ggf das passenden Bohrfutter.
PRAXIS TIPPS
Bohren Sie nicht in versteckte elektrische Leitungen oder
Gas- und Wasserrohre! Überprüfen Sie vor Arbeitsbeginn
den Arbeitsbereich z.B. mit einem Metalldetektor.
RUTSCHKUPPLUNG
Sollte sich das Einsatzwerkzeug verklemmen löst
sich die Rutschkupplung aus und verhindert so eine
Gefahrensituation.
n diesem Falle schalten Sie das Gerät aus und trennen
Sie es vom Einsatzwerkzeug. Ein erneutes Einschalten
trotz klemmendem Einsatzwerkzeug kann zu gefährlichen
Situationen führen.
Halten Sie die Maschine immer fest mit beiden
Händen und sorgen Sie für einen sicheren Stand.
Sie müssen beim Hammerbohren nur minimalen
mehr Druck ausüben. Die Leistung wird durch
starken Druck nicht erhöht. Zu viel Druck belastet
den Motor unnötig.
Prüfen Sie die Bohrer regelmäßig. Schärfen oder
ersetzen Sie stumpfe Bohrer.
Arbeiten Sie beim Hammerbohren immer mit Schutzbrille,
Gehörschutz und Zusatzhandgriff. Prüfen Sie vor dem
Einschalten, ob der Wahlschalter (4) in seiner Position
eingerastet ist.
EINSETZEN UND WECHSELN VON SDS-PLUS
WERKZEUGEN
Siehe Abbildung 6.
Das Gerät ist mit einem SDS-plus Verbindungssystem
ausgestattet.
WARTUNG
WARNUNG
Bei einem Austausch von Teilen dürfen nur
Originalersatzteile von Ryobi verwendet werden.
Die Verwendung von anderen Teilen kann zu
einer Gefährdung führen oder Ihr Werkzeug
beschädigen.
Verwenden Sie keine Lösemittel zum Reinigen der
Kunststoffteile. Die meisten Kunststoffe können durch
die Verwendung von bestimmten im Handel verkaufter
Lösungsmittel beschädigt werden. Verwenden Sie einen
sauberen Lappen für die Entfernung von Schmutz, Staub,
Öl, Fett usw.
11
Page 15
GB
DE
ES IT NL PT DK SE FI NO RU PL CZ HU RO LV LT EE HR SI SK GR TRFR
Deutsch
WARTUNG
WARNUNG
Die Kunststoffelemente dürfen niemals mit
Bremsflüssigkeit, Benzin, Produkten auf
Petroleumbasis, eindringenden Ölen usw. in
Kontakt kommen. Diese chemischen Produkte
enthalten Substanzen, die den Kunststoff
beschädigen, schwächen oder zerstören können,
und dies kann zu schweren Verletzungen führen.
WARNUNG
Überanspruchen Sie Ihre Werkzeuge nicht. Eine
Überanspruchung kann zu einer Beschädigung
Ihres Geräts und des Werkstücks führen.
WARNUNG
Versuchen Sie nicht dieses Werkzeug zu
modifizieren oder Zubehörteile herzustellen,
welche nicht für dieses Gerät zugelassen sind.
Jede Veränderung oder Modifikation dieser Art
könnte eine gefährliche Situation entstehen
lassen und schweren Personenschaden
verursachen.
Hammerbohren
Bitte lesen Sie die Anweisungen sorgfältig,
bevor Sie das Gerät einschalten.
Gehörschutz tragen
Augenschutz tragen
Entsorgen Sie unerwünschtes Material
Elektrische Geräte sollten nicht mit dem
übrigen Müll entsorgt werden. Bitte entsorgen
Sie diese an den entsprechenden
Entsorgungsstellen. Wenden Sie sich an die
örtliche Behörde oder Ihren Händler, um
Auskunft über die Entsorgung zu erhalten.
UMWELTSCHUTZ
Recyceln Sie das Rohmaterial anstatt es als
Müll zu entsorgen. Die Maschine, die
Zubehörteile und die Verpackung sollte
sortiert und umweltfreundlich entsorgt
werden.
SYMBOL
Sicherheitswarnung
V Volt
-1
min
Umdrehungen und Bewegungen in der
Minute
Gleichstrom
CE-Konformität
Bohren ohne Schlag / Schrauben
12
Page 16
GB IT NL PT DK SE FI NO RU PL CZ HU RO LV LT EE HR SI SK GR TRFR DE
ES
Español
REGLAS ESPECIALES DE SEGURIDAD
Q Utilizar el asa auxiliar suministrada con la
herramienta. La pérdida de control puede causar
daños personales.
Q Use protectores de oídos para la perforación
de impacto. La exposición al ruido puede causar
pérdidas de audición.
Q Use una máscara facial o una máscara para el
polvo si la operación de perforación genera polvo.
Q Agarre la herramienta eléctrica por las superfi cies
de agarre aislantes cuando realice una operación
en la que el accesorio de corte puede ponerse
en contacto con el cableado oculto. El accesorio
de corte que esté en contacto con un cable “vivo”
puede transmitir corriente a las piezas metálicas de la
herramienta que estén expuestas y el operador podría
sufrir una descarga eléctrica.
RUCCIONES PARA UN MANEJO SEGURO
Q Asegúrese de que la herramienta sólo se conecte al
voltaje marcado en la placa de identificación.
Q Nunca utilice la herramienta si está faltando su tapa
o cualquier perno. Si se han retirado la tapa o los
pernos, reemplácelos antes de usarse. Mantenga
todas las piezas en buen orden de funcionamiento.
Q Siempre asegure las herramientas cuando trabaje en
posiciones elevadas.
Q Nunca toque la cuchilla, broca, rueda moliente u otras
piezas móviles durante su uso.
Q Nunca arranque una herramienta cuando su
componente giratorio esté en contacto con alguna
pieza de trabajo.
Q Nunca apoye sobre una superficie una herramienta
antes de que sus piezas móviles se hayan detenido
completamente.
Q ACCESORIOS: El uso de accesorios o aditamentos
de una manera distinta a la recomendada en este
manual podrá representar un riesgo.
Q PIEZAS DE REEMPLAZO: Al reparar, sólo use
piezas de reemplazo idénticas.
DESCRIPCIÓN
1. Tapa de protección para el polvo
2. Portabrocas SDS
3. Banda de sujeción
4. Selector de modo
5. Interruptor de encendido
6. Selector de rotación
(Bloqueo de avance/retroceso/centro)
7. Asa auxiliar
8. Varilla del calibre de profundidad
9. Batería (no incluida)
10. Cierres
11. Para apretar
12. Para afl ojar
13. Profundidad de perforación
14. Broca (no incluida)
15. Rotación inversa
16. Rotación normal
17. Adaptador de portabrocas de 35mm (no incluido)
18. Broca destornillador (no incluida)
19. Broca SDS (no incluida)
CARACTERÍSTICAS TÉCNICAS
Voltaje 18 V
Velocidad sin carga 0-1000 min
Golpes de martillo (golpes por minuto) 0-4.000 min
Energía de impacto 1,5J
Capacidad máxima de perforación:
Madera 16 mm
Acero 13 mm
Hormigón (taladro percutor) 12 mm
Gama recomendada
de taladros percutores 4-12 mm
Tipo de conexión de brocas SDS-plus
Peso – sin incluir batería (Kg) 2.2
MODELO BATERÍA
(no suministrada)
BPP-1815
BPP-1817
BPP-1815M
CARGADOR
(no suministrada)
BCL-1800
BCS618
BCL1418
BPP-1817M
BPL-1820
CRH1801
BPL-1815
BPP-1815
BPP-1817
BPP-1815M
BC-1815S
BC-1800
BCA180
BPP-1817M
-1
-1
UTILIZACIÓN
ADVERTENCIA
No permita que la familiaridad con los productos
lo vuelva a usted descuidado. Recuerde que un
solo segundo de descuido es suficiente para
infligir lesiones serias.
ADVERTENCIA
Siempre use gafas o lentes de seguridad con
protectores laterales cuando utilice los productos.
No hacerlo así podrá causar que se arrojen
objetos a sus ojos, lo que causará posibles
lesiones serias.
13
Page 17
GB IT NL PT DK SE FI NO RU PL CZ HU RO LV LT EE HR SI SK GR TRFR DE
ES
Español
UTILIZACIÓN
ADVERTENCIA
No utilice ningún aditamento o accesorio no
recomendado por el fabricante de este
producto. El uso de aditamentos o accesorios
no recomendados puede causar lesiones
personales serias.
APLICACIONES
Usted puede usar este producto para los propósitos que
se listan abajo:
Q Taladrado en todos los tipos de productos de madera
(madera, madera laminada, paneles de madera, tabla
de composición y tabla dura)
Q Taladrado en cerámicas, plásticos, fi bras de vidrio y
láminas
Q Taladrado en metales
Q Taladro percutor en hormigón
Este producto aceptará paquetes de baterías de litio-ión
de 18V y paquetes de baterías de níquel-cadmio de 18V
de Ryobi One+.
ADVERTENCIA
Siempre retire el paquete de baterías de su
taladro cuando esté montando piezas, haciendo
ajustes, montando o retirando brocas, al limpiar
o cuando no se utilice. Retirar el paquete de
baterías evitará el arranque accidental que
puede causar lesiones personales serias.
CARACTERÍSTICAS DE PROTECCIÓN DE LA
BATERÍA
Las baterías de litio-ión de 18V de Ryobi están diseñadas
con características que protegen las celdas y maximizan
la vida de la batería. Bajo algunas condiciones operativas,
estas características incorporadas pueden causar que
la batería y herramienta que recibe energía actúen de
manera diferente a las baterías de níquel-cadmio.
Durante algunas aplicaciones, los equipos electrónicos
que usan baterías pueden enviar señales a la batería para
que se apague y que la herramienta deje de funcionar.
Para reestablecer la batería y herramienta, suelte el gatillo
y reasuma el funcionamiento normal.
NOTA: Para evitar que se siga apagando la batería, evite
forzar la herramienta.
Si soltar el gatillo no reestablece la batería y herramienta,
signifi ca que el paquete de baterías está sin energía.
En caso afi rmativo, el paquete de baterías empezará a
cargarse cuando se coloque en el cargador de litio-ión.
PARA INSTALAR EL PAQUETE DE BATERÍAS
Vea la fi gura 2.
Siga estos pasos para instalar la batería:
Q Sitúe el selector giratorio en la posición de bloqueo
central.
Q Inserte el paquete de baterías en el producto como se
muestra.
Q Asegúrese de que los seguros en cada lado del
paquete de baterías queden en su lugar y que el
paquete de baterías se asegure en el producto antes
de comenzar a utilizarlo.
PARA RETIRAR EL PAQUETE DE BATERÍAS
Siga estos pasos para extraer la batería:
Q Apriete los cierres en cada lado del paquete de
baterías.
Q Retire el paquete de baterías del taladro.
ADVERTENCIA
Los productos de baterías están siempre en
condiciones operativas. Por lo tanto, el interruptor
siempre debe bloquearse cuando no se utilice o
se transporte.
AJUSTE DEL MANGO AUXILIAR
Véase la fi gura 3.
Siga estos pasos para ajustar el mango auxiliar:
Q Afl oje el mango auxiliar girando el botón hacia la
izquierda (12).
Q Gire el mango auxiliar hasta la posición deseada.
Q Apriete el mango auxiliar de forma segura, girando el
botón en el sentido de las agujas del reloj (11).
AJUSTE DE LA VARILLA DE CALIBRE DE
PROFUNDIDAD
Véase la fi gura 4.
Siga estos pasos para ajustar la varilla de calibre de
profundidad:
Q Bloquee el gatillo-interruptor colocando el selector de
rotación en la posición central.
Q Afl oje el mango auxiliar girando el botón hacia la
izquierda (12).
Q Ajuste la varilla de calibre de profundidad de forma
que la broca se extienda más allá del fi nal de la varilla
hasta la profundidad de perforación deseada.
Q Apriete el mango auxiliar girando el botón en sentido
horario (11).
INTERRUPTOR
Véase la fi gura 5.
Para encender el taladro, apriete el gatillo del interruptor.
Para apagarlo, suelte el gatillo del interruptor.
FUNCIÓN DE BLOQUEO
Véase la fi gura 5.
El gatillo puede bloquearse en posición "parada".
Con esta función se evita que la taladradora-atornilladora
se ponga en marcha intempestivamente cuando no
la utilice. Para bloquear el gatillo, coloque el selector
del sentido de rotación (atornillado / destornillado) en
posición central.
Observación: Cuando el selector está en posición central,
el gatillo está bloqueado.
14
Page 18

GB IT NL PT DK SE FI NO RU PL CZ HU RO LV LT EE HR SI SK GR TRFR DE
ES
Español
UTILIZACIÓN
REVERSIBLE
Véase la fi gura 5.
Esta herramienta tiene la función de rotación reversible,
que está controlada por un selector situado sobre el
gatillo-interruptor (6).
Q Rotación en sentido de las agujas del reloj: confi gurar
la palanca de selección en la posición izquierda (16).
Q Rotación en sentido contrario a las agujas del reloj:
coloque la palanca de selección en la posición derecha
(15).
SELECTOR DE MODO (4)
Q Para perforar, coloque el selector en posición .
Q Para el taladro percutor, coloque el selector en
posición
El cambio de un modo a otro se realiza de una forma más
sencilla si la unidad se encuentra en reposo.
Sólo después de accionar el interruptor y de que la
máquina arranque, la caja de cambios pasa al modo
seleccionado.
Nota: El modo de taladro percutor dañará el mecanismo
de la herramienta cuando una broca sin SDS plus se utilice
para fi jar o perforar. Seleccione el modo de perforación
sólo para estos fi nes.
.
INSTALACIÓN Y CAMBIO DE BROCAS SDS
Véase la fi gura 6.
Esta herramienta está equipada con un sistema de
conexión SDS-plus.
Q Limpie la broca y engrásela con grasa para máquinas
antes de insertarla en el portabrocas (2).
Q Tire de la banda de sujeción hacia atrás(3) y agárrela.
Q Empuje y gire la herramienta (libre de polvo) en el
soporte de la broca tanto como sea posible.
Q Suelte la banda de sujeción para que la broca quede
bloqueada.
Q Compruebe que la broca ha quedado bloqueada
tirando de ella.
EXTRACCIÓN DE LA BROCA COLOCADA EN EL
SISTEMA SDS-PLUS
Tire hacia atrás de la banda de sujeción y retire broca.
ADAPTADOR DEL PORTABROCAS de 35mm (NO
INCLUIDO) (17)
Véase la Figura (6)
Para el trabajo de perforación en metal, madera y
plástico con brocas que no tengan un eje SDS PLUS, es
posible utilizar el adaptador de perforación.
CONSEJOS PRÁCTICOS
No perfore cerca de líneas eléctricas ocultas o conductos
de gas o agua. Compruebe la zona con un detector de
metales, por ejemplo, antes de comenzar.
Cuando se utilice en posición taladro percutor, utilice
exclusivamente brocas con metales duros y ejes SDSplus. No es posible utilizar brocas de mampostería
cilíndricas (disponibles en comercios) por medio del
adaptador de perforación.
USO COMO TALADRO PERCUTOR
Cuando la unidad se use como taladro percutor,
no es necesario aplicar demasiada presión. El
rendimiento no se incrementa si aplica más
presión. Demasiada presión supondrá una carga
innecesaria para el motor.
Revise periódicamente las brocas de perforación.
Vuelva a afilar o sustituya las brocas que estén
redondeadas.
Para utilizar la unidad como taladro percutor, utilice gafas
de protección, elementos de protección auditiva y el
mango auxiliar. Realice una comprobación antes de la
puesta en funcionamiento de la unidad si el selector está
bloqueado.
EMBRAGUE DE SEGURIDAD
Si la herramienta se atasca o se para, se activa el
embrague de seguridad.
Extraiga la carga de la máquina de inmediato tirando de
la herramienta de perforación hacia atrás.
Sostenga siempre la máquina firmemente con
ambas manos y con una posición segura.
MANTENIMIENTO
ADVERTENCIA
Si fuera preciso cambiar algún elemento, utilice
exclusivamente piezas de recambio Ryobi
originales. La utilización de cualquier otra
pieza puede representar un peligro o dañar la
herramienta.
No utilice disolventes para limpiar las piezas de plástico.
La mayor parte de los plásticos pueden resultar dañados
con los disolventes que se venden en el comercio. Utilice
un paño limpio para retirar las impurezas, el polvo, el
aceite, la grasa, etc.
15
Page 19

GB IT NL PT DK SE FI NO RU PL CZ HU RO LV LT EE HR SI SK GR TRFR DE
ES
Español
MANTENIMIENTO
ADVERTENCIA
Los elementos de plástico nunca deben estar
en contacto con líquido de frenos, gasolina,
productos a base de petróleo, aceites
penetrantes, etc. Estas sustancias químicas
contienen componentes que pueden deteriorar,
debilitar o destruir el plástico, pudiendo ocasionar
graves heridas corporales.
No exija demasiado a sus herramientas. Un uso
abusivo puede deteriorarlas, al igual que a la
pieza trabajada.
ADVERTENCIA
No intente modificar la herramienta ni utilizar
accesorios cuyo uso no haya sido recomendado.
Estas transformaciones o modificaciones
constituyen un uso abusivo y pueden provocar
situaciones peligrosas de las que podrían
resultar heridas graves.
Utilice dispositivos de protección para los
oídos
Utilice gafas de seguridad
Reciclado no deseado
Los productos eléctricos de desperdicio no
deben desecharse con desperdicios caseros.
Por favor recíclelos donde existan dichas
instalaciones. Compruebe con su autoridad
local o minorista para reciclar.
PROTECCIÓN DEL MEDIO AMBIENTE
Recicle las materias primas en lugar de
tirarlas a la basura doméstica. Para proteger
el medio ambiente, debe separar la
herramienta, los accesorios y los embalajes.
SÍMBOLO
Alerta de seguridad
V Voltios
-1
min
Revoluciones o reciprocidades por minuto
Corriente directa
Conformidad con CE
Modo de perforación
Modo taladro percutor
Por favor lea las instrucciones detenidamente
antes de arrancar la máquina.
16
Page 20
GB NL PT DK SE FI NO RU PL CZ HU RO LV LT EE HR SI SK GR TRFR DE ES
IT
Italiano
NORME DI SICUREZZA SPECIALI
Q Utilizzare il manico ausiliario fornito con l’utensile.
La perdita di controllo potrà causare lesioni personali.
Q Indossare cuffi e di protezione mentre si utilizza
il trapano a percussione. L’esposizione al rumore
potrà causare perdita di udito.
Q Indossare una maschera per il volto o per la
polvere se il trapano produce polvere.
Q Impugnare l’utensile dalle superfi ci isolate quando
si svolg e un’operazione nella quale le lame
potrebbero toccare dei cavi nascosti. Se la lama
taglia un cavo “vivo” le parti esposte dell’elettroutensile
potrebbero agire da conduttore e causare scosse
elettriche.
ISTRUZIONI PER UNA CORRETTA
GESTIONE DELL’UTENSILE
Q Assicurarsi che l’utensile sia collegato a una presa
che abbia un voltaggio identico a quello indicato
sull’etichetta.
Q Non utilizzare l’utensile senza coperchio o senza
bulloni. Se il coperchio o i bulloni sono stati rimossi,
sostituirli. Svolgere una corretta manutenzione su tutte
le parti.
Q Tenere sempre l’utensile saldamente quando si lavora
su posizioni rialzate.
Q Non toccare mai la lama, il mandrino o la punta, nè
altre eventuali parti in movimento durante l’utilizzo.
Q Non mettere mai in funzione un utensile quando
le parti in movimento entrano in contatto con la
superfi cie di lavoro.
Q Non appoggiare mai un utensile su una superfi cie
senza prima essersi assicurati che le sue parti in
movimento si siano completamente fermate.
Q ACCESSORI : L’utilizzo di accessori o prolunghe
diverse da quelle raccomandate nel presente manuale
potrà causare rischi.
Q PARTI DI RICAMBIO : Quando si svolge la
manutenzione sull’utensile utilizzare solo parti di
ricambio identiche.
DESCRIZIONE
1. Coperchio protezione polvere
2. Mandrino SDS
3. Collare ganasce
4. Selezionatore modalità
5. Interruttore ON / OFF
6. Selezionatore rotazione
(Avanti / Indietro / Blocco centrale)
7. Manico ausiliario
8. Asta profondità
9. Gruppo batterie (non incluso)
10. Linguette
11. Per serrare
12. Per allentare
13. Profondità di trapanazione
14. Punta trapano (non inclusa)
15. Rotazione indietro
16. Rotazione in avanti
17. Adattatore mandrino da 35mm (non incluso)
18. Punta cacciavite (non inclusa)
19. Punta SDS (non inclusa)
CARATTERISTICHE TECNICHE
Voltaggio 18 V
Velocità senza carico 0-1000 min
Colpi martello (Colpi al minuto) 0-4000 min
-1
-1
Energia di impatto 1.5J
Capacità di trapanazione massima:
Legno 16 mm
Alluminio 13 mm
Cemento (demolizione con martello) 12 mm
Dimensioni trapanazione raccomandate 4-12 mm
Tipo di collegamento punta SDS-plus
Peso – senza gruppo batterie (Kg) 2.2
MODELLO BATTERIA
(non fornita)
BPP-1815
BPP-1817
BPP-1815M
CARICABATTERIA
(non fornita)
BCL-1800
BCS618
BCL1418
BPP-1817M
BPL-1820
CRH1801
BPL-1815
BPP-1815
BPP-1817
BPP-1815M
BC-1815S
BC-1800
BCA180
BPP-1817M
FUNZIONAMENTO
AVVERTENZE
Eventuali distrazioni durante l’utilizzo di questo
prodotto potranno causare una perdita di
controllo. Ricordare che una minima disattenzione
potrà causare gravi danni alla persona.
17
Page 21
GB NL PT DK SE FI NO RU PL CZ HU RO LV LT EE HR SI SK GR TRFR DE ES
IT
Italiano
FUNZIONAMENTO
AVVERTENZE
Indossare sempre visiere o occhiali di sicurezza
con protezioni laterali mentre si utilizzano
questi attrezzi. Non rispettare questa regola di
base potrà causare gravi lesioni personali dal
momento che si potrà essere colpiti da materiali
di rimbalzo.
AVVERTENZE
Non utilizzare prolunghe o accessori non
raccomandati dalla ditta produttrice. L’utilizzo di
prolunghe o accessori non raccomandati potrà
causare gravi danni alla persona.
APPLICAZIONI
Questo prodotto è indicato per gli scopi indicati di
seguito:
Q Trapanare tutti i tipi di legno (semilavorati in legno,
compensato, pannelli di legno, cartone, truciolato)
Q Trapanare ceramica, plastica, fi bra di vetro e laminati
Q Trapanare metalli
Q Trapanazione nel cemento
e l’utensile, rilasciare l’interruttore a grilletto e riprendere
le normali operazioni.
NOTE: Per evitare che la batteria smetta di funzionare,
non forzare l’utensile.
Se rilasciando il grilletto la batteria e l’utensile non si
resettano, il gruppo batterie è scarico. Se il gruppo batterie
è scarico ricaricarlo collegandolo al caricatore per batterie
al litio-ionio.
PER INSTALLARE IL GRUPPO BATTERIE
Vedere la Figura 2.
Seguire queste fasi per installare il gruppo batterie:
Q Posizionare il selezionatore rotazionale nella
posizione di blocco centrale.
Q Inserire il gruppo batterie nel prodotto come mostrato.
Q Assicurarsi che le linguette su ciascun lato del gruppo
batterie vengano posizionate al loro posto e che il
gruppo batterie sia inserito correttamente nel prodotto
prima di iniziare le operazioni.
PER RIMUOVERE IL GRUPPO BATTERIE
Seguire queste fasi per rimuovere il gruppo batterie:
Q Premere le linguette su ciascun lato del gruppo
batterie.
Q Rimuovere il gruppo batterie dall’utensile.
Questo prodotto funziona con gruppi batteria Ryobi
One+ da 18V al litio-ionio e Ryobi One+ da 18V al nickelcadmio.
AVVERTENZE
Rimuovere sempre il gruppo batterie dal trapano
quando si stanno montando delle parti, si
stanno facendo delle regolazioni, si montano o
smontano parti, si svolgono operazioni di pulizia
o quando il trapano non è in uso. Rimuovere il
gruppo batterie eviterà di mettere in funzione
accidentalmente l’utensile evitando così di
correre gravi rischi personali.
CARATTERISTICHE PROTEZIONE BATTERIE
Le batterie Ryobi da 18V al litio-ionio sono dotate di
caratteristiche che proteggono le cellule al litio-ionio
e ottimizzano la durata della batteria. In condizioni
particolari di funzionamento, queste caratteristiche
integrate potranno causare alla batteria e all’utensile che
la utilizza di comportarsi in modo diverso dalle batterie al
nickel-cadmio.
In alcune situazioni, i dispositivi elettronici interni
segnaleranno alla batteria di smettere di fornire l’energia
necessaria, bloccando l’utensile. Per resettare la batteria
AVVERTENZE
Gli utensili a batterie sono sempre in una
condizione di funzionamento attiva. Bloccare
quindi l’interruttore quando non li si utilizza o
quando li si trasporta per evitare l’avviamento
accidentale del prodotto.
REGOLAZIONE DEL MANICO AUSILIARIO
Vedere la Figura 3.
Seguire queste fasi per regolare il manico ausiliario:
Q Allentare il manico ausiliario girando la manopola in
senso antiorario (12).
Q Ruotare il manico ausiliario nella posizione desirata.
Q Assicurare il manico ausiliario girando la manopola in
senso orario (11).
REGOLAZIONE ASTA DI PROFONDITÀ
Vedere la Figura 4.
Seguire queste fasi per regolare l’asta di profondità:
Q Bloccare l’interruttore posizionando il selezionatore di
rotazione nella posizione centrale.
Q Allentare il manico ausiliario girando la manopola in
senso antiorario (12).
18
Page 22

GB NL PT DK SE FI NO RU PL CZ HU RO LV LT EE HR SI SK GR TRFR DE ES
IT
Italiano
FUNZIONAMENTO
Q Regolare l’asta di profondità in modo che la punta
del trapano si estenda oltre la fi ne dell’asta fi no alla
profondità necessaria.
Q Assicurare il manico ausiliario girando la manopola in
senso orario (11).
INTERRUTTORE
Vedere la Figura 5.
Per accendere l’utensile, premere l’interruttore a grilletto.
Per spegnerlo, rilasciare l’interruttore.
FUNZIONE DI BLOCCAGGIO
Vedere la Figura 5.
È possibile bloccare il grilletto in posizione "arresto".
Tale funzione consente di evitare di avviare involontariamente il trapano avvitatore quando non viene utilizzato.
Per bloccare il grilletto, impostare il selettore del senso di
rotazione (senso di avvitatura / svitatura) in posizione
centrale.
Nota: Quando il selettore si trova in posizione centrale,
il grilletto è bloccato.
INDIETRO
Vedere la Figura 5.
Questo utensile ha un dispositivo di rotazione reversibile
controllato da un selezionatore situato sull’interruttore a
grilletto (6).
Q Rotazione in senso orario: posizionare la leva del
selezionatore a sinistra (16).
Q Rotazione in senso antiorario: posizionare la leva del
selezionatore a destra (15).
SELEZIONATORE MODALITÀ (4)
Q
Per trapanare, posizionare il selezionatore in posizione .
Q Per demolire impostare su .
Lo scambio da un’operazione all’altra può essere fatto
quando il trapano è fermo.
Solo dopo che l’interruttore viene premuto e l’utensile
viene avviato si potrà cambiare modalità.
Note: La modalità demolizione danneggerà il meccanismo
dell’utensile quando viene utilizzato per operazioni di
fissaggio o trapanazione con una punta diversa dalla
SDS plus. Selezionare la modlità trapanazione solo per
questo scopo.
Quando si svolgono operazioni di demolizione utilizzare
solo punte di metallo duro e punte SDS plus. L’utilizzo
di punte cilindriche disponibili per llavori di edilizia con
l’adattatore del trapano non è possibile.
OPERAZIONI DI TRAPANAZIONE
Quando si svolgono operazioni di demolizione
non applicare troppa pressione. Le prestazioni
non miglioreranno in questo modo. Troppa
pressione porrà un carico non necessario sul
motore.
Controllare le punte del trapano regolarmenre.
Riaffilare o sostituire le punte spuntate.
Durante le operazioni di demolizione, indossare occhiali
e cuffi e di protezione e utilizzare il manico ausiliario.
Controllare che la manopola sia bloccata nella sua
corretta posizione prima di mettere in funzionamento
l’utensile.
INSTALLAZIONE E CAMBIO PUNTE SDS
Vedere la Fig. 6
Questo utensile è dotato di un sistema di connessione
SDS-plus.
Q Pulire le punte e ingrassarle con olio per macchine
prima di inserirle nel mandrino (2).
Q Tirare indietro il colletto delle ganasce (3) e trattenerlo.
Q Spingere e ruotare il dispositivo anti-polvere nel
supporto punte per tutta la sua lughezza.
Q Rilasciare il colletto delle ganasce per bloccare la
punta.
Q Controllare che la punta sia stata inserita e bloccata
correttamente.
RIMUOVERE LA PUNTA DAL SISTEMA SDS-PLUS
Tirare indietro il colletto delle ganasce e rimuovere la
punta.
ADATTATORE MANDRINO 35mm (NON INCLUSO) (17)
Vedere la Figura (6)
È disponibile un adattatore per lavori di trapanatura nel
metallo, legno e plastica con punte da trapano che hanno
un’asta diversa da quella SDS Plus.
SUGGERIMENTI PRATICI
Non trapanare accanto a linee elettriche, tubi del gas o
dell’acqua. Controllare l’area di lavoro con un rilevatore di
metalli prima di iniziare.
FRIZIONE ANTISCIVOLAMENTO
Se l’utensile si blocca o rimane incastrato, la frizione
antiscivolamento viene rilasciata.
Interrompere le operazioni immediatamente tirando
indietro l’utensile.
19
Page 23
GB NL PT DK SE FI NO RU PL CZ HU RO LV LT EE HR SI SK GR TRFR DE ES
IT
Italiano
FUNZIONAMENTO
Tenere sempre l’utensile con entrambre le mani
e assumere una posizione stabile.
MANUTENZIONE
AVVERTENZA
In caso di sostituzione, utilizzare solo parti di
ricambio originali. L'impiego di qualunque altro
componente può rappresentare un pericolo o
danneggiare l'apparecchio.
Non utilizzare solventi per pulire le parti in plastica. La
maggior parte dei materiali plastici rischia di essere
danneggiata dall'uso dei solventi disponibili in commercio.
Utilizzare un panno pulito per rimuovere lo sporco, la
polvere, l'olio, il grasso, ecc.
AVVERTENZA
Le parti in plastica non devono mai entrare a
contatto con il liquido dei freni, la benzina, i
fluidi a base di petrolio, gli oli penetranti, ecc., in
quanto tali prodotti chimici contengono sostanze
che possono danneggiare, rendere fragile o
distruggere la plastica, rischiando di causare
ustioni o gravi lesioni fisiche.
SIMBOLO
Allarme di sicurezza
V Volt
-1
Rivoluzioni o giri al minuto
min
Corrente diretta
Modalità trapanazione
Modalità demolizione
Conformità CE
Leggere attentamente le istruzioni prima di
avviare l’utensile.
Indossare cuffie di protezione
Indossare occhiali di protezione
AVVERTENZA
Non esigere troppo dai propri apparecchi. Gli
utilizzi non consentiti possono danneggiare
l'apparecchio e il pezzo da lavorare.
AVVERTENZA
Non tentare di apportare modifiche o abbinare
degli accessori il cui utilizzo con questo
apparecchio è sconsigliato. Tali modifiche
o trasformazioni costituiscono un utilizzo
non consentito e possono causare situazioni
pericolose e quindi provocare gravi lesioni
fisiche.
TUTELA DELL’AMBIENTE
UTELA DELL'AMBIENTE
Riciclare le materie prime anziché gettarle
tra i rifiuti domestici. L’apparecchio, gli
accessori e gli imballaggi devono essere
smaltiti selettivamente.
Non riciclabile
I prodotti elettrici non devono essere smaltiti
con i rifiuti domestici, vi sono strutture per
smaltire tali prodotti. Informarsi presso il
proprio Comune o rivenditore di sicurezza per
smatire adeguatamente tali rifiuti.
20
Page 24
GB PT DK SE FI NO RU PL CZ HU RO LV LT EE HR SI SK GR TRFR DE ES IT
NL
Nederlands
SPECIFIEKE VEILIGHEIDSVOORSCHRFITEN
Q Gebruik de extra zijhandgreep dat met het toestel
wordt meegeleverd. Wanneer u de controle verliest
kan dit leiden tot lichamelijk letsel.
Q Draag gehoorbescherming wanneer u een
hamerboormachine gebruikt. Blootstelling aan
lawaai kan leiden tot gehoorverlies.
Q Draag gezichtsbescherming of een stofmasker
indien het boren stof veroorzaakt.
Q Houd de machine aan de geïsoleerde handvatten
vast wanneer u werkt op plaatsen waar het boortje
een verborgen leiding kan raken. Wanneer de boor
een spanningsleiding raakt, kunnen de blootgestelde
onderdelen van het gereedschap onder spanning
komen, waardoor de gebruiker geëlektrocuteerd
wordt.
INSTRUCTIES VOOR VEILIG GEBRUIK
Zorg ervoor dat het gereedschap enkel wordt
aangesloten op de juiste netspanning, aangeduid op
het naamplaatje.
Gebruik het gereedschap nooit wanneer de behuizing
ontbreekt of schroeven ontbreken. Indien de behuizing
werd weggenomen of schroeven, plaats deze dan
terug vooraleer u het toestel gebruikt. Houd alle
onderdelen in goede staat.
Zorg er steeds voor dat het gereedschap wordt
beveiligd wanneer u op hoogte werkt.
Raak het blad, de boorstiften, komschijf of andere
bewegende delen nooit aan.
Start nooit enig gereedschap, waarvan het draaiend
gedeelte het werkstuk aanraakt.
Leg het gereedschap nooit neer vooraleer de
bewegende delen volledig zijn gestopt.
TOEBEHOREN: Het gebruik van toebehoren
of aansluitingen die niet door de fabrikant worden
aangeraden, kan een gevaar betekenen.
VERVANGONDERDELEN: Gebruik identieke
vervangonderdelen voor het onderhoud van het
gereedschap.
VERKLARING
1. Stofbeschermkap
2. SDS boorhouder
3. Spanhals
4. Modusinstelling
5. AAN / UIT schakelaar
6. Links/rechtsschakelaar
(Links/rechts/middelste vergrendeling)
7. Extra zijhandgreep
8. Diepteaanslag
9. Batterijpak (niet inbegrepen)
10. Knipsluitingen
11. Vastmaken
12. Losmaken
13. Boordiepte
14. Boorstift (niet inbegrepen)
15. Draairichting omkeren
16. Links draaien
17. 35 mm boorhouderadapter (niet inbegrepen)
18. Schroefstift (niet inbegrepen)
19. SDS stift (niet inbegrepen)
TECHNISCHE GEGEVENS
Spanning 18 V
Onbelast toerental 0-1000 min
Hamerslagen (slagen per minuut) 0-4,000 min
Impactkracht 1.5J
Maximum boorcapaciteit
Hout 16 mm
Staal 13 mm
Beton (klopboren) 12 mm
Aangewezen hamerboorbereik 4-12 mm
Type opnameschacht SDS-plus
Gewicht - batterijpak niet inbegrepen (kg) 2.2
MODEL ACCUPAK
(niet bijgeleverd)
BPP-1815
BPP-1817
BPP-1815M
LADER
(niet bijgeleverd)
BCL-1800
BCS618
BCL1418
BPP-1817M
CRH1801
BPL-1820
BPL-1815
BPP-1815
BPP-1817
BPP-1815M
BC-1815S
BC-1800
BCA180
BPP-1817M
-1
-1
21
Page 25
GB PT DK SE FI NO RU PL CZ HU RO LV LT EE HR SI SK GR TRFR DE ES IT
NL
Nederlands
WERKING
WAARSCHUWING
Laat uw vertrouwdheid met deze machine uw de
aandacht niet verzwakken. Houd er rekening mee
dat een kleine onachtzaamheid voldoende is om
ernstige verwondingen te veroorzaken.
WAARSCHUWING
Draag altijd een veiligheidsbril of veiligheidsbril
met zijdelingse bescherming. Wanneer u dit niet
in acht neemt, kunnen voorwerpen in de ogen
terechtkomen, wat mogelijks leidt tot ernstige
verwondingen.
WAARSCHUWING
Gebruik geen hulpstukken of toebehoren die
niet door de fabrikant van dit toestel worden
aangeraden. Het gebruik van hulpstukken of
toebehoren die niet worden aangeraden, kan
leiden tot ernstige persoonlijke verwondingen.
TOEPASSINGEN
U mag dit product voor de onderstaande doeleinden
gebruiken:
Boren in alle types hout (timmerhout, multiplex,
lambrisering, samengesteld hout en hardhout)
Boren in aardewerk, kunststoffen, glasvezel en
laminaat
Boren in metalen
Klopboren in beton
Dit product kan worden gekoppeld aan Ryobi One+
18V lithium-ion batterijpacks en Ryobi One+ 18V
nikkelcadmium batterijpacks.
WAARSCHUWING
Haal het batterijpack steeds uit de machine
wanneer u onderdelen monteert, het toestel
afstelt, stiften monteert of wegneemt, het toestel
reinigt of wanneer het niet wordt gebruikt.
Wanneer u het batterijpack verwijdert, voorkomt
u ongewild starten wat ernstige letsels kan
veroorzaken.
EIGENSCHAPPEN VAN DE BATTERIJBESCHERMING
Ryobi 18V lithium-ion batterijen zijn ontworpen met
eigenschappen die de lithium-ioncellen beschermen
en de levensduur van de batterij maximaliseren. In
bepaalde werkomstandigheden kunnen deze ingebouwde
eigenschappen ertoe leiden dat de batterij en de machine
welke ermee wordt aangedreven, zich anders gedragen
dan bij nikkelcadmium batterijen.
Tijdens enkele toepassingen kan de batterijelektronica
de batterij het signaal geven te stoppen en ervoor zorgen
dat de machine stopt . Om de batterij en het gereedschap
te resetten, laat u de aan/uitschakelaar los en herneemt u
de normale werking.
OPMERKING: Om verdere stopzetting van de batterij
te voorkomen, dient u te vermijden dat het gereedschap
wordt geforceerd.
Indien het loslaten van de aan/uitschakelaar de batterij
en het gereedschap niet reset, is het batterijpack leeg.
Indien leeg, zal het batterijpack beginnen laden wanneer
het in de lithium-ion lader wordt geplaatst.
BATTERIJPACK INSTALLEREN
Zie figuur 2.
Volg deze stappen om het batterijpack te installeren.
Plaats de draairichtingselectieknop in de middelste
vergrendelstand.
Bevestig het batterijpack aan het gereedschap, zoals
getoond.
Zorg ervoor dat de knipsluitingen aan elke kant van
het batterijpack vastklikken en dat het batterijpack
in het gereedschap is vastgemaakt vooraleer u het
begint te werken.
BATTERIJPACK VERWIJDEREN
Volg deze stappen om het batterijpack te verwijderen.
Druk de knipsluitingen aan elke kant van het
batterijpack in.
Verwijder het batterijpack van de machine.
WAARSCHUWING
Batterijproducten zijn altijd klaar voor gebruik.
Daarom moet de schakelaar altijd worden
vergrendeld wanneer u de machine niet wordt
gebruikt ze aan uw zijde is bevestigd.
EXTRA ZIJHANDGREEP AFSTELLEN
Zie figuur 3.
Volg deze stappen om de extra zijhandgreep af te
stellen:
Maak de zijhandgreep los door de knop (12) in
tegenwijzerzin te draaien.
Draai de zijhandgreep op de gewenste plaats.
Maak de zijhandgreep stevig vast door de knop (11) in
wijzerzin te draaien.
DIEPTEAANSLAG AFSTELLEN
Zie figuur 4.
Volg deze stappen om de diepteaanslag af te stellen:
Vergrendel de snelheidsschakelaar door de links/
rechtsschakelaar in de middelste positie te plaatsen.
22
Page 26
GB PT DK SE FI NO RU PL CZ HU RO LV LT EE HR SI SK GR TRFR DE ES IT
NL
Nederlands
WERKING
Maak de zijhandgreep los door de knop (12) in
tegenwijzerzin te draaien.
Stel de diepteaanslag zo in dat de boorstift over
het einde van de meter uitsteekt tot de gewenste
boordiepte.
Maak de zijhandgreep opnieuw stevig vast door de
knop (11) in wijzerzin te draaien.
SCHAKELAAR
Zie figuur 5.
Om de machine AAN te schakelen, drukt u de aan/
uitschakelaar in. Om het toestel UIT te schakelen, laat u
de aan/uitschakelaar los.
VERGRENDELFUNCTIE
Zie figuur 5.
De aan/uit-schakelaar kan worden vergrendeld in de
UIT-stand. Deze functie dient om te voorkomen dat de
boor-schroefmachine ongewild wordt ingeschakeld als
u hem niet gebruikt. Plaats de draairichtingschakelaar
(voor indraaien/uitdraaien) in de middelste stand om de
aan/uit-schakelaar te vergrendelen.
Opmerking: Wanneer de keuzeschakelaar in het midden
staat, is de aan/uit-schakelaar geblokkeerd.
OMKEERBAAR
Zie figuur 5.
De draairichting van dit gereedschap kan worden
omgekeerd en wordt geregeld door een keuzeknop
boven de snelheidsschakelaar (6).
In wijzerzin draaien: stel de keuzeknop in de linker
positie (16) in.
In tegenwijzerzin draaien: stel de keuzeknop in de
rechter positie (15) in.
MODUSINSTELLING (4)
Q Plaats de instellingsknop in de stand om te boren.
Q Om te klopboren, stelt u in op .
De omschakeling kan het best worden uitgevoerd terwijl
de machine stil ligt.
Pas wanneer de schakelaar is geactiveerd en de machine
start, schakelt de transmissie in de geselecteerde
instelling.
Opmerking: De hamerboorinstelling zal het mechanisme
van het toestel beschadigen wanneer het wordt gebruikt
om niet-SDS plus stiften vast te maken of te boren. Kies
daarom de boormodus voor dit doel.
Wanneer u hamerboort, gebruik dan uitsluitend stiften
uit hard metaal met een SDS-plus opnameschacht.
Het is niet mogelijk om cilindervormige boorstiften
voor metselwerk, die in de handel verkrijgbaar zijn, te
gebruiken in combinatie met de booradapter.
HAMERBOREN
Wanneer u hamerboort, mag u niet teveel druk
uitoefenen. Het vermogen van de machine wordt
op deze manier niet verhoogd. Teveel druk zal
de motor onnodig belasten.
Controleer regelmatig de boorstiften. Slijp de
botte bootstiften opnieuw of vervang ze.
Terwijl u hamerboort dient u steeds gezichts- en
gehoorbescherming te dragen en de zijhandgreep te
gebruiken. Controleer of de schakelknop in de juiste
positie werd vergrendeld vooraleer u de machine
inschakeld.
SDS-STIFTEN INSTALLEREN EN WISSELEN
Zie fi guur 6.
Dit toestel is uitgerust met een SDS-plus
opnamesysteem.
Reinig de boorstift en smeer deze in met machineolie
vooraleer u deze in de boorhouder (2) plaatst.
Trek de spanhals (3) terug en houd deze vast.
Druk en draai de stofvrije boorstift in de boorhouder
en draai deze zover mogelijk.
Laat de spanhals los om de boorstift te vergrendelen.
Controleer of de boorstift vergrendeld is door eraan te
trekken.
BOORSTIFT UIT HET SDS-PLUS SYSTEEM
VERWIJDEREN
Trek de spanhals terug en verwijder de boorstift.
35mm BOORHOUDER ADAPTER (NIET
INBEGREPEN) (17)
Zie figuur 6.
Om in metaal, hout en plastic te boren met boorstiften
met een niet-SDS Plus opnameschacht , kunt u de
booradapter gebruiken.
PRAKTISCHE TIPS
Boor niet in verborgen elektrische leidingen of gas- en
waterleidingen. Controleer het werkgebied vooraleer u
start, d.m.v. een metaaldetector.
SLIPKOPPELING
Indien het toestel vast raakt of blokkeert, maakt de
slipkoppeling het toestel opnieuw los.
Verwijder onmiddellijk de belasting van het toestel door
de boor terug te trekken.
23
Page 27
GB PT DK SE FI NO RU PL CZ HU RO LV LT EE HR SI SK GR TRFR DE ES IT
NL
Nederlands
WERKING
Houd de machine steeds met beide handen
stevig vast en sta stevig op beide voeten.
ONDERHOUD
WAARSCHUWING
Alleen originele Ryobi reserveonderdelen mogen
voor vervanging worden gebruikt. Het gebruik
van andere onderdelen kan gevaar opleveren of
uw machine beschadigen.
Gebruik geen oplosmiddelen om kunststof onderdelen
te reinigen. De meeste kunststoffen kunnen beschadigd
worden door het gebruik van bepaalde in de handel
verkochte oplosmiddelen. Gebruik een schone doek om
vuil, stof, olie, vet en dergelijke te verwijderen.
WAARSCHUWING
Kunststof onderdelen mogen nooit in
aanraking komen met remvloeistof, benzine,
petroleumproducten, kruipolie en dergelijke.
Deze chemicaliën bevatten namelijk stoffen die
kunststof kunnen beschadigen, verzwakken
of aantasten wat ernstig lichamelijk letsel zou
kunnen veroorzaken.
SYMBOOL
Veiligheidswaarschuwing
V Volt
-1
Toeren of omwentelingen per minuut
min
Gelijkstroom
Boormodus
Hamerboormodus
EU-conformiteit
Gelieve de instructies zorgvuldig te lezen
vooraleer u het toestel start.
Draag gehoorbescherming
Draag gezichtsbescherming
WAARSCHUWING
Verg niet teveel van uw machine. Door verkeerd
gebruik kunt u het apparaat en ook het werkstuk
beschadigen.
WAARSCHUWING
Probeer niet om veranderingen aan het apparaat
aan te brengen of om accessoires toe te voegen
die niet zijn aanbevolen. Dergelijke aanpassingen
of wijzigingen vallen onder verkeerd gebruik en
kunnen gevaarlijke situaties teweegbrengen die
ernstig lichamelijk letsel kunnen veroorzaken.
MILIEUBESCHERMING
Zorg dat grondstoffen gerecycleerd worden.
Zet daarom een afgedankt elektrisch
apparaat niet bij het huishoudelijk afval. Om
het milieu te beschermen moeten het
apparaat, de accessoires en de verpakking
gesorteerd bij een erkend recyclingcentrum
worden aangeleverd.
Recycleer ongewenste producten
Elektrisch afval mag niet samen met ander
huishoudelijk afval worden weggegooid.
Gelieve te recycleren indien de mogelijkheid
bestaat. Neem contact op met uw lokaal
bestuur of handelaar om advies te krijgen
over recyclage.
24
Page 28
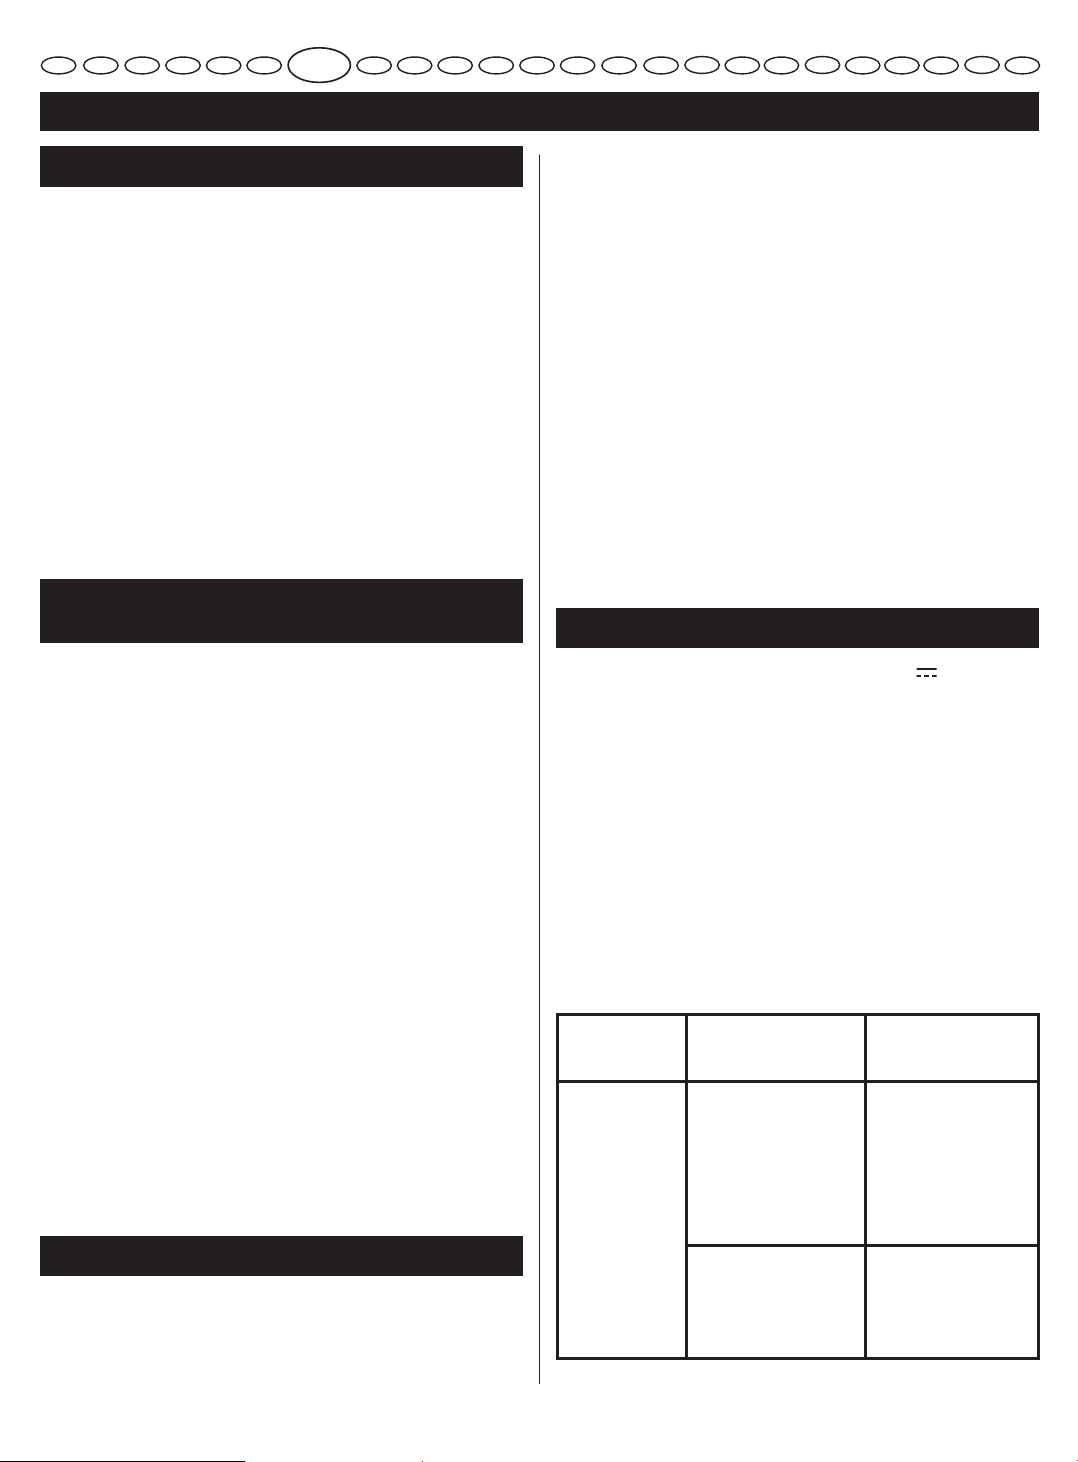
GB DK SE FI NO RU PL CZ HU RO LV LT EE HR SI SK GR TRFR DE ES IT NL
PT
Português
REGRAS ESPECIAIS DE SEGURANÇA
Q Use a pega auxiliar fornecida com a ferramenta. A
perda de controlo pode provocar ferimentos.
Q Use protectores de ouvidos com perfuradores de
impacto. A exposição ao ruído pode provocar perda
de audição.
Q Use uma máscara facial ou contra o pó se a
operação de perfuração provocar pó.
Q Segure a ferramenta eléctrica pelas superfícies de
pega isoladas, ao realizar uma operação em que
o acessório possa entrar em contacto com fios
eléctricos escondidos. O acessório de corte que
entre em contacto com um fio “ligado” pode tornar as
peças de metal da ferramenta eléctrica condutivas e
tal pode causar um choque eléctrico ao operador.
INSTRUÇÕES PARA UM MANUSEAMENTO
SEGURO
Q Assegure-se que a ferramenta é ligada apenas com a
tensão assinalada na placa de identificação.
Q Nunca utilize a ferramenta sem o revestimento
ou algum dos parafusos. Se o revestimento e os
parafusos tiverem sido retirados, volte a colocá-los
antes de usar a ferramenta. Mantenha todas as peças
em boas condições de funcionamento.
Q Segure sempre as ferramentas ao trabalhar em
posições elevadas.
Q Nunca toque na lâmina, broca de perfuração, mó ou
em outras peças em movimento durante a utilização.
Q Nunca ponha a funcionar uma ferramenta quando o
seu componente rotativo estiver em contacto com a
peça a trabalhar.
Q Nunca pouse uma ferramenta antes de as peças
móveis terem parado por completo.
Q ACESSÓRIOS: A utilização de acessórios ou peças
amovíveis que não as recomendadas neste manual
podem constituir um perigo.
Q PEÇAS DE SUBSTITUIÇÃO: Ao realizar a
manutenção utilize apenas peças de substituição
idênticas.
DESCRIÇÃO
1. Protecção contra pó
2. Mandril SDS
3. Braçadeira
4. Selector de modo
5. Interruptor ON / OFF
6. Selector de Rotação
(Avançar / Inverter / Fecho Central)
7. Pega auxiliar
8. Haste do calibre de profundidade
9. Bateria (não incluída)
10. Trincos
11. Demasiado apertado
12. Demasiado solto
13. Profundidade de perfuração
14. Broca de perfuração (não incluída)
15. Rotação inversa
16. Rotação para a frente
17. Adaptador de mandril 35 mm (não incluído)
18. Broca Aparafusadora (não incluída)
19. Broca SDS (não incluída)
CARACTERÍSTICAS TÉCNICAS
Tensão 18 V
Sem velocidade de carga 0-1000 min
Golpes de martelo
(golpes por minuto) 0-4.000 min
Energia de impacto 1,5J
Máxima capacidade de perfuração:
Madeira 16 mm
Aço 13 mm
Cimento (perfuração a martelo) 12 mm
Raio de perfuração a martelo
recomendado 4-12 mm
Tipo de ligação da broca SDS-plus
Peso - sem incluir bateria (kg) 2.2
MODELO BATERIA
(não fornecida)
BPP-1815
BPP-1817
BPP-1815M
BPP-1817M
BPL-1820
CRH1801
BPL-1815
BPP-1815
BPP-1817
BPP-1815M
BPP-1817M
CARREGADOR
(não fornecida)
BCL-1800
BCS618
BCL1418
BC-1815S
BC-1800
BCA180
-1
-1
25
Page 29

GB DK SE FI NO RU PL CZ HU RO LV LT EE HR SI SK GR TRFR DE ES IT NL
PT
Português
FUNCIONAMENTO
AVISO
Ao familiarizar-se com este produto, não deixe
de ter todos os cuidados. Lembre-se de que uma
fracção de segundo de distracção é suficiente
para infligir graves ferimentos.
AVISO
Use sempre óculos de protecção ou óculos
de segurança com protecções laterais quando
utilizar o produto. Caso contrário, os seus olhos
poderão ser atingidos por objectos provocando
graves ferimentos.
AVISO
Não utilize quaisquer equipamentos
complementares ou acessórios não
recomendados pelo fabricante deste produto.
O uso de equipamentos complementares ou
acessórios não recomendados pode provocar
graves ferimentos físicos.
APLICAÇÕES
Deve utilizar este produto para os fi ns indicados a seguir:
Q Perfuração em todos os tipos de produtos de madeira
(madeira de construção, contraplacado, revestimento,
chapas compostas e chapas rígidas)
Q Perfuração em cerâmica, plástico, fi bra de vidro e
laminados
Q Perfuração em metais
Q Perfuração a martelo em cimento
Este produto suporta baterias de iões de lítio Ryobi One+
18 V e de níquel-cádmio Ryobi One+ 18 V.
AVISO
Retire sempre a bateria do berbequim ao montar
peças, realizar ajustes, colocar ou remover
brocas, limpar e quando este não estiver a
ser utilizado. A remoção da bateria evitará o
funcionamento acidental da ferramenta que
poderá provocar ferimentos graves.
CARACTERÍSTICAS DE PROTECÇÃO DA BATERIA
As baterias de iões de lítio Ryobi 18 V são concebidas com
características que protegem as células de iões de lítio e
maximizam o tempo de vida da bateria. Sob determinadas
condições de funcionamento, estas características podem
fazer com que a bateria e a ferramenta que alimenta
actuem de modo diferente das baterias de níquel-cádmio.
Em determinadas aplicações, os elementos electrónicos
da bateria podem dar sinal à bateria para se desligar e
fazer com que a ferramenta deixe de funcionar. Para
reiniciar a bateria e a ferramenta liberte o interruptor e
retome o normal funcionamento.
NOTA: Para evitar que a bateria volte a desligar-se, evite
forçar a ferramenta.
Se a libertação do interruptor não reiniciar a bateria e a
ferramenta, é porque a bateria está descarregada. Se
descarregada, a bateria começará a carregar quando
colocada no carregador de iões de lítio.
PARA INSTALAR A BATERIA
Observe a Figura 2.
Siga os seguintes passos para instalar a bateria:
Q Coloque o selector de rotação na posição de fecho
central.
Q Insira a bateria no aparelho, como indicado.
Q Certifi que-se que as linguetas em cada lado do
compartimento da bateria deslizam correctamente e
que a bateria se encontra fi rma no aparelho antes de
começar a operação.
PARA RETIRAR A BATERIA
Siga estes passos para retirar a bateria:
Q Pressione as linguetas em cada lado da bateria.
Q Retire a bateria do berbequim.
AVISO
Os aparelhos que funcionam a bateria estão
sempre em condições operacionais. Por
conseguinte, o interruptor deve estar sempre
travado quando não estiver em utilização ou
quando transportar a ferramenta.
AJUSTE DA PEGA AUXILIAR
Consultar a fi gura 3.
Siga estes passos para ajustar a pega auxiliar:
Q Liberte a pega auxiliar fazendo girar o botão no
sentido contrário ao dos ponteiros do relógio (12).
Q Faça rodar a pega auxiliar para a posição
pretendida.
Q Aperte a pega auxiliar fi rmemente, fazendo girar o
botão no sentido dos ponteiros do relógio (11).
26
Page 30

GB DK SE FI NO RU PL CZ HU RO LV LT EE HR SI SK GR TRFR DE ES IT NL
PT
Português
FUNCIONAMENTO
AJUSTE DA HASTE DO CALIBRE DE
PROFUNDIDADE
Consultar a fi gura 4.
Siga estes passos para ajustar a haste do calibre de
profundidade:
Q Bloqueie o botão activador colocando o selector de
rotação na posição central.
Q Liberte a pega auxiliar fazendo girar o botão no
sentido contrário ao dos ponteiros do relógio (12).
Q Ajuste a haste do calibre de profundidade de modo
a que a broca de perfuração sobressaia para lá da
extremidade da haste necessária para a profundidade
de perfuração.
Q Aperte a pega auxiliar fazendo girar o botão no
sentido dos ponteiros do relógio (11).
INTERRUPTOR
Consultar a fi gura 5.
Para ligar o berbequim pressione o interruptor. Para o
desligar liberte o interruptor.
FUNÇÃO DE BLOQUEIO
Consultar a fi gura 5.
O gatilho pode ser bloqueado na posição "desliga".
Esta função permite evitar os arranques por descuido
do berbequim-aparafusadora quando não estiver em
utilização. Para bloquear o gatilho, coloque o selector
do sentido de rotação (sentido enroscar / desenroscar)
na posição central.
Nota: Quando o selector está na posição central,
o gatilho fica bloqueado.
REVERSÍVEL
Consultar a fi gura 5.
Esta ferramenta inclui uma função de rotação reversível
controlada por um selector colocado por cima do botão
activador (6).
Q Rotação no sentido dos ponteiros do relógio: coloque
a alavanca do selector na posição esquerda (16).
Q Rotação no sentido contrário ao dos ponteiros do
relógio: coloque a alavanca do selector na posição
direita (15).
SELECTOR DE MODO (4)
Q Para perfurar coloque o selector na posição .
Q Para perfuração a martelo, coloque em .
A troca é melhor realizada em paragem.
Só depois de o interruptor ser accionado e a máquina
arrancar é que a caixa de transmissão muda para o modo
seleccionado.
Nota: O modo de perfuração a martelo danifi cará o
mecanismo da ferramenta quando utilizado para apertar
ou perfurar com broca não SDS plus. Seleccione o modo
de perfuração apenas para esse fi m.
Ao perfurar a martelo use, exclusivamente, brocas em
metal rígido e eixo SDS-Plus. A utilização de brocas
cilíndricas disponíveis comercialmente é impossível
devido ao adaptador de broca.
PERFURAÇÃO A MARTELO
Ao perfurar a martelo não necessita aplicar muita
pressão. O desempenho não é aumentado deste
modo. Demasiada pressão colocará uma carga
desnecessária sobre o motor.
Verifique regularmente as brocas de perfuração.
Afie ou substitua as brocas de perfuração
rombas.
Para perfurar a martelo trabalhe sempre com óculos de
protecção, protecção de ouvidos e a pega auxiliar. Antes
de colocar em funcionamento verifi que se o selector está
bloqueado em posição.
EQUIPAR E SUBSTITUIR BROCAS SDS
Consulte a Fig. 6
Esta ferramenta está equipada com um sistema de
ligação SDS-plus.
Q Limpe a broca e lubrifi que-a com lubrifi cante para
máquinas antes de a inserir no mandril (2).
Q Puxe a braçadeira (3) e fi xe-o.
Q Empurre e faça rodar a ferramenta contra pó para o
suporte da broca o mais longe possível.
Q Liberte o bloqueador para prendar a broca.
Q Verifi que se a broca está presa puxando-a.
RETIRAR A BROCA DO SISTEMA SDS-PLUS
Puxe o bloqueador e retire a broca.
ADAPTADOR DE MANDRIL 35 mm (NÃO INCLUÍDO) (17)
Consulte a Figura 6.
Para trabalho de perfuração em metal, madeira e plástico
com brocas de perfuração que não tenham eixo SDS plus,
encontra-se disponível um adaptador de perfuração.
27
Page 31

GB DK SE FI NO RU PL CZ HU RO LV LT EE HR SI SK GR TRFR DE ES IT NL
PT
Português
FUNCIONAMENTO
DICAS PRÁTICAS
Não perfure cabos eléctricos nem tubos de gás ou de água
ocultos. Verifi que a área de trabalho com um detector de
metais, por exemplo.
MANDRIL DESLIZANTE
Se a ferramenta fi car bloqueada ou for apanhada, o
mandril deslizante é libertado.
Retire a carga da máquina imediatamente, removendo a
ferramenta de perfuração.
Segure sempre na máquina firmemente com
ambas as mãos e assuma uma posição segura.
MANUTENÇÃO
AVISO
Utilize unicamente peças sobresselentes de
origem quando fizer substituições. A utilização
de qualquer outra peça pode apresentar um
perigo ou danificar a sua ferramenta.
PROTECÇÃO DO AMBIENTE
Recicle os materiais em vez de pô-los
directamente no lixo doméstico. A máquina,
os acessórios e as embalagens devem ser
seleccionados.
SÍMBOLOS
Alerta de Segurança
V Voltagem
-1
min
Rotações ou movimentos alternados por
minuto
Corrente directa
Modo de perfuração
Modo de perfuração a martelo
Conformidade CE
Não utilize solventes para limpar as peças de plástico. A
maioria dos plásticos pode ser danificada pelos solventes
vendidos no comércio. Utilize um pano limpo para retirar
as sujidades, o pó, o óleo, a massa, etc.
AVISO
Os elementos de plástico nunca devem entrar
em contacto com líquido de travões, gasolina,
produtos à base de petróleo, óleos penetrantes,
etc. Estes produtos químicos contêm substâncias
que podem danificar, deteriorar ou destruir o
plástico, o que poderia provocar ferimentos
graves.
AVISO
Não exija demasiado das suas ferramentas.
As utilizações abusivas podem danificar a sua
ferramenta assim como a peça a trabalhar.
AVISO
Não tente modificar a sua ferramenta nem
acrescentar acessórios não recomendados.
Estas transformações ou modificações são
consideradas como um mau uso e podem
provocar situações perigosas com possibilidade
de ferimentos graves.
Agradecemos que leia atentamente as
instruções antes de iniciar a máquina.
Use protecção para os ouvidos
Use protecção para os olhos
Reciclagem indesejável
Os aparelhos eléctricos antigos não devem
ser eliminados juntamente com o lixo
doméstico. Recicle onde existem instalações
para o efeito. Verifique com as suas
Autoridades Locais ou revendedor para obter
informações sobre reciclagem.
28
Page 32

GB SE FI NO RU PL CZ HU RO LV LT EE HR SI SK GR TRFR DE ES IT NL PT
DK
Dansk
SPECIELLE SIKKERHEDSREGLER
Q Brug hjælpehåndtaget, der følger med værktøjet.
Hvis kontrollen mistes, kan det medføre personskade.
Q Brug ørebeskyttelse ved hammerboring.
Udsættelse for støj kan medføre høretab.
Q Brug ansigts- eller støvmaske, hvis borehandlingen
genererer støv.
Q Hold værktøjet på de isolerede overflader når der
arbejdes på steder, hvor man kan komme til at ramme
skjulte ledninger. Hvis der bores i en strømførende
ledning, kan det gøre udstatte metaldele på værktøjet
strømførende og give brugeren elektrisk stød.
INSTRUKTIONER TIL SIKKER ANVENDELSE
Q Sørg for værktøjet kun er forbundet til den type volt
markeret ratepladen.
Q Anvend aldrig værktøjet hvis dets cover eller nogen
af dens bolte mangler. Hvis coveret eller boltene er
fjernet, så installer disse før værktøjet igen tages i
brug. Vedligehold alle dele ordentligt.
Q Fastgør altid værktøj hvis der arbejdes i høje
positioner.
Q Berør aldrig bladet, borebit, slibeskiven eller andre
bevægende dele mens værktøjet er i brug.
Q Start aldrig værktøjet hvis dets roterende dele er i
kontakt med arbejdsmaterialet.
Q Læg aldrig værktøjet fra dig før alle dens roterende
dele er stoppet fuldstændig.
Q TILBEHØR : Anvendelse af tilbehør som ikke er
anbefalet i denne manual kan føre til fare.
Q RESERVEDELE : Anvend kun identiske reservedele
når værktøjet repareres.
BESKRIVELSE
1. Støvbeskyttelsesdæksel
2. SDS spændepatron
3. Spændepatronkrave
4. Indstillingsvælger
5. TÆND / SLUK kontakt
6. Rotationsvælger
(Forlæns / baglæns / midterlås)
7. Hjælpehåndtag
8. Pind til måling af dybde
9. Batterienhed (medfølger ikke)
10. Låse
11. For at stramme
12. For at løsne
13. Boredybde
14. Bor (medfølger ikke)
15. Baglæns rotation
16. Forlæns rotation
17. 35 mm spændepatronadatper (medfølger ikke)
18. Bit til skruetrækker (medfølger ikke)
19. SDS bit (medfølger ikke)
TEKNISKE SPECIFIKATIONER
Spænding 18 V
Hastighed uden belastning 0-1000 min
Hammerslag (hammerslag per minut) 0-4.000 min
-1
-1
Slagenergi 1,5J
Maksimal boreevne:
Træ 16 mm
Stål 13 mm
Beton (hammerboring) 12 mm
Anbefalet hammerboringsområde 4-12 mm
Bitforbindelsestype SDS-plus
Vægt uden batterienhed (kg) 2.2
MODEL BATTERI
(ikke medleveret)
BPP-1815
BPP-1817
BPP-1815M
OPLADER
(ikke medleveret)
BCL-1800
BCS618
BCL1418
BPP-1817M
BPL-1820
CRH1801
BPL-1815
BPP-1815
BPP-1817
BPP-1815M
BC-1815S
BC-1800
BCA180
BPP-1817M
ANVENDELSE
ADVARSEL
Selv om du måttte være en meget erfaren bruger
af enheden bør det ikke gøre dig uopmærksom.
Husk at et øjebliks uopmærksom er nok til at føre
til alvorlige skader.
29
Page 33

GB SE FI NO RU PL CZ HU RO LV LT EE HR SI SK GR TRFR DE ES IT NL PT
DK
Dansk
ANVENDELSE
ADVARSEL
Bær altid sikkerhedsbriller eller sikkerhedsbriller
med sidebeskyttelse når enheden anvendes.
Følges dette råd ikke kan det føre til at små
stykker kastes mod øjenene og fører til alvorlige
skader.
ADVARSEL
Anvend ikke noget tilbehør til denne enhed som
ikke er anbefalet af producenten. Anvendelse
af tilbehør som ikke er anbefalet kan føre til
alvorlige personlige skader.
ANVENDELSE
Du kan anvende dette produkt til nedenstående formål:
Q Bore i alle typer træmaterialer (tømmer, krydsfi ner,
paneler, spånplader og træfi berplader)
Q Bore i keramik, plastic, fi berglas og laminater
Q Bore i metal
Q Hammerboring i beton
Dette produkt anvender Ryobi One+ 18 V Lithium-Ion
batteripakker og Ryobi One+ 18 V Nikkel-Cadmium
batteripakker.
ADVARSEL
Fjern altid batteripakken fra værktøjet når du
samler dele, foretager indstillinger, indsætter
eller fjerner bits, rengører eller når det ikke er i
brug. Fjernes batteripakken undgås utilsigtet start
af værktøjet, som kan føre til alvorlige personlige
skader.
FUNKTIONER TIL BESKYTTELSE AF BATTERI
Ryobi 18 V Lithium-Ion batterier er designet med funktioner
der beskytter Lithium-Ion celler og maksimerer batteriets
levetid. Under visse anvendelsesforhold kan disse
indbyggede funktionerner få batteriet og værktøjet til at
fungere anderledes sammenlignet med Nikkel-Cadmium
batterier.
Under visse typer anvendelse, så kan elektronikken
i batteriet til at afbryde og dermed få værktøjet til at
stoppe. For at genstarte batteriet og værktøjet, så slip for
startknappen og start herefter igen.
BEMÆRK: For at undgå afbrydelse af batteriet, så undgå
af presse værktøjet.
Hvis slip af startknappen ikke genstarter batteriet og
værktøjet, så er batteripakken udtømt for strøm. Hvis
udtømt, så skal batteriet genoplades med Lithium-Ion
opladeren.
FOR AT INSTALLERE BATTERIPAKKEN
Se fi gur 2.
Installer batterienheden på følgende måde:
Q Placer rotationsvælgeren i midterlåspositionen.
Q Indsæt batteripakke i produktet som vist.
Q Sørg for at hasperne på hver side af batteripakken
klikker på plads og at batteripakken sidder fast i
produktet før det tages i brug.
FOR AT FJERNE BATTERIPAKKEN
Fjern batterienheden på følgende måde:
Q Tryk ned på hasperne på hver side af batteripakken.
Q Fjern batteripakken fra værktøjet.
ADVARSEL
Batteriprodukter er altid aktive. Således bør
startknappen altid være løst når værktøjet
opbevares eller hvis det bæres ved siden.
INDSTILLING AF HJÆLPEHÅNDTAGET
Se Figur 3.
Indstil hjælpehåndtaget på følgende måde:
Q Løsn hjælpehåndtaget ved at dreje knappen mod urets
retning (12).
Q Drej hjælpehåndtaget til det ønskede sted.
Q Stram hjælpehåndtaget ved at dreje knappen i urets
retning (11).
INDSTILLING AF DYBDEMÅLEPINDEN
Se Figur 4.
Indstil dybdemålepinden på følgende måde:
Q Lås kontaktudløseren ved at stille rotationsvælgeren i
midterposition.
Q Løsn hjælpehåndtaget ved at dreje knappen mod urets
retning (12).
Q Indstil dybdemålepinden således, således at boret går
længere end pinden til den ønskede boredybde.
Q Stram hjælpehåndtaget ved at dreje knappen i urets
retning (11).
KONTAKT
Se Figur 5.
For at tænde for værktøjet, ON, så tryk ind på startknappen.
For at slukke, OFF, så slip for startknappen.
30
Page 34

GB SE FI NO RU PL CZ HU RO LV LT EE HR SI SK GR TRFR DE ES IT NL PT
DK
Dansk
ANVENDELSE
LÅSEFUNKTION
Se Figur 5.
Start-stopknappen kan låses i "stop"stilling. Derved
undgås utilsigtet igangsætning, når bore-skruemaskinen
ikke er i brug. Sæt vælgerknappen for omdrejningsretning
(fastskruning / udskruning) i midterstilling for at låse
start-stopknappen.
Bemærk: Når vælgerknappen er i midterstilling, er startstopknappen spærret.
REVERSIBEL - TO RETNINGER
Se Figur 5.
Værktøjet kan rotere i to retninger, hvilket styres af en
omskifter, der er placeret over kontaktudløseren (6).
Q Rotation i urets retning: Indstil vælgerhåndtaget i
venstre position (16).
Q Rotation mod urets retning: Indstil vælgerhåndtaget i
højre position (15).
TILSTANDSVÆLGER (4)
Q For boring, indstil vælgeren på .
Q For hammerboring, indstil på .
Det er bedst at foretage skiftet i stoppet tilstand.
Først efter, at kontakten er aktiveret og værktøjet starter,
skifter gearet til den valgte tilstand.
Bemærk: Hammerboringstilstanden kan skade værktøjets
mekanisme, hvis den bruges til at stramme eller bore med
ikke-SDS plus bor. Brug kun boretilstanden til sådanne
formål.
Når der hammerbores, må der kun bruges bord med
hårdmetal- og SDS plus skaft. Det er umuligt at bruge
et almindeligt, standardmurbor med cylindrisk skaft med
boradapteren.
HAMMERBORING
anbringelsessystem.
Q Rengør bitten og smør den med smørefedt, inden du
anbringer den i spændepatronen (2).
Q Træk spændepatronkraven (3) tilbage og hold den.
Q Tryk og drej den støvfri bit ind i bitholderen, så langt
den kan komme.
Q Giv slip på spændepatronkraven for at låse bitten fast.
Q Kontroller, at bitten sidder fast ved at trække i den.
FJERNELSE AF BITTEN FRA SDS PLUS SYSTEMET
Træk spændepatronkraven tilbage for at fjerne bitten.
35mm SPÆNDEPATRON-ADAPTER (MEDFØLGER
IKKE) (17)
Se Figur 6.
Der fi ndes en bor-adapter til boring i metal, træ og plastik
med bor UDEN SDS plus skaft.
PRAKTISKE TIP
Bor ikke ind i skjulte el-, gas og vandledninger. Tjek inden
du begynder området med f.eks. en metaldetektor.
FRIKTIONSKOBLING
Hvis værktøjet på en eller anden måde sætter sig fast,
udløses friktionskoblingen.
Fjern med det samme belastningen på maskinen ved at
trække bordet tilbage.
Hold altid godt fast i maskinen med begge
hænder og stå i den rigtige stilling.
VEDLIGEHOLDELSE
ADVARSEL
Ved udskiftning må der kun anvendes originale
reservedele. Det kan være farligt at bruge andre
dele, eller værktøjet kan blive ødelagt.
Når der hammerbores, skal der ikke udøves for
meget tryk. Det øger ikke ydelsen. For stort tryk
belaster motoren unødvendigt.
Tjek borene regelmæssigt. Slib eller udskift sløve
bor.
Når du hammerborer, skal du bruge beskyttelsesbriller,
ørebeskyttelse og hjælpehåndtaget. Inden du begynder
arbejdet, skal du tjekke, at omskifteren er låst fast i
positionen.
MONTERING OG UDSKIFTNING AF SDS BITS
Se Figur 6.
Dette værktøj er udstyret med et SDS plus
Brug ikke opløsningsmidler til at rense plastdele. De
fleste plasttyper kan blive ødelagt, hvis de renses med
almindelige gængse opløsningsmidler. Fjern snavs, støv,
olie, fedt m.v. med en ren klud.
ADVARSEL
Plastelementer må aldrig komme i berøring
med bremsevæske, benzin, olie- eller
petroleumsbaserede produkter, rustløsnende olie
o.l. Disse kemiske produkter indeholder stoffer,
som kan beskadige, mørne eller ødelægge
plastmaterialet, så man risikerer at komme
alvorligt til skade.
31
Page 35

GB SE FI NO RU PL CZ HU RO LV LT EE HR SI SK GR TRFR DE ES IT NL PT
DK
Dansk
VEDLIGEHOLDELSE
ADVARSEL
Misbrug og pres ikke værktøjet. Hvis værktøjet
anvendes til uegnede formål, kan det blive
beskadiget og arbejdsstykket ødelagt.
ADVARSEL
Forsøg ikke at ombygge værktøjet eller montere
tilbehør, som ikke anbefales til denne maskine.
Sådanne ombygninger eller ændringer betragtes
som misbrug og kan være årsag til, at der opstår
farlige situationer med deraf følgende alvorlige
ulykker.
MILJØBESKYTTELSE
Råmaterialerne skal genvindes og ikke
bortkastes med almindeligt affald. Maskine,
tilbehør og emballage skal sorteres.
Benyt høreværn
Benyt øjenværn
Genbrug uønsket
Elektriske affalds produkter burde ikke
afskaffes sammen med husholdnings affald.
Venligst genbruge hvor faciliteter tillader
dette. Tjek med din local kommune eller
forhandler for genbrugs råd.
SYMBOL
Sikkerheds Varsel
V Volt (Spænding)
-1
Opdrejninger eller frem-og tilbage bevægelser
min
pr minut
Direkte strøm
Boretilstand
Hammerboring-tilstand
CE Overensstemmelse
Venligst læse vejledningerne forsigtigt før
opstart af maskinen.
32
Page 36

GB FI NO RU PL CZ HU RO LV LT EE HR SI SK GR TRFR DE ES IT NL PT DK
SE
Svenska
SPECIFIKA SÄKERHETSREGLER
Q Använd sekundärhandtaget som medföljer
verktyget. Kontrollförlust kan resultera i personskada.
Q Bär hörselskydd vid användning av slagborrmas-
kiner. Oljud kan orsaka hörselförlust.
Q Använd en ansikts- eller dammask om borrningen
orsakar damm.
Q Greppa verktyget i dess isolerade delar när du
utför arbeten där maskinen kan komma i kontakt
med dolda elkablar. Vid kontakt med en ström-
förande kabel kan de exponerade delarna på verktyget bli strömförande och ge användaren en elektrisk
stöt.
INSTRUKTIONER FÖR SÄKER HANTERING
Q Kontrollera att verktyget bara ansluts till en spännings-
källa med samma spänning som den som framgår på
verktygets namnplatta.
Q Använd aldrig verktyget om dess skydd eller någon av
dess bultar saknas. Sätt tillbaka skyddet och bultarna
innan användning om dessa har tagits bort. Håll alla
delar i gott skick.
Q Säkra alltid verktyget om du använder det i en förhöjd
position.
Q Vidrör aldrig bladet, borret, sliptrissan eller andra
föremål i rörelse under användning.
Q Starta aldrig ett verktyg när dess roterande del är i
kontakt med arbetsstycket.
Q Lägg aldrig ner ett verktyg innan dess rörliga delar
har stannat helt.
Q TILLBEHÖR: Användning av tillbehör som inte är
rekommenderade i denna manual kan utgöra en fara.
Q UTBYTESDELAR: Använd endast identiska utbytes-
delar vid service.
BESKRIVNING
10. Lås
11. För att dra åt
12. För att lossa
13. Borrdjup
14. Borrspets (inte inkluderat)
15. Bakåtrotation
16. Framåtrotation
17. 35 mm chuckadapter (inte inkluderat)
18. Skruvspets (inte inkluderat)
19. SDS-spets (inte inkluderat)
TEKNISKA DATA
Spänning 18 V
Hastighet utan belastning 0-1000 min
Hammarslag (Slag per minut) 0-4000 min
Slagenergi 1.5J
Maximal borrkapacitet:
Trä 16 mm
Stål 13 mm
Betong (borrning med hammarslag) 12 mm
Rekommenderad borrningsstorlek
med hammarslag 4-12 mm
Spetsanslutningstyp SDS-plus
Vikt – utan batteripack (kg) 2.2
MODELL BATTERI
(bifogas inte)
BPP-1815
BPP-1817
BPP-1815M
BPP-1817M
BPL-1820
CRH1801
BPL-1815
BPP-1815
BPP-1817
BPP-1815M
BPP-1817M
LADDARE
(bifogas inte)
BCL-1800
BCS618
BCL1418
BC-1815S
BC-1800
BCA180
-1
-1
1. Dammskyddslock
2. SDS-chuck
3. Låsring
4. Lägesväljare
5. PÅ/AV-strömbrytare
6. Rotationsväljare (Framåt / Bakåt / Mittenlås)
7. Sekundärhandtag
8. Djupmätare
9. Batteripack (inte inkluderat)
ANVÄNDNING
VARNING:
Tillåt dig inte att bli oförsiktigt när du känner dig
hemma med produkten. Kom ihåg att ett ögonblick av oförsiktighet räcker för att orsaka allvarlig
skada.
33
Page 37

GB FI NO RU PL CZ HU RO LV LT EE HR SI SK GR TRFR DE ES IT NL PT DK
SE
Svenska
ANVÄNDNING
VARNING:
Bär alltid skyddsglasögon eller skyddsglas med
breda sidoglas när du använder kraftfulla verktyg.
Att inte göra det kan resultera i att objekt kastas
in i ögonen vilket kan resultera allvarlig skada.
VARNING:
Använd inte några tillbehör som inte rekom-
menderas av tillverkaren av den här produkten.
Användning av tillbehör som inte rekommenderas kan resultera i allvarlig personskada
ANVÄNDNINGSOMRÅDEN
Du kan använda denna produkt i de syften som är uppräknade nedan:
Q Borrning i alla typer av träprodukter (virke, plywood,
panel, kartong och hård skiva)
Q Borrning i keramik, plast, glasfi ber och laminat
Q Borrning i metall
Q Borrning med hammarslag i betong
Denna produkt kan använda Ryobi One+ 18V litiumjonbat-
teripack och Ryobi One+ 18V nickelkadmiumbatteripack.
VARNING:
Ta alltid bort batteripacket från din borrmaskin
när du monterar delar, utför justeringar, monterar
eller tar bort bits, rengör eller inte ska använda
produkten mer. Genom att ta bort batteripacket
så undviks oavsiktlig start som kan leda till allvarlig personskada.
BATTERISKYDDSFUNKTIONER
Ryobi 18V litiumjonbatterier är utvecklade med en funktion som skyddar litiumjoncellerna och maximerar batteriets livslängd. I vissa användningssituationer kan dessa
inbyggda funktioner göra att batteriet, och det verktyg det
driver, agerar annorlunda jämfört med drift med nickelkadmiumbatterier.
I vissa situationer kan batterielektroniken stänga av batteriet och därmed stanna verktyget. För att återställa batteriet och verktyget, släpp upp strömbrytaren och återgå
till normal användning.
NOTERA: För att förebygga fortsatt avstängning av batteriet, undvik att överbelasta verktyget.
Om det inte hjälper att släppa upp strömbrytaren så är batteripacket urladdat. Genom att placera det på litiumjonladdaren så startar återuppladdningen.
MONTERA BATTERIPACK
Se fi gur2.
Följ dessa steg för att montera batteripacket:
Q Placera rotationsväljaren i låsläget i mitten.
Q Montera batteripacket på produkten enligt bilden.
Q Innan användning, kontrollera att låsanordningarna på
varje sida om batteriet hakar fast och att batteripacket
sitter ordentligt i produkten.
TA BORT BATTERIPACK
Följ dessa steg för att ta bort batteripacket:
Q Tryck in låsanordningarna på varje sida om batteri-
packet.
Q Ta bort batteripacket från borrmaskinen.
VARNING:
Batteriprodukter är alltid redo att användas.
Därför ska strömbrytaren alltid vara låst när maskinen bärs eller inte används.
USTERA SEKUNDÄRHANDTAGET
Se fi gur 3.
Följ dessa steg för att justera sekundärhandtaget:
Q Lossa sekundärhandtaget genom att vrida vredet mot-
sols (12).
Q Rotera sekundärhandtaget till önskat läge.
Q Dra åt sekundärhandtaget ordentligt genom att vrida
vredet medsols (11).
JUSTERA DJUPMÄTAREN
Se fi gur 4.
Följ dessa steg för att justera djupmätaren:
Q Lås avtryckaren genom att placera rotationsväljaren i
mittenläget.
Q Lossa sekundärhandtaget genom att vrida vredet mot-
sols (12).
Q Justera djupmätaren så att borrspetsen sticker fram
framför djupmätaren precis så djupt som du vill borra.
Q Dra åt sekundärhandtaget genom att vrida vredet med-
sols (11).
STRÖMBRYTARE
Se fi gur 5.
För att sätta PÅ borrmaskinen, tryck in strömbrytaren. För
att stänga AV borrmaskinen, släpp upp strömbrytaren.
34
Page 38

GB FI NO RU PL CZ HU RO LV LT EE HR SI SK GR TRFR DE ES IT NL PT DK
SE
Svenska
ANVÄNDNING
LÅSFUNKTION
Se fi gur 5.
Strömbrytaren kan låsas i avstängt läge. Denna funktion
gör att man slipper oavsiktlig igångsättning av verktyget,
när man inte använder det. Om du vill låsa strömbrytaren,
placerar du väljaren av rotationsriktning (iskruvning /
urskruvning) i mittläge.
Anmärkning: Då väljaren är i mittläge är strömbrytaren låst.
REVERSIBEL
Se fi gur 5.
Detta verktyg har möjlighet att vända på sin rotation.
Detta kontrolleras via en väljare som sitter ovanför
avtryckaren (6).
Q Medsols rotation: ställ väljaren i vänsterposition (16).
Q Motsols rotation: ställ väljaren i högerposition (15).
LÄGESVÄLJARE (4)
Q För borrning, placera väljaren i positionen.
Q För borrning med hammarslag, ställ väljaren i .
Växlingar mellan positionerna sker bäst när borret står
still.
Växellådan växlar rotation först när strömbrytaren trycks in
och maskinen startar.
Notera: Borrhammarläget skadar verktyget om det
används vid åtdragning eller vid borrning utan en SDSborrspets. Välj det vanliga borrläget i sådana situationer.
MONTERA OCH BYT UT SDS-BORRSPETSAR
Se fi gur 6.
Detta verktyg är utrustat med ett SDS-plusanslutningssystem.
Q Rengör borrspetsen och smörj in det med maskinfett
innan den sätts in i chucken (2).
Q Dra tillbaka låsringen (3) och håll den.
Q Tryck in och rotera det dammfria verktyget i borrspets-
hållaren så långt in som det går.
Q Släpp låsringen för att låsa fast borrspetsen.
Q Kontrollera att borrspetsen har låst fast genom att dra i
den.
TA BORT BORRSPETSEN FRÅN SDS-PLUSSYSTEMET
Dra tillbaka låsringen och ta bort borrspetsen.
35 mm CHUCKADAPTER (INTE INKLUDERAT) (17)
Se fi gur 6.
För borrning i metall, trä och plast med borrspetsar som
inte har SDS-plus-skaft fi nns chuckadaptern tillgänglig.
PRAKTISKA TIPS
Borra inte i gömda el-, gas- eller vattenledningar.
Kontrollera till exempel området med en metalldetektor
innan arbetet påbörjas.
GLIDKOPPLING
Om verktyget fastnas släpper glidkopplingen.
Ta bort belastningen från maskinen omedelbart genom att
dra tillbaka borrverktyget.
Använd endast borrspetsar med skaft av hård metall och
SDS-plus vid borrning med hammarslag. Det är omöjligt att
använda kommersiellt tillgängliga cylindriska betongborrar
med borradaptern.
BORRNING MED HAMMARSLAG
Vid borrning med hammarslag behöver du inte
lägga på mycket tryck. Effekten förbättras inte på
grund av ett större tryck på verktyget. För mycket
tryck belastar motorn onödigt mycket.
Kontrollera borrspetsarna regelbundet. Slipa eller
byt ut trubbiga borrspetsar.
Använd alltid skyddsglasögon, hörselskydd och
sekundärhandtaget vid borrning med hammarslag.
Kontrollera att väljaren är låst i position innan du påbörjar
arbetet.
35
Håll alltid maskinen ordentligt med båda hän-
derna och stå stadigt.
UNDERHÅLL
VARNING
Endast identiska originaldelar får användas vid
byte. Användning av andra delar kan innebära
en fara eller skada verktyget.
Använd inte lösningsmedel för att rengöra plastdelar.
Flertalet plaster kan skadas vid användning av vissa lösningsmedel som säljs i affärerna. Använd en ren tygtrasa
för att torka bort smuts, damm, olja, fett, osv.
Page 39

GB FI NO RU PL CZ HU RO LV LT EE HR SI SK GR TRFR DE ES IT NL PT DK
SE
Svenska
UNDERHÅLL
VARNING
Se till att plastdelarna aldrig kommer i kontakt
med bromsvätska, bensin, produkter med petroleumbas, penetrerande oljor, osv. Dessa kemiska
produkter innehåller ämnen som kan skada, försvaga eller förstöra plasten, vilket kunde förorsaka
allvarliga kroppsskador.
VARNING
Begär inte för mycket av dina verktyg. En felak-
tig användning kan skada både verktyget och
arbetsstycket.
VARNING
Försök inte ändra verktyget eller montera till-
behör vars användning inte rekommenderas
med den. Dylik ombyggnad eller dylika ändringar
anses som felaktig användning och kan leda till
farliga situationer som kan förorsaka allvarliga
kroppsskador.
CE-konformitet
Läs instruktionerna ordentligt innan start av
maskinen.
Bär hörselskydd.
Använd skyddsglasögon.
Återvinn oönskade
Gamla elektroniska produkter ska inte kastas
med hushållssoporna. Återvinn där sådana
faciliteter finns. Kontrollera med din lokala
myndighet eller säljaren för att få återvinningstips.
MILJÖSKYDD
Råmaterialen bör återanvändas i stället för
att kastas i hushållsavfallet. Maskinen, tillbehören och emballagen måste sorteras.
SYMBOL
Säkerhetsvarning
V Volt
-1
Rotationer eller rörelser fram och tillbaka per
min
minut
Likström
Borrläge
Borrhammarläge
36
Page 40

GB NO RU PL CZ HU RO LV LT EE HR SI SK GR TRFR DE ES IT NL PT DK SE
FI
Suomi
ERITYISET TURVAOHJEET
Q Käytä mukana tullutta lisäkahvaa. Jos laite riistäytyy
hallinnasta, se saattaa aiheuttaa loukkaantumisen.
Q Käytä iskuporien kanssa kuulonsuojaimia. Melulle
altistuminen saattaa aiheuttaa kuulonmenetyksen.
Q Käytä kasvo- tai pölysuojainta, jos poraaminen
tuottaa pölyä.
Q Pitele sähkötyökalua eristetystä tartuntapinnasta,
kun teet työtä, jossa leikkuri voi koskettaa piilossa
olevaa johtoa. Jos leikkuri koskettaa sähköistettyä
johtoa, työkalun metalliosat voivat sähköistyä ja
aiheuttaa käyttäjälle sähköiskun.
OHJEITA TURVALLISEEN KÄYTTÖÖN
Q Tarkista, että syöttöjännite on sama kuin nimilaatan
osoittama jännite.
Q Älä koskaan käytä työkalua, josta puuttuu kansi tai
ruuveja. Jos kansi tai ruuveja on poistettu, korvaa
ne uusilla ennen käyttöä. Pidä kaikki osat hyvässä
kunnossa.
Q Kiinnitä työkalut työskennellessäsi korkeissa
paikoissa.
Q Älä koskaan käytön aikana kosketa terää, poranterää,
hiomalevyä tai muita liikkuvia osia.
Q Älä koskaan käynnistä työkalua silloin, kun sen pyörivä
osa koskettaa työkohdetta.
Q Älä koskaan laita sähkötyökalua pois käsistäsi
ennenkuin liikkuvat osat ovat täysin pysähtyneet.
Q LISÄLAITTEET: Muiden kuin tässä ohjekirjassa
mainittujen lisälaitteiden käyttö saattaa johtaa
vaaratilanteisiin.
Q VARAOSAT: Käytä vaihdossa yksinomaan alkuperäisiä
varaosia.
KUVAUS
14. Poranterä (ei mukana)
15. Kierto taaksepäin
16. Kierto eteenpäin
17. 35mm:n istukkasovitin (ei mukana)
18. Ruuviavainterä (ei mukana)
19. SDS-terä (ei mukana)
TEKNISET TIEDOT
Jännite 18 V
Kuormaton nopeus 0-1000 min
Iskut (iskua minuutissa) 0-4000 min
Iskuenergia 1.5J
Poran maksimikoko
Puu 16 mm
Teräs 13 mm
Betoni (iskuporaus) 12 mm
Suositeltu iskuporausalue 4-12 mm
Terän liitostyyppi SDS-plus
Paino – ilman akkua (kg) 2.2
MALLI AKKU
(ei toimiteta)
BPP-1815
BPP-1817
BPP-1815M
BPP-1817M
BPL-1820
CRH1801
BPL-1815
BPP-1815
BPP-1817
BPP-1815M
BPP-1817M
-1
-1
LATAUSLAITE
(ei toimiteta)
BCL-1800
BCS618
BCL1418
BC-1815S
BC-1800
BCA180
1. Pölynsuoja
2. SDS-istukka
3. Puristuskaulus
4. Tilanvalitsin
5. ON/OFF-kytkin
6. Kiertosuunnan valitsin
(eteenpäin/taaksepäin/keskellä lukitus)
7. Lisäkahva
8. Syvyydenmittaustanko
9. Akku (ei mukana)
10. Salvat
11. Kiristä
12. Löysennä
13. Poraussyvyys
KÄYTTÖ
VAROITUS
Älä käytä työkalua huolettomasti opittuasi sen
käytön. Muista, että huomion herpaantuminen
sekunnin murto-osaksikin saattaa johtaa
vakavaan loukkaantumiseen.
VAROITUS
Käytä aina tavanomaisia tai sivusuojilla
varustettuja suojalaseja, kun käytät
sähkötyökaluja. Tämän ohjeen laiminlyönti voi
aiheuttaa roskien sinkoutumista silmiin käytön
aikana ja aiheuttaa täten vakavia silmävaurioita.
37
Page 41

GB NO RU PL CZ HU RO LV LT EE HR SI SK GR TRFR DE ES IT NL PT DK SE
FI
Suomi
KÄYTTÖ
VAROITUS
Älä käytä muita, kuin valmistajan tälle työkalulle
suosittelemia varaosia ja lisävarusteita.
Muiden, kuin suositeltujen varaosien ja
lisävarusteiden käyttö voi aiheuttaa vakavan
loukkaantumisvaaran.
SOVELLUKSET
Tätä työkalua voi käyttää:
Q kaiken tyyppisten puutuotteiden (puu, vaneri, paneli,
komposiittilevy, kovalevy) poraamiseen
Q keramiikan, muovien, lasikuidun ja laminaattien
poraamiseen
Q metallien poraamiseen
Q Betonin iskuporaus
Ryobi One+ 18 V litium-ioni ja Ryobi One+ 18 V
nikkelikadmium akut soveltuvat tämän työkalun kanssa
käytettäviksi.
VAROITUS
Irrota akku työkalusta ennen osien lisäämistä,
säätämistä, poranterien asentamista tai
poistamista, puhdistamista ja silloin kun työkalu
ei ole käytössä. Akku poistamalla vältytään
tahattomalta käynnistämiseltä, joka saattaa
johtaa vakavaan loukkaantumiseen.
AKUN SUOJELUOMINAISUUDET
Ryobi 18 V litium-ioni akut on suunniteltu siten, että ne
suojaavat litium-ioneja ja maksimoivat akun käyttöiän.
Tietyissä käyttötilanteissa nämä sisäänrakennetut
ominaisuudet saattavat johtaa siihen, että akku sekä
työkalu, jonka virtalähteenä se toimii, toimivat eri tavalla
kuin nikkelikadmium akut.
Tietyissä tilanteissa akun elektronit saattavat antaa akulle
pysähtymissignaalin ja johtaa työkalun sammumiseen.
Jatka akun ja työkalun käyttöä vapauttamalla ensin
virtakytkin ja jatkamalla sen jälkeen normaalia
työskentelyä.
HUOMAUTUS: Jatkossa voit estää akun sammumisen
välttämällä työkalun liiallisen kuormittamisen.
Jos virtakytkimen vapauttaminen ei palauta akkua ja
työkalua normaalitilaan, on akku ehtynyt. Jos akku on
ehtynyt, se tulee ladata litium-ioni laturissa.
AKUN ASENTAMINEN
Katso kuva 2.
Asenna akku seuraavasti:
Q Laita pyörinnän valitsin lukitusasentoon.
Q Asenna akku laitteeseen kuvan osoittamalla tavalla.
Q Varmista, että akun molemmilla puolella olevat
kiinnikkeet napsahtavat paikoilleen ja että akku on
työkalussa kiinni ennen käytön aloittamista.
AKUN IRROTTAMINEN
Irrota akku seuraavasti:
Q Paina akun molemmilla puolilla olevia kiinnikkeitä.
Q Irrota akku porasta.
VAROITUS
Akkukäyttöiset laitteet ovat aina käyttötilassa.
Näin ollen virtakytkin tulisi aina olla lukittuna, kun
laitetta ei käytetä tai kuljetat sitä mukanasi.
LISÄKAHVAN SÄÄTÄMINEN
Viittaa kuvaan 3.
Säädä lisäkahva seuraavasti:
Q Löysennä lisäkahvaa kiertämällä nuppia vastapäivään
(12).
Q Käännä lisäkahva haluamaasi asentoon.
Q Kiristä lisäkahva tiukasti kiertämällä nuppia
myötäpäivään (11).
SYVYYSMITTAUSTANGON SÄÄTÄMINEN
Viittaa kuvaan 4.
syvyysmittaustanko seuraavasti:
Säädä
Q Lukitse liipaisin asettamalla kiertosuunnan valitsin
keskiasentoon.
Q Löysennä lisäkahvaa kiertämällä nuppia vastapäivään
(12).
Q Säädä syvyysmittaustanko siten, että poranterä ulottuu
tangon päätä pidemmälle poraussyvyyden verran.
Q Kiristä lisäkahva kiertämällä nuppia myötäpäivään
(11).
LIIPAISIN
Viittaa kuvaan 5.
KÄYNNISTÄ pora virtakytkintä painamalla. SAMMUTA
pora virtakytkin vapauttamalla.
LUKINTATOIMINTO
Viittaa kuvaan 5.
Liipaisin voidaan lukita "seis" asentoon. Tämä toiminto
ehkäisee epähuomiossa tapahtuvat porakone-ruuvitaltan
käynnistykset, kun työkalu ei ole käytössä. Lukitse
liipaisin asettamalla pyörintäsuunnan valitsin (auki/kiinni
ruuvaus) keskiasentoon.
Huomautus: Kun valitsin on keskiasennossa, liipaisin on
lukossa ja sitä ei voida painaa.
38
Page 42

GB NO RU PL CZ HU RO LV LT EE HR SI SK GR TRFR DE ES IT NL PT DK SE
FI
Suomi
KÄYTTÖ
VAIHDETTAVA SUUNTA
Viittaa kuvaan 5.
Poran kiertosuuntaa on mahdollista vaihtaa. Suunta
säädetään liipaisimen päällä olevalla valitsimella (6).
Q Kierto myötäpäivään: käännä valitsin vasemmalle
(16)
.
Q Kierto vastapäivään: käännä valitsin oikealle (15).
TILANVALITSIN (4)
Q Kun poraat, aseta valitsin asentoon .
Q Kun käytät iskua, aseta se asentoon .
Tila on helpointa vaihtaa poran ollessa pysähdyksissä.
Rattaat siirtyvät valittuun tilaan vasta, kun kytkin on päällä
ja pora käynnistetään.
Huom: Iskuporaustila vioittaa poran mekanismia, jos sitä
käytetään muun kuin SDS-terän kanssa. Valitse poraustila
ainoastaan sellaiseen tarkoitukseen.
Käytä iskuporatessasi ainoastaan kovametalliteriä ja
SDS-Plus-akselia. Kaupallisesti saatavilla olevia kiviporia
ei voi käyttää sovittimen kanssa.
ISKUPORAUS
TERÄN IRROTTAMINEN SDS-PLUSJÄRJESTELMÄSTÄ
Vedä puristuskaulus taakse ja irrota terä.
35 mm:n ISTUKKASOVITIN (EI MUKANA) (17)
Viittaa kuvaan 6.
Sovitinta voidaan käyttää porattaessa metalleja, puuta tai
muovia terillä, joissa ei ole SDS-Plus-vartta.
KÄYTÄNNÖN VIHJEITÄ
Älä poraa näkymättömissä olevia sähköjohtoja tai
kaasu- tai vesiputkia. Tarkista työalue esimerkiksi
metallinpaljastimella ennen aloittamista.
LIUKULIIPAISIN
Jos pora jumiutuu tai tarttuu, liukuliipaisin vapautuu.
Vapauta porasta heti kuorma vetämällä poraa taaksepäin.
Pitele poraa aina tiukasti molemmin käsin ja
seiso tukevasti.
HUOLTO
VAROITUS
Käytä vaihdossa yksinomaan alkuperäisiä Ryobi-
varaosia. Muunlaisten varaosien käyttö voi
osoittautua vaaralliseksi ja vaurioittaa laitetta.
Poraa ei tarvitse painaa paljoa iskuporattaessa.
Tämä ei paranna suorituskykyä. Liian suuri paine
kuormittaa moottoria tarpeettomasti.
Tarkista poranterät säännöllisesti. Teroita tai
vaihda tylsät poranterät.
Käytä iskuporatessasi suojalaseja, kuulosuojaimia
ja lisäkahvaa. Tarkista ennen käyttöä, että nuppi on
oikeassa asennossa.
SDS-TERIEN KIINNITTÄMINEN JA VAIHTAMINEN
Viittaa kuvaan 6.
Porassa on SDS-plus-kiinnitysjärjestelmä.
Q Puhdista terä ja voitele se koneöljyllä, ennen kuin
asetat sen istukkaan (2).
Q Vedä puristuskaulus (3) taakse ja pitele sitä
paikoillaan.
Q Paina ja kierrä pölytön terä niin pitkälle
teränpidikkeeseen kuin se menee.
Q Lukitse terä vapauttamalla puristuskaulus.
Q Tarkista terää vetämällä, että se on lukkiutunut
oilleen.
paik
Älä käytä liuotteita muoviosien puhdistukseen. Yleensä
muovit eivät siedä markkinoilla olevia määrättyjä liuotteita,
jotka vahingoittavat niitä. Käytä puhdasta riepua lian,
pölyn, öljyn, rasvan jne. puhdistukseen.
VAROITUS
Muoviosat eivät saa koskaan joutua kosketukseen
jarrunesteen, bensiinin, petrolijohdannaisten,
ruosteenirrotusöljyn jne. kanssa. Nämä kemialliset
tuotteet sisältävät aineitta, jotka voivat vaurioittaa,
heikentää tai tuhota muovin minkä seurauksena
voi aiheutua vakavia ruumiinvammoja.
VAROITUS
Älä vaadi työkalulta liikaa. Kohtuuton käyttö voi
vaurioittaa työkalua sekä työkappaletta.
VAROITUS
Älä yritä tehdä muutoksia työkaluun tai liittää
siihen lisävarusteita, joita ei ole suositeltu
sen kanssa käytettäviksi. Tämäntyyppiset
muutokset ovat kohtuutonta käyttöä ja ne voivat
johtaa vaaratilanteisiin aiheuttaen vakavia
ruumiinvammoja.
39
Page 43

GB NO RU PL CZ HU RO LV LT EE HR SI SK GR TRFR DE ES IT NL PT DK SE
FI
Suomi
YMPÄRISTÖNSUOJELU
Älä heitä raaka-aineita kotitalousjätteisiin,
vaan vie ne kierrätykseen. Kone, lisävarusteet
ja pakkausmateriaali on lajiteltava.
SYMBOLI
Turvavaroitus
V Voltit
-1
min
Kierrokset tai edestakaisliike per minuutti
Tasavirta
Poraustila
Iskuporaustila
CE-vastaavuus
Lue ohjeet huolellisesti ennen laitteen
käynnistämistä.
Käytä kuulosuojaimia
Käytä suojalaseja
Kierrättäminen ei-toivottua
Käytöstä poistettavia sähkölaitteita ei pidä
hävittää talousjätteiden mukana. Ne on
mahdollisuuksien mukaan pantava kiertoon.
Kierrätysohjeita antavat kunnan viranomaiset
ja vähittäiskauppiaat.
40
Page 44

GB RU PL CZ HU RO LV LT EE HR SI SK GR TRFR DE ES IT NL PT DK SE FI
NO
Norsk
SPESIELLE SIKKERHETSREGLER
Q Bruk hjelpehåndtaket som er medsendt verktøyet.
Hvis du mister kontrollen kan det forårsake
personskade.
Q Bruk hørselsvern ved slagboring. Eksponering for
støy kan forårsake hørselstap.
Q Bruk en ansiktsmaske eller støvmaske hvis
boreoperasjonen avgir støv.
Q Hold det elektriske verktøyet på de isolerte
gripeflatene når du foretar arbeid der
skjæreredskapen kan få kontakt med skjulte
strømførende elektriske ledninger. Skjæreredskap
som får kontakt med strømførende elektriske
ledninger kan føre til at metalldelene på verktøyet blir
strømførende og at brukeren kan få støt.
INSTRUKSJONER FOR SIKKER
HÅNDTERING
Q Sørg for at verktøyet kun er tilkoblet spenningen som er
merket på navneplaten.
Q Bruk aldri verktøyet hvis dekslet eller noen bolter
mangler. Hvis dekselet eller boltene er fjernet, skal de
settes på plass før bruk. Oppretthold alle delene i god
driftstilstand.
Q Sikre alltid verktøyet når du arbeider i høytstående
stillinger.
Q Berør aldri blad, borer, slipehjul eller andre bevegelige
deler under bruk.
Q Start aldri verktøy når roterende komponenter er i
kontakt med arbeidsstykket.
Q Lagg aldri verktøyet ned før de bevegelige delene har
stoppet fullstendig.
Q TILBEHØR: Bruk av tilbehør eller festeanordninger
andre enn de som er anbefalt i denne manualen
representerer en fare.
Q RESERVEDELER: Ved vedlikehold skal kun originale
reservedeler brukes.
9. Batteripakke (ikke inkludert)
10. Sperrehaker
11. Feste
12. Løsne
13. Boredybde
14. Bor (ikke inkludert)
15. Revers rotasjon
16. Forover rotasjon
17. 35mm Chuck adapter (ikke inkludert)
18. Skrutrekkerbitt (ikke inkludert)
19. SDS bor (ikke inkludert)
TEKNISKE EGENSKAPER
Spenning 18 V
Tomgangshastighet 0-1000 min
Hammerslag (slag per minutt) 0-4000 min
Støtenergi 1.5J
Maksimum borekapasitet:
Treverk 16 mm
Stål 13 mm
Sement (slagboring) 12 mm
Anbefalt slagboreområde 4-12 mm
Tilkoblingstype for bor SDS-plus
Vekt – ikke inkludert batteripakke (Kg) 2.2
MODELL BATTERI
(ekstrautstyr)
BPP-1815
BPP-1817
BPP-1815M
BPP-1817M
BPL-1820
CRH1801
BPL-1815
BPP-1815
BPP-1817
BPP-1815M
BPP-1817M
LADARE
(ekstrautstyr)
BCL-1800
BCS618
BCL1418
BC-1815S
BC-1800
BCA180
-1
-1
BESKRIVELSE
1. Støvbeskyttelsesdeksel
2. SDS Chuck
3. Klemanlegg
4. Modusvelger
5. PÅ/AV bryter
6. Rotasjonsvelger (Framover / revers / senterlås)
7. Hjelpehåndtak
8. Dybdemålerstang
BETJENING
ADVARSEL
Ikke la fortrolighet med produktet gjøre deg
uforsiktig. Husk at uforsiktighet i brøkdel av
et sekund er tilstrekkelig til å påføre alvorlig
personskade.
41
Page 45

GB RU PL CZ HU RO LV LT EE HR SI SK GR TRFR DE ES IT NL PT DK SE FI
NO
Norsk
BETJENING
ADVARSEL
Bruk alltid vernebriller eller sikkerhetsbriller med
sideskjold når man bruker produktet. Hvis det
ikke følges, kan det resultere i at gjenstander blir
kastet i øynene dine og resultere i mulig alvorlig
skade.
ADVARSEL
Ikke bruk noen festeanordninger eller tilbehør
som ikke an befales av produsenten av dette
produktet. Bruk av festeanordninger eller tilbehør
som ikke anbefales, kan resultere i alvorlige
personskader.
ANVENDELSER
Du kan bruke dette produkter for de formålene som er
mopplistet under:
Q Boring i alle typer treprodukter (trelast, kryssfi nér,
panelplater, strukturplanker og harde trefi berplater)
Q Boring i keramikk, plast, glassfi ber og laminater
Q Boring i metealler
Q Slagboring i sement
vil batteripakken starte å lade når det settes i litium-ion
laderen.
MONTERE BATTERIPAKKEN
Se fi gur 2
For å montere batteripakken, skal du følge disse trinnene:
Q Sett rotasjonsvelgeren i senter låsestilling.
Q Sett inn batteripakken i produktet som vist.
Q Sørg for at sikkerhetslåsene på hver side av
batteripakken settes på plass og at batteripakken er
sikret i produktet før su starter operasjonen.
FJERNE BATTERIPAKKEN
For å ta av batteripakken, skal du følge disse trinnene:
Q Trykk ned sikkerhetslåsene på hver side av batteripak-
ken.
Q Fjern batteripakken fra drillen.
ADVARSEL
Batteriproduktet er alltid i driftstilstand. Derfor
skal bryteren alltid være låst når det ikke er i bruk
eller når du bærer det.
Dette produktet vil akseptere Ryobi One+ 18 V litiumion batteripakker og Ryobi One+ 18 V nikkel-kadmium
batteripakker
ADVARSEL
Fjern alltid batteripakken fra boren din når du
monterer deler, gjør justeringer, monterer eller
fjerner bits, rengjør eller når det ikke er i bruk.
Fjerning av batteripakken vil forhindre utilsiktet
oppstart som kan forårsake alvorlig personskade.
BATTERIBESKYTTELSE FUNKSJONER
Ryobi 18 V litium-ion batterier er laget med funksjoner
som beskytter litium-ion cellene og maksimere batteriets
levetid. Under enkelte driftsforhold, kan disse innebygde
funksjonene forårsake at batteriet og verktøyet det driver å
fungere forskjellig fra nikkel-kadmium batterier.
Under enkelte bruksområder, kan batteriets elektronikk
signalisere at batteriet slås av og forårsake at verktøyet
stopper. For å resette batteriet og verktøyet, frigjør
utløseren og gjenoppta normal drift.
MERK: For å forhindre ytterligere driftsstans av batteriet,
skal du unngå å bruke kraft på verktøyet.
Hvis frigjøring av utløseren ikke resetter batteriet og
verktøyet, er batteripakken tappet. Hvis det er tappet,
USTERE HJELPEHÅNDTAKET
Se fi gur 3.
Følg disse trinnene for å justere hjelpehåndtaket:
Q Løsne hjelpehåndtaket ved å vri knappen mot
urviseren (12).
Q Roter hjelpehåndtaket til ønsket stilling.
Q Fest hjelpehåndtaket sikkert ved å vri knappen med
urviseren (11).
JUSTERE DYBDEMÅLERSTANGEN
Se fi gur 4.
Følg disse trinnene for å justere dybdemålerstangen:
Q Lås utløserbryteren ved å plassere rotasjonsvelgeren i
senterstilling.
Q Løsne hjelpehåndtaket ved å vri knappen mot
urviseren (12).
Q Juster dybdemålerstangen slik at boret strekkes
utenfor enden av stangen til den ønskede boredybden.
Q Fest hjelpehåndtaket ved å vri knappen med urviseren
(11).
BRYTER
Se fi gur 5.
Frigjør vippebryteren for å slå drillen PÅ . Frigjør vippebryteren for å slå det AV.
42
Page 46

GB RU PL CZ HU RO LV LT EE HR SI SK GR TRFR DE ES IT NL PT DK SE FI
NO
Norsk
BETJENING
LÅSEFUNKSJON
Se fi gur 5.
Strømbryteren kan låses i stilling "av". Denne funksjonen
hindrer utilsiktet start av bore-/skrumaskinen når du ikke
bruker den. For å låse strømbryteren, still rotasjonsretningsvelgeren (inn-/utskruingsretning) i midtstilling.
OBS! Når velgeren er i midtstilling, er strømbryteren sperret.
REVERSIBEL
Se fi gur 5.
Dette verktøyet har en reversibel rotasjonsfunksjon,
som kontrolleres med en velger som er plassert over
utløserbryteren (6).
Q Rotasjon med urviseren: sett velgerhåndtaket i
venstre stilling (16).
Q Rotasjon mot urviseren: sett velgerhåndtaket i høyre
stilling (15).
MODUSVELGER (4)
Q Sett velgeren i stilling for boring.
Q For slagboring, sett til .
Omstillingen utføres best ved stillstand.
Girkassen skifter til det valgte modus kun etter at bryteren
er aktivert og maskinen starter.
setter det i chucken (2).
Q Dra tilbake klemanlegget (3) og hold det.
Q Dytt og roter det støvfrie verktøyet i boreholderen så
lagt det går.
Q Frigjør klemanlegget for å låse boret.
Q Kontroller at boret er låst ved å dra i det.
TA AV BORET FRA SDS-PLUS SYSTEMET
Dra tilbake klemanlegget og ta av boret.
35mm CHUCK ADAPTER (IKKE INKLUDERT) (17)
Se fi gur (6).
For borearbeid i metall, treverk og plast med borer som har
ikke-SDS Plus skaft, er det en tilgjengelig boreadapter.
PRAKTISKE TIPS
Ikke bor i gjemte elektriske ledninger eller gass og
vannrør. Kontroller arbeidsområdet med en metalldetektor
for eksempel, før du starter.
SLUREKOPLING
Hvis verktøyet klemmes fast eller blir fanget, må
slurekoblingen frigjøres.
Ta bort belastningen fra maskinen med en gang ved å
trekke boreverktøyet tilbake.
Hold alltid maskinen fast med begge hendene og
innta en sikker stående stilling.
Merk: Slagboringsmodus vil skade verktøyets mekanisme
når det brukes til fastgjøring eller boring av ikke-SDS plus
borer. Velg boremodus kun til slike formål.
Ved slagboring, bruk kun borer med hardmetall og SDSPlus skaft. Bruk av kommersielt tilgjengelige sylindriske
mureborer ved hjelp av boreadapter er umulig.
SLAGBORING
Ved slagboring, trenger du ikke å legge på for
mye trykk. Ytelsen økes ikke på denne måten.
For mye trykk vil legge unødvendig belastning på
motoren.
Kontroller borene med jevne mellomrom. Skjerpe
eller skift ut sløve borer.
For slagboring, skal du arbeide med beskyttelsesbriller,
hørselsvern og hjelpehåndtaket. Før du starter skal du
kontrollere at skifteknappen er låst i stilling.
MONTERING OG SKIFTING AV SDS BORER
Se fi gur 6.
Dette verktøyet er utstyrt med et SDS-plus
koblingssystem.
Q Rengjør boret og smør det med maskinfett før du
VEDLIKEHOLD
ADVARSEL
Ved bytting av deler skal kun originale reservedeler
brukes. Bruken av andre deler kan være farlig eller
skade verktøyet.
Bruk ikke løsningsmidler til å rengjøre plastdeler. De fleste
plastmaterialene kan skades ved bruk av løsningsmidlene
som fås i handelen. Bruk en ren klut til å fjerne smuss,
støv, olje, fett, osv.
ADVARSEL
Plastdeler må aldri komme i kontakt med
bremsevæske, bensin, petroleumsholdige
produkter, penetrerende oljer, osv. Slike kjemiske
produkter inneholder stoffer som kan skade,
svekke eller ødelegge plasten, noe som kan
medføre alvorlige kroppsskader.
ADVARSEL
Ikke krev for mye av verktøyene dine. Hvis de
misbrukes, kan det skade både verktøyet og
arbeidsstykket.
43
Page 47

GB RU PL CZ HU RO LV LT EE HR SI SK GR TRFR DE ES IT NL PT DK SE FI
VEDLIKEHOLD
NO
Norsk
ADVARSEL
Ikke forsøk å forandre dette verktøyet eller å tilføye
tilbehør som det ikke er anbefalt å bruke sammen
med dette verktøyet. Sådanne forandringer eller
endringer er det samme som å misbruke verktøyet
og kan skape farlige situasjoner som kan forårsake
alvorlige kroppsskader.
MILJØVERN
Resirkuler råmaterialer istedenfor å kaste dem
i søppelen. Maskinen, tilbehørene og
emballasjene skal sorteres.
SYMBOL
Sikkerhetsalarm
V Volt
-1
min
Omdreininger eller pendelbevegelse pr minutt
Likestrøm
Boremodus
Slagbormodus
CE samsvar
Vennligst les instruksjonene nøye før du starter
maskinen.
Bruk hørselsvern
Bruk øyebeskyttrelse
Resirkulering uønsket
Avfall fra elektriske produkter skal ikke kastes
sammen med husholdningsavfall. Vennligst
resirkuler ved eksisterende
avfallsbehandlingssted. Undersøk hos dine
lokale myndigheter eller forhandler for råd om
resirkulering.
44
Page 48

GB PL CZ HU RO LV LT EE HR SI SK GR TRFR DE ES IT NL PT DK SE FI NO
RU
кЫТТНЛИ
ǰǮǤǵǧǟǪǻǬǺǤ ǮǯǟǡǧǪǟ
ǠǤǦǭǮǟǰǬǭǰDZǧ
Q ǧȐȎȍȊțȆȒȈȑȄ ȁȐȎȍȋȍȂǿȑȄȊțȌȒȝ ȏȒȖȉȒ,
ȁȔȍȃȞȘȒȝ ȁ ȉȍȋȎȊȄȉȑ ȇȌȐȑȏȒȋȄȌȑǿ. ǮȍȑȄȏȞ
ȉȍȌȑȏȍȊȞ ȋȍȅȄȑ ȎȏȇȁȄȐȑȇ ȉ ȑȏǿȁȋȄ.
Q ǯǿȀȍȑǿȞ Ȑ ȒȃǿȏȌȍȈ ȃȏȄȊțȝ, ȇȐȎȍȊțȆȒȈȑȄ
ȐȏȄȃȐȑȁǿ ȆǿȘȇȑȚ ȍȏȂǿȌȍȁ ȐȊȒȔǿ. ǡȍȆȃȄȈȐȑȁȇȄ
ȗȒȋǿ ȋȍȅȄȑ ȎȏȇȁȄȐȑȇ ȉ ȎȍȑȄȏȄ ȐȊȒȔǿ.
Q ǤȐȊȇ ȁȍ ȁȏȄȋȞ ȐȁȄȏȊȄȌȇȞ ȎȏȍȇȆȁȍȃȇȑȐȞ
ȎȚȊț, ȌǿȃȄȁǿȈȑȄ Ȍǿ Ȋȇȕȍ ȆǿȘȇȑȌȒȝ ȇȊȇ
ȎȚȊȄȆǿȘȇȑȌȒȝ ȋǿȐȉȒ.
Q Ǯȏȇ ȏǿȀȍȑȄ ȃȄȏȅȇȑȄ ȇȌȐȑȏȒȋȄȌȑ Ȇǿ ȏȒȉȍȞȑȉȇ
Ȑ ȜȊȄȉȑȏȍȇȆȍȊȇȏȒȝȘȇȋ ȎȍȉȏȚȑȇȄȋ, ȑǿȉ
ȉǿȉ ȐȁȄȏȊȍ ȋȍȅȄȑ ȌǿȑȉȌȒȑțȐȞ Ȍǿ ȐȉȏȚȑȒȝ
ȜȊȄȉȑȏȍȎȏȍȁȍȃȉȒ. В ȏȄȆȒȊțȑǿȑȄ ȉȍȌȑǿȉȑǿ ȐȁȄȏȊǿ
Ȑ Ȏȏȍȁȍȃȍȋ, ȌǿȔȍȃȞȘȇȋȐȞ Ȏȍȃ ȌǿȎȏȞȅȄȌȇȄȋ,
ȋȄȑǿȊȊȇȖȄȐȉȇȄ ȖǿȐȑȇ ȇȌȐȑȏȒȋȄȌȑǿ ȑǿȉȅȄ ȋȍȂȒȑ
ȍȉǿȆǿȑțȐȞ Ȏȍȃ ȌǿȎȏȞȅȄȌȇȄȋ, Ȗȑȍ ȎȏȇȁȄȃȄȑ
ȉ ȎȍȏǿȅȄȌȇȝ ȏǿȀȍȑǿȝȘȄȂȍ ȜȊȄȉȑȏȇȖȄȐȉȇȋ
ȑȍȉȍȋ.
ǧǬǰDZǯDzǩǵǧǧ ǣǪǾ ǠǤǦǭǮǟǰǬǭǨ
ǭǠǯǟǠǭDZǩǧ
Q DzȃȍȐȑȍȁȄȏțȑȄȐț, Ȗȑȍ ȇȌȐȑȏȒȋȄȌȑ ȑȍȊțȉȍ
ȐȍȄȃȇȌȄȌ Ȑ ȌǿȎȏȞȅȄȌȇȄȋ, ȍȑȋȄȖȄȌȌȚȋ Ȍǿ
ȎȊǿȐȑȇȌȄ ȌǿȆȁǿȌȇȞ.
Q ǬȇȉȍȂȃǿ ȌȄ ȇȐȎȍȊțȆȒȈȑȄ ȇȌȐȑȏȒȋȄȌȑ, ȄȐȊȇ ȄȂȍ
ȎȍȉȏȚȑȇȄ ȇȊȇ ȊȝȀȚȄ Ȇǿȃȁȇȅȉȇ ȍȑȐȒȑȐȑȁȒȝȑ.
ǤȐȊȇ ȎȍȉȏȚȑȇȄ ȇȊȇ Ȇǿȃȁȇȅȉȇ ȀȚȊȇ ȒȃǿȊȄȌȚ,
ȆǿȋȄȌȞȝȑ ȇȔ ȃȍ ȇȐȎȍȊțȆȍȁǿȌȇȞ. ǭȀȐȊȒȅȇȑț ȁȐȄ
ȖǿȐȑȇ ȁ ȔȍȏȍȗȄȋ ȏǿȀȍȖȄȋ ȎȍȏȞȃȉȄ.
Q ǡȐȄȂȃǿ ȆǿȓȇȉȐȇȏȒȈȑȄ ȇȌȐȑȏȒȋȄȌȑȚ Ȏȏȇ ȏǿȀȍȑȄ ȁ
ȎȍȃȌȞȑȚȔ ȎȍȊȍȅȄȌȇȞȔ.
Q ǬȇȉȍȂȃǿȌȄȉǿȐǿȑțȐȞȊȄȆȁȇȞ,ȐȁȄȏȊǿ,ȗȊȇȓȍȁǿȊțȌȍȂȍ
ȉȍȊȄȐǿ ȇȊȇ ȃȏȒȂȇȔ ȎȄȏȄȋȄȘǿȝȘȇȔȐȞ ȖǿȐȑȄȈ ȁ
ȑȄȖȄȌȇȄ ȇȐȎȍȊțȆȍȁǿȌȇȞ.
Q ǬȇȉȍȂȃǿ ȌȄ ȆǿȎȒȐȉǿȑț ȇȌȐȑȏȒȋȄȌȑ, ȉȍȂȃǿ ȄȂȍ
ȉȍȋȎȍȌȄȌȑ ȁȏǿȘȄȌȇȞ ȌǿȔȍȃȇȑȐȞ ȁ ȉȍȌȑǿȉȑȄ Ȑ
ȖǿȐȑțȝ ȏǿȀȍȑȚ.
Q ǬȇȉȍȂȃǿ ȌȄ ȒȐȑǿȌȍȁȇȑȄ ȇȌȐȑȏȒȋȄȌȑ ȎȏȄȅȃȄ,
ȖȄȋ ȄȂȍ ȖǿȐȑȇ ȎȄȏȄȋȄȘȄȌȇȞ ȎȏȇȀȚȊȇ ȁ ȎȍȊȌȒȝ
ȍȐȑǿȌȍȁȉȒ.
Q ǮǯǧǬǟǣǪǤǥǬǭǰDZǧ:
ȇȐȎȍȊțȆȍȁǿȌȇȄ ȎȏȇȌǿȃȊȄȅȌȍȐȑȄȈ ȇȊȇ ȁȄȑȁȄȈ
ȊȍȉǿȊțȌȍȈ ȐȄȑȇ, ȍȑȊȇȖȌȚȔ ȍȑ ȏȄȉȍȋȄȌȃȍȁǿȌȌȚȔ ȁ
Ȝȑȍȋ ȏȒȉȍȁȍȃȐȑȁȄ, ȋȍȅȄȑ ȎȏȄȃȐȑǿȁȊȞȑț ȍȎǿȐȌȍȐȑț.
Q ǰǫǤǬǬǺǤ ǶǟǰDZǧ:
Ǯȏȇ ȍȀȐȊȒȅȇȁǿȌȇȇ ȇȐȎȍȊțȆȍȁǿȑț ȑȍȊțȉȍ
ȇȃȄȌȑȇȖȌȚȄ ȐȋȄȌȌȚȄ ȖǿȐȑȇ.
3. ǦǿȅȇȋȌȍȄ ȉȍȊțȕȍ
4. ǰȄȊȄȉȑȍȏ ȏȄȅȇȋǿ
5. ǩȒȏȉȍȁȚȈ ȁȚȉȊȝȖǿȑȄȊț ǡǩǪ / ǡǺǩǪ
6. ǰȄȊȄȉȑȍȏ ȌǿȎȏǿȁȊȄȌȇȞ ȁȏǿȘȄȌȇȞ
(ǮȏǿȁȍȄ/ǪȄȁȍȄ/ǰȏȄȃȌȄȄ ȀȊȍȉȇȏȒȝȘȄȄ ȎȍȊȍȅȄȌȇȄ)
7. ǡȐȎȍȋȍȂǿȑȄȊțȌǿȞ ȏȒȖȉǿ
8. DzȉǿȆǿȑȄȊț ȂȊȒȀȇȌȚ ȐȁȄȏȊȄȌȇȞ
9. ǟȉȉȒȋȒȊȞȑȍȏ (ȁ ȉȍȋȎȊȄȉȑ ȌȄ ȁȉȊȝȖȄȌ)
10. ǦǿȘȄȊȉȇ
11. ǦǿȑȞȌȒȑț
12. ǭȐȊǿȀȇȑț
13. ǢȊȒȀȇȌǿ ȐȁȄȏȊȄȌȇȞ
14. ǰȁȄȏȊȍ (ȁ ȉȍȋȎȊȄȉȑ ȌȄ ȁȉȊȝȖȄȌȍ)
15. ǪȄȁȍȄ ȁȏǿȘȄȌȇȄ (ȏȄȁȄȏȐ)
16. ǮȏǿȁȍȄ ȁȏǿȘȄȌȇȄ
17. 35-ȑȇ ȋȋ ȎǿȑȏȍȌȌȚȈ ȎȄȏȄȔȍȃȌȇȉ
(ȁ ȉȍȋȎȊȄȉȑ ȌȄ ȁȉȊȝȖȄȌ)
18. ǬǿȉȍȌȄȖȌȇȉ ȍȑȁȄȏȑȉȇ (ȁ ȉȍȋȎȊȄȉȑ ȌȄ ȁȉȊȝȖȄȌ)
19. ǰȁȄȏȊȍ SDS (ȁ ȉȍȋȎȊȄȉȑ ȌȄ ȁȉȊȝȖȄȌȍ)
DZǤǴǬǧǶǤǰǩǧǤ ǴǟǯǟǩDZǤǯǧǰDZǧǩǧ
ǬǿȎȏȞȅȄȌȇȄ 18 ǡ
ǰȉȍȏȍȐȑț ȔȍȊȍȐȑȍȂȍ Ȕȍȃǿ 0-1000 ȋȇȌ-1
ǶȇȐȊȍ Ȓȃǿȏȍȁ
(ȖȇȐȊȍ Ȓȃǿȏȍȁ ȁ ȋȇȌȒȑȒ) 0-4000 ȋȇȌ-1
DzȃǿȏȌǿȞ ȜȌȄȏȂȇȞ 1,5 ǣȅ
ǮȏȄȃȄȊțȌǿȞ ȂȊȒȀȇȌǿ ȐȁȄȏȊȄȌȇȞ:
ǣȄȏȄȁȍ 16 ȋȋ
ǰȑǿȊț 13 ȋȋ
ǠȄȑȍȌ (ȒȃǿȏȌȍȄ ȐȁȄȏȊȄȌȇȄ) 12 ȋȋ
ǯȄȉȍȋȄȌȃȒȄȋȚȈ ȃȇǿȎǿȆȍȌ
ȒȃǿȏȌȍȂȍ ȐȁȄȏȊȄȌȇȞ 4-12 ȋȋ
DZȇȎ ȐȍȄȃȇȌȄȌȇȞ ȐȁȄȏȊǿ SDS-ȎȊȝȐ
ǫǿȐȐǿ - ȌȄ ȁȉȊ. ǿȉȉȒȋȒȊȞȑȍȏ (ȉȂ) 2.2
ǫǭǣǤǪǻ ǟǩǩDzǫDzǪǾDZǭ
(ȁȌȄ ȉȍȋȎȊȄȉȑǿ)
BPP-1815
BPP-1817
BPP-1815M
BPP-1817M
BPL-1820
CRH1801
BPL-1815
ǦǟǯǾǣǬǭǤ
DzǰDZǯǭǨǰDZǡǭ
(ȁȌȄ ȉȍȋȎȊȄȉȑǿ)
BCL-1800
BCS618
BCL1418
ǭǮǧǰǟǬǧǤ
1. ǮȚȊȄȆǿȘȇȑȌȚȈ ȉȍȊȎǿȉ
2. ǮǿȑȏȍȌ SDS
45
BPP-1815
BPP-1817
BPP-1815M
BPP-1817M
BC-1815S
BC-1800
BCA180
Page 49

GB PL CZ HU RO LV LT EE HR SI SK GR TRFR DE ES IT NL PT DK SE FI NO
RU
кЫТТНЛИ
ǯǟǠǭDZǟ
ǮǯǤǣDzǮǯǤǥǣǤǬǧǤ
ǬȄ ȎȍȆȁȍȊȇȑț ȃȏȒȅȄȐȑȁȄȌȌȚȋ ȍȑȌȍȗȄȌȇȞȋ
Ȑ ȇȆȃȄȊȇȞȋȇ ȃȄȊǿȑț ȁǿȐ ȌȄȀȏȄȅȌȚȋȇ.
ǮȍȋȌȇȑț, Ȗȑȍ ȌȄȀȏȄȅȌǿȞ ȃȍȊȞ ȐȄȉȒȌȃȚ
ȃȍȐȑǿȑȍȖȌǿ,ȖȑȍȀȚ ȎȏȇȖȇȌȇȑț ȐȄȏțȄȆȌȚȈ
ȒȘȄȏȀ.
ǮǯǤǣDzǮǯǤǥǣǤǬǧǤ
ǡȐȄȂȃǿ ȌǿȃȄȁǿȑț ȎȏȇȐȎȍȐȍȀȊȄȌȇȞ
ȀȄȆȍȎǿȐȌȍȐȑȇ ȇȊȇ ȀȄȆȍȎǿȐȌȚȄ ȍȖȉȇ
Ȑ ȀȍȉȍȁȚȋ ȆǿȘȇȑȌȚȋ ȜȉȏǿȌȍȋ, ȉȍȂȃǿ
ǿȀȍȑǿȄȑȄ ȇȆȃȄȊȇȄȋ. ǭȑȉǿȆ ȃȄȊǿȑț ȑǿȉ,
ȋȍȅȄȑ ȉȍȌȖǿȑțȐȞ ȍȀșȄȉȑǿȋȇ, ȀȏȍȐǿȄȋȚȋȇ
ȁ ȁǿȗȇ ȂȊǿȆǿ, ȆǿȉǿȌȖȇȁǿȝȘȇȄȐȞ ȁȍȆȋȍȅȌȚȋ
ȐȄȏțȄȆȌȚȋ ȒȘȄȏȀȍȋ.
ǮǯǤǣDzǮǯǤǥǣǤǬǧǤ
ǬȄ ȇȐȎȍȊțȆȒȈȑȄ ȌȇȉǿȉȇȄ ȎȏȇȊȍȅȄȌȇȞ
ȇȊȇ ȎȏȇȌǿȃȊȄȅȌȍȐȑȇ, ȌȄ ȏȄȉȍȋȄȌȃȒȄȋȚȄ
ȇȆȂȍȑȍȁȇȑȄȊȄȋȜȑȍȂȍȇȆȃȄȊȇȞ.ǧȐȎȍȊțȆȍȁǿȌȇȄ
ȎȏȇȊȍȅȄȌȇȈ ȇȊȇ ȎȏȇȌǿȃȊȄȅȌȍȐȑȄȈ, ȌȄ
ȏȄȉȍȋȄȌȃȒȄȋȚȔ, ȋȍȅȄȑ ȉȍȌȖǿȑțȐȞȐȄȏțȄȆȌȚȋ
ȎȄȏȐȍȌǿȊțȌȚȋ ȒȘȄȏȀȍȋ.
ǮǯǧǫǤǬǤǬǧǤ
ǡȚ ȋȍȅȄȑȄ ȇȐȎȍȊțȆȍȁǿȑț Ȝȑȍ ȇȆȃȄȊȇȄ ȃȊȞ ȕȄȊȄȈ,
ȁȌȄȐȄȌȌȚȔ ȁ ȐȎȇȐȍȉ ȌȇȅȄ:
Q ǰȁȄȏȊȄȌȇȄ ȁȐȄȔ ȑȇȎȍȁ ȃȄȏȄȁȞȌȌȚȔ ȇȆȃȄȊȇȈ
(ȃȏȄȁȄȐȇȌǿ, ȓǿȌȄȏǿ, ȃȄȏȄȁȞȌȌǿȞ ȍȀȗȇȁȉǿ,
ȉȍȋȎȍȆȇȕȇȍȌȌȚȔ ȃȍȐȍȉ, ȇ ȑȁȄȏȃȚȔ ȃȍȐȍȉ)
Q ǰȁȄȏȊȄȌȇȄ ȉȄȏǿȋȇȉȇ, ȎȊǿȐȑȋǿȐȐȚ,
ȐȑȄȉȊȍȁȍȊȍȉȍȌǿ, ȇ ȊǿȋȇȌǿȑǿ.
Q ǰȁȄȏȊȄȌȇȄ ȋȄȑǿȊȊȍȁ
Q DzȃǿȏȌȍȄ ȐȁȄȏȊȄȌȇȄ ȁ ȀȄȑȍȌȄ
Ǽȑȍ ȇȆȃȄȊȇȄ ȎȏȇȌȇȋǿȄȑ Ryobi One+ 18 ǡ ȊȇȑȇȄȁȍ
- ȇȍȌȌȚȄ ȎǿȉȄȑȚ ȀǿȑǿȏȄȇ ȇ Ryobi Ryobi One+ 18 ǡ
ȉǿȃȋȇȄȁȍ - ȌȇȉȄȊțȌȚȄ ȎǿȉȄȑȚ ȀǿȑǿȏȄȇ.
ǮǯǤǣDzǮǯǤǥǣǤǬǧǤ
ǡȐȄȂȃǿ ȒȃǿȊȇȑȄ ȎǿȉȄȑ ȀǿȑǿȏȄȇ ȇȆ ȁǿȗȄȈ
ȃȏȄȊȇ, ȉȍȂȃǿ ȁȚ ȐȍȀȇȏǿȄȑȄ ȖǿȐȑȇ, ȁȌȍȐȇȑȄ
ȇȆȋȄȌȄȌȇȞ, ȁȐȑǿȁȊȞȄȑȄ ȇȊȇ ȒȃǿȊȞȄȑȄ ȀȇȑȚ,
ȖȇȐȑȇȑȄ ȇȊȇ ȉȍȂȃǿ ȌȄ ȇȐȎȍȊțȆȒȄȑȄ. DzȃǿȊȄȌȇȄ
ȎǿȉȄȑǿ ȀǿȑǿȏȄȇ ȎȏȄȃȍȑȁȏǿȑȇȑ ȐȊȒȖǿȈȌȚȈ
Ȑȑǿȏȑ, ȉȍȑȍȏȚȈ ȋȍȅȄȑ ȎȏȇȖȇȌȞȑț ȐȄȏțȄȆȌȚȈ
ȎȄȏȐȍȌǿȊțȌȚȈ ȒȘȄȏȀ.
ǭǰǭǠǤǬǬǭǰDZǧ ǦǟǸǧDZǺ ǠǟDZǟǯǤǧ
Ryobi 18 ǡ ȊȇȑȇȄȁȍ - ȇȍȌȌȚȄ ȀǿȑǿȏȄȇ ȏǿȆȏǿȀȍȑǿȌȚ
Ȑ ȍȐȍȀȄȌȌȍȐȑȞȋȇ, ȉȍȑȍȏȚȄ ȆǿȘȇȘǿȝȑ ȊȇȑȇȄȁȍ ȇȍȌȌȚȄ ȞȖȄȈȉȇ ȇ ȋǿȉȐȇȋȇȆȇȏȒȝȑ ȅȇȆȌț ȀǿȑǿȏȄȇ.
Ǯȍȃ ȌȄȉȍȑȍȏȚȋȇ ȜȉȐȎȊȒǿȑǿȕȇȍȌȌȚȋȇ ȏȄȅȇȋǿȋȇ,
ǯǟǠǭDZǟ
Ȝȑȇ ȁȐȑȏȍȄȌȌȚȄ ȍȐȍȀȄȌȌȍȐȑȇ ȋȍȂȒȑ ȆǿȐȑǿȁȊȞȑț
ȀǿȑǿȏȄȝ ȇ ȇȌȐȑȏȒȋȄȌȑ, ȉȍȑȍȏȚȈ ȍȌȇ ȐȌǿȀȅǿȄȑ
ȜȌȄȏȂȇȄȈ, ȖȑȍȀȚ ȃȄȈȐȑȁȍȁǿȑț Ȏȍ-ȃȏȒȂȍȋȒ Ȑ
ȉǿȃȋȇȄȁȍ - ȌȇȉȇȊȇȄȁȍȈ ȀǿȑǿȏȄȈ .
ǡ ȑȄȖȄȌȇȄ ȌȄȉȍȑȍȏȚȔ ȎȏȇȋȄȌȄȌȇȈ, ȜȊȄȉȑȏȍȌȇȉǿ
ȀǿȑǿȏȄȇ ȋȍȅȄȑ ȃǿȁǿȑț ȐȇȂȌǿȊ ȀǿȑǿȏȄȄ
ȆǿȉȏȚȁǿȑțȐȞ, ȇ ȆǿȐȑǿȁȊȞȑț ȇȌȐȑȏȒȋȄȌȑ ȎȏȄȉȏǿȘǿȑț
ȓȒȌȉȕȇȍȌȇȏȍȁǿȑț. ǶȑȍȀȚ ȎȍȁȑȍȏȌȍȆǿȎȒȐȑȇȑț
ȀǿȑǿȏȄȝ ȇ ȇȌȐȑȏȒȋȄȌȑ, ȁȚȎȒȐȑȇȑȄ ȑȏȇȂȂȄȏ, ȇ
ȁȍȆȍȀȌȍȁȇȑȄ ȌȍȏȋǿȊțȌȍȄ ȃȄȈȐȑȁȇȄ.
ǮǯǧǫǤǶǟǬǧǤ: ǶȑȍȀȚ ȎȏȄȃȍȑȁȏǿȑȇȑț ȃǿȊțȌȄȈȗȒȝ
ȀȊȍȉȇȏȍȁȉȒ ȀǿȑǿȏȄȇ, ȇȆȀȄȂǿȈȑȄ ȎȄȏȄȌǿȎȏȞȅȄȌȇȞ
ȇȌȐȑȏȒȋȄȌȑǿ.
ǤȐȊȇ ȁȚȎȒȐȉ ȑȏȇȂȂȄȏǿ ȎȍȁȑȍȏȌȍ ȌȄ ȆǿȎȒȐȉǿȄȑ
ȀǿȑǿȏȄȝ ȇ ȇȌȐȑȏȒȋȄȌȑ, ȎǿȉȄȑ ȀǿȑǿȏȄȇ ȇȐȖȄȏȎǿȌ.
ǤȐȊȇ ȇȐȖȄȏȎǿȌ, ȎǿȉȄȑ ȀǿȑǿȏȄȇ ȌǿȖȌȄȑ ȆǿȏȞȅǿȑțȐȞ,
ȉȍȂȃǿ ȎȍȋȄȘȄȌ ȁ ȊȇȑȇȄȁȍ-ȇȍȌȌȍȄ ȆǿȏȞȃȍȌȍȄ
ȒȐȑȏȍȈȐȑȁȍ.
DzǰDZǟǬǟǡǪǧǡǟDZǻ ǮǟǩǤDZ ǠǟDZǟǯǤǧ
ǰȋ. ǯȇȐȒȌȍȉ 2.
ǣȊȞ ȒȐȑǿȌȍȁȉȇ ǿȉȉȒȋȒȊȞȑȍȏǿ ȁȚȎȍȊȌȇȑȄ
ȐȊȄȃȒȝȘȇȄ ȃȄȈȐȑȁȇȞ:
Q ǯǿȆȋȄȐȑȇȑț ȎȄȏȄȉȊȝȖǿȑȄȊț ȁȏǿȘȄȌȇȞ ȁ
ȕȄȌȑȏǿȊțȌȒȝ ȎȍȆȇȕȇȝ Ȇǿȋȉǿ.
Q ǡȐȑǿȁȇȑț ȎǿȉȄȑ ȀǿȑǿȏȄȇ ȁ ȇȆȃȄȊȇȄ ȉǿȉ
ȎȍȉǿȆǿȌȍ.
Q ǦǿȉȏȄȎȇȑț Ȇǿȋȉȇ Ȍǿ ȉǿȅȃȍȈ ȐȑȍȏȍȌȄ ȀȊȍȉȇȏȍȁȉȇ
ȎǿȉȄȑǿ ȀǿȑǿȏȄȇ Ȍǿ ȋȄȐȑȄ ȇ ȑǿȉ, ȖȑȍȀȚ ȎǿȉȄȑ
ȀǿȑǿȏȄȇ ȆǿȘȇȘȄȌ ȁ ȇȆȃȄȊȇȇ ȎȄȏȄȃ ȌǿȖǿȊȍȋ
ȃȄȈȐȑȁȇȞ.
DzǣǟǪǾDZǻ ǮǟǩǤDZ ǠǟDZǟǯǤǧ
ǣȊȞ ȐȌȞȑȇȞ ǿȉȉȒȋȒȊȞȑȍȏǿ ȁȚȎȍȊȌȇȑȄ ȐȊȄȃȒȝȘȇȄ
ȃȄȈȐȑȁȇȞ:
Q ǮȍȌȇȆȇȑț Ȇǿȋȉȇ Ȍǿ ȉǿȅȃȍȈ ȐȑȍȏȍȌȄ ȎǿȉȄȑǿ
ȀǿȑǿȏȄȇ.
Q DzȃǿȊȇȑț ȎǿȉȄȑ ȀǿȑǿȏȄȇ ȇȆ ȃȏȄȊȇ.
ǮǯǤǣDzǮǯǤǥǣǤǬǧǤ
ǧȆȃȄȊȇȞȀǿȑǿȏȄȇ-ȁȐȄȂȃǿȁȜȉȐȎȊȒǿȑǿȕȇȍȌȌȍȋ
ȏȄȅȇȋȄ. ǮȍȜȑȍȋȒ, ȁȚȉȊȝȖǿȑȄȊț ȃȍȊȅȄȌ
ȁȐȄȂȃǿ ȆǿȎȇȏǿȑțȐȞ ȉȍȂȃǿ ȌȄ ȁ ȇȐȎȍȊțȆȍȁǿȌȇȇ
ȇȊȇ ȎȄȏȄȌȍȐȇȑȐȞ Ȍǿ ȁǿȗȄȈ ȐȑȍȏȍȌȄ.
ǯǤǢDzǪǧǯǭǡǩǟ ǡǰǮǭǫǭǢǟDZǤǪǻǬǭǨ ǯDzǶǩǧ
ǰȋ. ǯȇȐ. 3.
ǣȊȞ ȏȄȂȒȊȇȏȍȁȉȇ ȁȐȎȍȋȍȂǿȑȄȊțȌȍȈ ȏȒȖȉȇ
ȁȚȎȍȊȌȇȑȄ ȐȊȄȃȒȝȘȇȄ ȃȄȈȐȑȁȇȞ:
Q ǭȐȊǿȀțȑȄ ȁȐȎȍȋȍȂǿȑȄȊțȌȒȝ ȏȒȖȉȒ, ȎȍȁȄȏȌȒȁ ȄȄ
Ȏȏȍȑȇȁ ȖǿȐȍȁȍȈ ȐȑȏȄȊȉȇ (12).
Q ǡȏǿȘǿȈȑȄ ȁȐȎȍȋȍȂǿȑȄȊțȌȍȈ ȏȒȖȉȍȈ ȁ ȌȒȅȌȍȋ
ȌǿȎȏǿȁȊȄȌȇȇ.
Q DZȁȄȏȃȍ ȆǿȑȞȌȇȑȄ ȁȐȎȍȋȍȂǿȑȄȊțȌȒȝ ȏȒȖȉȒ,
ȎȍȁȄȏȌȒȁ ȄȄ Ȏȍ ȖǿȐȍȁȍȈ ȐȑȏȄȊȉȄ (11).
46
Page 50

GB PL CZ HU RO LV LT EE HR SI SK GR TRFR DE ES IT NL PT DK SE FI NO
RU
кЫТТНЛИ
ǯǟǠǭDZǟ
ǯǤǢDzǪǧǯǭǡǩǟ DzǩǟǦǟDZǤǪǾ ǢǪDzǠǧǬǺ
ǰǡǤǯǪǤǬǧǾ
ǰȋ. ǯȇȐ. 4.
ǣȊȞ ȏȄȂȒȊȇȏȍȁȉȇ ȒȉǿȆǿȑȄȊȞ ȂȊȒȀȇȌȚ ȐȁȄȏȊȄȌȇȞ
ȁȚȎȍȊȌȇȑȄ ȐȊȄȃȒȝȘȇȄ ȃȄȈȐȑȁȇȞ:
Q ǦǿȀȊȍȉȇȏȒȈȑȄ ȉȒȏȉȍȁȚȈ ȁȚȉȊȝȖǿȑȄȊț, ȒȐȑǿȌȍȁȇȁ
ȐȄȊȄȉȑȍȏ ȌǿȎȏǿȁȊȄȌȇȞ ȁȏǿȘȄȌȇȞ ȁ ȕȄȌȑȏǿȊțȌȍȄ
ȎȍȊȍȅȄȌȇȄ.
Q ǭȐȊǿȀțȑȄ ȁȐȎȍȋȍȂǿȑȄȊțȌȒȝ ȏȒȖȉȒ, ȎȍȁȄȏȌȒȁ ȄȄ
Ȏȏȍȑȇȁ ȖǿȐȍȁȍȈ ȐȑȏȄȊȉȇ (12).
Q ǭȑȏȄȂȒȊȇȏȒȈȑȄ ȒȉǿȆǿȑȄȊț ȂȊȒȀȇȌȚ ȐȁȄȏȊȄȌȇȞ
ȑǿȉ, ȖȑȍȀȚ ȐȁȄȏȊȍ ȁȚȐȑȒȎǿȊȍ ȍȑ ȉȍȌȕǿ
ȒȉǿȆǿȑȄȊȞ Ȍǿ ȏǿȐȐȑȍȞȌȇȄ ȌȄȍȀȔȍȃȇȋȍȈ ȂȊȒȀȇȌȚ
ȐȁȄȏȊȄȌȇȞ.
Q ǦǿȑȞȌȇȑȄ ȁȐȎȍȋȍȂǿȑȄȊțȌȒȝ ȏȒȖȉȒ, ȎȍȁȄȏȌȒȁ ȄȄ
Ȏȍ ȖǿȐȍȁȍȈ ȐȑȏȄȊȉȄ (11).
ǡǺǩǪǽǶǟDZǤǪǻ
ǰȋ. ǯȇȐ. 5.
ǶȑȍȀȚ ȁȉȊȝȖȇȑț ȃȏȄȊț, ȎȍȌȇȆțȑȄ ȑȏȇȂȂȄȏȌȚȈ
ȁȚȉȊȝȖǿȑȄȊț. ǶȑȍȀȚ ȁȚȉȊȝȖȇȑț ȄȄ, ȁȚȎȒȐȑȇȑȄ
ȑȏȇȂȂȄȏȌȚȈ ȁȚȉȊȝȖǿȑȄȊț.
ЕгйдакйЗдД
лП. кЛТ. 5.
дЫУН ПУКМУ Б‡·ОУНЛУ‚‡Ъ¸ ‚ ФУОУКВМЛЛ "Зхдг"
щЪ‡ ‚УБПУКМУТЪ¸ ФУБ‚УОflВЪ ЛБ·ВК‡Ъ¸ ТОЫ˜‡ИМУ„У Б‡ФЫТН‡
ЛМТЪЫПВМЪ‡ ‚ МВ‡·У˜ВВ ‚ВПfl. уЪУ·˚ Б‡·ОУНЛУ‚‡Ъ¸
НЫУН, ЫТЪ‡МУ‚ЛЪВ ФВВНО˛˜‡ЪВО¸ М‡Ф‡‚ОВМЛfl ‚‡˘ВМЛfl
(Б‡НЫ˜Л‚‡МЛВ / УЪНЫ˜Л‚‡МЛВ) ‚ ˆВМЪ‡О¸МУВ ФУОУКВМЛВ.
èËϘ‡ÌËÂ: äÓ„‰‡ ÔÂÂÍβ˜‡ÚÂθ ̇ԇ‚ÎÂÌËfl
‚‡˘ВМЛfl ТЪУЛЪ ‚ ˆВМЪ‡О¸МУП ФУОУКВМЛЛ, НЫУН
Б‡·ОУНЛУ‚‡М.
ǯǤǡǤǯǰ
ǰȋ. ǯȇȐ. 5.
ǣǿȌȌȚȈ ȇȌȐȑȏȒȋȄȌȑ ȌǿȃȄȊȄȌ ȓȒȌȉȕȇȄȈ ȍȀȏǿȑȌȍȂȍ
ȁȏǿȘȄȌȇȞ, ȉȍȌȑȏȍȊȇȏȒȄȋȍȂȍ ȐȄȊȄȉȑȍȏȍȋ,
ȏǿȐȎȍȊȍȅȄȌȌȚȋ Ȍǿȃ ȉȒȏȉȍȁȚȋ ȁȚȉȊȝȖǿȑȄȊȄȋ (6).
Q ǡȏǿȘȄȌȇȄ Ȏȍ ȖǿȐȍȁȍȈ ȐȑȏȄȊȉȄ: ȒȐȑǿȌȍȁȇȑȄ ȏȚȖǿȂ
ȐȄȊȄȉȑȍȏǿ ȁ ȊȄȁȍȄ ȎȍȊȍȅȄȌȇȄ (16).
Q ǡȏǿȘȄȌȇȄ Ȏȏȍȑȇȁ ȖǿȐȍȁȍȈ ȐȑȏȄȊȉȇ: ȒȐȑǿȌȍȁȇȑȄ
ȏȚȖǿȂ ȐȄȊȄȉȑȍȏǿ ȁ ȎȏǿȁȍȄ ȎȍȊȍȅȄȌȇȄ (15).
ǰǤǪǤǩDZǭǯ ǯǤǥǧǫǟ (4)
πǣȊȞ ȐȁȄȏȊȄȌȇȞ ȒȐȑǿȌȍȁȇȑȄ ȐȄȊȄȉȑȍȏ ȁ ȎȍȊȍȅȄȌȇȄ
.
Q ǣȊȞ ȒȃǿȏȌȍȂȍ ȐȁȄȏȊȄȌȇȞ ȒȐȑǿȌȍȁȇȑȄ ȄȂȍ ȁ Ȏȍ-
ȊȍȅȄȌȇȄ
ǮȄȏȄȉȊȝȖȄȌȇȄȊȒȖȗȄȁȚȎȍȊȌȞȑțȎȏȇȍȐȑǿȌȍȁȊȄȌȌȍȈ
ȃȏȄȊȇ.
ǯȄȃȒȉȑȍȏ ȎȏȍȇȆȁȍȃȇȑ ȎȄȏȄȉȊȝȖȄȌȇȄ ȁ ȁȚȀȏǿȌȌȚȈ
ȏȄȅȇȋ ȑȍȊțȉȍ ȎȍȐȊȄ ȑȍȂȍ, ȉǿȉ ǿȉȑȇȁǿȕȇȇ
.
ȁȚȉȊȝȖǿȑȄȊȞ ȇ ȌǿȖǿȊǿ ȏǿȀȍȑȚ ȋȄȔǿȌȇȆȋǿ.
ǮȏȇȋȄȖǿȌȇȄ: ǯȄȅȇȋ ȒȃǿȏȌȍȂȍ ȐȁȄȏȊȄȌȇȞ ȋȍȅȄȑ
ȎȏȇȁȄȐȑȇ ȉ ȎȍȁȏȄȅȃȄȌȇȝ ȋȄȔǿȌȇȆȋǿ ȇȌȐȑȏȒȋȄȌȑǿ,
ȄȐȊȇ ȄȂȍ ȇȐȎȍȊțȆȒȝȑ ȃȊȞ ȆǿȉȏȒȖȇȁǿȌȇȞ ȇȊȇ
ȐȁȄȏȊȄȌȇȞ Ȑ ȎȍȋȍȘțȝ ȐȁȄȏȊ, ȌȄ ȍȑȌȍȐȞȘȇȔȐȞ ȉ
ȑȇȎȒ SDS-ȎȊȝȐ. ǣȊȞ ȑǿȉȍȂȍ ȌǿȆȌǿȖȄȌȇȞ
ȑȍȊțȉȍ ȏȄȅȇȋ ȐȁȄȏȊȄȌȇȞ.
Ǯȏȇ ȒȃǿȏȌȍȋ ȐȁȄȏȊȄȌȇȇ ȇȐȎȍȊțȆȒȈȑȄ ȑȍȊțȉȍ
ȐȁȄȏȊǿ ȇȆ ȑȁȄȏȃȍȂȍ ȋȄȑǿȊȊǿ ȇ ȑȍȊțȉȍ Ȑȍ ȐȑȄȏȅȌȄȋ
SDS-ȎȊȝȐ. ǬȄȁȍȆȋȍȅȌȍ ȇȐȎȍȊțȆȍȁǿȑț ȇȋȄȝȘȇȄȐȞ
ȁ ȎȏȍȃǿȅȄ ȉǿȋȄȌȌȚȄ ȐȁȄȏȊǿ Ȑ ȕȇȊȇȌȃȏȍȋ Ȑ
ȎȍȋȍȘțȝ ȐȁȄȏȊȍȃȄȏȅǿȑȄȊȞ.
DzǣǟǯǬǭǤ ǰǡǤǯǪǤǬǧǤ
Ǯȏȇ ȒȃǿȏȌȍȋ ȐȁȄȏȊȄȌȇȇ ȁǿȋ ȌȄ ȌȒȅȌȍ
ȎȏȇȋȄȌȞȑț ȐȊȇȗȉȍȋ ȀȍȊțȗȍȄ ȃǿȁȊȄȌȇȄ.
ǮȏȍȇȆȁȍȃȇȑȄȊțȌȍȐȑț ȃȏȄȊȇ Ȏȏȇ Ȝȑȍȋ ȌȄ
ȒȁȄȊȇȖȇȁǿȄȑȐȞ. ǰȊȇȗȉȍȋ ȐȇȊțȌȍȄ ȃǿȁȊȄȌȇȄ
ȎȏȇȁȄȃȄȑ ȉ ȎȍȁȚȗȄȌȇȝ ȌȄȌȒȅȌȍȈ ȌǿȂȏȒȆȉȇ
Ȍǿ ȋȍȑȍȏ.
ǯȄȂȒȊȞȏȌȍ ȎȏȍȁȄȏȞȈȑȄ ȐȁȄȏȊǿ.
ǮȄȏȄȆǿȑǿȖȇȁǿȈȑȄ ȇȊȇ ȆǿȋȄȌȞȈȑȄ ȑȒȎȚȄ
ȐȁȄȏȊǿ.
Ǯȏȇ ȒȃǿȏȌȍȋ ȐȁȄȏȊȄȌȇȇ ȏǿȀȍȑǿȈȑȄ ȑȍȊțȉȍ Ȑ
ȆǿȘȇȑȌȚȋȇ ȍȖȉǿȋȇ, ȐȏȄȃȐȑȁǿȋȇ ȆǿȘȇȑȚ ȍȏȂǿȌȍȁ
ȐȊȒȔǿ ȇ Ȑ ȎȍȋȍȘțȝ ȁȐȎȍȋȍȂǿȑȄȊțȌȍȈ ȏȒȖȉȇ.
ǮȄȏȄȃ ȎȒȐȉȍȋ ȎȏȍȁȄȏțȑȄ, ȆǿȘȄȊȉȌȒȑǿ Ȋȇ ȉȌȍȎȉǿ
ȎȄȏȄȉȊȝȖȄȌȇȞ.
DzǰDZǟǬǭǡǩǟ ǧ ǰǫǤǬǟ ǰǡǤǯǪ SDS
ǰȋ. ǯȇȐ. 6
ǣǿȌȌȚȈ ȇȌȐȑȏȒȋȄȌȑ ȍȀȍȏȒȃȍȁǿȌ ȐȇȐȑȄȋȍȈ
ȐȍȄȃȇȌȄȌȇȞ SDS-ȎȊȝȐ.
Q ǮȏȄȅȃȄ ȖȄȋ ȁȐȑǿȁȇȑț ȐȁȄȏȊȍ ȁ ȎǿȑȏȍȌ (2)
ȍȖȇȐȑȇȑȄ ȐȁȄȏȊȍ ȇ ȐȋǿȅțȑȄ ȄȂȍ ȋǿȗȇȌȌȚȋ
ȋǿȐȊȍȋ.
Q ǭȑȑȞȌȇȑȄ ȌǿȆǿȃ ȆǿȅȇȋȌȍȄ ȉȍȊțȕȍ (3) ȇ
ȎȏȇȃȄȏȅȇȑȄ ȄȂȍ.
Q ǡȃǿȁȇȑȄ ȇ ȁȏǿȘǿȈȑȄ ȍȖȇȘȄȌȌȚȈ Ȃȍȑ ȎȚȊȇ
ȇȌȐȑȏȒȋȄȌȑ ȁ ȐȁȄȏȊȍȃȄȏȅǿȑȄȊț (ȎǿȑȏȍȌ) ȃȍ
ȒȎȍȏǿ.
Q ǭȑȎȒȐȑȇȑȄ ȆǿȅȇȋȌȍȄ ȉȍȊțȕȍ, ȖȑȍȀȚ ȆǿȓȇȉȐȇȏȍ-
ȁǿȑț ȐȁȄȏȊȍ.
Q ǮȒȑȄȋ ȌǿȑȞȅȄȌȇȞ ȎȏȍȁȄȏțȑȄ, ȖȑȍȀȚ ȐȁȄȏȊȍ Ȇǿ-
ȓȇȉȐȇȏȍȁǿȌȍ.
ǰǬǾDZǧǤ ǰǡǤǯǪǟ ǧǦ ǰǧǰDZǤǫǺ SDS-ǮǪǽǰ
ǭȑȑȞȌȇȑȄ ȌǿȆǿȃ ȆǿȅȇȋȌȍȄ ȉȍȊțȕȍ ȇ ȐȌȇȋȇȑȄ
ȐȁȄȏȊȍ.
35 ȋȋ ǮǟDZǯǭǬǬǺǨ ǮǤǯǤǴǭǣǬǧǩ (ǡ ǩǭǫǮǪǤǩDZ
ǬǤ ǡǩǪǽǶǤǬ) (17)
ǰȋ. ǯȇȐ. 6.
ǮȄȏȄȔȍȃȌȇȉ ȎȏȄȃȌǿȆȌǿȖȄȌ ȃȊȞ ȐȁȄȏȊȄȌȇȞ ȋȄȑǿȊȊǿ,
ȃȄȏȄȁǿ ȇ ȎȊǿȐȑȋǿȐȐȚ Ȑ ȃȏȄȊțȝ, ȌȄ ȍȐȌǿȘȄȌȌȍȈ
ȐȑȄȏȅȌȄȋ SDS-ȎȊȝȐ.
ȁȚȀȇȏǿȈȑȄ
47
Page 51

GB PL CZ HU RO LV LT EE HR SI SK GR TRFR DE ES IT NL PT DK SE FI NO
RU
кЫТТНЛИ
ǯǟǠǭDZǟ
ǮǯǟǩDZǧǶǤǰǩǧǤ ǰǭǡǤDZǺ
ǬȄ ȎȏȍȐȁȄȏȊȇȁǿȈȑȄ ȜȊȄȉȑȏȍȊȇȌȇȇ ȇȊȇ ȂǿȆȍ- ȇ
ȁȍȃȍȎȏȍȁȍȃȚ. ǮȏȍȁȄȏȞȈȑȄ ȒȖǿȐȑȍȉ ȏǿȀȍȑȚ Ȑ
ȎȍȋȍȘțȝ ȋȄȑǿȊȊȍȇȐȉǿȑȄȊȞ, ȌǿȎȏȇȋȄȏ, ȎȄȏȄȃ
ȐǿȋȚȋ ȌǿȖǿȊȍȋ ȏǿȀȍȑȚ.
ǮǯǤǣǭǴǯǟǬǧDZǤǪǻǬǟǾ ǫDzdzDZǟ
Ǯȏȇ ȆǿȐȑȏȄȁǿȌȇȇ ȇȊȇ ȆǿȉȊȇȌȇȁǿȌȇȇ ȇȌȐȑȏȒȋȄȌȑǿ
ȎȏȄȃȍȔȏǿȌȇȑȄȊțȌǿȞ ȋȒȓȑǿ ȏǿȐȐȊǿȀȊȞȄȑȐȞ.
ǬȄȋȄȃȊȄȌȌȍ ȐȌȇȋȇȑȄ ȌǿȂȏȒȆȉȒ Ȑ ȃȏȄȊȇ, ȍȑȑȞȌȒȁ
ȌǿȆǿȃ ȐȁȄȏȊȇȊțȌȚȈ ȇȌȐȑȏȒȋȄȌȑ.
ǡȐȄȂȃǿ ȉȏȄȎȉȍ ȃȄȏȅȇȑȄ ȃȏȄȊț ȍȀȄȇȋȇ
ȏȒȉǿȋȇ Ȍǿ ȀȄȆȍȎǿȐȌȍȋ ȏǿȐȐȑȍȞȌȇȇ.
ǭǠǰǪDzǥǧǡǟǬǧǤ
ǮǯǤǣDzǮǯǤǥǣǤǬǧǤ
ǡ ȐȊȒȖǿȄ ȏȄȋȍȌȑǿ ȎȍȊțȆȒȈȑȄȐț ȑȍȊțȉȍ
ȋǿȏȍȖȌȚȋȇȆǿȎȖǿȐȑȞȋȇ Ryobi. ǧȐȎȍȊțȆȍȁǿȌȇȄ
ȊȝȀȚȔȃȏȒȂȇȔ ȆǿȎȖǿȐȑȄȈȋȍȅȄȑ ȎȏȄȃȐȑǿȁȊȞȑț
ȍȎǿȐȌȍȐȑț ȇȊȇ ȎȍȁȏȄȃȇȑț ȇȌȐȑȏȒȋȄȌȑ.
ǬȇȉȍȂȃǿ ȌȄ ȎȍȊțȆȒȈȑȄȐț ȏǿȐȑȁȍȏȇȑȄȊȞȋȇ ȃȊȞ
ȖȇȐȑȉȇ ȎȊǿȐȑȋǿȐȐȍȁȚȔ ȃȄȑǿȊȄȈ. ǠȍȊțȗȇȌȐȑȁȍ
ȎȊǿȐȑȋǿȐȐ ȋȍȅȄȑ ȎȍȁȏȄȃȇȑțȐȞ ȍȑ ȍȀȚȖȌȚȔ
ȏǿȐȑȁȍȏȇȑȄȊȄȈ. ǣȊȞ ȐȌȞȑȇȞ ȂȏȞȆȇ, ȋǿȐȊǿ, ȅȇȏǿ,
ȎȚȊȇ ȇ ȑ.ȃ. ȎȍȊțȆȒȈȑȄȐț ȖȇȐȑȍȈ ȑȏȞȎȉȍȈ.
ǮǯǤǣDzǮǯǤǥǣǤǬǧǤ
ǮȊǿȐȑȋǿȐȐȍȁȚȄ ȃȄȑǿȊȇ ȌȄȊțȆȞ ȖȇȐȑȇȑț
ȑȍȏȋȍȆȌȍȈ ȅȇȃȉȍȐȑțȝ, ȀȄȌȆȇȌȍȋ,
ȌȄȓȑȄȎȏȍȃȒȉȑǿȋȇ, Ȅȃȉȇȋȇ ȋǿȐȊǿȋȇ ȇ ȑ.ȃ.
Ǽȑȇ ȔȇȋȇȉǿȑȚ ȐȍȃȄȏȅǿȑ ȁȄȘȄȐȑȁǿ, ȉȍȑȍȏȚȄ
ȋȍȂȒȑ ȇȐȎȍȏȑȇȑț, ȍȐȊǿȀȇȑț ȇȊȇ ȏǿȆȏȒȗȇȑț
ȎȊǿȐȑȋǿȐȐȒ. Ǽȑȍ ȁȄȃȄȑ ȉ ȑȞȅȄȊȚȋ ȑȏǿȁȋǿȋ.
ǮǯǤǣDzǮǯǤǥǣǤǬǧǤ
ǬȄ ȀȒȃțȑȄ ȖȏȄȆȋȄȏȌȍ ȑȏȄȀȍȁǿȑȄȊțȌȚȋȇ ȉ
ȇȌȐȑȏȒȋȄȌȑȒ. dzȍȏȐȇȏȍȁǿȌȇȄ ȇȌȐȑȏȒȋȄȌȑǿ
ȋȍȅȄȑ ȎȍȁȏȄȃȇȑț ȄȂȍ ȇȊȇ ȆǿȂȍȑȍȁȉȒ.
ǮǯǤǣDzǮǯǤǥǣǤǬǧǤ
ǬȄ ȎȚȑǿȈȑȄȐț ȇȆȋȄȌȞȑț ȇȌȐȑȏȒȋȄȌȑ ȇȊȇ
ȎȏȇȐȎȍȐǿȀȊȇȁǿȑț ȉ ȌȄȋȒ ǿȉȐȄȐȐȒǿȏȚ,
ȌȄ ȏȄȉȍȋȄȌȃȍȁǿȌȌȚȄ ȇȆȂȍȑȍȁȇȑȄȊȄȋ.
ǮȍȃȍȀȌȚȄ ȋȍȃȇȓȇȉǿȕȇȇ ȇ ȎȏȄȍȀȏǿȆȍȁǿȌȇȞ
ȎȏȄȃȐȑǿȁȊȞȝȑ ȐȍȀȍȈ ȌȄȎȏǿȁȇȊțȌȍȄ
ȇȐȎȍȊțȆȍȁǿȌȇȄ ȇȌȐȑȏȒȋȄȌȑǿ ȇ ȋȍȂȒȑ ȐȍȆȃǿȑț
ȍȎǿȐȌȚȄ ȐȇȑȒǿȕȇȇ, ȁȊȄȉȒȘȇȄ Ȇǿ ȐȍȀȍȈ
ȑȞȅȄȊȚȄ ȑȄȊȄȐȌȚȄ ȑȏǿȁȋȚ.
ǦǟǸǧDZǟ ǭǩǯDzǥǟǽǸǤǨ ǰǯǤǣǺ
ǬȄ ȁȚȀȏǿȐȚȁǿȈȑȄ ȐȚȏțȄ. ǰȃǿȁǿȈȑȄ ȄȂȍ ȁ
ȎȄȏȄȏǿȀȍȑȉȒ. ǫǿȗȇȌǿ, ǿȉȐȄȐȐȒǿȏȚ ȇ
ȒȎǿȉȍȁȉǿ ȃȍȊȅȌȚ ȀȚȑț ȍȑȐȍȏȑȇȏȍȁǿȌȚ.
ǰǧǫǡǭǪ
ǰȇȂȌǿȊ ȍȎǿȐȌȍȐȑȇ
V ǡȍȊțȑ
-1
min
ǭȀȍȏȍȑȍȁ ȇȊȇ ȁȍȆȁȏǿȑȌȍ-
ȎȍȐȑȒȎǿȑȄȊțȌȚȔ ȃȁȇȅȄȌȇȈ ȁ ȋȇȌȒȑȒ
ǮȍȐȑȍȞȌȌȚȈ ȑȍȉ
ǯȄȅȇȋ ȐȁȄȏȊȄȌȇȞ
ǯȄȅȇȋ ȒȃǿȏȌȍȈ ȃȏȄȊȇ
ǰȍȍȑȁȄȑȐȑȁȇȄ ȑȏȄȀȍȁǿȌȇȞȋ ǰǤ
ǮȄȏȄȃ ȇȐȎȍȊțȆȍȁǿȌȇȄȋ ȎȏȇȀȍȏǿ
ȁȌȇȋǿȑȄȊțȌȍ ȍȆȌǿȉȍȋțȑȄȐț Ȑ ȃǿȌȌȍȈ
ȇȌȐȑȏȒȉȕȇȄȈ.
ǮȏȇȋȄȌȞȈȑȄ ȐȏȄȃȐȑȁǿ ȆǿȘȇȑȚ ȍȏȂǿȌȍȁ
ȐȊȒȔǿ
ǮȏȇȋȄȌȞȈȑȄ ȐȏȄȃȐȑȁǿ ȆǿȘȇȑȚ ȍȏȂǿȌȍȁ
ȆȏȄȌȇȞ
DzȑȇȊȇȆǿȕȇȞ ȌȄȅȄȊǿȑȄȊțȌǿ
ǭȑȏǿȀȍȑǿȌȌǿȞ ȜȊȄȉȑȏȍȑȄȔȌȇȖȄȐȉǿȞ
ȎȏȍȃȒȉȕȇȞ ȃȍȊȅȌǿ ȒȌȇȖȑȍȅǿȑțȐȞ ȁȋȄȐȑȄ
Ȑ ȀȚȑȍȁȚȋȇ ȍȑȔȍȃǿȋȇ. DzȑȇȊȇȆȇȏȒȈȑȄ,
ȄȐȊȇ ȇȋȄȄȑȐȞ ȐȎȄȕȇǿȊțȌȍȄ ȑȄȔȌȇȖȄȐȉȍȄ
ȍȀȍȏȒȃȍȁǿȌȇȄ. Ǯȍ ȁȍȎȏȍȐǿȋ ȒȑȇȊȇȆǿȕȇȇ
ȎȏȍȉȍȌȐȒȊțȑȇȏȒȈȑȄȐț Ȑ ȋȄȐȑȌȚȋ
ȍȏȂǿȌȍȋ ȁȊǿȐȑȇ ȇȊȇ ȎȏȄȃȎȏȇȞȑȇȄȋ
ȏȍȆȌȇȖȌȍȈ ȑȍȏȂȍȁȊȇ.
48
Page 52

GB CZ HU RO LV LT EE HR SI SK GR TRFR DE ES IT NL PT DK SE FI NO RU
Polski
PL
SPECYFICZNE ZASADY BEZPIECZEļSTWA
Q NaleŮy korzystaü z doáĉczonego do urzĉdzenia
uchwytu pomocniczego. Utrata kontroli nad
urzĉdzeniem moŮe skutkowaü obraŮeniami
ciaáa.
Q Z wiertarek udarowych naleŮy korzystaü bĘdĉc
wyposaŮonym w ochronĘ sáuchu. Kontakt z
haáasem moŮe prowadziü do utraty sáuchu.
Q Korzystaü z maski ochronnej lub maski
przeciwpyáowej, jeŮeli wiercenie powoduje
wydzielanie pyáu.
Q Urządzenie elektryczne należy trzymać za izolowany
uchwyt, gdy zachodzi ryzyko przewiercenia przewodu
pod napięciem. Kontakt z przewodem pod napięciem
może spowodować przepływ prądu przez metalowe
elementy urządzenia i porażenie operatora.
ZASADY BEZPIECZNEJ OBSàUGI
URZĈDZENIA
Q NaleŮy upewniü siĘ, Ůe wiertarka zasilana jest
napiĘciem podanym na tabliczce znamionowej.
Q Nie wolno uŮywaü tego urzĉdzenia ze zdjĘtĉ
obudowĉ lub w przypadku braku jakichkolwiek
Œrub mocujĉcych. W przypadku zdjĘcia obudowy
lub braku Œrub, naleŮy je umieŒciü na swoim
miejscu przed rozpoczĘciem uŮytkowania.
Wszystkie podzespoáy naleŮy utrzymywaü w
dobrym stanie technicznym.
Q Podczas prac na wysokoŒci naleŮy odpowiednio
zabezpieczaü narzĘdzia i urzĉdzenia.
Q Podczas pracy nie wolno dotykaü ostrza, wiertáa,
tarczy Œciernej ani Ůadnego innego ruchomego
elementu.
Q Nie wolno uruchamiaü urzĉdzenia, gdy jego
obrotowa koĽcówka robocza dotyka obrabianego
elementu.
Q Nie wolno odkáadaü urzĉdzenia, zanim nie
zatrzyma siĘ ono caákowicie.
Q AKCESORIA: Stosowanie jakichkolwiek
przystawek, akcesoriów lub innych elementów,
które nie zostaáy wymienione w tym podrĘczniku
jest niebezpieczne.
Q CZėőCI ZAMIENNE: Do napraw uŮywaü wyáĉcznie
identycznych zamienników.
OPIS
1. Osáona przeciwpyáowa
2. Uchwyt SDS
3. Koánierz zaciskowy
4. Przeáĉcznik trybu pracy
5. Wáĉcznik/wyáĉcznik
6. Przeáĉcznik kierunku obrotów
(W prawo/w lewo/blokada Œrodkowa)
7. Uchwyt pomocniczy
8. Ogranicznik gáĘbokoŒci wiercenia
9. Bateria (dostarczana osobno)
10. Zatrzaski
11. DokrĘcanie
12. OdkrĘcanie
13. GáĘbokoŒü wiercenia
14. Wiertáo (dostarczane osobno)
15. Obroty do tyáu (w lewo)
16. Obroty do przodu (w prawo)
17. PrzejŒciówka uchwytu 35 mm
(dostarczana osobno)
18. Bit wkrĘtaka (dostarczany osobno)
19. Wiertáo SDS (dostarczane osobno)
PARAMETRY TECHNICZNE
NapiĘcie: 18 V
PrĘdkoŒü bez obciĉŮenia 0-1000 min
Liczba udarów
(uderzenia na minutĘ) 0-4000 min
Energia pojedynczego udaru 1,5J
Maksymalna zdolnoΟ wiercenia:
Drewno 16 mm
Stal 13 mm
Beton (wiercenie z udarem) 12 mm
Zalecana Œrednica wiercenia
z udarem 4-12 mm
Rodzaj uchwytu na bity SDS-plus
Waga – bez baterii (kg) 2.2
MODEL AKUMULATOR
(nie objĘ ty
dostawĉ)
BPP-1815
BPP-1817
BPP-1815M
àADOWARKA
(nie objĘ ta
dostawĉ)
BCL-1800
BCS618
BCL1418
BPP-1817M
BPL-1820
CRH1801
BPL-1815
BPP-1815
BPP-1817
BPP-1815M
BC-1815S
BC-1800
BCA180
BPP-1817M
-1
-1
49
Page 53

GB CZ HU RO LV LT EE HR SI SK GR TRFR DE ES IT NL PT DK SE FI NO RU
Polski
PL
SPOSÓB UŭYCIA
OSTRZEŭENIE
Nie wolno dopuŒciü do tego, aby fakt zapo-
znania siĘ z tym urzĉdzeniem zmniejszyá
ostroŮnoŒü operatora. NaleŮy pamiĘtaü o tym,
Ůe nieostroŮnoŒü trwajĉca uáamek sekundy moŮe byü powodem bardzo powaŮnych
obraŮeĽ.
OSTRZEŭENIE
Podczas pracy z urzĉdzeniami elektrycznymi
naleŮy koniecznie zakáadaü gogle lub okulary
ochronne z osáonami bocznymi. W przeciwnym wypadku moŮe dojŒü do uszkodzenia
wzroku przez uderzenie obcym przedmiotem.
OSTRZEŭENIE
Nie wolno uŮywaü przystawek ani akceso-
riów nie zalecanych przez producenta tego
urzĉdzenia. Stosowanie jakichkolwiek przystawek lub akcesoriów niewymienionych w tej
instrukcji grozi wypadkiem!
ZASTOSOWANIE
Dopuszcza siĘ uŮytkowanie tego urzĉdzenia w
celach wymienionych poniŮej:
Q Wiercenie we wszelkiego typu materiaáach drew-
nianych (deski, sklejka, panele, páyta pilŒniowa,
páyta wiórowa)
Q Wiercenie w ceramice, tworzywach sztucznych,
páytach z wáókna szklanego i laminatu
Q Wiercenie w metalach
Q
Wiercenie z udarem w betonie
akumulatorem zachowywaü siĘ bĘdzie odmiennie
niŮ w przypadku zasilania akumulatorem Ni-Cd.
W przypadku niektórych zastosowaĽ, ukáad
elektroniczny akumulatora moŮe odáĉczyü
zasilanie, powodujĉc zatrzymanie pracy urzĉdzenia.
Aby zresetowaü bateriĘ
urzĉdzenie w normalnym trybie pracy, naleŮy
zwolniü przycisk uruchamiajĉcy.
UWAGA: Aby zapobiec kolejnemu wyáĉczeniu
akumulatora, naleŮy unikaü forsowania urzĉdzenia.
JeŒli zwolnienie przycisku uruchamiajĉcego nie
resetuje akumulatora i urzĉdzenia, oznacza to,
Ůe akumulator jest rozáadowany. Rozáadowany
akumulator rozpocznie áadowanie po umieszczeniu
go w áadowarce Li-Ion.
MONTAŭ AKUMULATORA
i ponownie uruchomi
ü
Patrz rysunek 2.
Wykonaü poniŮsze czynnoŒci, aby zamontowaü bateriĘ:
Q Ustawiü przeáĉcznik zmiany kierunku obrotów w
poáoŮeniu centralnym – zablokowanym.
Q ZaáoŮyü akumulator do wiertarki, zgodnie z rysu-
nkiem.
Q Przed rozpoczĘciem pracy upewniü siĘ, Ůe za-
trzaski po obu stronach akumulatora traáy na
swoje miejsce we wiertarce i akumulator jest dobrze zamocowany.
ODàĈCZANIE AKUMULATORA
Wykonaü poniŮsze czynnoŒci, aby wymontowaü bateriĘ:
Q Nacisnĉü zatrzaski po obydwu stronach akumula-
tora.
Q Odáĉczyü akumulator od wiertarki.
Wiertarka jest przystosowana do wspóápracy
wyáĉcznie z akumulatorami Ryobi One+ 18 V Li-Ion
i akumulatorami Ryobi One+ 18 V Ni-Cd.
OSTRZEŭENIE
NaleŮy zawsze odáĉczaü akumulator od
wiertarki przed przystĉpieniem do montaŮu
podzespoáów, regulacji, montaŮu lub
demontaŮu koĽcówek roboczych, czyszczenia lub w przypadku przerwy w uŮytkowaniu
wiertarki. Odáĉczenie akumulatora zapobiegnie przypadkowemu uruchomieniu wiertarki,
co groziáoby powaŮnym zranieniem.
FUNKCJE ZABEZPIECZENIA AKUMULATORA
Akumulatory Ryobi 18 V Li-Ion wyposaŮone sĉ
w funkcje zabezpieczajĉce ogniwa Li-Ion i
pozwalajĉce wydáuŮyü ich ŮywotnoŒü. W okreŒlonych
warunkach roboczych, te wbudowane funkcje
mogĉ powodowaü, Ůe urzĉdzenie zasilane takim
OSTRZEŭENIE
Akumulatory sĉ zawsze w stanie gotowym do
pracy. Dlatego przeáĉcznik powinien zawsze
znajdowaü siĘ w poáoŮeniu centralnym – za-
blokowanym, gdy wiertarka nie jest uŮywana
lub jest transportowana.
REGULACJA UCHWYTU POMOCNICZEGO
Zobacz: rysunek 3
Wykonaü poniŮsze czynnoŒci, aby dopasowaü
poáoŮenie uchwytu pomocniczego:
Q RozluŬniü mocowanie uchwytu pomocniczego
obracajĉc rĘkojeŒciĉ w kierunku przeciwnym do
ruchu wskazówek zegara (12).
Q Obróciü uchwyt pomocniczy tak, aby zajĉá Ůĉdanĉ
pozycjĘ.
Q SkrĘciü mocowanie uchwytu pomocniczego
obracajĉc rĘkojeŒciĉ w kierunku zgodnym z ruchem wskazówek zegara (11).
50
Page 54

GB CZ HU RO LV LT EE HR SI SK GR TRFR DE ES IT NL PT DK SE FI NO RU
Polski
SPOSÓB UŭYCIA
REGULACJA OGRANICZNIKA GàėBOKOőCI
WIERCENIA
Zobacz: rysunek 4
Wykonaü poniŮsze czynnoŒci, aby dopasowaü
poáoŮenie ogranicznika gáĘbokoŒci wiercenia:
Q Zablokowaü wáĉcznik spustowy ustawiajĉc
przeáĉcznik kierunku obrotów w pozycji
Œrodkowej.
Q RozluŬniü mocowanie uchwytu pomocniczego
obracajĉc rĘkojeŒciĉ w kierunku przeciwnym do
ruchu wskazówek zegara (12).
Q Dopasowaü poáoŮenie ogranicznika gáĘbokoŒci
wiercenia w taki sposób, Ůe koĽcówka wiertáa
znajduje siĘ w pozycji oddalonej od koĽcówki
ogranicznika na odlegáoŒü gáĘbokoŒci wiercenia.
Q SkrĘciü mocowanie uchwytu pomocniczego
obracajĉc rĘkojeŒciĉ w kierunku zgodnym z ruchem wskazówek zegara (11).
PL
zycji
Zmiany ustawienia przeáĉcznika najlepiej dokonywaü,
gdy urzĉdzenie nie pracuje.
Przekáadnia zmienia tryb pracy urzĉdzenia, gdy
zmienione zostanie ustawienie przeáĉcznika i
urzĉdzenie zostanie ponownie uruchomione.
Uwaga: Wiercenie lub przykrĘcanie z udarem
spowoduje uszkodzenie mechanizmu narzĘdzia,
jeŮeli bĘdzie wykonywane przy pomocy koĽcówek,
które nie sĉ typu SDS plus. Do takich zastosowaĽ
naleŮy wybraü tryb wiercenia.
Do wiercenia z udarem uŮywaü jedynie wierteá z
twardego metalu i typu SDS plus. Nie jest moŮliwe
zastosowanie szeroko dostĘpnych cylindrycznych
wierteá do betonu przy uŮyciu przejŒciówki uchwytu.
WIERCENIE Z UDAREM
.
WàĈCZNIK
Zobacz: rysunek 5
Aby wáĉczyü wiertarkĘ, naleŮy nacisnĉü przycisk
uruchamiajĉcy. Aby wyáĉczyü wiertarkĘ, naleŮy
zwolniü przycisk uruchamiajĉcy.
FUNKCJA BLOKADY
Zobacz: rysunek 5
Spust- wáĉcznik moŮe byü zablokowany w
pozycji "wyáĉczony" Funkcja ta pozwala uniknĉü
przypadkowego wáĉczenia wiertarko-wkrĘtarki,
której nie uŮywacie. Aby zablokowaü spustwáĉcznik naleŮy ustawiü wybierak kierunku obrotów
(kierunek przykrĘcania/odkrĘcania) w pozycji
centralnej.
ObjaŒnienie: Kiedy wybierak znajduje siĘ w pozycji
centralnej, spust-wáĉcznik jest zablokowany.
ROTACJA WSTECZNA
Zobacz: rysunek 5
W urzĉdzeniu tym istnieje moŮliwoŒü ustawienia
obrotów w obu kierunkach. Kierunek obrotów
wybierany jest za pomocĉ przeáĉcznika
umieszczonego nad wáĉcznikiem spustowym.
Q Rotacja zgodna z ruchem wskazówek zegara:
ustawiü przeáĉcznik w pozycji lewej (16).
Q Rotacja przeciwna do ruchu wskazówek zegara:
ustawiü przeáĉcznik w pozycji prawej (15).
WYBÓR TRYBU PRACY (4)
Q Aby wierciü, ustawiü przeáĉcznik trybu pracy w
pozycji
Q Aby wierciü z udarem, ustawiü przeáĉcznik w po-
.
Nie istnieje potrzeba stosowania zbyt duŮego
nacisku podczas wiercenia z udarem. Rezultaty pracy nie sĉ dziĘki temu lepsze. Zbyt duŮy
nacisk powoduje niepotrzebne obciĉŮenie sil-
nika urzĉdzenia.
Regularnie sprawdzaü wiertáa. Ostrzyü lub
wymieniaü wiertáa stĘpione.
Przy wierceniu z udarem pracowaü zawsze w
okularach ochronnych, stosowaü ochronĘ sáuchu
oraz uchwyt pomocniczy. Przed rozpoczĘciem
pracy sprawdziü czy przeáĉcznik przekáadni jest na
wáaŒciwej pozycji.
MOCOWANIE I ZMIANA WIERTEà SDS
Zobacz: rysunek 6
NarzĘdzie to wyposaŮone jest w system mocowania
SDS-plus.
Q OczyŒciü wiertáo i nasmarowaü smarem maszy-
nowym przed umieszczeniem go w uchwycie (2).
Q Pociĉgnĉü do tyáu koánierz zaciskowy (3) i
przytrzymaü.
Q WáoŮyü do uchwytu i obróciü do oporu oczyszc-
zone z pyáu wiertáo.
Q PuŒciü koánierz zaciskowy, aby zablokowaü wiertáo
w uchwycie.
Q Pociĉgnĉü za wiertáo, aby sprawdziü, czy
zablokowaáo siĘ w uchwycie.
WYCIĈGANIE WIERTàA Z UCHWYTU SDS-PLUS
Pociĉgnĉü do tyáu koánierz zaciskowy i wyciĉgnĉü
wiertáo.
51
Page 55

GB CZ HU RO LV LT EE HR SI SK GR TRFR DE ES IT NL PT DK SE FI NO RU
Polski
PL
SPOSÓB UŭYCIA
PRZEJőCIÓWKA UCHWYTU 35 mm
(NIEDOàĈCZONA DO ZESTAWU) (17)
Zobacz: rysunek 6
Do wiercenia w metalu, drewnie i plastiku przy
zastosowaniu wierteá, które nie majĉ moŮliwoŒci
mocowania w systemie SDS Plus, dostĘpna jest
przejŒciówka uchwytu.
PRAKTYCZNE RADY
Zachowaü ostroŮnoŒü, aby nie traü wiertáem w
ukryte przewody elektryczne, rury gazowe lub z
wodĉ. Przed rozpoczĘciem prac naleŮy sprawdziü
obszar roboczy np. wykrywaczem metalu.
SPRZėGàO őLIZGOWE
JeŮeli urzĉdzenie utknie lub zablokuje siĘ w otworze,
uruchamia siĘ sprzĘgáo Œlizgowe.
Natychmiast naleŮy zdjĉü obciĉŮenie robocze z
urzĉdzenia wyciĉgajĉc je z otworu.
Zawsze trzymaü urzĉdzenie pewnie obiema
rĘkami i zajmowaü stabilnĉ pozycjĘ roboczĉ.
KONSERWACJA
OSTRZEŭENIE
Nie próbujcie modyfikowaü tego narzĘdzia
czy teŮ tworzyü akcesorii, których
zastosowanie z tym narzĘdziem nie jest
zalecane. Tego typu przeksztaácenia czy
modyfikacje kwalifikuje siĘ do báĘdnego
uŮycia i mogĉ one pociĉgaü za sobĉ
niebezpieczne sytuacje groŮĉce powaŮnymi
obraŮeniami ciaáa.
OCHRONA őRODOWISKA
Surowce naleŮy oddawaü do recyklingu
zamiast wyrzucaü je na Œmieci. Maszyna,
akcesoria i opakowania powinny byü
sortowane.
SYMBOL
Alarm bezpieczeństwa
V Napięcie
-1
min
Ilość cykli lub obiegów na minutę
OSTRZEŭENIE
Do wymiany naleŮy uŮ ywaü tylko
oryginalnych czĘŒci zamiennych Ryobi.
UŮycie jakiejkolwiek innej czĘŒci moŮe
spowodowaü zagroŮenie lub teŮ uszkodziü
wasze narzĘdzie.
Nie uŮywajcie rozpuszczalników do mycia czĘŒci
plastikowych. WiĘkszoŒü tworzyw sztucznych,
mogáyby zostaü uszkodzone przez uŮycie niektórych
rozpuszczalników dostĘpnych w sprzedaŮy.
UŮywajcie czystej szmatki do usuniĘcia zabrudzeĽ,
pyáu, oleju, smaru, itd.
OSTRZEŭENIE
Elementy plastikowe nigdy nie powinny
byü w kontakcie z páynem hamulcowym,
benzynĉ, czy produktami na bazie ropy
naftowej, przenikliwymi olejami itd. Te
produkty chemiczne zawierajĉ substancje,
które mogáyby uszkodziü, osáabiü lub
zniszczyü plastik, co mogáoby spowodowaü
powaŮne zranienie.
OSTRZEŭENIE
Nie wymagajcie zbyt wiele od waszych
narzĘdzi. BáĘdne uŮycie moŮe uszkodziü
wasze narzĘdzie oraz obrabiany przedmiot.
Prąd stały
Tryb wiercenia
Tryb wiercenia z udarem
Zgodność CE
Przed uruchomieniem urządzenia prosimy
uważnie przeczytać instrukcję
Stosować środki ochrony słuchu
Stosować środki ochrony wzroku
Po wykorzystaniu poddawać recyklingowi
Zużyte produkty elektryczne nie powinny być
utylizowane z odpadami domowymi. Prosimy
poddawać recyklingowi w odpowiednich
miejscach. Informacje o właściwych metodach
recyklingu można uzyskać u władz lokalnych
lub sprzedawcy.
52
Page 56

GB HU RO LV LT EE HR SI SK GR TRFR DE ES IT NL PT DK SE FI NO RU PL
ýeština
CZ
ZVLÁŠTNÍ BEZPEýNOSTNÍ PŏEDPISY
Q Používejte pŐídavnou rukojeŘ dodávanou
k náŐadí. Ztráta kontroly nad pŐístrojem mŢže
vést ke zranĚní.
Q PŐi používání pŐíklepové vrtaþky používejte
chrániþe sluchu. Vystavení hluku mŢže poškodit
sluch.
Q Pokud se bĚhem vrtání tvoŐí prach, používejte
protiprachovou masku.
Q Držte elektricky poháněný nástroj za izolované
úchopové plochy, když nástroj používáte s vrtacím
příslušenstvím, které může přijít do styku se skrytými
vodiči. Kontakt s „živým“ vodiþem zpŢsobí, že
kovové þásti elektricky pohánĚného nástroje se
stanou také „živými“ a zpŢsobí elektrický úraz
obsluze.
POKYNY PRO BEZPEýNOU OBSLUHU
Q Zkontrolujte, zda hodnoty napĚtí v elektrické síti
odpovídají provozním hodnotám napĚtí, které je
uvedeno na štítku náŐadí.
Q NáŐadí nikdy nepoužívejte, pokud chybí
ochranný kryt nebo upevŁovací šrouby. Pokud
jste demontovali ochranný kryt nebo vyjmuli
šrouby, pŐed uvedením do provozu je nutné
náŐadí zcela zkompletovat. Veškeré díly udržujte
v dobrém provozním stavu.
Q Pokud pracujete ve výškách, dávejte pozor, aby
bylo náŐadí ŐádnĚ upevnĚno.
Q Nikdy se bĚhem používání nedotýkejte nože,
vrtáku, brusného kotouþe nebo jiných rotujících
þástí.
Q Nikdy nástroj nespouštĚjte, když je rotaþní díl
v kontaktu s obrobkem.
Q Nikdy nástroj neodkládejte, dokud se pohyblivé
souþásti zcela nezastaví.
Q Pŏ ÍSLUŠENSTVÍ: Používání jiného než
doporuþeného pŐíslušenství nebo doplŁkŢ
než doporuþených v této pŐíruþce mŢže být
nebezpeþné.
Q NÁHRADNÍ DÍLY: Pokud opravujete, používejte
pouze stejné náhradní díly.
9. Bateriový modul (není pŐiložen)
10. Západky
11. Dotažení
12. UvolnĚní
13. Hloubka vrtání
14. Vrtací bit (není pŐiložen)
15. Otáþení vzad
16. Otáþení vpŐed
17. Adaptér sklíþidla 35 mm (není pŐiložen)
18. Šroubovací bit (není pŐiložen)
19. Bit SDS (není pŐiložen)
PARAMETRY
NapĚtí 18 V
Otáþky pŐi chodu naprázdno 0-1 000 min
Poþet úderŢ (údery/min) 0-4 000 min
Síla úderu 1,5 J
Max. prŢmĚr vrtáku:
DŐevo 16 mm
Ocel 13 mm
Beton (vrtání s pŐíklepem) 12 mm
Doporuþený rozsah vrtání s pŐíklepem 4 - 12 mm
Typ pŐipojení bitu SDS-plus
Hmotnost – bez bateriového modulu (kg) 2,2
MODEL
CRH1801
BLOK BATERIÍ
(nepŐibalen)
BPP-1815
BPP-1817
BPP-1815M
BPP-1817M
BPL-1820
BPL-1815
BPP-1815
BPP-1817
BPP-1815M
BPP-1817M
NABÍJEýKA
(nepŐibalena)
BCL-1800
BCS618
BCL1418
BC-1815S
BC-1800
BCA180
-1
-1
POPIS
1. Ochranná prachovka
2. Sklíþidlo SDS
3. Upínací pouzdro
4. Voliþ režimu
5. SíŘový vypínaþ Zap./Vyp.
6. Voliþ smĚru otáþení
(VpŐed/Vzad/StŐední aretovaná poloha)
7. PŐídavná rukojeŘ
8. Tyþinka hloubkového dorazu
OBSLUHA
VÝSTRAHA
Neseznamujte se s tímto výrobkem tak,
abyste ztratili opatrnost. NezapomeŁte, že
nedbalost mŢže ve zlomku vteŐiny zpŢsobit
vážná poranĚní.
53
Page 57

GB HU RO LV LT EE HR SI SK GR TRFR DE ES IT NL PT DK SE FI NO RU PL
ýeština
CZ
OBSLUHA
VÝSTRAHA
Vždy noste bezpeþnostní brýle nebo
bezpeþnostní brýle s postranními štítky,
když obsluhujete výrobek. Pochybení tak
mŢže zpŢsobit vniknutí cizího tĚlesa do oþí
a zpŢsobit vážná osobní poranĚní.
VÝSTRAHA
Nepoužívejte s tímto zaŐízením pŐíslušenství
nebo doplŁky, jež nejsou doporuþeny
výrobcem. Používání doplŁkŢ a pŐíslušenství
nedoporuþených výrobcem mohou zpŢsobit
vážná osobní poranĚní.
APLIKACE
Výrobek lze používat dle urþení uvedených níže:
Q Vrtání do všech typŢ dŐevĚných výrobkŢ (dŐevo,
pŐekližka, obklady, dlážky a tvrdá prkna)
Q Vrtání do keramiky, plastŢ, sklolaminátŢ a
laminátŢ
Q Vrtání do kovŢ
Vrtání do betonu s pŐíklepem
Q
Tento výrobek spolupracuje s Ryobi One+ 18 V
lithium-iontovými bateriovými moduly a Ryobi
One+ 18 V nikl-kadmiovými bateriovými moduly.
VÝSTRAHA
Vždy vyndávejte baterii z vaší vrtaþky, když
se montují díly, provádí seŐizování, vkládají
nebo vyndávají nástroje (vrtáky, nástavce,…)
þistí, nebo když se nepoužívá. Vyndáním
bateriového modulu pŐedejdete náhodnému
spuštĚní a tím vážnému osobnímu poranĚní.
FUNKCE OCHRANY BATERIE
Ryobi 18 V lithium-iontové baterie jsou navrženy
s funkcí, která chrání lithium-iontové þlánky
a maximalizuje životnost baterie. Za nĚkterých
provozních podmínek tato vestavĚná funkce mŢže
pŢsobit na baterii a náŐadí pak lze provozovat na
rŢzných nikl-kadmiových bateriích.
BĚhem nĚkterých prací mŢže elektronika baterie
signalizovat vypínání a zpŢsobit tak vyŐazení
baterie. Pro vynulování baterie a náŐadí uvolnĚte
spoušŘ a obnovte normální funkci.
POZNÁMKA: Pro zabránĚní dalšího vyŐazení baterie
se vyhnĚte pŐetĚžování náŐadí.
Pokud uvolnĚní spouštĚ nevynuluje baterii a náŐadí,
je bateriový modul vybit. Je-li vybit, zaþne bateriový
modul nabíjet, když se vloží na lithium-iontovou
nabíjeþku.
INSTALACE BATERIOVÉHO MODULU
Viz obrázek 2.
PŐi instalaci bateriového modulu se Őiďte následujícími
pokyny:
Q UmístĚte pŐepínaþ levého/pravého chodu do
stŐedové polohy.
Q NasuŁte bateriový modul do výrobku dle
obrázku.
Q ZajistĚte baterii zasunutím blokovací pojistky na
každé stranĚ bateriového modulu do své polohy
a ujistĚte se, že je bateriový modul zajištĚn pŐed
zapoþetím práce.
SUNDÁNÍ BATERIOVÉHO MODULU
PŐi vyjmutí bateriového modulu se Őiďte následujícími
pokyny:
Q Stlaþte blokovací pojistky po stranách
bateriového modulu.
Q VyjmĚte z vrtaþky bateriový modul.
VÝSTRAHA
Bateriové výrobky jsou vždy v provozním
stavu. Proto musí být spínaþ vždy uzamþen,
když se náŐadí nepoužívá nebo se pŐenáší.
NASTAVENÍ PŏÍDAVNÉ RUKOJETI
Viz obrázek 3.
PŐi nasazování pŐídavné rukojeti se Őiďte
následujícími pokyny:
Q Otoþením knoflíku doleva (12) uvolnĚte
pŐídavnou rukojeŘ.
Q PŐídavnou rukojeŘ otoþte do požadované pozice.
Q Otoþením knoflíku doprava (11) pŐídavnou
rukojeŘ dotáhnĚte.
NASTAVENÍ TYýINKY HLOUBKOVÉHO DORAZU
Viz obrázek 4.
PŐi nastavení hloubkového dorazu postupujte podle
následujících krokŢ:
Q PŐepnutím voliþe smĚru otáþení do stŐední
polohy bude spínaþ aretován.
Q Otoþením knoflíku doleva uvolnĚte pŐídavnou
rukojeŘ (12).
Q Tyþinku hloubkového dorazu nastavte tak,
aby vrtací bit pŐesahoval za konec tyþinky o
požadovanou hloubku vrtání.
Q Otoþením knoflíku doprava (11) pŐídavnou
rukojeŘ dotáhnĚte.
54
Page 58

GB HU RO LV LT EE HR SI SK GR TRFR DE ES IT NL PT DK SE FI NO RU PL
ýeština
CZ
OBSLUHA
VYPÍNAý
Viz obrázek 5.
Vrtaþka se ZAPÍNÁ (ON) stisknutím spínaþe spouštĚ.
Vrtaþka se VYPÍNÁ (OFF) uvolnĚním spínaþe
spouštĚ.
FUNKCE BLOKAýNÍ POJISTKY
Viz obrázek 5.
SpouštĚþ lze zablokovat v poloze "vypnuto". Tato
funkce brání nechtĚnému rozbĚhu náŐadí, jakmile
vrtací šroubovák nepoužíváte. Pokud chcete
spouštĚþ náŐadí zablokovat, nastavte pŐepínaþ
pravého/levého chodu (utahování/uvolŁování vrutŢ)
do stŐední polohy.
Poznámka: Jakmile je pŐepínaþ pravého/levého
chodu ve stŐední poloze, spouštĚþ náŐadí nelze
použít.
PŏEPÍNATELNÝ POHYB OTÁýENÍ
Viz obrázek 5.
Toto náŐadí je vybaveno funkcí pŐepínání pohybu
otáþení, které lze ovládat pomocí voliþe umístĚného
nad spínaþem (6).
Q Otáþení doprava: Nastavte páþku voliþe doleva
(16).
Q Otáþení doleva: Nastavte páþku voliþe doprava
(15).
VOLIý REŽIMU (4)
VRTÁNÍ S PŏÍKLEPEM
PŐi vrtání s pŐíklepem není tŐeba vyvíjet pŐíliš
velký pŐítlak. Tímto zpŢsobem se nezvýší
výkon. PŐíliš velký pŐítlak nadmĚrnĚ zatĚžuje
motor.
PravidelnĚ kontrolujte vrtací bity. Tupé vrtací
bity naostŐete nebo vymĚŁte.
PŐi vrtání s pŐíklepem pracujte pouze v ochranných
brýlích, používejte ochranu sluchu a pŐídavnou
rukojeŘ. DŐíve než se pustíte do práce, zkontrolujte,
zda je kno ík posunu aretován na svém místĚ.
NASAZENÍ A VÝMęNA BITš SDS
Viz. obr. 6.
Toto náŐadí je vybaveno systémem pŐipojení SDS-
plus.
Q PŐed vsazením do sklíþidla (2) bit oþistĚte a
namažte mazivem na stroje.
Q ZatáhnĚte zpĚt upínací pouzdro (3) a podržte je.
Q Zatlaþte a otoþte nástroj zbavený prachu do
držáku bitu co možná nejdále.
Q UvolnĚním upínacího pouzdra zŢstane bit
aretován.
Q ZatáhnĚte za bit a zkontrolujte, zda je dobŐe
zajištĚn.
VYJMUTÍ BITU ZE SYSTÉMU SDS-PLUS
ZatáhnĚte dozadu upínací pouzdro a bit vyjmĚte.
Q Vrtání - voliþ nastavte do polohy .
Q Vrtání s pŐíklepem – nastavte do polohy
PŐepnutí je nejlepší provádĚt v klidovém stavu.
Pouze tehdy, je-li vypínaþ stisknutý a pŐístroj se
spustí, rychlostní skŐíŁ se posune do vybraného
režimu.
Poznámka: Režim vrtání s pŐíklepem poškodí
mechanismus pŐístroje tehdy, jestliže je pŐístroj
používán k utahování nebo vrtání bez bitu SDS-plus.
Jen v takovém pŐípadĚ vyberte režim vrtání.
Jestliže se rozhodnete pro vrtání s pŐíklepem,
používejte výhradnĚ bity se spékaným karbidem a
pouze s dŐíkem SDS-Plus. Nelze použít komerþnĚ
dostupné vrtáky do zdiva spolu s cylindrickými,
které by byly spojeny adaptérem.
.
ADAPTÉR SKLÍýIDLA 35 mm (NENÍ PŏILOŽEN)
(17)
Viz obrázek (6).
PŐi vrtání do kovu, dŐeva a plastŢ pomocí vrtacích
bitŢ, které nejsou opatŐeny dŐíkem SDS Plus, lze
použít adaptér.
PRAKTICKÉ TIPY
Nenavrtejte ukryté elektrické vedení nebo
vodovodní þi plynové trubky. DŐíve než zaþnete,
zkontrolujte místo, kde bude provádĚno vrtání,
pomocí detektoru kovŢ.
KLUZNÁ SPOJKA
Pokud se nástroj zasekne nebo zachytí, uvolní se
kluzná spojka.
NeprodlenĚ zatáhnĚte vrtaþku dozadu, a tím
eliminujte zátĚž.
Držte pŐístroj vždy pevnĚ obĚma rukama a
udržujte bezpeþný postoj.
55
Page 59

GB HU RO LV LT EE HR SI SK GR TRFR DE ES IT NL PT DK SE FI NO RU PL
ýeština
CZ
ÚDRŽBA
VAROVÁNÍ:
Pokud opravujete, používejte pouze náhradní
díly firmy Ryobi. Použití jakýchkoliv jiných
souþástí mŢže vytvoŐit nebezpeþí nebo
pŐíþinu poškození výrobku.
VyhnĚte se používání rozpouštĚdel, když þistíte
plastové souþásti. Mnoho plastŢ je citlivých na
poškození rŢznými typy komerþních rozpouštĚdel
a mohou být jimi poškozeny. Používejte þistou
utĚrkou pro odstranĚní neþistot, prachu, oleje,
mastnot, atd.
VÝSTRAHA
Nikdy nenechte pŐijít brzdové kapaliny,
petrolej, výrobky založené na petroleji,
pronikavé oleje, atd. do kontaktu
s plastovými souþástmi. Chemikálie mohou
poškodit, oslabit nebo zniþit plast, který
mŢže mít za následek vážná osobní
poranĚní.
VÝSTRAHA
ElektronáŐadí zásadnĚ nepŐetĚžujte.
PŐetĚžování vrtacího šroubováku mŢže
poškodit nejen materiál, ale také náŐadí.
VÝSTRAHA
Na vrtaþce neprovádĚjte žádné úpravy a
používejte pouze doporuþené pŐíslušenství.
Tyto nepovolené úpravy náŐadí þi zmĚny
v používání pŐíslušenství mohou vytvoŐit
nebezpeþné situace, které mohou vést
k velmi závažnému zranĚní.
V Volty
-1
min
Otáþky nebo výmĚny za minutu
StejnosmĚrný proud
Režim vrtání
Režim vrtání s pŐíklepem
Shoda CE
PŐed spuštĚním pŐístroje si ŐádnĚ pŐeþtĚte
pokyny.
Noste ochranu sluchu
Noste ochranu oþí
Recyklujte nepotŐebné
Odpad elektrických výrobkŢ se nesmí
likvidovat v domovním odpadu.
Recyklujte prosím na sbĚrných místech.
Ptejte se u místních úŐadŢ nebo prodejce
na postup pŐi
OCHRANA ŽIVOTNÍHO PROSTŏEDÍ
V rámci možností neodhazujte vysloužilé
náŐadí do domovního odpadu a
upŐednostnĚte jeho recyklaci. Respektujte
životní prostŐedí, tŐiďte odpad a odneste
vysloužilé náŐadí, pŐíslušenství a obalový
materiál do speciálních kontejnerŢ nebo do
speciální sbĚrny odpadu k recyklaci.
SYMBOL
Bezpeþnostní výstraha
56
Page 60

GB RO LV LT EE HR SI SK GR TRFR DE ES IT NL PT DK SE FI NO RU PL CZ
Magyar
HU
SPECIÁLIS BIZTONSÁGI ELʼnÍRÁSOK
Q
Használja a szerszámhoz mellékelt kisegítŊ
fogantyút. Az irányítás elvesztése személyi
sérülést okozhat.
Q
Ütvefúrók használatakor viseljen fülvédŊt. A
fúrógép zaja halláskárosodást okozhat.
Q
Viseljen arc- vagy pormaszkot, ha a fúrási
mŤvelet porral jár.
Q
A szerszámgépet a szigetelŊ fogófelületeinél
fogja, ha olyan mŤveletet végez, melynek
során a vágóeszköz rejtett vezetékhez érhet.
Az “élŊ” vezetékkel érintkezŊ vágóeszköz
következtében a szerszám fém alkatrészei áram
alá kerülhetnek, minek következtében a kezelŊt
áramütés érheti.
A BIZTONSÁGOS KEZELÉSRE VONATKOZÓ
ELʼnÍRÁSOK
Q Ügyeljen rá, hogy a szerszám csak az adattáblán
megjelölt feszültségŤ áramforráshoz csatlakozzon.
Q Ne használja a szerszámot, ha a burkolata vagy
bármelyik csavarja hiányzik. Ha a burkolat vagy a
csavarok el lettek távolítva, használat elŊtt helyezze
vissza azokat. Minden alkatrészt jól tartson karban.
Q Magas helyszínen való munkavégzéskor mindig
rögzítse a szerszámokat.
Q Ne érintse meg a kést, a fúróbitet, a
csiszolókorongot vagy más forgó alkatrészt
használat közben.
Q Ne indítsa be a szerszámot, ha a forgórésze
érintkezik a munkadarabbal.
Q Ne tegye le a szerszámot addig, amíg a forgórészek
teljesen meg nem álltak.
Q TARTOZÉKOK: A kézikönyvben megadottaktól
eltérŊ tartozékok vagy kiegészítŊk használata
veszélyt okozhat.
Q CSEREALKATRÉSZEK: Szervizeléskor csak azonos
cserealkatrészeket használjon.
13. Fúrási mélység
14. Fúróbetét (nem tartozék)
15. Forgás hátrafelé
16. Forgás elŊrefelé
17. 35 mm-es tokmányadapter (nem tartozék)
18. Csavarbehajtó bit (nem tartozék)
19. SDS fúróbetét (nem tartozék)
MţSZAKI ADATOK
Feszültség 18 V
Üresjárati fordulatszám 0-1000 min
Kalapácsütések (ütés percenként) 0-4000 min
Ütési energia 1,5 J
Maximális fúrási átmérŊ:
Fa 16 mm
Acél 13 mm
Beton (ütvefúrás) 12 mm
Javasolt átmérŊ ütvefúráshoz 4-12 mm
Betét rögzítésének típusa SDS-plus
Tömeg – akkumulátor nélkül (kg) 2,2
MODEL AKKUMULÁTOR
CRH1801
(nem tartozék)
BPP-1815
BPP-1817
BPP-1815M
BPP-1817M
BPL-1820
BPL-1815
BPP-1815
BPP-1817
BPP-1815M
BPP-1817M
(nem tartozék)
BCL-1800
BCS618
BCL1418
BC-1815S
BC-1800
BCA180
-1
-1
TÖLTʼn
HASZNÁLAT
LEÍRÁS
1. PorvédŊ sapka
2. SDS tokmány
3. RögzítŊgyŤrŤ
4. Üzemmódválasztó
5. BE/KI kapcsoló
6. Forgásirány-választó
(ElŊre/Hátra/KözépsŊ rögzítés)
7. KisegítŊ fogantyú
8. MélységmérŊ rúd
9. Akkumulátor (nem tartozék)
10. RögzítŊfülek
11. Meghúzás
12. Kiengedés
FIGYELEM!
Ne engedje, hogy a termékek mind alaposabb
ismerete figyelmetlenné tegye. Ne feledje,
hogy elég egy figyelmetlen másodperctöredék
ahhoz, hogy komoly sérülés következzen be.
FIGYELEM!
A termék használatakor mindig viseljen
védŊszemüveget vagy oldalellenzŊvel
rendelkezŊ védŊsisakot. Ennek elmulasztása
ahhoz vezethet, hogy valamilyen tárgy
kerülhet a szemébe, ami komoly sérülést
eredményezhet.
57
Page 61

GB RO LV LT EE HR SI SK GR TRFR DE ES IT NL PT DK SE FI NO RU PL CZ
Magyar
HU
HASZNÁLAT
FIGYELEM!
Ne használjon semmilyen a gyártó által
a termékhez nem ajánlott kiegészítŊt vagy
tartozékot. A nem ajánlott tartozékok vagy
kiegészítŊk használata komoly személyi
sérülést eredményezhet.
MţVELETEK
A terméket az alábbi listában felsorolt mŤveletek
végzésére használhatja:
Q Minden típusú fából készült termékek (rönkfa,
furnér, lambéria, építŊlap és kemény farostlemez)
fúrása
Q Kerámia, mŤanyag, üvegszál és laminált lemez
fúrása
Q Fémek furása
Ütvefúrás betonba
Q
A termék Ryobi One+ 18 V-os lítium-ion
akkumulátorokkal és Ryobi One+ 18 V-os nikkelkadmium akkumulátorokkal használható.
FIGYELEM!
Alkatrészek szerelésekor, beállítás végzésekor,
bitek felszereléskor vagy cseréjekor,
tisztításkor vagy használaton kívül mindig
vegye ki az akkumulátort a fúróból. Az
akkumulátor kivétele megakadályozza a
véletlen bekapcsolódást, ami komoly személyi
sérülést okozhat.
AKKUMULÁTOR VÉDELMI FUNKCIÓK
A Ryobi 18 V-os lítium-ion akkumulátorok olyan
funkciókkal vannak ellátva, amik megóvják a lítiumion cellákat és maximalizálják az akkumulátor
élettartamát. Bizonyos használati körülmények
fellépése esetén ezek a beépített funkciók az
akkumulátor és az általa mŤködtetett szerszám a
nikkel-kadmium akkumulátoroktól elvárttól különbözŊ
viselkedését okozhatják.
Bizonyos alkalmazások során az akkumulátor
elektronikája az akkumulátor kikapcsolását
kezdeményezheti, ami a szerszám megállását okozza.
Az akkumulátor és a szerszám visszaállításához
engedje fel a kioldókapcsolót és folytassa a normál
használatot.
MEGJEGYZÉS: Az akkumulátor késŊbbi leállását
megelŊzendŊ kerülje a szerszám erŊltetését.
Ha a kioldókapcsoló felengedése nem állítja vissza az
akkumulátort és a szerszámot, akkor az akkumulátor
lemerült. Ha lemerült, az akkumulátor elkezd
feltöltŊdni, ha a lítium-ion töltŊre helyezi.
AZ AKKUMULÁTOR FELHELYEZÉSE
Lásd 2. ábra.
Az akkumulátor behelyezéséhez kövesse az alábbi
lépéseket:
Q A forgásirány választót állítsa középre, reteszelt
pozícióba.
Q A bemutatott módon helyezze be az akkumulátort
a termékbe.
Q Ügyeljen rá, hogy az akkumulátor két oldalán
található reteszek bepattantak a helyükre és
az akkumulátor rögzítve legyen a termékben a
használat megkezdése elŊtt.
AZ AKKUMULÁTOR ELTÁVOLÍTÁSA
Az akkumulátor eltávolításához kövesse az alábbi
lépéseket:
Q Nyomja be az akkumulátor két oldalán található
reteszeket.
Q Vegye ki az akkumulátort a fúróból.
FIGYELEM!
Az akkumulátoros termékek mindig készek
állnak a használatra. Ezért a kapcsolót
használaton kívül vagy az oldalánál való
szállításkor mindig rögzíteni kell.
A KISEGÍTʼn FOGANTYÚ BEÁLLÍTÁSA
Lásd 3. ábra.
A kisegítŊ fogantyú beállításához járjon el a
következŊ módon:
Q Lazítsa meg a kisegítŊ fogantyút úgy, hogy
elforgatja a gombot az óramutató járásával
ellentétes irányba (12).
Q Forgassa a kisegítŊ fogantyút a kívánt pozícióba.
Q Húzza meg erŊsen a kisegítŊ fogantyút úgy,
a gombot elforgatja az óramutató járásának irányába
(11).
A MÉLYSÉGMÉRʼn RÚD BEÁLLÍTÁSA
Lásd 4. ábra.
A mélységmérŊ rúd beállításához kövesse az alábbi
lépéseket:
Q A forgásirány-választó középsŊ pozícióba
állításával rögzítse a kioldókapcsolót.
Q Lazítsa meg a kisegítŊ fogantyút úgy, hogy
elforgatja a gombot az óramutató járásával
ellentétes irányba (12).
Q Állítsa be a mélységmérŊ rudat úgy, hogy a
fúróbetét a kívánt furatmélységgel megegyezŊ
hosszúsággal nyúljon túl a mélységmérŊ rúd
végén.
Q Húzza meg erŊsen a kisegítŊ fogantyút úgy, hogy a
gombot elforgatja az óramutató járásának irányába
(11).
hogy
58
Page 62

GB RO LV LT EE HR SI SK GR TRFR DE ES IT NL PT DK SE FI NO RU PL CZ
Magyar
HU
HASZNÁLAT
KAPCSOLÓ
Lásd 5. ábra.
A fúró BEKAPCSOLÁSÁHOZ nyomja be a
kioldókapcsolót. A KIKAPCSOLÁSHOZ engedje fel a
kioldókapcsolót.
RETESZELʼn FUNKCIÓ
Lásd 5. ábra.
A ravasz "ki" állásban reteszelhetŊ. Ez a funkció
megakadályozza, hogy a fúrógép véletlenül
bekapcsoljon, ha nem akarja használni. Ha a ravaszt
reteszelni szeretné, kapcsolja a forgásirány váltót (be /
ki csavarozás iránya) központi állásba.
Megjegyzés: Ha a forgásirány váltó központi állásban
van, a ravaszt nem lehet meghúzni.
FORGÁSIRÁNY
Lásd 5. ábra.
A szerszám megfordítható forgásirány funkcióval
van felszerelve, amelyet a kioldókapcsoló (6) felett
található forgásirány-választóval lehet szabályozni.
Q Forgás az óramutató járásának irányába: a
választókart állítsa bal oldali pozícióba (16).
Q Forgás az óramutató járásával ellentétes irányban:
a választókart állítsa jobb oldali pozícióba (15).
ÜZEMMÓDVÁLASZTÓ (4)
Q Fúráshoz állítsa a választót a állásba.
Rendszeresen ellenŊrizze a fúróbetéteket.
Élezze meg vagy cserél
Ütvefúráskor viseljen védŊszemüveget, fülvédŊt
és használja a kisegítŊ fogantyút. Használat elŊtt
ellenŊrizze, hogy a választógomb rögzített állásban
van.
SDS BETÉTEK BEHELYEZÉSE ÉS CSERÉJE
Lásd 6. ábra.
A szerszám SDS-plus csatlakozórendszerrel van
ellátva.
Q Tisztítsa meg és kenje be kenŊzsírral a betétet a
tokmányba (2) való behelyezés elŊtt.
Q Húzza hátra a rögzítŊgyŤrŤt (3) és tartsa úgy.
Q Nyomja be és forgassa meg a portalanított betétet
a betéttartóba amennyire csak lehet.
Q Engedje fel a rögzítŊgyŤrŤt a betét rögzítéséhez.
Q Kihúzással ellenŊrizze, hogy a betét rögzítve van.
A BETÉT ELTÁVOLÍTÁSA AZ SDS-PLUS
RENDSZERBʼnL
Húzza hátra a rögzítŊgyŤrŤt és vegye ki a betétet.
35 mm-es TOKMÁNYADAPTER (NEM TARTOZÉK) (17)
Lásd 6. ábra.
Fém, fa és mŤanyagok nem SDS PLUS típusú
betétekkel való fúrásához tokmányadapter
használható.
je ki a tompa betéteket.
Q Ütvefúráskor állítsa a
Az átkapcsolást legjobb álló tengelynél végrehajtani.
A fogaskerékház csak a kapcsoló aktiválása és
a motor elindulása után váltja át a szerszámot a
kiválasztott üzemmódba.
Megjegyzés: Az ütvefúrás üzemmód károsítja a
szerszám alkatrészeit, ha nem SDS plus betéttel
végzett csavarbehajtáshoz vagy fúráshoz használja.
Csak a megfelelŊ feladathoz válassza a fúrás
módot.
Ütvefúráskor kizárólag keményfém és SDS-Plus
tengelyŤ betéteket használjon. Kereskedelmi
forgalomba kapható hengeres kŊmŤves betétek
használata ezzel a szerszámmal még fúróadapterrel
sem lehetséges.
ÜTVEFÚRÁS
Ütvefúráskor nem kell túl nagy nyomást
kifejtenie. Nyomás hatására a teljesítmény nem
növekszik. A túl nagy nyomás felesleges terheli
le a motort.
állásba.
59
HASZNOS TIPPEK
Ne fúrjon rejtett elektromos vezetékekbe, gázilletve vízcsövekbe. A munkaterületet a munka
megkezdése elŊtt vizsgálja át például egy
fémdetektorral.
CSÚSZÓ TENGELYKAPCSOLÓ
Ha a szerszám elakad vagy beakad, aktiválódik a
csúszó tengelykapcsoló.
A fúrószerszámot hátrahúzva azonnal vegye le a
terhelést a géprŊl.
Mindig mindkét kezével tartsa erŊsen a
szerszámot, és vegyen fel stabil testtartást.
KARBANTARTÁS
FIGYELEM!
Szervizeléskor csak azonos Ryobi
cserealkatrészeket használjon. Bármilyen más
alkatrész használata veszélyt vagy a termék
károsodását okozhatja.
Page 63

GB RO LV LT EE HR SI SK GR TRFR DE ES IT NL PT DK SE FI NO RU PL CZ
Magyar
HU
KARBANTARTÁS
A mŤanyag részek tisztításakor tartózkodjon
a tisztítószerek használatától. A legtöbb mŤanyag
érzékeny a különbözŊ típusú kereskedelmi
oldószerekre és azok használata esetén károsodhat.
Egy tiszta ruhát használjon a kosz, por, olaj, kenŊzsír,
stb. eltávolítására.
FIGYELEM!
A mŤanyag részek semmilyen körülmények
között nem érintkezhetnek fékolajjal,
benzinnel, petróleum alapú termékekkel,
beszívódó olajokkal, stb. A vegyszerek
károsíthatják, gyengíthetik vagy tönkretehetik
a mŤanyagot, ami súlyos személyi sérülést
eredményezhet.
FIGYELEM!
Ne rongálja a szerszámgépet. A helytelen
használat károsíthatja a szerszámot és a
munkadarabot.
FIGYELEM!
Ne próbálja módosítani a szerszámot,
sem pedig olyan kiegészítŊket készíteni,
amelyeknek szerszámmal való használata
nem javasolt. Az ilyen módosítás vagy
megváltoztatás helytelen használatnak minŊsül
és veszélyes körülményeket eredményezhet,
amelyek komoly személyi sérüléshez
vezethetnek.
Fúrás üzemmód
Ütvefúrás üzemmód
CE megfelelŊség
A gép bekapcsolása elŊtt figyelmesen
olvassa el az útmutatót.
Viseljen fülvédőt
Viseljen szemvédőt
Feleslegessé vált termékek újrahasznosítása
A kiselejtezett elektromos termékeket nem
szabad a háztartási hulladékkal együtt
kidobni. Ezeket újra kell hasznosítani, ha
van rá lehetŊség. Az újrahasznosítással
kapcsolatban érdeklŊdjön a helyi
önkormányzatnál vagy a termék
forgalmazójánál.
KÖRNYEZETVÉDELEM
A szemétbe való kidobás helyett hasznosítsa
újra a nyersanyagokat. A gép, a tartozékok
és a csomagolás környezetkímélŊ
újrahasznosításra szétválogatható.
SZIMBÓLUM
Biztonsági figyelmeztetés
V Voltok
-1
min
Fordulat vagy ciklus percenként
Egyenáram
60
Page 64

GB LV LT EE HR SI SK GR TRFR DE ES IT NL PT DK SE FI NO RU PL CZ HU
Românć
RO
REGULI SPECIFICE DE SIGURANŕĆ
Q UtilizaŖi mânerul lateral furnizat împreunć cu
scula. Pierderea controlului poate conduce la
rćnirea operatorului.
Q PurtaŖi antifoane la gćurirea de impact.
Expunerea la zgomot poate conduce la pierderea
auzului.
Q PurtaŖi o mascć de faŖć sau o mascć împotriva
prafului în cazul în care procedura de gćurire
genereazć praf.
Q În cazul în care efectuaŖi operaŖii în locuri în
care accesoriul de tćiere poate intra în contact
cu cabluri ascunse, ŖineŖi unealta electricć de
suprafeŖele de prindere izolate. Accesoriul de
tćiere ce intrć în contact cu un cablu sub curent
ar putea alimenta electric pćrŖile metalice expuse
ale uneltei electrice úi ar putea expune operatorul
la un úoc electric.
INSTRUCŕIUNI PENTRU O MANIPULARE ÎN
SIGURANŕĆ
Q AsiguraŖi-vć cć scula este conectatć doar la
voltajul marcat pe plćcuŖa de identificare.
Q Nu folosiŖi niciodatć scula dacć apćrćtoarea
sau úuruburile lipsesc. Dacć apćrćtoarea sau
úuruburile au fost îndepćrtate, repuneŖi-le la
loc înainte de folosire. MenŖineŖi toate piesele în
condiŖii bune de funcŖionare.
Q AsiguraŖi întotdeauna sculele când lucraŖi la
înćlŖime.
Q Nu atingeŖi niciodatć lama, burghiul de gćurit,
discul de úlefuire sau alte piese în miúcare în
timpul folosirii.
Q Nu porniŖi niciodatć scula când componenta sa
rotitoare este în contact cu piesa de lucrat.
Q Nu lćsaŖi niciodatć scula jos înainte ca piesele în
miúcare sć se opreascć complet.
Q ACCESORII:
ataúamente altele decât cele recomandate în
acest manual pot prezenta pericol.
Q PIESE DE SCHIMB: Atunci când se efectueazć
service-ul folosiŖi doar piese de schimb identice.
Folosirea de accesorii sau
DESCRIERE
9. Acumulator (neinclus)
10. ClicheŖi
11. Pentru a strânge
12. Pentru a desface
13. Adâncime de gćurire
14. Cap de gćurire (neinclus)
15. Rotire în sens invers
16. Rotire înainte
17. Adaptator mandrinć 35 mm(neinclus)
18. Cap úurubelniŖć (neinclus)
19. Cap SDS (neinclus)
SPECIFICAŕII
Tensiune 18 V
TuraŖie în gol 0-1000 min
Lovituri de ciocan
(Lovituri pe minut) 0-4.000 min
Energie de impact 1,5 J
Capacitate maximć de gćurire:
Lemn: 16 mm
OŖel: 13 mm
Beton (gćurire rotopercutantć): 12 mm
Dimensiuni recomandate pentru
gćurirea rotopercutantć 4-12 mm
Tip conexiunea cap SDS-plus
Greutate – acumulator neinclus (kg) 2.2
MODEL ACUMULATOR
(neinclus)
BPP-1815
BPP-1817
BPP-1815M
BPP-1817M
BPL-1820
CRH1801
BPL-1815
BPP-1815
BPP-1817
BPP-1815M
BPP-1817M
ÎNCĆRCĆTOR
(neinclus)
BCL-1800
BCS618
BCL1418
BC-1815S
BC-1800
BCA180
-1
-1
1. Capac de protecŖie împotriva prafului
2. Mandrinć SDS
3. Inel de strângere
4. Selector mod
5. Comutator PORNIRE/OPRIRE (ON / OFF)
6. Selector de rotire
(Blocare înainte/în sens invers/central)
7. Mâner lateral
8. Tijć profundor
OPERAREA
AVERTIZARE
Nu permiteŖi ca familiarizarea cu produsul
sć vć facć mai neatent. AmintiŖi-vć cć o
fracŖiune de secundć de neatenŖie este
suficientć pentru a implica o vćtćmare
gravć.
61
Page 65

GB LV LT EE HR SI SK GR TRFR DE ES IT NL PT DK SE FI NO RU PL CZ HU
Românć
RO
OPERAREA
AVERTIZARE
PurtaŖi mereu ochelari de protecŖie sau
ochelari de protecŖie cu apćrćtoare lateralć
atunci când operaŖi produsul. Neurmarea
aceasta poate rezulta în obiecte aruncate
în ochii dvs, rezultând o posibilć vćtćmare
gravć.
AVERTIZARE
Nu folosiŖi niciun ataúament sau accesoriu
nerecomandat de cćtre producćtor pentru
acest produs. Folosirea de ataúamente
sau accesorii nerecomandate poate cauza
vćtćmare personalć gravć.
APLICAŕII
PuteŖi folosi acest produs pentru scopurile listate
mai jos:
Q Gćurirea în toate tipurile de produse din lemn
(cherestea, placaj, lambriuri, carton, plćci
aglomerate).
Q Gćurirea de ceramicć, plastic, fibrć de sticlćúi
laminate.
Q Gćurirea în metale.
Gćurirea rotopercutantć în beton.
Q
Acest produs acceptć acumulatori Ryobi One+18V
litiu-ion sau acumulatori Ryobi One+18V nichelcadmiu.
AVERTIZARE
ÎndepćrtaŖi întotdeauna acumulatorul din
maúina de gćurit când asamblaŖi piesele,
faceŖi ajustćri, asamblaŖi sau dezasamblaŖi
burghie, când curćŖaŖi sau nu folosiŖi
maúina. Îndepćrtarea acumulatorului va
preveni pornirea accidentalć ce poate cauza
vćtćmare personalć gravć.
CARACTERISTICI DE PROTECŕ IE A
ACUMULATORULUI
Bateriile Ryobi 18 V litiu-ion sunt proiectate cu
caracteristici ce protejeazć celulele de litiu-ion úi
cresc durata de funcŖionare a bateriei. În anumite
condiŖii de operare, aceste caracteristici încorporate
pot cauza ca bateria sau scula alimentate de la
aceastć baterie sć funcŖioneze diferit faŖć de
bateriile nichel-cadmiu.
În timpul anumitor aplicaŖii, sistemul electronic al
bateriei ar putea semnala bateriei sć se opreascć,
úi ar putea rezulta în oprirea sculei. Pentru a reseta
bateria úi scula, eliberaŖi trćgaciul úi reluaŖi operaŖia
normalć.
Pentru a preveni alte întreruperi ale bateriei,
:
NOTĆ
evitaŖi forŖarea sculei.
Dacć eliberarea trćgaciului nu reseteazć bateria
úi scula, atunci acumulatorul este epuizat. Dacć e
epuizat, acumulatorul se va încćrca atunci când este
aúezat în încćrcćtorul litiu-ion.
PENTRU A INSTALA ACUMULATORUL
Vezi Figura 2
UrmaŖi aceúti paúi pentru a instala acumulatorul:
Q AduceŖi selectorul rotativ la poziŖia centralć de
blocare.
Q IntroduceŖi acumulatorul în produs aúa cum este
arćtat.
Q AsiguraŖi-vć cć clicheŖii de pe fiecare parte a
acumulatorului se închid printr-un mic plesnet úi
cć bateria este asiguratć ferm în produs înainte
de începerea operćrii lui.
PENTRU ÎNDEPĆRTAREA ACUMULATORULUI
UrmaŖi aceúti paúi pentru a îndepćrta acumulatorul:
Q ApćsaŖi clicheŖii de pe fiecare parte a
acumulatorului.
Q ÎndepćrtaŖi acumulatorul din maúina de gćurit.
AVERTIZARE
Bateriile sunt mereu în stare de funcŖionare.
De aceea, întrerupćtorul trebuie sć fie
întotdeauna blocat atunci când nu este
maúina în uz sau când se poartć pe partea
dvs lateralć.
REGLAREA MÂNERULUI LATERAL
A se vedea Figura 3.
UrmaŖi aceúti paúi pentru a regla mânerul lateral:
Q DesfaceŖi mânerul lateral rotind butonul în
sensul opus acelor de ceasornic (12).
Q RotiŖi mânerul lateral în poziŖia doritć.
Q StrângeŖi mânerul lateral în mod securizat rotind
butonul în sensul acelor de ceasornic (11).
REGLAREA TIJEI PROFUNDORULUI
A se vedea Figura 4.
UrmaŖi aceúti paúi pentru a regla tija profundorului:
Q BlocaŖi trćgaciul comutator plasând selectorul de
rotire în poziŖia centralć.
Q DesfaceŖi mânerul lateral rotind butonul în
sensul opus acelor de ceasornic (12).
Q ReglaŖi tija profundorului astfel încât capul de
gćurire sć se extindć dincolo de capćtul tijei
pânć la adâncimea de gćurire necesarć.
Q StrângeŖi mânerul lateral rotind butonul în sensul
acelor de ceasornic (11).
62
Page 66

GB LV LT EE HR SI SK GR TRFR DE ES IT NL PT DK SE FI NO RU PL CZ HU
Românć
RO
OPERAREA
COMUTATOR
A se vedea Figura 5.
Pentru a PORNI maúina de gćurit, apćsaŖi trćgaciul.
Pentru a OPRI eliberaŖi trćgaciul.
FUNCŕIA DE BLOCARE
A se vedea Figura 5.
Butonul de pornire poate fi blocat în poziŖia
"oprit". Aceastć funcŖie permite evitarea pornirilor
involuntare ale burghiului-úurubelniŖć atunci când
nu îl utilizaŖi. Pentru a bloca butonul de pornire,
aúezaŖi selectorul sensului de rotaŖie (sens
înúurubare / deúurubare) în poziŖia centralć.
ObservaŖie: Atunci când selectorul este în poziŖia
centralć, butonul de pornire este blocat.
REVERSIBIL
A se vedea Figura 5.
Aceastć sculć dispune de opŖiunea de rotire
reversibilć, care este controlatć de cćtre un selector
situat deasupra trćgaciului comutator (6).
Q Rotire în sensul acelor de ceasornic: setaŖi
maneta selectorului în partea stângć (16).
Q Rotire în sensul opus acelor de ceasornic: setaŖi
maneta selectorului în partea dreaptć (15).
SELECTOR MOD (4)
Q Pentru gćurire, plasaŖi selectorul în poziŖia .
Q Pentru gćurirea rotopercutantć, setaŖi în poziŖia
.
Comutarea poate cel mai bine efectuatć atunci
când scula nu este utilizatć.
Cutia de viteze va trece în modul selectat doar dupć
ce comutatorul este activat úi dispozitivul porneúte.
Notć: Modul de gćurire rotopercutantć va deteriora
mecanismul sculei atunci când este utilizat pentru
strângerea sau gćurirea împreunć cu un cap nonSDS plus. SelectaŖi modul de gćurire doar pentru un
astfel de scop.
Atunci când efectuaŖi o operaŖie de gćurire
rotopercutantć, utilizaŖi exclusiv doar capurile din
metal dur úi arbore SDS-Plus. Utilizarea capurilor
cilindrice pentru zidćrie disponibile în comerŖ prin
intermediul adaptorului de gćurire este imposibilć.
GĆURIREA ROTOPERCUTANTĆ
Atunci când efectuaŖi o operaŖie de gćurire
rotopercutantć, nu este necesar sć aplicaŖi
o presiune prea mare. În acest mod,
performanŖa nu este sporitć. O presiune
prea mare va plasa o sarcinć non-necesarć
pe motor.
VerificaŖi capurile de gćurire în mod periodic.
ReascuŖiŖi sau înlocuiŖi capurile de gćurire
tocite.
Atunci când efectuaŖi o operaŖie de gćurire
rotopercutantć, trebuie sć purtaŖi obligatoriu ochelari
de protecŖie, antifoane úi sć folosiŖi mânerului lateral.
Înainte de a pune în funcŖiune dispozitivul, veri caŖi
dacć butonul de comutare este blocat în poziŖie.
FIXAREA ùI SCHIMBAREA CAPURILOR SDS
A se vedea Figura 6.
Aceastć sculć este echipatć cu un sistem de
conexiune SDS-plus.
Q Înainte de a introduce capul în mandrinć,
curćŖaŖi-l úi lubrifiaŖi-l cu unsoare de maúinć (2).
Q TrageŖi înapoi inelul de strângere (3) úi
menŖineŖi-l apćsat.
Q ÎmpingeŖi úi rotiŖi scula cu extractor de praf în
suportul capului atât cât este posibil.
Q EliberaŖi inelul de strângere pentru a bloca capul.
Q TrageŖi capul pentru a verifica dacć s-a blocat.
ÎNDEPĆRTAREA CAPULUI DIN SISTEMUL SDS-PLUS
TrageŖi înapoi inelul de strângere úi îndepćrtaŖi
capul.
ADAPTATOR MANDRINĆ 35 mm (NEINCLUS) (17)
A se vedea Figura 6.
Pentru lucrćri de gćurire în metal, lemn úi plastic cu
capuri de gćurire care nu dispun de arborele Non
SDS Plus, este disponibil adaptatorul de gćurire.
SFATURI PRACTICE
Nu gćuriŖi în liniile electrice ascunde sau conductele
de gaz úi apć. Veri caŖi zona de lucru cu ajutorul
unui detector de metale, de exemplu înainte de
începerea lucrćrilor.
AMBREIAJ CU ALUNECARE
Dacć scula se blocheazć sau este prinsć, ambreiajul
cu alunecare se elibereazć.
ÎndepćrtaŖi imediat sarcina de pe dispozitiv trćgând
înapoi scula de gćurire.
63
Page 67

GB LV LT EE HR SI SK GR TRFR DE ES IT NL PT DK SE FI NO RU PL CZ HU
Românć
RO
OPERAREA
ŕineŖi întotdeauna ferm dispozitivul cu
ambele mâini úi asiguraŖi-vć o poziŖie
sigurć.
ÎNTREŕINEREA
AVERTIZARE
Atunci când efectuaŖi service-ul, folosiŖi doar
piese de schimb Ryobi identice. Folosirea
oricćror altor piese poate crea un pericol úi
poate cauza deteriorarea produsului.
EvitaŖi folosirea de solvenŖi când curćŖaŖi piesele
din plastic. Majoritatea plasticului este susceptibil
la deteriorare de la anumitele tipuri de solvenŖi
comerciali úi poate fi deteriorat prin folosirea
acestor solvenŖi. FolosiŖi o cârpć curatć pentru a
îndepćrta mizeria, praful, uleiul, grćsimea, etc.
AVERTIZARE
Nu lćsaŖi niciun moment ca lichide de frânć,
benzinć, produse pe bazć de petrol, uleiuri
penetrante etc sć vinć în contact cu piesele
din plastic. Chimicalele pot deteriora, slćbi
sau distruge plasticul care poate cauza
vćtćmare personalć gravć.
SIMBOL
Avertizare de siguranŖć
V VolŖi
-1
min
RotaŖii sau miúcćri rectilinii alternative pe
minut
Curent continuu
Mod de gćurire
Mod de gćurire rotopercutantć
Conform CE
Vć rugćm citiŖi instrucŖiunile cu atenŖie
înainte de pornirea aparatului.
PurtaŖi echipamente de protecŖie a
auzului
PurtaŖi echipamente de protecŖie a vederii
AVERTIZARE
Nu abuzaŖi de sculele electrice. Practicile
abuzive pot deteriora scula precum úi piesa
de lucru.
AVERTIZARE
Nu încercaŖi sć modificaŖi aceastć sculć
sau sć creaŖi accesorii nerecomandate
pentru folosirea cu aceastć sculć. Orice
transformare sau modificare este consideratć
întrebuinŖare abuzivćúi poate rezulta în
situaŖie periculoasć ce poate duce la o
posibilć vćtćmare personalć gravć.
PROTECŕIA MEDIULUI
ReciclaŖi materiile prime în loc sć le
înlćturaŖi ca deúeuri. Maúina, accesoriile úi
amabalajul trebuie sć fie sortate pentru o
reciclare nedćunćtoare mediului.
Reciclare nedoritć
Deúeurile produselor electrice nu
trebuiesc înlćturate împreunć cu
deúeurile casnice. Vć rugćm reciclaŖi
acolo unde existć facilitćŖi. VerificaŖi la
autoritatea dvs localć sau la vânzćtor
pentru sfaturi privind reciclarea.
64
Page 68

GB LT EE HR SI SK GR TRFR DE ES IT NL PT DK SE
FI
NO RU PL CZ HU RO
Latviski
LV
ħPAŠIE DROŠħBAS NOTEIKUMI
Q Izmantojiet papildaprĨkojuma rokturi, kas ir
iekķauts komplektąciją. Kontroles zaudĒšana
var izraisĨt traumas.
Q Izmantojot perforatorus, valkâjiet dzirdes
aizsargus. Ausu pakķaušana trokšĿa iedarbĨbai
var izraisĨt dzirdes traucĒjumus.
Q Valkąjiet sejas vai putekķu masku, ja urbšanas
darbi rada putekķus.
Q Darbos, kuros instruments var saskarties
ar slĒptiem vadiem, turiet instrumentu
aiz izolĒtająm satveršanas virsmąm.
GriezĒjinstrumenta saskare ar strąvu vadošająm
vietąm var padarĨt arĨ atklątąs metąla daķas vadošas
un radĨs operatoram elektrisko triecienu.
INSTRUKCIJAS DROŠAI EKSPLUATĄCIJAI
Q Pąrliecinieties, ka instruments ir pievienots
tikai tądam spriegumam, kas ir norądĨts uz
pląksnĨtes.
Q Nekad neizmantojiet instrumentu, ja iztrŞkst tą
vąks vai jebkura skrŞve. Ja vąks vai skrŞves ir
izĿemtas, nomainiet tos pirms izmantošanas.
Uzglabąjiet visas detaķas labą darba kąrtĨbą.
Q VienmĒr nodrošiniet instrumentus, kad strądąjat
paaugstinątąs pozĨcijąs.
Q Nekad nepieskarieties asmenim, urbim,
slĨpĒšanas ripai vai citąm kustĨgąm detaķąm to
izmantošanas laiką.
Q Nekad neiedarbiniet instrumentu, ja tąs rotĒjošie
komponenti ir kontaktą ar darba virsmu.
Q Nekad nenolieciet instrumentu pirms tą kustošąs
ą apstąjušąs.
daķas nav pilnĨ
Q PIEDERUMI: Piederumu vai aprĨkojuma
izmantošana, kas nav rekomendĒti šają lietotąja
rokasgrąmatą var izraisĨt bĨstamĨbu.
Q REZERVES DETAĶAS: Kad veicat apkopi,
izmantojiet tikai identiskas rezerves detaķas.
b
APRAKSTS
7. Papildrokturis
8. Urbuma dziķuma mĒrĨtąjs
9. Akumulators (nav kompl.)
10. Fiksącijas mĒlĨtes
11. Lai pievilktu
12. Lai atbrĨvotu
13. Urbšanas dziķums
14. Urbis (nav komplektąciją)
15. Rotącija reversą
16. Rotącija uz priekšu
17. 35 mm patronas adapteris
(nav kompl.)
18. SkrŞvgrieža uzgalis (nav komplektąciją)
19. SDS urbis (nav komplektąciją)
SPECIFIKĄCIJAS
Spriegums 18 V
Ątrums bez slodzes 0-1000 apgr./min
Perforatora triecieni (minŞtĒ) 0-4000 triec./min
Trieciena enerĠija 1,5J
Maksimąlą urbšanas ražĨba:
Koks 16 mm
TĒrauds 13 mm
Betons (perforĒšana) 12 mm
Ieteicamais perforĒšanas diapazons 4-12 mm
Urbja stiprinąjuma tips SDS-plus
Svars bez akumulatora (kg)
MODELIS AKUMULATORU
KOMPLEKTS
(nav iekķauts)
BPP-1815
BPP-1817
BPP-1815M
BPP-1817M
BPL-1820
CRH1801
BPL-1815
2.2
LĄDđTĄJS
(nav iekķauts)
BCL-1800
BCS618
BCL1418
1. Putekķu aizsargvąciĿš
2. SDS patrona
3. Fiksącijas gredzens
4. RežĨma slĒdzis
5. Barošanas slĒdzis
6. Rotącijas pąrslĒgs
(Normąli/Reversą/BloIJĒts centrą)
65
AKUMULATORU
KOMPLEKTS
(nav iekķauts)
BPP-1815
BPP-1817
BPP-1815M
BPP-1817M
LĄDđTĄJS
(nav iekķauts)
BC-1815S
BC-1800
BCA180
Page 69

GB LT EE HR SI SK GR TRFR DE ES IT NL PT DK SE
FI
NO RU PL CZ HU RO
Latviski
LV
EKSPLUATĄCIJA
BRħDINĄJUMS
Nepieķaujiet nevĒrĨbu ar šo izstrądąjumu,
lai nepadarĨtu sevi paviršu. Atcerieties, ka
neuzmanĨgas sekundes daķas pietiek, lai
nodarĨtu nopietnu savainojumu.
BRħDINĄJUMS
Izstrądąjuma darbĨbas laiką vienmĒr valkąjiet
drošĨbas aizsargbrilles vai drošĨbas stiklus
ar sąnu vairogiem. To nedarot, rezultątą var
notikt priekšmetu iemešana acĨs, kas izraisa
nopietnas traumas.
BRħDINĄJUMS
Nelietojiet jebką dus piederumus vai
aprĨkojumu, ko šim izstrądąjumam nav
ieteicis ražotąjs. Piederumu vai aprĨkojuma
lietošana, kas nav ieteikti, var izraisĨt
nopietnas personĨgąs traumas.
PIELIETOJUMI
JŞs drĨkstat šo izstrądąjumu izmantot mĒrIJiem, kas
uzskaitĨti tąląk:
Q Urbšanai visu veidu koka izstrądąjumos
(kokmateriąli, apšuvums, kompozĨtie dĒķi un
cietie dĒķi)
Q Keramikas, plastmasas, stikla šIJiedras un
laminąta urbšanai
Q Metąlu urbšanai
PerforĒšana betoną
Q
Šim izstrądąjumam derĨgas Ryobi One+ 18 V litijajonu akumulatoru baterijas un Ryobi One+ 18 V
niIJeķa-kadmija akumulatoru baterijas.
BRħDINĄJUMS
VienmĒr noĿ emiet no urbjmašĨnas
akumulatoru bateriju, ja montĒjat daķas,
izdarąt regulĒšanu, montĒšanu vai urbju
noĿemšanu, tĨrĨšanu vai ja neizmantojat.
Akumulatoru baterijas noĿemšana novĒrsĨs
nejaušu iedarbinąšanu, kas var izraisĨt
nopietnas personas traumas.
AKUMULATORU AIZSARDZħBAS ħPATNħBAS
Ryobi 18 V litija- jonu akumulatoru baterijas ir
konstruĒtas ar Ĩpašąm konstrukcijąm, kas aizsargą
litija jonu elementus un pagarina akumulatoru
kalpošanas laiku. Dažos darbĨbas režĨmos šĨs
iebŞvĒtas konstrukcijas var likt akumulatoram un
ierĨcei, kuru tas piedzen, darboties atšIJirĨgi no
niIJeķa- kadmija akumulatoriem.
AtsevišIJu pielietojumu laiką akumulatoru
elektronika var dot signąlu izslĒgt un likt ierĨcei
apturĒ
ierĨces darbu no jauna, atbrĨvojiet mĒlĨti un atsąciet
normąlu darbĨbu.
PIEZħME: Lai novĒrst turpmąko akumulatora
izslĒgšanos, izvairieties no ierĨces forsĒšanas.
Ja mĒlĨtes atbrĨvošana neieslĒdz no jauna
akumulatoru un ierĨci, akumulatoru baterija ir
izlądĒjusies. Ja izlądĒjusies, akumulatoru baterija
jąsąk uzlądĒt, novietojot to uz litija jonu lądĒtąja.
LAI UZSTĄDħTU AKUMULATORU BATERIJU
t darb
Ĩbu. Lai uzsąktu akumulatora un
Skatiet 2. att.
Lai uzstądĨtu akumulatoru, rĨkojieties šądi:
Q Novietojiet rotącijas slĒdzi centra pozĨciją.
Q Ievietojiet akumulatoru bateriju izstrądąjumą ką
parądĨts.
Q Pirms darba uzsąkšanas pąrliecinieties, ka
aizslĒgi akumulatoru baterijas abos sąnos ir
vietą un akumulatoru baterija ir nostiprinąta
izstrądąjumą.
LAI NOľEMTU AKUMULATORU BATERIJU
Lai atvienotu akumulatoru, rĨkojieties šądi:
Q Atspiediet aizslĒgus uz katra akumulatoru
baterijas sąna.
Q NoĿemiet akumulatoru bateriju no urbja.
BRħDINĄJUMS
Akumulatoru izstrądąjumi vienmĒr ir
ekspluatącijas stąvoklĨ. TądĒķ slĒdzim
vienmĒr jąbŞt nobloIJĒtam, kad nelieto vai
pąrnes pie sąna.
PAPILDROKTURA REGULđŠANA
Skatiet 3. att.
Lai noregulĒtu papildroktura pozĨciju, rĨkojieties
šądi.
Q Palaidiet papildrokturi vaïîgâk, grieþot rokturi
pretçji pulksteòrâdîtâja kustîbas virzienam (12).
Q Pagrieziet papildrokturi vajadzĨgają pozĨciją.
Q Pievelciet papildrokturi, grieþot rokturi
pulksteòrâdîtâja kustîbas virzienâ (11).
DZIĶUMA ATDURSTIEľA REGULđŠANA
Skatiet 4. att.
Lai regulĒtu atdurstieĿa dziķumu, rĨkojieties šądi:
Q BloIJĒjiet mĒlĨti, novietojot rotącijas virziena
pąrslĒgu centrąlają pozĨciją.
Q Palaidiet papildrokturi vaïîgâk, grieþot rokturi
pretçji pulksteòrâdîtâja kustîbas virzienam (12).
Q NoregulĒjiet atdurstieni tą, lai urbis sniegtos
tąląk par atdurstieni tik tąlu, cik dziķš urbums ir
nepieciešams.
66
Page 70

GB LT EE HR SI SK GR TRFR DE ES IT NL PT DK SE
FI
NO RU PL CZ HU RO
Latviski
LV
EKSPLUATĄCIJA
Q Pievelciet papildrokturi, grieþot rokturi
pulksteòrâdîtâja kustîbas virzienâ (11).
SLđDZIS
Skatiet 5. att.
Lai IESLđGTU urbšanu, nospiediet slĒdža mĒlĨti. Lai
IZSLđGTU, atbrĨvojiet slĒdža mĒlĨti.
SLđDŽA DROŠINĄTĄJS
Skatiet 5. att.
SlĒdža mĒlĨti iespĒjams fiksĒt IZSLđGTĄ pozĨciją.
Šo iespĒju var lietot, lai nepieķautu netĨšas
iedarbinąšanas iespĒju, kad ierĨce netiek lietota.
Lai nofiksĒtu slĒdža mĒlĨti, novietojiet rotącijas
selektoru (uz priekšu/atpakaķ selektoru) centrąlają
pozĨciją.
PiezĨme: Kad selektors atrodas centrąlają pozĨciją,
tad slĒdža mĒlĨte ir nofiksĒta.
REVERSĄ ROTĄCIJA
Skatiet 5. att.
Šim instrumentam ir reversąs rotącijas funkcija, kuru
pąrslĒdz ar slĒdzi, kas atrodas virs slĒdža mĒlĨtes
(6).
Q Rotącija pulksteĿrądĨtąja virzieną: pąrslĒdziet
selektora sviru kreisają pozĨciją (16).
Q Rotącija pretĒji pulksteĿrądĨtąja virzienam:
pąrslĒdziet selektora sviru labają pozĨciją (15).
REŽħMA SLđDZIS (4)
neuzlabo sniegumu. Pąrąk liels spiediens
radĨs motoram nevajadzĨgu slodzi.
Reguląri pąrbaudiet urbjus. Noasiniet vai
nomainiet neasus urbjus.
Kad perforĒjat, strądąjiet tikai ar aizsargbrillĒm,
dzirdes aizsargiem un papildrokturi. Pirms sąkt
darbu, pąrbaudiet, vai režĨmu pąrslĒgšanas slĒdzis
ir no ksĒts vajadzĨgają pozĨciją.
SDS URBJU STIPRINĄŠANA UN MAINħŠANA
Skatiet 6. att.
ŠĨ instrumenta komplektąciją ir iekķauta SDS-plus
savienojumu sistĒma.
Q TĨriet urbjus un eķķojiet tos ar tehnisko smĒri,
pirms ievietot patroną (2).
Q Pavelciet atpakaķ fiksącijas gredzenu (3) un turiet
to.
Q Spiediet un grieziet bezputekķ u
griezĒjinstrumentu patroną, cik tąlu iespĒjams.
Q Atlaidiet fiksącijas gredzenu, lai nofiksĒtu urbi.
Q Pąrliecinieties, ka tas ir nofiksĒts, pavelkot to.
URBJA IZľEMŠANA NO SDS-PLUS SISTđMAS
Pavelciet ksącijas gredzenu un izĿemiet urbi.
35 mm PATRONAS ADAPTERIS (NAV KOMPL.) (17)
Skatiet 6. att.
Lai varĒtu urbt metąlą, koką vai plastmasą ar
urbjiem, kuriem nav SDS Plus kąta, ir pieejams
adapteris.
Q Lai urbtu, pąrslĒdziet slĒdzi pozĨciją.
Q Lai perforĒtu, pąrslĒdziet slĒdzi
PąrslĒgšanu vislabąk veikt, kad perforators
nedarbojas.
Reduktors pąrslĒdzas izvĒlĒtają režĨmą tikai pĒc
slĒdža pąrslĒgšanas un mašĨnas iedarbinąšanas.
PiezĨme: Darbs perforĒšanas režĨmą bojąs
instrumenta mehąnismu, ja to izmantos stiprinąšanai
vai ar urbjiem, kas nav SDS plus tipa. IzvĒlieties
šądiem darbiem tikai urbšanas režĨmu.
Kad veicat perforĒšanu, izmantojiet tikai urbjus
ar cietmetąla un SDS-Plus kątu. Nevar izmantot
pąrdošaną pieejamos mŞra urbjus ar cilindru kopą
ar adapterim.
PERFORđŠANA
PerforĒjot nav nepieciešams spiest
perforatoru ar pąrąk lielu spĒku. Tas
pozĨciją.
67
PRAKTISKI PADOMI
Centieties neieurbt slĒptąs elektriskająs lĨnijąs vai
gązes un Şdensvados. Pirms sąkt darbu, pąrbaudiet
darba zonu, piemĒram, ar metąla detektoru.
DROŠħBAS SAJŝGS
Ja urbis iestrĒgst, nostrądą drošĨbas sajŞgs.
NekavĒjoties atslogojies mašĨnu, pavelkot perforatoru
atpakaķ.
Turiet mašĨnu stingri abąs rokąs un
saglabąjiet stingru un stabilu stąju.
APKOPE
BRħDINĄJUMS:
Kad apkalpojat, izmantojiet tikai identiskas
Ryobi rezerves daķas. Jebkądu citu daķu
lietošana var radĨt bĨstamĨbu vai izraisĨt
izstrądąjuma bojąjumu.
Page 71

GB LT EE HR SI SK GR TRFR DE ES IT NL PT DK SE
FI
NO RU PL CZ HU RO
Latviski
APKOPE
Izvairieties lietot šIJĨdinątąjus, kad tĨrąt plastmasas
daķas. Vairums plastmasu ir jŞtĨgas pret dažąda
veida rŞpnieciskajiem šIJĨdinątąjiem un var tikt
sabojątas tos lietojot. Izmantojiet tĨru auduma
drąnu, lai noĿemtu netĨrumus, putekķus, eķķu, ziedes
utt.
BRħDINĄJUMS
Neķaujiet jebkurą laiką bremžu šIJidrumam,
gazolĨnam, naftas produktiem, asąm eķķąm
utt. nonąkt saskarĒ ar plastmasas daķąm.
ıimikąlijas var sabojąt, novąjinąt vai sagraut
plastmasu, kas var izraisĨt nopietnas personu
traumas.
LV
PerforĒšanas režĨms
CE atbilstĨba
Pirms iedarbinąt mašĨnu, lŞdzu rŞpĨgi
izlasiet instrukcijas.
Lietojiet dzirdes aizsargus
Valkąjiet acu aizsarglĨdzekķus
BRħDINĄJUMS
Nelietojiet ķaunprąt Ĩgi elektroierĨces.
ĶaunprątĨga rĨcĨba var sabojąt ierĨci, ką arĨ
apstrądąjamo gabalu.
BRħDINĄJUMS
Nevajag mĒĠinąt pąrveidot šo izstrądąjumu
vai izveidot piederumus, kas nav ieteikti
lietošanai ar šo rĨku. Jebkura tąda
pąrtaisĨšana vai pąrveidošana ir nepareiza
lietošana un var izraisĨt bĨstamus apstąkķus,
kas var novest pie iespĒjamąm nopietnąm
personĨgąm traumąm.
APKĄRTđJĄS VIDES AIZSARDZħBA
Izmantojiet atkąrtoti neapstrąd ątos
materiąlus tą vietą, lai izmestu atkritumos.
MašĨnu, piederumus un iepakojumu
jąsašIJiro apkąrtĒjai videi draudzĨgai
pąrstrądąšanai.
SIMBOLS
Pąrstrądąjiet nevajadzĨgos izstrądąjumus
Izlietotie elektroprodukti nedrĨkst tikt
izmesti kopą ar mąjsaimniecĨ bas
atkritumiem. LŞdzu, nododiet tos
attiecĨgająs atkąrtotas izmantošanas
vietąs. Sazinieties ar savu vietĒjo varas
pąrstąvi vai izplatĨtąju, lai noskaidrotu,
kur iespĒjama atkąrtota pąrstrąde.
DrošĨbas brĨdinąjums
V Volti
-1
min
Apgriezieni vai riĿIJojumi minŞtĒ
LĨdzstrąva
Urbšanas režĨms
68
Page 72

GB EE HR SI SK GR TRFR DE ES IT NL PT DK SE FI NO RU PL CZ HU RO LV
Lietuviškai
LT
SPECIALIOS SAUGOS TAISYKLĕS
Q Naudokite papildomĉ su Ĭrankiu tiekiamĉ
rankenĉ. īrankio nesuvaldžius, galima susižeisti.
Q Dirbdami su smŞginiu grĉžtu naudokite ausŦ
apsaugos priemones. Jei ausŦ neapsaugosite,
galite prarasti klausĉ.
Q DĖvĖkite veido kaukĘ ar kaukĘ nuo dulkiŦ, jei
tektŦ dirbti ten, kur išsiskiria dulkĖs.
Q ElektrinĬĬrankĬ laikykite už izoliuotŦ paviršiŦ,
kad darbo metu pjovimo Ĭrankio priedas
nesusiliestŦ su paslĖptais laidais Pjovimo
metu priedas, prisilietĘs prie laido, prijungto
prie maitinimo šaltinio, gali aktyvuoti metalines
elektrinio Ĭrankio detales ir sukelti operatoriui
elektros smŞgĬ.
SAUGAUS NAUDOJIMO INSTRUKCIJOS
Q Patikrinkite, ar Ĭrankis yra prijungtas prie
Ĭtampos, kuri nurodyta informacinĖje lentelĖje.
Q Niekada nenaudokite Ĭrankio, jei nĖra jo gaubto
ar trŞksta varžtŦ. Jei gaubtas nuimtas arba
varžtai išsukti, prieš naudodami ĬrankĬ, juos
uždĖkite arba Ĭsukite. Visos dalys turi bŞti geros
bŞklĖs.
Q Dirbdami aukštyje, Ĭrankius visada saugokite.
Q Dirbdami, niekada nelieskite ašmenŦ, grĉžto
antgalio, šlifuoklio disko ar kitŦ judanþiŦ daliŦ.
Q Niekada nejunkite Ĭrankio, kai jo judanti dalis
lieþiasi su darbine detale.
Q Niekada nedĖkite Ĭrankio, kol judanþios dalys
visiškai nesustojo.
Q PRIEDAI: naudojami priedai ar papildomi Ĭtaisai,
kurie nerekomenduojami šiose instrukcijose, gali
kelti pavojŦ.
Q ATSARGINĕS DALYS: sugedusias detales keiskite
tik originaliomis detalĖmis.
14. Grĉžto antgalis (nepridedamas)
15. Sukimosi kryptis atgal
16. Sukimosi kryptis pirmyn
17. 35 mm laikiklio adapteris (nepridedama)
18. Atsuktuvo antgalis (nepridedamas)
19. SDS antgalis (nepridedamas)
TECHNINIAI DUOMENYS
ītampa 18 V
Greitis be apkrovimo 0-1000 min
Kalamojo grĉžto smŞgiai
(smŞgiai per minutĘ) 0-4000 min
SmŞgio jĖga 1,5J
Didžiausias grĘžimo gylis:
Mediena: 16 mm
Plienas: 13 mm
Betonas (kalamasis grĘžimas): 12 mm
Rekomenduojamas kalamojo
grĘžimo diapazonas 4-12 mm
AntgaliŦ prijungimo tipas SDS-plus
Svoris be baterijos paketo (kg) 2.2
MODELIS
CRH1801
BATERIJOS PAKETAS
(nepridedama)
BPP-1815
BPP-1817
BPP-1815M
BPP-1817M
BPL-1820
BPL-1815
BPP-1815
BPP-1817
BPP-1815M
BPP-1817M
īKROVIKLIS
(nepridedama)
BCL-1800
BCS618
BCL1418
BC-1815S
BC-1800
BCA180
-1
-1
APRAŠYMAS
1. ApsauginĖ mova nuo dulkiŦ
2. SDS laikiklis
3. Spaustuvo žiedas
4. Režimo valdiklis
5. ON (ījungimo) / OFF (išjungimo) mygtukas
6. Sukimosi krypties valdiklis
(Pirmyn / Atgal / Vidurio ksatorius)
7. PagalbinĖ rankena
8. Gylio matavimo strypas
9. Baterijos paketas (nepridedama)
10. Fiksatoriai
11. Priveržti
12. Atsukti
13. GrĘžimo gylis
VEIKIMAS
īSPĕJIMAS:
BŞkite atsargŞs, net jei puikiai pažĬstate
ĬrankĬ. Atminkite, kad ir mažiausias
neatsargumas gali sukelti rimtus
susižalojimus.
īSPĕJIMAS:
Darbo metu visada dĖvĖkite apsauginius
akinius arba akinius su šonine apsauga.
NepasirŞpinus tinkama akiŦ apsauga, Ĭ jŞsŦ
akis gali patekti nuolaužŦ, kurios gali rimtai
sužaloti.
69
Page 73

GB EE HR SI SK GR TRFR DE ES IT NL PT DK SE FI NO RU PL CZ HU RO LV
Lietuviškai
LT
VEIKIMAS
īSPĕJIMAS:
Nenaudokite jokiŦ priedŦ ar papildomŦ
detaliŦ, kuriŦ nerekomenduoja šio produkto
gamintojas. Naudodami nerekomenduojamas
detales ar priedus galite sunkiai susižaloti.
NAUDOJIMO PASKIRTIS
ŠĬĬrankĬ galima naudoti šiems tikslams:
Q GrĘžti Ĭvairios rŞšies medienĉ (pjautinĘ medienĉ,
fanerĉ, plokštes, struktŞrines lentas, medienos
plaušŦ plokštes)
Q GrĘžti keramikĉ, plastikĉ, stiklo pluoštĉ ir
laminatĉ
Q GrĘžti metalĉ
Q
Kalamasis grĘžimas Ĭ betonĉ
Šiam produktui tinka „Ryobi One+“ 18 V liþio – jonŦ
ir „Ryobi One+“ 18 V nikelio – kadmio baterijos.
īSPĕJIMAS:
Visada ištraukite baterijĉ iš grĉžto, kai
surenkate dalis, reguliuojate, montuojate
arba ištraukiate antgalius, valote arba Ĭrankio
nenaudojate. Ištraukus baterijĉ, Ĭrenginys
negalĖs atsitiktinai Ĭsijungti, nes tai galĖtŦ
jus rimtai sužaloti.
BATERIJOS APSAUGOS SAVYBĕS
„Ryobi“ 18 V liþio jonŦ baterijos pasižymi tokiomis
savybĖmis, kurios apsaugos liþio jonŦ elementus ir
prailgina baterijos tinkamumo naudoti laikĉ. Tam
tikromis naudojimo sĉlygomis šios baterijŦ savybĖs
gali skirtis ir Ĭrankis, kuriame Ĭmontuota tokia
baterija, gali veikti kitaip negu nikelio – kadmio
elementai.
Kai kuriŦ darbŦ metu baterijos elektroninis
valdymas gali išjungti baterijĉ, todĖl Ĭrankis taip pat
nustos veikĘs. Baterijai atstatyti Ĭ pradinĘ padĖtĬ ir
Ĭrankiui vĖl Ĭjungti atleiskite gaidukĉ ir nustatykite
normalŦ darbo režimĉ.
PASTABA: kad baterija dar kartĉ neišsijungtŦ,
dirbdami su Ĭ
Jei atleidus gaidukĉ, baterija ir Ĭrankis negrĬžta Ĭ
pradinĘ padĖtĬ, baterija yra išsikrovusi. Jei baterija
yra išsikrovusi, jĉ pakrausite, padĖjĘ ant liþio jonŦ
Ĭkroviklio.
BATERIJOS PAKETO īDĕJIMAS
Žr. 2 pav.
Jei norite pritvirtinti baterijos paketĉ, atlikite šiuos
veiksmus:
Q Nustatykite sukimosi krypties selektoriŦĬ
vidurinĘ padĖtĬ.
Q īdĖkite baterijĉĬĬrankĬ, kaip parodyta.
Q Prieš pradĖdami darbĉ, patikrinkite, ar fiksatoriai
rankiu, nenaudokite jĖgos.
kiekvienoje baterijos pusĖje užsifiksavo ir ar
baterija gerai ĬdĖta.
BATERIJOS PAKETO IŠĕMIMAS
Jei norite baterijos paketĉ išimti, atlikite šiuos
veiksmus:
Q Atleiskite fiksatorius, esanþius kiekvienoje
baterijos paketo pusĖje.
Q Ištraukite iš grĉžto baterijĉ.
īSPĕJIMAS:
Bateriniai gaminiai yra visada paruošti
darbui. TodĖl jungiklis visada turi bŞti
užfiksuojamas, kai Ĭrankis nenaudojamas
arba nešamas.
PAPILDOMOS RANKENOS NUSTATYMAS
Žr. 3 pav.
Jei norite papildomĉ rankenĉ nustatyti, atlikite šiuos
veiksmus:
Q Papildomĉ rankenĉ atlaisvinti – rankenĖlĘ
pasukite prieš laikrodžio rodyklĘ (12).
Q Papildomĉ rankenĉ pasukite iki pageidaujamo
nustatymo.
Q Papildomĉ rankenĉ tvirtai priveržti – rankenĖlĘ
pasukite pagal laikrodžio rodyklĘ (11).
GYLIO MATAVIMO STRYPO NUSTATYMAS
Žr. 4 pav.
Jei norite gylio matavimo strypĉ nustatyti, atlikite
šiuos veiksmus:
Q Užfiksuokite perjungiklĬ, nustatydami sukimosi
krypties valdiklĬ per vidurĬ.
Q Papildomĉ rankenĉ atlaisvinti – rankenĖlĘ
pasukite prieš laikrodžio rodyklĘ (12).
Q Pjovimo gylio strypĉ nustatykite taip, kad grĉžto
antgalis išsikištŦ už strypo galo tiek, kokĬ gylĬ
reikia išgrĘžti.
Q Papildomĉ rankenĉ priveržti – rankenĖlĘ pasukite
pagal laikrodžio rodyklĘ (11).
JUNGIKLIS
Žr. 5 pav.
Grĉžtui Ĭjungti (ON) nuspauskite jungiklio gaidukĉ.
Jam išjungti (OFF) jungiklio gaidukĉ atleiskite.
JUNGIKLIO UŽFIKSAVIMAS
Žr. 5 pav.
JungiklĬ galima užfiksuoti IŠJUNGTOJE (OFF)
padĖtyje.
Ši funkcija apsaugo nuo netikĖto prietaiso
Ĭsijungimo juo nesinaudojant. NorĖdami užfiksuoti
jungiklĬ, nustatykite krypties pasirinkimo
reguliatoriŦ (sukimosi pirmyn / atgal reguliatoriŦ) Ĭ
centrinĘ padĖtĬ.
Pastaba: kai reguliatorius yra centrinĖje padĖtyje,
jungiklis yra užfiksuotas.
70
Page 74

GB EE HR SI SK GR TRFR DE ES IT NL PT DK SE FI NO RU PL CZ HU RO LV
Lietuviškai
LT
VEIKIMAS
ATBULINĕ EIGA
Žr. 5 pav.
Šiame Ĭrankyje yra Ĭrengtas atbulinĖs eigos sukimosi
mechanizmas, reguliuojamas valdikliu, esanþiu virš
perjungiklio (6).
Q Sukimasis pagal laikrodžio rodyklĘ: nustatykite
valdiklĬĬ kairĖs pusĖs padĖtĬ (16).
Q Sukimasis prieš laikrodžio rodyklĘ: nustatykite
valdiklĬĬ dešinĖs pusĖs padĖtĬ (15).
REŽIMO VALDIKLIS (4)
Q GrĘžimui nustatykite valdiklĬĬ padĖtĬ.
Q Kalamajam grĘžimui nustatykite Ĭ
Perjungti geriausiai galima, kai Ĭrankis nesisuka.
ī pasirinktĉ režimĉ perjungiama tik tuomet, kai
jungiklis yra nuspaustas ir Ĭrankis yra Ĭjungtas.
Pastaba: nustaþius kalamojo grĘžimo režimĉ, gali
bŞti pažeistas Ĭrankio mechanizmas, jei tvirtinimui ir
grĘžimui naudojami ne SDS-plus antgaliai. GrĘžimo
režimĉ nustatykite tik šiam tikslui.
Atlikdami kalamĉjĬ grĘžimĉ, naudokite tiktai kietojo
metalo antgalius ir SDS-plus velenĉ. Naudoti
parduotuvĖse Ĭsigytus antgalius mŞrui grĘžti
naudojant grĉžto adapterĬ yra neĬmanoma.
padĖtĬ.
Q Pastumkite ir pasukite švarŦ (be dulkiŦ) ĬrankĬĬ
antgaliŦ laikiklĬ iki pat galo.
Q Spaustuvo žiedĉ atleiskite, kad antgalis bŞtŦ
užfiksuotas.
Q Patikrinkite, ar antgalis užfiksuotas, už jo
patraukdami.
ANTGALIO IŠTRAUKIMAS IŠ SDS-PLUS SISTEMOS
Patraukite atgal spaustuvo žiedĉ ir antgalĬ
ištraukite.
35 mm LAIKIKLIO ADAPTERIS (NEPRIDEDAMAS) (17)
Žr. 6 pav.
GrĘžiant metalĉ, medienĉ ir plastikĉ ne SDS-plus
veleno antgaliais, galima pritaikyti grĉžto adapterĬ.
PRAKTINIAI PATARIMAI
NegrĘžkite paslĖptŦ elektros laidŦ, dujŦ ar vandens
vamzdžiŦ. Prieš pradĖdami darbĉ, darbo vietĉ
patikrinkite, pavyzdžiui, metalo detektoriumi.
SLENKAMOJI MOVA
īrankiui užsikirtus ar užstrigus, jĬ atlaisvinti galima
slenkamĉja mova.
Apkrovĉ nuo Ĭrankio nedelsdami pašalinkite grĉžtĉ
patraukdami atgal.
īrankĬ visada tvirtai laikykite abiejomis
rankomis ir tvirtai stovĖkite.
KALAMASIS GRėŽIMAS
īrankiui veikiant kalamuoju grĘžimu, per
daug jĖgos naudoti nereikia. Tokiu bŞdu
grĘžimo darbas netampa geresnis. Jei
Ĭrankiui taikomas per didelis spaudimas,
variklis perkraunamas, kai tai nebŞtina.
Reguliariai patikrinkite grĉžto antgalius.
Atšipusius grĉžto antgalius pagalĉskite ar
pakeiskite.
Dirbdami kalamuoju grĘžimo režimu, dĖvĖkite
apsauginius akinius, ausŦ apsaugos priemones
ir naudokite pagalbinĘ rankenĉ. Prieš pradĖdami
darbĉ, patikrinkite, ar perjungimo rankenĖlĖ yra
gerai už ksuota.
SDS ANTGALIť TVIRTINIMAS IR KEITIMAS
Žr. 6 pav.
īrankyje yra Ĭrengta SDS-plus sujungimo sistema.
Q Prieš Ĭkišdami antgalĬĬ laikiklĬ (2), jĬ nuvalykite ir
sutepkite mašinine alyva.
Q Patraukite spaustuvo žiedĉ (3) ir jĬ laikykite.
PRIEŽIŝRA
īSPËJIMAS:
Prietaisui remontuoti naudokite tik „Ryobi“
firmos identiškas atsargines detales. KitŦ
detaliŦ naudojimas gali sukelti pavojŦ ar
sugadinti ĬrankĬ.
Valydami plastikines dalis nenaudokite tirpikliŦ.
Komerciniai tirpikliai lengvai pažeidžia daugelĬ
plastikiniŦ daliŦ paviršiŦ ir gali jas apgadinti.
Valydami purvĉ, dulkes, tepalus, alyvas ir t. t.,
naudokite švarias šluostes.
īSPĕJIMAS:
StebĖkite, kad stabdžiŦ tepalas, benzinas,
naftos produktai, prasiskverbiantys tepalai
ir kt. nesiliestŦ su plastikinĖmis Ĭrankio
dalimis. Chemikalai gali jas pažeisti,
susilpninti arba sunaikinti, taip sukeldami
rimtĉ sužeidimŦ pavojŦ.
71
Page 75

GB EE HR SI SK GR TRFR DE ES IT NL PT DK SE FI NO RU PL CZ HU RO LV
Lietuviškai
LT
PRIEŽIŝRA
īSPĕJIMAS:
Elektrinius Ĭrankius naudokite tik pagal jŦ
paskirtĬ. Juos naudojant netinkamai, Ĭrankius
bei darbo medžiagas galite pažeisti.
īSPĕJIMAS:
Nerekomenduojama keisti šio Ĭrankio ar
jam pritaikyti papildomŦ detaliŦ, kurios su
šiuo gaminiu naudoti nerekomenduojamos.
Bandymas jas keisti ar modifikuoti laikoma
netinkamu naudojimu, galinþiu sukelti
pavojingĉ situacijĉ ir jus rimtai sužeisti.
APLINKOS APSAUGA
Neatiduokite žaliavŦĬ atliekas, o jas
perdirbkite. īrankĬ, priedus ir pakuotĘ bŞtina
r Ş šiuoti aplinkai nekenksmingam
perdirbimui.
SIMBOLIAI
Pranešimas apie sauguma
V Voltai
NuolatinĖ srovĖ
GrĘžimo režimas
Kalamojo grĘžimo režimas
CE suderinimas
Atidžiai persikaitykite instrukcijas prieš
pradĖdami naudoti mechanizmĉ.
DĖvĖkite klausos apsaugos priemones
DĖvĖkite akiŦ apsaugos priemones
Perdirbkite nereikalingus daiktus
ElektriniŦ produktŦ atliekos neturi bŞti
metamos kartu su namŦŞkio atliekomis.
Prašome perdirbkite jas ten, kur yra
tokios perdirbimo bazĖs. DĖl perdirbimo
patarimo kreipkitĖs Ĭ savo vietinĘ
savivaldybĘ ar pardavĖjĉ.
min
-1
Apsisukimai ar pasikeitimai per minutĘ
72
Page 76

GB HR SI SK GR TRFR DE ES IT NL PT DK SE FI NO RU PL CZ HU RO LV LT
Eesti
EE
SPETSIAALSED OHUTUSREEGLID
Q Kasutage kaasaantud lisakäepidet. Kontrolli alt
väljunud tööriist võib põhjustada kehavigastuse.
Q Puurvasaraga töötamisel tuleb kasutada
kuulmiskaitsevahendeid. Tugev müra võib
põhjustada kuulmise kaotuse.
Q Kui puurimisel eraldub tolmu, siis kasutage
näomaski või respiraatorit.
Q Töötamisel kohtades, kus lõikeriist võib
kokku puutuda varjatud elektrijuhtmetega,
hoidke tööriista kinni ainult isoleeritud
käepidemetest. Kui kinnitusdetail või puur satub
kontakti pinge all olevate juhtmetega, jäävad
tööriista isoleerimata metallosad pinge alla ja
kasutaja võib saada elektrilöögi.
OHUSTU KÄSITSEMISE JUHENDID
Q Veenduge, et tööriist oleks ühendatud ainult
nimiplaadil toodud pingega.
Q Ärge kasutage kunagi tööriista, kui selle kaas
või mõni polt on puudu. Kui kaas või poldid
on eemaldatud, asetage need enne kasutamist
tagasi. Hoidke kõiki osi heas töökorras.
Q Kinnitage alati tõstetud asendites töötades
tööriistad.
Q Ärge puudutage kunagi kasutamise ajal tera,
puuri, lihvimisketast või muid liikuvaid osi.
Q Ärge käivitage kunagi tööriista, kui selle
pöörlevad osad on kontaktis töödeldava
pinnaga.
Q Ärge asetage kunagi tööriista maha enne, kui
selle liikuvad osad on täielikult seiskunud.
Q LISASEADMED: Muude kui selles kasutusjuhendis
soovitatud lisaseadmete või lisaseadiste
kasutamine võib tekitada ohuolukorra.
Q VARUOSAD: Kui hooldate, kasutage ainult
identseid varuosi.
12. Lahtikeeramise suund
13. Puurimissügavus
14. Puur (ei kuulu komplekti)
15. Reverspöörlemine
16. Pärisuunas pöörlemine
17. Üleminekupadrun läbimõõduga 35 mm
(ei ole komplektis)
18. Kruviotsak (ei ole komplektis)
19. SDS puur (ei ole komplektis)
TEHNILISED ANDMED
Pinge 18 V
Kiirus ilma koormuseta 0 – 1000 min
Vasara löögisagedus
(löökide arv minutis) 0 – 4000 min
Löögienergia 1,5 J
Puuritava ava maksimaalne läbimõõt
Puit 16 mm
Teras 13 mm
Betoon (löökpuurimine) 12 mm
Soovitatav puuri läbimõõt 4 – 12 mm
Puuri kinnitusviis SDS-plus
Mass ilma akuta, kg 2,2
MUDEL
CRH1801
AKUPAKK
(ei ole kaasas)
BPP-1815
BPP-1817
BPP-1815M
BPP-1817M
BPL-1820
BPL-1815
BPP-1815
BPP-1817
BPP-1815M
BPP-1817M
LAADIJA
(ei ole kaasas)
BCL-1800
BCS618
BCL1418
BC-1815S
BC-1800
BCA180
-1
-1
KIRJELDUS
1. Tolmukaitsekübar
2. SDS-padrun
3. Lukustusmuhv
4. Režiimivalits
5. SISSE/VÄLJA lüliti
6. Pöörlemissuuna valits
(Edasi/Tagasi/Kesklukusti)
7. Lisakäepide
8. Puurimissügavuse piiraja
9. Aku (ei kuulu komplekti)
10. Lukustid
11. Kinnikeeramise suund
TÖÖTAMINE
HOIATUS
Ärge lubage sellel, et tunnete seda toodet,
muuta teid hooletuks. Pidage meeles, et
hetkeline hooletus, võib olla piisav tõsise
vigastuse tekitamiseks.
HOIATUS
Kandke toodet kasutades küljekaitsmetega
ohutus- või kaitseprille. Selle eiramine
võib tähendada, et objektid võivad sattuda
teile silma põhjustades võimalikku tõsist
vigastust.
73
Page 77

GB HR SI SK GR TRFR DE ES IT NL PT DK SE FI NO RU PL CZ HU RO LV LT
Eesti
EE
TÖÖTAMINE
HOIATUS
Ärge kasutage lisaseadmeid ega lisandeid,
mida pole selle toote tootja soovitanud.
Soovitamata lisaseadmete ja lisandite
kasutamine võib põhjustada tõsist enese
vigastamist.
RAKENDUSALAD
Te võite kasutada seda toodet alltoodud
eesmärkidel:
Q Igat tüüpi puidutoodete puurimine
(metsamaterjal, vineer, komposiitpaneel ja kõva
puitkiudplaat)
Q Keraamika, plastiku, fiiberklaasi ja laminaadi
puurimine
Q Metallide puurimine
Betooni löökpuurimine
Q
See toode kasutab Ryobi One+ 18 V liitiumioon
akupakke ja Ryobi One+ 18 V nikkelkaadium
akupakke.
HOIATUS
Alati eemaldage oma trellpuurist akupakk,
kui paigaldate detaile, teete reguleerimisi,
paigaldate või eemaldate puuriterasid,
puhastate või kui toode on kasutuseta.
Akupaki eemaldamine ennetab soovimatut
käivitumist, mis võib põhjustada tõsiseid
vigastusi.
AKU KAITSEOMADUSED
Ryobi 18 V liitiumioonakud on loodud omadustega,
mis kaitsevad liitiumioon akuelemente ja
maksimeerivad aku eluiga. Mõningate tingimuste
korral võivad need sisseehitatud omadused
põhjustada aku ja tema poolt toidetava tööriista
erinevat käitumist võrreldes nikkelkaadium
akudega.
Mõningate rakendusalade korral võib aku
elektroonika anda akule signaali välja lülitumiseks
ning see põhjustada tööriista pöörlemise seiskumist.
Aku ja tööriista algseadistamiseks vabastage päästik
ja naaske normaalse töötamise juurde tagasi.
MÄRKUS: Edasiste aku välja lülitamiste
ennetamiseks vältige jõu kasutamist tööriistal.
Kui päästiku vabastamine ei algseadista akut ja
tööriista, võib akupakk olla ammendunud. Kui
ammendunud, hakkab akupakk ennast liitiumioon
aku laadijasse asetades laadima.
AKUPAKI PAIGALDAMISEKS
Vt. joonist 2.
Aku paigaldamiseks tehke järgmist.
Q Asetage pöörlemisselektor keskmisse
lukustusasendisse.
Q Sisestage akupakk tootesse nagu näidatud.
Q Veenduge enne tööga alustamist, et mõlemal
pool akupakki olevad fiksaatorid lukustuksid
omale kohale ning akupakk oleks kinnitatud
tootele.
AKUPAKI EEMALDAMISEKS
Aku eemaldamiseks tehke järgmist.
Q Vajutage alla mõlemal pool akupakki olevad
fiksaatorid.
Q Eemaldage akupakk puurilt.
HOIATUS
Akutooted on alati töökorras. Seetõttu peaks
lüliti olema alati lukustatud kui toodet ei
kasutata või kantakse enda kõrval.
LISAKÄEPIDEME REGULEERIMINE
Vt joonis 3.
Lisakäepideme reguleerimiseks tehke järgmised
toimingud.
Q Keerake lisakäepide lahti seda vastupäeva
pöörates (12).
Q Keerake lisakäepide soovitud asendisse.
Q Keerake lisakäepide seda päripäeva (11) pöörates
kinni.
PUURIMISSÜGAVUSE PIIRAJA REGULEERIMINE
Vt joonis 4.
Puurimissügavuse piiraja reguleerimiseks tehke
järgmised toimingud.
Q Lukustage lülitusnupp pöörlemissuuna valitsa
lükkamisega keskasendisse.
Q Keerake lisakäepide lahti seda vastupäeva
pöörates (12).
Q Reguleerige puurimissügavuse piiraja nii välja, et
puur ulatub välja soovitava avasügavuse võrra.
Q Keerake lisakäepide seda päripäeva (11) pöörates
kinni.
LÜLITI
Vt joonis 5.
Puuri SISSE lülitamiseks vajutage alla päästiklüliti.
Selle VÄLJA lülitamiseks vabastage päästiklüliti.
LÜLITI LUKUSTI
Vt joonis 5.
Lüliti nuppu on võimalik väljalülitatud asendisse
lukustada.
Seda funktsiooni on võimalik kasutada juhusliku
sisselülitumise tõkestamiseks selleks ajaks, kui
trelli ei kasutata. Lüliti nupu lukustamiseks seadke
pöörlemissuuna valits („edasi-tagasi”-nupp)
keskasendisse.
Märkus. Kui valits on keskasendis, siis on lüliti
nupp lukustatud.
74
Page 78

GB HR SI SK GR TRFR DE ES IT NL PT DK SE FI NO RU PL CZ HU RO LV LT
Eesti
EE
TÖÖTAMINE
PÖÖRLEMISSUUNA MUUTMINE
Vt joonis 5.
Tööriistal on reverseerimisfunktsioon, mida saab
sisse lülitada lülitusnupu kohal asuva valitsaga (6).
Q Päripäeva pöörlemine: seadke valits
vasakpoolsesse asendisse (16).
Q Vastupäeva pöörlemine: seadke valits
parempoolsesse asendisse (15).
REŽIIMIVALITS (4)
Q Tavapuurimiseks seadke valits asendisse .
Q Löökpuurimiseks seadke valits asendisse .
Ümberlülitamist tuleb teha siis, kui trell on välja
lülitatud.
Hammasülekanne lülitub soovitud režiimile alles
pärast seda, kui trell käivitatakse.
Märkus.Löökpuurimisrežiimilpoltidekinnikeeramisel
või muu kui SDS-plus puuri kasutamisel saab trell
vigastada. Nimetatud puhkudel kasutage ainult
tavapuurimisrežiimi.
Löökpuurimisel kasutage eranditult ainult
kõvasulamist lõikeservadega puuri, millel on SDSplus sabaosa. Trelli padrun ei võimalda kasutada
kauplustes saadaolevaid silindrilise sabaosaga
kivipuure.
LÖÖKPUURIMINE
Puurvasaraga puurimisel ole vaja sellele
tugevasti peale suruda. Sellega ei parane
trelli puurimisvõime. Liigne surve koormab
mootori liigselt üle.
Kontrollige puur regulaarselt üle. Nüri puur
tuleb teritada või asendada.
Löökpuurimisel kasutage alati kaitsekindaid,
kuulmiskaitseid ja lisakäepidet. Enne puurimise
alustamist kontrollige, kas ümberlülitusnupp on
oma asendisse kseeritud.
SDS PUURIDE PAIGALDAMINE JA VAHETAMINE
Vt joonis 6.
Puurvasaral on puuri kinnitussüsteem SDS-Plus.
Q Enne padrunisse (2) sisestamist puhastage
kinnitatav tööriist ja kandke sabaosale veidi
määret.
Q Tõmmake lukustusmuhv tagasi (3) ja hoidke
seda kinni.
Q Pange tolmuvaba puur padrunisse nii kaugele
kui võimalik ja pöörake seda.
Q Laske lukustusmuhv lahti, et tööriist lukustada.
Q Kontrollige tööriista lukustumist seda välja
tõmmata proovides.
TÖÖRIISTA EEMALDAMINE SDS-PLUS PADRUNIST
Tõmmake lukustusmuhv tagasi ja võtke puur välja.
ÜLEMINEKUPADRUN LÄBIMÕÕDUGA 35 mm (17)
Vt joonis 6.
Avade puurimiseks metalli, puidu või plasti
sisse SDS-plus sabaosata puuridega on saadaval
üleminekupadrun.
KASUTUSSOOVITUSED
Ärge puurige kohtades, kus on varjatud
elektrijuhtmed, gaasi- või veetorustikud. Kontrollige
puuritav koht enne töö alustamist metalliotsijaga
üle.
LIUGSIDUR
Kui puur kiilub kinni või jääb millegi külge kinni, siis
hakkab sidur libisema.
Tõmmake puuri viivitamatult tagasi, et trell koormuse
alt vabastada.
Hoidke trelli tugevasti kahe käega ja võtke
ohutu kehaasend.
HOOLDUS
HOIATUS:
Kui hooldate, kasutage ainult identseid
Ryobi varuosi. Muude osade kasutamine
võib luua ohuolukorra või põhjustada toote
kahjustumist.
Plastikosasid puhastades vältige lahusteid. Enamik
plastikuid on erinevat tüüpi poes müüdavate lahuste
kahjustuste suhtes altid ja võivad saada neid
kasutades kahjustatud. Kasutage mustuse, tolmu,
õli, määrde jne eemaldamiseks puhast riiet.
HOIATUS
Ärge lubage mitte kunagi pidurivedelikel,
bensiinil, petrooleumist valmistatud
toodetel, immutusõlidel jne puutuda
kokku plastikosadega. Kemikaalid võivad
kahjustada, nõrgendada või hävitada
plastiku, mis võib omakorda põhjustada
vigastusi kasutajale.
75
Page 79

GB HR SI SK GR TRFR DE ES IT NL PT DK SE FI NO RU PL CZ HU RO LV LT
Eesti
EE
HOOLDUS
HOIATUS
Ärge väärkasutage elektritööriistu. Valed
töövõtted võivad kahjustada tööriista ja
töödeldavat pinda.
HOIATUS
Ärge üritage seda tööriista ümber
ehitada ega luua lisaseadmeid, mida pole
soovitatud selle tööriistaga koos kasutada.
Iga selline muutmine või ümberehitus on
väärkasutamine ja võib põhjustada ohtliku
olukorra ja viia võimaliku tõsise vigastuseni.
KESKKONNAKAITSE
Jäätmetena utiliseerimise asemel töödelge
toormaterjalid ümber. Masin, lisaseadmed ja
pakend tuleks keskkonnasõbralikuks
ümbertöötlemiseks sorteerida.
SÜMBOL
Ohutusalane teave
V Volt
Alalisvool
Puurimisrežiim
Löökpuurimisrežiim
CE vastavus
Enne seadme kasutamist lugege palun
kasutusjuhend hoolega läbi.
Kandke kuulmise kaitsevahendeid
Kandke silmade kaitsevahendeid
Tekkivad jäätmed tuleb suunata
taaskäitlemisse.
Mittekasutatavaid elektritooteid ei tohi
visata olmejäätmete hulka, vaid tuleb viia
vastavasse kogumispunkti. Vajadusel
küsige sellekohast nõu oma edasimüüjalt
või vastavalt kohaliku omavalitsuse
institutsioonilt.
min
-1
Pöördeid või edasi-tagasi liikumise kordi
minutis
76
Page 80

GB SI SK GR TRFR DE ES IT NL PT DK SE FI NO RU PL CZ HU RO LV LT EE
Hrvatski
HR
OPûA PRAVILA O SIGURNOSTI
Q Koristite pomoünu ruþku koja je isporuþena
uz alat. Gubitak kontrole može dovesti do
tjelesnih ozljeda.
Q Prilikom rada s udarnim bušilicama nosite
štitnike za uši. Izlaganje buci može izazvati
gubitak sluha.
Q Ako radnja bušenja stvara prašinu nosite masku
na licu ili masku protiv prašine.
Q Kad izvodite radove na mjestima gdje pribor
za rezanje može doüi u kontakt sa skrivenim
ožiþenjem ili svojim vlastitim kabelom,
držite alat za izoliranu površinu za hvatanje.
Dodirivanje „žive“ žice priborom za rezanje može
izložiti metalne dijelove alata elektriþnoj energiji
i može dovesti do strujnog udara na operatera.
UPUTE ZA SIGURNO RUKOVANJE
Q Budite sigurni da je ureÿaj prikljuþen samo na
napon koji je naznaþen na ploþici.
Q Nikada ne koristite alatku ukoliko nedostaje
poklopac ili bilo koji od zavrtnja. Ukoliko su
poklopac ili zavrtnji skinuti, vratite ih prije
uporabe alatke. Održavajte sve dijelove u
dobrom radnom stanju.
Q Uvijek osigurajte alatku kada radite na visini.
Q Nikada ne dotiþite nož, svrdlo, brusni kotaþ ili
druge pokretne dijelove tijekom uporabe.
Q Nikada ne pokreüite alatku kada je njen rotirajuüi
dio u kontaktu s materijalom koji se obraÿuje.
Q Nikada ne spuštajte alatku dok se svi njeni
rotirajuüi dijelovi sasvim ne zaustave.
Q PRIBOR: Uporaba drugog pribora ili dodataka
osim onih koji su naznaþeni u ovim uputama
mogu predstavljati opasnost.
Q ZAMJENA DIJELOVA: Prilikom servisiranja
koristiti samo originalne zamjenske dijelove.
16. Rotacija u naprijed
17. Adapter stezne glave od 35 mm
(nije ukljuþeno)
18. Svrdlo s nastavkom za uvrtanje (nije ukljuþeno)
19. SDS svrdlo (nije ukljuþeno)
SPECIFIKACIJE
Napon 18 V
Brzina bez optereüenja 0-1000 min
Udari þekiüa (udari po minuti) 0- 4000 min
Energija udara 1,5 J
Maksimalni kapacitet bušenja:
drvo 16 mm
þelik 13 mm
beton (bušenje s þekiüem) 12 mm
Preporuþeni raspon bušenja s þekiüem 4- 12 mm
Vrsta spoja sa svrdlom SDS-plus
Težina – nije ukljuþena baterija (Kg) 2,2
MODEL BATERIJA
(nije ukljuþena)
BPP-1815
BPP-1817
BPP-1815M
BPP-1817M
BPL-1820
CRH1801
BPL-1815
BPP-1815
BPP-1817
BPP-1815M
BPP-1817M
PUNJAý
ukljuþen)
BCL-1800
BCS618
BCL1418
BC-1815S
BC-1800
BCA180
-1
-1
(nije
OPIS
1. Zaštitni poklopac protiv prašine
2. SDS stezna glava
3. Stezaljka za prirubnicu
4. Izbornik naþina rada
5. Sklopka za pokretanje (ON/OFF – Uklj./isklj.)
6. Izbornik smjera rotacije
(naprijed/nazad/središnje zakljuþavanje)
7. Pomoüna ruþka
8. Šipka mjeraþa dubine
9. Baterija (nije ukljuþena)
10. Jeziþci
11. Za pritezanje
12. Za otpuštanje
13. Dubina bušenja
14. Svrdlo za bušenje (nije ukljuþeno)
15. Rotacija u nazad
RAD
POZOR:
Nemojte postati previše bliski s ureÿajem
kako ne biste postali nemarni. Zapamtite da
je nemarnost dovoljna da u djeliüu sekunde
izazove ozbiljnu povredu.
POZOR:
Uvijek nosite zaštitne naoþale ili zaštitne
naoþale s boþnim štitnicima kada rukujete
motoriziranim alatima. Propust da se uþini
tako rezultira da neki odbaþeni predmet
uleti u oko što može imati za posljedicu
ozbiljnu povredu.
77
Page 81

GB SI SK GR TRFR DE ES IT NL PT DK SE FI NO RU PL CZ HU RO LV LT EE
Hrvatski
HR
RAD
POZOR:
Ne koristite nikakav dodatak niti pribor koji
nije preporuþio proizvoÿaþ ovog proizvoda.
Korištenje dodataka ili pribora koji nije
preporuþio proizvoÿaþ može izazvati
ozbiljne osobne povrede.
PRIMJENA
Ovaj proizvod možete koristiti u svrhe pobrojane
niže:
Q Bušenje svih vrsta materijala od drveta (graÿa,
šperploþa, panel ploþa, kombinirana ploþa, tvrde
ploþe)
Q Bušenje keramike, plastike, fiberglasa i laminata.
Q Bušenje metala
Bušenje þekiüem u betonu
Q
Ova alatka može raditi na sljedeüe baterije:
Ryobi One+ 18V litij-ion i Ryobi One+ 18V niklkadmijum.
POZOR:
Uvijek izvadite bateriju iz bušilice kada
sastavljate dijelove, vršite podešavanja,
postavljanje ili uklanjanje svrdla, þišüenja
ili kada se ne koristi. Uklanjanje baterije
sprijeþit üe nehotiþno pokretanje koje bi
moglo izazvati ozbiljne osobne povrede.
ZAŠTITNE KARAKTERISTIKE BATERIJE
Ryobi 18V litij-ion baterije su konstruirane s
karakteristikama da zaštite üelije litij-iona i
maksimalno produže njihov vijek. U nekim radnim
uvjetima ove ugraÿene karakteristike mogu uþiniti
da baterija i alatka koju napaja energijom djeluje
drugaþije od nikl-kadmijum baterija.
Tijekom nekih radnji, elektronika može signalizirati
da üe se baterija iscrpiti što üe izazvati prestanak
rada alatke. Da se baterija vrati u prvobitno stanje
opustite prekidaþ i nastavite normalan rad.
NAPOMENA: Kako biste izbjegli ponovno gašenje
ne forsirajte alatku.
Ukoliko opuštanje prekidaþa ne vrati bateriju u
prvobitno stanje, baterija je istrošena. Ako je
istrošena, baterija üe se napuniti ako se stavi u
punjaþ za litij-ion baterije.
POSTAVLJANJE BATERIJE
Pogledajte Sliku 2.
Za montažu baterije slijedite ove korake:
Q Postavite preklopnik za izbor rotiranja u središnji
položaj.
Q Postavite bateriju u alatku kako je prikazano.
Q Provjerite da su pera na obje strane baterije
na svojim mjestima i da je baterija sigurno
postavljena u proizvod prije poþetka uporabe.
VAĐENJE BATERIJE
Za uklanjanje baterije slijedite ove korake:
Q Pritisnite pera s obje srane baterije.
Q Izvadite bateriju iz bušilice.
POZOR:
Proizvodi na baterijski pogon su uvijek u
radnom stanju. Stoga, prekidaþ uvijek treba
da je zakljuþan kada se proizvod ne koristi
ili ako se nosi.
NAMJEŠTANJE POMOûNE RUýKE
Pogledajte sliku 3.
Za namještanje pomoüne ruþke slijedite ove korake:
Q Otpustite pomoünu ruþku tako da okreüete gumb
suprotno od smjera kazaljki na satu (12).
Q Rotirajte pomoünu ruþku u željeni položaj.
Q ývrsto pritegnite pomoünu ruþku tako da
okreüete gumb u smjeru kazaljki na satu (11).
NAMJEŠTANJE ŠIPKE MJERAýA DUBINE
Pogledajte sliku 4.
Za namještanje šipke mjeraþa dubine slijedite ove
korake:
Q Zakljuþajte sklopku za pokretanje postavljajuüi
izbornik smjera rotacije u središnji položaj.
Q Otpustite pomoünu ruþku tako da okreüete gumb
suprotno od smjera kazaljki na satu (12).
Q Namjestite šipku mjeraþa dubine tako da se
svrdlo produžuje iza šipke do potrebne dubine
bušenja.
Q Pritegnite pomoünu ruþku tako da okreüete
gumb u smjeru kazaljki na satu (11).
SKLOPKA ZA POKRETANJE
Pogledajte sliku 5.
Ukljuþivanje (ON) bušilice vrši se pritiskom na
prekidaþ. Iskljuþivanje (OFF), vrši se puštanjem
prekidaþa.
ZAKLJU»AVANJE
Pogledajte sliku 5.
Zasun se moæe zakljuËati u poloæaju “iskljuËeno”.
Ova funkcija omoguÊava da se izbjegnu neæeljena
pokretanja vae builice-zavrtaËa dok je ne upotrebljavate.
Kako biste otponac zakljuËali, postavite sklopku za odabir
smjera rotacije (smjer zavrtanja / odvrtanja) u sredinji
poloæaj.
Napomena: Kad se sklopka nalazi u sredinjem poloæaju,
otponac je blokiran.
78
Page 82

GB SI SK GR TRFR DE ES IT NL PT DK SE FI NO RU PL CZ HU RO LV LT EE
Hrvatski
HR
RAD
REVERZIBILNA FUNKCIJA
Pogledajte sliku 5.
Ovaj alat ima funkciju reverzibilne rotacije koja
se kontrolira pomoüu izbornika smještenog iznad
sklopke za pokretanje (6).
Q Rotacija u smjeru kazaljki na satu: postavite
polugu izbornika u položaj ulijevo (16).
Q Rotacija suprotno od smjera kazaljki na satu:
postavite polugu izbornika u položaj udesno
(15).
IZBORNIK NAýINA RADA (4)
Q za bušenje postavite izbornik u položaj .
Q Za bušenje s þekiüem postavite u
Prebacivanje prekidaþa najbolje se izvodi kad alat
miruje.
Odmah nakon što se aktivira sklopka za pokretanje
i ureÿaj se pokrene, mjenjaþ prebacuje u odabrani
naþin rada.
Napomena: Naþin rada bušenja s þekiüem oštetit üe
mehanizam alata kad se koristi za brzo ili bušenje sa
svrdlom koje nije SDS-plus. Odaberite naþin bušenja
samo za takvu svrhu.
Prilikom bušenja s þekiüem, iskljuþivo koristite
samo svrdla s tvrdim metalom i osovinom SDSPlus. Korištenje raspoloživih komercijalnih zidarskih
svrdla s cilindrima, koji služe kao adapter za bušenje,
nije moguüe.
BUŠENJE S ýEKIûEM
Kad bušite s þekiüem nije potrebno
primjenjivati preveliki pritisak. U ovom
sluþaju performanse se neüe poveüati.
Prevelik pritisak stavlja nepotrebno
optereüenje na motor.
Redovito provjeravajte svrdla. Ponovno
naoštrite ili zamijenite tupa svrdla.
.
Q Oþistite svrdlo i namastite ga sa strojnom mašüu
prije umetanja u steznu glavu (2).
Q Povucite unazad stezaljku za prirubnicu (3) i
držite je.
Q Gurnite i rotirajte oþišüeni alat u držaþ svrdla
dokle got ide.
Q Otpustite stezaljku za prirubnicu kako bi
zabravila svrdlo.
Q Provjerite da li je svrdlo zabravljeno tako da ga
povuþete.
UKLANJANJE SVRDLA IZ SUSTAVA SDS-PLUS
Povucite unazad stezaljku za prirubnicu i uklonite
svrdlo.
ADAPTER STEZNE GLAVE OD 35 mm (NIJE
UKLJUýEN) (17)
Pogledajte sliku 6.
Za radove bušenja u metalu, drvu i plastici sa svrdlima
koja nemaju osovinu SDS plus, na raspolaganju je
adapter.
PRAKTIýNI SAVJETI
Nemojte bušiti skrivene elektriþne vodove ili cijevi od
plina i vode. Prije poþetka provjerite radno podruþje,
npr. s detektorom za metal.
PROKLIZAVANJE STEZNE GLAVE
Ako se alat zaglavi ili bude zahvaüen oslobaÿa se
proklizavanje stezne glave.
Odmah uklonite optereüenje s bušilice tako da je
povuþete unazad.
Uvijek bušilicu þvrsto držite s obje ruke i
držite sigurnu udaljenost.
ODRŽAVANJE
UPOZORENJE:
Prilikom servisiranja koristiti originalne
Ryobi zamjenske dijelove. Uporaba bilo
kojeg drugog dijela može izazvati opasnost
ili ošteüenje proizvoda.
Prilikom bušenja s þekiüem radite samo s zaštitnim
naoþalama, zaštitom za uši i pomoünom ruþkom.
Prije nego zapoþnete s radom provjerite da li je
gumb za izmjenu aretiran u položaju.
UýVRŠûIVANJE I PROMJENA SDS SVRDALA
Pogledajte sliku 6.
Ovaj alat opremljen je sa sustavom za prikljuþivanje
SDS-plus.
Izbjegavajte uporabu otapala za þišüenje plastiþnih
dijelova bušilice. Veüina plastiþnih dijelova osjetljiva
je na ošteüenje razliþitim vrstama komercijalnih
vrsta otapala i mogu se odštetiti njihovom
uporabom. ýista krpa je dovoljna da se ukloni
prljavština, prašina, ulje, mast i sl.
79
Page 83

GB SI SK GR TRFR DE ES IT NL PT DK SE FI NO RU PL CZ HU RO LV LT EE
Hrvatski
ODRŽAVANJE
POZOR:
Nikada ne dozvolite da koþiona teþnost,
benzin, proizvodi na bazi benzina, prodorna
ulja, itd., doÿu u dodir s plastiþnim
dijelovima bušilice. Kemikalije mogu
oštetiti, oslabiti ili uništiti plastiku što može
rezultirati ozbiljnim osobnim povredama.
POZOR:
Nemojte pogrešno koristiti alatku. Pogrešna
uporaba može oštetiti alatku kao i radni
materijal.
POZOR:
Ne pokušavajte mijenjati ovu alatku niti
praviti pribor koji se ne preporuþa za
uporabu s ovom alatkom. Svaka takva
izmjena ili preinaka je pogrešno korištenje i
može imati za posljedicu opasno stanje koje
može izazvati ozbiljne osobne povrede.
Nosite zaštitu za vid
Reciklaža nepoželjna
Otpadni elektriþni proizvodi ne treba da
se odlažu s otpadom iz domaüinstva.
Molimo da reciklirate gdje je to moguüe.
Potražite savjet od lokalnih vlasti ili
prodavca kako reciklirati.
HR
ZAŠTITA OKOLIŠA
Reciklirajte sirovine umjesto odlaganje kao
otpad. Ovaj ureÿaj, pribor i materijal za
pakiranje treba sortirati za reciklažu u cilju
zaštite okoliša.
SIMBOL
Sigurnosno upozorenje
V Volti
-1
min
Obrtaja ili gibanja u minutu
Istosmjerna struja
Naþin rada bušenja
Naþin rada bušenja s þekiüem
Sukladno CE
Molimo da pažljivo proþitate upute prije
pokretanja stroja.
Nosite zaštitu za sluh
80
Page 84

GB SK GR TRFR DE ES IT NL PT DK SE FI NO RU PL CZ HU RO LV LT EE HR
Slovensko
SI
POSEBNI VARNOSTNI PREDPISI
Q Uporabljajte pomožni roþaj, ki je del orodja.
Izguba nadzor lahko privede do osebnih
poškodb.
Q Pri delu z udarnimi vrtalniki nosite zašþito
za sluh. Izpostavljenost hrupu lahko povzroþi
izgubo sluha.
Q Nosite obrazne maske ali maske proti prahu,
þe pri vrtanju nastaja prah.
Q Elektriþno orodje držite za izolirane držalne
površine, ko bi se pri uporabi pripomoþki
za rezanje lahko dotikali skrite žice.
pripomoþki za rezanje dotaknejo žice, ki je
pod elektriþno napetostjo, lahko izpostavljeni
kovinski deli elektriþnega orodja postanejo »živi«
in povzroþijo elektriþni udar.
ýe se
NAVODILA ZA VARNO UPORABO
Q Preverite, da je orodje prikljuþeno na ustrezno
napajanje, navedeno na podatkovni plošþici
Q Nikoli ne uporabljajte orodja, ki nima
namešþenega pokrova ali je brez vijakov. ýe
pokrov ali vijake odstranite, jih pred uporabo
namestite nataj. Vzdržujte orodje v dobrem
stanju.
Q Pri delu v dvignjenem položaju, orodje ustrezno
podprite.
Q Nikoli se ne dotikajte rezila, svedra, brusilnega
koluta ali ostalih premikajoþih se delov.
Q Orodja ne zaganjajte, þe je vrteþi del v stiku s
površino.
Q Orodja ne odlagajte dokler se vrteþi deli
popolnoma ne zaustavijo.
Q PRIKLJUýKI: Uporaba prikljuþkov ali dodatkov,
ki niso priporoþeni je lahko nevarna.
Q REZERVNI DELI: porabljajte dodatni roþaj. Izguba
nadzora lahko povzroþi telesne poškodbe.
OPIS
14. Sveder (ni priložen)
15. Obratna smer vrtenja
16. Vrtenje naprej
17. 35mm prilagoditev pritezalnika (ni priložena)
18. Nastavek izvijaþa (ni priložen)
19. Vrtalni nastavek (ni priložen)
TEHNIýNI PODATKI IZDELKA
Napetost 18 V
Brez obremenitve 0-1.000 min
Udarci kladiva (udarci na minuto) 0-4000 min
Energija udarca 1,5 J
Maks. zmogljivost vrtanja:
Les 16 mm
Jeklo 13 mm
Beton (udarno vrtanje) 12 mm
Priporoþeno obmoþje udarnega vrtanja 4-12 mm
Tip prikljuþka nastavka SDS-plus
Teža – brez baterije (kg) 2.2
MODEL BATERIJSKI PAKET
(ni vkljuþen)
BPP-1815
BPP-1817
BPP-1815M
BPP-1817M
BPL-1820
CRH1801
BPL-1815
BPP-1815
BPP-1817
BPP-1815M
BPP-1817M
POLNILEC
(ni vkljuþen)
BCL-1800
BCS618
BCL1418
BC-1815S
BC-1800
BCA180
-1
-1
1. Zašþitni pokrovþek proti prahu
2. SDS pritezalnik
3. Objemna prirobnica
4. Gumb za izbiro naþina
5. Stikalo za VKLOP/IZKLOP
6. Gumb za izbiro smeri vrtenja
(naprej/nazaj/sredinski zaklep)
7. Pomožni roþaj
8. Palica za merjenje globine
9. Baterija (ni priložena)
10. Zatiþi
11. Za privitje
12. Za odvitje
13. Globina vrtanja
DELOVANJE
OPOZORILO
Ne dovolite si, da bi bili zaradi dobrega
poznavanja naprave nepazljivi. Zapomnite si,
da lahko že trenutek nepazljivosti povzroþi
resno poškodbo.
OPOZORILO
Pri delu z napravo vedno uporabljajte
varovalne naoþnike ali varnostna oþala s
stranskimi šþitniki.ýe tega ne storite, vam
lahko v oko prileti drobec in povzroþi resno
poškodbo.
81
Page 85

GB SK GR TRFR DE ES IT NL PT DK SE FI NO RU PL CZ HU RO LV LT EE HR
Slovensko
SI
DELOVANJE
OPOZORILO
Ne uporabljajte sestavnih delov ali pribora,
ki ga ne priporoþa proizvajalec te naprave.
Uporaba nepriporoþenih sestavnih delov
ali pribora lahko povzroþi resne telesne
poškodbe.
APLIKACIJE
Orodje lahko uporabljate za spodaj navedene
namene:
Q Vrtanje v les, (surov les, masivni les, tvoriva,
panelne plošþe, iverne plošþe)
Q Vrtanje v keraiko, plastiko, steklena vlakna in
laminate
Q Vrtanej v kovine
Udarno vrtanje v beton
Q
Izdelek uporablja Ryobi One+ 18 V litijeve bateriije
in Ryobi One+ 18 V nikel-kadmijeve baterije.
OPOZORILO
Pred sestavljanjem ali razstavljanjem
naprave vedno najprej odstranite baterijo.
Tako prepreþite poškodbe, ki bi jih lahko
povzroþilo orodje pri nenadnem zagonu.
SISTEM ZA ZAŠýITO AKUMULATORJA
Litijevi ionski akumulatorji Ryobi 18 V so opremljeni
z vgrajenim sistemom zašþite, ki varuje litijeve
ionske celice in podaljšuje življenjsko dobo
akumulatorja. V nekaterih pogojih delovanja
lahko ta sistem zašþite povzroþi, da akumulator in
naprava, ki se z njim napaja, delujeta drugaþe kot
pri uporabi nikelj kadmijevih akumulatorjev.
Med nekaterimi delovnimi postopki lahko
elektronika akumulatorja povzroþi njegov izklop,
kar povzroþi prenehanje delovanja naprave. Za
ponastavitev akumulatorja in naprave sprostite
sprožilec in nadaljujte z normalnim obratovanjem.
OPOMBA: Da bi prepreþili nadaljnje izklapljanje
akumulatorja, se izogibajte forsiranju naprave.
ýe sprostitev sprožilca ne ponastavi akumulatorja
in naprave, to pomeni, da je akumulator popolnoma
prazen.Prazen akumulator ponovno napolnite tako,
da ga vstavite v polnilnik litijevih baterij.
NAMESTITEV BATERIJE
Glejte sliko 2
Sledite tem korakom, da namestite baterijo:
Q Gumb za izbiro vrtenja postavite v osrednji
položaj
Q Vstavite baterijo kot je prikazano
Q Prepriþajte se, þe so zaklepi na obeh straneh
baterije na mestih in je slednaj dobro pritrjena
ODSTRANITEV BATERIJE
Sledite tem korakom, da odstranite baterijo:
Q Stisnite zaklepa na obeh straneh baterije
Q Odstranite baterijo iz orodja
OPOZORILO
Baterijski izdelki so vedno v stanju za
obratovanje. Zato vam sverujemo da po
uporabi ali med prenašanjem stikalo za
vklop premaknete v zaklenjen položaj.
NAMESTITEV POMOŽNEGA ROýAJA
Glejte sliko 3.
Za namestitev pomožnega roþaja sledite tem
korakom:
Q Pomožni roþaj sprostite tako, da gumb obrnete v
nasprotni smeri urinega kazalca (12).
Q Pomožno roþaj postavite v želen položaj.
Q Pomožni roþaj varno pritrdite tako, da gumb
obrnete v smeri urinega kazalca (11).
NASTAVITEV PALICE ZA MERJENJE GLOBINE
Glejte sliko 4.
Za nastavitev palice za merjenje globine sledite tem
korakom:
Q Sprožilec zaklenite tako, da gumb za smer
vrtenja postavite sredinski položaj.
Q Pomožni roþaj sprostite tako, da gumb obrnete v
nasprotni smeri urinega kazalca (12).
Q Palico za merjenje globine nastavite tako, da
sveder sega dlje od konca palice in da dosežete
želeno globino vrtanja.
Q Pomožni roþaj pritrdite tako, da gumb obrnete v
smeri urinega kazalca (11).
STIKALO
Glejte sliko 5.
Za VKLOP vrtalnika stisnite stikalo za vklop. Za
IZKLOP stikalo stisnite ponovno.
ZAKLEP STIKALA
Glejte Sliko 4.
Sprožilec stikala lahko zaklenete v položaju OFF.
Tako prepreþite nevarnost nenamernega vklopa,
ko orodje ni v uporabi. Sprožilec stikala na vrtalniku
zaklenete tako, da pomaknete izbirnik smeri vrtenja
(Izbirnik naprej / nazaj) v srednji položaj.
Opomba: Ko je izbirnik v srednjem položaju, je
sprožiles stikala zaklenjen.
POVRATNO
Glejte sliko 5.
To orodje ima funkcijo, ki omogoþa obratno smer
vrtenja, ki jo nadzoruje gumb, ki se nahaja na
sprožilcem (6).
82
Page 86

GB SK GR TRFR DE ES IT NL PT DK SE FI NO RU PL CZ HU RO LV LT EE HR
Slovensko
SI
DELOVANJE
Q Vrtenje v smeri urinega kazalca: gumb potisnite
v levo (16).
Q Vrtenje v nasprotni smeri urinega kazalca: gumb
potisnite v desno (15).
GUMB ZA IZBIRO NAýINA (4)
Q Za vrtanje postavite izbirnik v položaj .
Q Za udarno vrtanje nastavite izbirnik na
Preklop lahko najbolje izvedete v mirovanju.
Šele potem, ko stikalo aktivirate in se orodje zažene,
menjalnik preklopi na izbrani naþin.
Opomba: Udarno vrtanje poškoduje mehanizem
orodja, þe ta naþin uporabljate za pritrjevanje ali
vrtanje z nastavkom, ki ni SDS plus. Tak naþin vrtanja
izberite le s tem namenom.
Pri udarnem vrtanju uporabljajte izkljuþno svedre
iz trde kovine in z utorno gredjo SDS Plus. Uporaba
komercialnih zidarskih nastavkov z vrtalnim
prilagojevalnikom ni mogoþa.
UDARNO VRTANJE
Pri udarnem vrtanju vam ni treba preveþ
pritiskati. Na ta naþin ne izboljšate
u þ inkovitosti. Preveþ pritiska po
nepotrebnem obremenjuje motor.
Redno preverjajte svedre. Skrhane svedre
ponovno nabrusite ali pa jih zamenjajte.
.
ODSTRANJEVANJE NASTAVKA IZ SISTEMA SDS
PLUS
Objemno prirobnico potegnite nazaj in odstranite
nastavek.
35mm PRILAGODITEV PRITEZALNIKA (NI
PRILOŽENA) (17)
Glejte sliko 6
Za vrtanje v kovino, les in plastiko s svedri, ki
nimajo gredi SDS Plus, je na voljo prilagoditev
pritezalnika.
PRAKTIýNI NASVETI
Ne vrtajte v skrite elektriþne napeljave ali plinske
in vodovodne cevi. Obmoþje, kjer boste delali, pred
zaþetkom lahko pregledate z detektorjem kovin.
DRSNA SKLOPKA
ýe orodje zablokira ali se zatakne, se drsna sklopka
sprosti.
Takoj odstranite breme z orodja tako, da vrtalnik
potegnete nazaj.
Orodje vedno trdno držite z obema rokama
in stojte stabilno.
VZDRŽEVANJE
OPOZORILO
Pri vzdrževanju orodja uporabljajte le
enake nadomestne dele Ryobi. Uporaba
kakršnihkoli drugaþnih delov je nevarna in
lahko poškoduje izdelek.
Pri udarnem vrtanju nosite zašþitna oþala, zašþito za
sluh in uporabljajte pomožni roþaj. Preden zaþnete z
delom, preverite, þe je preklopni gumb zaskoþen na
svojem mestu.
NAMEŠýANJE IN ZAMENJAVA SDS NASTAVKOV
Glejte sliko 6
To orodje ima prikljuþni sistem SDS Plus.
Q Nastavek oþistite in ga namažite s strojno
mastjo, preden ga ponovno vstavite v pritezalnik
(2).
Q Objemno prirobnico (3) potegnite nazaj in jo
držite.
Q Neprašno orodje potisnite in zavrtite kar se da
globoko v držalo za nastavek.
Q Objemno prirobnico spustite, da zaklene
nastavek.
Q Da je nastavek zaklenjen, preverite tako, da ga
potegnete.
Izogibajte se uporabi topil za þišþenje plastiþnih
delov.Veþina plastiþnih materialov je obþutljiva
na mnoge vrste komercialno dostopnih topil in
jih z njihovo uporabo lahko poškodujemo. Za
odstranjevanje umazanije, prahu, olja, masti in
podobnega uporabljajte þisto krpo.
OPOZORILO
Ne dovolite, da bi zavorne tekoþine,
gorivo, izdelki, ki vsebujejo petrolej, olja in
podobno kadarkoli prišli v stik s plastiþnimi
deli. Te snovi vsebujejo kemikalije, ki lahko
poškodujejo, oslabijo ali uniþijo plastiko.
OPOZORILO
Ne ravnajte neprimerno z elektriþnimi
napravami. Grobo ravnanje lahko poškoduje
napravo in obdelovanec.
83
Page 87

GB SK GR TRFR DE ES IT NL PT DK SE FI NO RU PL CZ HU RO LV LT EE HR
Slovensko
SI
VZDRŽEVANJE
OPOZORILO
Ne poskušajte spreminjati naprave ali
izdelovati pripomoþkov, za katere naprava
ni predvidena.Take spremembe so primer
napaþne uporabe in lahko povzroþijo
nevarnost in težke telesne poškodbe.
ZAŠýITA OKOLJA
Namesto, da napravo zavržete,
reciklirajte surovine. Stroj, pribor in
embalažo je treba reciklirati na okolju
prijazen naþin.
SIMBOL
Varnostni alarm
V Volti
-1
min
Vrtljaji ali nihaji na minuto
Enosmerni tok
Vrtanje
Udarno vrtanje
Skladnost CE
Prosimo, da si pred zagonom naprave
pozorno preberete navodila
Nosite zašþito za ušesa
Nosite zašþito za oþi
Reciklaža ni potrebna
Odpadne elektriþne izdelke ne odlagajte
skupaj z ostalimi gospodinjskimi odpadki
Reciklažo opravljajte na predpisanih
mestih Za reciklažni nasvet se obrnite na
lokalne oblasti.
84
Page 88

GB GR TRFR DE ES IT NL PT DK SE
FI
NO RU PL CZ HU RO LV LT EE HR SI
Slovenþina
SK
ŠPECIÁLNE BEZPEýNOSTNÉ PRAVIDLÁ
Q Použite pomocné držadlo, dodávané s
nástrojom. Strata kontroly môže spôsobiŘ
zranenie osôb.
Q V prípade príklepových vŌtaþiek noste
ochranu sluchu. Vystavenie sa hluku môže
spôsobiŘ stratu sluchu.
Q Noste tvárovú a protiprachovú masku, ak sa
pri vŌtaní produkuje prach.
Q Pri vykonávaní operácie, kedy môže rezacie
príslušenstvo prísŘ do kontaktu so skrytým
vedením, držte nástroj za izolované úchopné
miesta. Pri kontakte rezacieho príslušenstva so
„živým“ vodiþom by mohli byŘ obnažené kovové
diely pod prúdom a spôsobiŘ obsluhujúcemu
úder elektrickým prúdom.
POKYNY PRE BEZPEýNÉ ZAOBCHÁDZANIE
Q Uistite sa, že zariadenie je zapojené do siete
korešpondujúcej so štítkom.
Q Nikdy nepoužívajte zariadenie, ak chýba kryt,
alebo niektorá skrutka na náradí. Ak boli vybraté,
pred prácou ich naspäŘ namontujte. Udržujte
všetky diele v dobrej pracovnom stave.
Q Vždy zaistite náradie pri práci vo vyvýšenej
polohe.
Q Nikdy sa nedotýkajte þepele, vrtáku, brúsneho
kotúþu, alebo iných pohyblivých þastí poþas
prevádzky.
Q Nikdy nezapínajte náradie, ak sa rotujúci diel
dotýka materiálu.
Q Nikdy nepokladajte náradie predtým, ako sa
pohyblivé þasti úplne zastavia.
Q PRÍSLUŠENSTVO: Použitie iného príslušenstva,
alebo nástavcov ako odporuþených v tomto
návode predstavuje riziko.
Q NÁHRADNÉ DIELY: Pri oprave používajte iba
totožné náhradné diely.
12. Na uvoĹnenie
13. Hĵbka vŌtania
14. VŌtací vrták (nedodáva sa)
15. Spätné otáþanie
16. Otáþanie vpred
17. 35 mm adaptér skĹuþovadla
(nedodáva sa)
18. Skrutkovací vrták (nedodáva sa)
19. SDS vrták (nedodáva sa)
ŠPECIFIKÁCIE
Napätie 18 V
RýchlosŘ pri nulovej záŘaži 0-1000 min
Údery kladiva (úderov za minútu) 0-4 000 min
Energia nárazu 1,5 J
Maximálna kapacita vŌtania:
Drevo 16 mm
OceĹ 13 mm
Betón (vŌtanie kladivom) 12 mm
Odporúþaný rozsah
vŌtania kladivom 4-12 mm
Typ pripojenia vrtáku SDS-plus
HmotnosŘ – nezahŌŁajúc
súpravu batérie (Kg) 2,2
MODEL BATÉRIOVÝ ýLÁNOK
(nie je dodaný)
BPP-1815
BPP-1817
BPP-1815M
BPP-1817M
BPL-1820
CRH1801
BPL-1815
NABÍJAýKA
(nie je
dodaný)
BCL-1800
BCS618
BCL1418
-1
-1
OPIS
1. Kryt na ochranu pred prachom
2. SDS skĹuþovadlo
3. Manžeta svorky
4. Voliþ režimu
5. Spínaþ ON / OFF (ZAP / VYP)
6. Voliþ smeru otáþania
(Vpred/vzad/stredové uzamknutie)
7. Pomocné držadlo
8. Tyþ na meranie hĵbky
9. Súprava batérie (nedodáva sa)
10. Západky
11. Na dotiahnutie
BPP-1815
BPP-1817
BPP-1815M
BC-1815S
BC-1800
BCA180
BPP-1817M
PREVÁDZKA
VAROVANIE
NedovoĹte, aby rutina oslabila vašu
opatrnosŘ. Zapamätajte si, že aj v
Ĺahostajnosti aj zlomok sekundy môže viesŘ
k vážnym zraneniam.
85
Page 89

GB GR TRFR DE ES IT NL PT DK SE
FI
NO RU PL CZ HU RO LV LT EE HR SI
Slovenþina
SK
PREVÁDZKA
PVAROVANIE:
S elektrickým náradím vždy pracujte s
ochrannými okuliarmi, alebo okuliarmi s
boþnými štítmi. Bez nich sa vystavujete
riziku zranenia oþí odletujúcimi úlomkami.
VAROVANIE:
Nepoužívajte nástavce, alebo príslušenstvo,
ktoré nie je odporuþené pre použitie s týmto
produktom. Takéto konanie môže viesŘ k
nebezpeþným podmienkam a následným
vážnym zraneniam.
POUŽITIE
Tento výrobok môžete použiŘ na nasledujúce úþely:
Q VŌtanie do všetkých druhov drevených produktov
(rezivo, preglejka, obloženie, lepenka a dosky)
Q VŌtanie do keramiky, plastov, sklolaminátu
a laminátov.
Q VŌtanie do kovu
VŌtanie kladivom v betóne
Q
Tento výrobok je kompatibilný s Ryobi One+ 18V
Li-Ion akumulátormi, alebo Ryobi One+ 18V Ni-Cd
akumulátormi.
INŠTALÁCIA BATÉRIOVÉHO ýLÁNKU
Pozrite obrázok 2.
Ak chcete nainštalovaŘ súpravu batérie, vykonajte
nasledovné kroky:
Q Umiestnite selektor smeru otáþania do stredovej
polohy.
Q Vložte batériový þlánok tak, ako je zobrazené.
Q Uistite sa, že západky na oboch stranách
batériového þlánku sú na svojom mieste a þlánok
je bezpeþne zaistený v náradí pred zaþatím
práce.
VYTIAHNUTIE BATÉRIOVÉHO ýLÁNKU
Ak chcete odstrániŘ súpravu batérie, vykonajte
nasledovné kroky:
Q Stlaþte západky na oboch stranách batériového
þlánku.
Q Vytiahnite batériový þlánok z vŌtaþky.
NASTAVENIE POMOCNÉHO DRŽADLA
Pozrite si obrázok 3.
Pre nastavenie pomocného držadla vykonajte
nasledovné kroky:
Q Otoþením tlaþidla oproti smeru hodinových
ruþiþiek (12) uvoĹnite pomocné držadlo.
Q Pomocné držadlo otoþte do požadovanej polohy.
Q Otoþením tlaþidla v smere hodinových ruþiþiek
(11) dotiahnite pomocné držadlo.
VAROVANIE
Vždy vytiahnite batériový þlánok z vašej
vŌtaþky pri skladaní dielov, nastavovaní,
pripájaní, alebo odpájaní vrtákov, alebo ak
vŌtaþku nepoužívate. Vytiahnutie batériového
þlánku zabráni náhodnému zapnutiu náradia,
ktoré môže zapríþiniŘ vážne zranenie.
SYSTÉM OCHRANY BATÉRIE
18V Li-Ion batérie znaþky Ryobi sú vybavené
integrovaným ochranným systémom, ktorý chráni
li-ion bunky a predlžuje životnosŘ batérie. Tento
ochranný systém môže za urþitých podmienok viesŘ
k vypnutiu batérie a náradia. Ni-Cd þlánky nepracujú
rovnako a nedochádza k ich deaktivovaniu.
Za urþitých podmienok elektronický systém vypne
batériu a tak zastaví aj náradie. Batérie aj náradie sa
znovu resetujú po pustení spínaþa. Potom je možné
náradie znovu zapnúŘ a pokraþovaŘ v práci.
POZNÁMKA: Aby ste predišli vypnutiu zariadenia,
nepresiĹujte ho.
Ak sa batérie nerestuje po pustení spínaþa,
batériový þlánok je vybitý. V tomto prípade nabite
batériu v príslušnej nabíjaþke.
NASTAVENIE TYýE NA MERANIE HĴBKY
Pozrite si obrázok 4.
Ak chcete nastaviŘ tyþ na meranie hĵbky, vykonajte
nasledovné kroky:
Q Uzamknite spínaþ spúšŘaþa umiestnením voliþa
otáþania do stredovej polohy.
Q Otoþením tlaþidla oproti smeru hodinových
ruþiþiek (12) uvoĹnite pomocné držadlo.
Q Nastavte tyþ na meranie hĵbky, aby sa vŌtací
vrták vysunul za koniec tyþe do požadovanej
hĵbky vŌtania.
Q Otoþením tlaþidla v smere hodinových ruþiþiek
(11) dotiahnite pomocné držadlo.
SPÍNAý
Pozrite si obrázok 5.
UŘahovaþ zapnete stlaþením spúšŘacieho spínaþa
a uvoĹnením ho vypnete.
POISTKA SPÍNAýA
Pozrite si obrázok 5.
SpúšŘací spínaþ môže byŘ zaistený v polohe OFF.
Táto funkcia môže zabrániŘ možnosti náhodného
zapnutia poþas neþinnosti. Poistku spínaþa
aktivujete umiestnením selektora smeru otáþania
(vpred/vzad/stredová poloha) do stredovej polohy.
86
Page 90

GB GR TRFR DE ES IT NL PT DK SE
FI
NO RU PL CZ HU RO LV LT EE HR SI
Slovenþina
SK
PREVÁDZKA
Poznámka: VŌtaþka zaþne pracovaŘ, až keď
nastavíte selektor smeru otáþania úplne doĹava
alebo doprava. V stredovej polohe je aktivovaná
poistka spínaþa.
VRATNÉ
Pozrite si obrázok 5.
Tento nástroj má funkciu spätného otáþania, ktorá
je ovládaná voliþom umiestneným nad spínaþom
spúšŘaþa (6).
Q Otáþanie v smere hodinových ruþiþiek: nastavte
páþku voliþa do Ĺavej polohy (16).
Q Otáþanie oproti smeru hodinových ruþiþiek:
nastavte páþku voliþa do pravej polohy (15).
VOLIý REŽIMU(4)
Q V prípade vŌtania dajte voliþ do polohy .
Q V prípade vŌtania kladivom nastavte na
Prepnutie je možné vykonaŘ najlepšie v kĹudovom
stave.
Len potom, ako je spínaþ aktivovaný a stroj sa spustí
je možné prepnúŘ prevod do zvoleného režimu.
Poznámka: Režim vŌtania kladivom poškodí
mechanizmus nástroja, keď sa používa na
pripevŁovanie a vŌtanie vrtákom, ktorý nie je typu
SDS plus. Režim vŌtania zvoĹte len na takýto úþel.
Pri vŌtaní kladivom použite výhradne vrták z tvrdého
kovu a len hriadeĹ SDS-Plus. Použitie komerþne
prístupných murárskych valcovitých vrtákov
pomocou vŌtacieho adaptéra je nemožné.
.
MONTÁŽ A VÝMENA SDS VRTÁKOV
Pozrite si obrázok 6.
Tento nástroj je vybavený systémom pripojenia
SDS-plus.
Q Vyþistite vrták a namažte ho strojovým mazadlom
predtým, ako ho vložíte do skĹuþovadla (2).
Q Vytiahnite späŘ svorku manžety (3) a pridržte ju.
Q Zatlaþte a otoþte bezprašný nástroj do držiaka
vrtáka až na doraz.
Q UvoĹnite manžetu svorky, þím sa uvoĹní vrták.
Q Zatiahnutím vrtáka skontrolujte, þi bol
uzamknutý.
ODSTRÁNENIE VRTÁKU ZO SYSTÉMU SDS-PLUS
Zatiahnite späŘ svorku manžety a odstráŁte vrták.
35 mm ADAPTÉR SKĴUýOVADLA (NEDODÁVA
SA) (17)
Pozrite si obrázok (6)
Pre práce vŌtania do kovu, dreva a plastu vŌtacími
vrtákmi, ktoré majú hriadeĹ, ktorý nie je typu SDS
Plus. Je prístupný vŌtací adaptér.
PRAKTICKÉ TIPY
NezavŌtajte do skrytých elektrických vedení, þi
plynových a vodovodných potrubí. Pred zaþatím
skontrolujte oblasŘ, kde pracujete napríklad pomocou
detektora kovov.
KLZNÁ SPOJKA
Ak sa nástroj zasekne alebo zachytí, uvoĹní sa klzná
spojka.
Okamžite odstráŁte záŘaž zo stroja vytiahnutím
vŌtacieho nástroja späŘ.
Stroj vždy držte pevne oboma rukami a
zaujmite bezpeþný postoj.
VŋTANIE KLADIVOM
Pri vŌtaní kladivom nie je potrebné aplikovaŘ
prílišný tlak. Týmto spôsobom sa výkon
nezvýši. Prílišný tlak znamená nepotrebnú
záŘaž pre motor.
Pravidelne kontrolujte vŌtacie vrtáky.
Naostrite alebo vymeŁte tupé vŌtacie vrtáky.
Pri vŌtaní kladivom pracujte len s ochrannými
okuliarmi, ochranou sluchu a pomocným držadlom.
Pred uvedením do prevádzky skontrolujte, þi je
tlaþidlo zmeny zaistené na svojom mieste.
ÚDRŽBA
VAROVANIE
Pri údržbe používajte len identické náhradne
diely od spoloþnosti Ryobi. Použitie
odlišných môže maŘ za následok zranenie,
alebo poškodenie výrobku.
Pri þistení plastových dielov sa vyhnite použitiu
rozpúšŘadiel. Mnoho plastov je náchylných na
poškodenie pri použití rôznych typov komerþných
rozpúšŘadiel. Na þistenie od špiny, prachu, maziva
a masti používajte þisté handry.
87
Page 91

GB GR TRFR DE ES IT NL PT DK SE
FI
NO RU PL CZ HU RO LV LT EE HR SI
Slovenþina
SK
ÚDRŽBA
VAROVANIE
Nikdy nedovoĹte kontaktu plastových
dielov s brzdovou kvapalinou, benzínom,
minerálnym olejom, agresívnym mazivami
atď. Chemikálie môžu poškodiŘ, oslabiŘ,
alebo zniþiŘ plastové þasti a tak spôsobiŘ
vážne zranenie.
VAROVANIE
NepresiĹujte náradie. Takéto konanie môže
poškodiŘ náradie a aj opracovaný materiál.
VAROVANIE
Nepokúšajte sa modifikovaŘ produkt,
alebo vytvoriŘ príslušenstvo, ktoré nie je
odporuþené pre použitie s týmto produktom.
Ignorovanie tohto upozornenia môže viesŘ k
nebezpeþným podmienkam a následným
vážnym zraneniam.
OCHRANA ŽIVOTNÉHO PROSTREDIA
V rámci možností neodhadzujte
opotrebovaný prístroj, alebo jeho þasti
do domového odpadu a snažte sa o jeho
recykláciu. Zariadenie, príslušenstvo
a obalový materiál by mal byŘ roztriedený
pre ekologickú recykláciu.
Noste ochranu zraku
Pred zapnutím zariadenia si prosím
preþítajte inštrukcie
Recyklujte
Opotrebované elektrické zariadenia by
ste nemali odhadzovaŘ do domového
odpadu. Prosíme o recykláciu ak je
možné. Kontaktujte miestne úrady, alebo
predajcu pre viac informácií ohĹadom
ekologického spracovania.
ZNAýKY
Výstražná znaþka
V Volty
-1
min
Otáþky, alebo kmity za sekundu
Jednosmerný prúd
Režim vŌtania
Režim vŌtania kladivom
CE konformita
Noste ochranu sluchu
88
Page 92

GB TRFR DE ES IT NL PT DK SE FI NO RU PL CZ HU RO LV LT EE HR SI SK
ƚƾƾƺƿƼƽƯ
GR
ƚƞ৫ƞƟƤƞ ƟƗƢƤƢƚƧ ƗƧƪƗƠƚƞƗƧ
Q ƫǂƺDŽƼǁǁƼƱDŽDžƸ Džƺ ƵǁƺƻƺDžƼƽƱ ƾƴƵƱ ǁdž
DŽdžƿǁƷƸǎƸƼ Džǁ ƸǂƶƴƾƸƲǁ. Ɯ ƴǏƾƸƼƴ ƸƾưƶLjǁdž
ǁǂƸƲ ƿƴ ǂǁƽƴƾưDŽƸƼ DžǂƴdžƴDžƼDŽǍ.
Q ƪǁǂƯDžƸ ǂǁDŽDžƴDžƸdžDžƼƽƯ ƴdžDžƼǏƿ ǍDžƴƿ
LjǂƺDŽƼǁǁƼƸƲDžƸ ƽǂǁdžDŽDžƼƽƯ DžǂdžƯƿƼƴ. Ɯ
ưƽƻƸDŽƺ DŽDžǁƿ ƻǍǂdžƵǁ ǁǂƸƲ ƿƴ ǂǁƽƴƾưDŽƸƼ
ƴǏƾƸƼƴ Džƺǃ ƴƽǁƱǃ.
Q ƪǁǂƯDžƸ ƯDŽƽƴ ǂǁDŽǏǁdž Ʊ DŽƽǍƿƺǃ ƴƿ ƺ
ƸǂƶƴDŽƲƴ ƴǂƯƶƸƼ DŽƽǍƿƺ.
Q Κρατάτε το εργαλείο από τι ονωένε επιφάνειε
λαβή όταν εκτελείτε εργασίε όπου το εξάρτηα κοπή
πορεί να έρθει σε επαφή ε κρυφέ καλωδιώσει. Η
επαφή του εξαρτήματος κοπής με «ζωντανό» καλώδιο
(ηλεκτροφόρο) μπορεί να μεταφέρει τον ηλεκτρισμό
στα εκτεθειμένα μεταλλικά εξαρτήματα του εργαλείου,
προκαλώντας ηλεκτροπληξία στον χειριστή.
Ƥ৫ƜƙƞƚƧ ƗƧƪƗƠƤƩƧ ƫƚƞƦƞƧơƤƩ
Q ƘƸƵƴƼNJƻƸƲDžƸ ǍDžƼ Džǁ ƸǂƶƴƾƸƲǁ ƸƲƿƴƼ DŽdžƿƷƸưƿǁ
DŽDžƺ DŽNJDŽDžƱ DŽDžƯDŽƺ ǁdž ƴƿƴƶǂƯLJƸDžƴƼ DŽDžƺƿ
ƾƴƽưDžƴ Džǁdž.
Q ơƺƿ LjǂƺDŽƼǁǁƼƸƲDžƸ ǁDžư Džǁ ƸǂƶƴƾƸƲǁ ƴƿ Džǁ
ƽƯƾdžƯ Džǁdž Ʊ DždžLjǍƿ ǁdžƾǍƿƼƴ ƾƸƲǁdžƿ. Ɨƿ
Džǁ ƽƯƾdžƴ Ʊ Džƴ ǁdžƾǍƿƼƴ ưLjǁdžƿ ƴLJƴƼǂƸƻƸƲ,
DžǁǁƻƸDžƱDŽDžƸ Džƴ ǀƴƿƯ ǂƼƿ Džƺ LjǂƱDŽƺ.
৫ƼƴDžƺǂƸƲDžƸ Ǎƾƴ Džƴ ƸǀƴǂDžƱƴDžƴ DŽƸ ƽƴƾƱ
ƽƴDžƯDŽDžƴDŽƺ.
Q ৫ƼƴDŽLJƴƾƲƹƸDžƸ
ƷǁdžƾƸǎƸDžƸ DŽƸ ǎljǁǃ.
Q ơƺƿ ƴƶƶƲƹƸDžƸ ǁDžư Džƺ ƾƸƲƷƴ, Džǁ ƸǀƯǂDžƺƴ
ƷǂƴƯƿǁdž, Džǁƿ ƾƸƼƴƿDžƼƽǍ DžǂǁLjǍ Ʊ ǁǁƼǁƷƱǁDžƸ
Ưƾƾǁ ƽƼƿǁǎƸƿǁ ƸǀƯǂDžƺƴ ƽƴDžƯ Džƺ LjǂƱDŽƺ.
Q ơƺƿ ǀƸƽƼƿƯDžƸ ǁDžư ưƿƴ ƸǂƶƴƾƸƲǁ ǍDžƴƿ Džǁ
ƸǂƼDŽDžǂƸLJǍƸƿǁ DžƱƴ Džǁdž ƸƲƿƴƼ DŽƸ ƸƴLJƱ Ƹ
Džǁ DžƸƯLjƼǁ DŽDžǁ ǁǁƲǁ ƸǂƶƯƹƸDŽDžƸ.
Q ơƺƿ ƴƽǁdžƯDžƸ ǁDžư ƽƯDžNJ
ƸǂƶƴƾƸƲǁ ưLjǂƼ ƿƴ DŽDžƴƴDžƱDŽǁdžƿ DžƸƾƸƲNJǃ Ǎƾƴ
Džƴ ƽƼƿǁǎƸƿƴ ƸǀƴǂDžƱƴDžƯ Džǁdž.
Q ƚƣƗƦƨƜơƗƨƗ: Ɯ LjǂƱDŽƺ ƸǀƴǂDžƺƯDžNJƿ
Ʊ DŽdžƿƷưDŽƸNJƿ ƷƼƴLJǁǂƸDžƼƽǏƿ ƴǍ Džƴ
ǂǁDžƸƼƿǍƸƿƴ DŽDžǁ ƴǂǍƿ ƸƶLjƸƼǂƲƷƼǁ, ǁǂƸƲ ƿƴ
ƸƲƿƴƼ ƸƼƽƲƿƷdžƿƺ.
Q ƗƢƨƗƠƠƗƟƨƞƟƗ: ƟƴDžƯ Džƺ ƷƼƯǂƽƸƼƴ Džǁdž
DŽưǂƵƼǃ, LjǂƺDŽƼǁǁƼƸƲDžƸ Ǎƿǁ ƴƿǁǁƼǍDždžƴ
ƴƿDžƴƾƾƴƽDžƼƽƯ.
ƯƿDžƴ Džƴ ƸǂƶƴƾƸƲƴ ǍDžƴƿ
Džǁ ƺLjƴƿƼƽǍ
4. ƚƼƾǁƶưƴǃ ƠƸƼDžǁdžǂƶƲƴǃ
5. ৫ƼƴƽǍDžƺǃ ON / OFF
6. ƥƸǂƼDŽDžǂǁLJƼƽǍǃ ƚƼƾǁƶưƴǃ
(ơǂǁDŽDžƯ / ƓƼDŽƻƸƿ / ƟƸƿDžǂƼƽǍ ƽƾƸƲƷNJƴ)
7. ƘǁƺƻƺDžƼƽƱ ƠƴƵƱ
8. ƦƯƵƷǁǃ ơưDžǂƺDŽƺǃ ƘƯƻǁdžǃ
9. ơƴDžƴǂƲƴ (ƷƸƿ ƸǂƼƾƴƵƯƿƸDžƴƼ)
10.ƎƶƽƼDŽDžǂƴ
11.ƙƼƴ ƧǎDŽLJƼǀƺ
12.ƙƼƴ ƫƴƾƯǂNJDŽƺ
13.ƘƯƻǁǃ ƨǂdžƱƴDžǁǃ
14.ƚǀƯǂDžƺƴ DžǂdžƴƿƼǁǎ (ƷƸƿ ƸǂƼƾƴƵƯƿƸDžƴƼ)
15.ƓƼDŽƻƸƿ ƥƸǂƼDŽDžǂǁLJƱ
16.ƥǂǍDŽƻƼƴ ƥƸǂƼDŽDžǂǁLJƱ
17.ƥǂǁDŽƴǂǁƶưƴǃ ƨDŽǁƽ 35mm
(ƷƸƿ ƸǂƼƾƴƵƯƿƸDžƴƼ)
18.ƚǀƯǂDžƺƴ ƽƴDžDŽƴƵƼƷƼǁǎ (ƷƸƿ ƸǂƼƾƴƵƯƿƸDžƴƼ)
19.ƚǀƯǂDžƺƴ SDS (ƷƸƿ ƸǂƼƾƴƵƯƿƸDžƴƼ)
ƥƦƤ৫ƞƗƙƦƗƪƚƧ
ƨƯDŽƺ 18 V
ƨƴLjǎDžƺDžƴ LjNJǂƲǃ LJǁǂDžƲǁ 0-1000 min
ƟǂǁǎDŽƺ DŽLJdžǂƼǁǎ
(ƫDždžƱƴDžƴ ƴƿƯ ƠƸDžǍ) 0-4000 min
ƚƿưǂƶƸƼƴ ƽǂǁǎDŽƺǃ 1.5J
ơưƶƼDŽDžǁ ৫džƿƴƼƽǍ ƨǂdžƴƿƼǁǎ:
ƣǎƾǁ 16 mm
ƗDžDŽƯƾƼ 13 mm
ƨDŽƼưƿDžǁ (DŽLJdžǂǁDžǂǎƴƿǁ) 12 mm
ƥǂǁDžƸƼƿǍƸƿǁ Ƹǎǂǁǃ LjǂƱDŽƺǃ
DŽLJdžǂǁDžǂǎƴƿǁdž 4-12 mm
ƨǎǁǃ ƧǎƿƷƸDŽƺǃ ƚǀƴǂDžƺƯDžNJƿ SDS-plus
ƘƯǂǁǃ – ƷƸƿ ƸǂƼƾƴƵƯƿƸDžƴƼ
ƺ ƴDžƴǂƲƴ (Kg) 2.2
ơƤƢƨƚƠƤ
৫ƞƗƨƗƣƜ
ơƥƗƨƗƦƞƗƧ
(ƷƸƿ
ƸǂƼƾƴƵƯƿƸDžƴƼ)
BPP-1815
BPP-1817
BPP-1815M
ƪƤƦƨƞƧƨƜƧ
(ƷƸƿ
ƸǂƼƾƴƵƯƿƸDžƴƼ)
BCL-1800
BCS618
BCL1418
BPP-1817M
BPL-1820
CRH1801
BPL-1815
-1
-1
ƥƚƦƞƙƦƗƪƜ
1. ƟƯƾdžƴ ǂǁDŽDžƴDŽƲƴǃ ƴǍ Džƺƿ DŽƽǍƿƺ
2. ƨDŽǁƽ SDS
3. ƟǁƾƯǂǁ DŽLJƼƶƽDžƱǂƴ
89
BPP-1815
BPP-1817
BPP-1815M
BPP-1817M
BC-1815S
BC-1800
BCA180
Page 93

GB TRFR DE ES IT NL PT DK SE FI NO RU PL CZ HU RO LV LT EE HR SI SK
ƚƾƾƺƿƼƽƯ
GR
ƫƚƞƦƞƧơƤƧ
ƥƦƤƚƞ৫ƤƥƤƞƜƧƜ
ƟƴƻǏǃ ƻƴ ƸǀǁƼƽƸƼǏƿƸDŽDžƸ Ƹ Džƴ ǂǁNjǍƿDžƴ,
ƴǂƴƸƲƿƸDžƸ ǂǁDŽƸƽDžƼƽǁƲ DŽDžƺ LjǂƱDŽƺ
Džǁdžǃ. Ƣƴ ƻdžƯDŽDžƸ ǍDžƼ ƴǂƽƸƲ Ƽƴ DŽDžƼƶƱ
ƴǂǁDŽƸǀƲƴǃ ƶƼƴ ƿƴ ǂǁƽƾƺƻƸƲ DŽǁƵƴǂǍǃ
DžǂƴdžƴDžƼDŽǍǃ.
ƥƦƤƚƞ৫ƤƥƤƞƜƧƜ
ƪǁǂƯDžƸ ƯƿDžƴ ǂǁDŽDžƴDžƸdžDžƼƽƯ ƶdžƴƾƼƯ Ʊ
ƶdžƴƾƼƯ ƴDŽLJƯƾƸƼƴǃ Ƹ ƾƴNjƿưǃ ƴDŽƲƷƸǃ
ƽƴDžƯ Džǁƿ LjƸƼǂƼDŽǍ ǂǁNjǍƿDžNJƿ. ৫ƼƴLJǁǂƸDžƼƽƯ
ǁǂƸƲ ƿƴ ƸƽDžƼƿƴLjƻǁǎƿ ƴƿDžƼƽƸƲƸƿƴ DŽDžƴ
ƯDžƼƴ DŽƴǃ, ǁƷƺƶǏƿDžƴǃ DŽƸ ƼƻƴƿǍ DŽǁƵƴǂǍ
DžǂƴdžƴDžƼDŽǍ.
ƥƦƤƚƞ৫ƤƥƤƞƜƧƜ
ơƺƿ LjǂƺDŽƼǁǁƼƸƲDžƸ DŽdžƿƷưDŽƸƼǃ Ʊ
ƸǀƴǂDžƱƴDžƴ ǁdž ƷƸƿ ǂǁDžƸƲƿǁƿDžƴƼ ƴǍ
Džǁƿ ƽƴDžƴDŽƽƸdžƴDŽDžƱ Džǁdž ǂǁNjǍƿDžǁǃ. Ɯ
LjǂƱDŽƺ DŽdžƿƷưDŽƸNJƿ Ʊ ƸǀƴǂDžƺƯDžNJƿ ǁdž
ƷƸƿ ǂǁDžƸƲƿǁƿDžƴƼ, ǁǂƸƲ ƿƴ ǁƷƺƶƱDŽƸƼ DŽƸ
DŽǁƵƴǂǍ DžǂƴdžƴDžƼDŽǍ.
ƚƪƗƦơƤƙƚƧ
ơǁǂƸƲDžƸ ƿƴ LjǂƺDŽƼǁǁƼƱDŽƸDžƸ Džǁ ǂǁNjǍƿ ƶƼƴ DžƼǃ
ƴǂƴƽƯDžNJ LjǂƱDŽƸƼǃ:
Q ǃ DžǂdžƯƿƼ DŽƸ Ǎƾǁdžǃ Džǁdžǃ Džǎǁdžǃ ǂǁNjǍƿDžNJƿ
ǀǎƾǁdž (ƷǁƼƽƱ ǀdžƾƸƲƴ, ƽǁƿDžǂƴƾƴƽư,
ǀdžƾƸưƿƷdžDŽƺ
DŽƽƾƺǂưǃ DŽƴƿƲƷƸǃ).
Q ǃ DžǂdžƯƿƼ DŽƸ ƸƲƷƺ ƽƸǂƴƼƽƱǃ, ƾƴDŽDžƼƽƯ,
LJƲƸǂƶƽƾƴǃ ƽƴƼ LJǎƾƾƴ ƸǀƸƾƯDŽƸNJǃ.
Q ǃ DžǂdžƯƿƼ DŽƸ ưDžƴƾƾƴ.
Q
ƫǂƱDŽƺ ƧLJdžǂǁDžǂdžƯƿǁdž DŽƸ DžDŽƼưƿDžǁ.
ƨǁ ǂǁNjǍƿ ƷưLjƸDžƴƼ ƷƼƴDžƯǀƸƼǃ ƴDžƴǂƲƴǃ Ryobi
One+ 18 V ƾƼƻƲǁdž – ƼǍƿDžNJƿ ƽƴƼ Ryobi One+ 18 V
ƿƲƽƸƾ-ƽƴƷƲǁdž.
ƥƦƤƚƞ৫ƤƥƤƞƜƧƜ
ƗLJƴƼǂƸƲDžƸ ƯƿDžƴ Džƺ ƷƼƯDžƴǀƺ ƴDžƴǂƲƴǃ
ƴǍ Džǁ ƺLjƯƿƺƴ ǍDžƴƿ DŽdžƿƴǂǁƾǁƶƸƲDžƸ
ƸǀƴǂDžƱƴDžƴ, ƽƯƿƸDžƸ ǂǁDŽƴǂǁƶưǃ,
DŽdžƿƴǂǁƾǁƶƸƲDžƸ Ʊ ƴLJƴƼǂƸƲDžƸ ƽǁƯDžƼƴ,
ƽƴƻƴǂƲƹƸDžƸ Džǁ ƺLjƯƿƺƴ Ʊ ǍDžƴƿ ƷƸƿ Džǁ
LjǂƺDŽƼǁǁƼƸƲDžƸ. ƗLJƴƼǂǏƿDžƴǃ Džƺ ƷƼƯDžƴǀƺ
ƴDžƴǂƲƴǃ ǂǁƾƴƵƯƿƸDžƴƼ ƺ DždžLjƴƲƴ
ƸƽƽƲƿƺDŽƺ Džǁdž ƺLjƴƿƱƴDžǁǃ ǁdž ǁǂƸƲ ƿƴ
ǂǁƽƴƾưDŽƸƼ DŽǁƵƴǂǍ DžǂƴdžƴDžƼDŽǍ.
ƫƗƦƗƟƨƜƦƞƧƨƞƟƗ ƥƦƤƧƨƗƧƞƗƧ ơƥƗƨƗƦƞƗƧ
ƤƼ ƴDžƴǂƲƸǃ ƾƼƻƲǁdž-ƼǍƿDžNJƿ Ryobi 18 V
ƸƲƿƴƼ DŽLjƸƷƼƴDŽưƿƸǃ
ǂǁDŽDžƴDžƸǎǁdžƿ Džƴ DŽDžǁƼLjƸƲƴ ƾƼƻƲǁdž-ƼǍƿDžNJƿ ƽƴƼ
ƸƶƼDŽDžǁǁƼǁǎƿ Džƺ ƷƼƯǂƽƸƼƴ ƹNJƱǃ Džƺǃ ƴDžƴǂƲƴǃ.
ƧƸ DŽdžƶƽƸƽǂƼưƿƸǃ DŽdžƿƻƱƽƸǃ LjƸƼǂƼDŽǁǎ, ƴdžDžƯ
Džƴ ƸƿDŽNJƴDžNJưƿƴ LjƴǂƴƽDžƺǂƼDŽDžƼƽƯ ǁǂƸƲ ƿƴ
ǂǁƽƴƾưDŽǁdžƿ Džƺ ƷƼƴLJǁǂƸDžƼƽƱ ƾƸƼDžǁdžǂƶƲƴ Džƺǃ
ƫƚƞƦƞƧơƤƧ
DžǁƲLjǁdž, DžƴƾǍ DŽǎƿƻƸDŽƺǃ ƽƴƼ
Ƹ LjƴǂƴƽDžƺǂƼDŽDžƼƽƯ ǁdž
ƴDžƴǂƲƴǃ ƽƴƼ Džǁdž ƸǂƶƴƾƸƲǁdž ƴǍ DžƼǃ ƴDžƴǂƲƸǃ
ƿƲƽƸƾ-ƽƴƷƲǁdž.
ƟƴDžƯ Džƺ ƷƼƯǂƽƸƼƴ ǁǂƼDŽưƿNJƿ ƸLJƴǂǁƶǏƿ,
Džƴ ƺƾƸƽDžǂǁƿƼƽƯ Džƺǃ ƴDžƴǂƲƴǃ ǁǂƸƲ ƿƴ Džƺǃ
ƷǏDŽǁdžƿ DŽƱƴ ƿƴ DŽDžƴƴDžƱDŽƸƼ ƽƴƼ ƿƴ ǂǁƽƴƾưDŽǁdžƿ
Džƺƿ ƴǎDŽƺ ƾƸƼDžǁdžǂƶƲƴǃ Džǁdž ƸǂƶƴƾƸƲǁdž. ƙƼƴ
ƸƴƿƸƽƽƲƿƺDŽƺ Džƺǃ ƴDžƴǂƲƴǃ ƽƴƼ Džǁdž ƸǂƶƴƾƸƲǁdž,
ƴLJƱDŽDžƸ Džǁƿ ƷƼƴƽǍDžƺ ƽƴƼ DŽdžƿƸLjƲDŽDžƸ ƽƴƿǁƿƼƽƯ Džǁƿ
LjƸƼǂƼDŽǍ.
ƧƜơƚƞƧƜ: ƙƼƴ ƿƴ ƺ DŽdžƵǁǎƿ ƯƾƾǁƼ DžƸǂƴDžƼDŽǁƲ
Džƺǃ ƴDžƴǂƲƴǃ, ƴǁLJǎƶƸDžƸ ƿƴ ƼưƹƸDžƸ Džǁ
ƸǂƶƴƾƸƲǁ.
Ɨƿ ƴLJƱƿǁƿDžƴǃ Džǁƿ ƷƼƴƽǍDžƺ ƷƸƿ ƶƲƿƸDžƴƼ
ƸƴƿƸƽƽƲƿƺDŽƺ Džƺǃ ƴDžƴǂƲƴǃ ƽƴƼ Džǁdž ƸǂƶƴƾƸƲǁdž, ƺ
ƷƼƯDžƴǀƺ ƴDžƴǂƲƴǃ ưLjƸƼ ƸƽƽƸƿNJƻƸƲ. ƧƸ ƴdžDžƱƿ Džƺƿ
ƸǂƲDžNJDŽƺ, ƻƴ LjǂƸƼƴDŽDžƸƲ LJǍǂDžƼDŽƺ Ƹ DžǁǁƻưDžƺDŽƺ
DŽDžǁƿ LJǁǂDžƼDŽDžƱ ƾƼƻƲǁdž-ƼǍƿDžNJƿ.
ƚƙƟƗƨƗƧƨƗƧƜ ৫ƞƗƨƗƣƜƧ ơƥƗƨƗƦƞƗƧ
Ƙƾ. ƧLjưƷƼǁ 2
ƗƽǁƾǁdžƻƱDŽDžƸ Džƴ ƴǂƴƽƯDžNJ ƵƱƴDžƴ ƶƼƴ ƿƴ
DžǁǁƻƸDžƱDŽƸDžƸ Džƺƿ ƴDžƴǂƲƴ:
Q ƨǁǁƻƸDžƱDŽDžƸ Džǁƿ ƸƼƾǁƶưƴ ƸǂƼDŽDžǂǁLJƱǃ DŽDžƺ
ƻưDŽƺ ƽƸƿDžǂƼƽǁǎ ƽƾƸƼƷǏƴDžǁǃ.
Q ƚƼDŽƯƶƸDžƸ Džƺ ƷƼƯDžƴǀƺ ƴDžƴǂƲƴǃ DŽDžǁ ǂǁNjǍƿ
ǍNJǃ LJƴƲƿƸDžƴƼ.
Q ƘƸƵƴƼNJƻƸƲDžƸ ǍDžƼ Džƴ ƯƶƽƼDŽDžǂƴ DŽƸ ƽƯƻƸ ƾƸdžǂƯ
Džƺǃ ƷƼƯDžƴǀƺǃ ƴDžƴǂƲƴǃ ưLjǁdžƿ ƽƾƸƼƷǏDŽƸƼ DŽDžƺ
ƻưDŽƺ Džǁdžǃ ƽƴƼ ǍDžƼ ƺ ƷƼƯDžƴǀƺ ƸƲƿƴƼ DŽDžƸǂƸNJưƿƺ
DŽDžǁ ǂǁNjǍƿ ǂƼƿ ǀƸƽƼƿƱDŽƸDžƸ Džǁƿ LjƸƼǂƼDŽǍ Džǁdž.
ƗƪƗƞƦƚƧƜ ৫ƞƗƨƗƣƜƧ ơƥƗƨƗƦƞƗƧ
ƗƽǁƾǁdžƻƱDŽDžƸ Džƴ ƴǂƴƽƯDžNJ ƵƱƴDžƴ ƶƼƴ ƿƴ
ƴLJƴƼǂưDŽƸDžƸ Džƺƿ ƴDžƴǂƲƴ:
Q ƥƼưDŽDžƸ Džƴ ƯƶƽƼDŽDžǂƴ DŽƸ ƽƯƻƸ ƾƸdžǂƯ Džƺǃ
ƷƼƯDžƴǀƺǃ ƴDžƴǂƲƴǃ.
Q ƗLJƴƼǂưDŽDžƸ Džƺ ƷƼƯDžƴǀƺ ƴDžƴǂƲƴǃ ƴǍ Džǁ
ƷǂƯƴƿǁ.
ƥƦƤƚƞ৫ƤƥƤƞƜƧƜ
ƨƴ ǂǁNjǍƿDžƴ ƴDžƴǂƼǏƿ ƷƼƴDžƺǂǁǎƿDžƴƼ
ƯƿDžƴ DŽƸ ƽƴDžƯDŽDžƴDŽƺ ƾƸƼDžǁdžǂƶƲƴǃ. ƙƼ· ƴdžDžǍ
ƿDžǁƿ ƾǍƶǁ, ǁ ƷƼƴƽǍDžƺǃ ƻƴ ǂưƸƼ ƯƿDžƴ
ƿƴ ƸƲƿƴƼ ƽƾƸƼƷNJưƿǁǃ ǍDžƴƿ Džǁ ƺLjƯƿƺƴ
ƷƸƿ LjǂƺDŽƼǁǁƼƸƲDžƸ Ʊ Džǁ ƸDžƴLJưǂƸDžƸ.
ƥƦƤƧƗƦơƤƙƜ ƘƤƜƝƜƨƞƟƜƧ ƠƗƘƜƧ
Ƙƾ. ƧLjƱƴ 3.
ƗƽǁƾǁdžƻƱDŽDžƸ Džƴ ƴǂƴƽƯDžNJ ƵƱƴDžƴ ƶƼƴ ƿƴ
LjǂƺDŽƼǁǁƼƱDŽƸDžƸ Džƺ ƵǁƺƻƺDžƼƽƱ ƾƴƵƱ:
Q ƣƸDŽLJƲǀDžƸ Džƺ ƵǁƺƻƺDžƼƽƱ ƾƴƵƱ ƶdžǂƲƹǁƿDžƴǃ Džǁ
DŽLJƴƼǂƼƽǍ ƽǁdžƲ ƴǂƼDŽDžƸǂǍDŽDžǂǁLJƴ (12).
Q ƥƸǂƼDŽDžǂưljDžƸ Džƺ ƵǁƺƻƺDžƼƽƱ ƾƴƵƱ DŽDžƺ ƻưDŽƺ ǁdž
ƻưƾƸDžƸ.
Q ƧLJƲǀDžƸ Džƺ ƵǁƺƻƺDžƼƽƱ ƾƴƵƱ ƽƴƾƯ ƶdžǂƲƹǁƿDžƴǃ Džǁ
DŽLJƴƼǂƼƽǍ ƽǁdžƲ ƷƸǀƼǍDŽDžǂǁLJƴ (11).
90
Page 94

GB TRFR DE ES IT NL PT DK SE FI NO RU PL CZ HU RO LV LT EE HR SI SK
ƚƾƾƺƿƼƽƯ
GR
ƫƚƞƦƞƧơƤƧ
ƥƦƤƧƗƦơƤƙƜ ƦƗƘ৫ƤƩ ơƚƨƦƜƧƜƧ ƘƗƝƤƩƧ
Ƙƾ. ƧLjƱƴ 4.
ƗƽǁƾǁdžƻƱDŽDžƸ Džƴ ƴǂƴƽƯDžNJ ƵƱƴDžƴ ƶƼƴ ƿƴ
ǂdžƻƲDŽƸDžƸ Džƺ ǂƯƵƷǁ ưDžǂƺDŽƺǃ ƵƯƻǁdžǃ:
Q ƟƾƸƼƷǏDŽDžƸ Džǁƿ ƷƼƴƽǍDžƺ, DžǁǁƻƸDžǏƿDžƴǃ Džǁƿ
ƸǂƼDŽDžǂǁLJƼƽǍ ƸƼƾǁƶưƴ DŽDžƺƿ ƽƸƿDžǂƼƽƱ ƻưDŽƺ.
Q ƣƸDŽLJƲǀDžƸ Džƺ ƵǁƺƻƺDžƼƽƱ ƾƴƵƱ ƶdžǂƲƹǁƿDžƴǃ Džǁ
DŽLJƴƼǂƼƽǍ ƽǁdžƲ ƴǂƼDŽDžƸǂǍDŽDžǂǁLJƴ (12).
Q ƥǂǁDŽƴǂǍDŽDžƸ Džƺ ǂƯƵƷǁ ưDžǂƺDŽƺǃ ƵƯƻǁdžǃ
ưDžDŽƼ ǏDŽDžƸ Džǁ ƸǀƯǂDžƺƴ DžǂdžƴƿƼǁǎ ƿƴ ƸǀưLjƸƼ
ưǂƴ ƴǍ Džƺƿ Ưƽǂƺ Džƺǃ, DŽDžǁ ƸƼƻdžƺDžǍ ƵƯƻǁǃ
DžǂdžƱƴDžǁǃ.
Q ƧLJƲǀDžƸ Džƺ ƵǁƺƻƺDžƼƽƱ ƾƴƵƱ ƽƴƾƯ ƶdžǂƲƹǁƿDžƴǃ Džǁ
DŽLJƴƼǂƼƽǍ ƽǁdžƲ ƷƸǀƼǍDŽDžǂǁLJƴ (11).
৫ƞƗƟƤƥƨƜƧ
Ƙƾ. ƧLjƱƴ 5.
ƙƼƴ ƿƴ ƚƢƚƦƙƤƥƤƞƜƧƚƨƚ Džǁ ƷǂƯƴƿǁ, ƴDžƱDŽDžƸ
Džǁƿ ƷƼƴƽǍDžƺ ƸƿƸǂƶǁǁƲƺDŽƺǃ. ƙƼƴ ƿƴ Džǁ
ƗƥƚƢƚƦƙƤƥƤƞƜƧƚƨƚ, ƴLJƱDŽDžƸ Džǁƿ ƷƼƴƽǍDžƺ
ƸƿƸǂƶǁǁƲƺDŽƺǃ.
ƠƚƞƨƤƩƦƙƞƗ ƗƧƪƗƠƞƧƜƧ
Ƙƾ. ƧLjƱƴ 5.
Ɯ DŽƽƴƿƷƯƾƺ ǁǂƸƲ ƿƴ ƴDŽLJƴƾƲDŽƸƼ DŽDžƺ ƻưDŽƺ
"ƷƼƴƽǁƱ".ƜƾƸƼDžǁdžǂƶƲƴƴdžDžƱƸƼDžǂưƸƼDžƺƿƴǁLJdžƶƱ
ƴƽǁǎDŽƼǁdžǀƸƽƼƿƱƴDžǁǃDžǁdžƷǂƴƴƿǁƽƴDžDŽƯƵƼƷǁǎDŽƴǃ
ǍDžƴƿ ƷƸƿ Džǁ LjǂƺDŽƼǁǁƼƸƲDžƸ. ƙƼƴ ƿƴ ƴDŽLJƴƾƲDŽƸDžƸ Džƺ
DŽƽƴƿƷƯƾƺ, DžǁǁƻƸDžƱDŽDžƸ Džǁƿ ƸƼƾǁƶưƴ ƷƼƸǎƻdžƿDŽƺǃ
ƸǂƼDŽDžǂǁLJƱǃ (ƵƲƷNJƴ / ǀƸƵƲƷNJƴ) DŽDžƺƿ ƽƸƿDžǂƼƽƱ
ƻưDŽƺ.
ƥƴǂƴDžƱǂƺDŽƺ: ƓDžƴƿ ǁ ƸƼƾǁƶưƴǃ ƵǂƲDŽƽƸDžƴƼ DŽDžƺƿ
ƽƸƿDžǂƼƽƱ ƻưDŽƺ, ƺ DŽƽƴƿƷƯƾƺ ƸƲƿƴƼ ƴƽƼƿƺDžǁǁƼƺưƿƺ.
ƥƗƠƞƢ৫ƦƤơƞƟƜ
Ƙƾ. ƧLjƱƴ 5.
ƨǁ ƸǂƶƴƾƸƲǁ ƷƼƴƻưDžƸƼ Džǁ LjƴǂƴƽDžƺǂƼDŽDžƼƽǍ
ƴƾƼƿƷǂǁƼƽƱǃ ƸǂƼDŽDžǂǁLJƱǃ, ǁdž ƸƾưƶLjƸDžƴƼ
ƴǍ ƸƼƾǁƶưƴ ǁ ǁǁƲǁǃ ƵǂƲDŽƽƸDžƴƼ ƯƿNJ ƴǍ Džǁƿ
ƷƼƴƽǍDžƺ (6).
Q ৫ƸǀƼǍDŽDžǂǁLJƺ ƸǂƼDŽDžǂǁLJƱ: ǂdžƻƲDŽDžƸ Džǁ
ƸƲƸƷǁ ƸƼƾǁƶưƴ DŽDžƺƿ ƴǂƼDŽDžƸǂƱ ƻưDŽƺ (16).
Q ƗǂƼDŽDžƸǂǍDŽDžǂǁLJƺ ƸǂƼDŽDžǂǁLJƱ: ǂdžƻƲDŽDžƸ Džǁ
ƸƲƸƷǁ ƸƼƾǁƶưƴ DŽDžƺ ƷƸǀƼƯ ƻưDŽƺ (15).
ƚƥƞƠƤƙƚƗƧ ƠƚƞƨƤƩƦƙƞƗƧ (4)
Q ƙƼƴ Džǂǎƺƴ, DžǁǁƻƸDžƱDŽDžƸ Džǁƿ ƸƼƾǁƶưƴ DŽDžƺ
ƻưDŽƺ
Q ƙƼƴ LjǂƱDŽƺ Džǁdž DŽLJdžǂǁDžǂǎƴƿǁdž, ǂdžƻƲDŽDžƸ DŽƸ
Ɯ ƴƾƾƴƶƱ ǁǂƸƲ ƿƴ ƸƽDžƸƾƸDŽDžƸƲ ƽƴƾǎDžƸǂƴ ǍDžƴƿ Džǁ
ƸǂƶƴƾƸƲǁ ƸƲƿƴƼ ƴƽƲƿƺDžǁ.
ơǍƿǁ ƴLJǁǎ ƸƿƸǂƶǁǁƼƺƻƸƲ ǁ ƷƼƴƽǍDžƺǃ ƽƴƼ Džǁ
ƸǂƶƴƾƸƲǁ ǀƸƽƼƿƱDŽƸƼ, ǁǂƸƲ ƿƴ ƴƾƾƯǀƸƼ ƺ DžƴLjǎDžƺDžƴ
DŽDžƺƿ ƸƼƾƸƶưƿƺ ƾƸƼDžǁdžǂƶƲƴ.
.
.
ƧƺƸƲNJDŽƺ: Ɯ ƾƸƼDžǁdžǂƶƲƴ LjǂƱDŽƺǃ DŽLJdžǂǁDžǂǎƴƿǁdž
LJƻƸƲǂƸƼ Džǁƿ ƺLjƴƿƼDŽǍ Džǁdž ƸǂƶƴƾƸƲǁdž ǍDžƴƿ
LjǂƺDŽƼǁǁƼƸƲDžƴƼ ƶƼƴ DŽDžƸǂưNJDŽƺ Ʊ Džǂǎƺƴ Ƹ
ƸǀƴǂDžƱƴDžƴ ǁdž ƷƸƿ ƸƲƿƴƼ Džǎǁdž SDS plus.
ƚƼƾưǀDžƸ Džƺ ƾƸƼDžǁdžǂƶƲƴ DžǂdžƱƴDžǁǃ Ǎƿǁ ƶƼƴ Džǁƿ
DŽdžƶƽƸƽǂƼưƿǁ DŽƽǁǍ.
ƟƴDžƯDžƺLjǂƱDŽƺDžǁdžDŽLJdžǂǁDžǂǎƴƿǁdž,LjǂƺDŽƼǁǁƼƸƲDžƸ
ƴǁƽƾƸƼDŽDžƼƽƯ ƸǀƴǂDžƱƴDžƴ Ƹ DŽƽƾƺǂǍ ƸDžƴƾƾƼƽǍ
Ưǀǁƿƴ ƽƴƼ SDS-Plus. Ɯ LjǂƱDŽƺ DžNJƿ ƸǀƴǂDžƺƯDžNJƿ
DžǁƼLjǁǁƼƲƴǃ ǁdž ƸƲƿƴƼ ƷƼƴƻưDŽƼƴ DŽDžǁ ƸǍǂƼǁ Ƹ
Džǁƿ ǂǁDŽƴǂǁƶưƴ DžǂdžƴƿƼǁǎ ƷƸƿ ƸƲƿƴƼ ƷdžƿƴDžƱ.
ƫƦƜƧƜ ƧƪƩƦƤƨƦƩƥƗƢƤƩ
ƓDžƴƿ LjǂƺDŽƼǁǁƼƸƲDžƸ Džǁ ƸǂƶƴƾƸƲǁ NJǃ
DŽLJdžǂǁDžǂǎƴƿǁ, ƷǁdžƾƸǎƸDžƸ LJǁǂǏƿDžƴǃ ƯƿDžƴ
ǂǁDŽDžƴDžƸdžDžƼƽƯ ƶdžƴƾƼƯ ƽƴƼ ǂǁDŽDžƴDžƸdžDžƼƽƯ ƴƽǁƱǃ
ƽƴƼ LjǂƺDŽƼǁǁƼǏƿDžƴǃ Džƺ ƵǁƺƻƺDžƼƽƱ ƾƴƵƱ. ƥǂƼƿ
LjǂƺDŽƼǁǁƼƱDŽƸDžƸ Džǁ ƸǂƶƴƾƸƲǁ, ƸƼƵƸƵƴƼǏDŽDžƸ
ǍDžƼ Džǁ DŽLJƴƼǂƼƽǍ ƽǁdžƲ ƴƾƾƴƶƱǃ ƵǂƲDŽƽƸDžƴƼ
ƴƶƽƼDŽDžǂNJưƿǁ DŽDžƺ ƻưDŽƺ Džǁdž.
ƨƤƥƤƝƚƨƜƧƜ ƟƗƞ ƗƠƠƗƙƜ ƚƣƗƦƨƜơƗƨƢ SDS
Ƙƾ. ƧLjƱƴ 6.
ƨǁ ƸǂƶƴƾƸƲǁ ƷƼƴƻưDžƸƼ DŽǎDŽDžƺƴ DŽǎƿƷƸDŽƺǃ SDS-
plus.
Q ƟƴƻƴǂƲDŽDžƸ Džǁ ƸǀƯǂDžƺƴ ƽƴƼ ƶǂƴDŽƯǂƸDžư
Q ƨǂƴƵƱǀDžƸ ǂǁǃ Džƴ ƲDŽNJ Džǁ ƽǁƾƯǂǁ DŽLJƼƶƽDžƱǂƴ
Q ƧǂǏǀDžƸ ƽƴƼ ƸǂƼDŽDžǂưljDžƸ Džǁ ƸǂƶƴƾƸƲǁ
Q ƗLJƱDŽDžƸ Džǁ ƽǁƾƯǂǁ DŽLJƼƶƽDžƱǂƴ ƶƼƴ ƿƴ
Q ƚƼƵƸƵƴƼǏDŽDžƸ ǍDžƼ Džǁ ƸǀƯǂDžƺƴ ưLjƸƼ ƽƾƸƼƷǏDŽƸƼ,
ƗƪƗƞƦƚƧƜ ƚƣƗƦƨƜơƗƨƤƧ ƗƥƤ ƨƤ ƧƩƧƨƜơƗ
SDS-PLUS
ƨǂƴƵƱǀDžƸ ƲDŽNJ Džǁ ƽǁƾƯǂǁ DŽLJƼƶƽDžƱǂƴ ƽƴƼ
ƴLJƴƼǂưDŽDžƸ Džǁ ƸǀƯǂDžƺƴ.
ƥƦƤƧƗƦơƤƙƚƗƧ ƨƧƤƟ 35mm (৫ƚƢ
ƥƚƦƞƠƗơƘƗƢƚƨƗƞ) (17)
Ƙƾ. ƧLjƱƴ 6.
ƙƼƴ ƸǂƶƴDŽƲƸǃ DžǂdžƱƴDžǁǃ DŽƸ ưDžƴƾƾǁ, ǀǎƾǁ ƽƴƼ
ƾƴDŽDžƼƽǍ Ƹ ƸǀƴǂDžƱƴDžƴ DžǂdžƴƿƼǁǎ ǁdž ƷƸƿ
ưLjǁdžƿ Ưǀǁƿƴ SDS Plus, ƷƼƴDžƲƻƸDžƴƼ ǁ ǂǁDŽƴǂǁƶưƴǃ
DžǂdžƴƿƼǁǎ.
ƓDžƴƿ LjǂƺDŽƼǁǁƼƸƲDžƸ Džǁ DŽLJdžǂǁDžǂǎƴƿǁ,
ƷƸƿ LjǂƸƼƯƹƸDžƴƼ ƿƴ ƴDŽƽƱDŽƸDžƸ džƸǂƵǁƾƼƽƱ
ƲƸDŽƺ. ৫Ƹƿ ǁǂƸƲDžƸ ƿƴ ƴdžǀƱDŽƸDžƸ Džƺƿ
ƴǍƷǁDŽƺ Džǁdž ƸǂƶƴƾƸƲǁdž Ƹ ƴdžDžǍƿ Džǁƿ
DžǂǍǁ. ƩƸǂƵǁƾƼƽƱ ƲƸDŽƺ ƸƼƵƴǂǎƿƸƼ Džǁƿ
ƽƼƿƺDžƱǂƴ Ƹ ƸǂƼDžDžǍ LJǁǂDžƲǁ.
ƚƾưƶLjƸDžƸ Džƴ ƸǀƴǂDžƱƴDžƴ DžǂdžƴƿƼǁǎ
DžƴƽDžƼƽƯ. ƗƽǁƿƲDŽDžƸ Ʊ ƴƿDžƼƽƴDžƴDŽDžƱDŽDžƸ Džƴ
DŽDžǁNJưƿƴ ƸǀƴǂDžƱƴDžƴ.
Džǁ Ƹ
ƶǂƯDŽǁ ƺLjƴƿƱǃ ǂƼƿ Džǁ DžǁǁƻƸDžƱDŽƸDžƸ DŽDžǁ
DžDŽǁƽ (2).
(3) ƽƴƼ ƽǂƴDžƱDŽDžƸ Džǁ.
DŽdžƾƾǁƶƱǃ DŽƽǍƿƺǃ DŽDžƺ ƻƱƽƺ ƸǀƴǂDžƺƯDžNJƿ ǍDŽǁ
Ƽǁ ưDŽƴ ƶƲƿƸDžƴƼ.
ƽƾƸƼƷNJƻƸƲ Džǁ ƸǀƯǂDžƺƴ.
DžǂƴƵǏƿDžƴǃ Džǁ.
91
Page 95

GB TRFR DE ES IT NL PT DK SE FI NO RU PL CZ HU RO LV LT EE HR SI SK
ƚƾƾƺƿƼƽƯ
GR
ƫƚƞƦƞƧơƤƧ
ƥƦƗƟƨƞƟƚƧ ƧƩơƘƤƩƠƚƧ
ơƺƿ LjǂƺDŽƼǁǁƼƸƲDžƸ Džǁ DžǂdžƯƿƼ DŽƸ ƺƾƸƽDžǂƼƽưǃ
ƶǂƴưǃ Ʊ ƴƶNJƶǁǎǃ ƴƸǂƲǁdž ƽƴƼ ƿƸǂǁǎ. ƚƾưƶǀDžƸ
Džƺƿ ƸǂƼǁLjƱ Ǎǁdž ƻƴ ƸǂƶƴDŽDžƸƲDžƸ, .Lj. Ƹ ưƿƴƿ
ƴƿƼLjƿƸdžDžƱ ƸDžƯƾƾNJƿ, ǂƼƿ ǀƸƽƼƿƱDŽƸDžƸ.
ƧƩơƥƠƚƟƨƜƧ ƤƠƞƧƝƜƧƜƧ
Ɨƿ Džǁ ƸǂƶƴƾƸƲǁ ƽǁƾƾƱDŽƸƼ Ʊ LJǂƴƽƯǂƸƼ,
ƴǁƷƸDŽƸǎƸDžƴƼ ǁ DŽdžƾưƽDžƺǃ ǁƾƲDŽƻƺDŽƺǃ.
ƗLJƴƼǂưDŽDžƸ Džǁ LJǁǂDžƲǁ ƴǍ Džǁ ƸǂƶƴƾƸƲǁ ƴưDŽNJǃ,
DžǂƴƵǏƿDžƴǃ Džǁ DžƸƾƸdžDžƴƲǁ ǂǁǃ Džƴ ƲDŽNJ.
ƟǂƴDžƯDžƸ ƯƿDžƴ Džǁ ƸǂƶƴƾƸƲǁ DŽLJƼLjDžƯ ƽƴƼ
Ƹ Džƴ Ʒǎǁ LjưǂƼƴ ƽƴƼ ƷƼƴDžƺǂƸƲDžƸ DŽDžƴƻƸǂƱ
DŽDžƯDŽƺ.
ƧƩƢƨƜƦƜƧƜ
ƥƦƤƚƞ৫ƤƥƤƞƜƧƜ:
ƟƴDžƯ Džƺ ƷƼƯǂƽƸƼƴ DŽưǂƵƼǃ, LjǂƺDŽƼǁǁƼƸƲDžƸ
Ǎƿǁ ƴƿǁǁƼǍDždžƴ ƴƿDžƴƾƾƴƽDžƼƽƯ Ryobi.
Ɯ LjǂƱDŽƺ ƯƾƾNJƿ ƸǀƴǂDžƺƯDžNJƿ ǁǂƸƲ ƿƴ
ǂǁƽƴƾưDŽƸƼ ƽƲƿƷdžƿǁ Ʊ ƹƺƼưǃ DŽDžǁ ǂǁNjǍƿ.
ǂǁƽƴƾǏƿDžƴǃ ƼƻƴƿǍ DŽǁƵƴǂǍ
DžǂƴdžƴDžƼDŽǍ.
ƥƦƤƧƨƗƧƞƗ ƥƚƦƞƘƗƠƠƤƢƨƤƧ
ƗƿƴƽdžƽƾǏƿƸDžƸ DžƼǃ ǂǏDžƸǃ ǎƾƸǃ ƽƴƼ ƺƿ
DžƼǃ ƴǁǂǂƲDžƸDžƸ. ƨǁ ƺLjƯƿƺƴ, Džƴ
ƸǀƴǂDžƱƴDžƴ ƽƴƼ ƺ DŽdžDŽƽƸdžƴDŽƲƴ Džǁdž
ǁǂǁǎƿ ƿƴ ƴƿƴƽdžƽƾNJƻǁǎƿ ƽƴƼ ƸƲƿƴƼ
LJƼƾƼƽƯ ǂǁǃ Džǁ ƸǂƼƵƯƾƾǁƿ.
ƥƧƩơƘƤƠƤ
ƥǂǁƸƼƷǁǁƲƺDŽƺ ƴDŽLJƯƾƸƼƴǃ
V ƘǁƾDž
-1
min
ƥƸǂƼDŽDžǂǁLJưǃ Ʊ ƴƾƼƿƷǂǁƱDŽƸƼǃ
ƴƿƯ ƾƸDžǍ
ƧdžƿƸLjưǃ ǂƸǎƴ
ƠƸƼDžǁdžǂƶƲƴ DžǂdžƱƴDžǁǃ
ƗǁLJǎƶƸDžƸ Džƺ LjǂƱDŽƺ ƷƼƴƾdžDžǏƿ DŽDžǁƿ ƽƴƻƴǂƼDŽǍ
DžNJƿ ƾƴDŽDžƼƽǏƿ ƸǀƴǂDžƺƯDžNJƿ. ƨƴ ƸǂƼDŽDŽǍDžƸǂƴ
ƾƴDŽDžƼƽƯ ƸƲƿƴƼ ƸƼǂǂƸƱ DŽƸ ƹƺƼưǃ ƴǍ
ƷƼƯLJǁǂǁdžǃ Džǎǁdžǃ ƷƼƴƾdžDžǏƿ ǁdž ƸƲƿƴƼ ƷƼƴƻưDŽƼǁƼ
DŽDžǁ ƸǍǂƼǁ ƽƴƼ ǁǂƸƲ ƿƴ ƽƴDžƴDŽDžǂƴLJǁǎƿ
LjǂƱDŽƺ Džǁdžǃ. ƫǂƺDŽƼǁǁƼƸƲDžƸ ƽƴƻƴǂƯ ƴƿƼƯ ƶƼƴ
Džƺƿ ƴLJƴƲǂƸDŽƺ ƵǂNJƼƯǃ, DŽƽǍƿƺǃ, ƾƴƷƼǏƿ, ƶǂƯDŽǁdž
ƽƾ.
ƥƦƤƚƞ৫ƤƥƤƞƜƧƜ
ơƺƿ ƴLJƱƿƸDžƸ ǁDžư džƶǂƯ LJǂưƿNJƿ, ƵƸƿƹƲƿƺ,
ǂǁNjǍƿDžƴ ƸDžǂƸƾƴƲǁdž, ƷƼƸƼDŽƷdžDžƼƽƯ ƾƯƷƼƴ
ƽƾ. ƿƴ ưǂLjǁƿDžƴƼ DŽƸ ƸƴLJƱ Ƹ ƾƴDŽDžƼƽƯ
ƸǀƴǂDžƱƴDžƴ. ƨƴ LjƺƼƽƯ ǁǂǁǎƿ ƿƴ
ǂǁƽƴƾưDŽǁdžƿ ƹƺƼưǃ, ƿƴ ƸǀƴDŽƻƸƿƱDŽǁdžƿ Ʊ
ƿƴ ƽƴDžƴDŽDžǂưljǁdžƿ Džƴ ƾƴDŽDžƼƽƯ, ǁƷƺƶǏƿDžƴǃ
DŽƸ ƼƻƴƿǍ DŽǁƵƴǂǍ DžǂƴdžƴDžƼDŽǍ.
ƥƦƤƚƞ৫ƤƥƤƞƜƧƜ
ơƺƿ ƽƯƿƸDžƸ ƽƴƽƱ LjǂƱDŽƺ DžNJƿ ƺLjƴƿƼƽǏƿ
ƸǂƶƴƾƸƲNJƿ. ƤƼ ǂƴƽDžƼƽưǃ ƽƴDžƯLjǂƺDŽƺǃ
ǁǂǁǎƿ ƿƴ ƵƾƯljǁdžƿ Džǁ ƸǂƶƴƾƸƲǁ ƽƴƼ Džǁ
DžƸƯLjƼǁ DŽDžǁ ǁǁƲǁ ƸǂƶƯƹƸDŽDžƸ.
ƥƦƤƚƞ৫ƤƥƤƞƜƧƜ
ơƺƿ ǂǁDŽƴƻƱDŽƸDžƸ ƿƴ DžǂǁǁǁƼƱDŽƸDžƸ Džǁ
ƸǂƶƴƾƸƲǁ Ʊ ƿƴ ƷƺƼǁdžǂƶƱDŽƸDžƸ ƸǀƴǂDžƱƴDžƴ
ǁdž ƷƸƿ ǂǁDžƸƲƿǁƿDžƴƼ ƶƼƴ LjǂƱDŽƺ ƴƹƲ
Džǁdž. ƟƯƻƸ DžưDžǁƼƴ DžǂǁǁǁƲƺDŽƺ Ʊ ƴƾƾƴƶƱ
ƴǁDžƸƾƸƲ ƽƴDžƯLjǂƺDŽƺ ƽƴƼ ǁǂƸƲ ƿƴ
ǁƷƺƶƱDŽƸƼ DŽƸ ƸƼƽƲƿƷdžƿƸǃ ƽƴDžƴDŽDžƯDŽƸƼǃ,
ƴǍ Džƺ
ƠƸƼDžǁdžǂƶƲƴ DŽLJdžǂǁDžǂǎƴƿǁdž
ƧdžǍǂLJNJDŽƺ CE
ƥƴǂƴƽƴƾǁǎƸ ƷƼƴƵƯDŽDžƸ DžƼǃ ǁƷƺƶƲƸǃ
ǂǁDŽƸƽDžƼƽƯ ǂƼƿ ǀƸƽƼƿƱDŽƸDžƸ Džǁ
ƺLjƯƿƺƴ.
Φοράτε προστατευτικά αυτιών
Φοράτε προστατευτικά ματιών
ƗƿƴƽdžƽƾǏDŽDžƸ Džƴ ƴǁǂǂƲƴDžƴ
ƨƴ ƺƾƸƽDžǂƼƽƯ ǂǁNjǍƿDžƴ ǂǁǃ ƴǍǂǂƼljƺ
ƷƸƿ ƻƴ ǂưƸƼ ƿƴ ƴǁǂǂƲDžǁƿDžƴƼ ƴƹƲ
Ƹ Džƴ ǁƼƽƼƴƽƯ ƴǍƵƾƺDžƴ. ƥƴǂƴƽƴƾǁǎƸ
ƴƿƴƽdžƽƾǏDŽDžƸ Ǎǁdž džƯǂLjǁdžƿ ǁƼ
ƴƿDžƲDŽDžǁƼLjƸǃ ƸƶƽƴDžƴDŽDžƯDŽƸƼǃ. ơƼƾƱDŽDžƸ Ƹ
DžƼǃ DžǁƼƽưǃ ƴǂLjưǃ Ʊ Džǁƿ NJƾƺDžƱ ƶƼƴ ƿƴ
DŽƴǃ ƸƿƺƸǂǏDŽǁdžƿ DŽLjƸDžƼƽƯ Ƹ Džƴ
ǂǁƶǂƯƴDžƴ ƴƿƴƽǎƽƾNJDŽƺǃ.
92
Page 96

GB FR DE ES IT NL PT DK SE FI NO RU PL CZ HU RO LV LT EE HR SI SK GR
Türkçe
TR
ÖZEL GÜVENLøK KURALLARI
Q Aletle birlikte verilen yardmc tutama÷
kullann. Kontrol kayb kiúisel yaralanmalara
neden olabilir.
Q Darbeli matkap ile çalúrken kulak koruyucu
kullann. Gürültüye maruz kalmak iúitme
kaybna neden olabilir.
Q Delme iúlemi toz meydana getiriyorsa bir yüz
ya da toz maskesi takn.
Q Kesici aksesuarlar gizli kablo tesisatn
kesebilece÷i için, matkapla çalúrken izolasyonlu
tutma yüzeylerinden tutun. Kesici aksesuarn
elektrik geçen kabloyla temas etmesi, elektrikli
aletin metal parçalarnn elektrikle yüklenmesine
ve kullancnn elektri÷e çarplmasna neden
olabilir.
GÜVENLø KULLANIM øÇøN TALøMATLAR
Q Aletin, sadece isim plakasnda belirtilen voltaja
ba÷l oldu÷undan emin olunuz.
Q Aletin kapa÷ veya herhangi bir civatas eksikse,
asla aleti kullanmaynz. E÷er kapak veya
civatalar çkartlmúsa, kullanm öncesi bunlar
yerlerine taknz. Bütün parçalar, iyi çalúr bir
düzende tutunuz.
Q Aleti kullanrken, daima yüksek pozisyonda
tutunuz.
Q Kullanm esnasnda, asla bça÷a, matkap ucuna,
döner bile÷i taúna veya hareket eden di÷er
parçalara dokunmaynz.
Q Dönen aksamlar, üzerinde çalúlan parçalarla
temas halinde iken asla baúka bir alete
baúlamaynz.
Q Hareketli parçalar tam olarak durmadan önce,
asla bir aleti yere koymayn
Q AKSESUARLAR: Bu klavuzda önerilenlerin
dúnda parçalarn ve aksesuarlarn kullanlmas
tehlikeli bir durum oluúturabilir.
Q YEDEK PARÇALAR: Servis bakm yaplrken,
sadece birebir ayn yedek parçalar kullannz.
z.
12. Gevúetmek için
13. Delme derinli÷i
14. Matkap ucu (dahil de÷ildir)
15. Geri dönüú
16. øleri dönüú
17. 35 mm mandren adaptörü (dahil de÷ildir)
18. Tornavida ucu (dahil de÷ildir)
19. SDS uç (dahil de÷ildir)
TEKNøK VERøLER
Voltaj 18 V
Yüksüz hz 0-1000 dak.
Çekiç darbesi (Dakika baúna darbe) 0-4000 dak.
Darbe enerjisi 1,5 J
Maksimum delme kapasitesi:
Ahúap 16 mm
Çelik 13 mm
Beton (darbeli delme) 12 mm
Tavsiye edilen darbeli delme aral÷ 4-12 mm
Uç ba÷lant türü SDS-plus
A÷rlk - batarya kutusu hariç (Kg) 2.2
MODEL BATARYA TAKIMI
(hariç)
BPP-1815
BPP-1817
BPP-1815M
BPP-1817M
BPL-1820
CRH1801
BPL-1815
BPP-1815
BPP-1817
BPP-1815M
BPP-1817M
ùARJ CøHAZI
(hariç)
BCL-1800
BCS618
BCL1418
BC-1815S
BC-1800
BCA180
KULLANIM
-1
-1
TANIMLAMA
1. Tozdan koruma baúl÷
2. SDS mandren
3. Kelepçe
4. Mod anahtar
5. ON / OFF (AÇMA / KAPAMA) anahtar
6. Dönüú yönü seçme anahtar
(øleri/Geri/Orta kilit)
7. Yardmc tutamak
8. Derinlik ölçme çubu÷u
9. Batarya kutusu (dahil de÷ildir)
10. Mandallar
11. Skútrmak için
UYARI
Bu ürünle olan aúinal÷nzn dikkatinizi
da÷tmasna izin vermeyiniz. Dikkat
edilmeyen bir saniyeninin ciddi yaralanmalara
yol açmada yeterli olaca÷n hatrlaynz.
UYARI
Bu ürünü kullanrken daima güvenlik
koruyucu gözlükleri veya kenar korumal
güvenlik gözlükleri kullannz. Bu talimata
uyulmamas, gözlerinize yabanc maddelerin
frlatlmas suretiyle ciddi olas fiziksel
yaralanmalarla sonuçlanabilir.
93
Page 97

GB FR DE ES IT NL PT DK SE FI NO RU PL CZ HU RO LV LT EE HR SI SK GR
Türkçe
TR
KULLANIM
UYARI
Bu ürünün üreticisi tarafndan tavsiye
edilmeyen hiçbir parçay veya aksesuar
kullanmaynz. Tavsiye edilmeyen bu
parçalarn ve aksesuarlarn kullanlmas,
ciddi fiziksel yaralanmalarla sonuçlanabilir.
UYGULAMALAR
Bu ürünü, aúa÷da listelenen amaçlar dahilinde
kullanabilirsiniz:
Q A÷aç ürünleri delmek (kereste, kontraplak, tahta
kaplama, mukavva ve levha)
Q Serami÷i, plasti÷i, fibrecam ve laminasyonlar
delmek
Q Metalleri delmek
Q
Beton üzerinde darbeli delme iúlemi
Bu ürün Ryobi One+ 18 V lityum-iyon batarya
takmn ve Ryobi One+ nikel-kadmiyum batarya
takmyla çalúr.
UYARI
Parçalarn montaj esnasnda, ayarlamalar
yaparken, uçlar çkartrken veya takarken,
temizlerken veya kullanmda olmad÷ zaman
batarya takmn matkabnzdan çkartnz.
Batarya takmn çkartmak, ciddi fiziksel
yaralanmalara neden olabilecek kazara
çalúmaya baúlamay önler.
BATARYA KORUMA ÖZELLøKLERø
Ryobi 18 V lityum-iyon bataryalar, lityum-iyon
hücrelerini koruyan ve batarya ömrünü uzatan
özelliklerle donatlmútr. Baz kullanm úartlar
altnda, bu entegre özellikler, bataryann ve aletin
nikel-kadmiyum bataryalarndan farkl çalúmasna
neden olabilir.
Baz uygulamalar esnasnda, batarya elektronikleri
bataryan
çalúmasn durdurabilir. Bataryay ve aleti tekrar
reset etmek için, tetik dü÷meyi serbest braknz ve
normal kullanma devam ediniz.
NOT: Bataryann tekrar kapanmasn önlemek için,
aleti zorlamaktan kaçnnz.
E÷er tetik dü÷meyi serbest brakmak bataryay ve
aleti reset etmezse,, batarya takm tükenmiútir.
E÷er bataryalar bitmiúse, batarya takm lityumiyon úarj cihazna konuldu÷unda tekrar úarj olmaya
baúlayacaktr.
BATARYA TAKIMININ TAKILMASI
ùekil 2·yi görünüz.
Batarya kutusunu takmak için úu admlar izleyin:
Q Rotasyon selektörünü ortada kilit pozisyonuna
n kapatlmas sinyalini verebilir ve aletin
yerleútiriniz.
Q Batarya takmn, ürüne gösterildi÷i gibi taknz.
Q Batarya takmnn heriki tarafndaki kilitleme
mandallarnn yerlerine geçti÷inden ve kullanma
baúlamadan önce, batarya takmnn ürüne
sa÷lam bir úekilde takl oldu÷undan emin
olunuz.
BATARYA TAKIMININ ÇIKARTILMASI
Batarya kutusunu çkarmak için úu admlar izleyin:
Q Batarya takmnn heriki tarafnda yer alan
kilitleme mandallarn bastrnz.
Q Batarya takmn matkaptan çkartnz.
UYARI
Batarya ürünleri daima kullanm
durumundadr. Bu nedenle, kullanlmad÷
zaman veya yannzda taúd÷nz zaman
açma-kapama dü÷mesi daima kilitli
olmaldr.
YARDIMCI TUTAMAöIN AYARLANMASI
Baknz ùekil 3.
Yardmc tutama÷ ayarlamak için úu admlar
izleyin:
Q Dü÷meyi saat yönünün tersinde döndürerek
yardmc tutama÷ gevúetin (12).
Q Yardmc tutama÷ istedi÷iniz konuma döndürün.
Q Dü÷meyi saat yönünde döndürerek yardmc
tutma÷ iyice skn (11).
DERøNLøK ÖLÇME ÇUBUöUNUN AYARLANMASI
Baknz ùekil 4.
Derinlik ölçme çubu÷unu ayarlamak için úu admlar
izleyin:
Q Dönüú yönü seçme anahtarn orta konuma
getirerek tetik anahtar kilitleyin.
Q Dü÷meyi saat yönünün tersinde döndürerek
yardmc tutama÷ gevúetin (12).
Q Matkap ucu istenen delme derinli÷i kadar
çubu÷un ucunu geçecek úekilde derinlik ölçme
çubu÷unu ayarlayn.
Q Dü÷meyi saat yönünde döndürerek yardmc kolu
skn (11).
ANAHTAR
Baknz ùekil 5.
Matkab çalútrmak (ON) için, tetik dü÷meyi
bastrnz. Kapatmak (OFF) için, tetik dü÷meyi
serbest braknz.
KøLøTLEME FONKSøYONU
Baknz ùekil 5.
Açma kapatma dü÷mesi “kapatma” pozisyonunda
kilitlenebilir. Bu fonksiyon, kullanmad÷nz
zamanlarda burgu matkabnzn istem dú
çalúmasn engeller. Çalútrma dü÷mesini kilitlemek
için, dönüú yönü seçiciyi ortadaki pozisyona
(vidalama / vida sökme yönü) getiriniz.
94
Page 98

GB FR DE ES IT NL PT DK SE FI NO RU PL CZ HU RO LV LT EE HR SI SK GR
Türkçe
TR
KULLANIM
Dikkat: Seçici ortadaki pozisyonda iken, çalútrma
dü÷mesi kilitlenmiútir.
GERø ÇEVRøLEBøLøR
Baknz ùekil 5.
Bu alet, tetik anahtarn üstünde bulunan bir seçme
anahtar tarafndan kumanda edilen geri çevrilebilir
özelli÷e sahiptir (6).
Q Saat yönünde dönüú: seçme kolunu sol konuma
ayarlayn (16).
Q Saat yönünün tersinde dönüú: seçme kolunu sa÷
konuma ayarlayn (15).
MOD ANAHTARI (4)
Q Delme iúlemi için, anahtar konuma getirin.
Q Darbeli delme iúlemi için
Dü÷me konumu de÷iútirme iúlemi en iyi úekilde cihaz
çalúmazken gerçekleútirilebilir.
Sadece dü÷me etkin hale getirildikten ve makine
çalútktan sonra diúli kutusu seçilen moda de÷iúir.
Not: SDS plus olmayan uç tarafndan sabitleme ve
delme iúlemi gerçekleútirildi÷inde darbeli delme
modu cihaz mekanizmasna zarar verecektir. Delme
modunu sadece bu türde amaçlar için seçin.
konumuna getirin.
Q Mandrene (2) yerleútirmeden önce uçlar
temizleyin ve makine gres ya÷ ile ya÷layn.
Q Kelepçeyi (3) geri çekin ve çekili olarak tutun.
Q Gidebildi÷i noktaya kadar tozsuz ucu uç
tutucunun içine itin ve döndürün.
Q Ucu sabitlemek için kelepçeyi brakn.
Q Ucu çekerek sabitlenmiú oldu÷unu kontrol edin.
SDS-PLUS SøSTEMøNDEN UCUN ÇIKARILMASI
Kelepçeyi geri çekin ve ucu çkarn.
35 mm MANDREN ADAPTÖRÜ (DAHøL DEöøLDøR) (17)
Baknz ùek. 6
SDS Plus olmayan uçlarla metal, ahúap ve plastik
delme iúleri için, matkap adaptörü mevcuttur.
PRATøK øPUÇLARI
Gizli elektrik hatlarnn, gaz ya da su borularnn
bulunabilece÷i yerlerde delme iúlemi
gerçekleútirmeyin. Delme iúlemine baúlamadan önce
örne÷in bir metal detektörü kullanarak alan kontrol
edin.
KAYAN KAVRAMA
Alet skúrsa ya da taklrsa kayan kavrama serbest
kalr.
Matkab geri çekerek aletin üzerinde bulunan yükü
hemen giderin.
Darbeli delme iúlemi srasnda sadece sert metalli
özel ve SDS-Plus uçlar kullann. Piyasada satlan
silindir úekilli duvar uçlarnn matkap adaptörüyle
kullanlmas mümkün de÷ildir.
DARBELø DELME øùLEMø
Darbeli delme iúlemi esnasnda çok fazla
bask uygulamanza gerek yoktur. Bu yolla
performans artrlmú olmaz. Çok fazla bask
motor üzerine gereksiz bir yük bindirecektir.
Matkap uçlarn düzenli olarak kontrol edin.
Körelmiú matkap uçlarn bileyin ya da
de÷iútirin.
Darbeli delme iúlemi esnasnda koruyucu gözlük,
kulak koruyucu ve yardmc tutama÷ kullann. Delme
iúlemine baúlamadan önce de÷iútirme dü÷mesinin
konumunda takl oldu÷unu kontrol edin.
SDS UÇLARIN TAKILMASI VE DEöøùTøRøLMESø
Baknz ùek. 6
Bu cihazda bir SDS-plus ba÷lant sistemi
bulunmaktadr.
Daima aleti iki elinizle birlikte skca tutun ve
güvenli bir úekilde durun.
BAKIM
UYARI
Servis yaplrken, sadece Ryobi yedek
parçalarn kullannz. Baúka yedek parçalarn
kullanlmas tehlike veya üründe hasar
meydana getirebilir.
Plastik parçalar temizlerken çözücü maddeler
kullanmaktan kaçnnz. Ço÷u plastic, ticari olarak
satlan çeúitli çözücü maddelerden zarar görme
e÷ilimindedir ve bunlarn kullanm hasara yol
açabilir. Kiri, tozu, ya÷ ve gresi vs. temizlemek için
temiz bezler kullannz.
UYARI
Svlarn, gazolinin, petrol bazl ürünlerin
ve delici ya÷larn vs. plastik parçalarla
temas etmesine izin vermeyiniz. Kimyasal
maddeler, plasti÷e zarar verebilir,
inceltebilir veya ciddi fiziksel yaralanmalarla
sonuçlanacak úekilde plasti÷i tahrip edebilir.
95
Page 99

GB FR DE ES IT NL PT DK SE FI NO RU PL CZ HU RO LV LT EE HR SI SK GR
Türkçe
TR
BAKIM
UYARI
Elektrikle veya batarya ile çalúan aletleri
kötü kullanma maruz brakmaynz. Bu tür
kullanmlar, alete oldu÷u kadar çalúma
alanna da hasar verebilir.
UYARI
Bu üründe de÷iúiklik yapmaya veya bu
ürünle birlikte kullanlmas tavsiye edilmeyen
aksesuarlar yaratmaya çalúmaynz. Bu tür
giriúimler yanlú kullanm olup olas ciddi
fiziksel yaralanmalara yol açabilecek tehlikeli
bir durum yaratabilir.
ÇEVREYø KORUMA
Hammaddeyi çöp olarak tasfiye etmek
yerine yeniden dönüúüme gönderiniz.
Makine, aksesuarlar ve paketleme
materyalleri çevre dostu yeniden
dönüúümde kullanlmaldr.
SEMBOL
Delme modu
Darbeli delme modu
CE Uygunlu÷u
Makineyi çalútrmadan talimatlar
dikkatlice okuyun.
Koruyucu kulaklık kullanın
Koruyucu gözlük kullanın
Geri dönüúüme verin
Atk elektrikli ürünler evsel atklarla
birlikte atlmamaldr. Tesis bulunuyorsa
lütfen geri dönüúüme verin. Geri
dönüúümle ilgili tavsiye için Yerel
Makamlarla veya bayi ile irtibat kurun.
Güvenlik Uyars
V Volt
-1
min
Dakikada devir veya piston hareketi
Do÷ru akm
96
Page 100

GB
WARRANTY - STATEMENT
IT
GARANZIA - CONDIZIONI
All Ryobi products are guaranteed against manufacturing defects and
defective parts for a period of twenty four (24) months from the date
stated on the original invoice drawn up by the retailer and given to the
end user.
Deterioration caused by normal wear and tear, unauthorised or improper
use or maintenance, or overload are excluded from this guarantee as are
accessories such as battery packs, light bulbs, blades, fittings, bags, etc.
In the event of malfunction during the warranty period, please take the
NON-DISMANTLED product, along with the proof of purchase, to your
retailer or nearest Authorised Ryobi Service Centre.
This warranty in no way affects your legal rights concerning defective
products.
FR
Ce produit Ryobi est garanti contre les vices de fabrication et les pièces
défectueuses pour une durée de vingt-quatre (24) mois, à compter de
la date faisant foi sur l'original de la facture établie par le revendeur à
l'utilisateur final.
Les détériorations provoquées par l'usure normale, par une utilisation ou
un entretien anormal ou non autorisé, ou par une surcharge sont exclues
de la présente garantie de même que les accessoires tels que batteries,
ampoules, lames, embouts, sacs, etc.
En cas de mauvais fonctionnement au cours de la période de garantie,
veuillez envoyer le produit NON DÉMONTÉ avec la preuve d'achat à votre
fournisseur ou au Centre Service Agréé Ryobi le plus proche de chez
vous.
Vos droits légaux se rapportant aux produits défectueux ne sont pas remis
en cause par la présente garantie.
GARANTIE - CONDITIONS
Questo prodotto Ryobi è garantito contro tutti i difetti di fabbricazione e
pezzi difettosi per una durata di ventiquattro (24) mesi, a partire dalla data
indicata sull’originale della fattura compilata dal rivenditore e consegnata
all’utente finale.
Il deterioramento provocato dall’usura normale, da un utilizzo o una
manutenzione non conformi o non autorizzati, o da un sovraccarico,
è escluso dalla presente garanzia. La garanzia è esclusa anche per gli
accessori come batterie, lampadine, lame, punte, borse, ecc.
In caso di malfunzionamento nel corso del periodo di garanzia, riportare
il prodotto NON SMONTATO corredato della prova d’acquisto al fornitore
o al più vicino Centro di Assistenza Autorizzato Ryobi.
I diritti legali relativi ai prodotti difettosi non sono rimessi in causa dalla
presente garanzia.
NL
Dit Ryobi product is gewaarborgd tegen fabricagefouten en defecte
onderdelen gedurende een periode van vierentwintig (24) maanden,
te rekenen vanaf de officiële datum op het origineel van de door de
wederverkoper aan de eindgebruiker uitgeschreven rekening.
Beschadigingen veroorzaakt door normale slijtage, door abnormaal of
ongeoorloofd gebruik of onderhoud, of door overbelasting vallen niet
onder deze garantie, evenmin als accu's, lampen, bits, snijbladen,
zakken enz.
In geval van slechte werking tijdens de garantieperiode, wordt u verzocht
het NIET GEDEMONTEERDE product samen met de koopbon aan uw
leverancier of aan het dichtstbijzijnde Ryobi servicecentrum te sturen.
Deze garantie doet niet af aan uw wettelijke rechten met betrekking tot
defecte producten.
GARANTIEVOORWAARDEN
DE
Für alle Ryobi-Produkte gilt eine Garantie gegen Material- und
Verarbeitungsfehler für einen Zeitraum von vierundzwanzig (24)
Monaten ab dem Datum der vom Wiederverkäufer für den Endbenutzer
ausgestellten Originalrechnung.
Fehler, die auf Grund einer normalen Abnutzung, einer unberechtigten oder
falschen Wartung oder Handhabung oder durch eine Überbelastung auftreten,
sind von der Garantie ausgeschlossen. Dies gilt auch für Zubehörteile wie
Batterien, Glühbirnen, Sägeblätter, Ansatzstücke, Beutel usw.
Senden Sie das Produkt im Fall eines Defekts innerhalb des
Garantiezeitraumes in NICHT ZERLEGTEM Zustand zusammen
mit dem Kaufnachweis an Ihren Händler oder Ihr nächstes RyobiKundendienstzentrum zurück.
Diese Garantie hat keine Auswirkungen auf Ihre gesetzlichen Rechte in
Bezug auf fehlerhafte Produkte.
ES
Este producto Ryobi está garantizado contra los defectos de fabricación
y las piezas defectuosas por un período de veinticuatro (24) meses, a
partir de la fecha que figura en el original de la factura establecida por el
distribuidor al usuario final.
Se excluyen de la presente garantía los deterioros provocados por
un desgaste normal, una utilización o mantenimiento incorrecto o no
autorizado, y una sobrecarga, así como los diversos accesorios: baterías,
bombillas, hojas, puntas, bolsas, etc.
En caso de funcionamiento incorrecto durante el período de la garantía, envíe
el producto SIN DESMONTAR con la prueba de compra a su proveedor o al
Centro de Servicio Acreditado Ryobi más cercano a su domicilio.
Los derechos legales relacionados con los productos defectuosos no son
cuestionados por la presente garantía.
GARANTIE - BEDINGUNGEN
GARANTÍA - CONDICIONES
PT
GARANTIA - CONDIÇÕES
Este produto Ryobi está garantido contra os vícios de fabrico e as peças
defeituosas por um prazo de vinte e quatro (24) meses, a contar da
data que faz fé no original da factura emitida pelo vendedor ao utilizador
final.
As deteriorações provocadas pelo desgaste normal, por uma utilização
ou uma manutenção anormal ou não autorizada, ou por uma sobrecarga
ficam excluídas da presente garantia assim como os acessórios tais como
baterias, lâmpadas, lâminas, ponteiras, sacos, etc.
No caso de mau funcionamento durante o período de garantia, queira
enviar o produto NÃO DESMONTADO com a prova de compra ao seu
fornecedor ou ao Centro de Serviço Autorizado Ryobi mais próximo.
Os seus direitos legais relativos aos produtos defeituosos não são
prejudicados pela presente garantia.
DK
GARANTI - REKLAMATIONSRET
Der er reklamationsret på dette Ryobi produkt for fabrikationsfejl og defekte
dele i fireogtyve (24) måneder fra gyldighedsdatoen på originalfakturaen
udstedt af forhandleren til slutbrugeren.
Skader opstået på grund af almindeligt slid, unormal eller ikke tilladt
anvendelse, forkert vedligeholdelse eller overbelastning er ikke dækket af
denne reklamationsret, det samme gælder tilbehør som batterier, pærer,
klinger, indsatser, poser osv.
I tilfælde af driftsfejl i garantiperioden skal produktet afleveres IKKE
DEMONTERET med købebevis til forhandleren eller nærmeste autoriserede
Ryobi serviceværksted.
De lovbestemte rettigheder i forbindelse med defekte produkter forringes
ikke af denne reklamationsret.
 Loading...