

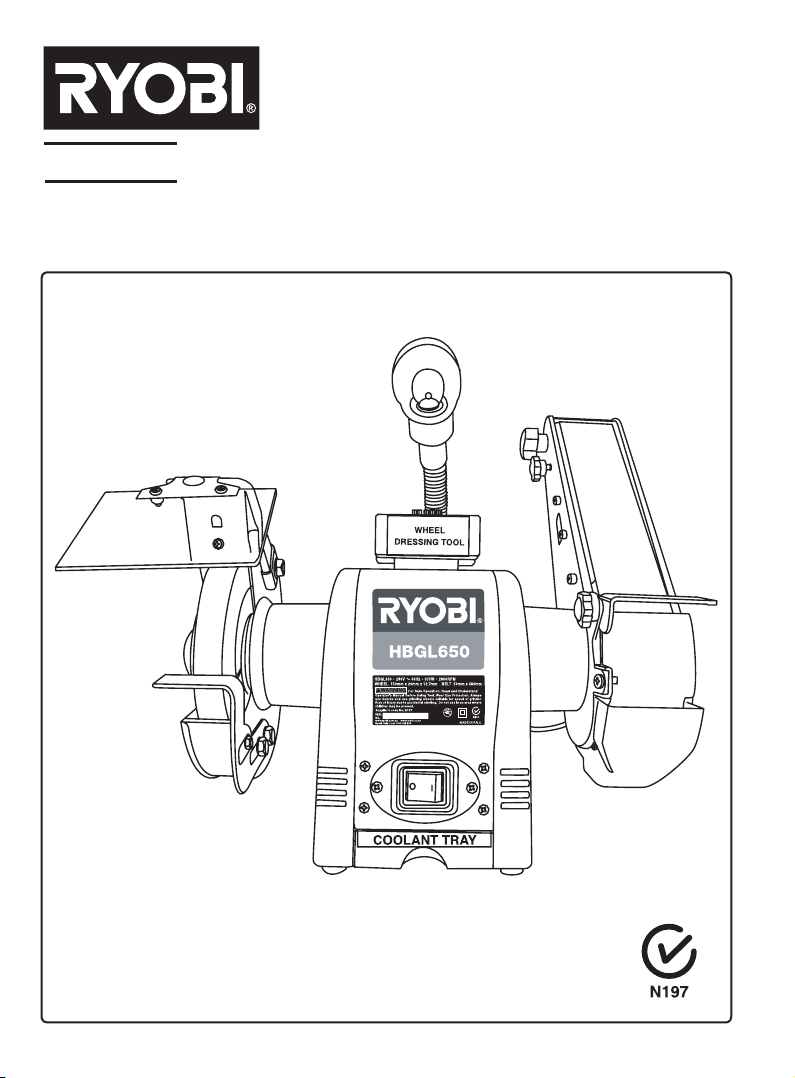
HBGL650
BENCH GRINDER LINISHER
O
WNER’S OPERATION MANUAL
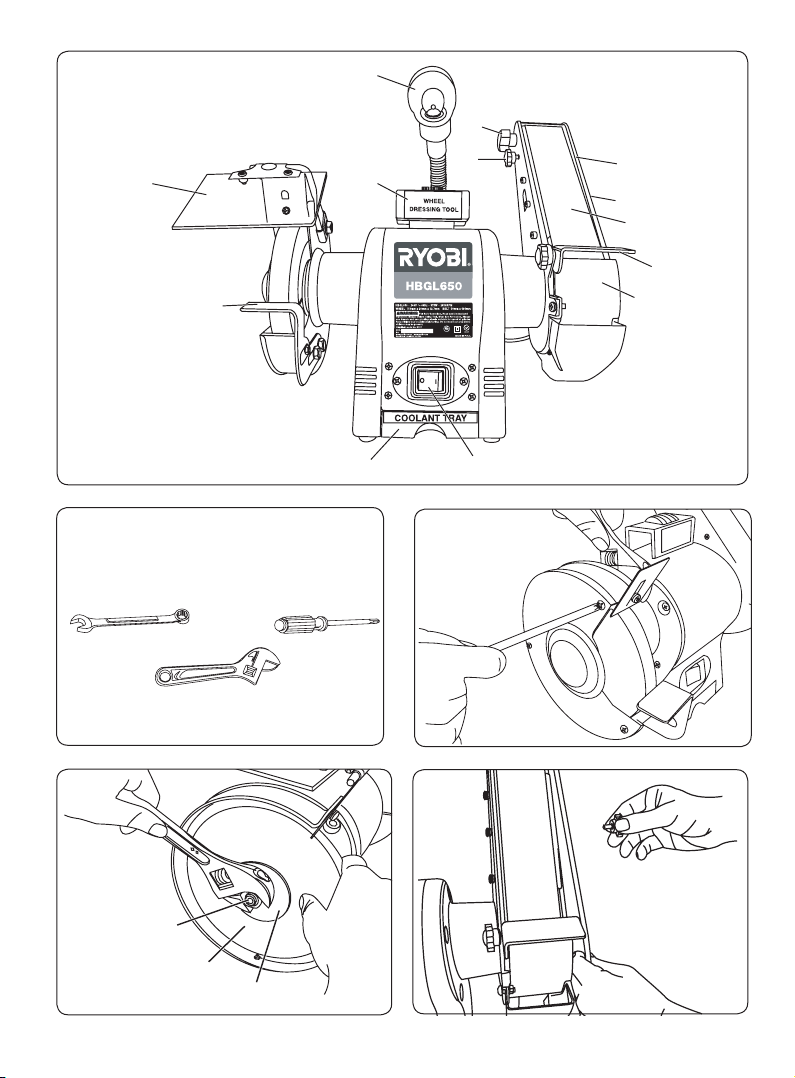
Fig. 0
Fig. 2
Fig.
4
8
9
10
12
A
2
3
4
5
6
7
1
B
13
Fig. 3
Fig. 1
C
11
(2)
(1)
(3)
WHEEL
DRESSING TOOL
WHEEL
DRESSING T
OOL
Fig. 5
Fig. 6
(2)
(2)
(1)
Fig. 8Fig. 7
Fig. 10
Fig.
12
Fig. 11
Fig. 9
(1)
(1)
(1)
(1)
(1)
(1)
(2)

Page 1
PRODUCT SPECIFICATIONS
Table of Contents
Product Specifications
Rules for Safe Operation
Loose Parts List
Features
Assembly
Operation
Maintenance
Parts Ordering / Service
1
2
3-4
5
5
6
6-7
8
9
TABLE OF CONTENTS
Diameter
Width
Arbor Hole
Belt size
NO Load Speed
Rating
Power
Weight
LOOSE PARTS LIST
PRODUCT SPECIFICATIONS
Wheel
150 mm
20 mm
12.7 mm
50 x 686 mm
2850 RPM
240V ~ 50Hz only
375W
10 kg
Look for this symbol to point out important safety precautions. It means attention!!!
Your safety is involved.

Page 2
Safe operation of this power tool requires that
you read and understand this operator’s manual
and all labels affixed to the tool. Safety is a
combination of common sense, staying alert,
and knowing how your power tool works.
READ ALL INSTRUCTIONS
KNOW YOUR POWER TOOL. Read the
operator’s manual
carefully. Learn the
applications and limitations as well as
specific potential hazards related to this
tool.
GUARD AGAINST ELECTRICAL SHOCK
by pr
eventing body contact with grounded
surfaces. For example:pipes, radiators,
ranges, refrigerator enclosures.
KEEP GUARDS IN PLACE and in working
order. Never operate the tool with any guard
or cover removed. Make sure all guards are
operating properly before each use.
REMOVE ADJUSTING KEYS AND
WRENCHES. Form habit of checking
to see keys and adjusting wrenches are
r
emoved from tool before turning it on.
KEEP THE WORK AREA CLEAN.
Clutter
ed work areas and work benches
invite accidents.
AVOID DANGEROUS ENVIRONMENTS.
Do
not use power tools near gasoline or
other flammable liquids, in damp or wet
locations or expose them to rain. Keep work
area well lighted.
KEEP CHILDREN AND VISITORS AWAY.
All
visitors should wear safety glasses and
be kept a safe distance from work area.
MAKE WORKSHOP CHILD PROOF with
padlocks, master switches, or by removing
starter keys.
DON’T
FORCE THE TOOL. It will do the job
better and safer at the rate for which it was
designed.
USE
THE RIGHT TOOL. Do not force the
tool or attachment to do a job for which it
was not designed.
USE
THE PROPER EXTENSION CORD.
Make
sure your extension cord is in good
condition. When using an extension cord,
be sure to use one heavy enough to carry
the current your product will draw. An
undersized cord will cause a drop in line
voltage resulting in loss of power and
overheating . A wire gauge size (A.W.G.) of
at least 16 is recommended for an extension
cord 8 metres or less in length. If in doubt,
use the next heavier gauge. The smaller the
gauge number, the heavier the cord.
INSPECT EXTENSION CORDS
PERIODICALLY and replace if damaged.
WEAR PROPER APPAREL. Do not wear
loose clothing, neckties, or jewelry that
can get caught in
the tool’s moving parts
and cause personal
injury. Nonslip footwear
is recommended when working outdoors. Wear
protective hair covering to contain long hair.
ALWAYS WEAR SAFETY GLASSES WITH SIDE
S
HIELDS. Everyday eyeglasses have only impact-
resistant lenses; they are NOT safety glasses.
PROTECT YOUR LUNGS. Wear a face or dust
mask if the cutting operation is dusty.
PROTECT YOUR HEARING. Wear hearing
protection during extended periods of operation.
D
ON’T ABUSE CORD. Never carry tool by the cord
or yank it to disconnect from the power supply. Keep
cord away from heat, oil, and sharp edges.
DO NOT OVERREACH. Keep proper footing and
balance at all times.
M
AINTAIN TOOLS WITH CARE. Keep tools sharp and
clean for best and safest performance. Follow
instructions for lubricating and changing accessories.
NEVER LEAVE TOOL RUNNING UNATTENDED. TURN
POWER OF F. D
isconnect all tools when not in use,
before servicing, or when changing attachments
etc.
AVOID ACCIDENTAL STARTING. Be sure switch
is of
f when plugging in.
USE RECOMMENDED ACCESSORIES. The use
of impr
oper accessories may cause risk of injury.
USE ONLY GRINDING WHEELS
that is rated
greater than 2850 PRM.
DO NOT use wheels with incorrect size bore.
NEVER use wheel washers or wheel screws
that are defective of incorrect and NEVER touch
grinding wheel or other moving parts.
NEVER STAND ON TOOL.
Serious injury
could occur if the tool is tipped or if the wheel is
unintentionally contacted.
DIRECTION OF FEED.
Be aware of wheel
rotation direction; never grind without the
workrest being properly set.
NEVER
grind more
than one workpiece at a time
CHECK DAMAGED PARTS. Before further use of
the tool, a guard or other part that is damaged
should be carefully checked to determine that
it will operate properly and perform its intended
function. Check for alignment of moving parts,
binding of moving parts, breakage of parts,
mounting and any other conditions that may
affect its operation. A guard or other part that is
damaged must be properly repaired or replaced
by an authorised service centre to avoid risk of
personal injury.
RULES FOR SAFE OPERATION

KEEP TOOL DRY, CLEAN, AND FREE FROM
OIL AND GREASE. Always use a clean cloth
when cleaning. Never use brake fluids, gasoline,
petroleum-based products, or any solvents to
clean tool.
INSPECT TOOL CORDS AND EXTENSION
CORDS PERIODICALLY and, if damaged,
have repaired by a qualified service
technician. Stay constantly aware of cord
location and keep it well away from the
rotating wheel.
NEVER USE IN AN EXPLOSIVE
ATMOSPHERE. Normal
sparking of the
motor or sparking from grinding metal could
ignite fumes.
USE OUTDOOR EXTENSION CORDS.
Use
only extension cords with approved
ground connection that are intended for use
outdoors and so marked.
USE ONLY FLANGES furnished with this
bench grinder linisher. IF ANY PART OF
THIS GRINDER LINISHER IS MISSING
or
should break, bend, or fail in any way,
or should any electrical component fail to
perform properly, shut off the power switch,
remove the machine plug from the power
source and have damaged, missing, or failed
parts replaced before resuming operation.
MAKE SURE THE GRINDER LINISHER IS
SECURELY MOUNTED as described in the
operating instructions before connecting the
tool to a power supply.
DO NOT OVERTIGHTEN THE WHEEL NUT.
Excessive
tightening can cause the wheel to
crack during operation.
INSPECT GRINDING WHEEL for visible
defects. Check the wheel for fissures and
cracks, and test for normal operation prior
to use.
ADJUST distance between wheel and work
r
est to maintain 1.6mm. or less separation
as the diameter of the wheel decreases
with use. The value of separation used
in the marking is to be the separation
recommended by the manufacturer but shall
not be more than 3.2mm.
Page 3
RULES FOR SAFE OPERATION
WARNING:
When servicing use only identical Ryobi replacement
parts. Use of any other parts may create a hazard
or cause product damage.
WARNING:
Some dust created by power sanding,
sawing, grinding, drilling, and other
construction activities contains chemicals
know to cause cancer, birth defects or other
reproductive harm. Some examples of these
chemicals are:
. lead from lead-based paints.
. crystalline silica from bricks and cement
and other masonry products.
. arsenic and chromium from chemicallytreated timber.
Your risk from these exposures varies,
depending on how often you do this type
of work. To reduce your exposure to these
chemicals: work in a well ventilated area,
and work with approved safety equipment,
such as those dust masks that are specially
designed to filter out microscopic particles.
DOT NOT EXPOSE
TO RAIN OR USE IN
D
AMP LOCATIONS
ALWAYS EASE THE WORKPIECE
AGAINST THE ABRASIVE WHEEL when
starting to grind. A harsh impact can break
the wheel. Use light pressure when starting
to grind; too much pressure on a cold wheel
can cause the wheel to crack.
NEVER START THE GRINDER LINISHER
when
the wheel is in contact with the
workpiece.
SECURE WORK. Always hold workpiece
firmly against the work rest.
DO NOT USE THE BENCH GRINDER
LINISHER if the flange nut or clamp nut is
missing or if the spindle shaft is bent.
FREQ
UENTLY clean grinding dust from
beneath grinder.
STAY ALERT AND EXERCISE CONTROL.
Watch what
you are doing and use common
sense. Do not operate tool when you are
tired. Do not rush.
SAVE THESE INSTRUCTIONS. Refer
to
them frequently and use them to instruct
other users. If you loan someone this tool,
loan them these instructions also.

Page 4
RULES FOR SAFE OPERATION
The purpose of safety symbols is to attract your attention to possible dangers. The safety symbols, and
the explanations with them, deserve your careful attention and understanding. The safety warnings do
not by themselves eliminate any danger. The instructions or warnings they give, are not substitutes for
proper accident prevention measures.
SYMBOL MEANING
SAFETY ALERT SYMBOL:
Indicates danger, warning, or caution. May be used in conjunction with other symbols or
pictographs.
DANGER: Failure to obey a safety warning will result in serious injury to yourself to others.
Always follow the safety precautions to reduce the risk of fire, electric shock and personal
injury.
WARNING: Failure to obey a safety warning may result in property damage or personal
injury to yourself or to others. Always follow the safety precautions to reduce the risk of
fire, electric shock and personal injury.
CAUTION: Failure to obey a safety warning may result in property damage or personal
injury to yourself or to others. Always follow the safety precautions to reduce the risk of
fire, electric shock and personal injury.
NOTE:
IMPORTANT
Servicing requires extreme care and knowledge and
should be performed only by a qualified service
technician. For s
ervice we suggest you return the
tool to your nearest RYOBI AUTHORISED SERVICE
CENTRE
for repair. When servicing,use only identical
Ryobi replacement parts.
WARNING:
Do not attempt to operate this tool until you have
read thoroughly and understand completely all
instructions, safety rules, etc. contained in this
manual. Failure to comply can result in accidents
involving fire, electric shock, or serious personal
injury. Save this operator’s manual and review
frequently for continuing safe operation and
instructing others who may use this tool.
The operation of any tool can result in foreign objects being thrown into your eyes, which
can result in severe eye damage. Before beginning power tool operation,always
wear safety goggles or safety glasses with side shields and a full face shield when
needed. We recommend Wide Vision Safety Mask for use over eyeglasses or
standard safety glasses with side shields.
WARNING:
Advises you of information or instructions vital to the operation or maintenance of the
equipment.

TOOLS NEEDED (NOT INCLUDED)
The following tools are needed for assembly
and alignment:
FEATURES
KNOW YOUR BENCH GRINDER LINISHER
See Figure. 0
Before attempting to use your new tool,
familiarise yourself with all operating features
and safety requirements.Carefully read this
operator’s manual before using your grinder.
POWER SWITCH ( 1)
Your Bench Grinder linisher features an easy
access On/Off switch for convenience and
safety.
MOTOR
P
owered by a precision-built electric induction
motor, your linisher has sufficient power to
handle tough grinding jobs.
GRINDING WHEEL
Equipped with coarse and fine grinding
wheels to suit most applications.
NOTE:New wheels sometimes require dressing
to true up the face of the wheel.
COOLANT TRAY (2)
When
grinding, metal objects become heated
quickly. It is important to keep moving the
object back and forth across the grinding
wheel and to cool the object frequently using
the grinder’s Coolant Tray.
WORK REST(3)
The work rests are independently adjustable
to compensate for wheel wear. Before
grinding, make certain the work rests are
adjusted properly. Generally the object being
ground is done slightly above centre of the
grinding wheel.
Adjust the distance between the wheel and
the work rest to maintain 1.6mm. or less
separation as the diameter of the wheel
decreases with use.
SAFETY EYE SHIELD (4)
The
safety shield is adjustable for operator
convenience. Operating the grinder without
these features attached could result in
serious injury. Do not grind with the safety
shield raised ; always wear safety glasses for
personal protection.
WHEEL DRESSING
TOOL (5)
A buildup of metals, dirt, rust, etc. will become
embedded in the grinding wheel as it wears.
Using the Wheel Dressing Tool to clean the
wheel of these ground-in particles will help
improve the grinder’s performance.
AUTO-ON WORKLIGHT (6)
Your Bench Grinder linisher comes equipped
with a permanently mounted worklight that
automatically lights the work area for safer,
more accurate grinding and sharpening.
LOOSE PART LIST
1. On/ Off Switch
2. Coolant Tray
3. Work Rest
4. Flat Eyeshield
5. Wheel Dressing Tool
6. 12V Light
7.
Belt T
ensioning Lock Knob
8. Belt Tracking Knob
9. Work rest
10. Guard Cover
11. Guard Cover knob
12. Sanding Belt
13.
Safety Guard
A: 7mm, 10mm, and 12mm COMBINATION
WRENCH
B:
PHILLIPS SCREWDRIVER
C: ADJUSTABLE WRENCH
Page 5

ASSEMBLY
OPERATION
EYESHIELD ADJUSTMENT
The Opti-View eyeshield allows users to
see operation more clearly and precisely.
Eyeshield can be adjusted up and down.
TOOL REST ADJUSTMENT
Tool rests are adjustable to maintain the
correct distance from grinding wheel of
1.6mm.
W
ARNING: Before every use, carefully
inspect the grinding wheel for any cracks
or chips and if any defects are found,
immediately replace the grinding wheel with
a new Ryobi grinding wheel. You should be
aware a defective grinding wheel can and do
explode causing serious injury.
CHANGING THE GRINDING WHEEL
To replace worn grinding wheel, the necessary
steps are listed below:
Disconnect the power supply.
Remove the three screws and nuts holding
the outside wheel guard (1). (Fig. 2)
Hold grinding wheel (1) firmly. Remove the
nut (2) and flange (3) on the shaft by using
proper tool.(Fig. 3)
Take off used wheel and replace with a new
one.
Assemble the flange, nut and outside cover
in reverse order. To ensure good balance,
make sure the surface between the grinding
wheel and the flanges are smooth.
Secure the three screws and nuts holding the
outside wheel guard.
Stand
to the side of the machine. Switch on
Fix tool rests with screws and washers
supplied. Keep tool rests Perpendicular to
grinding wheel and sanding assembly.
Assemble eyeshield and spark deflector
by using bolts, washers and knurled nuts
supplied loose.
Install eyeshield assembly to wheel guard.
the machine and let it run at full speed with no
load for one minute to check the wheel before
using it under load.
Note: Never sharpen or grind anything made of
aluminium, br
ass or copper.
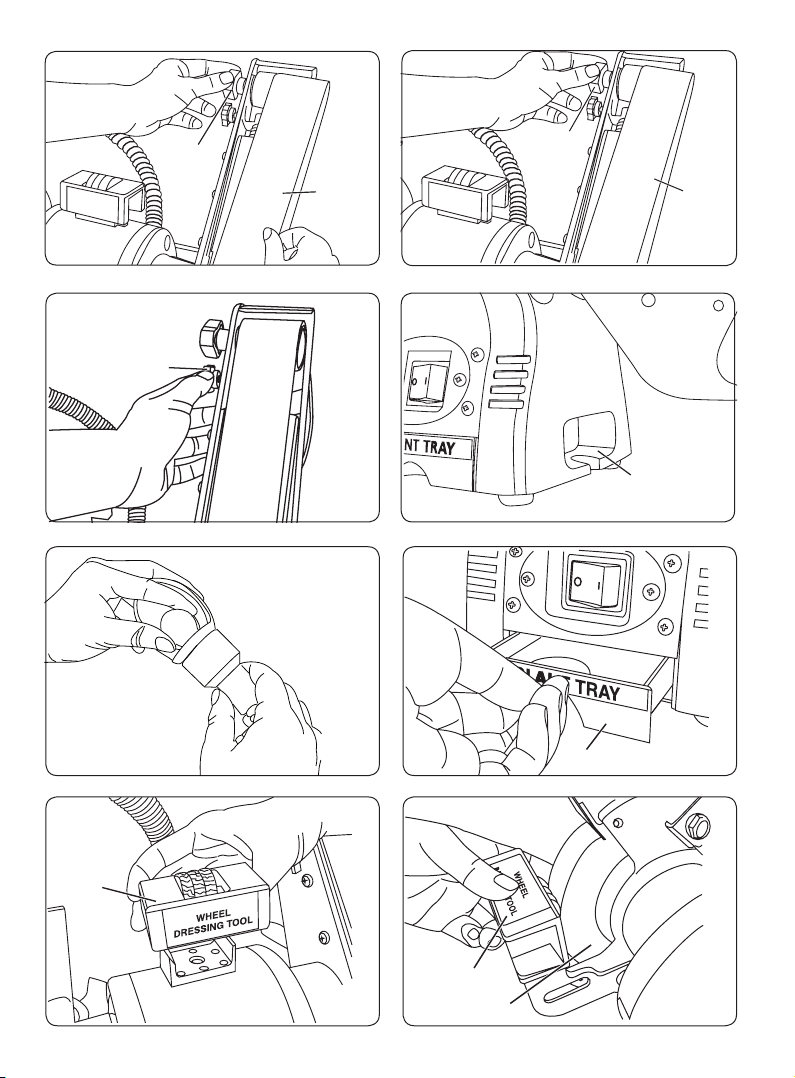
CHANGING THE SANDING BELT
To replace worn sanding belt, remove guard
cover (Fig. 4)
Turn the belt Tensioning Lock Knob (1)
anticlockwise which will loosen the tension
on the belt enabling removal of worn sanding
belt (2). (Fig. 5)
Insert new sanding belt (2) on belt drive
ensuring the direction of rotation printed
on the belt is pointing in the correct upward
position at the rear side and turn the belt
tensioning lock knob (1) clockwise to tighten
and adjust sanding belt.(Fig. 6)
TRACKING THE BELT
Ensure the belt is positioned on the centre of
the two rollers, turning the Belt Tracking Knob
(1) in a clockwise direction will move the belt
to the left, turning the Belt Tracking Knob (1)
in an anticlockwise direction will move the belt
to the right. (Fig.7)
NOTE: Extreme caution should be taken not to
let hands in contact with the belt when Bench
Grinder Linisher is in operation. With the guard
removed, switch on the Bench Grinder Linisher
and adjust the Belt Tracking Knob (1) until the
belt is positioned on the centre of the two rollers,
and reattach the guard (Fig. 7).
NOTE: After initial use the belt may stretch and
re-adjustment of the belt will be required.
Remo
ve top wheel cover bolt. washer and
nut and insert spark deflector. Replace bolt,
washer and nut. Adjust to desired working
position and tighten firmly.
NOTE: The height and angle of the eyeshield
can be adjusted up and down to the user's
requirement.
Page 6

OPERATION
BENCH ATTACHMENT
Fasten Grinder Linisher to work bench before
operating this machine. There is a hole (1) on
either side of the base which should be used
to secure the grinder. (Fig. 8)
2 x 10mm diameter bolts should be used to
secure the Grinder Linisher to the bench or
stand.
A
UTO ON LIGHT
Your Ryobi Bench Grinder Linisher comes
complete with and Auto On Adjustable light
which allows you to illuminate the workpiece
when operating in poorly lit.
The light will automatically come on when
the Grinder Linisher is switched on. When
Grinder Linisher is not in use, switch off the
tool to avoid overheating of the lamp.
WORKLIGHT BULB REPLACEMENT
When the light bulb is worn out and will no
longer work, unfasten the screws which fix
the lamp cover, then gently remove the bulb
from the holder by pushing in and turning
anticlockwise. Contact your dealer for
replacement part. To replace, gently push the
light bulb into the insert and turn clockwise,
then fix the lamp cover in reverse order.
WARNING: Do not use force as this
could lead to the bulb breaking and
serious injury.
COOLANT TRAY
The in-built coolant storage dip tray (1) allows
you to cool overheated workpieces. Simply
pull out the tray and half fill with appropriate
coolant, such as water. (fig. 10)
WARNING: Do not overfill the coolant
tray
WHEEL DRESSING TOOL
After extensive use, the grinding wheel will
accumulate in-ground metal build up. To
clean the wheel detach the Wheel Dressing
Tool (1) from the storage holder. (Fig. 11)
Rest the Wheel Dressing Tool on the tool rest
approx. 5mm from the grinding wheel.
Switch on the Grinder Linisher and wait a few
seconds until the grinding wheel reaches full
speed then slowly move the Dressing Tool
(1) to gently touch against the grinding wheel
(2)holding firmly with two fingers. Do not use
excessive pressure. (Fig. 12)
CAUTION: Do not allow the grinding
wheel and Dressing Tool to touch
before the grinding wheel has reached
full speed as this may cause the
Dressing tool to be flicked from your
grasp causing serious injury.
Page 7

MAINTENANCE
WARNING:
When servicing, use only identical Ryobi
replacement parts. Use of any other part
may create a hazard of cause product
damage.
GENERAL
K
eep the bench grinder linisher clean.
Remove dust from working parts and beneath
the grinder frequently.
Make sure the bench grinder linisher operates
proper
ly. Check screws, nuts, and bolts for
tightness.
EXTENSION CORDS
The
use of any extension cord will cause
some loss of power. To keep the loss to a
minimum and to prevent tool overheating,
use an extension cord that is heavy enough
to carry the current the tool will draw.
A wire gauge size (A.W.G.) of at least 16 is
recommended for an extension cord 8 metres
or less in length. When working outdoors, use
an extension cord that is suitable for outdoor
use. The cord’s jacket will be marked WA.
WARNING:
Check extension cords before each use. If
damaged, replace immediately. Never use
tool with a damaged cord since touching
the damaged area could cause electrical
shock resulting in serious injury.
WHEEL DRESSING TOOL
Dressing a wheel is done to renew sharpness
or to true up the face of the wheel. Set the
work rest of the bench grinder at a slight angle
and brace the wheel dressing tool against it.
Do not make contact with the grinding wheel
until after you have turned on the motor and
the wheel is rotating at full speed. Press the
dressing tool slightly against the rotating
wheel until you get a bite, then move slowly
from side to side across the wheel. A small
bite and many passes is better than a big
bite and one pass. Work cautiously, hold the
dresser with force on the work rest. Do not
use excessive pressure against the grinding
wheel. Proceed slowly until you master the
technique.
WARNING:
Do not use excess force as this could
lead to the grinding wheel breaking and
serious injury.
Page 8

This section covers the most common problems encountered during operation and what to do about them. Do not make any
adjustments until machine is unplugged and moving parts have come to a c
omplete stop.
SYMPTOM POSSIBLE CAUSE
CORRECTIVE ACTION
Motor will not start; fuses or
circuit breakers blow
1, S
hort circuit in line cord or plug
2, Short circuit in motor or loose
connections.
3, I
ncorrect fuses or circuit break-
ers in power line.
1, I
nspect cord or plug for damaged insulation and
shorted wires.
2, Inspect all connections on motor for loose or
shorted terminals or worn insulation.
3, Install correct fuses or circuit breakers.
Motor stalls (resulting in blown
fuses or tripped circuit)
1, S
hort circuit in motor or loose
connections
2, Low voltage.
3, I
ncorrectfusesor circuit breakers
in power line.
4, Motor overloaded.
1, I
nspect connections on motor for loose or shorted
terminals or worn insulation
2, Correct the low voltage conditions.
3, Install correct fuse
s or circuit breakers.
4. Reduce load on motor.
Wa
vy condition on surface of
workpiece.
1, Machine vibrating
2, Workpiece not being held firmly.
3, Wheel face uneven.
4, Wheel is too hard.
1, M
ake su re mac hines is securely mounted on
a solid surface.
2, Usea holdingdevice to firmlyretain the workpiece.
3, Dress the grinding wheel.
4. Use softer wheel, or reduce the feed rate.
Burningspots or c
racks in the
workpiece.
1, Improper type of grinding wheel
2, Improper feed rate.
3, Coolant required.
1, Try a wheel which is softer style or a coarser grit.
2, S
low down the rate of movement of the workpiece
into wheel.
3, Introduce coolant by hand.
Wheel clogs and workpiece
s
hows burn ma
rks
1, W
heel is too hard.
2, Feed rate too slow.
3, Bad wheel dress.
4. Coolant required.
1, Wheel too hard for the material being ground,
select softer bond.
2
, In
crease the rate of movement of the workpiece
into wheel.
3
, Dress thewheel.
4, Int ro duce coolant by hand
Wheel dulls quickly, grit falls
off.
1, D
epth of cut too great.
2, Wheel is soft.
3, Wheel diameter too small.
4, Bad wheel dress.
5, Defective wheel bonding.
1, Slow down the rateof movement of the workpiece
into wheel.
2, Wh
eeltoo softforthe material being ground,select
harderbond.
3, R
eplace the wheel.
4, Dress the wheel.
5, Consult manufacturer of grinding wheel.
Motor overheats. 1, Motor overloaded. 1
, Reduce load on motor
Machine slowswhen operating 1, Depth of cut too great. 1
, Slow down the rate of movement of the workpiece
into wheel.
Li
nes on surface of workpiece. 1, Impurity on wheel surface.
2, W
orkpiece not being held tightly.
1, Dress the grinding wheel.
2. Usea holding device to firmly retain theworkpiece.
Motor will not start
1, Low voltage.
2, Open circuit in motor or loose
connections.
1, Check powe
r line for proper voltage.
2, Inspect all lead connections on motor for loose
or open connections.
TROUBLESHOOTING

RYOBI TECHNOLOGIES AUSTRALIA PTY. LTD.
GUARANTEE
RYOBI TECHNOLOGIES AUSTRALIA PTY. LTD.
A.B.N. 98 002 277 509
SYDNEY: 359-361 Horsley Road, Milperra, N.S.W. 2214.
Contact during normal business hours.
RYOBI NEW ZEALAND PTY. LTD.
AUCKLAND: 27 Clemow Drive, Mt Wellington, N.Z.
Contact during normal business hours.
Subject to the guarantee condition below, this Ryobi tool
(hereinafter called “the product”) is guaranteed by Ryobi
(hereinafter called “the Company”) to be free from
defects in material or workmanship for a period of 24
months from the date of original purchase covering
both parts and labour. Under the terms of this
guarantee, the repair or replacement of any part shall
be the opinion of the Company or its authorised agent.
Should service become necessary during the warranty
period, the owner should contact the RYOBI HELPLINE
1300 361 505 or contact the retailer from whom the
product was purchased.
In order to obtain guarantee service, the owner must
present the sales docket and Guarantee Certificate
to confirm date of purchase. This product is sold by the
dealer or agent as principal and the dealer has no
authority from the Company to give any additional
guarantee on the Company’s behalf except as herein
contained or herein referred to.
Guarantee Conditions
This guarantee only applies provided that the Product
has been used in accordance with the manufacturer’s
recommendations under normal use and reasonable
care (in the opinion of the Company) and such
guarantee does not cover damage, malfunction or
failure resulting from misuse, neglect, abuse, or used
for a purpose for which it was not designed or is not
suited and no repairs, alterations or modifications
have been attempted by other than an Authorised
Service Agent. This guarantee will not apply if the tool is
damaged by accident or if repairs arise from normal
wear and tear.
The Company accepts no additional liability pursuant to
this guarantee for the costs of travelling or
transportation of the Product or parts to and from the
service dealer or agent - such costs are not included in
this guarantee.
Certain legislation, including the Trade Practices Act,
1974 (as amended) and other state and territorial laws
give rights to the buyer and impose liability on the seller in
certain circumstances. Nothing herein shall have the effect
of excluding, restricting or modifying any condition,
guarantee, right or liability imposed, to the extent only
that such exclusion, restriction or modification
would render any term herein void.
BRISBANE : All enquiries Tel : 1300 361 505
TOWNSVILLE: All enquiries Tel : 1300 361 505
MELBOURNE: 960 Stud Road, Rowville,Vic. 3178
Tel : (03) 9764 8656
HOBART: All enquiries Tel : 1300 361 505
ADELAIDE: All enquiries Tel : 1300 361 505
PERTH: 33-35 Sorbonne Cres. Canning Vale, W.A. 6155
Address Of Dealer
Present This Form With Your Purchase Docket When Guarantee Service Is Required.
Tel: (02) 9792 9800 - Fax: 1800 807 993 - www.ryobi.com.au
Tel: (09) 573 0230 - Free Call: 0800 279 624 - Fax: (09) 573 0231 - www.ryobi.co.nz
Tel : (08) 9455 7775
This Guarantee Form Should Be Retained By The Customer At All Times
For your record and to assist in establishing date of purchase (necessary for in-guarantee service)
please keep your purchase docket and this form completed with the following particulars.
Date Model No Serial No
 Loading...