

Page 1

EID1050RB
IMPACT DRILL
OWNER'S OPERATING MANUAL
Page 2
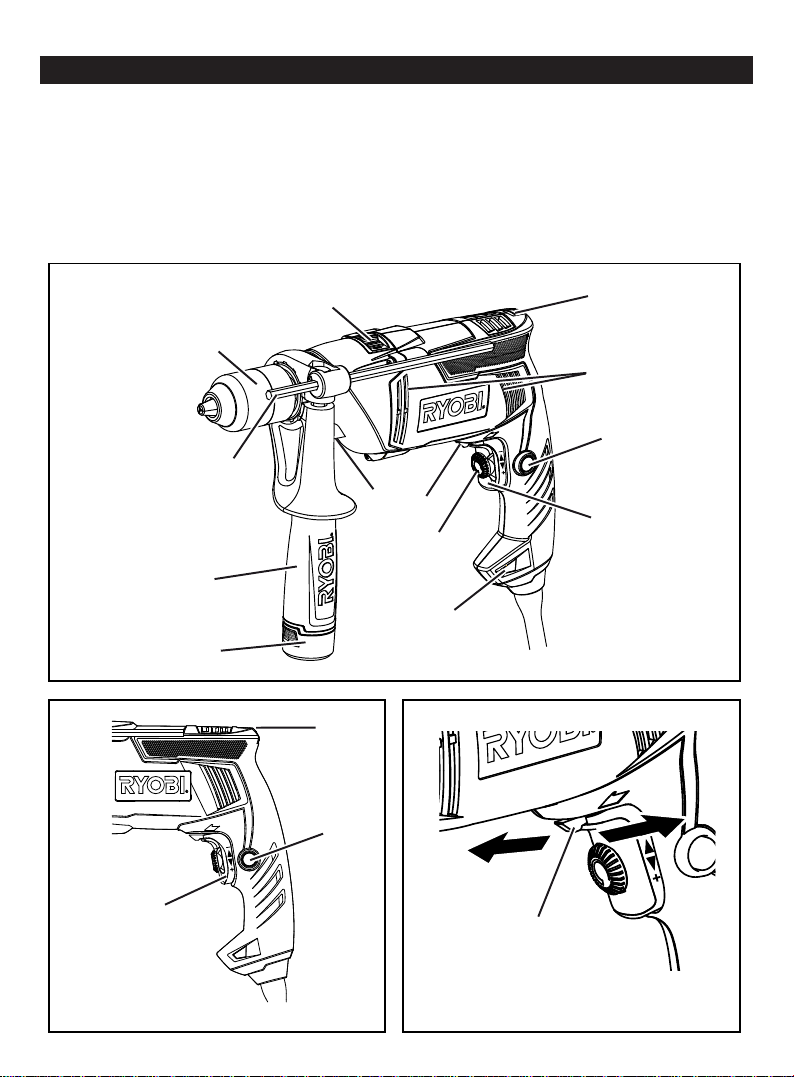
1. Trigger Switch
2. Forward / Reverse Selector
3. Keyless Chuck
4. Variable Speed Selector
5. Lock-on Button
6. Drill Mode Shift Knob
7. Depth Gauge
8. Auxiliary Handle
9. Bit (Not included)
DESCRIPTION
10. Air Vents
11. Livetool Indicator™
12. To Tighten Chuck
13. To Loosen Chuck
14. To Tighten Handle
15. To Loosen Handle
16. Bit Storge
17. Spindle Lock
18. Bubble Level
8
16
6
18
3
10
5
7
2
17
1
4
11
18
5
1
2
Fig. 2Fig. 1
Page 3
12
3
16
4
6
9
13
Fig. 4Fig. 3
7
6
Fig. 5
15 14
Fig. 6
Fig. 7
17
Fig. 8
Page 4

Important!
It is essential that you read the instructions in this manual before
operating this machine.
Subject to technical modifi cations.
Page 5

English
GENERAL SAFETY RULES
WARNING
Read all safety warnings and all instructions.
Failure to follow the warnings and instructions may
result in electric shock, fire and/or serious injury.
Save all warnings and instructions for future
reference.
The term "power tool'' in the warnings refers
to your mains-operated (corded) power tool or
battery-operated (cordless) power tool.
WORK AREA
■ Keep work area clean and well lit. Cluttered or dark
areas invite accidents.
■ Do not operate power tools in explosive
atmospheres, such as in the presence of
flammable liquids, gases, or dust. Power tools
create sparks which may ignite the dust or fumes.
■ Keep children and bystanders away while
operating a power tool. Distractions can cause you
to lose control.
ELECTRICAL SAFETY
■ Power tool plugs must match the outlet. Never
modify the plug in any way. Do not use any
adapter plugs with earthed (grounded) power
tools. Unmodified plugs and matching outlets will
reduce risk of electric shock.
■ Avoid body contact with earthed or grounded
surfaces such as pipes, radiators, ranges and
refrigerators. There is an increased risk of electric
shock if your body is earthed or grounded.
■ Do not expose power tools to rain or wet
conditions. Water entering a power tool will increase
the risk of electric shock.
■ Do not abuse the cord. Never use the cord for
carrying, pulling or unplugging the power tool.
Keep cord away from heat, oil, sharp edges or
moving parts. Damaged or entangled cords increase
the risk of electric shock.
■ When operating a power tool outdoors, use an
extension cord suitable for outdoor use. Use of
a cord suitable for outdoor use reduces the risk of
electric shock.
■ If operating a power tool in a damp location is
unavoidable, use a residual current device (RCD)
protected supply. Use of an RCD reduces the risk of
electric shock.
PERSONAL SAFETY
■ Stay alert, watch what you are doing and use
common sense when operating a power tool. Do
not use a power tool while you are tired or under
the influence of drugs, alcohol or medication. A
moment of inattention while operating power tools
may result in serious personal injury.
■ Use safety equipment. Always wear eye
protection. Safety equipment such as dust mask,
non-skid safety shoes, hard hat, or hearing protection
used for appropriate conditions will reduce personal
injuries.
■ Prevent unintentional starting. Ensure the switch
is in the off-position before connecting to power
source and/or battery pack, picking up or carrying
the tool. Carrying power tools with your finger on the
switch or energising power tools that have the switch
on invites accidents.
■ Remove any adjusting key or wrench before
turning the power tool on. A wrench or a key left
attached to a rotating part of the power tool may
result in personal injury.
■ Do not overreach. Keep proper footing and
balance at all times. This enables better control of
the power tool in unexpected situations.
■ Dress properly. Do not wear loose clothing or
jewellery. Keep your hair, clothing and gloves
away from moving parts. Loose clothes, jewellery or
long hair can be caught in moving parts.
■ If devices are provided for the connection of dust
extraction and collection facilities, ensure these
are connected and properly used. Use of dust
collection can reduce dust-related hazards.
POWER TOOL USE AND CARE
■ Do not force the power tool. Use the correct
power tool for your application. The correct power
tool will do the job better and safer at the rate for
which it was designed.
■ Do not use the power tool if the switch does not
turn it on and off. Any power tool that can not be
controlled with the switch is dangerous and must be
repaired.
■ Disconnect the plug from the power source before
making any adjustments, changing accessories,
or storing power tools. Such preventive safety
measures reduce the risk of starting the power tool
accidentally.
■ Store idle power tools out of the reach of children
and do not allow persons unfamiliar with the
power tool or these instructions to operate the
power tool. Power tools are dangerous in the hands
of untrained users.
1
Page 6

English
GENERAL SAFETY RULES
■ Maintain power tools. Check for misalignment or
bindling of moving parts, breakage of parts and
any other condition that may affect the power
tools operation. If damaged, have the power tool
repaired before use. Many accidents are caused by
poorly maintained power tools.
■ Keep cutting tools sharp and clean. Properly
maintained cutting tools with sharp cutting edges are
less likely to bind and are easier to control.
■ Use the power tool, accessories and tool bits etc.,
in accordance with these instructions and in the
manner intended for the particular type of power
tool, taking into account the working conditions
and the work to be performed. Use of the power
tool for operations different from intended could result
in a hazardous situation.
■ Recommended for the use of a residual current
device with a rated residual current of 30 mA or less.
SERVICE
■ Have your power tool serviced by a qualified
repair person using only identical replacement
parts. This will ensure that the safety of the power
tool is maintained.
SPECIAL RULES
■ Wear ear protectors with impact drills. Exposure to
noise can cause hearing loss.
■ Use auxiliary handles supplied with the tool. Loss
of control can cause personal injury.
■ Hold the power tool by the insulated grips when
performing an operation where the cutting
accessory may contact hidden wiring or its own
cord. A cutting accessory contacting a “live” wire may
make exposed metal parts of the power tool “live” and
could give the operator an electric shock.
■ This appliance is not intended for use by persons
(including children) with reduced physical, sensory
or mental capabilities, or lack of experience and
knowledge, unless they have been given supervision or instruction concerning use of the appliance
by a person responsible for their safety. Children
should be supervised to ensure that they do not
play with the appliance.
■ This appliance is not intended for use by young children
or infirm persons. Adequate supervision by a responsible person must be provided to ensure that they do not
play with the appliance.
■ Keep children and visitors away. Visitors should wear
safety glasses and be kept a safe distance from work
area. Do not let visitors contact tool or extension cord.
■ Complies with AS/NZS 60745.2.1 and 60745.1.
SPECIFICATIONS
EID1050RB
Voltage 240 V 50 Hz
Chuck capacity 13 mm (1/2”)
Drilling capacity
in wood 32 mm
in steel 13 mm
in masonry 20 mm
Input 1050 W
No load speed 0 - 3,200 min-1
Blows per minute 0 - 51,000 min-1
Weight 2.86 kg
STANDARD ACCESSORIES
Auxiliary handle and Depth Gauge.
OPERATION
APPLICATIONS
(Use only for the purposes listed below.)
■ Drilling wood, materials and resin boards.
■ Drilling concrete (impact drilling only).
■ Drilling metal: steel, brass, aluminum sheets, stainless
steel & pipe.
SWITCH
See Figure 1 & 3.
■ This tool can be started and stopped by squeezing
and releasing the trigger switch (1).
■ The speed can be adjusted by controlling the force
applied to the trigger.
■ The maximum speed of the drill may be set at different
speeds by adjusting the variable speed selector (4).
■ For continuous operation, press the lock-on button (5)
while squeezing the trigger. Squeeze the trigger again
to release the lock.
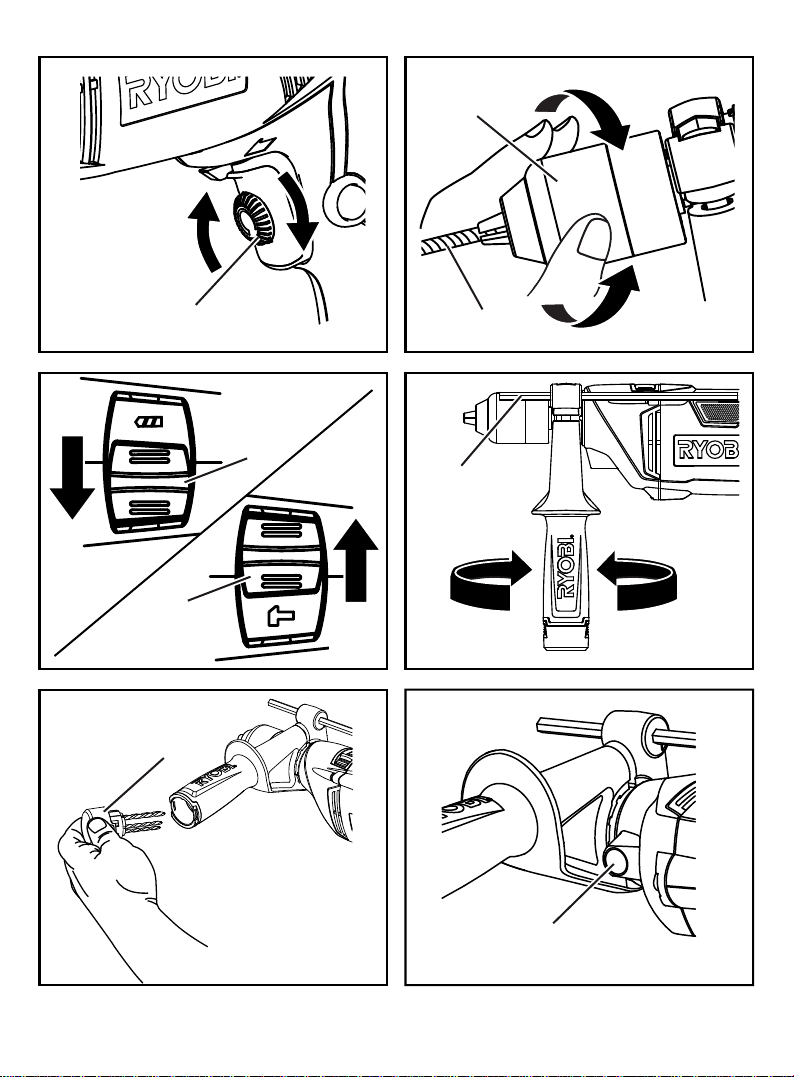
CHANGING THE ROTATION DIRECTION
See Figure 2.
■ To change the direction of rotation, stop the tool and
push the forward / reverse selector (2).
■ When the forward selector is pushed in, the bit rotates
clockwise when viewed from the handle end of the tool.
2
Page 7

English
OPERATION
■ When the reverse selector is pushed in, the bit rotates
counterclockwise.
MOUNTING AND REMOVING THE BIT
See Figure 4.
■ Insert the drill bit (9) into the chuck as far as the plain
part of its shank will go.
■ Tighten the chuck securely by rotating the chuck head
in a clockwise direction (12).
■ The bit can be removed by rotating the chuck in a
counterclockwise direction (13).
CHANGING BETWEEN DRILLING AND IMPACT
DRILLING MODE
See Figure 5.
The drilling mode shift knob (6) for changing between
the drilling mode and impact drilling mode is positioned
on the top of the tool.
DRILLING MODE: Shift the knob to the "
showing " " symbol for drilling.
IMPACT DRILLING MODE: Shift the knob to the " "
and showing "
" symbol for impact drilling.
" and
OPERATING
NEVER COVER THE AIR VENTS (10) SINCE THEY
MUST ALWAYS BE OPEN FOR PROPER MOTOR
COOLING.
DRILLING IN WOOD
To prevent ugly splits around the drill hole on the reverse
side of the workpiece, put a piece of scrap timber under
the work piece.
DRILLING IN METAL
Metals such as steel, brass, aluminum sheets, stainless
steel, and pipe may also be drilled. Mark the point to be
drilled with a nail or punch.
Do not use impact drilling mode on these materials.
DRILLING IN CONCRETE
Stone and masonry are generally drilled in the impact
drilling mode.
When drilling in delicate materials such as wall tiles,
it is essential to start with ordinary drilling and, once the
tile is pierced, to continue with impact drilling.
In deep bore holes the drill bit should be pulled out
occasionally in order to remove the debris from the
drill and hole.
AUXILIARY HANDLE AND DEPTH GAUGE
See Figure 6.
Auxiliary handle
The auxiliary handle (8) can be rotated 360º.
Loosen the handle grip by turning in direction (15),
and tighten it at an easy to use position by turning
the grip in direction (14).
Depth gauge
Holes of a fixed depth can be accurately bored by using
the depth gauge (7).
The depth of the hole will be the distance from the end
of the bit to the end of the depth gauge.
By turning the handle grip in direction (14), the depth
gauge can be released and the depth adjusted. After
adjusting the depth, fix the depth gauge again by turning
the handle grip in direction (15).
BIT STORAGE
See Figure 7.
The auxiliary handle also contains a compartment to
store drill bits. To access this compartment unscrew
the end cap below the grey trim on the handle in an
anticlockwise direction.
SPINDLE LOCK
See Figure 8.
For easy changing of the drill bit this drill is equipped with
an automatic spindle lock (17) which holds the spindle
stationary when loosening and tightening the chuck.
BUBBLE LEVEL
See Figure 1.
A bubble vial is located on the top of the motor housing
to help keep the drill bit level during use. This ensures
maximum accuracy in drilling.
Recommendation: Always be supplied via a residual
current device with a rated residual current of 30 mA or
less.
LIVETOOL INDICATOR™
This tool features a Livetool Indicator™ (11) which
illuminates as soon as the tool is connected to the power
supply. This warns the user that the tool is connected and
will operate when the switch is pressed.
3
Page 8

English
MAINTENANCE
After use, check the tool to make sure that it is in good
condition. It is recommended that you take this tool to
a RYOBI Authorised Service Center for a thorough
cleaning and lubrication at least once a year.
DO NOT MAKE ANY ADJUSTMENTS WHILE
THE MOTOR IS IN MOTION. ALWAYS DISCONNECT
THE POWER CORD FROM THE POWER SUPPLY
BEFORE CHANGING REMOVABLE OR CONSUMABLE
PARTS (BLADE, BIT, ETC.), LUBRICATING OR
WORKING ON THE UNIT.
WARNING
To ensure safety and reliability, all repairs should
be performed by an AUTHORISED SERVICE
CENTER or other QUALIFIED SERVICE
ORGANISATION.
SAVE THESE INSTRUCTIONS FOR FUTURE
REFERENCE.
SYMBOL
Safety Alert
V Volts
Hz Hertz
Alternating Current
W Watts
o No load Speed
n
-1
Revolutions or reciprocations per minute
min
Double Insulation
Wear Personal protective equipment
Please read the instructions carefully before
starting the machine.
Recycle raw materials instead of disposing
as waste. The machine, accessories
and packaging should be sorted for
environmentally-friendly recycling
4
Page 9

 Loading...