

Page 1
OPERATOR'S MANUAL
DADO THROAT PLATE
0131030330-35
(FOR USE WITH THE BTS20 TABLE SAW)
Your Dado Throat Plate has been engineered and manufactured to Ryobi's high standards for dependability, ease of operation, and operator safety.
WARNING: To reduce the risk of injury, the user must read and understand the operator's manual.
Thank you for buying a Ryobi tool.
SAVE THIS MANUAL FOR FUTURE REFERENCE
Page 2
TABLE OF CONTENTS
Introduction .....................................................................................................................................................................2
Rules for Safe Operation................................................................................................................................................. 2
Symbols ..........................................................................................................................................................................3
Unpacking ....................................................................................................................................................................... 4
Installation .......................................................................................................................................................................5
Parts Ordering / Service ................................................................................................................................................. 6
INTRODUCTION
This dado throat plate has many features for making the
use of this product more pleasant and enjoyable. Safety,
performance, and dependability have been given top priority in the design of this product making it easy to maintain
and operate.
WARNING:
The operation of any tool can result in foreign objects being thrown into your eyes, which can result
in severe eye damage. Before beginning operation, always wear safety goggles or safety glasses
with side shields and a full face shield when needed. We recommend Wide Vision Safety Mask
for use over eyeglasses or standard safety glasses with side shields. Always wear eye protection
which is marked to comply with ANSI Z87.1.
Look for this symbol to point out important safety precautions. It
means attention!!! Your safety is involved.
WARNING:
Do not attempt to use this product until you read thoroughly and understand completely the operator’s manual.
Pay close attention to the safety rules, including Dangers,
Warnings, and Cautions. If you use your product properly
and only as intended, you will enjoy years of safe, reliable service.
RULES FOR SAFE OPERATION
Safe operation of this accessory requires that you read and
understand this operator's manual, the operator’s manual for
the table saw and all labels afxed to the tool.
READ ALL INSTRUCTIONS
KNOW YOUR ACCESSORY. Read the operator's manual
carefully. Learn the product's applications and limitations
as well as the specic potential hazards related to this
product.
KEEP THE WORK AREA CLEAN. Cluttered work areas
and work benches invite accidents. DO NOT leave tools
or pieces of wood on the saw while operating.
ALWAYS WEAR SAFETY GLASSES WITH SIDE
SHIELDS. Everyday eyeglasses have only impact-
resistant lenses; they are NOT safety glasses.
DO NOT USE THIS PRODUCT WITH OTHER EQUIP-
MENT or for other purposes.
ALWAYS DISCONNECT THE SAW FROM THE POWER
SUPPLY BEFORE ASSEMBLING THIS KIT. Make sure
the switch is off when reconnecting the saw to a power
supply.
BEFORE MAKING A CUT, BE SURE ALL ADJUST-
MENTS ARE SECURE.
SAVE THESE INSTRUCTIONS. Refer to them frequently
and use them to instruct other users. If you loan someone
this product, also loan these instructions.
2
Page 3

SYMBOLS
Important: Some of the following symbols may be used on this tool. Please study them and learn their meaning. Proper
interpretation of these symbols will allow you to operate the tool better and safer.
SYMBOL NAME DESIGNATION/EXPLANATION
V Volts Voltage
A Amperes Current
Hz Hertz Frequency (cycles per second)
W Watt Power
min Minutes Time
Alternating Current Type of current
Direct Current Type or a characteristic of current
---
n0 No Load Speed Rotational speed, at no load
Class II Construction Double-insulated construction
.../min Per Minute Revolutions, strokes, surface speed, orbits etc., per minute
Safety Alert Precautions that involve your safety
The manual contains special messages to bring attention to
helpful operating and servicing information. Please read all
the information carefully to avoid injury and machine damage.
and a full face shield when operating this product.
Read The Operator’s Manual
Eye Protection
Wet Conditions Alert Do not expose to rain or use in damp locations.
Always wear safety goggles or safety glasses with side shields
potential safety concerns and machine damage as well as
SAVE THESE INSTRUCTIONS
3
Page 4

UNPACKING
INFORMATION
Remove the loose parts from the box.
Inspect the dado throat plate carefully to make sure no
breakage or damage occurred during shipping.
If the dado throat plate is damaged, please call
1-800-525-2579 for assistance.
WARNING:
If any parts are missing, replace the missing parts before assembling the kit. Failure to do so could result in
serious personal injury.
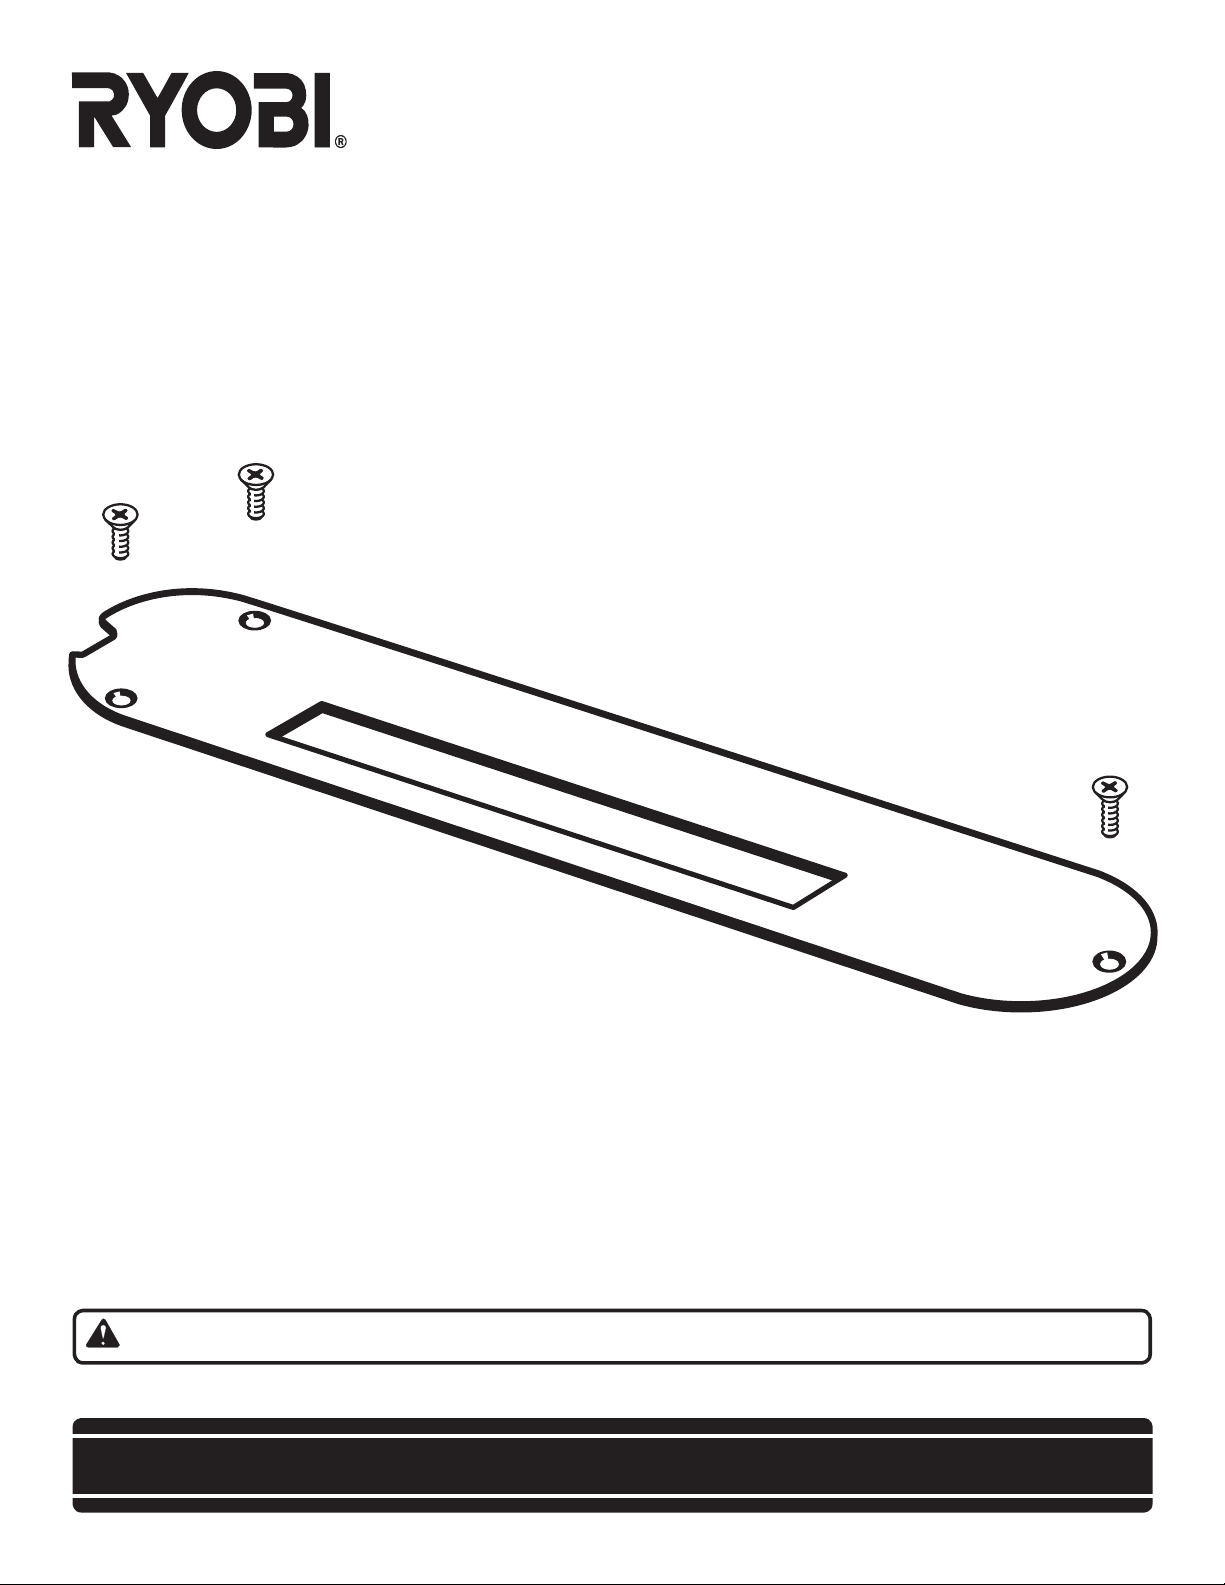
LOOSE PARTS LIST
Dado throat plate
10-24 x 1/2 in. at head screws (2)
10-24 x 3/4 in. at head screw (1)
TOOLS NEEDED
Phillips head screwdriver
10-24 X 1/2 IN.
SCREWS
10-24 X 3/4 IN.
SCREW
THROAT PLATE
4
Page 5

+
-
INSTALLING A DADO INSERT
INSTALLATION
WARNING:
Failure to turn the saw off, remove the switch key,
and unplug the saw could result in accidental starting
causing possible serious personal injury.
Lower the blade below the table surface.
Loosen the screw and remove the throat plate.
Remove the blade and blade guard assembly following
instructions in the table saw Operator's Manual.
Included with the dado blade are installation instructions.
Follow these instructions to install the dado set.
Tighten arbor nut and blade washer securely.
Place dado insert on the table saw as shown in gure 1.
Securely tighten using screws provided.
WARNING:
Never stand directly in line with the blade or allow hands
to come closer than 3 in. to the blade. Do not reach over
or across the blade. Failure to heed this warning can
result in serious personal injury.
DADO INSERT
SCREWS
TABLE TOP
Fig. 1
DADO CUT
USING A DADO INSERT
Make sure the wood is not touching the blade. Plug in the
saw, insert the switch key, and turn the saw on. Let the
saw build up to full speed before feeding the workpiece
into the blade. Always use pushsticks or pushblocks with
dado cuts. See Figure 2.
WARNING:
Always use pushsticks or pushblocks when making nonthrough cuts to avoid the risk of serious injury. Never
feed wood with your hands.
Follow all dado instructions.
When the work is complete, turn the saw off, remove the
switch key, and unplug the saw.
Lower the blade below the table surface.
WARNING:
Lower the blade to prevent possible injury.
Remove the dado insert and dado set or molding head.
Reinstall the blade, blade guard assembly, and throat plate
following instructions in the Operator's Manual.
PUSHSTICK
Fig. 2
WARNING:
To reduce the risk of injury and before plugging the
saw back in, make sure the blade guard is installed and
working properly.
5
Page 6

OPERATOR'S MANUAL
DADO THROAT PLATE
0131030330-35
(FOR USE WITH THE BTS20 TABLE SAW)
WARRANTY
Ryobi warrants its accessories for a period of 90 days from the date of purchase. Batteries and chargers are warranted
for a period of two years from the date of purchase.
PARTS AND SERVICE
For parts or service, contact your nearest Ryobi authorized service center. Be sure to provide all relevant
information when you call or visit. For the location of the authorized service center nearest you, please call
1-800-525-2579 or visit us online at www.ryobitools.com. When ordering parts, always give the model number:
MODEL NUMBER
983000-368
09-03
RYOBI TECHNOLOGIES INC.
1428 Pearman Dairy Road Anderson SC 29625
Post Ofce Box 1207 Anderson SC 29622-1207
Phone 1-800-525-2579
www.ryobitools.com
6
 Loading...