

Page 1
™
RYNO
MICRO-CYCLE
Rider’s Guide
WWW.RYNOMOTORS.COM
Page 2
MOVE WITHOUT BOUNDARIES.
2
Page 3
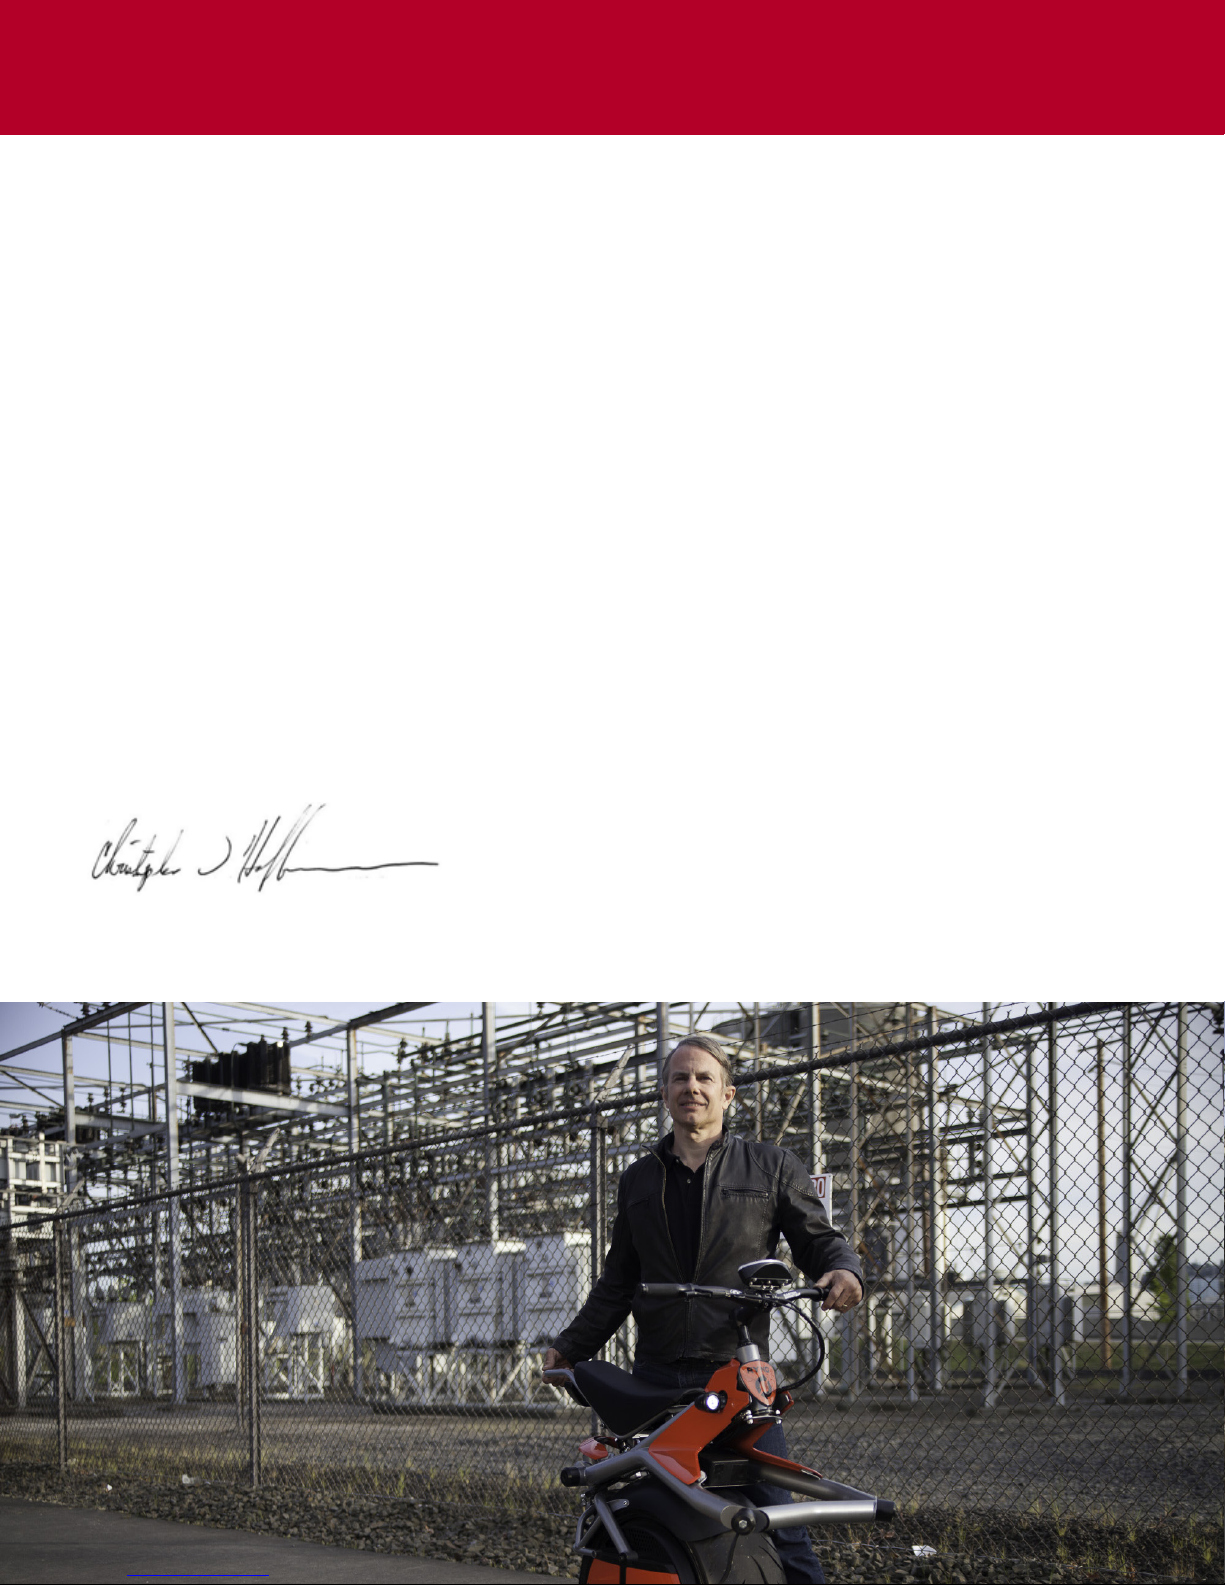
A Message from Founder and CEO Chris Homann
DEAR RYNO CUSTOMER,
The RYNO bike is a low speed (10 MPH) personal mobility product.
If you’re looking for an adrenalin rush from going fast, this is not the product for you.
If you’re physically coordinated and take pride in making smooth turns, well executed maneuvers, graceful transitions from the sidewalk
to winding gravel roads then the RYNO is the perfect product for you. It challenges you to pay attention and offers a great sense of
accomplishment as your riding technique advances and becomes more graceful.
RYNO is a well-proportioned product designed to carry the full weight of an adult over a variety of smooth, unobstructed terrains including
moderately steep hills and narrow pathways. As a result it requires the rider to be very aware of the power it has and the weight of the bike
and rider. When handled correctly, it has lots of power to keep you safe… but if abused, it can get you into trouble fast. The RYNO is not
designed to go over large bumps and curbs.
It is essential that the rider first train and gain experience on flat ground. Take your time until you feel comfortable. Don’t rush and try to
be more daring in your moves or ride in more difficult surroundings until you have gained experience. Always watch out for others and
moving cars.
Always wear a good heavy pair of boots when riding. Using your feet while making slow speed maneuvers is part of how the rider engages
with the bike and the ground. Dragging the edge of a boot in a turn or stepping one foot down on a curb is normal as you transition over the
variety of urban obstacles. If you’re not careful there are many ways to get feet caught and twisted, so bare toes and unsupported ankles are
a risk to injury.
Always wear an appropriate amount of safety gear for your level of proficiency.
The RYNO bike is a beautiful and well-engineered piece of high tech machinery. However, remember that even though it may appear you are
performing feats of magic, the bike can only do so much. The rest is up to you.
Thank you for your interest in the RYNO Micro-Cycle.
Sincerely,
Chris Hoffmann
CEO RYNO Motors
3
Page 4
WARNING!
Important
This manual is considered a permanent part of the Micro-Cycle and should remain with the Micro-Cycle when resold or otherwise
transferred to a new user or operator. The manual contains important safety information and instructions which should be read carefully
before operating the Micro-Cycle.
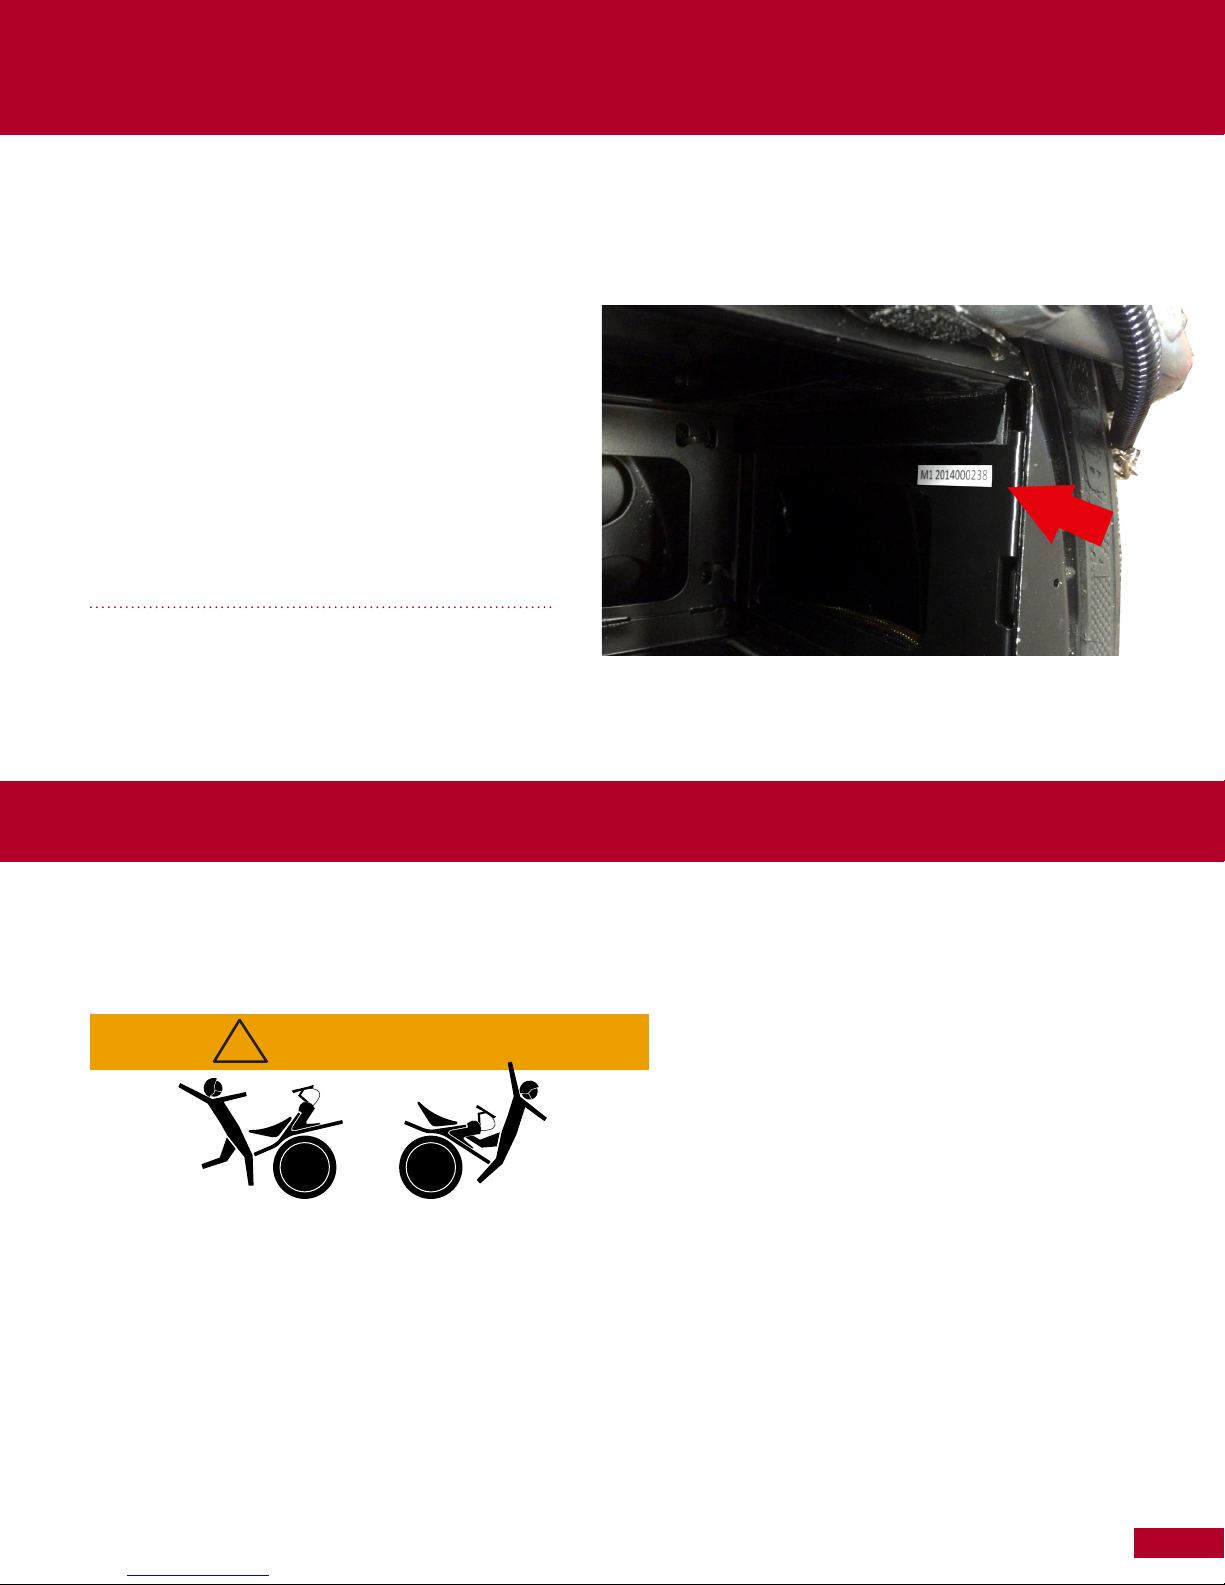
SERIAL
NUMBER:
(Located inside the right hand battery opening.)
Make sure to mail in the completed registration card included in the
information packet. RYNO Motors cannot warranty the Micro-Cycle
without this information.
Warning
As with any vehicle, when riding the Micro-Cycle, you risk death or serious injury from loss of control, collisions, and falls. To ensure your
safety, please read the instructions and cautions in this Rider’s Guide before you ride your Micro-Cycle.
!
Risk of death or serious injury from falls and collisions
Safety first! Read the Rider’s Guide and safety instructions
prior to riding. Find it at RYNOMOTORS.COM
Questions? Call RYNO at 503-526-0600.
Ryno Motors, LLC
Beaverton, OR 97008
© 2013 RYNO Motors, Inc. All rights reserved.
4
Page 5
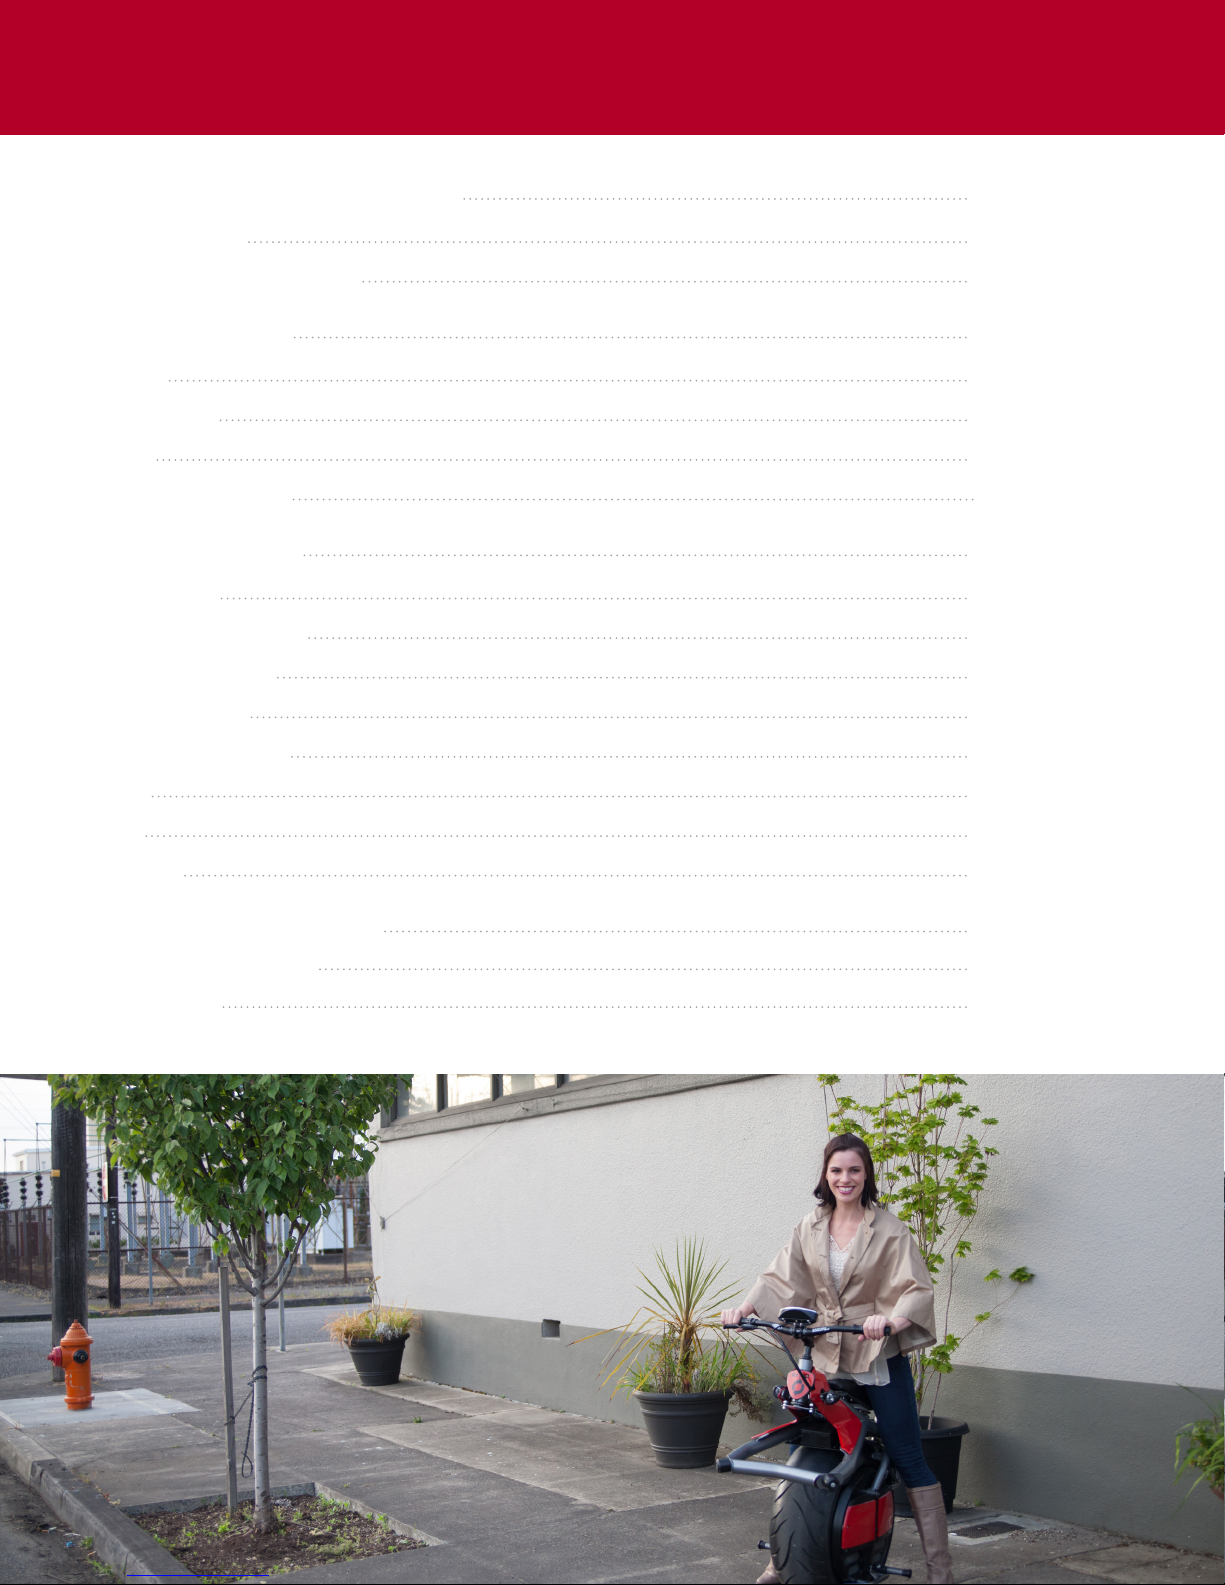
Table of Contents
MEET THE RYNO™ MICRO-CYCLE 6
Micro-cycle features 6
RYDE-EX™ auto-balance technology 7
BEFORE YOU RIDE 8
Safe riding 8
Operating modes 11
Batteries 12
Adjusting your Micro-cycle 14
LEARNING TO RIDE 17
Enlisting a Helper 17
Charged Up and Ready To Go 17
Powered Up & In Balance 17
Slowing and Stopping 18
More Aggressive Stopping 18
Steering 19
Parking 20
Transporting 20
CARE AND MAINTENANCE 21
TROUBLESHOOTING 22
WARRANTY 24
5
Page 6
Meet the Ryno™ Micro-cycle
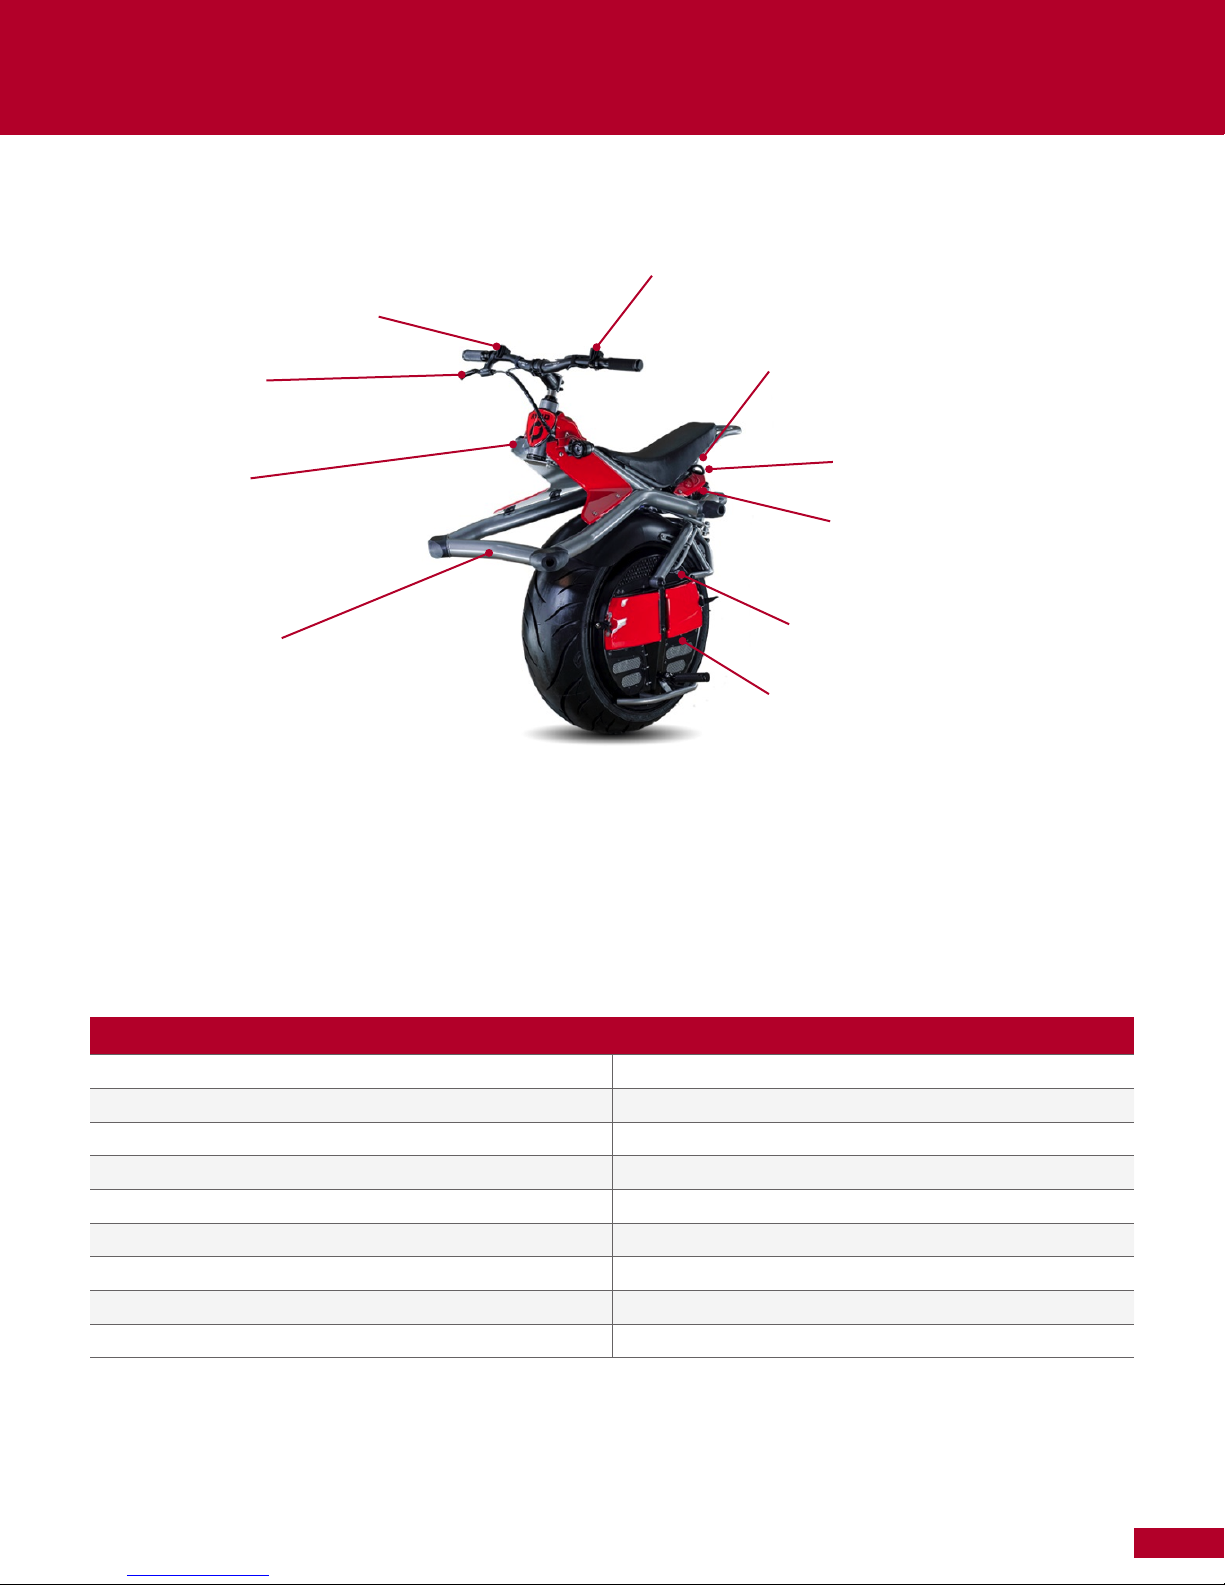
MICRO-CYCLE FEATURES
POWER BUTTON
With the key switch in the on position
the power button will engage the auto
balance stabilization.
ATTITUDE ADJUST /MODE SELECT BUTTONS
Allows you to change the balance point while riding or at
rest. Also change speed modes.
STOP-ASSIST LEVER
The stop-assist lever helps position
you to lean back and slow down.
LED HEADLIGHTS
Making sure you can see and be seen, the
ultra-bright LED headlights are always on.
PARKING BAR
The parking bar provides a platform
when parking your RYNO.
Your Micro-cycle comes with:
• Two batteries
• Two battery chargers
• Display stand
• Rider’s Guide
• Seat adjustment tool
ADJUSTABLE SEAT
The adjustable seat accommodates riders
short, tall, and in between.
SHOCK ABSORBER
The shock absorber smooths your ride.
TAIL LIGHT / MODE INDICATOR
Tail lights are on all the time, and brighter
when braking. Also displays speed mode
by different blinking patterns.
KEY POWER SWITCH
Two position removable key to turn main power on.
BATTERY BAYS
Allows access to slide out batteries. Velcro attached.
MORE SPECS
Range (two SLA batteries) Up to 15 miles (24 km)
Max speed 10 mph (16 kph)
Recharge time 6-8 hours
Tire diameter 25 inches (63.5 cm)
Micro-cycle weight 200 lbs (72 kg) (with batteries)
Max rider plus cargo weight 260 lbs (117 kg)
Max incline 20%
Turning radius 0-3 feet (0-1 meter)
Recommended tire pressure 35-40 psi
6
Page 7

Meet the RYNO™ Micro-cycle
RYDE-EX™ AUTO-BALANCE TECHNOLOGY
RYNO’s RYDE-EX auto-balance technology combines two advanced systems to keep the Micro-Cycle balanced:
Accelerometer
Determines vertical axis of the Micro-Cycle which then shows up as tilt angle in software.
Gyroscope
Measures how fast the Micro-Cycle’s tilt angle changes.
The accelerometer and gyroscope work with a motion controller that drives the wheel forward and backward under the center of gravity.
This keeps the Micro-Cycle in balance front to back. The rider is responsible for maintaining side-to-side balance.
Balance technology is safe and reliable as long as you operate the vehicle within the balance window. Staying within the balance window will
allow the Micro-Cycle to maintain an upright attitude. Ryde-Ex software will remind you when you are outside the balance window, going
too fast or accelerating too fast by tipping the bike back (raising the handlebars) momentarily. As you learn to ride the Micro-Cycle, you will
instinctively calibrate your riding behavior to stay within the balance window. This guide explains how to find and ride within the balance
window.
7
Page 8

Before You Ride
SAFE RIDING
WARNING
Riding the Micro-Cycle beyond its design limits can damage it and injure you or others.
Ask your RYNO dealer if you are unsure of the Micro-Cycle’s limits.
Safety equipment
We suggest the rider wear at a minimum, the following safety items:
• A helmet that meets CPSC or CE safety testing standards.
• Snug-fitting shoes or boots—no bare feet, sandals, or heelless shoes.
• Additional safety gear is suggested based on the rider’s skill level.
Riding behavior
Following are examples of safe (and courteous) riding behaviors and unsafe riding behaviors.
Safe riding behavior:
• Observe the minimum rider age of 16.
• Follow weight and height guidelines. For your safety and to reduce the risk of damaging the Micro-Cycle, riders must weigh between 100
lbs (45 kg) and 260 lbs (117 kg). The maximum payload (rider and cargo) for the Micro-Cycle is 260 lbs. Handlebar cargo, including
attachments hanging from the handlebar, should not exceed 5 lbs (2.3 kg).
• Riders must be tall enough that their feet can rest flat on the ground while seated on the Micro-Cycle. This is essential for safe starting
and stopping.
• Maintain tire contact with the ground at all times. DO NOT lift the bike off the ground while the power is on!
• Yield to pedestrians. On crowded sidewalks or pathways, ride at the pace of pedestrian traffic. Pass only if you have enough room to do so
safely. Do not weave in and out among pedestrians.
• Communicate with pedestrians. For example, say “on your left” when you are overtaking someone on their left side.
• Park the Micro-Cycle out of the way. The Micro-Cycle can be parked at a bike rack or by a light pole as you would a bicycle, but make sure
it is not impeding pedestrian traffic.
• If you let others ride your Micro-Cycle, be sure they are trained first.
8
Page 9
Before You Ride
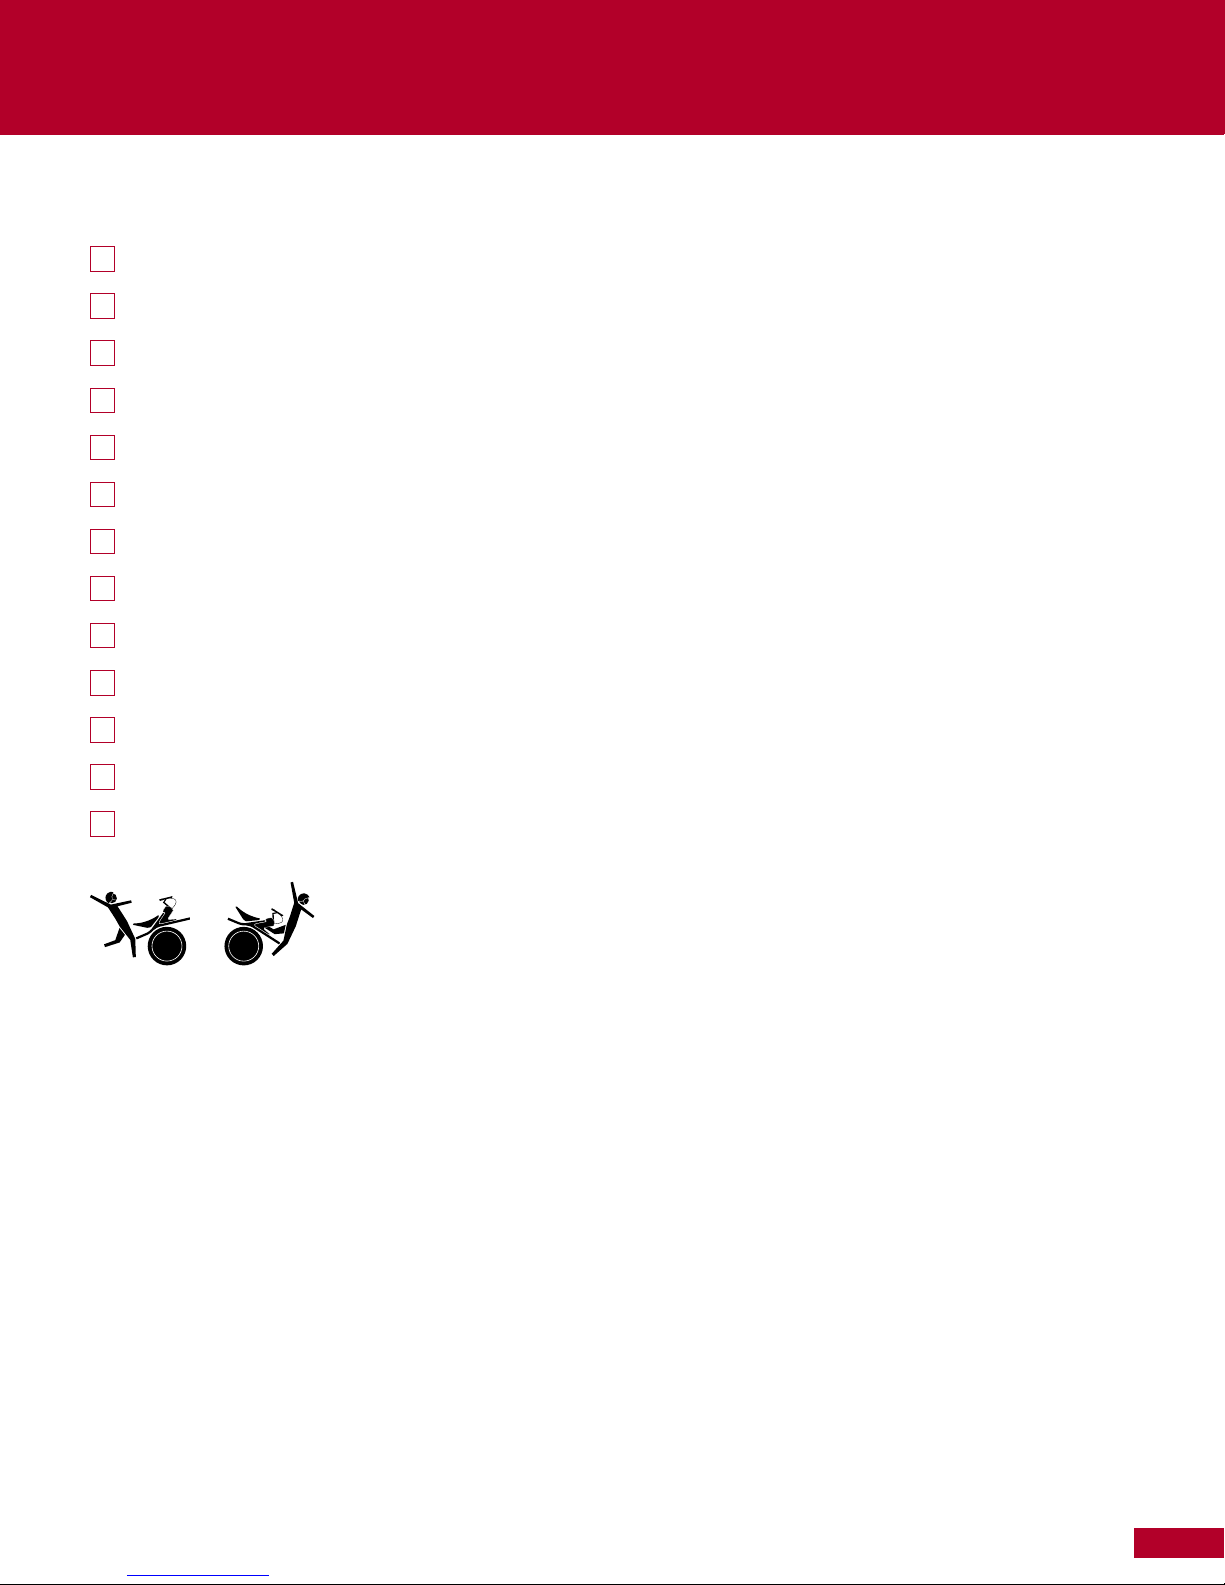
Safety checklist
Here’s what you should know and practice to be a safe rider.
Wear a helmet and shoes
Recognize unsafe riding behaviors and know how to avoid them (pg. 10)
Check that the batteries are charged (pg. 13)
Adjust seat height and tilt (pg. 14-15)
Adjust the balance window (pg. 15)
Check that tire pressure is between 35 and 40 psi (pg 21)
Know how to power on/off (pg. 11)
Know how to mount and dismount safely (pg. 17)
Know how to move forward, backward, and remain stationary (pg. 17)
Know how to park (pg. 20)
Know how to come to a controlled stop with posture and the stop-assist lever (pg. 18)
Know how to turn while moving and in place (pg. 19)
Know how to steer with posture, the handlebars, and the foot pegs (pg. 19)
WARNING
After any seat adjustment, be sure that the seat clamp is properly tightened before riding. A loose seat clamp can slip and fall and or cause
you to lose control of the bike. A correctly tightened seat clamp will not allow seat movement in any direction. Periodically check to make
sure that the seat clamp is properly tightened.
WARNING
Make sure the tire pressure is at between 35lbs and 40lbs per sq in. as shown on the side wall. An underinflated tire can cause poor handling
and may injure the rider. Use an accurate tire pressure gage. Purposely underinflating a tire can seriously change the handling characteristics
of the bike and could injure the rider.
9
Page 10
Before You Ride
Unsafe Riding Behaviors
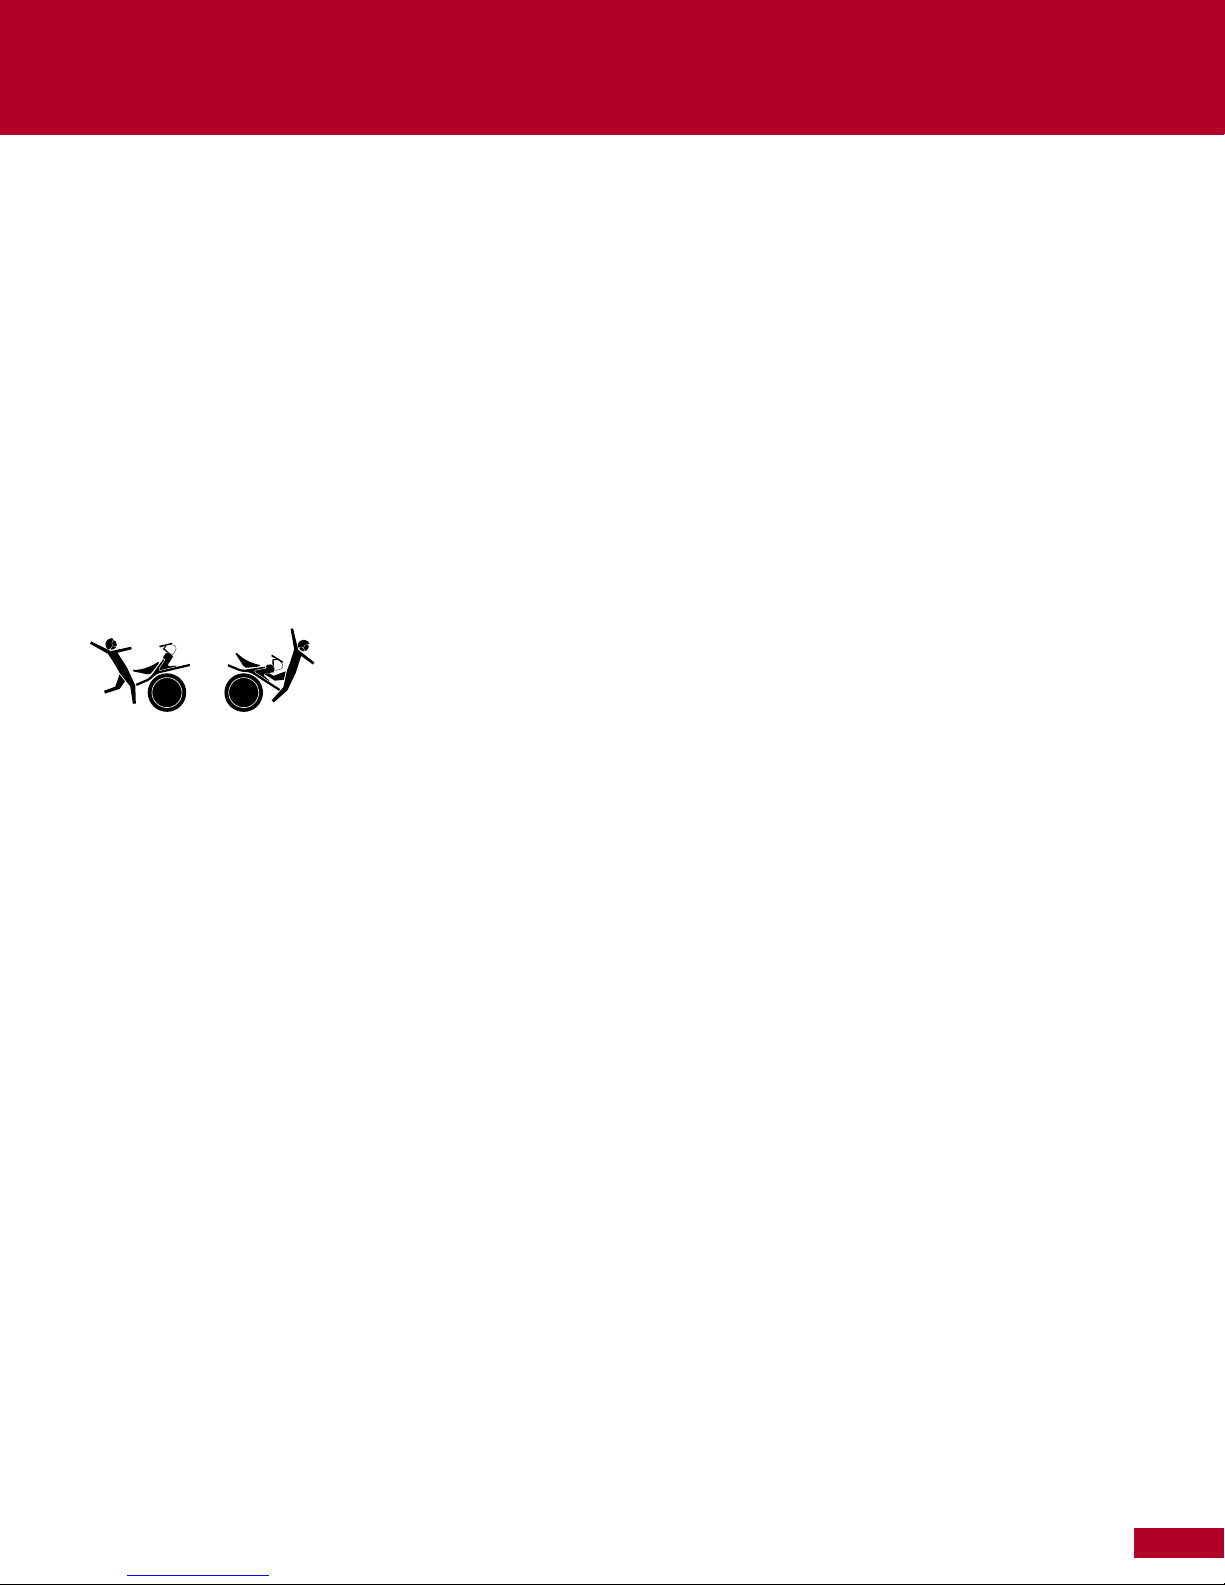
• Do not ride fast over big bumps or curbs. Slow down and lean back a bit as you approach even minor bumps. If you need to transition over
larger bumps do it at walking speed and extend one foot forward to stabilize yourself by placing your foot on the bump as you walk over it.
Make sure you have heavy shoes on.
• Do not ride on slippery, icy, wet, or slick surfaces; grass; hills with loose sand or gravel, steep slopes; debris such as litter, branches, and
stones; or off-road. Walk your Micro-Cycle over unsafe surfaces or terrain.
• One wheel, one rider. The Micro-Cycle is a one-person vehicle. Riding with a passenger—human or animal—is very dangerous.
• Do not lean sideways more than 45°. Leaning too far left or right drops the Micro-Cycle out of balance and stops the wheel from turning. If
the Micro-Cycle shuts off under these conditions, return the bike to an upright position, then press the silver balance-enable button on the
right of the handlebars. Rock the bike forward and back slowly while holding the balance button to feel it snap into balance.
• Do not put heavy, unevenly distributed weight on the optional cargo rack. Heavy, unevenly distributed cargo shifts the balance too far
forward and throws off the steering geometry. The bike may roll back uncontrollably.
• Avoid catching or jamming the wheel against a wall or under a car bumper. This will put the Micro-Cycle outside of its balance window,
and it will try to right itself, causing unpredictable behavior. If it gets stuck, turn off the Micro-Cycle or lay it on its side so it will shut itself
off. It may also shut itself off. If so, return the bike to an upright position and rock the bike forward and back slowly while holding the
balance button to feel it snap into balance.
WARNING
When stopped on a steep hill, turn the Micro-Cycle 90 degrees to the direction of the slope. Do not sit stationary on the Micro-Cycle facing
uphill or downhill for longer than 5 seconds or the bike will shut off. The controller is designed to sense that the wheel is jammed and sitting
on a steep hill looks to the controller like the wheel is stuck.
• Do not ride while impaired by alcohol, drugs, or prescription medications.
• Do not ride up or down a curb or stairs while sitting on the Micro-Cycle. If you must go up a curb or stairs, dismount and walk next to the
Micro-Cycle.
• Do not ride the Micro-Cycle with low batteries or only one battery. Sub-optimum battery conditions can weaken the balance window of
the Micro-Cycle, increasing your risk of falling while riding.
10
Page 11
Before You Ride
OPERATING MODES
Your Micro-Cycle has three power states:
Power-off
WARNING
The Micro-Cycle can roll when it is powered off.
When you power off:
• Lean the Micro-Cycle forward on its parking bar.
• If parking on a slope of any kind, be sure and safely secure the Micro-Cycle to prevent it from rolling away.
• To show off the Micro-Cycle at home, place it in its parking stand.
Power-on/Standby State
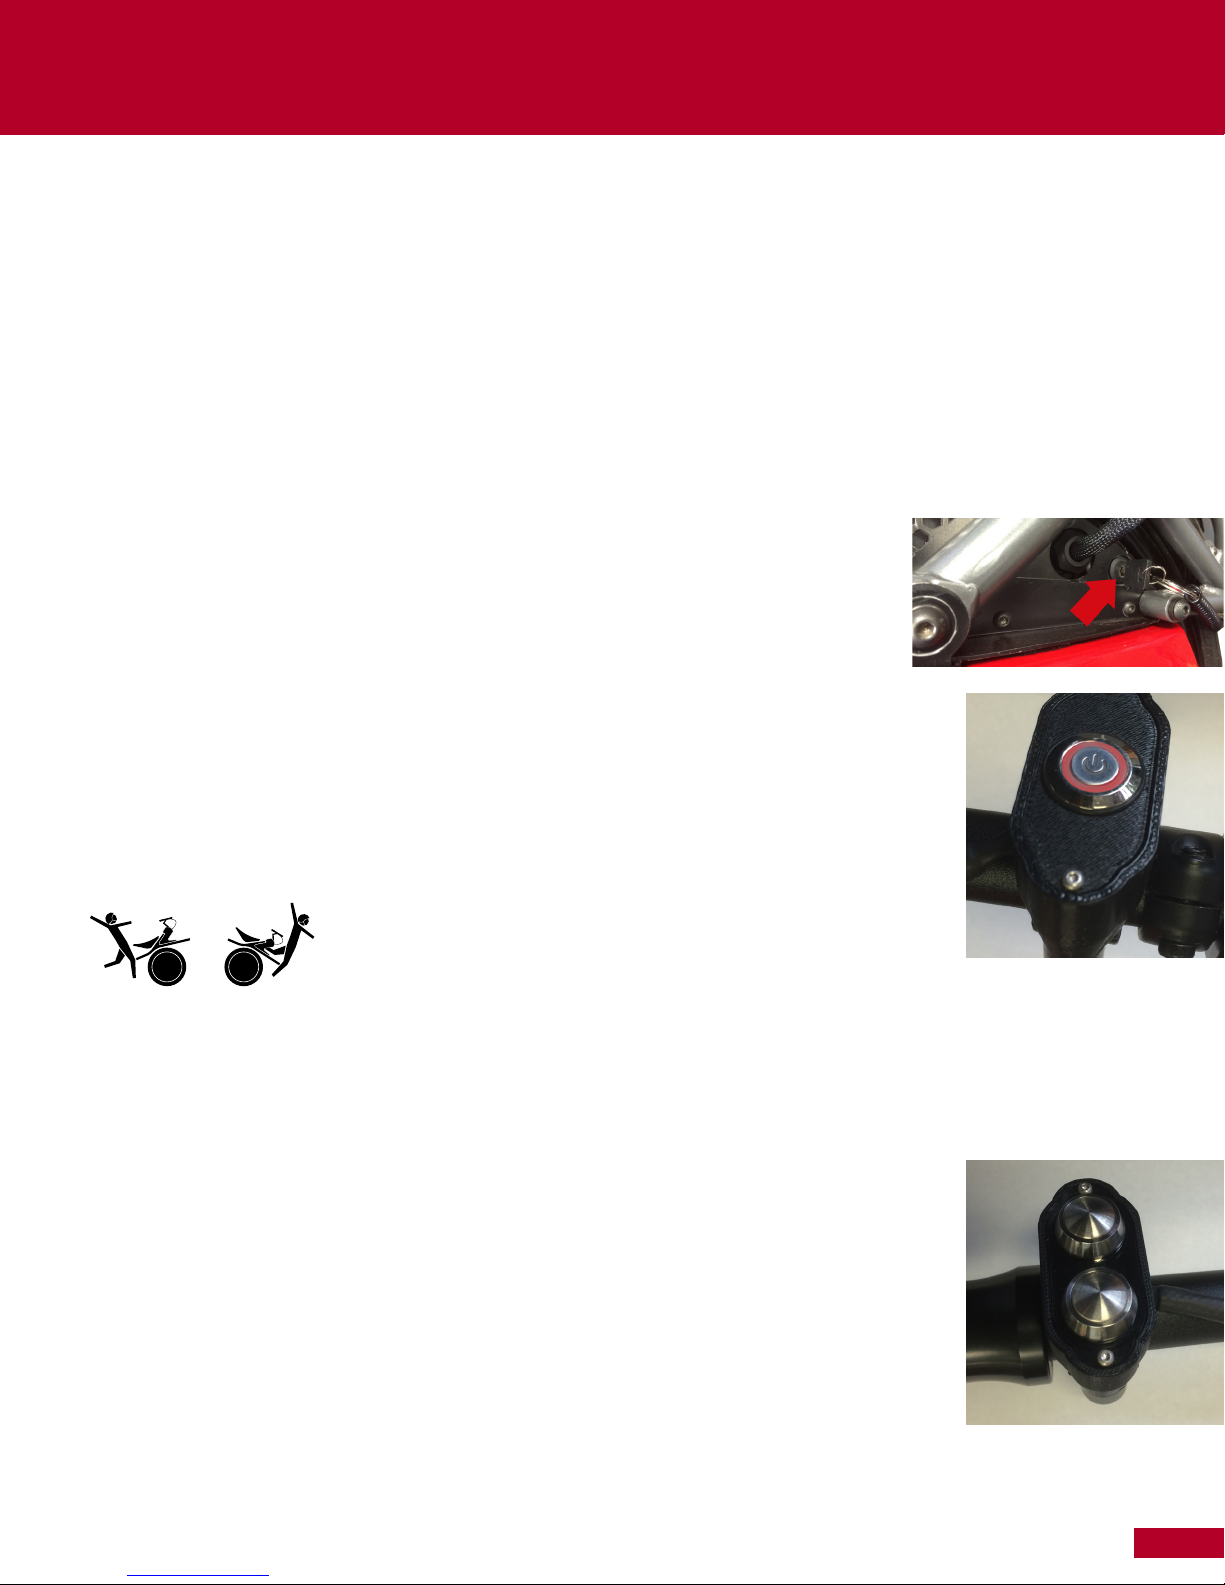
To turn power on, turn the key switch, mounted to the left side of the hub cap, to the right. This will put the
Micro-Cycle in standby state where the processor is running and the lights are on.
Although the Micro-Cycle is powered on in standby, it is not rideable. If the Micro-Cycle is left parked in
standby (the key can be removed in this position) the Cycle will go to sleep in 60 seconds and the lights will
go off. Very little power is consumed in this state.
In Balance Mode (Ready to Ride)
Wait at least 2 seconds after turning the key for the software to load before putting it into Balance Mode. From
Standby-state, go to Balance Mode by holding both the silver power button next to the right handlebar grip and the
rear of the seat while you rock the bike forward and back slowly until you feel it snap into balance.
The Micro-Cycle is rideable in Balance Mode when the red light that surrounds the power button slowly blinks on
and off. Check the tail light blinking rate to see what speed mode you’re in.
****To take it out of balance, simply press the silver power button again.
WARNING
Do not sit on the bike when taking it out of balance, and be prepared to stabilize the bike as it switches out of balance mode.
Balance check
Before getting on the Micro-Cycle, put pressure on the handlebars to be sure that the Micro-Cycle is in balance. If the RYNO is in balance, it
will remain upright.
Speed Modes
The Micro-Cycle has two different speed limits. To change speeds, the cycle must be taken out of balance by
dismounting the cycle first and then holding the power button for three seconds.
While in standby mode the rider can toggle between these two speed modes by pressing both the attitude adjust
buttons at the same time. The speed mode will switch speed modes when the buttons are released. To check which
speed you’re in, look at the tail lights. Fast flashing is training mode, steady on is normal run mode.
1. Training mode is set to 5 MPH. The Cycle can easily be ridden at this speed during normal training. This mode
is indicated by fast flashing tail lights.
2. Normal mode is set to 10 MPH. This mode is indicated by steady on tail lights.
CAUTION
When making adjustments such as changing speed modes or raising or lowering the seat, be sure your Micro-Cycle is in either power-off or
standby mode. Do not make adjustments in balance mode.
11
Page 12
Before You Ride
BATTERIES
The Micro-Cycle comes standard with two sealed leadacid (SLA) batteries and two chargers. A charge-status
light on the handlebars keeps you updated on the batteries’
discharge status (see below).
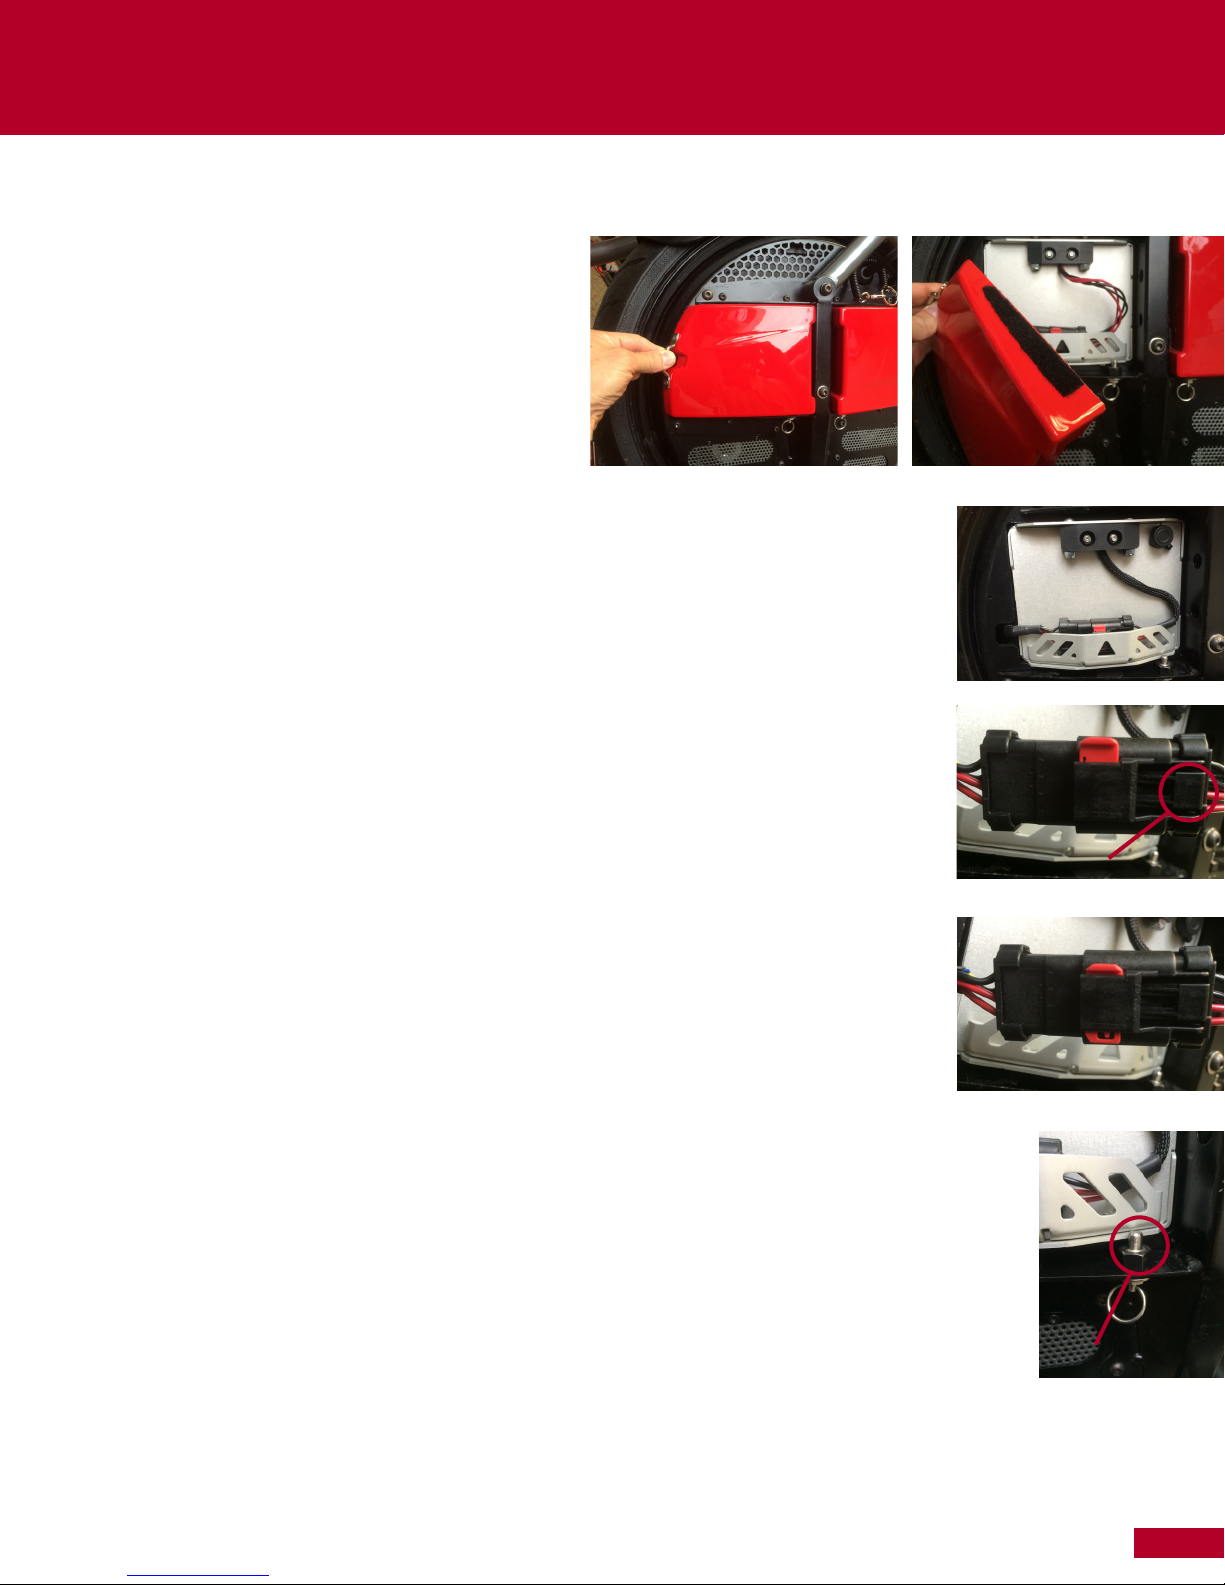
Open the battery doors on the left side of the bike (same
side as the key switch) by pulling on the little chrome
handle. The doors are attached with Velcro so it’s easy to
get them off. To replace the doors simply press them back
in place.
Connecting
The batteries are installed in the Micro-Cycles’ battery bay with a heavy duty power cable. The power
connectors must be connected to each battery. Notice how the connector for each battery is nested
into the handle tray to keep the cables flat.
Un-locked Position: To unplug the battery cables there are two different security latches. The first is
a sliding red tab that prevents the connector from accidentally being removed. At right it’s shown in
the un-locked position.
Locked Position: The second is the thumb latch to allow the connector to be pulled apart. The thumb
latch is used by pressing down on the tab with the square on the end. This will release a catch and
allow the connector to be pulled apart.
Charging
CAUTION
Use only RYNO 24 volt chargers to charge the batteries.
1. Open the battery cover by pulling on the chrome handle.
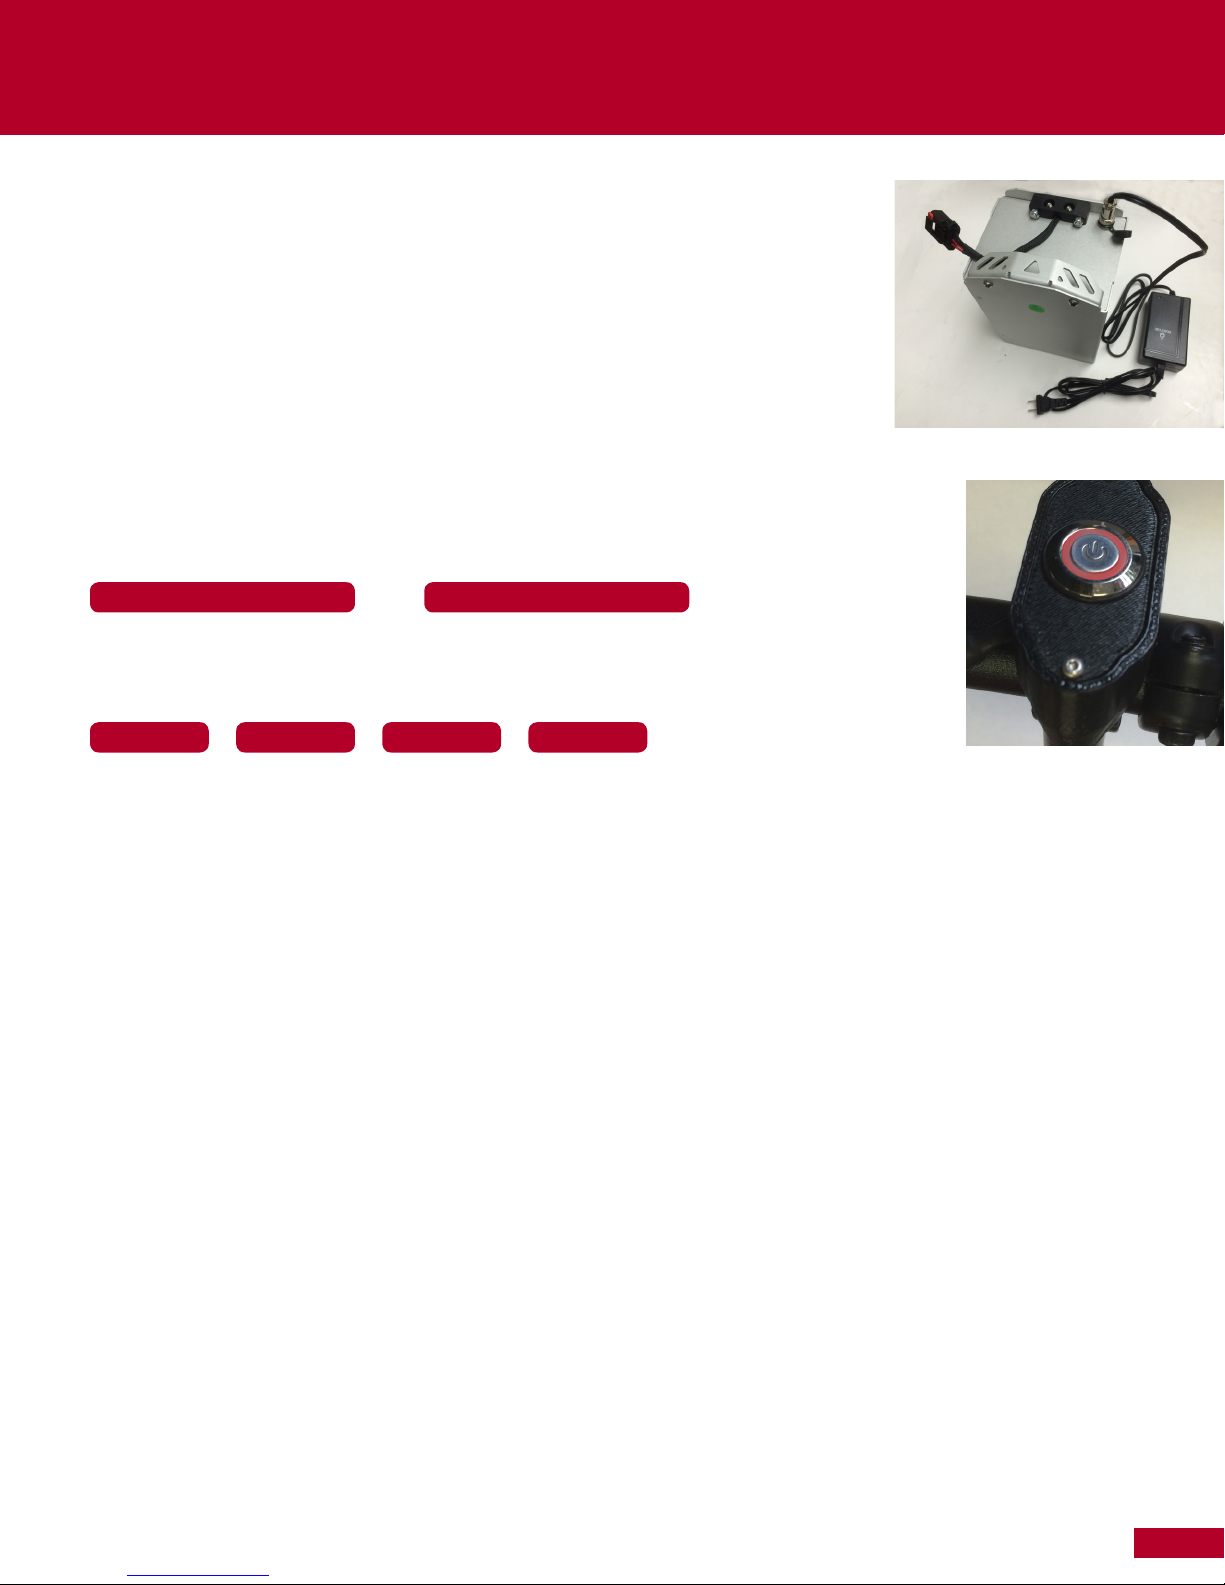
2. Connect the chargers to the batteries. You can charge the batteries in the Micro-Cycle, or you can remove them
and take them to a standard wall outlet for charging. To remove batteries, pull the catch ring and slide it out.
THUMB LATCH
Depending on your payload, riding style, and terrain, two fully-charged batteries can last up to fifteen miles (24 km).
Charging time is six to eight hours. Follow these steps to charge the batteries.
BATTERY LATCH
12
Page 13
Before You Ride
Additional guidelines for safe battery charging:
• Once the chargers recharge the batteries they continue to maintain a trickle charge, so you can
safely plug the Micro-Cycle into an outlet after every ride and leave the chargers connected.
• If you ride infrequently, don’t wait too long between charges. Keep the batteries plugged into
the charger.
• Charging the batteries for under six to eight hours is unsafe and is not recommended. Batteries
don’t charge in proportion to the time. Three hours is not half a charge.
Disposing
Batteries contain hazardous material. Dispose of the Micro-Cycle’s batteries properly.
Visit www.call2recycle.org to find a location near you to properly recycle your batteries.
Charge Indicator
The LED light circling the power button is the only status indicator on the bike. It communicates both the
amount of battery power left in the batteries and error message. This information is conveyed by a series of on
and off intervals. In normal operation the indicator will pulse (“breathe”) slowly to let you know the processor is
running and the bike is healthy and in balance.
As the battery power starts to go down these on and off intervals will warn you by blinking more frequently
per second.
****If for any reason, the bike is in the “ON” position and the bike does not have power to the wheel or will not go into Balance Mode, check
to see if the Charge Indicator light is flashing. If it is flashing in succession followed by a pause, refer to the Troubleshooting section at the
end of the Owner’s Manual.
13
Page 14
Before You Ride
ADJUSTING YOUR MICRO-CYCLE
CAUTION
Make all seat adjustments to the Micro-Cycle when it is in Power off or in Standby State. Be sure the Micro-Cycle is secured, such as parked
on its parking bar or held by an assistant, when you make adjustments.
Before your first ride, adjust the following parameters to fit you.
• Seat height
• Seat tilt
It is essential for a RYNO that the rider’s center of gravity is also centered over the wheel. If the rider is off balance, when the rider puts the
bike into balance mode the bike will roll forward or backward making it hard to control. The rider can easily compensate for this condition by
leaning forward or back, but for optimum riding experience the rider’s spine should be in a straight upright riding position. To allow the rider
to sit this way the seat must be adjusted based on the rider’s weight distribution.
For heavy, tall riders, the seat should be at a higher setting with the seat tilted forward a bit. For light weight, short riders, the seat should be
at the lowest setting tilted a bit back.
The seat is adjusted properly when the rider is able to put their full weight on the seat while keeping the bike level (the battery doors
are horizontal).
While adjusting these parameters, be sure that the Micro-Cycle is upright and in balance mode when you put your full weight on the seat.
Adjusting seat height
Follow these steps to adjust the seat height.
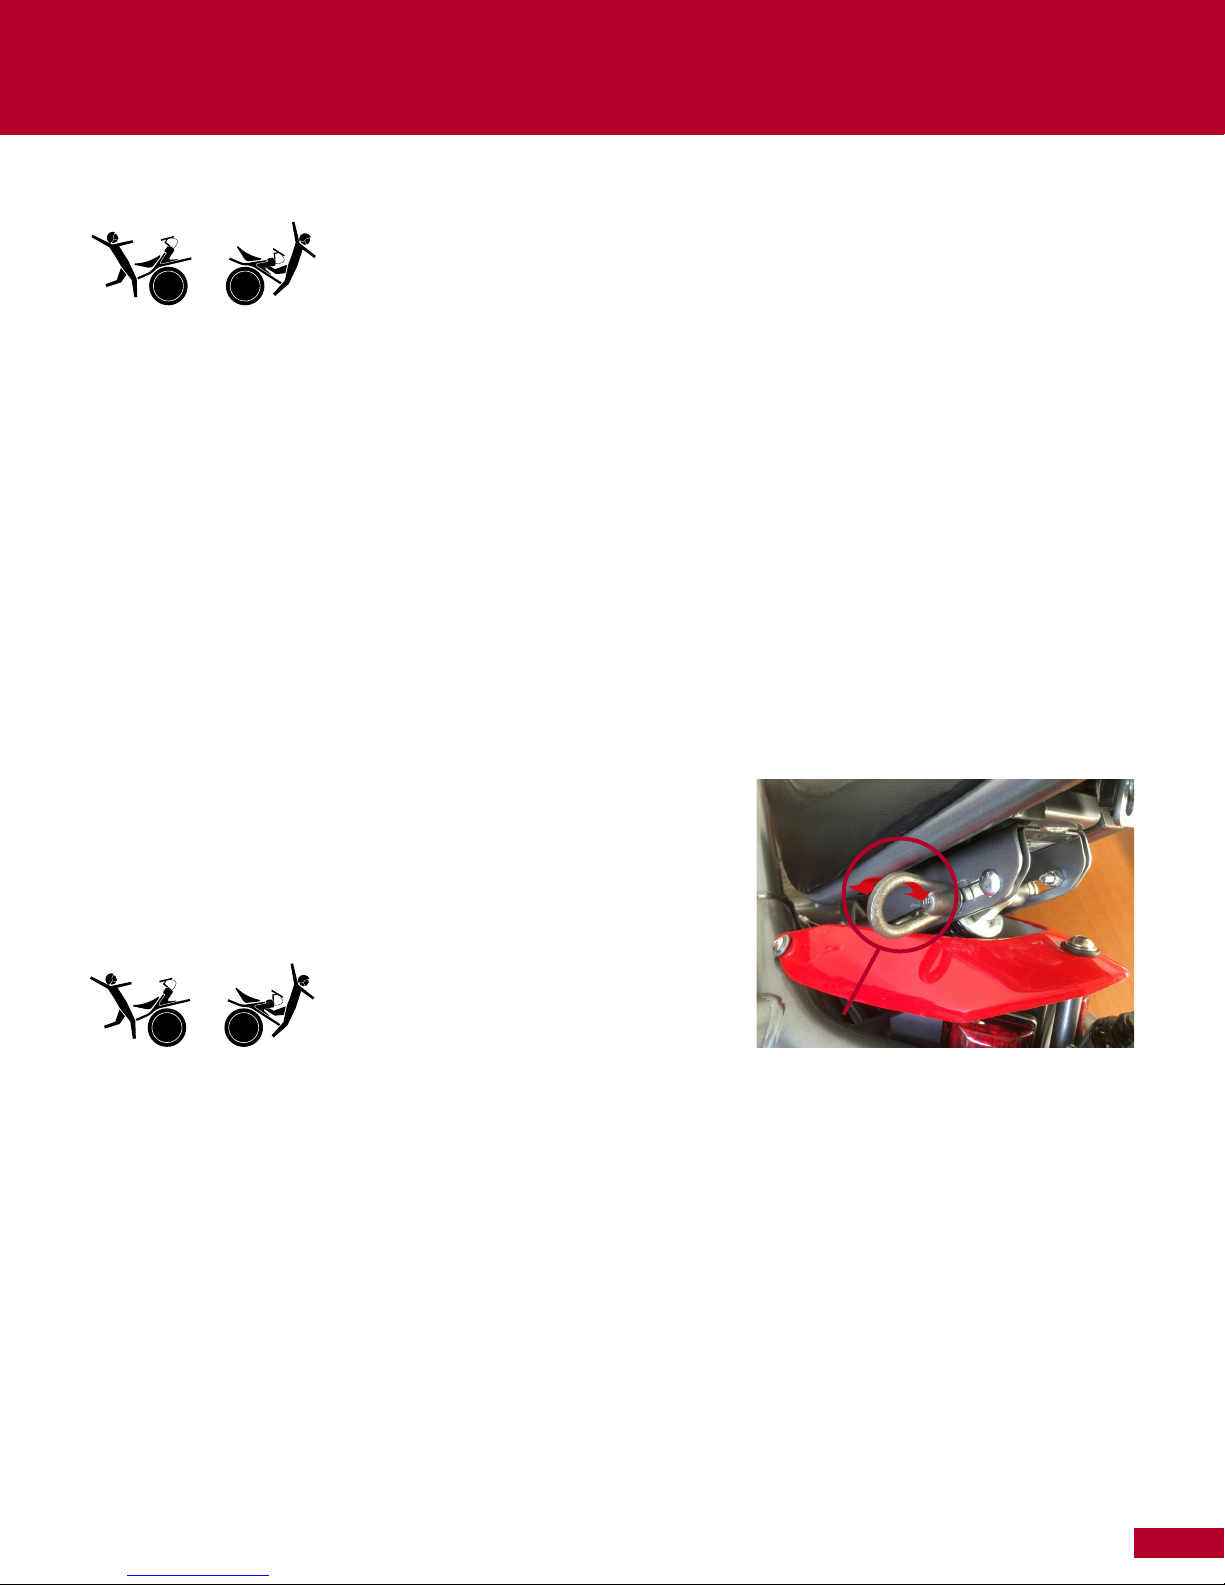
1. Loosen the seat adjustment ring at the top of the shock absorber. This will
loosen the grip on the seat slide channel.
2. Move the seat up and down to find the right height. The right height lets
you place both feet flat on the ground (legs slightly bent) when seated.
SEAT ADJUSTMENT RING
CAUTION
For your safety, do not ride the Micro-Cycle unless you can put your feet flat on the ground when seated.
3. When the seat is at the right height, tighten the seat adjustment ring.
4. Check to make sure the seat adjustment ring is sufficiently tight prior to every ride.
14
Page 15
Before You Ride
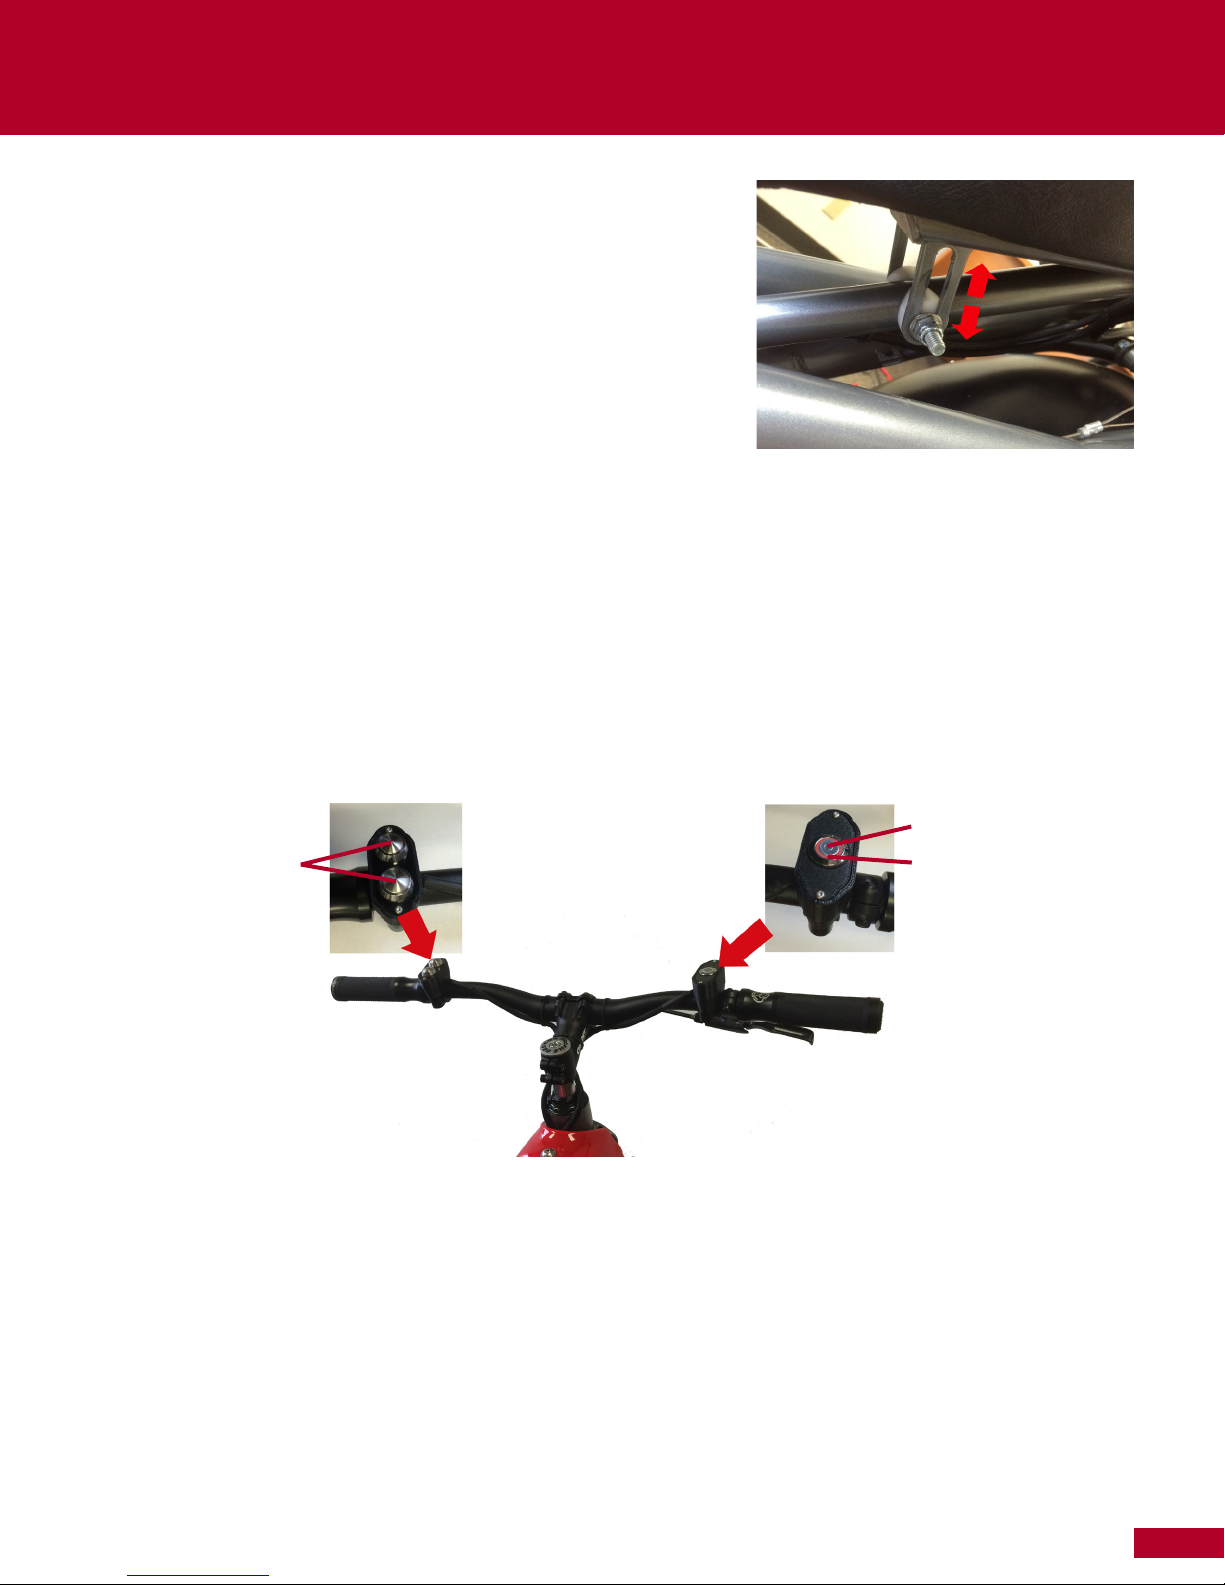
Adjusting seat tilt angle
If the seat is not properly tilted, you may feel as if you are falling off the back or are
pushed too far forward. Follow these steps to adjust the seat tilt angle.
1. Loosen the seat adjustment ring, raise the seat to full height and tighten the ring
again in order to have access to the adjustment bolt located at the front end of
the seat.
2. Use the 13mm socket end tool to loosen the adjustment bolt under the front of the
seat (see 13mm t-handle socket driver supplied with your RYNO).
3. Set the new angle.
4. The seat tilt angle is correct when you feel comfortably balanced and the Micro-
Cycle is upright with the battery doors parallel to the ground.
5. Tighten the adjustment bolt.
6. Stand next to the RYNO (on the left), turn the RYNO on with the key and press the power button. While holding the handlebars with
the left hand, throw your leg over the bike and slowly lower your weight onto the seat.
Adjusting the Attitude Balance Point
After adjusting the seat and putting the Micro-Cycle in balance mode, you should be able to sit on the Micro-Cycle with your feet flat on
the ground and your back straight. If the Micro-Cycle still rolls forward or backward while you are seated with your back straight, try moving
your buttocks farther forward or backward on the seat until the bike does not move forward or backward.
You can also fine tune the balance point by using the Attitude Adjustment Buttons to tip the balance point forward or back (handlebars up
or down). Different people will find they like the riding experience more by custom tuning the balance point with the Attitude Adjustment
Buttons. See below for instructions to fine tune the balance point.
POWER BUTTON
ATTITUDE BUTTONS
Press the up (top silver button on the left) to raise the nose. Raising the nose makes the Micro-Cycle more resistant to overdriving into an
out-of-balance condition. Some riders like the nose up for riding their Micro-Cycles down long hills or over rough terrain.
Press the down-arrow button (bottom silver button) to lower the nose. Lowering the nose makes riding easier for light-weight riders who
must lean over the handlebars to accelerate.
BLINKING LED
To test whether you have a comfortable balance point, momentarily press the attitude buttons up or down and ride the Micro-Cycle forward
10 feet on level pavement to see how it feels. Stop and press the buttons again until you find a comfortable balance point.
15
Page 16
Before You Ride
Rider Feedback Warnings
You are responsible for keeping the Micro-Cycle inside the balance window at all times. The Micro-Cycle is responsible for warning you
when you are approaching the limits of the balance window and when the battery is low.
The Micro-Cycle uses the drive motors to accelerate the wheel to create a kick-back effect when the rider exceeds the speed limit,
accelerates too fast, or climbs too steep a hill. The effect is as if you are riding and the handlebars are suddenly raised up to get you to
slow down.
The handlebars will also come up and stay up when the battery level drops too low to safely ride. When this happens, dismount the bike and
walk it home while it’s still in balance mode. DO NOT RIDE THE BIKE WHEN IT IS IN LOW BATTERY MODE! While the handlebars are up in
low voltage mode, the rider can walk home in balance mode for up to a mile before the Micro-Cycle shuts off.
If you feel the handlebars rise up suddenly, do not fight to keep going. Fighting the bike’s attempt to regulate itself to stay inside the balance
window may cause damage to the machinery inside the bike, damage the batteries, or could cause the system to enter a self-shut down
mode, stopping power to the wheel.
WARNING
Do not fight handlebar kick-back and push the bike beyond its balance window. Damage, injury or death may result.
WARNING
Do not overpower the balancing capabilities of the RYNO by aggressively leaning forward or backward. Loss of control, serious injury or
death may occur from ignoring safety warnings.
16
Page 17
Learning to Ride
After adjusting the Micro-Cycle to your personal seat position, balance point and learning the warning system as described in the previous
chapter, you are ready to learn to ride. The Micro-Cycle uses your natural instincts to balance, accelerate, decelerate, and steer. This section
will help you get started.
ENLISTING A HELPER
To practice riding, find a paved, level, unobstructed area, such as an empty parking lot. Enlist a helper to steady the Micro-Cycle by holding
onto the handle at the rear of the seat and walking with you as you get comfortable balancing, just like your parents did when you learned to
ride a bicycle. Be sure you can comfortably place both feet flat on the ground while sitting on the Micro-Cycle.
CHARGED UP AND READY TO GO
Before powering up the Micro-Cycle, check the following:
• The batteries are fully charged, and the battery connectors are clicked in place.
• The tire pressure is between 35 and 40 pounds. The higher the tire pressure, the easier the Micro-Cycle is to ride.
POWERED UP & IN BALANCE
Accelerating
Follow these steps to accelerate.
Helpful Hint: For greater control and confidence, keep your feet just touching the ground while you’re learning. Be careful not to let your feet
catch on anything as it may throw you off balance and cause you to lose control of the Micro-Cycle.
• Step 1: Make sure the Micro-Cycle is in balance, in low speed training mode (see tail light fast blink rate), and on level ground.
• Step 2: With the foot pegs folded up, sit on the seat and place your feet down on the ground. With your friend holding the back of the seat,
shift your weight forward by rocking your pelvis. Stay upright with a straight back. The Micro-Cycle will roll forward. It’s OK to drag your
feet while you’re getting used to the Micro-Cycle’s feel.
CAUTION
Take it slow and easy. Ride forward 10 feet and stop by leaning back.
• Step 3: As you gain confidence, rock farther forward to increase your speed. Keep your weight over the center of the wheel. If you go faster
that 5 MPH the handlebars will gently come up to slow you down. This is the way the RYNO will communicate to you. As you increase in
speed settings this feedback will be what lets you know you have reached to edge of the speed setting. Do not try to resist the gentle rise
of the handlebars as you approach the speed limit of the bike.
WARNING
Do not lean over the handlebars as this will put you in danger of falling outside the balance window.
• Step 4: To gradually stop or slow down, lean backwards. To slow down more quickly, use the stop-assist lever (covered in the following
section “Slowing and stopping”).
• Repeat steps 2 through 4 until you’re comfortable with the Micro-Cycle’s balance.
• When you’re comfortable riding with your feet down, practice riding with your feet resting on the foot pegs. Make sure your friend is
holding onto the rear of the seat.
• We have found that people learn to ride more quickly the faster they are able to stand up on the foot pegs. This provides an intuitive
shortcut into the performance aspect of accelerating and stopping as well as turning. Make sure that the first time you try this someone
you trust is holding the handle behind the seat as they run next to you.
17
Page 18
Learning to ride
• When you stand up, it is very important to stand STRAIGHT UP. Do not stand up and lean forward aggressively as you could overdrive the
system and cause a crash. When standing, use your arms to push the handlebars forward to accelerate and pull the handlebars toward
you to slow down. Make sure you are seated prior to stopping completely so you can put your feet on the ground to balance yourself when
you come to a complete stop.
WARNING:
Do not stand up on the pegs until you are comfortable riding in a straight line, accelerating smoothly, stopping and controlling your speed.
SLOWING AND STOPPING
This section covers the three stopping options.
Posture Stopping
Moderating your speed using posture soon becomes second nature. Here’s how:
• Lean back. To slow down or stop, lean back.
**Be sure and stay within the balance window. With time, you will learn the more quickly you lean back and the harder you lean back, the
faster you will decelerate and stop.
Stop-Assist Lever
The stop-assist lever is not a brake. It does not directly stop the Micro-Cycle or take balance away from you. Instead, the stop-assist lever
accentuates the effect of leaning back by tilting the frame back. This sits you back at an angle that lets you slow the Micro-Cycle more
aggressively.
Here’s how to use the stop-assist lever.
WARNING
Use the stop-assist lever only when you are sitting straight up. Never pull the stop-assist lever while leaning forward.
1. Lean back while firmly pulling the stop-assist lever toward you. The nose of the Micro-Cycle gradually lifts to let you sit back in the
seat, put your feet on the ground and stop.
NOTE
The stop-assist lever is an on/off switch, not a proportional control where the harder you squeeze the harder it works. However, it does tilt
more depending on the forward speed of the Micro-Cycle.
2. The Micro-Cycle returns to level when you release the stop-assist lever.
MORE AGGRESSIVE STOPPING
The following technique is the quickest way to stop your Micro-Cycle.
1. Simultaneously squeeze the stop-assist lever, pull hard on the handlebars, extend your hips back and lean back aggressively.
Remember to put your feet down when you come to a complete stop.
2. The Micro-Cycle can stop only as fast as the balance window allows. With a rider weighing 180 pounds, the Micro-Cycle traveling 10
mph can stop on level ground in about eight feet.
18
Page 19

Learning to ride
STEERING
Unlike a bicycle where you steer directly to where you want to go, steering the Micro-Cycle requires a coordinated effort between handlebars
and foot pegs.
The unique way the Micro-Cycle turns is by rolling the tire on its side. The farther the tire rolls over, the tighter the turn. The important thing
to remember is that while you’re rolling the tire on its side, the rider’s weight must stay above the point where the tire touches the ground.
In other words, you must keep your hips over the center of the Micro-Cycle while turning – you do not lean into corners like you would on a
traditional bicycle or motorcycle.
It is always surprising to new riders how effortlessly it is to steer to Micro-Cycle once they relax. As the rider improves, steering becomes a
totally intuitive process.
The following sections describe three ways of steering your Micro-Cycle.
1. Standing up on the foot pegs and steering
When standing on the foot pegs and holding the handlebars, the rider’s center of gravity must stay above the point where the tire touches
the ground. Unlike leaning into a turn on a bike, riding a Micro-Cycle requires a focus of staying straight up. Steering is done by rolling the
tire on its side. To go left, put more weight on the left foot peg. To stay in balance left to right the handlebars will extend up to the right. The
rider’s center of gravity falls between the handlebars and the feet. Focusing on where your hips are will assist in this process.
As the rider is steering, it is also important to keep leaning forward to assure the Micro-Cycle will continue to power through the turns. It
doesn’t take much effort at all, try small moves first before throwing too much weight around.
2. Handlebar Steering
New riders typically over-think handlebar steering by forcing the Micro-Cycle into a turn using shoulder strength. Handlebar steering
requires almost no energy. It’s all in your hips, feet and your sense of where the tire meets the road (intuition that comes with practice).
Here’s how to master handlebar steering.
1. Practice with your helper by using the handlebars to turn in wide arcs. As with riding a bicycle, you may find that touching your foot to
the ground or even dragging your foot a bit helps to turn the Micro-Cycle. If you feel unsure or out of control, pull the stop-assist lever
and put both feet on the ground.
2. The better you become, the tighter the turns you can make. Advanced riders can learn to make very tight turns by rocking the tire on
its side while shifting their hips in the opposite direction.
3. Remember to keep your body over the center of the wheel. Shift your hips, not your upper body.
4. Testing the edges of the steering range is good. Try shifting the handlebars left to right while at the same time standing on alternating
foot pegs. This will give you the feeling of how the Cycle steers. There is a lot of room to throw the bike left to right, so get comfortable
with it. As you get better the steering will become effortless and smooth while staying perfectly relaxed.
3. Seated Foot-peg steering
When riding the Micro-Cycle over a variety of terrains sometimes the bike will want to drift off of your straight line path in a certain direction
if the ground is sloping. To counter this effect a small amount of force can be applied to the uphill foot peg to impart a twist on the tire. This
will help the bike stay on track. As the rider gets more advanced this trick will become second nature.
Here’s how to steer using the foot pegs.
1. Put extra pressure on one foot peg to counteract the tendency to drift in the opposite direction. For example, if you’re riding on a road
that is sloped down to the right, putting extra pressure on the left foot platform counters the tendency of the Micro-Cycle to drift to
the right.
2. If the terrain is steep, stand on the foot peg to apply more pressure than when sitting.
19
Page 20
Learning to ride
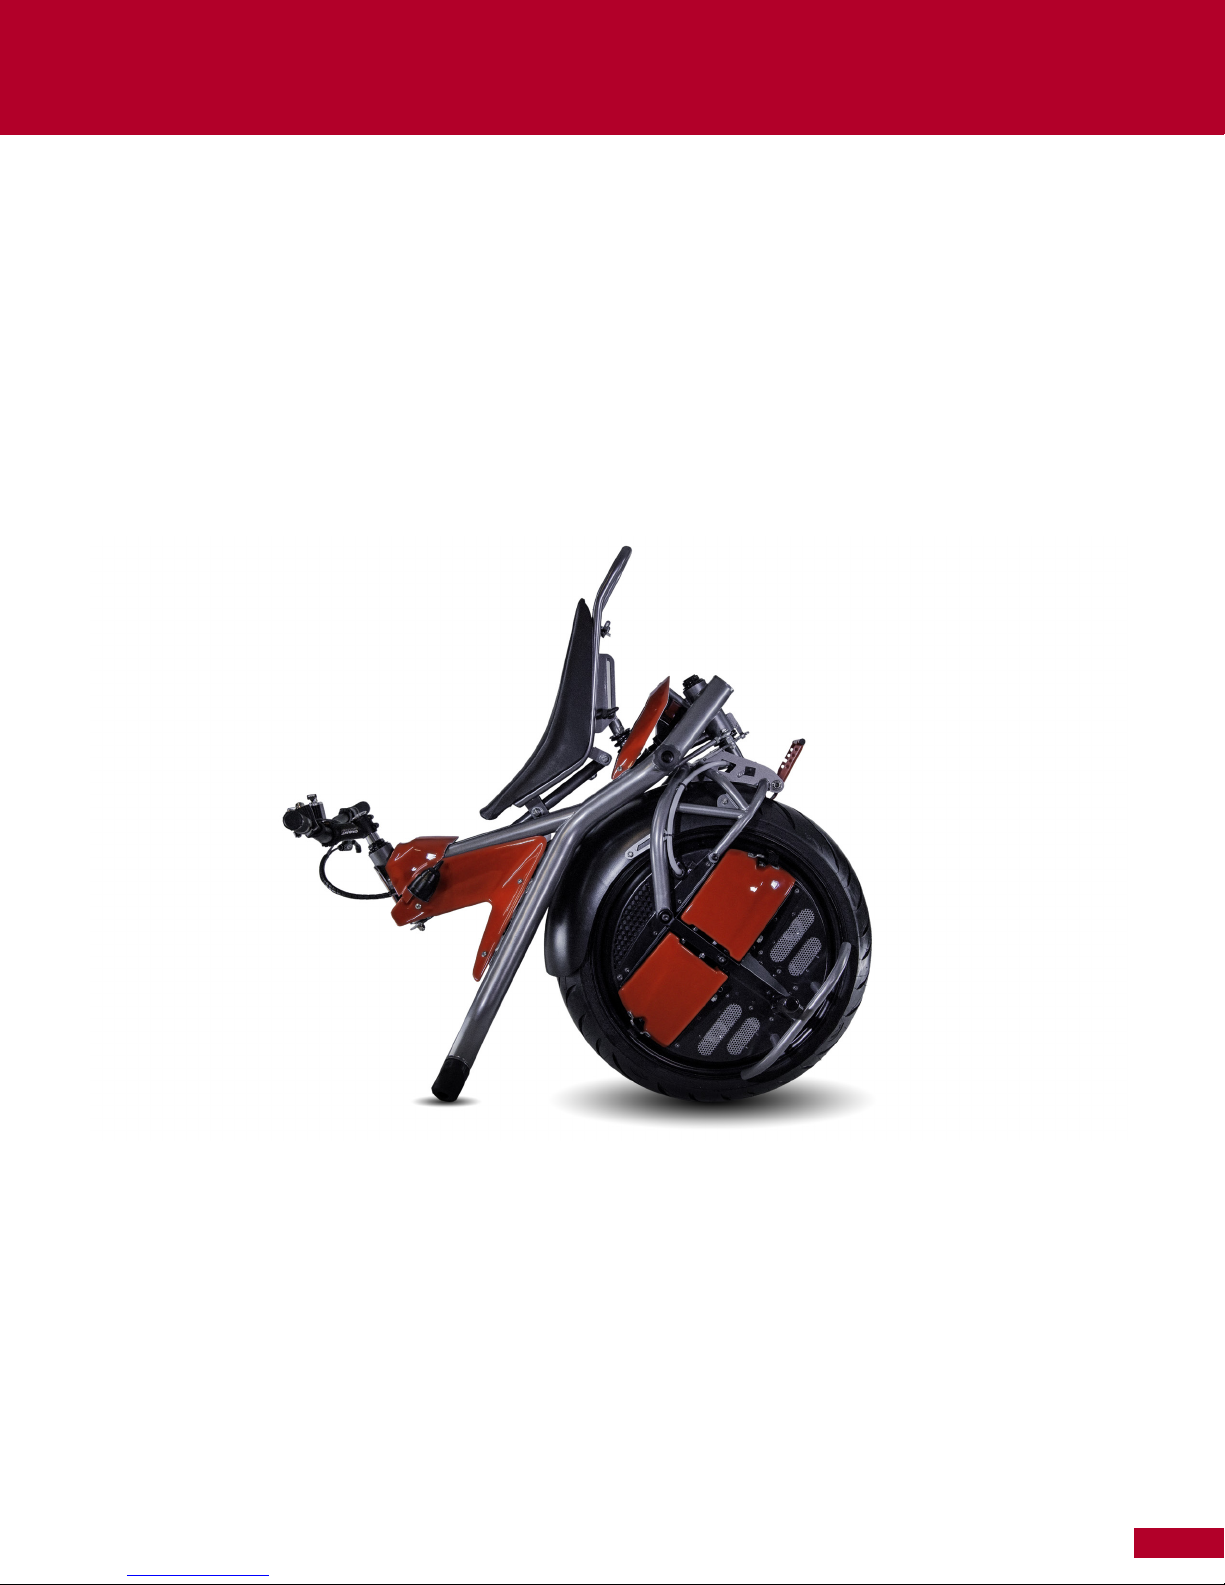
PARKING
Follow these steps to park the Micro-Cycle:
1. Come to a complete stop.
2. Dismount the Micro-Cycle.
3. Press the power button on the right for three seconds to switch from balance mode to standby mode.
4. Nose the bike down and park it on the front parking bar.
5. Turn the key to the left to power off.
6. Be sure and secure your RYNO if parked on a slope of any kind. Use a traditional bike lock to secure it to a bicycle rack or solid
structure if parked on a slope to prevent your Micro-Cycle from rolling down a hill.
TRANSPORTING
The Micro-Cycle is too large to fit in a car, but you can transport it by SUV, van, pickup, or trailer.
NOTE
Lay down a piece of plastic or carpet in the vehicle to protect the Micro-Cycle and the vehicle from damage.
1. With the rear hatch open or tailgate down, roll the Micro-Cycle up to the back bumper and place the Micro-Cycle’s parking bar on the
deck or tailgate of the SUV, van, or pickup. Make sure and place the parking bar on a piece of cardboard so it will slide in on the carpet
2. From behind the Micro-Cycle, lift its frame up and forward. The parking bar will slide forward as the wheel rolls up and over the rear
bumper or tailgate.
3. Slowly and carefully lay the Micro-Cycle on its side so it won’t roll.
20
Page 21
Care and Maintenance
Other than regularly charging the batteries and checking tire pressure, your Micro-Cycle doesn’t need much attention. Protect your
investment by treating your Micro-Cycle with respect:
• Park the Micro-Cycle in a garage or other heated space.
• If the temperature is at or below freezing, let the batteries warm up in a heated space before riding. The Micro-Cycle will keep itself warm
once it gets going.
• Extremely high or low temperatures reduce battery life and reduce ride time/range.
• Water can damage the Micro-Cycle’s internal components. Do not ride the Micro-Cycle through deep puddles.
CAUTION
Do not ride the Micro-Cycle in the ocean surf. Salt water will corrode sensitive electronics and void your warranty.
NOTE
The Micro-Cycle contains no user-serviceable parts. Except for charging and exchanging the batteries, let your RYNO dealer handle internalcomponent maintenance.
Care and Cleaning
Keep your Micro-Cycle looking good by cleaning it with mild soap and water. Never spray it with a hose or pressure washer. Water under
high pressure could breach sealed electronics and damage the Micro-Cycle.
Tires
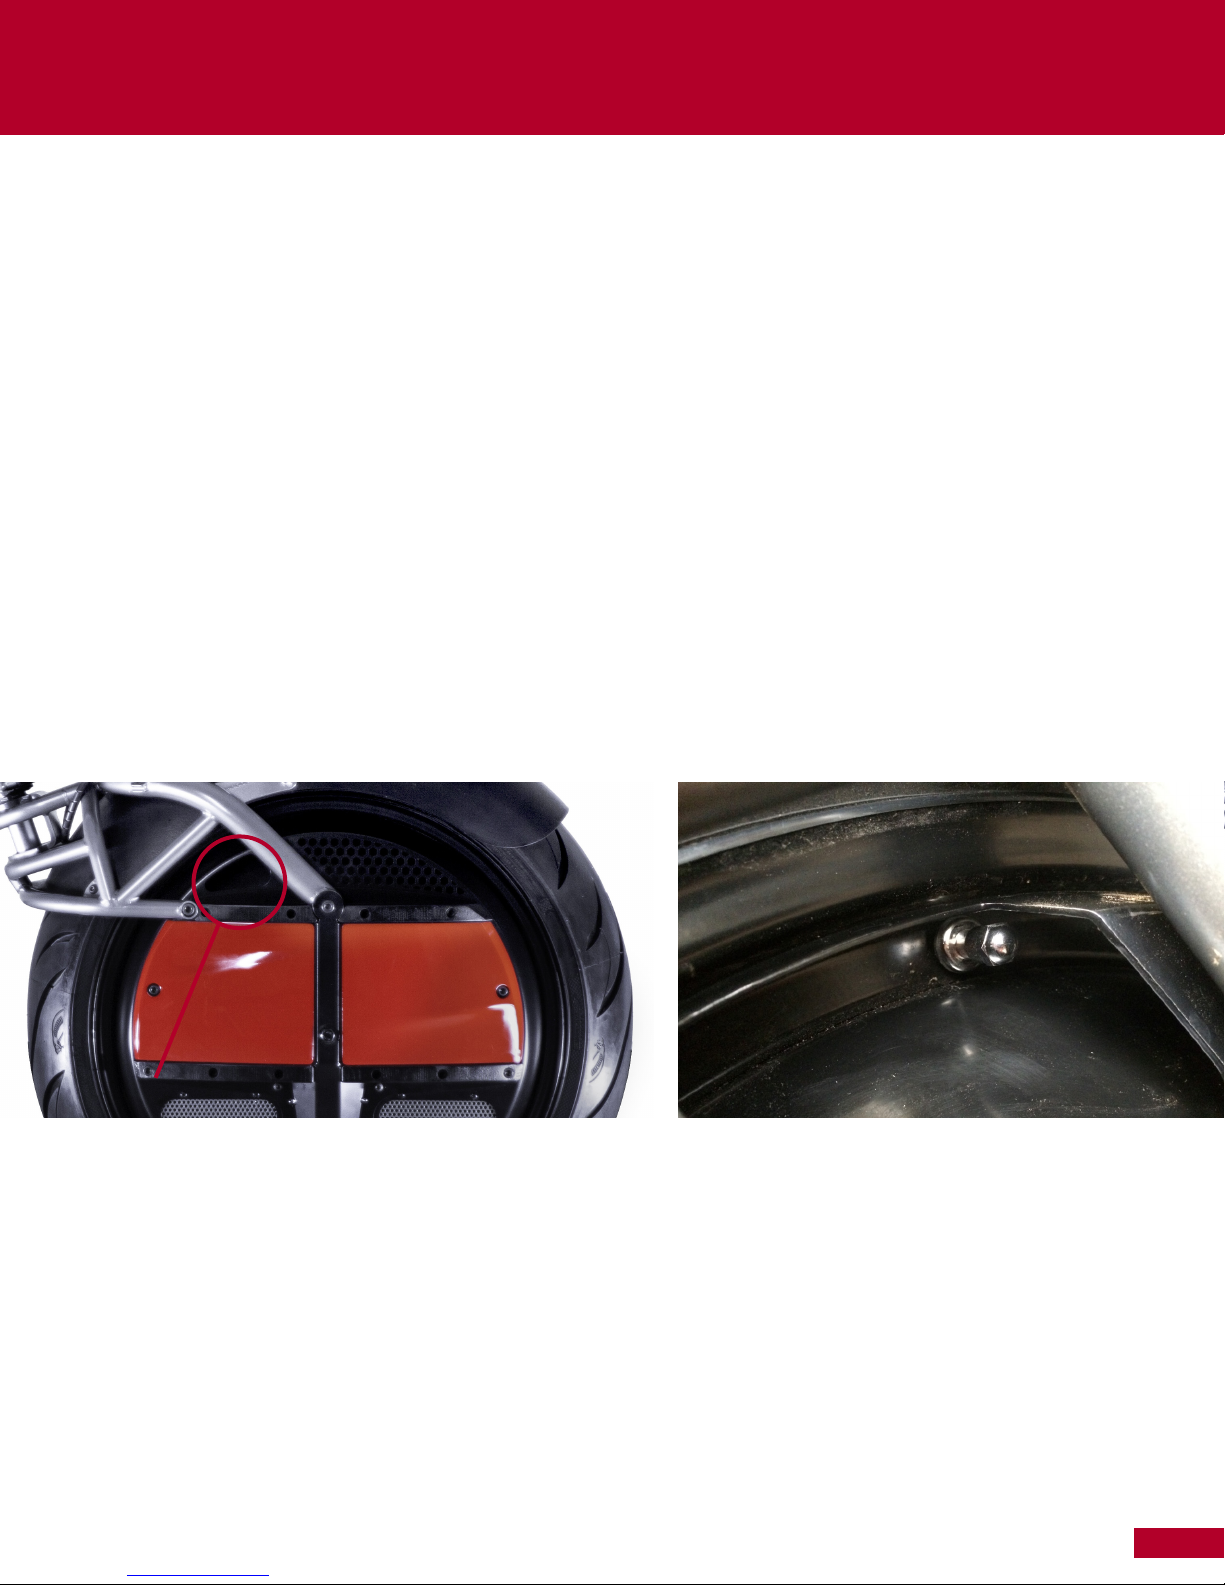
• Periodically check the tire pressure using a standard pressure gauge. Pressure should be between 35 and 40 psi. Low tire pressure will
make the Micro-Cycle hard to steer. To check the air pressure and add or remove air, locate the valve stem on the right side of the wheel in
the hubcap opening (as shown in picture). Roll the wheel forward until the valve stem becomes visible. For easiest access, roll the wheel
forward until the valve stem is in the position furthest forward in the hubcap opening.
HUBCAP OPENING
• Periodically check the tread and sides for cracks.
• The Micro-Cycle’s tire should last for many thousands of miles. If you ever need to replace the tire, take the Micro-Cycle to your RYNO
dealer for remounting.
Lights
Take your Micro-Cycle to your RYNO dealer to replace broken or burned-out lights.
Belt drive
The Micro-Cycle’s three timing belts are similar to those used in automobile engines. They are very reliable and should last for four to
five years of average use. If you are an aggressive rider or ride more than 1000 miles a year, have your RYNO dealer inspect the belts every
12 months.
Motors
Use compressed air on motors to clear any dust and or debris that may build up over time.
21
Page 22
Troubleshooting
FAULT INDICATORS
If for any reason the bike key is in the ON position and the bike does not have power to the wheel or will not go into Balance Mode, see the
following blinking error codes. Count the number of blinks in rapid succession followed by a pause to determine which code is thrown.
1 blink: Low battery
2 blinks: Voltage too low
3 blinks: Voltage too high
4 blinks: Fall detected
5 blinks: Pick up detected
6 blinks: Over-current detected
7 blinks: Over-temperature
8 blinks: Bad gyro
9 blinks: Bad accelerometer
10 blinks: Bad current sensor
11 blinks: Bad hall sensors
12 blinks: Bad motor
13 blinks: Curb abuse
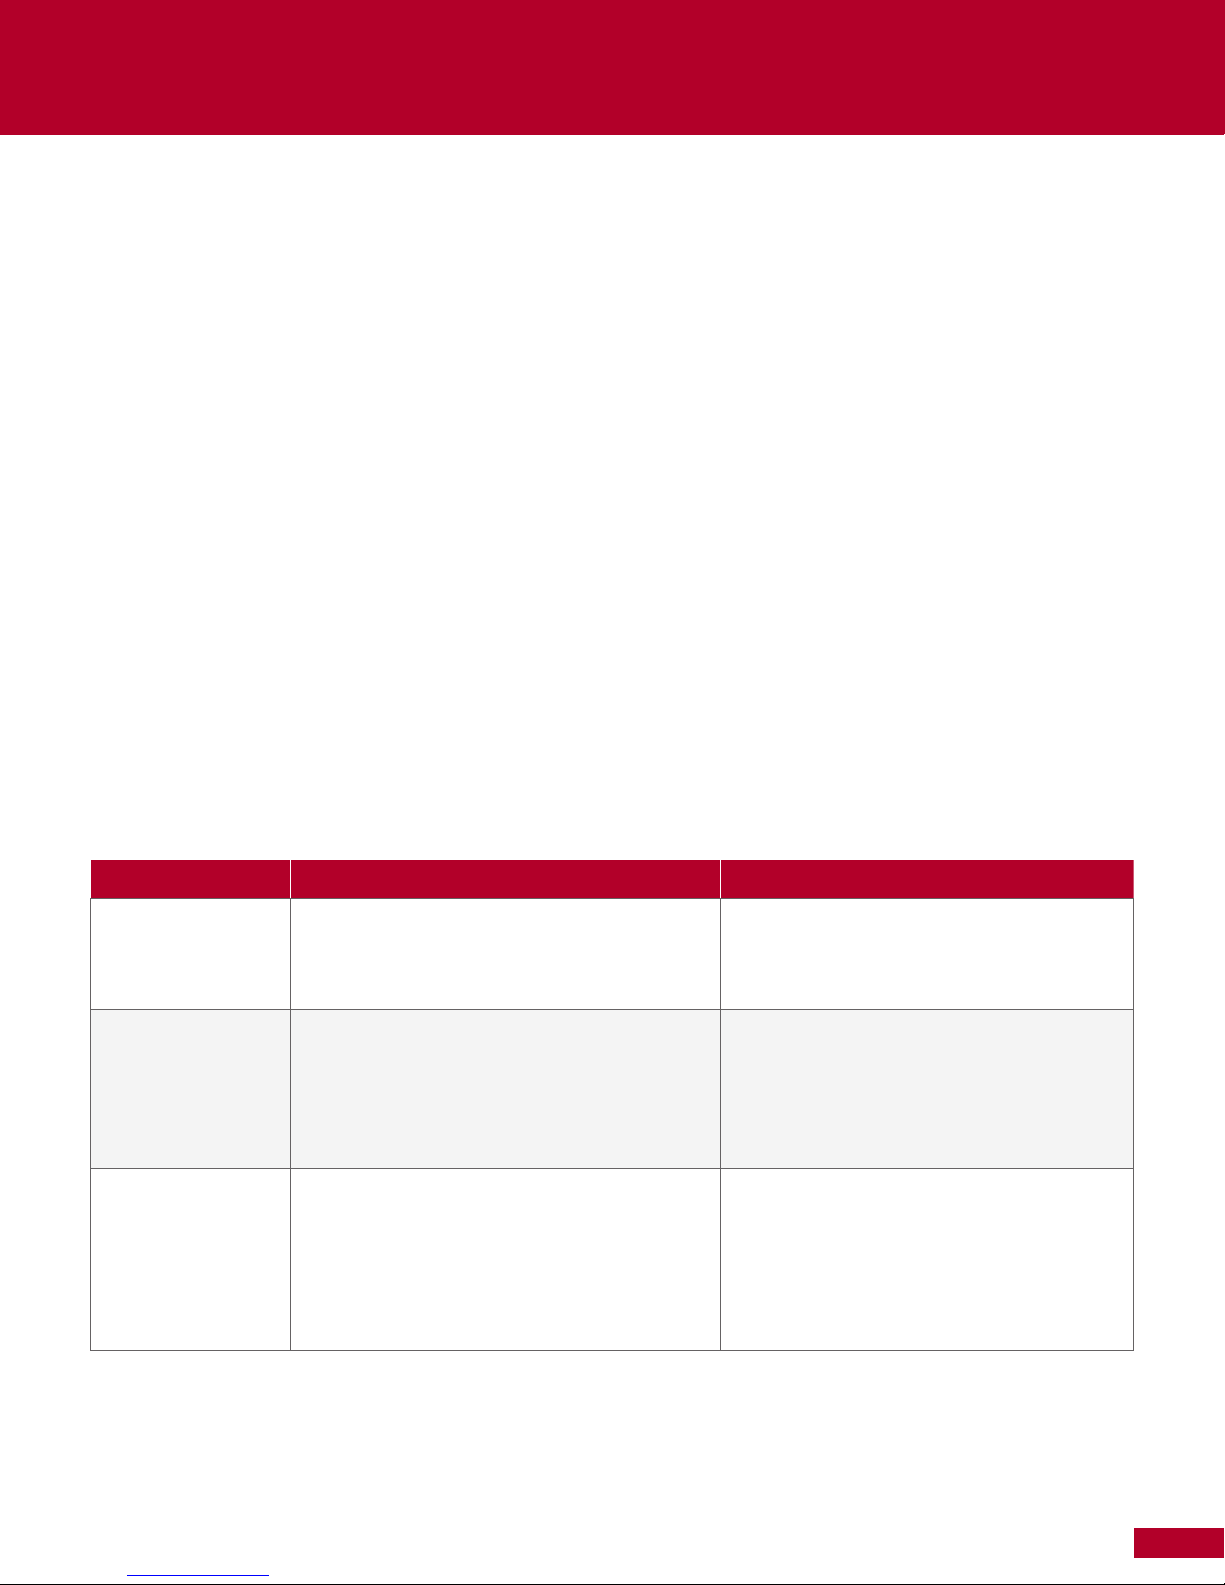
Problem Solution Explanation
The Micro-Cycle will
not turn on.
The Micro-Cycle
turns on and
balances but does
not run at full speed.
The power light
Check that both batteries are fully charged and
properly connected. Do not run the Micro-Cycle
on one battery or connect a charged and a discharged battery.
Be sure that both batteries are fully charged and
connected properly.
The Micro-Cycle will not run properly or safely
without two fully-charged batteries. Running
the Micro-Cycle on one battery increases the
risk of losing balance.
The Micro-Cycle will not run at on one battery.
The flashing display indicates that one of the
batteries is discharged (flat) or not connected
properly. Speed is limited to 3 mph under
these conditions.
shows flashing lights.
The Micro-Cycle
turns on but does
not balance when
you push the power
button.
Power the Micro-Cycle off and back on. Wait
three seconds, THEN press the power button. If
the Micro-Cycle still will not balance, take the
Micro-Cycle to your dealer.
The Micro-Cycle goes through a series of selftests before engaging balance. These tests
check the motor, the motor controllers, and
the batteries to ensure that the Micro-Cycle
can balance properly. If these tests fail, you
will see the power button flash. Check the fault
indicator reference to determine the fault code.
22
Page 23
Troubleshooting
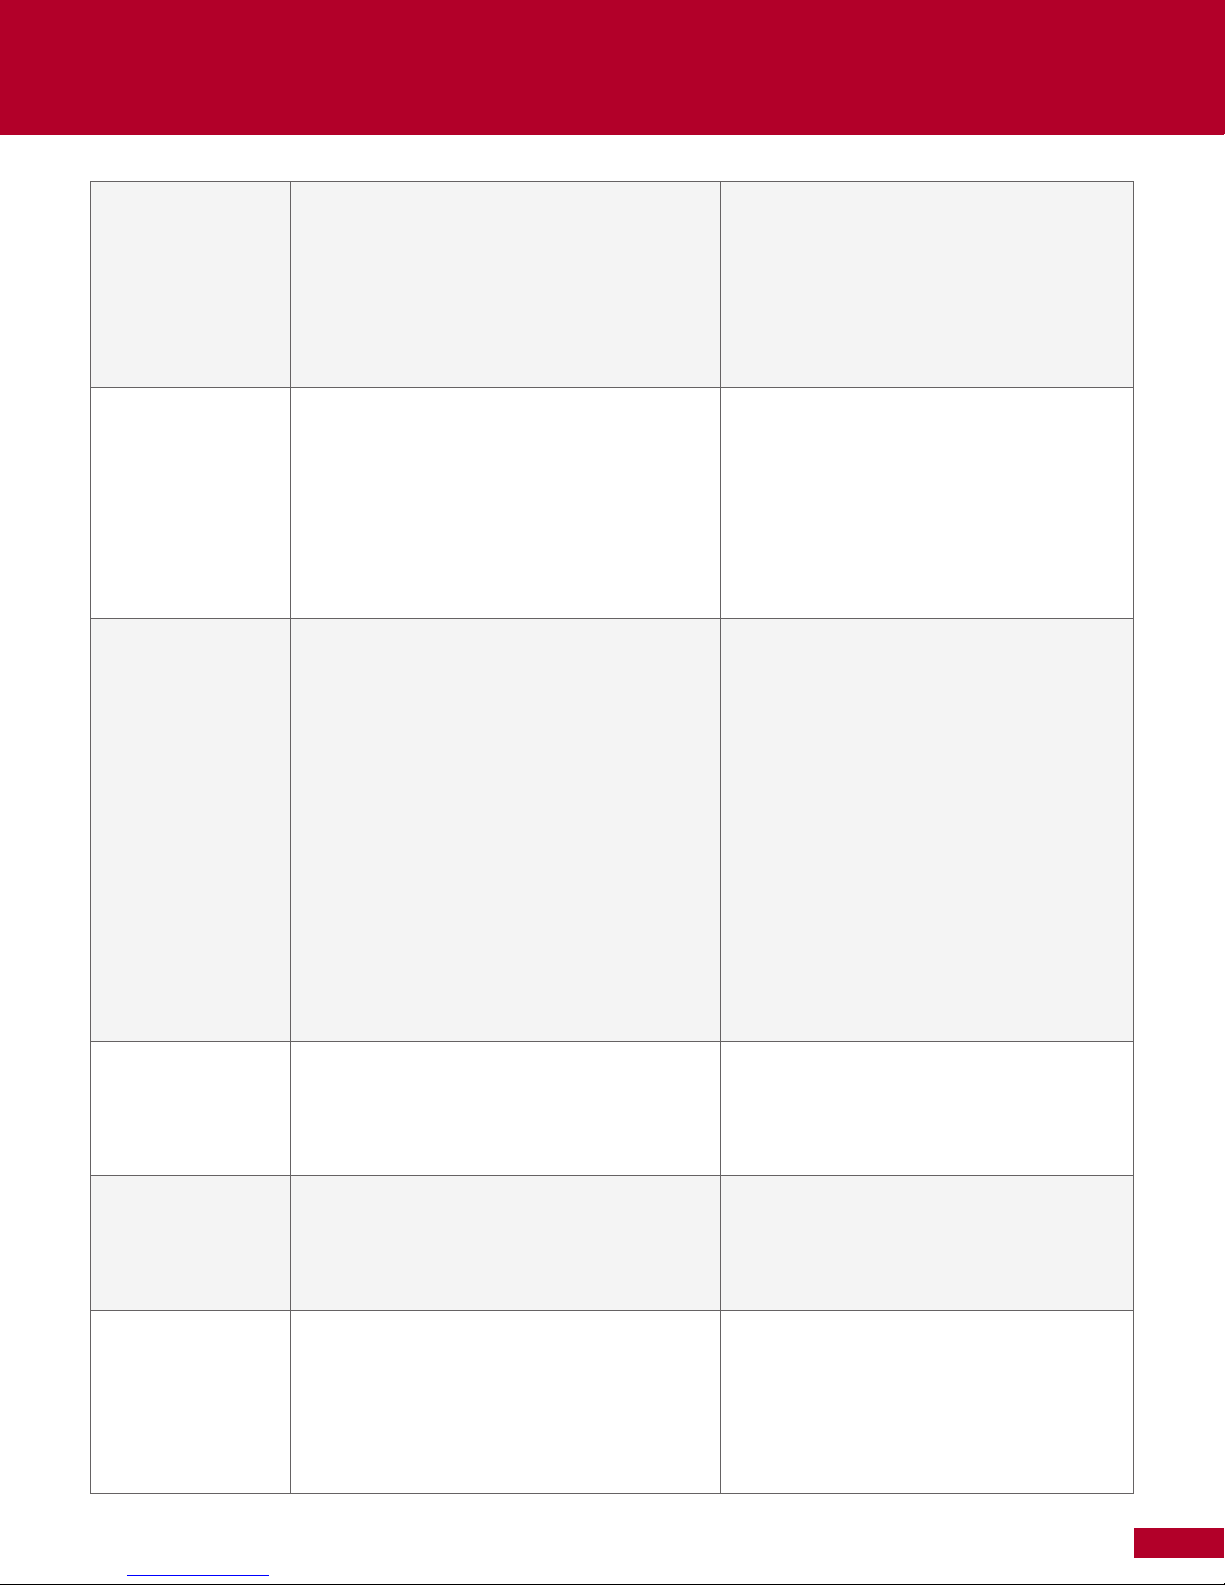
The Micro-Cycle
does not decelerate
quickly when the
stop assist lever is
engaged.
Attitude adjustment
buttons do not work
or cannot change
the balance point
enough to balance
properly.
While riding,
the Micro-Cycle
temporarily loses
and then regains
balance.
Check its operation by slowly pushing the
Micro-Cycle forward and engage the stop assist
lever. If the handlebars don’t lift up there may be
a broken brake cable (mounted under the seat).
If there is no tilt action, take the Micro-Cycle to
your dealer to check its operation.
Ensure that the adjustment buttons work by
balancing the Micro-Cycle then using the
adjustment buttons while standing still. The
Micro-Cycle should tilt. If it does not, take the
Micro-Cycle to your dealer for repair. If the
Micro-Cycle tilts and you still cannot balance
properly, check that the seat is adjusted properly
and that you do not have too much weight on the
front or the back of the Micro-Cycle.
Place your feet on the ground and be prepared to
dismount the Micro-Cycle.
The Micro-Cycle decelerates by tilting and
using your weight to slow down. If you defeat
this by leaning in the opposite direction, you
will not slow down quickly and risk losing
control of the Micro-Cycle. Ensure that the tilt
is operating properly and that you are leaning
in the direction opposite to which you are
traveling while slowing.
If the seat is not adjusted properly or you
have too much weight on the Micro-Cycle,
the attitude adjustment buttons cannot
compensate enough to allow you to
balance properly.
The Micro-Cycle should always balance
properly when moving on level ground. If
you encounter an obstacle such as a pothole
or a curb and you try to ride over it, the
Micro-Cycle may not have enough power to
ride over the obstacle, putting stress on the
motor. When this happens, the Micro-Cycle
temporarily shuts off power to the wheel and
loses balance. After about 1/10th of a second,
it tries to apply power and regain balance.
The Micro-Cycle
will not balance
or slows, and the
power button blinks
7 times.
The Micro-Cycle will
not balance or slows,
and power button
blinks in succession.
The Micro-Cycle
shuts off when you
tilt it too far from
side to side. If it is
balancing while you
are doing this, it
loses balance.
The Micro-Cycle is too hot. Slow down or
move the Micro-Cycle to a cool place and power
it down.
Check the battery charge indicator on
the display. You may be running low on
battery charge.
Do not tilt the Micro-Cycle too far (over 30
degrees) from side to side. Tilting 45 degrees or
more will cause the Micro-Cycle to lose balance.
Do not try to ride over obstacles, steep hills
over 20% grade, or ramps. If you are placed
in a situation where this is unavoidable, slow
down and carefully ride over the obstacle, with
your feet on the ground while being prepared
to dismount.
Temperatures of 122° F degrees 50° C or
higher cause the Micro-Cycle to not balance or
slow to 3 mph.
When the batteries are low, the Micro-Cycle
cannot balance properly and limits its speed to
3 mph. You risk losing balance while riding on
low or flat batteries, especially when riding up
or down hills.
The Micro-Cycle is designed to balance on
level ground from front to back. It is the rider’s
responsibility to maintain balance from side to
side. Extreme roll angles will cause the MicroCycle to lose balance.
23
Page 24

Warranty
Ryno one year limited warranty
RYNO Motors, Inc warrants that all new RYNOs and components therein are warranted to the original retail purchaser (“Purchaser”) against
manufacturing defects in materials and/or workmanship for a period of one (1) year from the date of original retail purchase.
Terms of limited warranty
This warranty is effective beginning on the date of original retail purchase. The original receipt is required to honor the warranty. This
warranty is transferable to ONE secondary party should the original owner sell or otherwise give the bike to someone as a gift. This warranty
is null and void if the RYNO changes ownership more than one time. This warranty is void if the RYNO is subjected to abuse, neglect,
improper repair, improper maintenance, alteration, modification, an accident or other abnormal, excessive, or improper use, as determined
at the sole discretion of RYNO Motors. During the duration of this warranty, RYNO, at their cost, will either repair the RYNO or fix or replace
any parts with the same or equivalent parts. RYNO requires all warranty service and evaluation be done through its authorized dealer
network. Any work or maintenance done on the RYNO outside of the RYNO dealer network shall render the warranty null and void. This
warranty does not include shipping or transportation costs to and from the authorized dealer. To find an authorized dealer, please visit www.
rynomotors.com.
Exclusions:
This warranty does not cover:
• Normal wear and tear from use of the RYNO
• Damage or failure from accident, misuse or unauthorized modification to the RYNO
• Damage from stunt riding, or other activities outside the normal intended use of the RYNO
• Damages resulting from failure to follow the Instructions for Use and Warnings as provided in the RYNO Owner’s Manual
• Damages resulting from improper charging of the batteries or use of any charger not supplied by RYNO or not charging batteries at all
times when not in use
• Installation of any parts, accessories, or electrical components not originally intended for or compatible with the RYNO or any
modification to the frame or any originally supplied parts; tire, motors, software, hardware, lights, batteries, displays, or brake other than
by RYNO or its authorized dealers.
All warranties are void if the RYNO is used for any purpose other than the reasonable intended use of the RYNO.
To fulfill a warranty:
All warranty work must be performed by RYNO or an authorized RYNO Dealer. Proof of purchase must be provided. To begin the warranty
process, please bring your RYNO into an authorized dealer to assess the RYNO and begin the process to take care of the problem. The
original purchaser is responsible for the return of the RYNO to the authorized local dealer. The purchaser is responsible for any cost
when shipping the bike to and from the dealer and/or RYNO if required. If the RYNO dealer is unable to fix a problem and needs to send
it to RYNO HEADQUARTERS, RYNO will reimburse the original purchaser for reasonable shipping costs incurred from dealer to RYNO
HEADQUARTERS ONLY. If warranty is not valid, RYNO will contact the owner and offer to repair or replace parts at a reasonable price.
Owner will then be responsible for all shipping costs.
One year limited battery warranty
RYNO warrants to the original purchaser that the batteries are free of defects in material and workmanship for 1 year from the original date
of purchase. The original receipt of purchase is required to establish proof of purchase and warranty date, and must be provided to your
RYNO Authorized Dealer for all warranty claims.
NOTE: Battery must be charging when not in use.
The warranty for replacement batteries will be based on the original battery purchase date, as identified on the original battery purchase
sale receipt. Under no circumstance will a replacement battery have a warranty date different than the original battery purchase date. If a
replacement is necessary due to a defect in materials and/or workmanship, then upon return to RYNO MOTORS, it will be evaluated: [not
sure what the purpose of the evaluation is if the battery will automatically be replaced] The battery will then be replaced free of charge,
within the free replacement period from date of original purchase for 6 months. After 6 months, we will contact you with the pro-rated cost
and ask for your credit card before making shipment of a replacement battery. Please supply a daytime phone number. The pro-rated cost
will be based on the retail price at the time of replacement. Shipping costs are not included in the warranty.
The original battery sale receipt must be maintained for any further claims. All replacement batteries will be warranted for the balance of the
original warranty period.
24
Page 25

Warranty
A COUPLE MORE THINGS:
No modifications to any hardware or software by hacking or changing anything related to how the bike performs. This is a strict no-no and
will void your warranty (it is a hi-tech product and if you have any value for your own well-being and safety, you will not mess with the
RYNO).
We have made a few promises, now it’s your turn
Please initial by each of the following so we can agree we are all on the same page, so to speak.
I promise to love and take care of my RYNO
I promise not to let any of my friends (or strangers) ride my RYNO without proper instruction, even though they will beg, cry,
demand and in some cases, offer you cold, hard cash.
If I decide to let others ride my RYNO, I promise to treat them with the same care I would a ten year old that I was teaching to ride
a bike for the first time. I will walk behind them to spot them with my hand holding on behind the seat until they are confident.
I promise to handle the fame and notoriety from my ownership of the RYNO with class and in a responsible manner. Treat the
paparazzi with respect!
I promise to always plug my RYNO in when not in use.
I promise to only ride the RYNO on terrain that will provide solid grip.
I promise not to let anyone under the age of 16 ride my RYNO.
The RYNO is designed for one and only one person. Let’s keep it that way.
Never use drugs or alcohol when operating the RYNO. It is fun enough as it is!
The RYNO does not conform to Federal Motor Vehicle Safety standards, so please do not use the RYNO in traffic on public streets
or the highway.
RYNO MOTORS IS THE EXCLUSIVE GUARANTOR OF THIS WARRANTY. NO OTHER PARTY HAS THE AUTHORITY TO CHANGE,
MODIFY, OR NULLIFY THIS WARRANTY IN ANY WAY SHAPE OR FORM.
25
Page 26
WWW.RYNOMOTORS.COM
 Loading...