

Page 1
SharkBite
Installation Guide
®
Page 2
The Total
Plumbing Solution
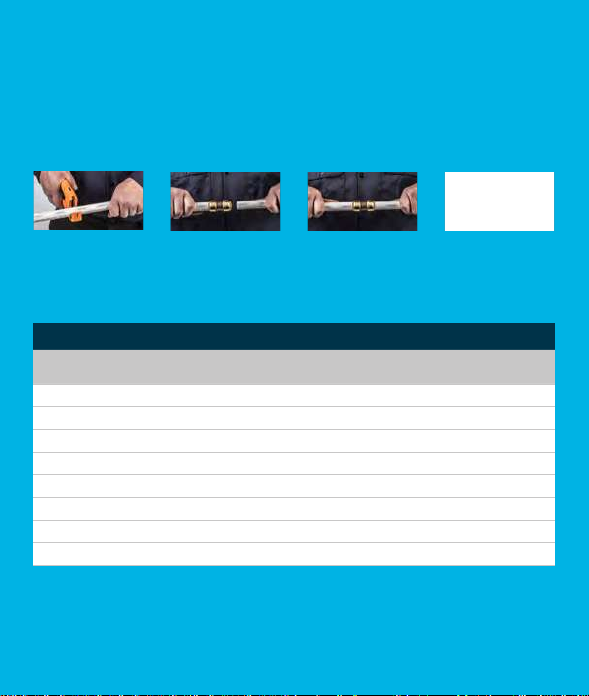
Cut the pipe square
removing rough edges and
debris. Mark the pipe to the
correct insertion depth.
Push:
Push pipe and tting
together up to the depth
mark.
Done.Cut:
Pipe Insertion Depth
SharkBite
Fitting Size
1/4 in. 1/4 in. CTS 3/8 in. 0.82 21
3/8 in. 3/8 in. CTS 1/2 in. 0.94 24
1/2 in. 1/2 in. CTS 5/8 in. 0.95 24
5/8 in. 5/8 in. CTS 3/4 in. 1.13 29
1 in. 1 in. CTS 1-1/8 in. 1.31 33
1-1/4 in. 1-1/4 in. CTS 1-3/8 in. 1.88 48
1-1/2 in. 1-1/2 in. CTS 1-5/8 in.
2 in. 2 in. CTS 2-1/8 in. 2.19 56
sharkbite.com
ii
Nominal Pipe
Size
Pipe OD Pipe Insertion
Depth IN
2.05 52
*Using the disconnect
clip, ttings can be easily
changed.
Pipe Insertion
Depth MM
Page 3
The SharkBite
®
Connection System
The SharkBite® connection system is certied for potable water and radiant heating.
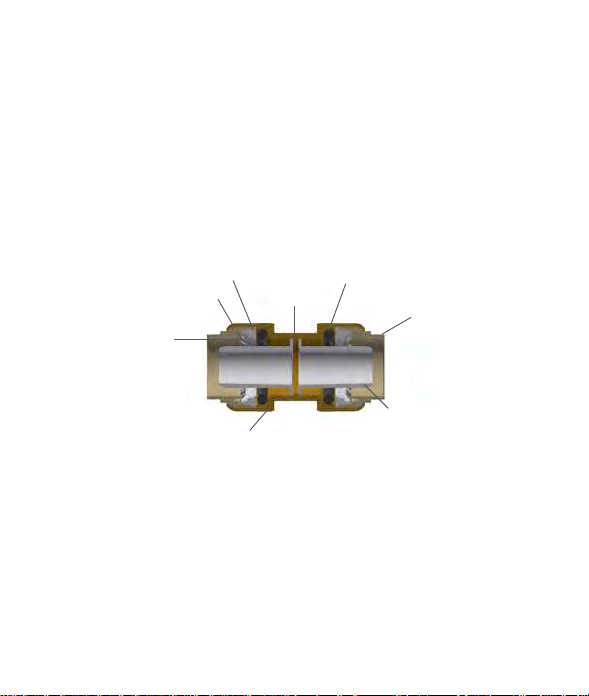
SharkBite uses an advanced push-to-connect design that works in two stages. When the
pipe is inserted into the tting it passes the rst stage through a release collar and then
through a stainless steel grab ring. The grab ring has teeth that open out and grip onto the
pipe. At the second stage the pipe is pushed through an o-ring protector which aligns the
pipe. A specially formulated o-ring is then compressed between the wall of the tting and
the pipe before the end of the pipe reaches the tube stop.
O-RING PROTECTOR
SUPPORT SLEEVE
GRAB RING
FIRST STAGE
DZR LEAD FREE BODY
Only when the pipe has passed through
the o-ring and reaches the tube stop is a
secure joint created. The SharkBite ttings
can only be used with pipe/tubing certied
to the following specications:
PEX (ASTM F876, CSA B137.5)
Copper (ASTM B 88)
CPVC (ASTM D 2846, CSA B137.6)
PE-RT (ASTM F 2769)
HDPE (SDR-9 ASTM D2737)
O-RING
TUBE STOP
SECOND STAGE
RELEASE COLLAR
PEX STIFFENER
The SharkBite ttings have an integral PEX
Stiener that is eective in supporting
PEX, PE-RT, and HDPE tubing to ensure
the o-ring seals correctly on the outside of
the pipe. The PEX Stiener is not required
for use with CPVC and copper tubing,
however these two types of tubing t over
the PEX Stiener easily and hold it against
the tube stop.
1
Page 4
Connecting a
SharkBite Joint
The following instructions must be followed to assemble the SharkBite Connection
System.
Preparation
Select the correct size tting and pipe
for the job. Check that ttings and pipe
are clean, in good condition and are free
from damage and foreign objects. Also
check that the pipe is round, and free from
scratches, cuts, or gouges. Cut the pipe
so that the ends are square. Ensure that
there are no burrs or damage to the cut
end. Wherever possible proper pipe cutting
tools such as rotary pipe cutters (copper
tubing) or pipe shears (for plastic pipe)
should be used.
2
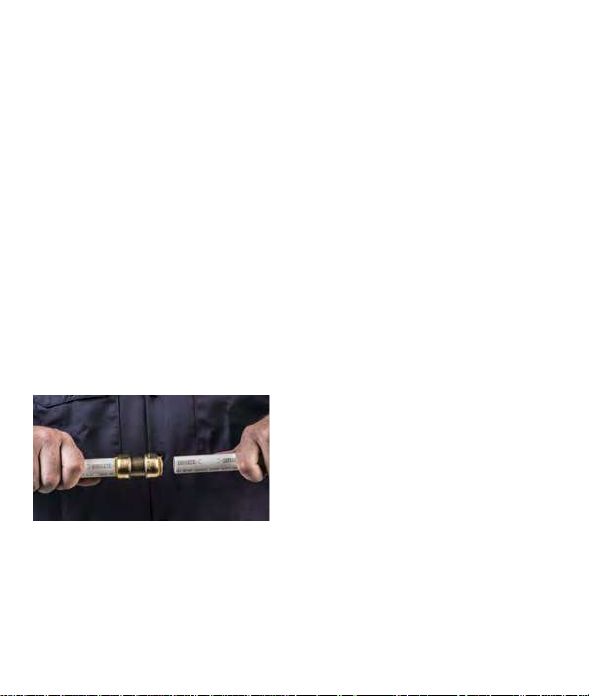
Once the pipe end is cut square and clean,
use the SharkBite Depth Deburr Gauge
(sold separately) and a permanent marker
to mark the insert depth on the outside
of the pipe. This mark is used to ensure
that the joint is assembled correctly. To
assemble correctly, the pipe needs to be
pushed into the tting until it meets the
tube stop. Follow these three steps to
insert the pipe into the tting.
1. Insert the pipe through the release
collar to rest against the grab ring.
2. Push the pipe rmly with a slight
twisting action until it reaches the tube
stop.
3. To ensure that the pipe is correctly
inserted, check that the depth mark is
within 0.005 in (0.13 mm) of the end of
the release collar
Page 5

Disconnecting a
SharkBite Joint
Disconnection of the joint can only occur by using either the SharkBite disconnect clip or
the SharkBite disconnect tongs. By applying pressure to the release collar with the clip
or the disconnect tongs, the grab ring teeth are splayed. This action releases the pipe,
allowing it to be removed from the tting.
1. Place the SharkBite disconnect clip
around the pipe with the non-branded
face against the release collar. If using
the SharkBite disconnect tongs, place
the teeth around the tting assembly.
The fork end with the SharkBite brand
logo should be positioned around the
pipe and the other end around the neck
of the tting.
2. Push the clip against the release
collar and pull the pipe with a twisting
action to release the pipe. If using the
SharkBite disconnect tongs, squeeze
the tool with one hand and pull the
pipe with a twisting action to release
the pipe.
3. Check the tting and pipe end for
damage. The tting and pipe should
be free of damage, foreign objects and
marks on the outside diameter. If the
pipe is damaged or marked, then cut
and use a new section of pipe.
3
Page 6

Installation
Requirements
SharkBite® Burial
SharkBite Universal ttings are suitable
for burial in most applications; however
care is required when using ttings in
applications that require burial to ensure
the correct installation practices are used
and due care is given to any environmental
factors that may have a detrimental eect
on the life expectancy of the ttings and
pipe.
The installation of SharkBite Universal
ttings in applications that will require the
burial of the tting must comply with all
local plumbing code requirements.
SharkBite Universal ttings and SharkBite
PEX are not suitable for use in areas where
the soil is or may become contaminated*
including the soil used for back lling. All
SharkBite Universal ttings with brass
bodies must have an impervious barrier
between the tting and the surrounding
soil. Self-fusing, formaldehyde and
chloride-free, fully cured silicone tape with
a minimum thickness of 0.020" should be
used for this purpose.
The soil used for back lling must be free
of rocks, debris or any sharp objects that
may cause damage to the tting or pipe
through impact or abrasion.
* Examples of contamination include, but are not limited to,
petrochemicals (reclaimed service station sites), high levels of
nitrogen compounds (this could be caused by animal waste or
fertilizer that may be found in some agricultural applications),
low pH levels (below pH 6), high pH levels(above pH 8), run
o from land ll, formaldehyde compounds, and solvents. It
should be noted that such contaminants have been known to
migrate through plastic piping systems and contaminate the
Potable water supplied through these pipes.
4
SharkBite Silicone Burial Wrap
Make a SharkBite Universal connection
ensuring pipe is inserted to proper depth.
While leaving the protective lm in place,
measure the amount of tape needed to
completely wrap the tting. To ensure a
proper seal, overlap tape by 1"past the
end of the tting on every end and 1/4"
– 1/2" between/across the tting. Wrap
the tting by pulling the tape tight and
removing the protective lm. Completely
cover the tting. The tape will bond to
itself within minutes and will cement to
itself within a few hours forming an air and
water tight seal.
SharkBite ttings in concrete
Do not allow joints within the slab. Use a
continuous length of SharkBite PEX Pipe
within the slab and be sure to check for
leaks before pouring concrete.
SharkBite Distance Between
Fittings
Allow at least 1" of spacing between
SharkBite Universal ttings for removal
purposes
SharkBite Grounding on Copper
Pipe
When connecting a SharkBite Universal
tting to a copper piping system, install
a copper jumper cable to ensure proper
grounding. SharkBite Universal ttings are
not an electrically continuous tting.
Page 7

Threaded Connectors
Teon tape should be used with thread
SharkBite connectors to make a proper
seal.
ed
Galvanized Tubing
SharkBite Universal ttings should not be
installed (threaded or push-to-connect)
on galvanized tubing.
SharkBite Soldering
When soldering is required near a
SharkBite Universal connection, make
all solder joints rst and then make the
SharkBite connections. Flame can cause
the pipe to reach high temperatures and
should not be used close to a SharkBite
Universal fitting.
SharkBite Fitting Reuse
SharkBite Universal ttings are intended
to be a permanent connection and are
not designed for repeated connection
and disconnection aer the initial install.
If a tting is installed incorrectly it can be
removed given that proper care is taken, as
detailed in the following steps.
1. SharkBite disconnect tongs or
SharkBite disconnect clips must be
used when removing the ttings.
2. The tting must be inspected by the
installer and be free of damage and
debris.
3. The initial pipe and the new pipe must
be clean and free from scratches and
burrs.
4. The insertion depth must be marked
on the pipe.
5. The connection must be pressure
tested and inspected by the installer to
verify that there are no leaks.
Working Pressure and
Temperature
SharkBite Universal ttings have a
maximum temperature of 200°F
maximum pressure 200 psi when used on
copper pipe. When used on PVC, CPVC,
PEX, PE-RT or HDPE refer to the maximum
pressure temperature rating of the pipe.
PEX Stieners
SharkBite Universal ttings (3/8" to 1")
come with an Integral PEX Stiener. 1/4"
(3/8" OD) ttings do not require PEX
stieners. PEX Stiener are required for
PEX, PE-RT and HDPE pipe. 2XL PEX
Stieners sold separately.
5
Page 8

For more information, visit
sharkbite.com
Connect with us
Reliance Worldwide Corporation
2300 Defoor Hills Rd NW,
Atlanta, GA 30318
Phone: 1-877-700-4242 • Fax: 1-877-700-4280
rwc.com
Reliance Worldwide Corporation (Canada) Inc.
74 Alex Avenue Vaughan, Ontario, L4L 5X1
Phone: 1-888-820-0120
Sales Inquiries: [email protected]
Orders: [email protected]
Manufac tured & Distr ibuted by Relian ce Worldwide Cor poration®.
6
 Loading...