

Installation Guide
and User Manual
2018

Congratulations on
your purchase of an
RV Wi-Fi Router.
• Wi-Fi for your RV;
• Specially designed software
for Recreational Vehicles;
• 12 volt power connection;
•
Enhanced reception with
our external antenna;
•
Easy installation;
•
Industrial Grade 3G/4G
capability;
•
Optimised for Telstra, but
will also work with most
Australia Mobile Carriers;
•
A built in media centre,
allowing you to insert a
hard drive or USB and
share movies, images or
music over multiple
devices data free;
The following steps are designed to get you started
and on the road with ease.
Welcome
• Works on Mobile and
Pre-Paid Plans;
•
Lets you set your own
Wi-Fi password;
•
Improved Wi-Fi performance
with two Wi-Fi antennas;
• 3G and 4G antennas for
greater mobile coverage;
•
Wi-Fi access for the family
whilst towing your caravan;
•
A ‘Hot Spot’ that stays
with the caravan when
your phone moves away;
•
Access the internet from
multiple devices.
•
3G antenna – 4dB
• 4G antenna – 4dB
• Draws 250 milliamps (mA)
The great features that are included in this unit are:
This purchase will give you greater freedom to enjoy your
travelling without sacrificing the lifestyle that the internet
provides.

There are fi ve components:
1. RV Wi-Fi+ Router
What makes up your RV Wi-Fi+?
3. Power Adapter
4. Internal Antennas (4 included )
5. External Antenna/bracket
2. Telstra Sim

Installing your RV Wi-Fi+
In most cases, your manufacturer will install your RV WiFi for you. But if you are looking at installing yourself,
please follow the steps below.
There are two methods available:
•
An external antenna fitted to the outside of the RV.
• No external antenna.
Set up for use with external antenna
1
Choose a position for RV WI-FI+ Router adjacent
to a 12v power point.
2
Pre wire external antenna and mount on roof
using bracket provided. Seal and waterproof.
3
Screw into place on router: 4G antenna cable into
‘4G/External’ point.
4
Screw into place on router: 3G antenna cable into
‘3G/External’ point.
5
Screw into place on router: Wi-Fi antenna cable
into ‘Wi-Fi/External’ point.
6
Attach single antenna to router into ‘Wi-Fi’ point
- the remaining black antenna are now spares.
7
Plug the power adapter into the power jack of the
RV Wi-Fi+ Router.
8
Place the power cord into the 12v power point.
9
Ensure the ‘Power’ light is on.
Installing your RV Wi-Fi+ using the
external antenna

To external antenna To external antenna
Insert Full Sized
Sim card as
shown
To external antenna

Installing your RV Wi-Fi+ without the external antenna
Set up for use with
NO external antenna
1
Choose a position for RV WI-FI+
Router adjacent to a 12v power
point.
2
Screw the four black antenna
into the four points - Wi-Fi/ 4G/
3G/ Wi-Fi. Please note male and
female connections.
3
Plug the power adaper into the
power jack of the RV WI-FI+
Router.
4
Place the power cord into the 12v
power point.
5
Ensure the ‘Power’ light is on.
1
Place the end of the power
adapter into the ‘Power’ slot.
2
Push the ‘On’ Button.
Turning on your RV Wi-Fi+ Router
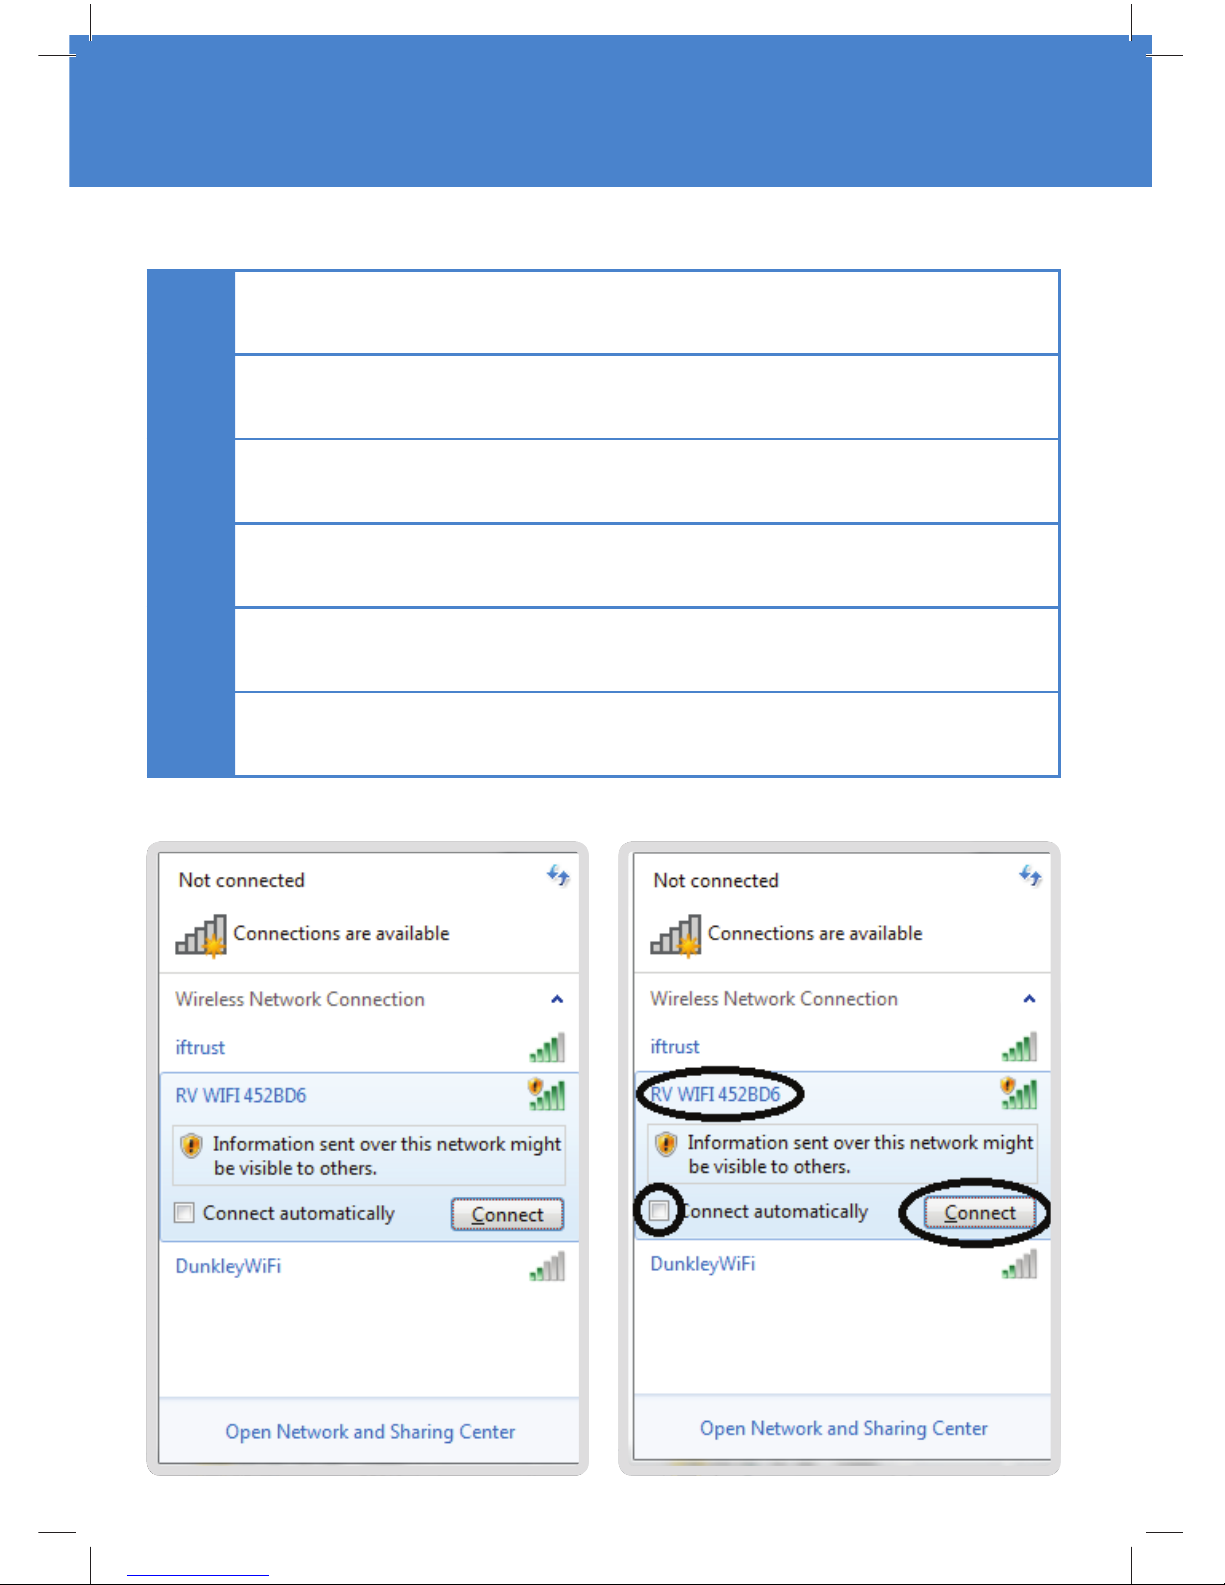
1
Turn on the device/s that you wish to connect to the Internet.
2
Click on the ‘Settings’ or equivalent page on your device.
3
Click on the ‘Wi-Fi’ heading and choose the wifi to work RV WIFI abc123
NOTE: “abc123” varies on each unique router.
4
Click the ‘Connect Automatically’ Box.
5
Click ‘Connect’.
6
When prompted enter the Wi-Fi password ‘rvwifi 1234’.
Connection to the RV Wi-Fi+ Router

1. Open the web/internet browser on your device and enter
the address http://10.0.1.1 into the ‘search’ bar, where you
would normally type in for example: www.google.com.au.
http://10.0.1.1
Type ‘admin’ Type ‘admin’
Setting your Wi-Fi+ Password.
2. You are about to enter the username and password.
You MUST enter the username “admin” and the password
“admin”. Failure to do so will result in router requiring
resetting.
This process is
recommened to
provide security
with your
internet use.

3. Select/click on the following:
1. ‘Network’.
2. ‘WiFi’.
3. Click on ‘Edit’

Setting your Wi-Fi+ Password.
4. Go to the ‘Interface Confi guration’ Section.
•
Click on ‘Wireless Security’.
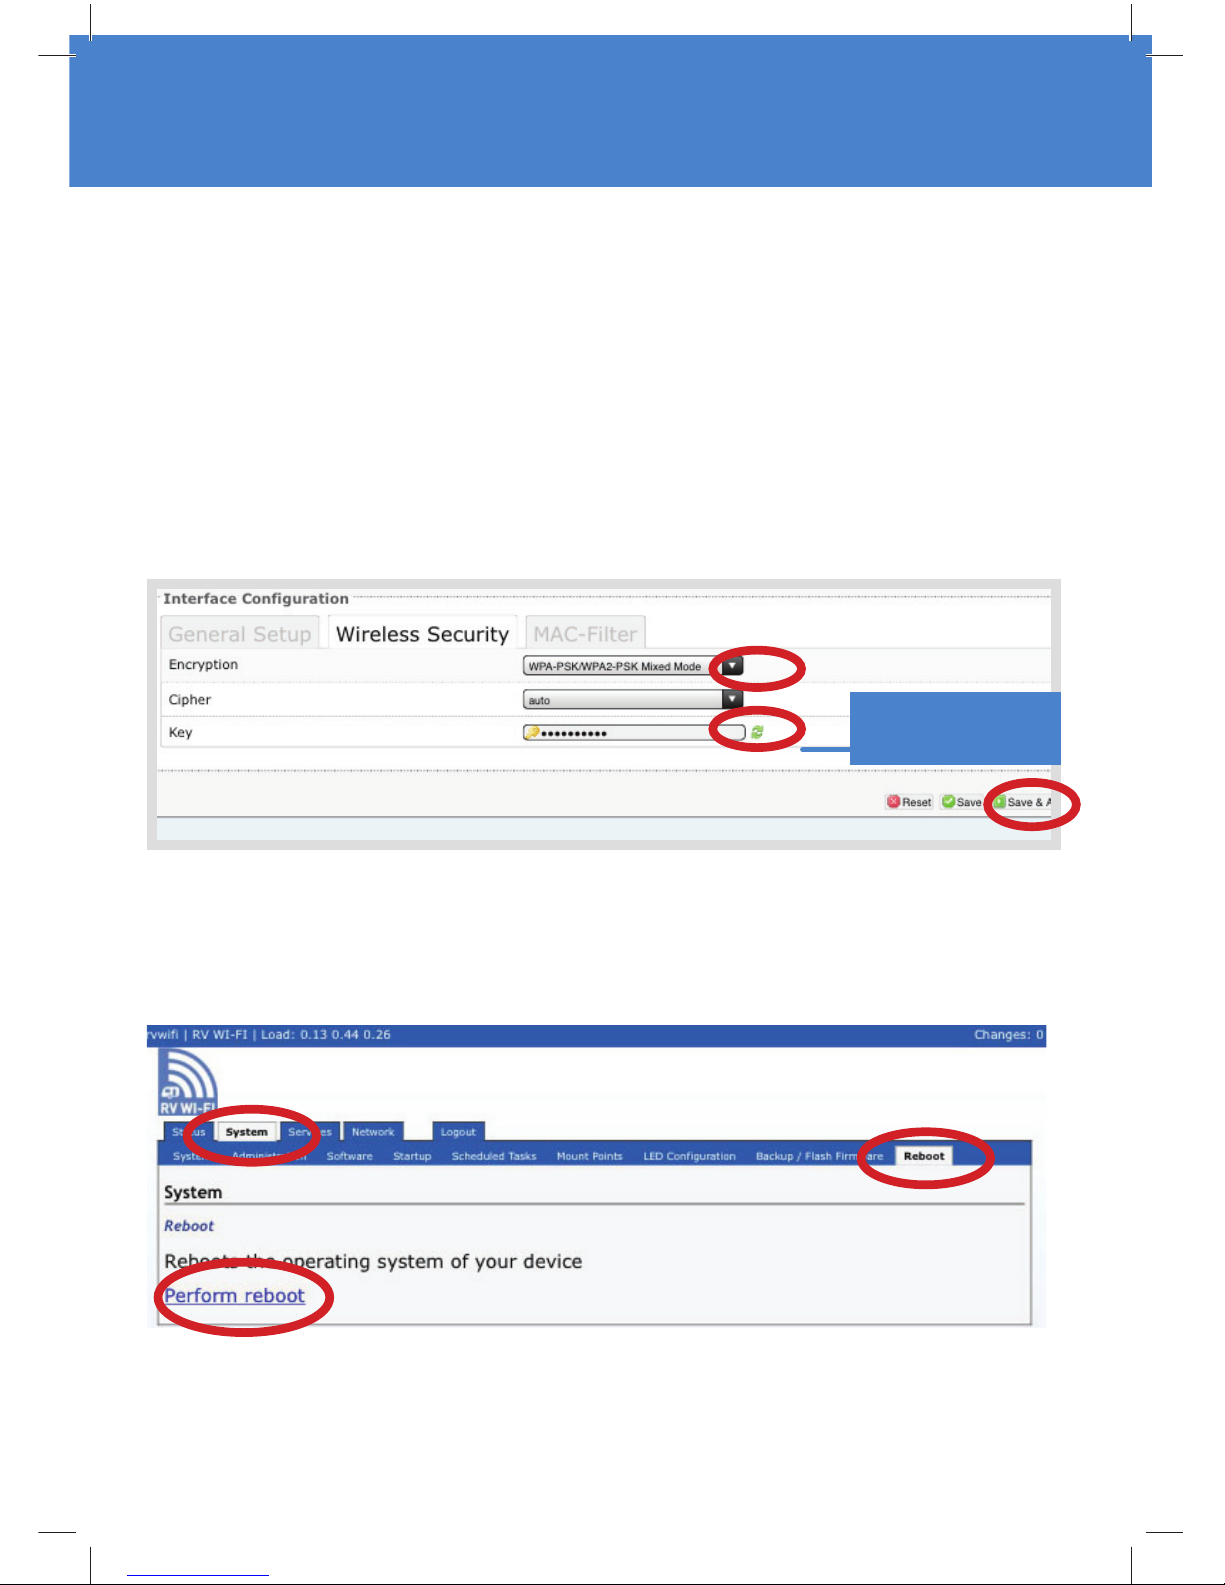
5. Last step is to ‘Reboot’; click on the following:
•
System
•
Reboot
•
Perform Reboot
Type password of
your choice’
• Click on drop down menu next to ‘Encryption’.
•
Click on ‘WPA-PSK/WPA2-PSK Mixed Mode’.
Next to the ‘Key’ drop down box, click on the double green arrows. This shows what the
current WiFi password is set to. Delete the password, either by backspacing or use the delete
button.
•
In the Key box, type your new password - your choice! It must be at least 8 characters and
it IS case sensitive.
•
Click on ‘Save and Apply’. The screen will either reboot, or show a ‘spinning icon’. Either
way, wait 1 minute then close your internet browser.
Go back to your device (laptop/iPad), go to ‘Settings’, Go to ‘Wifi ’, click on RV WIFIabc 123.
Your computer will tell you that you have an incorrect password.
Type in your the new password that you have just set. Wait for the ‘blue tick’.
Open up a new page on your internet brower and you are ready to go.

The orange Telstra satchel contains your Telstra Sim Card. You need to activate this and add
credit to it to fi nish the set up stage of your RV Wi-Fi unit.
You must use a FULL SIZED SIM CARD.
Once your SIM card is inserted. Turn your router ‘off’ and then ‘on’ to reboot.
How to Activate the Telstra Pre-Paid Service
Activate your Telstra Sim Card
1
Have your driver’s licence handy.
2
Use the Service Number located on the rear bottom space of the Telstra Satchel.
3
Open your browser and go to www.telstra.com/activate.
4 Follow the Telstra prompts for activation.
5
Once complete, a router restart may be necessary.
You are now ready to go. Enjoy!
For providers other than Telstra please look on their packaging for instructions to activate.
Below are links to Optus, Vodafone and Virgin.
Optus can be activated by going to www.optus.com.au/customercentre/activateprepaid
Vodafone can be activated by going to www.vodafone.com.au/activate
Virgin can be activated by going to www.virginmobile.com.au/activate
For other providers, please see your Sim card documentation.
Warranty Registration
Please complete your Warranty Registration by going to:
www.rvwifi .com.au/warranty-registration.
Your serial number for your RV Wi-Fi unit is located on the outside of the box, and on the rear
of your RV Wi-Fi unit.

Factory Reset
WARNING: This procedure will reset all of the settings applied to this router, back to original
factory settings, and your passwords will be forgotten. Use this procedure if errors are occurring
that may be related to unknown settings.
Once you have followed the steps below, please follow the User Manual to set up a new
password. A downloadable version of this can be found on our website: www.rvwifi .com.au.
Please note, this does not impact any Telstra data usage or activation.
Need help?
Type ‘admin’
Type ‘admin’
2. Enter the username ‘admin’ and the password ‘admin’.
There are two options
Option 1
Just above where the power cord inserts into the router is the ‘reset’ button. Press and hold
this button until all the blue lights on the router light up and then revert back to the normal
‘at least one blue light’ status.
Option 2.
Follow these steps below to return your RV Wi-Fi router to the factory settings.
1.
Open the web/internet browser on your device and enter the address http://10.0.1.1 into
the ‘search bar’.
For help with your RV Wi-Fi unit please go to:
www.rvwifi .com.au/contact-2 and a service agent will be in touch.
http://10.0.1.1

3. Select/click on the following:
• System.
• Backup/fl ash fi rmware.
• Perform Reset.
4.
Select/ click ‘OK’ button.

Frequently asked questions
What do I do if I can’t connect to the
Wi-Fi?
There are a number of causes that may have
made this happen.
1. Your Wi-Fi may have been accidently
deleted during the set up phase. You need
to insert an ethernet cable into the side of
your router - into one of the yellow slots,
and connect it to a device like a laptop. Then
follow the ‘Factory Reset’ part of the manual
and proceed through the steps.
2. You have entered your own password into
‘setting the Wi-Fi password’ point 2, instead
of entering ‘admin’ in both boxes. To fi x this
you need to go the ‘Factory Reset’ part of
the manual and proceed through the steps.
Will you be making updates to the
software? If so, how can I update my
router?
Yes, we are continually looking for new and
exciting features and improvements. We
will make these available for download on
our website.
Follow our Facebook page for notifi cations
and how to apply these updates www.
facebook.com/rvwifi
What coverage can I expect to get?
As we access our data from a range of
Australian Data Providers - the coverage
is where they are available - only better
than what you would get on a phone due
to the external antenna and the RV WI-FI
hardware/software confi guration.
For maps showing the coverage of the
major three, go to:
Telstra: www.telstra.com.au/coveragenetworks/our-coverage
Optus: www.optus.com.au/shop/mobile/
network/coverage
Vodafone: www.maps.vodafone.com.au/
VHAMap/apps/public-vf
How is RV WI-FI different to hot spotting
my phone, or a ‘pocket device’?
The RV WI-FI solution has been created with
the specifi c needs of the Australian Caravan
and motorhome community. The differences
are as follows:
• Superior 3G/4G coverage driven
through the antenna set up high on
the vehicle.
• Wired in to the 12V supply of the van, so
no chargers to look after or lose.
• Superior Wi-Fi coverage – typically
50 metres or more from the Caravan/
Motorhome.
• The RV WI-FI router Software has been
developed with the Australian travelling
holiday in mind, there is no other product
like it. No bill shock – no impact to your
phone data plan.

www.rvwifi .com.au
 Loading...