

Page 1
Instruction Manual
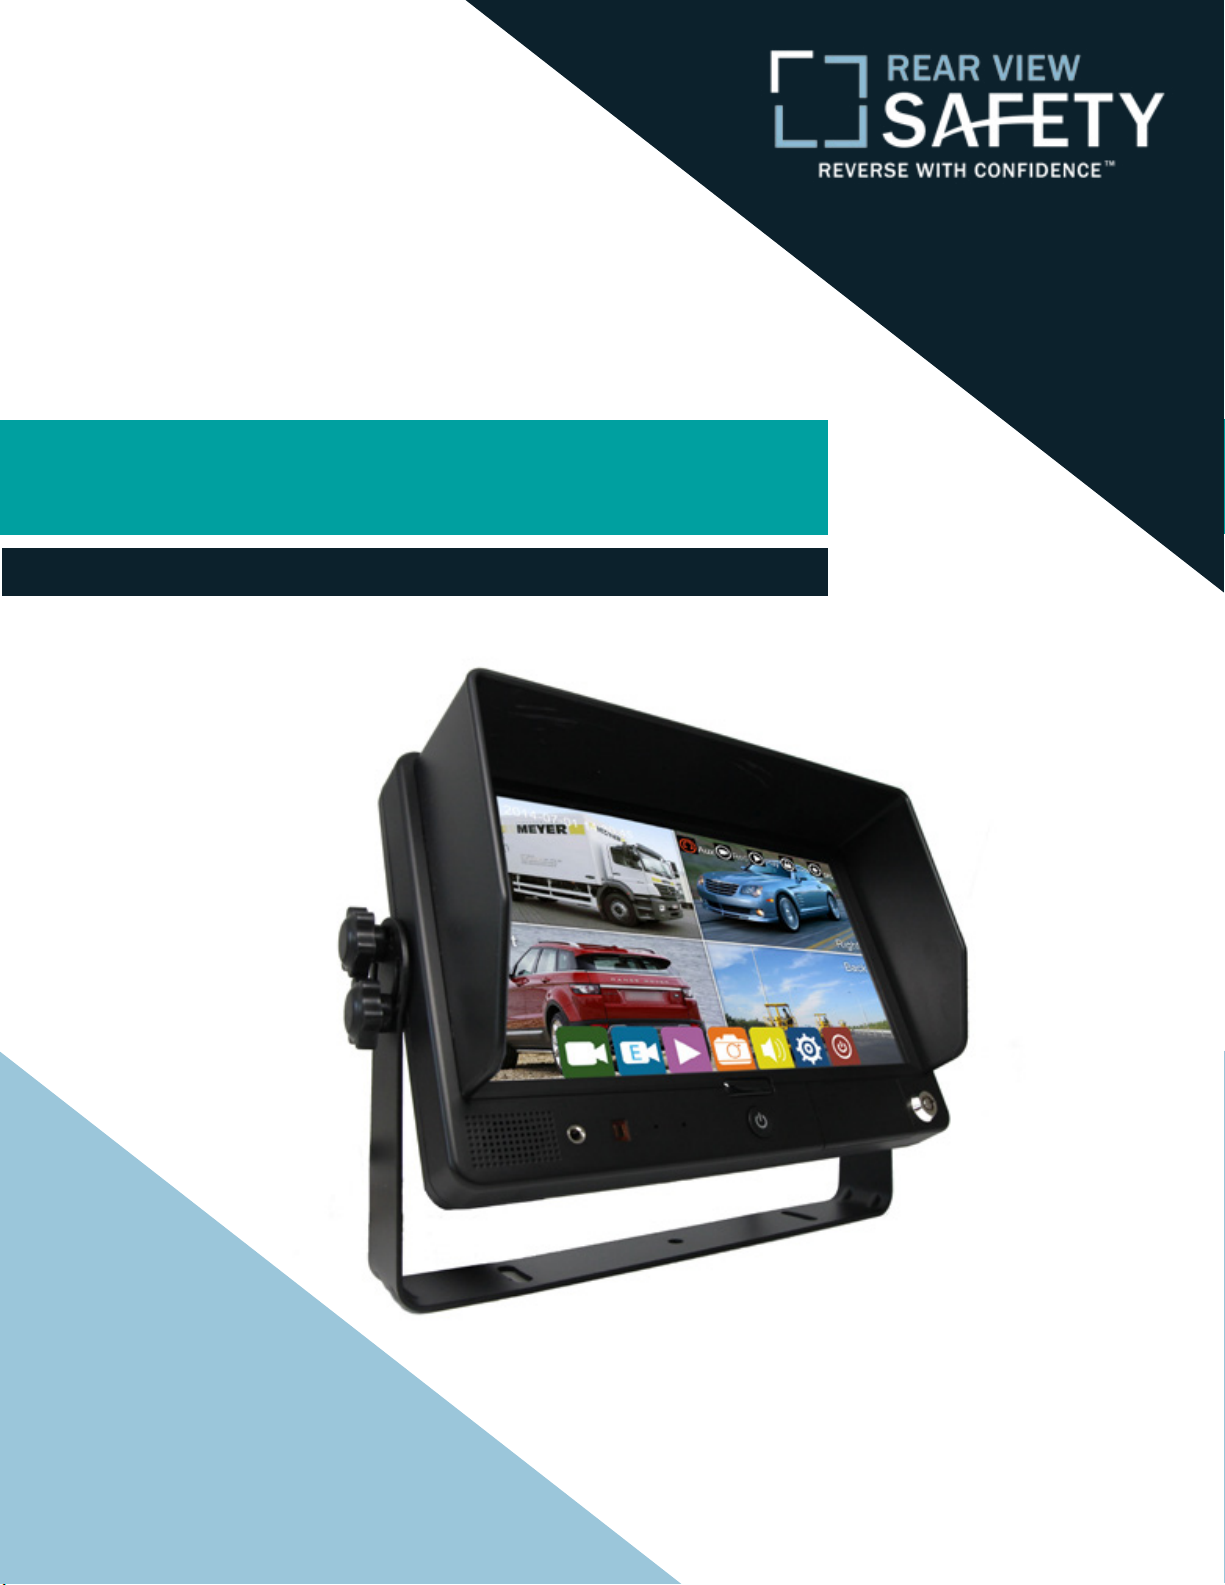
9” TFT LCD Digital Quad View Color Monitor
With Built-In DVR
RVS-97QUAD-DVR
Please read this manual before using this monitor.
The product may be dierent from how it is described in the manual
depending on what software version you are using.
Reverse With Condence ™
1
Page 2
Introduction.............................. 03
Safety Information.............................. 04-06
Before Beginning Installation ....................... 07
Precautions.......................... . . . . 08-09
Maintenance...............................10
Accessories.................................11
TABLE OF CONTENTS
2
Connections.................................12
Remote Control..................................13
Controls........................... . . . . . 14
Operation.......................... . . . . 15-18
Record.......................... . . . . . . 19
Display.......................... . . . . . 20-24
Storage.......................... . . . . . . 25
System.......................... . . . . 26-30
Notes............................. . . . . 31
Rear View Safety
Page 3

NOTE!
Please read all of the installation instructions
carefully before installing the product. Improper
installation will void manufacturer’s warranty.
Congratulations on purchasing a Rear View Backup
Camera System!
With this manual you will be able to properly install and
operate the unit.
The Backup Camera System is intended to be installed as a
supplement aid to your standard rear view mirror that already exists
in your vehicle. The Backup Camera System should not be used as a
substitute for the standard rear view mirror or for any other mirror
that exists in your vehicle.
In some jurisdictions, it is unlawful for a person to drive a
motor vehicle equipped with a TV viewer or screen located forward of
the back of the driver’s seat or in any location that is visible, directly
or indirectly, to the driver while operating the vehicle.
INTRODUCTION
Reverse With Condence ™
3
Page 4

Please read the entire manual and follow the instructions and
warnings carefully. Failure to do so can cause serious damage and/or
injury, including loss of life. Be sure to obey all applicable local
trac and motor vehicle regulations as it pertains to this product.
Improper installation will void manufacturer’s warranty.
USAGE:
• The Rear View Camera System is
designed to help the driver safely detect people and/or objects
helping to avoid damage or injury.
However, you the driver, must use it
properly. Use of this system is not a
substitute for safe, proper or legal
driving.
• Never back up while looking at the
monitor alone. You should always
damage or injury. Always back up
slowly.
• The Rear View Camera System is
not intended for use during extensive back-up maneuvers or backing
into cross trac or pedestrian walkways.
•Please, always remember, the area
displayed by the Rear View Camera
check behind and around the vehi-
SAFETY INFORMATION
cle when backing up, in the same
way as you would if the vehicle did
not have the Rear View Camera
System. If you back up while looking
only at the monitor, you may cause
4
System is limited. It does not display
the entire panorama that is behind
you.
Rear View Safety
Page 5

INSTALLATION:
• Electric shock or product
malfunction may occur if this
product is installed
incorrectly.
• Use this product within
the voltage range specied. Failure
to do so can cause
electronic shock or product
malfunction.
or disconnected wire may cause a
re.
• While installing the Rear View
System be careful with the wire
positioning in order to avoid wire
damage.
• The Rear View System should only
be used when the vehicle is in
reverse.
SAFETY INFORMATION
• Take special care when
cleaning the monitor.
• Make sure to rmly ax the prod-
uct before use.
• If smoke or a burning smell
is detected, disconnect the
system immediately.
• Where the power cable may touch
• Do not watch movies or
operate the monitor while driving;
as it may cause an
accident.
• Do not install the monitor
where it may obstruct drivers
view or obstruct an air bag
device.
a metal case, cover the cable with
friction tape. A short circuit
Reverse With Condence ™
• Dropping the unit may cause
possible mechanical failure.
5
Page 6
If you have questions about this product, contact:
Rear View Safety
1797 Atlantic Avenue
Brooklyn, NY 11233
Tel: 1.800.764.1028
IN NO EVENT SHALL SELLER OR MANUFACTURER BE
SAFETY INFORMATION
LIABLE FOR ANY DIRECT OR CONSEQUENTIAL DAMAGES OF
ANY NATURE, OR LOSSES OR EXPENSES RESULTING FROM
ANY DEFECTIVE PRODUCT OR THE USE OF ANY PRODUCT.
6
Rear View Safety
Page 7

Before drilling please check that no cable or wiring is on the other side
of the wall. Please clamp all wires securely to reduce the possibility
of them being damaged while vehicle is in use. Keep all cables away
from hot or moving parts and electrical noisy components.
We recommend doing a benchmark test before installation
to insure that all components are working properly.
Step 1: Choose the monitor and camera locations.
Step 2: Install all cables in vehicle, when necessary a 0.8 (20mm)
hole should be drilled for passing camera cable through vehicles
walls. Install split grommets where applicable.
Step 3: Once all cables and wiring have been properly routed, perform
a system function test by temporarily connecting the system.
BEFORE YOU BEGIN
Reverse With Condence ™
7
Page 8

Precautions
Storage and Keeping
1. Do not expose the monitor to excessive heat or cold. The storage
temperature of this device is -30°C~+80°C, and the operating temperature is -20°C~+70°C. Battery operating temperature is 0-70°C.
The humidity is Rh 90%.
2. Never use this device near water or damp locations.
3. Never use this device in environments with excessive moisture, dust
or smoke.
4. Avoid dropping or striking this device.
5. Avoid using this device in enclosed spaces, areas with excessive vibration or areas subject to severe impacts.
6. Never puncture, scratch or use abrasive cleaning materials on this
device.
7. Do not place cables where they may be pinched or stepped on.
8. Leave at least a 2” space between the monitor and walls, cabinets or
other objects to allow adequate air circulation around the device.
9. The monitor is not designed to be waterproof.
PRECAUTIONS
8
Rear View Safety
Page 9

Operating Precautions
1. The device may be powered by a 12 or 24 volt battery, as well as the
vehicle's electrical system.
2. Make sure all cables are connected properly. Improper cable connections may damage the monitor. Remove the power cable connections
when not using the device.
3. The back-up battery can be recharged when the power is on.
4. When battery is fully charged, recharging will automatically stop.
5. If batteries are not used for a while, it may take longer to charge.
Warning!
1. This monitor is high voltage. Only professionals should open the monitor's case.
2. Do not watch the video while driving unless you are monitoring the
rear view camera display.
Special Note
Occasionally, a few highlights or dark spots may appear on the LCD screen. This
doesn’t necessarily indicate any monitor defects. Never try to repair this device
yourself. If any problems occur, immediately turn the display o and notify our
company or an authorized dealer. Any disassembly or modication may lead to
PRECAUTIONS
damage and will also void the warranty.
Reverse With Condence ™
9
Page 10
Maintenance
1. Remove all cable connections from the monitor before cleaning the
device.
2. Use a mild household detergent and a slightly damp cloth to clean
the unit. Never use strong solvents such as thinner or benzine, as they
may damage the nish of the device.
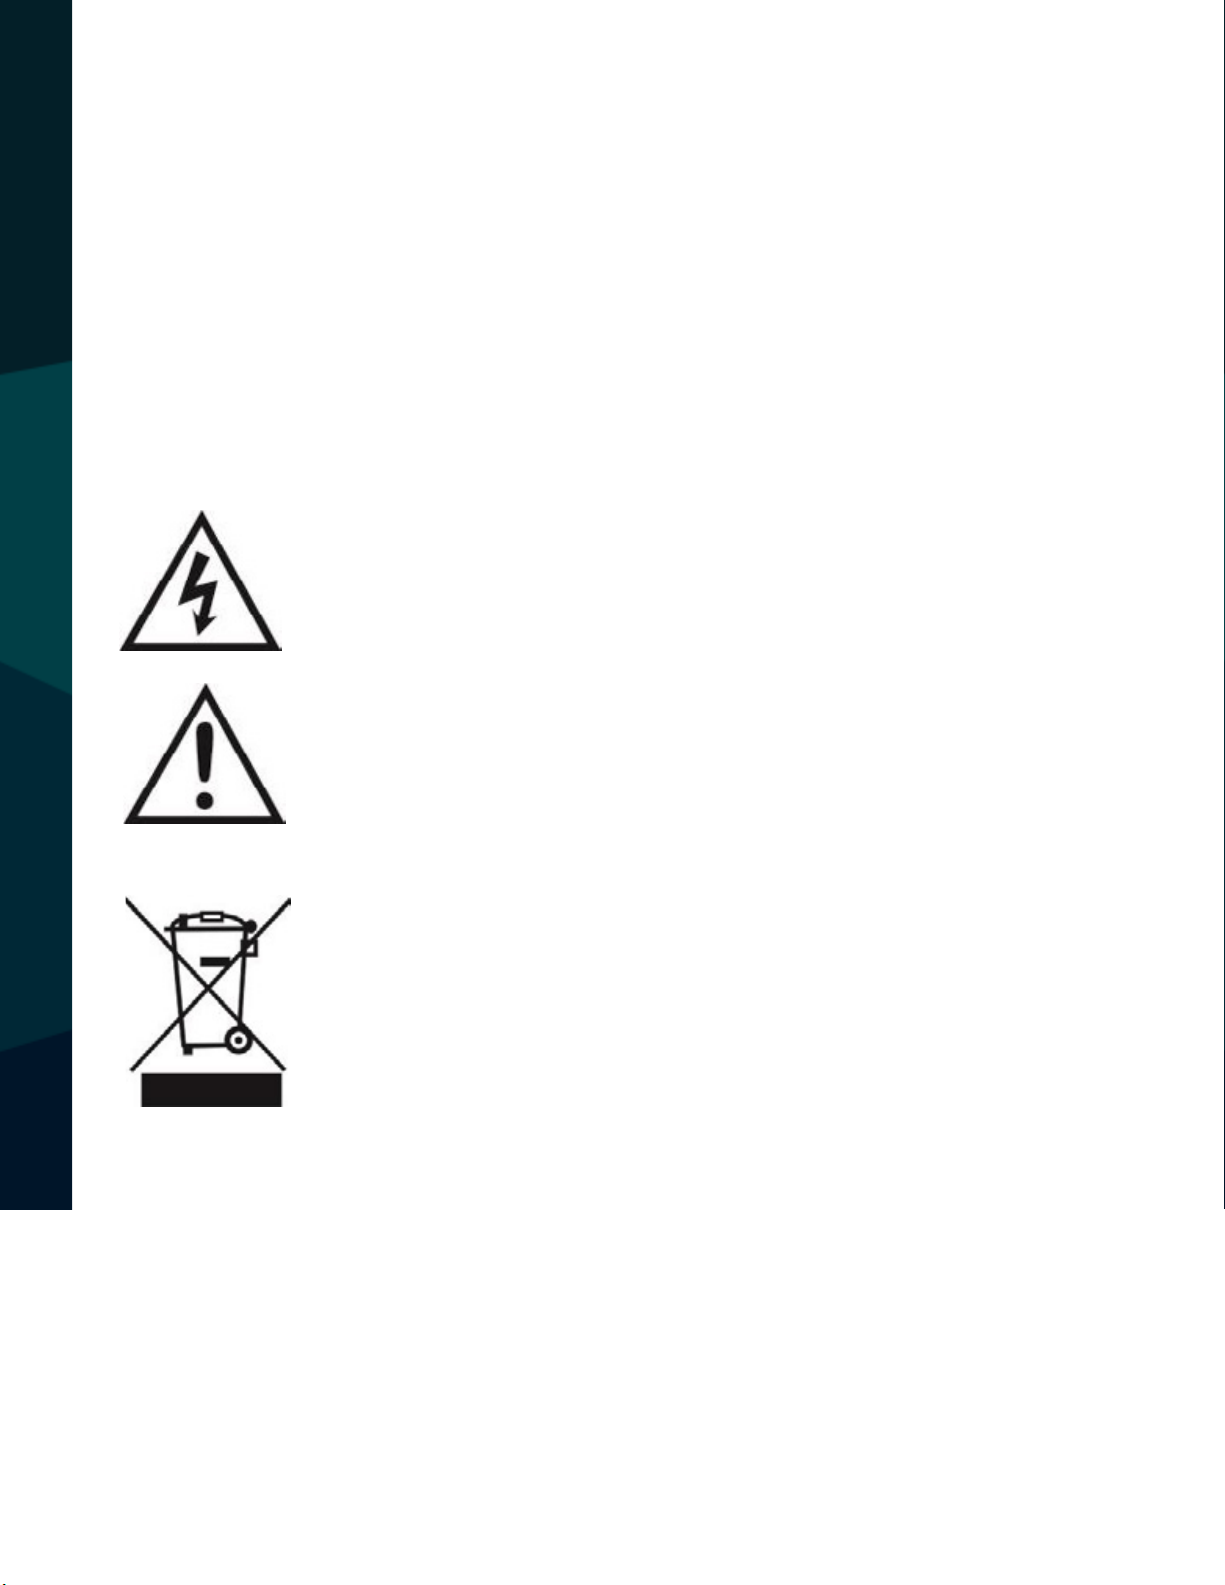
This symbol alerts the user to the presence of uninsulated “dangerous
voltage” inside the product. Never open the product case yourself, as
you may risk electric shock.
This symbol alerts the user to the presence of important operating
and maintenance instructions in the literature accompanying the
device.
This symbol reminds the user not to waste electronic equipment.
MAINTENANCE
Any changes or modications not expressly approved in this manual could void
CAUTION
your warranty and lead to expensive repairs.
10
Rear View Safety
Page 11
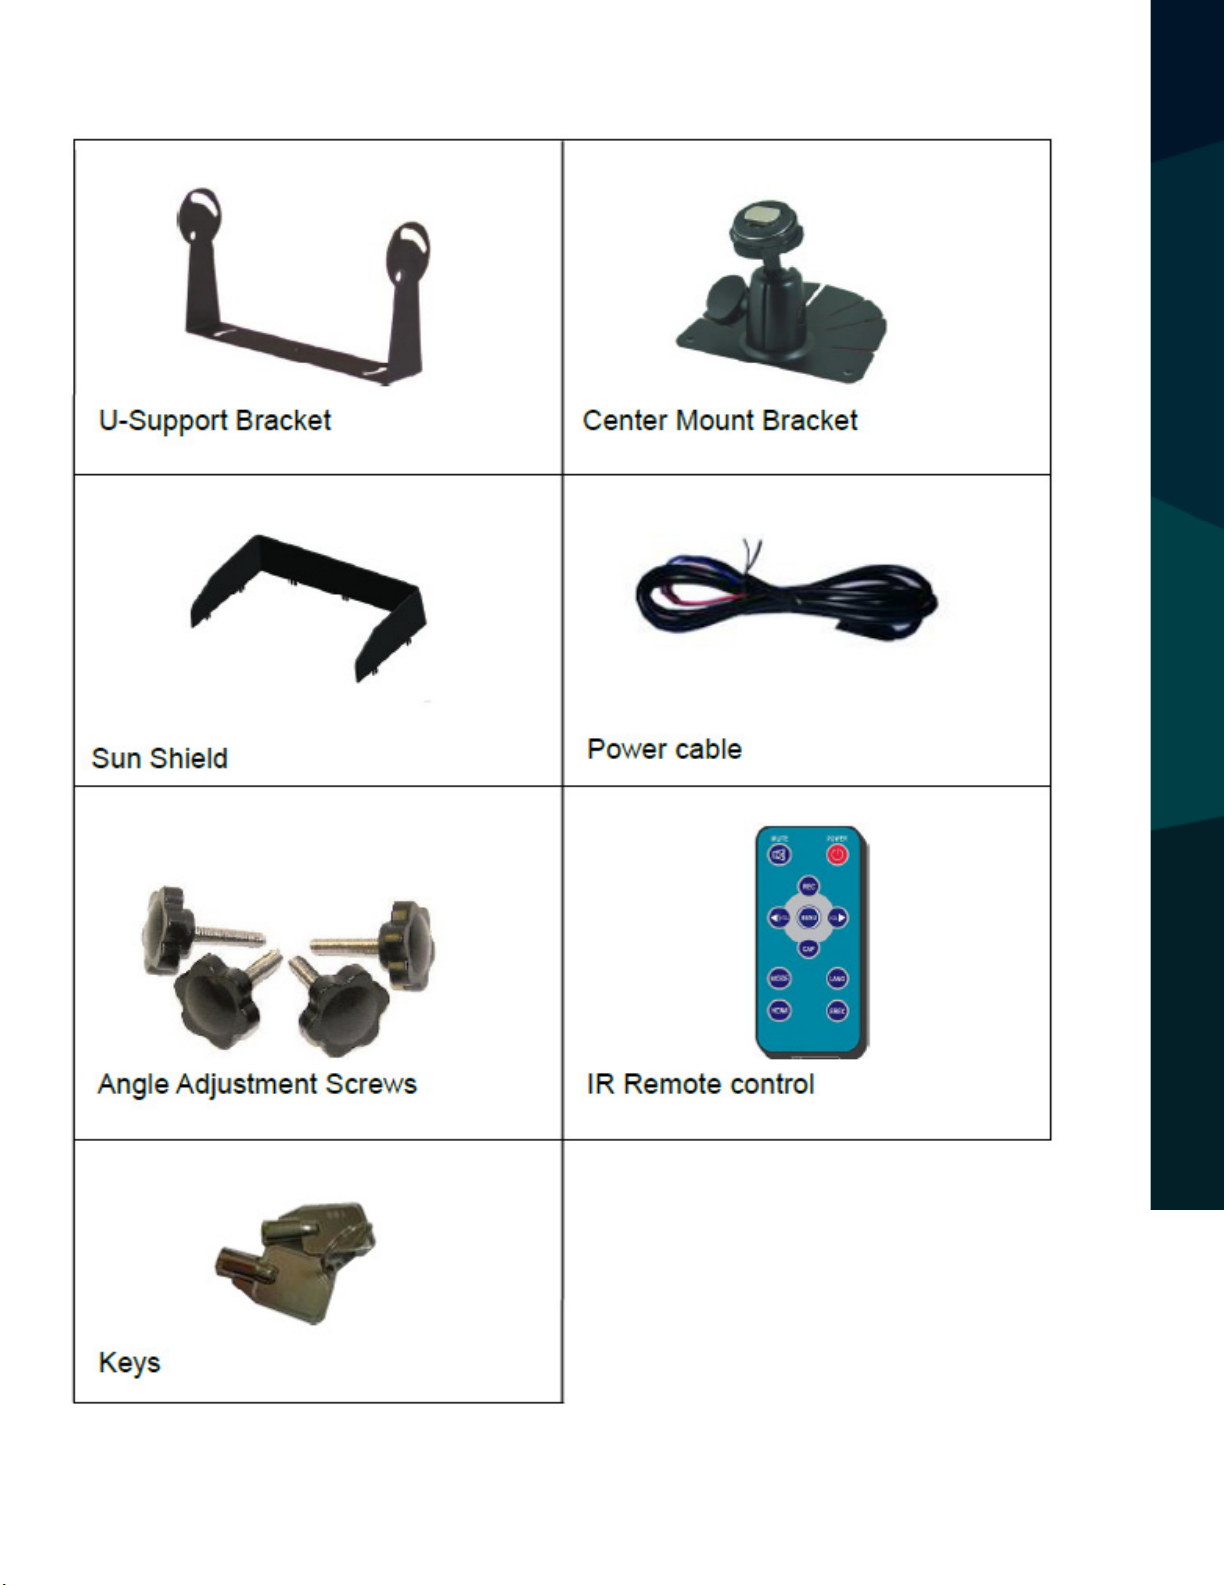
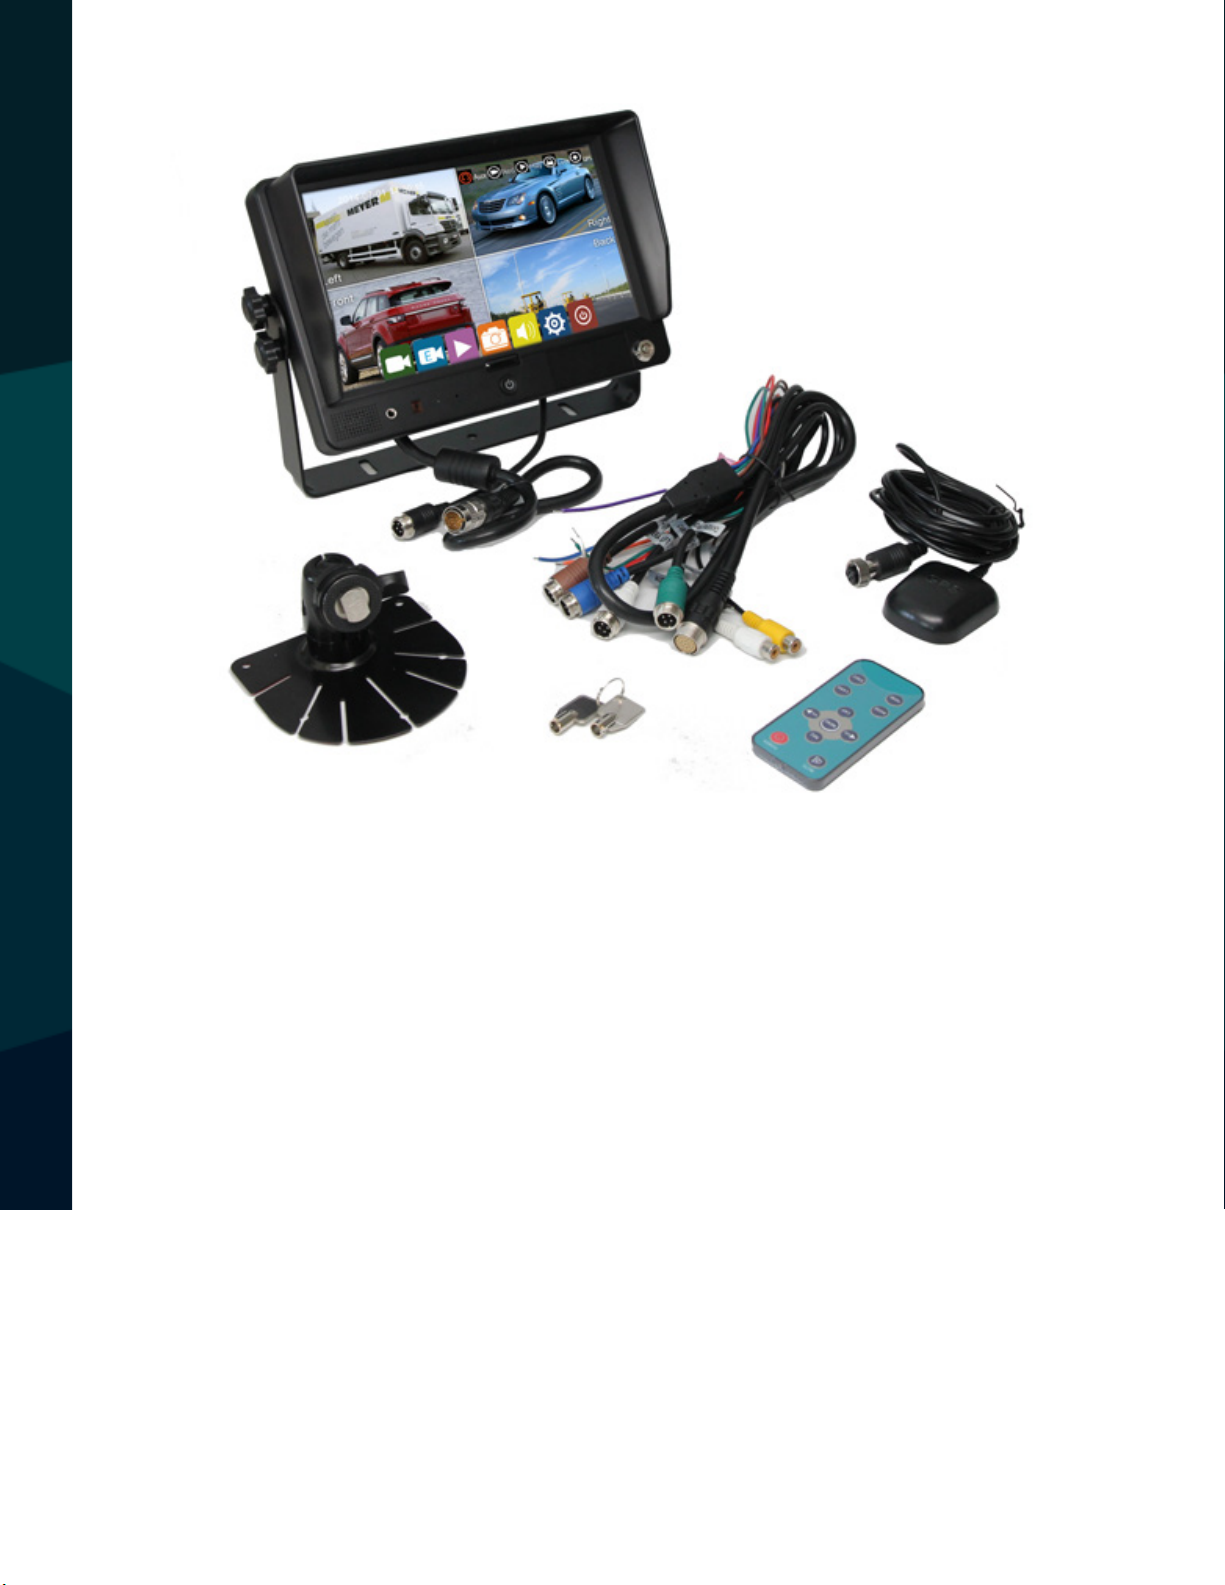
Accessories
Special Notice:
ACCESSORIES
Accessories may vary on certain devices.
Reverse With Condence ™
11
Page 12
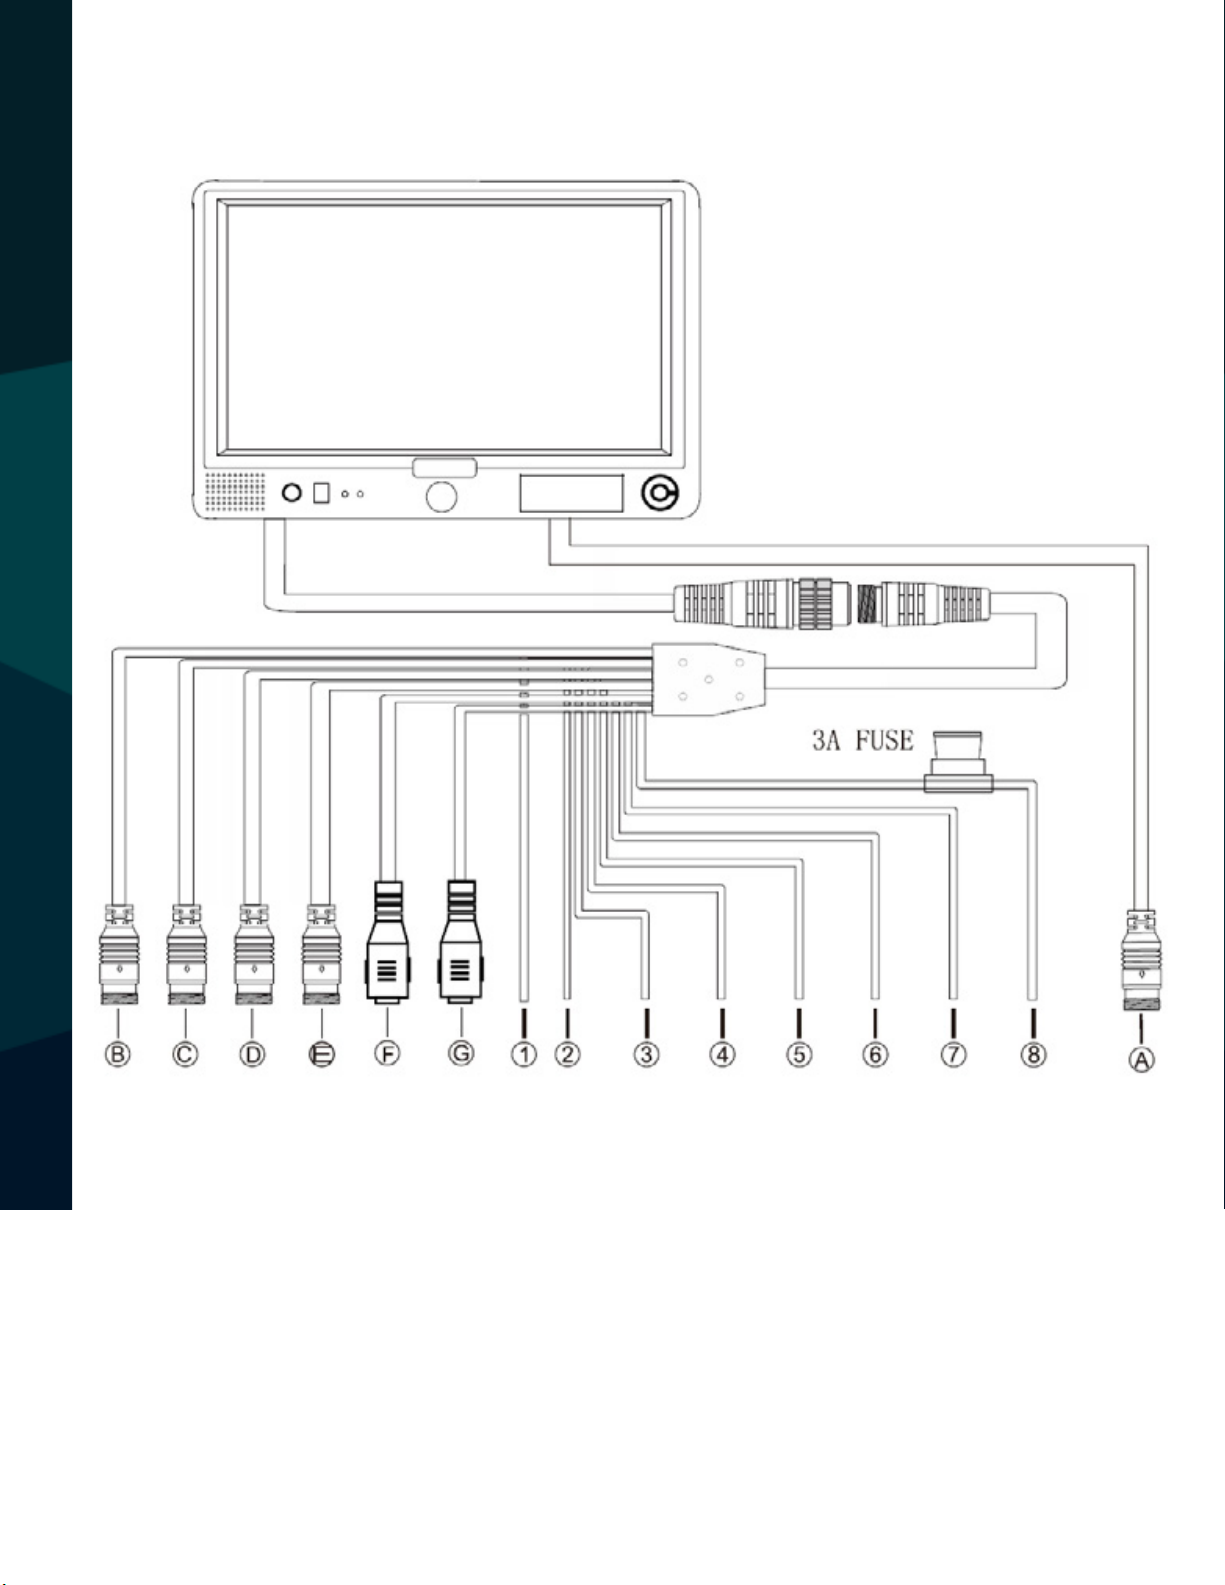
Connections
CONNECTIONS
A: GPS Input
B: Camera 1 White 4 PIN Female
C: Camera 2 Blue 4 PIN Female
D: Camera 3 Green 4 PIN Female
E: Camera 4 Brown 5 PIN Female / 4 PIN Female
F: Video Out Yellow RCA Female
G: Audio Out White RCA Female
12
Rear View Safety
1 White: Camera 1 trigger
2 Blue: Camera 2 trigger
3 Green: Camera 3 trigger
4 Brown: Camera 4 trigger
5 Orange: HDMI trigger
6 Purple: Speed
7 Black : Ground
8 Red: VCC
Page 13

Remote Control
1 Mute
2 Standby
3 Recording
4 Volume Decrease
5 Volume Increase
6 Snapshot
REMOTE CONTROL
7 Menu
8 Display Mode Selection
9 Language Selection
10 HDMI Switch
11 Event Recording
Reverse With Condence ™
13
Page 14
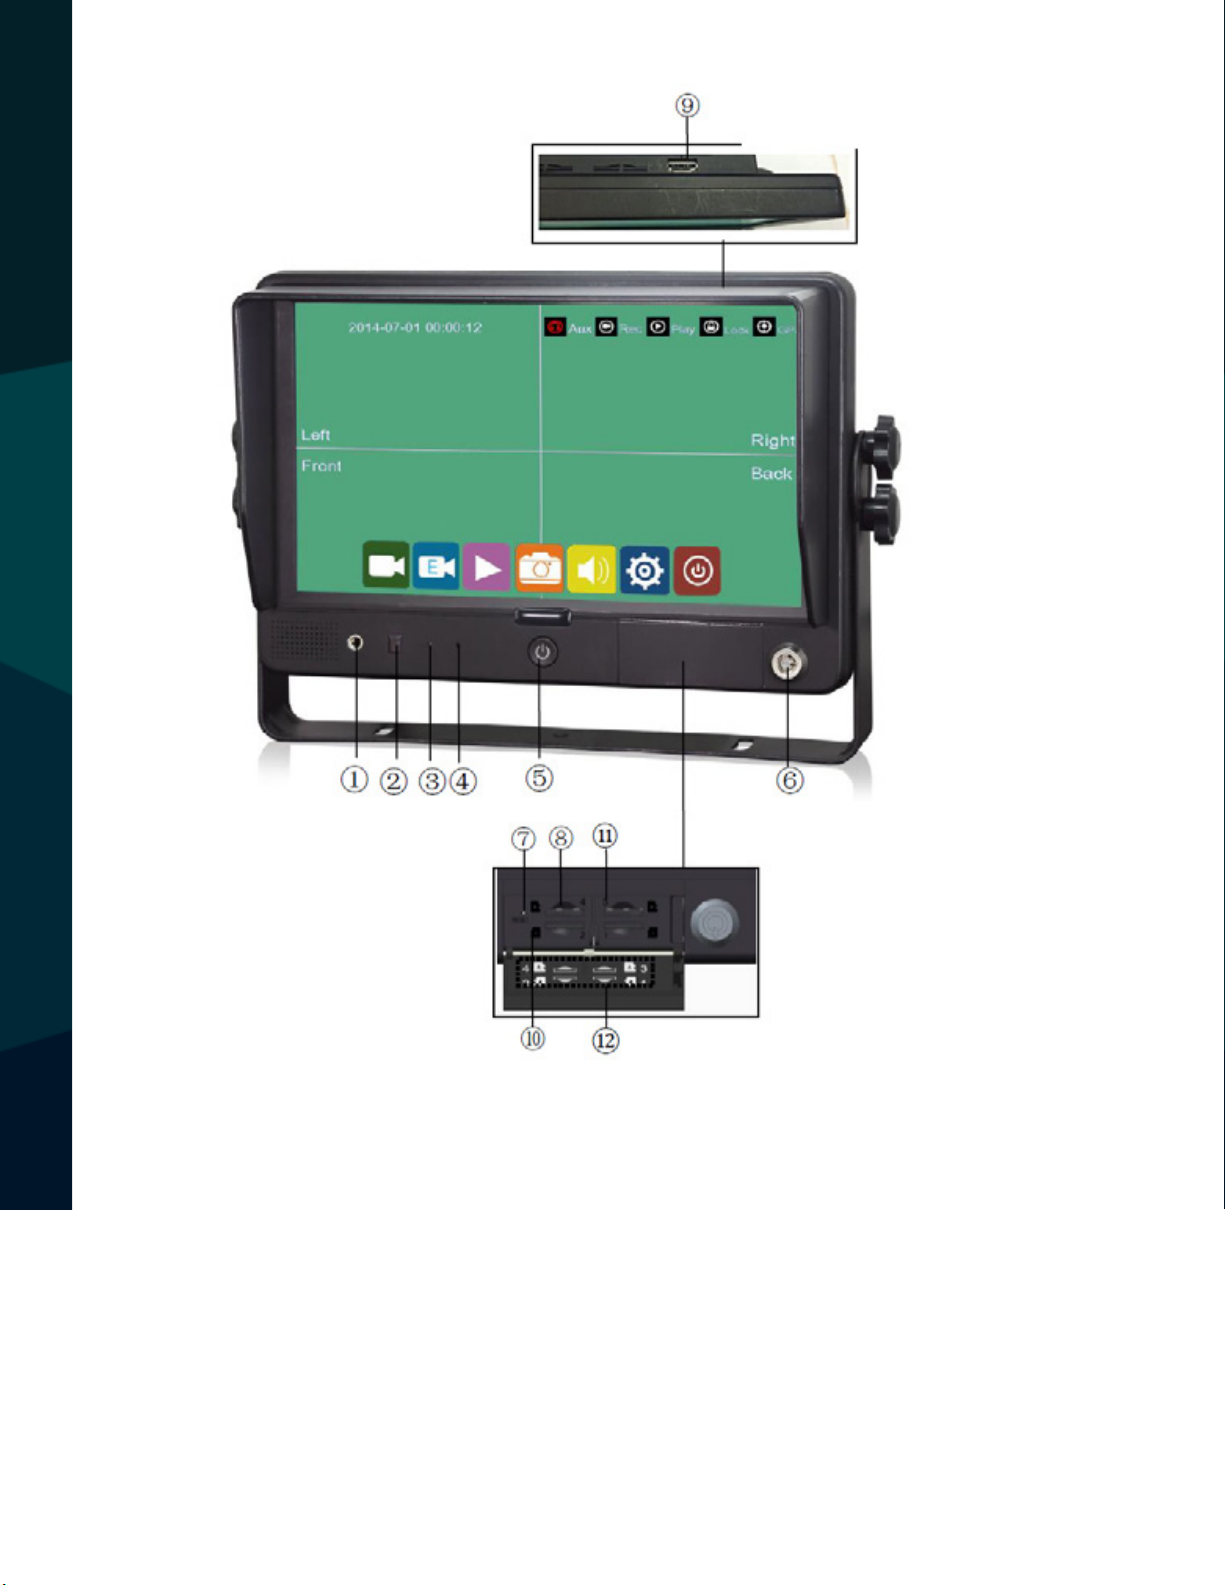
Controls
CONTROLS
1 AUX Input
2 Remote Receiver
3 LDR (Light Dependent Resistor)
4 Recording Indicator
5 Power
6 Lock
14
7 Emergency Reset
8 Micro SD Slot
9 HDMI Input
10 Insert Direction
11 Slot Number
12 Sketch of slots/microSD card
direction
Rear View Safety
Page 15
Power Function
A) Short press the power button to turn on the monitor when the
panel LED is red.
B) Hold the power button for 5 seconds, then enter the password in
the pop-up window to turn o the monitor.
C) When the monitor is on, short press the power button to turn o
the backlighting.
Emergency Reset: If the device freezes, press the Emergency Reset
button using a pen/needle. This will reboot the system.
Operation
OPERATION
Reverse With Condence ™
15
Page 16

Time and Indicators
Date and time are displayed on the top left.
AUX/Rec/Play/Lock/GPS are displayed on the top right.
AUX indicator turns red when AUX audio is inserted on the front panel.
Rec indicator turns red when recording.
Play indicator turns red when playing back.
Lock indicator turns red when menu is locked.
GPS indicator ickers when searching for signal and becomes red when GPS
signal is received.
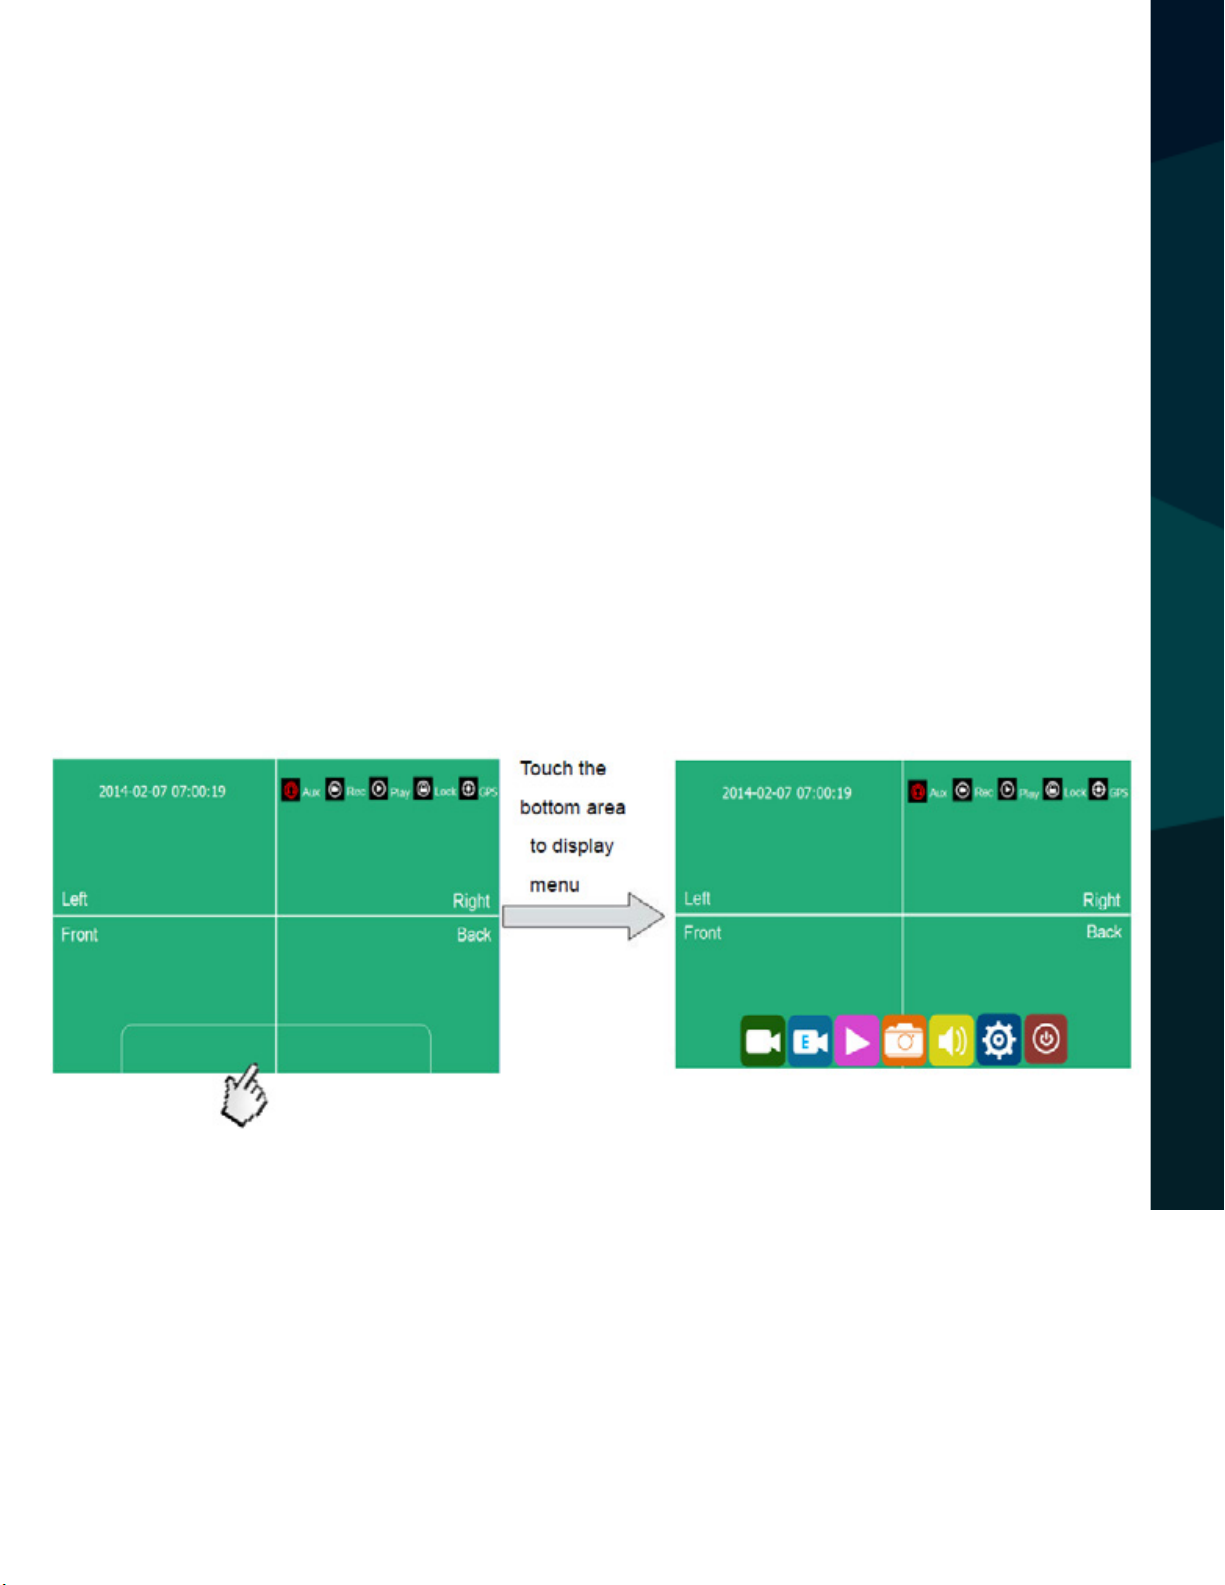
Menu Operation
OPERATION
Press this icon to start/stop recording. Video les are saved in the normal
list on the player menu. When Event Mode is activated (trigger signal,
motion detection, collision etc.), regular recording is paused and will
resume after Event Mode is nished.
Press this icon to manually record in Event Mode. The footage 15 seconds
before pressing button will also be saved in Event Mode. Event recording
will stop when the pre-set recording time for this mode has passed. Video
les are saved in the event list on the player menu. These les can only be
erased manually. Clicking the icon again before Event Mode has ended will
switch the monitor to normal mode after the pre-set recording time is up.
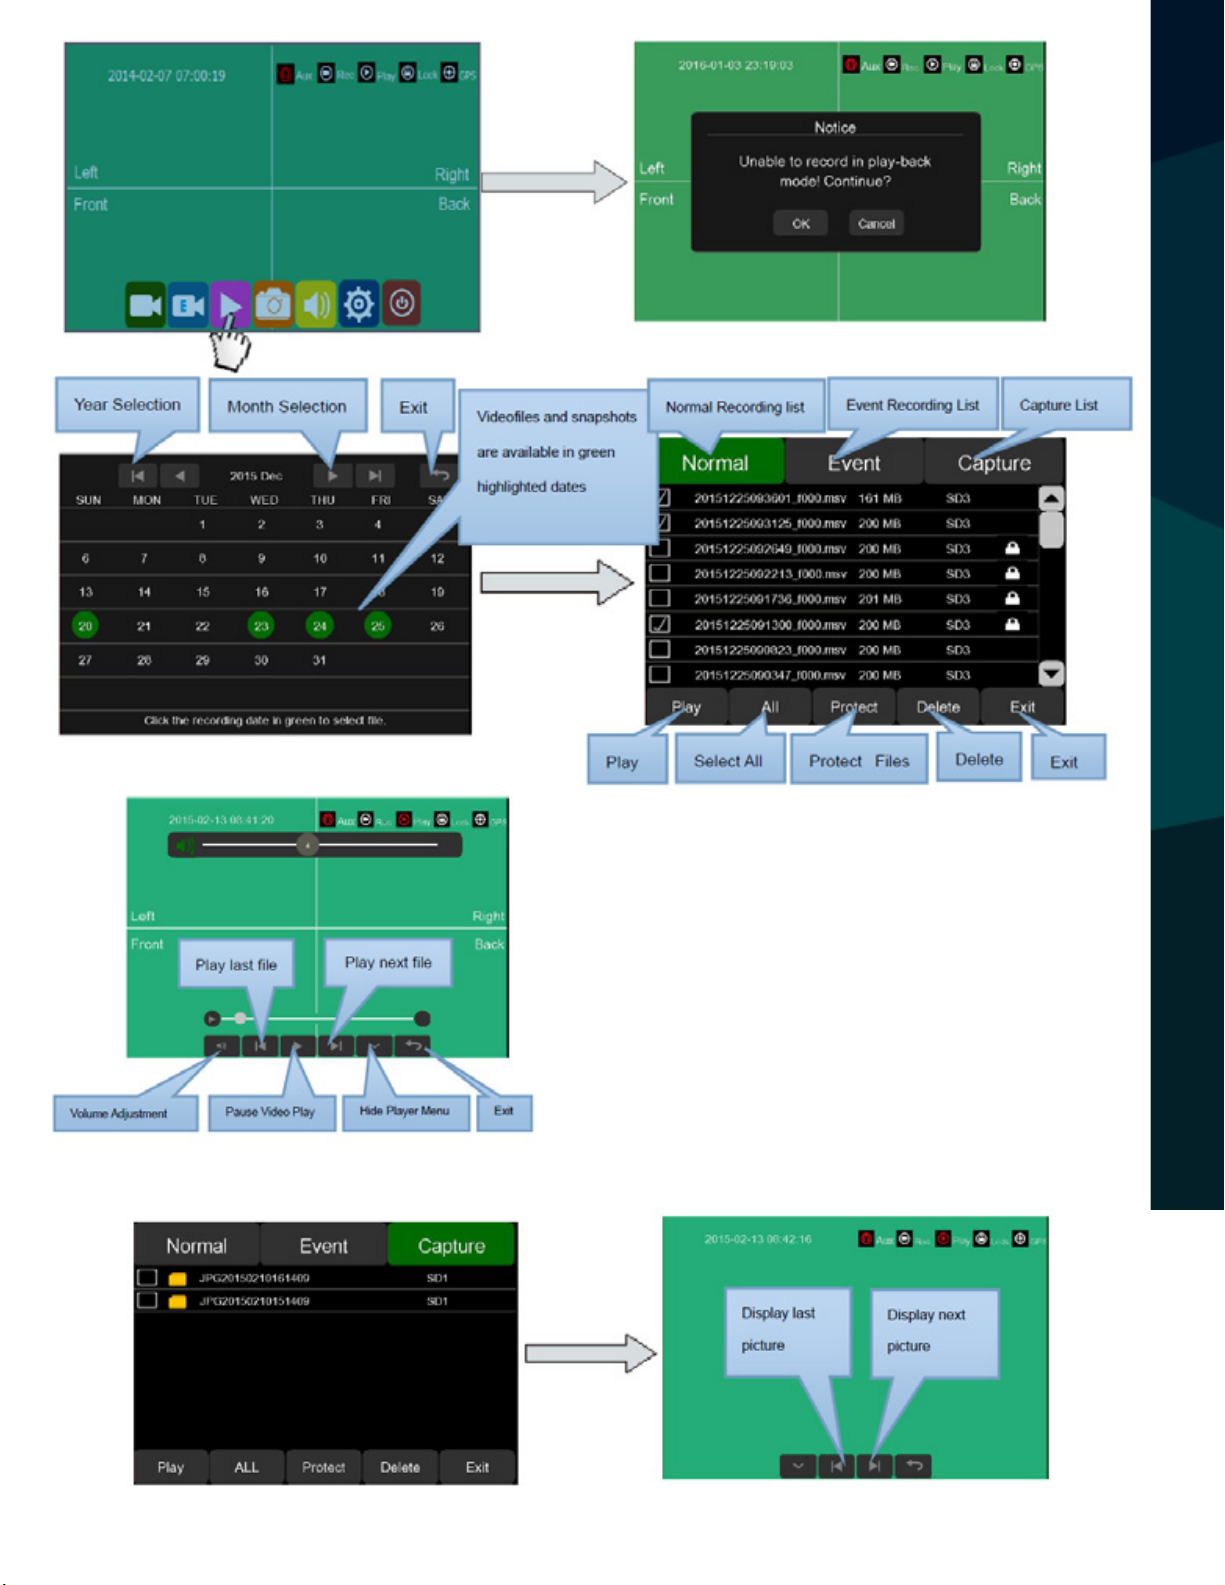
Press this icon to enter the playback menu. A prompt dialog will display
“Unable to record in play mode! Continue?” Click OK to view the recording
16
calendar menu. Video les are available as green highlighted dates. Click
the date to select, play or delete video les/snapshots. Multiple video les
can be set to play in sequence. Snapshots must be played individually.
Rear View Safety
Page 17
OPERATION
Reverse With Condence ™
17
Page 18
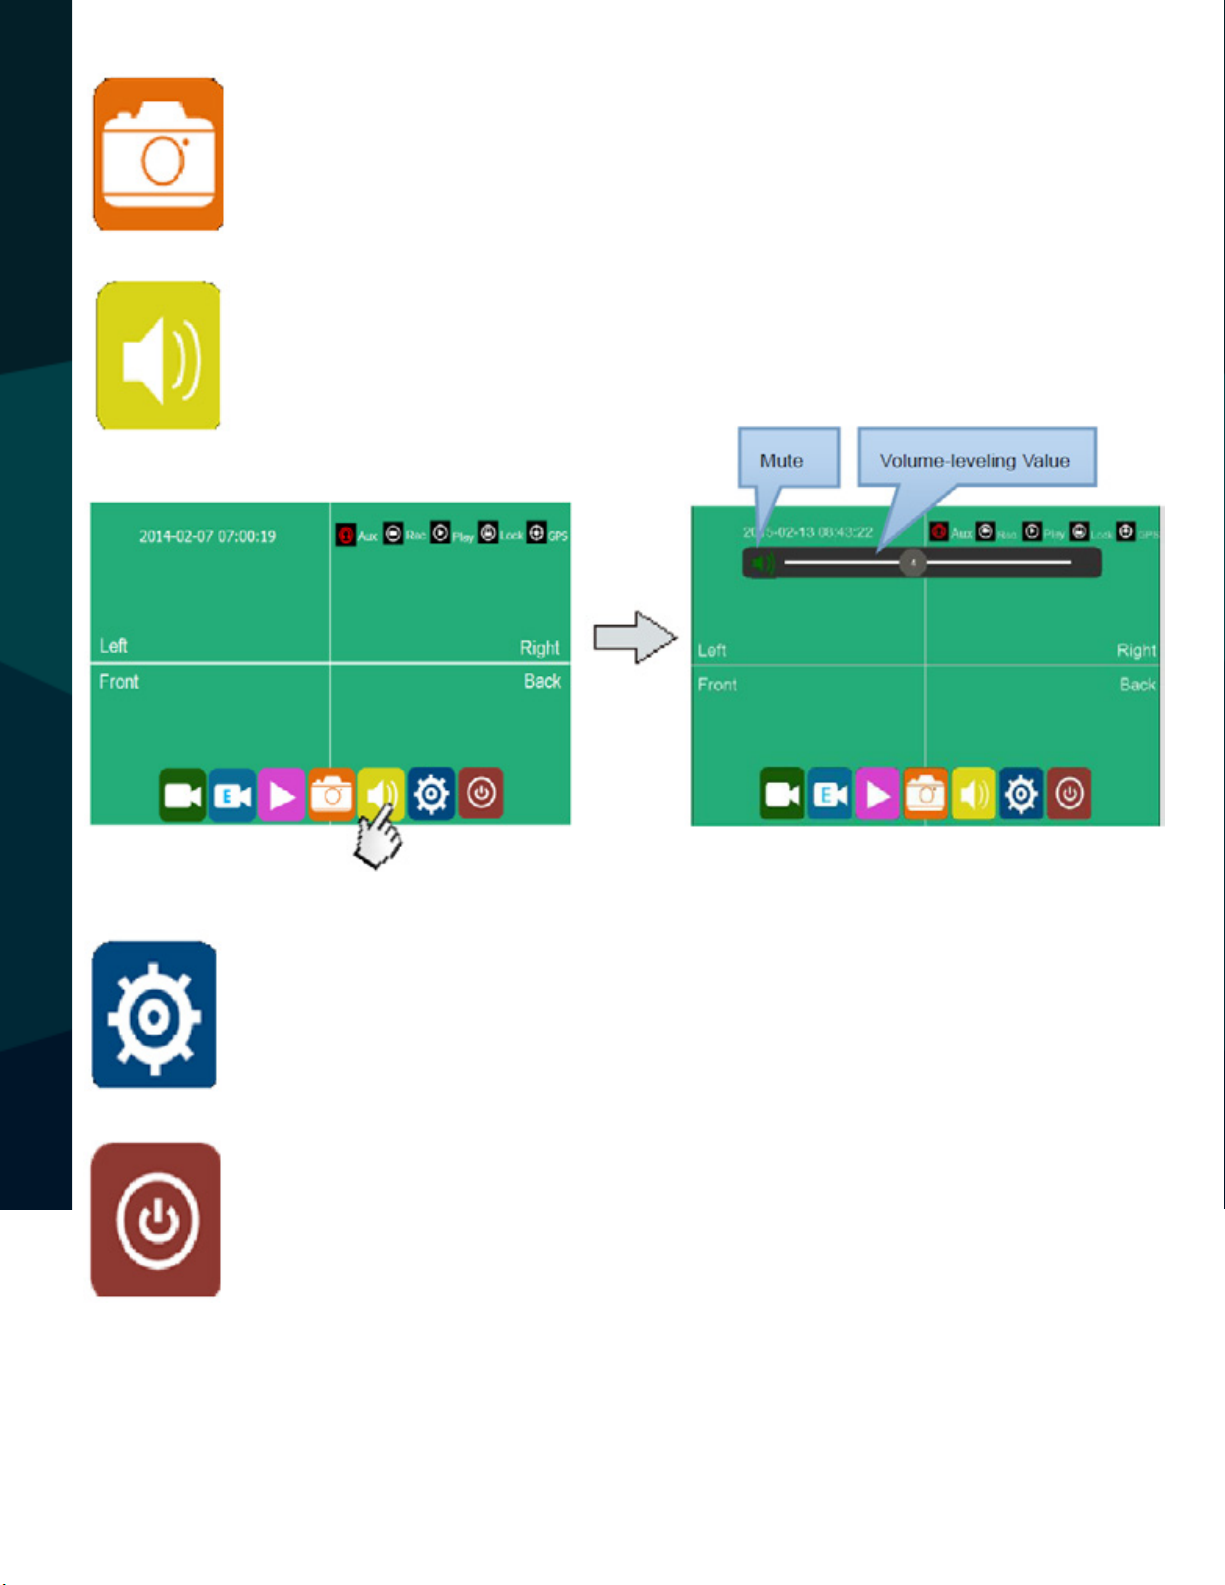
Press this icon to take a snapshot when recording or in playback mode.
“Snapshot Success” will display when picture is successfully captured.
Snapshots are saved in the capture list in player menu.
Press this icon to adjust volume when recording or in playback mode.
OPERATION
18
Press this icon to enter the setup menu. A prompt dialog will display
“Unable to record in setup mode! Continue?” Click OK to continue.
Press this icon and enter the password in the pop-up window to turn o
the monitor.
Rear View Safety
Page 19
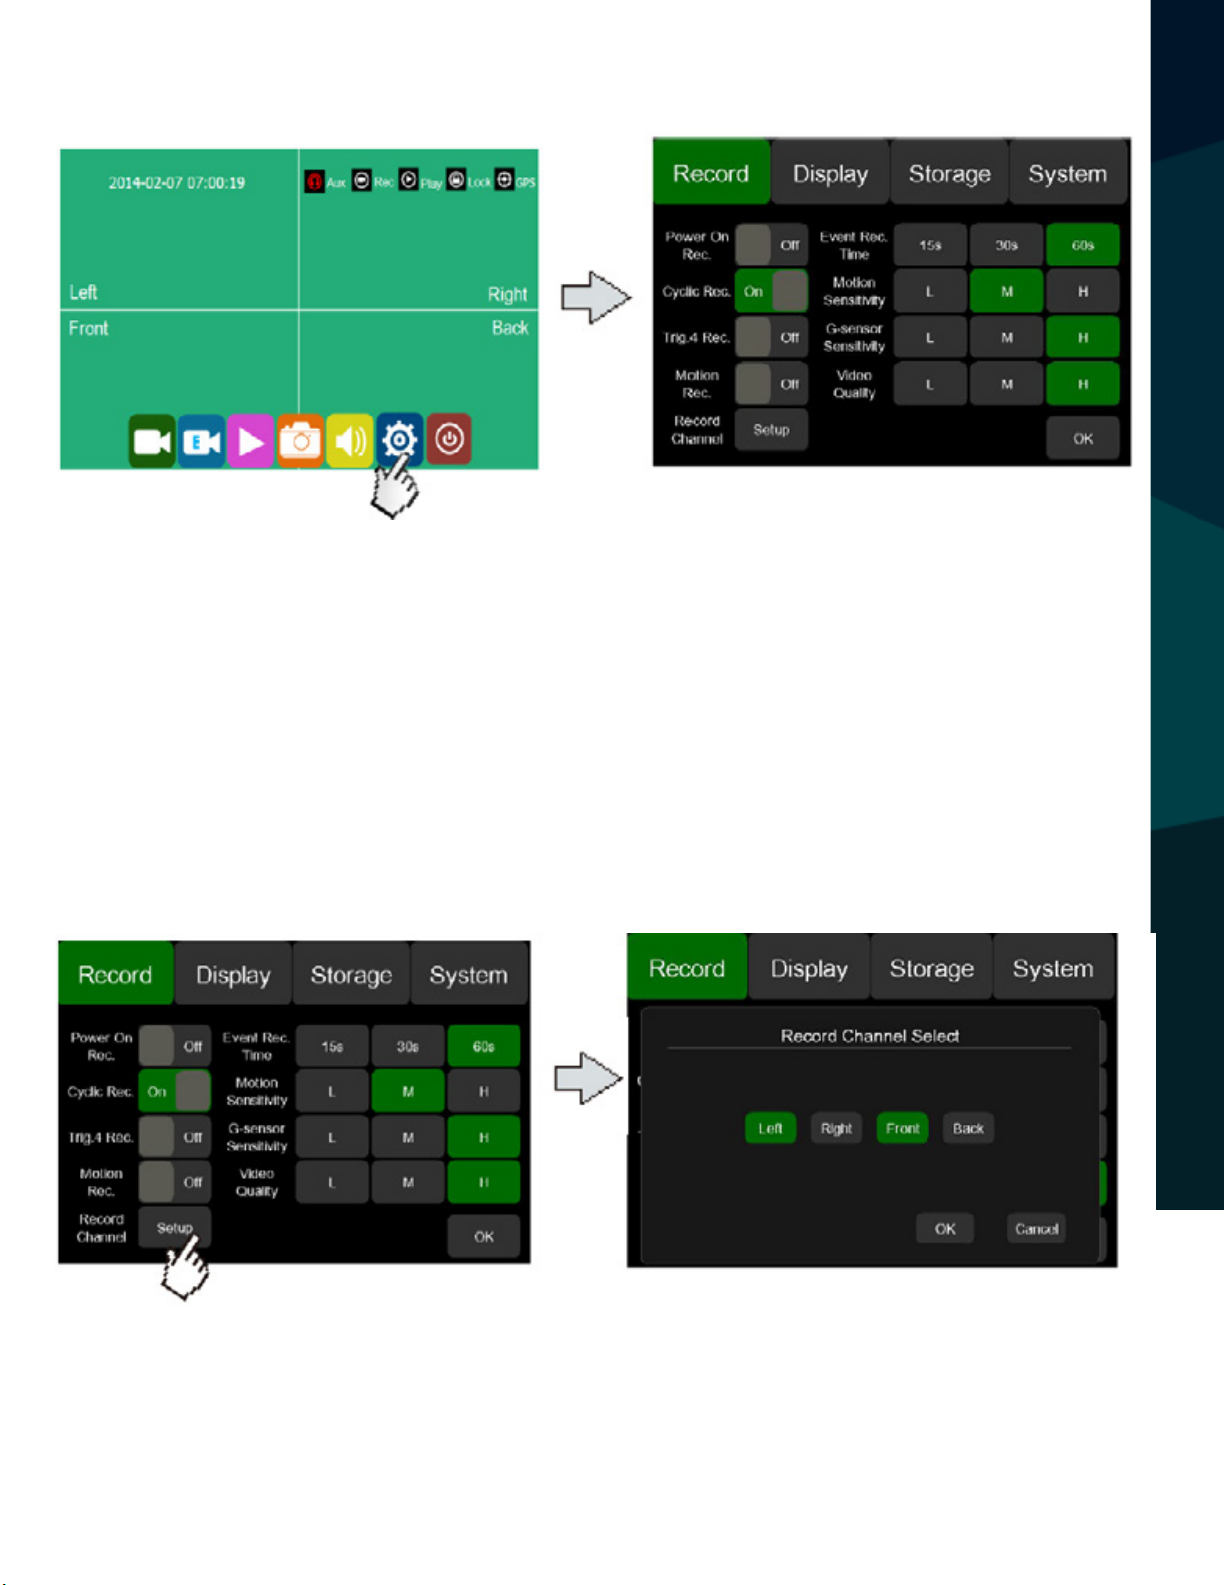
Record
Power On Rec: Start recording automatically when power is on. Select ON/OFF.
Cyclic Rec: With this setting on, new video les will overwrite previous les after SD cards ll
up. When this setting is o, all recording will stop after SD cards ll up. Event Mode
les will never be overwritten. Select ON/OFF.
Trig.4 Rec: Event mode will start automatically when trigger is signaled. Select ON/OFF.
Motion Rec: Event mode will start automatically if motion reaches a pre-set threshold. Select
ON/OFF.
Event Record Time: How long Event Mode will last. The options are 15 seconds/30 seconds/60
seconds.
RECORD
Record Channel Select: Select which camera channels will record. The default setting records
ALL 4 camera channels. Event mode records all 4 camera channels and cannot be changed.
Reverse With Condence ™
19
Page 20

Motion Sensitivity: When motion reaches this threshold, it will start recording. The
options are Low/Middle/High.
G-sensor Sensitivity: The options are Low(+/-1g)/Middle(+/-2g)/High(+/-4g).
Video Quality: Video resolution options are Low/Middle/High. The default quality is
High.
Display
DISPLAY
20
Rear View Safety
Page 21

Press this
icon to edit
the camera
names.
Press this icon to
change how long
the menu will display.
Press Menu Lock
to set password.
Default Password is
123456
DISPLAY
Reverse With Condence ™
21
Page 22
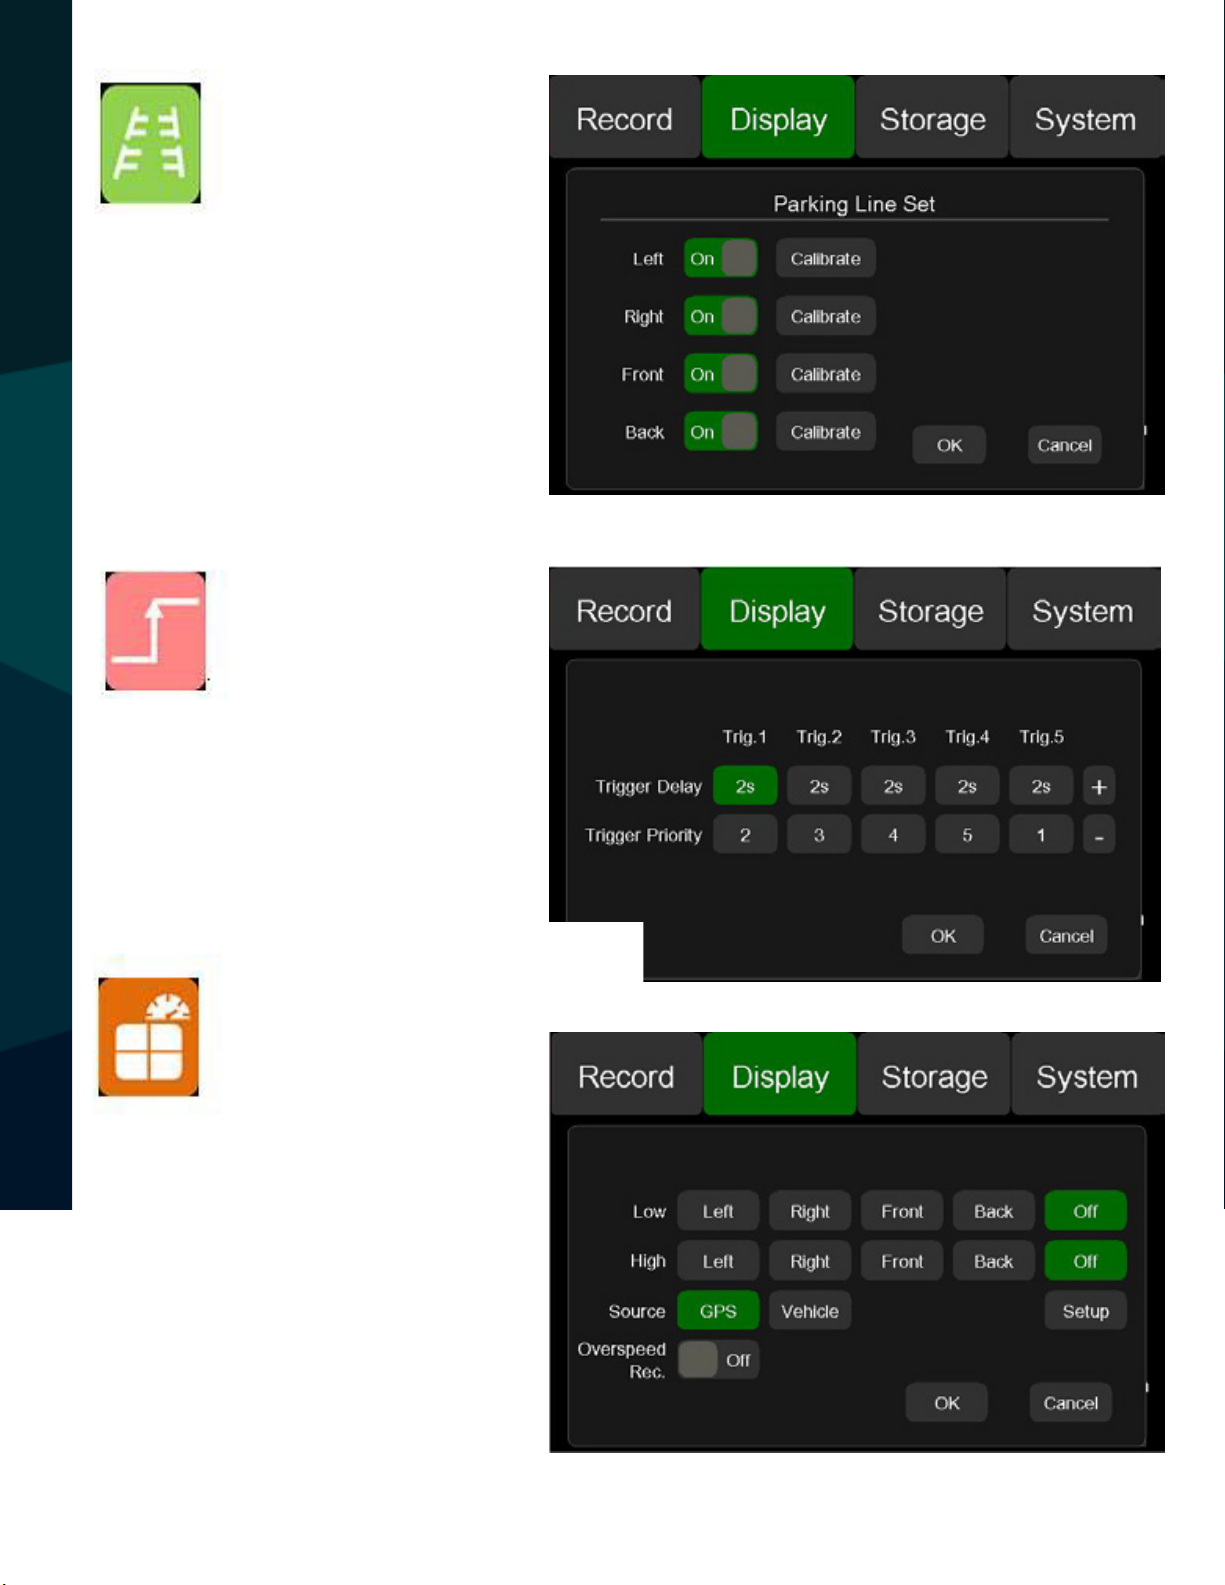
Press this icon to
turn camera parking lines on/o. Use
Calibrate to adjust
parking lines.
Press this icon to
change trigger
delaying time and
priority. 5 is the
highest priority.
DISPLAY
First connect vehicle speed
wire with monitor speed
wire. Use this menu to select
which camera will display a
warning when the vehicle is
over/under pre-set speed.
22
Rear View Safety
Page 23
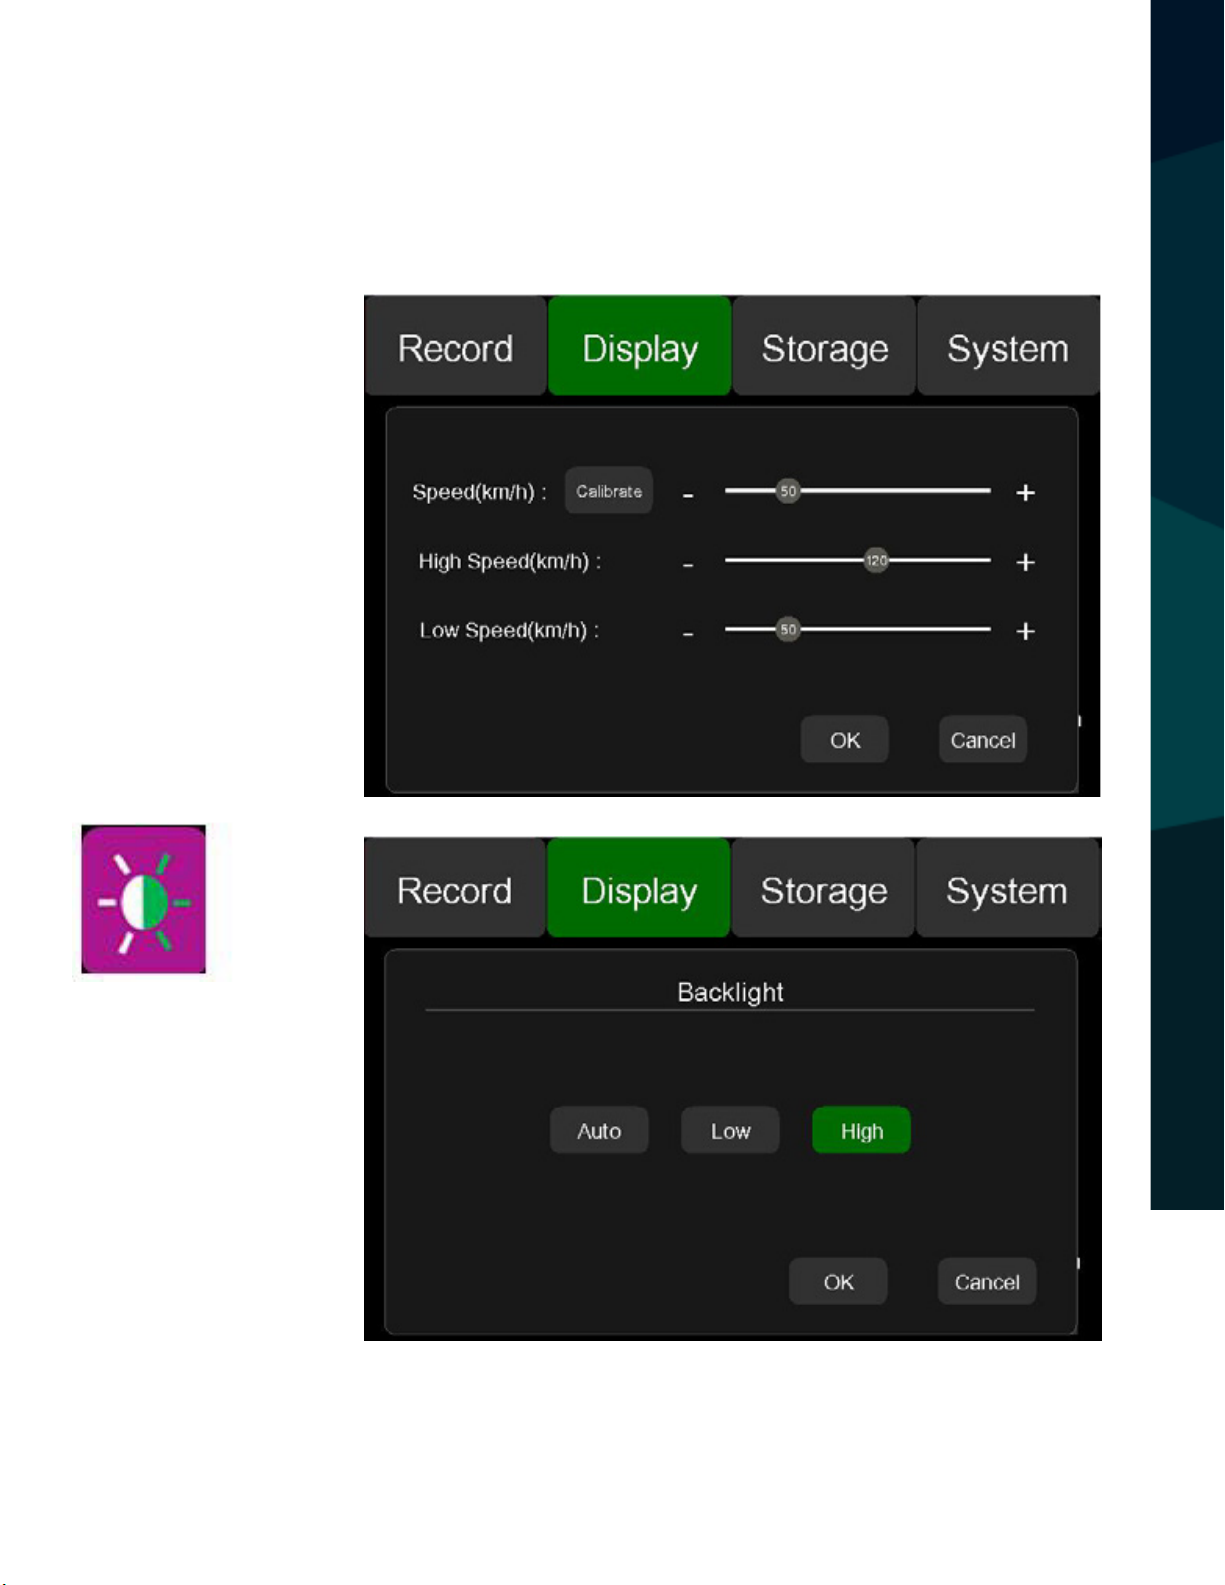
Speed Range/Calibration Setup
Press the Calibrate icon to calibrate the your monitor's current speed.
Select a range using the high/low speed cursors. A warning will appear when the vehicle is over/under this range.
Press this icon to
change blacklight brightness.
Reverse With Condence ™
DISPLAY
23
Page 24
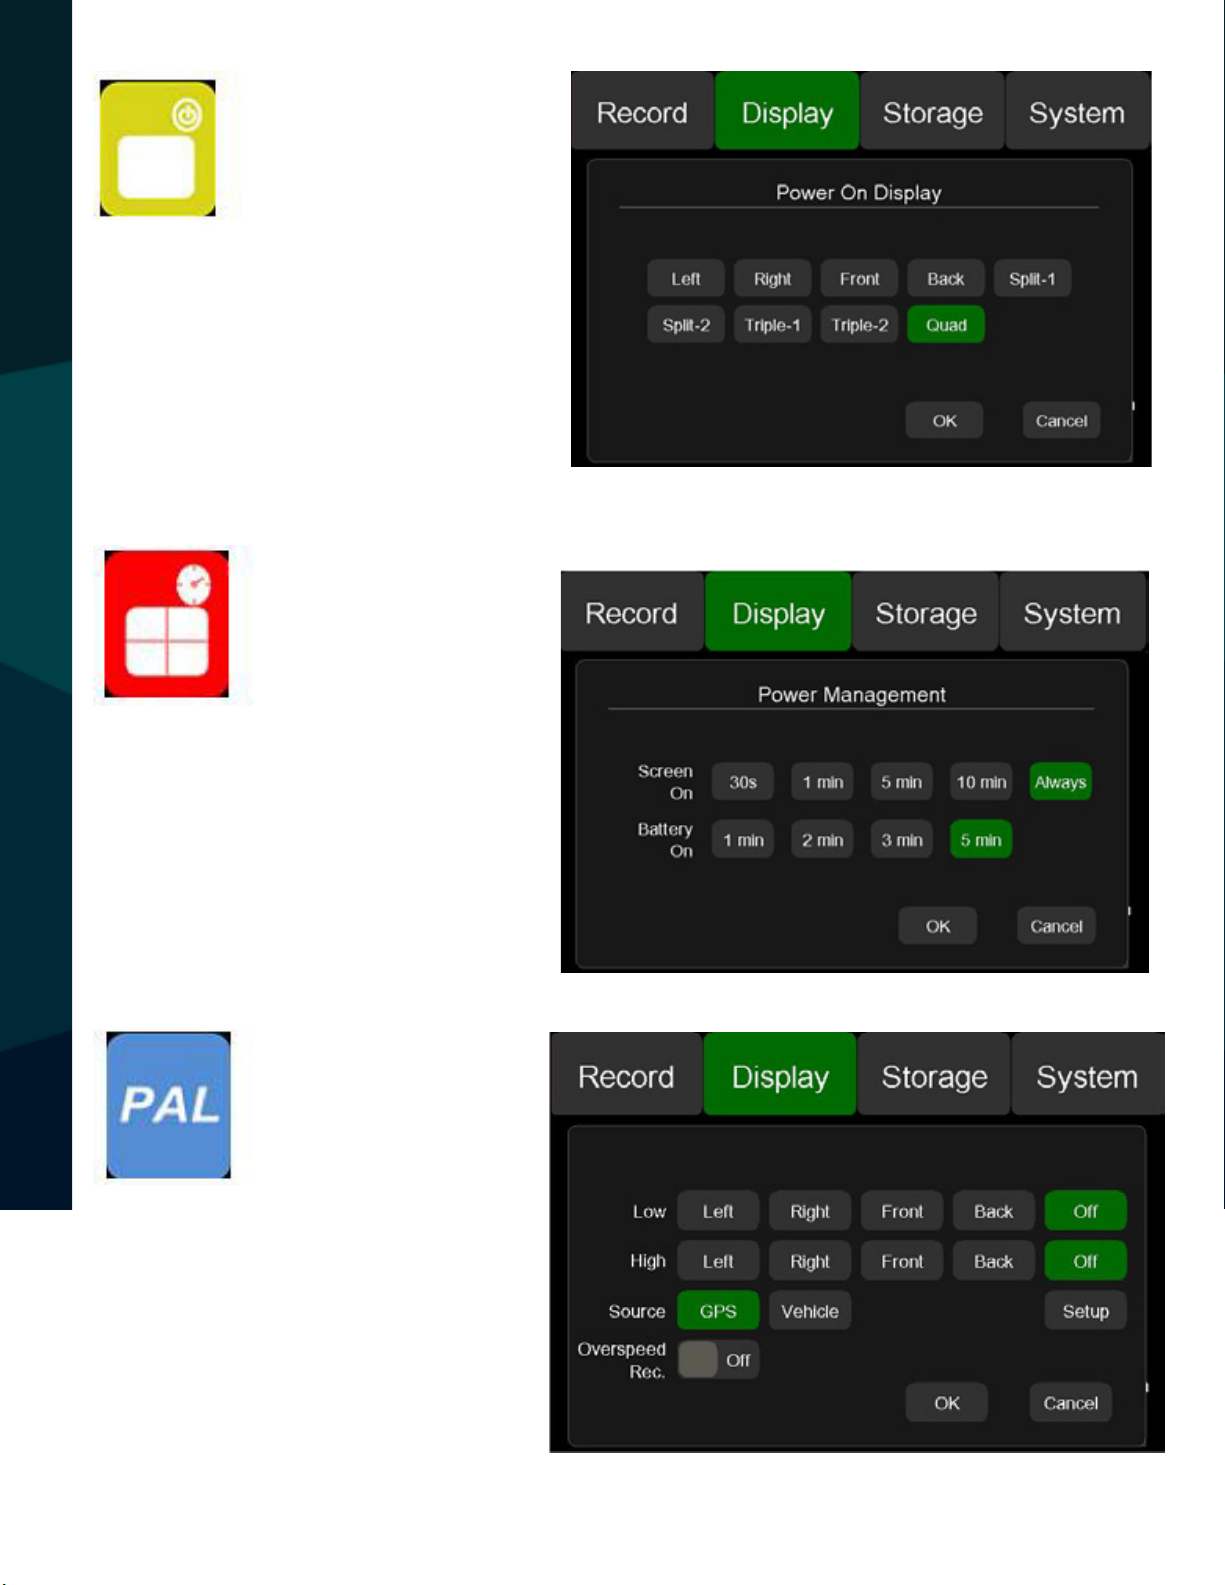
Press this icon to
change what is displayed when the
device is turned on.
Press this icon to
change how long
the screen and battery will remain on
after external power is turned o.
DISPLAY
Press this icon to select video
system in camera mode or
HDMI input in non-camera
mode.
24
Rear View Safety
Page 25

In the mirror sub-menu, each video input can be
set to display either a mirror or a non-mirror image.
Storage
ALL: Total capacity and free capacity for all cards.
TF1~4: Total capacity and free capacity for each individual microSD card.
Format : Format microSD card. You may format all MicroSD cards at the same
STORAGE
time or format them individually. Format icon will appear gray if SD card is not
found.
TF SLOT: MicroSD card slot position.
Warning: MicroSD cards should not be taken out during recording or playback.
Reverse With Condence ™
25
Page 26
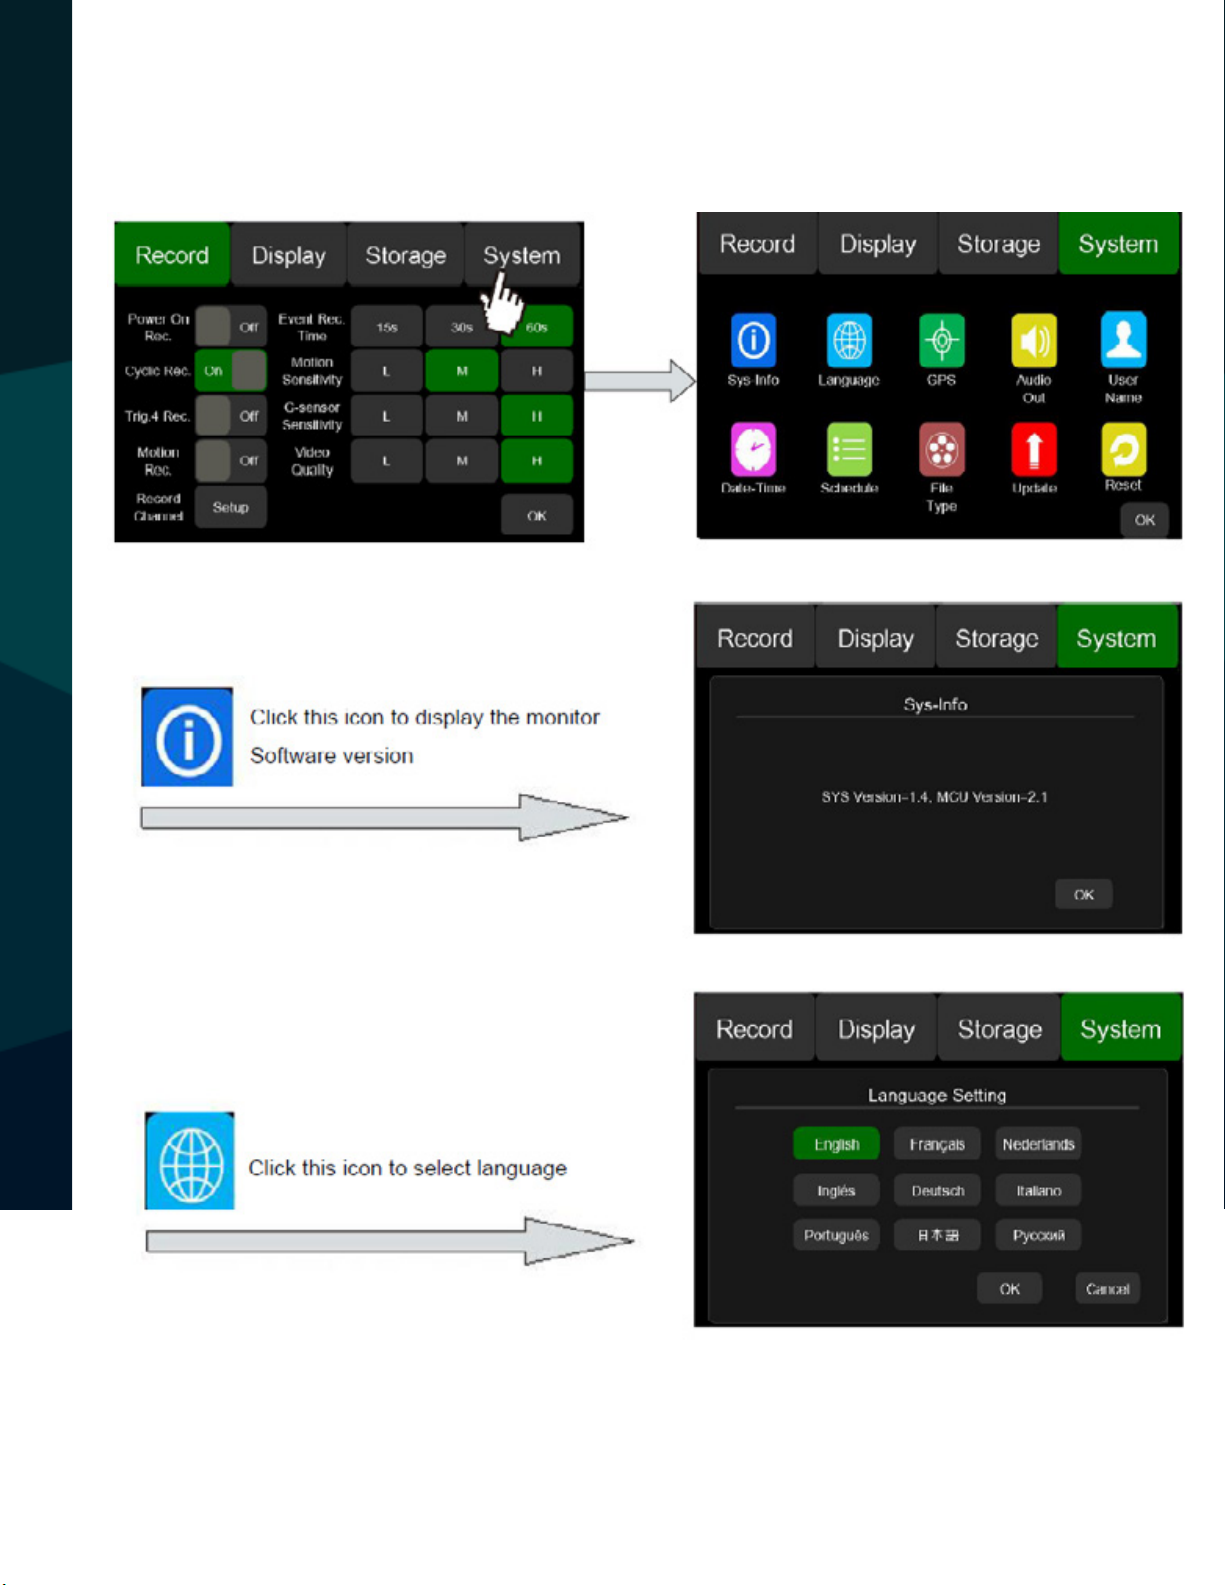
System
SYSTEM
26
Rear View Safety
Page 27

SYSTEM
Reverse With Condence ™
27
Page 28

Start: Starting time of scheduled recording.
End: Ending time of scheduled recording.
Conrm: Save scheduled recording (Maximum of 3).
* Each scheduled recording time can be set to record once, daily or
weekly.
* Single scheduled recording will display as expired, completed or deleted.
* You cannot overlap scheduled recordings.
* Recording must be resumed manually if interrupted.
* To stop a scheduled recording press the start/stop recording button.
* If Event Mode is activated (trigger signal, motion detection, collision
SYSTEM
etc.), scheduled recording will be paused and will resume when event
recording is nished. Scheduled recording will not resume if the preset time has passed.
28
Rear View Safety
Page 29

Press this icon to change le
type
Update: Press this icon to update software.
Note: System will reboot after being upgraded. Do not turn o device during reboot
(approx. 40s of dark screen) or the monitor will not start because of upgrade failure.
Factory Default: Will display “Conrm to reset?” Click this icon to restore factory
settings.
Recording Time
There are 3 image quality options: High/Middle/Low. Recording time for these
options are listed in the chart below (4 x 128G microSD cards recording 4 channels):
SYSTEM
Reverse With Condence ™
29
Page 30
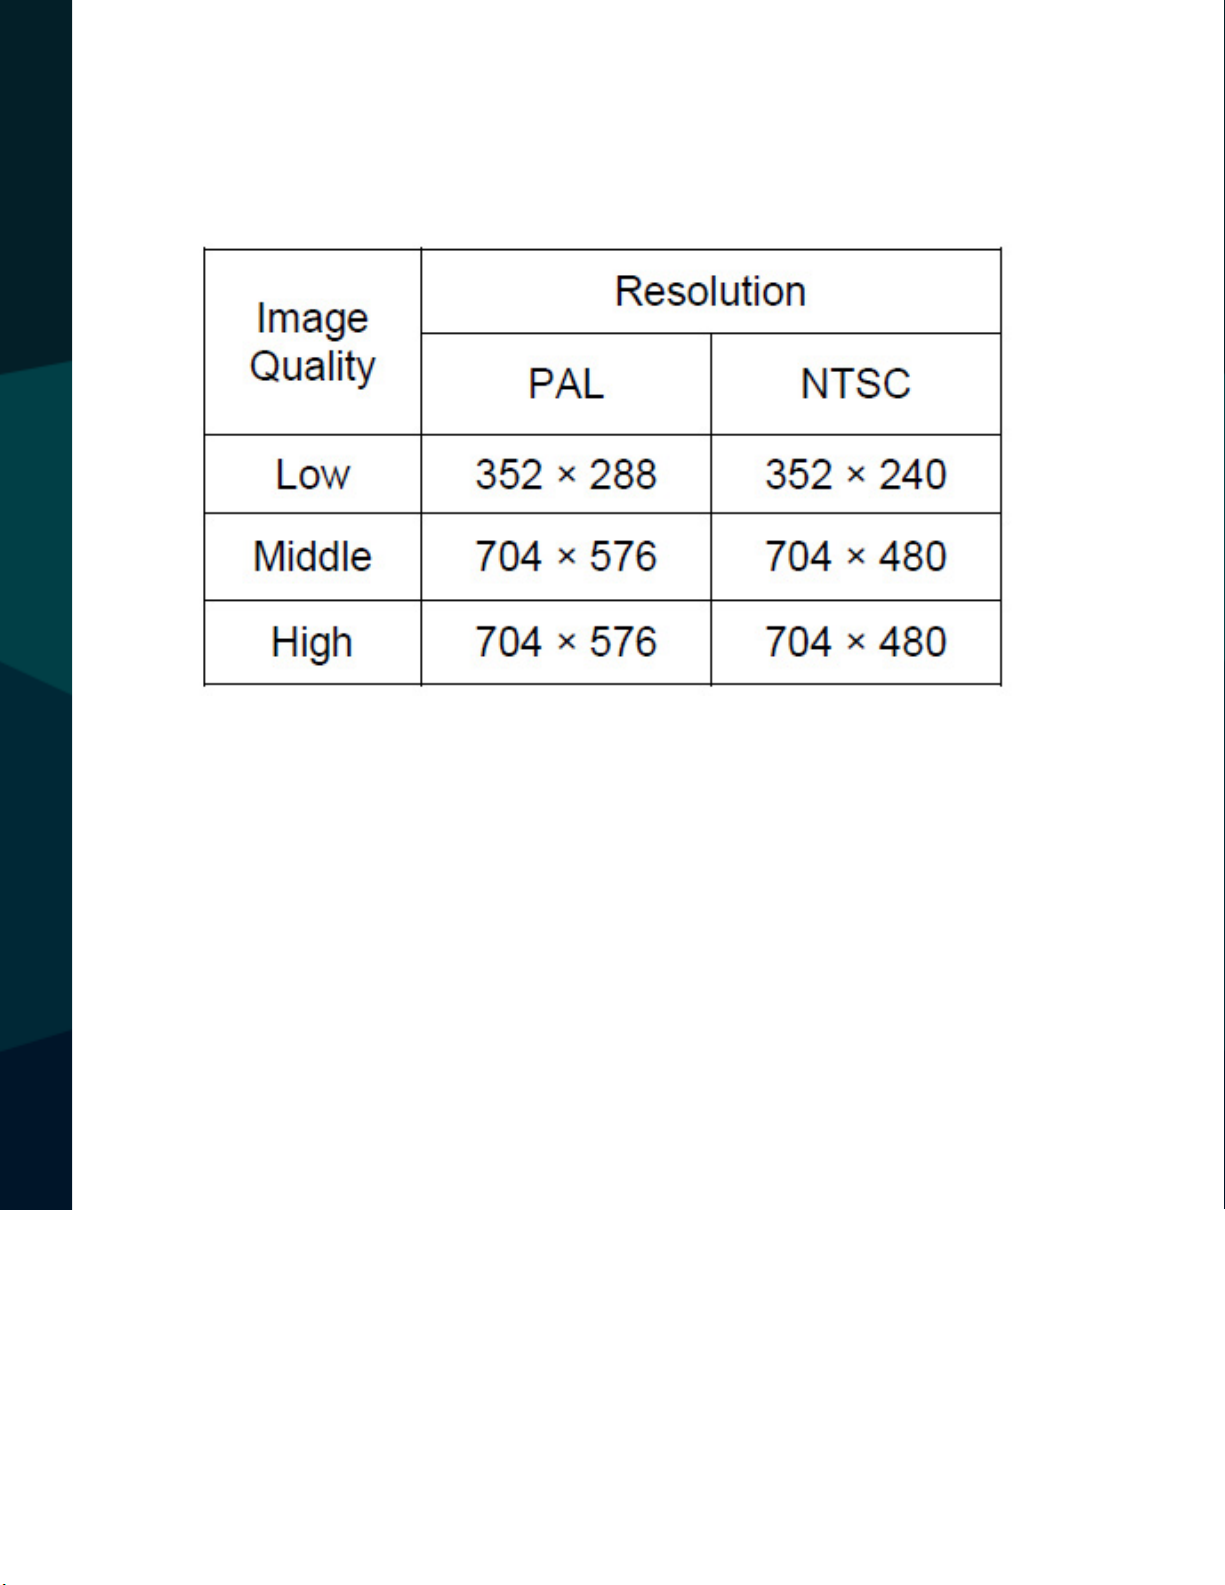
The 3 levels of resolution corresponding to the image quality options are
listed in the chart below. The high image quality has the same resolution as
the middle image quality, but also has twice the bit rate.
SYSTEM
30
Rear View Safety
Page 31

NOTES
Reverse With Condence ™
NOTES
31
Page 32

If you have any questions
about this product, contact:
Rear View Safety, Inc.
1797 Atlantic Avenue
Brooklyn, NY 11233
800.764.1028
Better Cameras. Better Service.
IT’S OUR GUARANTEE.
32
Rear View Safety
 Loading...