

Page 1
TM
1
Page 2

What’s in the Box?
TO OUR LOYAL CUSTOMERS:
Congratulations on purchasing a Rear View Backup
Camera System. With this manual you will be able to
properly install and operate the unit.
To insure the best performance and avoid any false alarm
or function failure, please read this manual carefully and
install it accordingly.
Packing list:
Monitor
License plate camera with built in sensors
Camera Cable with sensor attachment
2
REAR VIEW SAFETY
Page 3
Installation Instructions
5.3 Cable connection Instructions:
Before installing system let the components of the exhaust system cool down. This will make the
installation safer and preclude heat damage to the backup sensor wiring or components.
5.3 Installation Instructions:
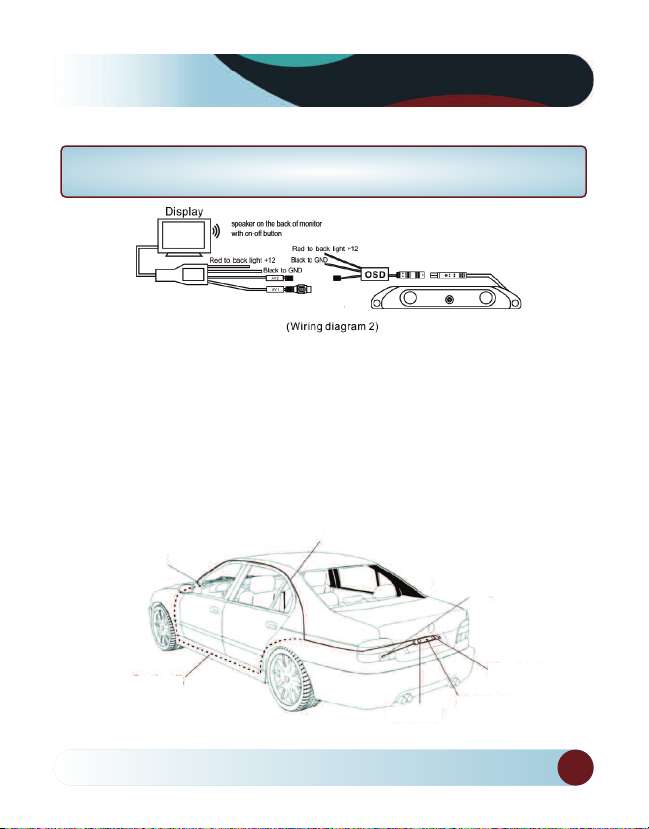
Monitor:
- Attach the monitor to the dash with the 3M
sticker.
- Connect the camera cable to the YELLOW
RCA input labeled AV2 and
connect the power wires on the monitor to a
12V power source. If it is connected to AV1 the
sensors will not appear on the monitor.
Display
Note:
Camera:
- Use a screwdriver to remove the screws of the
licence plate. Line up the screw holes on the camera
with the holes on the license plate and attach the
camera using the license plate screws.
- Plug the anti-dismounting cap into the screw
hole.
Option A
Back Light
Option B
Reverse With Confidence
Sensors
Sensors
™
Camera
3
Page 4
Installation Instructions
- Connect the 4 pin connection on the camera to the 4 pin connection on the
camera wiring harnass.
- Connect the power wires on the wiring harness to a 12V power source from the
reverse lights.
Red to back light +12
Black to GND
Black to GND
NOTE:
When connecting the power wires, connect the RED to power and the BLACK to ground.
red to 12V power
3. Align the host bracket screw groove and the
plate screw holes, Locking screw.
5.5 Display Installation
4
Monitor
4. Plug the anti dismounting cap into the screw
hole. Connect the cable.
REAR VIEW SAFETY
Page 5

Installation Instructions
Tools Needed
Small flat-tip Screwdriver #2 Phillips Screwdriver Tape Measure
Black Electrical Tape Masking Tape Multimeter
Pliers Pencil/Marker
Testing the system:
After installing the system, test the sensors.
If you see the sensors but not do not hear an audible alert, press the button on the
back of the monitor.
Warning:
Do not stand behind a moving vehicle death or injury could occur. Prior to testing, set the
parking brake on, ignition key on (do not start), step foot on brake and shift the vehicle into
reverse. Ensure that the engine is not running while proceeding with the following tests:
Test the system operation with a large object (piece of wood (60*30*1cm) or other
object (not too small). Start with the object more than 1m away from the vehicle.
Then move the object closer the vehicle and ensure that the buzzer, LED, and distance
indicators display correctly.
Reverse With Confidence
™
5
Page 6

Specifications
Control box
Specifications
Operating voltage
Operating current
Ultrasonic frequency
Detecting distance
Camera Angle
Working temperature
Store temperature
Alarm MODE
Awareness
Safe mode
Alarm mode
Alarm mode
Dange mode
Dange mode
6
Sensors
Distance
130-150cm
90-130cm
60-90cm
40-60cm
0-40cm
Camera
DC9~16V
≤150mA
40KHz
0.3~1.50m
120 degree
-20°C ~ 85°C
-30°C ~ 85°C
Sound
Bi...Bi...
Bi..Bi..
Bi.Bi.
BiBi
Biiii
Sensors
Digital Display
1.3m-1.5m
0.9m-1.3m
0.6m-0.9m
0.4m-0.6m
0.0m
REAR VIEW SAFETY
Page 7

Installation Instructions / Splicing
Installing & Splitting Embedded Monitor
Installing sun shield: Put shade cover on
the display. Installing back cover: Put the
monitor with shade cover in the back cover
(only for embedded monitor)
Splitting back cover: Hold monitor with 2
hands and detach with fingers, as indicated
by arrows. (only for embedded monitor)
Splitting sun shield: Take the monitor with
the left hand and detach with right hand as
indicated by the white arrow. (see below)
Splicing
1.
2.
3.
4.
5.
1. Red - Power (+)
2. Yellow - Video
3. Green - Mirror / Normal Imaging
4. White - Audio
5. Black - Ground (-)
Reverse With Confi-
Reverse With Confidence
™
7
Page 8

Limitations
Limitations:
The sensors may not work if an object does not reflect the ultrasonic waves or it has an unusual
shape, pole, cardboard carton, tire of bicycle, small or slender tree, rectangular lumber or curbs
tone. The sensor may not detect another vehicle bumper if it is too high.
Also note: This system has different detection distance to the different object. To the wall, the max
detection distance is 1.8m; tho the human body, the max detection distance is 1.0m; to the colum
is 40cm, the max detection tion, obstacle shape, reflection condition and so on. Some examples
are given below:
If the vehicle is equipped with
high-power radio antenna.
When backing up downhill If there is a very small object.
The rear 45° oblique to the obstacle If there is a wire fence.
Backing up in heavy rain or snow.
If is smooth round object Objects absorbing wave, e.g. Cotton
8
If another vehicle bumper is too high
If it’s a smooth slope
REAR VIEW SAFETY
Page 9

Troubleshooting
Troubleshooting:
No buzzer or display at power up.
1. Is power wire connected to control unit correctly?
2. Verify(+)12V at control unit when vehicle is in reverse.
3. Verify the ground connection.
4. Have you connected to the correct reversing indicator wire?
5. Do you have a minimum of (+)12V and ground at the display?
No reverse image.
1. Is the connection of camera power cable and AV cable are right or not?
2. Is AV cable connected to AV2?
Guarantee time:12 months.
The guarantee will be effective with the stamp/signature of the dealer.
Please keep the guarantee form well to ensure 12 months guarantee.
Reverse With Confidence
™
9
Page 10

Warranty
One Year Warranty
Rear View Safety, Inc. warrants this product against material defects for a
period of one year from date of purchase. We reserve the right to repair or
replace any such defective unit at our sole discretion. Rear View Safety, Inc.
is not responsible for a defect in the system as a result of misuse, improper
installation, damage or mishandling of the electronic components. Rear View
Safety, Inc. is not responsible for consequential damages of any kind.
This warranty is void if: defects in materials or workmanship or damages re-
sult from repairs or alterations which have been made or attempted by others or the unauthorized use of nonconforming parts; the damage is due to
normal wear and tear, this damage is due to abuse, improper maintenance,
neglect or accident; or the damage is due to use of the Rear View Safety,
Inc. system after partial failure or use with improper accessories.
Warranty Performance
DURING THE ABOVE WARRANTY PERIOD, SHOULD YOUR REAR VIEW SAFETY
PRODUCT EXHIBIT A DEFECT IN MATERIAL OR WORKMANSHIP, SUCH DEFECT
WILL BE REPAIRED WHEN THE COMPLETE REAR VIEW SAFETY, INC. PRODUCT
IS RETURNED, POSTAGE PREPAID AND INSURED, TO REAR VIEW SAFETY, INC.
OTHER THAN THE POSTAGE AND INSURANCE REQUIREMENT, NO CHARGE
WILL BE MADE FOR REPAIRS COVERED BY THIS WARRANTY.
Warranty Disclaimers
NO WARRANTY, ORAL OR WRITTEN, EXPRESSED OR IMPLIED, OTHER THE
ABOVE WARRANTY IS MADE WITH REGARD TO THIS REAR VIEW SAFETY, INC.
REAR VIEW SAFETY, INC. DISCLAIMS ANY IMPLIED WARRANTY OR MERCHANTABILITY OR FITNESS FOR A PARTICULAR USE OR PURPOSE AND ALL OTHER
WARRANTIES IN NO EVENT SHALL REAR VIEW SAFETY. INC. LIABLE FOR ANY
INCIDENTAL, SPECIAL, CONSEQUENTIAL, OR PUNITIVE DAMAGES OR FOR ANY
COSTS, ATTORNEY FEES, EXPENSES, LOSSES OR DELAYS ALLEGED TO BE AS A
CONSEQUENCE OF ANY DAMAGE TO, FAILURE OF, OR DEFECT IN ANY PRODUCT INCLUDING, BUT NOT LIMITED TO, ANY CLAIMS FOR LOSS OF PROFITS.
10
REAR VIEW SAFETY
Page 11

Disclaimer
Rear View Safety and/or its affiliates does not guarantee or promise
that the user of our systems will not be in/part of an accident or
otherwise not collide with an object and/or person. Our systems are
not a substitute for careful and cautious driving or for the consistent
adherence to all applicable traffic laws and motor vehicle safety
regulations. The Rear View Safety products are not a substitute for
rearview mirrors or for any other motor vehicle equipment mandated
by law. Our camera systems have a limited field of vision and do not
provide a comprehensive view of the rear or side area of the vehicle.
Always make sure to look around your vehicle and use your mirrors
to confirm rearward clearance and that your vehicle can maneuver
safely. Rear View Safety and/or its affiliates shall have no responsibility or liability for damage and/or injury resulting from accidents
occurring with vehicles having some of Rear View Safety products
installed and Rear View Safety and/or its affiliates, the manufacturer,
distributor and seller shall not be liable for any injury, loss or
damage, incidental or consequential, arising out of the use or
intended use of the product. In no event shall Rear View Safety
and/or its affiliates have any liability for any losses (whether direct
or indirect, in contract, tort or otherwise) incurred in connection
with the systems, including but not limited to damaged property,
personal injury and/or loss of life. Neither shall Rear View Safety
and/or its affiliates have any responsibility for any decision, action
or inaction taken by any person in reliance on Rear View Safety
systems, or for any delays, inaccuracies and/or errors in connection
with our systems functions.
Reverse With Confidence
™
11
Page 12

If you have any questions
about this product, contact:
Rear View Safety, Inc.
1797 Atlantic Avenue
Brooklyn, NY 11233
800.764.1028
BETTER CAMERAS. BETTER SERVICE.
IT’S OUR GUARANTEE.
12
REAR VIEW SAFETY
 Loading...