

Page 1
DR490L-2CH
ENGLISH
Page 2

BLACKVUE
DR490L-2CH
For manuals, customer support and FAQs go to www.blackvue.com
Page 3

Important safety information
For user safety and to avoid property damage, read through this manual and follow these
safety instructions to use the product correctly.
y
Do not disassemble, repair, or modify the product yourself.
Doing so may cause re, electric shock, or malfunction. For internal inspection and repair,
contact the service center.
y
Do not adjust the product while driving.
Doing so may cause an accident. Stop or park your car in a safe place before installing and
setting up the product.
y
Do not operate the product with wet hands.
Doing so may cause electric shock.
y
If any foreign matter gets inside the product, detach the power cord immediately.
Contact the service center for repair.
y
Do not cover the product with any material.
Doing so may cause external deformation of the product or re. Use the product and
peripherals in a well-ventilated location.
y
If the product is used outside the optimal temperature range (-20°C 70°C / -4°F 158°F),
performance can decline or malfunctions may occur.
y
When entering or exiting a tunnel, when directly facing into bright sunlight, or when
recording at night without lighting the quality of recorded video may deteriorate.
y
If the product is damaged or the power supply is cut due to an accident, video may not be
recorded.
y
Do not remove the microSD card while the microSD card is saving or reading data.
The data can be damaged or malfunctions may occur.
y
Do not press the LCD screen with a sharp object.
y
Do not press the LCD screen too rmly.
DR490L-2CH 3
Page 4

FCC Compliance Information
This equipment has been tested and found to comply with the limits for a Class A digital
device, pursuant to Part 15 of the FCC Rules. These limits are designed to provide reasonable
protection against harmful interference when the equipment is operated in a commercial
environment.
This equipment generates, uses, and can radiate radio frequency energy and, if not installed
and used in accordance with the instruction manual, may cause harmful interference to radio
communications. Operation of this equipment in a residential area is likely to cause harmful
interference in which case the user will be required to correct the interference at the user’s
own expense.
Finally, any changes or modications to the equipment by the user not expressly approved by
the grantee or manufacturer could void the user's authority to operate such equipment.
4 BLACKVUE
Page 5
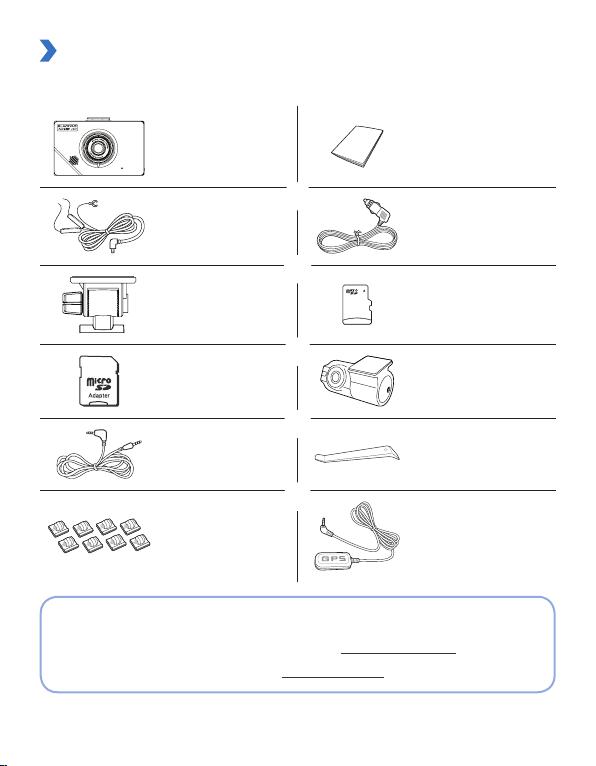
In the box
Check the box for each of the following items before installing the BlackVue dashcam.
Front camera Quick start guide
Hardwire cable Power cord
Bracket microSD Card
microSD card adapter Rear camera
Rear camera
connection cable
Cable clips
(8 EA)
Need help?
Download the manual and the latest rmware from www.blackvue.com
Or contact a Customer Support expert at cs@pittasoft.com
Pry tool
External GPS
(Optional)
DR490L-2CH 5
Page 6
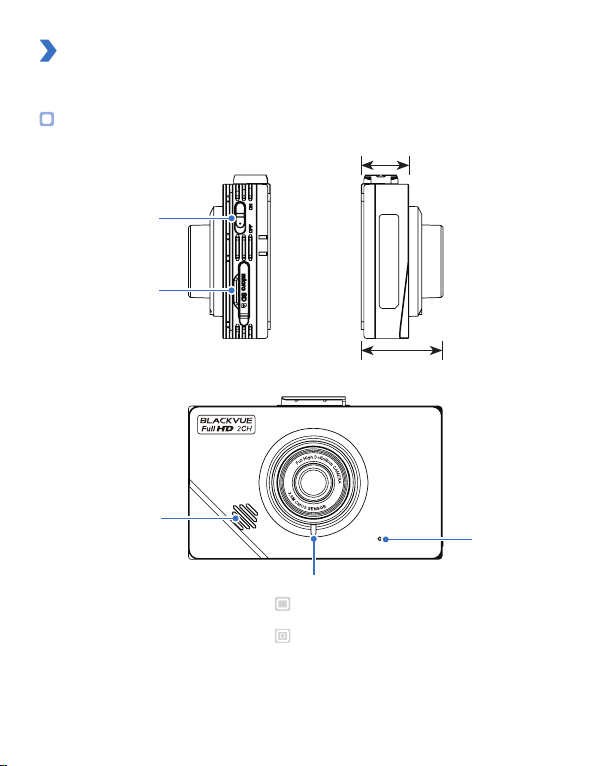
At a glance
The following diagrams explain each part of the BlackVue dashcam.
Front camera
18.5 mm
Power switch
microSD card slot cover
31.8 mm
Speaker
Front security LED
: Blinks white slowly in normal mode or event standby
mode.
: Blinks white quickly:
(i) when an event is being recorded (impact detected);
or
(ii) in parking mode
.
Mic
6 BLACKVUE
Page 7
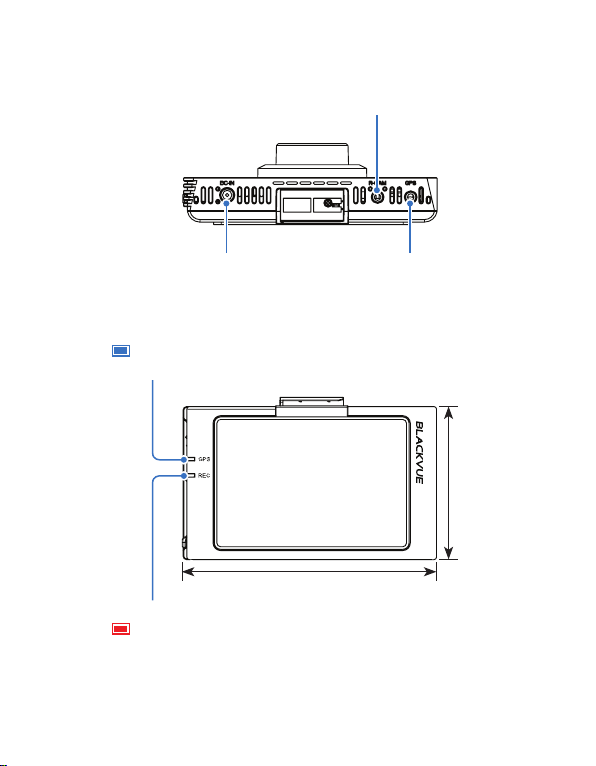
Rear camera connection port
DC in (power connector)
GPS LED
: Blue LED is on when GPS is on; blinks when there is no GPS signal.
LED is o when no GPS is connected.
99.5 mm
Recor
ding LED
: Red LED is on in normal mode, event standby mode and when
saving a parking recording (motion detected).
Red LED blinks when an event is being recorded (impact detected).
Red LED is o in parking standby mode.
GPS connection port
60.1 mm
DR490L-2CH 7
Page 8
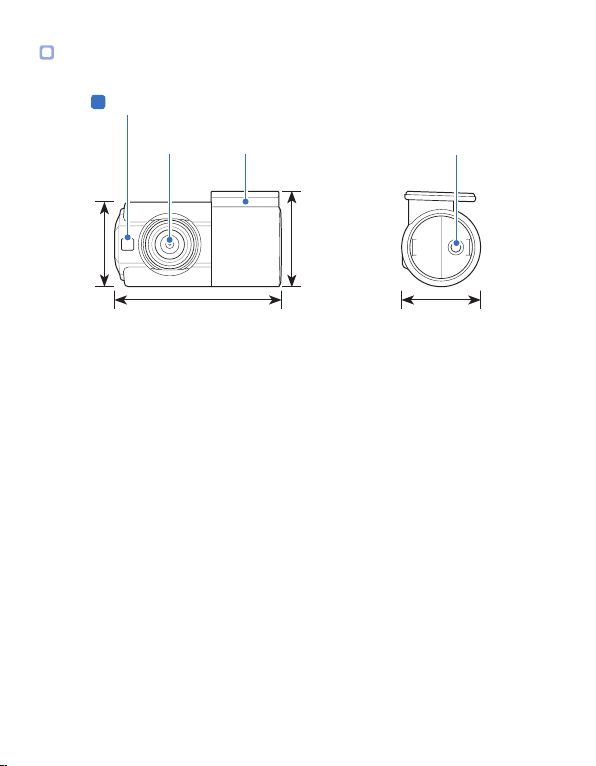
Rear camera
Rear security LED
: Blue LED blinks when rear and front cameras are connected.
Mounting bracketCamera lens
29.7 mm
25.6 mm
51.3 mm 29.2 mm
Front camera
connection port
8 BLACKVUE
Page 9

STEP 1
Install the front camera behind the rear view mirror. Install the rear camera at the top of
the back windshield. Remove any foreign matter and clean and dry the windshield before
installation.
A
Install and power up
Warning
y
Do not install the product in a location where it can obstruct the driver's eld of
vision.
Turn o the engine and make sure accessory power is o. Flick the power switch to
the o position.
Open the cover of the microSD card slot, gently push the card into the slot until it
locks into place and close the cover.
DR490L-2CH 9
Page 10

Peel o the plastic lm from the lens. Peel o the protective lm from the double-
B
sided tape and attach the front camera to the windshield behind the rear-view mirror.
Optional GPS receiver: Plug in the GPS receiver and attach it in a corner of the
C
windshield. Tuck the cable into the windshield trim using the pry tool.
Adjust the angle of the lens by loosening the nut and rotating the front camera. We
D
recommend pointing the lens slightly downwards (≈10° below horizontal), so as to
record video with a 6:4 road to background ratio. After installation the camera angle
can be adjusting in real time with the LCD screen on.
10 BLACKVUE
Page 11

Peel o the protective lm from the double-sided tape and attach the rear camera
E
to the rear windshield. Adjust the angle of the lens by rotating the body of the rear
camera.
Connect the front camera (‘R CAM’ port) and the rear camera using the rear camera
F
connection cable.
Use the pry tool to lift the edges of the rubber window sealing and molding and tuck
G
in the rear camera connection cable.
Rear camera connection cable
DR490L-2CH 11
Page 12

To record in parking mode you must hardwire the dashcam to your car’s fuse
H
panel using the hardwire cable. Normal mode and event mode will also be
available while driving. Plug the hardwire cable into the DC-IN port on the front
camera. Proceed to Step I.
Alternatively, if you power the dashcam from the cigarette lighter socket you
will not be able to record in parking mode. Normal mode and event mode will only
be available while driving. Plug the power cord into the cigarette lighter socket and
the DC-IN port on the front camera. Proceed to Step L.
Connect the yellow [ACC] wire to a Switched fuse. Referring to your vehicle
I
Owner's Manual/Handbook, identify a Switched (accessory power) fuse in your
interior fuse panel. Typical examples are the cigarette lighter and car stereo fuse slots.
Remove the identied Switched fuse. Many cars come with a fuse puller tool in the
engine compartment fuse panel.
Remove the sleeve from the end of the yellow [ACC] wire, and wrap the wire around
one of the blades of the Switched fuse. Reinsert the fuse back into the fuse panel.
ACC (Yellow): Connect to Switched fuse slot
GND (Black): Connect to
ground point
B + (Red): Connect to Constant
Power fuse slot
12 BLACKVUE
Page 13

Connect the red [B +] wire to a Constant Power fuse. Identify a Constant Power
J
(battery power) fuse in your fuse panel. Typical Constant Power fuses are the hazard
light (emergency lamp), tail lights and interior light fuses. If your car has a “Battery
Saver Function” please utilize the hazard light fuse.
Remove the identied Constant Power fuse. Remove the sleeve from the end of the
red [B +] wire, and wrap the wire around one of the blades of the Constant Power
fuse. Reinsert the fuse back into the fuse panel.
Connect the black [GND] wire to a ground point. Locate a ground point, such as
K
a bolt, that is directly on a bare metal part of the vehicle's frame. Secure the ground
wire to the bare metal frame (for example by securing it under the bolt).
Use the pry tool to lift the edges of the windshield trim/molding and tuck in the
L
hardwire cable.
Hardwire cable installation:
Rear camera connection cableHardwire cable
Fuse panel
DR490L-2CH 13
Page 14

Alternative cigarette lighter socket installation:
Power cordRear camera connection cable
Turn on the engine and switch on the dashcam. The BlackVue dashcam will power
M
up and start recording. Video les are stored on the microSD card. When the microSD
card lls up, the newest video les will start to replace the oldest video les (called
loop recording) – so you will always have the most recent video les.
Note
y
There are 3 recording modes: Normal, Event and Parking. The dashcam starts
recording in normal mode, switches to event mode when an impact is detected,
and switches to parking mode when the engine is o. A low voltage power cut-o
function protects the automotive battery from discharge.
14 BLACKVUE
Page 15

STEP 2
LCD main menu composition
Tap the LCD screen anywhere when it is o to turn the LCD on.
Tap to switch between the front camera view,
rear camera view and picture-in-picture
Tap the screen to access
the Quick Menu.
Current state Voice guidance
Recording mode Microphone (audio recording)
Date & time GPS signal
DR490L-2CH 15
Page 16

Quick menu
Access the settings menu
Exit
Go to the video list
Displays your current mode (Normal
mode or Parking mode)
Turn audio recording on/o
Turn voice guidance on/o
Turn the security LED (front camera)
on/o
Turn the text overlay on/o
16 BLACKVUE
Page 17

STEP 3
Playback
Playing video les on the LCD screen
Tap the N/E/P button to switch between normal,
y
Select the List button from the Quick Menu.
y
Use the arrows to select a recording and press the Play button.
Normal Normal mode recordings
event and parking recordings
Event
Parking
When the dashcam detects an impact while in normal or parking
mode, it switches to event mode and saves an event recording
beginning 10 seconds before the event trigger.
In parking mode the dashcam continuously buers video. When
motion is detected in the dashcam's eld of view, it saves a parking
recording beginning 10 seconds before the motion detection.
DR490L-2CH 17
Page 18

Playing video les on your computer
You can play video les in BlackVue Viewer (available for Windows and macOS) on your
computer. Remove the microSD card from the camera and use the included microSD card
adapter to connect it to your computer.
For more information about the BlackVue Viewer please visit www.blackvue.com
18 BLACKVUE
Page 19

STEP 4
Adjusting the time and other settings
Adjusting the settings on the LCD screen
Select Settings from the Quick Menu.
The settings that can be adjusted include:
y
Video settings: Brightness, Saturation
y
Advanced Driver Assistance Systems (ADAS): Lane Departure Warning System (LDWS)
activation speed, Warning alarm
y
Time settings: Manual time and time zone setting
y
System settings: Cut-o voltage, Screen timeout, Language, High temperature cut-o,
Volume
y
Recording settings: Night vision, Image quality, Recording mode, Rear camera recording,
Mic Volume, Motion detection sensitivity, G-Sensor sensitivity
y
Other settings: Camera info., Storage allocation, Calibrate touch, Format (microSD card),
Reset settings
DR490L-2CH 19
Page 20

Adjusting the time on the LCD screen
Please backup any important recordings before adjusting the time. When you save the new
time settings the dashcam will format the microSD card and delete all recordings stored on
the card.
If you do not connect the GPS receiver:
To manually set the time select Settings from the Quick Menu and press the Time button.
Enter your date (year, month, day) by selecting each eld and using the up/down buttons.
Tap Set date to change to Set time and enter your time (hour, minute, second). Tap Exit and
save the settings.
If you connect the GPS receiver:
If you run the dashcam with the GPS receiver connected, it is possible to sync with GPS time.
To sync with GPS time select Settings from the Quick Menu and press the Time button. Tap
the top right button (Set date) twice to get to GMT (Time zone).
Enter your GMT time zone by selecting the eld and using the up/down buttons.
Tap Daylight saving time to turn it on or o.
20 BLACKVUE
Page 21

Tips for optimal performance
Format the microSD card once a month, or when the BlackVue dashcam tells you the
A
card needs maintenance.
Formatting the card in the BlackVue:
Tap the screen to turn the LCD on. Tap again to access the Quick Menu.
Select Settings > Other > Format (microSD card) > Yes to format the microSD card.
Format using BlackVue Viewer (Windows):
Insert the microSD card into the microSD card adapter and connect it to your
computer. Go to \BlackVue\Application\ and locate and run the setup le for BlackVue
Viewer to install it on your computer. Launch BlackVue Viewer, click the
Format button, select the card drive and click OK.
Format using BlackVue Viewer (macOS):
Insert the microSD card into the microSD card adapter and connect it to your
computer. Go to \BlackVue\Application\ and locate and run the setup le for
BlackVue Viewer to install it on your computer. Launch BlackVue Viewer, click the
Format button and select the microSD card from the list of drives in the left frame.
After selecting your microSD card select the Erase tab in the main window. Select
“MS-DOS (FAT)” from the Volume Format drop-down menu and click Erase.
Only use ocial BlackVue microSD cards. Other cards may have compatibility issues.
B
Regularly upgrade the rmware for performance improvements and updated
C
features. Firmware updates will be made available for download at
www.blackvue.com > Support > Downloads.
Customer Support
For customer support, manuals, software and rmware updates please visit www.blackvue.com
You can also email a Customer Support expert at cs@pittasoft.com
DR490L-2CH 21
Page 22

Product specications
Model Name DR490L-2CH
Front: Black / Width 99.5 mm x Height 60.1 mm x Thickness
Color/Size/Weight
Memory microSD Card (16 GB/32 GB/64 GB/128 GB)
Recording Mode
Camera
Viewing Angle
Resolution/Frame Rate
Image Quality Highest, High, Normal
LCD 3.5 inch touch LCD
Video Compression Mode AVI
GPS External
Microphone Built-in
Speaker (Voice Guidance) Built-in
LED Indicators
Switch Power Switch
31.8 mm / 93 g
Rear: Black / Width 51.3 mm x Height 29.7 mm x Thickness
29.2 mm / 18 g
Normal Recording, Event Recording (Impact Detection),
Parking Mode Recording (Motion & Impact Detection)
Front: CMOS Sensor (Approx. 2 megapixels)
Rear: CMOS Sensor (Approx. 2 megapixels)
Front: Diagonal 130°, Horizontal 113°, Vertical 58°
Rear: Diagonal 130°, Horizontal 110°, Vertical 62.5°
<Front - Rear>
Full HD (1920x1080) @ 30 fps - Full HD (1920x1080) @ 30 fps
Front: Front Security, GPS, REC
Rear: Rear Security
22 BLACKVUE
Page 23

Sensor 3-Axis Acceleration Sensor
Backup Battery Built-in super capacitor
Input Power
Power Consumption
Operation Temperature -20 °C–70 °C (-4 °F–158 °F)
Storage Temperature -30 °C–80 °C (-22 °F–176 °F)
High Temperature Cut-O Approx. 70 °C (158 °F )
Low Voltage Cut-O
Certications
Software
Advanced Driver
Assistance Systems (ADAS)
Other Features Format-Free Technology for Stable Recording
DC 12 V–24 V (DC Plug(Ø3.5 x Ø1.1) to Wires (Black: GND /
Yellow: ACC / Red: BAT T))
Max. 370 mA (4.81 W at 13 V, when GPS and LCD are On)
Max. 280 mA (3.64 W at 13 V, when in parking standby mode)
* Actual power consumption may vary depending on use
conditions and environment.
Congurable: OFF / 11.8 V (23.2) / 11.9 V (23.6) / 12.0 V (24.0)
/ 12.2 V (24.4) / 12.4 V (24.8)
Front: FCC, CE, RoHS
Rear: FCC, CE, RoHS
BlackVue Viewer
* Windows XP or higher (Windows 8 supported) and Mac
Yosemite OS X (10.10) or higher
Lane Departure Warning System (LDWS)
DR490L-2CH 23
Page 24

DR490L-2CH
 Loading...