

Page 1
BGD1
Page 2

© Russound/FMP, Inc. dba: Russound.
This Electronic file and all documents contained within are private, confidential
and the sole property of Russound/FMP, Inc. The concepts, ideas and information are
proprietary and may not be disclosed to third parties. All Rights Reserved. Printed
in the United States of America. This document, or parts thereof, may not be
reproduced in any form by photographic, electrostatic, mechanical, or any other
method for any use, including information storage and retrieval, without written
permission from the publisher.
Confidentiality Statement
Page 1
Page 3

© Russound/FMP, Inc. dba: Russound.
This Electronic file and all documents contained within are private, confidential
and the sole property of Russound/FMP, Inc. The concepts, ideas and information are
proprietary and may not be disclosed to third parties. All Rights Reserved. Printed
in the United States of America. This document, or parts thereof, may not be
reproduced in any form by photographic, electrostatic, mechanical, or any other
method for any use, including information storage and retrieval, without written
permission from the publisher.
Confidentiality Statement
Page 1
Page 4

BGD1 iBridge Dock
Instruction Manual
Page 5

2
For your safety, please read and follow these precautions before installing or using this product:
➤ Read instructions. Read and understand all the
applicable instructions before installing or operating the product.
➤ Retain documents. Keep this manual in a con-
venient place for reference.
➤ Heed warnings. Be aware of all warnings on the
product and in the instructions.
➤ Follow instructions. Install and use this product
only as described in the instructions. Don’t try to
use this product in ways it wasn’t designed for.
➤ Use indoors only. Don’t expose this product to
the weather or harsh environmental conditions
such as continuous sunlight, excessive humidity,
or rain.
➤ Keep product dry. Don’t use the product near
water; for example, near a bathtub, washbowl,
kitchen sink, laundry tub, in a wet basement, or
near a swimming pool. Also, don’t handle the
product when your hands are wet or damp.
➤ Avoid heat. Locate the product away from heat
sources such as radiators, heat registers, stoves
or other appliances (including amplifiers) that produce heat.
➤ Maintain ventilation. Locate the product so as
not to interfere with its proper ventilation. Don’t
use the product on a bed, sofa, rug, or similar
surface that may block the ventilation openings,
or in a bookcase or cabinet that may impede the
flow of air through the ventilation openings.
➤ Use the right power. Don’t connect the product
directly to electrical line voltage. Use only the
power adapter provided with the product,
described in the operating instructions, or as
marked on the product.
➤ Ground product properly. Make sure the prod-
uct’s means of grounding or polarization is not
defeated.
➤ Keep product clean. From time to time, wipe
off the product with a clean soft cloth. Don’t use
abrasive materials, thinners, alcohol or other
chemical solvents or materials.
➤ Avoid spills and foreign objects. Make sure liq-
uids and objects don’t get into the product enclosure through any openings.
➤ Get professional service. Have the product
serviced only by qualified service personnel when:
• Liquids have spilled or objects have fallen into
the product
• The product has been exposed to rain
• The product doesn’t seem to operate normally
• The product is damaged
Don’t attempt to service the product yourself.
Doing so will void the warranty.
If you have any questions, call Russound at
1.800.638.8055 or 603.659.5170.
Safety Precautions
Page 6
3
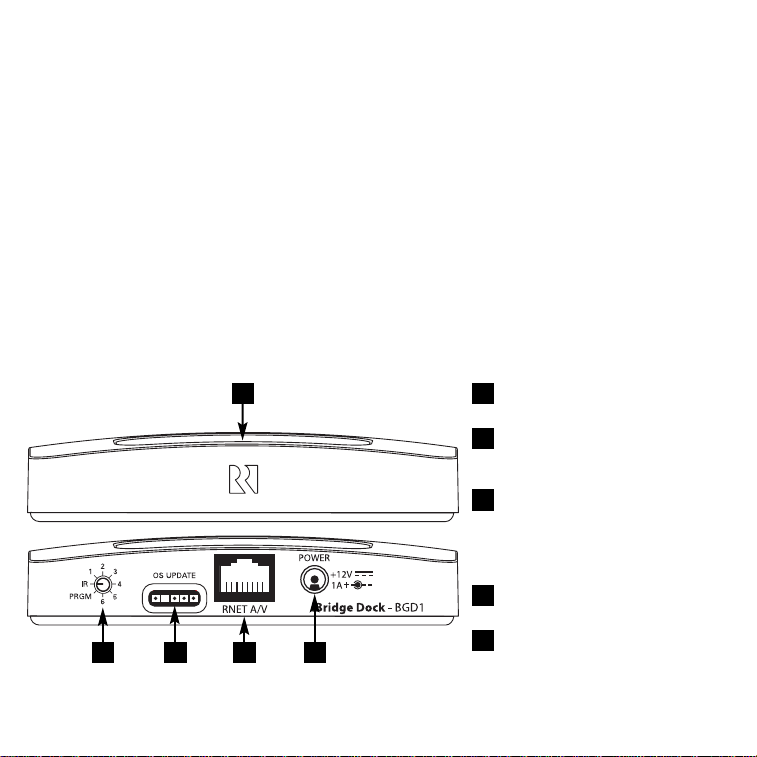
1
2
3
4
5
CONNECTOR WELL – Accepts most
iPod models with supplied adapters
SOURCE/FUNCTION SELECTOR – 8position switch for selecting source
input or function
OS UPDATE PORT – 4-pole
connector for updating device
firmware with programming cable,
Russound part number 2500521065
RNET A/V PORT – RJ-45 connector
for RNET A/V Decoder
POWER JACK – Connector for
included 12 VDC 1 A power adapter
Product Information
Front and Rear Views
The source/function selector allows using multiple units on one RNET system by assigning each a unique
ID. It also supports a simple IR mode for non-RNET systems and a PRGM mode for firmware updates.
2 3 4 5
1
Product Overview
The BGD1 iBridge Dock allows you to use an iPod
as a remote source for a Russound RNET®or other
multiroom system. Used with a Russound RNET A/V
Decoder, it provides either RNET or infrared (IR) control of the iPod, depending on the type of system.
With a Russound RNET system, the BGD1 treats the
iPod as a fully functional RNET smart source. It
gives the system’s keypads, touchscreens, and
remotes full control of the iPod: Play, Pause, Next
Song, Previous Song, Playlist Up, and Playlist Down.
The UNO-TS2 touchscreen adds the ability to select
music by playlist, genre, artist, album, and song.
The BGD1 also enables program information to
display on the RNET system’s keypads and touchscreens. They show playlist, genre, artist, album,
and song title information from the iPod.
When used with a non-RNET system, the BGD1 only
conveys IR commands from the system to the iPod.
No program information feeds back to the system.
The BGD1 supports most iPod models. It connects
via a single CAT-5 cable to an RNET A/V Decoder at
the system controller.
In addition, the BGD1 iBridge Dock provides power
to the iPod to keep it charged while docked and
connected to the system.
Page 7
4
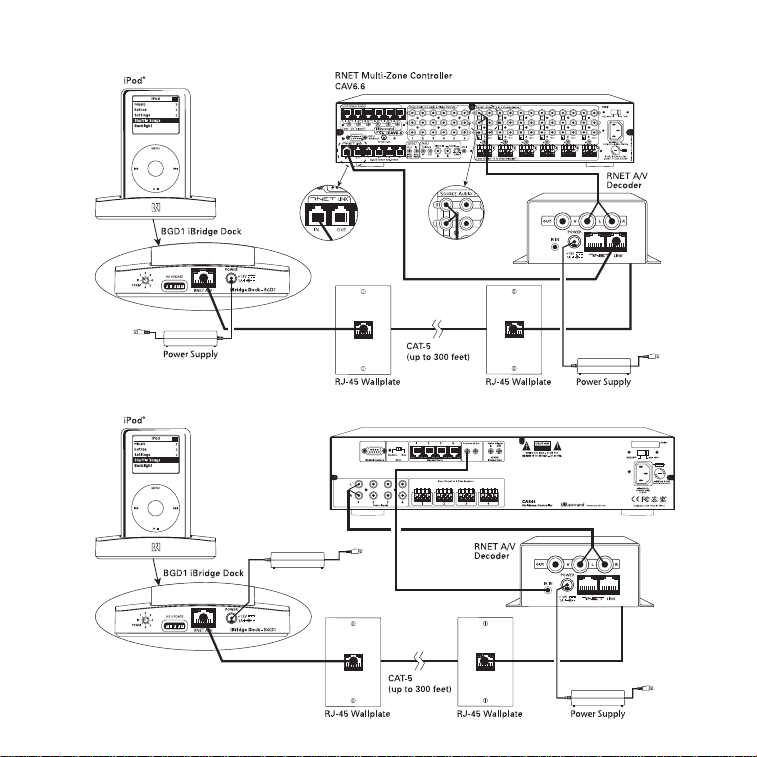
Typical Applications
Connection to RNET system
Connection for IR control
Multi-Zone Controller CAS44
Power Supply
Page 8
5
Connections
Note:
The BGD1 iBridge Dock requires the use of
an RAVD1 RNET A/V Decoder at the audio system,
regardless of which system is used.
1. Locate devices. Place the iBridge Dock where
the iPod will be located. Place the RNET A/V
Decoder with the audio system controller.
2. Run cable. Install CAT-5 or CAT-5e cable
between the Dock and Decoder locations, up to
300 feet (90 m). If desired, use modular wall plates
and RJ-45 patch cables for a neater appearance.
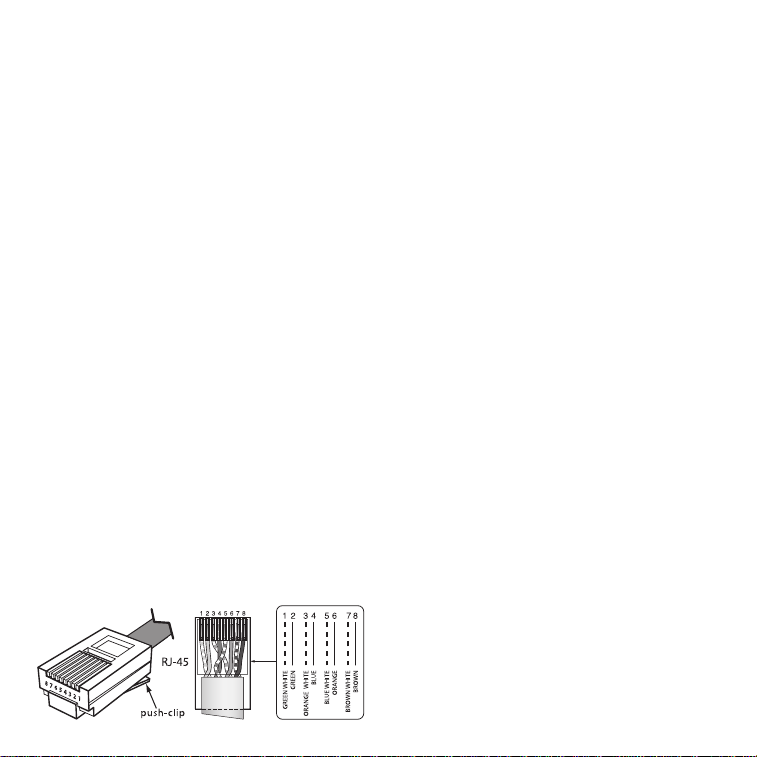
3. Connect iBridge Dock. Crimp an RJ-45 connector on the source end of the CAT-5 cable, following the T568A standard as shown. Plug the connector into the RNET A/V jack on the Dock. (If
using a wall plate, punch down the CAT-5 per the
T568A standard and use a straight-through patch
cable between the Dock and the wall plate.)
4. Connect RNET A/V Decoder. Crimp an RJ-45
connector on the system end of the CAT-5 cable,
following the T568A standard as shown. Plug the
connector into the RNET A/V jack on the Decoder.
(If using a wall plate, punch down the CAT-5 per the
T568A standard and use a straight-through patch
cable between the Decoder and the wall plate.)
Setup for RNET Control
1. Connect Decoder to RNET system. With the
audio system turned off, use an RJ-45 patch cable
to connect from either RNET Link jack on the Decoder to an RNET Link jack on the system or an
RNET source component. Use an RCA patch cable
to connect from the Decoder’s audio outputs to a
source audio input on the RNET system controller.
Note:
The Decoder’s video output does not function
in RNET mode.
2. Select Dock source input. Set the source/
function selector switch on the Dock to the number
of the source input the Decoder is connected to on
the RNET system.
3. Power Dock and Decoder. Plug the power
adapters into AC power receptacles and connect
their output leads to the device power jacks.
4. Dock iPod. Put the iPod in the Dock with the
appropriate iPod adapter.
5. Turn on audio system. Power up the audio
system and select the source input you’re using for
the iPod. As long as the iPod is playing, you should
hear it through the audio system.
6. Program RNET system. Follow the RNET system’s programming instructions to configure the
iPod source as a peripheral device. If the system
includes UNO-TS2 touchscreens, also use the
Screen Setup feature in the UNO-TS2 Options menu
to configure the iPod as an “iPod (iBridge)” source
type to assign the correct screen template.
Installation
RJ-45 Using T568A
Wiring Standard
Page 9

6
Setup for IR Control
1. Connect Decoder to audio system. With the
audio system turned off, use an RCA patch cable
to connect from the Decoder’s outputs to a source
input on the audio system. Use an IR link cable or
mono patch cable with
1
⁄8-inch (3.5 mm) TS connectors to connect from the system’s IR output to the
Decoder’s IR input.
2. Select IR function. Set the source/function
selector switch on the Dock to IR for infrared control of the iPod.
3. Power Dock and Decoder. Plug the power
adapters into AC power receptacles and connect
their output leads to the device power jacks.
4. Dock iPod. Put the iPod in the Dock with the
appropriate iPod adapter.
5. Turn on audio system. Power up the audio
system and select the source input you’re using for
the iPod. As long as the iPod is playing, you should
hear it through the audio system.
6. Program audio system. Configure the audio
system for IR control of the iPod.
Firmware Update
From time to time Russound may offer updated
firmware for the BGD1 iBridge Dock. You can
download updated firmware from the Document
Center at www.russound.com.
1. Disconnect power. Unplug the power adapter
from the Dock.
2. Select program function. Set the source/
function selector switch on the Dock to PRGM.
3. Reconnect power. Plug the power adapter into
the Dock’s power jack.
4. Connect programming cable. Remove the
rubber plug from the OS update port on the Dock.
Connect an Advanced Programming Cable,
Russound part number 2500-521065, between the
OS update port and a serial port on a Windowsbased personal computer.
5. Run update program. Run the update software on the computer to load the firmware into the
Dock.
6. Disconnect power. Unplug the power adapter
from the Dock.
7. Restore source selection. Return the
source/function selector switch on the Dock to the
previous source setting.
8. Reconnect power. Plug the power adapter into
the Dock’s power jack.
Installation
Page 10
Operation
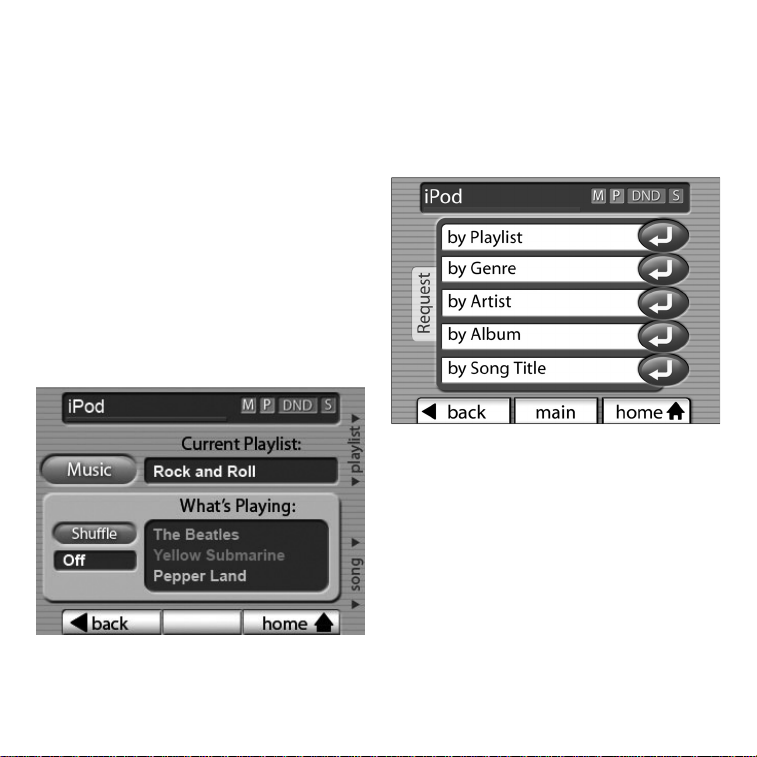
UNO-TS2 Touchscreen Control
An UNO-TS2 touchscreen with an RNET system
provides the most complete control and feedback
option for the iPod. The touchscreen allows navigation through the iPod’s menus to select music by
playlist, genre, artist, album, and song. It also displays current selections.
Note:
UNO-TS2 screen
version 2.00.01 is required for use with iBridge.
The touchscreen controls and displays information
from the iPod the same way it does for a music
stream on Russound’s SMS3 Smart Media Server.
When set up with the “iPod (iBridge)” source template (see touchscreen installation instructions), the
UNO-TS2 displays the following main screen upon
selecting the iPod source:
Whenever the name of the iPod appears in the
Current Playlist field, the iPod is in All Songs mode.
From this screen you can select a specific playlist
by pressing the hard + and – keys to the right of
the display, or select the next or previous song
with the
> or < key. You can also press the Shuffle
soft key to toggle through the iPod’s three shuffle
mode options. Pressing the Music soft key calls up
the following music request screen:
From this screen you can access any of the five
categories to make music selections.
UNO-S2 Keypad Control
The UNO-S2 keypad also provides convenient control of the iPod through an RNET system. After
selecting the iPod source, you can press the + and
– keys to select playlists and use the >| and |<
keys to select songs. Pressing the Play key
accesses NOW PLAYING, where you can use the >|
and |< keys to cycle through artist, album, and
song title. Pressing Play again accesses SHUFFLE
MODE, where you can select random play of songs
or albums or no random play (off).
7
Page 11

5 Forbes Road, Newmarket NH 03857 USA
Tel 603.659.5170 • Fax 603.659.5388
www.russound.com
Warranty
The Russound BGD1 iBridge Dock is fully guaranteed against all defects in materials and workmanship for two (2) years from the date
of purchase. During this period, Russound will replace any defective parts and correct any defect in workmanship without charge for
either parts or labor. For this warranty to apply, the unit must be installed and used according to its written instructions. If service is necessary, it must be performed by Russound. The unit must be returned to Russound at the owner's expense and with prior written permission. Accidental damage and shipping damage are not considered defects, nor is damage resulting from abuse or from servicing by
an agency or person not specifically authorized in writing by Russound.
This warranty does not cover: damage caused by abuse, accident, misuse, negligence, or improper installation or operation; power
surges and lightning strikes; normal wear and maintenance; products that have been altered or modified; any product whose identifying
number, decal, serial number, etc. has been altered, defaced or removed.
Russound sells products only through authorized dealers and distributors to ensure that customers obtain proper support and service.
Any Russound product purchased from an unauthorized dealer or other source, including retailers, mail order sellers and online sellers
will not be honored or serviced under existing Russound warranty policy. Any sale of products by an unauthorized source or other manner not authorized by Russound shall void the warranty on the applicable product.
Damage to or destruction of components due to application of excessive power voids the warranty on those parts. In these cases, repairs
will be made on the basis or the retail value of the parts and labor. To return for repairs, the unit must be shipped to Russound at the
owner's expense, along with a note explaining the nature of service required. Be sure to pack the unit in a corrugated container with at
least three (3) inches of resilient material to protect the unit from damage in transit. Before returning a unit for repair, call Russound at
603.659.5170 for a return authorization number. Write this number on the shipping label and ship to: Russound, 5 Forbes Road,
Newmarket, NH 03857.
iPod is a trademark of Apple Computer Inc., registered in the US and other countries.
Copyright © 2006 Russound. All rights reserved. All trademarks are the property of their respective owners. Specifications are subject
to change without notice. Russound is not responsible for typographical errors or omissions. 28-1224 04/06/06
Specifications
Switch: 8-position source/function selector
RNET A/V connector: 8-pole modular RJ-45 jack
OS Update Port connector: 4-pole jack for Programming Cable,
Russound part #2500-521065
Power requirement: 12 VDC 1 A (adapter included)
Dimensions: 4.72” W x 1.0” H x 2.5” D
(12.0 x 2.5 x 6.4 cm)
Weight: 5.4 oz (153 g)
Supported iPod Models
• iPod mini 4GB 6GB Adapter #3
• iPod 20GB Adapter #4
• iPod 40GB Adapter #5
• iPod with color 20GB 30GB Adapter #6
• iPod with color 40GB 60GB Adapter #7
• iPod nano (adapter included with iPod)
• iPod with video (adapter included with iPod)
Page 12

iBridge & RNET AV Decoder
Test Procedure
Revised August 7, 2006
Revised Pages
Page Step Description of Revision
3 4 Adds Step to select H8S/2328F or H8S/2329F device.
4 7 Choose the H8S/2328F or H8S/2329F device in the pull down menu.
5 12 Adds note to Step 12 about H8S/2328F or H8S/2329F.
10 23 Adds note to return to Step 5 of programming is not successful.
iBridge & RNET AV Decoder
Revised August 7, 2006
1 of 33
Page 13

iBridge & RNET AV Decoder
Test Procedure
Revised August 7, 2006
Items needed:
2 – 6’ Cat5e patch cables
1 – 6’ Cat5e cable connecting the UNO-S2 to the CAV6.6
1 – IBM PC (Windows XP loaded) with RS232 Comm port
1 – Russound Advanced Programming cable (p/n 2500-521065)
supplied by Russound
1 – CAV6.6 and UNO-S2 Keypad supplied by Russound
1 – iBridge Dock
1 – AV Decoder
1 – iPod 30GB or 60GB only (must have video output to TV)
1 – TV or Video Monitor with RCA composite video input jack
(Viewsonic N2750W used in this manual)
2 – 12V Power Supply
1 – SRC2 Remote Control with iPod functions supplied by Russound
1 – cable with mono 1/8” phono jacks on each end
1 – Stereo RCA cable
1 – RCA composite video cable
Approximate time to complete test is less than 7 minutes.
Note: Building the CAT5e patch cable and wiring an UNO-S2 keypad is described
at the end of this procedure on pages 25 and 26.
1. The procedure assumes you have already loaded the “Flash Development Toolkit Version
3.3”.
2. If FDT3.3 is not installed on your PC go to the procedure for obtaining and installing “Flash
Development Toolkit Version 3.3”.
3. Double click the icon
iBridge & RNET AV Decoder
Revised August 7, 2006
2 of 33
Page 14

4. If the “FDT Simple Interface” dialog box appears showing the correct device for the IC
being programmed in the “Device:” window, go to Step 18.
(Use H8S/2328F or H8S/2329F in the device window)
If H8S/2328F fails to program then return to this step and use H8S/2329F.
If “H8S/2328F or H8S/2329F” is not in the “Device:” window, go to Step 5.
5. Click the “Options” menu then click “New Settings” from the drop down menu.
6. The “Choose Device and Kernel” dialog box will open.
iBridge & RNET AV Decoder
Revised August 7, 2006
3 of 33
Page 15
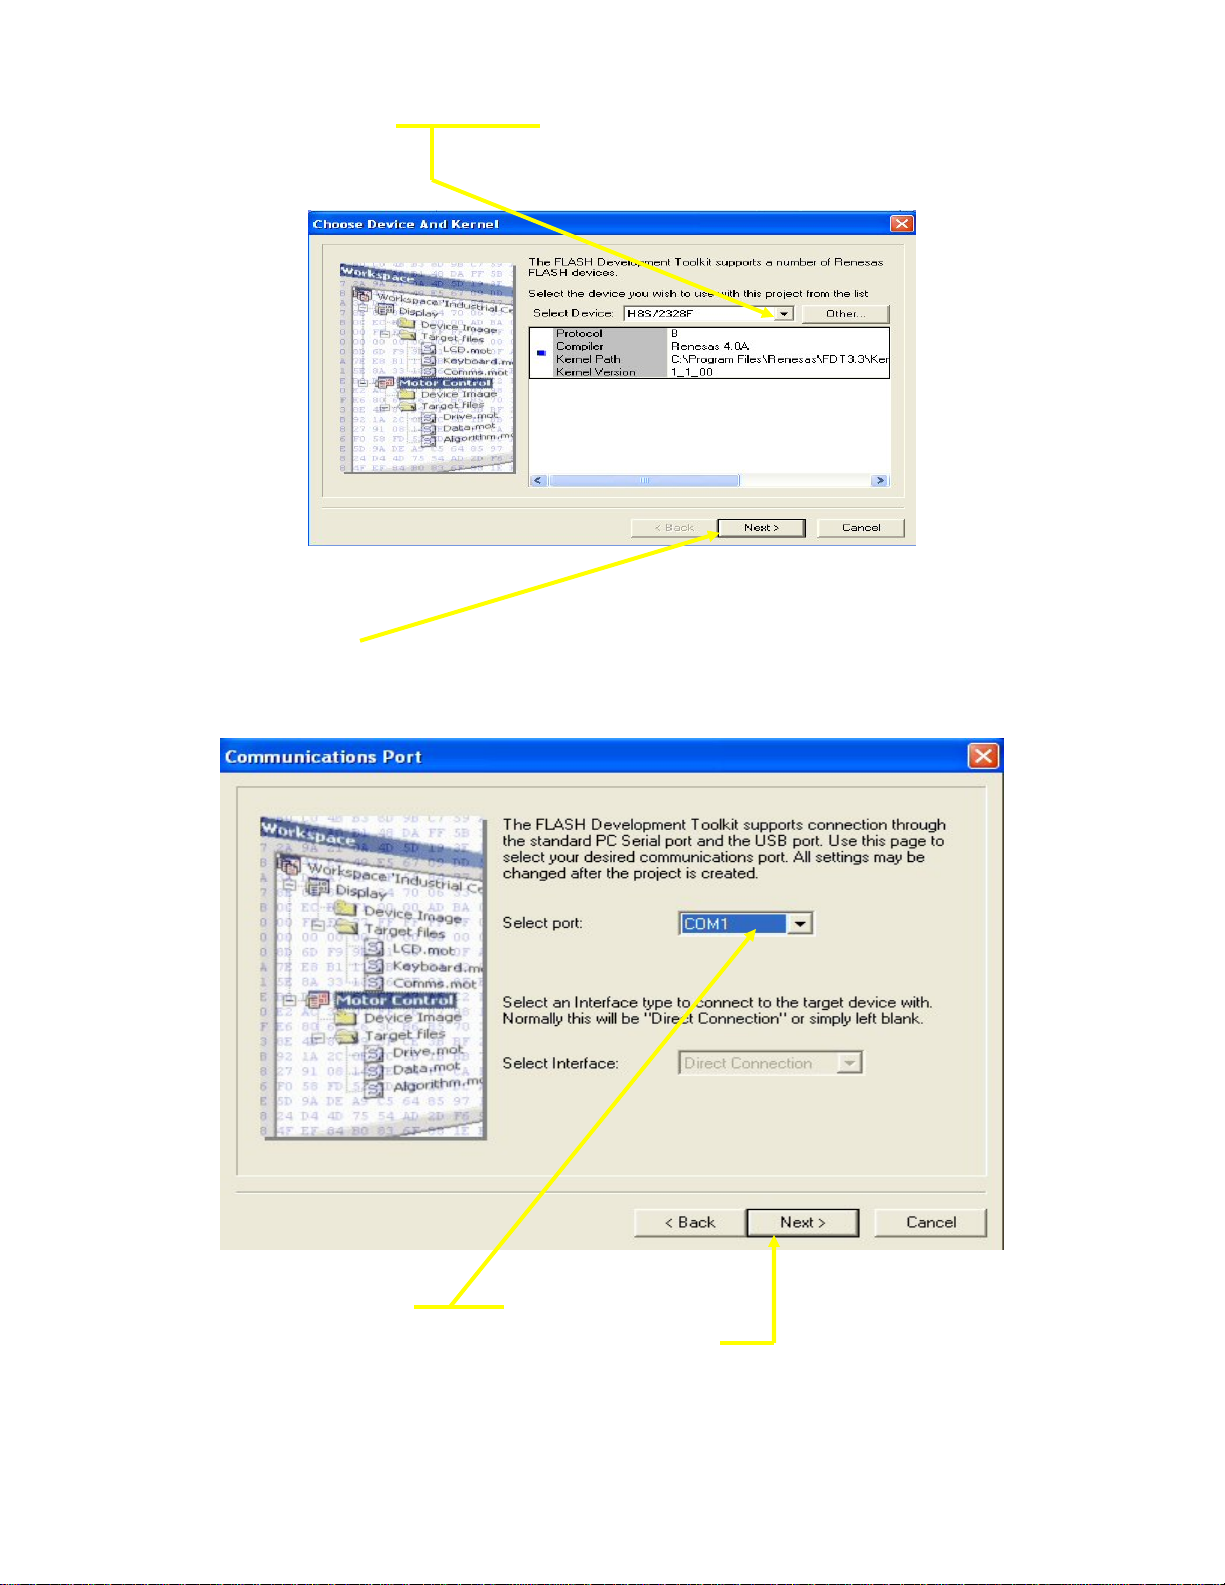
7. Click the button in the “Select Device:” window of the “Choose Device and Kernel” dialog
box and from the pull down menu select “H8S/2328F or H8S/2329F”.
Then click Next >.
8. The “Communications Port” dialog box will open.
9. Click the button for the “Select Port:” window and select the communications port you are
using from the pull down menu. Then click “Next”
iBridge & RNET AV Decoder
Revised August 7, 2006
4 of 33
Page 16
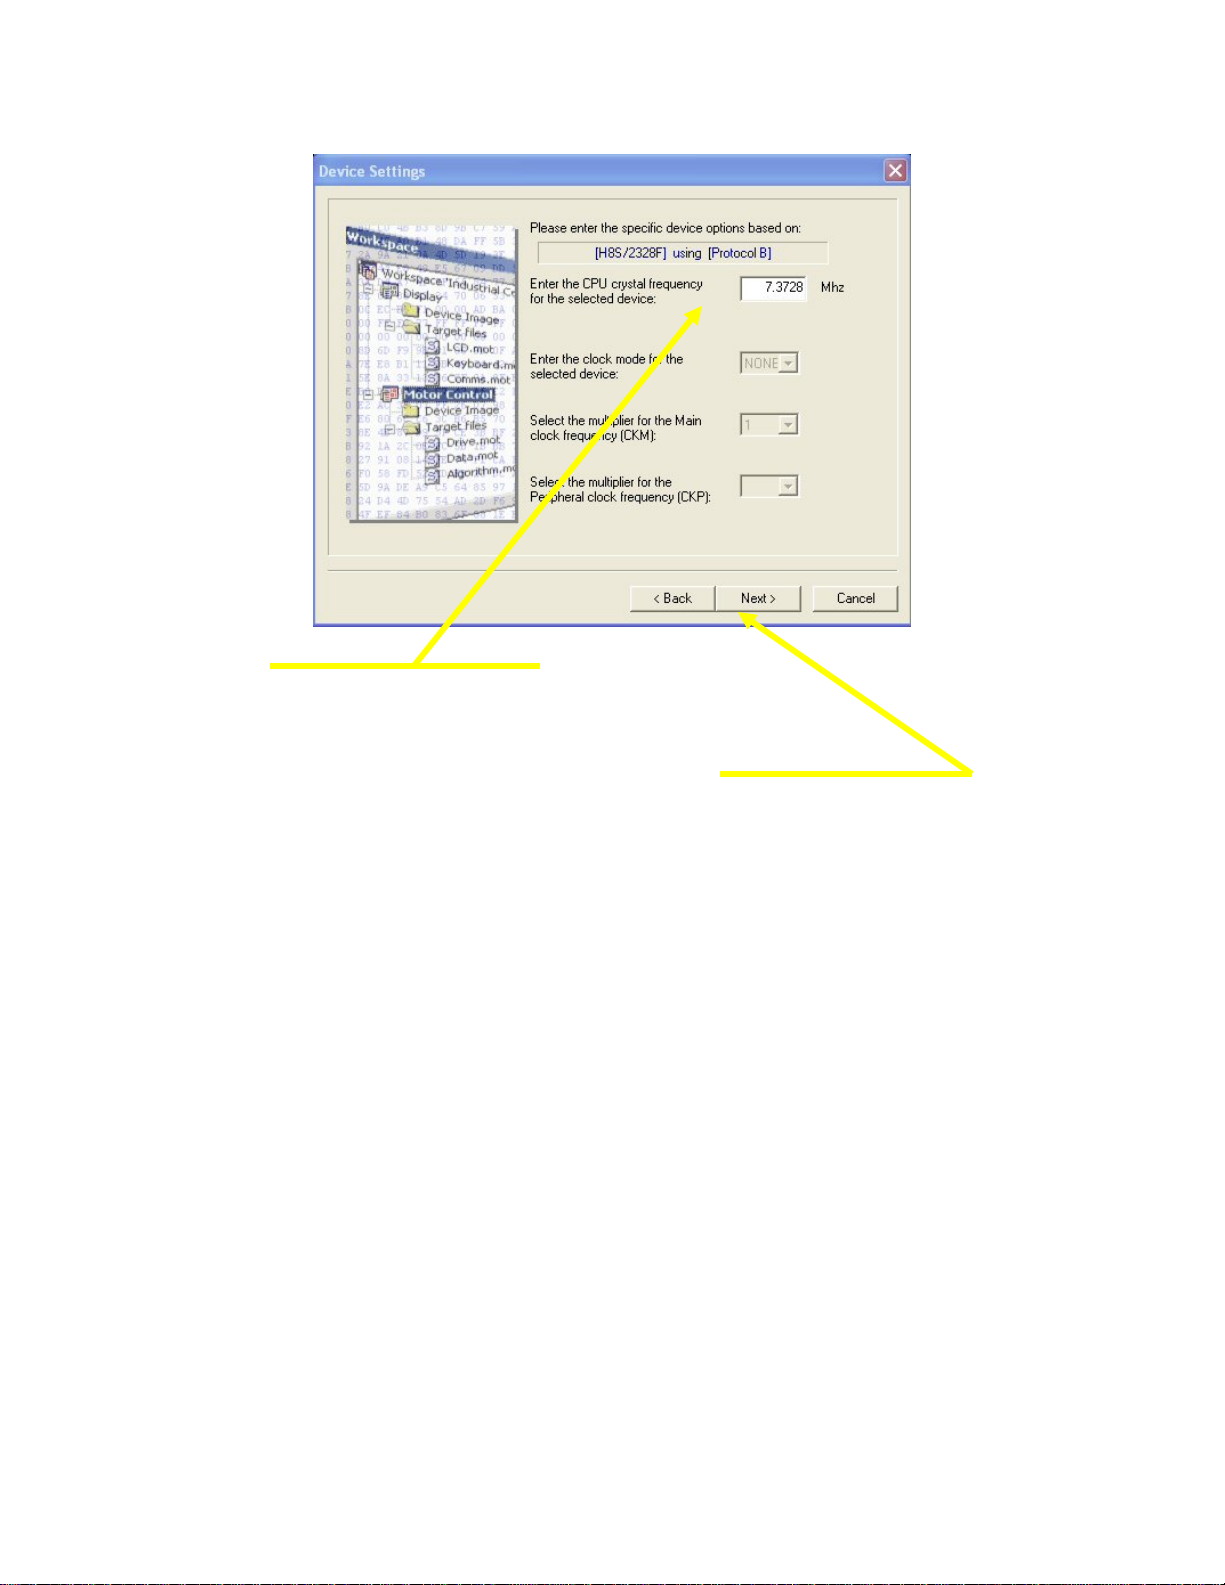
10. The “Device Settings” dialog box will appear.
11. Set the “Enter the CPU crystal frequency” window to 7.3728 Mhz.
12. Ensure the “Specific device options” window displays
“[H8S/2328F] using [Protocol B] and click “Next >”
Note: This window will display [H8S/2328F] or [H8S/2329F] depending on the device you
select in previous steps.
iBridge & RNET AV Decoder
Revised August 7, 2006
5 of 33
Page 17
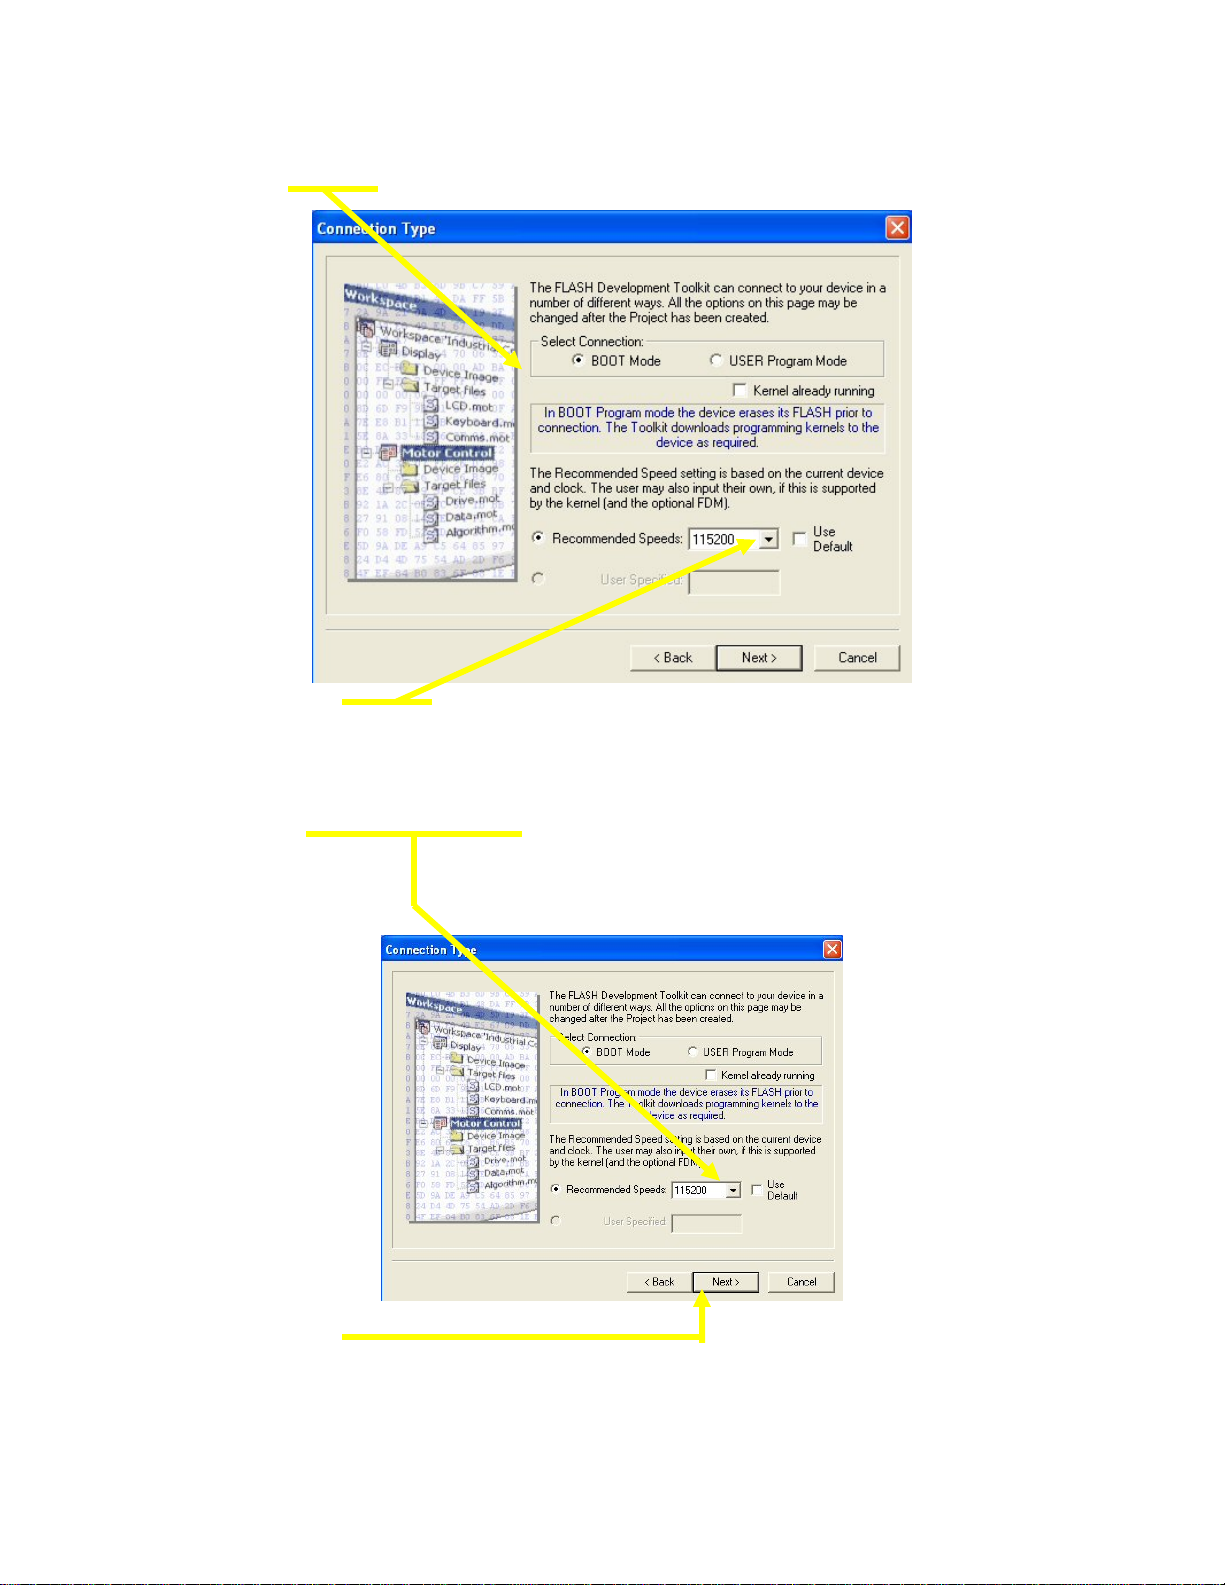
13. The “Connection Type” dialog box will appear.
Ensure “Boot Mode” is selected.
14. Make sure the “Use Default” window does not have a checkmark in it by clicking its
window.
15. Ensure the “Recommended Speeds:” window displays 115200, if not click the
button and select 115200 from the pull down menu.
16. Click “Next >”
iBridge & RNET AV Decoder
Revised August 7, 2006
6 of 33
Page 18

The “Programming Options” dialog box will appear.
17. Ensure the “Automatic” and “Advanced” buttons are selected. Then Click “Finish”
iBridge & RNET AV Decoder
Revised August 7, 2006
7 of 33
Page 19

18. The “FDT Simple Interface” dialog box appears.
19. Click “User Area” to place a checkmark in its window. Click “…” and navigate to the
directory where the current file for the iBridge is stored and select it in the
“User Area:” window.
iBridge & RNET AV Decoder
Revised August 7, 2006
8 of 33
Page 20

20. Connect the Advanced Programming Cable to the “OS UPDATE PORT” of the iBridge
dock.
21. Move the Source Function selector switch to the PRGM position.
22. Using a 12V Power Supply plug +12V power to the iBridge dock.
23. On the “FDT Simple Interface” dialog box click the “Program Flash” box.
The iBridge Dock is now being programmed, look on the next page for examples of dialog
boxes during programming.
iBridge & RNET AV Decoder
Revised August 7, 2006
9 of 33
Page 21

Note: If the iBridge dock fails to program successfully return to Step 5 in the procedure
and select the alternate device listed.
Example of MCU being programmed
Example of MCU successfully programmed.
24. Unplug the 12V Power Supply.
25. Disconnect the Advanced Programming Cable from the iBridge Dock.
iBridge & RNET AV Decoder
Revised August 7, 2006
10 of 33
Page 22

26. Connect the following and refer to the picture and diagrams below.
CAV6.6
UNO-S2
iBridge Dock RNET AV Decoder
27. Connect the iBridge AV-Port to the RNET AV Decoder AV-Port using a CAT5e patch cable.
Cat5e patch cable
iBridge & RNET AV Decoder
Revised August 7, 2006
11 of 33
Page 23

28. Connect the CAV6.6 to the AV Decoder.
a) Use RCA Cables with feed thru jacks on one end and connect to the AV Out of the
RENT AV Decoder and the other end to the Source 1 Input of the CAV6.6.
b) Use a CAT5e patch cable to connect the RNET LINK of the RNET AV Decoder to the
RNET LINK OUT of the CAV6.6
c) Use a second set of RCA cables to connect to the feed thru jacks on the RNET AV
Decoder and the other end to the input of each channel of the Dual Trace Oscilloscope.
Dual Trace
Oscilloscope
Zone Output 1 of CAV6,6
UNO-S2
iBridge & RNET AV Decoder
Revised August 7, 2006
12 of 33
Page 24

29. Turn on your oscilloscope and adjust to the following settings:
a) Channel 1 to 2V per division.
b) Channel 2 to 2V per division.
c) Time Base to 1ms
d) Triggering to Normal
Example of the scope we used at Russound
30. Connect a UNO-S2 Keypad to UNO Keypad Port 1 of the CAV6.6.
31. Connect a set of speakers to Zone Output number 1 of the CAV6.6.
32. Move the Source Function Selector Switch of the iBridge Dock to the 1 position.
33. Plug the 12V Power Supply into the iBridge Dock and RNET AV Decoder.
34. Turn on the CAV6.6.
35. Ensure your iPod is not in the iBridge Dock.
36. Push the Source button on the UNO-S2 until Source 1 is Displayed.
37. “Source 1” will only be displayed for a few seconds.
38. Wait a few seconds and “WAITING FOR IPOD” will scroll across the UNO-S2.
iBridge & RNET AV Decoder
Revised August 7, 2006
13 of 33
Page 25

39. Pick up your iPod and turn it on. The ipod display will illuminate.
Note: Before starting the test check the iPod being used has several playlists
recorded and the 1Khz test tones are loaded and that has several photos
stored. (Test tones are supplied by Russound)
40. Plug the iPod into the iBridge Dock.
41. The Ipod will display the Rossound Logo for several seconds and go dark.
(The ipod illumination time is dependent upon your iPod backlight setting)
42. The UNO-S2 Keypad will display the name of the ipod momentarily.
(This is the name you gave your iPod when loading iTunes on your computer)
43. Music will automatically be heard out both speakers of the CAV6.6.
(A song from any stored on the iPod will be played at this time)
44. The UNO-S2 will display and scroll the song being played.
45. Press the Volume UP or Down buttons paying close attention that the music is clear
not distorted. Confirm that music is heard from both speakers.
Observe the two waveforms on the Oscilloscope and ensure there is no distortion.
iBridge & RNET AV Decoder
Revised August 7, 2006
14 of 33
Page 26

46. Press the + button on the UNO-S2 Keypad
Forward
Button
47. The title of a Playlist stored on your iPod will display on the UNO-S2 momentarily.
48. The artist and songs on that play list will be heard and scroll across the display.
49. Press and release the Forward button on the UNO-S2. Look at picture above.
50. The next song will be heard then displayed on the UNO-S2 Keypad.
51. Unplug the 12V Power Supply on the iBridge Dock.
52. Move the Source Function Selector Switch of the iBridge Dock to the 2 position.
53. Move the RCA cable on the CAV6.6 from Source Audio Input 1 to Input 2.
Source Audio Input 2 of the CAV6.6
iBridge & RNET AV Decoder
Revised August 7, 2006
15 of 33
Page 27

54. Plug the 12V Power Supply into the iBridge Dock.
55. No music should be heard from the speakers.
56. Press and release the Source button on the UNO-S2 keypad unit Source 2 is displayed.
Note: Source 2 will display momentarily then iPod, song, and title information should display on
the UNO-S2.
Source
Button
57. Music should be heard from the speakers.
58. Press and release the Forward button on the UNO-S2.
59. The next song will be heard then displayed on the UNO-S2 Keypad.
60. Unplug the 12V Power Supply on the iBridge Dock.
61. Move the Source Function Selector Switch of the iBridge Dock to the 3 position.
iBridge & RNET AV Decoder
Revised August 7, 2006
16 of 33
Page 28

62. Move the RCA cable on the CAV6.6 from Source Audio Input 2 to Input 3.
Source Audio Input 3 of the CAV6.6
63. Plug the 12V Power Supply into the iBridge Dock.
64. No music should be heard from the speakers.
65. Press and release the Source button on the UNO-S2 keypad unit Source 3 is displayed.
Note: Source 3 will display momentarily then iPod, song, and title information should display on
the UNO-S2.
Source
Button
66. Music should be heard from the speakers.
67. Press and release the Forward button on the UNO-S2.
68. The next song will be heard then displayed on the UNO-S2 Keypad.
iBridge & RNET AV Decoder
Revised August 7, 2006
17 of 33
Page 29

69. Unplug the 12V Power Supply on the iBridge Dock.
70. Move the Source Function Selector Switch of the iBridge Dock to the 4 position.
71. Move the RCA cable on the CAV6.6 from Source Audio Input 3 to Input 4.
Source Audio Input 4 of the CAV6.6
72. Plug the 12V Power Supply into the iBridge Dock.
73. No music should be heard from the speakers.
74. Press and release the Source button on the UNO-S2 keypad unit Source 4 is displayed.
Note: Source 4 will display momentarily then iPod, song, and title information should display on
the UNO-S2.
iBridge & RNET AV Decoder
Revised August 7, 2006
18 of 33
Page 30

Source
Button
75. Music should be heard from the speakers.
76. Press and release the Forward button on the UNO-S2.
77. The next song will be heard then displayed on the UNO-S2 Keypad.
78. Unplug the 12V Power Supply on the iBridge Dock.
79. Move the Source Function Selector Switch of the iBridge Dock to the 5 position.
80. Move the RCA cable on the CAV6.6 from Source Audio Input 4 to Input 5.
Source Audio Input 5 of the CAV6.6
81. Plug the 12V Power Supply into the iBridge Dock.
iBridge & RNET AV Decoder
Revised August 7, 2006
19 of 33
Page 31

82. No music should be heard from the speakers.
83. Press and release the Source button on the UNO-S2 keypad unit Source 5 is displayed.
Note: Source 5 will display momentarily then iPod, song, and title information should display on
the UNO-S2.
Source
Button
84. Music should be heard from the speakers.
85. Press and release the Forward button on the UNO-S2.
86. The next song will be heard then displayed on the UNO-S2 Keypad.
87. Unplug the 12V Power Supply on the iBridge Dock.
88. Move the Source Function Selector Switch of the iBridge Dock to the 6 position.
iBridge & RNET AV Decoder
Revised August 7, 2006
20 of 33
Page 32

89. Move the RCA cable on the CAV6.6 from Source Audio Input 5 to Input 6.
Source Audio Input 6 of the CAV6.6
90. Plug the 12V Power Supply into the iBridge Dock.
91. No music should be heard from the speakers.
92. Press and release the Source button on the UNO-S2 keypad unit Source 6 is displayed.
Note: Source 5 will display momentarily then iPod, song, and title information should display on
the UNO-S2.
Source
Button
93. Music should be heard from the speakers.
94. Press and release the Forward button on the UNO-S2.
95. The next song will be heard then displayed on the UNO-S2 Keypad.
96. Go to the next page and continue testing.
iBridge & RNET AV Decoder
Revised August 7, 2006
21 of 33
Page 33

97. Unplug the cable from the RNET LINK on the RNET AV Decoder.
98. Plug the cable into the other jack of the RNET AV Decoder.
Dual Trace
Oscilloscope
Zone Output 1 of CAV6,6
UNO-S2
99. Press the + button on the UNO-S2 and a new playlist will play.
100. You have confirmed operation of the other RNET jack.
101. Unplug the 12V Power Supply from the iBridge Dock.
iBridge & RNET AV Decoder
Revised August 7, 2006
22 of 33
Page 34

102. Move the Source Function Selector Switch of the iBridge Dock to the IR position.
103. Plug the 12V Power Supply into the iBridge Dock.
104. The iPod menu will be displayed.
105. Scroll to Music on the iPod menu screen and press the center button.
106. The Music menu will be displayed.
iBridge & RNET AV Decoder
Revised August 7, 2006
23 of 33
Page 35

107. Scroll to Playlists on the Music menu screen and press the center button.
108. The Playlists menu will be displayed.
109. Scroll to Test Tones on the Playlists menu screen and press the center button.
110. The Test Tones menu will be displayed.
111. Press the center button on the iPod.
112. The 1Khz_5sec_Left screen will be displayed.
iBridge & RNET AV Decoder
Revised August 7, 2006
24 of 33
Page 36

113. You will hear a 1 Khz tone from the Left Speaker only for 5 seconds.
The Oscilloscope will display a 1Khz waveform at 4V P-to-P on one channel.
114. After 5 seconds the iPod will display the 1Khz_5sec_Right screen.
115. You will hear a 1 Khz tone from the Right Speaker only for 5 seconds.
The Oscilloscope will display a 1Khz waveform at 4V P-to-P the other channel.
iBridge & RNET AV Decoder
Revised August 7, 2006
25 of 33
Page 37

116. After 5 seconds the iPod will display the 1Khz_5sec_Center screen.
The Oscilloscope will display a 1Khz waveform at 4V P-to-P on both channels.
117. Ensure all scope waveforms are 1Khz at 4V P-to-P with no distortion.
118. Press the pause button on the iPod.
119. Press the Menu button on the iPod several times until the iPod menu displays.
120. Scroll to Photos on the iPod menu and press the center button.
iBridge & RNET AV Decoder
Revised August 7, 2006
26 of 33
Page 38

121. The Photos menu should display on the iPod.
122. Scroll to Slideshow Settings and press the center button on the iPod.
(If you have already set Slideshow settings previously skip this step)
123. Set Slideshow Settings to the following values by selecting its menu and changing it
accordingly.
Time Per Slide 5 Seconds
Music Off
Repeat On
Shuffle Photos Off
Transitions Off
TV Out On
TV Signal NTSC
iBridge & RNET AV Decoder
Revised August 7, 2006
27 of 33
Page 39

124. Press Menu on the iPod until the Photos menu displayed.
125. Scroll to Photo Library and press the center button on the iPod.
126. All your photos will be displayed.
127. Press the Play button on the iPod.
128. Your photos will be displayed on the iPod for 5 seconds per picture.
129. Do not remove any cables to the existing test setup. You will be adding
a video cable from the RNET AV Decoder to a TV or monitor in the next step.
iBridge & RNET AV Decoder
Revised August 7, 2006
28 of 33
Page 40

130. Plug a video cable from the RNET AV Decoder yellow RCA jack to a Television
with an RCA video input.
Viewsonic N2750W
Front View
Viewsonic N2750W
Rear View
Note: This picture is shown for comparison purposes. The Viewsonic N2750W TV
monitor has an RCA composite video input. Any TV or monitor with an RCA
composite video input will be able to perform this test.
131. Turn on you TV or monitor and select composite video input mode.
132. The pictures being displayed on the iPod should also be seen on the TV or monitor.
133. After the pictures are clearly viewed on the monitor press the Menu button on the iPod until
the iPod screen is displayed .
134. Scroll to Music and press the center button.
iBridge & RNET AV Decoder
Revised August 7, 2006
29 of 33
Page 41

135. Scroll to Playlists and press the center button.
136. Select a playlist (Elton John) and press the center button.
137. Scroll to any song and press the center button.
138. That song should be playing on the speakers.
139. Unplug the cable connected to the RNET LINK of the RNET AV Decoder.
140. Unplug the RCA video cable from the RNET AV Decoder.
141. Unplug the 12V Power Supply from the iBridge Dock and the RNET AV Decoder.
142. Take cable that has a 1/8” phono plug on each end and plug one end into the ACC
IR jack of the CAV6.6 and the other end into the RNET AV Decoder IR Input jack.
143. Plug the 12V Power Supply into the IBridge Dock and the RNET AV Decoder.
144. The iPod will go back to playing music automatically.
iBridge & RNET AV Decoder
Revised August 7, 2006
30 of 33
Page 42

145. Point the SRC2 remote control at the UNO-S2 and press the button to advance songs
or playlists to confirm IR operation.
Press the Video button first then the right arrow button.
146. Each time you press the right arrow button the songs should advance.
147. If a playlist or song is advanced the IR operation test is confirmed.
148. Unplug all cables from the RNET AV Decoder and iBridge Dock.
149. You have completed testing the IBridge Dock and RNET AV Decoder.
150. Move the Source Function Selector Switch of the iBridge Dock to the Source 6 position.
Building the CAT5e patch cable and
UNO-S2 Keypad cable.
iBridge & RNET AV Decoder
Revised August 7, 2006
31 of 33
Page 43

CAT5e patch cable
1. Cut a 6’ section of CAT5e 4 pair cable.
2. Strip the insulation and connect each end to an 8 pin RJ45 connector as shown below.
iBridge & RNET AV Decoder
Revised August 7, 2006
32 of 33
Page 44

UNO-TS2 cable wiring
1. Cut a 6’ section of CAT5e 4 pair cable.
2. Wire one end using an RJ45 connector and the CAT5e diagram.
3. Wire the other end to the rear of the UNO-S2 Keypad using a 110 Punch down tool
like the diagram below.
Rear View of the UNO-S2
iBridge & RNET AV Decoder
Revised August 7, 2006
33 of 33
Page 45

BGD1_Rev3_06_14_06.sch-1 - Wed Jun 14 15:23:14 2006
Page 46

BGD1_Rev3_06_14_06.sch-2 - Wed Jun 14 15:23:14 2006
Page 47

BGD1_Rev3_06_14_06.sch-3 - Wed Jun 14 15:23:14 2006
Page 48

BGD1_Rev3_06_14_06.sch-4 - Wed Jun 14 15:23:15 2006
Page 49

BGD1_Rev3_06_14_06.sch-5 - Wed Jun 14 15:23:15 2006
Page 50

w
BGD1 Assembly Bill of Materials
V
08/11/06
Item Qty
Reference
Designators
1 1 Base Moulding ABS PC RUS22002 D
2 1 Top Moulding ABS PC RUS22010 E
3 1 Snap Mechanism ABS PC RUS22011 C
4 1 PCB Assembly RUS22007 G
5 1 Header Plug IRHD 55 PU RUS22013 A
6 1 Steel Plate MS RUS22012 A
7 1 Connector Sleeve ABS
8 4 3M Bumpons SJ5382 PU 3M SJ5382
9 6 Diameter 3.5 X 8mm Screw Stainless Steel Pan Head
10 1 Mylar Sheet RUS22014 A
11 1
12 1 Bottom Panel Sticker silver background with black text
Description
Serial Number Label white with black text 1 1/4" x 3/16".
This label includes the serial number of the BGD1, the Rev.
# of the BGD1, and the software version of the BGD1. This
label is placed on the larger label on the underneath of the
BGD1.
alueRussound Dra Manufacturer Manuf. Part Number Distributor Distrib. Part Number Web Site
Apple Computer,
Inc. is liscenser
815-8471 Rev.13
Leon Chen(陳坤)
Green Point Technology (Shenzhen)
CO. , LTD.
Sale Department
TEl: +86(0)755 - 8176 8888 ext 258 /
182
Fax: +86(0)755 - 8176 8988
E-mail: leon_chen@gpgtech.com
815-8471 Rev.13
http://www.greenp
oint.com.tw/ea.ht
m
Page 51

7
C
L
0
U
RTT44
T
iBridge Doc BOM Rev2
r
V
A
Item Qty/Brd Reference Part Numbe
Manufacturer Description
alue
1 3 C1 C9 C34 ECEV1CA101WP Panasonic SMD Electrolytic Cap 100uF Digikey
2 8 C2 C19 C21 C26-2
ECJ-1VC1H101J Panasonic Multilayer Cer Chip Cap NPO 0603 100pF Digikey
3 2 C22-23 ECJ-2VC1H180J Panasonic Multilayer Cer Chip Cap NPO 0805 18pF
4 8 C3 C12-13 C15-17 ECEV1CA220WR Panasonic SMD Alunimun Elect Cap Size B 22uF Digikey
5 14 C4 C7-8 C10 C18
ECJ-2YB1H104K Panasonic Multilayer Cer Chip Cap X7R 0805 0.1uF
6 1 C47 ECEV1CA220WR Panasonic SMD Alunimun Elect Cap Size B 22uF
7 3 C5 C14 C35 ECJ-2VB1H103K Panasonic Multilayer Cer Chip Cap X7R 0805 .01uF
8 4 C6 C11 C25 C39 ECJ-4YB1E225K Panasonic Multilayer Cer Chip Cap X5R 1210 2.2 uF
9 1 D1 DL4002-13 Diodes Inc Diode Digikey
10 1
D2 - DON'T POPU
LN1251CTR Panasonic Red SMD LED Digikey
11 1 D3 BZX84C3V3LT1 On Semiconductor 3.3V ZENER DIODE Digikey
12 3 D8-10 BZX84C5V6LT1 On Semiconductor 5.6V ZENER DIODE DIgikey
13 2 F1 F3 MICROSMD010 Raychem 0.10A hold current PTC Digikey
14 1 F2 MiniSMDC050 Raychem 0.50A hold current PTC Digikey
15 1 J12 406525-1 Tyco 8 pos RJ-45 Modular Connector Future
16 1 J6 TSW-105-08-T-S-RA-
Samtec GENERIC 5 PIN SIP HEADER .100 CENTERS Arrow
17 1 J7 163-2121 TTI 2.1mm Power Jack Mouser
iPod Universal-Well 15 deg Connector (RUSSOUND
18 1 J8 MFI514S0098 Avnet
MUST PURCHASE THIS PART)
lternate Man. Part #
19 2 Q1-2 MMBT3904LT1 Infineon Technologies GENERAL PURPOSE NPN SILICON TRANSISTOR Digikey
20 1 Q3 MMBT3906LT1 Infineon Technologies GENERAL PURPOSE PNP SILICON TRANSISTOR Digikey
21 2 R1 R2 MCR10EZHJ000 Rohm 0805 Zero Ohm Jumper 0 Digikey
22 4 R10 R15 R17 R42 ERJ-6ENF1001V Panasonic 0805 SMD 1/10W Resistor - 1% 1.00k
23 1 R30 R12 ERJ-3GEYJ472V Panasonic 0603 SMD 1/10W Resistor 4.7K
24 1
R31 - DON'T POP
ERJ-3GEYJ681V Panasonic 0603 SMD 1/10W Resistor 680
25 1 R32 ERJ-6GEYJ471V Panasonic 0805 SMD 1/10W Resistor 470
26 2 R36-37 30BJ250-22 Xicon Carbon Comp 1/4 Watt Resistor 22R Mouser
27 4 R4 R51 R62 R63 ERJ-6GEYJ103V Panasonic 0805 SMD 1/10W Resistor 10K
28 10 R13 R33 R40 R48
9C08052A4702FKHF Yageo 0805 SMD 1/10W Resistor - 1% 47.0K
29 12 R5-7 R19-26 R52 ERJ-6GEYJ472V Panasonic 0805 SMD 1/10W Resistor 4.7K
30 2 R57 R61 9C08052A4703FKHF
31 6 R8 R11 R27-28 R3
ERJ-3GEYJ470V Panasonic 0603 SMD 1/10W Resistor 47
Yageo 0805 SMD 1/10W Resistor 470K
32 1 R98 ERJ-3GEYJ102V Panasonic 0603 SMD 1/10W Resistor 1K
33 6 R9 R35 R41 R43 R
9C08052A1802FKHF Yageo 0805 SMD 1/10W Resistor - 1% 18.0K
34 1 R50 ERJ-3GEYJ103V Panasonic 0603 SMD 1/10W Resistor 10K
35 1 R53 ERJ-6GEYJ564V Panasonic 0805 SMD 1/10W Resistor 560K
36 1 R29 ERJ-6GEYJ121V Panasonic 0805 SMD 1/10W Resistor 120R
37 1 R64
ERJ-6GEYJ750V Panasonic 0805 SMD 1/10W Resistor 75R
38 1 R65 ERJ-6GEYJ102V Panasonic 0805 SMD 1/10W Resistor 1.0K
39 4 R38 R39 R45 R46 ERJ-6ENF3652V Panasonic 0805 SMD 1/10W Resistor - 1% 36.5K
40 1 U1 L7805CD2T ST Microelectronics 5 VOLT Digikey
41 1 U11 TS464CDT ST Microelectronics Quad Rail to Rail Op Amp Digikey
42 1 U12 L78L05ACUTR ST Microelectronics 5 VOLT Digikey KEC Semiconductor KIA78L05F
Page 52

43 1 U13 IRU1015-33CD International Rectifier 3.3V low dropout regulator Digikey STMicroelectronics LD1117DT33
44 1 U14 94HAB08RAT Grayhill 8 Pos Rotary DIP Switch Flush Digikey
45 1 U16 CD74HC4053M Texas Instruments ANALOG MULTIPLEXER/DEMULTIPLEXER Digikey
46 2 U2 U8 SN74HC08DR TEXAS INSTRUMENTS QUAD 2-INPUT POS-AND GATE Digikey
47 1 U3 HD64F2327BVFBL25 Renesas 16 Bit Microcontroller In House
48 1 U4 MCP130T-300I/TT Microchip Microcontroller Supervisory Circuit With Open Drain Ouput Digikey
49 1 U5 L78L09ACUTR ST Microelectronics 9 VOLT Digikey KEC Semiconductor KIA78L09F
50 1 U6 24LC64-I/SN Microchip 8k X 8 BIT I2C BUS EEPROM Digikey
51 1 U7 74V1G14STR ST Microelectronics Single Gate HEX SCHMITT-TRIGGER INV Digikey
52 1 U9 MAX3075EASA Maxim 3v RS-485 Driver Maxim
53 1 U10 CY7C1020CV33-15ZC Cypress 32K SRAM Avnet ISSI IS61WV3216BLL-12TLI
54 1 U15 TS462CDT ST Microelectronics Dual Rail to Rail Op Amp Digikey
55 1 U17 LMH6639MA National Semiconductor 190Mhz Rail to Rail Op-Amp Digikey
56 1 Y1 HCM49-7.3728MABJT Citizen CRYSTAL 7.3728 MHz Digikey
Page 53

Product
Produit
Name and address of the applicant
Nom et adresse du demandeur
Name and address of the manufacturer
Nom et adresse du fabricant
Name and address of the factory
Nom et adresse de l'usine
~(Q)~W
CB TEST CERTIFICATE
Note: When more than one factory, please report on page 2
Note: Lorsque il y plus d'une usine, veuil/ez utiliser fa 2"''' page
Ratings and principal characteristics
Valeurs nominales et caracteristiques principales
Trademark (if any)
Marque de fabrique (si elle existe)
Model/Type Ref.
Ref. De type
Additional information (if necessary, may also be reported
on page 2)
Les informations complementaires (si necessaire, peuvent
etre indiques sur la 2'm' page)
A sample of the product was tested and found
to be in conformity with
Un echantillon de ce produit a ete essaye et a ete
considere conforme it la
As shown in the Test Report Ref. No. which forms part of
this Certificate
Comme indique dans Ie Rapport d'essais numero de
reference qui constitue partie de ce Certificat
This CB Test Certificate is issued by the National Certification Body
Ce Certificat d'essai OC est etabli par l'Organisme National de Certification
Page 54

Page 55

 Loading...