

Russound AW4-LS-BR Installation Manual
AW4-LS-BR
Landscape Speaker
Installation Manual
AW4-LS-BR Manual.indd 1 3/28/17 9:10 AM
2
AW4-LS-BR Installation Manual
INTRODUCTION
Introduction
Thank you for selecting the AW4-LS-BR landscape speaker from Russound.
This advanced loudspeaker oers an elegant, scalable platform for providing
high quality audio to any outdoor area in even the harshest environmental
conditions. Specially designed to withstand both extreme heat and cold, the
speakers work great from the humid, hot conditions of summertime in Florida
to the bone-chilling cold of a Minnesota winter.
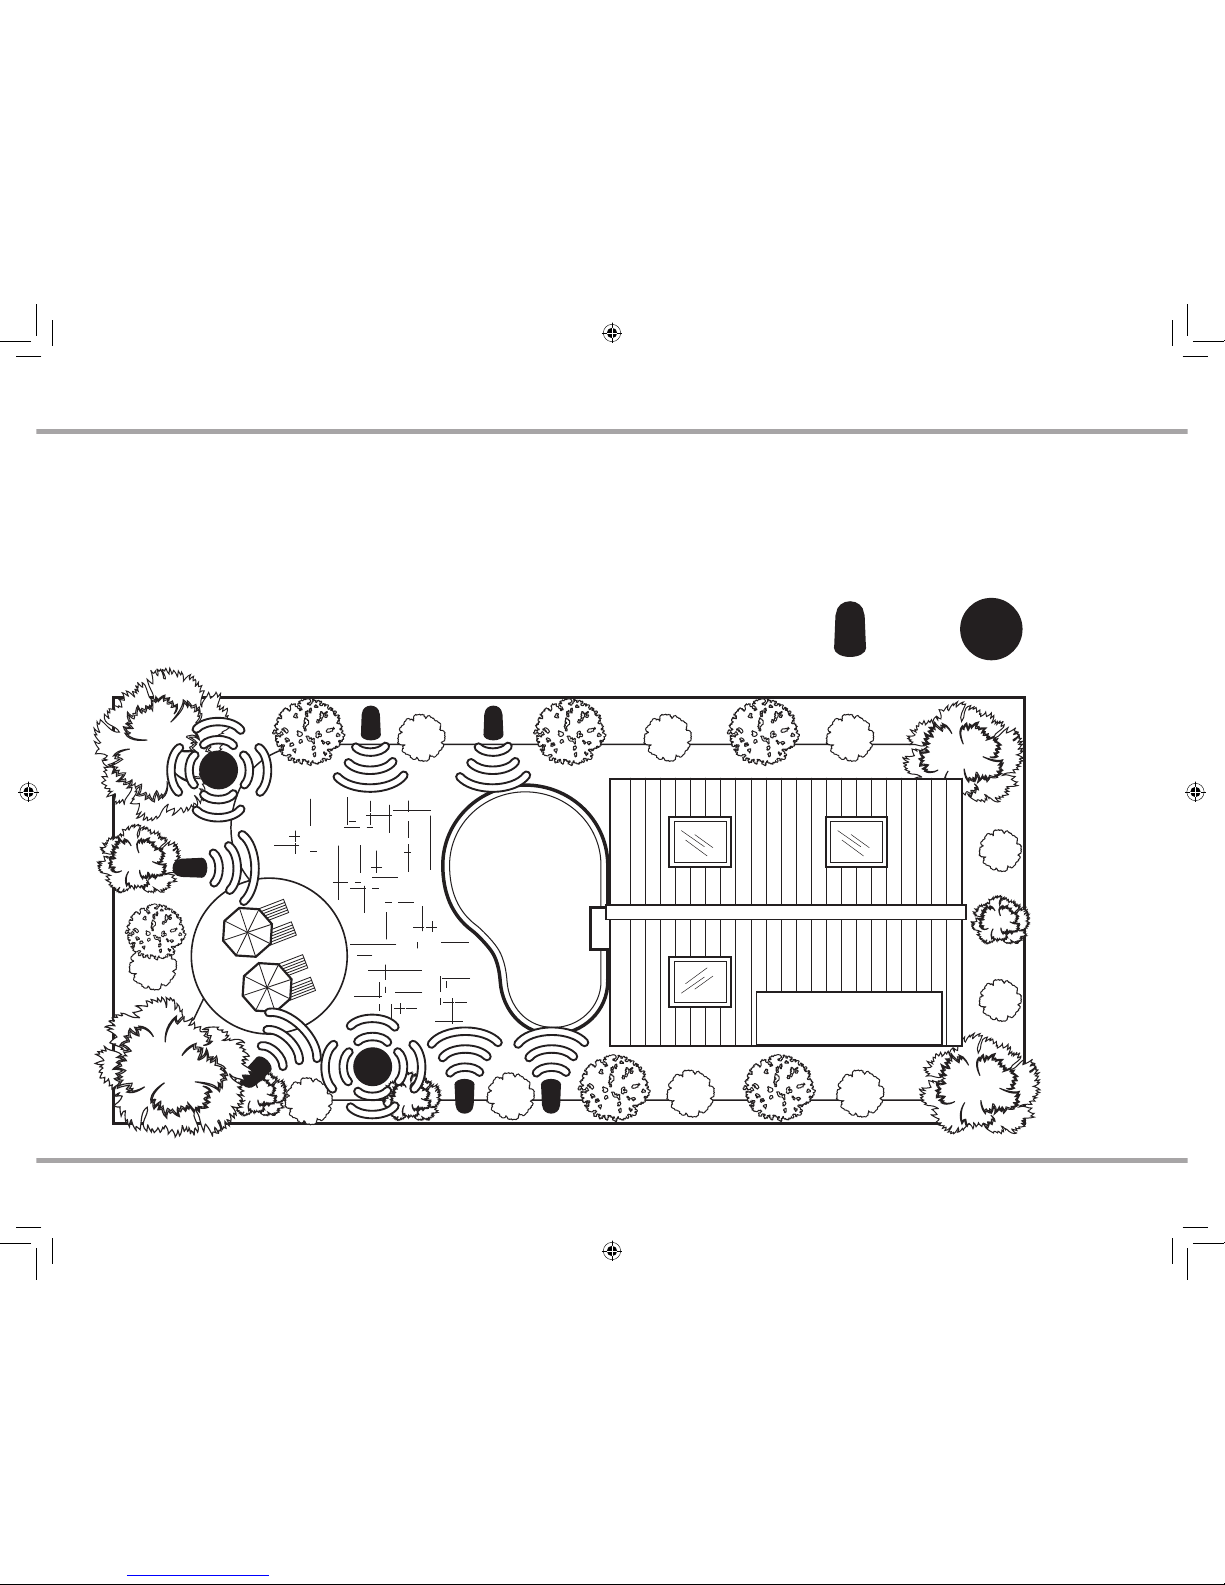
Sample landscape layout with 2 subwoofers and 6 satellite speakers
AW4-LS-BR AW10-LSUB-BR
AW4-LS-BR Manual.indd 2 3/28/17 9:10 AM
3AW4-LS-BR Installation Manual
360
O
120°
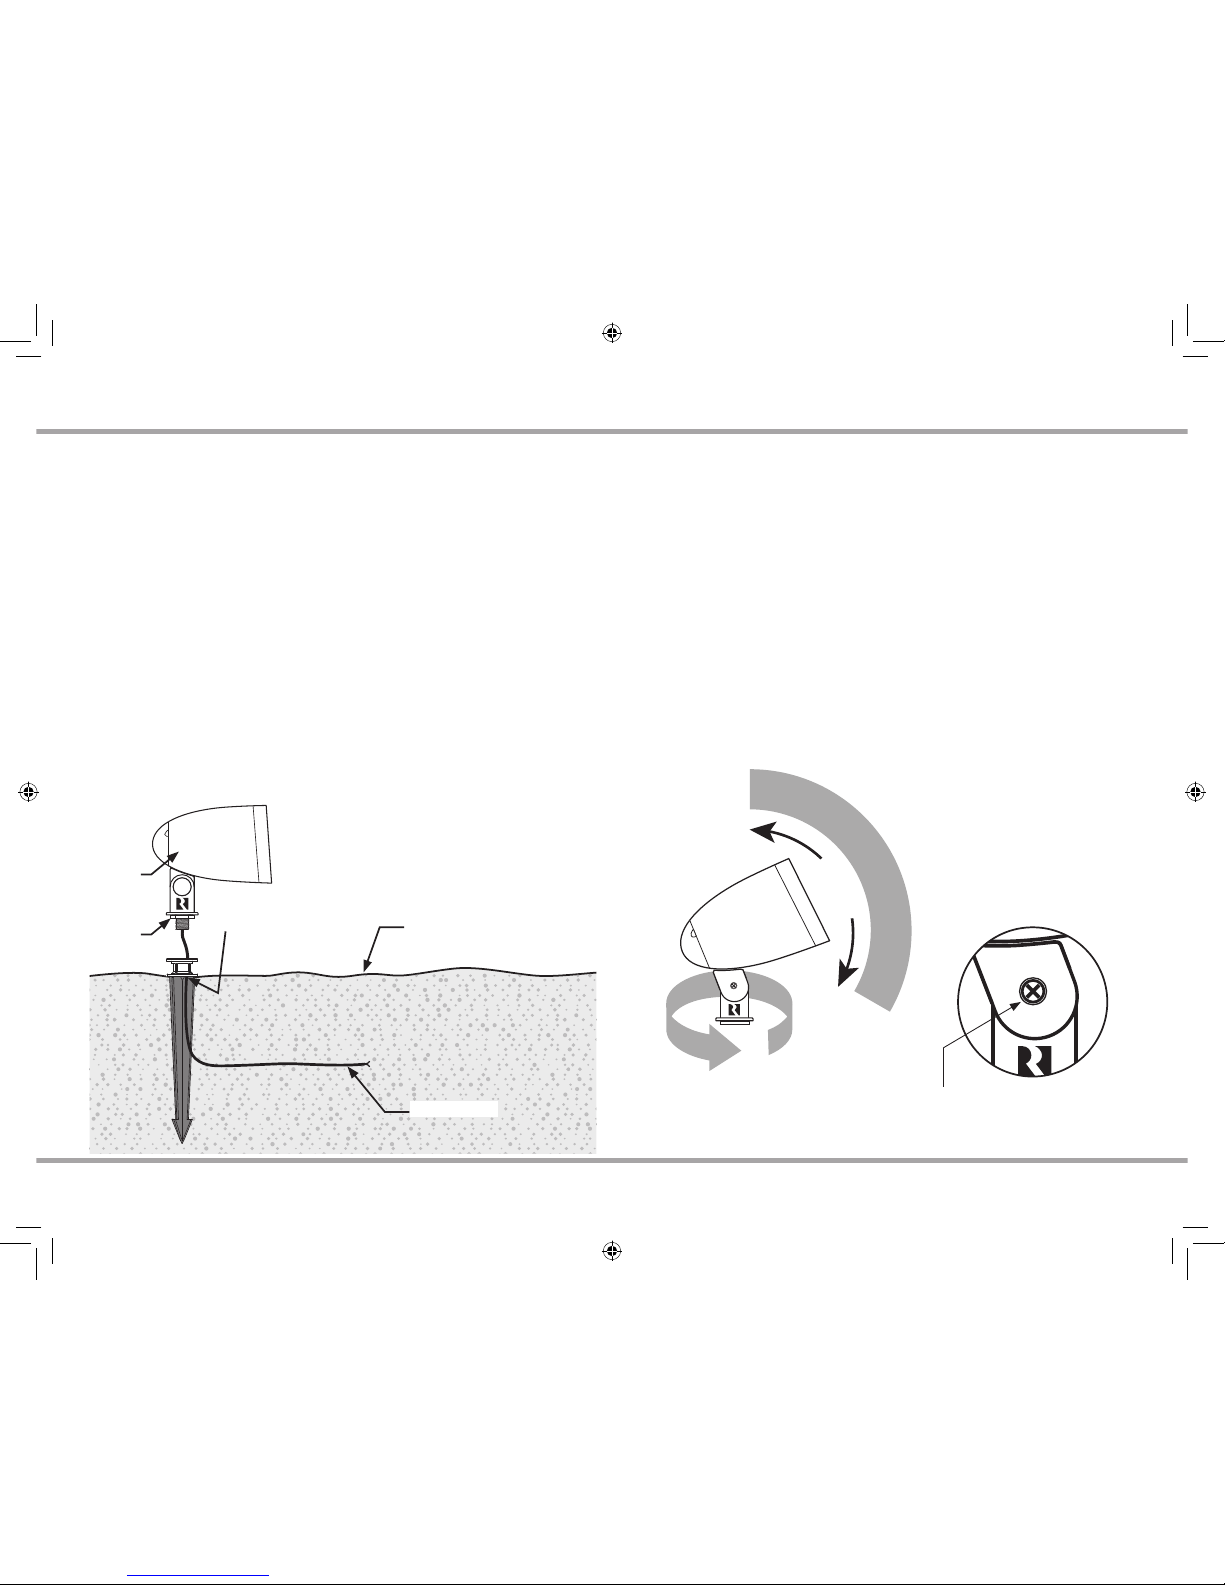
INSTALLING THE SPEAKER
Ground Level
Hinge Bolt
Wire Opening
Speaker
Locknut
Stake mount (included)
1) Determine the appropriate mounting position, making sure that it is not
near any buried utility, water, irrigation, or other lines/connections.
2) Using a rubber mallet or sledge, pound the stake into the ground leaving
enough clearance for the wire opening to be accessed.
3) Pass the speaker cable through the top of the stake and let it exit through
the wire opening.
4) Pound the stake the remaining distance needed into the ground, leaving
the top threaded section above ground level.
5) Attach the loudspeaker to the stake and turn the speaker clockwise until
it is securely mounted and facing the correct direction for your installation.
The speaker wire should be able to turn freely through the wire opening so
that it doesn’t twist excessively. Leaving some twists in the speaker wire is
okay.
6) Turn the locknut so that it tightens against the stake, xing the
loudspeaker in the correct orientation.
Surface Mount, Tree Mount, or other Options
The AW4-LS-BR speaker uses a standard ½” NPS thread so that it will work with
common landscape lighting mounting accessories such as those by Hadco®.
Philips Hadco Surface Mount Accessory, Model: MC1A
Philips Hadco Tree Mount Accessory, Model: TM1H
Angle Adjustment
Once the speaker has been oriented to the proper direction, the angle of the
speaker can be adjusted by loosening the hinge bolt adjusting the angle of
the speaker, and then tightening the hinge bolt, locking the speaker into the
desired angle.
Speaker Cable
AW4-LS-BR Manual.indd 3 3/28/17 9:10 AM
4
AW4-LS-BR Installation Manual
INSTALLING THE SPEAKER
Weep Hole
The AW4-LS-BR includes a weep hole at the bottom edge of the front of the
speaker for water drainage. This allows the speaker to be installed at a steeper
angle than most competitive landscape loudspeaker models. An angle of up
to 60° above the ground surface can safely be achieved with the Russound
AW4-LS-BR speaker while still allowing any water to drain from the speaker
housing properly. The AW4-LS-BR is fully weatherproof, so water will not cause
any damage. However, should a large amount of water accumulate and then
freeze and expand, this might cause damage to the speaker that would not
be covered by the warranty. For this reason, never install the speakers directly
upwards towards the sky as water would collect and pool at the top of the
speaker.
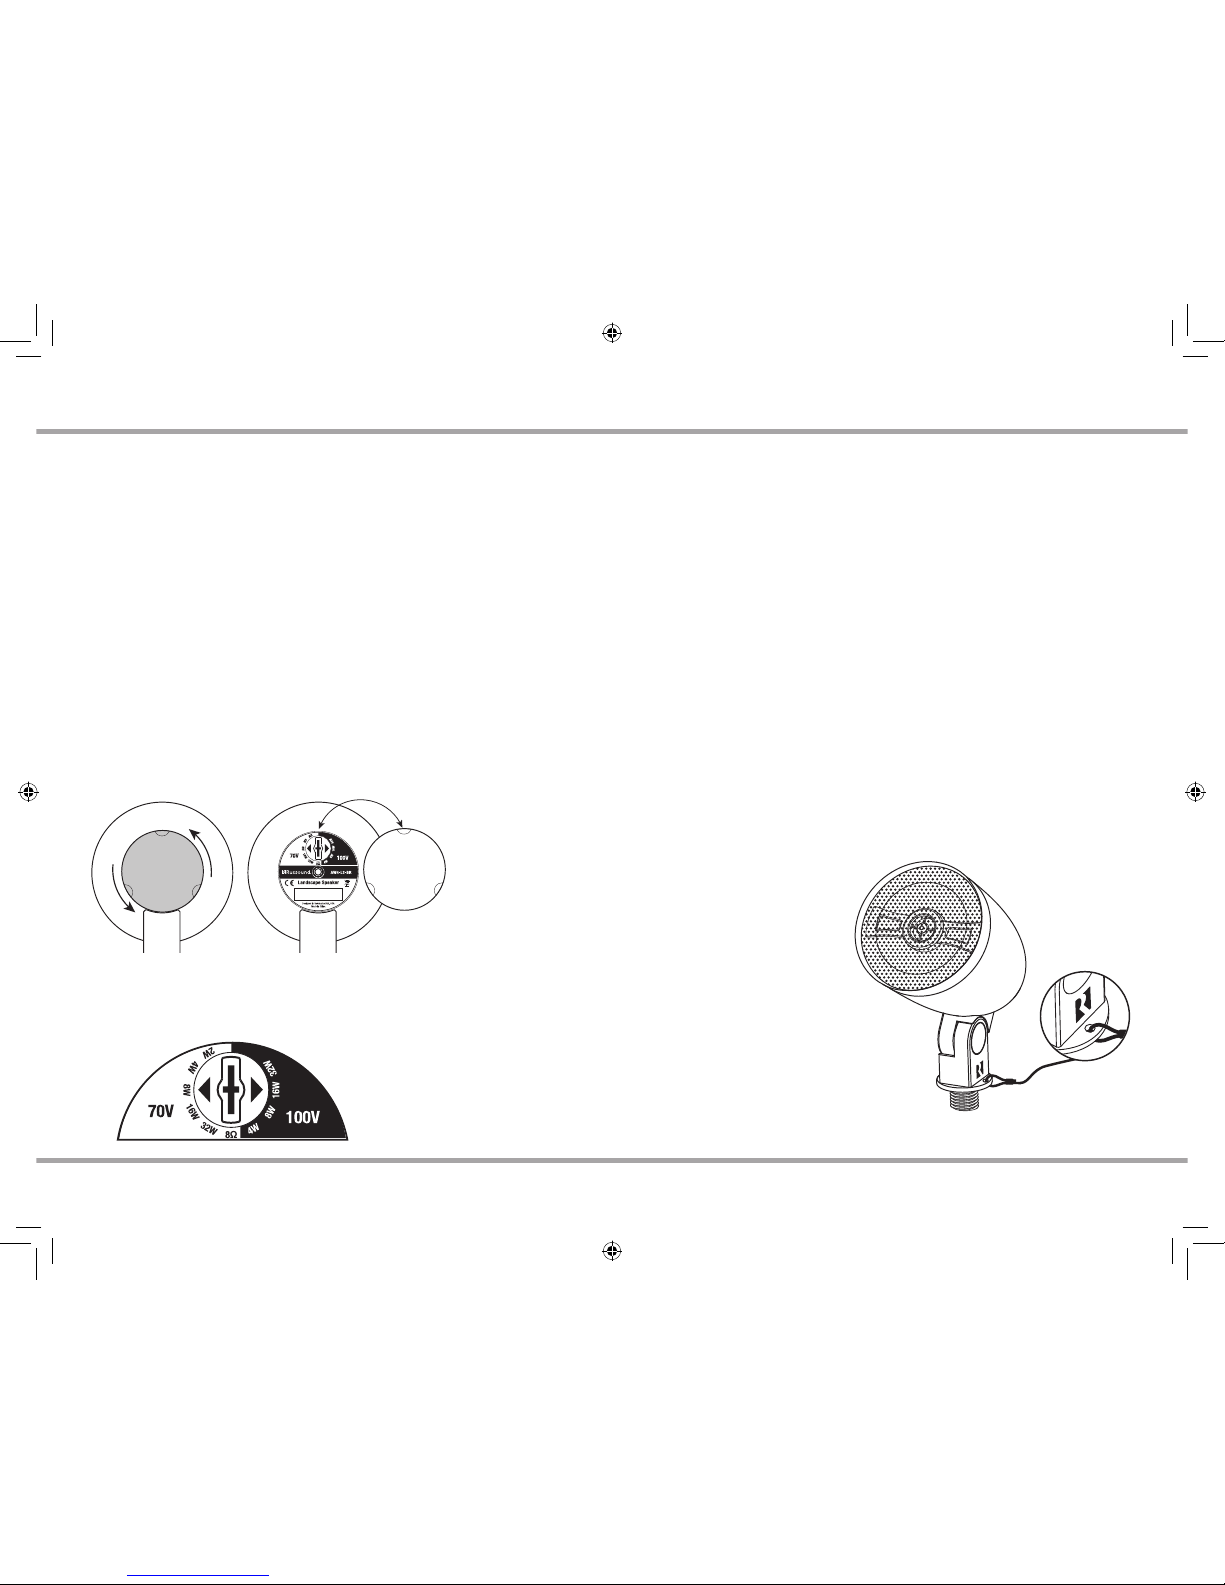
Wiring Connections
Note: Before connecting any wires, make certain that the tap setting switch
(located by unscrewing the rear cover cap from the speaker) is set to either a
70v/100v position for 70v/100v systems or to the 8Ω position when used with
a standard low impedance amplier or receiver.
Remove
weatherproof rear
cap by turning it
counterclockwise
You can now access
the tap settings
knob
Available Tap Settings:
70V - 2W, 4W, 8W, 16W, 32W
100V - 4W, 8W, 16W, 32W
8Ω Bypass
When you are ready to connect the loudspeaker wiring, make certain that you
leave enough slack in the wiring to completely protect the wire when buried
at least 6” underground or whatever minimum depth your local building code
requires, or by protecting the wire in conduit. Leaving a wire exposed can
lead to inadvertent damage during lawn mowing or trimming. Keeping the
wire properly protected is essential to preventing unwanted service calls in the
future.
While maintaining the proper polarity of the wires, twist the wire leads
together and insert them into the enclosed waterproof wire nuts. Tighten the
nuts securely and then test all speakers in the system before burying the wire,
closing any junction boxes, or lling any wire trenchwork.
Adjusting the tap setting (volume level)
When used as a 70v/100v speaker, the tap setting should be adjusted for each
speaker in the system. Keep in mind that the total wattage number of all
speakers connected to the same amplier should not exceed the amplier’s
power rating, always leaving 20% of power as headroom.
When you have nished adjusting the tap settings, make sure to securely
re-attach the rear cap of the speaker and hand-tighten it. All of the interior
components are weatherproof, but a loose cap may become dislodged in
storms or windy environments over time.
Security Wire Attachment
The base of the AW4-LS-BR
speaker includes a 5mm
hole for mounting a security
wire (not included). This is
for installations where extra
security for your valuable
loudspeakers may be needed,
such as in a commercial setting
like an outdoor seating area at a
restaurant, or by a pool or patio
area at a hotel.
AW4-LS-BR Manual.indd 4 3/28/17 9:10 AM
 Loading...