

Russound AW10-LSUB-BR Installation Manual

AW10-LSUB-BR
Landscape Subwoofer
Installation Manual
2
AW10-LSUB-BR Installation Manual
INTRODUCTION
Introduction
Thank you for selecting the AW10-LSUB-BR in-ground subwoofer from Russound.
This impressive subwoofer, designed to be installed by a professional, oers an
elegant, scalable platform for providing high quality audio enhancement to any
outdoor area in even the harshest environmental conditions. Specially designed
to withstand both extreme heat and cold, this subwoofer works great from the
humid, hot conditions of summertime in Florida to the bone-chilling cold of a
Minnesota winter.
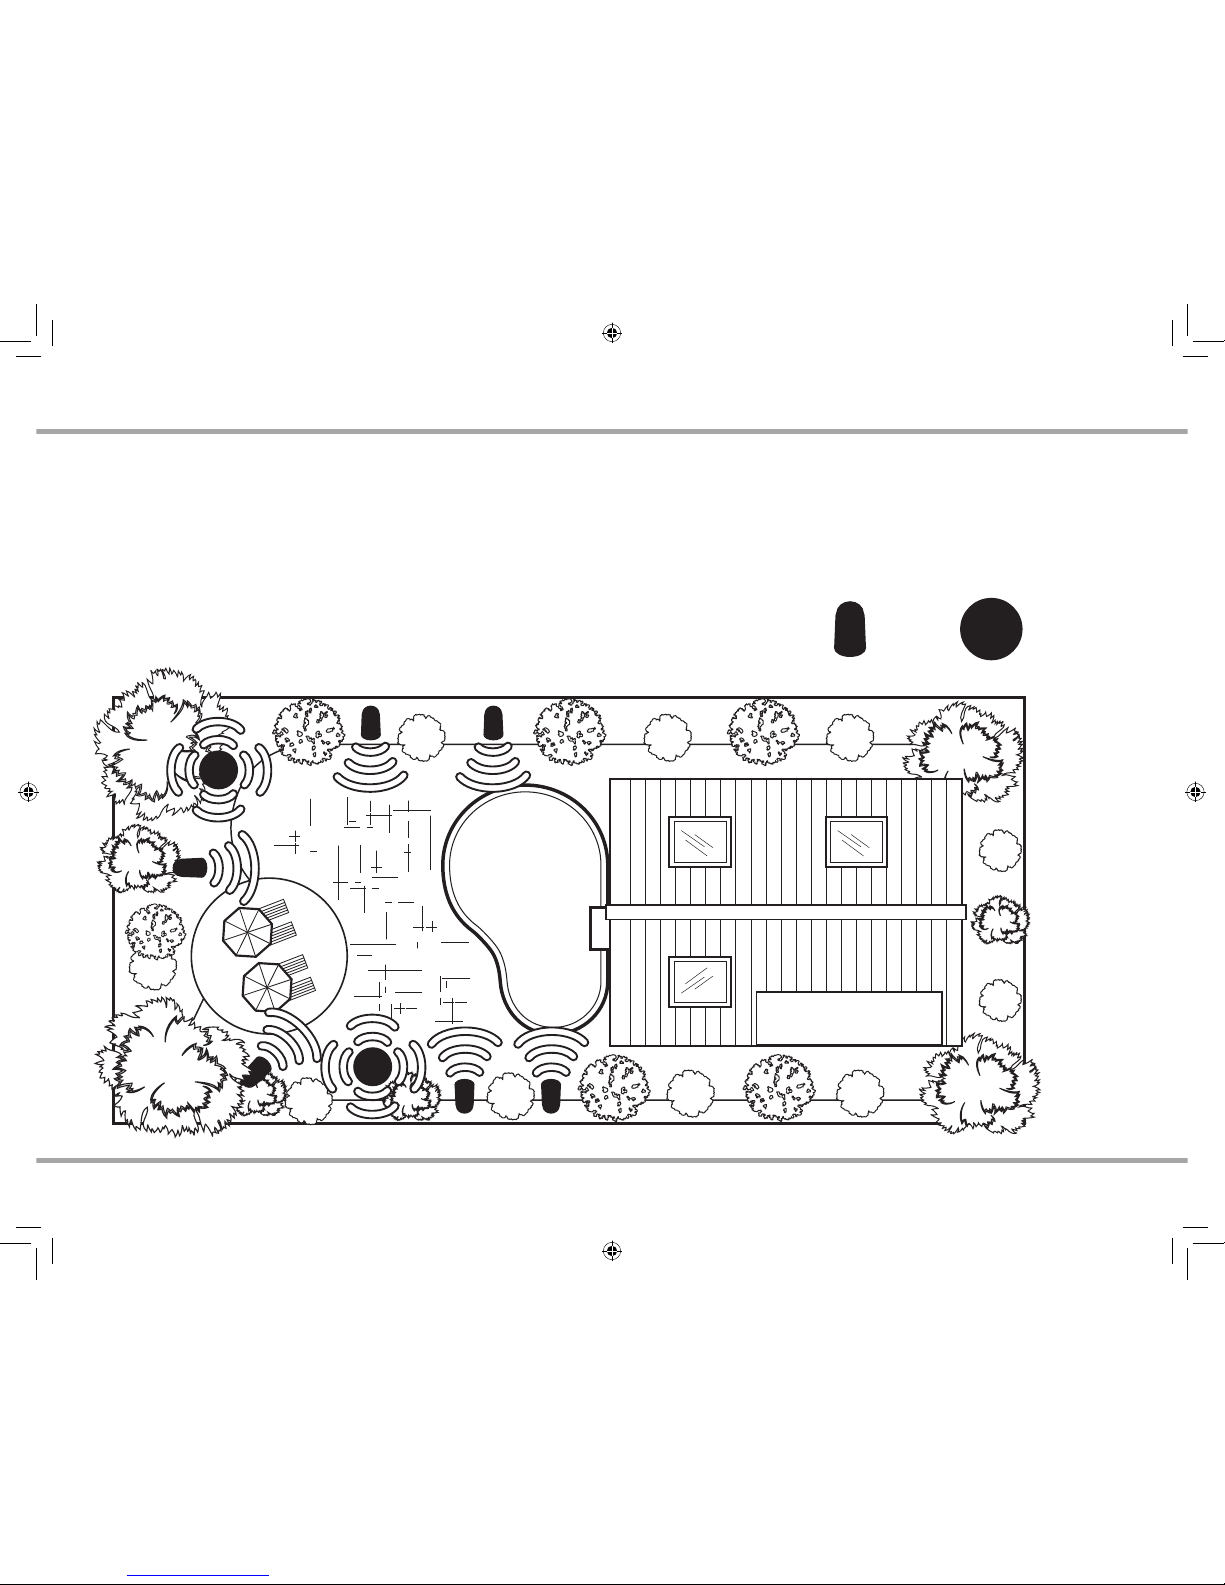
Sample landscape layout with 2 subwoofers and 6 satellite speakers
AW4-LS-BR AW10-LSUB-BR
3
AW10-LSUB-BR Installation Manual
9) Make your wiring connections using the included weatherproof wire nuts
and, when the entire system is ready, turn on your amplier(s). See page 6-8
for information on wiring connections.
10) Lower the subwoofer into the hole. Russound recommends placing a 1-2”
layer of pea gravel or similar substrate at the bottom of the hole to ensure
proper drainage. When placed, the subwoofer and canopy should be level.
You can verify this with a bubble level.
11) Before covering the subwoofer and any wiring, verify the system operation
and that the proper volume levels are set. It is easy to adjust the subwoofer tap
setting before the subwoofer gets buried. Adjust the tap setting as necessary
for the desired sound level near the subwoofer.
12) When the entire system is veried and tap settings throughout have been
adjusted, replace the tap setting cover and hand tighten it until secure. You
can now bury the subwoofer and its wiring.
13) Make certain that the subwoofer does not rotate out of position while you
are lling the hole. Pack the dirt as you go for an even installation base.
14) When nished, the canopy bottom edge should be between 6” and 8”
above the ground level.
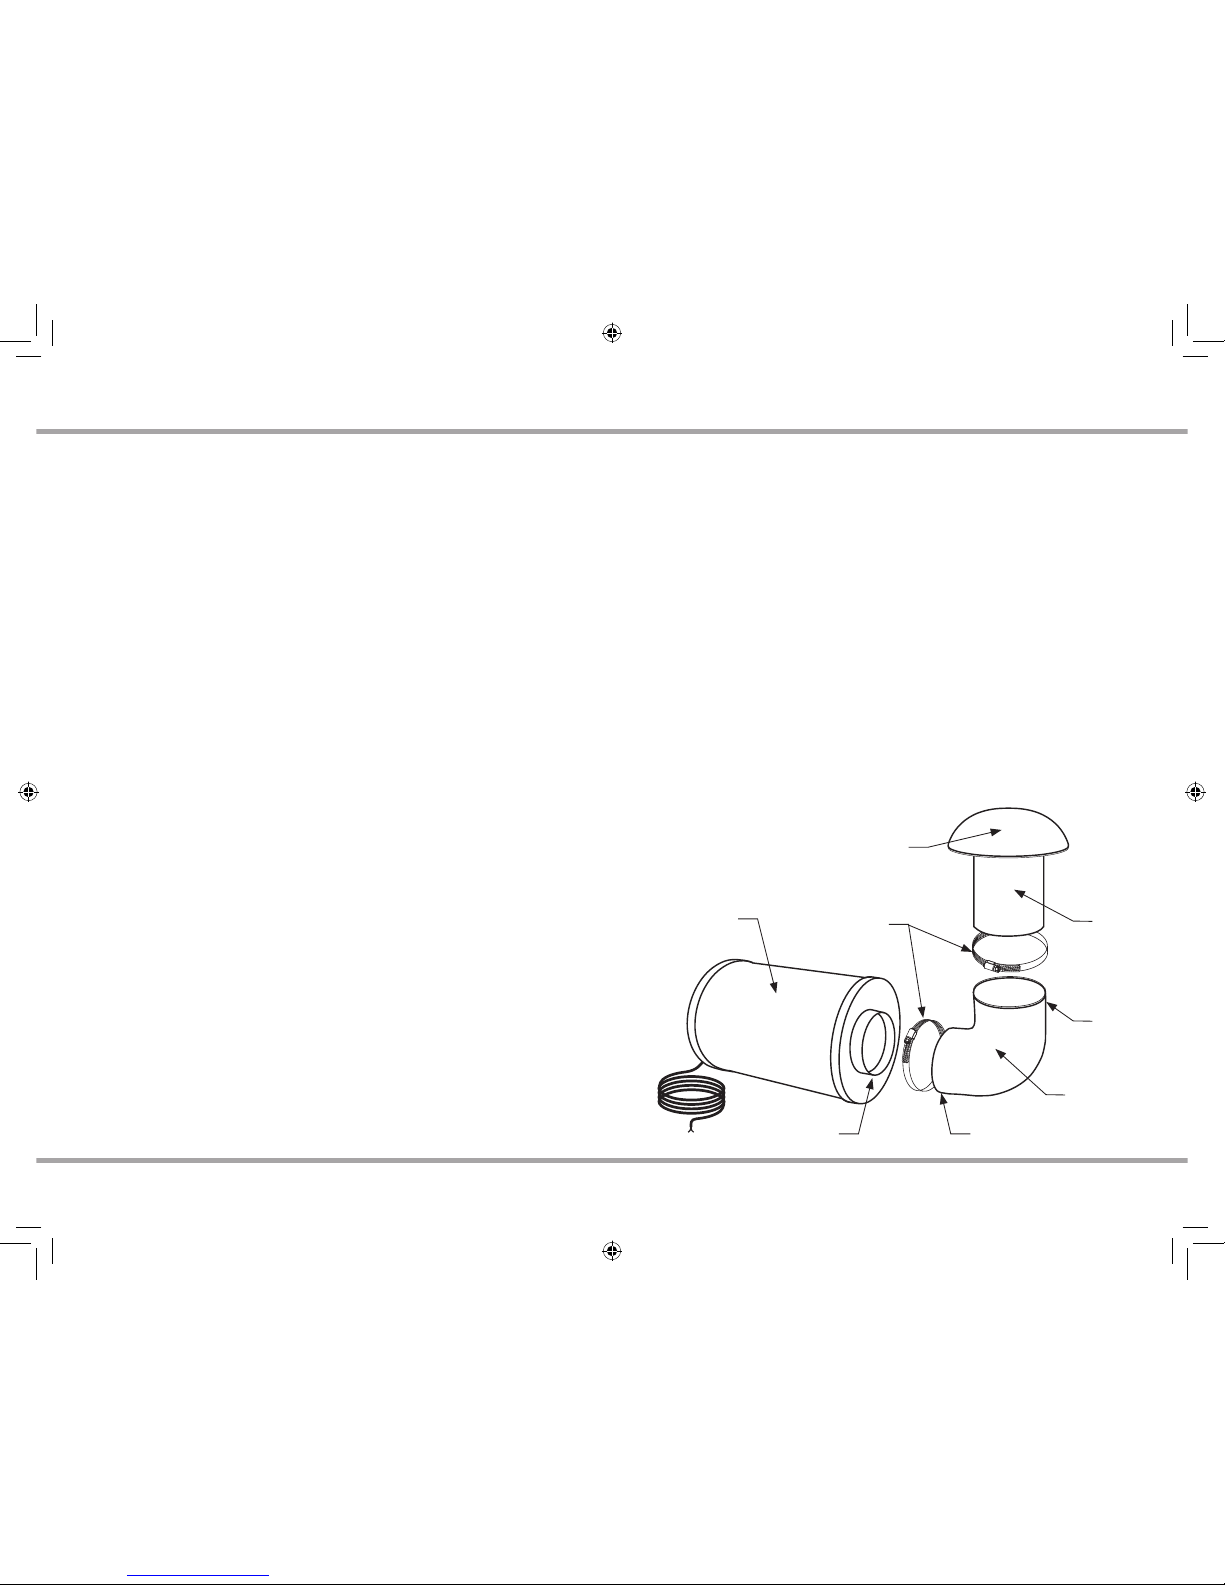
ASSEMBLING THE SUBWOOFER
Stainless
steel clamp
Subwoofer body
port opening
Small end
Large
end
Port
Tube
Silicone
Elbow
Subwoofer
Underground
Enclosure
Canopy
1) Unpack the contents of the box. Use caution when lifting the subwoofer.
The included carrying support rope should be utilized to help remove it from
the box.
2) Examine the silicone elbow. Note that one end is slightly larger than the
other. The smaller end attaches to the subwoofer body and the larger end
attaches to the port tube.
3) Place a stainless steel clamp ring on each end of the silicone elbow. There
are two dierent size clamp rings, one for the large end of the elbow, and one
for the smaller end of the elbow.
4) Attach the small end of the silicone elbow to the subwoofer body port
opening as shown.
5) Before tightening the clamp, determine the orientation that you would like
for the port tube. The speaker wire comes out of one edge of the subwoofer
and the tap setting adjustment is located near an edge of the rear panel. You
can rotate the elbow so that the speaker wire connection and tap setting
adjustment are best suited for your installation.
6) Once the orientation that you desire for the port tube is set, tighten the
clamp ring using a screwdriver until the ring is fully tightened. Making a good
seal is important both to prevent water penetration as well as to prevent audio
issues with the subwoofer.
7) Attach the canopy to the large end of the silicone elbow. Make sure that
the tube is fully seated and forms a 90 degree angle with the subwoofer.
When the tube is properly seated in the elbow, tighten the clamp ring using
a screwdriver until the ring is fully tightened. Making a good seal is important
both to prevent water penetration as well as to prevent audio issues with the
subwoofer.
8) Adjust the tap setting switch. Remove the tap setting switch cover by turning
the cover counter-clockwise. Under the cover is the tap setting switch. Set
the tap setting to the appropriate position. Use the 8Ω setting for installation
with low impedance ampliers or receivers. Use any of the 70v/100v settings
for use with 70v/100v ampliers. Due to the nature of 70v/100v technology,
better bass performance will typically result if the subwoofer is used at 8Ω,
however the AW10-LSUB-BR is designed for operation at 70v/100v.
4 AW10-LSUB-BR Installation Manual
INSTALLING THE SPEAKER
Choosing a location for the subwoofer
The AW10-LSUB-BR is designed to cover approximately 2,000 ft2 (185.8
m2). Sound from the subwoofer will carry in all directions and this means an
approximate spacing of 50’ (15.2 meters) between subwoofers. One important
consideration in positioning a burial subwoofer is avoiding placement near
walls or building foundations. Placing a subwoofer near a wall can increase
the bass by about 3dB and placing one in a corner will increase it by another
3dB. Keep in mind that if played at loud volume, this could induce unwanted
vibration or sound penetration into a home or adjacent building. Locate the
subwoofers near the primary outdoor listening areas, typically on the outer
edges of a space, and not next to a home or building. Other considerations
to keep in mind are the ease of installation at the location, and the ease of
running wires to that location.
The subwoofer is made of materials designed for rugged outdoor use, and
will withstand occasional hits from common landscape tools, but can be
damaged if struck by lawn mowers or other motorized equipment. Placing the
subwoofer near bushes, shrubs, or rock decorations may help protect it from
being struck by lawn maintenance equipment.
The subwoofer requires a hole size of approximately 15” Wide x 30” Long x 17-19" Deep.
(38.1 x 76.2 x 43.2-48.3 cm)
Make sure that the desired location:
1) Has the required mounting depth.
2) Is not near a building wall or foundation that would allow unwanted sound
noise to intrude.
3) Has proper drainage. Placing a subwoofer in a low-lying area that is prone
to ooding can damage the subwoofer if water levels rise enough for water to
enter through the underside of the port tube canopy.
4) Is free of any obstructions or underground utilities. In the United States, you
must dial 811 (1-888-344-7233) before any digging in order for underground
utilities to be marked prior to any digging.
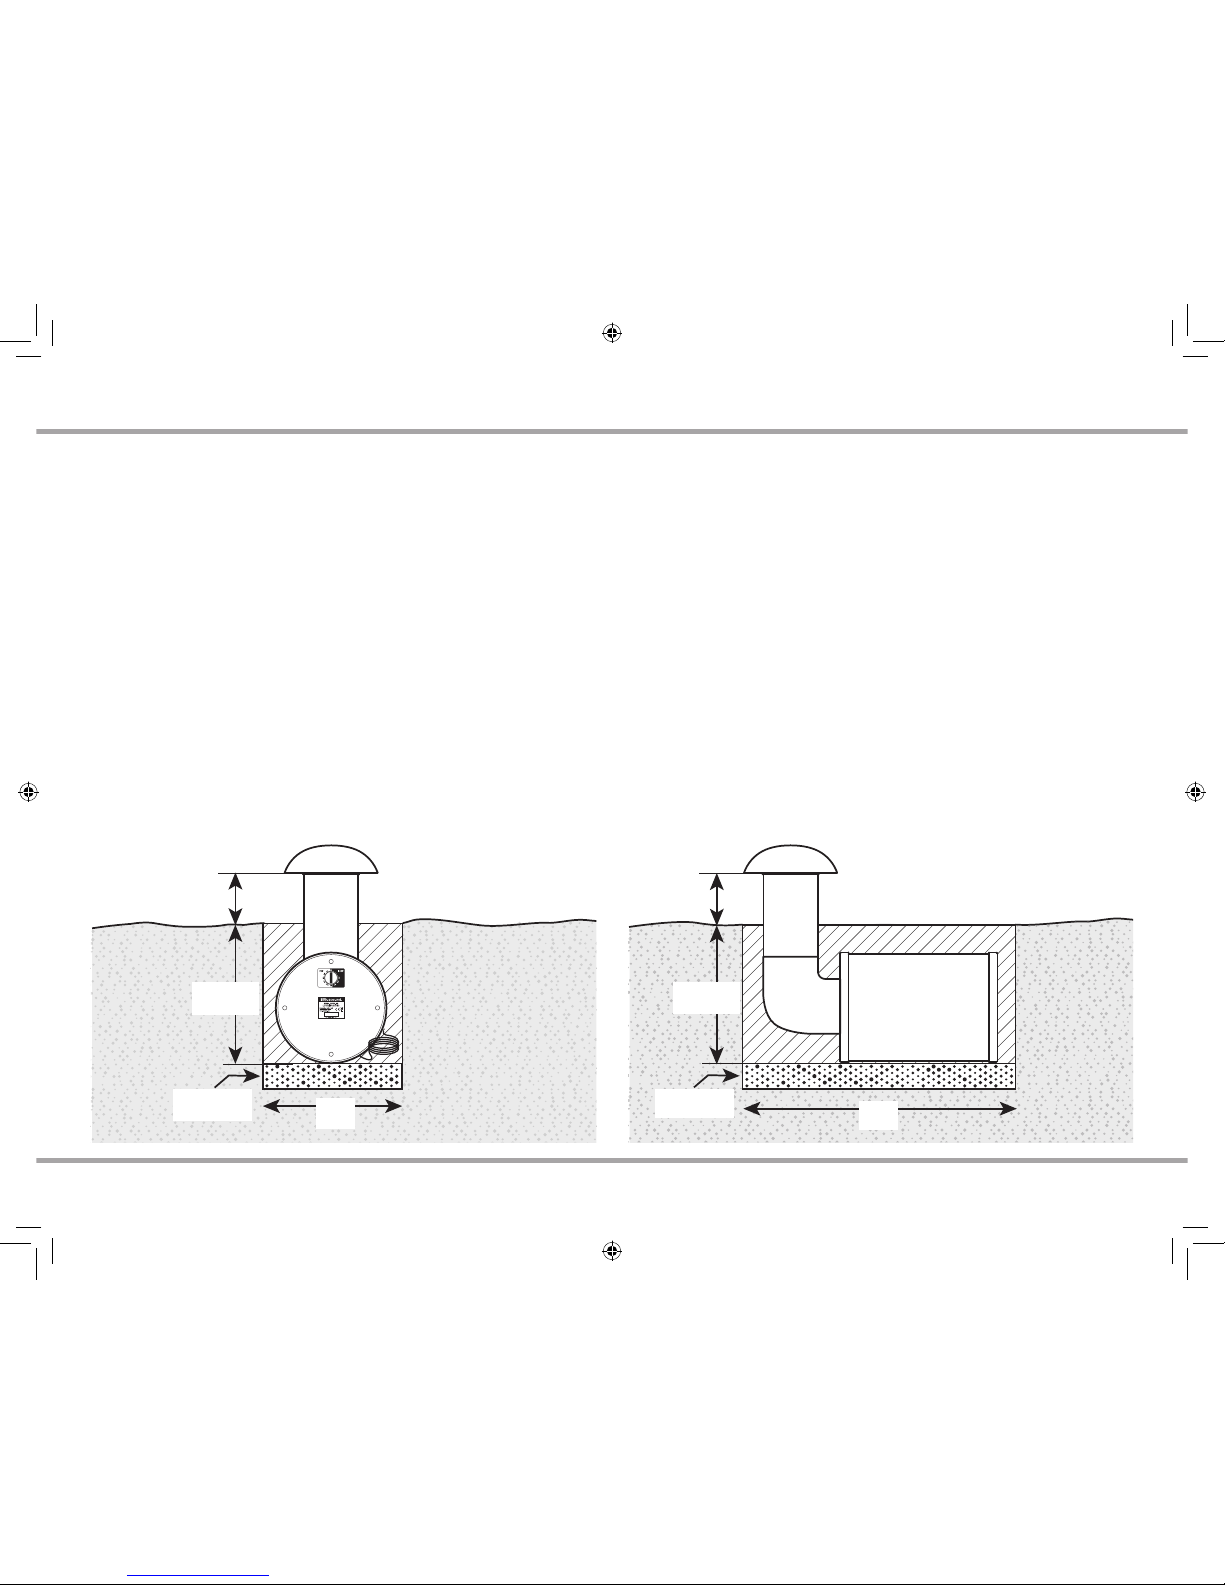
The depth of the mounting hole will a ect the nished look of the subwoofer.
The subwoofer is recommended to be installed at a depth of 15-17”. This
will leave approximately 6-8” of the subwoofer port tube and cap above the
ground after the installation.
Russound recommends adding a layer of 1-2” of pea gravel at the bottom of
the hole to facilitate drainage around the base of the subwoofer. If adding
gravel, make sure to dig the hole slightly deeper to accommodate the layer of
gravel.
2” Gravel
15-17”
6-8”
30”
(15.2-20.3 cm)
(38.1-43.2 cm)
(76.2 cm)
(5 cm)
15”
2” Gravel
15-17”
6-8”
(15.2-20.3 cm)
(38.1-43.2 cm)
(38.1 cm)
(5 cm)
 Loading...