

Russound ALT-126R UltraMatch Installation Manual
Volume Control
Installation Manual
ALT-126R

SAFETY INSTRUCTIONS
Safety Instructions
1. Read Instructions - All the safety and operating instructions should be read before the
appliance is operated.
2. Retain Instructions - The safety and operating instructions should be retained for future
reference.
3. Heed Warnings - All warnings on the appliance in the operating instructions should be
adhered to.
4. Follow Instructions - Follow all operating and user instructions.
5. Water and Moisture - The appliance should not be used near water; for example, near a
bathtub, washbowl, kitchen sink, laundry tub, in a wet basement, or near a swimming pool.
6. Wall Mounting - The appliance should be mounted to a wall as recommended by the
manufacturer.
7. Heat - The appliance should be situated away from heat sources such as radiators, heat
registers, stoves, or other appliances (including ampli ers) that produce heat.
8. Power Sources - The appliance should be connected to a power supply only of the type
described in the operating instructions or as marked on the appliance.
9. Grounding or Polarization - Precaution should be taken so that the grounding or polarization
means of an appliance is not defeated.
10. Object and Liquid Entry - Care should be taken so that objects do not fall and liquids are not
spilled into the enclosure through the openings.
11. Damage Requiring Service - The appliance should be serviced by quali ed service personnel when:
The power supply cord or the plug has been damaged; Objects have fallen, liquid has been
spilled into the appliance; The appliance has been exposed to rain; The appliance does
not appear to operate normally; or The appliance has been dropped or the enclosure is
damaged.
12. Servicing - The user should not attempt to service the appliance beyond that described in the
operating instructions. All other servicing should be referred to quali ed service personnel.
13. Care – From time to time you should wipe o the front panel with a soft dry cloth.
2
Russound ALT-126R Installation Manual

PRODUCT OVERVIEW
Introduction
The ALT-126R UltraMatch™ Volume Control is a wall-mounted standard or Decora® style stereo
speaker-level 12-step attenuator. It connects between the speaker outputs of an ampli er/receiver
and a pair (or multiple pairs) of speakers. The ALT-126R adjusts volume level by attenuating the
ampli er signal output of the ALT-126R to the speakers. It is manufactured using a high-quality
autoformer design for long life, excellent frequency response, no heat build-up, and maximum
power transfer from the ampli er to the speakers.
The UltraMatch™ designation means the ALT-126R can match the minimum output impedance of
the ampli er/receiver, in addition to adjusting volume. It eliminates the need for a speaker selector
or other impedance matching equipment. When the impedance matching switch is in 1X position
the volume control can be used as a standard control. The 2X, 4X, and 8X settings allow it to be
used as an UltraMatch™ control.
Considerations
Ampli er power rating - Make sure the ampli er has 20 watts per channel for each pair of
speakers to be connected.
How many ALT-126R - An UltraMatch™ volume control should be used for each pair of speakers
(however, up to 2 pairs of speakers can be used on each control).
Speaker rating - A minimum 4-ohm speaker load can be connected to the Output of each
UltraMatch™ volume control.
Impedance matching switch - Each ALT-126R in the system must have the impedance matching
switch positioned correctly (1X, 2X, etc.). Switch must be set BEFORE the ALT-126R is installed.
Installation location - Typical locations for ALT-126R installation include proximity to other wall
controls, near a desk or next to entrances.
Proper impedance matching switch position for UltraMatch™ Impedance Matching - ALT-126R
impedance matching switch position must be choosen to correctly multiply the impedance of the
system to a level that equals or exceeds the minimum impedance of the ampli er.
By determining the impedance capability of the ampli er with a few simple calculations, you can
determine the number of speakers the system can safely operate. The impedance matching switch
position can then be determined by using the charts on the next pages.
Russound ALT-126R Installation Manual
3
IMPEDANCE MATCHING
Ampli er impedance - Determine the ampli er's minimum impedance. The ampli er's minimum
impedance is measured in ohms (4, 6 or 8 ohms) and can be found in the ampli er's manual. It may
also be listed on the back panel of the ampli er near the speaker terminals.
Speaker impedance - Determine the impedance for each pair of speakers (see speaker’s manual).
If the speaker impedance is 6 ohms, use the 4-ohm row in the charts below.
Speaker pairs - Determine the total number of 8-ohm pairs of speakers. Also determine the total
number of 4 ohm pairs of speakers.
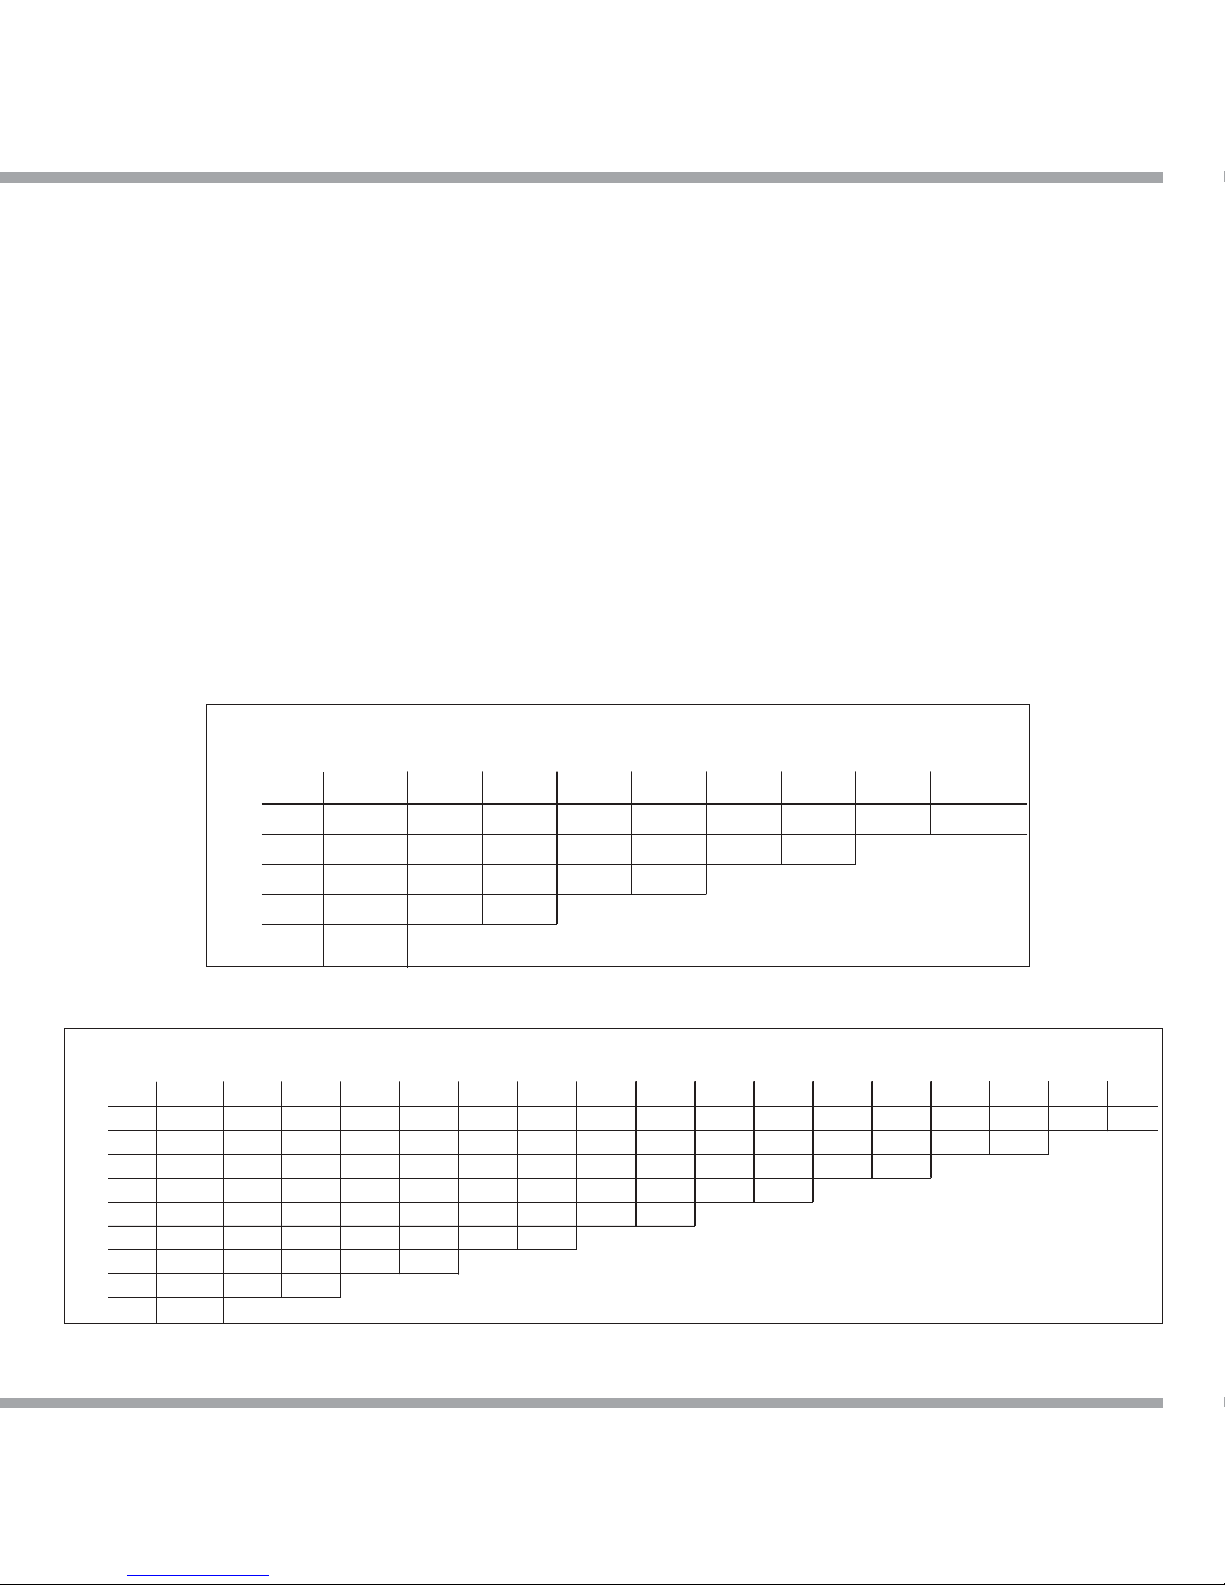
Appropriate chart - Choose the “4-ohm Ampli er” or “8-ohm Ampli er” impedance matching
chart below that matches the ampli er's minimum impedance. If the ampli er is 6 ohm stable, use
the 8 ohm chart.
Appropriate row and column - Cross reference the total number of 4-ohm pairs of speakers (rows
on charts below) with the total number of 8 ohm pairs of speakers (columns on charts below) to
choose the right switch position (1X, 2X, 4X or 8X.) - see illustration on page 5.
Impedance Matching For 8-ohm Amplifiers
8-ohm Speaker Pairs
0 1 2 3 4 5 6 7 8
0 - 1X 2X 4X 4X 8X 8X 8X 8X
1 2X 4X 4X 8X 8X 8X 8X
2 4X 8X 8X 8X 8X
3 8X 8X 8X
4-ohm Speaker Pairs
4 8X
Impedance Matching For 4-ohm Amplifiers
8-ohm Speaker Pairs
0 1 2 3 4 5 6 7 8 9 10 11 12 13 14 15 16
0 - 1X 1X 2X 2X 4X 4X 4X 4X 8X 8X 8X 8X 8X 8X 8X 8X
1 1X 2X 2X 4X 4X 4X 4X 8X 8X 8X 8X 8X 8X 8X 8X
2 2X 4X 4X 4X 4X 8X 8X 8X 8X 8X 8X 8X 8X
3 4X 4X 4X 8X 8X 8X 8X 8X 8X 8X 8X
4 4X 8X 8X 8X 8X 8X 8X 8X 8X
5 8X 8X 8X 8X 8X 8X 8X
4-ohm Speaker Pairs
6 8X 8X 8X 8X 8X
7 8X 8X 8X
8 8X
4
Russound ALT-126R Installation Manual
 Loading...