

Page 1
Nottingham
2 Slice Toaster
instructions and guarantee
Model No. RHT3
Page 2
2
Page 3

3
Important Safeguards
When using electrical appliances, basic safety precautions should always be followed,
including the following:
1 Read all instructions before, and follow whilst using appliance.
2 Do not touch hot surfaces. Use handles or knobs.
3 To protect against electric shock do NOT immerse cord, plug or body of
unit in water or liquid.
4 Close supervision is necessary when any appliance is used near children or inrmed
persons.
5 The appliance is not intended for use by young children or inrm persons unless
they have been adequately supervised by a responsible person to ensure that they
can use the appliance safely.
6 Unplug from outlet when not in use and before cleaning. Allow to cool before
putting on or taking o parts, and before cleaning the appliance.
7 Do not operate any appliance with a damaged cord or plug or after the appliance
malfunctions, or has been dropped or damaged in any manner. Contact customer
service for replacement, examination, repair or adjustment.
8 If the supply cord is damaged, it must be replaced by the manufacturer or similarly
qualied person in order to avoid a hazard. No user serviceable parts are inside.
9 A distance of at least 10cm should be maintained between the toaster and the wall.
10 Do not place near or below curtains or other combustible materials.
11 The use of accessory attachments NOT recommended by the appliance
manufacturer may cause injuries.
12 Do not use on an unstable surface, always use on a at steady surface.
13 Do not use outdoors or in damp or moist areas.
14 Do not let the cord hang over edge of table or counter, or touch hot surfaces.
15 Do not place on or near a hot gas or electric element, or in a heated oven.
16 To disconnect, press CANCEL, then grasp the plug and remove from wall outlet.
Never pull by the cord.
17 Do not use appliance for other than intended purpose.
18 Do not move HOT appliance before allowing to cool.
19 Do not cover or place items on top of the unit.
20 Do not attempt to dislodge food when the toaster is plugged into electrical outlet.
21 Do not toast buttered breads.
22 Never force food into toasting slot, they should t freely between the guard wires.
23 Clean out accumulated crumbs frequently to avoid risk of re or toaster
malfunction.
24 This appliance is not a toy. Young children should be supervised to ensure they do
not play with the appliance.
25 To avoid the possibility of re, do not leave toaster unattended during use.
SAVE THESE INSTRUCTIONS
This appliance is for household use
Page 4

4
before using for the rst time
1 Turn the browning control to the highest setting (6).
2 Operate the toaster empty, to cure the new elements. This may smell a bit, but it’s
nothing to worry about. Ensure the room is well ventilated.
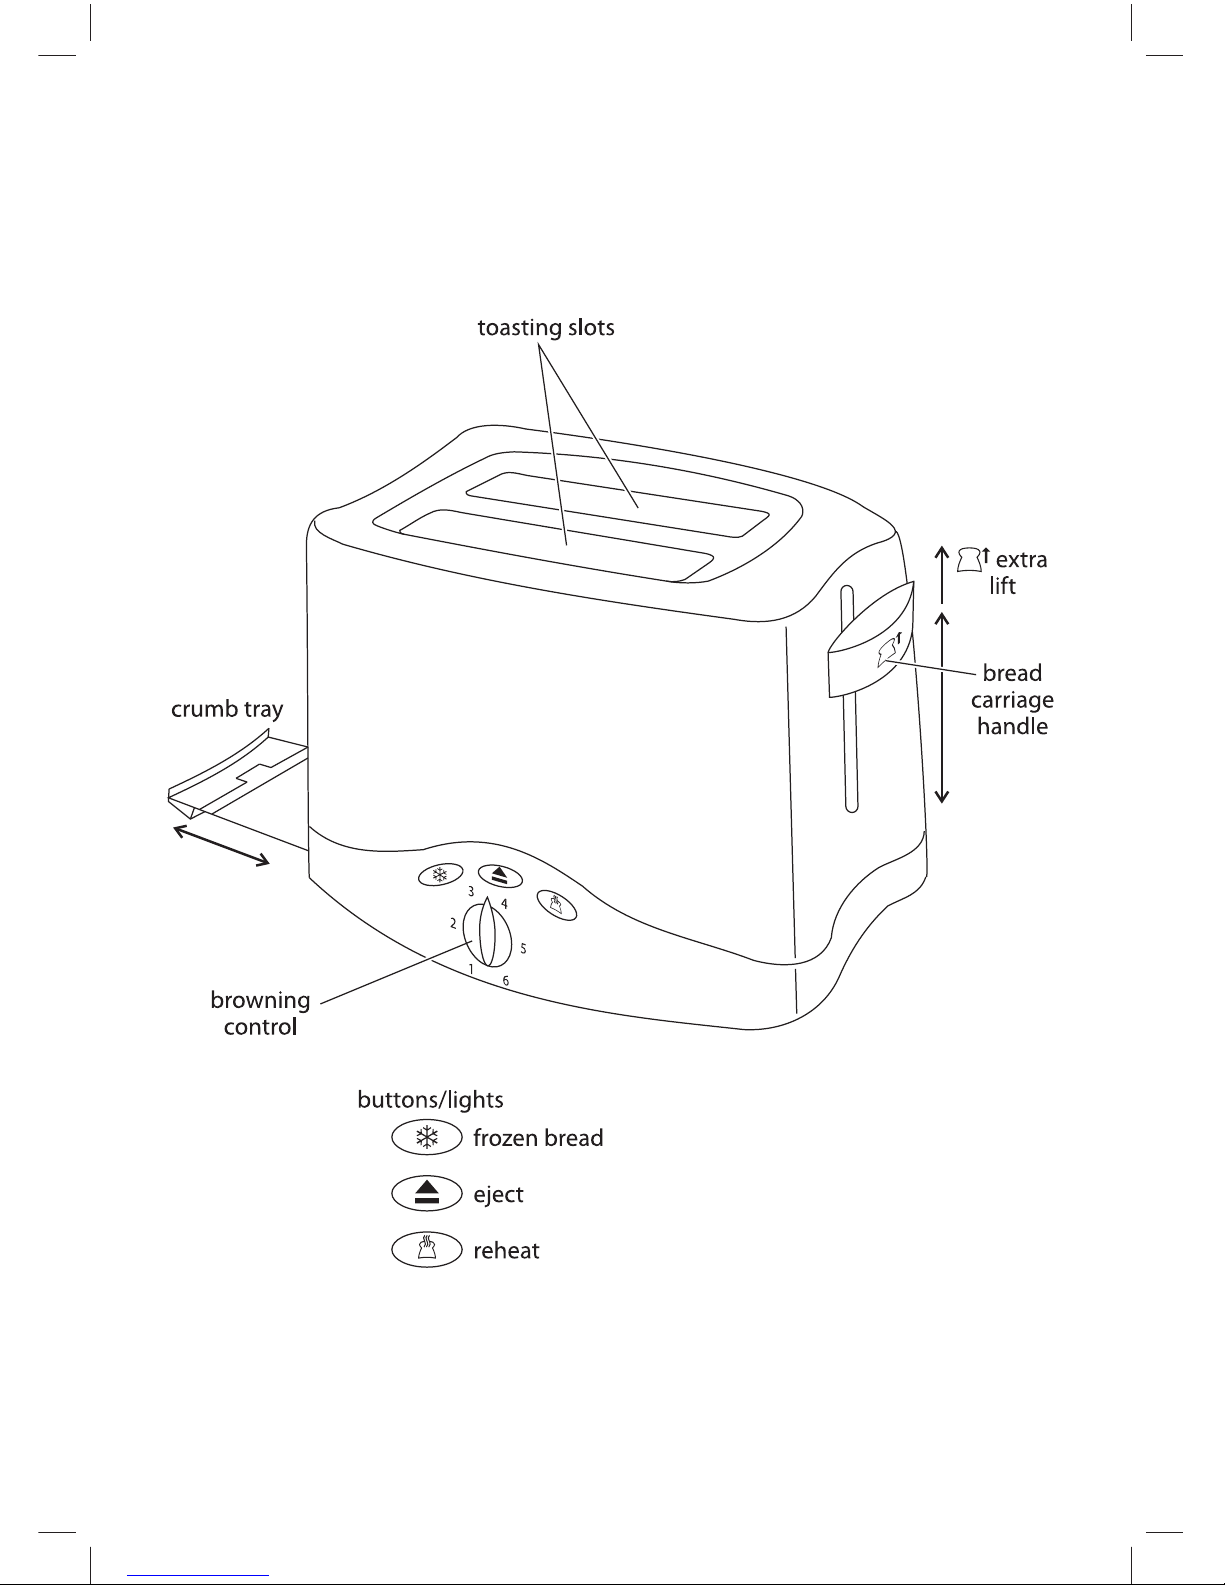
toasting bread
3 Sit the toaster upright on a stable, level, heat-resistant surface.
4 Don’t put it on or near anything that could be damaged even by moderate heat.
5 Route the cable so it doesn’t overhang, and can’t be tripped over or caught.
6 Bread may burn. Don’t use the toaster near or below curtains or other combustible
materials and watch it while it’s hot.
7 Put the plug into the power socket (switch the socket on, if it’s switchable).
8 Turn the browning control to the required setting (1 = light, 6 = dark).
9 Put bread into the toasting slots (maximum thickness 25mm).
10 Press the bread carriage handle down fully – it won’t lock down unless the toaster is
connected to the electricity supply.
11 The light will come on, and the elements will heat up.
12 When it’s done, the toast will pop up, the light will go out, and the elements will
turn o automatically.
eject
13 To stop the toaster before it’s nished, press the button. The toast will pop up,
and the elements will turn o.
extra lift
14 After toasting small items (bagels, crumpets, etc.) the bread carriage handle may be
raised further, to allow them to be removed more easily.
frozen bread
15 This takes the guesswork out of toasting frozen bread.
16 There’s no need to adjust the browning control, leave it at your favoured setting.
17 Put the frozen bread into the slots.
18 Lower the bread carriage handle, then press the button.
19 The light will come on, and the toasting time will be altered automatically to
give the same degree of browning you get with unfrozen bread.
caution don’t try to defrost bread – you’ll probably wreck the toaster
a) toasting frozen bread changes ice to steam, which escapes via the toasting slots
b) defrosting bread on a low setting changes ice to water, which drips into the
toaster, over the electronics and maybe the elements, causing mayhem
reheating toast
20 There’s no need to adjust the browning control.
21 Put the toast into the slots.
22 Lower the bread carriage handle, then press the button.
23 The light will come on, the toast will be given a short burst of heat, then it’ll pop
up, and the lights will go out.
24 You must only reheat plain, “unbuttered” toast.
Page 5

5
hints and tips
25 When toasting more than one slice of bread, use slices of similar size, thickness and
freshness.
26 Old (yesterday’s) bread contains less moisture, so makes crisper toast.
27 Old or thin bread cooks faster than fresh or thick bread, so use a lower setting.
28 Sweet bread products (tea cakes, fruit loaf, etc.) brown much more quickly than
ordinary bread, so should be toasted on a lighter setting.
crumbs
29 Clean the crumbs out of your toaster frequently, to avoid a build up of crumbs. This
is unhygienic and could cause a re hazard.
30 Unplug the toaster and let it cool.
31 Slide the crumb tray out and empty it.
32 Wipe it with a damp cloth, dry, then slide it back into place under the toaster.
33 Don’t use the toaster unless the crumb tray is tted and closed.
care and maintenance
34 Unplug the toaster when not in use, before moving and before cleaning. Let it cool
before cleaning and storing away.
35 Wipe outer surfaces with a damp cloth. If necessary, use a little washing-up liquid.
36 Don’t let anything enter the slots, you might damage the elements.
37 Don’t put the toaster in liquid.
38 Don’t use harsh or abrasive cleaning agents or solvents.
Page 6

6
Page 7

7
Page 8

8
GUARANTEE
This product is guaranteed for a period of two years from date of
purchase against defects in material and workmanship. It is particularly
important that the purchaser carefully read the instructions provided in
order to get maximum use from this product. This guarantee is only
valid if the appliance is used solely for domestic purposes in
accordance with the instructions and provided it is not connected to an
unsuitable electricity supply or dismantled or interfered with in any way
or damaged through dropping or misuse. Under this guarantee we
undertake to repair or replace free of charge any parts found to be
defective
Nothing in this guarantee or the instructions relating to the product
exclude, restrict or otherwise affect your statutory right.
In line with our policy of continuous product development we reserve
the right to change the product, packaging and specifications without
notice
This product conforms to Radio Frequency Interface requirements
230 - 240V 50Hz AC Only.
CUSTOMER SERVICE
AUSTRALIAN CUSTOMER SERVICE
Salton (Aust) Pty. Ltd.
P.O. Box 683
Mordialloc Victoria 3195
Australia
Freecall: 1800 427 842
Hours: 9am - 5pm (EST) Mon - Fri
NEW ZEALAND CUSTOMER SERVICE
Salton NZ Limited
P.O. Box 300 201
Albany, Auckland
New Zealand
Freecall: 0508 629 777
Hours: 9am - 5pm Mon - Fri
 Loading...