

Page 1
INSTRUCTIONS AND WARRANTY
MODEL NO. RHSS75
RUSSELL HOBBS 6.5L OVAL SLOW COOKER
Page 2

2
Congratulations on purchasing our Russell Hobbs 6.5L Oval Slow Cooker. Each unit is
manufactured to ensure safety and reliability. Before using this appliance for the first
time, please read the instruction manual carefully and keep it for future reference.
FEATURES OF THE RUSSELL HOBBS 6.5L OVAL SLOW COOKER
265W
6.5L capacity
3 heat settings – Low, High and Keep Warm
Attractive stainless steel finish
Modern oval shape accommodates more food
Removable ceramic bowl which allows for easier cleaning and can also be used
as a stylish serving dish
Tempered glass lid to view while cooking
Ergonomic cool touch handles
Dishwasher safe ceramic insert
Power “ON” indicator light
Great for making a variety of soups, stews and other delicious meals
Thermostatic regulator control ensures worry free cooking
Economical, nutritious and healthy cooking
Non-slip rubber feet
Includes recipes
For domestic use only
1 year warranty
IMPORTANT SAFEGUARDS
When using any electrical appliance, basic safety precautions should always be followed
including the following:
1. Please read the instructions carefully before using any appliance.
2. Always ensure that the voltage on the rating label corresponds to the mains
voltage in your home.
3. Incorrect operation and improper use can damage the appliance and cause injury
to the user.
Page 3

3
4. The appliance is intended for household use only. Commercial use invalids the
warranty and the supplier can not be held responsible for injury or damage
caused when using the appliance for any other purpose than that intended.
5. Avoid any contact with moving parts.
6. Extreme caution must be taken when moving an appliance containing food, water
or other hot liquids.
7. Do not switch on the cooker if the ceramic pot is empty.
8. Allow the lid and ceramic pot to cool before submersing in water or cleaning.
9. Never touch the outer enclosure of the slow cooker during its operation or before
it cools. Use the handles or knobs and also use oven gloves or a cloth when
removing the lid or handling contents.
10. Never cook directly in the unit, always use the ceramic pot.
11. Do not use the ceramic pot or glass lid if they have cracked or chipped.
12. Never leave the appliance connected to the electrical outlet when not in use.
13. Do not switch on the appliance when it is upside down or on its side.
14. The glass lid and ceramic pot are fragile, handle them with care.
15. Close supervision is required when any appliance is used near or by children or
invalids.
16. This appliance is not intended for use by persons (including children) with
reduced physical, sensory or mental capabilities, or lack of experience and
knowledge, unless they have been given supervision or instruction concerning
use of the appliance by a person responsible for their safety
17. Check the power cord and plug regularly for any damage. If the cord or the plug
is damaged, it must be replaced by the manufacturer or a qualified person in
order to avoid an electrical hazard.
18. Do not use the appliance if it has been dropped or damaged in any way. In case
of damage, take the unit in for examination and/or repair by an authorised service
agent.
19. To reduce the risk of electric shock, do not immerse or expose the unit, plug or
the power cord to water or any other liquid.
20. Never immerse the cooking body in water or any other liquid for cleaning
purposes.
21. If water should accidentally enter the switch mechanism or spill into the base,
unplug the power cord immediately. Important: Prior to reconnecting to the power
supply, the product should be inspected by a qualified technician.
Page 4

4
22. Remove the plug from the socket by gripping the plug. Do not pull on the cord to
disconnect the appliance from the mains. Always unplug the unit when not in
use, before cleaning or when adding or removing parts.
23. The use of accessory attachments that are not recommended or supplied by the
manufacturer may result in injuries, fire or electric shock.
24. A short cord is provided to reduce the hazards resulting from becoming
entangled in or tripping over a longer cord.
25. Do not let the cord hang over the edge of a table or counter. Ensure that the cord
is not in a position where it can be pulled on inadvertently.
26. Do not allow the cord to touch hot surfaces and do not place on or near a hot gas
or electric burner or in a heated oven.
27. Do not use the appliance on a gas or electric cooking top or over or near an open
flame.
28. Use of an extension cord with this appliance is not recommended. However, if it
is necessary to use an extension lead, ensure that the lead is suited to the power
consumption of the appliance to avoid overheating of the extension cord,
appliance or plug point. Again, do not place the extension cord in a position
where it can be pulled on by children or animals or tripped over.
29. This appliance is not suitable for outdoor use. Do not use this appliance for
anything other than its intended use.
30. DO NOT carry the appliance by the power cord.
31. Always unplug the unit when not in use or before cleaning.
32. Always operate the appliance on a smooth, even, stable surface. Do not place
the full unit (ceramic bowl) on a hot surface.
33. The manufacturer does not accept responsibility for any damage or injury caused
by improper or incorrect use, or for repairs carried out by unauthorised
personnel.
34. In case of technical problems, switch off the machine and do not attempt to
repair it yourself. Return the appliance to an authorised service facility for
examination, adjustment or repair. Always insist on the use of original spare
parts. Failure to comply with the above mentioned pre-cautions and instructions,
could affect the safe operation of this machine.
35. Cook only in the inner ceramic bowl provided.
36. Do not operate this appliance by means of an external timer or separate remote
control system.
Page 5
5
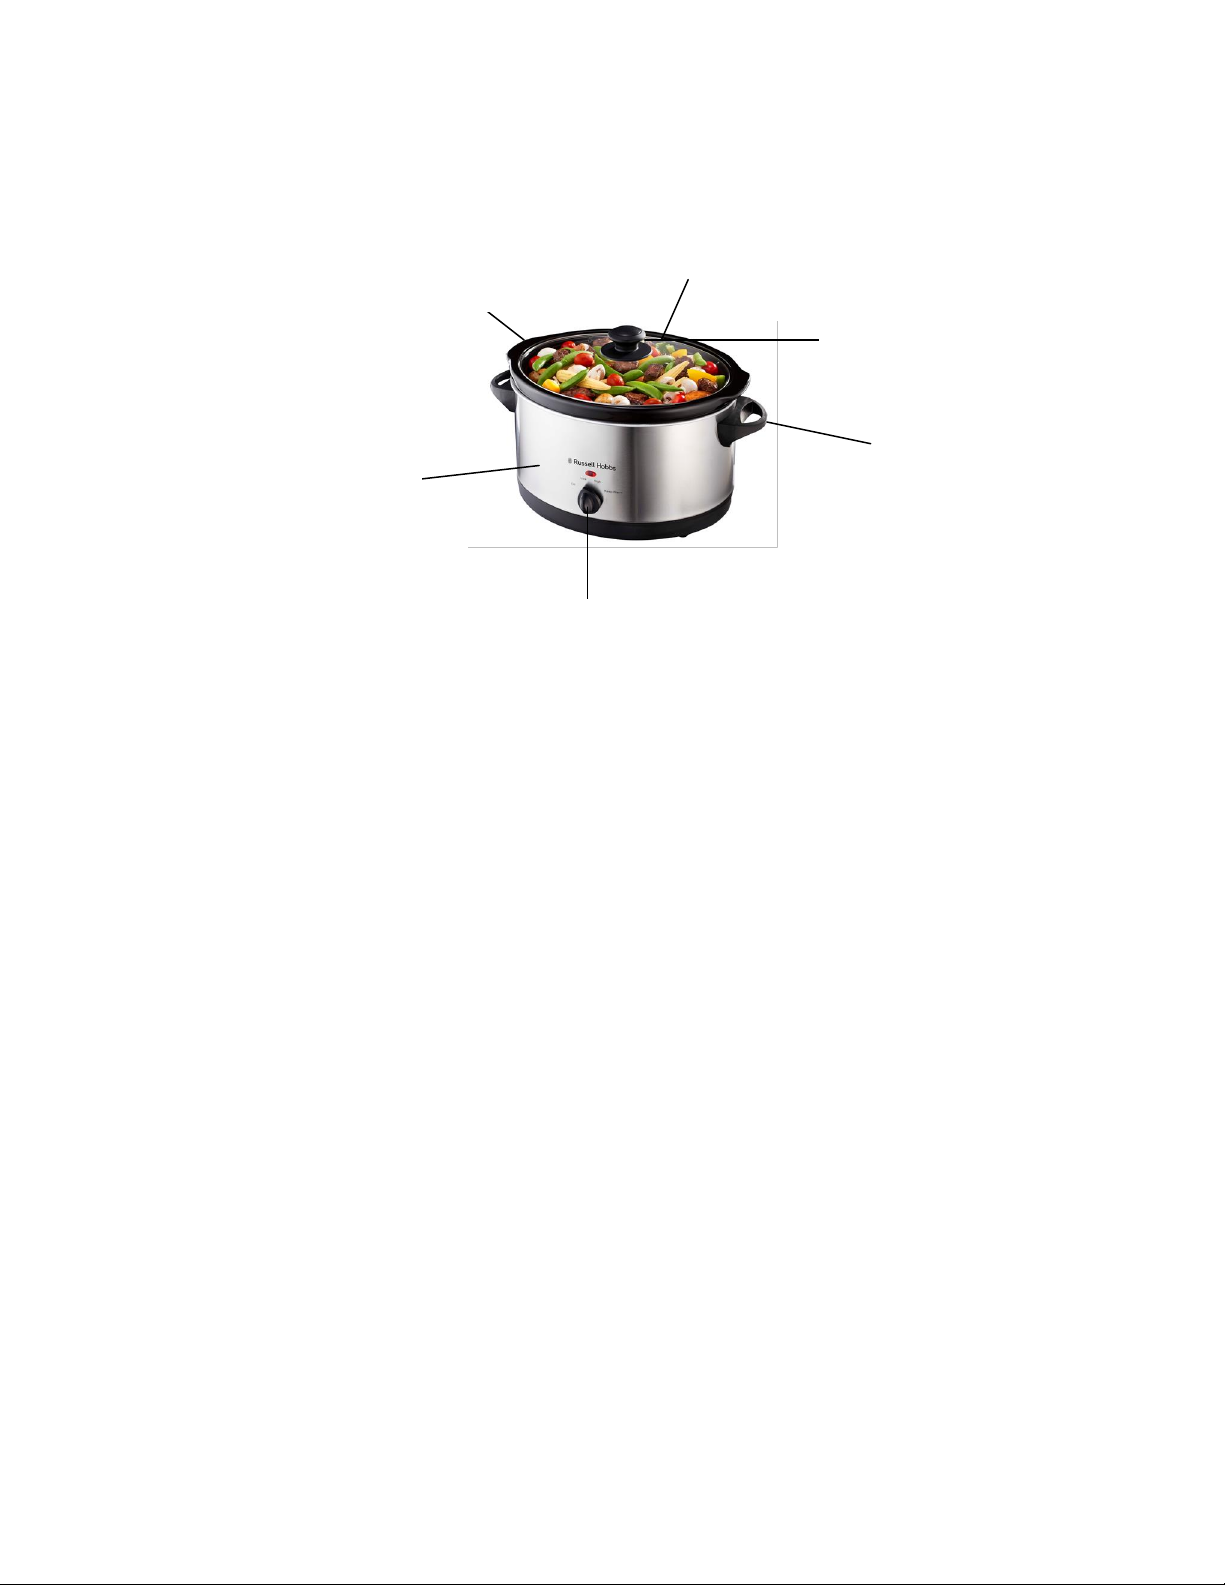
PARTS DIAGRAM
Glass Lid
Knob
Handle
Temperature Control
Knob
Base
Ceramic Bowl
BEFORE FIRST USE
1. Remove all packaging materials from the unit.
2. Clean the unit with a soft damp cloth.
3. The tempered glass lid and ceramic bowl are dishwasher safe or can be cleaned
with warm soapy water.
4. Let the unit dry completely before using.
5. Set the unit on a secure table or counter.
6. We recommend keeping all the packaging material in a safe place in case at any
time you wish to re-pack the product for shipping purposes.
Page 6

6
USING THE SLOW COOKER
1. Always ensure the temperature control knob is set to the OFF position for the
temperature settings that are not in use.
2. Place the ceramic bowl into the cavity of the slow cooker.
3. Prepare desired food and place ingredients into the ceramic bowl.
4. Place the lid securely on the ceramic bowl.
5. Plug the unit into the electrical outlet.
6. Select desired temperature setting, LOW, HIGH or KEEP WARM.
7. We do not recommend using the KEEP WARM setting for more than four hours.
8. The KEEP WARM setting is only for keeping food warm which has already been
cooked.
9. Refer to your favourite recipe, add foods and follow appropriate cooking times.
10. When the cooking cycle is complete, set the control knob to KEEP WARM.
11. Place the bowl in a suitable location for serving.
12. Always make sure that the control knob is set to the OFF position once the
ceramic bowl is empty to prevent damaging it.
13. When you have finished using the slow cooker, turn the control knob to the OFF
position, unplug the unit and wait until all parts and accessories have cooled
completely before cleaning.
COOKING HINTS
1. Do not fill ceramic bowl past 3/4 full. Some foods may expand during cooking
and this may result in food spilling over.
2. Always cook with the lid in place. Avoid removing lid to check progress while
cooking for the first two hours. This may result in heat loss and delay the cooking
cycle.
3. Always wear protective oven mitts when handling parts and accessories when
the unit is on.
4. Unplug the unit when it is empty or not in use.
5. If the power or heat has been turned off for any extended period of time, the food
inside the container may no longer be safe to eat. It is recommended the food be
discarded due to health and safety reasons.
6. Do not use the ceramic bowl in an oven, microwave or directly on a stove-top.
Page 7

7
Preparing in Advance
Prepare a recipe in advance the night before in the removable ceramic bowl and store it,
covered, in the refrigerator. When you are ready to cook, transfer the ceramic bowl to
the slow cooker.
Important: The cooking bowl within the slow cooker is ceramic, and as with any fine
ceramic, it will not withstand the shock of sudden temperature changes. Do not place
any frozen or very cold foods in it, or store in the refrigerator if the ceramic bowl has
been pre-heated or hot to the touch. The ceramic bowl is not suitable for storing foods in
the freezer.
Cutting Vegetables
An unusual characteristic of slow cooking is that most vegetables – depending on their
age – generally cook slower than most meats. Most vegetables should be cut into small
pieces, or at least quartered and placed near the sides, or close to the bottom of the
slow cooker. Carrots should be peeled and placed where they will be completely
covered with liquid.
Spicing up your Cooking
Meats will pick up flavours from the vegetables they are cooked with. This might give
you more flavour than you are used to. You can reduce quantities of vegetables, such as
onions and carrots, if desired, to suit your personal taste. The same applies to fresh
spices; a little goes a long way in the slow cooker. Meats, especially cubed for a stew, if
not browned first, should be cleaned and carefully wiped to remove particles normally
disposed of during browning to ensure the best flavour, before cooking.
Cooking Times
Altitude, high humidity and slight fluctuations in power can slightly alter cooking times in
a slow cooker. Allow plenty of time – it is almost impossible to overcook.
It is seldom necessary to stir while cooking on 1 (Low) setting. When cooking on 2
(High) setting, occasional stirring may be necessary and will improve the distribution of
flavours throughout the food.
Page 8

8
Additional liquid may also be required, as food will boil in setting 2 (High). Make sure the
slow cooker has not been pre-heated. Most recipes including the recipes in this manual
require cooking times of 8 to 10 hours. From experience, you will learn whether to use
the shorter or longer times given in the recipes. If foods are cooked more than you
desire, or end up with too much liquid, it is probably due to not trimming excess fat from
meats or adding too much liquid as the liquid content of meats and vegetables will vary.
Any excess liquid can be reduced by removing the cover and switching the slow cooker
to 2 (High) for approximately 45 minutes.
Hints for Using Standard Recipes in your Slow Cooker
Cooking in a slow cooker is very different to oven or frying pan cooking. Using the
following hints you can prepare and cook your favourite recipes in the slow cooker:-
If using fresh milk or yoghurt only add to the slow cooker during the last 2 hours
of cooking. Evaporated milk may be added at the start of cooking.
Rice, noodles and pasta are not recommended for long cooking periods. Cook
them separately then add to the slow cooker during the last 30 minutes of
cooking.
Wine can add flavour and tenderness to meat. Substitute part wine for water for
richer flavour.
Whole leaf herbs are best for prolonged cooking in your slow cooker, but
decrease the quantity in the standard recipe by a quarter.
Very little moisture boils away in the slow cooker, so in most cases the liquid
quantity in the standard recipes can be halved. If you find you have too much
liquid, remove the cover and switch the slow cooker to setting 2 (High) for 30-45
minutes to reduce.
Cooking times for conventional recipes have to be considerably increased when
cooking in a slow cooker. For example, food that will cook in 30 minutes
conventionally, will take 4 – 5 hours slow cooking on 1 (Low).
Recipes calling for 1 hour will take 6 – 8 hours on 1 (Low) in the slow cooker.
Food that will cook for 1 – 3 hours, conventionally, will take 8 – 12 hours on 1
(Low).
Without browning, some meat and poultry may come out bland and appearance
will be unappetizing when cooked in the slow cooker.
Page 9

9
CLEANING AND MAINTENANCE
Be sure the product is turned OFF and disconnected from the power supply
before cleaning.
Allow the product to completely cool down.
It is much easier to clean the accessories directly after they have been used.
Do not immerse the unit in water or any other liquid, or hold it under a tap to
clean.
The tempered glass lid and ceramic bowl are dishwasher safe. They can also be
washed in hot, soapy water.
Do not use abrasive cleaning tools such as scouring pads. A soft cloth, sponge
or rubber spatula can be used to remove any food residue.
To clean hard-to-remove food particles or water spots, use a non-abrasive
cleanser or vinegar.
Do not allow sudden temperature changes for both the lid and ceramic bowl.
Sudden changes in temperature may result in cracks or breakage of these parts.
The exterior of the main cooking base can be cleaned with a soft damp cloth.
Wipe dry thoroughly. Do not use abrasive cleaners or scouring pads.
CAUTION: Do not immerse the base in water or other liquids.
After each use, wash the ceramic bowl and cover in warm soapy water. Dry with
a clean, soft cloth before storage, or re-connecting to the power supply.
NOTE: If food sticks to the ceramic bowl, fill the bowl with hot, soapy water and
let it stand for several minutes before washing.
Important: Do not use metallic pads, abrasive or harsh cleaners as they may
scratch the glazed surfaces of the ceramic bowl.
Page 10

10
Clean the base of the product by wiping with a slightly dampened soft cloth. To
remove water spots and other stains, use a non-abrasive cleaner or weak
vinegar solution.
Remove stubborn spots with a cloth moistened with sudsy water or a mild, non-
abrasive cleaner. Avoid the use of scouring pads, harsh detergents, solvents,
polish, abrasives or aerosol cleaners as they may damage surfaces of the
product. Dry with a clean, soft cloth before storage, or re-connecting to the power
supply.
The ceramic bowl and lid can be totally immersed for washing and are
completely Automatic Dishwasher safe.
STORING THE APPLIANCE
Unplug the unit from the electrical outlet and clean all the parts as instructed
above. Ensure that all parts are dry before storing.
Store the appliance in its box or in a clean, dry place.
Never store the appliance while it is still wet or dirty.
Never wrap the power cord around the appliance.
SERVICING THE APPLIANCE
There are no user serviceable parts in this appliance. If the unit is not operating
correctly, please check the following:
You have followed the instructions correctly.
That the unit has been wired correctly and that the wall socket is switched on.
That the mains power supply is ON.
That the plug is firmly in the mains socket.
If the appliance still does not work after checking the above:
- Consult the retailer for possible repair or replacement. If the retailer fails to resolve the
problem and you need to return the appliance, make sure that:
The unit is packed carefully back into its original packaging.
Proof of purchase is attached.
A reason is provided for why it is being returned.
Page 11
11
If the supply cord is damaged, it must be replaced by the manufacturer or an authorised
service agent, in order to avoid any hazard. If service becomes necessary within the
warranty period, the appliance should be returned to an approved Home of Living
Brands (Pty) Ltd service centre. Servicing outside the warranty period is still available,
but will, however, be chargeable.
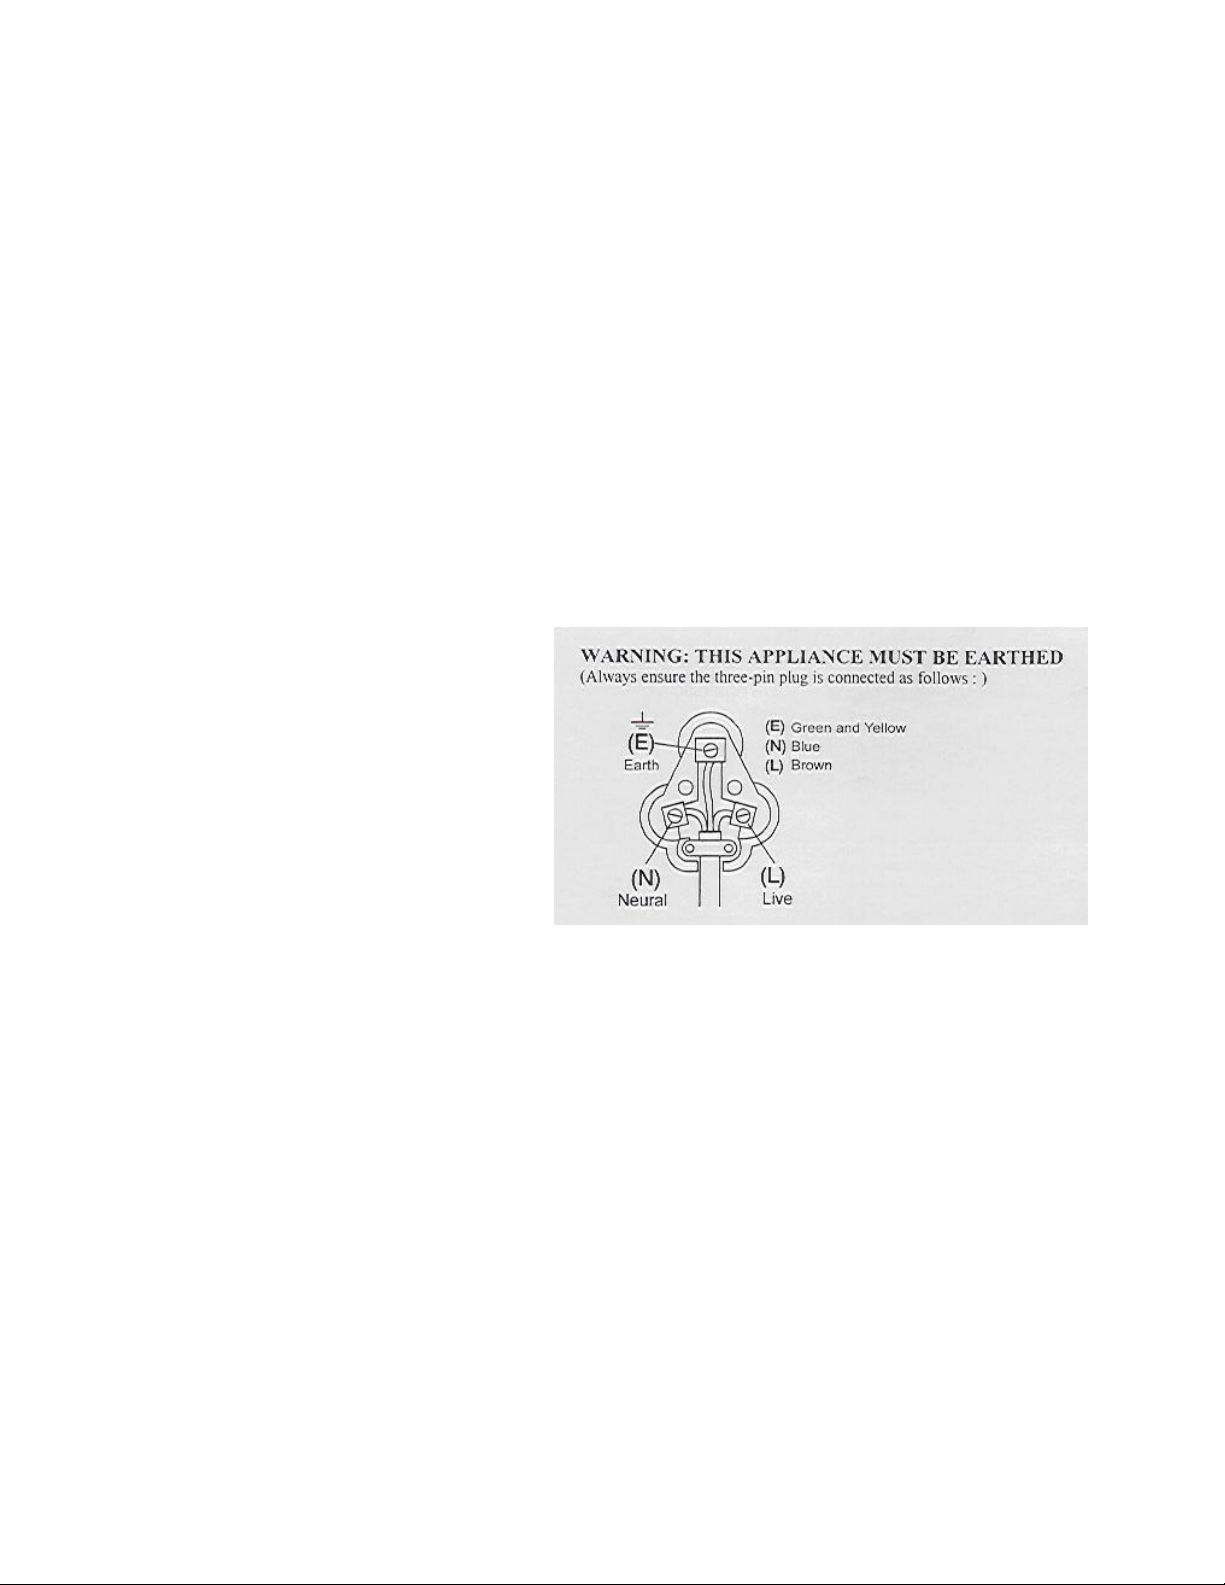
CHANGING THE PLUG
Should the need arise to change the fitted plug, follow the instructions below.
This unit is designed to operate on 230V-240V current only. Connecting to other
power sources may damage the appliance. Connect a three-pin plug as follows:
The wires in this mains lead are coloured in accordance with the following code:
Green/Yellow = Earth
Blue = Neutral
Brown = Live
Page 12

12
PLEASE AFFIX YOUR PROOF OF PURCHASE/RECEIPT HERE
IN THE EVENT OF A CLAIM UNDER WARRANTY THIS RECEIPT MUST BE PRODUCED.
W A R R A N T Y
1. Home of Living Brand warrants to the original purchaser of this product (“the customer”) that this
product will be free of defects in quality and workmanship which under normal personal, family or
household use and purpose may manifest within a period of 1 (one) year from the date of purchase
(“warranty period”).
2. Where the customer has purchased a product and it breaks, is defective or does not work properly
for the intended purpose, the customer must notify the supplier from whom the customer bought
the product (“the supplier”) thereof within the warranty period. Any claim in terms of this warranty
must be supported by a proof of purchase. If proof of purchase is not available, then repair, and/or
service charges may be payable by the customer to the supplier.
3. The faulty product must be taken to the supplier's service centre to exercise the warranty.
4. The supplier will refund, repair or exchange the product in terms of this warranty subject to
legislative requirements. This warranty shall be valid only where the customer has not broken the
product himself, or used the product for something that it is not supposed to be used for. The
warranty does not include and will not be construed to cover products damaged as a result of
disaster, misuse, tamper, abuse or any unauthorised modification or repair of the product.
5. This warranty will extend only to the product provided at the date of the purchase and not to any
expendables attached or installed by the customer.
6. If the customer requests that the supplier repairs the product and the product breaks or fails to work
properly within 3 (three) months of the repair and not as a result of misuse, tampering or
modification by or on behalf of the customer, then the supplier may replace the product or pay a
refund to the customer.
7. The customer may be responsible for certain costs where products returned are not in the original
packaging, or if the packaging is damaged. This will be deducted from any refund paid to the
customer.
HOME OF LIVING BRANDS (PTY) Ltd
JOHANNESBURG TEL NO. (011) 267 3000
CAPE TOWN TEL NO. (021) 552-5161
DURBAN TEL NO. (031) 792-6000
www.homeoflivingbrands.com
www.facebook.com/ Russell Hobbs
www.russellhobbs.co.za
Page 13

13
RECIPES
Note: the cooking times given are merely a guideline.
French Onion Soup
Serves 6-8
7 cups beef stock
3 cups onions, thinly sliced
¼ cup butter
1 ½ teaspoons salt
1 tablespoon sugar
2 tablespoons flour
¼ cup dry vermouth or brandy
Pour stock (or water and beef bouillon cubes) into the Slow Cooker, cover and set to 2
(High). Cook onions slowly in butter in a pan. Cover and allow to cook for about 15
minutes. Uncover and add salt, sugar and flour. Stir well. Add to the stock in the Slow
Cooker. Cover and cook on 1 (Low) for 6 – 8 hours, or 2 (High) for 3 hours. Add
vermouth or brandy, stir and serve. Top each serving with grated Parmesan cheese.
Minestrone Soup
Serves 6
6-8 cups water
1.5kg shin of beef, cut into 5cm slices
1 medium onion, diced
2 carrots, diced
2 stalks celery, sliced
1 cup leeks, diced (optional)
1 cup canned tomatoes (drained)
1 small package frozen vegetables
2 tablespoons salt
1 tablespoon dried basil
1 clove garlic, minced
½ cup vermicelli
1-teaspoon oregano
Prepare the stock a day in advance; place water, beef shank and bones in the Slow
Cooker, cover and cook overnight (8-12 hours) on 1 (Low).
Next day remove the meat and bones from the liquid.
Cool. Scoop marrow from the bones and return it with the lean meat to the stock.
(This can be done in advance and refrigerated). Add all remaining ingredients to 6 cups
of stock in the Slow Cooker. Cover and cook on 1 (Low) for 6 – 8 hours or 2 (High) for 4
hours. Ladle into bowls and sprinkle with grated Parmesan cheese. Serve with crusty
bread.
Page 14

14
Chilli Con Carne
Serve 6
500gms dry red kidney beans
500gms steak cut in thin strips
2 tablespoons flour
1-teaspoon chilli powder
2-teaspooons salt
1 large onion, chopped
1 cup canned tomatoes
2 cups water
2 cloves garlic
Wash the beans well. Dust the beef with the flour, salt and chilli powder. Place all
ingredients into the Slow Cooker and stir well. Cover and cook for 8 – 9 hours.
Tarragon Chicken
Serves4
1 ½ - 1 ¾ kg Roasting chicken
60gms. Butter
1 strip orange rind
1 teaspoon dried tarragon
½ clove garlic, crushed
Salt and pepper to taste
Chicken stock cube
½ cup hot water
½ cup cream
Tie the chicken’s legs together. Mix together half the butter, the chopped tarragon and
the crushed garlic. Season with salt and pepper and place inside the bird with the
orange rind. Spread the breast thickly with the remaining butter. Place the chicken in
the Slow Cooker. Dissolve chicken stock cube in hot water. Pour stock around the
chicken, cover and cook on 1 (Low) for 6 – 8 hours or 2 (High) for 4 – 6 hours.
Remove the chicken from the Slow Cooker, take off the trussing string and keep the
chicken hot. Spoon off the fat, add the cream and heat on 2 (High) for 10 minutes to
make the gravy. Stir and season to taste then strain into a gravy boat. Serve chicken
garnished with parsley and accompanied with the gravy served on a bed of cooked
noodles or rice. A can of baby potatoes, drained may be added during the last hour of
cooking.
Beef Pot Roast
Serves 4
1 ½ - 2 kgs Chuck, topside or rump roast
1 clove garlic, crushed
Salt and pepper to taste
1 carrot, chopped
1 stalk celery, chopped
Page 15

15
1 small onion, stuck with 3 cloves
¾ cup sour cream mixed with 3 tablespoons flour
1 cup red wine
Rub beef roast with garlic and season with salt and pepper. Place roast in the Slow
Cooker and add all the remaining ingredients. Cover and cook on 1 (Low) for 10 – 12
hours. Excellent served with hot buttered noodles.
Corned Beef
Serves 4
3 carrots cut into small chunks
1 ½ - 2kg Silverside
2 – 3 medium onions, quartered
1 – 2 cups water
Place all ingredients into the Slow Cooker in the order listed. Cover and cook on 1 (Low)
for 12 – 14 hours, or 2 (High) for 7 – 10 hours. Serve hot with plain boiled potatoes and
cabbage wedges.
Port Chops in Cider
Serves 6
6 port chops
Salt and pepper to taste
½ cup plain flour
3 onions, finely sliced
Sprig of parsley and oregano
½ cup apple cider
¼ cup waster
2 apples, peeled and quartered
Trim the excess fat off the chops and set aside. Season the chops on both sides with
salt and pepper. Coat with flour. Heat fat trimmings in a heavy frying pan until the fat
starts to run then add chops and fry one side at a time until brown on both sides.
Remove from the frying pan. Add onions and cook over gentle heat, stirring occasionally
until golden brown. Place chops in the Slow Cooker and add onions, herbs, cider and
water. Arrange the peeled and quartered apples on top of the chops and cook on 1
(Low) for 6 – 8 hours. Remove the herbs and skim any fat from the top. Serve with
boiled potatoes or fluffy boiled rice.
Beef Curry
Serves 6
1 kg. Blade bone or chuck steak
3 tablespoons flour
3 tablespoons curry powder
2 tablespoons vegetable oil
1 large onion, finely chopped
Page 16

16
4 cloves garlic crushed
1 piece fresh ginger, grated2 teaspoons salt
1-tablespoon vinegar
1 stick cinnamon
1 strip lemon rind
½ cup water
Cut steak into 2.5 cm cubes, toss in the flour and curry powder and brown lightly with the
onions in a frying pan with the oil. Remove from the frying pan, drain and place in the
Slow Cooker with the other ingredients. Mix well, cover and cook 1 (Low) for 8 – 9
hours, or 2 (High) for 4 hours. Serve with boiled rice.
Hungarian Goulash
Serves 4
1kg Round steak or veal fillet, cut into 8mm cubes
1cup onion, chopped
1 clove garlic, minced
2 tablespoons flour
1-teaspoon salt
½ teaspoon pepper
1-tablespoon paprika
¼ teaspoon dried thyme crushed
1 bay leaf
1 cup canned tomatoes
1cup sour cream
Place steak cubes, onion, garlic in the Slow Cooker. Stir in the flour and mix to coat the
steak cubes. Add all remaining ingredients except sour cream. Stir well. Cover and
cook on 1 (Low) for 7 – 10 hours or 2 (High) for 5 – 6 hours. 30 minutes before serving
thoroughly blend in the sour cream. Stir occasionally. Serve over hot buttered noodles.
Chicken Marengo
Serves 4
1 ¾ - 2kg Chicken or chicken pieces
Salt and pepper to taste
1-tablespoon plain flour
1-tablespoon vegetable oil
1-tablespoon butter
2 cloves garlic, finely chopped
1cup hot water
2 tablespoons brandy
2 large tomatoes, peeled and chopped
12 mushrooms, peeled and chopped
1 bouquet garni
1sprig parsley, chopped.
Page 17

17
Cut chicken into serving pieces. Pat each piece dry and season with salt and pepper
and roll in flour. In a heavy frying pan, heat the oil and butter. Add the chicken pieces
and cook over a medium heat until golden, turning frequently. Remove from the frying
pan drain and place in the Slow Cooker. Add the garlic, bouquet garni, hot water,
brandy tomatoes and mushrooms. Cover and cook on 1 (Low) for 6 – 8 hours or 2 (High)
for 4 – 6 hours. Serve on a bed of hot fluffy rice and sprinkle with chopped parsley. To
thicken the sauce, blend together 1 tablespoon of flour and 1 tablespoon of butter until
smooth. After the chicken has been removed, turn the Slow Cooker to 2 (High) and drop
the butter mixture into the Slow Cooker in small pieces. Stir and allow to simmer about
10 minutes.
Chicken Pariesienne
Serves 6
6 medium chicken breasts or chicken pieces
Salt, pepper and paprika to taste.
½ cup dry white wine or vermouth
1can condensed cream of thickened soup
1 small can sliced mushrooms, drained
1cup sour cream.
Sprinkle chicken breasts lightly with salt, pepper and paprika. Place chicken breasts in
the Slow Cooker. Mix white wine, soup mushrooms and sour cream until well combined
and pour over the chicken breasts. Sprinkle with paprika, cover and cook on 1 (Low) for
6 - 8 hours, or 2 (High) for 4 – 6 hours. NOTE: If cooking on 2 (High), do not add the
sour cream until the last 30 minutes of cooking time. Stir occasionally. Serve the sauce
over the chicken with rice or noodles.
Baked Potatoes
These are perfect for the barbecue.
Fill the Slow Cooker with scrubbed and buttered medium sized potatoes (it will hold
about 10). Sprinkle with salt, cover and cook on 1 (Low) for 8 – 10 hours, or until the
potatoes are tender. For family meals, just cook the required number of potatoes – you
get the same excellent result.
Scalloped Potatoes
Serves 4 – 6
6 rashers bacon
8-10 medium potatoes, peeled and thinly sliced
2 onions, peeled and thinly sliced
Salt, pepper and paprika to taste
Page 18

18
1 cup cheddar cheese, grated
1 - 284g can cream of celery or mushroom soup.
Cut bacon into pieces. Place half the bacon, potatoes and onion into the Slow Cooker.
Sprinkle with salt, pepper, then grated cheese. Repeat with the remaining bacon,
potatoes and onions. Spoon undiluted soup over the top. Sprinkle with paprika, cover
and cook on 1 (Low) for 8 – 10 hours or 2 (High) for 4 – 6 hours.
Ratatouille (Vegetable Casserole)
Serves 4 – 6
2 medium eggplants, cubed but not peeled
4 small zucchini (baby marrow) sliced
2 red peppers sliced
4 tomatoes sliced
2 onions cut into fine rings
2 cloves garlic crushed
Salt to taste
Freshly ground pepper to taste
½ cup oil.
Place onions into the Slow Cooker first. Then add remaining ingredients. Cover and
cook on 1 (Low) overnight for 7 – 8 hours. Vegetables should be soft, but not mushy.
Mix lightly and add more salt and pepper if necessary. Serve Ratatouille hot or cold as a
first course, or as a filling for omelettes or as an accompaniment with grills, meat, fish or
eggs.
Baked Custard
Serves 6
3 eggs
2 tablespoons sugar
2 cups milk
½ teaspoon vanilla essence
Nutmeg
Beat eggs with sugar and then add remaining ingredients. Place in a heat-proof bowl or
dish that will fit into the Slow Cooker. Cover the custard with foil or a small heat-proof
plate. Pour 1 cup of water into the Slow Cooker and add the custard in bowl. Cover and
cook on 1 (Low) for 6 – 8 hours. Serve warm or cold.
Page 19

19
Creamy Rice Pudding
Serves 6
2 ½ cups cooked rice
3 – 4 tablespoons brown sugar
1-cup milk
2 tablespoons butter
1-teaspoon nutmeg
½ cup raisins
½ cup cream
Thoroughly combine rice with other ingredients. Pour into a slightly greased Slow
Cooker. Cover and cook on 1 (Low) for 4 – 6 hours, or 2 (High) for 1 – 2 hours. Stir
several times during the first 30 minutes.
Baked Apples
Serves 6 – 8
6 – 8 medium baking apples, washed and cored
3 tablespoons dried fruits
¼ cup sugar
1-teaspoon cinnamon
2 tablespoons butter
Make a cut around the top skin of the apples and remove the core. Mix dried fruits and
half the sugar; fill the center of the apples.
Sprinkle with cinnamon and the remaining sugar and dot with butter. Place in the Slow
Cooker and add ¼ cup of water. Cover and cook on 1 (Low) for 8 hours.
Hot Fruit Compote
Serves 4
1 cup dried prunes
1 cup dried apricots
1 can pineapple chunks, un-drained (optional)
2 cups water
Put all ingredients in the Slow Cooker. Cover and cook on 1 (Low) for 7 – 8 hours, or 2
(High) for 3 – 4 hours. Serve warm. Good with cream and a dash a cinnamon or
nutmeg.
Page 20

20
Poached Pears in Red Wine
Serves 6 – 8
2 cups dry red wine
1-cup sugar
6 – 8 medium pears, peeled with the stems on
4 tin strips lemon peel
Put wine and sugar in the Slow Cooker.
Cover and cook on 2 (High) until the sugar is dissolved. Place the pears into the Slow
Cooker turning them well to fully coat them with the wine mixture. Add lemon peel,
cover and cook on 1 (Low) for 4 – 6 hours, turning them occasionally to coat them with
the wine mixture. After serving pour the wine mixture over the pears.
Slow Cooker Yoghurt
First sterilize the cooker using a commercial sterilizing solution.
Pour 600ml milk into the cooker and gently whisk in 30ml of plain yoghurt (use a wire
whisk). Cover cooker with a tea towel and then with the lid. Set on LOW for 1 hour.
Switch cooker off and allow to stand for 2 hours without stirring, until it is soft set.
Transfer to a clean container and refrigerate until required.
Page 21

21
Parabéns por ter comprado a nossa Panela de cozedura lenta manual de 6,5 L da
Russell Hobbs. Cada unidade é fabricada de forma a garantir segurança e fiabilidade.
Antes de utilizar este aparelho pela primeira vez, leia o manual de instruções
atentamente e guarde-o para futura referência.
SALVAGUARDAS IMPORTANTES:
Quando utilizar qualquer aparelho elétrico, deve seguir sempre as precauções de
segurança básicas, incluindo o seguinte:
1. Leia atentamente as instruções antes de utilizar qualquer aparelho.
2. Certifique-se sempre de que a tensão na etiqueta de classificação corresponde à
tensão da corrente elétrica na sua residência.
3. A operação incorreta e utilização imprópria podem danificar o aparelho e causar
lesões no utilizador.
4. O aparelho destina-se apenas a utilização doméstica. A utilização comercial
invalida a garantia e o fornecedor não pode ser responsabilizado por lesões ou
danos causados quando o aparelho for utilizado para qualquer outra finalidade
diferente da prevista.
5. Evite qualquer contacto com as peças em movimento.
6. É necessário ter uma extrema atenção quando mover um aparelho que contém
alimentos, água ou outros líquidos quentes.
7. Não ligue o aparelho se a caçarola de cerâmica estiver vazia.
8. Aguarde até a tampa e a caçarola de cerâmica arrefecerem antes de as
submergir em água.
9. Nunca toque no invólucro exterior da panela de cozedura lenta durante a
operação ou antes de arrefecer. Use as pegas ou puxadores, bem como pegas
de cozinha ou um pano para remover a tampa ou manusear o conteúdo.
10. Nunca cozinhe diretamente na unidade. Deve sempre cozinhar na caçarola de
cerâmica.
11. Não utilize a caçarola de cerâmica ou tampa de vidro se estiverem partidas ou
lascadas.
12. Nunca se esqueça de desligar a unidade da tomada elétrica quando não está a
ser utilizado.
13. Não ligue o aparelho quando está virado ao contrário ou de lado.
Page 22

22
14. A tampa de vidro e a panela de cerâmica são frágeis, manusear com cuidado.
15. É necessária uma supervisão de perto quando qualquer aparelho for utilizado
perto ou por crianças ou pessoas com incapacidades.
16. Este aparelho não se destina a ser utilizado por pessoas (incluindo crianças)
com capacidades físicas, sensoriais ou mentais reduzidas, ou com falta de
experiência e conhecimentos, a não ser que tenham sido supervisionados ou
ensinados a utilizar o aparelho por uma pessoa responsável pela sua segurança.
17. Verifique o cabo de alimentação e a ficha regularmente para verificar a
existência de quaisquer danos. Se o cabo ou a ficha estiverem danificados,
devem ser substituídos pelo fabricante ou por uma pessoa qualificada de forma
a evitar um perigo elétrico.
18. Não utilize o aparelho se este tiver sido deixado cair ou estiver danificado de
qualquer forma. Em caso de danos, devolva a unidade para verificação e/ou
reparação por parte de um agente de assistência autorizado.
19. Para reduzir o risco de choque elétrico, não mergulhe ou exponha a unidade,
ficha ou cabo de alimentação em água ou em qualquer outro líquido.
20. Nunca coloque a estrutura de cozedura dentro de água ou qualquer outro líquido
para fins de limpeza.
21. Caso entre líquido acidentalmente para o mecanismo de troca ou se derrame na
base, desligue imediatamente o cabo de alimentação. Importante: Antes de
voltar a ligar à fonte de alimentação, o produto deve ser inspeccionado por um
técnico qualificado.
22. Remova a ficha da tomada ao agarrar na ficha. Não puxe pelo cabo para
desligar o aparelho da corrente elétrica. Desligue sempre a unidade quando esta
não estiver a ser utilizada, antes de limpar ou quando adicionar ou remover
peças.
23. A utilização de acessórios não recomendados ou fornecidos pelo fabricante
pode resultar em lesões, incêndios ou choque elétrico.
24. É fornecido um cabo pequeno para reduzir os riscos resultantes de ficar preso
ou de tropeçar num cabo maior.
25. Não deixe o cabo suspenso pela extremidade de uma mesa ou balcão.
Certifique-se de que o cabo não se encontra numa posição em que possa ser
puxado inadvertidamente.
26. Não permita que o cabo toque em superfícies quentes e não o coloque sobre ou
perto de uma caldeira elétrica ou a gás quente ou num forno aquecido.
Page 23

23
27. Não utilize o aparelho sobre uma superfície de cozimento a gás ou elétrica ou
sobre ou perto de uma chama.
28. A utilização de uma extensão com este aparelho não é recomendada. No
entanto, caso seja necessário utilizar uma ficha de extensão, certifique-se de
que a ficha é adequada para o consumo de energia do aparelho para evitar o
sobreaquecimento do cabo da extensão, aparelho ou tomada. Lembre-se de não
colocar o cabo de extensão numa posição onde possa ser puxado por crianças
ou animais ou que possa provocar quedas.
29. Este aparelho não é adequado para ser utilizado no exterior. Não utilize este
aparelho para outra finalidade diferente da prevista.
30. NÃO transporte o aparelho pelo cabo de alimentação.
31. Desligue sempre a unidade quando não estiver a ser utilizada ou antes de
limpar.
32. Utilize sempre o aparelho numa superfície suave, uniforme e estável. Não
coloque a unidade (com a excepção da caçarola de cerâmica) numa superfície
quente.
33. O fabricante não aceita responsabilidade por qualquer dano ou lesão causados
devido a uma utilização imprópria ou incorreta ou a reparações realizadas por
pessoal não autorizado.
34. Em caso de problemas técnicos, desligue a máquina e não tente repará-la você
próprio. Devolva o aparelho a um agente de assistência autorizado para
verificação, ajuste ou reparação. Insista sempre em utilizar peças
sobresselentes originais. O não cumprimento das precauções e instruções
acima poderá afetar o funcionamento seguro desta máquina.
35. Cozinhe apenas na caçarola de cerâmica interna fornecida.
36. Não utilize este aparelho através de um temporizador externo ou sistema de
controlo remoto separado.
Page 24

24
DIAGRAMA DE PEÇAS
Tampa de vidro
Puxador
Pega
Botão de control da
temperatura
Base
Caçarola de cerâmica
ANTES DA PRIMEIRA UTILIZAÇÃO
1. Retire todo o material da embalagem da unidade.
2. Limpe a unidade com um pano humedecido suave.
3. A tampa de vidro temperado e a caçarola de cerâmica podem ser lavadas na
máquina de lavar loiça ou com água quente e detergente.
4. Deixe a unidade secar completamente antes de utilizar.
5. Coloque a unidade numa mesa ou bancada segura.
6. É recomendável guardar todo o material da embalagem num local seguro, caso
pretenda voltar a embalar o produto a qualquer altura para fins de expedição.
UTILIZAR A PANELA DE COZEDURA LENTA
1. Certifique-se sempre de que o botão de controlo da temperatura está na posição
Desligado (OFF) para assegurar que as definições da temperatura não estão em
uso.
2. Coloque a caçarola de cerâmica na cavidade da panela de cozedura lenta.
3. Prepare os alimentos desejados e coloque os ingredientes desejados na
caçarola de cerâmica.
4. Coloque a tampa fixamente na caçarola de cerâmica.
Page 25

25
5. Ligue a unidade à tomada eléctrica.
6. Selecione a definição da temperatura desejada: Baixa (LOW), Elevada (HIGH)
ou Manter quente (KEEP WARM).
7. Não recomendamos o uso da definição Manter quente (KEEP WARM) durante
mais de quatro horas.
8. A definição Manter quente (KEEP WARM) destina-se a manter comida quente
cozinhada previamente.
9. Siga as instruções da sua receita preferida, adicione os alimentos e respeite os
tempos de cozedura apropriados.
10. Após a conclusão do ciclo de cozedura, coloque o botão de controlo na definição
Manter quente (KEEP WARM).
11. Coloque a caçarola num local adequado para servir.
12. Quando a caçarola de cerâmica está vazia, certifique-se sempre de que o botão
de controlo está na posição Desligado (OFF) para não a danificar.
13. Rode o botão de controlo para a posição Desligado (OFF) quando terminar o
uso da panela de cozedura lenta, retire a ficha da unidade da tomada elétrica e
aguarde até todas as peças e acessórios arrefecerem completamente antes de
os limpar.
DICAS DE COZEDURA
1. Não encher a caçarola de cerâmica acima de 3/4. Alguns alimentos podem
expandir durante a cozedura e provocar o derrame da comida.
2. Cozinhe sempre com a tampa colocada. Evite remover a tampa para verificar o
progresso da cozedura nas primeiras duas horas. Isto pode originar perda de
calor e atrasar o ciclo de cozedura.
3. Utilize sempre luvas de forno protetoras ao manusear peças e acessórios
quando a unidade está ligada.
4. Retire a ficha da unidade da tomada elétrica quando a panela estiver vazia ou
não estiver em uso.
5. Os alimentos no interior da panela podem ser perigosos para consumo se a
potência ou calor forem desligados durante um período prolongado de tempo.
Recomendamos a eliminação da comida por motivos de saúde e segurança.
6. Não use a caçarola de cerâmica no forno, micro-ondas ou diretamente no fogão.
Page 26

26
Preparação Antecipada
Prepare uma receita antecipadamente na noite anterior na caçarola de cerâmica
removível e guarde, coberta no frigorífico. Quando estiver pronta para cozinhar, transfira
a caçarola de cerâmica para a panela de cozedura lenta.
Importante: A caçarola de cozedura na panela de cozedura lenta é de cerâmica, e tal
como com qualquer cerâmica fina, não resiste ao choque de mudanças súbitas de
temperatura. Não coloque alimentos congelados ou muito frios, ou guarde no frigorífico
se a caçarola de cerâmica tiver sido pré-aquecida ou esteja quente. A caçarola de
cerâmica não é adequada para armazenar alimentos na congeladora.
Como Cortar Legumes
Uma característica invulgar de cozedura lenta é que a maior parte dos legumes –
dependendo da sua idade – geralmente cozinham mais lentamente do que a maior
parte das carnes. A maior parte dos legumes devem ser cortados em pedaços
pequenos, ou pelo menos em quartos e colocados próximo dos lados, ou próximo do
fundo da panela de cozedura lenta. Cenouras devem ser descascadas e colocadas
onde se encontrem completamente cobertas com líquido.
Como temperar os alimentos
As carnes adquirem os sabores dos legumes com os quais são cozinhadas. Isto pode
proporcionar mais sabor do que está habituado. Pode reduzir as quantidades de
legumes, tais como cebolas e cenouras, de desejar, para satisfazer o gosto pessoal. O
mesmo se aplica a especiarias frescas; na panela de cozedura lenta, pouco rende
muito. As carnes, especialmente cortadas para estufado, se não forem primeiramente
tostadas, devem ser limpas e cuidadosamente secas para remover partículas
normalmente eliminadas durante a tostadura para assegurar o melhor sabor, antes de
cozinhar.
Page 27

27
Tempo de cozedura
Altitude, humidade elevada e ligeiras flutuações na energia eléctrica podem alterar
ligeiramente os tempos de cozedura na panela de cozedura lenta. Conceda bastante
tempo – é quase impossível cozinhar demasiado.
É raramente necessário agitar enquanto cozinha na regulação 1 (Baixo). Quando
cozinha na definição 2 (Elevada), pode ser necessário mexer ocasionalmente e isto
melhora a distribuição dos sabores na comida.
Pode também ser necessário líquido adicional, pois a comida ferve na definição 2
(Elevada). Assegure-se que a panela de cozedura lenta não tenha sido pré-aquecida. A
maior parte das receitas, incluindo as receitas deste manual, requerem tempo de
cozedura de 8 a 10 horas. Com a experiência, você aprenderá se deve usar os períodos
mais curtos ou mais prolongados fornecidos nas receitas. Se os alimentos cozinharem
mais do que é desejado, ou tiverem demasiado líquido, é provavelmente devido a não
ter cortado o excesso de gordura das carnes ou ter adicionado demasiado líquido pois o
conteúdo de líquido nas carnes e legumes varia. Qualquer líquido em excesso pode ser
reduzido removendo a tampa e ligando a panela de cozedura lenta para 2 (Elevada)
durante aproximadamente 45 minutos.
Sugestões para o Uso de Receitas Padrão na sua Panela de Cozedura Lenta
Cozinhar numa panela de cozedura lenta é muito diferente de cozinhar no forno
ou frigideira. Usando as sugestões seguintes, pode preparar e cozinhar as suas
receitas favoritas na panela de cozedura lenta:-
Se usar leite fresco ou iogurte adicione somente à panela de cozedura lenta
durante as últimas 2 horas de cozedura. Leite evaporado pode ser adicionado no
início da cozedura.
Não se recomenda cozer arroz, massa e pasta durante períodos prolongados.
Cozinhe em separado e depois adicione na panela de cozedura lenta durante os
últimos 30 minutos de cozedura.
Vinho pode dar sabor e tenrura à carne. Substitua parte da água por vinho para
obter sabor mais rico.
Ervas de folha inteira são superiores para cozedura prolongada na sua panela
de cozedura lenta, mas reduza a quantidade da receita padrão em um quarto.
Page 28

28
Pouca humidade ferve na panela de cozedura lenta, por isso, na maior parte dos
casos, a quantidade de líquido das receitas padrão pode ser reduzido a metade.
Se vê que tem líquido demasiado, remova a tampa e ponha a panela de
cozedura lenta na definição 2 (Elevada) durante 30-45 minutos para reduzir.
Os tempos de cozedura das receitas convencionais devem ser aumentados
substancialmente ao cozinhar com a panela de cozedura lenta. Por exemplo,
comida que cozinha em 30 minutos convencionalmente, demorará 4 – 5 horas
com cozedura lenta em 1 (Baixo).
Receitas que exigem 1 hora demorarão 6 – 8 horas em 1 (Baixo) na panela de
cozedura lenta. Alimentos que cozinham durante 1 – 3 horas,
convencionalmente, demorarão 8 – 12 horas em 1 (Baixo).
Sem tostar, algumas carnes e aves podem resultar com aspecto pouco apetitoso
quando cozinhadas na panela de cozedura lenta.
LIMPEZA E MANUTENÇÃO
Certifique-se de que o produto está desligado (OFF) e que a ficha está
desconectada da tomada eléctrica antes de limpar.
Deixe o produto arrefecer completamente.
É muito mais simples limpar os acessórios imediatamente depois de serem
utilizados.
Nunca mergulhe a unidade em água ou em qualquer outro líquido nem a
coloque debaixo de água a correr para a limpar.
A tampa de vidro temperado e caçarola de cerâmica podem ser lavadas na
máquina de lavar loiça. Também podem ser lavadas com água quente e
detergente.
Não use ferramentas de limpeza abrasivas, como esfregões abrasivos. Pode
utilizar um pano macio, uma esponja da louça ou espátula de borracha para
remover quaisquer resíduos de alimentos.
Use um detergente não abrasivo ou vinagre para limpar partículas de alimentos
difíceis de remover ou manchas de água.
Não permita alterações súbitas da temperatura na tampa e caçarola de
cerâmica. Alterações súbitas da temperatura podem provocar o aparecimento de
fissuras ou a quebra destas peças.
Page 29

29
Use um pano macio humedecido para limpar o exterior da base de cozedura
principal. Seque cuidadosamente com um pano. Não utilize agentes de limpeza
ou esfregões abrasivos.
ATENÇÃO: Não mergulhe a base em água ou outros líquidos.
Após cada utilização, lave a caçarola de cerâmica e tampa em água quente com
detergente. Seque com um pano limpo e suave antes de armazenar ou de voltar
a ligar à tomada de alimentação.
NOTA: Se os alimentos ficarem pegados à caçarola de cerâmica, encha a
caçarola com água quente e detergente e deixe repousar durante vários minutos
antes de lavar.
Importante: Não utilize esfregões metálicos, agentes de limpeza abrasivos ou
agressivos, uma vez que podem riscar as superfícies envidraçadas da caçarola
de cerâmica.
Limpe base do produto ao limpar com um pano suave ligeiramente humedecido.
Para remover bolhas de água e outras manchas, utilize um agente de limpeza
não abrasivo ou solução de vinagre fraco.
Remova manchas persistentes com um pano humedecido em água quente ou
com um agente de limpeza suave não abrasivo. Evite utilizar esfregões de
palha-de-aço, agentes de limpeza agressivos, solventes, abrasivos ou aerossóis,
uma vez que podem danificar as superfícies do produto. Seque com um pano
limpo e suave antes de armazenar ou de voltar a ligar à tomada de alimentação.
A caçarola de cerâmica e a tampa podem ser totalmente mergulhadas para a
lavagem e é totalmente seguro lavar na máquina de lavar loiça.
Page 30

30
GUARDAR O APARELHO
Desligue o aparelho da tomada e limpe todas as peças conforme instruído
acima. Certifique-se de que todas as peças estão secas antes de guardar.
Depois de limpar, dobre a pega dobrável. Guarde a prensa de bolachas e as
peças na sua embalagem original, num local limpo e seco.
Nunca guarde o aparelho enquanto estiver molhado ou sujo.
Nunca enrole o cabo de alimentação à volta do aparelho.
REPARAÇÃO DO APARELHO
O aparelho não contém componentes que possam ser reparados pelo utilizador. Se a
unidade não estiver a funcionar corretamente, verifique o seguinte:
Se seguiu as instruções corretamente.
Se a unidade foi devidamente ligada e se a tomada de parede está ligada.
Se a fonte de alimentação elétrica está ligada.
Se a ficha está firmemente encaixada na tomada elétrica.
Se o aparelho continuar sem funcionar depois de verificar os itens acima:
- Consulte o revendedor para uma possível reparação ou substituição. Se o revendedor
não for capaz de resolver o problema e necessitar de devolver o aparelho, certifique-se
de que:
A unidade está devidamente embalada na sua embalagem original.
Apresenta uma prova de compra.
É fornecida uma razão para a devolução.
Se o cabo de alimentação estiver danificado, deve ser substituído pelo fabricante ou por
um agente de assistência autorizado de forma a evitar qualquer perigo. Caso seja
necessário reparar o aparelho dentro do período de garantia, o aparelho deve ser
devolvido a um centro de assistência da Home of Living Brands (Pty) Limited aprovado.
A reparação fora do período de garantia continua a ser possível, mas, contudo, será
cobrada.
Page 31

31
SUBSTITUIÇÃO DA FICHA
Cumpra com as instruções seguintes caso seja necessário substituir a ficha.
Esta unidade destina-se a operar apenas na corrente indicada. A ligação a outras
fontes de alimentação poderá danificar o aparelho. Ligue uma ficha de três pinos
da seguinte maneira:
Os fios neste terminal de alimentação estão coloridos de acordo com o seguinte código:
Verde/Amarelo = Terra
Azul = Neutro
Castanho = Vivo
Page 32

32
ANEXE A SUA PROVA DE COMPRA/RECIBO AQUI
EM CASO DE RECLAMAÇÃO AO ABRIGO DE GARANTIA, É NECESSÁRIO PRODUZIR ESTE
RECIBO.
GARANTIA
1. Home of Living Brands (Pty) Limited garante ao comprador original deste produto (“o cliente")
que este produto não apresenta defeitos de material e fabrico que se manifestam na utilização
normal pessoal, familiar ou doméstica num período de 1 (um) ano desde a data de compra
(“período de garantia”).
2. No caso de um cliente comprar um produto e este se quebrar, apresentar defeitos ou não
funcionar corretamente para a finalidade prevista, o cliente tem de notificar o fornecedor ao
qual comprou o produto ("o fornecedor") desse fato dentro do período de garantia. Qualquer
reclamação nos termos da garantia deve ser acompanhada por uma prova de compra. Caso
não esteja disponível uma prova de compra, então as despesas da reparação e/ou
manutenção poderão ter de ser pagas pelo cliente ao fornecedor.
3. O produto avariado tem de ser devolvido ao centro de assistência do fornecedor para aplicar a
garantia.
4. O fornecedor irá reembolsar, reparar ou trocar o produto nos termos desta garantia, sujeito
aos requisites legislativos. Esta garantia será válida apenas quando o cliente não tiver
quebrado ele próprio o produto ou utilizado o produto para outro fim que não o previsto. A
garantia não inclui e não será interpretada como abrangendo produtos danificados como
resultado de um desastre, utilização imprópria, manipulação, abuso ou qualquer modificação
não autorizada ou reparação do produto.
5. Esta garantia aplicar-se-á apenas ao produto fornecido na data de compra e não a quaisquer
acessórios incluídos ou instalados pelo cliente.
6. Se o cliente solicitar que o fornecedor repare o produto e o produto se quebrar ou não
funcionar corretamente nos 3 (três) meses após a reparação, considerando que não seja
resultado de utilização imprópria, manipulação ou modificação por ou em nome do cliente,
então o fornecedor poderá substituir o produto ou pagar um reembolso ao cliente.
7. O cliente poderá ser responsável por certos custos quando os produtos devolvidos não
estiverem na embalagem original, ou caso a embalagem esteja danificada. Este custo será
deduzido de qualquer reembolso pago ao cliente.
HOME OF LIVING BRANDS (PTY) LTD (JOANESBURGO)
JOANESBURGO N.º TEL. (011) 267-3000
CIDADE DO CABO N.º TEL. (021) 552-5161
DURBAN N.º TEL. (031) 792-6000
www.homeoflivingbrands.com
www.russellhobbs.co.za
www.facebook.com/ Russell Hobbs
Page 33

33
Félicitations pour l’achat de notre mijoteuse manuel Russell Hobbs 6,5 L. Chaque unité
est fabriquée afin de d’assurer la sécurité et la fiabilité. Avant d’utiliser cet appareil pour
la première fois, merci de lire le manuel avec soin et de le garder à titre de référence.
GARANTIES IMPORTANTES
Lors de l’utilisation de n’importe quel appareil électrique, des précautions de sécurité
élémentaires devraient toujours être suivies, ainsi que les points suivants :
1. Merci de lire les instructions avec attention avant d’utiliser tout appareil quel qu’il
soit.
2. Toujours vous assurer que le voltage indiqué sur la plaque signalétique
correspond aux voltages principaux dans votre maison.
3. Une opération incorrecte et une utilisation inappropriée peuvent endommager
l’appareil et entraîner des blessures pour l’utilisateur.
4. L’appareil est destiné à uniquement à un usage domestique. Une utilisation
commerciale annule la garantie et le fournisseur ne peut pas être tenu pour
responsable des blessures ou des dommages causent lors de l’utilisation de
l’appareil pour tout autre usage que celui auquel il est destiné.
5. Eviter tout contact avec les parties mobiles.
6. Une prudence extrême est de mise lorsque vous déplacez un appareil contenant
de la nourriture, de l’eau ou autres liquides brûlants.
7. Ne mettez pas la mijoteuse sous tension si le bol en céramique est vide.
8. Laissez refroidir le couvercle et le bol en céramique avant de les plonger dans
l'eau ou de les nettoyer.
9. Ne touchez jamais l'enveloppe extérieure de la mijoteuse pendant son
fonctionnement ou avant qu'il n'ait refroidi. Utilisez les poignées ou les boutons et
des gants ou un chiffon pour retirer le couvercle ou manipuler le contenu.
10. Ne faites jamais rien cuire directement dans l'appareil, utilisez toujours le bol en
céramique.
11. N'utilisez pas le bol en céramique ou le couvercle en verre s'ils sont fissurés ou
ébréchés.
12. Ne laissez jamais l'appareil branché sur le secteur lorsqu'il n'est pas utilisé.
13. Ne mettez pas l'appareil sous tension lorsqu’il est à l'envers ou sur le côté.
14. Le couvercle en verre et le bol en céramique sont fragiles, manipulez-les avec
précaution.
Page 34

34
15. Une surveillance étroite est requise lorsque tout appareil est utilisé près d’enfants
ou de personnes invalides.
16. Cet appareil n’est pas destiné aux personnes (y compris les enfants) dont les
capacités physiques, sensorielles et intellectuelles sont limitées, ou qui ont un
manque d’expérience et de connaissances à moins qu’elles n’aient été
supervisées ou qu’elles aient reçu des instructions sur l’utilisation de l'appareil
par une responsable de leur sécurité.
17. Vérifier le cordon d’alimentation et brancher régulièrement pour éviter que le
cordon ne soit endommagé. Si le cordon ou la prise sont endommagés, ils
doivent être remplacés par le fabricant ou par une personne qualifiée afin d’éviter
un danger électrique.
18. Ne pas utiliser l’appareil s’il est tombé ou s’il a été endommagé de quelque
manière que ce soit. En cas de dommage, rapporter l’unité pour un examen et /
ou une réparation par un agent de maintenance agréé.
19. Pour éviter le risqué de choc électrique, ne pas immerger ou exposer l’unité, la
prise, ou le cordon d’alimentation dans l’eau ou bien dans tout autre liquide.
20. Ne jamais immerger l’appareil de cuisson dans l’eau ou dans tout autre liquide
pour le nettoyer.
21. Si du liquide venait à pénétrer accidentellement dans l’interrupteur ou se
répandre dans le base, débranchez immédiatement le cordon d'alimentation.
Important : avant de rebrancher l'appareil, il faudrait le faire inspecter par un
technicien qualifié.
22. Retirer la fiche de la prise en tenant la fiche. Ne pas tirer sur le cordon pour
déconnecter l’appareil du secteur. Toujours débrancher l’unité lorsqu’elle n’est
pas utilisée, avant le nettoyage ou lors de l’ajout ou du retrait de parties.
23. L’utilisation d’accessoires se fixant à l’unité qui ne sont ni recommandés ou
fournis par le fabricant pourrait entraîner des blessures, un incendie ou un choc
électrique.
24. Un cordon court est fourni pour réduire les risques résultant d’un entremêlement,
ou de trébuchement sur ce dernier.
25. Ne pas laisser le cordon dépasser du bord de la table ou du comptoir. S’assurer
que le cordon n’est pas dans une position ou il peut être tire par inadvertance.
26. Ne pas laisser le cordon de toucher des surfaces chaudes et ne pas le placer sur
ou près d’un réchaud à gaz ou électrique ou d’un four chaud.
Page 35

35
27. Ne pas utiliser l’appareil sur une plaque à gaz ou électrique ou au-dessus d’une
flamme.
28. L’utilisation d’un cordon d’extension avec cet appareil n’est pas recommandée.
Cependant, s’il s’avère nécessaire d’utiliser une rallonge électrique qui est
adaptée à la consommation d’énergie de l’appareil, afin d’éviter le
surchauffement du cordon d’extension, de l’appareil ou de la prise de courant.
Ne pas mettre la rallonge dans une position où elle peut être tirée par des
enfants, ou des animaux, ou bien où ils risquent de trébucher dessus.
29. Cet appareil n’est pas recommandé pour un usage extérieur. Ne pas utiliser cet
appareil pour quoique ce soit d’autre que l’utilisation à laquelle il est destiné.
30. NE PAS porter l’appareil en le prenant par le cordon d’alimentation.
31. Débrancher toujours l’unité lorsqu’elle n’est pas utilisée, ou avant de la nettoyer.
32. Faire toujours fonctionner l’appareil sur une surface régulière et stable. Ne pas
placer l'unité complète (bol en céramique) sur une surface chaude.
33. Le fabricant n’accepte de prendre aucune responsabilité pour tout dommage ou
blessure que ce soit, qui seraient dues à une utilisation incorrecte ou
inappropriée, ou celle de réparations exécutées par un personnel non-agréé.
34. En cas de problèmes techniques, éteindre la machine et ne pas essayer de la
réparer vous-même. Renvoyer l’appareil à un service de maintenance habileté
pour un examen, un ajustement ou pour une réparation. Insister toujours pour
que les pièces détachées d’origines soient utilisées. Le non-respect avec les
précautions et les instructions mentionnées ci-dessus pourrait empêcher le bon
fonctionnement de cette machine.
35. Préparez uniquement des aliments dans le bol en céramique interne fourni.
36. Ne faites pas fonctionner cet appareil au moyen d’une prise minuterie ou un
système de télécommande à distance séparée.
Page 36

36
SCHÉMA DES PIÈCES
Couvercle en verre
Bouton
Poignèe
Poignèe
Bol en cèramique
Socle
AVANT LA PREMIÈRE UTILISATION
1. Retirez tous les matériaux d’emballage de l’unité.
2. Nettoyer l'unité avec un chiffon doux et humide.
3. Le couvercle en verre trempé et le bol en céramique passent au lave-vaisselle ou
peuvent être nettoyés avec de l'eau chaude savonneuse.
4. Laissez l'appareil sécher complètement avant de l'utiliser.
5. Disposez l'appareil sur une table ou un comptoir sécurisé.
6. Il est recommandé de garder le matériel d’emballage dans un endroit sûr, au cas
où vous souhaitiez remballer le produit pour l'expédier.
Page 37

37
UTILISER LA MIJOTEUSE
1. Assurez-vous toujours que le bouton de contrôle de la température est
positionné sur OFF (ARRÊT) pour les réglages de température qui ne sont pas
en cours d'utilisation.
2. Placez le bol en céramique dans la cavité de la mijoteuse.
3. Préparez les ingrédients désirés et placez-les dans le bol en céramique.
4. Placez le couvercle fermement sur le bol en céramique.
5. Branchez l’appareil à la prise électrique.
6. Sélectionnez la température désirée, LOW (BASSE), HIGH (ÉLEVÉE) ou KEEP
WARM (CONSERVER AU CHAUD).
7. Nous recommandons de ne pas utiliser la position KEEP WARM (CONSERVER
AU CHAUD) pendant plus de quatre heures.
8. La position KEEP WARM (CONSERVER AU CHAUD) convient pour garder les
aliments déjà cuits au chaud.
9. Reportez-vous à vos recettes préférées, ajoutez des ingrédients et suivez les
temps de cuisson appropriés.
10. Lorsque le cycle de cuisson est terminé, tournez le bouton de contrôle pour
conserver le plat au chaud (KEEP WARM).
11. Placez le bol dans un endroit approprié pour le service.
12. Assurez-vous toujours que le bouton de contrôle est sur OFF (ARRÊT) lorsque le
bol en céramique est vide, pour éviter de l'endommager.
13. Lorsque vous avez fini d'utiliser la mijoteuse, tournez le bouton de contrôle en
position OFF (ARRÊT), débranchez l'appareil et attendez que tous les pièces et
accessoires aient complètement refroidi avant de les nettoyer.
CONSEILS DE CUISSON
1. Ne remplissez pas le bol en céramique au-delà des 3/4. Certains aliments
peuvent gonfler à la cuisson, ce qui peut les entraîner à déborder.
2. Cuisinez toujours avec le couvercle en place. Évitez de retirer le couvercle pour
vérifier les progrès de cuisson pendant les deux premières heures. Cela peut
entraîner une perte de chaleur et rallonger le temps de cuisson.
3. Portez toujours des gants de cuisine pour manipuler les pièces et accessoires
lorsque l'appareil est allumé.
Page 38

38
4. Débranchez l'appareil quand il est vide ou n'est pas utilisé.
5. Si l’alimentation ou la chaleur a été arrêtée pendant une période prolongée, la
nourriture à l'intérieur du conteneur peut être devenue impropre à la
consommation. Nous vous recommandons de jeter cette nourriture pour des
raisons de santé et de sécurité.
6. N'utilisez pas le bol en céramique dans un four, un four à micro-ondes ou
directement sur une cuisinière.
Préparer à l’avance
Préparez une recette à l’avance la veille au soir dans le bol en céramique
amovible et gardez-le couvert dans le réfrigérateur. Lorsque vous êtes prêt à
cuisine, mettez le bol en céramique dans la mijoteuse.
Important : Le bol de cuisson contenu dans la mijoteuse est en céramique et
comme tout type de céramique fine, il ne supportera pas les changements
soudains de température. N’y mettez pas d’aliments qui soient très froids ou bien
surgelés, ou bien ne le rangez pas dans le réfrigérateur, si le bol en céramique a
été préchauffé ou s’il est chaud au touché. Le bol en céramique ne convient pas
pour conserver des aliments dans le congélateur.
Couper les légumes
L’une des caractéristiques inhabituelle de la mijoteuse, est le fait que la plupart des
légumes - selon leur stade de mûrissement - cuisent en général plus lentement que la
plupart des viandes. La plupart des légumes devraient être découpés en petits
morceaux, ou au moins en quartiers et ils devraient être mis près des parois, ou bien
près du fond de la mijoteuse. Les carottes devraient être épluchées et mises là où elles
seront totalement recouvertes de liquide.
Épicez votre cuisine
Les viandes absorberont les saveurs des légumes avec lesquels elles cuisent. Cela peut
donner plus de saveur que ce à quoi vous êtes habitué. Vous pouvez réduire la quantité
de légumes, comme les oignons et les carottes si vous le souhaitez, afin que cela
convienne à votre goût personnel. La même chose s’applique aux épices fraîches ; vous
Page 39

39
pouvez les mijoter un peu plus longtemps. Les viandes, en particulier coupées en
morceaux pour un ragoût, si elles ne sont pas braisées d’avance, devraient être
nettoyées et essuyées avec soin, afin de retirer les particules qui se déposent
habituellement pendant qu’elles braisent, afin d’assurer la meilleure saveur possible
avant la cuisson.
Temps de cuisson
L’altitude, une humidité élevée et des variations légères dans l’alimentation
électrique peuvent légèrement altérer les temps de cuisson dans la mijoteuse.
Laissez tout le temps de cuire - il est à peu près impossible de cuire trop
longtemps.
Il est rarement utile de remuer les aliments lors de la cuisson sur le réglage 1
(bas). Lors de la cuisson sur le réglage 2 (élevé), il peut être utile de remuer à
l’occasion les aliments et cela améliorera la répartition des saveurs dans les
aliments.
Des liquides supplémentaires peuvent être requis, quand aliments bouilleront sur
le réglage 2 (élevé). Assurez-vous que la mijoteuse n’a pas été préchauffée. La
plupart des recettes, y compris celles de ce manuel requièrent des temps de
cuisson de 8 à 10 heures. Avec l’expérience, vous apprendrez quand il faut
utiliser des durées plus courtes ou plus longues que celles qui sont données
dans les recettes. Si les aliments sont plus cuits que ce que vous souhaitez, ou
s’ils rendent trop de liquide, ceci est sans doute dû à un parage insuffisant de la
viande ou à un ajout trop important de liquide, car le jus contenu dans les
viandes et dans les légumes peut varier. Tout liquide en trop peut être réduit en
enlevant le couvercle et en réglant la mijoteuse sur la température 2 (élevée)
pendant 45 minutes.
Page 40

40
Conseils pour utiliser les recettes standards dans votre mijoteuse
La cuisson à la mijoteuse est très différente de la cuisson au four ou à la poêle.
En utilisant les conseils suivants, vous pouvez préparer et cuisiner vos recettes
préférées dans la mijoteuse :
Si vous utilisez du lait frais ou du yaourt ne les ajoutez dans la mijoteuse que
dans les deux dernières heures de la cuisson. Du lait évaporé peut être ajouté au
début de la cuisson.
Le riz, les nouilles et les pâtes ne sont pas recommandés pour les longs temps
de cuisson. Cuisez-les séparément, puis ajoutez à la mijoteuse pendant les 30
dernières minutes de cuisson.
Du vin peut ajouter de la saveur et de l’onctuosité à la viande. Remplacez l’eau
par du vin pour une saveur plus riche.
Les feuilles entières des fines herbes sont meilleures pour une cuisson
prolongée dans votre mijoteuse, mais diminuez la quantité d’un quart, par rapport
à celle qui est indiquée dans la recette standard.
Très peu d’humidité s’évapore dans la mijoteuse, donc dans la plupart des cas la
quantité de liquide dans les recettes standards peut être réduite de moitié. Si
vous trouvez que vous avez trop de liquide, enlevez le couvercle et passez la
mijoteuse sur le réglage 2 (Élevé) pendant 30-45 minutes afin de réduire la
quantité de liquide.
Les temps de cuisson des recettes habituelles doivent être considérablement
rallongés, lors de la cuisson dans une mijoteuse. Par exemple, les aliments qui
cuiraient habituellement 30 minutes, prendront 4 - 5 heures avec la cuisson lente
à 1 (basse) température.
Les recettes demandant 1 heure, prendront 6 – 8 heures à 1 (basse)
température dans la mijoteuse. Les aliments qui habituellement cuiront 1 – 3
heures, prendront 8 – 12 heures sur le réglage 1 (basse) température.
Certaines viandes et volailles pourraient sembler fades s’ils elles ne sont pas
d’abord braisées et leur aspect ne sera pas appétissant lorsqu’elles cuiront dans
la mijoteuse.
Page 41

41
NETTOYAGE ET MAINTENANCE
Assurez-vous que le produit est en position OFF et de le débrancher de son
alimentation avant de le nettoyer.
Laissez le produit refroidir complètement.
Il est plus facile de nettoyer les accessoires directement une fois qu’ils ont été
utilisés.
Ne pas immerger l'unité dans de l’eau ou dans tout autre liquide, et le maintenir
sous un robinet pour le nettoyer.
Le couvercle en verre trempé et le bol en céramique peuvent être nettoyés au
lave-vaisselle. Ils peuvent également être lavés à l'eau chaude savonneuse.
N’utilisez pas d’accessoires de nettoyage abrasifs comme les tampons à récurer.
Vous pouvez utiliser un chiffon, une éponge ou une spatule en caoutchouc
souple pour retirer les résidus de nourriture.
Pour nettoyer les particules de nourritures difficiles à retirer, utilisez un nettoyant
non abrasif ou du vinaigre blanc.
Ne soumettez pas le couvercle ou le récipient en céramique à de brusques
changements de température. Les brusques changements de température
peuvent fissurer ou ébrécher ces pièces.
L’extérieur de la base principale de la mijoteuse peut être nettoyé avec un chiffon
doux et humide. Essuyez-la soigneusement. N’utilisez pas de nettoyants
abrasifs ou de tampons à récurer.
MISE EN GARDE : N’immergez pas le socle dans de l’eau ou dans d’autres
liquides.
Après chaque utilisation, nettoyez le bol en céramique et faites le tremper dans
de l'eau tiède et savonneuse. Essuyez avec un tissu propre et doux avant de
ranger le produit ou de le rebrancher à l'alimentation.
Page 42

42
NOTE : Si de la nourriture colle au bol en céramique, remplissez-le d'eau chaude
et savonneuse et laissez tremper pendant plusieurs minutes avant de le nettoyer.
Important : Ne pas utiliser de tampons métalliques, de nettoyants abrasifs ou
durs qui pourraient rayer les surfaces vitrées du bol en céramique.
Nettoyez la base du produit en l'essuyant à l'aide d'un tissu doux légèrement
humide. Pour éliminer les tâches d'eau et autres, utilisez un nettoyant non abrasif
ou une solution de vinaigre diluée.
Éliminez les tâches tenaces à l'aide d'un tissu humidifié avec de l'eau
savonneuse ou un nettoyant doux et non abrasif. Évitez d'utiliser des tampons
récurant, des détergents agressifs, des solvants, des agents polissant, abrasifs
ou nettoyants aérosols susceptibles d'endommager les surfaces du produit.
Essuyez avec un tissu propre et doux avant de ranger le produit ou de le
rebrancher à l'alimentation.
Le bol en céramique et le couvercle peuvent être totalement immergés pour être
lavés et sont lavables au lave-vaisselle.
RANGEMENT DE L'APPAREIL
Débrancher l’appareil de l’alimentation électrique et nettoyer les pièces
comme il l’a été recommandé ci-dessus. S’assurer que toutes les pièces
sont sèches avant de les ranger.
Après le nettoyage, repliez la poignée pliable dessus. Rangez la presse à
biscuit et les pièces dans sa boîte d’origine, dans un lieu propre et sec.
Ne jamais ranger l'appareil s’il est encore humide ou sale.
Ne jamais enrouler le cordon d’alimentation autour du appareil.
MAINTENANCE DE L’APPAREIL
Il n’existe pas de pièces dans cet appareil, dont la maintenance puisse être faite par
l’utilisateur. Si l’unité ne fonctionne pas correctement, veuillez vérifier les points suivants:
Vous avez correctement suivi les instructions.
Que l’unité a été correctement connectée et que toutes les prises murales sont
allumées.
Page 43

43
Que l’alimentation secteur est sur MARCHE.
Que la fiche est solidement ancrée dans la prise de courant.
Si cet appareil ne fonctionne toujours pas après avoir vérifié les points énoncés cidessus :
Consulter un détaillant pour la possibilité d’une réparation ou bien d’un replacement. Si
le détaillant ne réussit pas à résoudre le problème et que vous devez renvoyer l’appareil,
assurez-vous que :
L’unité est emballée avec soin dans son emballage d’origine.
La preuve d’achat est jointe.
La raison pour laquelle l’appareil est renvoyé.
Si le cordon d’alimentation est endommagé, il doit être remplacé par le fabriquant ou par
un agent de maintenance agréé, afin d’éviter tout danger. Si la maintenance devient
nécessaire pendant la durée de la garantie, l’appareil devrait être renvoyé à un centre
de maintenance agréé par Home of Living Brands (Pty) Ltd. La maintenance au-delà de
la garantie est toutefois possible, mais elle sera cependant facturée.
Page 44

44
LE CHANGEMENT DE LA PRISE
Si la prise intégrée devait être change, suivez les instructions ci-dessous.
Cette unité est uniquement conçue pour fonctionner au courant indiqué. La
connexion à d’autres sources d’alimentation pourrait endommager l’appareil.
Connecter la prise à trois chiffes de la manière suivante :
Les fils de ce réseau sont colorés selon le code suivant :
Vert/jaune = Terre
Bleu = Neutre
Marron = Actif
Page 45

45
VEUILLEZ APPOSER VOTRE PREUVE D’ACHAT / RECU ICI EN CAS DE RECLAMATION PENDANT
LA PERIODE DE GARANTIE CE RECUS DOIT ETRE PRESENTE.
GARANTIE
1. Home of Living Brands (Pty) Limited garantie à l’acheteur d’origine de ce produit (« le client »),
que ce dernier ne présentera pas de défauts de qualité, ni de fabrication qui dans le cadre
d’une utilisation normale, familiale ou domestique pourrait apparaître en l’espace d’1 (d’une)
année suivant la date d’achat (« période de garantie »).
2. Lorsque le client a acheté un produit qui se casse, présente des défauts ou qui ne fonctionne
pas correctement pour l’utilisation pour laquelle il était destiné, le client doit signaler cela au
fournisseur auprès duquel il a acheté le produit (« le fournisseur ») durant la période de
garantie. Toute réclamation selon les conditions de la garantie doit être accompagnée d’une
preuve d’achat. Si la preuve d’achat, n’est pas disponible, à ce moment-là, les frais de
réparation et / ou d’entretien peuvent être à la charge du client vis-à-vis du fournisseur.
3. Un produit défectueux doit être rapporté au centre d’entretien du fournisseur pour faire jouer la
garantie.
4. Le fournisseur remboursera, réparera ou échangera le produit selon les termes de cette
garantie qui est assujettie aux exigences légales. Cette garantie devrait être valable
uniquement quand le client n’a pas cassé lui-même l’appareil, ou utilisé ce dernier pour faire
quelque chose pour lequel il n’était pas destiné. La garantie ne comprend pas et ne peut pas
être saurait être considérée comme couvrant les dommages affectant l’appareil, qui seraient le
résultat d’un accident, d’une mauvaise utilisation, d’une modification, d’un abus ou de toute
modification ou réparation non-autorisée de l’appareil.
5. La garantie couvrira uniquement le produit fournit à la date d’achat et elle ne s’appliquera pas
à toute pièces ajoutée ou installée par le client.
6. Si le client demande au fournisseur de réparer le produit et si le produit casse ou ne fonctionne
pas correctement dans les 3 (trois) mois de la réparation, et si ceci n’est pas le résultat d’une
mauvaise utilisation, à ce moment-là le fournisseur pourrait remplacer le produit ou rembourser
le client.
7. Le client pourrait être tenu pour responsable de certains frais lorsque les produits ne sont pas
renvoyés dans leur emballage d’origine, ou si l’emballage est endommagé. Ceci sera déduit de
tout remboursement fait au client.
HOME OF LIVING BRANDS (PTY) LTD (JOHANNESBURG)
JOHANNESBURG TEL NO. (011) 267-3000
CAPE TOWN TEL NO. (021) 552-5161
DURBAN TEL NO. (031) 792-6000
www.homeoflivingbrands.com
www.russellhobbs.co.za
www.facebook.com/Russell Hobbs
 Loading...