

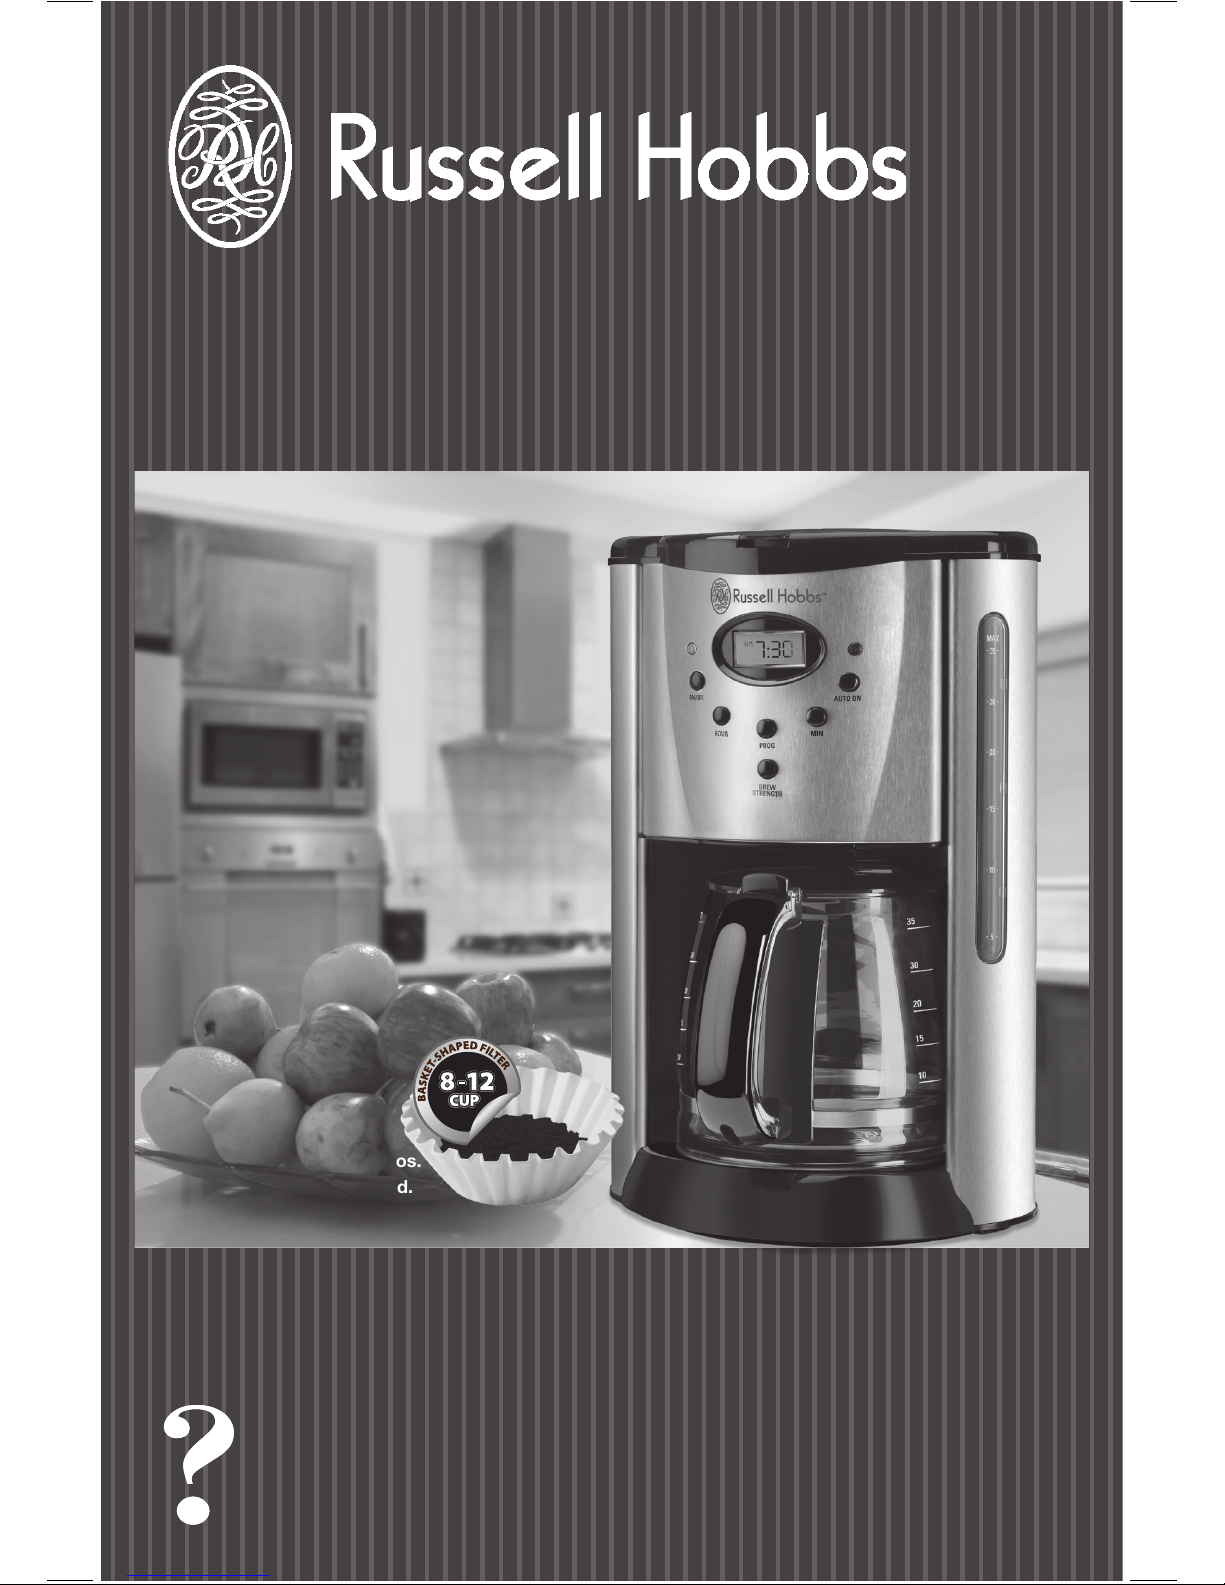
Page 1
TM
Modelos
Models
❑
RHSCM 127V
❑
RHSCM 220V
Cafeteira programável para
12 xícaras de café
12-Cup Programmable Coffeemaker
SAC: 0800 701 7989
www.saltonbrasil.com.br
IMPORTANTE / IMPORTANT
LAVE BEM A JARRA DE VIDRO ANTES
DO PRIMEIRO USO!
WASH CARAFE BEFORE FIRST USE!
* Filtros não incluídos.
* Filters not included.
*
Page 2

2
1
PRECAUÇÕES IMPORTANTES
Ao se usar aparelhos elétricos, as precauções de segurança básica devem
sempre serem seguidas para reduzir o risco de incêndio, de choque elétrico
e/ou de ferimentos pessoais, o que inclui:
❑
Ler todas as instruções.
❑
Não tocar em superfícies quentes. Usar o pegador ou a alça da cafeteira.
❑
Para proteção contra choque elétrico não coloque o fio, plugue ou o
aparelho na água ou em outros líquidos quando estiver ligado.
❑
É necessária uma supervisão mais cuidadosa quando o aparelho estiver
sendo usado próximo a crianças.
❑
Desconectar da tomada quando não estiver em uso e antes de limpar.
Deixar esfriar o aparelho antes de colocar ou retirar peças e antes de
limpá-lo.
❑
Não operar nenhum aparelho que esteja com o fio ou o plugue danificado
ou após mau funcionamento, ou com qualquer outro dano. Leve o aparelho
a um serviço autorizado mais próximo para avaliação, reparo ou ajuste. Ou
ligue para o número gratuito que está escrito na capa deste manual.
❑
O uso de um acessório não indicado para ser utilizado com este aparelho
pode causar ferimentos.
❑
Não usar ao ar livre.
❑
Não deixar o fio pendurado sobre a mesa ou a bancada em contato com
superfícies quentes.
❑
Não colocar sobre ou próximo de queimadores a gás ou elétricos quentes
ou em forno aquecido.
❑
Para desligar, coloque todos os botões de controle em “desligar” e depois
retire o plugue da tomada.
❑
Manter a jarra de vidro tampada quando estiver em uso.
❑
A jarra de vidro é projetada para ser usada com este aparelho. Não deve ser
usada em qualquer outro tipo de cafeteira.
❑
Não colocar a jarra de vidro quente sobre uma superfície molhada ou fria.
❑
Não usar a jarra se o vidro estiver quebrado, se a alça estiver danificada ou
se a jarra não possuir a alça.
❑
Não limpar a jarra de vidro com esponjas abrasivas, com palhas de aço ou
qualquer outro material abrasivo.
❑
Não usar este aparelho para qualquer fim à exceção do uso destinado.
❑
Podem ocorrer queimaduras se a tampa for removida durante os ciclos de
funcionamento da cafeteira.
CONSERVAR ESTAS INSTRUÇÕES.
Este aparelho é exclusivamente de uso doméstico.
CUIDADOS ADICIONAIS
AVISO: Este dispositivo gera calor e vapor durante o uso.
As precauções apropriadas devem ser tomadas para impedir o risco de
queimaduras, incêndios, ou ferimentos pessoais e danos à propriedade.
❑
Todos os usuários devem ler e compreender o Manual do Proprietário antes
de operar ou limpar este aparelho.
❑
O fio deste aparelho deve ser conectado a uma tomada elétrica.
❑
Usar somente ÁGUA neste aparelho! Não colocar nenhum outro líquido
ou produtos alimentícios neste aparelho. Não misturar ou adicionar
qualquer produto ao reservatório destinado à água , exceto o que constar
na seção de Cuidados e Limpeza para realizar a limpeza do aparelho.
❑
Não tentar mover um aparelho que contem líquidos quentes. Esperar o
aparelho esfriar completamente antes de movê-lo.
❑
Manter o aparelho a pelo menos 4 polegadas longe da parede ou de outros
objetos durante o funcionamento. Não colocar nenhum objeto sobre o
aparelho enquanto ele estiver em funcionamento.
❑
Colocar o aparelho em uma superfície que seja resistente ao calor.
❑
Se o aparelho começar a funcionar mal durante a operação, desconectar
imediatamente o fio da tomada. Não usar o aparelho com defeito ou
tampouco tentar reparar o mau funcionamento do aparelho.
❑
Se este aparelho cair ou acidentalmente ficar imerso em água ou em outro
líquido, desconecte-o imediatamente da tomada. Não tente retirá-lo da
água! Não utilizar este aparelho depois que caiu em água ou ficou imerso
em água. Contate o serviço do consumidor para avaliação e reparo do
produto.
❑
Não deixar este aparelho sem acompanhamento enquanto estiver
funcionando.
❑
Deve-se deixar o aparelho esfriar o suficiente antes de adicionar mais água,
para evitar respingos de água quente.
❑
Usar sempre água fresca, e fria no aparelho. Água morna ou outro líquido,
exceto os descritos na seção da limpeza, podem causar dano ao aparelho.
❑
Não colocar a jarra de vidro no microondas.
❑
Não deixar a jarra de vidro vazia na placa de aquecimento quando o
aparelho estiver ligado, pois a jarra pode se rachar ou danificar-se.
❑
Não levantar a tampa articulada do filtro até que o ciclo de funcionamento
seja completado e todas as peças se tenham esfriado.
❑
CUIDADO: Para evitar ferimentos quando utilizar a Sneak-A-Cup®
(chave de interrupção de gotejamento), coloque a jarra novamente
na base dentro de 1 minuto após a sua remoção enquanto estiver
ocorrendo o processo de fabricação (ver as instruções na seção
Sneak-A-Cup®).
Page 3
4
3
PLUGUE POLARIZADO (modelos 120V somente)
Este aparelho possui plugue polarizado (um pino é mais largo que o outro). Este plugue é
feito para conectar-se a uma tomada polarizada somente de um jeito, para reduzir o risco
de choque elétrico. Se o plugue não couber inteiramente na tomada, inverta o plugue. Se
ainda não couber, contatar um eletricista qualificado. Não tentar modificar o plugue de
nenhum outro jeito.
PARAFUSOS INVIOLÁVEIS
Aviso: Este aparelho é equipado com um parafuso inviolável para impedir a remoção
da tampa exterior. Para reduzir o risco de incêndio ou de choque elétrico, não tentar
remover a tampa exterior. Não há nenhuma peça que seja útil ao usuário na parte
de dentro. O reparo deve ser feito somente pelo pessoal do serviço autorizado.
FIO ELÉTRICO
a) Um fio de fornecimento de energia curto (ou um fio destacável) deve ser
fornecido para reduzir o risco de entrelaçamento ou de tropeço em um fio mais
longo.
b) Fios de fornecimento de energia longos e destacáveis ou extensões estão
disponíveis, e podem ser usados se forem tomados os cuidados necessários.
c) Se um fio de extensão longo for utilizado,
1) A classificação elétrica marcada no fio de extensão deve ser pelo menos tão
boa quanto a classificação elétrica do aparelho,
2) Se o dispositivo é do tipo aterrado, o cabo de extensão deve ser do tipo
aterrado com 3 pinos, e
3) O fio mais longo deve ser arranjado de modo que não fique jogado sobre
a bancada onde pode ser puxado por crianças ou de um modo em que possam
tropeçar no fio.
Nota: Se o fio de fornecimento de energia é danificado, deve ser substituído por
pessoas qualificadas ou na América Latina por um centro de serviço autorizado.
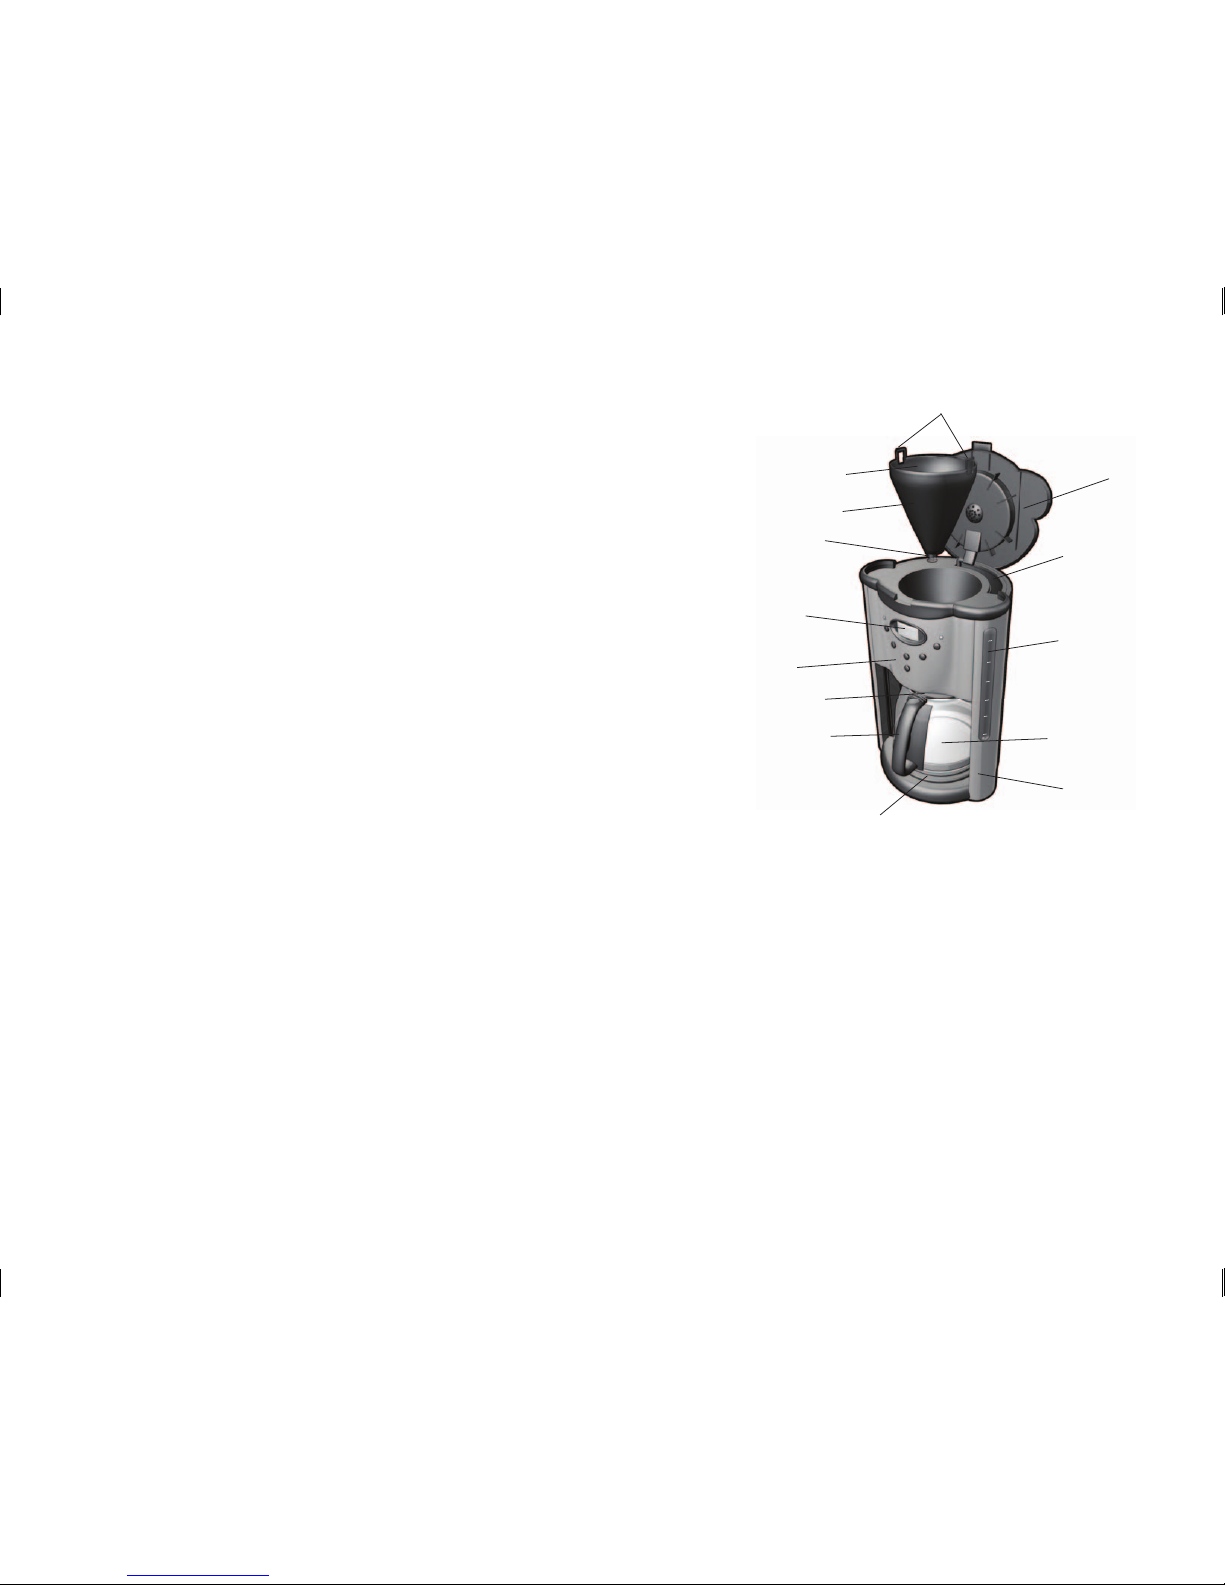
O produto pode variar ligeiramente do que é ilustrado.
1. Alças
2. Filtro permanente (não mostrado)
3. Cesta do filtro removível
4. Sneak-um-cup® (chave de interrupção de gotejamento)
5. Visor de LCD
6. Painel de controle
7. Tampa da jarra
8. Alça da jarra
9. Placa de aquecimento
10. Base
11. Jarra de vidro
12. Indicador de nível de água
13. Reservatório de água
14. Tampa articulada do filtro
AU
TO
ON
MIN
PROGRAM
BREW STRENGTH
HOUR
ON/OFF
MAX
12
10
8
6
4
2
7:
30
A
Page 4
6
5
AUTO ON
MIN
PROGRAM
BREW STRENGTH
HOUR
ON/OFF
7:30
PM
B
1. Tecla de LIGAR/DESLIGAR: Use esta tecla para ligar a cafeteira e começar o
processo de funcionamento. Você pode usar esta tecla igualmente para desligar a
unidade quando o ciclo de fabricação estiver completo.
2. Tecla da hora: Use esta tecla para visualizar a hora correta ajustando o tempo.
3. Tecla de programa: Use esta tecla para programar sua cafeteira para começar o
processo de fabricação numa hora específica.
4. Tecla para produção mais forte de café: Use esta tecla para selecionar uma
produção mais forte de café.
5. Tecla de minutos: Use esta tecla para indicar o minuto correto ao ajustar o
tempo.
6. Tecla de fabricação automática: Usar esta tecla para começar a fabricação do
café no horário pré-ajustado. Você pode igualmente pressionar esta tecla para
que o aparelho comece a funcionar na mesma hora pré-ajustada no dia seguinte.
PAINEL DE CONTROLE
COMO SE USAR
Este dispositivo é exclusivamente de uso doméstico.
ANTES DO PRIMEIRO USO
Aviso: Para reduzir o risco de incêndio ou de choque elétrico, não imergir o fio,
plugue ou o aparelho na água, ou em qualquer outro líquido.
1. Antes de preparar o café em sua nova cafeteira, lave completamente a jarra de
vidro, a tampa da jarra e a cesta removível do filtro com água morna e sabão.
Enxágüe e seque. Coloque as peças que estão desmontadas no aparelho.
Nota: A cesta removível do filtro deve ser colocada na cafeteira
com as duas alças, que estão localizadas dos dois lados da
cesta, alinhadas com as duas marcas no interior do aparelho (c).
Pressionar a cesta do filtro para baixo até que faça um clique.
2. Limpe o interior da cafeteira fabricando duas jarras cheias
de água da torneira (ver instruções de FABRICAÇÃO). Não
coloque o filtro permanente ou pó de café dentro da cesta
do filtro removível para realizar esta limpeza inicial.
Nota: Ao final do primeiro ciclo, desligue a cafeteira e espere dez minutos para
que o aparelho esfrie. Ligue a cafeteira novamente e comece o segundo ciclo de
funcionamento para limpeza inicial.
INSTRUÇÕES PARA FABRICAÇÃO DO CAFÉ
Nota: O indicador do relógio piscará quando o aparelho for ligado. Você pode ajustar
o relógio a qualquer hora, (ver instruções de AJUSTE DO RELÓGIO) antes ou depois
do processo de funcionamento. O ajuste do relógio não afetará o funcionamento
normal da cafeteira.
1. Coloque a cafeteira em uma superfície plana, nivelada. Conecte o aparelho a uma
tomada elétrica.
2. Abra a tampa usando a borda da cafeteira.
3. Coloque um filtro permanente na cesta de filtro removível. Medir uma colher de pó
de café para cada copo de café desejado. Para um café mais forte ou mais suave,
ajuste a quantidade de pó de acordo com o seu gosto.
Nota: Nós recomendamos o uso de pó de café específico para ser usado em
cafeteiras automáticas.
4. Encher a jarra com água fria e colocar a água no reservatório até o nível desejado.
Não é recomendado colocar menos que dois copos. Coloque a jarra na placa de
aquecimento.
Importante: Use sempre água fria no seu aparelho. Aquecer a água ou usar
outro líquido, a não ser os listados nas instruções de cuidados e limpeza,
podem causar dano ao aparelho.
Nota: A quantidade de café fabricado será sempre menor do que a quantidade de
água colocada na cafeteira, pois 10% da água é absorvida pelo pó de café e pelo
filtro.
C
Page 5

8
7
5. Feche a tampa.
6. Para ligar a cafeteira, pressione a tecla LIGAR/DESLIGAR (ON/OFF) . Acenderá uma
luz vermelha, e a palavra "ON" aparecerá no canto direito superior do visor de
LCD, indicando que o ciclo de funcionamento da cafeteira começou. A água
quente será dispensada suavemente e uniformemente através do pó de café.
Nota: Se você preferir usar o sensor de tempo para pré-ajustar a cafeteira, ver
instruções de USO DO SENSOR DE TEMPO.
7. Para se obter uma xícara de café antes que o ciclo tenha sido completado, remova
simplesmente a jarra da placa de aquecimento e coloque o café na xícara
(ver SNEAK-A-CUP® CHAVE DE INTERRUPÇÃO DO GOTEJAMENTO). A fabricação "
do café continuará, mas o gotejamento do café na jarra será automaticamente
paralisado. Retorne a jarra para a placa de aquecimento dentro de 1 minuto;
o gotejamento recomeçará.
Cuidado: Para impedir ferimentos ao utilizar Sneak-A-Cup® (chave de
interrupção de gotejamento), recolocar a jarra de vidro dentro de 1 minuto após
a remoção na placa de aquecimento durante o processo de funcionamento.
8. Quando o ciclo tiver sido completado, espere até cessar todo o gotejamento para
retirar a jarra. A tampa da jarra deve ser mantida no lugar para facilitar o serviço.
9. Para começar um novo ciclo de fabricação do café, desligue a cafeteira e espere
10 minutos para esfriar.
Importante: Se o aparelho não tiver esfriado antes da repetição imediata do
ciclo, a água do reservatório pode tornar-se superaquecida e respingos de vapor
podem ser liberados pela abertura, gerando risco de queimaduras.
10. Quando não estiver em uso, desconectar a base da tomada. Permitir que
o aparelho esfrie completamente antes da limpeza (ver as instruções de cuidado
e limpeza).
FABRICANDO UMA NOVA QUANTIDADE DE CAFÉ
Como mencionado acima, recomenda-se que a cafeteira seja desligada por 10
minutos entre os ciclos, a fim de permitir que o aparelho esfrie. Quando o aparelho
estiver desligado, retire o filtro de café usado e enxágüe a jarra de vidro, o filtro
permanente e a cesta removível do filtro. Repetir então o procedimento de fabricação
do café.
Sneak-A-Cup® chave de interrupção do gotejamento
Você pode retirar uma xícara de café enquanto a cafeteira estiver funcionando sem
ter que interromper o processo de fabricação do café. Quando tiver acabado de servir
a xícara de café, coloque novamente a jarra na cafeteira. O processo da fabricação do
café continuará normalmente.
Importante: Para evitar um possível gotejamento de café após a remoção da
jarra, recoloque a jarra na cafeteira dentro de 1 minuto após a retirada.
USANDO O SENSOR DE TEMPO
Sua cafeteira possui um sensor de tempo multifuncional. As seções seguintes
descrevem o uso apropriado do sensor de tempo.
Ajustando o relógio
Para ajustar o relógio, pressione a tecla “HORA” e a tecla “MINUTOS”. Pressione
primeiramente a tecla “HORA” até que se tenha obtido a hora desejada. Certifique-se
de que o indicador “AM” (as primeiras 12 horas do dia) ou “PM” (as últimas 12 horas do
dia) esteja aparecendo no lado esquerdo do visor de LCD. Pressione a tecla “MINUTOS”
até que se tenha obtido os minutos desejados. Você pode pressionar e segurar a tecla
“HORA” ou “MINUTOS” para obter a hora correta mais rapidamente.
Nota: Desconectar o aparelho da tomada redefinirá o relógio para as 12:00 horas.
TECLA DE FABRICAÇÃO AUTOMÁTICA
Para pré-ajustar sua cafeteira para começar a fabricar o café numa hora préprogramada, siga as etapas: 1- siga os 5 primeiros passos da seção “instruções para
fabricação do café” normalmente. Verifique se o relógio foi ajustado na hora correta.
Se não, siga as instruções acima para ajustar o relógio. Pressione a tecla de PROGRAMA
uma vez, o visor de LCD piscará “PROGRAMA”. Pressione as teclas “HORA” e “MINUTOS”
até que você obtenha a hora desejada em que a cafeteira começará a funcionar.
Certifique-se do “AM/PM apropriado” que aparece no lado esquerdo do visor de LCD.
Pressione a tecla de fabricação automática e a palavra “AUTO” irá aparecer em verde
no canto direito do visor de LCD. A hora pré ajustada irá aparecer momentaneamente,
indicando que a cafeteira está esperando para começar a funcionar na hora em que
foi pré ajustada.
Nota: Se a tecla de fabricação automática é pressionada durante o processo de
fabricação do café, o processo paralisará e o aparelho desligará.
Para cancelar a fabricação automática: Pressione a tecla de fabricação automática
e a luz verde no canto direito do visor de LCD desaparecerá. Para que a cafeteira volte
a funcionar na mesma hora pré-programada no dia seguinte, pressione a tecla de
fabricação automática e a palavra “AUTO” em verde reaparecerá.
Nota: A cafeteira desligará após terminar a fabricação de café na hora pré-ajustada.
• A tecla de fabricação automática deve ser pressionada novamente para que a
cafeteira volte a funcionar na mesma hora pré-ajustada no dia seguinte.
Nota: No caso de faltar luz elétrica ou se o aparelho for desconectado da tomada, o
relógio é redefinido automaticamente para as 12:00 horas e a fabricação automática
de café deve ser reprogramada.
PRODUÇÃO MAIS FORTE DE CAFÉ
Usar A tecla de produção mais forte de café quando você planeja fabricar somente
uma pequena quantidade de café. Esta tecla retarda o processo da fabricação de
modo que esta pequena quantidade de café terá a mesma qualidade e gosto de
quando você fabrica uma jarra inteira. A tecla de produção mais forte de café pode
ser ativada antes que o aparelho seja ligado ou durante o processo da fabricação do
café pressionando-se a tecla no momento desejado. Quando esta tecla for ativada, um
desenho de um copo de café aparecerá no visor de LCD.
Nota: Para desativar a tecla de produção mais forte de café, pressione a tecla
novamente e o desenho do copo de café desaparecerá.
DESLIGAMENTO AUTOMÁTICO
Convenientemente, sua cafeteira foi projetada com um dispositivo de desligamento
automático. Quando o ciclo de fabricação do café está completo, a cafeteira desliga
automaticamente após 2 horas.
Page 6

10
9
SUGESTÕES PARA UM CAFÉ MAIS SABOROSO
• Uma cafeteira limpa é essencial para fazer um café saboroso. Limpeza regular, como
especificado na seção de cuidados e limpeza é altamente recomendado. Sempre
usar água fria em sua cafeteira. Grãos moídos mais finos, promove uma extração
melhor e fornece um café mais rico,encorpado. Grãos moídos mais grosseiramente
exigirão uma maior quantidade de pó para se obter o mesmo gosto encorpado de
um café moído mais fino.
• Armazenar o pó de café em um lugar fresco, e seco. Uma vez que o café foi aberto,
mantenha-o firmemente selado na geladeira para manter o frescor. Para um café
melhor, comprar os grãos de café inteiros e moer pouco antes de colocar na
cafeteira para fazer o café.
• Não reutilize o pó de café, pois isto altera extremamente o sabor.
• Reaquecer o café não é recomendado. O café mais saboroso é aquele servido
imediatamente após a sua fabricação.
• As gotas pequenas do óleo na superfície do café preto são devido à extração
de óleo do pó de café. A oleosidade ocorre mais freqüentemente quando é
utilizado café torrado. Se uma quantidade maior de óleo é observada, isso indica a
necessidade de limpar a cafeteira.
CUIDADO E LIMPEZA
Este aparelho exige pouca manutenção. Não contém nenhuma peça utilizável. Todo
serviço que exija desmontagem do aparelho, à exceção da limpeza, deve ser executado
por um técnico qualificado.
Aviso: Desconectar da tomada antes de limpar.
1. Certificar-se sempre que a cafeteira está desconectada da tomada e que a placa de
aquecimento está fria antes de limpar o aparelho.
2. Depois do uso diário, a cesta removível do filtro, a jarra de vidro e a tampa da jarra
devem ser lavadas em água morna com sabão.
3. Caso necessário, limpar a parte externa da cafeteira com um pano macio e úmido.
Não usar limpadores, esponjas de limpeza ou palhas de aço abrasivas. Nunca imergir
a cafeteira em água ou em outro líquido.
CUIDADOS COM A JARRA DE VIDRO
1. Não permitir que todo o líquido evapore da jarra quando estiver sobre a placa de
aquecimento, pois esse procedimento superaquece a jarra quando está vazia.
2. Não utilize a jarra de viro se ela estiver danificada de alguma.
3. Nunca usar esponjas de limpeza ou limpadores abrasivos; riscarão o vidro.
4. Evitar manipular a jarra com objetos ásperos ou afiados.
DEPÓSITOS MINERAIS E OBSTRUÇÃO
Os depósitos minerais deixados pela água podem obstruir sua cafeteira. Vapor excessivo
ou um ciclo de funcionamento prolongado são sinais de que é necessária uma limpeza.
A limpeza é recomenda a cada 60 ciclos de fabricação de café.
1. Coloque vinagre branco na jarra de vidro até a marca de 7 copos. Adicione água fria
até a marca de 12 copos. Coloque a mistura de água/vinagre no reservatório de água.
2. Coloque um filtro permanente na cesta removível de filtro, a seguir feche a tampa.
Coloque a jarra na placa de aquecimento. Pressione a tecla LIGAR/DESLIGAR.
Nota: Durante a limpeza, ocorrerá mais vapor do que durante a fabricação de normal
café.
3. MANTENHA A CAFETEIRA LIGADA ATÉ QUE A METADE DA ÁGUA TENHA PASSADO
PELA CAFETEIRA, ISSO PODE SER VISTO ATRAVÉS DO INDICADOR DE NÍVEL DE ÁGUA.
Pressione a tecla LIGAR/DESLIGAR para desligar o aparelho. Quando o líquido parar
de gotejar da cesta removível do filtro na jarra, remova a jarra e deixe que o líquido
esfrie por 10 minutos. Quando tiver esfriado, coloque o líquido novamente no
reservatório de água.
4. Recoloque a jarra na placa de aquecimento.
5. Ligue a cafeteira novamente e repita este procedimento, permitindo que toda a
solução de limpeza goteje dentro da jarra de vidro. Depois que o gotejamento parar,
descarte o conteúdo da jarra.
6. Após permitir que a cafeteira refrigere por 10 minutos, enxágüe a cafeteira colocando
somente água pura no reservatório e recomeçando mais um ciclo de funcionamento.
Certifique-se de que colocou um filtro permanente na cesta removível do filtro antes
de ligar a cafeteira.
7. Ao final do ciclo de funcionamento, desligue o aparelho pressionando a tecla LIGAR/
DESLIGAR. Descarte a água da jarra. Remova o filtro permanente e lave a jarra e a
cesta removível do filtro em água morna com sabão. Enxágüe e seque.
8. Quando a cafeteira esfriar, limpe o exterior com um pano seco.
Page 7

12
11
IMPORTANT SAFEGUARDS
When using electrical appliances, basic safety precautions should always be
followed to reduce the risk of fire, electric shock and/or injury to persons,
including the following:
❑ Read all instructions.
❑ Do not touch hot surfaces. Use handle or knobs.
❑ To protect against electric shock, do not place cord, plug or appliance in
water or other liquids.
❑ Close supervision is necessary when any appliance is used by or near
children.
❑ Unplug from outlet when not in use and before cleaning. Allow to cool
before putting on or taking off parts and before cleaning the appliance.
❑ Do not operate any appliance with a damaged cord or plug or after the
appliance malfunctions, or has been damaged in any manner. Return the
appliance to the nearest authorized service facility for examination, repair
or adjustment. Or, call the appropriate toll-free number on the cover of this
manual.
❑ The use of an accessory not evaluated for use with this appliance may
cause injuries.
❑ Do not use outdoors.
❑ Do not let cord hang over the edge of table or counter, touch with hot
surfaces.
❑ Do not place on or near a hot gas or electric burner or in a heated oven.
❑ To disconnect, turn any control to OFF then remove plug from wall outlet.
❑ Keep the lid on the carafe when in use.
❑ The carafe is designed for use with the appliance. It must never be used on
a range top.
❑ Do not set a hot carafe down on a wet or cold surface.
❑ Do not use the carafe if the glass is cracked or has a loose or weakened
handle.
❑ Do not clean the carafe with abrasive cleansers, steel wool or other abrasive
material.
❑ Do not use this appliance for anything other than intended use.
❑ Scalding may occur if the lid is removed during the brewing cycles.
SAVE THESE INSTRUCTIONS.
This appliance is for household use only.
ADDITIONAL SAFEGUARDS
Warning: This appliance generates heat and escaping steam during use.
Proper precautions must be taken to prevent the risk of burns, fires, or
other injury to persons or damage to property.
❑All users of this appliance must read and understand this Owner’s Manual
before operating or cleaning this appliance.
❑The cord to this appliance should be plugged into an electrical outlet.
❑UseWATER ONLYin this appliance! Do not put any other liquids or food
products in this appliance. Do not mix or add anything to the water placed
in this appliance, except as instructed in the Care and Cleaning Instructions
to clean the appliance.
❑DO NOT attempt to move an appliance containing hot liquids. Allow
appliance to cool completely before moving.
❑Keep appliance at least 4 inches away from walls or other objects during
operation. Do not place any objects on top of appliance while it is
operating. Place the appliance on a surface that is resistant to heat.
❑If this appliance begins to malfunction during use, immediately unplug the
cord. Do not use or attempt to repair the malfunctioning appliance.
❑If this appliance falls or accidentally becomes immersed in water or any
other liquid, unplug it immediately. Do not reach into the water!Do not
use this appliance after it has fallen into, or has become immersed in
water.Contact Consumer Services for examination and repair.
❑Do not leave this appliance unattended during use.
❑The appliance must be left to cool down sufficiently before adding more
water, to avoid splattering.
❑Always use fresh, cool water in your appliance. Warm water or other liquids,
except as listed in cleaning section, may cause damage to the appliance.
❑DO NOT put carafe into a microwave.
❑DO NOT leave empty carafe on warming plate when appliance is turned
ON, as the carafe may crack or become otherwise damaged.
❑DO NOT lift hinged filter lid until brewing is complete, and all parts have
cooled.
❑Caution: To prevent injury when utilizing Sneak-A-Cup® Interrupt
feature, replace carafe within 1 minute of removing during brewing
process.
Page 8

14
13
POLARIZED PLUG (120V Models Only)
This appliance has a polarized plug (one blade is wider than the other). To reduce the
risk of electric shock, this plug is intended to fit into a polarized outlet only one way. If
the plug does not fit fully into the outlet, reverse the plug. If it still does not fit, contact a
qualified electrician. Do not attempt to modify the plug in any way.
TAMPER-RESISTANT SCREW
Warning: This appliance is equipped with a tamper-resistant screw to prevent
removal of the outer cover. To reduce the risk of fire or electric shock, do not attempt
to remove the outer cover. There are no user-serviceable parts inside. Repair should
be done only by authorized service personnel.
ELECTRICAL CORD
a) A short power-supply cord (or detachable power-supply cord) is to be provided to
reduce the risk resulting from becoming entangled in or tripping over
a longer cord.
b) Longer detachable power-supply cords or extension cords are available
and may be used if care is exercised in their use.
c) If a long detachable power-supply cord or extension cord is used,
1) The marked electrical rating of the detachable power-supply cord or
extension cord should be at least as great as the electrical rating of the
appliance,
2) If the appliance is of the grounded type, the extension cord should be
a grounding-type 3-wire cord, and
3) The longer cord should be arranged so that it will not drape over the
countertop or tabletop where it can be pulled on by children or
tripped over.
Note: If the power supply cord is damaged, it should be replaced by qualified
personnel. In Latin America, by an authorized service center.
Product may vary slightly from what is illustrated.
1. Handles
2. Permanent filter (not shown)
3. Removable filter basket
4. Sneak-a-cup® interrupt feature
5. LCD display
6. Control panel
7. Carafe lid
8. Carafe handle
9. Warming plate
10. Base
11. Carafe
12. Water level indicator
13. Water reservoir
14. Hinged filter lid
AU
TO
ON
MIN
PROGRAM
BREW STRENGTH
HOUR
ON/OFF
MAX
12
10
8
6
4
2
7:
30
A
Page 9

15
16
CONTROL PANEL
AUTO ON
MIN
PROGRAM
BREW STRENGTH
HOUR
ON/OFF
7:30
PM
1. Power ON/OFF Button: Use this button to turn the unit on and start the brewing
process. You can also turn the unit off by pressing this button when the brewing
cycle is complete.
2. Hour Button: Use this button to display the correct hour when setting the time.
3. Program Button: Use this button to program your coffeemaker to start brewing
at a specified time.
4. Brew Strength Button: Use this button to select a stronger strength of brew.
5. Minute Button: Use this button to display the correct minute when setting the
time.
6. Auto On Button: Use this button to start brewing at the time you have pre-set.
You may also press this button to make the unit turn on at the same pre-set time
the next day.
B
How to Use
This appliance is intended for household use only.
BEFORE FIRST USE
Warning: To reduce risk of fire or electric shock, do not immerse cord, plug or
appliance in water or any other liquid.
1. Before preparing coffee in your new coffeemaker, thoroughly clean the carafe,
carafe lid and removable filter basket in warm, soapy water.
Rinse and dry. Replace disassembled parts.
Note: The removable filter basket must be placed into the
coffeemaker with the two handles, located on the sides of the
filter basket, aligning with the two notches on the inside of the
unit (c). Press the filter basket down until it clicks into place.
2. Clean the inside of the coffeemaker by brewing two full
carafes of tap water (see BREWING INSTRUCTIONS). Do not
place permanent filter or coffee in the removable filter basket
for this initial cleaning.
Note: At the end of the first brewing cycle, turn the coffeemaker
off and wait ten minutes for the appliance to cool. Turn unit on and brew second
carafe of cool water.
BREWING INSTRUCTIONS
Note: The display on the clock will flash when you plug in the unit. You may set the
clock at any time (see SETTING THE CLOCK) before or after brewing. Setting the clock
will not affect normal brewing operation.
1. Place the coffeemaker on a flat, level surface. Plug the unit into an AC electrical
outlet.
2. Open the lid by using the lip located on top of the coffeemaker.
3. Place a permanent filter into the removable filter basket. Measure one level
tablespoon of drip or regular ground coffee for each cup of coffee desired. For
stronger or milder coffee, adjust amount of grounds to suit your taste.
Note: We recommend using coffee ground specifically for automatic drip
coffeemakers.
4. Fill the carafe with cold water and pour it into the water reservoir to the desired
level. No less than two cups are recommended. Place the carafe on the warming
plate.
Important: Always use fresh, cool water in your appliance. Warm water or other
liquids, except as listed in the Care and Cleaning Instructions, may cause damage
to the appliance.
Note: The amount of brewed coffee will always be less than the amount of water
placed into the coffeemaker, since about 10% is absorbed by the coffee grounds and
filter.
5. Close the Lid.
6. In order to turn unit on, press the ON/OFF button. The red “ON” light will illuminate
and the word “ON” will appear in the upper right hand corner of the LCD, indicating
that the brewing cycle has begun. Hot water will be dispensed gently and evenly
through the coffee grounds.
C
Page 10

17
18
Note: If you prefer to use the timer to pre-set the coffeemaker, see the USING THE
TIMER CONTROL section.
7. To pour a cup of coffee before the brew cycle is complete, simply remove the
carafe from the warming plate and pour (see SNEAK-A-CUP® INTERRUPT FEATURE).
Brewing will continue but dripping will automatically pause. Return the carafe to
the warming plate within 1 minute; dripping will resume.
Caution: To prevent injury when utilizing Sneak-A-Cup® Interrupt feature, replace
carafe within 1 minute of removing during brewing process.
8. Upon completion of the brew cycle, wait until dripping has stopped before
removing the carafe. The carafe lid should be kept in place to facilitate safe serving.
9. To brew another carafe of coffee, turn unit OFF and wait 10 minutes to allow
heating element to cool.
Important: If the unit is not allowed to cool before immediate repeated use,
water placed in water reservoir may become overheated and a spray of steam
may be released from the opening, creating a risk of burns.
10. When not in use, unplug the base from the wall outlet. Allow the unit to cool
completely before cleaning (see CARE AND CLEANING Instructions).
BREWING A SECOND POT OF COFFEE
As mentioned above, it is recommended that the coffeemaker should be OFF for
10 minutes between cycles, in order to allow unit to cool. While the unit is OFF, dispose
of the used coffee filter and rinse the carafe, permanent filter and the removable filter
basket in water. Then repeat the brewing procedure.
SNEAK-A-CUP® INTERRUPT FEATURE
You can pour a cup of coffee while coffee is brewing without leaking from the
brew basket. When finished pouring coffee, place the carafe under brew basket. The
brewing process continues.
Important: To avoid possible overflow after removing the carafe, be sure to
replace the carafe under the filter basket within 1 minute to prevent the basket
from overflowing.
USING THE TIMER CONTROL
Your coffeemaker has a built in multifunction timer. The following sections describe
the proper use of the timer.
Setting The Clock
To set the clock, simply press the HOUR and MIN buttons. First press the HOUR button
until the desired hour has been reached. Make sure the proper “AM/PM” indicator
is shown on the left side of the LCD display. Press the MIN button until the desired
minutes have been reached. You may press and hold the HOUR or MIN buttons to
display the correct time more rapidly.
Note: Unplugging the unit will reset the clock to 12:00.
AUTO ON FEATURE
To pre-set your coffeemaker to begin brewing at a later time, first follow steps 15 in the Brewing Instructions section. Check to make sure that the clock is set to
the correct time. If it is not, follow the above instructions to set the clock. Press the
PROGRAM Button once, the LCD Display will flash “PROGRAM”. Press the HOUR and
MIN Buttons until the desired brew time is reached. Make sure the proper “AM/PM”
appears on the left side of the LCD display. Press the AUTO ON button. The green
“AUTO” light will illuminate in the upper right corner and the pre-set brew time will be
displayed momentarily, indicating that the coffeemaker is now waiting for the pre-set
brew time to be reached before it begins the brewing cycle.
Note: If the AUTO ON button is pressed during the brewing process, the brewing will
stop and the unit will turn off.
To Cancel Auto On: Press the AUTO ON button and the green light will shut off. To
re-set the Auto On time so the unit will turn on at the same pre-set time the next day,
press the AUTO ON button and the green “AUTO” light will illuminate.
Note: The Auto On feature will turn off after completing the brewing process at the
pre-set brew time. The AUTO ON button must be pressed after each use in order for
the unit to turn on at the same pre-set time the following day.
Note: In the event of a power outage or if the unit is unplugged, the clock will reset to
12:00 and the Auto On feature will have to be reprogrammed.
BREW STRENGTH FEATURE
Use the Brew Strength feature when you plan on brewing only a small amount of
coffee. This feature slows down the brewing process so that the smaller amount of
coffee will have the same taste quality as when you brew an entire carafe. The Brew
Strength feature can be activated before the unit is turned ON or during the brewing
process by pressing the BREW STRENGTH button. When this feature is activated, a
coffee cup icon will be displayed in the LCD display.
Note: To deactivate the Brew Strength feature, press the BREW STRENGTH button
again and the coffee cup icon will disappear.
AUTO SHUT-OFF FEATURE
As an added convenience, your coffeemaker has been designed with an Auto Shut-Off
feature. When the brewing cycle is complete, the coffeemaker will automatically shut
off after 2 hours.
HINTS FOR GREAT TASTING COFFEE
• A clean coffeemaker is essential for making great tasting coffee. Regular cleaning,
as specified in Care and Cleaning is highly recommended. Always use fresh, cool
water in your coffeemaker. Finer grinds, such as drip and ADC coffee, promote fuller
extraction and provide rich, full-bodied coffee. Regular grinds will require slightly
more coffee per cup to provide the strength of a finer grind.
• Store coffee in a cool, dry place. Once coffee has been opened, keep it tightly sealed
in the refrigerator to maintain freshness. For optimum coffee, buy whole beans and
grind them just before brewing.
• Do not re-use coffee grounds since this will greatly impair coffee flavor.
• Reheating coffee is not recommended. Coffee is at its peak flavor immediately after
brewing.
• Small oil droplets on the surface of brewed, black coffee is due to the extraction of
oil from the coffee grounds. Oiliness may occur more frequently if heavily roasted
coffees are used. Over extraction may also cause oiliness, indicating a need to clean
your coffeemaker.
Page 11

19
20
Care and Cleaning
This appliance requires little maintenance. It contains no user-serviceable parts. Any
servicing requiring disassembly other than cleaning must be performed by a qualified
appliance repair technician.
Warning: Unplug from wall outlet before cleaning.
1. Always make sure the coffeemaker is unplugged and the warming plate is cool
before attempting to clean.
2. After daily use, the removable filter basket, carafe and carafe lid should be washed
in warm, soapy water.
3. If necessary, wipe the outside of the coffeemaker with a soft, damp cloth and wipe
dry. Do not use abrasive cleansers, scouring pads or steel wool. Never immerse the
coffeemaker in water or any other liquid.
CARING FOR YOUR CARAFE
1. Do not allow all liquid to evaporate from the carafe while on the warming plate, or
heat the carafe when empty.
2. Discard the carafe if damaged in any manner.
3. Never use abrasive scouring pads or cleansers; they will scratch the glass.
4. Avoid rough handling and sharp blows.
MINERAL DEPOSITS AND CLOGGING
Mineral deposits left by hard water can clog your coffeemaker. excessive steaming
or a prolonged brewing cycle are signs that a cleaning is needed. Cleaning is
recommended every 60 brewing cycles.
1. Pour white into the carafe up to the 7-cup mark. Add cold water up to the
12-cup mark. Pour the water/vinegar mixture into the water reservoir.
2. Place a permanent filter in the removable filter basket, then close the lid. Place the
carafe on the warming plate. Press the ON/OFF button.
Note: During cleaning, more steam will occur than during normal brewing.
3. KEEP THE COFFEEMAKER ON UNTIL HALF THE WATER HAS CYCLED THROUGH THE
COFFEEMAKER, AS CAN BE VIEWED THROUGH THE WATER LEVEL INDICATOR. Press
the ON/OFF button to turn the power off. When liquid stops dripping from the
removable filter basket into the carafe, remove the carafe and allow the liquid to
cool for 10 minutes. When cooled, pour liquid back into the water reservoir.
4. Return carafe to the warming plate.
5. Turn the coffeemaker back on and repeat this procedure, allowing all the cleaning
solution to empty into the carafe. After dripping has stopped, discard contents in
the carafe.
6. After allowing the coffeemaker to cool for 10 minutes, rinse it out by brewing
a carafe full of cold water. Make sure to insert the permanent filter into the
removable filter basket before brewing.
7. At the end of the brew cycle, turn OFF the unit by pressing the ON/OFF button.
Discard water in the carafe. Remove the permanent filter and wash the carafe and
removable filter basket in warm, soapy water. Rinse and dry.
8. When the coffeemaker has cooled, wipe exterior with a dry cloth.
Page 12

21
NOTAS/NOTES
TERMO DE GARANTIA LIMITADA
Garantia: este produto, devidamente lacrado, é garantido pela Salton
Brasil contra defeitos de material e mão-de-obra, pelo prazo total de
um (1) ano a partir da data de Nota Fiscal de venda ao consumidor.
Abrangência: a garantía do produto fica automaitcamente inválida se
o produto for danificado em consequência de acidentes de transporte
ou manuseio, uso inapropriado, descuido, negligência, serviços não autorizados, uso
comercial, reparos providos por pessoas ou entidades não credenciadas, desgaste
normal, adição de peças ou acessórios que não sejam de fábrica, danos de instalação
ou outras causas que não as constatadas como sendo de fabricação. A presente
garantia é aplicável somente para produtos adquiridos e utilizados no Brasil e não se
estende a produtos que não tenham sido operados de acordo com as instruções de
uso e operação especificasas no respectivo Manual do Proprietário fornecido pela
Salton Brasil ou que tenham sido modificados ou peças danificadas que tenham tido o
número de série removido, modificado, adulterado ou tornado ilegível.
Grantias Implícitas: Esta garantia substitui todas as outras garantias expressas ou
implícitas e nenhum representante ou terceiro está autorizado a assumir qualquer outra
obrigação relacionada à venda de nossos produtos em nome da Salton Brasil.
Execução da Garantía: durante o prazo de vigência da garantía, o produto defeituoso
será reparado ou substituído por um modelo similar equivalente a novo (a critério
exclusivo da Salton Brasil) quando for encaminhado à Assitência Técnica autorizada
da Salton Brasil ou o valor referente ao preço de compra será devolvido. O produto
reparado ou substituído terá garantia pelo prazo remanescente da garantia original
do produto e mais um (1) mês adicional. Nenhuma taxa será cobrada pelo reparo ou
substituição.
Nas localidades onde não exita Assistência Técnica autorizada pelo Salton Brasil, as
despesas de transporte do produto correm por conta do consumidor.
Itens Excluidos desta Garantía: esta garantía substitui todas sa outras garantias
expressas ou implicitas e nenhum representante ou terceiro está autorizado a assumir
qualquer outra obrigação relacionada à venda de nossos produtos em nome de
Salton Brasil. Sob hipótese alguma a Salton Brasil será responsável por defeitos, mau
funcionamento ou deficiência do produto, seja baseado em lei contratual, comercial ou
qualquer outra teoria legal, incluíndo, sem limitação, negligência, obrigação expressa,
quebra da garantia e não cumprimento de cláusula contratual. A Salton Brasil não
se responsabilizará por quaisquer danos diretos, indiretos, ou resultantes de uso ou
desempenho do produto, ou outros prejuizos relativos a danos de propriedade, ou
prejuízos pecuniarios.
Assistência Técnica: Em caso de mau funcionamento entre em contato com o Serviço
de Atendimento ao Consumidor Salton no número mencionado abaixo.
Sporte e Serviço
Para mais informações sobre os produtos da Salton visite nosso site:
www.saltonbrasil.com.br
Salton Brasil Com. Imp. E Exp. De Produtos Eletro-Eletrônicos Ltda
Av. Major Sylvio de Magalhães Padilha, 5200
Edifício Quebec, 8 andar - São Paulo - SP - CEP 05693-000
Todos os Direitos Reservados.
SAC: 0800-701 7989
Page 13

O símbolo do relâmpago refere-se a
“voltagem perigosa”; o símbolo de
exclamação indica que se deve seguir as
instruções. Ver abaixo.
AVISO: Para reduzir o risco de incêndio ou
choque elétrico, não remova a
tampa da cafeteira. Não há nenhuma peça
utilizável pelo usuário dentro do aparelho.
Qualquer reparo deve ser feito somente
pelo pessoal do serviço autorizado.
The lightning symbol refers to “dangerous
voltage”; the exclamation symbol refers to
maintenance instructions. See below.
WARNING: To reduce the risk of fire
or electric shock, do not remove the cover
of the coffeemaker. There are
no user-serviceable parts inside. Repair
should be done by authorized service
personnel only.
AVISO / WARNING
RISCO DE INCÊNDIO OU DE CHOQUE ELÉTRICO. NÃO ABRA
RISK OF FIRE OR ELECTRIC SHOCK. DO NOT OPEN.
2008/3-20-65P/E
Código da data
Copyright © 2008 Applica Consumer Products, Inc.
Fabricado na República Popular da China
Impresso na República Popular da China
Importado por: / Imported by:
CISA Trading S.A.
CNPJ: 39.373.782/0001-40
POR CONTA E ORDEM DE
Salton Brasil Com. Imp/Exp. de Produtos Eletro Eletrônicos Ltda
CNPJ: 05.753.154/0001-78
SAC: 0800 701 7989
Made in People's Republic of China
Printed in People's Republic of China
Modelo:RHSCM127V
Voltagem:127V
Modelo:RHSCM220V
Voltagem:220V
 Loading...