

Page 1
Food Processor
Model RHPK1002
Instructions & Guarantee
Page 2

Read the instructions before use and keep them safe. If you pass the processor
on, make sure to pass on the instructions too. Remove all packaging, but keep
it till you’re satisfied the processor is working.
important safeguards
When using electrical appliances, basic safety precautions should always be
followed including the following:
1. Read all instructions.
2. To protect against risk of electrical shock do not put food processor in
water or other liquid.
3. This appliance must only be used by a responsible adult.
4. Unplug the unit from the power supply when not in use, before putting
on or taking off parts, and before cleaning.
5. Avoid contact with moving parts.
6. Do not operate any appliance with a damaged cord or plug after the
appliance malfunctions, or is dropped or damaged in any manner.
Return appliance to the nearest authorized service facility for examination,
repair or electrical or mechanical adjustment.
7. The use of attachment not recommended or sold by the manufacturer may
cause fire, electric shock or injury.
8. Do not use outdoors.
9. Do not let cord hang over edge of table or counter.
10. Keep hands and utensils away from moving blades or discs while processing
food to reduce the risk of severe injury to person or damage to the food
processor. A scraper may be used but must be used only when the food
processor is not running.
11. Blades are sharp. Handle with care.
12. To reduce the risk of injury, never place cutting blade or discs on base
without first putting bowl properly in place.
13. Be certain cover is securely locked in place before operating appliance.
14. Never feed food by hand. Always use food pusher.
15. Do not attempt to defeat the cover interlock mechanism.
16. This product is designed for household use only.
17. This appliance is not intended for use by young children or infirmed persons.
18. This appliance is not a toy.
19. If the supply cord is damaged, it must be replaced by the manufacturer
or it’s service agent or a similarly qualified person in order to avoid hazard.
(Contact Salton Customer Service).
2
Page 3
20. Care is needed when handling cutting blades, especially when removing the
blade from the bowl, emptying the bowl and during cleaning.
21. When using this appliance, do not exceed 50 seconds on maximum power.
household use only
3
Page 4

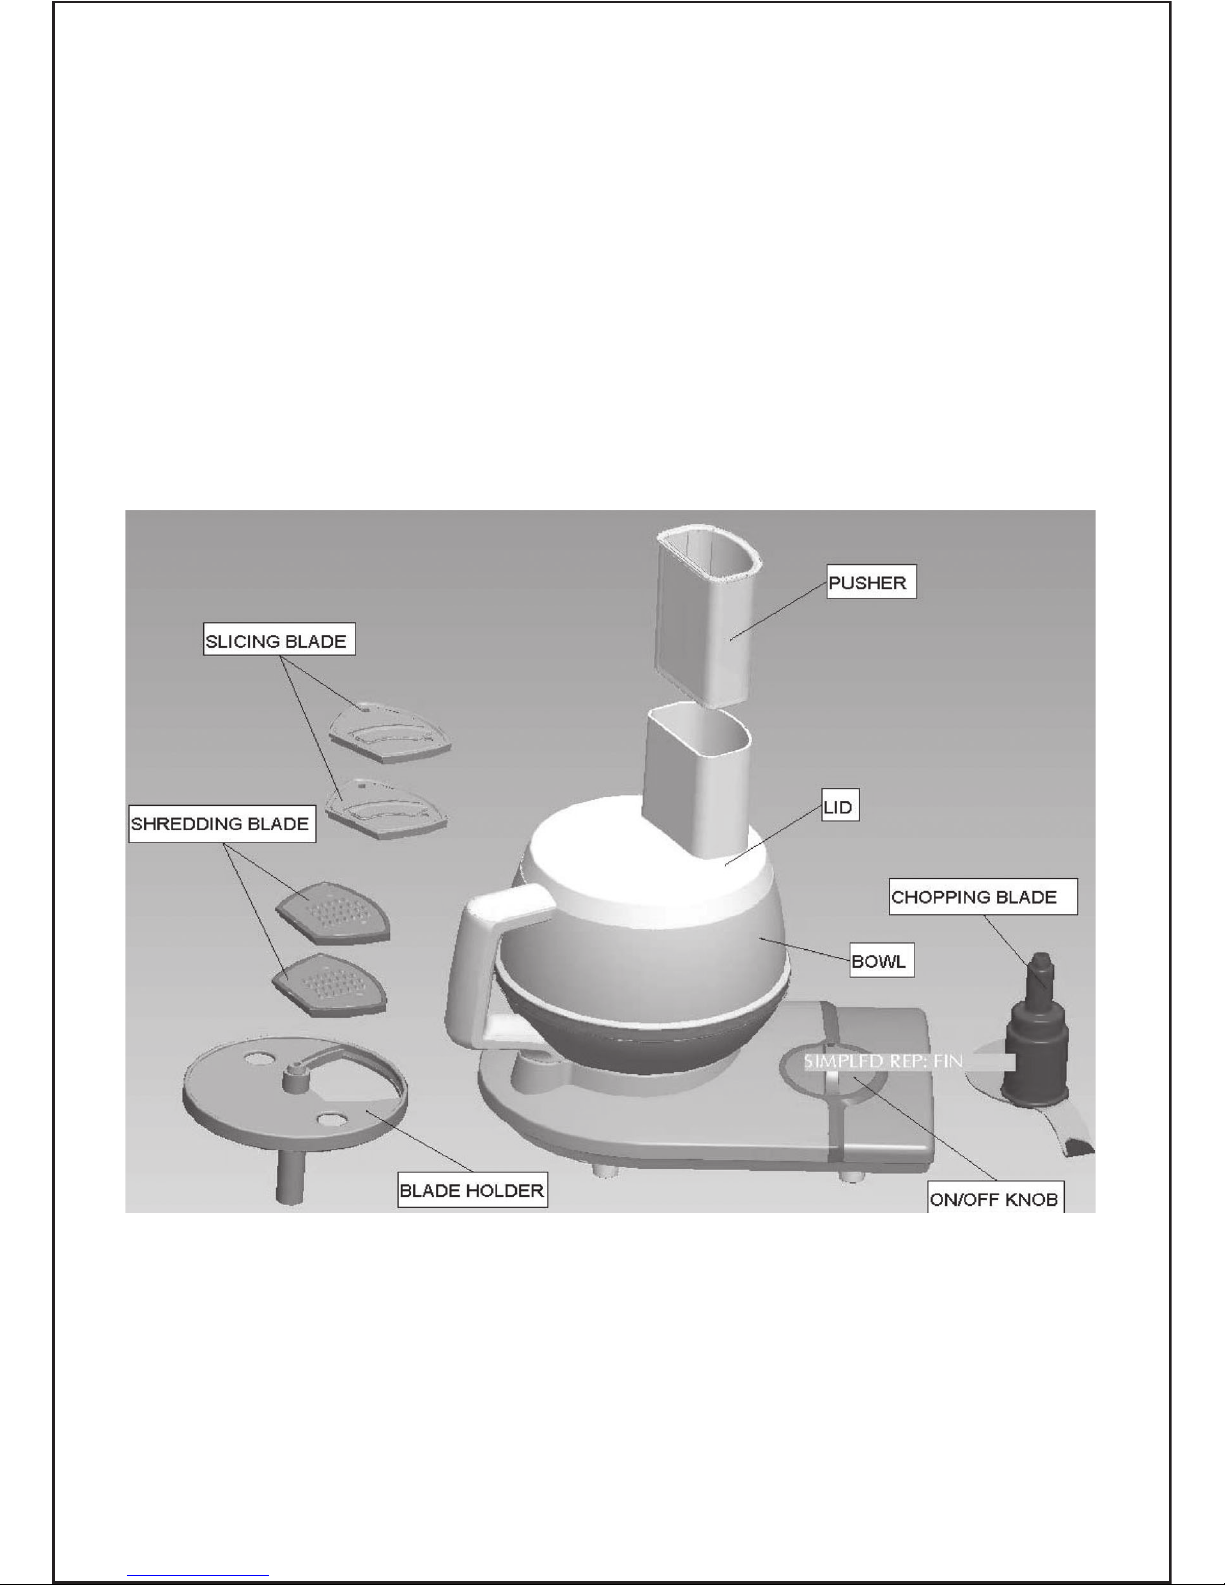
Food processor features
Bowl Lid and Pusher are easy to assemble and clean.
Bowl features a smooth design for easy assembly and cleaning.
Slicing Blades can slice the food into 2 mm thickness or 4 mm thickness.
Shredding Blades can shred most firm fruits, vegetables and cheeses into fine
or coarse size.
Multi propose Blade can chop, mince, blend and mix in a matter of seconds.
Blade Holder is removable for easy cleaning.
Operating Your Food Processor
WARNING
Rotating Blade Hazard
Always use food pusher…
Keep fingers out of opening.
Keep away from children.
•Before operating the food processor, be sure the work bowl, blades and
work bowl cover are properly assembled on the food processor power base.
•2 speeds control: I – low speed, II – High speed, P – Pulse, 0 – Off.
•The PULSE control helps to better regulate the degree of processing.
By alternately rotating the knob to the PULSE position, the food processor
will be quickly turned on and off.
NOTE: If unit fails to operate, check that both the work bowl and cover are
properly positioned on the power base.
•To stop your food processor, rotate the knob to the OFF position. Wait until
the blade comes to a complete stop before removing the work bowl cover.
Be sure the knob is at the OFF position before removing the work bowl cover
or unplugging unit.
AUTOMATIC BRAKE: When the food processor is turned OFF, the automatic
brake stops the action of the blade or disc within seconds. The brake provides
an additional measure of safety as you remove the work bowl cover.
4
Page 5

Disassembling Your Food Processor
WARNING
Cut Hazard
Handle blades carefully.
Failure to do so can result in cuts.
•Turn the work bowl cover to the left and remove.
•If using a slicing blade or shredding blade, remove it with blade holder before
removing the bowl.
•Turn the work bowl to the left to unlock it from the base. Lift up to remove.
•If using the multipurpose blade, you can remove it from the work bowl before
emptying the contents, or grasp the work bowl from the bottom placing one
finger through the center opening to hold the blade in place. Remove contents
of work bowl with spatula. If food sticks to blade, remove it with the spatula.
Care and Cleaning
WARNING
Cut Hazard
Handle blades carefully.
Failure to do so can result in cuts.
•Always make sure the knob is turned to the off position and unplug food
processor before cleaning. Wipe food processor base with warm soapy cloth;
wipe clean with a damp cloth. Dry with a soft cloth.
•All the other parts of your food processor are dishwasher safe. Be sure to load
them away from exposed heating elements in the dishwasher. If washing the
food processor parts by hand, avoid the use of abrasive cleansers or scouring
pads. They may scratch or cloud the work bowl and cover. Thoroughly dry all
parts after washing.
•Wipe cord with warm, soapy cloth; then wipe clean with a damp cloth.
Dry with a soft cloth. Re-coil cord in cord storage area on bottom of food
processor base.
•Always store the work bowl and work bowl cover in the unlocked position
when not in use to prevent damage to the interlock system.
5
Page 6

1. Processing blade
Stainless steel edged processing blade
is designed for cutting and kneading.
2. Slicing blade
2mm or 4mm thickness
The stainless steel slicing blade allows
foods to be sliced into 2mm or 4mm
thickness.
2.0mm 4.0mm
Slicing thickness
Slicing thickness
3. Shredding disc
fine and coarse
Ideal control, the stainless steel
shredding blades allow for the choice
of fine or coarse results.
Fine
Coarse
4. Spatula
The spatula is ideal for assisting with
all food processing tasks.
5. Blade holder
The plastic holder is used for fitting
slicing blade or shredding blade.
Attachment for the Food Processor
6
Page 7

Using the Food Processor
Before using your Food Processor
• Wash the processing bowl, cover and
all attachments in warm water using
a mild detergent. Dry each part
thoroughly before use.
• Before you assemble the food
processor, ensure that the power
cord is unplugged.
1. Place the motor base facing you on
a dry, level surface.
2. Place the processing bowl onto the
motor base, the bowl will only sit
correctly on the base when the
handle is positioned to the
left, see figure 1.
Fig 1
3. Rotate the handle anticlockwise to
lock, as indicated by the graphics on
the right side of the motor base, see
figure 2.
Fig 2
4. Position the lid onto the processing
bowl. To lock, turn the lid anti
clockwise, as indicated by the
graphics, on the top of the handle,
see figure 3.
Fig 3
7
Page 8

Using your Food Processor
1. Plug the power cord into a 120V AC
power outlet.
2. Using the rotary knob, turn to I or II
to start processing.
The Pulse function remains on as
long as the knob is held to P.
Further ingredients can also be added
whilst processing by pouring through
the feed tube once the food pusher
has been removed.
3. After you have completed
processing, turn the rotary knob to 0
position to stop processing.
Note: For maximum control when
using your food processor, before
turning on your food processor load
the feed tube. Always use the food
pusher for more evenly processed
foods and never use your fingers.
Using the Food Processor (continued)
Important: If the processing bowl and cover are not correctly assembled,
the Food Processor will not function.
8
Page 9

Processing Blade
1. Fit the processor bowl as detailed
previously in figures 1 & 2.
2. Fit the processing blade over the
spindle, see figure 4.
Fig 4
Warning:
Use caution, as blades are
sharp. Always handle the processing
blade by its plastic section.
3. Place food into the processing bowl.
4. Fit the processing cover to the
processing bowl, see figure 3 and
place the food pusher in the feed
tube.
5. Plug the power cord into a 120V AC
power outlet.
6. Start processing using the rotary
knob.
7. When processing is complete,
remove the blade from the
processing bowl before removing
the processed food.
Slicing blade and Shredding blades
1. Fit the processor bowl as detailed
previously, in figures 1 and 2.
2. Select the slicing or shredding
blade.
3. Fit the blade into blade holder,
see figure 5 & 6.
Fig 5
Fig 6
Fitting/using the tools on the Food Processor
Note: Always adjust the attachments until you are sure that they are correctly
fitted.
9
Page 10

4. Fit the blade holder with blade over
the spindle, see figure 7
Warning:
Use caution as the blades
are sharp
Fig 7
5. Fit the processing cover to the
processing bowl as previously shown
in figure 3 and place the food pusher
in the feed tube.
6. Plug the power cord into a 120V AC
power outlet.
7. Start processing using the rotary
knob.
8. When processing is complete,
remove the chopping blade from the
processing bowl before removing
the processed food.
Cord Storing
The Food Processor was designed for
cord storage within the unit itself,
see figure 8.
Fig 8
10
Page 11

Handy hints for Processing
Chopping
For the best, most consistent results,
you should try to process pieces of
food that are approximately equal
in size. When you break, cut or tear
food into uniform pieces before you
begin processing, the finished results
will be more uniform. More consistent
processing results are achieved if the
container is not overloaded.
Mincing
Pre-cut meat into cubes approximately
2cm square.
Vegetables
When processing vegetables such as
onions, peel and quarter or cut large
vegetables into eighths.
Mixing
The quantities that can be processed
within the Processing bowl will vary
with the density of the mixture.
Adding Ingredients
When various recipes require dry
ingredients such as flour, add them
directly into the processing bowl
before processing. There is no need to
sift ingredients when using your food
processor. Liquid ingredients may be
added while the processor is operating
by pouring through the feed tube in
the processor cover.
Note: When processing sauces or
semi-liquid ingredients, stop the
food processor and scrape down
the container sides with the spatula
provided.
Using the Feed Tube
The most important factor for
successful slicing and shredding is the
way in which the food is packed into
the feed tube.
When slicing and shredding
Cut all ingredients to a size that fits
comfortably into the feed tube. Pack
the feed tube and, while holding food
steady and upright with the food
pusher, press down evenly until all
ingredients are sliced or shredded.
The more firmly you push, the thicker
the slices or shreds. Do not use
excessive force or you may damage
the food processor.
Note: Never use fingers to push food
down the feed tube. Always use the
food pusher.
For best results when slicing.
The feed tube should always be
packed firmly to allow each piece of
food to support the others. There will
always be a small portion of food left
unprocessed between the food pusher
and the blade.
Preparing longer slices
Pack food items horizontally in the
feed tube, see figure 9
Fig 9
11
Page 12

Handy hints for Processing
(continued)
Preparing shorter slices
Pack the food items vertically in the
feed tube, see figure 10
Fig 10
For best results when shredding
Remember that softer foods such
as cheese (cheddar, mozzarella or
Swiss) should be well chilled before
processing. Harder foods such as
parmesan or Romano cheese should
be at room temperature before
processing.
Note: When grating parmesan cheese
do not apply a lot of pressure to the
food pusher.
Disassembly
When processing is completed, remove
the cover from the processing bowl
first and then remove the processing
bowl with the processing blade still in
place. To remove the processing bowl
firstly unlock the processing cover
by rotating it in an anti clockwise
direction until the cover is unlocked.
Note: Always wait for the processing
blade to stop moving completely
before removing the cover.
Warning:
Use extreme caution, as
blades are sharp. Always handle the
chopping blade by its plastic section.
with the processing blade still in
place. To remove the processing bowl
firstly unlock the processing cover
by rotating it in an anti clockwise
direction until the cover is unlocked.
Care and cleaning
When you have finished processing,
unplug the Food Processor from the
power outlet. All accessories and
processor tools can be washed in hot
soapy water except for the processor
body. Clean the processor body by
wiping with a damp cloth.
Warning:
Care must be taken when
handling the metal blades as these
items are extremely sharp.
Note: Always unplug the Food
Processor before cleaning.
Dishwasher Use
All plastic components deteriorate
through the prolonged use of a
dishwasher for cleaning. However
all parts of your Food Processor are
tolerant to dishwasher use, excluding
the processor body. If using the
dishwasher place parts only on the
top rack of your dishwasher.
12
Page 13

Guarantee
This product is guaranteed for a period of 1 year from date of purchase,
against defects in material and workmanship. It is particularly important that
the purchaser carefully read the instructions provided in order to get maximum
use from this product.
This guarantee is only valid if the appliance is used solely for domestic purposes
in accordance with the instructions and provided it is not connected to an
unsuitable electricity supply or dismantled or interfered with in any way or
damaged through dropping or misuse. Under this guarantee we undertake to
repair or replace free of charge any parts found to be defective.
Nothing in this guarantee or the instructions relating to the product excludes,
restricts or otherwise affects your statutory right.
In line with our policy of continuous product development we reserve the right
to change the product, packaging and documentation specifications without
notice.
This product conforms to Radio Frequency Interference requirements
230-240V 50Hz AC Only
13
 Loading...