

Page 1
Page 2

2
IMPORTANT SAFEGAURDS
Read these instructions before using your contact grill. Keep this in a safe place for
future reference. When using electrical appliances, basic safety precautions should
always be followed, including the following:
1. To protect against electrical hazards do not immerse the power cord,
plug, stand, or contact grill in water or any other liquid.
2. Do not use in the bathroom or near any source of water.
Do notuse outdoors.
3. Always use the appliances handles as some parts may be hot.
4. This appliance is not intended for use by persons (including children) with reduced
physical, sensory or mental capabilities, or lack of experience and knowledge,
unless they have been given supervision or instruction concerning use of the
appliance by a person responsible for their safety.
5. Always turn o and unplug from the power outlet before cleaning the appliance.
6. Do not operate this appliance with a damaged cord/plug or after the appliance has
malfunctioned, dropped or damaged in any manner. Contact Customer Service for
replacement, examination, repair or adjustment.
7. There are no user serviceable parts. If power cord or appliance is damaged, it must
be replaced by the manufacturer or similarly qualied person in order to avoid a
hazard.
8. Do not use on an inclined plane or unstable surface.
9. Do not move the contact grill while it is switched on.
10. Do not cover the contact grill when in use.
11. Do not cook food items too large for the contact grill.
12. Take care when opening the lid of the contact grill, there may be some steam.
13. Always take care when removing food after cooking as it is hot.
14. Food may burn. Always monitor when using this appliance.
15. Do not use the contact grill near or below any curtains or other combustible materials.
16. Keep the contact grill and the power cord away from the edge of table or
countertops and out of reach of children and inrmed persons.
17. To disconnect, turn o the wall power outlet, then grasp the plug and remove from
wall power socket. Never pull by the cord.
18. Do not cook food wrapped in plastic lm or polythene bags or aluminium foil.
It will cause a re hazard.
19. Always clean the contact grill after use.
20. Do not place on or near any heat sources.
21. Do not leave the contact grill unattended when in use.
22. Follow the instructions when cleaning this appliance
23. Do not use appliance for other than its intended purpose.
24. This appliance is not a toy. Children should be supervised to ensure that they do not
play with the appliance.
25. This appliance is not intended to be operated by means of an external timer or
separate remote control system.
SAVE THESE INSTRUCTIONS
THIS APPLIANCE IS FOR HOUSEHOLD USE
Page 3
3
Congratulations on purchasing your Russell Hobbs 3 in 1 Grill.
The Russell Hobbs 3 in 1 grill allows you to use it as a Panini Press, a Grill and as a
Barbecue Griddle. It also comes with a drip tray to collect any unwanted oils/fats and
liquid. Please read and retain this instruction before rst using this product.
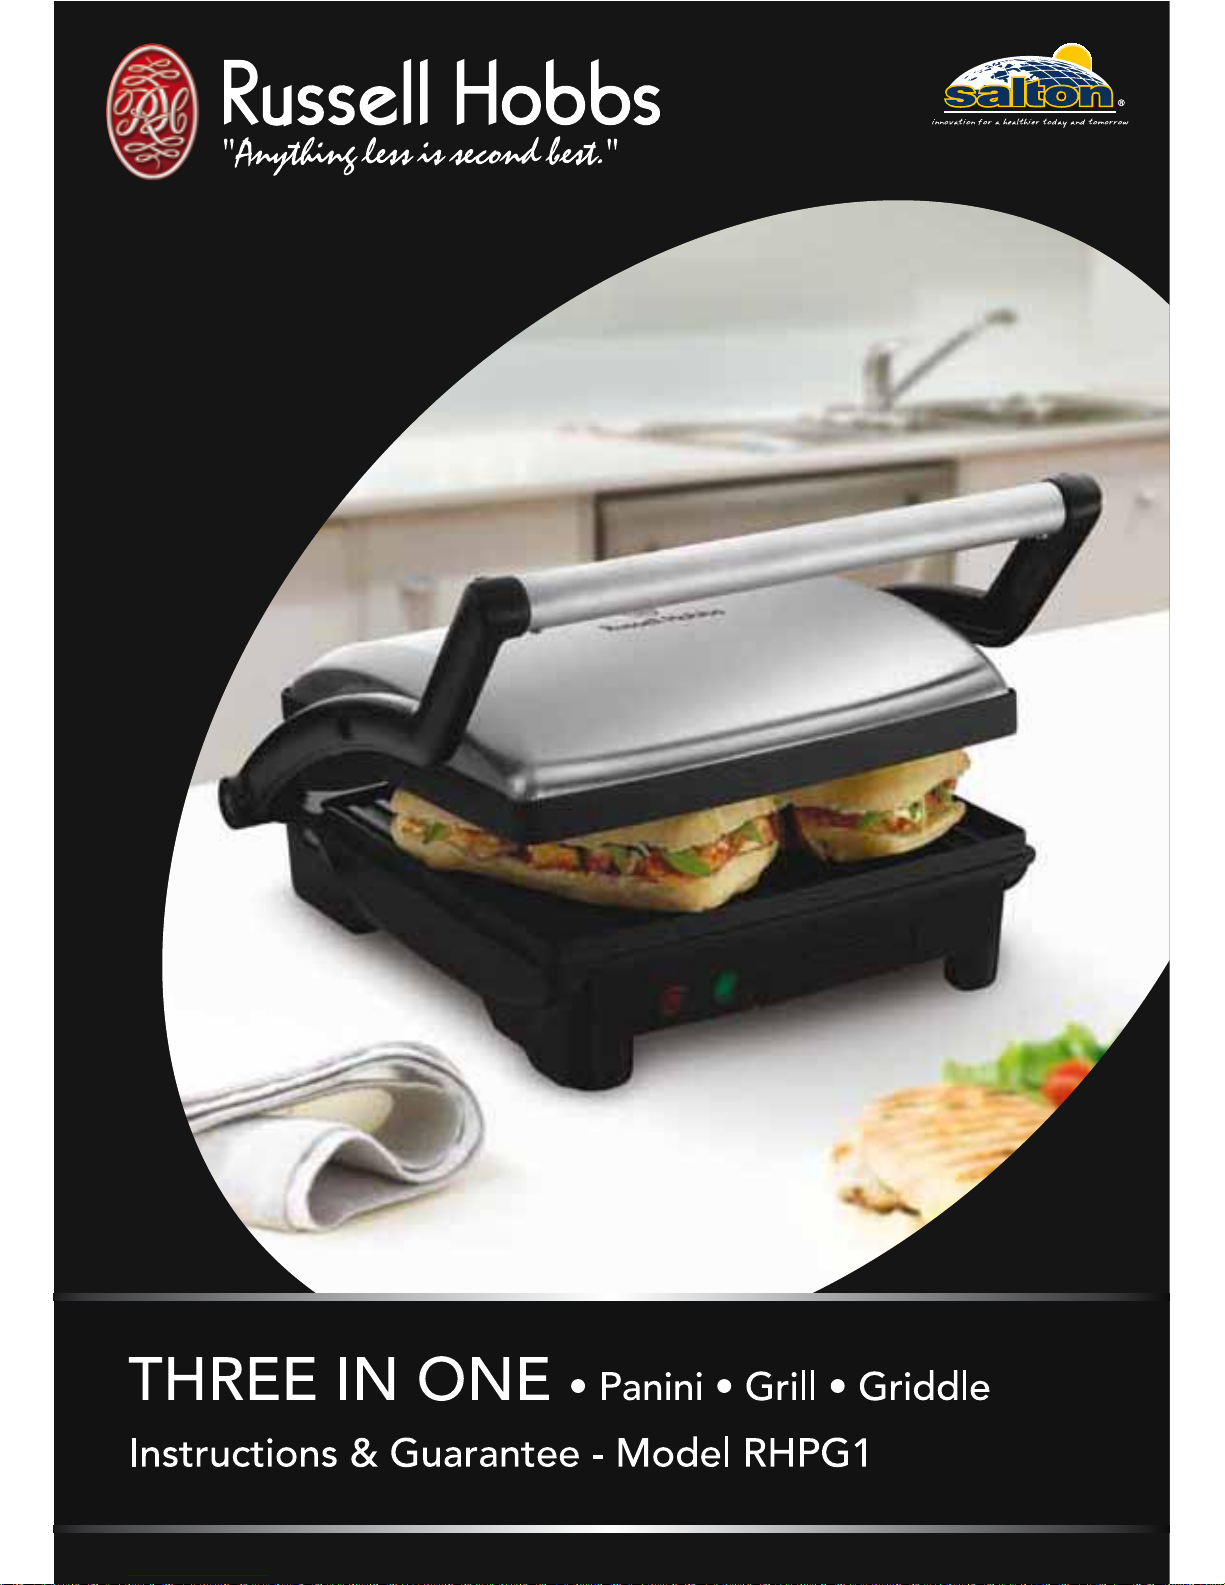
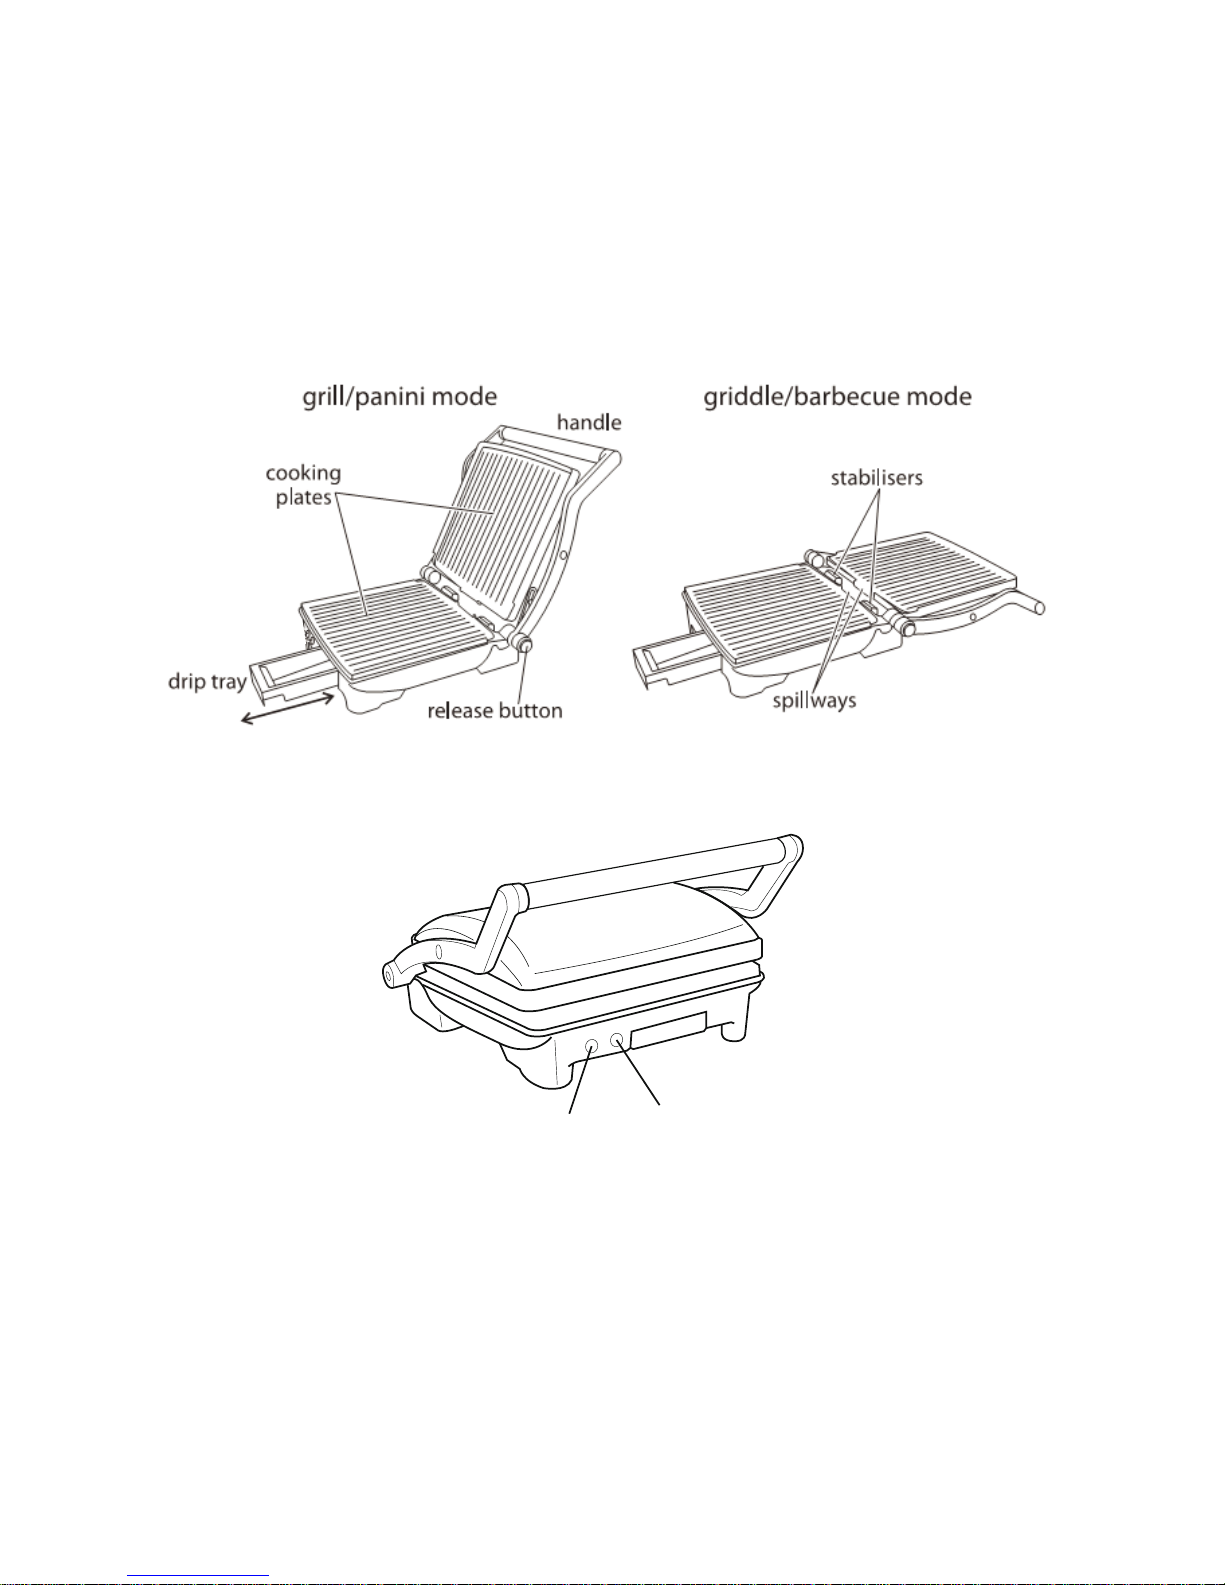
power light
ready light
Page 4

4
Clean the appliance before rst using it. Remove any packaging, labels from the
products. Wipe the exterior with a damp cloth to remove any dust. Wipe the grill plates
with a damp cloth. Plug the power cord into the power socket and switch it on. Allow it
to heat up for 2 minutes. Switch o the appliance at the power socket and condition
the grill plates with some vegetable oil. Do not use low fat oil at all times.
Positioning
1. Sit the grill on a stable, level, heat-resistant surface.
2. Leave a space of at least 50mm all round the grill
3. Route the cable so it doesn’t overhang and can’t be caught or tripped over.
Preparation
4. Check that the drip tray is pushed fully in – the rear should sit beneath both spillways.
5. Open the grill, wipe the cooking plates with a little cooking oil or butter, and then
close it. Do not use low fat spread – it may burn onto the grill.
Pre-heat
6. Plug the grill into the power socket (switch the socket on, if it is switchable)
7. The power light indicator will glow red as long as the grill is connected to the
electricity supply.
8. The ready light indicator will glow green while the elements are heating, then go
out when the grill reaches operating temperature. It’ll then go on and o as the
thermostat operates.
9. Wait till the ready light indicator goes o before cooking.
Fill the grill
10. When the light goes o, use the oven glove to open the grill.
11. Lay the food on the bottom cooking plate with a spatula or tongs, do not use your
ngers.
12. Don’t use anything metal or sharp, you’ll damage the non-stick surfaces.
13. Close the grill.
14. The cooking plates are articulated, to cope with thick or oddly shaped foods or
panini – try to keep the plates roughly parallel, to avoid uneven cooking.
15. Wait till the food is cooked. Remove the food
16. Check it is cooked through – if you are in doubt, let it cook a bit longer, then check
again.
17. Use the oven glove to open the grill.
Finished?
18. Unplug the grill.
Page 5

5
More?
19. Put on the oven glove.
20. Slide the drip tray out from under the bottom plate.
21. Empty it into a heatproof bowl.
22. Give it a wipe with kitchen paper.
23. Replace it in the rails under the front of the grill.
24. Push it in – the rear should sit beneath both spill-way.
Griddle/Barbecue
25. You may open the grill up for use as griddle or barbecue.
26. To go to the griddle position:
i) Move the handle forward till the plates are less than 90 degrees apart
ii) Press the release button, and hold it in
iii) Pull the handle back, till the grill is fully open
iv) Check that the front of the top plate does not catch on the end of the stabilisers
v) If it does, close it slightly, push the top of the plate with an oven glove, and open
it again
vi) Let the release button go
27. To close the griddle, simply lift the handle, till the plates are less than 90 degrees
apart, you can then close it fully, or open it again in grilling mode.
CARE AND MAINTENANCE
1. Unplug the grill and let it cool before cleaning and storing away.
2. Wipe all surfaces with a clean damp cloth. Use kitchen paper moistened with a little
cooking
oil to remove stubborn stains.
3. Wash the drip tray in warm soapy water, or in the top rack of the dishwasher.
4. Take extra care with the non-stick cooking surfaces.
5. Don’t put the grill in water or any other liquid.
6. Don’t use harsh or abrasive cleaning agents or solvents.
7. Don’t use scourers, wire wool, or soap pads.
8. Wind the cable round the clips at the back of the grill.
Page 6

6
cooking times
t Use these times purely as a guide – they’re for grilling fresh or fully defrosted food.
t When cooking frozen foods, add 2-3 minutes for seafood, and 3-6 minutes for meat and
poultry, depending on the thickness and density of the food.
beef min
llet 5-7
loin steak 7-8
burger, 50g, fresh 5-6
burger, 100g, fresh 7-8
kebabs, 25mm cube 7-8
round steak 5-7
sausages (thin) 5-6
sausages (thick) 7-8
sirloin 7-9
T-Bone 8-9
pork
burger, 50g, fresh 5-6
burger, 100g, fresh 7-8
chop, 12mm
5-6
gammon steak 5-6
kebabs, 25mm cube 7-8
sausages (thin) 5-6
sausages (thick) 7-8
tenderloin, 12mm 4-6
chicken/turkey
chicken breast pieces 5-7
burger, 50g, fresh 4
burger, 100g, fresh 5
kebabs, 25mm cube 7-8
thighs (chicken) 5-7
turkey breast, thin sliced 3-4
lamb
kebabs, 25mm cube 7-8
minced 6-7
loin chops 4-6
fruit min
apple, halve/slice 6-8
bananas, slice lengthwise 3-4
nectarines/peaches, halve/slice 3-5
pineapple, slice 3-7
toasted sandwiches
cheese 2-3
ham (cooked) 5-6
roast beef/sausage/turkey (cooked) 6-7
seafood – steaks (25mm)
halibut, salmon, swordsh, tuna 6-9
seafood – llets (12mm)
red snapper, salmon, sea bass 3-5
seafood
kebabs, 25mm cube 4-6
langoustines, prawns 1-2
scallops 4-6
snacks
calzone 8-9
hot dogs 2-3
quesadillas 2-3
tacos, meat lling 6-8
vegetables
asparagus 3-4
carrots, sliced 5-7
aubergine, slice/cube 8-9
onions, thin slice 5-6
peppers, thin slice 6-8
peppers, grill then skin 2-3
potatoes, slice/cube 7-9
squash, slice/cube 6-8
food safety
t Whether grilling or griddling/barbecuing, check that the food is cooked through before
serving. If in doubt, cook it a bit more.
t Cook meat, poultry, and any derivatives (mince, burgers, etc.) till the juices run clear. Cook sh
till the esh is opaque throughout.
t When cooking pre-packed foods, follow any guidelines on the package or label.
Page 7

CUSTOMER SERVICE
AUSTRALIAN CUSTOMER SERVICE
Salton (Aust) Pty. Ltd.
P.O. Box 683
Braeside Victoria 3195
Australia
Freecall: 1800 427 842
Hours: 9am - 5pm (EST) Mon - Fri
NEW ZEALAND CUSTOMER SERVICE
Salton NZ Limited
P.O. Box 300 201
Albany , Auckland
New Zealand
Freecall: 0508 629 777
Hours: 9am - 5pm Mon - Fri
2 year warranty - Russell Hobbs
Nothing in this guarantee or the instructions relating to the product excludes,
restricts or otherwise affects your statutory rights under the Trade Practices
Act 1974 and other relevant legislation.
In addition to your statutory rights, Salton (Aust) Pty Ltd and Salton NZ Ltd
(hereafter referred to as “Salton”) provide a LIMITED 2 YEAR WARRANTY for
this product. Salton warrants this product free from defects in material and
workmanship for two (2) years from the date of purchase. Within this
warranty period Salton will repair or replace defective parts at no charge.
Defective products may be returned to Salton or the place of purchase. Salton
recommends you keep your receipt as proof of purchase. If distance prevents
you from taking the product to the place of purchase, please call the Salton
customer service department freecall within Australia 1800 427 842,
or freecall within New Zealand 0508 629 777.
The warranty does not cover improper installation, misuse, abuse or neglect
of the product. This warranty also does not cover any product taken apart,
altered or serviced by an unauthorised repairer.
Registration of your warranty card is not compulsory, but entitles you to
receive these benefits:
Information on special price offers and promotions,
Notification of any issues concerning your product.
To register your product please:
9isit www.salton.com.au/warranty OR
)ill in the warranty card and send it to the address shown
Page 8

Add Your Favourite Recipe Here:
Page 9

Add Your Favourite Recipe Here:
 Loading...