

Page 1
4 Quart Electric
Cool Touch Pressure Cooker
OWNER’S MANUA L
RHNPC401
Page 2

Garantie : Ce produit Russel Hobbs
pour une période de (1) an à compter de la date d’achat d’origine. La garantie de ce produit couvre uniquement
l’acheteur initial du produit.
Application de la Garantie : Cette garantie sera considérée nulle si le produit a été endommagé par accident
durant le transport, par un usage excessif, par usage abusif, suite à une négligence, une réparation non conforme,
un usage commercial, des réparations entreprises par du personnel non agréé, l’usure normale, ainsi qu’à cause de
l’usure, d’un assemblage non conforme, ou d’une installation ou de réparations négligentes, ou de tout autre cause
ne relevant pas de défauts de matériaux ou de fabrication. Cette garantie est valable uniquement lorsque le produit a
été acheté et utilisé aux Etats-Unis, elle ne s’applique pas aux appareils qui auraient été utilisés d’une manière non
conforme aux instructions écrites stipulées, ni aux appareils ayant fait l’objet de modifications, ni aux produits ou à
des pièces endommagés de la sorte, et dont le numéro de série a été retiré, modifié, effacé, ou rendu illisible.
Garantie implicite : TOUTE GARANTIE IMPLICITE EN LA POSSESSION DE L’ACHETEUR, EST LIMITEE A UNE
DUREE DE UN (1) AN A PARTIR DE LA DATE D’ACHAT. Certains états n’autorisent pas les limitations de
garantie concernant la durée d’une garantie implicite, en conséquence, les limitations mentionnées ci-dessus
ne s’appliquent pas à tous les cas.
Exécution de la Garantie :Durant la période de garantie de un an mentionnée ci-dessus, tout produit défectueux
sera soit réparé, soit remplacé par un modèle équivalent reconditionné (selon la décision de la société) lorsque le
produit est réexpédié au centre SAV, soit remboursé du montant indiqué sur le ticket de caisse. Le produit réparé ou
de remplacement sera garanti pour le restant de la période de garantie de un an, ainsi qu’une période d’un mois
supplémentaire. Il ne sera prélevé aucun frais pour ce type de réparation ou de remplacement.
Service après-vente et réparations :Si l’appareil ne fonctionne pas correctement, veuillez tout d’abord appeler
le numéro vert 1 (800) 233-9054 entre 9h00 et 17h00, Heure GMT - 6, et demander le SERVICE CLIENT, en indiquant que
vous possédez un appareil défectueux. Veuillez mentionner le numéro de modèle
S AV sous garantie (USA) : Il n’y a aucun frais de SAV et d’expédition pour un appareil sous garantie. Appeler
afin d’obtenir l’autorisation de retour de l’appareil le 1 (800) 233-9054.
S AV hors garantie (USA) : Des frais forfaitaires de SAV hors garantie sont établis en fonction du modèle. Ils
comprennent la somme de 12,00 dollars américains pour couvrir les frais d’expédition et de manutention. Vous serez
informé des frais de SAV par courrier. Ces frais doivent être réglés à l’avance dans le cas d’une réparation ou d’un
produit de remplacement.
P roduits achetés aux Etats-Unis et utilisés au Canada : Retourner le produit assuré, en veillant à ce qu’il
soit correctement emballé, et en réglant auprès de nos services, les frais d’affranchissement et d’assurance à
l’avance, à l’ordre de l’adresse aux Etats-Unis mentionnée ci-dessous. Veuillez noter que tous droits de douane/frais
d’assurance sont à votre charge, et que vous devez vous acquitter des frais de droits de douane/ d’assurance à
l’avance, auprès de nos services.
Risques encourus durant le transport :Nous ne sommes nullement responsables des pertes ou dégâts
causés durant le transport jusqu'à notre établissement. Pour votre protection, nous vous conseillons d’emballer
soigneusement le produit et de l’assurer auprès de l’établissement se chargeant de l’expédition. Veillez à bien
inclure les éléments suivants : Tout accessoire lié au problème, votre adresse complète ainsi qu’un numéro de
téléphone auquel on peut vous joindre pendant les heures ouvrables, une note décrivant le problème, une
photocopie du ticket de caisse, ou toute autre preuve d’achat permettant de déterminer le statut de la garantie du
produit. Les envois en contre-remboursement ne sont pas acceptés.
A d resse de réexpédition Pour nous contacter,
de l’appareil : veuillez nous faire parvenir un courrier ou nous appeler :
Attn : Repair Center Salton, Inc.
Salton, Inc. P.O. Box 7366
708 South Missouri Street Columbia, MO 65205-7366
Macon, MO 63552 1-800-233-9054
Limitation du recours: Aucun représentant ni personne n’est autorisé à prendre en charge toute responsabilité
incombant à la société, en relation avec la vente de nos produits. Les défauts, absences de fonctionnement, ou
défaillances d’appareils, ne peuvent nullement faire l’objet de compensations suite à préjudice, contrat, ou loi
commerciale, y compris, et non limitées à la négligence, la responsabilité stricte, une rupture de garantie, ou une
rupture de contrat. Les réparations, remplacements ou remboursements constituent les uniques recours de
l’acheteur selon les termes de la présente garantie. La société Salton ne peut en aucun cas être tenue
responsable des dégâts, pertes, ou frais accidentels ou consécutifs. Certains états n’autorisent pas les
exclusions ou limitations des dégâts accidentels ou consécutifs. En conséquences, les limitations ou exclusions
mentionnées ci-dessus ne s’appliquent pas à tous les cas.
D roits juridiques : La présente garantie vous confère des droits juridiques spécifiques qui sont dans certains cas
complétés par d’autres droits, en fonction des états.
Pour de plus amples informations sur les produits Salton, visitez notre site web à :
© 2002 Salton Inc. Tous droits réservés Nº de Pièce 61156
Imprimé en Chine 8/02
1
IMPORTANT SAFEGUARDS
When using electrical appliances,basic safety precautions should always
be followed including the following:
1. Read all instructions before using appliance.
2. Do not touch hot surfaces. Use handles or knobs.
3. To protect against fire,electrical shock,and injury to persons ,
do not immerse Cord,Plug or Pressure Cooker Housing in water
or other liquid.
4. Close supervision is necessary when any appliance is used near
children.This appliance is not for use by children.
5. Unplug appliance from outlet when not in use and before cleaning.
Allow to cool before putting on or taking off parts,and before cleaning
the appliance.
6. Do not operate any appliance with a damaged cord or plug or after
the appliance malfunctions,or has been dropped or damaged in any
manner. Contact Consumer Service.
7. The use of accessory attachments not recommended by the ap p l i a n c e
ma n u fa c t u rer may result in fi re ,e l e c t ric shock , or injury to pers o n s.
8. Do not use outdoors.
9. Do not let cord hang over edge of table or counter,or touch
hot surfaces.
10. Do not place on or near a hot gas or electric burner,or in a
heated oven.
11. To disconnect,turn the Variable Temperature/Pressure Control to
WARMING.Press the (O) on the ON/OFF Switch,the ON/OFF Indicator
Light will turn off.Remove the plug from the wall outlet.
12. Do not use appliance for other than intended use.
13. Extreme caution must be used when moving an appliance containing
hot oil or other hot liquids.
14. A fire may occur if the appliance is covered or touching flammable
material,including curtains, draperies,walls, and the like, when in
operation.
15. Do not attempt to dislodge food when the appliance is plugged in.
16. Do not fill the unit above the MAX Fill Line.When cooking foods that
expand during cooking,such as rice or dried vegetables, do not
fill the unit over 1/2 full.See Important Safety Information Section
in this manual.
17. Do not cook foods such as applesauce,cranberries, pearl barley,
oatmeal or other cereals, split peas,noodles,macaroni,rhubarb,or
spaghetti.These foods tend to foam,froth and sputter, and may block
the Steam Vent Tube.
18. CAUTION: To reduce the risk of electric shock,cook only in the Pressure
Cooker Pan.
SAVE THESE INSTRUCTIONS
FOR HOUSEHOLD USE ONLY
Page 3

ADDITIONAL IMPORTA N T
S A F E G U A R D S
WARNING: This appliance generates heat and escaping steam
d u ring use. Use proper precautions to prevent risk of burn s,
fi re s, or other injury to persons or damage pro p e rt y.
WARNING: DO NOT IMMERSE THE PRESSURE COOKER PAN IN WATER
OR ANY OTHER LIQUID.
1. Keep hands and face away from Pressure Regulator Valve.
2. Use extreme caution when removing the Lid after cooking.
Serious burns can result from steam inside.
3. Never remove the Lid while the unit is in operation.
4. Do not cover the Pressure Regulator Valve,Safety Valves,or
Pressure Lift Pin with anything as an explosion may occur.
5. Do not touch the Pressure Cooker Pan,any removable
parts, or heating parts during or immediately after using.Use
Cool Touch Handles.Let the unit cool completely first.
6. Clean all parts thoroughly after each use.
7. DO NOT ATTEMPT TO COOL OR RELEASE PRESSURE USING WATER.
8. CAUTION: When the Pressure Lift Pin is in the UP position,turn the
Pressure Regulator Valve to the STEAM RELEASE position to
release steam in a short bursts. Do not turn to any other position.
Failure to follow these instructions may cause hot liquid to be
ejected.
3-PRONG GROUNDED TYPE PLUG
This appliance is equipped with a grounded type 3-wire cord (3prong plug).This plug will only fit into an electrical outlet made for a
3-prong plug.This is a safety feature.If the plug should fail to fit the
outlet,contact an electrician to replace the obsolete outlet.Do not
attempt to defeat the safety purpose of the Grounding Pin part of
the 3-prong plug.
2
Page 4

POMMES FOURREES A LA MURE
4 grosses pommes à cuire
de type Rome,Jonagold,Cortland ou Winesap
1/3 de verre de sucre roux tassé
1/2 de verre de mûres fraîches
1/4 de verre de noix hachées
1/2 c.à café de cannelle
1 c.à café et demi de beurre non salé
1 verre de jus de pommes ou de cidre
1 . Oter le cœur des pommes,en les coupant jusqu’au fond mais sans
t ra ve rs e r,puis placer les pommes dans la Cocotte-Minute.
2 . Combiner le sucre roux,les mûres,les noix et la cannelle dans un bol.
Verser le mélange à la cuillère dans les pommes .Ajouter une noisette
de beurre.Saupoudrer les pommes du mélange à base de sucre s’il
en reste.Verser le jus de pommes dans la Cocotte-Minute.
3 . M e t t re le couve rcle et régler la soupape de
régulation de la pression sur ‘ P R E S S U R E ’
( P re s s u ri s a t i o n ) .Fa i re chauffer sur ‘ M A X / B R OW N I N G ’
jusqu’à ce que l’indicateur de haute/basse
p ression et le taquet de compression montent.
4. Lorsque la vapeur commence à s’évacuer
régulièrement de la soupape de régulation de la
pression,placer le Bouton de commande
réglable de la température/pression sur 6 – 7,puis
faire cuire à basse pression pendant 5 à
7 minutes, ou jusqu’à ce que les ingrédients soient
cuits.
5 . Placer le Bouton de commande réglable de la
température/pression sur ‘WARMING’(Maintien au
chaud),puis débrancher l’appareil.Le témoin
lumineux de marche/arrêt ‘ON/OFF’s’éteint.
Laisser la Cocotte refroidir lentement à
température ambiante jusqu’à ce que le taquet
de compression descende.
6 . Servir accompagné de la sauce à base de
sucre roux.
Pour 4 personnes.
SHORT CORD INSTRUCTIONS
A short power supply cord is provided to reduce the risk resulting
from becoming entangled in or tripping over a longer cord.
Longer detachable power-supply cords or extension cords are
available and may be used if care is exercised in their use.
If a longer detachable power-supply or extension cord is used,(1)
the marked electrical rating of the cord set or extension cord
should be at least as great as the electrical rating of the
appliance,and (2) the cord should be arranged so that it will not
drape over the countertop or tabletop where it can be pulled on
by children or tripped over accidentally.
The extension cord should be a grounding-type 3-wire cord.
ELECTRIC POWER
If the electric circuit is overloaded with other appliances,your
appliance may not operate.It should be operated on a separate
electrical circuit.
PLASTICIZER WARNING
CAUTION: To prevent Plasticizers from migrating from the finish of
the counter top or table top or other furniture,place
NON-PLASTIC placemats between the appliance and
the finish of the counter top or table top.
Failure to do so may cause the finish to darken, permanent
blemishes may occur or stains can appear.
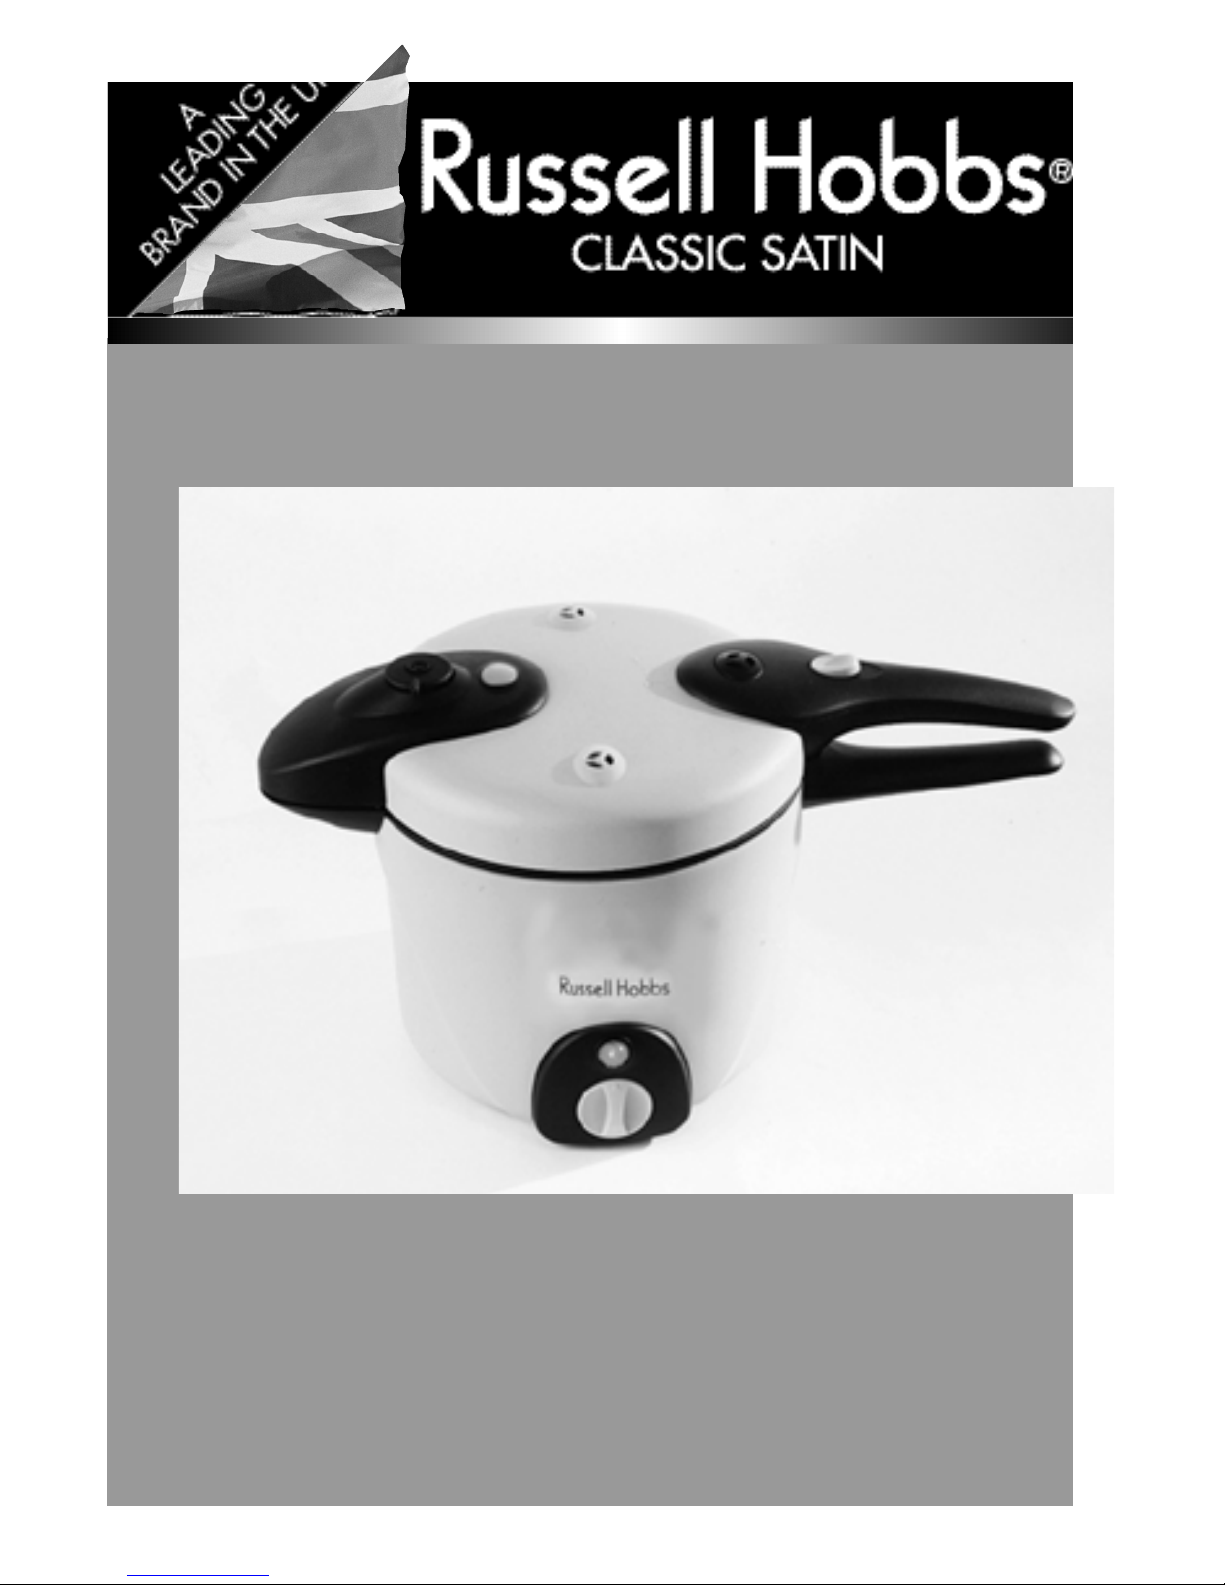
INTRODUCTION
Congratulations on your purchase of the Russell Hobbs® Electric
Pressure Cooker featuring Cool Touch exterior and non-stick
interior finish.The special coating on the Pressure Cooker Pan has
been designed to add durability and ease of use and cleaning.It
has been specially formulated for selected premium performance
appliances.
Care and cleaning of your Electric Pressure Cooker is a snap.
Washing or rinsing with warm,soa py water and a sponge or a
cloth is all that is needed.Do not use steel wool,coarse scouring
pads or harsh abrasives on the exterior or any non-stick surface.
Not only are they unnecessary,they may damage the surface.
3
Page 5
PRODUCT MAY VARY SLIGHTLY FROM ILLUSTRATIONS
Pressure
Regulator
Valve
(P/N 21936)
Variable
Temperature/
Pressure
Control
ON/OFF
Switch with
Indicator Light
Cleaning Brush
(P/N 21100A)
Non-Skid Feet
(P/N 21966)
Steam Vent
Tube
Pressure
Lift Pin
HIGH/LOW
Pressure Level
Indicator
Lid Lock
Button
Lid Assembly (P/N )
Cool Touch
Lid Handles
Cool Touch
Handle
Pressure
Cooker Pan
Power
Plug
Lid Gasket
(P/N 21938)
4
Pressure Regulator Valve
Page 6
STEAK A LA SUISSE
450 g de rouelle de steak de 1 cm d’épaisseur
1 c.à soupe d’huile végétale
2 boîtes de tomates en sauce (425 g)
au céleri,à l’oignon et au poivron vert
1 c.à café de moutarde de Dijon
1 poivron vert coupé en cubes de 2,5 cm
1 oignon coupé en cubes de 2,5 cm
en les séparant les uns des autres
1 verre de bouillon de bœuf
1. Couper la rouelle en dés de 10 cm. Faire chauffer
l’huile dans la Cocotte sur ‘MAX/BROWNING’.
Ajouter le steak
et le faire dorer des deux côtés.
2. Mélanger les tomates et la moutarde.Ajouter les
poivrons,l’oignon,le mélange de tomates ,et le
bouillon dans la Cocotte.
3. M e t t re le couve rcle et régler la soupape de
régulation de la pression sur ‘ P R E S S U R E ’
( P re s s u ri s a t i o n ) .Fa i re chauffer sur
‘ M A X / B R OW N I N G ’jusqu’à ce que l’indicateur de
H AU T E / BA S S E p ression et le taquet de compre s s i o n
m o n t e n t .
4. Lorsque la vapeur commence à s’évacuer
régulièrement de la soupape de régulation de
la pression,placer le Bouton de commande
réglable de la température/pression sur 7 – 8,
puis faire cuire à haute pression pendant 18 à
20 minutes, ou jusqu’à ce que les ingrédients
soient cuits.
5. Placer le Bouton de commande réglable de la
température/pression sur ‘WARMING’(Maintien au
chaud),puis débrancher l’appareil.Le témoin
lumineux de marche/arrêt ‘ON/OFF’s’éteint.Laisser
la Cocotte refroidir lentement à température
ambiante jusqu’à ce que le taquet de compression
descende.
Pour 4 personnes.
Safety
Valves
Pressure
Regulator
Valve with
Steam Vent
Tube
(P/N 21936)
Pressure
Indicator
Safety Valve
with Pressure
Lift Pin
(P/N 21967)
Pressure
Regulator
Valve with
Steam Vent
Tube
Lid Lock
Button
Cool Touch
Handle
Lid Lock
Mechanism
Steam Vent
Cutout
Pressure Lift Pin
(P/N 21970)
with Gasket
(P/N 21948)
Lid Gasket
(P/N 21938)
Cool Touch
Handle
5
Lid Top View
Lid Bottom View
HIGH/LOW
Pressure Level
Indicator
Safety Valves
HIGH/LOW
Pressure Level
Indicator Gasket
(P/N 21961)
Page 7

BEFORE USING YOUR PRESSURE COOKER
FOR THE FIRST TIME
CAUTION: To protect against electric shock,do not immerse the
Pressure Cooker Pan or allow cord to come into
contact with water or other liquids.
1. Hand wash the Lid and Lid Gasket and the HIGH/LOW
Pressure Level Indicator Gasket of the Pressure Cooker
thoroughly with liquid dishwashing soap.Rinse and towel
dry thoroughly. Replace the HIGH/LOW Pressure Level
Indicator Gasket by tucking the bottom of the Gasket into the
hole on the underside of the Lid.
2. Use a damp paper towel to clean the non-stick interior of the
Pressure Cooker Pan.Towel dry.
WARNING: DO NOT IMMERSE THE PRESSURE COOKER PAN IN WATER
OR ANY OTHER LIQUID.
3. Read the Owner’s Manual carefully and completely before
using the Pressure Cooker to become familiar with the parts
and features.
4. Follow directions for Pressure Cooking, filling the Pressure
Cooker Pan up to the MAX Fill Line with water. Pressure cook
for 15 minutes at HIGH pressure.This will ensure correct fitting
of the Gaskets.
5. Turn the Variable Temperature/Pressure Control to WARMING.
Press the (O) on the ON/OFF Switch,the ON/OFF Indicator
Light will turn off.Unplug the unit.The pressure will be released
naturally.When the HIGH/LOW Pressure Level Indicator and
the Pressure Lift Pin drops and all pressure is released,open the
Lid.Carefully pour out the water and allow to cool.Dry all
parts.The Pressure Cooker is now ready to use.
6
Page 8
SAUERBRATEN
1/4 de verre de vinaigre de vin rouge
1/2 c.à café de sel
1/8 de c.à café de poivre
1/2 c.à café de clous de girofle moulus
1 gousse d’ail émincée
1 rôti de 680 g,avant
ou rumsteck,de 5 cm d’épaisseur
1 c.à soupe d’huile végétale
1 verre et demi de bouillon de bœuf
1 grosse carotte hachée grossièrement
1 céleri en branches, haché grossièrement
Une moitié de gros oignon
hachée grossièrement
1 feuille de laurier sauce
1 verre de petits gâteaux au gingembre écrasés
1. Combiner le vinaigre de vin rouge,le sel,le poivre,les clous de girofle
moulus, l’ail émincé,et faire mariner le rôti de bœuf au réfrigérateur
dans un récipient non métallique pendant plusieurs heures ou tout
une nuit.
2. Tourner le Bouton de commande réglable de la
température/pression sur ‘MAX/BROWNING’et
faire chauffer l’huile dans la Cocotte-Minute.
Retirer la viande de la marinade et la placer
dans la Cocotte en conservant la marinade à
part. Faire dorer le rôti des deux côtés.
3. Verser la marinade,le bouillon de bœuf,la
carotte,le céleri,l’oignon et la feuille de laurier sauce dans la
cocotte.
4. M e t t re le couve rcle et régler la soupape de
régulation de la pression sur ‘ P R E S S U R E ’
( P re s s u ri s a t i o n ) .Fa i re chauffer sur ‘ M A X / B R OW N I N G ’
jusqu’à ce que l’indicateur de H AU T E / BA S S E
p ression et le taquet de compression montent.
5. Lorsque la vapeur commence à s’évacuer
régulièrement de la soupape de régulation de la
pression,placer le Bouton de commande réglable
de la température/pression sur 7 – 8,puis faire
cuire à haute pression pendant 50 à 60 minutes,
ou jusqu’à ce que les ingrédients soient cuits.
6. Placer le Bouton de commande réglable de la température/pression
sur ‘WARMING’(Maintien au chaud),puis débrancher l’appareil.Le
témoin lumineux de marche/arrêt ‘ON/OFF’s’éteint.Laisser la
Cocotte refroidir lentement à température ambiante jusqu’à ce que
le taquet de compression descende.
7. Mettre la viande sur un plat de service et couvrir de papier
d’aluminium.Verser les petits gâteaux au gingembre écrasés sur la
sauce,en ajoutant suffisamment de bouillon jusqu’à l’obtention
d’une sauce.Goûter et saler à nouveau si nécessaire.Couper la
viande en grosses tranches dans le sens inverse des fibres et servir
accompagné de la sauce.
Pour 4 à 6 personnes.
For Your Safety
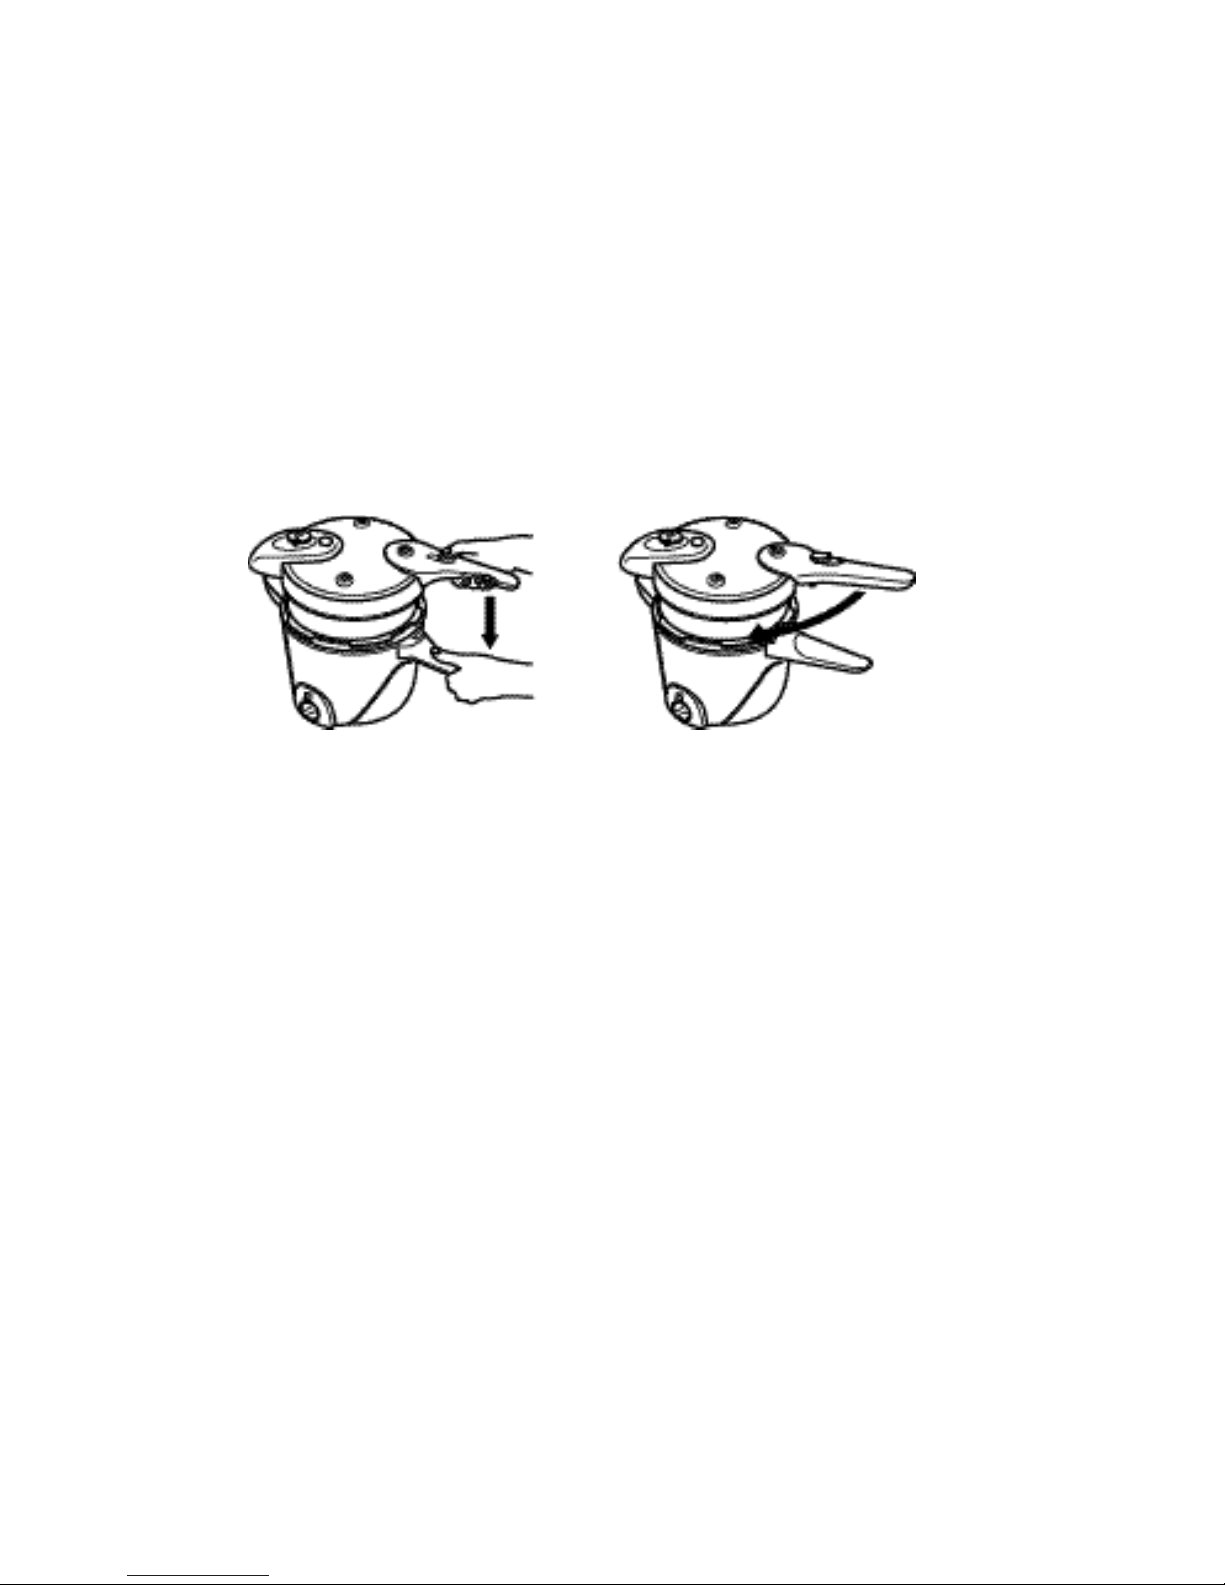
LOCKING LID WITH EASY-GRIP HANDLE
The large,easy-to-handle Lid Lock Button effortlessly locks or
unlocks the Pressure Cooker Lid. To close,place the Lid onto the
top of the Pressure Cooker Pan so that the Lid Handle is slightly to
the right of the Pressure Cooker Pan Handle.Turn the Lid Handle
clockwise until the two Handles are together and facing you.The
Lid Lock Button locks the Lid in place.Make sure the Lid falls
below the rim of the Pressure Cooker Pan and is securely
attached onto the Pan.
To remove the Pressure Cooker Lid,pressure must be released
before opening.When pressure is completely reduced,slide the
Lid Lock Button towards you,twist the Lid counter-clockwise until
the Lid can be removed easily. Always tilt the Lid away from you
to avoid the steam.(See Operating Instructions Section in this
Owner’s Manual.)
LID GASKET
The Lid Gasket provides a tight seal for your Pressure Cooker.
Never use the Lid without making sure that the Gasket is properly
positioned. Do not use the Lid if the Gasket appears to be
cracked,worn or torn.In this case,you must replace the Lid
Gasket.You can prolong the life of your Gasket by lightly coating
it with a small amount of vegetable oil after each use.
For your safety, we have incorporated into your Pressure Cooker
Lid,4 Safety Pressure Release Valves:
• Pressure Regulator Valve with Steam Vent Tube
• Pressure Indicator Safety Valve with Pressure Lift Pin and Gasket
• 2 Safety Valves
7
Page 9

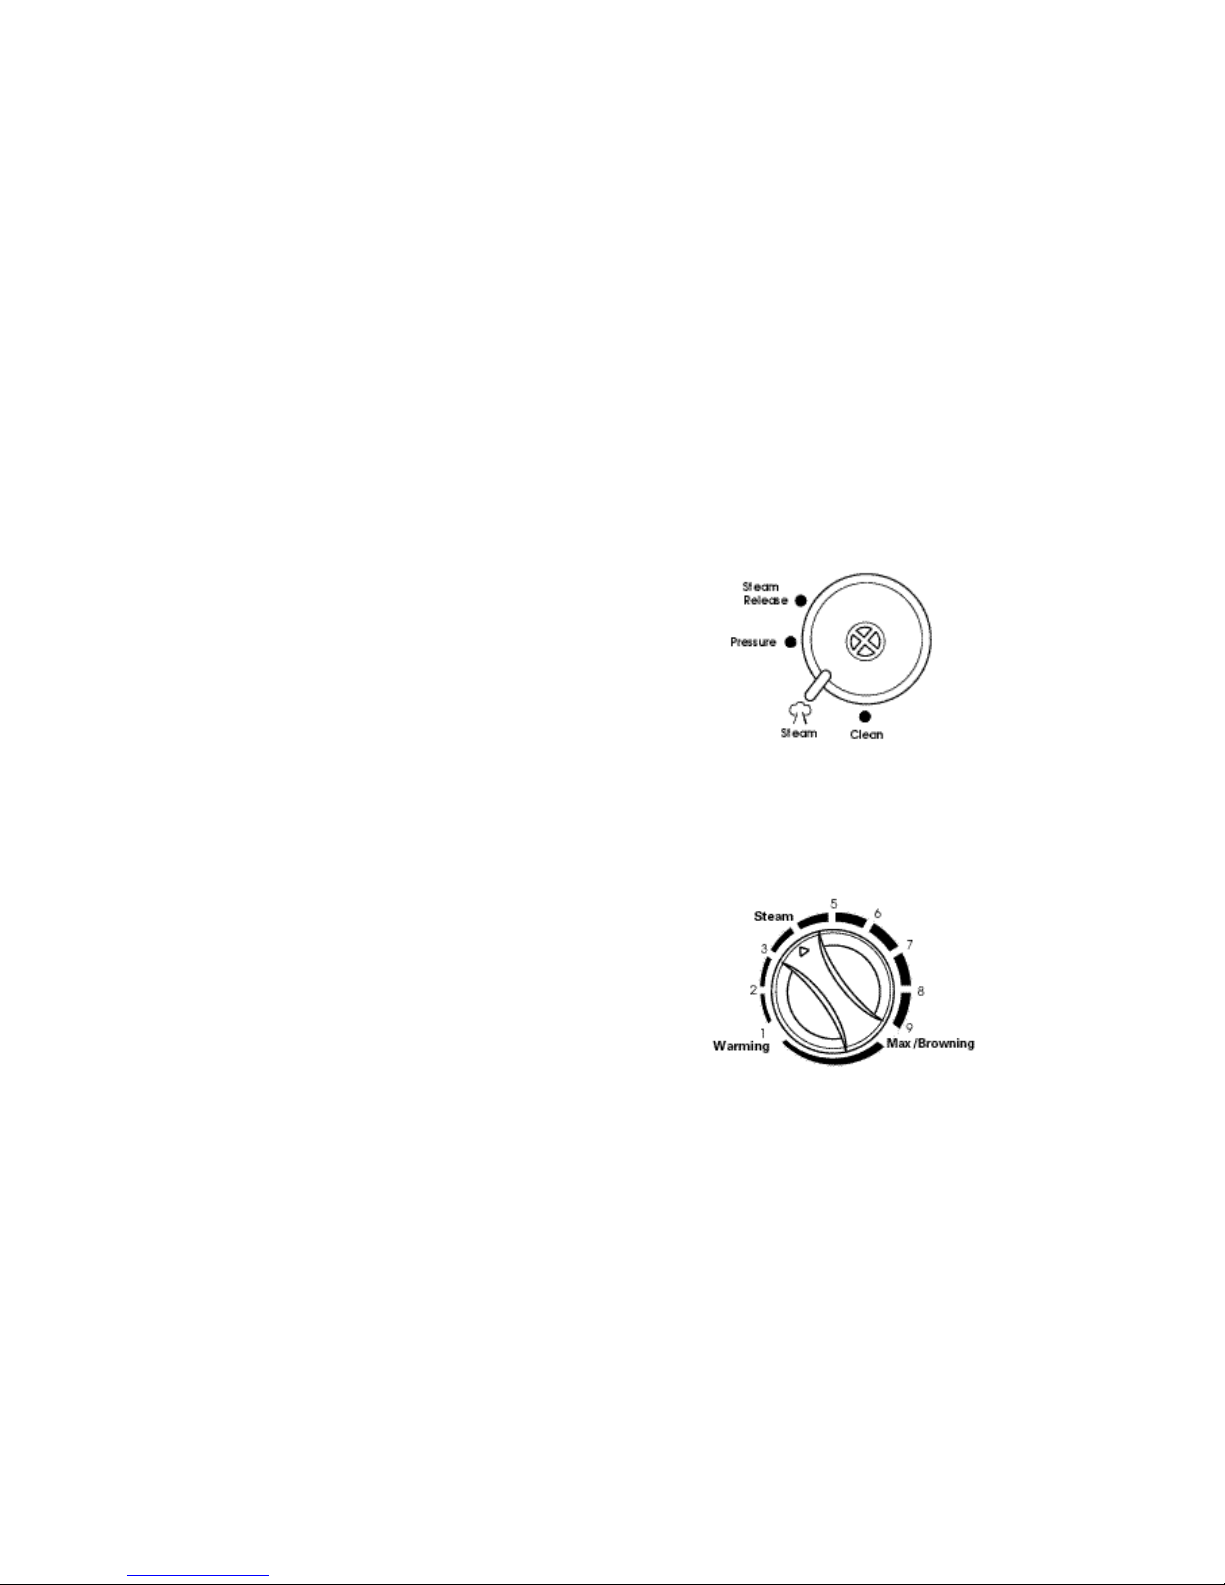
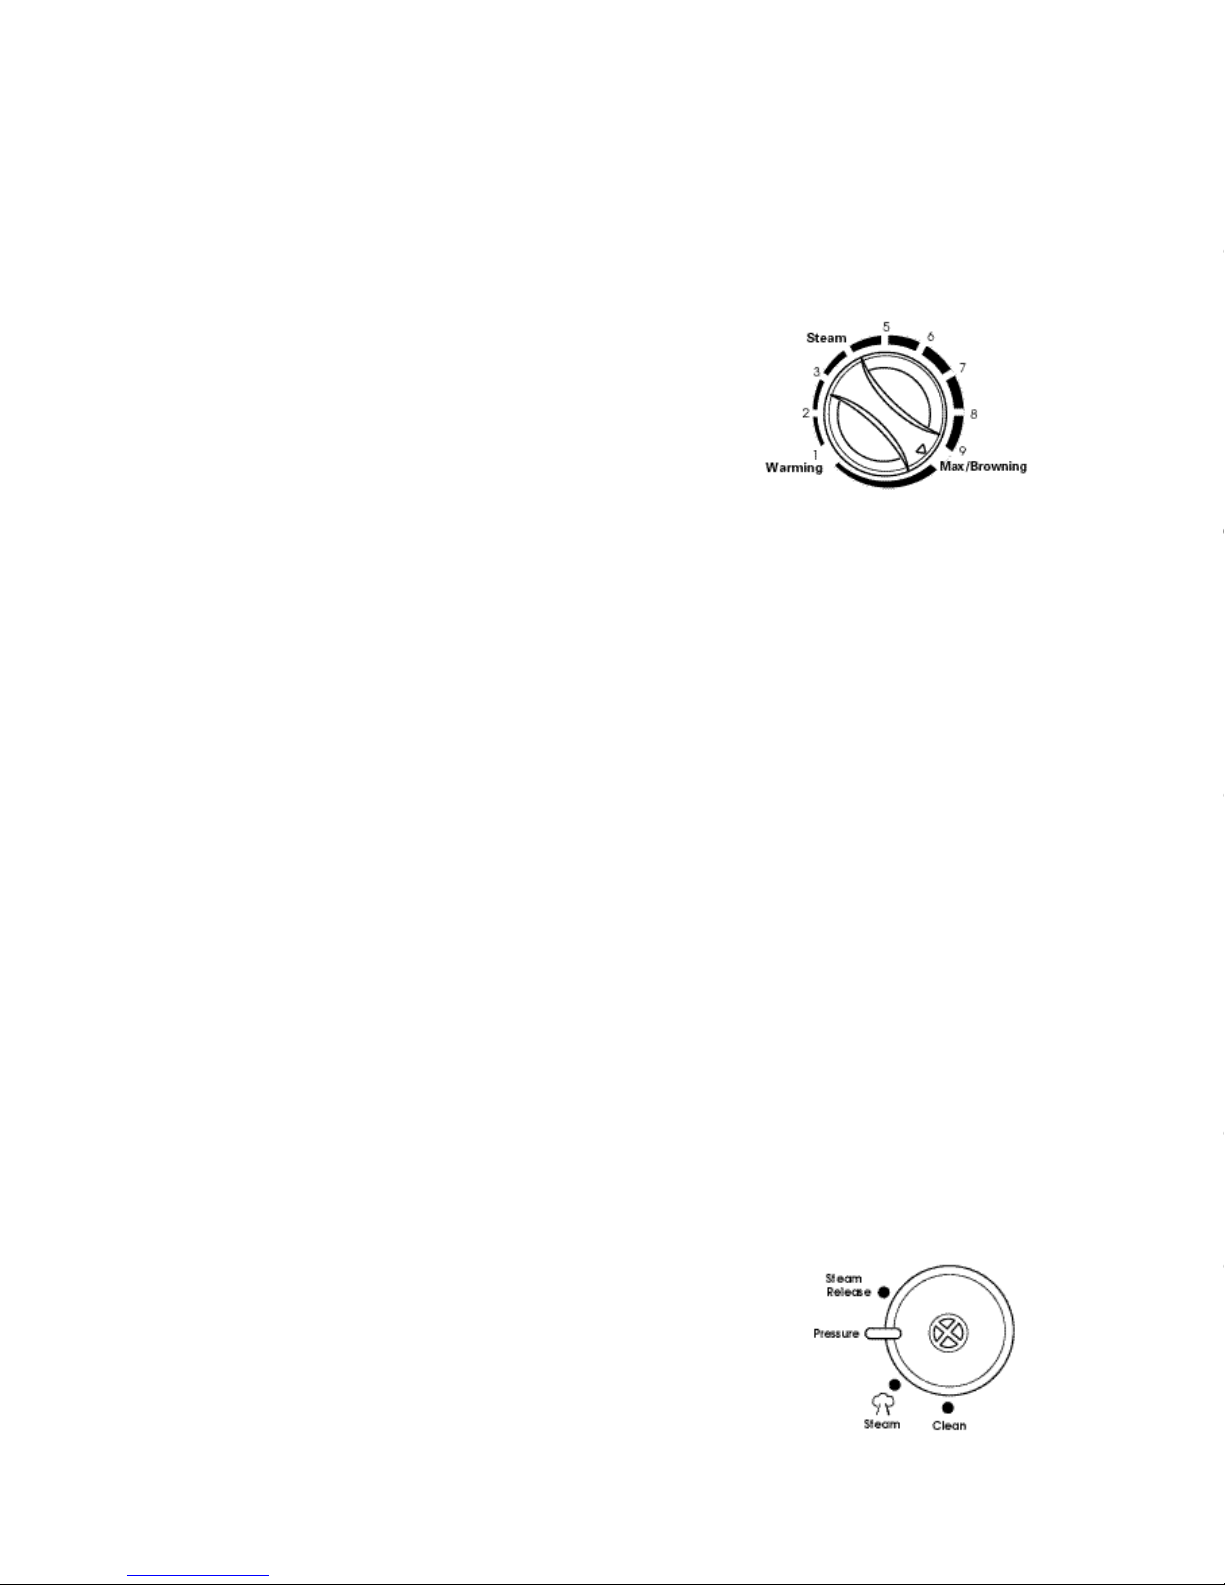
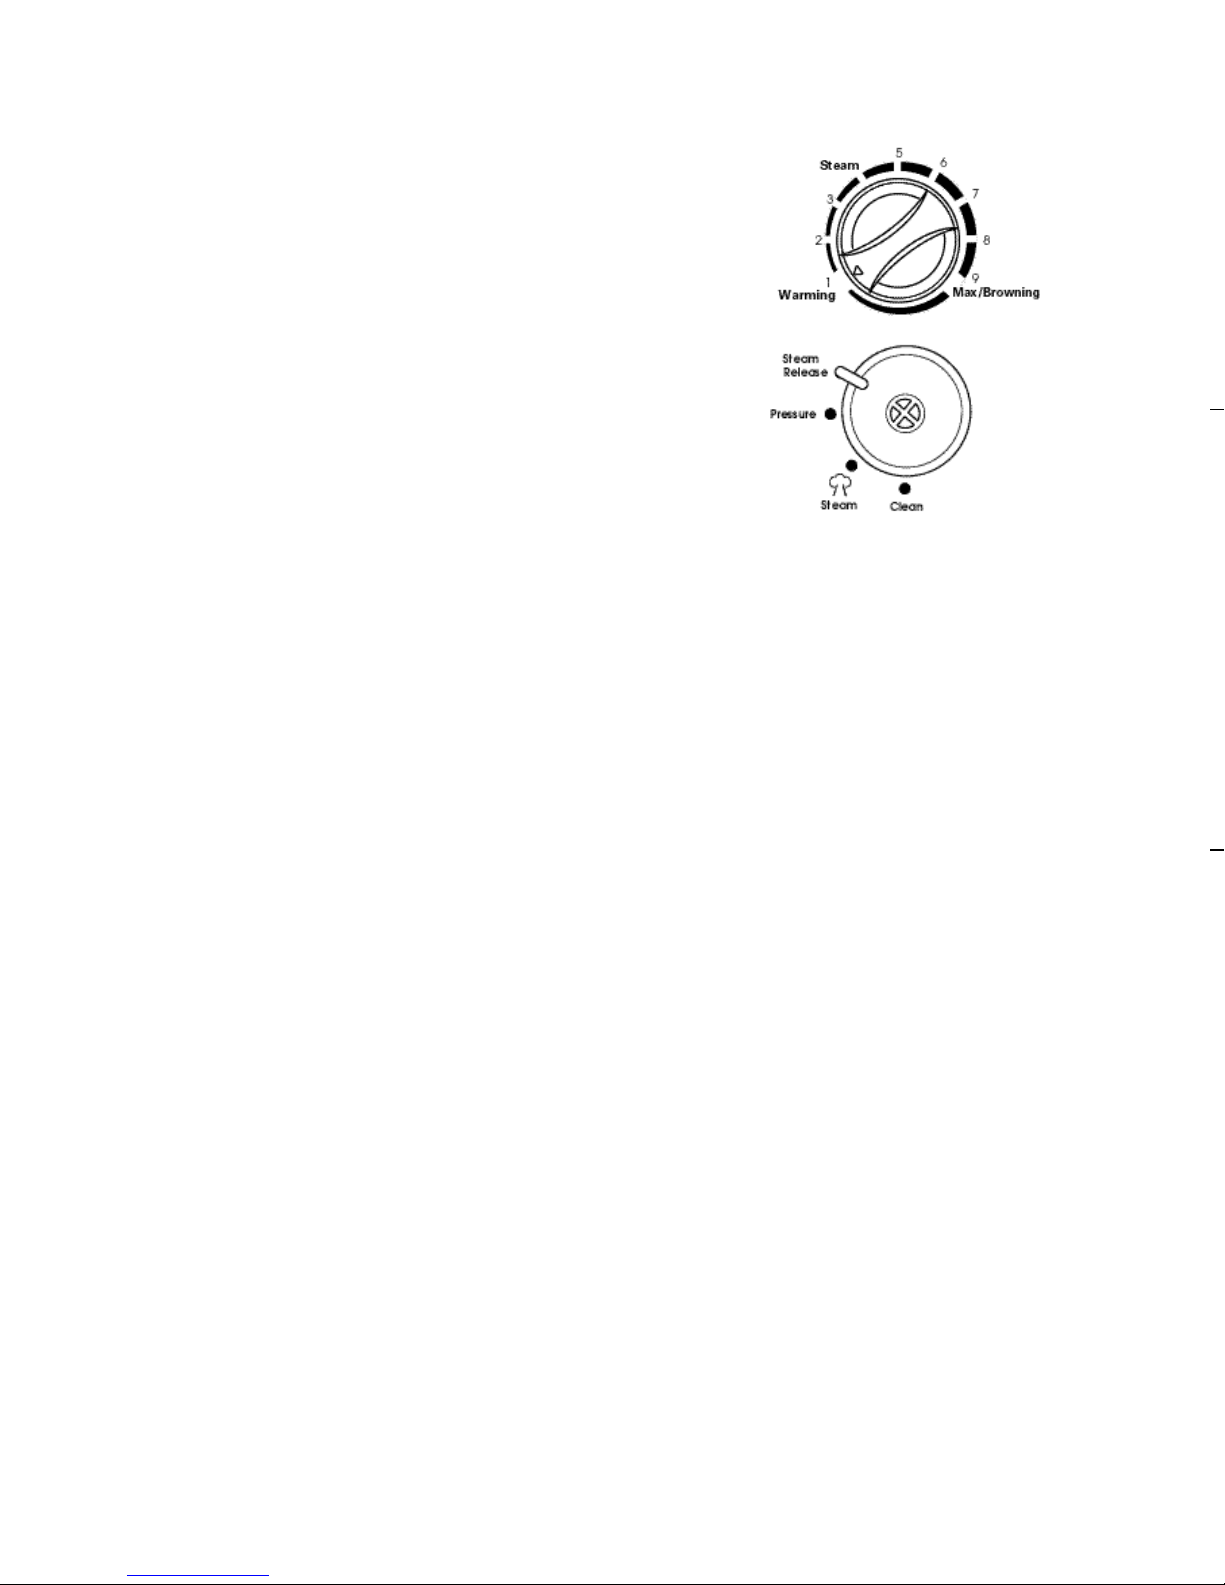
PRESSURE REGULATOR VALVE
WITH STEAM VENT TUBE
This Valve serves as a manual pressure regulator.
By adjusting this Lever you will be able to switch
from PRESSURE to STEAM to CLEAN or from
PRESSURE to STEAM RELEASE to release pressure in
short bursts.This Pressure Regulator Valve has been factory calibrated to release steam from your Pressure Cooker when it reaches
its factory determined maximum pressure capacity (15 psi).
Remove the Pressure Regulator Valve and rinse under lukewarm
water for easy cleaning.(See Important Safety Information section
of this manual for removal instructions.) If this Valve is worn it MUST
be replaced.
CAUTION: Never disassemble Pressure Regulator Valve or clean the
Steam Vent Tube when Pressure Cooker is in use.
PRESSURE INDICATOR SAFETY VALVE
WITH PRESSURE LIFT PIN
This visual safety device indicates if the Pre s s u re Cooke r
Pan is under pre s s u re or if all pre s s u re has been re l e a s e d
f rom the inside of the Pa n .When the Pre s s u re Lift Pin is in
the UP position,you will know the Pre s s u re Cooker Pan is
p re s s u ri z e d .In this position you will not be able to re m ove the
P re s s u re Cooker Lid.It also acts a Pre s s u re Relief Va l ve ,e x h a u s t i n g
excess pre s s u re .The Pre s s u re Lift Pin Gasket should fit snugly aro u n d
the Pin.
If the Pressure Lift Pin is clogged or unclean,it may not function
properly. If the Pressure Lift Pin does not drop when expected,
gently slide the Lid Lock Button towards you to see if the Pressur e
Lift Pin drops. If it still does not drop, wait until all steam has been
released.
If this Valve becomes clogged it can easily be cleaned by gently
removing excess food particles from the Valve located on the
underside of the Pressure Cooker Lid.(See Important Safety
Information section of this manual.)
8
Page 10

CHILI VEGETARIEN AUX TOMATES SECHES
ET AUX HARICOTS NOIRS
1/2 tasse de haricots noirs séchés
1 c.à soupe d’huile d’olive
1 verre d’oignon émincé
1 c.à café d’ail émincé
1 poivron vert de taille moyenne,
épépiné et haché et dont on aura ôté le cœur
1 piment Jalapeno épépiné
et émincé,et dont on aura ôté le cœur
3 carottes émincées
2 c.à café de poudre de piment
1 c.à café de poudre de cumin
1/4 de c.à café d’origan séché
2 boîte (410 g) de tomates en cubes
1 verre 1/2 d’eau
1 c.à soupe d’huile végétale
1/4 de verre de tomates sèches
1/2 c.à café de sel
1 c.à soupe de coriandre fraîche hachée
1. Faire tremper les haricots toute une nuit en fonction des indications
du paquet.Egoutter les haricots et les laisser de côté.
2. Faire chauffer l’huile dans la Cocotte-Minute sur
MAX/BROWNING.Ajouter l’oignon,l’ail,les
poivrons, la carottes,la poudre de piment,le
cumin et l’origan. Faire revenir 5 à 7 minutes
jusqu’à ce que l’oignon devienne tendre,en
remuant fréquemment.
3. Ajouter les haricots trempés, les tomates,l’eau,l’huile,les tomates
sèches et le sel.Mélanger.
4. M e t t re le couve rcle et régler la soupape de
régulation de la pression sur ‘ P R E S S U R E ’
( P re s s u ri s a t i o n ) .Fa i re chauffer sur ‘ M A X /
B R OW N I N G ’jusqu’à ce que l’indicateur de
H AU T E / BA S S E p ression et le taquet de
c o m p ression montent.
5. Lorsque la vapeur commence à s’évacuer
régulièrement de la soupape de régulation de la
pression,placer le Bouton de commande
réglable de la température/pression sur 7 – 8,puis
faire cuire à haute pression pendant 18 à
22 minutes, ou jusqu’à ce que les ingrédients soient cuits.
6. Placer le Bouton de commande réglable de la température/pression
sur ‘WARMING’(Maintien au chaud),puis débrancher l’appareil.Le
témoin lumineux de marche/arrêt ‘ON/OFF’s’éteint.Laisser la
Cocotte refroidir lentement à température ambiante jusqu’à ce que
le taquet de compression descende.
7. Servir avec de la coriandre fraîche.
Pour 6 personnes.
SAFETY VALVES
When pre s s u re builds,excess steam or pre s s u re ma y
begin to escape through these automatic Va l ve s.T h i s
is normal and so is the audible hissing sound coming
f rom these Va l ve s.
If these Valves become clogged,they can easily be cleaned by
gently removing excess food particles from the Valves located on
the underside of the Pressure Cooker Lid.(See Important Safety
Information section of this manual.)
Safety Steam Vent: In case of a high-pressure build-up,steam will
be released through the Safety Vent Cutout located in the rim of
the Pressure Cooker Lid.
F e a t u re s
HIGH/LOW PRESSURE LEVEL INDICATOR
To cook foods at HIGH pressure,turn the Variable Temperature/
Pressure Control to to MAX/BROWNING, 7,8,or 9 until the HIGH/LOW
Pressure Level Indicator rises,and both rings are visible.Reduce the
Variable Temperature/Pressure Control to 7 - 8 to maintain HIGH
pressure; both rings will be showing.
To cook foods at LOW pressure,bring the Pressure Cooker up to
HIGH Pressure (both rings are visible),and then reduce the Variable
Temperature/Pressure Control to 6 - 7 to maintain LOW pressure;
one ring will be showing.
9
Both rings are visible
when cooking at HIGH
Pressure
HIGH/LOW Pressure
Level Indicator
Reduce heat to
7 - 8 to maintain
HIGH pressure
Heat on
MAX/BROWNING, 7, 8,
or 9 until the Pressure
Level Indicator raises
One ring is visible
when cooking at
LOW Pressure
Reduce heat to
6 - 7 to maintain
LOW pressure
Heat on
MAX/BROWNING, 7,8,
or 9 until the Pressure
Level Indicator raises
HIGH/LOW Pressure
Level Indicator
Page 11
If the HIGH/LOW Pressure Level Indicator is clogged,it may not
function properly. See User Maintenance Instructions in this manual,
for information on cleaning.
As the Pressure Cooker cycles ON and OFF,the Pressure Level
Indicator will rise and fall a little.
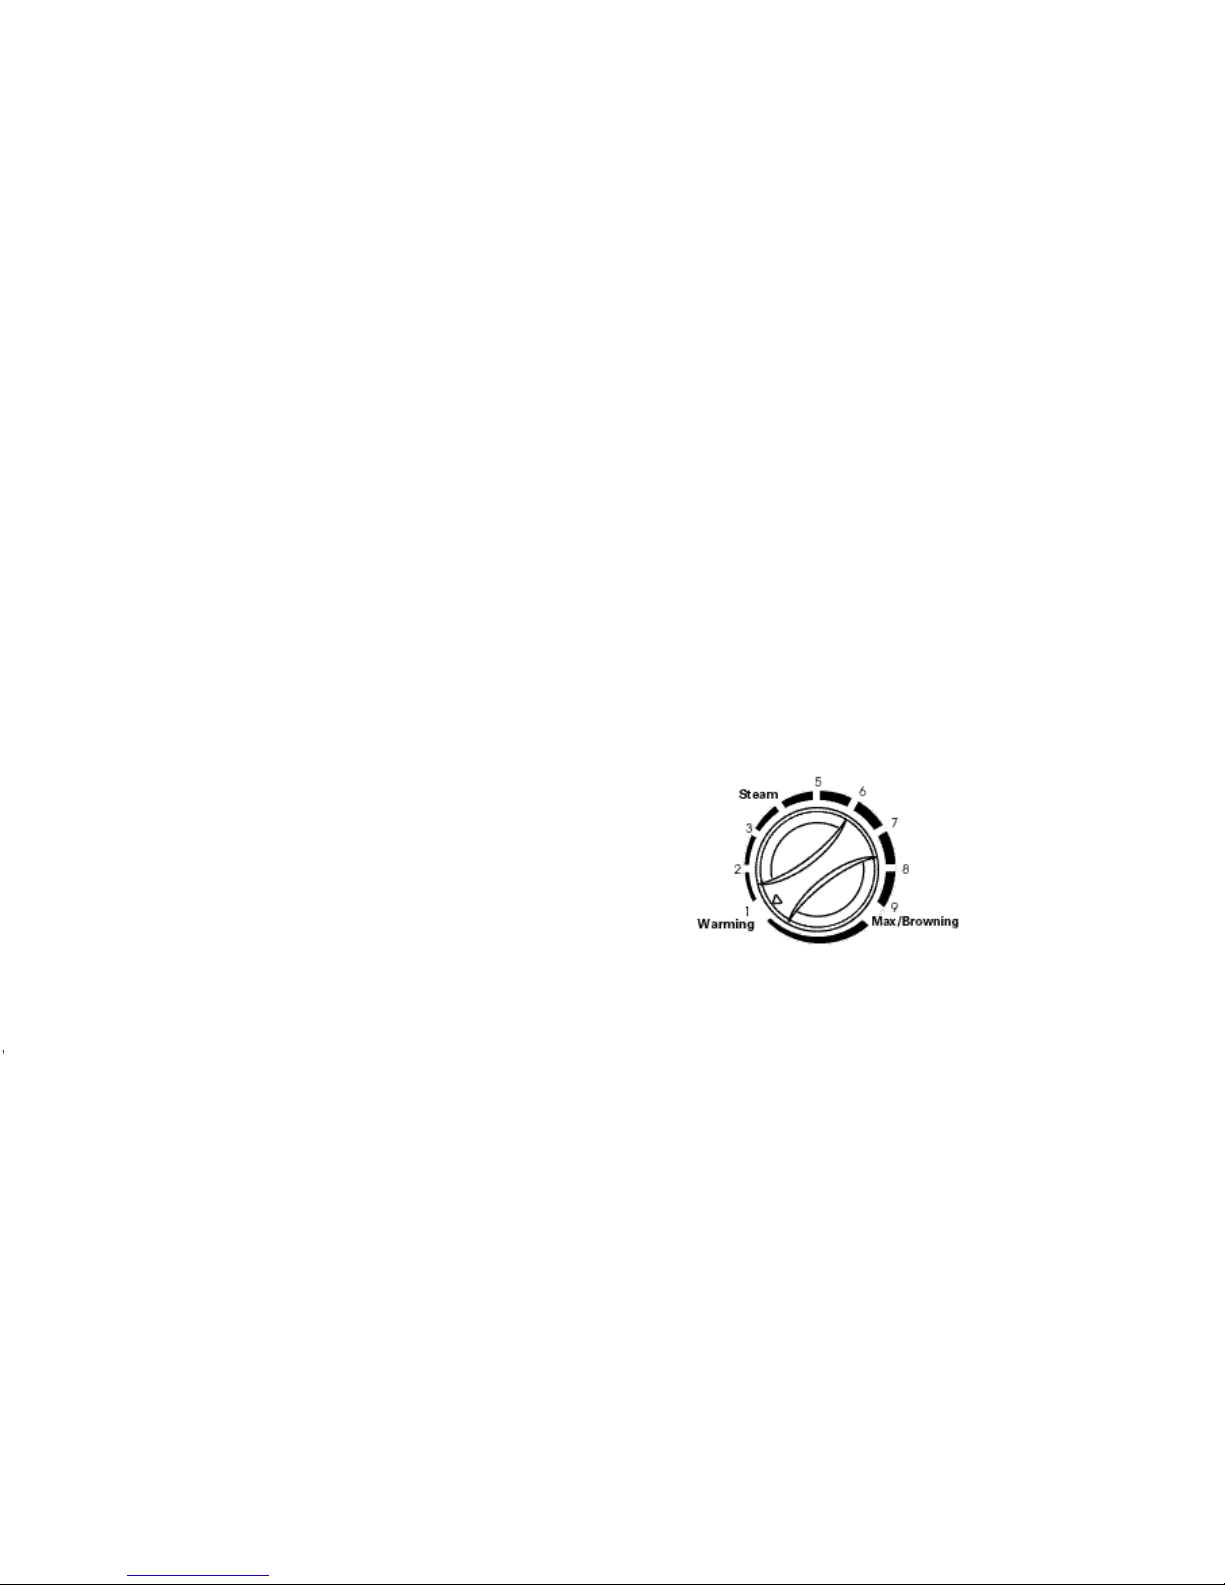
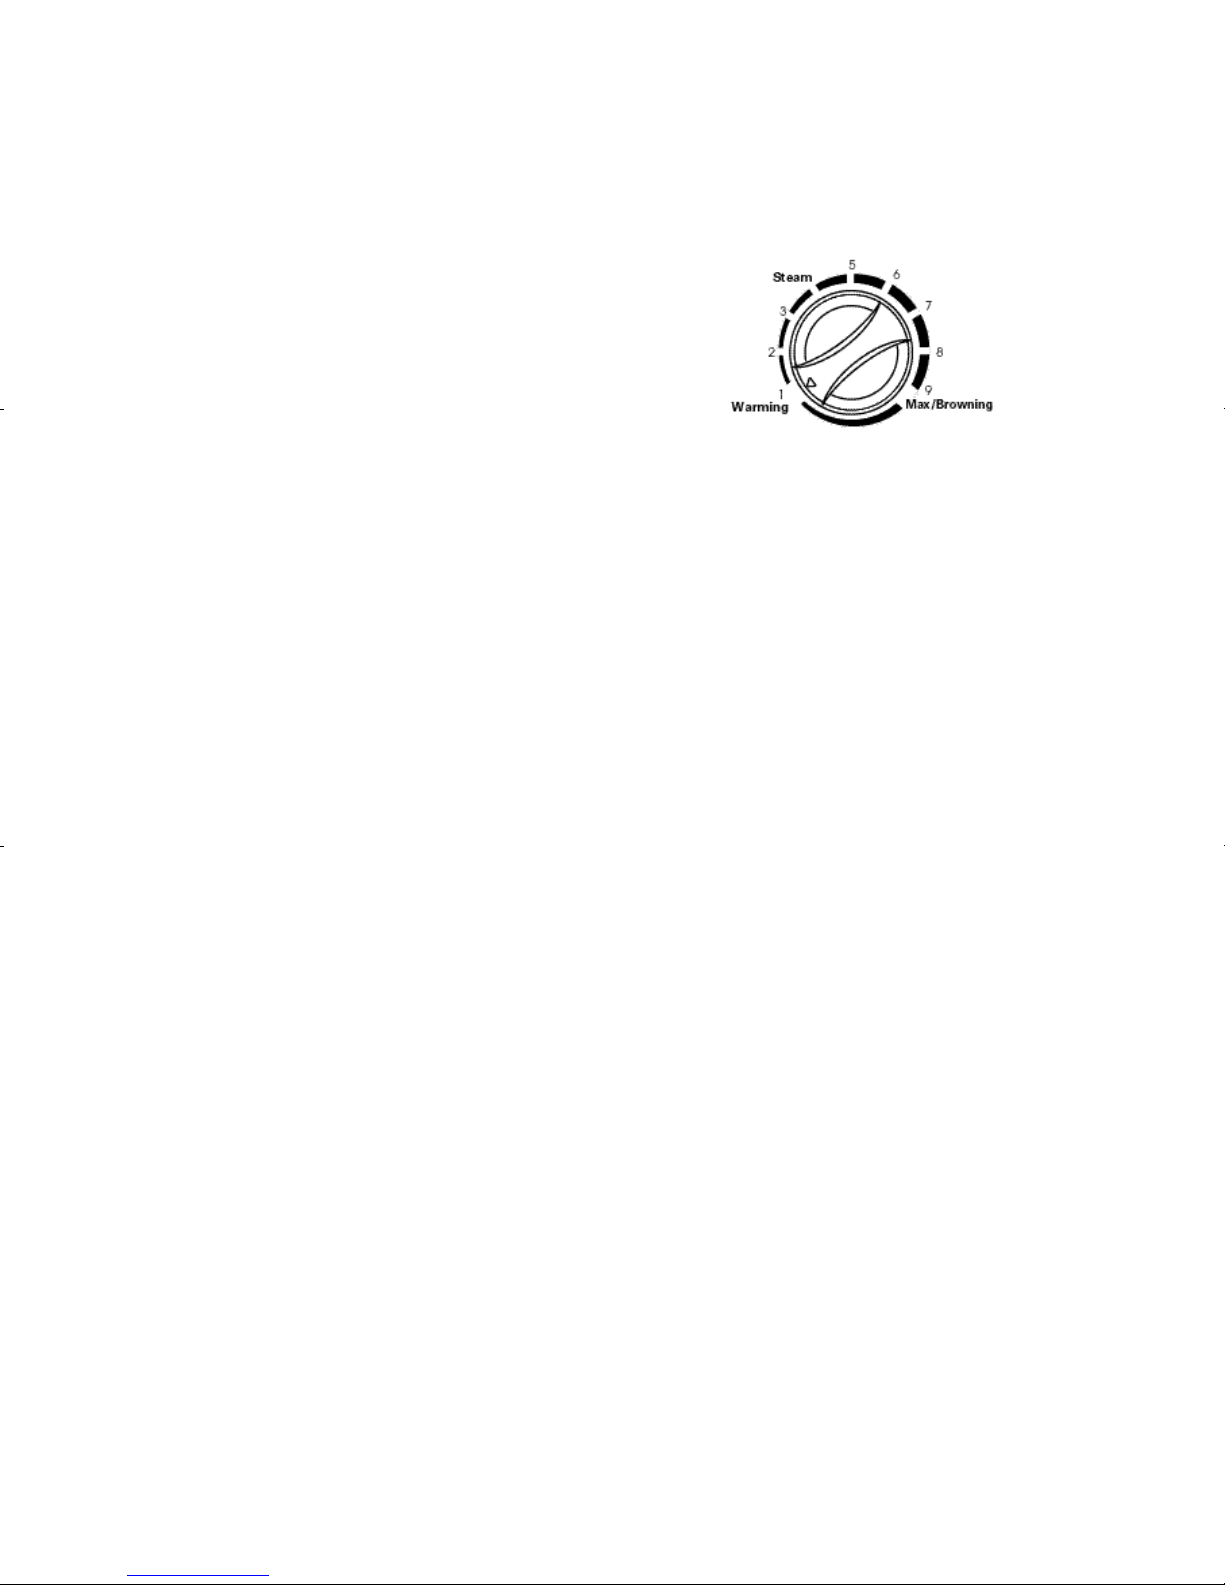
VARIABLE TEMPERATURE/PRESSURE CONTROL
Your Pressure Cooker has variable temperature control that
cycles on and off to maintain the temperature.Adjust the
setting as necessary for HIGH or LOW pressure according to the
chart or recipe.
By turning the Variable Temperature/Pressure Control to 7 - 8, you
can maintain 15 psi / HIGH pressure with both rings visible on the
HIGH/LOW Pressure Level Indicator.To cook at LOW pressure,turn the
Variable Temperature/Pressure Control to 6 - 7 to keep one ring
visible.The exact position of the Control will depend on the amount
and type of food being cooked.
WARMING
This Function reheats or keeps cooked
food warm.WARMING can either be
used on its own or after pressure cooking
to keep food warm.
1.Position the electrical cord in the
slot located on the bottom of the
Pressure Cooker.
2. Place or leave cooked food in Pressure Cooker Pan.
3. Turn the Variable Temperature/Pressure Control to WARMING.
Plug the unit into a 120V AC wall outlet and press the (-) on the
ON/OFF Switch to turn the Pressure Cooker ON.The ON/OFF
Indicator Light will illuminate.
4. If you would like to keep food warm after steaming or pressure
cooking,after cooking is completed and pressure has been
released,simply turn the Variable Temperature/Pressure Control
to WARMING 1,2,or 3.Stir frequently.
5. When finished,turn the Variable Temperature/Pressure Control to
WARMING. Press the (O) on the ON/OFF Switch,the ON/OFF
Indicator Light will turn off.Unplug the unit.
10
HIGH/LOW PRESSURE LEVEL INDICATOR (Con’t)
Page 12

R e c e t t e s
HARICOTS VERTS FRAIS AUX POMMES DE TERRE
NOUVELLES ET AU JAMBON
1 c.à soupe d’huile d’olive
1 verre d’oignon émincé
680 g de haricots verts frais coupés en morceaux de 2,5 cm.
450 g de pommes de terre nouvelles grattées
et coupées en quatre
1 verre de jambon coupé en cubes
1/2 c.à café de sel
1/8 de c.à café de poivre noir
2 verre et demi d’eau
1 c.à café de basilique frais haché
1. Faire réchauffer l’huile dans la Cocotte-Minute sur
‘MAX/BROWNING’.Ajouter l’oignon et faire revenir
pendant 5 à 7 minutes jusqu’à ce que l’oignon
devienne tendre,en remuant fréquemment.
2. Ajouter le reste des ingrédients. Mélanger.
3 . M e t t re le couve rcle et régler la soupape de
régulation de la pression sur ‘ P R E S S U R E ’
( P re s s u ri s a t i o n ) .Fa i re chauffer sur ‘ M A X /
B R OW N I N G ’jusqu’à ce que l’indicateur de
H AU T E / BA S S E p ression et le taquet de compre s s i o n
m o n t e n t .
4. Lorsque la vapeur commence à s’évacuer
régulièrement de la soupape de régulation de la
pression,placer le Bouton de commande réglable
de la température/pression sur 7 – 8,puis faire
cuire à haute pression pendant 9 à
13 minutes, ou jusqu’à ce que les ingrédients
soient cuits.
5. Placer le Bouton de commande réglable de la température/pression
sur ‘WARMING’(Maintien au chaud),puis débrancher l’appareil.Le
témoin lumineux de marche/arrêt ‘ON/OFF’s’éteint.Laisser la
Cocotte refroidir lentement à température ambiante jusqu’à ce que
la jauge de pression descende.
Pour 6 personnes.
BROWNING
Braised foods always taste better when
browned before cooking in liquid.The
Russell Hobbs® Electric Pressure Cooker
has a built-in browning cycle.
1.Position the electrical cord in the slot
located on the bottom of the
Pressure Cooker.
2. For best results, food should be patted dry with paper
towels and cut into small,uniform pieces.Brown or sauté
food using a small amount of oil in small batches.
3. Add the ap p ro p riate amount of oil as called for in the recipe to
the Pre s s u re Cooker Pa n .With the Lid off,plug the unit into a 120V
AC wall outlet and press the (-) on the ON/OFF Switch to turn
the Pressure Cooker ON.The ON/OFF Indicator Light will
illuminate.Tu rn the Va ri able Te m p e ra t u re / P re s s u re Control to
M A X / B R OW N I N G,7 ,8 ,or 9.
4. After approximately 5 minutes of preheating,add food and
begin browning without the Lid.
WARNING: Do not leave the Pressure Cooker unattended while
browning foods.
5. When desired browning is complete,either remove browned
food and continue with the recipe,or add recipe ingredients to
the Pressure Cooker Pan and begin pressure cooking according
to recipe instructions.
6. When finished,turn the Variable Temperature/Pressure Control to
WARMING. Press the (O) on the ON/OFF Switch,the ON/OFF
Indicator Light will turn off.Unplug the unit.
11
Page 13
STEAMING
This Function quickly brings cooking liquid to a boil for steaming
fresh vegetables or rice.Times will be similar to cooking the same
food on top of the stove in a sauce pan.
1.Position the electrical cord in the slot located on the bottom of
the Pressure Cooker.
2. To steam food,place food in the bottom of the Pressure Cooker
Pan or you may use a small heat-resistant steaming rack or
basket (not included) in the bottom of the Pressure Cooker Pan.
Add at least 1 cup of water when cooking up to 30 minutes. Do
not fill the Pressure Cooking Pan past the MAX Fill Line,2/3 full.
3. Add the Lid and lock it into place onto the Pressure Cooker Pan
following the instructions in the For Your Safety section of this
manual.
4. On the top of the Lid,turn the Pressure
Regulator Valve to STEAM.
5. Turn the Variable Temperature/Pressure
Control to WARMING. Plug the unit into
a 120V AC wall outlet and press the (-)
on the ON/OFF Switch to turn the
Pressure Cooker ON.The ON/OFF
Indicator Light will illuminate.
NOTE: The Lid can be removed while
STEAMING to check the food for
doneness, but you must wait until the
Pressure Lift Pin drops.
6. Turn the Variable Temperature/Pressure
Control to STEAM,3 to 5 (see
illustration).The Pressure Lift Pin may
raise and lower during cooking as the
unit cycles on and off to maintain the
temperature.
7. When finished,turn the Variable
Temperature/Pressure Control to WARMING.press the (O) on
the ON/OFF Switch,the ON/OFF Indicator Light will turn off.
Unplug the unit.
8. Wait until the Pressure Lift Pin drops and remove the Lid.
WARNING: Use caution when lifting Locking Lid. Escaping steam
can scald you, and the Lid will be hot.
12
Page 14
Conseils utiles ( S u i t e )
Quand faut-il utiliser une grille de cuisson normale ou à la vapeur ?
Solution : • Une grille de cuisson normale ou à la vapeur permet
Que doit-on faire lorsque de la mousse sort du tube du conduit
d’évacuation au moment où la vapeur commence à être évacuée ?
Solution : • Après la cuisson vap e u r,t o u rner le Bouton de
Comment peut-on faire cuire ensemble de la viande et des
légumes ?
Solution : • Commencer par fa i re cuire à la vapeur la viande qui
Pourquoi se développe-t-il une traînée d’humidité sur le pourtour du
tube du conduit d’évacuation sur les poignées de la cocotte-minute,
sur la soupape de régulation de la pression et/ou sur les soupapes de
sécurité lorsqu’on commence à faire chauffer la cuve de la cocotte ?
Solution : • Il est normal d’apercevoir des traces d’humidité sur
P re s s u re Cooking
Operating Instru c t i o n s
1. Position the electrical cord in the slot located on the bottom of
the Pressure Cooker.
2. Prepare food according to recipe or
chart.If recipe calls for sautéing
vegetables or browning meat,add oil
to the Pressure Cooker Pan and turn
the Variable Temperature Pressure
Control to MAX/BROWNING,7,8,or 9.
The Russell Hobbs® Pressure Cooker
has a Browning Feature that allows you to sauté or brown foods
in the Pressure Cooking Pan before cooking under pressure.
(Follow the procedures described in the Features: Browning
section of this manual.)
3. Follow recipe or chart directions; remove the browned food
and/or add the the other ingredients.Always use 1-3 cups of
water, broth,wine, fruit or vegetable juice,or other liquid for
pressure cooking.Do not use milk,milk products, or cream
sauces,as they tend to scorch easily.Make sure the rim of the
Pan is clean and dry.Never beat a spoon or other utensil on the
rim of the Pressure Cooker Pan.Any dent or mar in the rim may
prevent a good seal from forming and prevent the Pressure
Cooker from pressurizing properly.
4. Place the clean Lid Gasket in position inside the Pressure Cooker
Lid,make sure it is under Lid Lock Mechanism and the Steam
Vent inside the rim of the Lid.Make sure the HIGH/LOW Pressure
Level Indicator is properly assembled and the Gasket is securely
tucked inside the Lid opening.You may press the Gasket into
the Lid before using to make sure it is tight and able to
operate properly.
5. Place Lid onto the top of the Pressure Cooker Pan so that the
Lid Handle is slightly to the right of the Pressure Cooker Pan
Handle.Turn the Lid Handle clockwise until the two Handles are
together and facing you.The Lid Lock Button locks the Lid in
place. Make sure the Lid is properly seated on the rim of the
Pressure Cooker Pan and is securely
attached onto the Pan.
6. Turn the Pressure Regulator Valve on top
of the Lid to PRESSURE.
13
Page 15

7. Turn the Variable Temperature/Pressure Control to WARMING.
8. Plug the unit into a 120V AC wall outlet and press the (-) on the
ON/OFF Switch to turn the Pressure Cooker ON.The ON/OFF
Indicator Light will illuminate.
9. Turn the Variable Temperature/
Pressure Control to MAX/BROWNING.
CAUTION: NEVER LEAVE YOUR PRESSURE
COOKER UNATTENDED AT A
HIGH HEAT SETTING.
10. As soon as the pressure starts to build,however slight,the Pressure
Lift Pin will jiggle until it reaches full pressure and locks the Lid onto
the Pressure Cooker Pan.Do not try to remove the Lid until the
pressure has been safely released.The HIGH/LOW Pressure Level
Indicator will start to rise and some steam will escape from the
Pressure Regulator Valve.Wait for both rings to be visible on the
Pressure Level Indicator and a gentle steady flow of steam is
released from the Pressure Regulator Valve accompanied by a
loud hiss: the Pressure Cooker is now at full pressure.
11. Begin timing once the HIGH pressure is
reached.Follow the recipe or Cooking Guide,
allow food to cook for time specified.
NOTE: The amount of food being cooked will
determine how long it takes to bring the
Pressure Cooker up to full pressure.
12. Quickly turn the Variable Temperature/
Pressure Control to 7 - 8 (see illustration);
both rings will be visible,to maintain the
HIGH pressure.If you prefer to cook using
LOW pressure,turn the Variable
Temperature/Pressure Control to 6 - 7,
one ring will be visible.The constant
hissing sound and amount of steam will
fluctuate as the pressure changes.
Experience will teach you what setting
on your Pressure Cooker to use to
maintain the proper pressure.
IMPORTANT: If the heat is too high, there is a
constant very loud hissing.You
MUST turn the heat down. TOO
MUCH HEAT CAN RESULT IN
EXCESSIVE LOSS OF COOKING
LIQUID.
Operating Instructions ( C o n t i n u e d )
Both rings are visible
when cooking under
HIGH Pressure
Reduce heat to 7 - 8 to
maintain HIGH pressure
Reduce heat to 6 - 7 to
maintain LOW pressure
14
Page 16

Conseils utiles
La vapeur d’eau ne sort pas du tube du conduit d’évacuation.
Solution : • Le couvercle de la cocotte-minute n’est pas fermé
Le couvercle de la Cocotte-Minute ne s’ouvre pas
Solution : • Il faut dépressuriser de manière à ce que toute la
Toute l’eau s’est évaporée de la Cocotte-Minute avant que les
ingrédients soient cuits.
Solution : • Le Bouton de commande réglable de la
13. When the food has cooked under proper pressure for the
required length of time,turn the Variable Temperature/
Pressure Control to WARMING.Press the (O) on the ON/OFF
Switch,the ON/OFF Indicator Light will turn off.Unplug the unit.
14. Release pressure using either the Natural Steam Release or
Quick Steam Release Feature, following the procedures
d e s c ribed in the Steam Release Methods section of this ma n u a l .
NOTE: Cooking times listed in this book are only guidelines.
Personal preferences vary; adjust cooking times
accordingly.
CAUTION: Always use the Cool Touch Handles to move the Pressure
Cooker Pan.
15. Wait until the pressure has totally been released from the
Pressure Regulator Valve and the HIGH/LOW Pressure Level
Indicator and the Pressure Lift Pin has dropped.
CAUTION: The HIGH/LOW Pressure Level Indicator and the Pressure
Lift Pin will be UP when the Pressure Cooker is under
pressure. When the pressure is released, the Pressure Lift
Pin will drop DOWN. NEVER attempt to open the Lid while
they are in the UP position.
CAUTION: Escaping steam can scald you, and the Lid will be hot.
Release steam where it will not cause damage to
cabinets or kitchen equipment/accessories.
16. To remove the Pressure Cooker Lid,pressure must be released
before opening.When pressure is completely reduced,slide the
Lid Lock Button towards you,twist the Lid counter-clockwise until
the Lid can be removed easily. Always tilt the Lid away from you
to avoid the steam.
CAUTION: Never force the Pressure Cooker Lid open. The Safety
Lock will not release if any steam pressure remains in the
Pressure Cooker. If the Lid is difficult to remove, allow the
Pressure Cooker more time to cool down until the
pressure is fully reduced.
CAUTION: Proper care must be taken with hot cookware. Be careful
not to come in contact with hot Pressure Cooker Pan, Lid
and accessories. Use protective mitts or gloves to move
hot Pan. When opening a hot Pan, use special caution.
Escaping steam is hot and can cause burns.
15
Operating Instructions ( C o n t i n u e d )
Page 17
Steam Release Methods
NATURAL STEAM RELEASE METHOD
1. After pressure cooking, turn the Variable
Temperature/Pressure Control to
WARMING. Press the (O) on the ON/OFF
Switch,the ON/OFF Indicator Light will
turn off.Unplug the unit.
2. Allow the Pressure Cooker to cool slowly
at room temperature.Depending on the
amount and type of food,this will take
5 to 20 minutes.Wait until the pressure has totally been
released from the Pressure Regulator Valve and the
HIGH/LOW Pressure Level Indicator and the Pressure Lift Pin
has dropped.
3. To remove the Pressure Cooker Lid,slide the Lid Lock Button
towards you,twist the Lid counter-clockwise until the Lid can
be removed easily. Always tilt the Lid away from you to
avoid the steam.
CAUTION: Never force the Pressure Cooker Lid open. The Safety
Lock will not release Lid if any steam pressure
remains in the Pressure Cooker. If the Lid is difficult to
open, allow the Pressure Cooker more time to cool
down until the pressure is fully reduced.
CAUTION: Proper care must be taken with hot cookware. Be
careful not to come in contact with hot Pressure
Cooker Pan, Lid and accessories. Use protective mitts
or gloves to move hot Pan. When opening a hot Pan,
use special caution. Escaping steam is hot and can
cause burns.
WARNING: The Pressure Cooker Pan and Lid remain very hot
after cooking.
16
Page 18
TEMPS DE CUISSON A HAUTE PRESSION
Haricots Temps Eau Contenance
et Légumineuses de cuisson + 1 c.à soupe une
Haricots Adzuki secs, 1 verre 12 à 14 mn. 3 verres 2 verres
Haricots noirs secs 18 à 22 mn. 3 verres 2 verres
Haricots aux yeux noirs 1 verre, 18 à 20 mn. 3 verres 2 verres un quart
Pois chiches secs 1 verre, 23 à 25 mn 3 verres 2 verres et demi
Haricots Great Northern secs 10 à 12 mn. 3 verres 2 verres et demi
Haricots rouges
ou blancs secs, 1 verre 13 à 15 mn. 3 verres 2 verres
Lentilles vertes, marrons
ou rouges séches, 2 verres 11 à 13 mn. 3 verres 4 verres
Petits haricots
blancs secs, 1 verre 13 à 15 mn. 3 verres 2 verres
Haricots Pinto secs 1 verre 10 à 12 mn. 3 verres 2 verres un quart
* Ajouter une cuillerée à soupe d’huile végétale à l’eau de manière à produire
moins de mousse.
•
Valable pour l’ensemble des haricots secs et légumineuses, à l’exception des
lentilles : Suivre les instructions indiquées sur le paquet pour effectuer un
prétrempage toute une nuit ou faire bouiillir quelques instants, pour faire
tremper, et pour égoutter.
Les temps de cuisson réels peuvent varier en fonction de la fraîcheur des
haricots et des goûts personnels de chacun.
QUICK STEAM RELEASE METHOD
1. After pressure cooking,turn the Variable
Temperature/Pressure Control to
WARMING, press the (O) on the ON/OFF
Switch,the ON/OFF Indicator Light will
turn off. Unplug the unit.
2. You can release pressure quickly,
without waiting for the steam to
dissipate,or the Pressure Cooker to
cool down by using the Pressure
Cooker’s STEAM RELEASE feature.
Wearing oven mitts,press the Pressure
Regulator Valve in and rotate
clockwise to the STEAM RELEASE position.To stop the release of
steam,rotate back to the PRESSURE position.
CAUTION: To avoid scalding, release steam in short bursts by pushing
the Pressure Regulator Valve momentarily.
CAUTION: When using this feature, only release the steam IN
SHORT BURSTS until the pressure is reduced, as hot
liquid may be ejected.
CAUTION: Keep hands and face away from the Pressure Regulator
Valve and Steam Vent Tube as hot steam will be released.
Use oven mitts.
CAUTION: The Pressure Regulator Valve may be hot. Use an oven mitt
or kitchen towel to protect your hand. Handle with care.
Never run water over or immerse the Pressure Cooker in
water to release pressure.
CAUTION: Escaping steam can scald you, and the Lid will be hot.
Release steam where it will not cause damage to
cabinets or kitchen equipment/accessories. Keep
face away from the Pressure Regulator Valve when
releasing steam.
WA R N I N G :
DO NOT GO PAST THE STEAM POSITION to the CLEAN position.
CAUTION: Do not use the Quick Steam Release Feature for foods
containing alot of liquid.There could be an overflow.
3. Use this method for some pressure cooking such as fruits,soft
vegetables and frozen vegetables.
4. It will take 2-5 minutes for pressure to go down completely.Wait
for the steam to stop coming out of the Pressure Regulator
Valve’s Steam Vent Tube.Then wait for the Pressure Level
Indicator and the Pressure Lift Pin to drop down before opening
the Lid, following the procedures described in the Pressure
Cooking Operating Instructions section of this manual.
17
Page 19
I m p o rtant Safety Information
For best results,always check that the Pressure Regulator Valve,
Pressure Indicator Valve,HIGH/LOW Pressure Level Indicator and
Gasket,Lid Gasket and Lid Lock Button are in good working order
and that there are no foreign particles blocking the Steam Vent
Tube,Pressure Lift Pin,Safety Valves or Steam Vent.
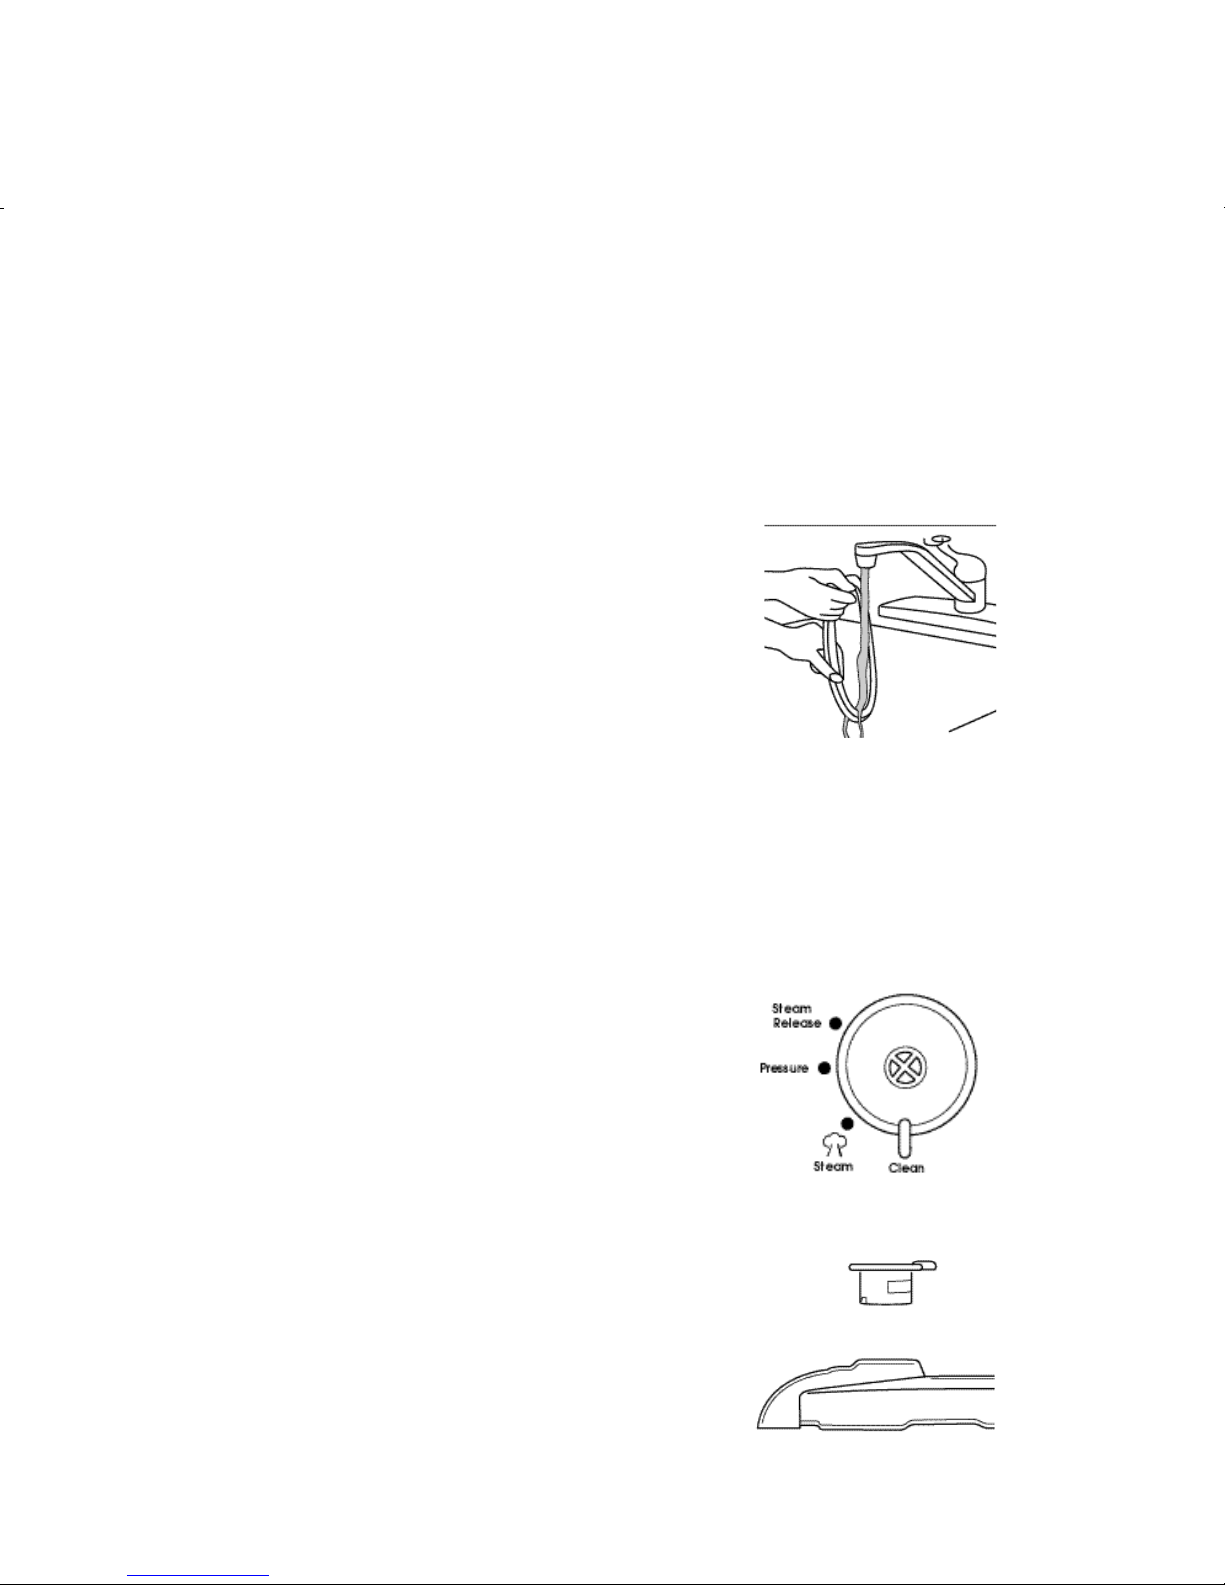
To expose the Steam Vent Tube,
the Pressure Regulator Valve
must be removed.
1. Press down and turn
the Pressure Regulator Valve
counter-clockwise to the
CLEAN Position until it stops.
Lift up on the Pressure
Regulator to remove easily.
Hold the Lid up to the light.
You should be able to see light
through the Steam Vent Tube.
2. If you cannot see light,the
Steam Vent Tube is blocked.
Insert the Cleaning Brush into
the Steam Vent tube and
gently move it in and out until
you are sure the Tube is clear.
3. Replace the Pressure Regulator
Valve.Line the notches on the
bottom of the Pressure
Regulator with the grooves in
the Lid.Press down and rotate
the Regulator clockwise until it
is in position.
CAUTION: Never disassemble
Pressure Regulator or
clean the Steam Vent
Tube when Pressure
Cooker is in use.
All Pressure Release Valve Systems are produced with the utmost
quality and standards.
18
Turn Pressure Regulator
Valve to CLEAN position
Lift Pressure Regulator
Valve for easy removal
Clean Pressure Regulator
Valve using the
Cleaning Brush.
Cleaning Brush
(P/N 21100A)
Page 20

TEMPS DE CUISSON DES LEGUMES FRAIS
Légumes frais Temps
Bonnets de prêtre, 905 g coupés en 2 10 à 11 mn. 1 verre et
demi
Courges, spaghetti, 905 g coupés en 2 18 à 20 mn. 1 verre et
demi
Courge d'été, courgette
ou courgette de Nice en tranches d'1 cm 2 à 3 mn. 1 verre
Papate douce de 2,5 cm d’épaisseur, tranchée 8 à 10 mn. 1 verre
Bettes à côtes grossièrement hachées 3 à 4 mn. 1 verre
Tomates en quartiers 2 à 3 mn. 1 verre
Petits navets en quartiers 4 à 6 mn. 1 verre
Navets de 3,8 cm, en morceaux 4 à 6 mn. 1 verre
TEMPS DE CUISSON A BASSE PRESSION
METHODE D’EVACUATION RAPIDE DE LA VAPEUR
Légumes surgelés Temps
Asperges 2 mn. 1 verre
Haricots verts, beurre ou très fins, coupés 1 mn. 1 verre
Haricots de Lima 2 mn. 1 verre
Têtes ou pointes de brocolis
coupés en morceaux 2 mn. 1 verre
Choux de Bruxelles 2 mn. 1 verre
Têtes de chou-fleur 1 mn. 1 verre
Grains de maïs 1 mn. 1 verre
Epis de maïs 2 à 3 mn. 1 verre
Légumes variés 2 mn. 1 verre
Poids non cassés 1 mn. 1 verre
Pois et carottes 1 mn. 1 verre
Epinards 1 mn. 1 verre
• En ce qui concerne les légumes surgelés mentionnés dans la liste, il est
recommandé d’utiliser 1 verre de liquide. Si vous en utilisez davantage, le
liquide risque de déborder de la soupape de régulation de la pression lorsque
la pression commence à retomber.
MAXimum Fill Line: The line inside the Pressure Cooker Pan
indicates the Pressure Cooker is 2/3 full.
For most foods, it is safe to fill the Pressure Cooker Pan 2/3 full.
When cooking foods that expand,such as rice,dry beans and
legumes or recipes containing these foods, do not fill the Pressure
Cooker Pan more than 1/2 full.Fill only 1/2 full when cooking
stocks or soups.
CAUTION: NEVER fill the Pressure Cooker Pan with food or liquid
beyond the 2/3 MAX Fill Line. Overfilling the Pressure
Cooker with food may result in preventing the steam
from being released through the Pressure Lift Pin and
Pressure Regulator Valve.Do not let any portion of food
extend above the MAX Fill Line.
19
I m p o rtant Safety Information ( C o n ’t . )
Page 21
User Maintenance Instru c t i o n s
This appliance contains no user serviceable parts. Do not try to repair
it yourself.Any servicing requiring disassembly other than cleaning
must be performed by a qualified appliance repair technician.
Always remember to unplug the unit from the wall outlet when not in
use and before cleaning.
CLEANING AND STORAGE INSTRUCTIONS
Before using for the first time and after each use,wash all Pressure
Cooker parts by hand.Always unplug unit and allow to cool
completely before cleaning.
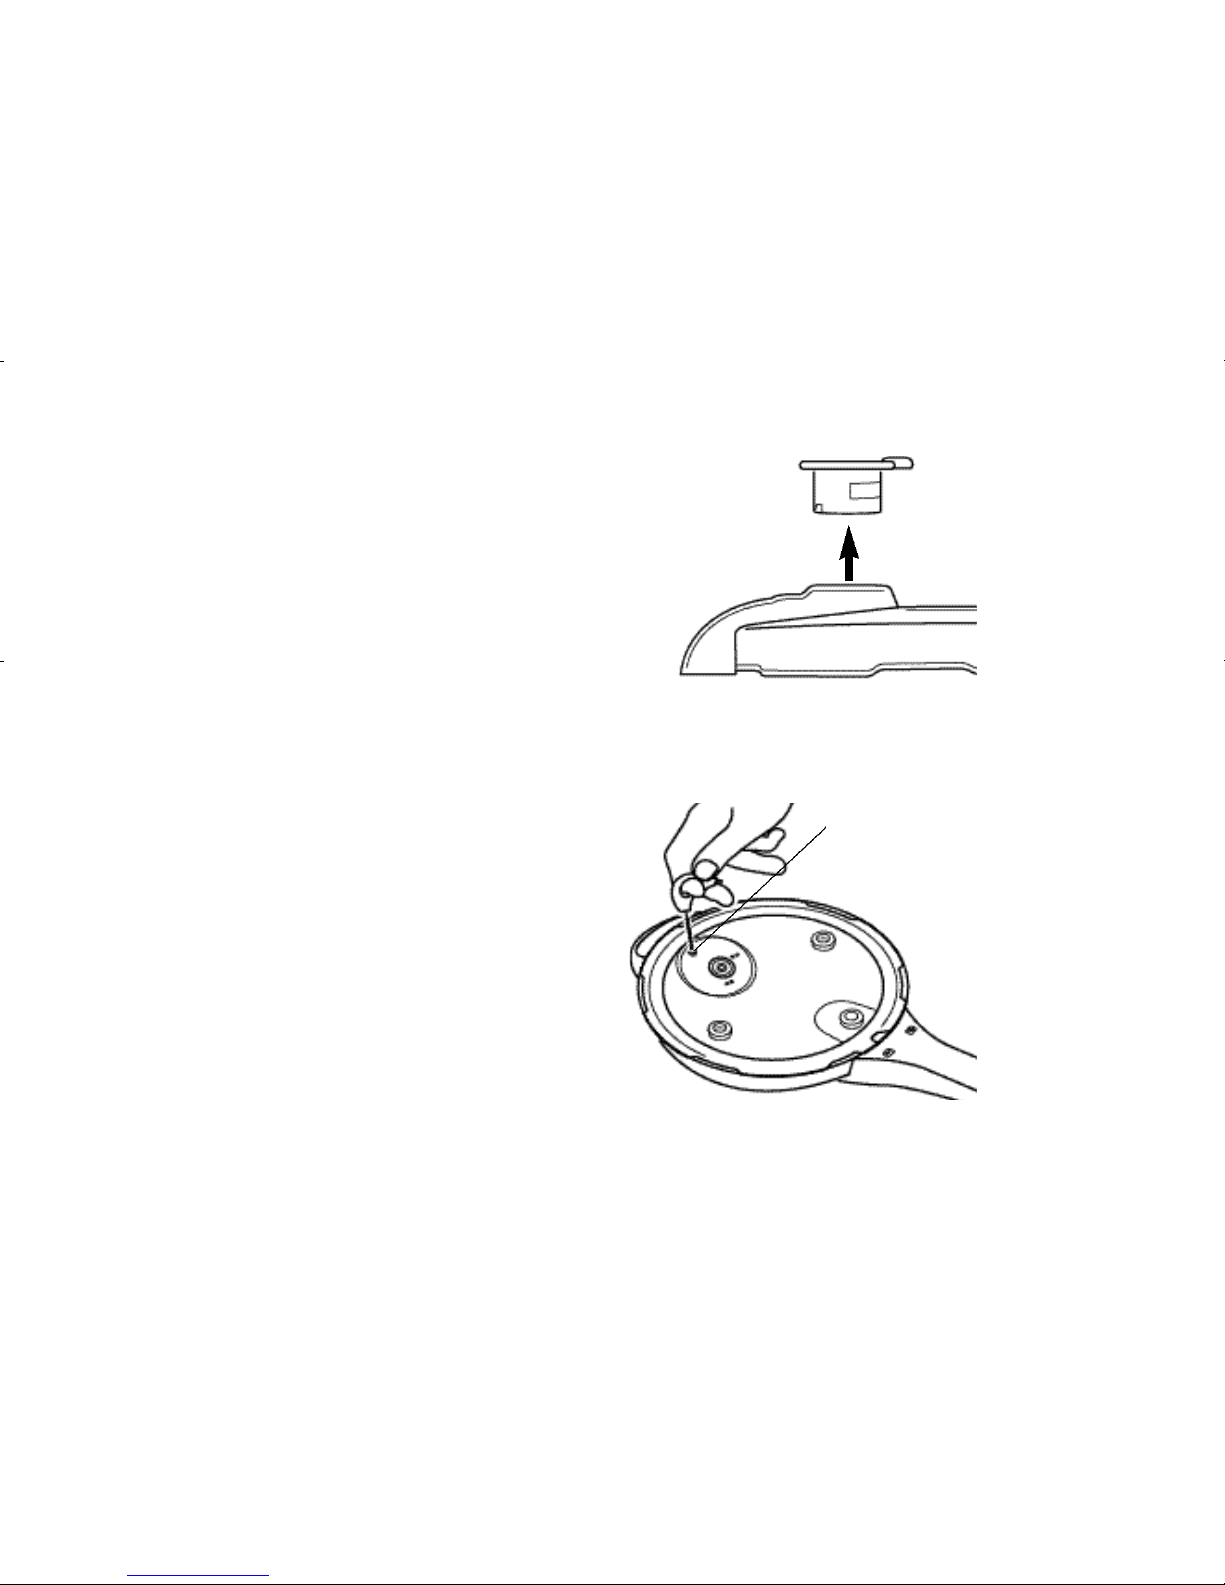
1. Remove the Lid Gasket and the HIGH/LOW
Pressure Level Indicator from the Lid. Wash
Gaskets thoroughly in hot,soapy water.
Rinse and dry thoroughly. Apply a thin
coating of vegetable oil to each Gasket
after each use.This will extend the life of the
Gasket.Slip the Gasket back in place on
the inside of the Lid.
2. The Gaskets that fit inside the Lid may
become worn after many uses. If one becomes torn,cracked,cut
or visibly damaged,DO NOT USE THE PRESSURE COOKER.Call
Consumer Service at 800-233-9054 to order a new Gasket.If the
Pressure Indicator Valve Gasket becomes damaged,the Lid must
be sent in for repair or replacement.
3. Clean around the openings of the Pressure Level Indicator and
Gasket,Pressure Lift Pin and Lift Pin Gasket with warm soapy
water to keep it free of grease or food
particles that could keep it from operating
properly. Rinse and dry thoroughly.
4. To expose the Steam Vent Tube,the
Pressure Regulator must be removed.
Press down and turn the Pressure
Regulator counter-clockwise to the
CLEAN position,until it stops. Lift up on
the Pressure Regulator and remove.
Hold the Pressure Cooker Lid up to the
light to make sure the Steam Vent Tube is
clear. If the Steam Vent Tube is blocked,
carefully insert the Cleaning Brush into the
Steam Vent Tube and run it gently in and
out to clear any obstructions.Wash again
with soapy water,rinse and dry thoroughly.
(See Important Safety Information.)
20
Page 22

TEMPS DE CUISSON A BASSE PRESSION
METHODE D’EVACUATION RAPIDE DE LA VAPEUR
Fruits de mer Temps Liquide
Petites coques 1 à 1 mn.
Moules 2 à 4 mn. 1 verre
Grosses Crevettes 0 à 1/2 mn. 1 verre
Poisson entier, 250 g à 900 g, vidé 4 à 6 mn. 1 verre
Steaks de poisson de 2,5 cm d’épaisseur 4 à 6 mn. 1 verre
TEMPS DE CUISSON A HAUTE PRESSION
METHODE D’EVACUATION RAPIDE DE LA VAPEUR
Légumes frais Temps
Asperges entières épaisses 4 à 5 mn. 1 verre
Asperges entières fines 2 à 3 mn. 1 verre
Haricots verts ou beurre, entiers
ou en morceaux 9 à 13 mn. 1 verre
Haricots de Lima dans leur cosse 3 à 4 mn. 1 verre
Bettes entières de taille moyenne 20 à 25 mn. 2 verres
Têtes de brocolis 2 à 3 mn. 1 verre
Pointes de brocolis 3 à 4 mn. 1 verre
Choux de Bruxelles entiers 5 à 6 mn. 1 verre
6. Wash the Pressure
Regulator under
running water.
7. Check spring-loaded
part before replacing.
8. Align the Pressure Regulator at the CLEAN position,press down
and turn clockwise to secure the Pressure Regulator in place
for storage.
9. When the unit has cooled after cooking, remove food residue
with a paper towel,then wipe with hot,sudsy sponge and
rinse.Dry with a soft cloth or paper towel.Never use harsh
chemical detergents, scouring pads or powders on any of the
parts or components of this Pressure Cooker.
WARNING: DO NOT IMMERSE THE PRESSURE COOKER PAN IN WATER
OR ANY OTHER LIQUID.
NOTE: Do not place the Pressure Cooker Lid, Pressure
Regulator Valve parts, Pressure Level Indicator parts, Lid
Gasket or Pressure Cooker Pan in the dishwasher.
10. The HIGH/LOW Pressure Level Indicator should be cleaned
after each use.Remove the round Pressure Level Indicator
Gasket from the bottom of the lid.With one hand on the
inside of the Lid,press the spring-loaded black cap upwards
into the red Indicator rod while gently rotating the red rod
clockwise until it can be easily removed.You may then
remove the black cap and the spring inside.Clean the area
thoroughly.Reassemble when cleaned.Make sure the
HIGH/LOW Pressure Level Indicator is properly assembled and
the Gasket is securely tucked inside the Lid opening.Press the
Gasket into the Lid opening before using to make sure it is
tight and able to operate properly.
11. Store the Pressure Cooker with the Pressure Cooker Lid off or
upside-down on the Pan.Do not store the Pressure Cooker
with the Pressure Cooker Lid and Lid Gasket closed tightly on
the Pan.
12. For increased safety and best results, the Lid Gasket,Pressure
Level Indicator Gasket and Pressure Lift Pin Gasket should be
replaced every 12 months.For ordering information, call
Consumer Service at 1-800-233-9054.
21
User Maintenance Instructions ( C o n ’t . )
Page 23

SUGGESTED COOKING TIMES
The following cooking times are provided as a guide to be
used when cooking in the Russell Hobbs® Electric Cool Touch
Pressure Cooker. Cooking times can vary depending on the
quality and the individual piece sizes of the food being
cooked; maximum and minimum cooking times are given in
some instances.Cooking time for vegetables will vary
depending on size,freshness,and variety of vegetables.
When uncertain how long to cook something,always start
with the shortest cooking time because you can always
continue cooking for additional time until the desired texture
is reached.
All cooking times listed begin once full pressure is reached.
Use your own heat-resistant steaming basket in the bottom of
the Pressure Cooker Pan to hold food while pressure cooking
or steaming.
FOODS THAT SHOULD NOT BE COOKED UNDER
PRESSURE ARE:
Applesauce,cranberries, rhubarb, macaroni,spaghetti or
other pasta,dried soup mixes,oatmeal or other cereals,
grains,pearl barley, split peas or any dried beans, peas or rice
not listed on the Cooking Charts.These foods tend to expand,
foam,or froth and may block the Pressure Lift Pin and Pressure
Regulator Valve’s Steam Vent Tube.
NOTE: The USDA recommends that ground turkey and chicken
be cooked to an internal temperature of 165ºF and
ground beef, veal, lamb and pork be cooked to an
internal temperature 160ºF. Meats such as beef and
lamb, etc. should be cooked to an internal temperature
of at least 145ºF. Pork should be cooked to an internal
temperature of at least 160ºF and poultry products
should be cooked to an internal temperature of 170ºF-
180ºF to be sure any harmful bacteria has been killed.
When re-heating meat/poultry products, they should
also be cooked to an internal temperature of 165ºF.
22
Page 24

Lorsque vous ne savez pas combien de temps il faut pour faire
cuire un ingrédient donné,toujours commencer par le temps de
cuisson minimum dans la mesure où vous pouvez toujours
prolonger le temps de cuisson jusqu’à ce que l’aliment soit cuit.
L’ensemble des temps de cuisson mentionnés est indiqué à partir
du moment où la pression est maximale.Utiliser votre panier
thermorésistant que vous placerez au fond de la cuve de la
Cocotte-Minute pour maintenir les ingrédients en place durant le
processus de cuisson sous pression ou à la vapeur.
INGREDIENTS QUI NE PASSENT PAS
A LA COCOTTE-MINUTE :
La compote de pommes, les airelles, la rhubarbe,les petites
pâtes,les spaghetti ou tout autre type de pâtes, les soupes en
sachet,l’avoine et les autres céréales, les graines, le boulgour,les
pois cassés ou tout autre type de haricots secs, les pois et le riz qui
ne figurent pas dans la liste des Tableaux de cuisson.Ces aliments
ont tendance à gonfler ou à mousser et pourraient bloquer le
taquet de compression et le tube du conduit d’évacuation de la
soupape de régulation de la pression.
REMARQUE : L’ U S DA recommande de fa i re cuire la dinde et le
MEAT & POULTRY
HIGH PRESSURE COOKING TIMES
NATURAL STEAM RELEASE
Meat & Poultry Cooking Time Cooking
Liquid
B e e f / Veal/Pork chuck, pot, rump roast or brisket,
2 to 4 lbs., 1-1/2 to 2 in. thick 50 to 65 min. 2-1/2 cups
B e e f / Veal/Pork chuck, pot, rump roast or brisket,
2 to 4 lbs., 2 to 3 in. thick 70 to 85 min. 3 cups
Beef, corned, 2 to 3 lbs. 60 to 70 min. 2-1/2 cups
Beef, round steak, 2 lbs., 1/2 in. thick 18 to 20 min. 1-1/2 cups
Beef, stew meat, 1 in. cubes 15 to 20 min. 1-1/2 cups
Meatballs, up to 2 lbs., browned 8 to 10 min. 1 cup
Pork or Beef ribs, 2 to 3 lbs. 25 to 35 min.
1-1/2
cups
Chicken, whole, 3 to 4 lbs. 25 to 35 min.
1-1/2
cups
Chicken, pieces, 2 to 3 lbs. 12 to 15 min. 1 cup
Cornish Hens, 2 25 to 30 min.
1-1/2
cups
• Do not pressure cook meat that is more than 3 in. thick.
It will not cook evenly.
23
Page 25

SHELLFISH & FISH
LOW PRESSURE COOKING TIMES
QUICK STEAM RELEASE
Seafood Cooking
Cooking
Time
Liquid
Clams, baby 1 to
1-1/2
min. 1 cup
Mussels 2 to 4 min. 1 cup
Shrimp, large 0 to 1/2 min. 1 cup
Fish, whole, 1/2 to 1 lb., cleaned 4 to 6 min. 1 cup
Fish, steaks, 1 in. thick 4 to 6 min. 1 cup
FRESH VEGETABLES
HIGH PRESSURE COOKING TIMES
QUICK STEAM RELEASE
Fresh Vegetables Cooking
Cooking
Time
Liquid
Asparagus, thick whole 4 to 5 min. 1 cup
Asparagus, thin whole 2 to 3 min. 1 cup
Beans, green or wax, whole or piece 9 to 13 min. 1 cup
Beans, lima, shelled 3 to 4 min. 1 cup
Beets, medium, whole 20 to 25 min. 2 cups
Broccoli, florets 2 to 3 min. 1 cup
Broccoli, spears 3 to 4 min. 1 cup
Brussels Sprouts, whole 5 to 6 min. 1 cup
24
Page 26

2. Le joint qui se loge à l’intérieur du couvercle peut devenir
usagé au bout d’un certain nombre d’utilisations. S’il se
déchire,est fendu,coupé ou abîmé d’une manière visible,ne
pas utiliser la cocotte-minute.Contacter le Service
Consommateurs au 800-233-9054 pour commander un
nouveau joint.Si le joint de la soupape d’indication de
pression est abîmé,le couvercle doit être renvoyé afin d’être
réparé ou remplacé.
3. Nettoyer le pourtour des ouvertures de
l’indicateur de niveau de pression et son
joint,ainsi que du taquet de compression
et son joint à l’eau chaude savonneuse,
de manière à ce que le fonctionnement
de l’appareil ne soit pas entravé par du
gras ou des particules d’aliments.Rincer
et sécher soigneusement.
4. Pour que le tube du conduit
d’évacuation soit visible,il faut retirer la
soupape de régulation de la pression.
Appuyer et faire tourner la soupape de
régulation de la pression dans le sens
inverse des aiguilles d’une montre jusqu’à
la position de nettoyage ‘CLEAN’,jusqu’à
ce qu’elle s’arrête.Soulever le régulateur de pression de
manière à pouvoir le retirer sans forcer.
Placer le couve rcle à la lumière pour vous assurer que le tube du
conduit d’évacuation est bien pro p re .S’il était bloqué,i n s é re r
a vec précaution la brosse de nettoyage à l’intérieur du tube du
conduit d’évacuation et effectuer un mouvement de va - e t - v i e n t
jusqu’à ce que le tube soit pro p re .L a ver à nouveau à l’eau
s a vo n n e u s e ,rincer et
sécher soigneusement
( Voir les Info rmations de
s é c u rité import a n t e s ) .
5. Nettoyer le régulateur
de pression sous l’eau
courante.
6. Vérifier la pièce à
ressort avant de la
remettre en place.
7. Aligner le régulateur de pression sur la position de nettoyage
‘CLEAN’,appuyer et tourner dans le sens des aiguilles d’une
montre de manière à fixer solidement le régulateur de
pression avant de ranger l’appareil.
Cabbage, red or green, 1/4 in. shreds 2 to 3 min. 1 cup
Cabbage, red or green, quartered 10 to 12 min. 1 cup
Carrots, whole 6 to 8 min. 1 cup
Carrots, 1 in. chunks 4 to 5 min. 1 cup
Carrots, 1/4 in. slices 1 to 2 min. 1 cup
Cauliflower, florets 1 to 2 min. 1 cup
Collard Greens, coarsely chopped 7 to 9 min. 1 cup
Corn, on-the-cob 7 to 9 min. 1 cup
Corn, kernels 2 to 3 min. 1 cup
Eggplant, 1/2 in. chunks 1/2 to 1 min. 1 cup
Escarole, coarsely chopped 1 to 2 min. 1 cup
Okra, small pods 3 to 4 min. 1 cup
Onions, whole 1-1/2 in. diameter 3 to 4 min. 1 cup
Parsnips,1 in. chunks 4 to 6 min. 1 cup
Peas, shelled 2 to 3 min. 1 cup
Potatoes, whole new 1-1/2 to 2 in. 7 to 9 min. 1 cup
Potatoes, whole new 2 to 3 in. 11 to 14 min. 1 cup
Potatoes, 1-1/2 in. chunks 7 to 9 min. 1 cup
Pumpkin, 2 in. chunks 10 to 13 min. 1 cup
Rutabaga, 1 in. chunks 6 to 8 min. 1 cup
Spinach, fresh, coarsely chopped 1 to 2 min. 1 cup
Spinach, fresh, whole leaves 2 to 3 min. 1 cup
Squash, acorn, halved 10 to 12 min. 1 cup
Squash, butternut, 1 in. chunks 6 to 7 min. 1 cup
Squash, pattypan, 2 lbs. halved 10 to 11 min. 1-1/2 cups
Squash, spaghetti, 2 lbs. halved 18 to 20 min. 1-1/2 cups
Squash, summer, zucchini
or yellow, 1/2 in. slices 2 to 3 min. 1 cup
Sweet Potato, 1 in. slices 8 to 10 min. 1 cup
Swiss Chard, coarsely chopped 3 to 4 min. 1 cup
Tomatoes, quartered 2 to 3 min. 1 cup
Turnips, small quartered 4 to 6 min. 1 cup
Turnips, 1-1/2 in. chunks 4 to 6 min. 1 cup
25
FRESH VEGETABLES COOKING TIMES
Fresh Vegetables Cooking Time Water
Page 27

FROZEN VEGETABLES
LOW PRESSURE COOKING TIMES
QUICK STEAM RELEASE
Frozen Vegetables Cooking Time Water
Asparagus 2 min. 1 cup
Beans, green, wax or French cut 1 min. 1 cup
Beans, lima 2 min. 1 cup
Broccoli, chopped, florets, or spears 2 min. 1 cup
Brussels Sprouts 2 min. 1 cup
Cauliflower, florets 1 min. 1 cup
Corn, kernels 1 min. 1 cup
Corn, on the cob 2 to 3 min. 1 cup
Mixed Vegetables 2 min. 1 cup
Peas (not split) 1 min. 1 cup
Peas and Carrots 1 min. 1 cup
Spinach 1 min. 1 cup
•
For the frozen vegetables listed, 1 cup liquid is recommended. If more than
1 cup liquid is used, there may be excess liquid released through the Pressure
Regulator Valve as the pressure is released.
26
Page 28

I n f o rmations de sécurité
i m p o rtantes
Pour des résultats optimaux,toujours veiller à ce que la soupape
de régulation de la pression,la soupape d’indication de pression,
l’indicateur de haute/basse pression et son joint,le joint du
couvercle et le bouton de verrouillage du couvercle soient en
bon état de marche et qu’aucun corps étranger ne bloque le
tube du conduit d’évacuation,le taquet de compression,les
soupapes de sécurité et le conduit d’évacuation.
Pour que tube du conduit d’évacuation
soit visible, Il faut retirer la soupape de
régulation de la pression.
1. Appuyer et faire tourner la
soupape de régulation de la
pression dans le sens inverse des
aiguilles d’une montre jusqu’à la
position de nettoyage ‘CLEAN’,
jusqu’à ce qu’elle s’arrête.
Soulever le régulateur de pression
de manière à pouvoir le retirer sans
forcer. Placer le couvercle à la
lumière.Vous devriez voir la lumière
passer au travers du tube du
conduit d’évacuation.
2 . Si vous n’ap e rc evez pas de
l u m i è re ,c’est que le tube du
conduit d’évacuation est
b l o q u é .I n s é rer alors la brosse de
n e t t oyage à l’intérieur du
conduit d’évacuation et
e ffectuer un mouvement de va -
et-vient jusqu’à ce que le tube
soit pro p re .
3. Remettre la soupape de
régulation de la pression.Aligner
les fentes situées en bas du
régulateur de pression sur les rainures du couvercle.Presser et
faire tourner le régulateur dans le sens des aiguilles d’une
montre jusqu’à ce qu’il se retrouve à sa place.
FRESH FRUITS
LOW PRESSURE COOKING TIMES
QUICK STEAM RELEASE
Fresh & Dried Fruit Cooking Time Water
Apricots, fresh whole or halved 0 to 1 min.* 1 cup
Berries, fresh 0 to 1 min.* 1 cup
Cherries, fresh 0 to 1 min.* 1 cup
Peaches, fresh halved 1 to 2 min. 1 cup
Pears, fresh halved 1/2 to 1 min. 1 cup
Plums, fresh 2 to 3 min. 1 cup
Prunes (dried plums) 2 to 3 min. 1 cup
*
For fruits that cook for 1 minute or less: As soon as the pressure builds,
and the steam begins to hiss, start a timer and cook under pressure for
1 minute or less.
Turn the Variable Temperature/Pressure Control to
WARMING and unplug the unit.
27
Page 29

DRIED BEANS & LEGUMES
HIGH PRESSURE COOKING TIMES
NATURAL STEAM RELEASE
Beans & Legumes Cooking Water*
Yield
Time
+ 1 Tbl. Cooked
Veg.Oil
Adzuki, 1 cup dry 12 to 14 min. 3 cups 2 cups
Black Beans, 1 cup dry 18 to 22 min. 3 cups 2 cups
Black Eyed Peas, 1 cup dry 18 to 20 min. 3 cups 2-1/4 cups
Chickpeas (Garbanzo), 1 cup dry 23 to 25 min. 3 cups 2-1/2 cups
Great Northern Beans, 1 cup dry 10 to 12 min. 3 cups 2-1/4 cups
Kidney Beans, red or white, 1 cup dry 13 to 15 min. 3 cups 2 cups
Lentils, green, brown or red,2 cups dry 11 to 13 min. 3 cups 4 cups
Navy Beans 1 cup dry 13 to 15 min. 3 cups 2 cups
Pinto Beans, 1 cup dry 10 to 12 min. 3 cups 2-1/4 cups
*Add one tablespoon of vegetable oil to the water to reduce excess foaming.
• All dried beans and legumes, with the exception of lentils: Follow package directions
to pre-soak overnight or boil for a few minutes, soak and drain.
The actual cooking times may vary depending on how old the beans are and personal
preference.
28
Page 30

3. Pour retirer le couvercle de la Cocotte-Minute,faire glisser le
bouton de verrouillage du couvercle vers vous,puis faire
tourner le couvercle dans le sens inverse des aiguilles d’une
montre jusqu’à ce que le couvercle puisse être retiré sans
forcer.Toujours incliner le couvercle loin de vous afin d’éviter
d’entrer en contact avec la vapeur d’eau.
ATTENTION : Ne jamais forcer le couvercle de la Cocotte-Minute.
ATTENTION : Prendre les précautions qui s’imposent avant de
ATTENTION : La cuve de la Cocotte-Minute et le Couvercle restent
METHODE D’EVACUATION RAPIDE DE LA VAPEUR
1. Après la cuisson à la vapeur,tourner
le Bouton de commande réglable de
la température/pression sur
‘WARMING’,(Maintien au chaud)
Appuyer sur le (O) de l’interrupteur
de marche/arrêt ‘ON/OFF’,le voyant
de marche/arrêt ‘ON/OFF’ s’éteint.
Débrancher l’appareil.
2. Pour fa i re évacuer la pression rapidement et
sans avoir à attendre que la vapeur se soit
é c h ap p é e ,ou que la Cocotte-Minute ait
re f ro i d i ,utiliser la fonction ‘STEAM RELEASE’
( E vacuation de la vapeur) de l’ap p a re i l .Ave c
des ma n o q u e s,ap p u yer sur la soupape de
régulation de la pre s s i o n ,puis fa i re tourn e r
dans le sens des aiguilles d’une montre jusqu’à la position ‘ S T E A M
R E L E A S E ’ .Pour arrêter l’évacuation de la vap e u r,re m e t t re le
bouton sur la position ‘ P R E S S U R E ’( P re s s u ri s a t i o n ) .
RICE
HIGH PRESSURE COOKING TIMES
NATURAL STEAM RELEASE
Rice Cooking Water*
Yield
Time
+ 1 Tbl. Cooked
Veg. Oil
Rice, basmati, 1 cup dry 6 to 7 min. 1-1/2 cups 3 cups
Rice, white, converted
or long grain,
1 cup dry 7 to 8 min. 1-1/2 cups 3 cups
Rice, white, converted
or medium grain,
1 cup dry 6 to 7 min. 1-1/2 cups 3 cups
Rice, white, arborio
or short grain
1 cup dry 6 to 7 min. 1-1/2 cups 3 cups
Rice, brown, 1 cup dry 18 to 19 min. 2 cups 2-1/4 cups
Rice, wild, 1 cup dry 25 to 27 min. 3 cups 2-1/4 cups
Quinoa, 1 cup dry 6 to 7 min. 1-1/2 cups 3 cups
*Add one tablespoon of vegetable oil to the water to reduce excess foaming.
•
Actual cooking times may vary depending on how old the grain is and
personal preference.
•
Either water or bouillon may be used. Add one tablespoon of vegetable oil to the
water to reduce excess foaming.
•
A small amount of rice may stick to the bottom of the Pressure Cooker Pan. After
removing the cooked rice, fill the Pan immediately with water to soak.
29
Page 31

Helpful Hints
No steam comes out of the Steam Vent Tube.
Solution: • The Pressure Cooker Lid may not be tightly clamped
onto the Pan.
• Check to make sure that the Lid Gasket is in place
under the Steam Vent all the way around the Lid.
• Make sure that the Pressure Regulator Valve with
Steam Vent Tube,HIGH/LOW Pressure Level Indicator,
Pressure Indicator Safety Valve with Pressure Lift Pin,or
Safety Valves do not have any food clogging the
openings.
• At least 1 cup of water or other liquid must be used
when pressure cooking foods.
The Pressure Cooker Lid cannot be opened.
Solution: • All the pressure that had built up inside the Pressure
Cooker during cooking must be let out through the
Steam Vent Tube and the Pressure Indicator Safety
Valve with Pressure Lift Pin before the Lid can
be opened.
• Turn the Variable Temperature/Pressure Control to
WARMING, press the (O) on the ON/OFF Switch,the
ON/OFF Indicator Light will turn off.Unplug the unit.
Wait until the pressure has totally been released from
the Pressure Regulator Valve and the HIGH/LOW
Pressure Level Indicator and the Pressure Lift Pin has
dropped.
All the water evaporated from the Pressure Cooker before the
food was done.
Solution: • The Variable Temperature/Pressure Control may have
been set on too high during pressure cooking and
the water turned to steam too fast.
• Not enough water was placed into the Pressure
Cooker at the start of the cooking process.
• For pressure cooking,add at least 1 to 2-1/2 cups of
liquid to make sure you have enough liquid to cook
until done.
30
Page 32

I n s t ructions de fonctionnement
de la Cocotte-Minute ( S u i t e )
IMPORTANT : Si la température est trop
1 3 . L o rsque les aliments ont cuit le temps
n é c e s s a i re à la pression qui conv i e n t ,
t o u rner le Bouton de commande réglable de la
t e m p é ra t u re / p ression sur ‘ WA R M I N G ’(Maintien au chaud),
Appuyer sur le (O) de l’interrupteur de marche/arrêt
‘ON/OFF’,le voyant de marche/arrêt ‘ON/OFF’s’éteint.
Débrancher l’appareil.
1 4 . Fa i re tomber la pression en utilisant soit la bouche d’éva c u a t i o n
n a t u relle de la vap e u r,soit la commande d’évacuation rap i d e
de la vap e u r,en suivant la pro c é d u re décrite au chap i t re
‘Méthodes d’évacuation de la vap e u r ’du présent guide.
REMARQUE : Les temps de cuisson répert o riés dans ce livre ne sont
ATTENTION : Toujours utiliser la poignée à toucher froid pour retirer
15. Attendre qu’il n’y ait plus du tout de vapeur d’eau qui
s’échappe de la soupape de régulation de la pression et que
le taquet de compression se soit abaissé.
ATTENTION : L’indicateur de haute/basse pression et le taquet de
ATTENTION : La vapeur d’eau qui s’échappe peut causer des brûlure s
The Pressure Cooker Lid Gasket, the HIGH/LOW Pressure Level
Indicator Gasket and Pressure Lift Pin Gaskets are stiff.
Solution: • Apply a thin coating of vegetable oil to the
clean Gaskets after each use to keep them soft
and pliable.
• When the Gaskets are not soft and pliable or have
stretched so that they no longer fit easily into
position,it is time to replace them. New Gaskets
can be ordered by calling the Consumer Relations
Department at 800-233-9054.
• It is a good idea to replace both Gaskets every
12 months or more often if the Pressure Cooker is
used frequently.
The food is not done.
Solution: • Simply bring the Pressure Cooker back up to
pressure after checking to make sure there is
adequate liquid in the Pan and continue cooking
a few more minutes.
Adapting other pressure cooker recipes to the Russell Hobbs®
Pressure Cooker.
Solution: • Any pressure cooker recipe in which the recipe
calls for a PRESSURE setting of 10 to 15 pounds of
pressure may be used in the Russell Hobbs®
Pressure Cooker.
• Do not exceed the MAX Fill line for the food
being cooked.
31
Helpful Hints ( C o n t i n u e d )
Page 33

When should you use a Steaming or Cooking Rack?
Solution: • A steaming or cooking rack will keep the food above
the liquid used for pressure cooking.
• But if you want the foods to pick up more flavor from
the liquid,do not use a Steaming or Cooking Rack.
What should you do if froth comes out of the Steam Vent Tube
when pressure is being released?
Solution: • After pressure cooking,turn the Variable Temperature/
Pressure Control to WARMING,press the (O) on the
ON/OFF Switch,the ON/OFF Indicator Light will turn off.
Unplug the unit.
How can meat and vegetables be cooked together?
Solution: • Start pressure cooking the longer cooking meat first.
Turn the Variable Temperature/Pressure Control to
WARMING press the (O) on the ON/OFF Switch,the
Wait until the pressure has totally been released from
the Pressure Regulator Valve and the HIGH/LOW
Pressure Level Indicator and the Pressure Lift Pin have
dropped.Remove the Lid and add the vegetables.
Continue pressure cooking until all the food is done.
Why is there a trickle of moisture around the Steam Vent Tube,
Pressure Cooker Handles, Pressure Regulator Valve and/or Safety
Valves when the Pan is first heated?
Solution: • A small amount of moisture around these parts is
normal when first beginning to cook.This moisture
will disappear when the Pan is fully heated.
• The Lid Gasket must be in place inside the Lid and
the Lid closed tightly onto the Pan.
32
Helpful Hints ( C o n t i n u e d )
Page 34

I n s t ructions de fonctionnement
de la Cocotte-Minute (suite)
. La Cocotte-Minute Russell Hobbs
comprend un mode qui permet de
faire revenir ou dorer les aliments dans
la Cocotte avant de les faire cuire à
la vapeur.(Suivre la démarche
indiquée dans les Caractéristiques de
l’appareil : Chapitre‘Faire dorer les
aliments’de ce guide).
3 . S u i v re les indications de la recette ou du tableau ; re t i rer les
aliments dorés et/ou ajouter les autres ingrédients.To u j o u rs utiliser 1
à 3 ve r res d’eau,de bouillon,de vin,de jus de fruits ou de légumes,
ou d’un autre type de liquide avant de fa i re cuire à la vap e u r.N e
pas utiliser de lait,de produits laitiers ou de sauces contenant de la
c r è m e ,car ces produits ont tendance à roussir rap i d e m e n t .Ve i l l e r
à ce que le pourtour du plat soit pro p re et sec.Ne jamais tap e r
une cuillère ou tout autre ustensile sur le pourtour de la cuve de la
C o c o t t e - M i n u t e .Une indentation ou un éclat sur le pourt o u r
ri s q u e rait de compro m e t t re l’étanchéité de l’ap p a reil et
d’empêcher la Cocotte-Minute de fonctionner conve n ab l e m e n t
sous pre s s i o n .
4 . Placer le joint pro p re à l’intérieur du couve rcle de la Cocotte-
M i n u t e ,à l’endroit qui lui est réserv é ,sous le mécanisme de
ve r rouillage du couve rcle et du conduit d’éva c u a t i o n ,s u r
l ’ i n t é rieur du pourtour du couve rc l e .Veiller à ce que l’indicateur
de haute/basse pression soit assemblé correctement et que le
joint loge conve n ablement à l’intérieur de l’ouve rt u re du
c o u ve rc l e .Vous pouvez ap p u yer sur le joint à l’intérieur du
l ’ o u ve rt u re du couve rcle de ma n i è re à ce qu’il soit solidement en
place et qu’il fonctionne corre c t e m e n t .
5 . Placer le couve rcle sur la cuve de la Cocotte-Minute de ma n i è re
à ce que la poignée du couve rcle se tro u ve légèrement à dro i t e
de la poignée de la cuve de la Cocotte-Minute.To u rner la
poignée du couve rcle dans le sens des aiguilles d’une montre
jusqu’à ce que les deux poignées se rejoignent et se re t ro u vent en
face de vo u s.Veiller à ce que le couve rcle soit scellé
c o r rectement sur le pourtour de la cuve de la Cocotte-Minute et
qu’il soit fixé conve n ablement à la cuve .
6. Tourner la soupape de régulation de la pression située en
haut du couvercle sur la position ‘PRESSURE’(Pressurisation).
7. Tourner le Bouton de commande réglable de la
température/pression sur ‘WARMING’(Maintien au chaud).
Using your Pressure Cooker at altitudes above 2,000 feet
Add 1 cup of additional liquid when cooking at altitudes above
2,000 feet.The cooking time will also need to be increased by 5%
for every 1,000 feet beginning at an altitude of 3,000 feet.
Altitude/Feet Increase Suggested
Cooking Time by:
3,000 5%
4,000 10%
5,000 15%
6,000 20%
7,000 25%
8,000 30%
Converting a personal recipe to pressure cooking
• Compared to conventional cooking, foods cooked under
pressure will generally be done in approximately 1/3 of the
normal cooking time.
• The overall liquids called for in your personal non-pressure
cooker recipe,may need to be reduced.If too much liquid
remains at the end of the pressure cooking time,continue
cooking.Plug the unit into a 120V AC wall outlet. Turn the
Variable Temperature/Pressure Control to 6 - 7 heat and
`simmer uncovered to thicken.
• Use the charts and recipes pr ovided in this book as a guide for
pressure level,cooking times and liquids needed.
33
Helpful Hints ( C o n t i n u e d )
Page 35

R e c i p e s
FRESH GREEN BEANS WITH
NEW POTATOES AND HAM
1 tablespoon olive oil
1 cup chopped onion
1-1/2 pounds fresh green beans,cut into 1 inch pieces
1 pound new potatoes,scrubbed and quartered
1 cup cubed ham
1/2 teaspoon salt
1/8 teaspoon black pepper
2-1/2 cups water
1 teaspoon fresh chopped basil
1. Heat the oil in the Pressure Cooker Pan
on MAX/BROWNING.Add the onion
and sauté 5 to 7 minutes until onion is soft,
stirring frequently.
2. Add the remaining ingredients.
Stir to combine.
3. Cover with the Lid and set the Pressure
Regulator Valve to PRESSURE.Heat on
MAX/BROWNING until the HIGH/LOW
Pressure Level Indicator and the Pressure
Lift Pin raises.
4. When a steady flow of steam is released from
the Pressure Regulator Valve,reduce the
Variable Temperature/Pressure Control to 7 - 8
and cook at HIGH pressure 9 to 13 minutes or
until done.
5. Turn the Variable Temperature/Pressure Control
to WARMING and turn the Pressure Cooker OFF.
Unplug the unit.The POWER Indicator Light will
turn off. Allow the Pressure Cooker to cool
slowly at room temperature until the HIGH/LOW
Pressure Level Indicator and the Pressure Lift
Pin drops.
Makes 6 servings
34
Page 36

3.Ajouter la quantité d’huile nécessaire à la réalisation de la
recette dans la Cocotte-Minute.Brancher l'appareil dans une
prise murale de 120V CA,puis appuyer sur le (-) de
l'interrupteur de marche/arrêt 'ON/OFF' pour allumer la
Cocotte-Minute.Le voyant de marche/arrêt 'ON/OFF'
s'allume.Tourner le Bouton de commande réglable de la
température/pression sur ‘MAX/BROWNING’, position 7,8 ou 9.
4.Au bout de 5 minutes de préchauffage,ajouter les aliments et
commencer à les faire dorer sans le couvercle.
ATTENTION : Toujours surveiller la Cocotte-Minute lorsque vous
5.Lorsque les aliments ont suffisamment doré, vous pouvez soit
les retirer du plat et continuer la recette,soit ajouter les
ingrédients de la recette dans le plat de la Cocotte et
commencer la cuisson sous pression en suivant les instructions
de la recette.
6.Lorsque la cuisson est terminée,tourner le Bouton de
commande réglable de la température/pression sur
‘WARMING’(Maintien au chaud).Appuyer sur le (O) de
l’interrupteur de marche/arrêt ‘ON/OFF’,le voyant de
marche/arrêt ‘ON/OFF’s’éteint.Débrancher l’appareil.
CUISSON A LA VAPEUR
Cette fonction permet de faire rapidement bouillir le liquide de
manière à obtenir des légumes ou du riz cuits à la vapeur. Les
temps de cuisson sont semblables à la cuisson sur une cuisinière.
1.Brancher le cordon électrique dans la prise située en bas de
la Cocotte-Minute.
2.Pour faire cuire à la vapeur,placer les aliments au fond de la
Cocotte ou utiliser une petite grille thermorésistante ou
encore un panier (non inclus) que vous placerez au fond de
la cuve.Ajouter au moins 1 verre d’eau pour un temps de
cuisson allant jusqu’à 30 minutes. Ne pas remplir la Cocotte-
Minute au-delà de la graduation ‘MAX Fill’,c’est-à-dire au-
delà des deux-tiers de sa capacité.
3.Mettre le couvercle et le verrouiller sur la cuve de la Cocotte-
Minute en suivant les consignes du chapitre Conseils de
sécurité de ce guide.
4.Tourner la soupape de régulation de la pression située sur le
couvercle,sur la position ‘STEAM’(Vapeur).
NORTHERN BEAN AND HAM SOUP
1 cup dried Great Northern beans
2 cups water
2 (10-ounce) cans French Onion Soup
1 tablespoon vegetable oil
1 cup cubed ham
1/2 cup sliced celery
1/2 cup sliced carrots
1 tablespoon dried parsley
1 bay leaf
1/8 teaspoon salt
1/8 teaspoon black pepper
1. Soak beans overnight according to package directions .
2. Drain the beans and place into the Pressure Cooker Pan.
3. Add the remaining ingredients. Stir to
combine.
4. Cover with the Lid and set the Pressure
Regulator Valve to PRESSURE.Heat on
MAX/BROWNING until the HIGH/LOW
Pressure Level Indicator and the Pressure
Lift Pin raises.
5. When a steady flow of steam is
released from the Pressure Regulator
Valve,reduce the Variable Temperature/
Pressure Control to 7 - 8 and cook
at HIGH pressure10 to 12 minutes or
until done.
6. Turn the Variable Temperature/Pressure
Control to WARMING and turn the
Pressure Cooker OFF. Unplug the unit.The
Power Indicator Light will turn off.Use the
Natural Steam Release method. Wait until
the HIGH/LOW Pressure Level Indicator
and the Pressure Lift Pin drops..
Makes 6 servings
35
Page 37

SUNDRIED TOMATO AND
BLACK BEAN VEGETARIAN CHILI
1/2 cup dried black beans
1 tablespoon olive oil
1 cup chopped onion
1 teaspoon minced garlic
1 medium green pepper,cored,seeded and chopped
1 jalapeno pepper,cored seeded and chopped
3 carrots, chopped
2 teaspoons chili powder
1 teaspoon ground cumin
1/4 teaspoon dried oregano
2 (14.5-ounce) cans diced tomatoes
1-1/2 cups water
1 tablespoon vegetable oil
1/4 cup sundried tomatoes
1/2 teaspoon salt
1 tablespoon minced fresh cilantro
1. Soak beans overnight according to package directions. Drain
the beans and set aside.
2. Heat the oil in the Pressure Cooker Pan on
MAX/BROWNING.Add the onion, garlic,
peppers, carrot,chili powder,cumin and
oregano.Sauté 5 to 7 minutes until onion is
soft,stirring frequently.
3. Add the soaked beans, tomatoes, water,oil,
sundried tomatoes and salt.Stir to combine.
4. Cover with the Lid and set the Pressure
Regulator Valve to PRESSURE.Heat on
MAX/BROWNING until the HIGH/LOW
Pressure Level Indicator and the Pressure Lift
Pin raises.
5. When a steady flow of steam is released from
the Pressure Regulator Valve,reduce the
Variable Temperature/Pressure Control to 7 - 8
and cook at HIGH pressure 18 to 22 minutes or
until done.
6. Turn the Variable Temperature/Pressure Control to WARMING and
turn the Pressure Cooker OFF.Unplug the unit.The Power Indicator
Light will turn off.Use the Natural Steam Release method.Wait
until the HIGH/LOW Pressure Level Indicator and the Pressure Lift
Pin drops.
7. Serve with fresh cilantro.
Makes 6 servings
36
Page 38

INDICATEUR DE HAUTE/BASSE PRESSION (SUITE)
Pour faire cuire des aliments à basse pression,faire chauffer la
Cocotte-Minute à haute pression (les deux bagues sont alors
visibles),puis placer le Bouton de commande réglable de la
température/pression sur 6 – 7 de manière à à maintenir la basse
pression.Seule une bague reste alors visible.
Faire chauffer sur
‘MAX/BROWNING’sur
la position 7,8,ou 9, jusqu’à
ce que l’indicateur de
pression monte
Si l’indicateur de haute/basse pression est encrasé,il peut ne pas
fonctionner correctment.Consulter les Instructions d’entretien du
manuel pour tout renseignement relatif au nettoyage.
L’indicateur de niveau de pression monte et descent légèrement en
fonction des cycles de ma rche et d’arrêt de la Cocotte-Minute.
BOUTON DE COMMANDE REGLABLE
DE LA TEMPERATURE/PRESSION
Votre Cocotte-Minute possède un thermostat réglable qui
s’allume et s’éteint afin de maintenir une température constante.
Régler en fonction de vos préférences.Régler le programme en
fonction de la haute ou basse pression et des indications du
tableau ou de la recette.
Vous pouvez maintenir une haute pression de 15 psi tout en
conservant les deux bagues visibles sur l’indicateur de
haute/basse pression en tournant le Bouton de commande
réglable de la température/pression sur 7 – 8.Pour cuire à basse
pression,tourner le Bouton de commande réglable de la
température/pression sur 6 – 7 de manière à ce que l’une des
bagues soit visible.La position exacte du bouton de commande
dépend de la quantité et du type d’aliment que l’on cuisine.
HERBED CHICKEN WITH FRESH VEGETABLES
2 boneless-skinless chicken breast halves
1/4 teaspoon dried oregano
1/4 teaspoon dried basil
1/4 teaspoon salt
dash black pepper
1 cup chicken or vegetable stock,or
canned low sodium broth
2 medium red potatoes, scrubbed and quartered
2 carrots, quartered
2 ribs celery, quartered
1 leek,trimmed,washed well,light green
and white parts only,sliced thinly
1. Rub chicken with herbs, salt and black pepper.
2. Add the chicken broth,chicken and vegetables to the
Pressure Cooker Pan.
3. Cover with the Lid and set the Pressure
Regulator Valve to PRESSURE.Heat on
MAX/BROWNING until the HIGH/LOW
Pressure Level Indicator and the Pressure Lift
Pin raises.
4. When a steady flow of steam is released from
the Pressure Regulator Valve,reduce the
Variable Temperature/Pressure Control to 7 - 8
and cook at HIGH pressure12 to 15 minutes or
until done.
5. Turn the Variable Temperature/Pressure
Control to WARMING and turn the Pressur e
Cooker OFF. Unplug the unit.The Power
Indicator Light will turn off.Use the Natural
Steam Release method. Wait until the
HIGH/LOW Pressure Level Indicator and the
Pressure Lift Pin drops.
Makes 2 servings
37
Page 39

SAUERBRATEN
1/4 cup red wine vinegar
1/2 teaspoon salt
1/8 teaspoon pepper
1/2 teaspoon ground cloves
1 clove garlic,crushed
1-1/2 pound chuck or rump roast,2 inches thick
1 tablespoon vegetable oil
2 cups beef broth
1 large carrot,coarsely chopped
1 rib celery, coarsely chopped
1/2 large onion,coarsely chopped
1 bay leaf
1 cup crushed ginger snaps
1. Combine the red wine vinegar,salt,pepper,ground cloves,
crushed garlic and marinate the beef roast in a non-metal
container for several hours or overnight in the refrigerator.
2. Turn the Temperature Control Dial to MAX/
BROWNING and heat the oil in the Pressure
Cooker Pan.Remove the meat from the
marinade and place it in the Pressure Cooker
Pan,reserve the marinade.Brown the roast on
both sides.
3. Pour in the reserved marinade,beef
broth,carrot,celery, onion and bay leaf.
4. Cover with the Lid and set the Pressure
Regulator Valve to PRESSURE.Heat on
MAX/BROWNING until the HIGH/LOW Pressure
Level Indicator and the Pressure Lift Pin raises.
5. When a steady flow of steam is released from
the Pressure Regulator Valve,reduce the
Variable Temperature/Pressure Control to 7 - 8
and cook at HIGH pressure 50 to 60 minutes or
until done.
6. Turn the Variable Temperature/Pressure Control
to WARMING and turn the Pressure Cooker OFF. Unplug the unit.
The Power Indicator Light will turn off.Use the Natural Steam
Release method.Wait until the HIGH/LOW Pressure Level
Indicator and the Pressure Lift Pin drops.
7. Place the meat on a serving platter and cover with foil.Stir in
the crushed ginger snaps into the gravy,adding more broth as
necessary to make a gravy.Taste and adjust for salt.Slice the
meat across the grain into thick slices and serve with the gravy
on the side.
Makes 4 to 6 servings
38
Page 40

Pour votre sécurité, nous avons équipé la Cocotte-Minute de
4 soupapes d’évacuation de sécurité :
• Soupape de régulation de la pression à conduit d’évacuation
à tube.
• Soupape d’indication de la pression à taquet de compression
et joint
• 2 soupapes de sécurité
( Vapeur) ou à ‘ C L E A N ’( N e t t oyage) ,ou encore de ‘ P R E S S U R E ’à
‘STEAM RELEASE’( E vacuation de la vapeur) de ma n i è re à ce que la
vapeur s’échappe par petites bouff é e s.Cette soupape de
régulation de la pression a été calibrée en usine pour perm e t t re
une évacuation de la vapeur lorsque la Cocotte atteint un seuil de
p re s s u risation ma x i mum (de 15psi) préréglé en usine.
Retirer la soupape de régulation de la pression et la rincer à l’eau
tiède pour un nettoyage facile.(Voir le chapitre des Informations
de sécurité importantes de ce guide pour savoir comment retirer
la soupape).Si la soupape est usagée,il faut alors absolument la
remplacer.
ATTENTION : Ne jamais démonter la Soupape de régulation de la
L o rsque le taquet est en position haute,la Cocotte-Minute se
t ro u ve sous pre s s i o n .Vous ne pouvez pas re t i rer le couve rc l e .C e
système de sécurité sert également de Soupape d’évacuation de
la vap e u r,en éliminant un éventuel trop plein.Le joint du taquet de
c o m p ression doit venir se loger conve n ablement autour du taquet.
BURGUNDY BEEF STEW
1 pound beef stew meat,trimmed of all fat
and cut into 1 inch cubes
1 tablespoon olive oil
1 cup chopped onion
1 clove garlic,minced
1/2 teaspoon dried thyme
2 cups peeled baby carrots, cut into 1 inch pieces
2 cups all-purpose potatoes,cut into 1 inch pieces
2 cups frozen cut green beans
1 (8-ounce) can tomato sauce
1 cup beef broth
1/2 cup Burgundy wine
1 bay leaf
1/2 teaspoon salt
dash black pepper
1/2 tablespoon minced parsley
1. Heat the oil in the Pressure Cooker Pan on
MAX/BROWNING.Sauté the meat and brown
on all sides.
2. Add onion and garlic to the meat mixture
and sauté 5 - 7 minutes,or until soft.
3. Add the remaining ingredients,except the
parsley. Stir well.
4. Cover with the Lid and set the Pressure
Regulator Valve to PRESSURE.Heat on
MAX/BROWNING until the HIGH/LOW
Pressure Level Indicator and the Pressure
Lift Pin raises.
5. When a steady flow of steam is released from
the Pressure Regulator Valve,reduce the
Variable Temperature/Pressure Control to
7 - 8 and cook at HIGH pressure10 to 12
minutes or until done.
6. Turn the Variable Temperature/Pressure Control
to WARMING and turn the Pressure Cooker
OFF. Unplug the unit.The Power Indicator Light
will turn off.Use the Natural Steam Release
method.Wait until the HIGH/LOW Pressure
Level Indicator and the Pressure Lift Pin drops.
Makes 4 servings
39
Page 41

SWISS STEAK
1 pound round steak,1/2 inch thick
1 tablespoon vegetable oil
2 (15-ounce) cans stewed tomatoes, celery, onion
and green pepper-style
1 teaspoon Dijon mustard
1 green pepper,cut into 1 inch cubes
1 onion,cut into 1 inch cubes and separated
1 cup beef broth
1. Cut round steak into 4 pieces . Heat
the oil in the Pressure Cooker Pan on
MAX/BROWNING.Add the round steak and
brown on both sides.
2. Mix the tomatoes and mustard together.
Add the peppers,onion,tomatoes mixture
and broth to the Pressure Cooker Pan.
3. Cover with the Lid and set the Pressure
Regulator Valve to PRESSURE.Heat on
MAX/BROWNING until the HIGH/LOW
Pressure Level Indicator and the Pressure
Lift Pin raises.
4. When a steady flow of steam is released
from the Pressure Regulator Valve,reduce
the Variable Temperature/Pressure Control
to 7 - 8 and cook at HIGH pressure 18 to
20 minutes or until done.
5. Turn the Variable Temperature/Pressure Control
to WARMING and turn the Pressure Cooker
OFF.Unplug the unit.The Power Indicator Light
will turn off.Use the Natural Steam Release
method.Wait until the HIGH/LOW Pressure
Level Indicator and the Pressure Lift Pin drops.
Makes 4 servings
40
Page 42

AVANT D’UTILISER LA COCOTTE-MINUTE
POUR LA PREMIERE FOIS
ATTENTION : Afin d’éviter tout risque d’électrocution,ne pas
1. Laver soigneusement à la main le couvercle et son joint ainsi
que le joint de l’indicateur de haute/basse pression de la
cocotte avec du produit à vaisselle.Rincer et sécher au
torchon.Remettre en place le joint de l’indicateur de
haute/basse pression en le repoussant à l’intérieur de
l’espace situé sous le couvercle.
2. Nettoyer la surface anti-adhérente de la Cocotte-Minute
avec un chiffon propre humide.Sécher au torchon
ATTENTION : NE PAS IMMERGER LA COCOTTE-MINUTE SOUS
3. Lire attentivement et intégralement le Guide de l’utilisateur
avant d’utiliser la Cocotte,de manière à se familiariser avec
les pièces et caractéristiques de l’appareil.
4. Suivre les consignes de cuisson sous pression,remplir la
Cocotte-Minute d’eau jusqu’à la graduation ‘MAX Fill’. Faire
cuire sous pression pendant 15 minutes sur ‘MAX/BROWNING’.
Ceci permet de s’assurer que le joint est fixé correctement.
5. Tourner le Bouton de commande réglable de la
température/pression sur ‘WARMING’(Maintien au chaud).
Appuyer sur le (O) de l’interrupteur de marche/arrêt
‘ON/OFF’,le voyant de marche/arrêt ‘ON/OFF’s’éteint.
Débrancher l’appareil.La pression s’évacue naturellement.
Lorsque l’indicateur de haute/basse pression ‘HIGH/LOW’et le
taquet de compression retombent et que la vapeur d’eau
s’est entièrement échappée,ouvrir le couvercle.Verser l’eau
avec précaution et laisser refroidir.Sécher l’ensemble des
pièces.La Cocotte-Minute est prête à l’emploi.
CANDIED SWEET POTATOES
1/4 cup packed brown sugar
1/2 teaspoon ground cinnamon
1/4 teaspoon ground nutmeg
pinch salt
1 long strip orange peel
1 pound sweet potatoes,peeled and cut into
1 inch thick slices
1 cup orange juice
1-1/2 tablespoons butter,softened
1. Mix the brown sugar, cinnamon,nutmeg and salt together.
2. Place the orange peel in the bottom of the Pressure Cooker
Pan.Add sweet potato slices in layers, sprinkling each layer
with brown sugar mixture,ending with a final layer of brown
sugar mixture.Drizzle with orange juice.Dot with butter.
3. Cover with the Lid and set the Pressure
Regulator Valve to PRESSURE.Heat on
MAX/BROWNING until the HIGH/LOW
Pressure Level Indicator and the Pressure Lift
Pin raises.
4. When a steady flow of steam is released
from the Pressure Regulator Valve,reduce
the Variable Temperature/Pressure Control to
7 - 8 and cook at HIGH pressure 4 to 6
minutes or until done.
5. Turn the Variable Temperature/Pressure
Control to WARMING and unplug the unit.The
POWER Indicator Light will turn off.Use the
Quick Steam Release method. Wait until the
HIGH/LOW Pressure Level Indicator and the
Pressure Lift Pin drops.
Makes 6 servings
41
Page 43

BLUEBERRY STUFFED APPLES
4 large firm baking apples such as:
Rome,Jonagold,Cortland or Winesap
1/3 cup packed brown sugar
1/2 cup fresh blueberries
1/4 cup chopped walnuts
1/2 teaspoon cinnamon
1-1/2 tablespoons unsalted butter
1 cup apple juice or cider
1. Core the apples, cutting to,but not through the bottoms and
place into the the Pressure Cooker Pan.
2. Combine the brown sugar, blueberries, walnuts and cinnamon
in a bowl.Spoon mixture into the apples. Dot the apples with
the butter.Sprinkle any remaining sugar mixture over apples.
Pour the apple juice into the Pressure Cooker Pan.
3. Cover with the Lid and set the Pressure
Regulator Valve to PRESSURE.Heat on
MAX/BROWNING until the HIGH/LOW
Pressure Level Indicator and the Pressure
Lift Pin raises.
4. When a steady flow of steam is released
from the Pressure Regulator Valve, reduce the
Variable Temperature/Pressure Control to 6 - 7
and cook at LOW pressure 5 to 7 minutes or
until done.
5. Turn the Variable Temperature/Pressure
Control to WARMING and turn the Pressure
Cooker OFF. Unplug the unit.The POWER
Indicator Light will turn off.Use the Quick
Steam Release method. Wait until the
HIGH/LOW Pressure Level Indicator and the
Pressure Lift Pin drops.
6. Serve with the hot brown sugar sauce.
Makes 4 servings
42
Page 44

LIMITED ONE YEAR WA R R A N T Y
Wa r r a n t y : This Russell Hobbs® product is warranted by Salton, Inc. to be free from defects in materials or
workmanship for a period of (1) year from the original purchase date. This product warranty covers only the
original consumer purchaser of the product.
Warranty Coverage: This warranty is void if the product has been damaged by accident in shipment,
unreasonable use, misuse, neglect, improper service, commercial use, repairs by unauthorized personnel,
normal wear and tear, improper assembly, installation or maintenance abuse or other causes not arising out
of defects in materials or workmanship. This warranty is effective only if the product is purchased and
operated in the USA, and does not extend to any units which have been used in violation of written
instructions furnished with the product or to units which have been altered or modified or to damage to
products or parts thereof which have had the serial number removed, altered, defaced or rendered illegible.
Implied Wa r r a n t i e s : ANY IMPLIED WARRANTIES WHICH THE PURCHASER MAY HAVE ARE LIMITED IN
D U R ATION TO ONE (1) YEAR FROM THE DATE OF PURCHASE. Some states do not allow limitations on how
long an implied warranty lasts, so the above limitation may not apply to you.
Warranty Performance: During the above one-year warranty period, a product with a defect will be
either repaired or replaced with a reconditioned comparable model (at our option) when the product is
returned to the Repair Center, or the purchase price refunded. The repaired or replacement product will be
in warranty for the balance of the one-year warranty period and an additional one-month period. No charge
will be made for such repair or replacement.
Service and Repair: Should the appliance malfunction, you should first call toll-free 1 (800) 233-9054
between the hours of 9:00 am and 5:00 pm Central Standard Time and ask for CONSUMER SERVICE stating
that you are a consumer with a problem. Please refer to model number RHNPC401 when you call.
I n - Warranty Service (USA): For an appliance covered under the warranty period, no charge is made for
service or postage. Call for return authorization (800) 233-9054.
Out-of Warranty Service: A flat rate charge by model is made for out-of-warranty service. Include
$12.00 (U.S.) for return shipping and handling. We will notify you by mail of the amount of the charge for
service and require you to pay in advance for the repair or replacement.
For Products Purchased in the USA, but Used in Canada: You may return the product insured,
packaged with sufficient protection, and postage and insurance prepaid to the USA address listed below.
Please note that all customs duty / brokerage fees, if any, must be paid by you and we will require you to pay
the cost of customs duty / brokerage fees to us in advance of our performing any service.
Risk During Shipment: We cannot assume responsibility for loss or damage during incoming shipment.
For your protection, carefully package the product for shipment and insure it with the carrier. Be sure to
enclose the following items with your appliance: any accessories related to your problem, your full return
address and daytime phone number, a note describing the problem you experienced, a copy of your sales
receipt or other proof of purchase to determine warranty status. C.O.D. shipments cannot be accepted.
To re t u rn the appliance, ship to: To contact us, please write to, call, or email:
ATTN: Repair Center Salton, Inc.
Salton, Inc. P.O. Box 7366
708 South Missouri Street Columbia, MO 65205-7366
Macon, MO 63552 1 - 8 0 0 - 2 3 3 - 9 0 5 4
E-mail: Salton@Saltonusa.com
Limitation of Remedies: No representative or person is authorized to assume for Salton, Inc. any other
liability in connection with the sale of our products. There shall be no claims for defects or failure of
performance or product failure under any theory of tort, contract or commercial law including, but not
limited to negligence, gross negligence, strict liability, breach of warranty and breach of contract. Repair,
replacement or refund shall be the sole remedy of the purchaser under this warranty, and in no event
shall Salton be liable for any incidental or consequential damages, losses or expenses.
Some states do not allow the exclusion or limitation of incidental or consequential damages, so the above
limitation or exclusion may not apply to you.
Legal Rights: This warranty gives you specific legal rights, and you may also have other rights which vary
from state to state.
For more information on Salton products: visit our website:
w w w. e S a l t o n . c o m
©2002 Salton, Inc. All rights reserved. P/N 61156
Made in China 8 / 0 2
Cool Touch Pressure Cooker
Page 45

LES ILLUSTRATIONS NE SONT PAS CONTRACTUELLES
Soupape de
régulation de la
pression
(Réf. 21936)
Tube du conduit
d’évacuation
Poignée du
couvercle à
toucher froid
Cuve de la
Cocotte-Minute
Cordon d’alimentation
Joint du
couvercle
(Réf. 21938)
Soupape de régulation de la pression
d’évacuation de
Cocotte-minute éléctrique
à toucher froid de 3,7 l
GUIDE DE L’ U T I L I S AT E U R
RHNPC401
Page 46

ALIMENTATION ELECTRIQUE
Si le circuit électrique est surc h a rgé par d’autres ap p a re i l s,l ’ ap p a re i l
peut ne pas fonctionner corre c t e m e n t .Dans la mesure du possible,i l
doit être branché sur un circuit électrique indépendant.
AVERTISSEMENT : PLASTIFIANTS
ATTENTION : Afin d’éviter la migration des plastifiants de la finition
Le non respect des indications données ci-dessus pourrait entraîner
le noircissement de la fi n i t i o n , la fo rm ation d'imperfections de nat u re
p e rm a n e n t e , ou l'ap p a rition de taches.
INTRODUCTION
Nous vous félicitons d’avoir fait l’achat de la Cocotte-Minute
électrique Russell Hobbs
toucher froid et une finition intérieure antiadhérente. Le
revêtement spécial de la Cocotte-Minute est conçu pour
augmenter la durée de vie de l’appareil tout en en facilitant
l’utilisation et le nettoyage.Ce revêtement est conçu pour les
appareils aux performances de pointe.
L’entretien et le nettoyage de votre Cocotte-Minute électrique
s’effectue en un clin d’œil.Il suffit de laver ou de rincer à l’eau
chaude savonneuse avec une éponge ou un chiffon.Ne pas
utiliser de tampons en laine de verre ou de tampons abrasifs, ni
de produits décapants sur la surface anti-adhérente.Ces
ustensiles et produits sont inutiles et endommagent la finition.
MISES EN GARDE
IMPORTANTES
Pendant l’utilisation de tout appareil électroménager, toujours observer les
précautions élémentaires de sécurité, y compris les suivantes :
1. Lire l'ensemble des instructions.
2. Ne pas toucher les surfaces chaudes. Utiliser les poignées ou les
boutons.
3. Afin de réduire les risques d'incendie,d'électrocution et de blessures,
ne pas immerger le cordon,les prises,ou la Cocotte-Minute dans
l'eau ou dans tout autre liquide.
4. Se montrer particulièrement vigilant lorsqu’un appareil
électroménager est utilisé à proximité d’enfants.Cet appareil ne doit
pas être utilise par des enfants.
5 . D é b rancher l’ap p a reil de la prise lorsqu’il n’est pas en serv i c e ,a i n s i
q u ’ a vant de procéder au nettoya g e .Laisser re f roidir avant de monter ou
de démonter des pièces,ainsi qu’avant de nettoyer l’ap p a re i l .
6 . Ne pas se servir de l'ap p a reil si le cordon ou la fiche est endomma g é ( e ) ,
s'il ne fonctionne pas corre c t e m e n t ,ou s'il a été endommagé d’une
quelconque ma n i è re .Contacter le centre de SAV.
7. L’utilisation d’accessoires non recommandés par le fabricant peut
entraîner des risques d’incendie,d’électrocution,ou de blessures.
8. Ne pas utiliser à l’extérieur.
9. Ne pas laisser le cordon pendre du bord d’une table ou d’un plan
de travail,ni toucher des surfaces chaudes.
10. Ne pas placer sur ou près d’un brûleur à gaz ou électrique chaud,ni
dans un four chaud
11. Pour débrancher, tourner le Bouton de commande réglable de la
température/pression sur ‘WARMING’(Maintien au chaud) Appuyer
sur le (O) de l’interrupteur de marche/arrêt ‘ON/OFF’,le voyant de
marche/arrêt ‘ON/OFF’s’éteint. Retirer le cordon de la prise murale.
12. Ne pas utiliser l’appareil pour un usage autre que celui pour lequel il
a été conçu.
13. Se montrer extrêmement vigilant en déplaçant un appareil
contenant de l’huile ou tout autre liquide chaud.
1 4 . Un incendie peut se déclarer si l’ap p a reil en cours de fo n c t i o n n e m e n t
est couve rt ou s’il touche des ma t é riaux infl a m mables tels que des
ri d e a u x ,d rap e ri e s,mu rs,e t c .
15. Ne pas essayer de déloger les aliments lorsque le grille-pain
est branché.
16. Ne pas remplir au-delà de la graduation ‘MAX Fill’.Lorsque vous
cuisez des ingrédients qui gonflent durant la cuisson,tels que du riz
ou des légumes secs, ne pas remplir l’appareil au-delà de la moitié.
Voir le chapitre des Informations de sécurité de ce guide.
44
Page 47

7 . NE PAS ESSAYER DE FAIRE REFROIDIR OU DE FAIRE DEPRESSURISER A
L’ E AU.
8. ATTENTION : Lorsque le taquet de compression se trouve en
position haute,tourner la soupape de régulation de la
pression sur la position ‘STEAM RELEASE’de manière à faire
évacuer la vapeur par petites bouffées.Ne pas sélection une
autre position.Le non-respect de ces consignes risquerait de
faire éjecter le liquide chaud.
9. ATTENTION : Ne pas régler la soupape d’évacuation de la
vapeur lorsque l’appareil est chaud ou que le taquet de
compression est en position haute,sous peine de faire éjecter
le liquide chaud.
FICHE POLARISEE A TROIS LAMES
Cet appareil est équipé d’un cordon polarisé à trois broches
(fiche à trois lames).La fiche ne s’adapte que dans une prise
électrique pour fiches à trois lames. Il s'agit là d'une mesure de
sécurité.Si la fiche ne peut pas être branchée dans la prise,
consultez un électricien afin de faire remplacer la prise obsolète.
Ne pas essayer de modifier le dispositif de sécurité de la prise de
terre de la fiche à trois lames.
INSTRUCTIONS CONCERNANT LE CORDON COURT
L'appareil est livré avec un cordon d'alimentation court afin de
réduire le risque de blessures liées au fait de se prendre les pieds
ou de trébucher sur un cordon plus long.
Il existe des cordons d’alimentation détachables plus longs et des
rallonges qui peuvent être utilisés à condition de pre n d re quelques
p r é c a u t i o n s.
Si un cordon d’alimentation plus long ou une rallonge s’avère
n é c e s s a i re ,(1) le cordon ou la rallonge doit au minimum présenter
des cara c t é ristiques nominales aussi importantes que celles de
l ’ ap p a reil électroménager et (2) être disposé de façon à ne pas
retomber du plan de tra vail ou de la table où un enfant pourrait tire r
d e s s u s,ou trébucher sur ce dernier accidentellement.
La rallonge doit être de type cordon de terre à trois broches.
17. Ne pas cuisiner d’aliments tels que de la compote de pommes, des
airelles,de l’orge,de l’avoine ou toute autre céréale,des pois
cassés, des pâtes,de la rhubarbe ou des spaghetti.Ces aliments ont
tendance à mousser et à éclabousser, ce qui risquerait de bloquer le
tube du conduit d’évacuation.
18. ATTENTION : Pour réduire le risque d’électrocution, cuisiner
uniquement à l’intérieur de la cuve de la Cocotte-Minute.
C O N S E RVER CES INSTRUCTIONS
CE PRODUIT EST EXCLUSIVEMENT
DESTINE A UN USAGE MENAGER
AUTRES MISES EN GARDE
IMPORTANTES
AVERTISSEMENT : L’ ap p a reil en cours de fonctionnement produit de la
chaleur et de la vapeur d’eau.Des précautions
p a rt i c u l i è res sont nécessaires afin d’éviter tout ri s q u e
de brûlure s, d ’ i n c e n d i e , ou tout autre dommage qui
pourrait être causé aux personnes ou aux biens.
AVERTISSEMENT : NE PAS IMMERGER LA COCOTTE-MINUTE DANS
L’EAU OU DANS TOUT AUTRE LIQUIDE.
1. Tenir les mains et le visage éloignés de la soupape de
régulation de la pression.
2. Se montrer extrêmement vigilant en retirant le couvercle en
fin de cuisson.La vapeur d’eau brûlante pourrait causer des
blessures graves.
3. Ne jamais retirer le couvercle de l’appareil en cours
d’utilisation.
4.Ne pas couvrir la soupape de régulation de la pression,les
soupapes de sécurité,ou le taquet de compression de quoi
que ce soit,sous peine de déclencher une explosion.
5. Ne pas toucher la cuve de la Cocotte-Minute,les pièces
amovibles ou les éléments chauffants en cours d’utilisation ou
immédiatement après.Utiliser les poignées à toucher froid.
Laisser d’abord l’appareil refroidir complètement.
6. Nettoyer soigneusement l’ensemble des pièces après chaque
utilisation.
45
Page 48

7 . NE PAS ESSAYER DE FAIRE REFROIDIR OU DE FAIRE DEPRESSURISER A
L’ E AU.
8. ATTENTION : Lorsque le taquet de compression se trouve en
position haute,tourner la soupape de régulation de la
pression sur la position ‘STEAM RELEASE’de manière à faire
évacuer la vapeur par petites bouffées.Ne pas sélection une
autre position.Le non-respect de ces consignes risquerait de
faire éjecter le liquide chaud.
9. ATTENTION : Ne pas régler la soupape d’évacuation de la
vapeur lorsque l’appareil est chaud ou que le taquet de
compression est en position haute,sous peine de faire éjecter
le liquide chaud.
FICHE POLARISEE A TROIS LAMES
Cet appareil est équipé d’un cordon polarisé à trois broches
(fiche à trois lames).La fiche ne s’adapte que dans une prise
électrique pour fiches à trois lames. Il s'agit là d'une mesure de
sécurité.Si la fiche ne peut pas être branchée dans la prise,
consultez un électricien afin de faire remplacer la prise obsolète.
Ne pas essayer de modifier le dispositif de sécurité de la prise de
terre de la fiche à trois lames.
INSTRUCTIONS CONCERNANT LE CORDON COURT
L'appareil est livré avec un cordon d'alimentation court afin de
réduire le risque de blessures liées au fait de se prendre les pieds
ou de trébucher sur un cordon plus long.
Il existe des cordons d’alimentation détachables plus longs et des
rallonges qui peuvent être utilisés à condition de pre n d re quelques
p r é c a u t i o n s.
Si un cordon d’alimentation plus long ou une rallonge s’avère
n é c e s s a i re ,(1) le cordon ou la rallonge doit au minimum présenter
des cara c t é ristiques nominales aussi importantes que celles de
l ’ ap p a reil électroménager et (2) être disposé de façon à ne pas
retomber du plan de tra vail ou de la table où un enfant pourrait tire r
d e s s u s,ou trébucher sur ce dernier accidentellement.
La rallonge doit être de type cordon de terre à trois broches.
46
Page 49

ALIMENTATION ELECTRIQUE
Si le circuit électrique est surc h a rgé par d’autres ap p a re i l s,l ’ ap p a re i l
peut ne pas fonctionner corre c t e m e n t .Dans la mesure du possible,i l
doit être branché sur un circuit électrique indépendant.
AVERTISSEMENT : PLASTIFIANTS
ATTENTION : Afin d’éviter la migration des plastifiants de la finition
du plan de travail,de la table,ou d’un autre meuble,
placer des dessous-de-verre ou des napperons SANS
PLASTIQUE entre l’appareil et la finition du plan de
travail ou de la table.
Le non respect des indications données ci-dessus pourrait entraîner
le noircissement de la fi n i t i o n , la fo rm ation d'imperfections de nat u re
p e rm a n e n t e , ou l'ap p a rition de taches.
INTRODUCTION
Nous vous félicitons d’avoir fait l’achat de la Cocotte-Minute
électrique Russell Hobbs®qui comporte une surface extérieure à
toucher froid et une finition intérieure antiadhérente. Le
revêtement spécial de la Cocotte-Minute est conçu pour
augmenter la durée de vie de l’appareil tout en en facilitant
l’utilisation et le nettoyage.Ce revêtement est conçu pour les
appareils aux performances de pointe.
L’entretien et le nettoyage de votre Cocotte-Minute électrique
s’effectue en un clin d’œil.Il suffit de laver ou de rincer à l’eau
chaude savonneuse avec une éponge ou un chiffon.Ne pas
utiliser de tampons en laine de verre ou de tampons abrasifs, ni
de produits décapants sur la surface anti-adhérente.Ces
ustensiles et produits sont inutiles et endommagent la finition.
47
Page 50

LES ILLUSTRATIONS NE SONT PAS CONTRACTUELLES
Soupape de
régulation de la
pression
(Réf. 21936)
Bouton de commande
réglable de la
température/pression
Interrupteur de
marche/arrêt ‘ON/OFF’
à voyant lumineux
Pieds
antidérapants
(Réf 21966)
Tube du conduit
d’évacuation
Taquet de
compression
Indicateur de
haute/basse pression
‘HIGH/LOW’
Bouton de
verrouillage
du couvercle
Assemblage du couvercle (Réf. 21939)
Poignées du
couvercle à
toucher froid
Poignée du
couvercle à
toucher froid
Cuve de la
Cocotte-Minute
Cordon d’alimentation
Joint du
couvercle
(Réf. 21938)
Soupape de régulation de la pression
Bouche
d’évacuation de
la vapeur
Pression
Vapeur
Nettoyage
Brosse de nettoyage
(Réf 21100A)
48
Page 51

Soupapes
de sécurité
Soupape de sécurité
à indicateur de
pression et à taquet
de compression.
Soupape de
sécurité à
indicateur de
pression et à
taquet de
compression.
Soupape de
régulation de la
pression et Tube
du conduit
d’évacuation
Bouton de
verrouillage
du couvercle
Poignées à
toucher froid
Mécanisme de
verrouillage du
couvercle
Arrêt du conduit
d’évacuation
Taquet de
compression à
joint
Joint
Poignées à
toucher froid
Vue supérieure du couvercle
Vue inférieure du couvercle
Indicateur de
haute/basse pression
‘HIGH/LOW’
Soupapes de
sécurité
Joint de
l’indicateur de
haute/basse
pression
‘HIGH/LOW’
49
BLUEBERRY STUFFED APPLES
4 large firm baking apples such as:
Rome,Jonagold,Cortland or Winesap
1/3 cup packed brown sugar
1/2 cup fresh blueberries
1/4 cup chopped walnuts
1/2 teaspoon cinnamon
1-1/2 tablespoons unsalted butter
1 cup apple juice or cider
1. Core the apples, cutting to,but not through the bottoms and
place into the the Pressure Cooker Pan.
2. Combine the brown sugar, blueberries, walnuts and cinnamon
in a bowl.Spoon mixture into the apples. Dot the apples with
the butter.Sprinkle any remaining sugar mixture over apples.
Pour the apple juice into the Pressure Cooker Pan.
3. Cover with the Lid and set the Pressure
Regulator Valve to PRESSURE.Heat on
MAX/BROWNING until the HIGH/LOW
Pressure Level Indicator and the Pressure
Lift Pin raises.
4. When a steady flow of steam is released
from the Pressure Regulator Valve, reduce the
Variable Temperature/Pressure Control to 6 - 7
and cook at LOW pressure 5 to 7 minutes or
until done.
5. Turn the Variable Temperature/Pressure
Control to WARMING and turn the Pressure
Cooker OFF. Unplug the unit.The POWER
Indicator Light will turn off.Use the Quick
Steam Release method. Wait until the
HIGH/LOW Pressure Level Indicator and the
Pressure Lift Pin drops.
6. Serve with the hot brown sugar sauce.
Makes 4 servings
Page 52

AVANT D’UTILISER LA COCOTTE-MINUTE
POUR LA PREMIERE FOIS
ATTENTION : Afin d’éviter tout risque d’électrocution,ne pas
immerger la Cocotte-Minute ou laisser le cordon
entrer en contact avec de l’eau ou tout autre
liquide.
1. Laver soigneusement à la main le couvercle et son joint ainsi
que le joint de l’indicateur de haute/basse pression de la
cocotte avec du produit à vaisselle.Rincer et sécher au
torchon.Remettre en place le joint de l’indicateur de
haute/basse pression en le repoussant à l’intérieur de
l’espace situé sous le couvercle.
2. Nettoyer la surface anti-adhérente de la Cocotte-Minute
avec un chiffon propre humide.Sécher au torchon
ATTENTION : NE PAS IMMERGER LA COCOTTE-MINUTE SOUS
PRESSION DANS L’EAU OU DANS TOUT AUTRE LIQUIDE.
3. Lire attentivement et intégralement le Guide de l’utilisateur
avant d’utiliser la Cocotte,de manière à se familiariser avec
les pièces et caractéristiques de l’appareil.
4. Suivre les consignes de cuisson sous pression,remplir la
Cocotte-Minute d’eau jusqu’à la graduation ‘MAX Fill’. Faire
cuire sous pression pendant 15 minutes sur ‘MAX/BROWNING’.
Ceci permet de s’assurer que le joint est fixé correctement.
5. Tourner le Bouton de commande réglable de la
température/pression sur ‘WARMING’(Maintien au chaud).
Appuyer sur le (O) de l’interrupteur de marche/arrêt
‘ON/OFF’,le voyant de marche/arrêt ‘ON/OFF’s’éteint.
Débrancher l’appareil.La pression s’évacue naturellement.
Lorsque l’indicateur de haute/basse pression ‘HIGH/LOW’et le
taquet de compression retombent et que la vapeur d’eau
s’est entièrement échappée,ouvrir le couvercle.Verser l’eau
avec précaution et laisser refroidir.Sécher l’ensemble des
pièces.La Cocotte-Minute est prête à l’emploi.
50
Page 53

Conseils de sécurité
COUVERCLE DE VERROUILLAGE A POIGNEE
FACILE A MANIER
Le grand bouton facile à manier de ve r rouillage du couve rcle perm e t
de ve r rouiller ou de déve r rouiller le couve rcle de la Cocotte-Minute.
Pour fe rm e r,placer le couve rcle sur la cuve de la Cocotte-Minute de
ma n i è re à ce que la poignée du couve rcle se re t ro u ve légèrement à
d roite de la poignée de la Cocotte-Minute.To u rner la poignée du
c o u ve rcle dans le sens des aiguilles d’une montre jusqu’à ce que les
deux poignées se rejoignent et se re t ro u vent en face de vo u s.L e
bouton de ve r rouillage du couve rcle permet de ve r rouiller le
c o u ve rcle en place.Veiller à ce que le couve rcle se tro u ve sous le
p o u rtour de la cuve de la Cocotte-Minute et qu’il soit solidement fi x é
à la cocotte.
Pour retirer le couvercle de la Cocotte-Minute,il faut dépressuriser
avant d’ouvrir.Ceci étant fait, faire glisser le bouton de
verrouillage du couvercle vers vous, faire tourner le couvercle
dans le sens inverse des aiguilles d’une montre jusqu’à ce qu’il
puisse être facilement retiré. Toujours incliner le couvercle à
l’opposé de l’endroit où vous vous trouvez de manière à ne pas
entrer en contact avec la vapeur d’eau.(Voir le chapitre des
Instructions de fonctionnement de ce présent guide).
JOINT DU COUVERCLE
Le joint du couvercle permet de fermer la Cocotte-Minute de
manière étanche.Ne jamais utiliser le couvercle sans s’être
assuré que le joint est correctement en place. Ne pas utiliser le
couvercle si le joint semble abîmé,usagé ou déchiré.Dans ce
cas,il faut remplacer le joint du couvercle.Vous pouvez
augmenter la durée de vie du joint en l’enduisant d’une fine
couche d’huile végétale après chaque utilisation.
51
SWISS STEAK
1 pound round steak,1/2 inch thick
1 tablespoon vegetable oil
2 (15-ounce) cans stewed tomatoes, celery, onion
and green pepper-style
1 teaspoon Dijon mustard
1 green pepper,cut into 1 inch cubes
1 onion,cut into 1 inch cubes and separated
1 cup beef broth
1. Cut round steak into 4 pieces . Heat
the oil in the Pressure Cooker Pan on
MAX/BROWNING.Add the round steak and
brown on both sides.
2. Mix the tomatoes and mustard together.
Add the peppers,onion,tomatoes mixture
and broth to the Pressure Cooker Pan.
3. Cover with the Lid and set the Pressure
Regulator Valve to PRESSURE.Heat on
MAX/BROWNING until the HIGH/LOW
Pressure Level Indicator and the Pressure
Lift Pin raises.
4. When a steady flow of steam is released
from the Pressure Regulator Valve,reduce
the Variable Temperature/Pressure Control
to 7 - 8 and cook at HIGH pressure 18 to
20 minutes or until done.
5. Turn the Variable Temperature/Pressure Control
to WARMING and turn the Pressure Cooker
OFF.Unplug the unit.The Power Indicator Light
will turn off.Use the Natural Steam Release
method.Wait until the HIGH/LOW Pressure
Level Indicator and the Pressure Lift Pin drops.
Makes 4 servings
Page 54

Pour votre sécurité, nous avons équipé la Cocotte-Minute de
4 soupapes d’évacuation de sécurité :
• Soupape de régulation de la pression à conduit d’évacuation
à tube.
• Soupape d’indication de la pression à taquet de compression
et joint
• 2 soupapes de sécurité
S O U PAPE DE REGULATION DE LA
PRESSION A CONDUIT D’EVA C U AT I O N
A TUBE
Cette soupape permet de réguler la pre s s i o n
ma n u e l l e m e n t .En réglant le lev i e r,vous pouve z
passer de ‘ P R E S S U R E ’( P re s s u risation) à ‘ S T E A M ’
( Vapeur) ou à ‘ C L E A N ’( N e t t oyage) ,ou encore de ‘ P R E S S U R E ’à
‘STEAM RELEASE’( E vacuation de la vapeur) de ma n i è re à ce que la
vapeur s’échappe par petites bouff é e s.Cette soupape de
régulation de la pression a été calibrée en usine pour perm e t t re
une évacuation de la vapeur lorsque la Cocotte atteint un seuil de
p re s s u risation ma x i mum (de 15psi) préréglé en usine.
Retirer la soupape de régulation de la pression et la rincer à l’eau
tiède pour un nettoyage facile.(Voir le chapitre des Informations
de sécurité importantes de ce guide pour savoir comment retirer
la soupape).Si la soupape est usagée,il faut alors absolument la
remplacer.
ATTENTION : Ne jamais démonter la Soupape de régulation de la
pression ou nettoyer le tube du conduit d’évacuation
lorsque la Cocotte-Minute est en cours d’utilisation.
SOUPAPE DE SECURITE A INDICATEUR DE
PRESSION ET A TAQUET DE COMPRESSION
Ce système de sécurité visuel indique le moment où la
Cocotte-Minute est sous pression ou encore si
l’ensemble de la vapeur s’est évacuée de la Cocotte.
L o rsque le taquet est en position haute,la Cocotte-Minute se
t ro u ve sous pre s s i o n .Vous ne pouvez pas re t i rer le couve rc l e .C e
système de sécurité sert également de Soupape d’évacuation de
la vap e u r,en éliminant un éventuel trop plein.Le joint du taquet de
c o m p ression doit venir se loger conve n ablement autour du taquet.
52
Page 55

Si le taquet de compression est encrassé ou sale,il risque de ne
pas fonctionner correctement. Si le taquet de compression ne
s’abaisse pas lorsqu’il est censé le faire,faire glisser lentement le
Bouton de verrouillage du couvercle vers vous et voir si le taquet
de compression s’abaisse.Si cela n’est pas le cas, attendre que
l’ensemble de la vapeur d’eau ait été évacué.
Si la soupape s’encrasse,il est facile de la nettoyer à retirant tout
doucement les particules d’aliments de la soupape située sous le
couvercle de la Cocotte-Minute.(Voir le chapitre des Informations
de sécurité importantes de ce guide).
SOUPAPES DE SECURITE
L o rsque la pression augmente,le surplus de vap e u r
d’eau ou de pression s’évacue par les soupap e s
a u t o ma t i q u e s.Ceci est norma l ,tout comme le sifflement qui éma n e
de ces soupap e s.
Si les soupapes venaient à s’encra s s e r,il est facile de les nettoyer en
re t i rant tout doucement les particules d’aliments des soupap e s
situées sous le couve rcle de la Cocotte-Minute.( Voir le chap i t re des
I n fo rmations de sécurité importantes de ce guide).
Conduit d’évacuation de sécurité : Dans le cas où la pression
serait très élevée,la vapeur s’évacue alors par l’arrêt du conduit
d’évacuation de sécurité situé sur le pourtour du couvercle de la
Cocotte-Minute.
C a r a c t é r i s t i q u e s
INDICATEUR DE HAUTE/BASSE PRESSION
Pour faire cuire des aliments à haute pression,tourner le Bouton
de commande réglable de la température/pression sur
‘MAX/BROWNING’,sur la position 7,8,ou 9,jusqu’à ce que
l’indicateur de haute/basse pression monte et que les deux
bagues deviennent visibles.Baisser le Bouton de commande
réglable de la température/pression sur 7 - 8 de manière à
conserver une haute pression.Les deux bagues sont visibles .
En mode de cuisson
à haute pression,
les deux bagues
sont visibles.
Indicateur de
haute/basse pression
Réduire la température
sur 7 – 8 pour maintenir
la haute pression
Faire chauffer sur
‘’MAX/BROWNING, sur la
position 7, 8,ou 9 jusqu’à
ce que l’indicateur de
pression monte.
53
SAUERBRATEN
1/4 cup red wine vinegar
1/2 teaspoon salt
1/8 teaspoon pepper
1/2 teaspoon ground cloves
1 clove garlic,crushed
1-1/2 pound chuck or rump roast,2 inches thick
1 tablespoon vegetable oil
2 cups beef broth
1 large carrot,coarsely chopped
1 rib celery, coarsely chopped
1/2 large onion,coarsely chopped
1 bay leaf
1 cup crushed ginger snaps
1. Combine the red wine vinegar,salt,pepper,ground cloves,
crushed garlic and marinate the beef roast in a non-metal
container for several hours or overnight in the refrigerator.
2. Turn the Temperature Control Dial to MAX/
BROWNING and heat the oil in the Pressure
Cooker Pan.Remove the meat from the
marinade and place it in the Pressure Cooker
Pan,reserve the marinade.Brown the roast on
both sides.
3. Pour in the reserved marinade,beef
broth,carrot,celery, onion and bay leaf.
4. Cover with the Lid and set the Pressure
Regulator Valve to PRESSURE.Heat on
MAX/BROWNING until the HIGH/LOW Pressure
Level Indicator and the Pressure Lift Pin raises.
5. When a steady flow of steam is released from
the Pressure Regulator Valve,reduce the
Variable Temperature/Pressure Control to 7 - 8
and cook at HIGH pressure 50 to 60 minutes or
until done.
6. Turn the Variable Temperature/Pressure Control
to WARMING and turn the Pressure Cooker OFF. Unplug the unit.
The Power Indicator Light will turn off.Use the Natural Steam
Release method.Wait until the HIGH/LOW Pressure Level
Indicator and the Pressure Lift Pin drops.
7. Place the meat on a serving platter and cover with foil.Stir in
the crushed ginger snaps into the gravy,adding more broth as
necessary to make a gravy.Taste and adjust for salt.Slice the
meat across the grain into thick slices and serve with the gravy
on the side.
Makes 4 to 6 servings
Page 56

INDICATEUR DE HAUTE/BASSE PRESSION (SUITE)
Pour faire cuire des aliments à basse pression,faire chauffer la
Cocotte-Minute à haute pression (les deux bagues sont alors
visibles),puis placer le Bouton de commande réglable de la
température/pression sur 6 – 7 de manière à à maintenir la basse
pression.Seule une bague reste alors visible.
En mode de cuisson à
basse pression ,seule
une bague est visible
Réduire la température
ur 6 – 7 de manière
à maintenir
une basse pression
Faire chauffer sur
‘MAX/BROWNING’sur
la position 7,8,ou 9, jusqu’à
ce que l’indicateur de
pression monte
Indicateur de
haute/basse pression
Si l’indicateur de haute/basse pression est encrasé,il peut ne pas
fonctionner correctment.Consulter les Instructions d’entretien du
manuel pour tout renseignement relatif au nettoyage.
L’indicateur de niveau de pression monte et descent légèrement en
fonction des cycles de ma rche et d’arrêt de la Cocotte-Minute.
BOUTON DE COMMANDE REGLABLE
DE LA TEMPERATURE/PRESSION
Votre Cocotte-Minute possède un thermostat réglable qui
s’allume et s’éteint afin de maintenir une température constante.
Régler en fonction de vos préférences.Régler le programme en
fonction de la haute ou basse pression et des indications du
tableau ou de la recette.
Vous pouvez maintenir une haute pression de 15 psi tout en
conservant les deux bagues visibles sur l’indicateur de
haute/basse pression en tournant le Bouton de commande
réglable de la température/pression sur 7 – 8.Pour cuire à basse
pression,tourner le Bouton de commande réglable de la
température/pression sur 6 – 7 de manière à ce que l’une des
bagues soit visible.La position exacte du bouton de commande
dépend de la quantité et du type d’aliment que l’on cuisine.
54
Page 57

‘WARMING’
(MAINTIEN AU CHAUD)
Ce mode de cuisson permet de
réchauffer ou de maintenir les aliments au
chaud. Le mode ‘WARMING’peut être
utilisé seul ou après la cuisson vapeur, pour
conserver les aliments au chaud.
1.Brancher le cordon électrique dans la
prise située en bas de la CocotteMinute.
2.Placer ou laisser les aliments cuits dans la cuve de la CocotteMinute.
3.Tourner le Bouton de commande réglable de la
température/pression sur ‘WARMING’(Maintien au chaud).
Brancher l'appareil dans une prise murale de 120V CA, puis
appuyer sur le (-) de l'interrupteur de marche/arrêt 'ON/OFF'
pour allumer la Cocotte-Minute.Le voyant de marche/arrêt
'ON/OFF' s'allume.
4.Si vous souhaitez conserver les aliments au chaud après la
cuisson vapeur ou sous pression,une fois la cuisson terminée
et lorsque la pression est retombée,il suffit de tourner le
Bouton de commande réglable de la température/pression
sur ‘WARMING’(Maintien au chaud),position 1,2, ou 3.Brasser
régulièrement.
5.Lorsque la cuisson est terminée,tourner le Bouton de
commande réglable de la température/pression sur
‘WARMING’(Maintien au chaud).Appuyer sur le (O) de
l’interrupteur de marche/arrêt
‘ON/OFF’,le voyant de marche/arrêt
‘ON/OFF’ s’éteint.Débrancher
l’appareil.
POUR FAIRE DORER
Les aliments braisés ont toujours meilleur
goût lorsqu’on les fait dorer avant de les
faire cuire dans du liquide.La Cocotte-Minute électrique Russell
Hobbs®possède un cycle intégré permettant de faire dorer les
aliments.
1.Brancher le cordon électrique dans la prise située en bas de
la Cocotte-Minute.
2.Pour des résultats optimaux,les aliments doivent être épongés
avec de l’essuie-tout et coupés en petits morceaux de taille
uniforme.Faire dorer ou revenir les aliments par petite
quantité dans un peu d’huile.
55
SUNDRIED TOMATO AND
BLACK BEAN VEGETARIAN CHILI
1/2 cup dried black beans
1 tablespoon olive oil
1 cup chopped onion
1 teaspoon minced garlic
1 medium green pepper,cored,seeded and chopped
1 jalapeno pepper,cored seeded and chopped
3 carrots, chopped
2 teaspoons chili powder
1 teaspoon ground cumin
1/4 teaspoon dried oregano
2 (14.5-ounce) cans diced tomatoes
1-1/2 cups water
1 tablespoon vegetable oil
1/4 cup sundried tomatoes
1/2 teaspoon salt
1 tablespoon minced fresh cilantro
1. Soak beans overnight according to package directions. Drain
the beans and set aside.
2. Heat the oil in the Pressure Cooker Pan on
MAX/BROWNING.Add the onion, garlic,
peppers, carrot,chili powder,cumin and
oregano.Sauté 5 to 7 minutes until onion is
soft,stirring frequently.
3. Add the soaked beans, tomatoes, water,oil,
sundried tomatoes and salt.Stir to combine.
4. Cover with the Lid and set the Pressure
Regulator Valve to PRESSURE.Heat on
MAX/BROWNING until the HIGH/LOW
Pressure Level Indicator and the Pressure Lift
Pin raises.
5. When a steady flow of steam is released from
the Pressure Regulator Valve,reduce the
Variable Temperature/Pressure Control to 7 - 8
and cook at HIGH pressure 18 to 22 minutes or
until done.
6. Turn the Variable Temperature/Pressure Control to WARMING and
turn the Pressure Cooker OFF.Unplug the unit.The Power Indicator
Light will turn off.Use the Natural Steam Release method.Wait
until the HIGH/LOW Pressure Level Indicator and the Pressure Lift
Pin drops.
7. Serve with fresh cilantro.
Makes 6 servings
Page 58

3.Ajouter la quantité d’huile nécessaire à la réalisation de la
recette dans la Cocotte-Minute.Brancher l'appareil dans une
prise murale de 120V CA,puis appuyer sur le (-) de
l'interrupteur de marche/arrêt 'ON/OFF' pour allumer la
Cocotte-Minute.Le voyant de marche/arrêt 'ON/OFF'
s'allume.Tourner le Bouton de commande réglable de la
température/pression sur ‘MAX/BROWNING’, position 7,8 ou 9.
4.Au bout de 5 minutes de préchauffage,ajouter les aliments et
commencer à les faire dorer sans le couvercle.
ATTENTION : Toujours surveiller la Cocotte-Minute lorsque vous
faites dorer des ingrédients.
5.Lorsque les aliments ont suffisamment doré, vous pouvez soit
les retirer du plat et continuer la recette,soit ajouter les
ingrédients de la recette dans le plat de la Cocotte et
commencer la cuisson sous pression en suivant les instructions
de la recette.
6.Lorsque la cuisson est terminée,tourner le Bouton de
commande réglable de la température/pression sur
‘WARMING’(Maintien au chaud).Appuyer sur le (O) de
l’interrupteur de marche/arrêt ‘ON/OFF’,le voyant de
marche/arrêt ‘ON/OFF’s’éteint.Débrancher l’appareil.
CUISSON A LA VAPEUR
Cette fonction permet de faire rapidement bouillir le liquide de
manière à obtenir des légumes ou du riz cuits à la vapeur. Les
temps de cuisson sont semblables à la cuisson sur une cuisinière.
1.Brancher le cordon électrique dans la prise située en bas de
la Cocotte-Minute.
2.Pour faire cuire à la vapeur,placer les aliments au fond de la
Cocotte ou utiliser une petite grille thermorésistante ou
encore un panier (non inclus) que vous placerez au fond de
la cuve.Ajouter au moins 1 verre d’eau pour un temps de
cuisson allant jusqu’à 30 minutes. Ne pas remplir la CocotteMinute au-delà de la graduation ‘MAX Fill’,c’est-à-dire au-
delà des deux-tiers de sa capacité.
3.Mettre le couvercle et le verrouiller sur la cuve de la CocotteMinute en suivant les consignes du chapitre Conseils de
sécurité de ce guide.
4.Tourner la soupape de régulation de la pression située sur le
couvercle,sur la position ‘STEAM’(Vapeur).
56
Page 59

5.Tourner le Bouton de commande réglable
de la température/pression sur ‘WARMING’
(Maintien au chaud).Brancher l’appareil
dans une prise murale de 120V CA.et
brancher l'appareil dans une prise murale
de 120V CA,puis appuyer sur le (-) de
l'interrupteur de marche/arrêt 'ON/OFF'
pour allumer la Cocotte-Minute.Le voyant de marche/arrêt
'ON/OFF' s'allume.
REMARQUE : Le couvercle peut être retiré lorsque la Cocotte-
Minute fonctionne en cuisson vapeur de manière à
vérifier le degré de cuisson des aliments. Cependant,
il faut attendre que le taquet de compression
s’abaisse.
6. Tourner le Bouton de commande
réglable de la température/pression
sur ‘STEAM’(Vapeur)’,position 3 à 5
(voir l’illustration).Le taquet de
compression peut monter et
descendre durant la cuisson dans la
mesure où l’appareil s’allume et
s’éteint de manière à conserver une
température constante.
7. Lorsque la cuisson est terminée,tourner le Bouton de
commande réglable de la température/pression sur
‘WARMING’(Maintien au chaud).Appuyer sur le (O) de
l’interrupteur de marche/arrêt ‘ON/OFF’,le voyant de
marche/arrêt ‘ON/OFF’s’éteint.Débrancher l’appareil.
8. Attendre que le taquet de compression descende,puis retirer
le couvercle.
ATTENTION : Soulever le couvercle de verrouillage avec
précaution dans la mesure où la vapeur d’eau est
brûlante, tout comme le couvercle.
I n s t ructions de fonctionnement
de la Cocotte-Minute
1. Brancher le cordon électrique dans la prise située en bas de
la Cocotte-Minute.
2. Préparer les ingrédients en suivant la recette ou le tableau.Si
la recette indique qu’il faut faire revenir les légumes ou dorer
la viande,ajouter de l’huile dans la cuve de la CocotteMinute,puis tourner le Bouton de commande réglable de la
température/pression sur ‘BROWNING’(Faire dorer),position 7,
8,ou 9.
57
R e c i p e s
FRESH GREEN BEANS WITH
NEW POTATOES AND HAM
1 tablespoon olive oil
1 cup chopped onion
1-1/2 pounds fresh green beans,cut into 1 inch pieces
1 pound new potatoes,scrubbed and quartered
1 cup cubed ham
1/2 teaspoon salt
1/8 teaspoon black pepper
2-1/2 cups water
1 teaspoon fresh chopped basil
1. Heat the oil in the Pressure Cooker Pan
on MAX/BROWNING.Add the onion
and sauté 5 to 7 minutes until onion is soft,
stirring frequently.
2. Add the remaining ingredients.
Stir to combine.
3. Cover with the Lid and set the Pressure
Regulator Valve to PRESSURE.Heat on
MAX/BROWNING until the HIGH/LOW
Pressure Level Indicator and the Pressure
Lift Pin raises.
4. When a steady flow of steam is released from
the Pressure Regulator Valve,reduce the
Variable Temperature/Pressure Control to 7 - 8
and cook at HIGH pressure 9 to 13 minutes or
until done.
5. Turn the Variable Temperature/Pressure Control
to WARMING and turn the Pressure Cooker OFF.
Unplug the unit.The POWER Indicator Light will
turn off. Allow the Pressure Cooker to cool
slowly at room temperature until the HIGH/LOW
Pressure Level Indicator and the Pressure Lift
Pin drops.
Makes 6 servings
Page 60

I n s t ructions de fonctionnement
de la Cocotte-Minute (suite)
. La Cocotte-Minute Russell Hobbs
comprend un mode qui permet de
faire revenir ou dorer les aliments dans
la Cocotte avant de les faire cuire à
la vapeur.(Suivre la démarche
indiquée dans les Caractéristiques de
l’appareil : Chapitre‘Faire dorer les
aliments’de ce guide).
3 . S u i v re les indications de la recette ou du tableau ; re t i rer les
aliments dorés et/ou ajouter les autres ingrédients.To u j o u rs utiliser 1
à 3 ve r res d’eau,de bouillon,de vin,de jus de fruits ou de légumes,
ou d’un autre type de liquide avant de fa i re cuire à la vap e u r.N e
pas utiliser de lait,de produits laitiers ou de sauces contenant de la
c r è m e ,car ces produits ont tendance à roussir rap i d e m e n t .Ve i l l e r
à ce que le pourtour du plat soit pro p re et sec.Ne jamais tap e r
une cuillère ou tout autre ustensile sur le pourtour de la cuve de la
C o c o t t e - M i n u t e .Une indentation ou un éclat sur le pourt o u r
ri s q u e rait de compro m e t t re l’étanchéité de l’ap p a reil et
d’empêcher la Cocotte-Minute de fonctionner conve n ab l e m e n t
sous pre s s i o n .
4 . Placer le joint pro p re à l’intérieur du couve rcle de la Cocotte-
M i n u t e ,à l’endroit qui lui est réserv é ,sous le mécanisme de
ve r rouillage du couve rcle et du conduit d’éva c u a t i o n ,s u r
l ’ i n t é rieur du pourtour du couve rc l e .Veiller à ce que l’indicateur
de haute/basse pression soit assemblé correctement et que le
joint loge conve n ablement à l’intérieur de l’ouve rt u re du
c o u ve rc l e .Vous pouvez ap p u yer sur le joint à l’intérieur du
l ’ o u ve rt u re du couve rcle de ma n i è re à ce qu’il soit solidement en
place et qu’il fonctionne corre c t e m e n t .
5 . Placer le couve rcle sur la cuve de la Cocotte-Minute de ma n i è re
à ce que la poignée du couve rcle se tro u ve légèrement à dro i t e
de la poignée de la cuve de la Cocotte-Minute.To u rner la
poignée du couve rcle dans le sens des aiguilles d’une montre
jusqu’à ce que les deux poignées se rejoignent et se re t ro u vent en
face de vo u s.Veiller à ce que le couve rcle soit scellé
c o r rectement sur le pourtour de la cuve de la Cocotte-Minute et
qu’il soit fixé conve n ablement à la cuve .
6. Tourner la soupape de régulation de la pression située en
haut du couvercle sur la position ‘PRESSURE’(Pressurisation).
7. Tourner le Bouton de commande réglable de la
température/pression sur ‘WARMING’(Maintien au chaud).
58
Page 61

8. Brancher l'appareil dans une prise murale
de 120V CA,puis appuyer sur le (-) de
l'interrupteur de marche/arrêt 'ON/OFF'
pour allumer la Cocotte-Minute.Le voyant
de marche/arrêt 'ON/OFF' s'allume.
9. Tourner le Bouton de commande réglable
de la température/pression sur ‘MAX/BROWNING’.
ATTENTION : TOUJOURS SURVEILLER LA
COCOTTE-MINUTE SUR LE
MODE DE CUISSON A FEU
FORT ‘HIGH HEAT’.
10. Dès que la pression monte, m ê m e
l é g è re m e n t ,le taquet de compre s s i o n
se met en mouvement jusqu’à ce que
la pression ma x i male soit atteinte et que le couve rcle se
ve r rouille sur la cuve de la Cocotte-Minute.Ne pas essayer de
re t i rer le couve rcle avant que la pression soit descendue.
A t t e n d re que la vapeur s’échappe doucement de la soupap e
de régulation de la pression tout en produisant un sifflement :
La pression de la Cocotte-Minute est alors maximale.
11. Commencer à calculer le temps de cuisson à partir du
moment où la pression est maximale.Suivre les indications de
la recette ou du guide de cuisson et laisser cuire pendant le
temps indiqué.
REMARQUE : La quantité d’aliments à cuire
détermine le temps nécessaire
pour que la pression atteigne son
niveau maximum.
12. Tourner rapidement le Bouton de
commande réglable de la
température/pression sur 7 – 8 (voir
l’illustration); les deux bagues sont alors visibles de manière à
ce que la haute pression soit maintenue.Si vous préférez
cuisiner à basse pression,tourner le
Bouton de commande réglable de la
température/pression sur 6 – 7; seule
une bague reste visible.Le sifflement
constant et la quantité de vapeur qui
se dégage varient en fonction des
changements de pression. Vous
apprendrez vite à connaître le
réglage qui convient le mieux pour
maintenir une pression adéquate.
En mode de cuisson à
haute pression ‘HIGH”, les
deux bagues sont visibles
Pour maintenir la haute
pression,réduire la
température sur 7 – 8
59
When should you use a Steaming or Cooking Rack?
Solution: • A steaming or cooking rack will keep the food above
What should you do if froth comes out of the Steam Vent Tube
when pressure is being released?
Solution: • After pressure cooking,turn the Variable Temperature/
How can meat and vegetables be cooked together?
Solution: • Start pressure cooking the longer cooking meat first.
Why is there a trickle of moisture around the Steam Vent Tube,
Pressure Cooker Handles, Pressure Regulator Valve and/or Safety
Valves when the Pan is first heated?
Solution: • A small amount of moisture around these parts is
Helpful Hints ( C o n t i n u e d )
Page 62

I n s t ructions de fonctionnement
de la Cocotte-Minute ( S u i t e )
IMPORTANT : Si la température est trop
élevée, le sifflement produit
est constant et très fort. Il
faut alors réduire le feu. UNE
TEMPERATURE EXCESSIVE
RISQUERAIT D’ENTRAINER UNE
PERTE DE LIQUIDE
IMPORTANTE.
1 3 . L o rsque les aliments ont cuit le temps
n é c e s s a i re à la pression qui conv i e n t ,
t o u rner le Bouton de commande réglable de la
t e m p é ra t u re / p ression sur ‘ WA R M I N G ’(Maintien au chaud),
Appuyer sur le (O) de l’interrupteur de marche/arrêt
‘ON/OFF’,le voyant de marche/arrêt ‘ON/OFF’s’éteint.
Débrancher l’appareil.
1 4 . Fa i re tomber la pression en utilisant soit la bouche d’éva c u a t i o n
n a t u relle de la vap e u r,soit la commande d’évacuation rap i d e
de la vap e u r,en suivant la pro c é d u re décrite au chap i t re
‘Méthodes d’évacuation de la vap e u r ’du présent guide.
REMARQUE : Les temps de cuisson répert o riés dans ce livre ne sont
fo u rnis qu’à titre indicatif.Les préférences de chacun
sont à pre n d re en compte.Il vous ap p a rtient d’ajuster les
temps de cuisson en fo n c t i o n .
ATTENTION : Toujours utiliser la poignée à toucher froid pour retirer
la cuve de la Cocotte-Minute.
15. Attendre qu’il n’y ait plus du tout de vapeur d’eau qui
s’échappe de la soupape de régulation de la pression et que
le taquet de compression se soit abaissé.
ATTENTION : L’indicateur de haute/basse pression et le taquet de
compression sont en position haute lorsque la
Cocotte-Minute est sous pression. Lorsqu’il n’y a plus
de pression, le taquet retombe. Ne jamais essayer
d’ouvrir le couvercle lorsque l’indicateur et le taquet
sont en position haute.
ATTENTION : La vapeur d’eau qui s’échappe peut causer des brûlure s
et le couve rcle est très chaud. Laisser la vapeur d’eau
s ’ é c h apper loin des meubles ou de tout équipement ou
a c c e s s o i re de cuisine qu’elle pourrait endommager.
Pour maintenir la basse
pression,réduire la
température sur 6 – 7
60
Page 63

16. Attendre que la pression soit retombée avant de retirer le
couvercle de la Cocotte-Minute. Lorsque la pression est
entièrement tombée, faire glisser le bouton de verrouillage du
couvercle vers vous,puis tourner le couvercle dans le sens
inverse des aiguilles d’une montre de manière à ne pas entrer
en contact avec la vapeur d’eau.
ATTENTION : Ne jamais ouvrir le couvercle de la Cocotte-Minute
de force. Le verrou de sécurité ne se relâche pas tant
que la Cocotte-Minute n’a pas dépressurisé. Si le
couvercle est difficile à retirer, laisser la CocotteMinute refroidir à nouveau jusqu’à ce que la pression
soit entièrement tombée.
ATTENTION : Prendre les précautions qui s’imposent avant de
manier du matériel de cuisine chaud.Veiller à ne pas
entrer en contact avec la cuve de la Cocotte-Minute
chaude et sous pression, le couvercle, et les
accessoires. Utiliser des manoques de protection ou
des gants de cuisine pour retirer la cuve chaude.
Faire très attention en ouvrant la cuve chaude. La
vapeur d’eau est très chaude et pourrait causer des
brûlures.
METHODE D’EVA C U AT I O N
N ATURELLE DE LA VA P E U R
1 . L o rsque la cuisson à la vapeur est
t e rm i n é e ,t o u rner le Bouton de
c o m mande réglable de la
t e m p é ra t u re / p ression sur ‘ WA R M I N G ’
(Maintien au chaud).A p p u yer sur le (O)
de l’interrupteur de ma rc h e / a r r ê t
‘ O N / O F F ’ ,le voyant de ma rc h e / a r r ê t
‘ O N / O F F ’s ’ é t e i n t .D é b rancher l’ap p a re i l .
2. Laisser la Cocotte-Minute re f roidir lentement à tempéra t u re
a m b i a n t e .En fonction de la quantité et du type d’aliment,c e c i
peut pre n d re entre 5 et 20 minutes.A t t e n d re que la pression soit
e n t i è rement retombée de la soupape de régulation de la
p ression et que l’indicateur de haute/basse pression et le
taquet de compression soient re t o m b é s.
61
Helpful Hints
No steam comes out of the Steam Vent Tube.
Solution: • The Pressure Cooker Lid may not be tightly clamped
The Pressure Cooker Lid cannot be opened.
Solution: • All the pressure that had built up inside the Pressure
All the water evaporated from the Pressure Cooker before the
food was done.
Solution: • The Variable Temperature/Pressure Control may have
Page 64

3. Pour retirer le couvercle de la Cocotte-Minute,faire glisser le
bouton de verrouillage du couvercle vers vous,puis faire
tourner le couvercle dans le sens inverse des aiguilles d’une
montre jusqu’à ce que le couvercle puisse être retiré sans
forcer.Toujours incliner le couvercle loin de vous afin d’éviter
d’entrer en contact avec la vapeur d’eau.
ATTENTION : Ne jamais forcer le couvercle de la Cocotte-Minute.
Le verrou de sécurité ne se relâche pas tant qu’il
reste de la vapeur d’eau à l’intérieur de la CocotteMinute. Si le couvercle est difficile à ouvrir, laisser la
Cocotte-Minute refroidir à nouveau jusqu’à ce qu’elle
soit entièrement dépressurisée.
ATTENTION : Prendre les précautions qui s’imposent avant de
manier du matériel de cuisine chaud.Veiller à ne pas
entrer en contact avec la cuve de la Cocotte-Minute
chaude et sous pression, le couvercle, et les
accessoires. Utiliser des manoques de protection ou
des gants de cuisine pour retirer la cuve chaude.
Faire très attention en ouvrant la cuve chaude. La
vapeur d’eau est très chaude et pourrait causer des
brûlures.
ATTENTION : La cuve de la Cocotte-Minute et le Couvercle restent
très chauds après la cuisson.
METHODE D’EVACUATION RAPIDE DE LA VAPEUR
1. Après la cuisson à la vapeur,tourner
le Bouton de commande réglable de
la température/pression sur
‘WARMING’,(Maintien au chaud)
Appuyer sur le (O) de l’interrupteur
de marche/arrêt ‘ON/OFF’,le voyant
de marche/arrêt ‘ON/OFF’ s’éteint.
Débrancher l’appareil.
2. Pour fa i re évacuer la pression rapidement et
sans avoir à attendre que la vapeur se soit
é c h ap p é e ,ou que la Cocotte-Minute ait
re f ro i d i ,utiliser la fonction ‘STEAM RELEASE’
( E vacuation de la vapeur) de l’ap p a re i l .Ave c
des ma n o q u e s,ap p u yer sur la soupape de
régulation de la pre s s i o n ,puis fa i re tourn e r
dans le sens des aiguilles d’une montre jusqu’à la position ‘ S T E A M
R E L E A S E ’ .Pour arrêter l’évacuation de la vap e u r,re m e t t re le
bouton sur la position ‘ P R E S S U R E ’( P re s s u ri s a t i o n ) .
62
Page 65

ATTENTION : Afin d'éviter de s'ébouillanter, faire évacuer la
vapeur par petites bouffées en appuyant sur la
soupape de régulation de la pression sans attendre.
ATTENTION : Si vous utilisez cette fonction, faire évacuer la vapeur
uniquement par petites bouffées jusqu’à ce que la
pression soit tombée, dans la mesure où le liquide
chaud risquerait d’être éjecté.
ATTENTION : Eloigner les mains et le visage de la soupape de
régulation de la pression et du tube du conduit
d’évacuation qui produisent de la vapeur chaude.
Utiliser des manoques.
AT T E N T I O N : La soupape de régulation de la pression est parfois très
c h a u d e .Utiliser des manoques ou un torchon de cuisine
pour se protéger les mains.A manier avec précaution.
Ne jamais fa i re couler d’eau sur la Cocotte-Minute ni
l ’ i m m e rger dans l’eau pour la fa i re dépre s s u ri s e r.
AT T E N T I O N : La vapeur d’eau qui s’échappe peut causer des brûlure s
et le couve rcle est très chaud.Laisser la vapeur d’eau
s ’ é c h apper loin des meubles ou de tout équipement ou
a c c e s s o i re de cuisine qu’elle pourrait endommager.
ATTENTION : NE PAS ALLER AU-DELA DE LA POSITION VAPEUR ‘ S T E A M ’
POUR ATTEINDRE LA POSITION DE NETTOYAGE ‘ C L E A N ’ .
ATTENTION : Ne pas utiliser la méthode d’évacuation rapide de la
vapeur pour les ingrédients qui contiennent une
grande quantité de liquide car la cocotte risquerait
de déborder.
3. Utiliser cette méthode pour la cuisson à la vapeur
d’ingrédients tels que les fruits, les légumes tendres,ou les
légumes surgelés.
4. La pression tombe complètement en 2 à 5 minutes . Attendre
ensuite que l’indicateur de niveau de pression et le taquet de
compression soient retombés avant d’ouvrir le couvercle,en
suivant les procédures décrites au chapitre Instructions de
fonctionnement de la Cocotte-Minute de ce guide.
63
Beans & Legumes Cooking Water*
Adzuki, 1 cup dry 12 to 14 min. 3 cups 2 cups
Black Beans, 1 cup dry 18 to 22 min. 3 cups 2 cups
Black Eyed Peas, 1 cup dry 18 to 20 min. 3 cups 2-1/4 cups
Chickpeas (Garbanzo), 1 cup dry 23 to 25 min. 3 cups 2-1/2 cups
Great Northern Beans, 1 cup dry 10 to 12 min. 3 cups 2-1/4 cups
Kidney Beans, red or white, 1 cup dry 13 to 15 min. 3 cups 2 cups
Lentils, green, brown or red,2 cups dry 11 to 13 min. 3 cups 4 cups
Navy Beans 1 cup dry 13 to 15 min. 3 cups 2 cups
Pinto Beans, 1 cup dry 10 to 12 min. 3 cups 2-1/4 cups
*Add one tablespoon of vegetable oil to the water to reduce excess foaming.
• All dried beans and legumes, with the exception of lentils: Follow package directions
to pre-soak overnight or boil for a few minutes, soak and drain.
The actual cooking times may vary depending on how old the beans are and personal
preference.
Page 66

I n f o rmations de sécurité
i m p o rtantes
Pour des résultats optimaux,toujours veiller à ce que la soupape
de régulation de la pression,la soupape d’indication de pression,
l’indicateur de haute/basse pression et son joint,le joint du
couvercle et le bouton de verrouillage du couvercle soient en
bon état de marche et qu’aucun corps étranger ne bloque le
tube du conduit d’évacuation,le taquet de compression,les
soupapes de sécurité et le conduit d’évacuation.
Pour que tube du conduit d’évacuation
soit visible, Il faut retirer la soupape de
régulation de la pression.
1. Appuyer et faire tourner la
soupape de régulation de la
pression dans le sens inverse des
aiguilles d’une montre jusqu’à la
position de nettoyage ‘CLEAN’,
jusqu’à ce qu’elle s’arrête.
Soulever le régulateur de pression
de manière à pouvoir le retirer sans
forcer. Placer le couvercle à la
lumière.Vous devriez voir la lumière
passer au travers du tube du
conduit d’évacuation.
2 . Si vous n’ap e rc evez pas de
l u m i è re ,c’est que le tube du
conduit d’évacuation est
b l o q u é .I n s é rer alors la brosse de
n e t t oyage à l’intérieur du
conduit d’évacuation et
e ffectuer un mouvement de va et-vient jusqu’à ce que le tube
soit pro p re .
3. Remettre la soupape de
régulation de la pression.Aligner
les fentes situées en bas du
régulateur de pression sur les rainures du couvercle.Presser et
faire tourner le régulateur dans le sens des aiguilles d’une
montre jusqu’à ce qu’il se retrouve à sa place.
To u rner la soupape de régulation
de la pression jusqu’à la position
de nettoyage ‘ C L E A N ’
S o u l ever la soupape de régulation
de la pression de ma n i è re à
p o u voir la re t i rer sans fo rc e r
Nettoyer la soupape de
régulation de la pression
avec la brosse de nettoyage
Brosse de
nettoyage
(Réf 21100A)
64
Page 67

ATTENTION : Ne jamais démonter le régulateur de pression ni
nettoyer le tube du conduit d’évacuation lorsque la
Cocotte-Minute est en cours d’utilisation.
Toutes les soupapes d’évacuation de la pression bénéficient d’un
système de la plus haute qualité et sont strictement conformes
aux normes.
Graduation de remplissage maximum :
La graduation se tro u vant à l’intérieur de la cuve de la CocotteMinute indique que la Cocotte-Minute est remplie aux deux-tiers.
L o rsque vous faites cuire des aliments qui gonfl e n t ,tels que du ri z ,d e s
h a ricots ou des pois secs,ou qu’une recette contient ce type
d ’ i n g r é d i e n t s,ne pas remplir la Cocotte-Minute au-delà de la moitié.
Ceci est également va l able pour les bouillons et les soupes.
ATTENTION : Ne jamais remplir la cuve de la Cocotte-Minute
d’ingrédients ou de liquide au-delà de la graduat i o n
des deux-tiers.Le fait de trop remplir la Cocotte-Minute
ri s q u e rait d’empêcher la vapeur de s’échapper par le
taquet de compression et la soupape de régulation de
la pre s s i o n .Ne pas laisser d’aliment dépasser au-delà
de la graduation ‘MAX Fill’.
Conseils d’entre t i e n
Cet appareil ne contient aucune pièce pouvant être réparée par
l’utilisateur.Ne pas essayer d’effectuer des réparations par ses
propres moyens.Toute opération d’entretien autre que le
nettoyage,qui nécessite le démontage de l’appareil,doit être
effectuée par un technicien qualifié.
Ne pas oublier de toujours débrancher l’appareil de la prise
murale lorsqu’il n’est pas en service ainsi qu’avant de le nettoyer.
INSTRUCTIONS DE NETTOYAGE ET DE STOCKAGE
Avant d’utiliser l’appareil pour la première fois et après chaque
utilisation,laver l’ensemble des pièces de la Cocotte-Minute à la
main.Toujours débrancher l’appareil et le laisser refroidir
intégralement avant de le nettoyer.
1. Retirer le joint du couvercle.Laver
soigneusement le joint à l’eau chaude
savonneuse.Rincer et sécher
soigneusement.Appliquer une fine couche
d’huile végétale sur le joint après chaque
utilisation.Ceci permet de prolonger la
durée de vie du joint.Remettre le joint à sa
place sur l’intérieur du couvercle.
65
Frozen Vegetables Cooking Time Water
Asparagus 2 min. 1 cup
Beans, green, wax or French cut 1 min. 1 cup
Beans, lima 2 min. 1 cup
Broccoli, chopped, florets, or spears 2 min. 1 cup
Brussels Sprouts 2 min. 1 cup
Cauliflower, florets 1 min. 1 cup
Corn, kernels 1 min. 1 cup
Corn, on the cob 2 to 3 min. 1 cup
Mixed Vegetables 2 min. 1 cup
Peas (not split) 1 min. 1 cup
Peas and Carrots 1 min. 1 cup
Spinach 1 min. 1 cup
•
For the frozen vegetables listed, 1 cup liquid is recommended. If more than
1 cup liquid is used, there may be excess liquid released through the Pressure
Regulator Valve as the pressure is released.
Page 68

2. Le joint qui se loge à l’intérieur du couvercle peut devenir
usagé au bout d’un certain nombre d’utilisations. S’il se
déchire,est fendu,coupé ou abîmé d’une manière visible,ne
pas utiliser la cocotte-minute.Contacter le Service
Consommateurs au 800-233-9054 pour commander un
nouveau joint.Si le joint de la soupape d’indication de
pression est abîmé,le couvercle doit être renvoyé afin d’être
réparé ou remplacé.
3. Nettoyer le pourtour des ouvertures de
l’indicateur de niveau de pression et son
joint,ainsi que du taquet de compression
et son joint à l’eau chaude savonneuse,
de manière à ce que le fonctionnement
de l’appareil ne soit pas entravé par du
gras ou des particules d’aliments.Rincer
et sécher soigneusement.
4. Pour que le tube du conduit
d’évacuation soit visible,il faut retirer la
soupape de régulation de la pression.
Appuyer et faire tourner la soupape de
régulation de la pression dans le sens
inverse des aiguilles d’une montre jusqu’à
la position de nettoyage ‘CLEAN’,jusqu’à
ce qu’elle s’arrête.Soulever le régulateur de pression de
manière à pouvoir le retirer sans forcer.
Placer le couve rcle à la lumière pour vous assurer que le tube du
conduit d’évacuation est bien pro p re .S’il était bloqué,i n s é re r
a vec précaution la brosse de nettoyage à l’intérieur du tube du
conduit d’évacuation et effectuer un mouvement de va - e t - v i e n t
jusqu’à ce que le tube soit pro p re .L a ver à nouveau à l’eau
s a vo n n e u s e ,rincer et
sécher soigneusement
( Voir les Info rmations de
s é c u rité import a n t e s ) .
5. Nettoyer le régulateur
de pression sous l’eau
courante.
6. Vérifier la pièce à
ressort avant de la
remettre en place.
7. Aligner le régulateur de pression sur la position de nettoyage
‘CLEAN’,appuyer et tourner dans le sens des aiguilles d’une
montre de manière à fixer solidement le régulateur de
pression avant de ranger l’appareil.
66
Page 69

8. Lorsque l’appareil a refroidi après la cuisson, retirer les restes
d’aliments avec un essuie-tout,puis essuyer avec une éponge
imbibée d’eau chaude savonneuse.Rincer.Sécher avec un
torchon doux ou un essuie-tout.Ne jamais utiliser de produits
chimiques, de tampons métalliques ou de poudre à récurer
sur une quelconque partie ou un quelconque composant de
la Cocotte-Minute.
ATTENTION: NE PAS IMMERGER LA CUVE DE LA COCOTTE-MINUTE
DANS L’EAU OU DANS TOUT AUTRE LIQUIDE.
Remarque : Ne pas passer le couvercle de la Cocotte-Minute, les
pièces de la soupape de régulation de la pression,
le joint ou encore la cuve de la Cocotte-Minute au
lave-vaisselle.
9. L’indicateur de haute/basse pression doit être nettoyé après
chaque utilisation.Retirer le joint de l’indicateur de pression
du fond du couvercle.Placer une main à l’intérieur du
couvercle et presser vers le haut sur le capuchon noir à ressort
pour qu’il vienne s’enclencher dans la barre métallique rouge
servant d’indicateur tout en faisant tourner avec précaution
la barre rouge dans le sens des aiguilles d’une montre jusqu’à
ce qu’elle puisse être retirée sans difficulté.Vous pouvez
ensuite retirer le capuchon noir et le ressort se trouvant à
l’intérieur.Nettoyer soigneusement la surface.Assembler de
nouveau lorsque tout est propre.S’assurer que l’indicateur de
haute/basse pression est assemblé correctement et que le
joint est bien fixé à l’intérieur de l’ouverture du couvercle.
Presser le joint à l’intérieur du couvercle avant de vous servir
de ce dernier de manière à vous assurer qu’il est bien
étanche et qu’il peut fonctionner normalement.
10. S t o cker la Cocotte-Minute sans son couve rcle ou à l’enve rs sur la
c u ve de l’ap p a re i l .Ne pas stocker la Cocotte-Minute avec son
c o u ve rcle et le joint fe rmés hermétiquement sur la cuve .
11. Pour une sécurité renforcée et des résultats optimaux, veuillez
remplacer le joint du couvercle,le joint de l’indicateur de
niveau de pression et le joint du taquet de compression tous
les ans.Pour commander, contacter le Service
Consommateurs au 1-800-233-9054.
TEMPS DE CUISSON RECOMMANDES
Les temps de cuisson suivants sont mentionnés à titre indicatif
pour la Cocotte-Minute électrique à toucher froid Russel Hobbs
®
Les temps de cuisson peuvent varier en fonction de la qualité et
de la taille des morceaux individuels qui sont préparés.Vous
trouverez parfois les temps de cuisson maximum et minimum.Le
temps de cuisson des légumes varie en fonction de la taille,de la
fraîcheur et de la variété de légumes.
67
Seafood Cooking
Clams, baby 1 to
Mussels 2 to 4 min. 1 cup
Shrimp, large 0 to 1/2 min. 1 cup
Fish, whole, 1/2 to 1 lb., cleaned 4 to 6 min. 1 cup
Fish, steaks, 1 in. thick 4 to 6 min. 1 cup
Fresh Vegetables Cooking
Asparagus, thick whole 4 to 5 min. 1 cup
Asparagus, thin whole 2 to 3 min. 1 cup
Beans, green or wax, whole or piece 9 to 13 min. 1 cup
Beans, lima, shelled 3 to 4 min. 1 cup
Beets, medium, whole 20 to 25 min. 2 cups
Broccoli, florets 2 to 3 min. 1 cup
Broccoli, spears 3 to 4 min. 1 cup
Brussels Sprouts, whole 5 to 6 min. 1 cup
Page 70

68
Lorsque vous ne savez pas combien de temps il faut pour faire
cuire un ingrédient donné,toujours commencer par le temps de
cuisson minimum dans la mesure où vous pouvez toujours
prolonger le temps de cuisson jusqu’à ce que l’aliment soit cuit.
L’ensemble des temps de cuisson mentionnés est indiqué à partir
du moment où la pression est maximale.Utiliser votre panier
thermorésistant que vous placerez au fond de la cuve de la
Cocotte-Minute pour maintenir les ingrédients en place durant le
processus de cuisson sous pression ou à la vapeur.
INGREDIENTS QUI NE PASSENT PAS
A LA COCOTTE-MINUTE :
La compote de pommes, les airelles, la rhubarbe,les petites
pâtes,les spaghetti ou tout autre type de pâtes, les soupes en
sachet,l’avoine et les autres céréales, les graines, le boulgour,les
pois cassés ou tout autre type de haricots secs, les pois et le riz qui
ne figurent pas dans la liste des Tableaux de cuisson.Ces aliments
ont tendance à gonfler ou à mousser et pourraient bloquer le
taquet de compression et le tube du conduit d’évacuation de la
soupape de régulation de la pression.
REMARQUE : L’ U S DA recommande de fa i re cuire la dinde et le
poulet hachés à une températ u re interne de 74°C, e t
le bœuf, ve a u ,a g n e a u , et porc hachés à une
t e m p é r at u re interne de 71°C.Les viandes telles que le
b œ u f, l ’ a g n e a u , e t c . d o i vent cuire à une températ u re
i n t e rne d’au moins 63°C. La températ u re interne de
cuisson du porc doit at t e i n d re au moins 71°C tandis
que les produits à base de volailles doivent être cuits à
une températ u re interne de 77°C-82°C de manière à
d é t ru i re les bactéries nocive s. Les produits réchauffés à
base de viande et de volaille doivent être cuits à une
t e m p é r at u re interne de 74°C.
Page 71

69
VIANDE ET VOLAILLE
TEMPS DE CUISSON A LA VAPEUR
METHODE D’EVACUATION NATURELLE
DE LA VAPEUR
Viande et Volaille Temps Liquide
de cuisson de cuisson
Avant, pot-au-feu, rumsteak en rôti
ou pointe de poitrine de Bœuf/Ve a u / P o rc
905 g à 1,8 kg, 3,8 cm à 5 cm d’épaisseur 50 à 65 mn. 2 verres et demi
Avant, pot-au-feu, rumsteak en rôti
ou pointe de poitrine de Bœuf/Ve a u / P o rc
905 g à 1,8 kg, 5 cm à 7,5 cm d’épaisseur 70 à 85 mn. 3 verres
Corned Beef, 905 g à 1,5 kg 60 à 70 mn. 2 verres et demi
Rouelle de bœuf, 905 g, 1 cm d’épaisseur 18 à 20 mn. 1 verre et demi
Pot au feu en cubes de 5 cm 15 à 20 mn. 1 verre et demi
Boulettes de viande jusqu’à 905 g, faire dorer 8 à 10 mn. 1 verre
Côtes de porc ou de bœuf, 905 g à 1,5 kg 25 à 35 mn. 1 verre et demi
Poulet entier 1,5 kg à 1,8 kg 25 à 35 mn. 1 verre et demi
Morceaux de poulet, 905 g à 1,5 kg 12 à 15 mn. 1 verre
Poules de Cornouailles, 2 25 à 30 mn. 1 verre et demi
• Ne pas faire cuire de viande de plus de 7,5 cm d’épaisseur à la cocotte.
La viande ne cuierait pas.
SUGGESTED COOKING TIMES
The following cooking times are provided as a guide to be
used when cooking in the Russell Hobbs® Electric Cool Touch
Pressure Cooker. Cooking times can vary depending on the
quality and the individual piece sizes of the food being
cooked; maximum and minimum cooking times are given in
some instances.Cooking time for vegetables will vary
depending on size,freshness,and variety of vegetables.
When uncertain how long to cook something,always start
with the shortest cooking time because you can always
continue cooking for additional time until the desired texture
is reached.
All cooking times listed begin once full pressure is reached.
Use your own heat-resistant steaming basket in the bottom of
the Pressure Cooker Pan to hold food while pressure cooking
or steaming.
FOODS THAT SHOULD NOT BE COOKED UNDER
PRESSURE ARE:
Applesauce,cranberries, rhubarb, macaroni,spaghetti or
other pasta,dried soup mixes,oatmeal or other cereals,
grains,pearl barley, split peas or any dried beans, peas or rice
not listed on the Cooking Charts.These foods tend to expand,
foam,or froth and may block the Pressure Lift Pin and Pressure
Regulator Valve’s Steam Vent Tube.
NOTE: The USDA recommends that ground turkey and chicken
be cooked to an internal temperature of 165ºF and
ground beef, veal, lamb and pork be cooked to an
internal temperature 160ºF. Meats such as beef and
lamb, etc. should be cooked to an internal temperature
of at least 145ºF. Pork should be cooked to an internal
temperature of at least 160ºF and poultry products
should be cooked to an internal temperature of 170ºF-
180ºF to be sure any harmful bacteria has been killed.
When re-heating meat/poultry products, they should
also be cooked to an internal temperature of 165ºF.
Page 72

70
FRUITS DE MER ET POISSON
TEMPS DE CUISSON A BASSE PRESSION
METHODE D’EVACUATION RAPIDE DE LA VAPEUR
Fruits de mer Temps Liquide
de cuisson de cuisson
Petites coques 1 à 1 mn.
1/2
1 verre
Moules 2 à 4 mn. 1 verre
Grosses Crevettes 0 à 1/2 mn. 1 verre
Poisson entier, 250 g à 900 g, vidé 4 à 6 mn. 1 verre
Steaks de poisson de 2,5 cm d’épaisseur 4 à 6 mn. 1 verre
LEGUMES FRAIS
TEMPS DE CUISSON A HAUTE PRESSION
METHODE D’EVACUATION RAPIDE DE LA VAPEUR
Légumes frais Temps
Liquide
de cuisson
de cuisson
Asperges entières épaisses 4 à 5 mn. 1 verre
Asperges entières fines 2 à 3 mn. 1 verre
Haricots verts ou beurre, entiers
ou en morceaux 9 à 13 mn. 1 verre
Haricots de Lima dans leur cosse 3 à 4 mn. 1 verre
Bettes entières de taille moyenne 20 à 25 mn. 2 verres
Têtes de brocolis 2 à 3 mn. 1 verre
Pointes de brocolis 3 à 4 mn. 1 verre
Choux de Bruxelles entiers 5 à 6 mn. 1 verre
Page 73

71
TEMPS DE CUISSON DES LEGUMES FRAIS
Légumes frais Temps de cuisson Eau
Chou rouge ou vert en lamelles de 6 mm 2 à 3 mn. 1 verre
Chou rouge ou vert en quartiers 10 à 12 mn. 1 verre
Carottes entières 6 à 8 mn. 1 verre
Carottes en morceaux de 2,5 cm 4 à 5 mn. 1 verre
Carottes en tranches de 6 mm 1 à 2 mn. 1 verre
Têtes de chou-fleur, 1 à 2 mn. 1 verre
Chou vert grossièrement haché 7 à 9 mn. 1 verre
Epi de maïs 7 à 9 mn. 1 verre
Grains de maïs 2 à 3 mn. 1 verre
Aubergines en morceaux de 1 cm 1/2 à 1 mn. 1 verre
Scarole grossièrement hachée 1 à 2 mn. 1 verre
Pettis okras 3 à 4 mn. 1 verre
Oignons entiers d’un diamètre de 4 cm 3 à 4 mn. 1 verre
Céleri-rave en morceaux de 2,5 cm 4 à 6 mn. 1 verre
Poids dans leur cosse 2 à 3 mn 2 à 3 mn. 1 verre
Pommes de terre entière entre 4 et 5 cm 7 à 9 mn. 1 verre
Pommes de terre entière de 5 à 7,5 cm 11 à 14 mn. 1 verre
Pommes de terre en morceaux de 4 cm 7 à 9 mn. 1 verre
Potiron en morceaux de 5 cm, 10 à13 mn. 1 verre
Rutabaga en morceaux de 5 cm, 6 à 8 mn. 1 verre
Epinards frais grossièrement hachés 1 à 2 mn. 1 verre
Epinards frais, branches entières 2 à 3 mn. 1 verre
Courge poivrée tranchée 10 à 12 mn. 1 verre
Courge musquée
en morceaux de 5 cm d’épaisseur 6 à 7 mn. 1 verre
User Maintenance Instru c t i o n s
This appliance contains no user serviceable parts. Do not try to repair
it yourself.Any servicing requiring disassembly other than cleaning
must be performed by a qualified appliance repair technician.
Always remember to unplug the unit from the wall outlet when not in
use and before cleaning.
CLEANING AND STORAGE INSTRUCTIONS
Before using for the first time and after each use,wash all Pressure
Cooker parts by hand.Always unplug unit and allow to cool
completely before cleaning.
1. Remove the Lid Gasket and the HIGH/LOW
Pressure Level Indicator from the Lid. Wash
Gaskets thoroughly in hot,soapy water.
Rinse and dry thoroughly. Apply a thin
coating of vegetable oil to each Gasket
after each use.This will extend the life of the
Gasket.Slip the Gasket back in place on
the inside of the Lid.
2. The Gaskets that fit inside the Lid may
become worn after many uses. If one becomes torn,cracked,cut
or visibly damaged,DO NOT USE THE PRESSURE COOKER.Call
Consumer Service at 800-233-9054 to order a new Gasket.If the
Pressure Indicator Valve Gasket becomes damaged,the Lid must
be sent in for repair or replacement.
3. Clean around the openings of the Pressure Level Indicator and
Gasket,Pressure Lift Pin and Lift Pin Gasket with warm soapy
water to keep it free of grease or food
particles that could keep it from operating
properly. Rinse and dry thoroughly.
4. To expose the Steam Vent Tube,the
Pressure Regulator must be removed.
Press down and turn the Pressure
Regulator counter-clockwise to the
CLEAN position,until it stops. Lift up on
the Pressure Regulator and remove.
Hold the Pressure Cooker Lid up to the
light to make sure the Steam Vent Tube is
clear. If the Steam Vent Tube is blocked,
carefully insert the Cleaning Brush into the
Steam Vent Tube and run it gently in and
out to clear any obstructions.Wash again
with soapy water,rinse and dry thoroughly.
(See Important Safety Information.)
Page 74

72
TEMPS DE CUISSON DES LEGUMES FRAIS
Légumes frais Temps
de cuisson Eau
Bonnets de prêtre, 905 g coupés en 2 10 à 11 mn. 1 verre et
demi
Courges, spaghetti, 905 g coupés en 2 18 à 20 mn. 1 verre et
demi
Courge d'été, courgette
ou courgette de Nice en tranches d'1 cm 2 à 3 mn. 1 verre
Papate douce de 2,5 cm d’épaisseur, tranchée 8 à 10 mn. 1 verre
Bettes à côtes grossièrement hachées 3 à 4 mn. 1 verre
Tomates en quartiers 2 à 3 mn. 1 verre
Petits navets en quartiers 4 à 6 mn. 1 verre
Navets de 3,8 cm, en morceaux 4 à 6 mn. 1 verre
LEGUMES SURGELES
TEMPS DE CUISSON A BASSE PRESSION
METHODE D’EVACUATION RAPIDE DE LA VAPEUR
Légumes surgelés Temps
de cuisson Eau
Asperges 2 mn. 1 verre
Haricots verts, beurre ou très fins, coupés 1 mn. 1 verre
Haricots de Lima 2 mn. 1 verre
Têtes ou pointes de brocolis
coupés en morceaux 2 mn. 1 verre
Choux de Bruxelles 2 mn. 1 verre
Têtes de chou-fleur 1 mn. 1 verre
Grains de maïs 1 mn. 1 verre
Epis de maïs 2 à 3 mn. 1 verre
Légumes variés 2 mn. 1 verre
Poids non cassés 1 mn. 1 verre
Pois et carottes 1 mn. 1 verre
Epinards 1 mn. 1 verre
• En ce qui concerne les légumes surgelés mentionnés dans la liste, il est
recommandé d’utiliser 1 verre de liquide. Si vous en utilisez davantage, le
liquide risque de déborder de la soupape de régulation de la pression lorsque
la pression commence à retomber.
Page 75

73
FRUITS FRAIS
TEMPS DE CUISSON A BASSE PRESSION
METHODE D’EVACUATION RAPIDE DE LA VAPEUR
Fruits frais et secs Temps de cuisson Eau
Abricots frais entiers ou coupés en deux 0 à 1 mn. 1 verre
Fruits rouges frais 0 à 1 mn. 1 verre
Cerises fraiches 0 à 1 mn. 1 verre
Pèches fraiches coupées en deux 1 à 2 mn. 1 verre
Poires fraiches coupées en 2 1/2 à 1 mn. 1 verre
Prunes fraiches 2 à 3 mn. 1 verre
Pruneaux (prunes sèches) 2 à 3 mn. 1 verre
* Pour les fruits à cuisson en 1 minute ou moins : Mettre la minuterie et faire
cuire à la vapeur pendant une minute ou moins à partir du moment où la
pression monte et que la vapeur commence à siffler. Tourner le Bouton de
commande réglable de la température/pression sur ‘WARMING’
(Maintien au chaud), puis débrancher l’appareil.
I m p o rtant Safety Information
For best results,always check that the Pressure Regulator Valve,
Pressure Indicator Valve,HIGH/LOW Pressure Level Indicator and
Gasket,Lid Gasket and Lid Lock Button are in good working order
and that there are no foreign particles blocking the Steam Vent
Tube,Pressure Lift Pin,Safety Valves or Steam Vent.
To expose the Steam Vent Tube,
the Pressure Regulator Valve
must be removed.
1. Press down and turn
the Pressure Regulator Valve
counter-clockwise to the
CLEAN Position until it stops.
Lift up on the Pressure
Regulator to remove easily.
Hold the Lid up to the light.
You should be able to see light
through the Steam Vent Tube.
2. If you cannot see light,the
Steam Vent Tube is blocked.
Insert the Cleaning Brush into
the Steam Vent tube and
gently move it in and out until
you are sure the Tube is clear.
3. Replace the Pressure Regulator
Valve.Line the notches on the
bottom of the Pressure
Regulator with the grooves in
the Lid.Press down and rotate
the Regulator clockwise until it
is in position.
CAUTION: Never disassemble
All Pressure Release Valve Systems are produced with the utmost
quality and standards.
Page 76

74
HARICOTS SECS ET LEGUMINEUSES
TEMPS DE CUISSON A HAUTE PRESSION
METHODE D’EVACUATION
NATURELLE DE LA VAPEUR
Haricots Temps Eau Contenance
et Légumineuses de cuisson + 1 c.à soupe une
d’huile fois cuit
Haricots Adzuki secs, 1 verre 12 à 14 mn. 3 verres 2 verres
Haricots noirs secs 18 à 22 mn. 3 verres 2 verres
Haricots aux yeux noirs 1 verre, 18 à 20 mn. 3 verres 2 verres un quart
Pois chiches secs 1 verre, 23 à 25 mn 3 verres 2 verres et demi
Haricots Great Northern secs 10 à 12 mn. 3 verres 2 verres et demi
Haricots rouges
ou blancs secs, 1 verre 13 à 15 mn. 3 verres 2 verres
Lentilles vertes, marrons
ou rouges séches, 2 verres 11 à 13 mn. 3 verres 4 verres
Petits haricots
blancs secs, 1 verre 13 à 15 mn. 3 verres 2 verres
Haricots Pinto secs 1 verre 10 à 12 mn. 3 verres 2 verres un quart
* Ajouter une cuillerée à soupe d’huile végétale à l’eau de manière à produire
moins de mousse.
•
Valable pour l’ensemble des haricots secs et légumineuses, à l’exception des
lentilles : Suivre les instructions indiquées sur le paquet pour effectuer un
prétrempage toute une nuit ou faire bouiillir quelques instants, pour faire
tremper, et pour égoutter.
Les temps de cuisson réels peuvent varier en fonction de la fraîcheur des
haricots et des goûts personnels de chacun.
Page 77

75
RIZ
TEMPS DE CUISSON A LA VAPEUR
METHODE D’EVACUATION
NATURELLE DE LA VAPEUR
Riz Temps Eau Contenance
de cuisson + 1 c.à soupe une
d’huile fois cuit
Riz, Basmati, 1 verre de riz sec 6 à 7 mn. 1 verre et demi 3 verres
Riz blanc, précuit ou longs grains
1 verre de riz sec 7 à 8 mn. 1 verre et demi 3 verres
Riz blanc, précuit
ou grains de taille normale
1 verre de riz sec 6 à 7 mn. 1 verre et demi 3 verres
Riz blanc, arborio
ou petits grains
1 verre de riz sec 6 à 7 mn. 1 verre et demi 3 verres
Riz brun 1 tasse de riz sec 18 à 19 mn. 2 verres 2 verres un quart
Riz sauvage 1 verre de riz sec 25 à 27 mn. 3 verres 2 verres un quart
Quinoa sec 1 verre 6 à 7 mn. 1 verre et demi 3 verres
* Ajouter une cuillerée à soupe d’huile végétale à l’eau afin de réduire la production
de mousse.
•
Les temps de cuisson réels peuvent varier en fonction de la fraîcheur du riz et des
préférences de chacun.
•
Vous pouvez utiliser de l’eau ou du bouillon. Ajouter une cuillerée à soupe d’huile
végétale à l’eau afin de réduire la production de mousse.
•
Il est possible qu’une petite quantité de riz colle au fond de la cuve de la cocotteminute. Après avoir retiré le riz cuit, remplir la cuve d’eau sans attendre et la
laisser tremper.
Steam Release Methods
NATURAL STEAM RELEASE METHOD
1. After pressure cooking, turn the Variable
Temperature/Pressure Control to
WARMING. Press the (
Switch,the ON/OFF Indicator Light will
turn off.Unplug the unit.
2. Allow the Pressure Cooker to cool slowly
at room temperature.Depending on the
amount and type of food,this will take
5 to 20 minutes.Wait until the pressure has totally been
released from the Pressure Regulator Valve and the
HIGH/LOW Pressure Level Indicator and the Pressure Lift Pin
has dropped.
3. To remove the Pressure Cooker Lid,slide the Lid Lock Button
towards you,twist the Lid counter-clockwise until the Lid can
be removed easily. Always tilt the Lid away from you to
avoid the steam.
CAUTION: Never force the Pressure Cooker Lid open. The Safety
CAUTION: Proper care must be taken with hot cookware. Be
WARNING: The Pressure Cooker Pan and Lid remain very hot
Page 78

76
Conseils utiles
La vapeur d’eau ne sort pas du tube du conduit d’évacuation.
Solution : • Le couvercle de la cocotte-minute n’est pas fermé
hermétiquement sur la cuve.
• S’assurer que le joint est en place sous le conduit
d’évacuation tout autour du couvercle.
• Veiller à ce que les ouvertures de la soupape de
régulation de la pression comportant le tube du
conduit d’évacuation,de l’indicateur de niveau de
pression,de la soupape de sécurité de l’indicateur
de pression comportant le taquet de compression,
ou des soupapes de sécurité ne soient pas bloqués
par des aliments.
• Utiliser au moins 1 verre d’eau ou de tout autr e
liquide pour cuire les aliments à la vapeur.
Le couvercle de la Cocotte-Minute ne s’ouvre pas
Solution : • Il faut dépressuriser de manière à ce que toute la
pression accumulée dans la cocotte pendant la
cuisson puisse s’évacuer par le tube du conduit
d’évacuation et la soupape de sécurité à indicateur
de pression comportant un taquet de compression
avant de pouvoir ouvrir le couvercle.
• Tourner le Bouton de commande réglable de la
température/pression sur ‘WARMING’(Maintien au
chaud),appuyer sur le (O) de l’interrupteur de
marche/arrêt ‘ON/OFF’,le voyant de marche/arrêt
‘ON/OFF’s’éteint.Débrancher l’appareil.Attendre
que la pression soit entièrement évacuée par la
soupape de régulation de la pression et que le
taquet de compression soit retombé.
Toute l’eau s’est évaporée de la Cocotte-Minute avant que les
ingrédients soient cuits.
Solution : • Le Bouton de commande réglable de la
température/pression a peut-être été réglé un peu
trop haut durant la cuisson à la vapeur et l’eau s’est
évaporée en vapeur d’eau trop rapidement.
• Vous n’avez pas mis suffisamment d’eau dans la
Cocotte-Minute au moment de la cuisson.
• Pour cuire à la vap e u r,ajouter au moins 1 à 2 ve r res et
demi de liquide de ma n i è re à avoir suffisamment de
liquide pour que les ingrédients puissent cuire .
Page 79

77
Conseils utiles ( S u i t e )
Le couvercle de la Cocotte-Minute et les joints du taquet de
compression sont raides.
Solution : • Appliquer une fine couche d’huile végétale sur les
joints propres après chaque utilisation,de manière à
ce qu’ils restent flexibles et pliables.
• Lorsque les joints ne sont plus flexibles ni pliables, ou
qu’ils se sont distendus et ne logent plus facilement
dans leur emplacement,c’est qu’il est temps de les
changer.Vous pouvez commander de nouveaux
joints en appelant le Service des Relations Clients au
800-233-9054.
• Il est conseillé de remplacer les deux joints tous les
ans,ou plus souvent si la cocotte-minute fait l’objet
d’une utilisation fréquente.
Les ingrédients ne sont pas cuits.
Solution : • Remettre à nouveau la Cocotte-Minute sous pression
après avoir vérifié qu’il reste suffisamment de liquide
dans la cuve,puis continuer la cuisson pendant
quelques minutes supplémentaires.
Adapter d’autres recettes pour Cocotte-Minutes à la CocotteMinute Russell Hobbs®.
Solution : • Toute recette pour cocotte-minute dans laquelle le
réglage de la pression est indiqué de 4,5 à 7 kg
peut-être utilisée pour cuisiner un plat dans la
cocotte-minute Russell Hobbs®.
• Ne pas dépasser la graduation ‘Max Fill’en versant
les ingrédients à cuire dans la cuve.
7. Turn the Variable Temperature/Pressure Control to WARMING.
8. Plug the unit into a 120V AC wall outlet and press the (
ON/OFF Switch to turn the Pressure Cooker ON.The ON/OFF
Indicator Light will illuminate.
9. Turn the Variable Temperature/
Pressure Control to MAX/BROWNING.
CAUTION: NEVER LEAVE YOUR PRESSURE
10. As soon as the pressure starts to build,however slight,the Pressure
Lift Pin will jiggle until it reaches full pressure and locks the Lid onto
the Pressure Cooker Pan.Do not try to remove the Lid until the
pressure has been safely released.The HIGH/LOW Pressure Level
Indicator will start to rise and some steam will escape from the
Pressure Regulator Valve.Wait for both rings to be visible on the
Pressure Level Indicator and a gentle steady flow of steam is
released from the Pressure Regulator Valve accompanied by a
loud hiss: the Pressure Cooker is now at full pressure.
11. Begin timing once the HIGH pressure is
reached.Follow the recipe or Cooking Guide,
allow food to cook for time specified.
NOTE: The amount of food being cooked will
determine how long it takes to bring the
Pressure Cooker up to full pressure.
12. Quickly turn the Variable Temperature/
Pressure Control to 7 - 8 (see illustration);
both rings will be visible,to maintain the
HIGH pressure.If you prefer to cook using
LOW pressure,turn the Variable
Temperature/Pressure Control to 6 - 7,
one ring will be visible.The constant
hissing sound and amount of steam will
fluctuate as the pressure changes.
Experience will teach you what setting
on your Pressure Cooker to use to
maintain the proper pressure.
IMPORTANT: If the heat is too high, there is a
Operating Instructions ( C o n t i n u e d )
Page 80

78
Conseils utiles ( S u i t e )
Quand faut-il utiliser une grille de cuisson normale ou à la vapeur ?
Solution : • Une grille de cuisson normale ou à la vapeur permet
de conserver les aliments au-dessus du niveau du
liquide utilisé pendant la cuisson à la vapeur.
• Ne pas utiliser de grille de cuisson nor male ou à la
vapeur si vous préférez que les aliments s’imprègnent
de l’arôme de liquide.
Que doit-on faire lorsque de la mousse sort du tube du conduit
d’évacuation au moment où la vapeur commence à être évacuée ?
Solution : • Après la cuisson vap e u r,t o u rner le Bouton de
c o m mande réglable de la tempéra t u re / p ression sur
‘ WA R M I N G ’(Maintien au chaud) Appuyer sur le (O) de
l’interrupteur de marche/arrêt ‘ON/OFF’,le voyant de
marche/arrêt ‘ON/OFF’s’éteint.Débrancher
l’appareil.
Comment peut-on faire cuire ensemble de la viande et des
légumes ?
Solution : • Commencer par fa i re cuire à la vapeur la viande qui
p rend le plus longtemps à cuire .To u rner le Bouton de
c o m mande réglable de la tempéra t u re / p ression sur
' WARMING' (Maintien au chaud),ap p u yer sur le (O) de
l ' i n t e r rupteur de ma rche/arrêt 'ON/OFF'.A t t e n d re que la
vapeur se soit entièrement échappée par la soupap e
de régulation de la pression et que l'indicateur de
haute/basse pression 'HIGH/LOW' et le taquet de
c o m p ression soient re t o m b é s.R e t i rer le couve rcle et
ajouter les légumes.Continuer la cuisson à la vap e u r
jusqu'à ce que l'ensemble des ingrédients soit cuit.
Pourquoi se développe-t-il une traînée d’humidité sur le pourtour du
tube du conduit d’évacuation sur les poignées de la cocotte-minute,
sur la soupape de régulation de la pression et/ou sur les soupapes de
sécurité lorsqu’on commence à faire chauffer la cuve de la cocotte ?
Solution : • Il est normal d’apercevoir des traces d’humidité sur
ces parties de la cocotte-minute en début de
cuisson.L’humidité disparaît lorsque la cuve est
entièrement chaude.
• Le joint doit être placé à l’intérieur du couvercle et
ce dernier doit être fermé hermétiquement sur la
cuve de la cocotte.
Page 81

79
Conseils utiles ( S u i t e )
Utilisation de votre Cocotte-Minute à une altitude supérieure à
610 m
Ajouter 1 verre de liquide supplémentaire lorsque vous cuisinez à
une altitude supérieure à 610 m.Le temps de cuisson augmente
de 5% tous les 305 m,à partir de 915 m.
Altitude/Mètres Suggestions d’augmentation du
temps de cuisson
915 m 5%
1200 m 10%
1500 m 15%
1800 m 20%
2000 m 25%
2400 m 30%
Pour convertir une recette de famille en une recette pour la
cocotte-minute
• Comparés à la cuisson conventionnelle,les aliments préparés à
la vapeur cuisent en général un tiers de temps plus vite qu’en
mode de cuisson standard.
• La quantité de liquide de la recette de famille doit
généralement être réduite. S’il subsiste trop de liquide en fin de
cuisson à la vapeur, continuer la cuisson.Brancher l’appareil
dans une prise de 120V CA. Tourner le Bouton de commande
de la température/pression sur 6 ou 7,puis faire cuire à petits
bouillons à découvert jusqu’à épaississement.
• Utiliser les tableaux et recettes fournis dans ce livre pour vous
guider dans les niveaux de pressions, temps de cuisson et la
quantité de liquide nécessaire.
STEAMING
This Function quickly brings cooking liquid to a boil for steaming
fresh vegetables or rice.Times will be similar to cooking the same
food on top of the stove in a sauce pan.
1.Position the electrical cord in the slot located on the bottom of
the Pressure Cooker.
2. To steam food,place food in the bottom of the Pressure Cooker
Pan or you may use a small heat-resistant steaming rack or
basket (not included) in the bottom of the Pressure Cooker Pan.
Add at least 1 cup of water when cooking up to 30 minutes. Do
not fill the Pressure Cooking Pan past the MAX Fill Line,2/3 full.
3. Add the Lid and lock it into place onto the Pressure Cooker Pan
following the instructions in the For Your Safety section of this
manual.
4. On the top of the Lid,turn the Pressure
Regulator Valve to STEAM.
5. Turn the Variable Temperature/Pressure
Control to WARMING. Plug the unit into
a 120V AC wall outlet and press the (
on the ON/OFF Switch to turn the
Pressure Cooker ON.The ON/OFF
Indicator Light will illuminate.
NOTE: The Lid can be removed while
STEAMING to check the food for
doneness, but you must wait until the
Pressure Lift Pin drops.
6. Turn the Variable Temperature/Pressure
Control to STEAM,3 to 5 (see
illustration).The Pressure Lift Pin may
raise and lower during cooking as the
unit cycles on and off to maintain the
temperature.
7. When finished,turn the Variable
Temperature/Pressure Control to WARMING.press the (
the ON/OFF Switch,the ON/OFF Indicator Light will turn off.
Unplug the unit.
8. Wait until the Pressure Lift Pin drops and remove the Lid.
WARNING: Use caution when lifting Locking Lid. Escaping steam
Page 82

80
R e c e t t e s
HARICOTS VERTS FRAIS AUX POMMES DE TERRE
NOUVELLES ET AU JAMBON
1 c.à soupe d’huile d’olive
1 verre d’oignon émincé
680 g de haricots verts frais coupés en morceaux de 2,5 cm.
450 g de pommes de terre nouvelles grattées
et coupées en quatre
1 verre de jambon coupé en cubes
1/2 c.à café de sel
1/8 de c.à café de poivre noir
2 verre et demi d’eau
1 c.à café de basilique frais haché
1. Faire réchauffer l’huile dans la Cocotte-Minute sur
‘MAX/BROWNING’.Ajouter l’oignon et faire revenir
pendant 5 à 7 minutes jusqu’à ce que l’oignon
devienne tendre,en remuant fréquemment.
2. Ajouter le reste des ingrédients. Mélanger.
3 . M e t t re le couve rcle et régler la soupape de
régulation de la pression sur ‘ P R E S S U R E ’
( P re s s u ri s a t i o n ) .Fa i re chauffer sur ‘ M A X /
B R OW N I N G ’jusqu’à ce que l’indicateur de
H AU T E / BA S S E p ression et le taquet de compre s s i o n
m o n t e n t .
4. Lorsque la vapeur commence à s’évacuer
régulièrement de la soupape de régulation de la
pression,placer le Bouton de commande réglable
de la température/pression sur 7 – 8,puis faire
cuire à haute pression pendant 9 à
13 minutes, ou jusqu’à ce que les ingrédients
soient cuits.
5. Placer le Bouton de commande réglable de la température/pression
sur ‘WARMING’(Maintien au chaud),puis débrancher l’appareil.Le
témoin lumineux de marche/arrêt ‘ON/OFF’s’éteint.Laisser la
Cocotte refroidir lentement à température ambiante jusqu’à ce que
la jauge de pression descende.
Pour 6 personnes.
Page 83

81
SOUPE NORDIQUE AUX HARICOTS ET AU JAMBON
1 verre de haricots Great Northern
2 verres d’eau
2 boîtes (280 g) de soupe à l’oignon
1 c.à soupe d’huile végétale
1 verre de jambon en dés
1/2 de verre de céleri tranché
1/2 de tasse de carottes
1 c.à soupe de persil sec
1 feuille de laurier sauce
1/8 de c.à café de sel
1/8 de c.à café de poivre noir
1. Faire tremper les haricots toute une nuit selon les indications du
paquet.
2. Egoutter les haricots et les placer dans la Cocotte-Minute.
3. Ajouter le reste des ingrédients. Mélanger.
4. M e t t re le couve rcle et régler la soupape de régulation de la pression sur
‘ P R E S S U R E ’( P re s s u ri s a t i o n ) .Fa i re chauffer sur ‘ M A X / B R OW N I N G ’jusqu’à ce
que l’indicateur de H AU T E / BA S S E p ression et le taquet de compre s s i o n
m o n t e n t .
5. Lorsque la vapeur commence à s’évacuer
régulièrement de la soupape de régulation de
la pression,placer le Bouton de commande
réglable de la température/pression sur 7 – 8,
puis faire cuire à haute pression pendant 10 à
12 minutes, ou jusqu’à ce que les ingrédients
soient cuits.
6. Placer le Bouton de commande réglable de la
température/pression sur ‘WARMING’(Maintien au
chaud),puis débrancher l’appareil.Le témoin
lumineux de marche/arrêt ‘ON/OFF’s’éteint.
Laisser la Cocotte refroidir lentement à
température ambiante jusqu’à ce que le taquet
de compression descende.
Pour 6 personnes.
If the HIGH/LOW Pressure Level Indicator is clogged,it may not
function properly. See User Maintenance Instructions in this manual,
for information on cleaning.
As the Pressure Cooker cycles ON and OFF,the Pressure Level
Indicator will rise and fall a little.
VARIABLE TEMPERATURE/PRESSURE CONTROL
Your Pressure Cooker has variable temperature control that
cycles on and off to maintain the temperature.Adjust the
setting as necessary for HIGH or LOW pressure according to the
chart or recipe.
By turning the Variable Temperature/Pressure Control to 7 - 8, you
can maintain 15 psi / HIGH pressure with both rings visible on the
HIGH/LOW Pressure Level Indicator.To cook at LOW pressure,turn the
Variable Temperature/Pressure Control to 6 - 7 to keep one ring
visible.The exact position of the Control will depend on the amount
and type of food being cooked.
WARMING
This Function reheats or keeps cooked
food warm.WARMING can either be
used on its own or after pressure cooking
to keep food warm.
1.Position the electrical cord in the
slot located on the bottom of the
Pressure Cooker.
2. Place or leave cooked food in Pressure Cooker Pan.
3. Turn the Variable Temperature/Pressure Control to WARMING.
Plug the unit into a 120V AC wall outlet and press the (
ON/OFF Switch to turn the Pressure Cooker ON.The ON/OFF
Indicator Light will illuminate.
4. If you would like to keep food warm after steaming or pressure
cooking,after cooking is completed and pressure has been
released,simply turn the Variable Temperature/Pressure Control
to WARMING 1,2,or 3.Stir frequently.
5. When finished,turn the Variable Temperature/Pressure Control to
WARMING. Press the (
Indicator Light will turn off.Unplug the unit.
HIGH/LOW PRESSURE LEVEL INDICATOR (Con’t)
Page 84

82
CHILI VEGETARIEN AUX TOMATES SECHES
ET AUX HARICOTS NOIRS
1/2 tasse de haricots noirs séchés
1 c.à soupe d’huile d’olive
1 verre d’oignon émincé
1 c.à café d’ail émincé
1 poivron vert de taille moyenne,
épépiné et haché et dont on aura ôté le cœur
1 piment Jalapeno épépiné
et émincé,et dont on aura ôté le cœur
3 carottes émincées
2 c.à café de poudre de piment
1 c.à café de poudre de cumin
1/4 de c.à café d’origan séché
2 boîte (410 g) de tomates en cubes
1 verre 1/2 d’eau
1 c.à soupe d’huile végétale
1/4 de verre de tomates sèches
1/2 c.à café de sel
1 c.à soupe de coriandre fraîche hachée
1. Faire tremper les haricots toute une nuit en fonction des indications
du paquet.Egoutter les haricots et les laisser de côté.
2. Faire chauffer l’huile dans la Cocotte-Minute sur
MAX/BROWNING.Ajouter l’oignon,l’ail,les
poivrons, la carottes,la poudre de piment,le
cumin et l’origan. Faire revenir 5 à 7 minutes
jusqu’à ce que l’oignon devienne tendre,en
remuant fréquemment.
3. Ajouter les haricots trempés, les tomates,l’eau,l’huile,les tomates
sèches et le sel.Mélanger.
4. M e t t re le couve rcle et régler la soupape de
régulation de la pression sur ‘ P R E S S U R E ’
( P re s s u ri s a t i o n ) .Fa i re chauffer sur ‘ M A X /
B R OW N I N G ’jusqu’à ce que l’indicateur de
H AU T E / BA S S E p ression et le taquet de
c o m p ression montent.
5. Lorsque la vapeur commence à s’évacuer
régulièrement de la soupape de régulation de la
pression,placer le Bouton de commande
réglable de la température/pression sur 7 – 8,puis
faire cuire à haute pression pendant 18 à
22 minutes, ou jusqu’à ce que les ingrédients soient cuits.
6. Placer le Bouton de commande réglable de la température/pression
sur ‘WARMING’(Maintien au chaud),puis débrancher l’appareil.Le
témoin lumineux de marche/arrêt ‘ON/OFF’s’éteint.Laisser la
Cocotte refroidir lentement à température ambiante jusqu’à ce que
le taquet de compression descende.
7. Servir avec de la coriandre fraîche.
Pour 6 personnes.
Page 85

83
POULET AUX HERBES AUX LEGUMES FRAIS
2 blancs de poulet sans peau et désossés
1/4 de c.à café d’origan séché
1/4 de c.à café de basilique séché
1/4 de c.à café de sel
un peu de poivre noir
1 verre de bouillon de poulet ou de légumes,
ou un bouillon en boîte à teneur réduite en sel.
2 pommes de terre rouge
de taille moyenne,grattées et coupées en quatre.
2 carottes coupées en quatre
2 branches de céleri coupées en quatre
1 poireau bien lavé dont on aura coupé le bout.
Ne conserver que les morceaux vert pâle
et blanc en les coupant en tranches fines
1. Rouler le poulet dans les herbes,le sel et le poivre noir.
2. Ajouter le bouillon de poulet, le poulet et les légumes dans la
cocotte-minute.
3. M e t t re le couve rcle et régler la soupape de
régulation de la pression sur ‘ P R E S S U R E ’
( P re s s u ri s a t i o n ) .Fa i re chauffer sur ‘ M A X / B R OW N I N G ’
jusqu’à ce que l’indicateur de haute/basse
p ression et le taquet de compression montent.
4. Lorsque la vapeur commence à s’évacuer
régulièrement de la soupape de régulation de la
pression,placer le Bouton de commande réglable
de la température/pression sur 7 – 8,puis faire
cuire à HAUTE pression pendant 12 à
15 minutes, ou jusqu’à ce que les ingrédients
soient cuits.
5. Placer le Bouton de commande réglable de la
température/pression sur ‘WARMING’(Maintien au
chaud),puis débrancher l’appareil.Le témoin
lumineux de marche/arrêt ‘ON/OFF’s’éteint.
Laisser la Cocotte refroidir lentement à
température ambiante jusqu’à ce que le taquet
de compression descende.
Pour 2 personnes.
short bursts.This Pressure Regulator Valve has been factory cali-
brated to release steam from your Pressure Cooker when it reaches
its factory determined maximum pressure capacity (15 psi).
Remove the Pressure Regulator Valve and rinse under lukewarm
water for easy cleaning.(See Important Safety Information section
of this manual for removal instructions.) If this Valve is worn it MUST
be replaced.
CAUTION: Never disassemble Pressure Regulator Valve or clean the
PRESSURE INDICATOR SAFETY VALVE
WITH PRESSURE LIFT PIN
p re s s u ri z e d .In this position you will not be able to re m ove the
P re s s u re Cooker Lid.It also acts a Pre s s u re Relief Va l ve ,e x h a u s t i n g
excess pre s s u re .The Pre s s u re Lift Pin Gasket should fit snugly aro u n d
the Pin.
If the Pressure Lift Pin is clogged or unclean,it may not function
properly. If the Pressure Lift Pin does not drop when expected,
gently slide the Lid Lock Button towards you to see if the Pressur e
Lift Pin drops. If it still does not drop, wait until all steam has been
released.
If this Valve becomes clogged it can easily be cleaned by gently
removing excess food particles from the Valve located on the
underside of the Pressure Cooker Lid.(See Important Safety
Information section of this manual.)
Page 86

SAUERBRATEN
1/4 de verre de vinaigre de vin rouge
1/2 c.à café de sel
1/8 de c.à café de poivre
1/2 c.à café de clous de girofle moulus
1 gousse d’ail émincée
1 rôti de 680 g,avant
ou rumsteck,de 5 cm d’épaisseur
1 c.à soupe d’huile végétale
1 verre et demi de bouillon de bœuf
1 grosse carotte hachée grossièrement
1 céleri en branches, haché grossièrement
Une moitié de gros oignon
hachée grossièrement
1 feuille de laurier sauce
1 verre de petits gâteaux au gingembre écrasés
1. Combiner le vinaigre de vin rouge,le sel,le poivre,les clous de girofle
moulus, l’ail émincé,et faire mariner le rôti de bœuf au réfrigérateur
dans un récipient non métallique pendant plusieurs heures ou tout
une nuit.
2. Tourner le Bouton de commande réglable de la
température/pression sur ‘MAX/BROWNING’et
faire chauffer l’huile dans la Cocotte-Minute.
Retirer la viande de la marinade et la placer
dans la Cocotte en conservant la marinade à
part. Faire dorer le rôti des deux côtés.
3. Verser la marinade,le bouillon de bœuf,la
carotte,le céleri,l’oignon et la feuille de laurier sauce dans la
cocotte.
4. M e t t re le couve rcle et régler la soupape de
régulation de la pression sur ‘ P R E S S U R E ’
( P re s s u ri s a t i o n ) .Fa i re chauffer sur ‘ M A X / B R OW N I N G ’
jusqu’à ce que l’indicateur de H AU T E / BA S S E
p ression et le taquet de compression montent.
5. Lorsque la vapeur commence à s’évacuer
régulièrement de la soupape de régulation de la
pression,placer le Bouton de commande réglable
de la température/pression sur 7 – 8,puis faire
cuire à haute pression pendant 50 à 60 minutes,
ou jusqu’à ce que les ingrédients soient cuits.
6. Placer le Bouton de commande réglable de la température/pression
sur ‘WARMING’(Maintien au chaud),puis débrancher l’appareil.Le
témoin lumineux de marche/arrêt ‘ON/OFF’s’éteint.Laisser la
Cocotte refroidir lentement à température ambiante jusqu’à ce que
le taquet de compression descende.
7. Mettre la viande sur un plat de service et couvrir de papier
d’aluminium.Verser les petits gâteaux au gingembre écrasés sur la
sauce,en ajoutant suffisamment de bouillon jusqu’à l’obtention
d’une sauce.Goûter et saler à nouveau si nécessaire.Couper la
viande en grosses tranches dans le sens inverse des fibres et servir
accompagné de la sauce.
Pour 4 à 6 personnes.
84
Page 87

85
RAGOUT DE BŒUF AU VIN DE BOURGOGNE
450 g d’avant de bœuf dans os,en enlevant le gras
et en coupant la viande en cubes de 2,5 cm.
1 c.à soupe d’huile d’olive
1 verre d’oignon émincé
1 gousse d’ail émincée
1/2 c.à café de thym séché
2 verres de petites carottes épluchées
et coupées en tranches de 2,5 cm.
2 verres de pommes de terre coupées en morceaux de 2,5 cm.
2 verres de haricots verre surgelés et coupés en morceaux
1 boîte (de 110 g) de sauce tomate
1 tasse de bouillon de bœuf
1/2 de verre de vin de Bourgogne
1 feuille de laurier sauce
1/2 c.à café de sel
un peu de poivre noir
1/2 c.à soupe de persil haché
1 . Fa i re chauffer l’huile dans la Cocotte-Minute sur ‘ M A X / B R OW N I N G ’ .Fa i re
revenir la viande jusqu’à ce qu’elle soit bien dorée.
2 . Ajouter l’oignon et l’ail au mélange de viande et
fa i re revenir pendant 5 à 7 minutes,ou jusqu’à ce
que la viande devienne tendre .
3. Ajouter les ingrédients qui restent à l’exception
du persil.Bien mélanger.
4. Mettre le couvercle et régler la soupape de
régulation de la pression sur ‘PRESSURE’
(Pressurisation). Faire chauffer sur ‘MAX/
BROWNING’jusqu’à ce que l’indicateur de
HAUTE/BASSE pression et le taquet de
compression montent.
5 . L o rsque la vapeur commence à s’éva c u e r
r é g u l i è rement de la soupape de régulation de la
p re s s i o n ,placer le Bouton de commande réglable de la
t e m p é ra t u re / p ression sur 7 – 8,puis fa i re cuire à
haute pression pendant 10 à 12 minutes,ou jusqu’à
ce que les ingrédients soient cuits.
6. Placer le Bouton de commande réglable de la
température/pression sur ‘WARMING’(Maintien
au chaud),puis débrancher l’appareil.Le témoin
lumineux de marche/arrêt ‘ON/OFF’s’éteint.Laisser
la Cocotte refroidir lentement à température
ambiante jusqu’à ce que le taquet de
compression descende.
Pour 4 personnes.
BEFORE USING YOUR PRESSURE COOKER
FOR THE FIRST TIME
CAUTION: To protect against electric shock,do not immerse the
1. Hand wash the Lid and Lid Gasket and the HIGH/LOW
Pressure Level Indicator Gasket of the Pressure Cooker
thoroughly with liquid dishwashing soap.Rinse and towel
dry thoroughly. Replace the HIGH/LOW Pressure Level
Indicator Gasket by tucking the bottom of the Gasket into the
hole on the underside of the Lid.
2. Use a damp paper towel to clean the non-stick interior of the
Pressure Cooker Pan.Towel dry.
WARNING: DO NOT IMMERSE THE PRESSURE COOKER PAN IN WATER
3. Read the Owner’s Manual carefully and completely before
using the Pressure Cooker to become familiar with the parts
and features.
4. Follow directions for Pressure Cooking, filling the Pressure
Cooker Pan up to the MAX Fill Line with water. Pressure cook
for 15 minutes at HIGH pressure.This will ensure correct fitting
of the Gaskets.
5. Turn the Variable Temperature/Pressure Control to WARMING.
Press the (
Light will turn off.Unplug the unit.The pressure will be released
naturally.When the HIGH/LOW Pressure Level Indicator and
the Pressure Lift Pin drops and all pressure is released,open the
Lid.Carefully pour out the water and allow to cool.Dry all
parts.The Pressure Cooker is now ready to use.
Page 88

86
STEAK A LA SUISSE
450 g de rouelle de steak de 1 cm d’épaisseur
1 c.à soupe d’huile végétale
2 boîtes de tomates en sauce (425 g)
au céleri,à l’oignon et au poivron vert
1 c.à café de moutarde de Dijon
1 poivron vert coupé en cubes de 2,5 cm
1 oignon coupé en cubes de 2,5 cm
en les séparant les uns des autres
1 verre de bouillon de bœuf
1. Couper la rouelle en dés de 10 cm. Faire chauffer
l’huile dans la Cocotte sur ‘MAX/BROWNING’.
Ajouter le steak
et le faire dorer des deux côtés.
2. Mélanger les tomates et la moutarde.Ajouter les
poivrons,l’oignon,le mélange de tomates ,et le
bouillon dans la Cocotte.
3. M e t t re le couve rcle et régler la soupape de
régulation de la pression sur ‘ P R E S S U R E ’
( P re s s u ri s a t i o n ) .Fa i re chauffer sur
‘ M A X / B R OW N I N G ’jusqu’à ce que l’indicateur de
H AU T E / BA S S E p ression et le taquet de compre s s i o n
m o n t e n t .
4. Lorsque la vapeur commence à s’évacuer
régulièrement de la soupape de régulation de
la pression,placer le Bouton de commande
réglable de la température/pression sur 7 – 8,
puis faire cuire à haute pression pendant 18 à
20 minutes, ou jusqu’à ce que les ingrédients
soient cuits.
5. Placer le Bouton de commande réglable de la
température/pression sur ‘WARMING’(Maintien au
chaud),puis débrancher l’appareil.Le témoin
lumineux de marche/arrêt ‘ON/OFF’s’éteint.Laisser
la Cocotte refroidir lentement à température
ambiante jusqu’à ce que le taquet de compression
descende.
Pour 4 personnes.
Page 89

87
PATATES DOUCES EN PRALINE
1/4 de tasse de sucre roux tassé
1/2 c.à café de cannelle moulue
1/4 de c.à café de noix de muscade moulue
une pincée de sel
1 grande rondelle d’écorce d’orange
450 g de patates douces épluchées
et coupées en tranches de 2,5 cm
1 verre de jus d’orange
1 c.à soupe et demi de beurre ramolli
1 . Mélanger le sucre ro u x ,la cannelle,la noix de muscade et le sel.
2. Placer l’écorce d’orange au fond de la Cocotte-Minute.Ajouter les
tranches de patate douce en saupoudrant chaque couche du
mélange du sucre,en terminant par une fine couche du mélange
de sucre roux.Imprégner de jus d’orange et ajouter une noisette de
beurre.
3. M e t t re le couve rcle et régler la soupape de
régulation de la pression sur ‘ P R E S S U R E ’
( P re s s u ri s a t i o n ) .Fa i re chauffer sur ‘ M A X / B R OW N I N G ’
jusqu’à ce que l’indicateur de H AU T E / BA S S E
p ression et le taquet de compression montent.
4. Lorsque la vapeur commence à s’évacuer
régulièrement de la soupape de régulation de
la pression,placer le Bouton de commande
réglable de la température/pression sur 7 – 8,
puis faire cuire à haute pression pendant 4 à
6 minutes, ou jusqu’à ce que les ingrédients soient
cuits.
5. Placer le Bouton de commande réglable de la
température/pression sur ‘WARMING’(Maintien au
chaud),puis débrancher l’appareil.Le témoin
lumineux de marche/arrêt ‘ON/OFF’s’éteint.
Laisser la Cocotte refroidir lentement à
température ambiante jusqu’à ce que le taquet
de compression descende.
Pour 6 personnes.
PRODUCT MAY VARY SLIGHTLY FROM ILLUSTRATIONS
Pressure
Regulator
Valve
(P/N 21936)
Steam Vent
Tube
Cool Touch
Handle
Pressure
Cooker Pan
Power
Plug
Lid Gasket
(P/N 21938)
Page 90

88
POMMES FOURREES A LA MURE
4 grosses pommes à cuire
de type Rome,Jonagold,Cortland ou Winesap
1/3 de verre de sucre roux tassé
1/2 de verre de mûres fraîches
1/4 de verre de noix hachées
1/2 c.à café de cannelle
1 c.à café et demi de beurre non salé
1 verre de jus de pommes ou de cidre
1 . Oter le cœur des pommes,en les coupant jusqu’au fond mais sans
t ra ve rs e r,puis placer les pommes dans la Cocotte-Minute.
2 . Combiner le sucre roux,les mûres,les noix et la cannelle dans un bol.
Verser le mélange à la cuillère dans les pommes .Ajouter une noisette
de beurre.Saupoudrer les pommes du mélange à base de sucre s’il
en reste.Verser le jus de pommes dans la Cocotte-Minute.
3 . M e t t re le couve rcle et régler la soupape de
régulation de la pression sur ‘ P R E S S U R E ’
( P re s s u ri s a t i o n ) .Fa i re chauffer sur ‘ M A X / B R OW N I N G ’
jusqu’à ce que l’indicateur de haute/basse
p ression et le taquet de compression montent.
4. Lorsque la vapeur commence à s’évacuer
régulièrement de la soupape de régulation de la
pression,placer le Bouton de commande
réglable de la température/pression sur 6 – 7,puis
faire cuire à basse pression pendant 5 à
7 minutes, ou jusqu’à ce que les ingrédients soient
cuits.
5 . Placer le Bouton de commande réglable de la
température/pression sur ‘WARMING’(Maintien au
chaud),puis débrancher l’appareil.Le témoin
lumineux de marche/arrêt ‘ON/OFF’s’éteint.
Laisser la Cocotte refroidir lentement à
température ambiante jusqu’à ce que le taquet
de compression descende.
6 . Servir accompagné de la sauce à base de
sucre roux.
Pour 4 personnes.
Page 91

ADDITIONAL IMPORTA N T
S A F E G U A R D S
WARNING: This appliance generates heat and escaping steam
WARNING: DO NOT IMMERSE THE PRESSURE COOKER PAN IN WATER
1. Keep hands and face away from Pressure Regulator Valve.
2. Use extreme caution when removing the Lid after cooking.
Serious burns can result from steam inside.
3. Never remove the Lid while the unit is in operation.
4. Do not cover the Pressure Regulator Valve,Safety Valves,or
Pressure Lift Pin with anything as an explosion may occur.
5. Do not touch the Pressure Cooker Pan,any removable
parts, or heating parts during or immediately after using.Use
Cool Touch Handles.Let the unit cool completely first.
6. Clean all parts thoroughly after each use.
7. DO NOT ATTEMPT TO COOL OR RELEASE PRESSURE USING WATER.
8. CAUTION: When the Pressure Lift Pin is in the UP position,turn the
Pressure Regulator Valve to the STEAM RELEASE position to
release steam in a short bursts. Do not turn to any other position.
Failure to follow these instructions may cause hot liquid to be
ejected.
3-PRONG GROUNDED TYPE PLUG
This appliance is equipped with a grounded type 3-wire cord (3-
prong plug).This plug will only fit into an electrical outlet made for a
3-prong plug.This is a safety feature.If the plug should fail to fit the
outlet,contact an electrician to replace the obsolete outlet.Do not
attempt to defeat the safety purpose of the Grounding Pin part of
the 3-prong plug.
Page 92

GARANTIE LIMITEE D’UN AN
Garantie : Ce produit Russel Hobbs®est garanti par Salton, Inc. contre les défauts de matériaux et de fabrication
pour une période de (1) an à compter de la date d’achat d’origine. La garantie de ce produit couvre uniquement
l’acheteur initial du produit.
Application de la Garantie : Cette garantie sera considérée nulle si le produit a été endommagé par accident
durant le transport, par un usage excessif, par usage abusif, suite à une négligence, une réparation non conforme,
un usage commercial, des réparations entreprises par du personnel non agréé, l’usure normale, ainsi qu’à cause de
l’usure, d’un assemblage non conforme, ou d’une installation ou de réparations négligentes, ou de tout autre cause
ne relevant pas de défauts de matériaux ou de fabrication. Cette garantie est valable uniquement lorsque le produit a
été acheté et utilisé aux Etats-Unis, elle ne s’applique pas aux appareils qui auraient été utilisés d’une manière non
conforme aux instructions écrites stipulées, ni aux appareils ayant fait l’objet de modifications, ni aux produits ou à
des pièces endommagés de la sorte, et dont le numéro de série a été retiré, modifié, effacé, ou rendu illisible.
Garantie implicite : TOUTE GARANTIE IMPLICITE EN LA POSSESSION DE L’ACHETEUR, EST LIMITEE A UNE
DUREE DE UN (1) AN A PARTIR DE LA DATE D’ACHAT. Certains états n’autorisent pas les limitations de
garantie concernant la durée d’une garantie implicite, en conséquence, les limitations mentionnées ci-dessus
ne s’appliquent pas à tous les cas.
Exécution de la Garantie :Durant la période de garantie de un an mentionnée ci-dessus, tout produit défectueux
sera soit réparé, soit remplacé par un modèle équivalent reconditionné (selon la décision de la société) lorsque le
produit est réexpédié au centre SAV, soit remboursé du montant indiqué sur le ticket de caisse. Le produit réparé ou
de remplacement sera garanti pour le restant de la période de garantie de un an, ainsi qu’une période d’un mois
supplémentaire. Il ne sera prélevé aucun frais pour ce type de réparation ou de remplacement.
Service après-vente et réparations :Si l’appareil ne fonctionne pas correctement, veuillez tout d’abord appeler
le numéro vert 1 (800) 233-9054 entre 9h00 et 17h00, Heure GMT - 6, et demander le SERVICE CLIENT, en indiquant que
vous possédez un appareil défectueux. Veuillez mentionner le numéro de modèle
RHNPC401
lors de votre appel.
S AV sous garantie (USA) : Il n’y a aucun frais de SAV et d’expédition pour un appareil sous garantie. Appeler
afin d’obtenir l’autorisation de retour de l’appareil le 1 (800) 233-9054.
S AV hors garantie (USA) : Des frais forfaitaires de SAV hors garantie sont établis en fonction du modèle. Ils
comprennent la somme de 12,00 dollars américains pour couvrir les frais d’expédition et de manutention. Vous serez
informé des frais de SAV par courrier. Ces frais doivent être réglés à l’avance dans le cas d’une réparation ou d’un
produit de remplacement.
P roduits achetés aux Etats-Unis et utilisés au Canada : Retourner le produit assuré, en veillant à ce qu’il
soit correctement emballé, et en réglant auprès de nos services, les frais d’affranchissement et d’assurance à
l’avance, à l’ordre de l’adresse aux Etats-Unis mentionnée ci-dessous. Veuillez noter que tous droits de douane/frais
d’assurance sont à votre charge, et que vous devez vous acquitter des frais de droits de douane/ d’assurance à
l’avance, auprès de nos services.
Risques encourus durant le transport :Nous ne sommes nullement responsables des pertes ou dégâts
causés durant le transport jusqu'à notre établissement. Pour votre protection, nous vous conseillons d’emballer
soigneusement le produit et de l’assurer auprès de l’établissement se chargeant de l’expédition. Veillez à bien
inclure les éléments suivants : Tout accessoire lié au problème, votre adresse complète ainsi qu’un numéro de
téléphone auquel on peut vous joindre pendant les heures ouvrables, une note décrivant le problème, une
photocopie du ticket de caisse, ou toute autre preuve d’achat permettant de déterminer le statut de la garantie du
produit. Les envois en contre-remboursement ne sont pas acceptés.
A d resse de réexpédition Pour nous contacter,
de l’appareil : veuillez nous faire parvenir un courrier ou nous appeler :
Attn : Repair Center Salton, Inc.
Salton, Inc. P.O. Box 7366
708 South Missouri Street Columbia, MO 65205-7366
Macon, MO 63552 1-800-233-9054
Email : Salton@Saltonusa.com
Limitation du recours: Aucun représentant ni personne n’est autorisé à prendre en charge toute responsabilité
incombant à la société, en relation avec la vente de nos produits. Les défauts, absences de fonctionnement, ou
défaillances d’appareils, ne peuvent nullement faire l’objet de compensations suite à préjudice, contrat, ou loi
commerciale, y compris, et non limitées à la négligence, la responsabilité stricte, une rupture de garantie, ou une
rupture de contrat. Les réparations, remplacements ou remboursements constituent les uniques recours de
l’acheteur selon les termes de la présente garantie. La société Salton ne peut en aucun cas être tenue
responsable des dégâts, pertes, ou frais accidentels ou consécutifs. Certains états n’autorisent pas les
exclusions ou limitations des dégâts accidentels ou consécutifs. En conséquences, les limitations ou exclusions
mentionnées ci-dessus ne s’appliquent pas à tous les cas.
D roits juridiques : La présente garantie vous confère des droits juridiques spécifiques qui sont dans certains cas
complétés par d’autres droits, en fonction des états.
Pour de plus amples informations sur les produits Salton, visitez notre site web à :
www.eSalton.com
© 2002 Salton Inc. Tous droits réservés Nº de Pièce 61156
Imprimé en Chine 8/02
 Loading...