

Page 1
!
!
!!!INSTRUCTIONS!AND!WARRANTY!
!
!
!
!
!
!
MODEL!NO.!RHMF10!
!
RUSSELL!HOBBS!18”!MIST!FAN!
!
Page 2
Introduction!
!
Thank&you& for&purchasing& this& product.&Please& read&this&instruction& manual&thoroughly&b efore&operating&it& in&
order&to&use&the&fan&correctly&and&efficiently.&
&
Working!Elements!
The&Electric& M ist&Fan&uses&ultrasonic&vibration&elements,&atomizes&the&water&to&1-5& micro&ultra-particles,& a n d &
spreads& the& mist& to& the& air& through& wind.& This& increases& the& cool& hu m idity& which& makes& you&feel&cool& in& a&
single&room&or&entire&home.&
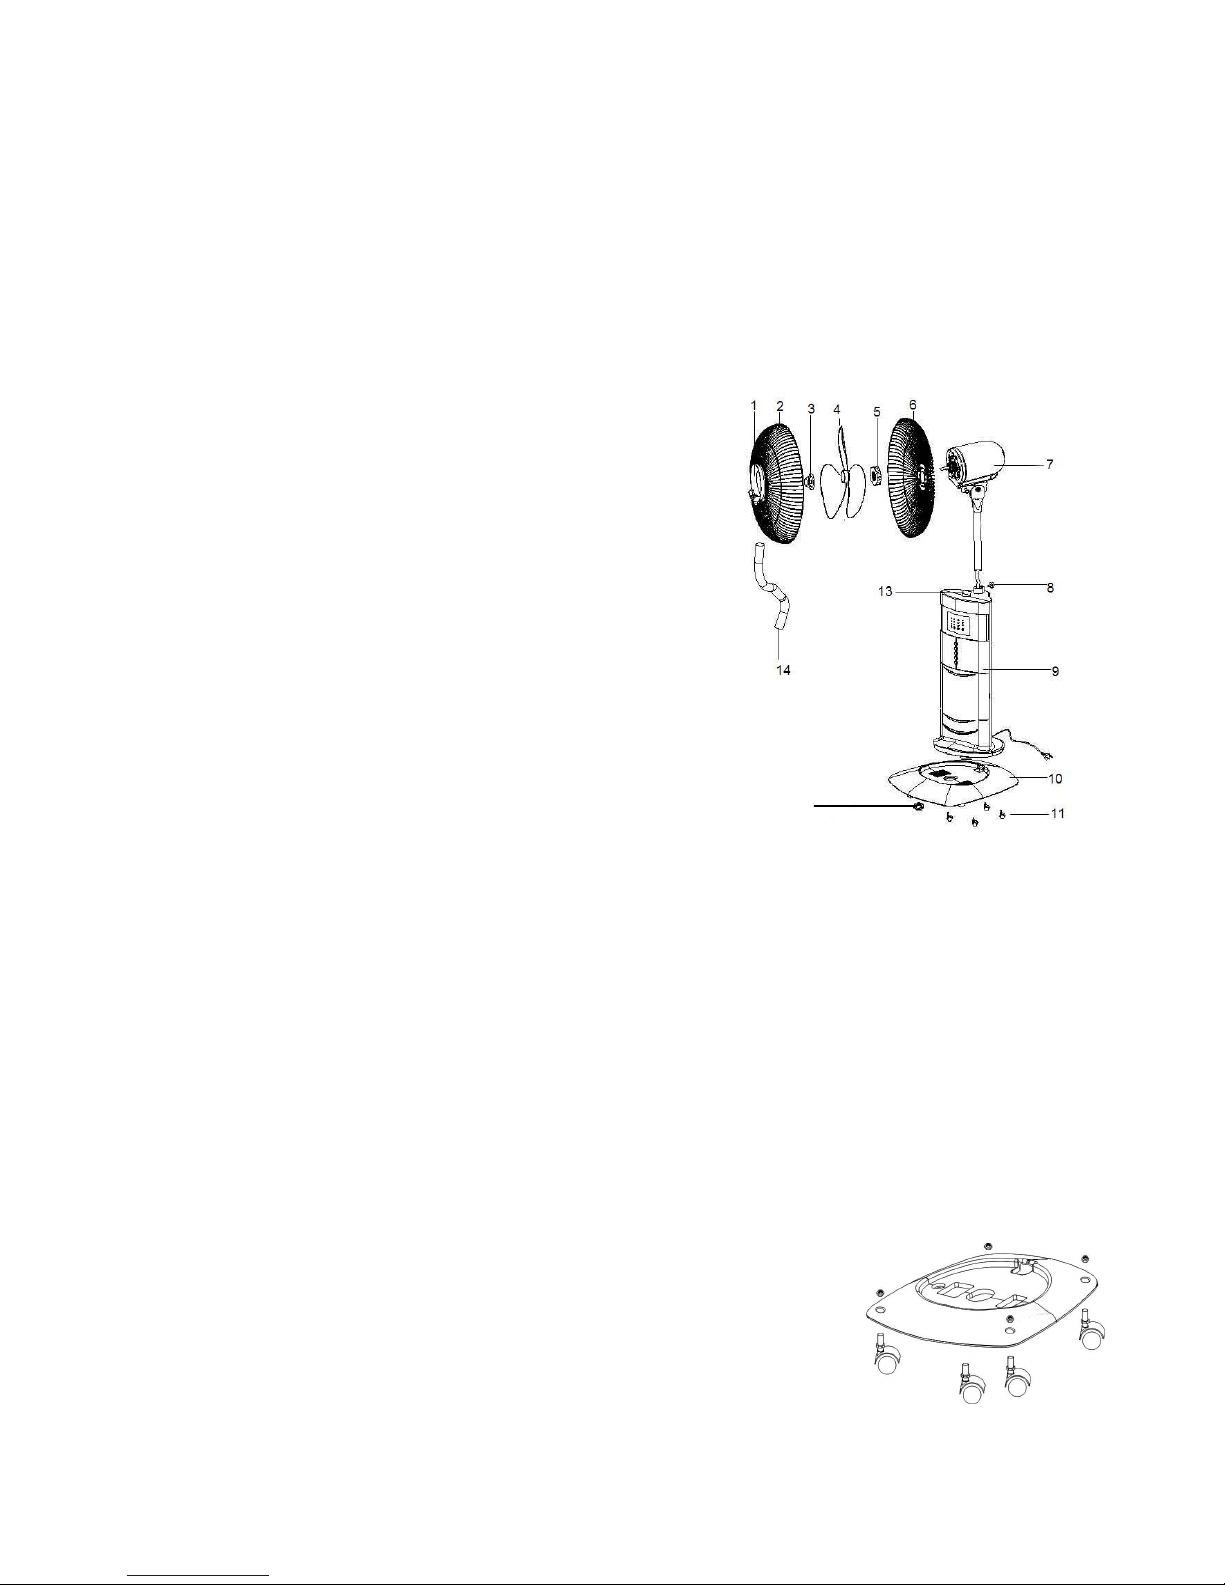
Assembly!Chart!and!Technical!Specifications!
1. Front&guard&ornament&
2. Front&guard&
3. Blade&cap&
4. Blade&
5. Guard&mounting&nut&
6. Rear&guard&
7. Motor&
8. Adjust&knob&
9. Fan&body&
10. Base&
11. Wheel&
12. Base&nut&
13. Mist&tube&fixer&
14. Mist&tube&
&
How!to!Assemble!
Please&reference&the&picture&and&assemble&the&fan&following&the&below&steps:&
1)& & Fix&the&four&wheels&11&into&the&base&10.&
2)& & Install&motor&7&on&the&fan&body&9,&and&fasten&the&adjust&knob&8.&
3)& & Install&fan&buoy&9&on&the&base&10,&and&fasten&the&base&nut&12.&
4)& & Install&rear&guard&6&on&the&motor&shaft&16,&then&fasten&the&guard&mounting&nut&5.&
5)& & Install&the&blade&4&on&the&motor&shaft&16,&then&fasten&blade&cap&3&in&an&anticlockwise&direction.&
6)& & Make&the&front&guard&2&face&to&face&rear&guard&6,&and&push&down&the&f ront&guard&2&p roper ly.&
7)& & Set&one&side&mist&tube&14&into&front&guard&ornament&1,&the&other&side&mist&tube&insert&the&mist&tube&fixer.&
&
Assembling!the!Stand!Fan!Body!to!the!Base!
1. Take&o ut& the &ba se& nut &un der &th e&b ody.&
2. Use& the& base& nut& to& assemble& the& body& to& the& base& (black& base& holes& are& in&
downward&position).&
3. Place&and&fix&the&wheels&into&their&holes&on&the&base&and&press&them&firmly.&The&
wheels&have&been&supplemented&with&the&feature&of&clips!
!
!
12
Page 3
Assembling!the!Rear!Guard!
1. Take&o ut& the &bl ade &ca p&f rom &th e&s haf t&t urn ing &it &clock wis e.&
2. Take&out&the&rear&guard&mounting&nut&turning&it&anti-clockwise.&
3. Insert&the&rear&guard&into&the&m o tor& matching&3&rods&on&the&front&side&of&the&motor&(th e & h an d le & w ill& d irect& &&
upwards)&to&3&holes&of&the&rear&guard.&
4. Fasten&the&rear&guard&tightly&by&turning&the&guard&mounting&nut&clockwise.&
&
Assembling!the!Fan!Blade!
1. Insert&the&blade&to&the&shaft&an d &en s u re&the&p in &e nters&the&blade&slot.&
2. Tighten&the&blade&using&the&blade&cap&turning&anti-clockwise&in&the&direction”&TIGHT”&arrow&on&it.&
Note:&Proper&assembly&of&the&blade&is&of&great&importance.&Otherwise,&the&blade&spins&in&the&air&and&damages&
the&appliance.&
&
Assembling!the!Front!Guard!
1. Fix& the& front& guard& with& the& logo& in& the& up right& position& on& the& rear& guard.& Make& sure& that& they& are&
connected&from&the&upper&side.&
2. Take&the&front&guard&rim&to&set&in&the&groove&and&fix&it&with&screwdriver.&
Note:&Do¬&operate&the&fan&without&assembling&the&guards&properly&and&tightly.&
&
&
&
Techni c al!Sp e c ificat ions!
&
Rated&Voltage:&230V~&
Rated&Frequency:&50Hz&
General&Power:&110W&
Max&Mist&Capacity:&200ml/h&
Blades&Size:&450mm&
Water&Tank&Capacity:&1500m&
Page 4

&
Operating!the!Water!Tank&
According&to&the&six&steps&below,&firmly&place&the&m ist&fan&on&the&ground&and&add&water&inside&the&water&tank.&
&
Note:&Do& not&take&out& the&water&tank&before& unpluggi ng& the&power&cord,&hot&water& (40℃&and&above)& is¬&
allowed&to&be&added&in&the&water&tank.&
&
&
&
&
&
&
&
&
&
&
&
&
&
&
&
&
Note:& Do& not& add& dirty& or& chalky& water&in&your&tank,& instead,& add& air-conditioned&water& or& fresh& water& to&
ensure&longer&life&for&your&fan.&
&
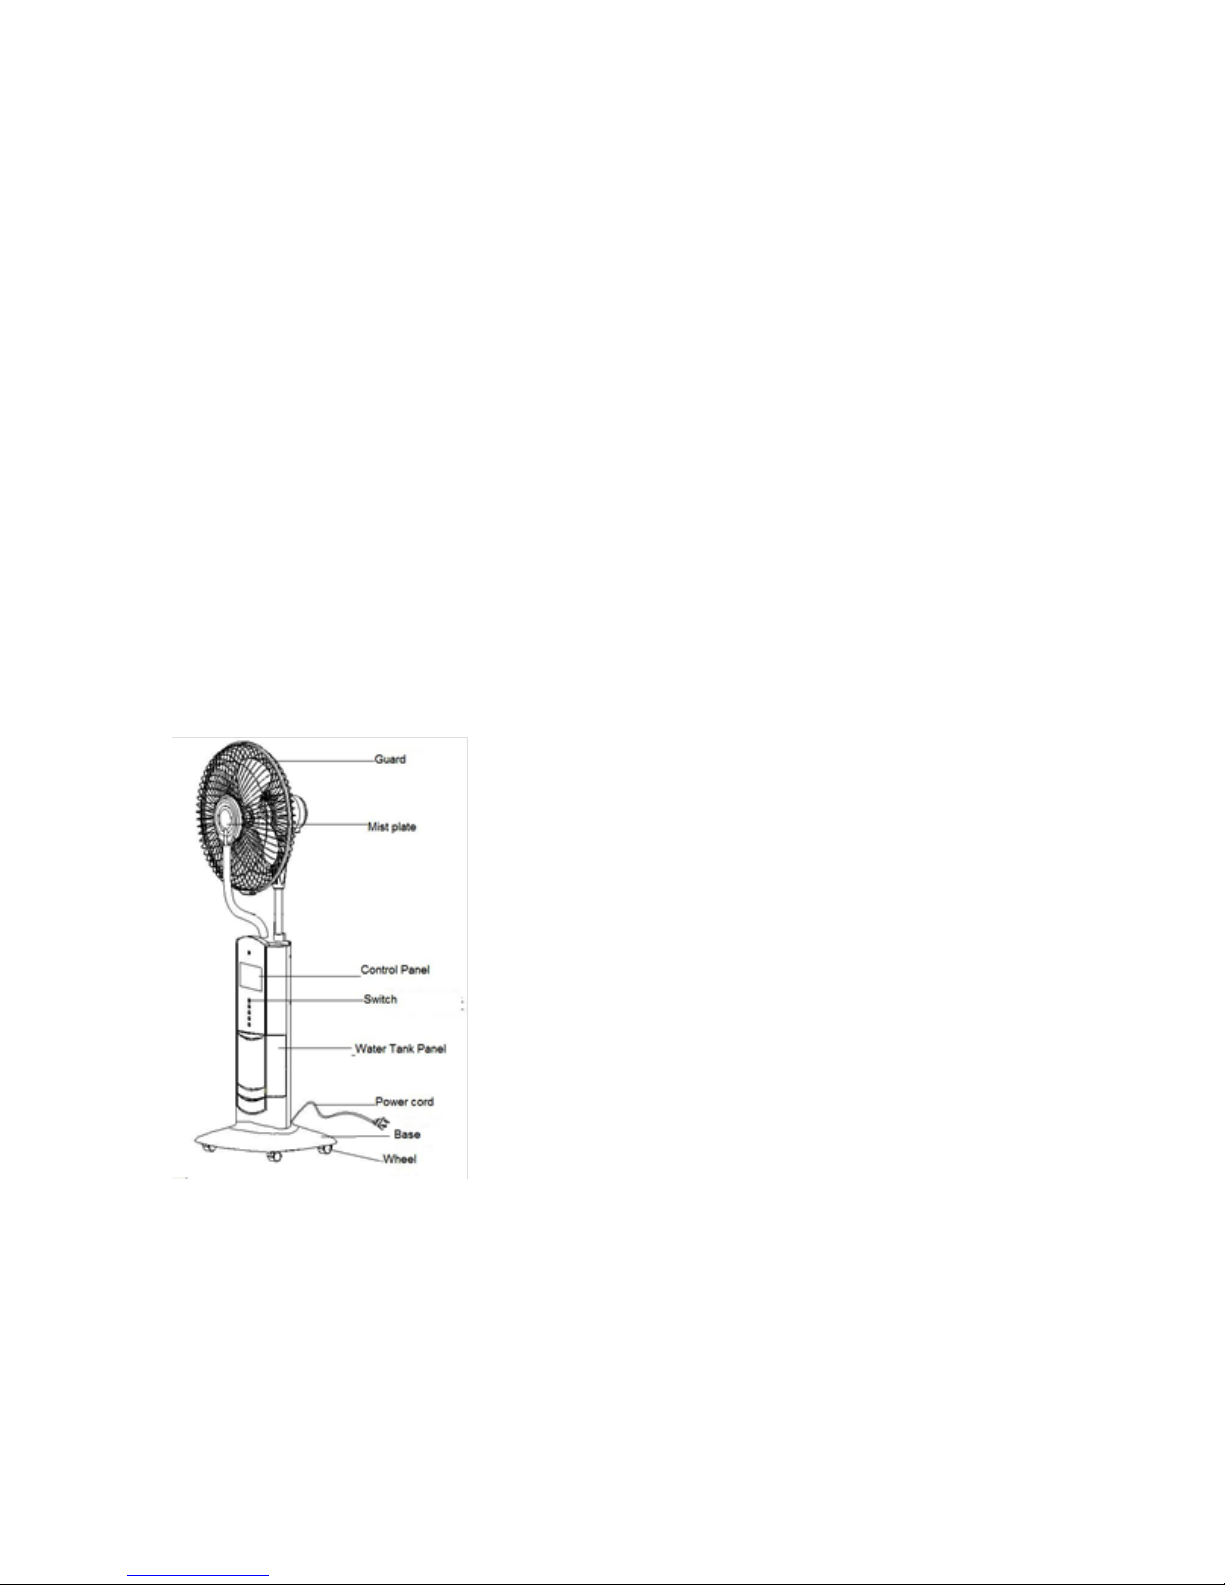
Operating!the!Fan!
1. Insert&plug&to&the&electrical&outlet,&m a ke&sure&that&the&indicator&light&is&on&a s&s h ow n &a b ove.&
2. Press&“OFF”&button,&to&turn&off&the&fan.&
3. Press& “ON/SPEED”& button,& to& choose& the& wind& speed-Low,& Med,& High& that&
matches&the&light&on&the&control&panel.&
4. Press& “SWING”& button,& to& change& the& wind& direction,& meanwhile& the&
corresponding&light& switches& on.& P ress&this&button&again&to& stop&oscillation.&The&wind&
angle& of& upwards& and& downwards& is& done& manually.& Set& the& desired& w ind& &&&&&&&&&&&&&&&&&&&&&&&&&&&&&&&&&&&&&&&&&&&&&&&&&&&&&&&&&&&&&&&&&&&&&&&&&&&&&&&&&&&&&&&&&
angle&moving&the&guard&and&the&motor&of&the&fan&up&and&down.&
5. Press&“ION”&button,&to&turn&th e&Ionizer&feature&on/off&(the& fa n&must&be&operating&
for&Ionizing&to& w o rk).&When&the&ionizer&is&turned&on,&it&will&assist&in&th e &purification&of&
the&room&air.&
6. Press& “MIST”& button,&the&light& is& on,& the& mist& will& spread& out& of& the& front& mist&
plate.&
“MIST”&button& can&be&operated&separately&or&worked&together&with&the&fan,&this&will&
result& in& a& cool& feel& wind.& If& the& mist& function& is& used& separately,& it& can& increase&
humidity&in&the&air.&
Page 5

Note:&When&the&mist&function&is&on,&an&apparent&mist&will&be&observed.&Such&an&emission&is&quite&normal&and&
to& should& not& change& the& settings& of& your& appliance.&&&&&&&&&&&&&&&&&&&&&&&&&&&&&&&&&&&&&&&&&&&&&&&&&&&&&&&&&&&&&&&&&&&&&&&&&&&&&&&&&&&&&&&&&&&&&
&
&
7. Press&“TIMER”&button&to&set&the&time&using&the&timer&fun ction.&Sets&the&time&between&1&to&15&hours&and&
switches&the&fan&off&after&the&preset&time.&There&are&4& indicator&lights&of&automatic&timing.&To&set&a&time&of&1&
hour&you&need&to&press&the&button&once&and&to&set&15&hours&of&running&time&you&need&to&press&15×&and&
all&the&4&indicator&lights&will&light&up.&
&
!
WARNING!
Do¬&take&out&the&plastic&tube&on&the&front&of&your&fan.& &
&
Remote! Control:&must&be&aimed& at&the&infra-red&port& (as& shown&in&the&picture)&when&using& it.&If&the& remote&
control&doesn’t&work,&please&first&check&the&inside&battery&and&change&to&new&batteries&if&needed.&
&
Notes:!
Change&the&batteries&with&new&and&same&types,&otherwise&your&remote&control&may¬&operate&properly.&
Remove& the& batteries& out& of& the& remote& control& if& you& won’t& use& the& remote& control& for& a& lon g&time.& Old&
batteries&may&damage&your&remote&control.&
&
Safety!Precautions!
1.& Make& sure& the& fan& and& the& power& cord& is& not& damaged& before& operating&your& fan.& In& case& of& damage,&
consult&your&authorized&technical&service&provider.&
2.&Do¬&place&the&fan&or&any&part&close&to&flammable&materials&and&heating&appliances.&
3.&Do¬&install&your&fan&onto&wall&or&ceiling.&
4.&Avoid&touching&moving&parts.&
5.&Never&plug&the&power&cord&before&the&installation&has&been&completed.&
6.&Ensure&voltage&used&corresponds&with&the&voltage&indicated.&
7.&Place&your& fan&in&dry&and& stable& surfaces.&Do& not& use& the&fan&in& wet&environments&such& as& the& bath-tub,&
swimming&pool&and&bathrooms.&
Page 6

8.& Unplug& your& fan& from& the& electric& outlet& when& not& operating,& moving& it& from& one& room& to& another ,&
installing&or&uninstalling&it’s&parts&and&before&cleaning.&
9.&Supervision&is&needed&w hen& this& product&is&used&anywhere&near&children.&The&appliance&is¬& intended&for&
use& by& children& or& other& persons& without& assistance& or& supervision& if& their& physical,&sensory& or& mental&
capabilities&prevent&them&from&using&it&safely.&
10.&For&safety& reasons,&please&disconnect&the& plug& from& th e& electrical&outlet.& Do& not& pull&the& plug& while& the&
power&is&on.&Always&ensure&that&the&plug&is&fully&inserted&into&the&electric&outlet.&
11.&Never&handle&the&power&cord&with&wet&hands&as&this&could&result&in&fire&or&electric&shock.&
12.&Do¬&disassemble,&repair&or&modify&this&product&on&your&own.&Warranty&will&be&voided&if&repair&is&carried&
out&by&an&unauthorized&person/agency.&
13.&The&water&safety&button&will&automatically&switch&off&the&fan&when&it&runs&out&of&water&in&the&tank.&
14.&Never&forget&to&add&water&for&permanent&operation&of&your&fan.&
15.&Do¬&put&any&sundries&into&guard&and&mist-prayed&hole&to&avoid&destroying&the&fan.&
16.&Do¬&stick&any&finger&or&objects&into&the&guard.&
17.&If&the&supply&cord&is&damaged,&it’s&service&agent&or&a&similarly&qualified&person&must&replace&it&in&order&to&
avoid&any&hazard.&
18.&This& appliance& is& not&intended&for& use&by&persons& (including& children)& with& reduced& physical,&sensory&or&
mental& capabilities,& or& lack& of& experience& and& knowledge,& unless& they& are& under& superv ision& or& given&
instructions&concerning&use&of&the&appliance&by&a&person&responsible&for&their&safety.&
19.&Children&should&be&supervised&to&ensure&that&they&do¬&play&with&the&appliance.&
&
&
Cleaning!and!Maintenance!
1.&Pull& out&the&power& cord&plug& from&the&electrical& outlet&and & make&sure&that&your&fan&is&
not&operating&before&cleaning&it.&
2.&Please&clean&the&water&tank&every&two&to&three&weeks,&and&clean&the&flume&every&week.&
3.& Take& out& the& water& tank& when& cleaning& it,& pull& plastic&tube&out&of&the&atomizing&cup&
properly,&then&take&out&the&atomizing&cup&and&clean&it.&
4.&Use& a&dry&cloth&to&absorb&water&remaining&when& cleaning&the&ultrasonic&atomizer,&and&
dry&it&using&a&piece&of&soft&cloth.&Or&use&mild&detergent&to&clean&the&ultrasonic&atomizer&if&it&
is&dirty.&
5.&Please& add&a&few&drops& of&lubricant& to&the& motor&shaft& after&cleaning&to&extend&motor&
life&every&year.&
6.&Pack&this&appliance&properly&and&store&it&in&a&cool&dry&place&if&you&are¬&using&it.&
&
!
&
&
&
&
&
&
Page 7

&
PLEASE!AFFIX!YOUR!PROOF!OF!PURCHASE/RECEIPT!HERE!
IN!THE!EVENT!OF!A!CLAIM!UN D E R !WARRANTY!THIS !R ECEIPT!MUST!BE!PRODUCED.!
!
W!A!R!R!A!N!T!Y!
&
1. Home&of&Living&Brands&(Pty)&Limited&(“Home&of&Living&Brands”)&warrants&to&the&original&purchaser&of&this&product&
(“the&customer”)&that&this&product&will&be&free&of&defects&in&quality&and&w o rkm an sh ip&w hich &un de r&normal&personal,&
family&or&household&use&and&purpose&may&manifest&w ithin&a&p erio d&o f&1&(on e)&ye ar&from&the&date&of&purchase&
(“warranty&period”).& &
2. Where&the&customer&has&purchased&a&product&and&it&breaks,&is&defective&or&does¬&work&properly&for&the&intended&
purpose,& the& customer& must& notify& the& supplier& from& whom& the& customer& bought& the& product& (“the& supplier”)&
thereof&within&the&warranty&period .& Any&claim&in & terms&of&th is& warranty&must&be&supported&by&a& proof& of&purchase.& &
If& proof&of& p u rc h as e & is& not& available,& then& repair,& and/or& service&charges&may&be&payab le & by& the& customer& to& the&
supplier.& & &
3. The&faulty&product&must&be&taken&to&the&supplier's&service¢re&to&exercise&the&warranty.&
4. The& supplier& will& refund,& repair& or& exchange& the& product& in& terms& of& this& warranty& subject& to& legislative&
requirements.&This&warranty&shall&be& v alid&only&where&the&customer&has¬&broken&the&pro d uct&himself,&or&used&the&
product& for& something& that& it& is& not& supposed& to& be& used& for.& The& warranty& does& not& include& and& will& not& be&
construed& to& cover& products& damaged& as& a& resu lt& of& disaster,& misuse,& tamper,& abuse& or& any& unauthorised&
modification&or&repair&of&the&product.& &
5. This&warranty& will& extend& only& to& the& product& provided& at& the& date& of& the& purchase& and& not& to& any& expendables&
attached&or&installed&by&the&customer.&
6. If&the& customer& requests& that& the& su p plie r& repairs& the& product& and & the& product& breaks& or& fails& to& work& properly&
within&3&(three)&months&of&the&repair&and¬&as&a& result&of&m isuse,&tampering&or&m odification&by&or&on& behalf&of& the&
customer,&then&the&supplier&may&replace&the&product&or&pay&a&refund&to&the&customer.& &
7. The&customer&may&be&responsible&for&certain&costs&where& products& returned&are& no t& in&the&original&packaging,&or&if&
the&packaging&is&damaged.&This&will&be&deducted&from&any&refun d&p aid&to &the&cu sto m er.&
&
&
HOME!OF!LIVING!BRANDS!(PTY)!LTD!(JOHANNESBURG)!
!
JOHANNESBURG& & & & & & & TEL&NO.&(011)&490-9600&
&
CAPE&TOWN& & & & & & & TEL&NO.&(021)&552-5161&
&
DURBAN& & & & & & & TEL&NO.&(031)&792-6000&
&
www.russellhobbs.co.za&
 Loading...