

Page 1

INSTRUCTIONS AND WARRANTY
RUSSELL HOBBS ESSE 400W HAND MIXER
MODEL NO: RHM500
Page 2

2
Congratulations on purchasing our Russell Hobbs Esse 400W Hand Mixer. Each unit is
manufactured to ensure safety and reliability. Before using this hand mixer for the first
time, please read the instruction manual carefully and keep it for future reference.
FEATURES OF THE RUSSELL HOBBS ESSE 400W HAND MIXER
• Powerful 400W motor
• 5 speed settings plus turbo button
• Stainless Steel beaters and dough hooks
• Eject button for releasing attachments
• Visual safe-to-use indicator
• With cord storage
• Versatile: mix, whisk, beat, cream and mash!
• Dishwasher safe parts
• For domestic use only
IMPORTANT SAFEGUARDS
When using any electrical appliance, basic safety precautions should always be followed
including the following:
CAUTION: When using the hand mixer, the unit must not be used for longer than 3
minute cycles, as this puts pressure on the motor which could lead to overheating and
product malfunction. It is recommended to allow the hand mixer a 30 minute break after
each cycle. This will also help to prolong the life of your hand mixer. Your hand mixer
has a powerful motor which results in a highly efficient kitchen tool. There should be no
need to run the motor for longer than 3 minutes at a time.
1. Please read the instructions carefully before using any hand mixer.
2. Always ensure that the voltage on the rating label corresponds to the mains
voltage in your home.
3. Incorrect operation and improper use can damage the hand mixer and cause
injury to the user.
Page 3

3
4. This appliance is intended for household use only. Commercial use invalids the
warranty and the supplier cannot be held responsible for injury or damage
caused when using the hand mixer for any other purpose than that intended.
5. Avoid any contact with moving parts.
6. This appliance is not intended for use by persons (including children) with
reduced physical, sensory or mental capabilities, or lack of experience and
knowledge, unless they have been given supervision or instruction concerning
use of the appliance by a person responsible for their safety.
7. Children should be supervised to ensure that they do not play with the hand
mixer.
8. Check the power cord and plug regularly for any damage. If the cord or the plug
is damaged, the manufacturer or a qualified person must replace it in order to
avoid an electrical hazard.
9. Do not use the hand mixer if it has been dropped or damaged in any way. In
case of damage, take the unit in for examination and/or repair by an authorised
service agent
10. To reduce the risk of electric shock, do not immerse or expose the motor
assembly, plug or the power cord to water or any other liquid. Do not use it with
wet hands.
11. Never immerse the unit in water or any other liquid for cleaning purposes.
12. Remove the plug from the socket by gripping the plug. Do not pull on the cord to
disconnect the hand mixer from the mains. Always unplug the unit when not in
use, before cleaning or when adding or removing parts.
13. Insert only original parts (dough hooks and beaters).
14. The use of accessory attachments that are not recommended or supplied by the
manufacturer may result in injuries, fire or electric shock.
15. A short cord is provided to reduce the hazards resulting from becoming
entangled in or tripping over a longer cord.
16. Do not let the cord hang over the edge of a table or counter. Ensure that the cord
is not in a position where it can be pulled on inadvertently.
17. Do not allow the cord to touch hot surfaces and do not place on or near a hot gas
or electric burner or in a heated oven.
18. Keep the appliance and cord away from direct radiant heat from the sun, from
damp, from sharp edges and other dangers.
19. Do not use the hand mixer on a gas or electric cooking top or over or near an
open flame.
Page 4

4
20. Use of an extension cord with this hand mixer is not recommended. However, if it
is necessary to use an extension lead, ensure that the lead is suited to the power
consumption of the hand mixer to avoid overheating of the extension cord, hand
mixer or plug point. Do not place the extension cord in a position where it can be
pulled on by children or animals or tripped over.
21. This hand mixer is not suitable for outdoor use. Do not use this hand mixer for
anything other than its intended use.
22. Do not operate this appliance by means of an external timer.
23. DO NOT carry the hand mixer by the power cord.
24. Do not leave this hand mixer unattended during use. Always unplug the unit
when not in use or before cleaning.
25. Always operate the hand mixer on a smooth, even, stable surface. Do not place
the unit on a hot surface.
26. Ensure both beaters or dough hooks are fitted to the mixer before use.
27. Never touch the rotating tools while still in motion; always wait for them to come
to a complete stop.
28. It is absolutely necessary to keep this appliance clean at all times as it comes
into direct contact with food.
29. To avoid splashes, always put the dough hooks or beaters right/ deep into the
mixture before running. Begin mixing at a low speed.
30. Be careful when mixing hot liquids or food preparation.
31. Ensure that the switch is in the “0” / “Off” position after each use.
32. The manufacturer does not accept responsibility for any damage or injury caused
by improper or incorrect use, or for repairs carried out by unauthorised
personnel.
33. In case of technical problems, switch off the machine and do not attempt to repair
it yourself. Return the hand mixer to an authorised service facility for
examination, adjustment or repair. Always insist on the use of original spare
parts. Failure to comply with the above mentioned pre-cautions and instructions,
could affect the safe operation of this machine.
NOTICE: This appliance is not for professional use. You should follow the requested
breaks. Failure to follow this instruction carefully may result in damage to the motor.
When using the hand mixer, the unit must not be used for longer than 3 minute cycles,
as this puts pressure on the motor which could lead to overheating and product
Page 5
5
malfunction. It is recommended to allow the hand mixer a 30 minute break after each
A
B
C
D
cycle. This will also help to prolong the life of your hand mixer.
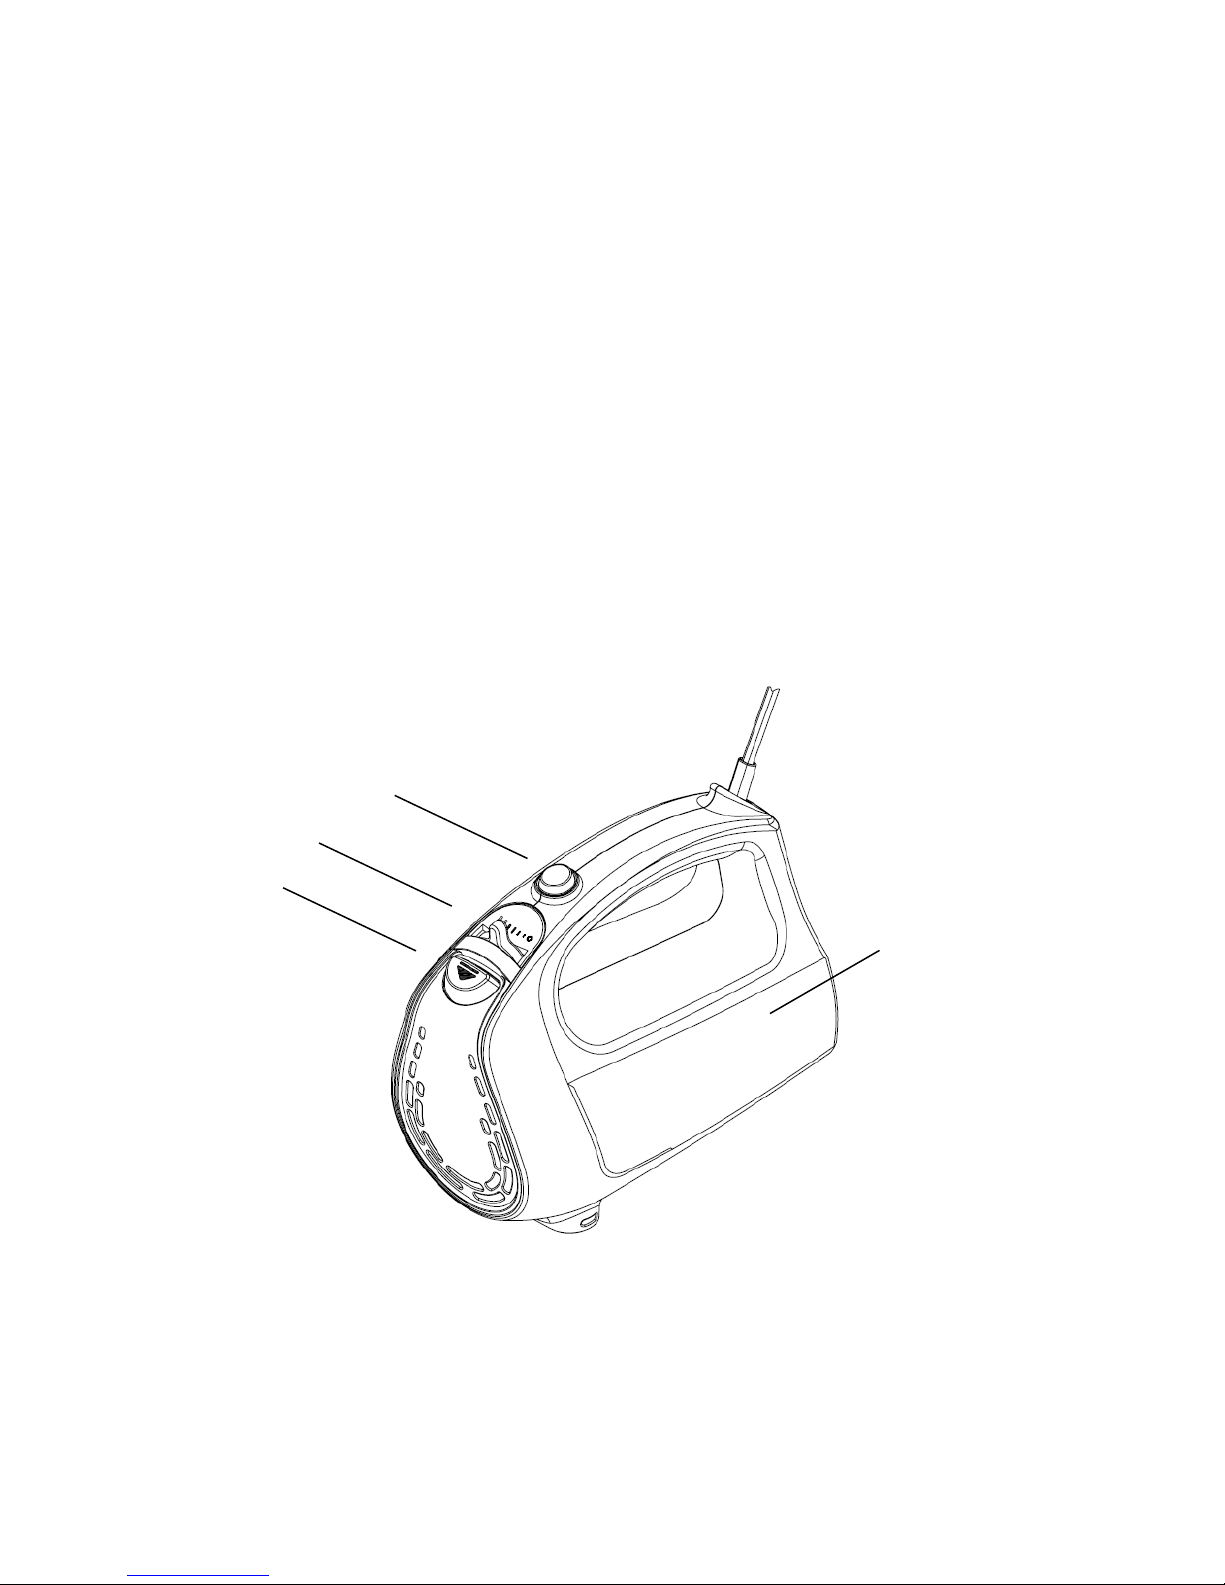
PARTS DIAGRAM
A. Turbo Button
B. Speed Control
C. Eject Button
D. Main Body
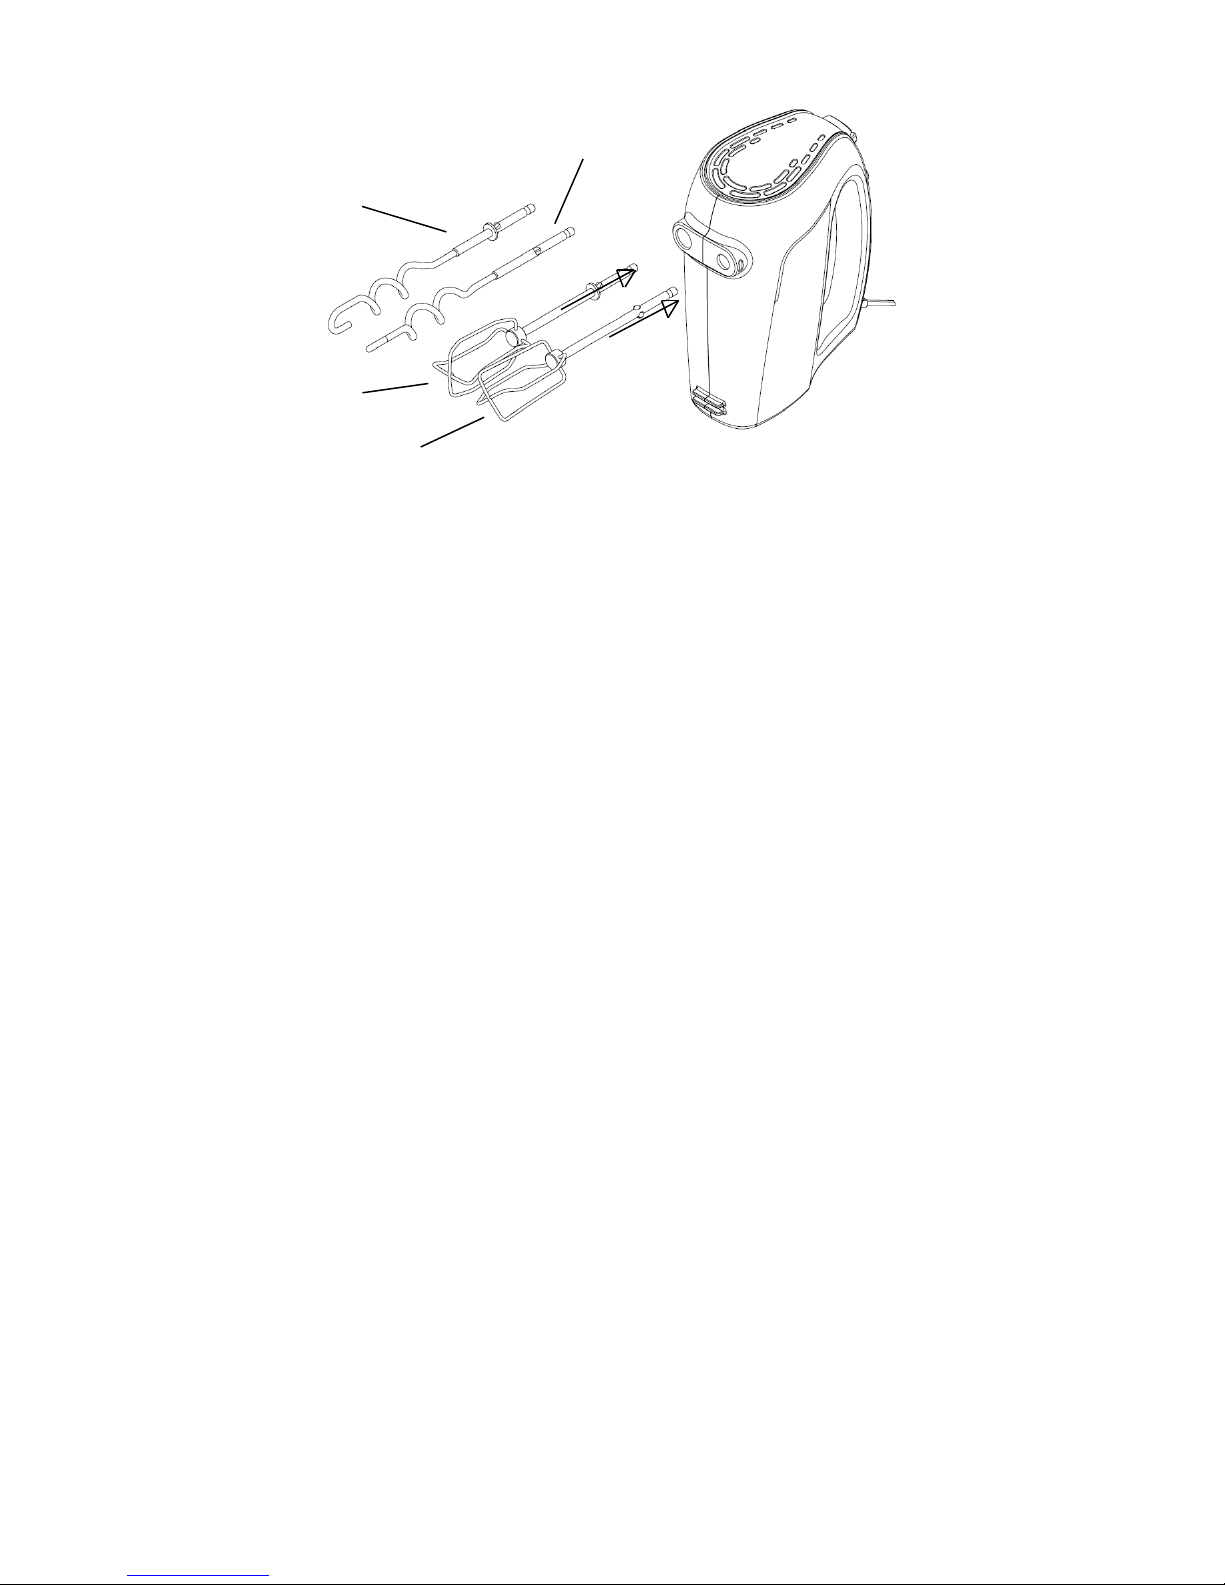
E. Dough Hook (for large hole)
F. Dough Hook (for small hole)
G. Beater (for large hole)
H. Beater (for small hole)
Page 6
6
E
H
F
G
Turbo Button (A):
For a short high-speed burst; press and release (Pulse action).
Speed Control (B):
0: stop / OFF 1: Slow 5: MAX
CAUTION: Always check that the hand mixer is switched to “0” / “OFF” and not
connected to the mains power supply, when changing or touching the beaters or dough
hooks.
BEFORE FIRST USE
Before using your appliance for the first time take the hand mixer out of the box and
take off any protective wrappings. REMEMBER: DO NOT LEAVE PROTECTIVE
PACKAGING LYING AROUND, AS IT COULD BE DANGEROUS AROUND INFANTS.
Wash the beaters and dough hooks in warm soapy water, rinse well and dry. Wipe the
mixer body with a slightly dampened cloth.
Page 7

7
OPERATING INSTRUCTIONS
FITTING THE BEATERS & DOUGH HOOKS
Remove the plug from the power outlet. Set the speed switch to “0” / “OFF”.
Insert the two beaters (G and H) into body of appliance, turn slightly until they
engage. If using the dough hooks, insert the two dough hooks (E and F) into the
corresponding holes and turn slightly until they engage. Never use the beaters
and dough hooks together.
NOTE: The right and left beaters or dough hooks are not the same. The right has a ring
and the left does not. Do not interchange the left and right with each other.
USING YOUR HAND MIXER
The Russell Hobbs Esse hand mixer is perfectly suited for preparing dips, sauces,
whipping cream, cake mixtures and the like.
1. Ensure the hand mixer is unplugged and the speed control is set to “0” / “OFF”.
2. Put the ingredients into a durable, deep enough mixing bowl, which is sufficiently
tall and wide to avoid splashing. For best results, use a medium-sized, highsided bowl.
3. With the speed control still set to “0” / “OFF”, plug the unit into the mains power
supply,
NOTE: Do not operate the hand mixer before inserting it into the food being mixed.
4. Dip the beaters or dough hooks into the mixture as deep as possible so as to
avoid splashing.
NOTE: Do not immerse the hand mixer into food or liquid beyond the length of the
mixing tools. No liquid or food must touch the mixer body.
5. Set the desired mixing speed by moving the speed selector dial to the right, from
1 for a low speed to 5 for MAX speed. We recommend first starting on a low
Page 8

8
speed and increasing the speed as needed, depending on the desired
consistency of the food stuffs being processed.
General speed guide/ combination:“1” Dough Hooks : butter, potatoes
“2” Beaters : sauces, milk products
“3” Dough Hook : light pastry dough
“4” Beaters : whipped desserts, cream
“5” Beaters : egg whites, whipped cream
6. Gently move the unit up and down while beating. Work the hand mixer through
the ingredients with a gentle circular motion, and up and down movement.
7. When you have finished using your hand mixer, switch the mixer to the “0” /
“OFF” position. Wait until the beaters or dough hooks have come to a complete
stop.
8. Remove the beaters or dough hooks. See “REMOVING THE BEATERS OR
DOUGH HOOKS” section.
9. Unplug the appliance from the main power outlet.
10. Clean the unit and the attachments thoroughly after use.
THE TURBO/ PULSE BUTTON
Use the pulse button to over-ride the speed control and give a burst of extra high speed
beating, regardless of the speed set on the speed control. Simply press and hold the
pulse button down. To avoid overheating, do not use the pulse function for more than 30
seconds at a time, and let it rest for a minute or so between pulses.
REMOVING THE BEATERS OR DOUGH HOOKS
To eject the beaters/dough hooks, move the speed selector dial to “0” / “OFF”, and
unplug the mixer. Shake off any excess food which is attached to the beaters or dough
hooks into the mixing bowl. Hold both beaters/dough hooks, into the mixing bowl to
prevent them from jumping out, and press the eject button (C). The eject button will not
work if the speed control is not set to the “0” / “OFF” position.
Page 9

9
Procedure to handle yeast and create dough with dough hook accessories
Use a mixing bowl with a height of 130mm and an inner diameter of 170mm at the top,
tapering down to 150mm at the bottom. This will sufficiently contain a yeast and dough
mixture made by 520g flour + 400g water.
Procedure to mix egg whites with beater accessories
The hand mixer can operate without interruption for a maximum of 3minutes allowing
mixing of 8 egg whites or 500ml cream. Follow by a 30 minute break to cool down
before continuing operation.
SUGGESTIONS FOR USE
Move the beaters/dough hooks gently around the mixture to ensure uniform
results.
If you want to clean the sides and base of the utensil/container with a hand-held
utensil, first switch the machine to “0” / “OFF”.
To avoid unnecessary splashing, immerse the beater/dough hooks into the
mixture before switching the appliance ON.
Unplug the appliance when not in use, before fitting or removing the
beaters/dough hooks and before cleaning it.
Avoid coming into contact with moving parts. Keep hands, hair, clothes, as well
as spatulas and other utensils away during operation to prevent injury and/or
damage to the appliance.
The speed can be adjusted at any time. Starting from “0” / “OFF” and then
adjusting the speed to the food type being mixed. For thicker mixtures, a low
speed is recommended. For fine consistency, use the high-speed settings.
Page 10
10
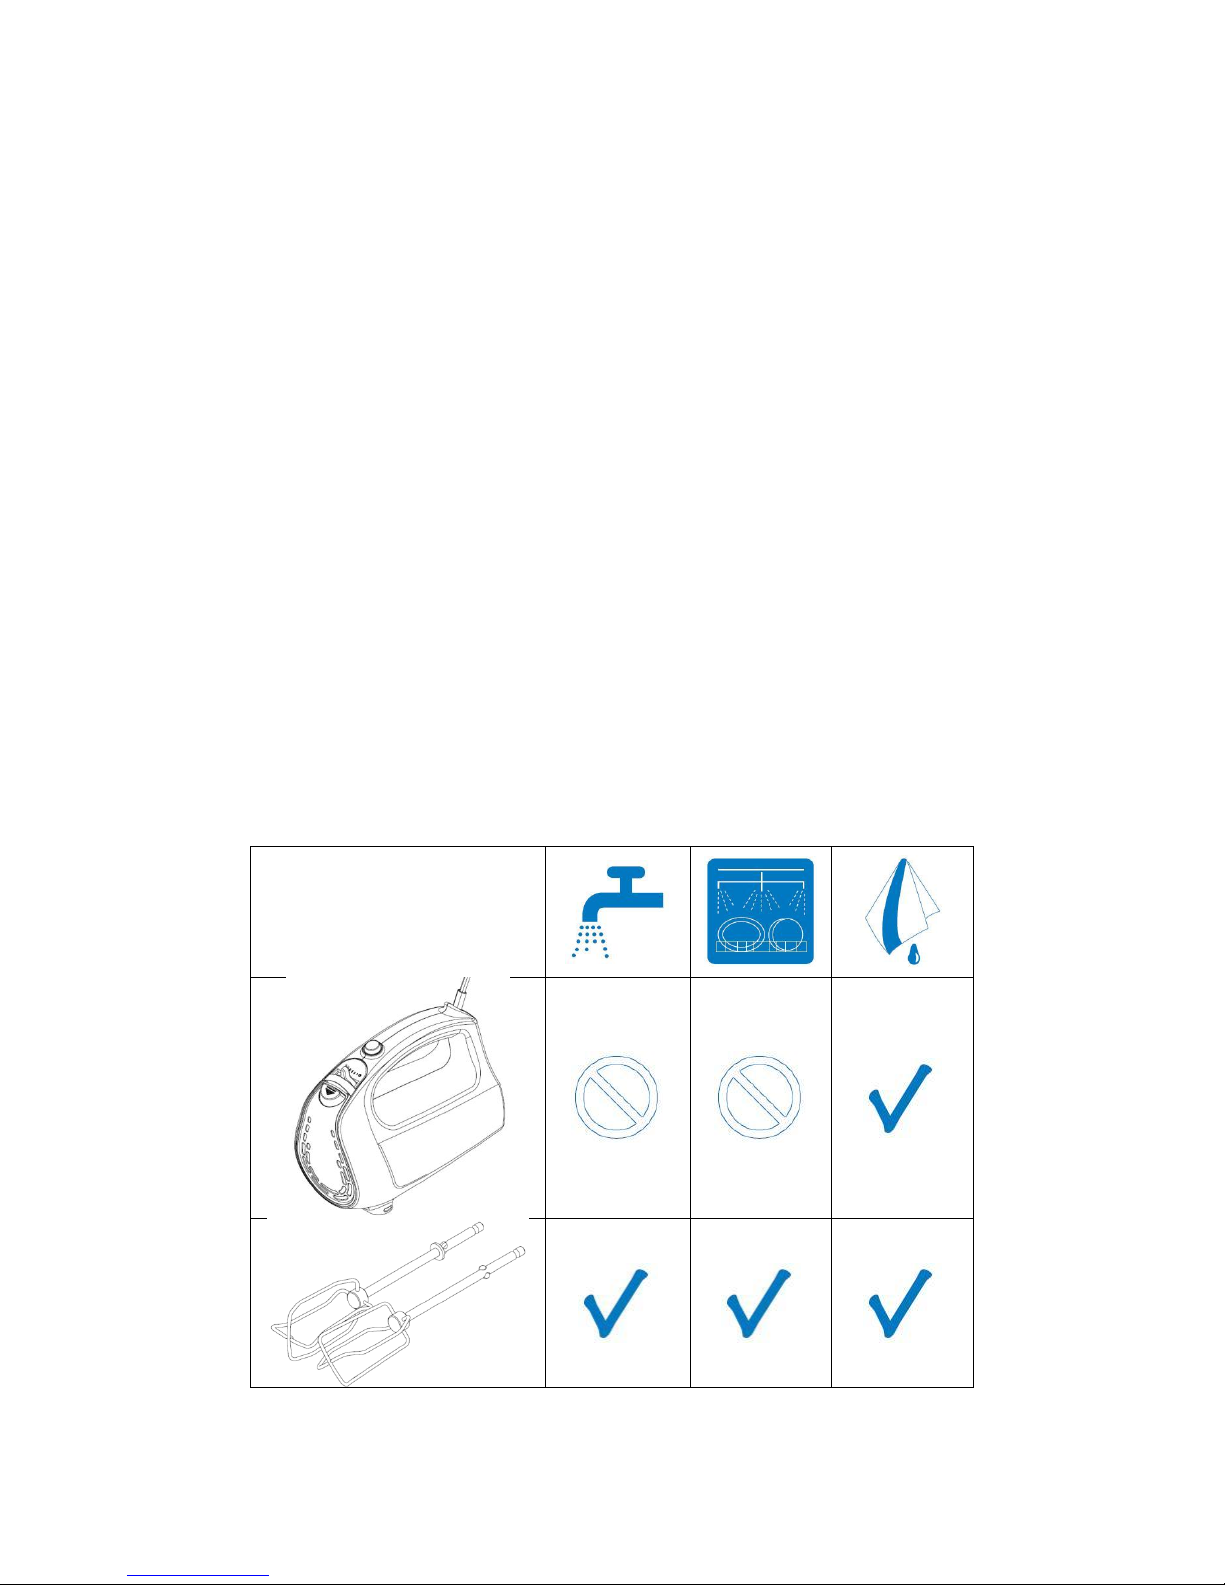
CLEANING AND MAINTENANCE
This hand mixer is for household use only and is not user-serviceable.
Do not open or change any parts by yourself. Please refer to a qualified electrical
service department or return to the supplier if servicing is necessary.
Always remember to unplug the unit from the electrical outlet when not in use
and before cleaning. Ensure that the speed control is set to “0” / “OFF”.
It is much easier to clean the accessories directly after they have been used.
Wash them in warm, soapy water, rinse and dry well.
The body of the hand mixer should be cleaned with a damp cloth. Do not let
water enter the hand mixer.
Do not use bleach or other abrasive substance or solvents to clean your hand
mixer as it can be damaging to the finish.
Do not immerse the mixer in water or any other liquid, or hold it under a running
tap to clean.
To remove stubborn spots/marks, wipe the surfaces with a cloth slightly
dampened in soapy water or mild non-abrasive cleaner. Rinse and dry a clean,
dry, soft cloth.
Page 11

11
STORING THE HAND MIXER
Unplug the unit from the wall outlet and clean all the parts as instructed above.
Ensure that all parts are dry before storing.
Store the hand mixer in its box or in a clean, dry place.
Never store the hand mixer while it is still wet or dirty.
RECIPES
Grand Marnier Delight
-2 tablespoons orange rind
-½ cup Grand Marnier
-150g dark chocolate
-3 eggs separated
-100ml thickened cream
Decoration:
-½ cup whipped cream
-2 teaspoons caster sugar
-Orange segments
Marinate orange rind overnight in Grand Marnier. Drain and reserve marinade. Melt
chocolate over hot water, do not boil water. Beat egg yolks on Speed 5 until thick and
creamy, pour onto warm chocolate. Beat well to blend mixture together, adding one
tablespoon of marinated orange rind. Allow to cool, beat cream on speed 3 until soft
peaks form. Fold cream into chocolate mixture. Whip egg whites on speed 5 until stiff.
Page 12

12
Fold in chocolate mixture, adding half the reserved marinade. Pour into small pots,
refrigerate for 5 hours. Serve with whipped cream.
Chocolate Pecan Pudding
-100g dark chocolate
-75g pecan nits, finely chopped
-2 slices white bread, crumbed
-60g plain flour
-100g unsalted butter, softened
-4eggs, separated
-100g sugar
Grease a large pudding bowl and dust with caster sugar.
Melt the chocolate in a small bowl over a saucepan of hot water. Combine pecan nuts,
breadcrumbs and flour. Beat butter on Speed 5 until fluffy, add chocolate, yolks and half
the sugar, continue to beat on speed 3 until smooth. Clean beaters thoroughly-whisk egg
whites until stiff, gradually adding remaining sugar. Fold the egg mixture into the butter
mixture, also add the flour mixture and fold lightly to combine.
Place mixture in prepared bowl. Cover with foil and secure. Lower into a saucepan of
boiling water-half way up sides of bowl and steam for 45-50 minutes.
Almond fingers
-225g butter
-2 cups caster sugar
-1 teaspoon almond essence
-1 egg
-3 cups plain flour
-1 teaspoon baking powder
Topping
-1 egg white, beaten with 2 tablespoons caster sugar
-1/2 cup chopped almonds
Cream butter and sugar on speed 5 for 5 minutes, or until light and fluffy. Add essence
and egg, beating until combined.
Page 13

13
Add sifted flour and baking powder and working with your hands form a smooth dough.
Roll out to 5mm thick, cut into finger shapes. Place on an oven tray. Bake at 150ºC for
15 minutes. Remove from oven. Brush with beaten egg white and sugar and sprinkle
with almonds. Return to oven for 5 minutes.
Allow to cool on tray.
Cold Lemon Soufflé
-5 eggs, separated
-1 cup caster sugar
-2 teaspoons grated lemon rind
¾ cup strained lemon juice
-1 tablespoon gelatine
-1/4 cup cold water
-300ml thickened cream lightly whipped
Cut a piece of foil 5cm longer than circumference of a deep 16cm soufflé dish. Fold foil
in half and wrap around the outside of dish. Secure foil with string. Beat egg yolks, sugar
and lemon rind on Speed 3 until the sugar has dissolved, and the mixture is pale and
thick. Heat lemon juice and gradually add to yolk mixture while beating. Combine
gelatine with water in a small bowl. Stand bowl in hot water and stir until gelatine
dissolves. Add gradually to lemon mixture- continuing on speed 1.
Transfer mixture to a large bowl, cover and refrigerate for 15 minutes. Using a metal
spoon, fold cream into the lemon mixture. Beat egg whites on Speed 5 until soft peaks
form. Fold whites quickly and lightly into the lemon mixture. Pour gently into the
prepared dish and chill until set.
Serve with whipped cream.
Tropical Treat
-125g butter, softened
-1 cup firmly packed brown sugar
-1 egg
-1 cup crushed pineapple, drained
-1 1/2 cups self-raising flour
-1 cup milk
Page 14

14
Cream the butter and sugar on Speed 4 until creamed. Add egg and continue to beat
until light and fluffy. Reduce to Speed 2: add pineapple, flour and milk, mixing only until
combined. Place mixture in a greased pudding bowl and cover with 2 thicknesses of
greaseproof paper and secure with a string. Place in a dish of water. Bake in a preheated 180ºC oven for 45-50minutes. Serve with vanilla ice cream garnished with
toasted shredded coconut.
Scones
-60g butter or margarine
-2 cups self-raising flour
-1 teaspoon salt
-1 cup sour cream
Place butter into mixing bowl, beat until soft. Add half the flour and mix well. Add
remaining flour, salt, milk and sour cream. With dough hooks mix to soft dough. Turn
dough onto a floured board and knead lightly. Cut into rounds and place on a lightly
floured oven tray. Bake in a preheated 200ºC oven for 12 minutes.
Wholemeal Fruit Scones
-60g butter or margarine
-1 cup wholemeal self-raising flour
-1 cup self-raising flour
-125g raisins, sultanas or chopped dates.
-1 cup cream
-1 egg beaten
Place butter into mixing bowl, beat until soft. Add flour and mix into butter with dough
hooks, add fruit. Mix in milk and egg forming a soft dough- a little extra milk may be
required. Turn onto floured board and knead lightly. Cut into rounds and place on a
lightly floured oven tray. Bake in a pre-heated 200ºC oven for 12 minutes.
Page 15

15
Cheese & Sour Cream Scones
-2 cups self-raising flour
-60g butter, melted
-125g tasty cheese, shredded
-1cup sour cream
-1 egg, beaten
-paprika
Place flour into mixing bowl. Add butter and mix well. Add cheese, sour cream and egg.
With dough hooks mix to a soft dough. Turn onto a floured board and knead lightly. Cut
into rounds and place onto a lightly floured oven tray. Brush tops with a little extra milk
and sprinkle with paprika. Bake a pre-heated 200ºC oven for 12 minutes.
Serve with hot butter.
Handy Hints
BLENDING
For course or dry foods, such as flour, butter and baby food.
STIRRING
For liquid ingredients, such as salad dressings
MIXING
For creaming together butter and sugar, desserts and other sweet mixtures
BEATING
For beating eggs, icing, cream, etc
Hints for beating egg whites
Be sure that the bowl and beaters are clean.
Be sure that there is no egg yolk in the egg white.
Egg whites should be at room temperature for maximum volume.
Use a high setting.
Beating time will vary according to the freshness of the eggs.
Hints for whipping cream
Use heavy cream.
Page 16

16
Chill cream before whipping.
Use a deep bowl.
For best results, chill both beaters and bowl.
Start beating at a low speed to prevent spatter, increase to high as cream
thickens.
Beating time will vary according to the fat content, age and temperature of the
cream.
SERVICING THE APPLIANCE
There are no user serviceable parts in this appliance. If the unit is not operating
correctly, please check the following:
You have followed the instructions correctly
That the unit has been wired correctly and that the wall socket is
switched on.
That the mains power supply is ON.
That the plug is firmly in the mains socket.
If the appliance still does not work after checking the above:
- Consult the retailer for possible repair or replacement. If the retailer fails to
resolve the problem and you need to return the appliance, make sure that:
The unit is packed carefully back into its original packaging.
Proof of purchase is attached.
A reason is provided for why it is being returned.
If the supply cord is damaged, it must be replaced by the manufacturer or an
authorised service agent, in order to avoid any hazard. If service becomes
necessary within the warranty period, the appliance should be returned to an
approved Home Of Living Brands (Pty) Limited service centre. Servicing outside
the warranty period is still available, but will, however, be chargeable.
Page 17
17
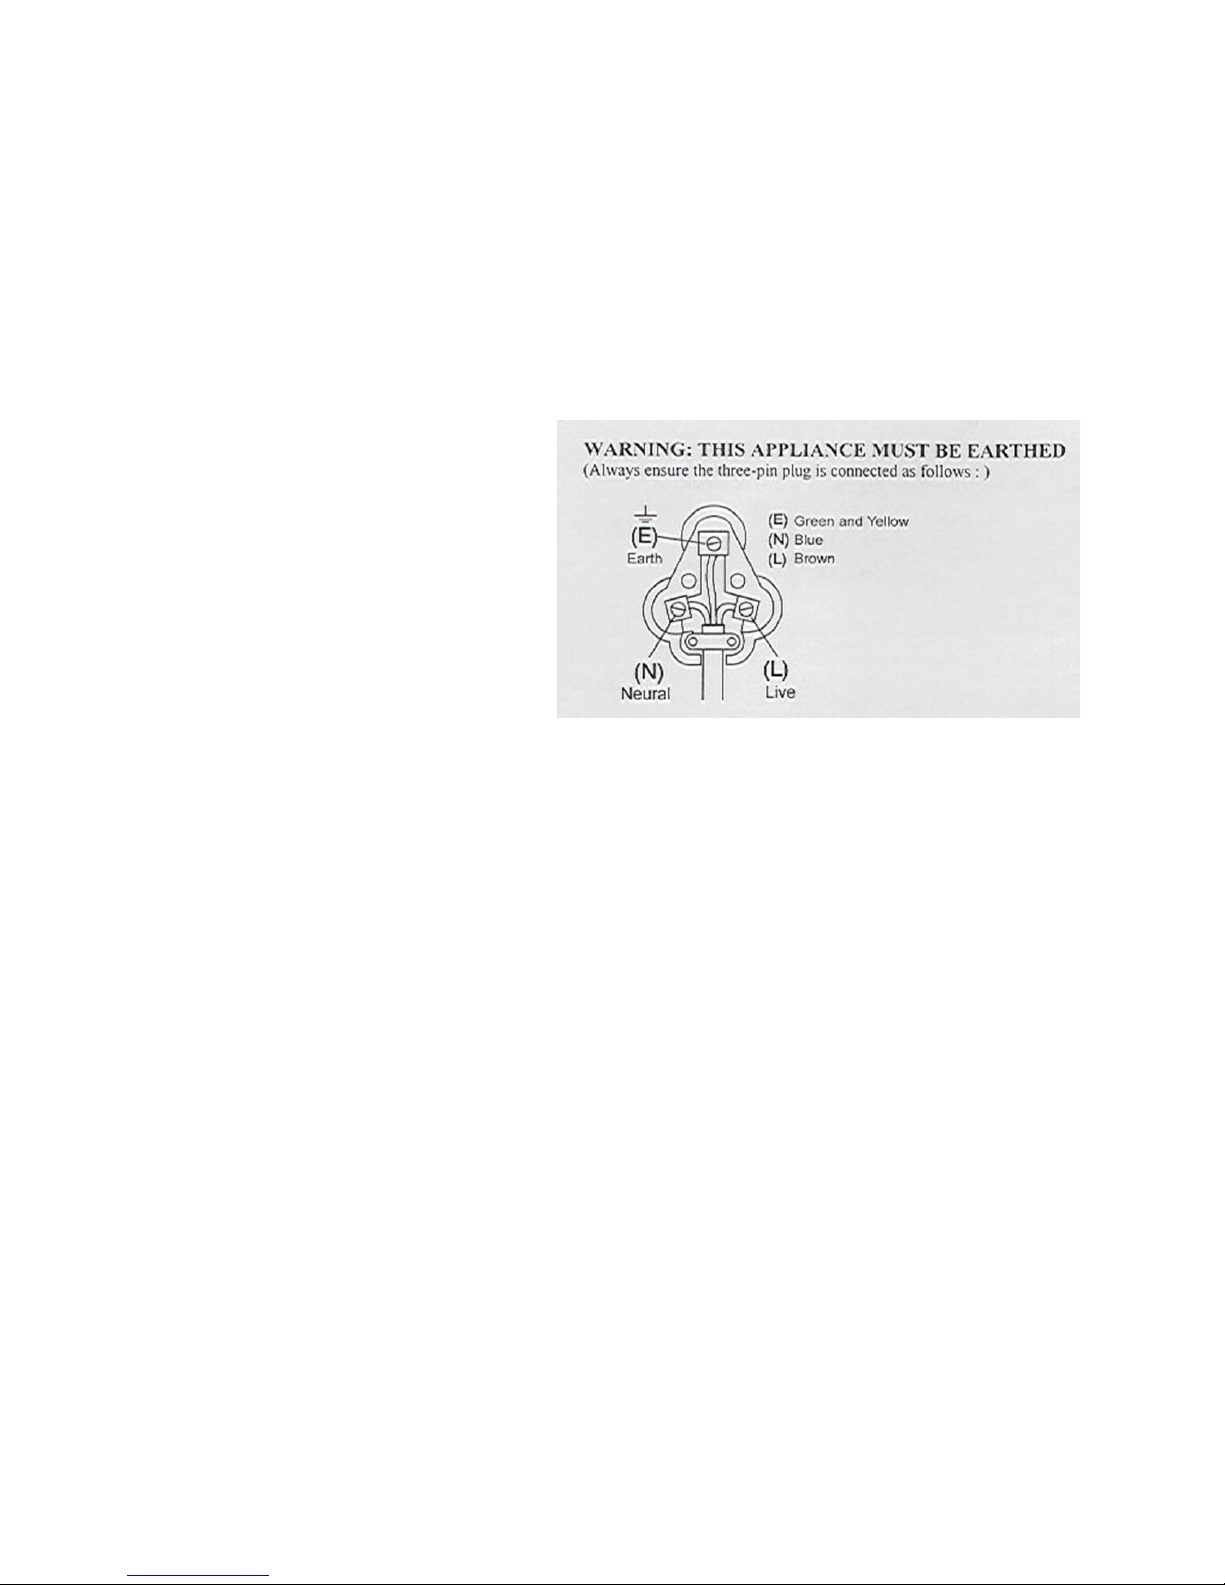
CHANGING THE PLUG
Should the need arise to change the fitted plug, follow the instructions below.
This unit is designed to operate on the stated current only. Connecting to
other power sources may damage the appliance. Connect a three-pin plug
as follows:
The wires in this mains lead are coloured in accordance with the following code:
Green/Yellow = Earth
Blue = Neutral
Brown = Live
Page 18

18
IN THE EVENT OF A CLAIM UNDER WARRANTY THIS RECEIPT MUST BE
PRODUCED.
W A R R A N T Y
1. Home Of Living Brands (Pty) Limited warrants to the original purchaser of this product (“the
customer”) that this product will be free of defects in quality and workmanship which under
normal personal, family or household use and purpose may manifest within a period of 1
(one) year from the date of purchase (“warranty period”).
2. Where the customer has purchased a product and it breaks, is defective or does not work
properly for the intended purpose, the customer must notify the supplier from whom the
customer bought the product (“the supplier”) thereof within the warranty period. Any claim
in terms of this warranty must be supported by a proof of purchase. If proof of purchase is
not available, then repair, and/or service charges may be payable by the customer to the
supplier.
3. The faulty product must be taken to the supplier's service centre to exercise the warranty.
4. The supplier will refund, repair or exchange the product in terms of this warranty subject to
legislative requirements. This warranty shall be valid only where the customer has not
broken the product himself, or used the product for something that it is not supposed to be
used for. The warranty does not include and will not be construed to cover products
damaged as a result of disaster, misuse, tamper, abuse or any unauthorised modification
or repair of the product.
5. This warranty will extend only to the product provided at the date of the purchase and not
to any expendables attached or installed by the customer.
6. If the customer requests that the supplier repairs the product and the product breaks or
fails to work properly within 3 (three) months of the repair and not as a result of misuse,
tampering or modification by or on behalf of the customer, then the supplier may replace
the product or pay a refund to the customer.
7. The customer may be responsible for certain costs where products returned are not in the
original packaging, or if the packaging is damaged. This will be deducted from any refund
paid to the customer.
HOME OF LIVING BRANDS (PTY) LTD
www.homeoflivingbrands.co.za
011 490-9600 (Jhb)
031 792-6000 (Dbn)
021 552-5161 (CT)
www.russellhobbs.co.za
www.facebook.com/RussellHobbsSA
Page 19

19
Cumprimentos pela compra da Batedeira Eléctrica Russell Hobbs Esse 400W. Cada
unidade é feita para proporcionar segurança e confiabilidade. Antes de usar este
aparelho pela primeira vez, leia o manual de instruções cuidadosamente e guarde-o
para futuras referências.
CARACTERíSTICAS DA BATEDEIRA ELÉCTRICA RUSSELL HOBBS
ESSE 400W
• Motor com 400W de potência
• 5 velocidades + turbo
• Batedor de aço inoxidável e ganchos para massa
• Botão ejetor para liberação das peças removíveis
• Visual safe-to-use indicator
• Guarda-fio
• Versatilidade: mistura, bate claras, tritura!
• Lavável na máquina de lavar louça
• Para uso doméstico apenas
PRECAUÇÕES IMPORTANTES
Ao usar um aparelho elétrico, devem-se tomar precauções básicas de segurança,
incluindo o seguinte:
AVISO: Para evitar sobrecarga e aquecimento excessivo no motor e consequentes
danos, não utilizar a batedeira eléctrica por períodos (ciclos) superiores a 3 minutos.
Recomenda-se um intervalo de descanso de 30 minutos após cada ciclo. Assim protege
a vida da sua batedeira eléctrica. A sua batedeira eléctrica possui um motor potente o
que a torna num eficiente acessório de cozinha. Não deve ser necessário utilizá-la por
períodos superiores a 3 minutos ( a cada utilização).
1. Leia as instruções cuidadosamente antes de usar qualquer batedeira eléctrica.
2. Sempre se certifique se a voltagem na etiqueta de classificação corresponda à
voltagem principal da sua casa.
3. O uso incorreto ou impróprio pode danificar a batedeira eléctrica e causar danos
ao usuário.
Page 20

20
4. O aparelho é para uso doméstico apenas. O uso comercial invalida a garantia e
o fornecedor não será responsável por danos ou prejuízos causados pelo uso
inapropriado do aparelho.
5. Evite qualquer contato com as partes removíveis.
6. Este aparelho não deve ser usado por pessoas com capacidade física, sensorial
ou mental reduzida (inclusive crianças) ou por pessoas com falta de experiência
e conhecimento, a menos que elas tenham supervisão ou recebam instruções
concernente ao uso do aparelho por uma pessoa responsável pela segurança
delas.
7. As crianças devem ser supervisionadas para que não brinquem com o aparelho.
8. Verifique regularmente o fio e a tomada. Se o fio ou a tomada estiverem
danificados, o fabricante ou uma pessoa qualificada deverá substituí-los para
evitar problemas elétricos.
9. Não use a batedeira eléctrica se tiver caído ou de alguma forma estragado. Em
caso de dano leve a panela para o conserto num agente autorizado de serviços.
10. A fim de reduzir o risco de choque elétrico, não submirja ou exponha o motor, a
tomada ou o fio de energia em água ou qualquer outro líquido.
11. Nunca coloque a base na água ou em qualquer outro tipo de líquido para fazer a
limpeza.
12. Remova o plugue da tomada pegando pelo plugue. Não puxe o fio para
desconectar a batedeira eléctrica. Sempre desconecte a panela quando não
estiver em uso, antes de limpá-la ou ao adicionar ou remover as partes.
13. Use apenas peças originais do fabricante (varinhas para massas leves ou
pesadas).
14. O uso de acessórios que não são recomendados ou fornecidos pelo fabricante
pode causar danos, fogo ou choque elétrico.
15. O fio de energia é curto para reduzir o risco de enrolar em alguma coisa ou de se
tropeçar num fio maior.
16. Não deixe o fio dependurado fora da borda da mesa ou do balcão. Certifique-se
de que o fio não esteja num lugar em que possa ser puxado inadvertidamente.
17. Não deixe o fio tocar superfícies quentes e não o coloque perto do queimador de
gás ou elétrico ou num fogão quente.
18. Mantenha o aparelho e o fio fora da irradiação direta de sol, da umidade,
distante de pontas afiadas e outros perigos.
19. Não use a batedeira sobre o fogão a gás ou elétrico nem próximo à chama.
Page 21

21
20. Não se recomenda o uso de fio de extensão com esta batedeira. Contudo, caso
seja necessário o uso de uma extensão, certifique-se de que a fiação seja
compatível com o consumo de energia do mixer para evitar superaquecimento
do fio, da batedeira ou da tomada. Não coloque o fio de extensão numa posição
em que possa ser puxado por uma criança ou os animais possam tropeçar nele.
21. Esta batedeira eléctrica não deve ser usada ao ar livre. Não o use para nada
além daquilo para o qual foi projetado.
22. Não utilize este equipamento com um temporizador externo.
23. NÃO carregue a batedeira eléctrica pelo fio de energia.
24. Esteja atento a batedeira eléctrica durante o uso. Sempre desconecte a unidade
quando não estiver em uso ou antes de limpá-la.
25. Sempre use a batedeira eléctrica numa superfície lisa, regular e estável. Não
coloque a base numa superfície quente.
26. Antes de utilizar a batedeira certifique-se que ambas as varinhas estão
devidamente excaixadas.
27. Nunca toque nos acessórios rotativos quando em funcionamento. Aguarde que
estes estejam completamente imobilizados.
28. É absolutamente indispensável manter este equipamento sempre limpo pois
entra em contacto directo com alimentos.
29. Para evitar dispersão da massa, mantenha as varinhas bem dentro da massa
antes de ligar a batedeira. Inicie o funcionamento da batedeira a uma velocidade
reduzida.
30. Cuidado ao bater líquidos quentes e na preparação de comida.
31. Certifique-se de que o seletor esteja na posição “0”/“Off” depois de cada uso.
32. O fabricante não assume a responsabilidade por qualquer dano ou prejuízo
causado pelo uso impróprio ou incorreto, ou por consertos feitos por pessoal não
autorizado.
33. Em caso de problemas técnicos, desligue a máquina e não tente consertá-la
você mesmo. Leve a batedeira a um representante autorizado para exame,
ajuste ou conserto. Sempre use peças originais. O não cumprimento das
precauções e instruções mencionadas acima, poderão afetar o funcionamento
seguro da máquina.
AVISO: Este aparelho não se destina ao uso profissional. Deve seguir todos os
intervalos exigidos. O incumprimento desta instrução pode resultar em danos ao motor.
Para evitar sobrecarga e aquecimento excessivo no motor e consequentes danos, não
Page 22

22
utilizar a batedeira eléctrica por períodos (ciclos) superiores a 3 minutos. Recomenda-se
A
B
C
D
um intervalo de descanso de 30 minutos após cada ciclo. Assim protege a vida da sua
batedeira eléctrica.
DIAGRAMA DAS PARTES
A. Botão Turbo
B. Controlo de velocidade
C. Botão de ejecção
D. Corpo principal
E. Varinha para massa pesada (para encaixe no orifício maior)
F. Varinha para massa pesada (para encaixe no orifício mais pequeno)
G. Varinha para massa leve (para encaixe no orifício maior)
H. Varinha para massa leve (para encaixe no orifício mais pequeno)
Page 23

23
E
H
F
G
Turbo Button (A):
Para bater por períodos muito curtos a uma velocidade maior pressione e solte ( por
impulsos).
Controlo de velocidade (B):
0: stop / OFF 1: MIN 5: MAX
AVISO: Quando trocar ou tocar as varinhas verificar sempre se a batedeira
eléctrica está desligada em “0” / “OFF” e desligada da corrente.
ANTES DE USAR
Antes de utilizar a batedeira eléctrica pela primeira vez, retire-a da caixa e da película
protectora. COMO MEDIDA DE SEGURANÇA LEMBRE-SE QUE DEVE MANTER
QUALQUER PELÍCULA DE PROTECÇÃO FORA DO ALCANCE DE CRIANÇAS.
Lave as varinhas em água quente com detergente, enxague e seque, Limpe o corpo da
batedeira com um pano ligeiramente húmido.
Page 24

24
INSTRUÇÕES DE OPERAÇÃO
COMO ENCAIXAR AS VARINHAS
Remova a ficha da tomada eléctrica e rode o botão da velocidade para a posição
“0” / “OFF”.
Insira as duas varinhas (G e H) no corpo da batedeira,e gire ligeiramente até que
fiquem presas. Se utilizar as varinhas para massa pesada, insira as duas
varinhas (E e F) nos orifícios correspondentes e gire ligeiramente até que as
varinhas fiquem presas. Nunca utilize simultaneamente as varinhas para massa
pesada e para massa leve.
Obs.: As varinhas de massa leve ou pesada do lado esquerdo e lado direito não são
iguais. As varinhas do lado direito têm um pequeno anel e as do lado esquerdo não.
Não troque as varinhas do lado esquerdo com as do lado direito.
COMO UTILIZAR A BATEDEIRA ELÉCTRICA
A batedeira eléctrica Russell Hobbs Esse é ideal para a preparação de molhos, cremes,
natas batidas, misturas para bolos e semelhantes.
1. Certifique-se que a batedeira eléctrica está desligada e que a velocidade está
na posição “0” / “OFF”.
2. Ponha os ingredientes numa tigela funda e resistente, que seja suficientemente
alta e larga para evitar salpicos. Para obter melhores resultados, utilize uma
tigela e tamanho médio e com funda.
3. Com o botão de velocidade ainda na posição “0” / “OFF”, ligue a batedeira à
corrente eléctrica.,
Obs: Não dê início ao funcionamento da batedeira antes de ter introduzido as varinhas
na mistura a ser processada.
4. Introduza as varinhas na mistura tanto quanto possível para evitar salpicos.
Page 25

25
Obs.: A batedeira eléctrica não deve ser submersa em alimentos ou líquidos para além
dosdo alcance das varinhas. Alimentos e líquidos não podem estar em contacto com o
corpo da batedeira.
5. Seleccione a velocidade desejada girando o botão de selecção de velocidade
para a direita, de 1 para uma velocidade mais reduzida para 5 (velocidade
máxima). Recomenda-se iniciar o funcionamento da batedeira numa velocidade
menos e ir aumentando progressivamente conforme for necessário, dependendo
da consistência desejada dos alimentos a preparar.
Guia geral da combinação entre varinhas, velocidades e alimentos:“1” Varinha para massa pesada: manteiga, batatas
“2” Varinha para massa leve: molhos e produtos lácteos
“3” Varinha para massa pesada: light pastry dough
“4” Varinha para massa leve: sobremesas batidas, cremes
“5” Varinha para massa leve: claras de ovo, natas batidas
6. Enquanto estiver a bater mova levemente a batedeira para cima e para baixo e
trabalhe os ingredientes com um ligeiro movimento circular e de cima para baixo.
7. Qaundo tiver terminado de utilizar a sua bateedeira, desligue para a posição “0” /
“OFF”. Aguarde até que as varinhas estejam completamente imóveis.
8. Remova as varinhas do corpo da batedeira. Consulte a secção “COMO
REMOVER AS VARINHAS”.
9. Desligue a batedeira da corrente.
10. Após a utilização limpe bem a batedeira e os acessórios.
BOTÃO TURBO/IMPULSO
Utilize o botão de impulso para neutralizar a velocidade previamente seleccionada e
para dar um impulso de velocidade extra, independentemente da velocidade que tinha
selecionado. Basta pressionar por segundos o botão. Para evitar o sobreaquecimento,
não utilize esta função por mais de 30 segundos de cada vez e deixe repousar por
cerca de um minuto entre impulsos.
Page 26

26
COMO REMOVER AS VARINHAS
Para ejectar as varinhas, mova o botão de selecção de velocidade para “0” / “OFF” e
desligue a batedeira. Deixe escorrer para a tigela qualquer resto de comida das
varinhas e segure-as para evitar que saltem e carregue no botão para as ejectar (C). O
botão de ejecção não funcionará se o botão de velocidade não estiver na posição “0” /
“OFF”.
Procedimento para fermentos e preparar massas com as varinhas para massas
pesadas
Utilize uma tigela com 130mm de altura e um diâmetro de 170mm no topo e de 150mm
na parte inferior. Estas dimensões são suficientes para conter uma mistura de massa
com fermento composta de 520g de farinha + 400g de água.
Procedimento para bater claras com as varinhas para massas leves
A batedeira eléctrica pode funcionar ininterruptamente durante 3 minutos no máximo
permitindo bater 8 claras de ovo ou 500ml de natas. Espere 30 minutos para deixar
arrefecer o motor da batedeira antes de a utilizar de novo.
SUGESTÕES DE UTILIZAÇÃO
Movimente ligeiramente as varinhas pela massa para tornar a massa
homógenea.
Se desejar limpar as partes laterais e a base do recipente com um utensilio
como uma espátula ou colher, desligue a batedeira primeiro para a posição “0” /
“OFF”.
Para evitar salpicos, introduza as varinhas na massa antes de iniciar o
funcionamento da batedeira.
Mantenha a batedeira desligada se não estiver a utilizar, antes e depois de
introduzir as varinhas ou antes de a limpar.
Evite o contacto com quaisquer partes em movimento. Mantenha as mãos,
cabelo, roupa, assim como espátulas e outros utensílios fora de alcance durante
Page 27

27
o funcionamento da batedeira para evitar lesões pessoais e/ou danos no
aparelho.
A velocidade pode ser ajustada em qualquer momento apartir da posição “0” /
“OFF” e seleccionando a velocidade de acordo com o tipo de alimento a ser
preparado. Para misturas mais espessas, recomenda-se uma velocidade mas
baixa. Para consistências mais finas, utilize velocidades mais altas.
LIMPEZA E CONSERVAÇÃO
Esta batedeira é para uso domiciliar apenas e não pode ser reparado ou aberto
pelo utilizador.
Não abra ou troque quaisquer partes você mesmo. Procure um departamento de
serviço elétrico especializado ou devolva ao fornecedor se for necessário algum
conserto.
Lembre-se sempre de desligar a torradeira da tomada quando não a estiver a
utilizar e antes de limpar. Certifique-se de que o controle de velocidade esteja
em “0” / “OFF”.
É muito mais fácil limpar os acessórios logo após a utilização. Lave-os em água
morna com detergente, enxague e seque-os bem.
O corpo da batedeira eléctrica deve ser limpo com um pano húmido. Não deixe
entrar água na batedeira eléctrica .
Não utilize lexívia ou outras substâncias abrasivas ou solventes para limpar a
batederia, pois pode ser prejudicial para o acabamento exterior.
Não mergulhe a batdeira na água ou em qualquer outro líquido, nem o segure
sob água corrente da torneira para limpá-lo.
Para remover marcas e manchas teimosas, esfregue a superfície com um pano
levemente umedecido em água com sabão ou removedor suave não abrasivo.
Enxágue e seque muito bem com um pano limo, macio e seco.
Page 28

28
GUARDAR A BATEDEIRA
Desconecte a unidade da parede e limpe todas as partes como instruído acima.
Certifique-se de que todas as partes estejam secas antes de guardar.
Guarde a batedeira eléctrica na sua caixa ou num lugar limpo e seco.
Nunca guarde a batedeira eléctrica enquanto ele estiver molhado ou sujo.
RECEITAS
Delícia com Grand Marnier
-2 colheres de sopa de casca (fina) de laranja
-½ copo de Grand Marnier
-150g de chocolate amargo
Page 29

29
-3 ovos (gemas separadas das claras)
-100ml de natas batidas
Decoração:
-½ copo de natas batidas
-2 colheres de açúcar refinado
-gomos de laranja
Deixe marinar de um dia para o outro as cascas de laranja no Grand Marnier. Escorra e
reserve o líquido a marinada. Derreta o chocolate em banho-maria, sem deixar ferver a
água. Bata as gemas na velocidade 5 até que se apresentem grossas e cremosas e
junte-lhes o chocolate quente. Bata bem até obter uma mistura homogénea,
adicionando uma colher de sopa da marinada de casca de laranja. Deixe arrefecer e
bata as natas na velocidade 3 até se apresentarem em castelo. Misture as natas na
mistura que tem o chocolate. Bata as claras em castelo na velocidade 5. Misture com a
mistura que tem o chocolate acdicionando metada da marinada restante. Disponha em
pequenas taças e leve ao frigorífico durante 5 horas. Sirva com natas batidas.
Pudim de chocolate e nozes pecã
-100g de chocolate amargo
-75g de pedacinhos de noz pecã
-2 fatias de pão branco em migalhas
-60g de farinha de trigo
-100g de manteiga sem sal, amolecida
-4 ovos (gemas separadas das claras)
-100g de açúcar
Unte uma forma grande de pudim e polvilhe com açúcar refinado.
Derreta o chocolate em banho-maria numa taça pequena. Junta as nozes, o pão em
migalhas e a farinha. Bata a manteiga na velocidade 5 até que esta se apresente
cremosa, adicione os chocolate e metade do açúcar. Continue a bater na velocidade 3
até se apresentar bem macio. Limpe bem as varinhas e de seguida bata as claras em
castelo adicionando gradualmente o açúcar restante. Misture a massa com os ovos na
massa com a manteiga e adicione a farinha e envolva com cuidado para misturar os
ingredientes.
Page 30

30
Coloque a mistura na forma previamente preparada, cubra com papel de alumínio e
feche. Coloque num tacho com água a ferver. A altura da água deve chegar até meio da
parede da forma de pudim. Deixe cozinhar lentamente em banho-maria durante 45 a 50
minutos.
Palitos de amêndoa
-225g de manteiga
-2 copos de açúcar refinado
-1 colher de chá de extracto de amêndoa
-1 ovo
-3 copos de farinha
-1 colher de chá de fermento em pó
Cobertura
-1 clara de ovo, batida com 2 colheres de sopa de açúcar refinado
-1/2 copo de amêndoas em lascas
Bata a manteiga e o açúcar na velocidade 5 durante 5 minutos ou até apresentar uma
mistura leve e fofa. Adicione o extracto de amêndoa e o ovo, batendo bem para
misturar.
Adicione a farinha peneirada e o fermento em pó trabalhando a massa com as mãos
para formar uma massa macia. Use o rolo e estenda a massa com 5mm de espessura e
recorte tiras com a forma de dedos. Coloque num tabuleiro, leve ao forno a 150ºC por
15 minutos. Retire do forno. Pincele com clara de ovo batida e açúcar e polvilhe com
amêndoas. Volte a colocar no forno por 5 minutos.
Deixe arrefecer no tabuleiro.
Semi-frio de limão
-5 ovos, gemas separadas das claras
-1 copo de açúcar refinado
-2 colheres de chá de raspa de casca de limão
¾ copo de sumo de limão
-1 colher de sopa de gelatina
Page 31

31
-1/4 copo de água fria
-300ml de natas levemente batidas
Recorte em papel de alumínio uma circunferência 5cm mais larga do que o diâmetro de
um tabuleiro de suflé de 16cm. Dobre o papel de alumínio e ajuste nos lados do
tabuleiro. Prenda o papel de aluminio com um cordel de cozinha. Bata as gemas de
ovo, o açúcar e a raspa de limão na velocidade 3 até dissolver o açúcar e a mistura se
apresente esbranquiçada e espessa. Aqueça o sumo de limão e gradualmente adicione
a mistura com as gemas, batendo sempre. Junte a gelatina com a água numa taça
pequena. Coloque a taça num recipiente com água quente e mexa até dissolver a
gelatina. Adicione gradualmente à mistura com o sumo de limão, continuando a bater na
velocidade 1.
Deite a mistura numa taça maior, cubra e refrigere durante 15 minutos. Utilizando uma
colher de metal, misture as natas na massa que tem o limão. Bata as claras em castelo
na velocidade 5. Misture as claras rápida e levemente na mass que tem o limão. Deite
a mistura com cuidado no tabuleiro de suflé e leve ao frigorífico para solidificar.
Sirva com natas batidas.
Delícia tropical
-125g de manteiga amolecida
-1 copo de açúcr amarelo bem compacto
-1 ovo
-1 copo de ananás desfeito e escorrido
-1 1/2 copos de farinha com fermento
-1 copo de leite
Bata a manteiga e o açúcar na velocidade 4 até obter uma mistura cremosa. Adicione
ovo e continue a bater até a massa se apresentar leve e fofa. Reduza para a velocidade
2: adicione o ananás, a farinha e o leite, apenas para misturar os ingredientes. Coloque
a mistura numa forma de pudim untada com manteida e cubra com duas camadas de
papel impermeável a goordura. Prenda com um cordel de cozinha. Coloque a forma
num tabileiro com água. Leve ao forno pré-aquecido a 180ºC durante 45 a 50 minutos.
Sirva com gelado de baunilha e decore com coco ralado torrado.
Page 32

32
Scones
-60g de manteiga ou margarina
-2 copos de farinha de trigo com fermento
-1 colher de chá de sal
-1 copo de natas azedas
Coloque a manteiga na tigela e bata até amolecer. Adicione metade da farinha e misture
bem. Adicione a restante farinha, o sal, o leite e as natas azedas. Misture usando as
varinhas de massa pesada para obter uma massa macia. Passe para uma superfície
ligeiramente polvilhada com farinha e amasse ligeiramente. Corte em bolinhos redondos
e coloque num tabuleiro ligeiramente polvilhado com farinha. Leve ao forno préaquecido a 200ºC durante 12 minutos.
Scones integrais com fruta
-60g de manteiga ou margarina
-1 copos de farinha integral com fermento
-1 copo de farinha de trigo com fermento
-125g de sultnas, passas e tâmaras picadas
-1 copo de natas
-1 ovo batido
Coloque a manteiga na tigela e bata até amolecer. Adicione a farinha e misture,
utilizando as varinhas para massa pesada, adicionando as frutas. Misture o leite e o ovo
formando uma massa fofa – pode necessitar de um pouco de leite. Passe para uma
superfície ligeiramente polvilhada com farinha e amasse ligeiramente. Corte em
bolinhos redondos e coloque num tabuleiro ligeiramente polvilhado com farinha. Leve ao
forno pré-aquecido a 200ºC durante 12 minutos.
Scones de queijo e natas azedas
-2 copos de farinha de trigo com fermento
-60g de mantega derretida
Page 33

33
-125g queijo curado, em pedacinhos
-1copo de natas azedas
-1 ovo, batido
-paprika
Coloque a farinha numa tigela, adicione a manteiga e misture bem. Adicione o queijo, as
natas azedas e o o ovo. Com as varinhas para massa pesada misture até obter uma
massa macia. Passe para uma superfície polvilhada com farinha e amasse ligeiramente.
Corte em bolinhos circulares e disponha num tabuleiro para forno ligeiramente
polvilhado de farinha. Pincele a parte superior com o restante leite e polvilhe com a
paprika. Leve ao forno pré-aquecido a 200ºC durante 12 minutos.
Sirva com manteiga quente.
Dicas úteis
MISTURAR INGREDIENTES SECOS
Para alimentos granulados ou secos, como farinha, manteiga e comida para
bebés.
MEXER
Para ingredientes líquidos, como molhos para saladas
MISTURAR
Para misturar manteiga com açúcar, sobremesas e outras misturas doces
BATER
Para ovos, coberturas de bolos, cremes, etc.
Dicas para bater claras de ovo
Certifique-se que a tigela e as varinhas estejam limpas.
Certifique-se que as claras não têm qualquer bocadinho de gema.
Para obter o máximo volume as claras devem estar à temperatura ambiente.
Use uma velocidade alta.
O tempo necessário varia de acordo com a frescura os ovos.
Dicas para bater natas
Use natas mais espessas em vez de natas líquidas
Refrigere as natas antes de as bater
Use uma tigela funda
Page 34

34
Para obter melhores resultados, refrigere as natas e a tigela
Comece a bater as natas a uma velocidade reduzida para evitar salpicos e
aumente gradualmente à medida que as natas vão engrossando.
O tempo necessário varia de acordo com a quantidade de gordura, frescura e
temperatura das natas
SERVIÇO DE MANUTENÇÃO DO APARELHO
Não há partes substituíveis neste aparelho. Se a unidade não estiver
funcionando corretamente, verifique o seguinte:
Você seguiu corretamente as instruções.
Que a unidade foi instalada corretamente e que a tomada está ligada
na parede.
Que o provedor de energia está ON.
Que o plugue está firmemente seguro na tomada.
Se ainda assim o aparelho não funcionar depois do acima:
- Consulte o varejista para um possível conserto ou substituição. Se o varejista
não resolver o problema, devolva o aparelho, certificando-se de:
Embalar a unidade cuidadosamente na embalagem original.
Anexar o recibo de compra.
Dar um motivo para a devolução.
Se o fio fornecido estiver danificado, deverá ser substituído pelo fabricante ou
agente de serviço autorizado, para evitar qualquer dano. Se o conserto for
necessário dentro do período de garantia, o aparelho deve ser devolvido para
um centro de serviço da Home of Living Brands (Pty) Limited aprovado.
Consertos fora da garantia ainda estarão disponíveis, mas serão cobrados.
Page 35

35
SUBSTITUIÇÃO DA FICHA
Cumpra com as instruções seguintes caso seja necessário substituir a ficha.
Esta unidade destina-se a operar apenas na corrente indicada. A ligação a
outras fontes de alimentação poderá danificar o aparelho. Ligue uma ficha
de três pinos da seguinte maneira:
Os fios neste terminal de alimentação estão coloridos de acordo com o seguinte
código:
Verde/Amarelo = Terra
Azul = Neutro
Castanho = Vivo
Page 36

36
NO CASO DE RECLAMAÇÃO SOB GARANTIA, DEVE-SE TER ESTE
RECIBO.
GARANTIA
1. Home Of Living Brands (Pty) Limited garante ao comprador original deste produto (“o
cliente”) que o produto está sem defeitos de qualidade e manufatura que sob uso normal
pessoal, familiar ou domiciliar e propósito pode manifestar dentro do período de 1 (um)
ano da data de compra (“período da garantia”).
2. Se o cliente tiver comprador um produto e ele quebrar, estiver com defeito ou não
funcionar adequadamente pelo período devido, o cliente deve notificar o fornecedor de
quem comprou o produto (‘’o fornecedor”) dentro do período de garantia. Qualquer
reclamação nos termos desta garantia devem ser acompanhadas pelo recibo de compra.
Se não possuir o recibo, então a cobrança do conserto, e/ou do serviço deverá ser pago
pelo cliente ao fornecedor.
3. O produto defeituoso deve ser levado ao centro de serviço do fornecedor representante
para ter direito à garantia.
4. O fornecedor reembolsará, consertará ou trocará o produto nos termos desta garantia
sujeita a requerimentos legislativos. Esta garantia será válida somente se o cliente não
tiver quebrado ele mesmo o produto, ou usado de modo inapropriado. A garantia não
inclui e não será usada para cobrir produtos danificados por causa de desastre, mau
uso, falsificação, abuso ou modificação não autorizada ou conserto do produto.
5. Esta garantia somente será estendida ao produto fornecido na data da compra e não
valerá para nenhuma das extensões anexadas ou instaladas pelo cliente.
6. Se o cliente solicitar que o fornecedor conserte o produto e o produto quebrar ou não
funcionar apropriadamente dentro de 3 (três) meses do conserto e não devido ao uso
errado, falsificação ou modificação por ou da parte do cliente, então o fornecedor pode
substituir o produto ou reembolsar o cliente.
7. O cliente poderá ser responsabilizado por certos custos se os produtos devolvidos não
estiverem na embalagem original ou se a embalagem estiver danificada. Isso será
deduzido de qualquer reembolso pago ao cliente.
HOME OF LIVING BRANDS (PTY) LTD
www.homeoflivingbrands.co.za
JOANESBURGO N.º TEL. +2711 490-9600
CIDADE DO CABO N.º TEL. +2721 552-5161
DURBAN N.º TEL. +2731 792-6000
www.russellhobbs.co.za
www.facebook.com/RussellHobbsSA
Page 37

37
Félicitations pour l'achat de notre Batteur à main Russell Hobbs Esse 400W. Chaque
unité est produite pour garantir un maximum de sécurité et de fiabilité. Avant d'utiliser
cet ustensile pour la première fois, veuillez lire attentivement le manuel d'utilisation et le
conserver pour toute référence future.
CARACTERISTIQUES DU BATTEUR A MAIN RUSSELL HOBBS ESSE
400W
• Puissant moteur de 400W
• 5 réglages de vitesse et bouton turbo
• Batteur en acier inoxydable et crochets pétrisseurs
• Bouton ejectpour libérer les accessoires
• Visual safe-to-use indicator
• Espace pour ranger le cordon
• Polyvalent : mélanger, fouetter, battre, crème et purée
• Les éléments peuvent être lavés au lave-vaisselle
• Uniquement pour usage domestique
MESURES DE PROTECTION IMPORTANTES
Lorsqu'on utilise un appareil électrique, il est toujours important de suivre les consignes
de sécurité y compris ce qui suit :
ATTENTION : Lorsque vous utilisez le batteur à main, veuillez ne pas le laisser en
fonction pendant plus de 3 minutes à la fois, sinon vous risquez de mettre le moteur
sous pression et donc de le surchauffer et de provoquer le mauvais fonctionnement du
produit. Après chaque cycle de fonctionnement, il est conseillé de laisser refroidir
l'appareil pendant 30 minutes. Ceci contribuera à augmenter la durée de vie de votre
batteur à main. Votre batteur à main est équipé d'un moteur puissant, ce qui en fait un
outil de cuisine très efficace. Normalement il ne devrait pas être nécessaire de faire
tourner le moteur pendant plus de 3 minutes à la fois.
1. Avant d'utiliser tout batteur électrique veuillez lire attentivement les instructions.
2. S'assurer que le voltage indiqué sur l'étiquette corresponde au voltage de la
maison.
Page 38

38
3. Une utilisation incorrecte ou non appropriée peut endommager le batteur à main
et provoquer des blessures à l'usager.
4. Cet appareil est conçu uniquement pour l'utilisation domestique. L'utilisation à
des fins commerciales de cet appareil annule la garantie et le fournisseur ne
pourra être tenu responsable de tout dommage ou accident causé par l'appareil
lorsque son usage diffère de celui prévu.
5. Éviter tout contact avec les parties en mouvement.
6. Cet appareil ne doit pas être utilisé par des personnes (y compris les enfants) à
mobilité réduite, dont les capacités sensorielles ou mentales sont amoindries, ou
manquant de l'expérience ou des connaissances nécessaires, à moins qu'elles
ne soient sous la surveillance d'une personne responsable de leur sécurité ou
qu'elle aient reçu de cette dernière des instructions d'utilisation de l'appareil.
7. Les enfants devraient être toujours surveillés afin qu'ils ne jouent pas avec
l'appareil.
8. Inspecter et brancher régulièrement le fil électrique pour vérifier qu'il ne soit pas
endommagé. Si le fil ou la prise sont endommagés, leur substitution sera faite
par le producteur ou par une personne qualifiée afin d'éviter tout risque
d'accident électrique.
9. Ne pas utiliser l'appareil s'il a été endommagé d'une manière quelconque ou en
cas de chute. En cas de dommage, faire examiner et/ou réparer l'unité par un
agent agréé.
10. Afin de réduire les risques d'électrocution, ne pas immerger ou exposer à l'eau
ou à tout autre liquide le bloc moteur, le fil ou la prise.
11. Ne pas immerger l'unité dans l'eau ou dans tout autre liquide pour la nettoyer.
12. Pour enlever la prise la tenir fermement. Ne pas tirer le fil pour déconnecter le
batteur à main de la prise de courant. Déconnecter l'unité lorsqu'elle n'est pas en
fonction ou lors du nettoyage ou du démontage.
13. Utilisez uniquement des parties originales (pétrins métalliques et fouets).
14. L'utilisation d'accessoires qui ne sont pas recommandés ou fournis par le
producteur pourrait provoquer des accidents, des incendies ou des
électrocutions.
15. Le fin fourni est court afin d'éviter tout risque de suffocation ou de blessure suite
au trébuchement sur un fil plus long.
16. Ne pas laisser le fil pendre d'une table ou d'un plan de travail. S'assurer que le fil
ne soit pas en une position où il pourrait être tiré par mégarde.
Page 39

39
17. Ne pas laisser le fil en contact avec des surfaces chaudes et ne pas placer sur
ou près d'un réchaud au gaz ou électrique ou dans un four chaud.
18. Rangez l'appareil et le fil électrique à l'abri de la chaleur directe du soleil,
ou de l'humidité, d’objets tranchants ou d'autres dangers.
19. Ne pas utiliser le batteur à main sur une taque au gaz ou électrique ou
près d'une flamme libre.
20. L'utilisation d'une rallonge avec cet appareil est déconseillée. Cependant,
si cela s'avère nécessaire, assurez-vous que la rallonge soit conçue pour
supporter la consommation du batteur afin d'éviter de surchauffer la
rallonge, le batteur à main ou la prise murale. Ne placez pas la rallonge à
un endroit où elle peut être tirée par des enfants ou par des animaux ou
où elle pourrait provoquer des trébuchements.
21. Ce batteur à main ne convient pas à l'utilisation en plein air. N'utilisez pas
ce batteur à main pour autre chose que son but spécifique.
22. Ne pas utiliser l'appareil en appliquant un minuteur externe.
23. NE PAS transporter le batteur à main en le soulevant par le câble électrique.
24. Pendant l'utilisation ne pas laisser le batteur à main sans surveillance.
Débrancher toujours l'appareil lorsqu'il n'est pas en fonction ou avant le
nettoyage.
25. Poser toujours le batteur à main sur une surface lisse, égale et stable. Ne pas
placer l'unité sur une surface chaude.
26. Avant l'utilisation, s'assurer que les deux fouets ou les pétrins soient bien insérés
dans le batteur.
27. Ne pas toucher les parties mouvantes lorsqu'elles sont encore en mouvement ;
attendre toujours qu'elles soient complètement à l'arrêt.
28. Il est extrêmement important que l'appareil soit toujours propre puisqu'il entre en
contact direct avec les aliments.
29. Afin d'éviter les éclaboussures, assurez vous d'insérer toujours les fouets ou les
pétrins bien profondément dans le mélange à travailler, avant de mettre en
fonction le batteur. Commencer à la vitesse plus basse.
30. Faites attention lorsque vous mélanger des liquides ou des préparations
alimentaires chauds.
31. Après chaque usage, s'assurer que le bouton soit en position "O" / "Off".
Page 40

40
32. Le producteur n'est pas responsable de dommages ou accidents causés par une
utilisation incorrecte du produit ou suite à des réparations effectuées par un
agent non agréé.
33. En cas de problèmes techniques, éteindre la machine et ne pas essayer de la
réparer soi-même. Rapporter le batteur à main à un agent agréé pour qu'il soit
examiné, réglé ou réparé. Insister pour que les pièces utilisées soient des
originaux. Le manque de respect de ces précautions et instructions pourrait
compromettre le fonctionnement de la machine.
AVERTISSEMENT : Cet appareil ne convient pas pour un usage professionnel. Il est
important de respecter les temps de repos conseillés. Ne pas suivre ces instructions
pourrait endommager le moteur. Lorsque vous utilisez le batteur à main, veuillez ne pas
le laisser en fonction pendant plus de 3 minutes à la fois, sinon vous risquez de mettre le
moteur sous pression et donc de le surchauffer et de provoquer le mauvais
fonctionnement du produit. Après chaque cycle de fonctionnement, il est conseillé de
laisser refroidir l'appareil pendant 30 minutes. Ceci contribuera à augmenter la durée de
vie de votre batteur à main.
SCHEMA DES ELEMENTS
A. Touche turbo
B. Contrôle de la vitesse
C. Touche éjection
D. Boîtier principal
E. Pétrin (pour le trou plus large)
F. Pétrin (pour le trou plus petit)
G. Fouet (pour le trou plus large)
H. Fouet (pour le trou plus petit)
Page 41

41
A
B C D
E
H
F
G
Touche turbo (A) :
Pour une impulsion à haute vitesse mais de courte durée, pousser et relâcher la touche
(action momentanée).
Contrôle vitesse (B) :
0 : stop / OFF 1 : Lent 5 : MAX
Page 42

42
ATTENTION : Vérifiez toujours que le batteur à main soit éteint (position 0 / OFF) et
débranchez de la prise de courant lorsque vous changez ou vous manipulez les fouets
ou les pétrins métalliques.
AVANT LA PREMIERE MISE EN FONCTION
Avant d'utiliser l'appareil pour la première fois sortez-le de la boîte et retirez tout
emballage de protection. RAPPEL : LES EMBALLAGES POURRAIENT ETRE
DANGEREUX POUR LES ENFANTS, JETEZ-LES IMMEDIATEMENT.
Lavez les fouets et les pétrins métalliques dans de l'eau tiède et savonneuse, rincez
soigneusement et essuyez. Passez un torchon humide sur le batteur.
INSTRUCTIONS D'UTILISATION
INSERTION DES FOUETS ET DES PETRINS
Débranchez l'appareil de la prise électrique. Positionnez l'interrupteur de vitesse
sur « 0 / OFF ».
Insérez les deux fouets (G et H) dans le châssis de l'appareil, en tournant
légèrement jusqu'au clic. Si vous utilisez les pétrins métalliques, insérez-les (E
et F) dans les fentes correspondantes et tournez-les légèrement jusqu'au clic.
Ne pas utiliser les fouets et les pétrins en même temps.
NOTE : Les fouets et les pétrins de droite sont différents des fouets et des pétrins de
gauche. L'outil de droite est équipé d'un anneau qui n'est pas présent sur l'outil de
gauche. Ne pas inverser les deux outils.
UTILISATION DU BATTEUR A MAIN
Le Batteur à main Russell Hobbs Esse est conçu pour effectuer la préparation de
sauces assaisonnées, sauces, crème fouettée, mélanges à tartes et préparations
semblables.
Page 43

43
1. Assurez-vous que le batteur soit débranché et que le contrôle de vitesse soit en
position « 0 / OFF ».
2. Placez les ingrédients dans un récipient durable et assez profond, qui soit
suffisamment haut pour que le mélange ne déborde pas. Pour des résultats
excellents, utilisez un récipient de taille moyenne avec des bords élevés.
3. Branchez l'unité à la prise de courant, veuillez à ce que la touche de contrôle de
la vitesse soit encore en position « 0 / OFF ».
NOTE : Ne pas actionner le batteur à main avant d'avoir introduit les éléments dans le
mélange à travailler.
4. Introduisez complètement les fouets ou les pétrins dans le mélange à travailler
afin d'éviter les éclaboussures.
NOTE : Ne pas immerger le batteur à main dans les aliments ou dans des liquides audelà de la longueur des outils. Le corps du batteur ne doit pas être touché par des
liquides ou des aliments.
5. Choisissez la vitesse voulue en déplaçant la touche de sélection de la vitesse
vers la droite, de 1, pour la vitesse plus basse, à 5 pour la vitesse Maximale.
Nous conseillons de commencer par une vitesse basse et d'augmenter la vitesse
selon la nécessité et la fermeté désirée.
Guide général vitesse/aliment :
“1” Pétrins : beurre, pommes de terre
“2” Fouets : sauces, produits laitiers
“3” Pétrins : pâtes légères à pâtisserie
“4” Fouets : desserts fouettés, crème
“5” Fouets : blanc d'œuf, crème fouettée
6. Pendant l'utilisation bouger légèrement l'unité de haut en bas. Appliquez un
léger mouvement circulaire et de bas en haut lorsque vous utilisez le batteur.
7. Lorsque vous avez terminé, remettez la touche en position « 0 / OFF ».
Attendez l'arrêt complet des fouets ou des pétrins.
Page 44

44
8. Enlevez les fouets ou les pétrins. Voir la section « COMMENT ENLEVER LES
FOUETS OU LES PETRINS ».
9. Débranchez l'appareil de la prise électrique.
10. Après l'utilisation, veillez à bien nettoyer le batteur et ses éléments.
LA TOUCHE TURBO / ACTION MOMENTANEE
La touche turbo annule les paramètres de contrôle de la vitesse et donne une impulsion
extraordinaire à vitesse élevée, peu importe la vitesse imposée par le contrôle de
vitesse. Poussez tout simplement sur la touche et maintenez poussé. Pour éviter la
surchauffe n'utilisez pas la touche pendant plus de 30 secondes à la fois, et laissez
reposer pendant une minute après chaque utilisation.
COMMENT ENLEVER LES FOUETS OU LES PÉTRINS
Pour enlever les fouets/les pétrins, déplacer le sélecteur de vitesse en position
« 0 / OFF ». Secouez dans le récipient les aliments qui seraient restés collés aux fouets
ou aux pétrins. Maintenant, tenez les deux fouets/pétrins dans le récipient afin qu'ils ne
tombent pas à l'extérieur et poussez sur la touche éjection (C). La touche ne va pas
actionner l'éjection si le contrôle de vitesse n'est pas en position « 0 / OFF ».
Comment procéder pour utiliser de la levure et pour pétrir une pâte avec les
pétrins métalliques
Utilisez un récipient de la hauteur de 130 mm et ayant un diamètre interne de 170 mm
au sommet et de 150 mm à la base. Ces dimensions vous permettent de travailler un
mélange de 520 gr de farine et 400 gr d'eau.
Comment mélanger des œufs avec les fouets
Le batteur à main peut travailler sans interruption pour des périodes maximales de 3
minutes à la fois, permettant de mélanger 8 blancs d'œuf ou 500 ml de crème. Avant de
continuer le travail, laissez reposer pendant 30 minutes.
Page 45

45
CONSEILS D'UTILISATION
Pour obtenir des résultats uniformes, tournez gentiment le batteur en
mouvements circulaires dans le mélange.
Si vous voulez nettoyer les rebords et la base de l'accessoire/du récipient avec
un outil à main, éteignez d'abord le batteur.
Afin d'éviter les éclaboussures veillez à immerger les fouets/pétrins dans le
mélange à travailler avant d'allumer le batteur.
Lorsque l'appareil n'est pas en fonction veuillez le débrancher de la prise,
débranchez-le aussi avant d'insérer ou d'enlever fouets/pétrins et avant de le
nettoyer.
Éviter tout contact avec les parties en mouvement. Lorsque l'appareil est en
fonction faites attention à ce que vos mains, cheveux, vêtements ou spatules et
autres ustensiles, n'entrent pas en contact avec les parties en mouvement, ceci
pourrait provoquer des blessures et/ou endommager l'appareil.
Vous pouvez régler la vitesse à tout moment. Commencez par le paramètre « 0 /
OFF » et adaptez la vitesse aux aliments à travailler. Pour les préparations plus
épaisses il est conseillé d'utiliser une vitesse inférieure. Pour les préparations
fines utilisez une vitesse supérieure.
NETTOYAGE ET ENTRETIEN
Ce batteur à main est destiné uniquement à un usage domestique et son
entretien ne peut être effectué par l'usager.
Ne pas ouvrir ni remplacer des pièces soi-même. Si un entretien s'avérait
nécessaire, s'adresser à un service électrique qualifié ou rapporter l'appareil au
fournisseur.
Débranchez toujours l'appareil de la prise électrique lorsqu'il n'est pas en
fonction et avant de le nettoyer. S’assurer que le contrôle de vitesse est réglé
sur “0” / “OFF”.
Il est beaucoup plus aisé de nettoyer les accessoires tout de suite après l'usage.
Laver à l'eau tiède et savonneuse, rincer et essuyer soigneusement.
Le corps du batteur à main devrait être nettoyé uniquement à l'aide d'un torchon
humide. Ne jamais immerger le batteur à main dans l'eau.
Page 46

46
Ne pas utiliser eau de javel ou autre substances abrasive ou solvants pour
nettoyer le batteur à main, ces produits pourraient endommager la finition.
Ne pas immerger le batteur à main dans de l’eau ou tout autre liquide, ni le tenir
sous un robinet ouvert pour le nettoyer.
Pour éliminer les tâches résistantes nettoyer les surfaces avec un torchon
humide et savonneux ou avec un produit de ménage non abrasif. Rinse and dry
a clean, dry, soft cloth.
RANGER LE BATTEUR A MAIN
Débrancher l'appareil de la prise de courant et nettoyer tous les éléments suivant
les indications ci-haut. Avant de ranger l'appareil s'assurer que toutes ses parties
soient bien sèches.
Ranger le batteur à main dans sa boîte ou dans un endroit propre et sec.
Page 47

47
Ne jamais ranger le batteur à main quand il est encore mouillé ou sale.
RECETTES
Délice au Grand Marnier
- 2 cuillères à soupe de zeste d'orange
- 1/2 tasse de Grand Marnier
- 150 gr de chocolat noir
- 3 œufs séparés
- 100 ml de crème épaisse
Pour la décoration :
- 1/2 tasse de crème fouettée
- 2 cuillères à café de sucre
- des quartiers d'orange
Laissez mariner une nuit le zeste d'orange dans le Grand Marnier. Egouttez et gardez la
marinade. Faites fondre le chocolat au bain marie, ne faites pas bouillir l'eau. Fouettez
les jaunes d'œuf à la vitesse 5 jusqu'à ce qu'ils aient une consistance ferme et
crémeuse, mélangez au chocolat chaud. Battez soigneusement le mélange en ajoutant
une cuillère de zeste d'orange mariné. Laissez refroidir, fouettez la crème à la vitesse 3
jusqu'à obtenir une consistance moelleuse. Ajoutez la crème au mélange au chocolat en
laissant entrer l'air. Battez les blancs à la vitesse 5. Ajoutez au mélange avec la moitié
de la marinade. Versez dans des petits gobelets, laissez refroidir au frigidaire pendant 5
heures. Servez avec de la crème fouettée.
Dessert au Chocolat et Pacanes
- 150 gr de chocolat noir
- 75 gr de Pacanes émincées
- 2 tranches de pain blanc émiettées
- 60 gr de farine
- 100 gr de beurre doux à température ambiante
Page 48

48
- 4 œufs séparés
- 100 gr de sucre
Beurrez un récipient à dessert de grandes dimensions et saupoudrez de sucre.
Faites fondre le chocolat au bain marie dans un petit récipient. Mélangez Pacanes,
miettes de pain et farine. Battez le beurre à la vitesse 5 jusqu'à ce-qu'il soit léger et
cotonneux, ajoutez le chocolat, les jaunes et la moitié du sucre, continuez à fouetter à la
vitesse 3 jusqu'à ce-que le mélange soit homogène. Nettoyez les fouets et battez les
blancs en neige ferme, en ajoutant le restant du sucre. Incorporez les œufs dans le
mélange de beurre en ajoutant le mélange de farine.
Versez le tout dans le récipient préparé auparavant. Couvrez avec du papier alu. Posea
à moitié dans une casserole d'eau bouillante et faites cuire à la vapeur pendant 45-50
minutes.
Bâtonnets aux amandes
- 225 gr de beurre
- 2 tasses de sucre
- 1 cuillère à café d'extrait d'amande
- 1 œuf
- 3 tasses de farine
- 1 cuillère à café de levure
Pour la garniture
- 1 blanc d'œuf, battu avec 2 cuillères à soupe de sucre
- 1/2 tasse d'amandes émincées
Fouettez le sucre et le beurre en un mélange crémeux à la vitesse 5 pendant 5 minutes.
Ajoutez l'extrait d'amande et l'œuf et incorporez-les bien.
Ajoutez la farine tamisée et la levure et travaillez à la main pour obtenir une pâte souple.
Préparez des rouleaux de 5 mm d'épaisseur et découpez des bâtonnets. Placez sur un
plat à four. Faire cuire à 150°C pendant 15 minutes. Sortez-les du four. Badigeonnez
avec le blanc d'œuf battu avec le sucre et saupoudrez d'amandes. Remettez au four
pendant 5 minutes. Laissez refroidir sur un plateau.
Page 49

49
Soufflé froid au citron
- 5 œufs séparés
- 1 tasse de sucre
- 2 cuillères à café de zeste de citron
- 3/4 de tasse de jus de citron filtré
- 1 cuillère à soupe de gélatine
- 1/4 tasse d'eau froide
- 300 ml de crème épaisse légèrement fouettée
Découpez un morceau de papier alu pour un plat à soufflé de 16 cm, en laissant au
moins 5 cm dépasser sur toute la circonférence. Pliez le papier en deux et enrobez
l'intérieur du plat. Assurez la stabilité du papier avec du cordon. Fouettez les jaunes, le
sucre et le zeste de citron à la vitesse 3 jusqu'à ce-que le sucre soit fondu et que le
mélange soit pâle et épais. Réchauffez le jus de citron et ajoutez au fur et à mesure
dans le mélange tout en fouettant. Mettez la gélatine dans l'eau dans un petit récipient.
Faites-la fondre au bain marie. Ajoutez lentement au mélange au citron en battant à la
vitesse 1.
Versez le mélange dans un récipient large, couvrez et laissez reposer au frigo pendant
15 minutes. Avec une cuillère métallique ajoutez la crème au mélange au citron.
Fouettez les blancs à la vitesse 5 jusqu'à-ce qu'ils soient fermes. Incorporez-les avec
des mouvements rapides et légers dans le mélange au citron. Versez dans le plat que
vous avez préparez à l'avance et laissez reposer au frigo.
Servez avec de la crème fouettée.
Délice tropical
-125 gr de beurre à température ambiante
- 1 tasse de sucre brun
- 1 œuf
- 1 tasse d'ananas en morceaux, égoutté
- 1 tasse 1/2 de farine avec levure incorporée
- 1 tasse de lait
Page 50

50
Mélangez en un mélange crémeux le beurre et le sucre à la vitesse 4. Ajoutez l'œuf et
continuez à battre jusqu'à-ce-que le mélange soit léger et doux. Réduisez la vitesse à 2 :
ajoutez l'ananas, la farine et le lait, mélangez le tout. Versez le mélange dans un
récipient que vous aurez beurré et couvrez avec deux couches de papier sulfurisé que
vous assurerez avec du cordon. Placez dans un récipient d'eau. Faites cuire au four à
180°C pendant 45-50 minutes. Servez avec de la glace à la vanille et décorez avec des
miettes de noix de coco grillées.
Scones
- 60 gr de beurre ou de margarine
- 2 tasses de farine avec levure incorporée
- 1 cuillère à café de sel
- 1 tasse de crème aigre
Fouettez le beurre jusqu'à-ce-qu'il soit crémeux. Ajoutez la moitié de la farine et
mélangez. Ajoutez le reste de la farine, le sel, le lait et la crème aigre. Travaillez le
mélange avec les pétrins. Versez sur une surface saupoudrée de farine et travaillez la
pâte. Coupez en ronds et placez dans le four. Faites cuire au four à 220°C pendant 12
minutes.
Scones de farine intégrale aux fruits
- 60 gr de beurre ou de margarine
- 1 tasse de farine intégrale avec levure incorporée
- 1 tasse de farine avec levure incorporée
- 125 gr de raisins secs ou de Smyrne ou de dattes émincées.
- 1 tasse de crème
- 1 œuf battu
Fouettez le beurre jusqu'à-ce-qu'il soit crémeux. Ajoutez la farine et mélangez le beurre
avec les pétrins métalliques, ajoutez les fruits. Mélangez le lait et l'œuf pour obtenir une
pâte moelleuse - ajoutez du lait si nécessaire. Versez sur une surface saupoudrée de
farine et travaillez la pâte. Coupez en ronds et placez dans le four. Faites cuire au four à
220°C pendant 12 minutes.
Page 51

51
Scones au fromage et à la crème aigre
- 2 tasses de farine avec levure incorporée
- 60 gr de beurre fondu
- 125 gr de bon fromage, en petits morceaux
- 1 tasse de crème aigre
- 1 œuf battu
- paprika
Versez la farine dans un récipient. Ajoutez le beurre et mélangez soigneusement.
Ajoutez le fromage, la crème aigre et l'œuf. Travaillez le mélange avec les pétrins.
Versez sur une surface saupoudrée de farine et travaillez la pâte. Coupez en ronds et
placez dans le four. Badigeonnez la surface des scones avec un peu de lait et
saupoudrez de paprika. Faites cuire au four à 220°C pendant 12 minutes.
Servir avec du beurre chaud.
Conseils utiles
MELANGER
Pour obtenir des aliments en gros morceaux ou secs, comme la farine, le beurre
et les aliments pour bébés.
REMUER
Pour des ingrédients liquides comme par exemple les vinaigrettes.
INCORPORER
Par exemple le beurre et le sucre pour les desserts et autres mélanges sucrés.
BATTRE
Pour monter œufs, glaçage, crème, etc.
Conseils pour monter les blancs en neige
Assurez-vous que le récipient et les fouets soient propres.
Assurez-vous que les blancs soient dépourvus de la moindre trace de rouge.
Pour obtenir un volume maximal il est préférable que les œufs soient à
température ambiante.
Utilisez un paramètre de vitesse élevé.
Page 52

52
Le temps de travail varie selon la fraîcheur des œufs.
Conseils pour fouetter la crème
Utilisez de la crème épaisse.
Laissez refroidir la crème avant de la fouetter.
Utilisez un récipient profond.
Pour obtenir d'excellents résultats, refroidissez le récipient et les fouets.
Commencez avec une vitesse basse pour éviter d'éclabousser, puis passez
progressivement aux vitesses supérieures.
Le temps de travail varie selon le contenu de graisse, l'âge, et la température de
la crème.
ENTRETIEN DE L'APPAREIL
Aucun élément de cet appareil ne peut être entretenu par l'usager. Si l'unité ne
fonctionne pas correctement vérifier ce qui suit :
Les instructions ont été suivies correctement
L'unité a été branchée correctement et la prise de courant est bien
allumée.
L'alimentation générale de courant est ALLUMEE.
La prise est bien insérée.
Si l'appareil ne marche toujours pas après ces vérifications :
- Consulter le revendeur pour qu'il répare ou remplace l'appareil. Si le revendeur
ne parvient pas à résoudre le problème et le retour de l'appareil s'avère
nécessaire, s'assurer que :
L'unité soit emballée avec soin dans son emballage d'origine.
La preuve d'achat soit jointe.
Il y ait une explication des raisons du retour.
Si le câble d'alimentation est endommagé il doit être remplacé par le producteur
ou par un agent agréé afin d'éviter tout accident. Si pendant la période couverte
par la garantie il est nécessaire d'effectuer un entretien, l'appareil devrait être
Page 53

53
apporté chez un centre d'entretien approuvé par Home Of Living Brands (Pty)
Limited. En dehors de la période couverte par la garantie il est possible
d'effectuer les entretiens mais au frais du client.
LE CHANGEMENT DE LA PRISE
Si la prise intégrée devait être change, suivez les instructions ci-dessous.
Cette unité est conçue pour fonctionner uniquement sur un courant
continu de 230V-240V. La connexion à d’autres sources d’alimentation
pourrait endommager l’appareil. Connecter la prise à trois chiffes de la
manière suivante :
Les fils de ce réseau sont colorés selon le code suivant :
Vert/jaune = Terre
Bleu = Neutre
Marron = Actif
Page 54

54
DANS LE CAS D'UTILISATION DE LA GARANTIE CE RECU DOIT ÊTRE
FOURNI.
G A R A N T I E
1. Home Of Living Brands (Pty) Limited garantit à l'acheteur original de ce produit ("le
client") que ce produit n'a aucun défaut de qualité et de manufacture qui pourrait
apparaître en 1 (un) an d'utilisation ordinaire, personnelle, familiale ou domestique du
produit, à partir de la date d'achat ("période de garantie").
2. Si le client a acheté un produit et ce dernier se casse, est défectueux ou ne fonctionne
pas correctement par rapport à son usage prévu, le client doit le communiquer au
fournisseur aurpès duquel il a effectué son achat ("le fournisseur") dans les délais
imposés par la période de garantie. Toute déclaration selon les termes de la garantie
doit être supportée par la preuve d'achat. Si cette preuve n'est pas disponible, la
réparation et/ou les frais d'entretien seront à charge du client et payable au fournisseur.
3. Le produit défectueux doit être remis au centre d'entretien du fournisseur afin de
pouvoir utiliser la garantie.
4. Le fournisseur va rembourser, réparer ou échanger le produit selon les termes de la
garantie assujettie aux provisions de loi. Cette garantie est valable uniquement si le
client n'a pas cassé le produit lui-même ou n'a pas utilisé le produit à des fins non
prévues. Cette garantie n'inclut pas et ne couvrira pas les dommages provoqués par
des calamités, mauvaise utilisation, manipulation, abus ou modification non autorisée
ou réparation du produit.
5. Cette garantie s'applique uniquement au produit fourni à la date d'achat et pas aux
matériels consommables joints ou installés par le client.
6. Si le client demande au fournisseur de réparer le produit et le produit se casse ou ne
fonctionne pas correctement endeans les 3 (trois) mois de la réparation sans pour
autant avoir fait l'objet d'une mauvaise utilisation, de manipulation ou de modification
par ou pour compte du client, alors le fournisseur pourra remplacer le produit ou
rembourser le client.
7. Le client pourra devoir prendre en charge certains coûts lorsque les produits retournés
ne sont pas dans leur emballage d'origine, ou si l'emballage est endommagé. Ceci sera
déduit de tout remboursement fait au client.
HOME OF LIVING BRANDS (PTY) LTD
www.homeoflivingbrands.co.za
011 490-9600 (Jhb)
031 792-6000 (Dbn)
021 552-5161 (CT)
www.russellhobbs.co.za
www.facebook.com/RussellHobbsSA
 Loading...