

Page 1

20 Litre microwave oven
User manual
Model number: RHM2048SS
Important safety instructions , please read carefully and keep them for future reference
For Customer Services & Spare Parts please call 0345 209 7461
Opening times: Monday - Friday 8am – 6pm & Saturday 9am – 1pm or visit us at
www.productcareuk.com
Page 2

Page
1
7
8
10
11
12
13
15
16
17
18
19
20
21
23
24
26
28
29
30
31
32
33
34
Safety instructions ……........................................
Connection to the mains supply ……………….......
Cleaning and care ………………………………..………...
Microwaving principles …………………….……...…...
Standing guidelines ………………………………….…….
General guidelines ……..………………………………....
Container and utensil guidelines ………………...…
Standard conversion chart ………………………….….
Unpacking your microwave oven ......................
Microwave oven installation .............................
Feature diagram ................................................
Turn table installation …………………...…………….…
Control panel .....................................................
Display symbols …………………………………….….…...
How to use your microwave oven .....................
Microwave cooking …………………………….……...…
Auto menu cooking …………………………….……...…
Weight defrost ………………………………………………
Pre-set and multi stage cooking..…………………...
Timer and child lock …………………………………......
Problem solving .……….......................................
Guarantee ……………………………………….................
Technical specification …………………………………...
Spare parts and maintenance ………………………….
For Customer Services & Spare Parts please call 0345 209 7461
Opening times: Monday - Friday 8am – 6pm & Saturday 9am – 1pm or visit us at www.productcareuk.com
Contents
Page 3

• Important - Before using this microwave oven please ensure you read these instructions carefully and keep them for future reference.
• Warning: Children should not use this microwave oven.
• Warning: This appliance is not intended for use by persons (including children) with reduced physical, sensory or mental capabilities, or
lack of experience and knowledge, unless they have been given supervision or instruction concerning use of the appliance by a person
responsible for their safety. Children should be supervised to make sure that they do not play with the appliance.
• Warning: The microwave should be examined after unpacking and before use to check that it is not damaged.
• Warning: If the door or door seals are damaged, the oven must not be operated until it has been repaired by a competent person. The
door seals are located around the window on the inside of the door. These seals are not airtight, although no microwaves can be released,
it is normal for small amounts of air or steam to escape when the oven is in use.
• Warning: It is hazardous for anyone other than a qualified electrical engineer to carry out any service or repair operation which involves
the removal of a cover which gives protection against exposure to microwave energy. Do not attempt to repair, adjust or tamper with the
door, safety interlock switches, control panel, housing cabinet or any other part of the microwave oven.
• Warning: Do not place the microwave near a cooker or heat producing appliance.
• Warning: Liquids and other foods must not be heated in sealed containers as they are liable to explode, which may cause serious injury
and damage to the microwave oven.
• Warning: Do not use the microwave when it is empty or for warming plates.
3
Safety instructions
For Customer Services & Spare Parts please call 0345 209 7461
Opening times: Monday - Friday 8am – 6pm & Saturday 9am – 1pm or visit us at www.productcareuk.com
Page 4

Caution: Hot Surfaces
• The exterior surfaces of the microwave oven, including the air vents on the cabinet housing and the oven door, will get hot during grilling
and combination settings. Please take care when opening and closing the door to insert or remove food and accessories. During and after
using the grilling and combination functions the interior roof and walls of the microwave will be extremely hot. Take care not to touch
these surfaces and wear oven gloves whenever necessary.
• Please ensure children are kept away from the microwave oven at all times and that they do not touch the hot housing cabinet during or
after operation of the microwave.
To reduce the risk of fire in the oven cavity:
• Do not overcook food.
• Do not leave the microwave oven unattended while you are using it and if using paper or plastic containers check regularly to ensure they
do not ignite.
• Remove wire twist-ties from bags before putting the bag in the oven.
• If materials inside the oven smoke or catch fire, keep the oven door closed to stifle the flames, turn the oven off at the wall switch, or shut
the power off at the fuse or circuit-breaker panel.
Cleaning
• Ensure that the inside of the microwave, door assembly, under the turntable and the waveguide cover are cleaned regularly. Food
splatters, spills should be immediately wiped off. Mild detergent may be used for tough marks, but harsh abrasive detergents and
commercial oven cleaners should not be used. If grease is not cleaned up it may start to ‘smoke’ during use.
• Failure to maintain the microwave in a clean condition could lead to deterioration of surfaces which will damage and affect the life of the
appliance and could cause a safety hazard.
4
Safety instructions
Page 5

5
Safety instructions
• If the power supply cord is damaged, cease using the appliance immediately. Contact the service agent for advice on how to proceed.
• Do not use the oven when it is empty. This could damage the oven.
• Do not store anything in the oven, such as papers, cookbooks and so on in case it is accidently turned on.
• This appliance should not be operated by means of an external timer or separate remote-controlled system.
• Never put any objects into the openings on the outer case or attach items to the housing cabinet of the microwave.
• Never remove parts from the oven such as the feet, screws or top cabinet.
• Only use microwave utensils in line with these instructions that are suitable for use in microwave ovens.
• Only use the accessories supplied by the manufacturer.
• Always have the glass tray and turntable support in place when using the oven.
• Do not cook food directly on the glass tray. Put food on a suitable plate or in a bowl before putting it in the oven.
• Do not use the oven for any reason other than preparing food, such as for drying clothes, paper or any other non-food items, or for
sterilising purposes.
• When heating liquids such as beverages, sauces and soups in your microwave oven please be aware that overheating beyond the liquid
boiling point can occur without any noticeable evidence of boiling and bubbling. This can result in a sudden boil over of the hot liquid,
especially when the contents are moved or disturbed when removing from the oven.
For Customer Services & Spare Parts please call 0345 209 7461
Opening times: Monday - Friday 8am – 6pm & Saturday 9am – 1pm or visit us at www.productcareuk.com
Page 6

6
Safety instructions
• Food containing a mixture of fat and water (for example, stock) should stand for 30 to 60 seconds in the oven after it has been turned off.
This is to allow the mixture to settle and to prevent it from bubbling when a spoon is placed in it, or a stock cube is added.
• Heat from the contents of a container may be transmitted to the container itself, so please be careful when removing it from the oven.
Please remember that the food or liquid inside will be releasing some steam or may be spitting. You may need oven gloves to handle the
container. Never cover any container fully, always leave a gap for steam to escape.
• Ensure the contents of baby feeding bottles and food jars are stirred or shaken. The temperature must be checked before consumption to
avoid burns.
• Do not cook any food surrounded by a membrane, such as egg yolks, sausages, potatoes, chicken livers, ready meals and so on without
piercing them several times with a fork.
• Do not cook eggs in their shells and whole hard-boiled eggs by microwave. Pressure can build up causing the eggs to explode during or
even after the microwave heating has ended. This can cause serious injury.
• Do not try to deep-fry foods in this oven.
• Always test the temperature of cooked food, never eat or drink food or liquid straight from the oven, allow it to stand for a few minutes and
stir to distribute the heat evenly.
• When heating or cooking food or liquid, remember that there are certain foods (such as Christmas puddings, jam and mincemeat) which
heat up very quickly.
• When heating or cooking foods that contain a lot of fat or sugar, do not use plastic containers
For Customer Services & Spare Parts please call 0345 209 7461
Opening times: Monday - Friday 8am – 6pm & Saturday 9am – 1pm or visit us at www.productcareuk.com
Page 7
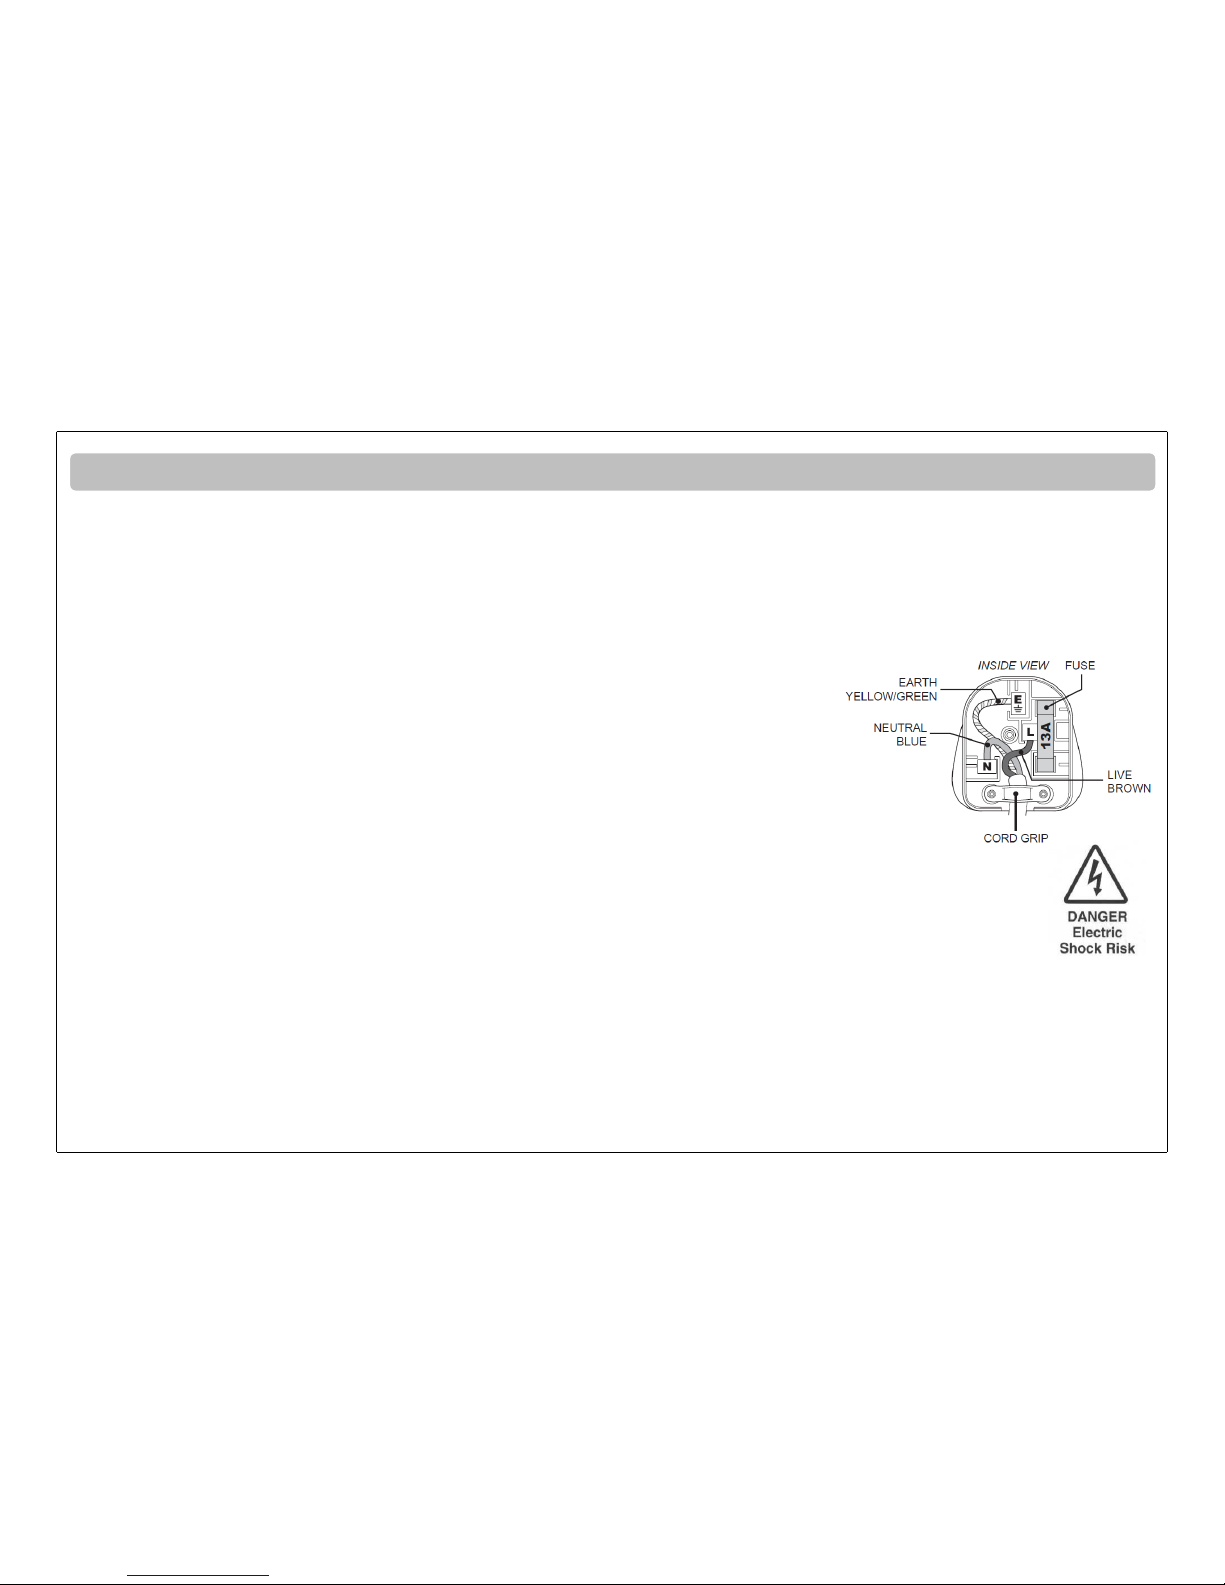
For UK use only – Plug fitting details (where applicable):
As the colours of the wires in the mains lead of this appliance may not correspond with the coloured markings identifying the terminals in
your plug, proceed as follows:
• The GREEN/YELLOW wire is the EARTH and must be connected to the terminal which is marked with the letter E or by the earth symbol or
coloured GREEN or GREEN/YELLOW.
• The BLUE wire is the NEUTRAL and must be connected to the terminal marked with the
letter N or coloured BLACK.
• The BROWN wire is the LIVE wire and must be connected to the terminal marked with the
letter L or coloured RED.
Always ensure that the plug cord grip is fastened correctly.
If you need to remove the plug, cut it from the mains lead and dispose of it. Never attempt to
re-use this removed plug or insert it into a socket outlet, as there is a very great risk of electric shock.
This plug has a 13A (BS1363) fused plug. Should the fuse need replacing, you must use an ASTA
approved fuse (conforming to BS1362) of the same rating
This appliance is designed to operate from a mains supply of AC230V ~ 50HZ.Check that the voltage marked on the product
corresponds with your supply voltage. Using a higher voltage than specified is dangerous and may result in a fire.
Important:
Do not immerse the cord or plug in liquid. Keep the cord away from heat sources or surfaces. Do not allow the cord to hang over the edge of
the work top surface. Do not use an extension cable to plug your oven in as this can be dangerous. Ensure that the oven is plugged directly
into a wall socket. Do not let the cord come into contact with the back of the appliance or housing cabinet, as this heats up during use and
damage the cord.
7
Connection to the mains supply
For Customer Services & Spare Parts please call 0345 209 7461
Opening times: Monday - Friday 8am – 6pm & Saturday 9am – 1pm or visit us at www.productcareuk.com
Page 8

Important: It is essential that the microwave oven is kept clean and is wiped down after each use, especially any moisture or liquid
underneath the turntable. If the microwave is not kept in a clean condition this can lead to deterioration of the surfaces which will
adversely affect the life of the microwave and may result in a hazardous situation.
• Before you clean the oven, turn it off and unplug it at the socket.
• Keep the inside of the oven, door seals and underneath the turntable clean. When food or liquids stick to the oven walls, wipe with a
damp cloth or mild detergent if needed. Do not use harsh detergent or abrasives.
• On the right hand side wall of the cavity is the wave guide cover; microwaves are passed through this to enable your food to cook. It is
important that this wave guide cover is kept clean at all times. To do this wipe with mild detergent and water, then dry.
• The outside surfaces clean the outside of the oven with a damp cloth. Do not allow water to seep into the ventilation openings.
• If the control panel becomes dirty, you can clean it with a soft, damp cloth. Do not allow the control panel to become wet. Do not use
harsh detergents, abrasives or spray-on cleaners on the control panel.
• If steam builds up inside or around the outside of the oven door, wipe with a soft cloth. This may happen when the microwave oven is
used in humid conditions. The build up of steam does not mean that the unit is malfunctioning.
• The glass turntable should be cleaned regularly, or straight away if there has been a spill of food or liquid. Remove the turntable and wash
it in warm soapy water. If the glass turntable is hot, allow to cool before placing in water or cleaning, as otherwise it may crack or shatter.
• The microwave cavity floor and the roller ring needs to be cleaned regularly to ensure the floor surface does not become damaged. Simply
wipe the bottom surface of the oven with mild detergent and water, then dry thoroughly. You can wash the turntable support in mild
soapy water.
8
Cleaning and care
For Customer Services & Spare Parts please call 0345 209 7461
Opening times: Monday - Friday 8am – 6pm & Saturday 9am – 1pm or visit us at www.productcareuk.com
Page 9

• After removing the turntable support, please ensure that it is replaced properly in the correct position before using the microwave oven.
Make sure the flat side on the circular centre piece of the turntable support matches up with the flat side of the circular hole in the centre
of the microwave, it may take a bit of wiggling to make the shapes match up. This will ensure that the turntable support is fully inserted
into the hole and that the wheels on the turntable support are flush with the floor of the microwave.
• If the inside of the oven smells, put a cup of water with the juice and skin of one lemon in a deep microwave bowl. Microwave it for three
minutes, wipe thoroughly and then dry with a soft cloth. This should eradicate any unpleasant food smells.
• A steam cleaner product should not be used to clean any parts of the microwave oven.
• The air vents should be kept clear and clean at all times. Regularly check that there is no dust or other material blocking the air vents on
the top, sides or rear of the microwave.
• Do not use sharp metal scrapers to clean any surface of the microwave, including walls, floor, or door surfaces, as they can scratch the
surface and damage the appliance.
9
Cleaning and care
Page 10

Microwaving principles
Microwaves are high-frequency electromagnetic waves similar to radio waves. While radio waves may vary in length from one metre to many
kilometres, microwaves are very short (about 4cm). Inside the microwave oven is the magnetron, which converts the electrical energy into
microwaves. The microwaves are reflected off the metal walls and the metal door screen and bounce around inside the oven cavity. Then
they pass through the cooking container as microwaves are transmitted by glass, china, pottery, microwaveble plastics and paper.
Microwaves do not make any heat themselves but only cause water molecules in food to vibrate. This vibration causes friction i.e. heat which
cooks the food. Microwaves are also attracted to fat and sugar particles so foods which contain higher levels of these will cook quicker.
Microwaves can only penetrate food about 4-5cm (1½-2 inches) so food thicker than 8-10cm is cooked as the heat spreads through the food
by conduction to the centre. So just like convectional cooking in a traditional oven the food cooks from the outside inwards.
Microwaves cannot pass through metal, so the inside of the oven is lined with metal. The door is lined with a fine metal mesh which stops
microwaves getting through. This means that when the microwave oven door is shut, there is no possibility that microwaves can be released.
This is why the microwave oven has been made so that it will not work when the door is open. The doors and hinges are fitted with locks,
seals and cut-out switches which automatically turn off the microwaves as soon as the door is opened. The microwaves do not stay in the air
or in the food when you open the microwave oven door. The food will continue to cook after the microwave is switched off, this is by heat
conduction and not through continued release or residual microwave energy being present (please refer to Standing time on page 11).
IMPORTANT: Microwaves cannot pass through metal, so metal cookware and utensils can never be used in a microwave when cooking on
microwave only setting.
Unsuitable foods for microwave cooking
Do not attempt to cook foods that require dry external heat to cook effectively on the microwave only settings. Such foods in this category
are soufflés, double crust pastry pies, yorkshire puddings etc.
A microwave oven is not suitable for foods that need to be deep fat fried.
Do not boil eggs in their shells in a microwave oven as they can explode and cause injury.
10
For Customer Services & Spare Parts please call 0345 209 7461
Opening times: Monday - Friday 8am – 6pm & Saturday 9am – 1pm or visit us at www.productcareuk.com
Page 11

Standing guidelines
Standing time
Foods that are dense e.g. jacket potatoes, meat and cakes, will require a certain amount of standing time after the end of the cooking
programme un order to allow the heat to finish conducting through the food and to cook the centre completely. This standing time can be
completed either inside or outside the microwave oven.
• Defrosting – The defrosting process needs to include standing time so that the food is fully defrosted in the centre. This standing time can
vary between different food types e.g. up to 1 hour for a join of meat or 5mins. for frozen fruit pieces. Keep checking the food by using a
skewer to poke through to the centre to test if the item is still frozen in the middle. Leave item standing until fully defrosted throughout.
• Jacket potatoes – Stand for 5 mins. wrapped in aluminium foil, do not cook in aluminium foil.
• Meat joints – Stand for 15 mins. wrapped in aluminium foil, do not cook in aluminium foil.
• Fish – Stand for 2-3 mins.
• Egg dishes – Stand for 1-2 mins.
• Vegetables – most types of vegetables can be served immediately after cooking. The exception is boiled potatoes which should have a
standing time of 1-2 mins.
• Convenience packaged food – Stand for 1-2 mins. or follow the guidelines on the packaging if standing times are provided.
• Home cooked plated meals – Stand for 1-2mins.
• Dense heavy cakes – Stand for 15-20 mins.
• Light cakes – Stand for 5 mins. before removing from the dish
11
For Customer Services & Spare Parts please call 0345 209 7461
Opening times: Monday - Friday 8am – 6pm & Saturday 9am – 1pm or visit us at www.productcareuk.com
Page 12

General guidelines
• Arranging – Pieces of food such as meat chops or chicken pieces should be placed on a dish/in the container with the larger or thicker
parts facing the outside of the dish. This ensures that it cooks more evenly rather than the smaller/thinner parts overcooking.
• Checking Foods – It is vital that food is checked during and after the cooking programme, even during the Auto Cook Menus. Check the
food as you would do when using a conventional oven. Continue the cooking time after as necessary.
• Cling film – Please ensure that the cling film used is suitable for microwave use, check the packaging. Cling film is used to cover food to
avoid spitting and is beneficial as it keeps in more moisture and the trapped steam speeds up the cooking time. The cling film needs to be
pierced or a gap left so that excess steam can be released, otherwise it could burst causing injury. After cooking, take care when removing
the cling film as the build up of steam underneath will be very hot.
• Covering – Check that covers and lids for cookware are suitable for microwave use and always ensure lids are not fully pressed down and
that a gap is left for steam to escape.
• Density – Dense heavy food quicker slower that porous airy foods, alter timing accordingly and check that airy foods do not overcook.
• Dish size – Use a dish size that reflects the amount or size of food. An amount of food spread in a bigger dish will cook/reheat quicker.
• Liquids – Liquids need to be stirred or shaken before, during and after heating. This is to avoid overboiling which can occur with no
evidence of bubbling. Do not heat liquids that have already been boiled. Make sure liquids do not overheat. Make sure the metal spoon is
removed before microwaving.
• Moisture – Fresh and dry ingredients/foods contain different amounts of moisture so cooking times will vary. Fresh foods contain different
amounts of moisture content depending on seasons, therefore cooking times may have to be adjusted throughout the year.
• Piercing – The membrane or skin will cause steam to build up during cooking therefore the food must be pierced so that steam can
escape. Foods include chicken with skin, sausages, egg yolks, potatoes, apples
• Quantity – Smaller quantities of food /liquid cook faster than larger quantities. Small portion meals will reheat quicker than large meals.
• Shape – Even shaped food cooks more evenly. Food will cook more evenly in a round container than a square/rectangular container.
• Spacing – Do not pile food on top of each other. the food will cook more evenly and quickly when spaced apart.
• Starting temperature - The colder the food the longer the time to heat up therefore food from the fridge will take longer to reheat/cook
than food at room temperature.
• Stirring and turning – Stir food during cooking if required. Meat and poultry should be turned halfway through cooking to ensure even
cooking.
12
For Customer Services & Spare Parts please call 0345 209 7461
Opening times: Monday - Friday 8am – 6pm & Saturday 9am – 1pm or visit us at www.productcareuk.com
Page 13

Please test whether your chosen dish is suitable for microwave use if it is not stated on the dish. You can use the below test to determine if
the dish/container is suitable:
• Use a microwave safe measuring jug and fill it with 300 ml (1/2pt) of cold tap water.
• Place it on the turntable next to the dish that you wish to test. If the dish you are testing is a larger dish or container then place the
measuring jug standing inside the empty dish/container.
• Set the microwave to heat on full 100% power for 1 minute.
• If the dish or container remains cool whilst the water in the jug is getting warm then your dish/container is suitable for microwaving.
However, if the testing dish feels warm then it is absorbing the microwave energy and should not be used.
• Please note that this test does not apply to metal based container or plastic containers.
• Please note that when you use your suitable microwaving dish to heat food or liquid up then it will get warm as the heat from the food is
conducting into the dish/container.
Glassware – Normal glass is heat resistant e.g. Pyrex® is ideal for microwaving and combination cooking. Do not use for grilling. Do not use
lead crystal which may arc or crack.
China & ceramic – Normal glazed china, porcelain/ceramic plates, bowls and cups may be used if they are heat resistant. Fine bone china
should not be used apart from short period of reheating. Do not use plates or cups that have a metal decoration, pattern or rim. Mugs or
jugs with glued handles can not be used as the glue can melt. Heat resistant dishes cannot be used directly under the grill on grill only or
combination grill settings.
Pottery – Only use pottery dishes if they are completely glazed. Partially or unglazed stoneware can absorb water which will then absorb the
microwave energy. This may cause the dishes to crack or burn, and will slow down the cooking speed. Only use microwave proof.
Foil/metal containers – Do not use foil or metal containers or containers with metal handles on the microwave only setting, as the
microwave energy cannot pass through, resulting in damage to your microwave and uncooked food. Foil containers can be used on the grill
only setting. Wooden skewers should be used instead of metal skewers when microwaving. Remove paper covered wire twist-ties form bags
and packaging.
13
Container and utensil guidelines
For Customer Services & Spare Parts please call 0345 209 7461
Opening times: Monday - Friday 8am – 6pm & Saturday 9am – 1pm or visit us at www.productcareuk.com
Page 14

Cast iron cookware – Dishes that are cast iron and covered with enamel, such as Le Creuset®, can not be used in the microwave.
Plastic containers – Most plastic containers are suitable for microwave use but please check before using. Do not use plastic containers to
cook food high in sugar and fat or foods that require a long cooking time. Do not use Melamine as they absorb microwave energy. Do not
cook in yogurt or margarine cartons as these will melt after conducting the heat of the food.
Paper – Greaseproof paper can be used to lined dishes or to cover foods to stop them from splattering. A sheet of plain white absorbent
kitchen paper towel can be used for microwave cooking only e.g. covering food to prevent splattering or blind pastry. Ensure it is only used
for a short period of time and always use a fresh piece each time. Please check that the kitchen towel paper does not contain manmade
fibres and that recycled paper is suitable for microwave use. White paper plates may be used to reheat food on the microwave only setting
but only for a very short period of time. Plastic or wax coated paper cups cannot be used in the microwave as they may melt.
Wood, wicker & straw – Do not use these items or wooden cookware in the microwave as they could ignite. Do not use on any of the
cooking settings.
Thermometers - Only use thermometers that are approved for microwave ovens.
Utensils – Do not use the microwave oven to heat up plates or cooking utensils.
Bottles – Do not cook or reheat using a container with a restricted opening, such as bottles, as they may explode. Do not heat baby bottles
with the teat left on and remove if replacing the bottle back into the oven.
14
Container and utensil guidelines
For Customer Services & Spare Parts please call 0345 209 7461
Opening times: Monday - Friday 8am – 6pm & Saturday 9am – 1pm or visit us at www.productcareuk.com
Page 15

15
Standard conversion chart
For Customer Services & Spare Parts please call 0345 209 7461
Opening times: Monday - Friday 8am – 6pm & Saturday 9am – 1pm or visit us at www.productcareuk.com
Imperial Metric
½ oz 15g
1oz 25g
2oz 50g
3oz 75g
4oz 100g
5oz 150g
6oz 175g
7oz 200g
8oz 225g
9oz 250g
10oz 275g
11oz 300g
12oz 350g
13oz 375g
14oz 400g
15oz 425g
1lb/16oz 450g
Weight
Liquid capacity
Imperial Metric
½ tsp 3ml
1 tsp 5ml
1 tbsp 15ml
¼ pt 150ml
½ pt 300ml
¾ pt 450ml
1 pt 600ml
1 ¾ pt 1 litre
Page 16

Before you use your microwave oven:
1. Remove all the packaging. Do not remove the small piece of card from the right hand side of the cavity wall. This is called a wave-guide
cover and allows the microwaves to pass through to cook the food. Please ensure you keep this cover clean at all time.
2. Examine the oven after unpacking for any visual damage such as:
● A misaligned door
● Damage to the door
● Dents or holes in the door window and screen
● Dents in the inside
● Damage to the door seals or door seal areas
● Damage to the supply cord
● If you can see any damage do not use the microwave oven. Please contact retailer immediately.
16
Unpacking your microwave oven
For Customer Services & Spare Parts please call 0345 209 7461
Opening times: Monday - Friday 8am – 6pm & Saturday 9am – 1pm or visit us at www.productcareuk.com
Page 17

• This microwave is only suitable for countertop use and must not be installed for built-in or enclosed cupboard usage. This microwave oven
weighs approximately 12.5kg so you must put it on a horizontal stable surface that is strong enough to support this weight.
• Select a level surface that provides enough space for the outlet vents to ensure sufficient air flow. Leave a minimum clearance of 30cm
above the microwave, 7.5cm behind, 7.5cm at one side and the other side should be kept open.
• Do not place the microwave directly over a cooker or other heating producing appliance. This will damage the oven and cause a safety
hazard.
• Do not block the air vents on the top, sides or bottom of the oven. If air vents are blocked when the microwave is in use it may overheat
and damage the unit.
• Place the oven as far away from radios and TV's as possible. Using the oven may cause interference with the reception.
• Plug the oven into a suitable 13 amp mains socket, make sure the voltage is the same as on the rating label (do not use extension cables or
mains socket adaptors).
17
Microwave oven installation
Page 18

18
1. Door Safety Lock System
2. Oven Window
3. Turntable Ring Assembly
4. Control Panel
5. Wave Guide Cover
6. Glass Turntable
7. Air vents on the top, at the back and on
the side.
Feature diagram
For Customer Services & Spare Parts please call 0345 209 7461
Opening times: Monday - Friday 8am – 6pm & Saturday 9am – 1pm or visit us at www.productcareuk.com
Page 19

19
• Before first use, check that any securing tape has been removed from the glass tray and
turntable ring assembly. These parts must never be restricted from rotating.
• Never place the glass tray upside down.
• Both the glass tray and turntable ring assembly must always be used during operation in
all functions: microwave only, grill only and combination.
• The glass turntable and roller ring are the only accessories to be used for microwave
only cooking.
• Do not place the food directly onto the glass tray, always place on or in suitable
microwaveable cookware.
• If the glass tray or turntable ring assembly has been damaged in anyway, please contact
the spares helpline number detailed on the back of this instruction manual.
• If food or cookware touches the oven walls causing the turntable to stop moving or
become dislodged, open the door and reposition the food/cookware and restart.
• If the glass turntable is hot, allow to cool before placing in water or cleaning, as
otherwise it may crack or shatter.
• Only use the glass turntable specifically designed for this microwave oven. Do not
substitute with any other glass turntable.
Turntable installation
For Customer Services & Spare Parts please call 0345 209 7461
Opening times: Monday - Friday 8am – 6pm & Saturday 9am – 1pm or visit us at www.productcareuk.com
Page 20

20
DISPLAY WINDOW Cooking time, power, action indicators, and clock time are displayed.
POWER LEVEL Press this button a number of times to set a cooking power level.
WEIGHT DEFROST Turn to choose the defrost function and select a defrost weight. Press to start defrosting.
Turn to input a cooking time. Select the weight of the food you want to cook from the Auto menu.
CLOCK Use to set the time.
PRESET Press this button for easy cooking menus.
AUTO COOK Press this button for easy cooking menus.
STOP/CANCEL Press to cancel a setting or reset the oven before setting a cooking program. Press once to
pause a cooking program and twice to cancel a cooking program.
WEIGHT/TIME This dial is used to select, time, weight and is then pressed to start the cooking process.
START Press the Weight/Time dial. Press it to start the microwave on full power for the 30 seconds, it will be
increased by 30 seconds each time the button/dial is pressed.
DOOR RELEASE To open the door pull the handle on the door. To close the door, push the door firmly until it
fully clicks shut.
Control panel
For Customer Services & Spare Parts please call 0345 209 7461
Opening times: Monday - Friday 8am – 6pm & Saturday 9am – 1pm or visit us at www.productcareuk.com
Page 21

Please refer to the below key for explanation of the symbols that are displayed in the display window during cooking:
• Clock – this symbol will be visible when you are programming the clock time. Once the time has been set this symbol will
remain constantly visible in the top right corner when the microwave oven is not in use. When the microwave is in use the
clock symbol will not be visible on the display. It will reappear when the programme has ended.
• Microwave power – when using the microwave oven, the microwave symbol will be visible in the bottom left of the display
window. The symbol will remain visible throughout the microwave programme and will only disappear once the microwave
programme has fully ended or been cancelled.
• High microwave power – when using the microwave only function on either full power 100% or 80% power this symbol
will be displayed in the bottom centre of the display window. The symbol will remain throughout the cooking programme
and will only disappear once the microwave programme has fully ended or been cancelled.
• Medium low microwave power – when using the microwave only function on 60%, 40% and 20% power this symbol will
be displayed in the bottom right corner of the display window. The symbol will remain throughout the cooking programme
and will only disappear once the microwave programme has fully ended or been cancelled.
• Fan only mode – when using the microwave only function on 0% power this symbol will be displayed in the top left of the
display window to indicate that the microwave oven is not producing microwave energy and only the fan is operating. The
symbol will remain throughout the programme and will only disappear once the programme has fully ended or been
cancelled. This programme is useful for timing standing time for food or using as an extra kitchen timer.
• Stage cooking - The 1S & 2S illuminate during multi stage cooking to indicate the stage. The 1S illuminates when the
microwave is cooking in a single stage.
21
Display symbols
For Customer Services & Spare Parts please call 0345 209 7461
Opening times: Monday - Friday 8am – 6pm & Saturday 9am – 1pm or visit us at www.productcareuk.com
Page 22

• Pause – This symbol flashes in the top centre of the display window to show that the cooking operation has either not yet
started or is paused. For example, this symbol flashes whilst setting the quick start cooking feature to indicate the
programme is paused whilst you set the time, and then disappears when the cooking has started. When the Stop/Cancel
button is pressed once during a cooking programme the programme and timing will be paused and the symbol will flash.
The symbol will disappear when the Start/Quick Start button is pressed and cooking resumes.
• Auto Cook – When using the auto cook menus this symbol will be displayed in the top left corner of the display window.
• Defrost – The defrost symbol will illuminate when the Weight defrost button is pressed. It will remain on during the
defrosting stage.
• Child lock – when using the child lock function this symbol will be displayed. When the child lock function is cancelled then
the symbol will disappear.
• Percentage – when selecting the microwave power level this symbol will be displayed next to the numbers to show what
power percentage the microwave will be operating at for your chosen programme.
• Grams – when selecting weights for either the auto cook menus or weight defrost settings this symbol will appear next to
the numbers to show that the weights displayed on the screen are in grams. The symbol will disappear along with the
numbers when you have fully selected/and or started your programme.
• Clock – this is where the clock time or the countdown time for your cooking programme will be displayed. When the
microwave is not in use then the clock time will be displayed here. When you are selecting a programme the clock time will
disappear and be replaced with numbers here that represent either the microwave power level or food weight, depending
on your programme. Once you’ve started your programme the time countdown will be displayed.
22
Display symbols
For Customer Services & Spare Parts please call 0345 209 7461
Opening times: Monday - Friday 8am – 6pm & Saturday 9am – 1pm or visit us at www.productcareuk.com
Page 23

23
Connect the main plug into a suitable 13 amp mains socket, make sure the voltage is the same as on the rating label (do not use
extension cables or mains socket adaptors). The microwave oven will beep once and the display will show the clock symbol
in the top right of the screen and the time ‘1:01’ will be displayed.
Setting the clock ( 12 or 24 hour)
Before setting a cooking programme the clock needs to be set. For example, if you want to set the time to 8:30.
1) Press the ‘Clock’ button. The display will show ‘24H’, press again and the display will show ‘12H’, the red clock symbol will be
displayed in the top right corner.
2) To set the hour, turn the 'Weight/Time' dial clockwise until the display shows ‘8:’ and the red clock symbol will remain illuminated.
The dial can be turned clockwise to increase the numbers or turn it anticlockwise to go back to a lower number.
3) Press the ‘Clock’ button. The display will show ‘8:00’ and the red clock symbol will remain illuminated.
4) To set the minutes, turn the 'Weight/Time' dial clockwise until the display shows ‘8:30’. The dial can be turned clockwise to increase
the numbers or turn it anticlockwise to go back to a lower number.
5) Press the ‘Clock’ button to confirm. The clock is now set. The colon symbol ‘:’ will continue to flash whilst the red clock symbol
remains lit.
To reset the time of day, repeat step 1 through to step 5.
The clock will remain set as long as the microwave is plugged in the socket and electricity is being supplied. In the instance of a power cut in
your home, please reset the time following the above instructions when your power returns.
How to use the microwave oven
For Customer Services & Spare Parts please call 0345 209 7461
Opening times: Monday - Friday 8am – 6pm & Saturday 9am – 1pm or visit us at www.productcareuk.com
Page 24

24
There are 5 different microwave power levels available.
To cook with microwave power only
1. Press the ‘Power Level’ button until the power level you require is displayed. The microwave symbol will be displayed on the bottom left.
The high microwave power symbol is shown on the bottom centre to represent the 100% and 80% power levels and the medium low
microwave power symbol is shown on the bottom right corner to represent 60%, 40% and 20% power levels. The fan only symbol is
shown on the top right to represent fan only, no microwave power.
2. Then use the 'Weight/Time' dial to set the cooking time. When turning the 'Weight/Time' dial the time goes up in the following
graduations : 10 seconds For 0-5 minutes, 30 seconds for 5-10 minutes, 1 minute for 10-30 minutes and 5minutes for 30-60 minutes.
3. Press the ‘Start/Quick Start’ dial to start the programme.
Please note - The longest cooking time is 60 minutes.
During any cooking program, to pause cooking, press the ‘Stop/Cancel’ button. To stop the cooking, press the ‘Stop/cancel’ button again.
Do not use any metal accessory in your microwave oven during the microwave only programme. The only accessory that should be inside the
microwave is the glass turntable on the turntable support.
Press power button Cooking power Wattage
once
100%800
W
Twice
80%640
W
3
times
60%480
W
4
times
40%320
W
5
times
20%160
W
6
times
0%0
W
Microwave cooking
For Customer Services & Spare Parts please call 0345 209 7461
Opening times: Monday - Friday 8am – 6pm & Saturday 9am – 1pm or visit us at www.productcareuk.com
Page 25

25
Quick start cooking
This programme allows you to cook food at 100% power between 30 seconds and 12 minutes by pressing the 'Start/ Quick Start' dial directly.
Keep pressing the dial until the time that you requires is displayed in the window. The microwave symbol appears on the bottom left, the full
power symbol appears on the bottom centre and a symbol flashes at the top centre and then disappears when cooking starts.
For example if you want to cook food for 2 minutes.
1. Place the food in a container suitable for use with microwave ovens and place it on the turntable.
2. To set the time (2 minutes), press the 'Start/Quick Start' dial 4 times. The microwave oven will automatically start.
3. When the food has finished cooking the oven will beep 3 times to let you know and the word 'End' will be displayed.
4. To pause the cooking programme press ‘Stop/Cancel’ button. The time and symbols will remain and the symbol will flash whilst the
programme is paused. To restart the programme again press ‘Start/Quick start’ and the symbol will disappear as cooking commences.
Please note: 'End' will be displayed and 3 beeps will be heard every 2 minutes until the oven door is opened or the 'Stop/Cancel' button is
pressed.
Microwave cooking
For Customer Services & Spare Parts please call 0345 209 7461
Opening times: Monday - Friday 8am – 6pm & Saturday 9am – 1pm or visit us at www.productcareuk.com
Page 26

26
Auto menus
There are 9 auto menus you can use for easy cooking. To access the menus, press the 'Auto Cook' button. For guide lines, please see the Auto
menus chart on page 27 .
1. Place the food in a container suitable for use with microwave ovens and grilling, depending on your choice of programme, and put it into
the oven.
2. To select your chosen auto cook menu press the 'Auto Cook' button. The ‘AUTO’ symbol will be displayed in the top right corner and the
auto cook menu number e.g 1 will be displayed on the right. Press the ‘Auto Cook’ until the programme you require appears.
3. Turn the 'Weight/Defrost/Time' dial to select the weight. The display will show the weight in grams or amounts and the ‘pause’ symbol will
flash.
4. Press the 'Start/ Quick Start' dial. The oven will now start to cook the food.
5. When the food has finished cooking the oven will beep 3 times to let you know and the word 'End' will be displayed.
Please note: 'End' will be displayed and 3 beeps will be heard every 2 minutes until the oven door is opened or the 'Stop/Cancel' button is
pressed.
Please note: when using the Auto menus for weights and times, if food being cooked is between weights, please make sure that it is cooked
thoroughly. It is advisable to stir and turn food where needed to ensure even cooking. Be sure to handle hot food with care.
Important
Do not cook, reheat or defrost foods directly on the turntable, always put the food into a suitable microwave container.
Do not cook foods such as meat from frozen, always defrost the foods first.
Where appropriate cover dishes with microwave safe cling film and pierce, this will retain the moisture and prevent splashing and spillages.
Always loosen lids before putting into the oven.
To distribute heat evenly, stir or shake foods halfway through cooking.
Auto menu cooking
Page 27

27
Auto menu
Food Weights Recommendations
1
Milk/Coffee
1=200ml, 2=400ml,
3=600ml
Place the cup onto the
centre of the turntable. When the liquid has been
removed from the oven, leave to stand before adding sugar.
2 Rice 150g, 300g, 450g, 600g
Place the rice into a suitable container, cover with water.
3 Spaghetti
Pasta
100g, 200g, 300g
Place the pasta into a suitable container, cover with boiling water.
4 Potatoes 200g, 300g, 400g
Prick the skins and place on a suitable plate. Turn the potatoes over halfway
through the cooking time.
5 Auto
reheat
200g, 300g, 400g, 500g,
600g, 700g, 800g
Straight from the
refrigerator, various foods and weights.
6 Fish 200g, 300g, 400g, 500g,
600g
Place the fish in a suitable container and cover with microwave safe cling
film leaving a gap for the steam to escape.
7 Chicken
800g, 1000g, 1200g, 1400g
Place the chicken on a suitable plate and place on the turntable.
8 Popcorn 99g
This will microwave the
99g of popcorn for a set length of time.
9 Pizza 150g, 300g, 450g Place the Pizza on to a suitable plate.
Auto menu cooking
Page 28

28
Weight defrost
Weight defrost allows you to set the food weight and the oven will determine how long the food will take to defrost as a guideline. You can
defrost foods between 100g and 1800g, with graduations of 100g.
To defrost food using the weight defrost function:
1. Place the food in a container suitable for use with microwave ovens and place container on the turntable.
2. Press the ‘Weight/Defrost’ button.
3. Turn the 'Weight/Time' dial clockwise, until the display shows your required weight. Turn the 'Weight/Time' dial anticlockwise to return
through the weight lists if you miss the weight you need.
4. The ‘1S' and 'Defrost' symbols will appear and the ‘pause’ symbol will flash.
5. Press the 'Start/ Quick Start' dial to start the defrosting programme. The ‘1S' and ‘defrost’ symbols will remain visible throughout the
programme.
6. The microwave oven will beep 2/3 times through defrosting and the oven will pause the defrosting programme and timer. This is to
remind you to turn over the food to ensure even defrosting. Open the door, turn over or rearrange the food, close the door and then
press the ‘Start/Quick Start’ button to resume the cooking programme.
7. When the food has finished cooking the oven will beep 3 times to let you know and the word 'End' will be displayed.
Please note: 'End' will be displayed and 3 beeps will be heard every 2 minutes until the oven door is opened or the 'Stop/Cancel' button is
pressed.
Important:
The weight defrost programme is a guideline for defrosting, you must always check that your food has fully defrosted. If it has not, either
resume defrosting in the microwave oven or leave for a longer standing time to allow food to fully defrost to the centre.
Fatty meat will require intermittent defrosting.
Ice should be removed from food during defrosting.
Weight defrost
For Customer Services & Spare Parts please call 0345 209 7461
Opening times: Monday - Friday 8am – 6pm & Saturday 9am – 1pm or visit us at www.productcareuk.com
Page 29

29
Pre-set and multi stage cooking
For Customer Services & Spare Parts please call 0345 209 7461
Opening times: Monday - Friday 8am – 6pm & Saturday 9am – 1pm or visit us at www.productcareuk.com
Preset
Preset function allows the oven to start up at a later time.
Suppose the clock is running at 9:00, and you want the oven to start cooking at 11:30.
Set a cooking program.
Press the PRESET button.
Rotate the WEIGHT/TIME dial to enter hour digit 11.
Press the PRESET button.
Rotate the WEIGHT/TIME dial to enter minute digit 30.
Press PRESET button to confirm.
The microwave oven will now start at 11:30 am, at full power.
Note: After the preset function has been set, you can check the preset time by pressing the PRESET button. To cancel the feature, touch
PRESET and then STOP/CANCEL. When it reaches the preset time, beeps can be heard to signal that the preset cooking program will
begin. Weight Defrost and Quick Start functions can not be preset.
Multi stage cooking
Your oven can be programmed for up to 2 automatic cooking sequences.
Suppose you want to set the following cooking program for Microwave Cooking followed by Microwave Cooking (with lower cooking
power).
Input Microwave Cooking program, by pressing the power level and then input the time, then choose another power level and input the
second time. 1S & 2S will illuminate when the relative cooking stages are selected.
Press START/QUICK START.
Note:
Quick Start and Weight Defrost can not be set in the multistage cooking mode. Auto Cook could be only set on the first stage.
The respective lights will turn on to indicate which stage the oven is operating in. After total time has elapsed, beeps will sound.
Page 30

30
Kitchen timer
The kitchen timer is used to set a countdown time for the convenience of the user, it can be used as a reminder.
1. Press the 'Power Level' button until the display shows 00%.
2. Turn the 'Weight/Time' dial to the length of time required.
3. Press the 'Start/Quick Start‘ dial. The timer will now start to count down. The oven will not produce microwave energy or heat during this
time, the noise that can be heard is the fan working only.
4. When the time is complete the oven will beep 3 times to let you know and the word 'End' will be displayed.
Please note: 'End' will continue to be displayed and 3 beeps will be heard every 2 minutes until the oven door is opened or the 'Stop/Cancel'
button is pressed.
Child Safety Lock
This function is to prevent children from using the microwave oven.
To activate the child lock, press and hold the ‘stop/cancel' button for 3 seconds. The microwave will beep and the lock symbol will be
displayed in the top right corner.
To de-activate the child lock, press and hold the ‘stop/cancel' button for 3 seconds. You will hear a beep and the lock symbol will disappear.
Timer and child lock
For Customer Services & Spare Parts please call 0345 209 7461
Opening times: Monday - Friday 8am – 6pm & Saturday 9am – 1pm or visit us at www.productcareuk.com
Page 31

Q Is it normal that my microwave oven is causing interference with my TV?
A The microwave oven may cause interference to your radio, TV or similar equipment. This does not mean there is a fult with your
microwave. You can eliminate the interference by moving the radio, TV or equipment as far away from your microwave oven as possible.
Q The microwave is not working?
A Make sure the mains plug is plugged in securely. If it is not, remove the plug from the socket, wait 10 seconds and plug it in again securely.
Check the premises for a blown circuit fuse or a tripped main circuit breaker. If these seem to be working properly, test the socket with
another appliance.
Q The microwave power is not working?
A Check to see whether the timer for your programme is set. Make sure the door is securely closed, as otherwise, the microwave energy will
not flow into the oven.
Q Why is warm air coming out of the vents?
A The food generates heat in the cooking process which in turn heats the air inside the microwave. The warm air leaves the microwave
through the air vents. There are no microwaves in the air, or steam. The oven vents should never be covered or blocked during cooking as this
could damage the microwave.
Q How can I get rid of the odour in my microwave?
A If the inside of the oven smells, put a cup of water with the juice and skin of one lemon in a deep microwave bowl. Microwave it for three
minutes, wipe thoroughly and then dry with a soft cloth. This should eradicate any unpleasant food smells
31
Problem solving
For Customer Services & Spare Parts please call 0345 209 7461
Opening times: Monday - Friday 8am – 6pm & Saturday 9am – 1pm or visit us at www.productcareuk.com
Page 32

32
This product is guaranteed for 12 months from the date of the original purchase. If any defect arises due to faulty materials or workmanship
the faulty product must be returned to the retailer where it was purchased.
Refund or replacement is at the discretion of the store.
The following conditions apply:
• The product must be returned to the retailer with the original proof of purchase.
• The product must be installed and used in accordance with the instructions contained in this instruction guide and any other instructions
for use which has been supplied.
• It must be used for domestic purposes only and for its intended use.
• This guarantee does not cover wear and tear, damage, misuse or consumable parts.
This does not affect your statutory rights.
Guarantee
For Customer Services & Spare Parts please call 0345 209 7461
Opening times: Monday - Friday 8am – 6pm & Saturday 9am – 1pm or visit us at www.productcareuk.com
Page 33

33
Rated Voltage: 230V – 240V ~ 50Hz
Rated Output Power(Microwave): 800W
Oven Capacity: 20 L
External Dimensions(L x W x H): 452mm x 393mm x 262mm
Net Weight: Approx. 12 kg
Produced for:
G2S Limited
Wigan
WN2 4EZ
Technical Specifications
For Customer Services & Spare Parts please call 0345 209 7461
Opening times: Monday - Friday 8am – 6pm & Saturday 9am – 1pm or visit us at www.productcareuk.com
Page 34

The following spare parts may be ordered direct from Product Care: online at www.productcareuk.com or by telephoning the customer
service centre on 0345 209 7461.
Glass turntable Turntable ring Waveguide cover
Oven light
The light bulb inside the microwave cannot be replaced by anyone other than a qualified engineer. This is because to replace the light bulb
the outer housing cabinet of the microwave oven needs to be removed which exposes live and highly dangerous microwave generating parts.
For this reason, spare bulbs are not available for purchase or fitting. If the light bulb in your microwave oven has developed a fault then
please consult the guarantee guidelines on how to proceed.
Important: Do not attempt to remove the outer casing from the microwave oven.
34
For Customer Services & Spare Parts please call 0345 209 7461
Opening times: Monday - Friday 8am – 6pm & Saturday 9am – 1pm or visit us at www.productcareuk.com
Spare parts and maintenance
Page 35

This symbol is known as the 'Crossed-out wheelie bin Symbol'. When this symbol is marked on a product/batteries, it means that
the product/batteries should not be disposed of with your general household waste. Only discard electrical/electronic/battery
items in separate collection schemes, which cater for the recovery and recycling of materials contained within. Your co-operation
is vital to make sure the success of these schemes and for the protection of the environment. For your nearest disposal facility,
visit www.recycle-more.co.uk or ask in store for details.
We reserve the right due to possible changes to design to alter the instruction manual without prior notice.
Revision 1
For Customer Services & Spare
Parts please call
0345 209 7461
Opening times: Monday - Friday
8am – 6pm & Saturday 9am –1pm
or visit us at
www.productcareuk.com
 Loading...