

Page 1

DESIRE MATTE BLACK
5.5L KITCHEN MACHINE
RHKM5BLK_IB_RB_FA_151020
Part No. T22-9002136
2 YEAR WARRANTY
RHKM5BLK
INSTRUCTIONS & WARRANTY
Page 2

IMPORTANT SAFEGUARDS
When using this appliance, basic safety precautions should always be followed, including the
following:
Read all instructions before, and follow whilst using this appliance.
1. To protect against electric shock DO NOT immerse cord, plug or motor unit in water or any other
liquid.
2. Do not use in the bathroom or near any source of water.
3. Do not use outdoors.
4. This product is not intended for use by persons (including children) with reduced physical, sensory
or mental capabilities, or lack of experience and knowledge, unless they have been given
supervision or instruction concerning use of the product by a person responsible for their safety.
5. This appliance is not a toy. Children shall be supervised to ensure they do not play with this
appliance.
6. Cleaning or user maintenance shall not be carried out by children without the supervision of a
person responsible for their safety.
7. Always switch off and disconnect this appliance from the wall power outlet when not in use,
before cleaning and removing attachments.
8. To disconnect, set the control to off. Turn off the wall power outlet, then grasp the plug and
remove from the wall power outlet. Never pull by the cord.
9. Do not operate any appliance with a damaged cord or plug or after the appliance has
malfunctioned, or has been dropped or damaged in any manner. Contact customer service for
replacement, examination, repair or adjustment.
10. There are no user serviceable parts. If the power cord is damaged, it must be replaced by the
manufacturer or similarly qualified person in order to avoid a hazard.
11. Switch off and unplug the appliance before changing accessories or touching parts that move
whilst in use.
12. Do not leave the appliance unattended when in use.
13. Do not use on an inclined plane or unstable surface.
14. Keep the appliance and the power cord away from the edges of benches and countertops.
15. Do not place on or near any heat sources.
16. Do not use appliance for other than its intended purpose.
17. Misuse of the appliance may cause injury.
18. Do not touch the whisk, beater or dough hook while the appliance is in operation.
19. Keep fingers and utensils away from moving parts.
20. Do not operate the appliance for more than 10 minutes at a time. Allow 20 minutes rest before
next use to allow the motor to cool.
21. CAUTION: Never process heated liquids (over 40°C) as they may be ejected due to steaming.
22. Do not use the appliance for any purpose other than those described in these instructions.
23. Do not use attachments or accessories other than those supplied with this appliance.
24. Keep the appliance and the power cord away from the edge of tables or countertops and out of
reach of children and persons with reduced physical, sensory and mental capacities.
2
Page 3

25. This appliance is not intended to be operated by means of an external timer or separate remote
control system.
26. For added safety, electrical appliances should be connected to a power outlet that is protected by
a residual current device (RCD / ‘Safety Switch’) having a rated residual operating current not
exceeding 30mA. Your switchboard may already incorporate an RCD. If unsure, call an electrician
for verification and fitting if necessary.
2 7. This appliance is intended to be used in household and similar applications such as:
– Staff kitchen areas in shops, offices and other working environments;
– Farm houses;
– By clients in hotels, motels, and other residential type environments;
– Bed & breakfast type environments.
SAVE THESE INSTRUCTIONS.
3
Page 4
Congratulations on the purchase of your new Russell Hobbs appliance. Each unit is
manufactured to ensure safety and reliability.
Before using the appliance for the first time, please read this instruction booklet carefully
and keep it for future reference. Pass it on if you pass on the appliance.
When using this appliance, basic safety precautions should always be followed.
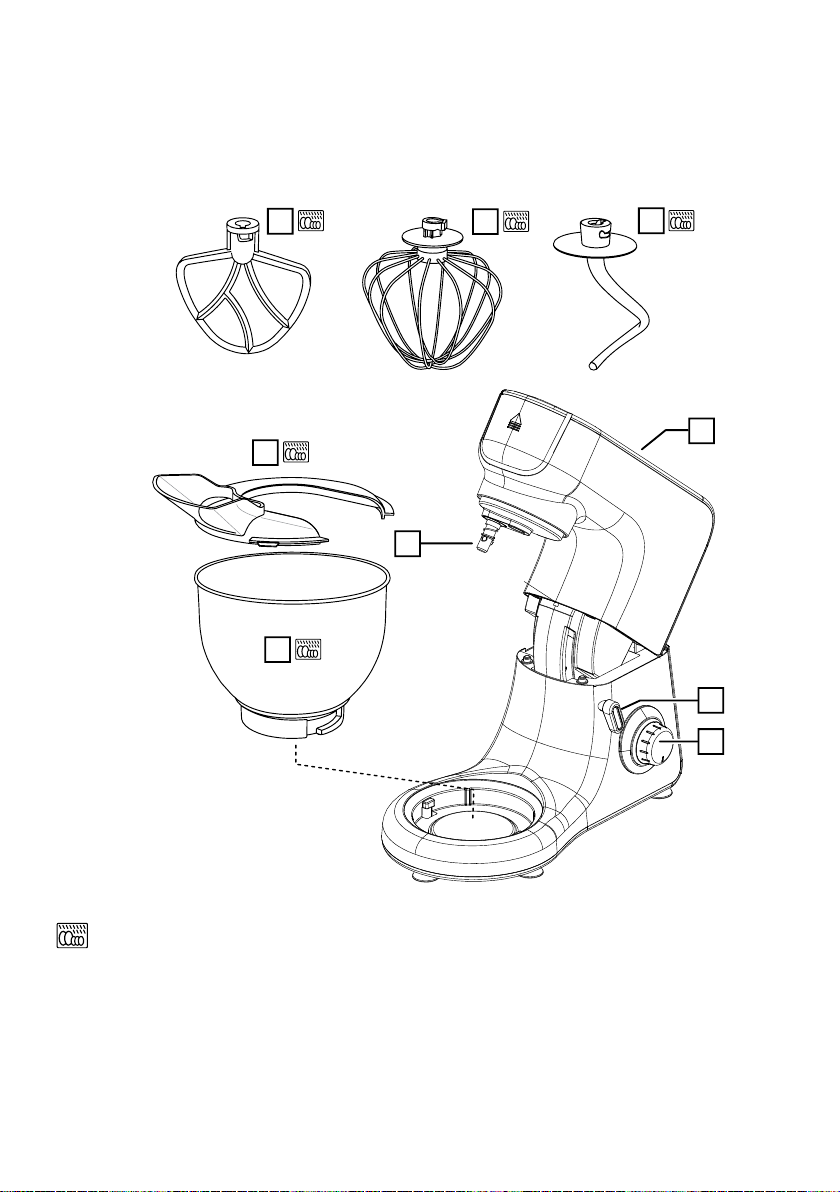
1 2
8
5
9
3
4
6
7
Dishwasher safe
1. Beater
2. Whisk
3. Dough hook
4. Arm
5. Drive shaft and pin
6. Arm lock lever
7. Speed dial
8. Splash guard
9. Bowl
4
Page 5

BEFORE FIRST USE
8
1 2
3
9
4
5
6
7
3
4
5
6
7
• Read all of the instructions included in this manual.
• Remove any packaging material and labels from the Kitchen Machine.
• All parts of the Kitchen Machine need to be thoroughly cleaned before being used for the
rst time. (See “Care and Maintenance” section).
PREPARATION
1. Sit the appliance on a water-resistant, dry, stable, level surface.
2. Route the cable so it doesn’t overhang, and can’t be tripped over or caught.
3. Don’t plug the appliance in until you have nished assembling it.
GENERAL USE
RAISING THE ARM
1. Ensure the Kitchen Machine is switched off and unplugged.
2. Turn the arm lock lever to the unlock position.
3. The arm will lift, with your assistance, allowing removal/replacement of the stainless steel
bowl and/or mixing attachments.
4. At its uppermost position the arm will lock into place and the arm lock lever will return to
the lock position.
LOWERING THE ARM
CAUTION: Keep hands and items clear of the arm pivoting area to avoid injury or damage
to the appliance.
1. Ensure the required mixing attachment is correctly tted and the mixing bowl is in position.
(See “Fitting the Bowl” and “Fitting/Removing Attachments” sections)
2. Turn the arm lock lever to the unlock position.
3. Gently lower the arm by pressing down on the top of the Kitchen
Machine until it locks into position.
4. The arm lock lever will return to the lock position.
FITTING THE BOWL
1. Raise the arm before tting or removing the bowl.
2. Fit the bowl into the recess in the base and turn the bowl clockwise
until it locks.
3. To remove, turn the bowl anti-clockwise then lift it off the base.
FITTING/REMOVING ATTACHMENTS
Switch off, unplug and raise the arm before tting or removing
attachments.
1. Align the slot in the attachment with the pin on the drive shaft (Fig
A).
2. Push the attachment onto the drive shaft then turn it anti-clockwise to lock it in place
(Fig B).
To remove an attachment, push the attachment upwards slightly then turn it clockwise and
withdraw it from the shaft.
5
Page 6

SPLASH GUARD
3
4
6
7
The splash guard protects you from spills or splashes during mixing
while still allowing you to add ingredients. Switch off and unplug your
mixer before tting/removing the splash guard.
With the bowl in position and the arm in the lowered position:
1. Slide the splash guard between the arm and the bowl.
2. Align the guard so that the opening is on the same side as the
speed control dial (Fig C).
NOTE: Always remove the splash guard before raising the arm.
USING YOUR MIXER
1. Check that the speed control is set to ‘O’.
2. Put the plug into the power socket (switch the socket on, if its switchable).
3. Turn the speed control clockwise to the speed you want.
4. The range is from 1 (low) to 10 (high).
Turn the speed control back to ‘O’ to turn the motor off.
5. To operate the motor in short bursts, turn the speed control to the ‘P’ position.
Release the control to stop the motor.
RECOMMENDED SPEEDS
Attachment Speed Use for
Whisk 7-10 Egg whites, whipping cream
Beater 4-7 creaming butter and sugar, cake mixes
Dough hook 1-4 heavy mixtures, bread, pastry
CARE AND MAINTENANCE
NOTE: Switch off and unplug appliance before cleaning.
MIXER:
1. Clean as soon after use as possible to prevent residues setting inside the bowl.
2. Wash the bowl, splash guard and attachments in warm soapy water, rinse, and dry.
3. You may put the bowl and attachments in a dishwasher, but note: the harsh environment
4. Wipe the outside surfaces of the appliance with a clean damp cloth.
inside the dishwasher will affect the surface nishes. The damage should be cosmetic
only, and should not affect the operation of the appliance.
DISPOSAL/RECYCLING
Legislation in some localities mandates that e-waste (anything with a plug, battery or cord)
is disposed of through controlled recycling facilities and must not be disposed of in general
household waste. For more information about recycling of electrical and battery operated
appliances, please contact your local council or your local household waste disposal service.
6
Page 7

Spectrum Brands Australia Pty Ltd
Locked Bag 3004 Braeside
Victoria 3195 Australia
Customer Service in Australia
TollFree: 1800 623 118
Email: info@spectrumbrands.com.au
Website: www.spectrumbrands.com.au
Spectrum Brands New Zealand Ltd
PO Box 9817 Newmarket
Auckland 1149 New Zealand
Customer Service in New Zealand
TollFree: 0800 736 776
Email: service@spectrumbrands.co.nz
Website: www.spectrumbrands.co.nz
Spectrum Brands Australia Pty Ltd and Spectrum Brands New Zealand Ltd
Warranty Against Defects
In this warranty:
Australian Consumer Law means the Australian consumer law set out in Schedule 2 to the
Competition and Consumer Act 2010;
CGA means the New Zealand Consumer Guarantees Act 1993;
Goods means the product or equipment which was accompanied by this warranty and
purchased in Australia or New Zealand, as the case may be;
Manufacturer, We or us means:
1. for Goods purchased in Australia, Spectrum Brands Australia Pty Ltd ABN, 78 007 070 573;
or
2. for Goods purchased in New Zealand, Spectrum Brands New Zealand Ltd, as the case
may be, contact details as set out at the end of this warranty;
Supplier means the authorised distributor or retailer of the Goods that sold you the Goods in
Australia or in New Zealand; and
You means you, the original end-user purchaser of the Goods.
1. Our goods come with guarantees that cannot be excluded under the Australian Consumer
Law, or the CGA. You are entitled to a replacement or refund for a major failure and
compensation for any other reasonably foreseeable loss or damage. You are also entitled
to have the goods repaired or replaced if the goods fail to be of acceptable quality and the
failure does not amount to a major failure.
2. The benefits provided by this Warranty are in addition to all other rights and remedies in
respect of the Goods which the consumer has under either the Australian Consumer Law
or the CGA. The original purchaser of the Goods is provided with the following Warranty
subject to the Warranty Conditions:
3. We warrant the Goods for all parts defective in workmanship or materials for the period of 2
years from the date of purchase (Warranty Period).
If the Goods prove defective within the Warranty Period by reason of improper workmanship
or material, we may, at our own discretion, repair or replace the Goods without charge.
7
Page 8

Warranty Conditions
4. The Goods must be used in accordance with the manufacturer’s instructions. This
Warranty does not apply should the defect in or failure of the Goods be attributable
to misuse, abuse, accident or non-observance of manufacturer’s instructions on the
part of the user. As far as the law permits, the manufacturer does not accept liability
for any direct or consequential loss, damage or other expense caused by or arising
out of any failure to use the Goods in accordance with the manufacturer’s instructions.
5. Exhaustible components (such as batteries, filters and brushes) of the Goods are
included under this Warranty only where there is a defect in workmanship or materials
used.
6. The warranty granted under clause 3 is limited to repair or replacement only.
7. Any parts of the Goods replaced during repairs or any product replaced remain the
property of the manufacturer. In the event of the Goods being replaced during the
Warranty Period, the warranty on the replacement Goods will expire on the same
date as for the Warranty Period on the original Goods which are replaced.
8. In order to claim under the warranty granted under clause 3 you must:
(a) Retain this warranty with your receipt/proof of purchase; and
(b) Return the Goods to us at the relevant address or to the Supplier by prepaid
freight within the Warranty Period accompanied with (i) the legible and unmodified
original proof of purchase, which clearly indicates the name and address of the
Supplier, the date and place of purchase, the product name or other product serial
number and (ii) this warranty.
9. This warranty is immediately void if:
(a) Any serial number or appliance plate is removed or defaced;
(b) The Goods have been serviced or otherwise repaired by a person not authorised
to do so by us or where non approved replaced parts are used.
10. The Goods are designed for domestic use only. The Goods must be connected to the
electrical voltage requirements as specified in the ratings label located on the Goods.
11. This warranty does not cover the cost of claiming under the warranty or transport
of the Goods to and from the Supplier or us.
12. This warranty is only valid and enforceable in Australia against Spectrum Brands
Australia Pty Ltd and in New Zealand against Spectrum Brands New Zealand Ltd.
Contact us or the Supplier for further details.
Register your product online
If you live in Australia please visit: www.spectrumbrands.com.au/warranty
If you live in New Zealand Please visit: www.spectrumbrands.co.nz/warranty
Registration of your warranty is not compulsory, it gives us a record of your purchase
AND entitles you to receive these benefits: Product information; Hints and tips; Recipes
and news; Information on special price offers and promotions.
Any questions? Please contact Customer Service for advice.
8
Page 9

DESIRE MATTE BLACK
5.5L KITCHEN MACHINE
RHKM5BLK_IB_RB_FA_151020
Part No. T22-9002136
2 YEAR WARRANTY
RHKM5BLK
RECIPE BOOK
1
Page 10

FRUIT CAKE
BEATER
Ingredients:
150g butter
300g self raising our
150g caster sugar
Pinch salt
75g glace cherries, chopped
1 tsp mixed spice
75g each of sultanas and raisins
3 tbsp milk
25g mixed peel
3 eggs
1. Preheat the oven to 180°C.
2. Grease a 20cm round cake tin and line with greaseproof paper.
3. Put the butter, sugar, dried fruits and spices in the bowl, and beat on speed ‘3’ until
combined slightly. Add the eggs and milk and beat for a few seconds, gradually adding the
our, and continue beating until well mixed.
4. Pour into the cake tin and bake for about 1½ hours.
5. Cool in the tin for 15 minutes then turn onto a wire rack.
www.russellhobbs.com.au
www.russellhobbs.co.nz
RUSSELL HOBBS and logo are Trade Marks of Spectrum Brands, Inc., or one of its subsidiaries.
©2020 Spectrum Brands, Inc.
Recipes are to be used in conjunction with the RHKM5BLK Desire Matte Black Kitchen Machine by Russell Hobbs. All rights reserved.
No part of this publication may be reproduced, stored in a retrieval system or transmitted in any form or by any means, electronic,
mechanical, photocopying, recording or otherwise, without prior permission of the copyright owner.
2
Page 11

SPONGE CAKE
Ingredients:
500g plain our
1 tbsp baking powder
250g soft butter or margarine
125ml milk
250g sugar
Pinch of salt
1. Preheat the oven to 190°C.
2. Grease and line a deep 23cm round cake tin.
3. Put everything into the bowl, mix on speed ‘1’ for 30 seconds, then on speed ‘2’ for 3
minutes or until combined.
4. Pour the mixture into the cake tin, and bake in the centre of the oven for 50-60 minutes.
5. Before removing the cake from the oven, test to see if it’s done. Pierce the centre of the
cake with a skewer. If no mixture sticks to it, the cake is cooked.
6. Turn the cake onto a wire tray and allow to cool.
7. Cut in half with a serrated bread knife. Spread the lower half with the jam and top with
cream. Top with other half of sponge and serve.
2 drops vanilla essence
50g strawberry jam
4 eggs
200g whipped cream
BEATER
VANILLA BEAN BUTTER CAKE
Ingredients:
125g butter
100g caster sugar
1 vanilla bean pod
2 eggs
125g self raising our
1 tbsp milk
1. Preheat the oven to 180°C.
2. Grease two 18cm straight sided sandwich tins and line with greaseproof paper.
3. Split the vanilla pod, and scrape out the seeds with a knife. Put the butter, sugar and
vanilla seeds in the bowl, and beat on speed ‘1’ for a few seconds. Add one of the eggs,
mix well on speed ‘2’, and then add half the our. Repeat, adding eggs and our until all
the ingredients are combined and smooth in texture.
4. Divide into the two tins and bake in the centre of the oven for 20-25 minutes.
5. Cool on a wire rack. Fill with butter cream or whipped cream and jam.
3
BEATER
Page 12

TREACLE PUDDING
Ingredients:
100g caster sugar
5 tbsp golden syrup
2 eggs
1. Grease a 900ml pudding basin and set aside.
2. Put the butter and sugar in the bowl and beat on speed ‘2’ or ‘3’ until light and uffy. Add
one egg, then a little our, then the other egg, and then mix in the remaining our.
3. Put the syrup into the greased pudding basin, and pour the mixture on top.
4. Cover with greaseproof paper or foil, secure with string and steam for 1½-2 hours.
5. Serve hot with custard or cream.
100g butter
100g self raising our
Extra butter for greasing
BEATER
CHOCOLATE CAKE
Ingredients:
1 1/3 cups plain our
1 tsp bicarbonate of soda
1/3 cup cocoa powder
1 cup caster sugar
1. Preheat the oven to 180°C.
2. Grease and line a deep 20cm round cake tin.
3. Sift our, bicarbonate of soda and cocoa powder into the bowl. Add the sugar.
4. Combine buttermilk, eggs, melted butter and vanilla in a jug.
5. Make a well in centre of our mixture, and pour in buttermilk mixture.
6. Begin to mix on speed ‘1’ or ‘2’ until combined. Then increase to speed ‘4’, and beat for 3
to 4 minutes or until thick and creamy.
7. Pour mixture into prepared pan. Bake for 40 to 45 minutes or until a skewer inserted in the
centre comes out clean.
8. Allow to cool in pan for 5 minutes. Turn out onto a wire rack to cool completely.
1 cup buttermilk
2 eggs
125g butter, melted, cooled
1 tsp vanilla essence
BEATER
4
Page 13

BASIC MERINGUES
Ingredients:
4 egg whites
100g caster sugar
100g icing sugar
1. Preheat the oven to 120°C
2. Combine the sugars and set aside. Whisk the egg whites in the bowl on speed ‘5’ until
fairly stiff. Add half the sugar and whisk until smooth and stiff peaks have formed.
3. Remove the bowl, and lightly fold in the remaining sugar with a metal spoon.
4. Line a tray with baking paper, and spoon or pipe the meringue mixture into ovals, then
sprinkle with the remaining sugar.
5. Cook on the lowest shelf of the oven for 1½ hours. Cool on a wire rack.
6. Serve as they are or top with soft fruits, grated chocolate, or sweetened cream.
WHISK
HOT CHOCOLATE SOUFFLÉ
Ingredients:
75g butter
450ml milk
50g plain our
1. 1. Preheat the oven to 190°C
2. Melt the butter in a pan, stir in the our and cocoa, and blend over a low heat. Add the
milk and mix well until thickened slightly. Remove from the heat and set aside to cool, then
add the egg yolks and beat in.
3. Put the egg whites in the bowl, mix on speed ‘6’ for a few seconds, then add the sugar
and continue to whisk until soft peaks form. Fold in the sauce.
4. Pour the mixture into a greased 1.2 litre dish. Stand the dish in a roasting tin lled half full
with boiling water, put into the oven, and bake for 40-45 minutes, until well risen.
4 eggs, separated
3 tbsp cocoa powder
50g caster sugar
WHISK
5
Page 14

ITALIAN HERB BREAD
Makes a 1kg loaf
Ingredients:
575g bakers white bread our
2 tsp sugar
1 sachet active dried yeast
(about 2½ tsp)
1. Preheat the oven to 200°C
2. Mix the water, oil, sugar, salt and yeast in a jug or bowl, and leave for 5 minutes.
3. Put the our and dried herbs in the bowl, and mix on speed ‘1’, gradually adding the liquid,
then increase the speed to ‘2’ and mix for 5 minutes. Put the dough in a bowl, cover and
leave in a warm place until doubled in size (20-30 minutes).
4. Put on a oured surface and knead gently to knock out the air, then shape. Place on
greaseproof baking paper and leave in a warm place until doubled in size.
5. Bake until golden brown and hollow sounding on the bottom.
2 tsp salt
290ml lukewarm water (30°-35°C)
4 tbsp mixed dried herbs
2 tbsp olive oil
DOUGH HOOK
BASIC WHOLEMEAL BREAD
Makes a 1kg loaf
Ingredients:
575g bakers wholemeal bread our
2 tbsp sunower oil or butter
1 sachet active dried yeast
(about 2½ tsp)
1. Preheat the oven to 200°C
2. Put the dry ingredients in the bowl and mix gently with a wooden spoon. Gradually add the
liquid and mix on speed ‘1’. As the ingredients incorporate, and the dough ball becomes
more formed, increase the speed to ‘2’. Knead for a couple of minutes on this speed, until
the dough ball is smooth.
3. Put the dough in a bowl, cover and leave in a warm place until it has doubled in size (30-40
minutes).
4. Remove the dough and punch down to remove air. Knead lightly on a oured board,
shape it into a loaf, or put it in a tin, cover, and leave in a warm place to rise for another 30
minutes.
5. Bake for 25-30 minutes or until golden brown and hollow sounding on the bottom.
1 tbsp light brown sugar
375ml warm water
2 tsp salt
6
DOUGH HOOK
Page 15

SOFT POPPY SEED ROLLS
Makes 8-10
Ingredients:
570g bakers white bread our
1 tbsp sunower oil
1 sachet active dried yeast
(about 2½ tsp)
1½ tsp sugar
1. Preheat the oven to 220°C
2. Mix the milk, eggs, oil, sugar, salt and yeast in a jug or bowl, and leave for 5 minutes.
3. Put the our and poppy seeds in the bowl, and mix on speed ‘1’, gradually adding the
liquid, then increase the speed to ‘2’ and mix for ve minutes.
4. Remove the dough to a oured surface, cut into 8-10 pieces, and roll into shape. Place on
greaseproof baking paper and leave in a warm place until doubled in size.
5. Brush with a little egg or milk, and bake for 20-25 minutes until golden brown and hollow
sounding on the bottom.
300ml milk, warmed slightly
2 tsp salt
2 eggs (room temperature)
75g poppy seeds
DOUGH HOOK
CURRANT LOAF
Makes a 1kg loaf
Ingredients:
500g wholemeal our
150g currants
150g butter, softened
50g mixed peel
1 tbsp baking powder
1. Preheat the oven to 180°C.
2. Place the our in the bowl, add the softened butter, and mix on speed ‘1’. When the butter
and our start to blend, add the sugar, salt, currants, peel and baking powder.
3. Leave it mixing while you beat the eggs and milk together, and then add the egg/
milk mixture to the bowl. Increase the speed to ‘2’ and mix until all the ingredients are
combined.
4. Put into a greased loaf tin and bake for 30-35 minutes, or until golden brown.
5. Turn onto a wire rack and allow to cool before slicing.
2 eggs (medium)
½ tsp salt
2 tbsp milk
150g sugar
7
DOUGH HOOK
Page 16

BASIC WHITE BREAD
Makes a 1kg loaf
Ingredients:
600g bakers white bread our
1 tbsp sunower oil or butter
1 sachet active dried yeast
(about 2½ tsp)
1. Preheat the oven to 200°C.
2. Put the dry ingredients in the bowl and mix gently with a wooden spoon. Gradually add the
liquid and mix on speed ‘1’. As the ingredients incorporate, and the dough ball becomes
more formed, increase the speed to ‘2’. Knead for a couple of minutes on this speed, until
the dough ball is smooth.
3. Put the dough in a bowl, cover and leave in a warm place until it has doubled in size
(30-40 minutes).
4. Remove the dough and punch down to remove air. Knead lightly on a oured board,
shape it into a loaf, or put it in a tin, cover, and leave in a warm place to rise for another 30
minutes.
5. Bake for 25-30 minutes or until golden brown and hollow sounding on the bottom.
1 tsp sugar
345ml warm water
2 tsp salt
DOUGH HOOK
PIZZA DOUGH
Ingredients:
400g plain our
1½ tbsp olive oil
1 sachet active dried yeast
(about 2½ tsp)
1. Preheat the oven to 200°C.
2. Put the dry ingredients in the bowl and mix gently with a wooden spoon. Gradually add the
liquid and mix on speed ‘1’. As the ingredients incorporate, and the dough ball becomes
more formed, increase the speed to ‘2’. Knead for a couple of minutes on this speed, until
the dough ball is smooth.
3. Remove from the bowl and split into 2-4 pieces. Roll into pizza bases (circles or
rectangles) on a oured surface, then lay them on a baking sheet or pizza tray.
4. Spread the pizza bases with tomato purée and add toppings – mushrooms, ham, olives,
sun dried tomatoes, spinach, artichoke, etc. Top with dried herbs, pieces of mozzarella,
and a drizzle of olive oil.
5. Bake for 15-20 minutes, until the toppings are bubbling and golden brown.
½ tsp sugar
250ml warm water
1 tsp salt
8
DOUGH HOOK
 Loading...