

Page 1

INSTRUCTIONS AND WARRANTY
RHJM05
RUSSELL HOBBS
POWER GEAR SUPER JUICER
Page 2

Thank you for purchasing the Russell Hobbs Power Gear Super Juicer. Each unit
has been manufactured to ensure safety, reliability and ease of use. Before use, please
read these instructions carefully and keep them for further reference.
FEATURES OF THE RUSSELL HOBBS POWER GEAR SUPER JUICER
Traditional Juicers use steel blades that turn at high speeds and heat the food causing its
oxidation. They also allow wastage of food and often result in the appliance overheating.
The Russell Hobbs Power Gear Super Juicer uses innovative Soft Squeeze, Cold Press
Technology and a Bladeless Screw system extracting up to 30% more juice at a far higher
quality from fruit and vegetables.
It does this with its bladeless screw system by a gentle turning action that crushes and
squeezes juice from fruit and vegetables, retaining more vitamins, minerals, enzymes and
fibre. Its stainless steel micro-filter ensures that juice is smooth and pulp free. This type of
juicer may also be referred to as a Masticating Juicer or Slow Juicer. Traditional juicers
are referred to Centrifugal Juicers. Other Juicer types include Citrus Presses.
The Power Gear Super Juicer comprises three essential elements: a helical worm screw, a
stainless steel micro-filter and a spatula that conveys juice and pulp through two separate
output channels.
400W DC motor
80 RPM
Soft Squeeze, Cold Press Technology
Bladeless screw system
Extract fruit juice, vegetable juice and nut milk
Well-suited to juicing leafy greens, grasses, sprouts and herbs
Create amazing flavours and use them in jams, dips, soups and desserts!
Juicing lets you add a wide variety of fruit and vegetables to your diet
Fresh juice offers incredible health benefits
Higher juice yield
Juice lasts longer with enzyme integrity
Page 3

Lower speeds means less heat is generated, preserving more nutrients and
enzymes
Low noise
Reverse function
Easily cleaned
Easy to assemble and disassemble
Dry waste output
1L dry waste container
1L juice container with Easy-Pour spout
Safety-lock system and anti-slip feet
Beautifully brushed 304 stainless steel design
1.25m cord
Recipes included
Dimensions: 150 (W) x 240 (L) x 490 (H) mm
For domestic use only
1 year warranty
IMPORTANT SAFEGUARDS
When using any electrical appliance, basic safety precautions should always be followed
including the following:
1. Read all instructions and save the instructions provided with this appliance.
2. Do not put the motor unit in water or any other liquid; do not use it in a bathroom or
near any source of water or damp situations.
3. Do not use outdoors. Use this appliance only for its intended use.
4. This appliance must be used only by a responsible adult.
5. Switch OFF and unplug the appliance from the main power supply outlet before
dismantling, assembling, cleaning, storing or moving.
6. Wait until the components come to a complete stop before dismantling or removing
parts.
7. This appliance is not intended for use by persons (including children) with
reduced physical, sensory or mental capabilities, or lack of experience and
knowledge, unless they have been given supervision or instruction concerning
Page 4

use of the appliance by a person responsible for their safety.
8. Children should be supervised to ensure that they do not play with the appliance.
9. Do not fill the juicer with hot or boiling liquids.
10. Do not come into contact with moving parts.
11. Do not put any objects (spoon, spatula, etc.) into the juicer and especially not
while the juicer is plugged in.
12. Do not leave the juicer unattended when plugged in.
13. Misuse of this appliance may result in injury.
14. Position the motor unit on a dry, firm, level surface, close to a power socket
and out of reach of children.
15. Do not put the motor unit directly underneath a power socket.
16. Route the mains lead so that it cannot be caught accidentally or tripped over.
17. Keep the blender and the mains lead away from hotplates, hobs and burners.
18. Store the appliance away from direct sunlight and fluorescent light
where possible.
19. Do not let the j ui ce b ow l o verflow. If liquid gets under the motor unit,
it may be sucked into the motor, damaging it.
20. Do not use with wet hands or use in damp situations.
21. Do not run the motor for more than 3 minutes, either continuously, or using
the reverse setting, otherwise it may overheat. After 3 minutes use, switch it
off for at least 3 minutes allowing it to cool to room temperature and allowing it
recover.
22. Do not use the appliance for any purpose other than those described in
these instructions.
23. Do not run the appliance empty, as it may overheat.
24. Do not operate the appliance after it malfunctions. If the mains lead or plug
is damaged, return the appliance to the manufacturer in order to avoid any
hazard.
25. Children should be supervised to ensure that they do not play with the appliance.
26. Always turn the power off at the power outlet before you remove the plug.
Remove by grasping the plug. Do not pull on the electrical cord.
27. This appliance is designed for processing household quantities; it is not
suitable for commercial purposes. Use the appliance only for the purpose it
was designed for.
28. Do not use this appliance if it or parts of it show visible damage or if the
Page 5

appliance has been dropped.
29. Do not attempt to make any modifications to this appliance.
30. To avoid any risk and to remain within warranty, repairs to this appliance
must be carried out by an authorised service agent only.
31. If the supply cord is damaged, it must be replaced by the manufacturer, its
authorised service agent or similarly qualified persons in order to avoid any
hazard.
32. Switch off the appliance and disconnect from the power supply before
changing accessories or approaching parts that move when in use.
33. Use only accessories provided by the manufacturer for this appliance.
34. Do not run this appliance with an external timer or separate remote control
system.
Page 6
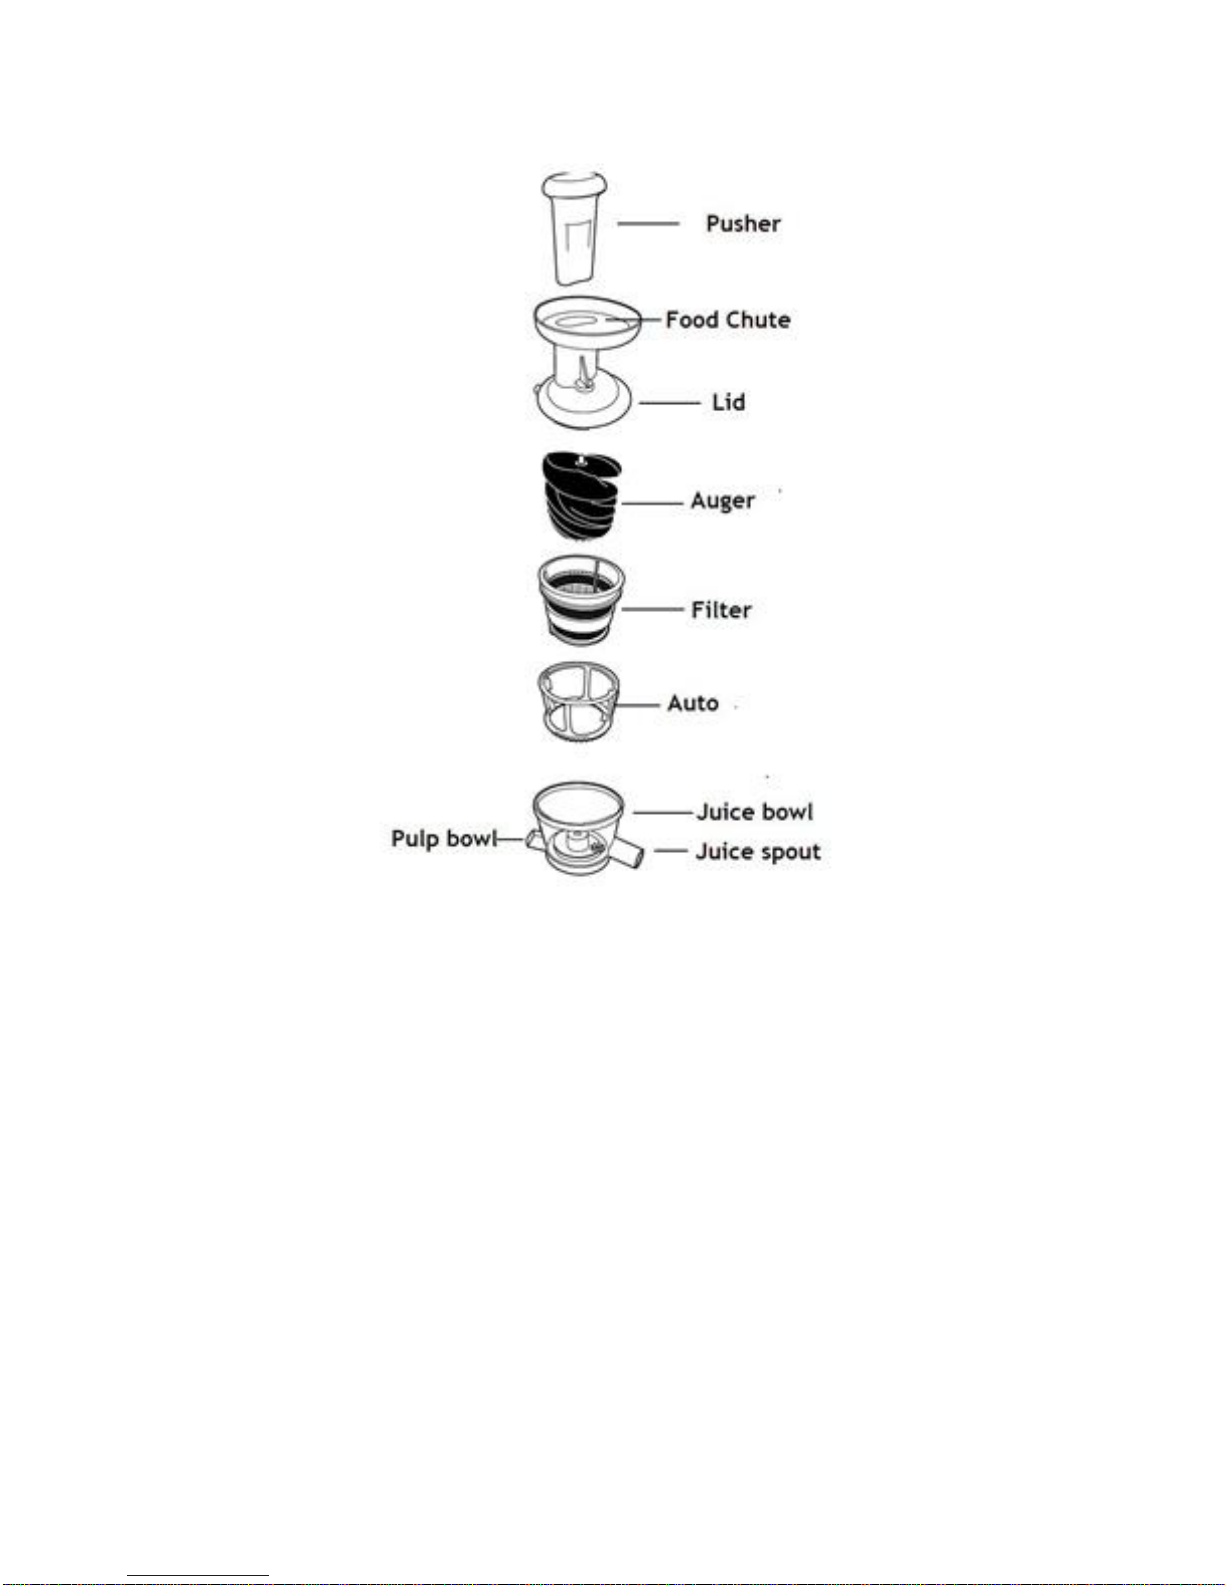
PARTS DIAGRAM
BEFORE FIRST USE
Before using your appliance for the first time take it out of the box and take off any
protective wrappings. REMEMBER: DO NOT LEAVE PROTECTIVE PACKAGING LYING
AROUND, AS IT COULD BE DANGEROUS AROUND INFANTS.
Carefully wipe the exterior of the appliance to remove any dust that may have
accumulated. Dry with a dry towel. Do not use harsh abrasive cleaners. Remove any label
or stickers. Wash the accessories in warm soapy water, dry with a dry towel. Do not
immerse the supply cord or motor in water or any other liquids.
Wash the juicing bowl, strainer, strainer holder, auger, food pusher, juice cup and pulp cup
Page 7
in warm soapy water with a soft cloth or nylon brush. Rinse and dry thoroughly.
Note: These parts are not dishwasher safe.
This appliance has a built-in safety lock; this feature ensures that you can only switch on
the appliance if you have assembled the juicer correctly on the motor unit. When
assembled correctly, the built-in safety lock will be unlocked.
OPERATING INSTRUCTIONS
Assembling the Juicer
1. Before you assemble the juicer, ensure that the power cord is unplugged.
2. Place the motor base on a flat dry surface such as a counter-top.
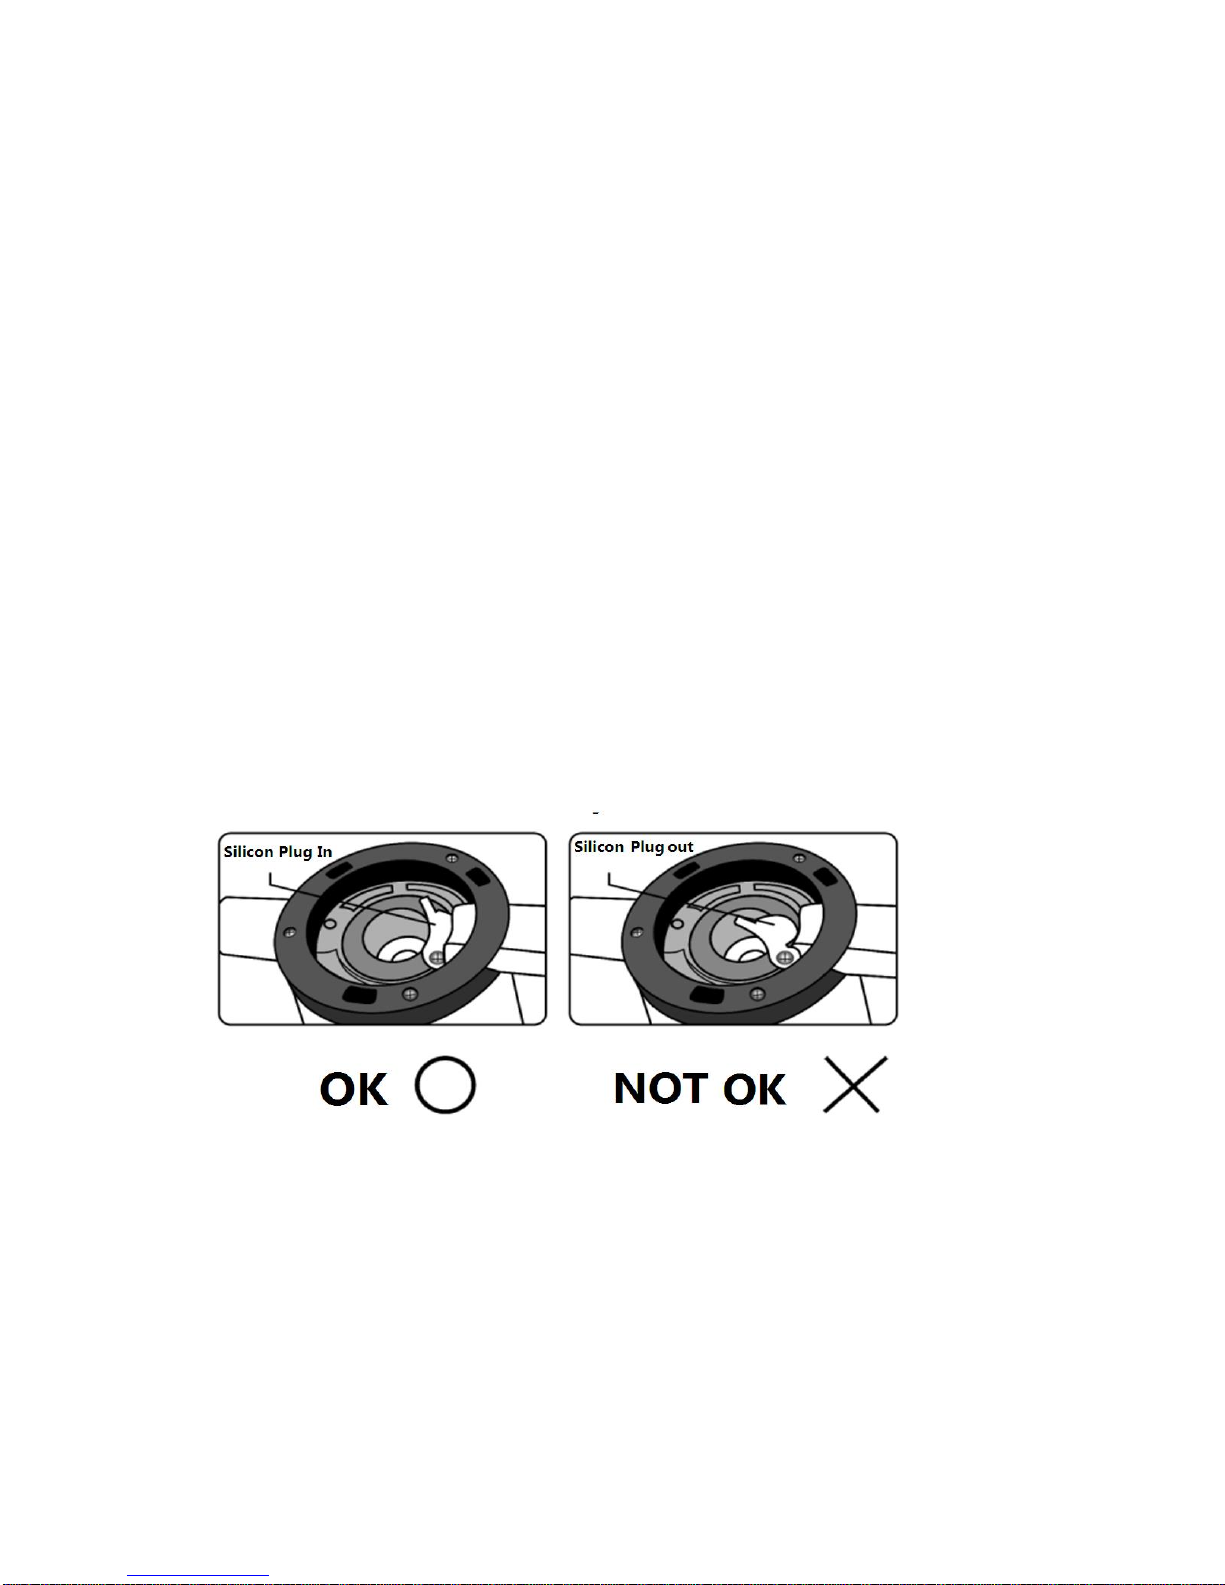
3. Underneath the juice bowl is the pulp extraction silicon, which is used to remove the
pulp from the spout of the juicing bowl. Ensure that the silicon is firmly inserted into
the hole.(see fig.1)
Fig. 1
4. Place the juicing bowl on top of the motor base ensuring that the 3 holes of the juice
bowl align with the 3 screens on the motor base, align the triangle mark of the juice
bowl with the triangle mark on the motor base, press the juice bowl down and rotate
it in a clockwise direction, then lock it into position. (see Fig.2)
Page 8
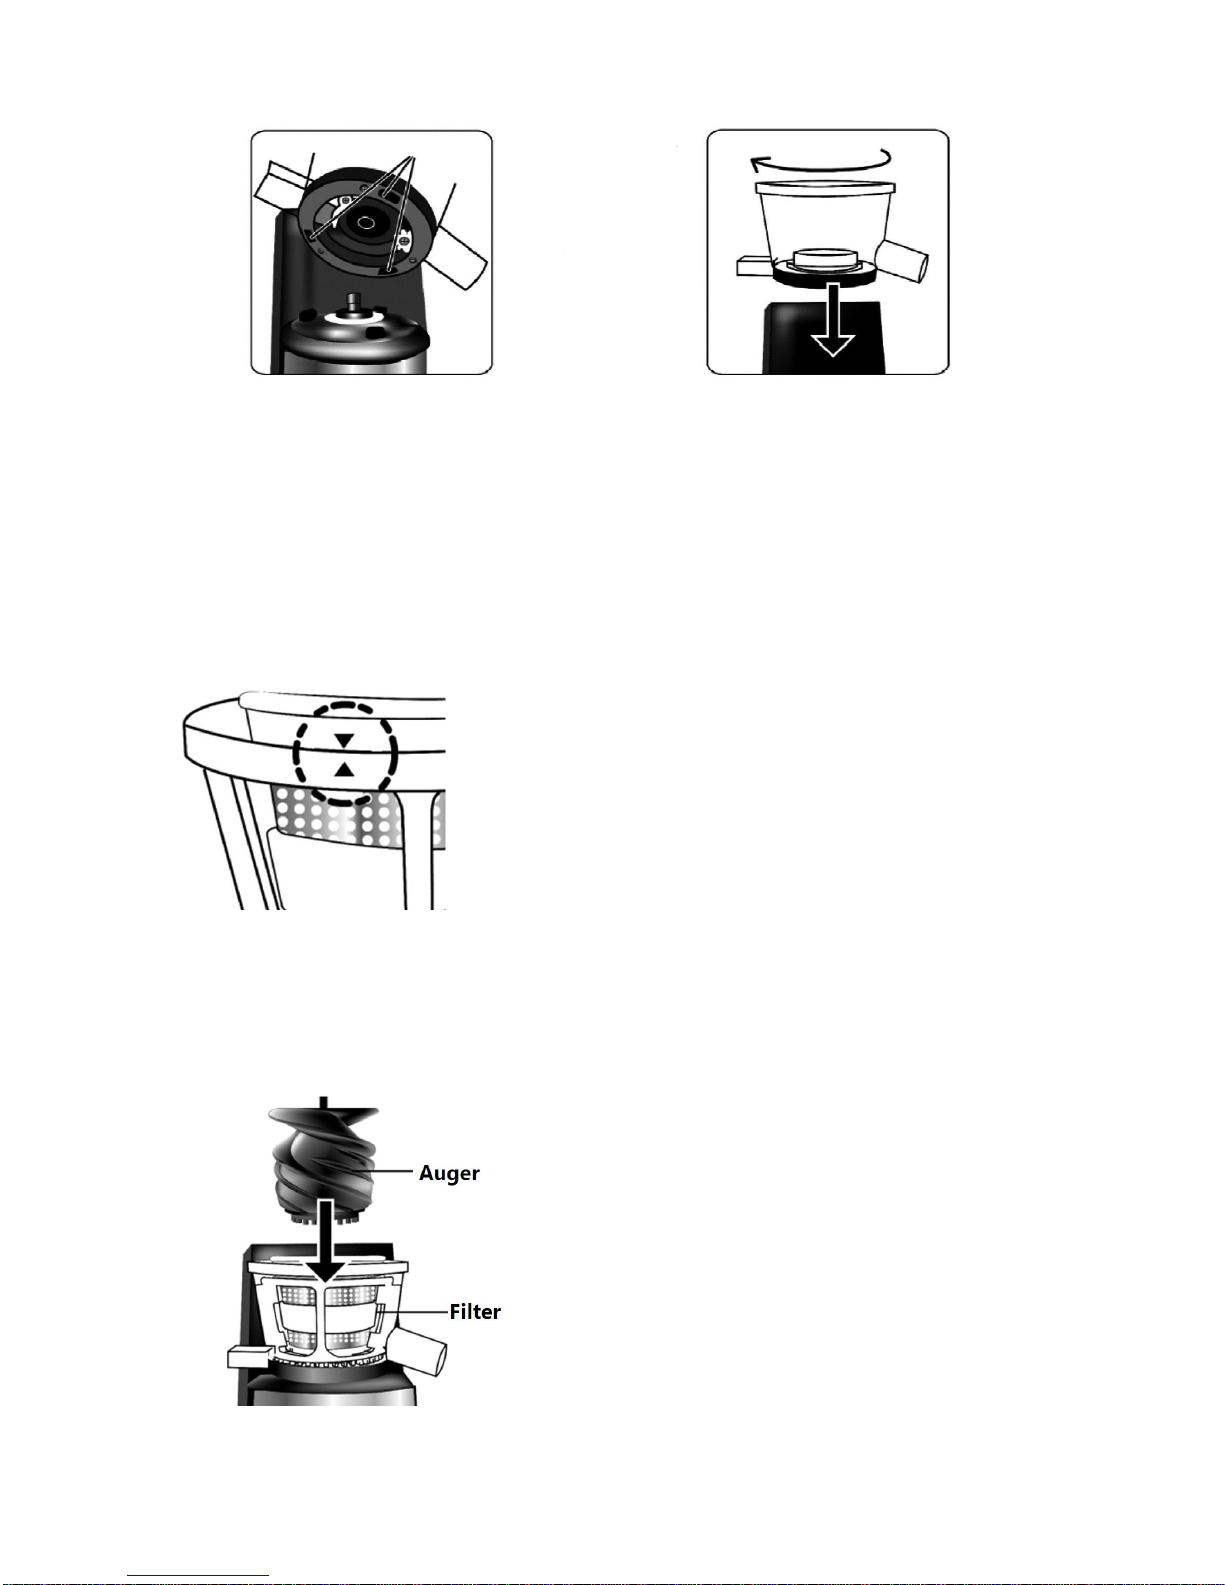
Fig.2 Fig. 3
5. Insert the strainer into the strainer holder, then place these assembled parts into the
juicing bowl.(see Fig.3) Note that the triangle mark on the strainer needs to align
with the triangle mark on the juicing bowl. Ensure that the strainer is completely
pushed down. (see Fig.4)
Fig. 4Triangle Mark
6. Place the Auger into the strainer. Ensure that the Auger is in position by pressing
down on it until you feel the Auger click into place.(see Fig.5)
Fig. 5
Page 9
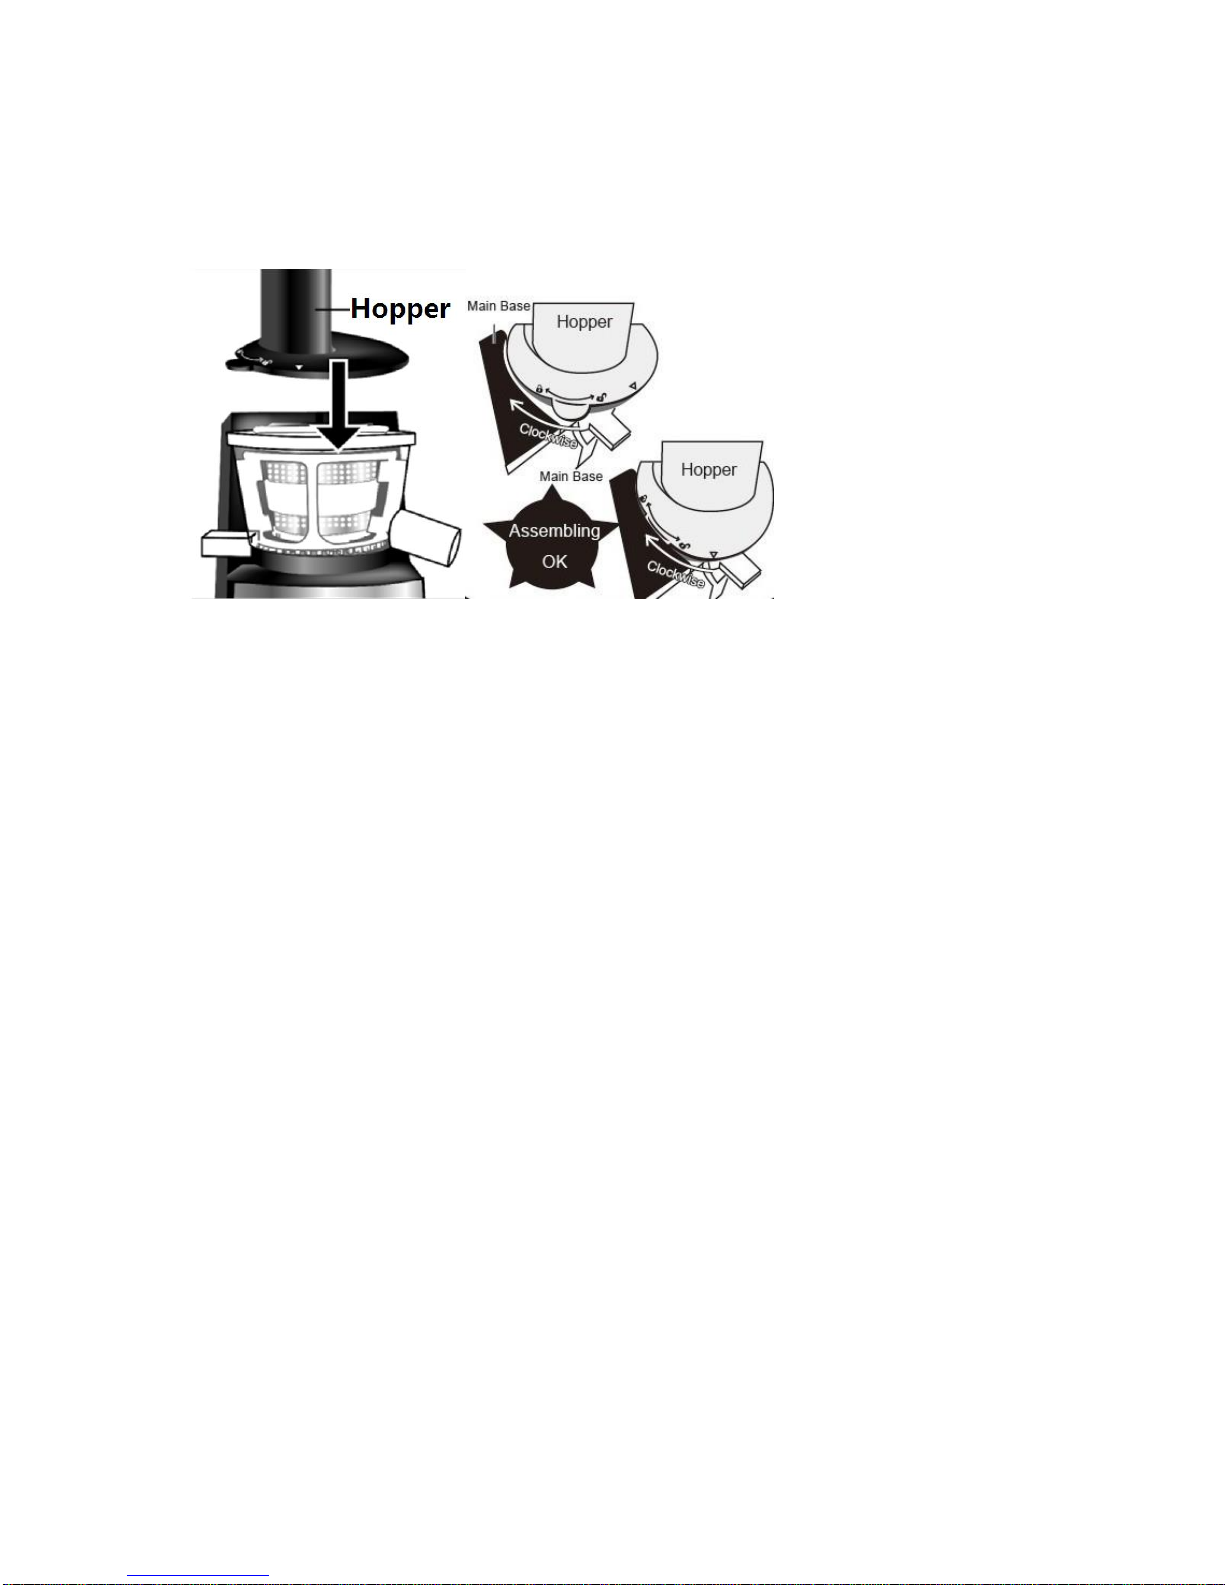
7. Place the Hopper onto the juice bowl. Align the triangle mark on the Hopper with the
triangle mark on the juice bowl and turn it clockwise to the locked position. The
Hopper will click into position.(see Fig.6)
Fig. 6
8. Place the food pusher into the hopper.
9. Place the pulp cup so that it fits in position on the left hand side of the juicer’s main
body.
10. Place the juice cup under the Juicer spout.
11. Slide the food pusher down the food chute. The pusher can only fit in one way.
IMPORTANT: If the Juice bowl and lid are not correctly assembled, the Juicer will not
operate. This is a safety feature.
Using your Juicer
1. Clean fruit and vegetables thoroughly.
2. If juicing fruit with stones or hard seeds, pit the fruit. Ensure to remove any hard
inedible skins, i.e. skin of melons, pineapples and mangoes prior to juicing. If citrus
fruits are being used, remove the skin prior to juicing.
3. If pieces of fruit or vegetables are very large, chop them to a size that will fit down
the juicer’s food chute.
4. Ensure the safety clamps are locked in position on top of the juicer lid.
5. Turn the control switch to the ON position.
6. Use the food pusher to slowly push down all fruit or vegetables until they have gone
Page 10

through the juicer. Do not press the food pusher down too quickly as the juicer will
not be as effective. CAUTION: do not put your hand or any other object in the food
chute during operation.
7. The juice from the fruit and/or vegetables will flow directly into the juice cup and the
pulp will be collected in the pulp bin.
8. When juicing is complete, ensure that the juicer’s control switch is set to the OFF
position, the power is turned off at the outlet and the juicer is unplugged. Ensure that
all moving parts have come to a complete stop.
9. It is now safe to disassemble the unit.
10. If the Juice Bowl is stuck and does not detach from the base, press the reverse
button “R” for 3-5 seconds. Repeat this process 2-3 times. Then push the bowl
upward while turning.
11. The strainer is equipped with an auto-cleaning brush.
Disassembling your Juicer
1. Ensure that the juicer is turned OFF and the power cord is unplugged from the
power outlet.
2. Remove the pulp tank and juice cup.
3. Remove the hopper by turning it to the open position (anti-clockwise). (see Fig.9)
Page 11

Fig. 9
4. The juice bowl, auger, strainer and strainer holder can all be removed together. Grip
the juice bowl and turn it to the open position (anti-clockwise) slightly, it will click out
of position. This is a very small movement. The juicing bowl and all the internals can
now be lifted off the motor base for cleaning.
Juicing Tips
Cut food items into small pieces for optimal extraction.
Do not place ice or frozen fruit into the juicer.
Do not push the food down with excessive force. The food pusher is designed to
gently push food down the chute if food becomes stuck.
Insert food at a regular speed, allowing all the pulp to be extracted. For maximum
efficiency, do not rush this process.
When juicing leafy greens or wheat grass, it is suggested that you mix it with fruits
or other hard vegetables for optimal results. Juice nuts only with other foods such as
soaked soybeans or liquids. Check the recipes at the end of the operating
instructions for ideas.
The juice from fresh fruit and vegetables is high in nutritional content. Juice from
fresh fruit and vegetables is an important part of a balanced diet.
When selecting fruit and vegetables for juicing, always select fresh and well ripened
ingredients. Fresh fruit and vegetables carry more flavour and juice than those that
are not properly ripened. Juice is best consumed when freshly made as this is when
its vitamin and mineral content is highest.
Your juicer can handle most varieties of fruit and vegetables. If using fruit with hard,
inedible skin (i.e. watermelons, pineapple, mangoes etc.) always peel the skin
before placing in the juicer.
The skin of citrus fruit should also be removed before fruit is placed in the juicer. For
better tasting citrus juice, also remove the inner white peel from the fruit.
Fruits with stones or hard seeds (i.e. mangoes, nectarines, apricots, and cherries)
should be pitted before juicing.
A small amount of lemon can be added to apple juice to prevent the juice browning.
The juicer is not suitable for juicing very hard and starchy fruits or vegetables such
as sugar cane.
Page 12

When juicing fruit and vegetables of different consistency it may help to juice
different combinations, i.e. juice soft fruit first, (i.e. oranges) then follow with hard
fruit (i.e. apples). This will help you achieve maximum juice extraction.
If juicing herbs or leafy vegetables, wrap them together to form a bundle before
placing in the juicer or combine them with other ingredients on low speed.
NOTE: The juicer will only function correctly if all parts have been assembled
correctly and the hopper is in position.
Metric Conversion Chart
Source: http://www.exploratorium.edu/cooking/convert/measurements.html
Volume (Dry)
American Standard
Metric
1/8 teaspoon
.5 ml
1/4 teaspoon
1 ml
1/2 teaspoon
2 ml
3/4 teaspoon
4 ml
1 teaspoon
5 ml
1 tablespoon
15 ml
1/4 cup
59 ml
1/3 cup
79 ml
1/2 cup
118 ml
2/3 cup
158 ml
3/4 cup
177 ml
1 cup
225 ml
2 cups or 1 pint
450 ml
3 cups
675 ml
4 cups or 1 quart
1 liter
1/2 gallon
2 liters
1 gallon
4 liters
Volume (Liquid)
American
Standard
(Cups &
Quarts )
American
Standard
(Ounces)
Metric
(Milliliters &
Liters)
Oven Temperatures
American Standard
Metric
250° F
130° C
300° F
150° C
350° F
180° C
400° F
200° C
450° F
230° C
Weight (Mass)
American Standard
(Ounces)
Metric
(Grams)
1/2 ounce
15 grams
1 ounce
30 grams
3 ounces
85 grams
3.75 ounces
100 grams
4 ounces
115 grams
8 ounces
225 grams
12 ounces
340 grams
16 ounces or 1 pound
450 grams
Dry Measure Equivalents
3 teaspoons
1
tablespoon
1/2
ounce
14.3
grams
2
1/8 cup
1 ounce
28.3
Page 13

2 tbsp
1 fl. oz.
30 ml
1/4 cup
2 fl. oz.
60 ml
1/2 cup
4 fl. oz.
125 ml
1 cup
8 fl. oz.
250 ml
1 1/2 cups
12 fl. oz.
375 ml
2 cups or 1
pint
16 fl. oz.
500 ml
4 cups or 1
quart
32 fl. oz.
1000 ml or 1
liter
1 gallon
128 fl. oz.
4 liters
tablespoons
grams
4
tablespoons
1/4 cup
2
ounces
56.7
grams
5 1/3
tablespoons
1/3 cup
2.6
ounces
75.6
grams
8
tablespoons
1/2 cup
4
ounces
113.4
grams
12
tablespoons
3/4 cup
6
ounces
.375
pound
32
tablespoons
2 cups
16
ounces
1
pound
British and American Variances
Term
Abbreviation
Nationality
Dry or
liquid
Metric
equivalent
Equivalent in
context
cup
c., C.
usually
liquid
237 milliliters
16 tablespoons or 8
ounces
ounce
fl oz, fl. oz.
American
liquid only
29.57 milliliters
British
either
28.41 milliliters
gallon
gal.
American
liquid only
3.785 liters
4 quarts
British
either
4.546 liters
4 quarts
inch
in, in.
2.54
centimeters
ounce
oz, oz.
American
dry
28.35 grams
1/16 pound
liquid
see OUNCE
see OUNCE
pint
p., pt.
American
liquid
0.473 liter
1/8 gallon or 16
ounces
dry
0.551 liter
1/2 quart
British
either
0.568 liter
pound
lb. dry
453.592 grams
16 ounces
quart
q., qt, qt.
American
liquid
0.946 liter
1/4 gallon or 32
ounces
dry
1.101 liters
2 pints
British
either
1.136 liters
teaspoon
t., tsp., tsp
either
about 5
milliliters
1/3 tablespoon
tablespoon
T., tbs., tbsp.
either
about 15
milliliters
3 teaspoons or 1/2
ounce
We found http://www.joyofbaking.com/PanSizes.html useful when researching
baking pan sizes. You might too!
Page 14

Juicing Recipes
Important: Temperature settings, quantities and volumes as given in recipes are
approximate. Due to personal differences in taste, some foods may be desired more or
less crisp, more or less done. Therefore, heat settings may be increased, decreased or
varied in any way to suit individual preference.
Ideas for Leftover Pulp
My Heart’s a Fritter (Makes 20 fritters)
11⁄2 cups pulp from “Beet but not Beat” Juice
2 eggs
1⁄4 cup all-purpose flour
1⁄2 teaspoon ground cinnamon
1⁄4 teaspoon salt
4 tablespoons vegetable oil
Honey
Combine juice pulp, eggs, flour, cinnamon and salt in large bowl; mix well. Heat 2
tablespoons oil in large nonstick skillet over medium heat. Drop batter by tablespoonfuls
into skillet; flatten into circle with back of spoon (do not crowd pan). Cook 1 to 2 minutes
per side or until browned and firm. Repeat with remaining batter, adding additional oil if
needed. Serve fritters warm with honey.
Bell of the Ball Marinara (Makes 4 to 6 servings)
2 tablespoons olive oil
1 cup chopped onion
1 each red, yellow and green bell pepper, cut into 1-inch pieces
4 cloves garlic, minced
1 can (6 ounces) tomato paste
2 cans (about 14 ounces each) diced tomatoes
1 cup pulp from “Miss Pepper” recipe
1 teaspoon each salt, dried basil and oregano
1⁄4 teaspoon red pepper flakes
Hot cooked pasta
Heat olive oil in large saucepan over medium-high heat. Add onion and bell peppers; saute
5 minutes or until vegetables are softened. Add garlic; saute 1 minute. Add tomato paste;
cook and stir 2 minutes. Stir in 1⁄2 cup water, scraping up any browned bits from
Page 15

bottom of saucepan. Add tomatoes, juice pulp, salt, basil, oregano and red pepper flakes.
Bring to a boil. Reduce heat to low; cover and simmer 30 to 45 minutes or until vegetables
are tender, stirring occasionally and adding additional water if needed. Serve marinara
over hot pasta.
Fruit Roll-ups (Makes 4 to 6 rolls)
11⁄2 cups pulp from two batches of Tropical Delight
1⁄4 cup honey
2 tablespoons water
Preheat oven to 200°F. Line baking sheet with parchment paper. Combine juice pulp,
honey and water in blender; puree until smooth paste forms. Pour fruit mixture onto
prepared baking sheet; spread into 1⁄4-inch-thick rectangle, leaving 1-inch border on all
sides. Bake 2 to 31⁄2 hours or until fruit mixture is firm and not too sticky. Cool completely
on baking sheet. Roll up fruit leather jelly-roll style from long end. Cut into pieces with
serrated knife. Store in airtight container at room temperature 2 to 3 weeks.
Chicken Spinach Lasagna (Makes 8 servings)
3⁄4 cup chopped onion
2 medium cloves garlic, minced
1 pound minced chicken
1 teaspoon Italian seasoning
1⁄4 teaspoon freshly ground black pepper
1 container (15 ounces) ricotta cheese
1 cup (4 ounces) Italian shredded cheese blend, divided
1 package (10 ounces) frozen chopped spinach, thawed and squeezed dry
1 cup spinach pulp from “Not so Mean Green Machine” juice
12 ounces no-boil lasagna noodles
1 jar (24 ounces) chunky marinara sauce
1⁄2 cup water, divided
Preheat oven to 350°F. Spray 1339-inch baking dish with nonstick cooking spray. Spray
large skillet with cooking spray; heat over medium heat. Add onion and garlic; saute 4
minutes. Add turkey; saute until cooked through, stirring to break up meat. Stir in Italian
seasoning and pepper; remove from heat. Combine ricotta cheese and 1⁄2 cup Italian
cheese in medium bowl; mix well. Combine spinach and spinach pulp in small bowl. Layer
half of noodles in prepared dish, breaking in half to fit if necessary. Spread half of turkey
mixture and half of spinach mixture over noodles. Top with half of marinara sauce and .
cup water. Gently spread cheese mixture on top. Repeat layers. Cover and bake 40
minutes or until noodles are tender. Sprinkle with remaining . cup Italian cheese; bake just
until cheese is melted.
Page 16

Date Loaf (Makes 1 loaf)
1 cup chopped pitted dates
1 cup water
1 cup whole wheat flour
1 cup all-purpose flour
2 tablespoons sugar
1 teaspoon baking powder
1⁄2 teaspoon each baking soda, salt and ground cinnamon
1⁄4 teaspoon ground cloves
2 eggs
1 cup shredded zucchini, squeezed dry
1 cup pulp from “Do the Twist” recipe
Preheat oven to 350°F. Spray 834-inch loaf pan with non-stick cooking spray. Combine
dates and water in small saucepan; bring to a boil over medium-high heat. Remove from
heat; let stand 15 minutes. Combine flours, sugar, baking powder, baking soda, salt,
cinnamon and cloves in large bowl. Beat eggs in medium bowl; stir in date mixture,
zucchini and juice pulp. Stir egg mixture into flour mixture just until moistened. Pour into
prepared pan. Bake 30 to 35 minutes or until toothpick inserted into center comes out
clean. Cool in pan 5 minutes. Remove to wire rack to cool completely.
Seeds ‘n Greens
Pappa Papaya (Makes 2 servings)
1⁄4 papaya, peeled and seeded
1 orange, peeled
3⁄4 cup fresh parsley
1 clove garlic
2 tablespoons soy protein powder
Assemble Russell Hobbs Slow Juicer. Cut papaya and orange to fit in food chute. Juice
papaya, orange, parsley and garlic. Stir in soy protein powder until well blended; serve
immediately.
Flexing Flaxseed (Makes 2 servings)
4 carrots, ends trimmed
1 cup broccoli rabe or other dark greens
1 cup watercress
1 (2-inch) piece jicama, peeled
1 lemon, peeled and seeded
1 tablespoon flaxseed oil
Page 17

Assemble Russell Hobbs Slow Juicer. Juice carrots, broccoli rabe, watercress, jicama
and lemon. Stir in flaxseed oil until well blended; serve immediately.
Honey, oh Honey (Makes 2 servings)
1 grapefruit, peeled
1⁄4 pineapple, peeled
1⁄2 inch fresh ginger, peeled
4 whole cloves
1 teaspoon honey
Assemble Russell Hobbs Slow Juicer. Cut grapefruit and pineapple to fit in food chute.
Juice grapefruit, pineapple and ginger. Stir. Pour into medium saucepan. Add cloves and
honey; simmer over low heat until heated through. Remove from heat; let stand 5 minutes.
Strain through fine-mesh sieve.
Asian Ritz (Makes 2 servings)
1 pear, cored
1 apple, cored
1 beet, peeled
1⁄4 head green cabbage
1 carrot, ends trimmed
8 leaves Swiss chard
1 teaspoon finely ground chia seeds
Assemble Russell Hobbs Slow Juicer. Cut pear, apple, beet and cabbage to fit in
food chute. Juice Swiss chard, pear, apple, beet, carrot and cabbage. Stir in chia seeds
until well blended; serve immediately.
So much Tang! (Makes 3 servings)
1 grapefruit, peeled
1 apple, cored
1 beet, peeled
4 carrots, ends trimmed
1 inch fresh ginger, peeled
1 tablespoon ground flaxseed
Ice cubes (optional)
Assemble Russell Hobbs Slow Juicer. Cut grapefruit, apple and beet to fit in
food chute. Juice grapefruit, apple, beet, carrots and ginger. Stir in flaxseed until well
blended; serve immediately over ice.
Page 18

Wheatgrass Wonder (Makes 1 serving)
1 apple, cored
1 cup wheatgrass
1⁄2 lemon, peeled and seeded
3 sprigs fresh mint
Assemble Russell Hobbs Slow Juicer. Cut apple to fit in food chute. Juice apple,
wheatgrass, lemon and mint. Stir and serve immediately.
Sprout Duo (Makes 2 servings)
2 apples, cored
1 carrot, ends trimmed
1 cup alfalfa sprouts
1 cup bean sprouts
4 sprigs fresh parsley
Assemble Russell Hobbs Slow Juicer. Cut apples to fit in food chute. Juice apples, carrot,
alfalfa sprouts, bean sprouts and parsley. Stir and serve immediately.
Floreta (Makes 2 servings)
1 yellow bell pepper, stemmed
1 apple, cored
1 beet, peeled
1⁄2 sweet potato, peeled
2 carrots, ends trimmed
1 cup broccoli florets
1 cup fresh parsley
2 teaspoons powdered spirulina (green algae)
Assemble Russell Hobbs Slow Juicer. Cut bell pepper, apple, beet and sweet potato
to fit in food chute. Juice bell pepper, apple, beet, sweet potato, carrots, broccoli and
parsley. Stir in spirulina until well blended; serve immediately.
Fruit Juices
Winterton (Makes 2 servings)
1 Gala apple, cored
1 pear
1 orange, peeled
Page 19

Assemble Russell Hobbs Slow Juicer. Cut apple, pear and orange to fit in food chute.
Juice apple, pear and orange. Stir and serve immediately.
Sweet ‘o Sour (Makes 2 servings)
1⁄2 grapefruit, peeled
1⁄8 papaya, peeled and seeded
11⁄2 cups raspberries
Assemble Russell Hobbs Slow Juicer. Cut grapefruit and papaya to fit in food chute.
Juice raspberries, papaya and grapefruit. Stir and serve immediately.
Tropical Delight (Makes 2 servings)
1⁄4 pineapple, peeled
1 orange, peeled
1⁄2 mango, peeled
1⁄2 cup strawberries, hulled
1⁄2 cup coconut water
Assemble Russell Hobbs Slow Juicer. Cut pineapple, orange and mango to fit in feed
Chute. Juice strawberries, mango, orange and pineapple. Stir in coconut water and serve
immediately.
Carrot and Apple Mix (Makes 2 servings)
2 apples, cored
4 carrots, ends trimmed
1⁄4 cucumber
1 inch fresh ginger, peeled
Assemble Russell Hobbs Slow Juicer. Cut apple to fit in food chute. Juice carrots, apples,
cucumber and ginger. Stir and serve immediately.
Berry Crusher (Makes 2 servings)
2 apples, cored
1 cup raspberries
1 cup strawberries, hulled
Assemble Russell Hobbs Slow Juicer. Cut apples to fit in food chute. Juice apples,
raspberries and strawberries. Stir and serve immediately.
Page 20

The Big Pink (Makes 2 servings)
1⁄4 small watermelon, rind removed
1 tomato
1 lemon, peeled and seeded
Assemble Russell Hobbs Slow Juicer. Cut watermelon and tomato to fit in food chute.
Juice watermelon, tomato and lemon. Stir and serve immediately.
Kiwi Lassi (Makes 1 serving)
6 large strawberries, hulled
1 kiwi, peeled
1⁄2 cup chopped peeled mango
Assemble Russell Hobbs Slow Juicer. Juice strawberries, kiwi and mango. Stir and serve
immediately.
Just Peachy (Makes 2 servings)
1 tangerine, peeled
1 peach, pitted
1 apple, cored
1 pear
1 cup green seedless grapes
Assemble Russell Hobbs Slow Juicer. Juice tangerine, peach, apple, pear and grapes.
Stir and serve immediately.
Nightshade (Makes 4 servings)
4 apples, cored
1 sweet potato, peeled
1 carrot, ends trimmed
Assemble Russell Hobbs Slow Juicer. Cut apples and sweet potato to fit in food chute.
Juice apples, sweet potato and carrots. Stir and serve immediately.
Page 21

Sweet ‘n Spicy (Makes 2 servings)
1 orange, peeled
5 carrots, ends trimmed
1⁄3 cup strawberries, hulled
1 lemon, peeled and seeded
1⁄2 inch fresh ginger, peeled
Assemble Russell Hobbs Slow Juicer. Cut orange to fit in food chute. Juice carrots,
strawberries, orange, lemon and ginger. Stir and serve immediately.
Do The Twist (Makes 1 serving)
1⁄8 seedless watermelon, rind removed
1 orange, peeled
1⁄2 mango, peeled
1⁄8 pineapple, peeled
1⁄3 cup strawberries, hulled
Assemble Russell Hobbs Slow Juicer. Cut watermelon, orange, mango and pineapple
to fit in food chute. Juice watermelon, orange, mango, strawberries and pineapple. Stir
and serve immediately.
Pomegranate Kiss (Makes 2 servings)
1 Gala apple, cored
11⁄2 cups pomegranate seeds
Assemble Russell Hobbs Slow Juicer. Cut apple to fit in food chute. Juice apple and
pomegranate seeds. Stir and serve immediately.
Vegetable Juices
Absolute Green (Makes 1 serving)
1⁄4 pineapple, peeled
4 leaves Swiss chard
4 leaves kale
Assemble Russell Hobbs Slow Juicer. Cut pineapple to fit in food chute. Juice Swiss
chard, kale and pineapple. Stir and serve immediately.
Page 22

Beet but not Beat (Makes 1 serving)
1 small apple, cored
1 beet, peeled
3 medium carrots, ends trimmed
1⁄2 cup packed kale leaves
Assemble Russell Hobbs Slow Juicer. Cut apple and beet to fit in food chute. Juice apple,
beet, carrots and kale. Stir and serve immediately.
Ginger Ninja (Makes 1 serving)
12 small to medium carrots, ends trimmed
1⁄2 inch fresh ginger, peeled
Assemble Russell Hobbs Slow Juicer. 2 Juice carrots and ginger. Stir and serve
immediately.
Fresh English Morning (Makes 2 servings)
2 large English cucumbers
1 cup packed fresh spinach
1⁄2 lemon, peeled and seeded
Assemble Russell Hobbs Slow Juicer. Cut cucumbers to fit in food chute. Juice cucumber,
spinach and lemon. Stir and serve immediately.
Hustle in Brussels (Makes 1 serving)
1 cup brussels sprouts
1 orange, peeled
1⁄2 apple, cored
1⁄2 lemon, peeled and seeded
4 leaves romaine lettuce
Assemble Russell Hobbs Slow Juicer. Cut brussels sprouts into quarters. Cut orange
to fit in food chute. Juice apple, orange, lemon, romaine and brussels sprouts. Stir and
serve immediately.
Deeply Rooted (Makes 2 servings)
2 beetroots, peeled
1 turnip
1 sweet potato, peeled
2 carrots, ends trimmed
Page 23

2 parsnips, ends trimmed
Assemble Russell Hobbs Slow Juicer. Cut beetroots, turnip and sweet potato to fit in
food chute. Juice beetroots, carrots, parsnips, turnip and sweet potato. Stir and serve
immediately.
Fever Fire (Makes 2 servings)
1 cucumber
1 beetroot, peeled
1 lemon, peeled and seeded
1⁄2 jalapeno pepper, stemmed
1 inch fresh ginger, peeled
Assemble Russell Hobbs Slow Juicer. Cut cucumber and beet to fit in food chute. Juice
cucumber, beet, lemon, jalapeño pepper and ginger. Stir and serve immediately.
Miss Pepper (Makes 2 servings)
2 apples, cored
1 red bell pepper, stemmed
1 yellow bell pepper, stemmed
1⁄2 jalapeno pepper, stemmed
Assemble Russell Hobbs Slow Juicer. Cut apples and bell peppers to fit in food chute.
Juice apples, bell peppers and jalapeño pepper. Stir and serve immediately.
Presley Parsely (Makes 2 servings)
1 apple, cored
1 pear
1 bulb fennel
3 parsnips, ends trimmed
1 cup fresh parsley
Assemble Russell Hobbs Slow Juicer. Cut apple, pear and fennel to fit in food chute.
Juice parsnips, apple, pear, fennel and parsley. Stir and serve immediately.
Rad Raddish (Makes 1 serving)
5 carrots, ends trimmed
2 radishes
1⁄2 inch fresh ginger, peeled
Page 24

Assemble Russell Hobbs Slow Juicer. Juice carrots, radishes and ginger. Stir and serve
immediately.
Not so Mean Green Machine (Makes 2 servings)
2 cucumbers
1 pear
2 cups fresh spinach
1⁄2 lemon, peeled and seeded
1 inch fresh ginger, peeled
Assemble Russell Hobbs Slow Juicer. Cut cucumbers and pear to fit in food chute. Juice
cucumbers, pear, spinach, lemon and ginger. Stir and serve immediately.
Marinades and Savoury Sauces
Pepper Basil Marinade (Makes 2 cups)
5 lemons, peeled and seeded
1 cup packed fresh basil leaves
6 cloves garlic
6 tablespoons extra virgin olive oil
1 teaspoon coarse salt
1⁄2 teaspoon freshly ground black pepper
Assemble Russell Hobbs Slow Juicer. Juice 2 lemons, basil, garlic and remaining 3
lemons. Pour juice into jar with tight-fitting lid. Add olive oil, salt and pepper; seal jar and
shake to blend. Store in airtight jar or container in fridge for up to 2 weeks.
Cilimé Marinade (Makes 11⁄2 cups)
4 limes, peeled
1 small yellow onion, quartered
1 cup packed fresh cilantro
6 tablespoons extra virgin olive oil
1 tablespoon sugar
1 teaspoon coarse salt
1⁄2 teaspoon freshly ground black pepper
Assemble Russell Hobbs Slow Juicer screen. Juice 2 limes, onion, cilantro and remaining
Page 25

2 limes. Pour juice into jar with tight-fitting lid. Add olive oil, sugar, salt and pepper; seal
jar and shake to blend. Store in fridge for up to 2 weeks. Goes great with chicken on the
grill.
Mango Tomato Sauce (Makes 3⁄4 cup)
1 can plum tomatoes
1 large mango, peeled, pitted and quartered
1⁄2 medium onion
1 clove garlic
2 tablespoons sugar
3 tablespoons white vinegar
1 tablespoon tomato paste
Salt and freshly ground black pepper
Assemble Russell Hobbs Slow Juicer. Juice tomatoes, mango, onion and garlic. (If using
canned tomatoes, reserve juice and add to saucepan in step 2). Combine juice, sugar,
vinegar and tomato paste in medium saucepan. Bring to a boil over medium-high
heat. Reduce heat to low; simmer 30 to 40 minutes or until mixture is significantly reduced
and reaches desired consistency. Season with salt and pepper. Cool completely. Store in
airtight jar or container in fridge 1 to 2 weeks.
Mato Sauce (Makes about 31⁄2 cups)
31⁄2 pounds fresh plum tomatoes
1 carrot, ends trimmed
1 tablespoon extra virgin olive oil
1 tablespoon butter
1⁄2 medium onion, finely chopped
2 cloves garlic, minced
1⁄2 teaspoon dried oregano
1⁄4 teaspoon salt
1⁄4 teaspoon freshly ground black pepper
Assemble Russell Hobbs Slow Juicer. Juice tomatoes and carrot. Heat olive oil and butter
in large saucepan over medium heat until mixture is frothy. Add onion and garlic; saute
about 1 minute or until fragrant. Add juice and oregano; bring to a simmer. Simmer 1 to
11⁄2 hours or until sauce thickens to desired consistency, stirring occasionally. Season
with salt and pepper. Serve over pasta with cheese. Store leftover sauce in an airtight
container in fridge for up 5 days or freeze up to 3 months.
Orangey Marinade (Makes 2 cups)
3 large oranges, peeled and halved
4 ounces fresh ginger, peeled and cut into chunks
1⁄4 cup dark sesame oil
1 tablespoon honey
Page 26

1 teaspoon coarse salt
1⁄2 teaspoon freshly ground black pepper
Assemble Russell Hobbs Slow Juicer. Juice oranges and ginger. Measure 13⁄4 cups
juice; pour into jar with tight-fitting lid. Add sesame oil, honey, salt and pepper; seal jar and
shake to blend. Store in fridge for up to 2 weeks.
Vinaigrette (Makes 11⁄4 cups)
2 cups packed fresh cilantro
2 limes, peeled
1 Granny Smith apple, quartered and cored
1⁄2 inch fresh ginger
1 clove garlic
1⁄2 cup light olive oil
1 teaspoon honey
1⁄2 teaspoon dark sesame oil
Salt and freshly ground black pepper
Assemble Russell Hobbs Slow Juicer. Juice cilantro, limes, apple, ginger and garlic.
Pour juice into medium bowl. Add light olive oil in slow, steady stream, whisking constantly
until blended. Whisk in honey and light olive oil. Season with salt and pepper. Store in
airtight jar or container in fridge for up to 3 days.
Jellies and Sweet Sauces
Citrus Jelly (Makes 3 (1⁄2-pint) jars)
6 oranges, peeled and halved
4 lemons, peeled and seeded
3 large grapefruit, peeled and quartered
2 cups sugar
3 tablespoons powdered pectin
3 (1⁄2-pint) canning jars
Assemble Russell Hobbs Slow Juicer. Juice oranges, lemons and grapefruit. Measure 4
cups juice; pour into 5-quart saucepan. Whisk sugar and pectin in medium bowl; add to
juice. Bring to a boil over high heat. Boil 15 to 20 minutes or until thickened, stirring
frequently. Jelly is done cooking when it forms thick layer on side of pan and registers
221°F when tested with candy thermometer. Transfer jam to clean, hot jars. Wipe off any
jelly from tops of jars; seal jars. Meanwhile, fill stockpot with enough water to cover jars;
bring to a boil over high heat. Reduce heat slightly to stop boiling; carefully lower jars into
water. Add additional water to fully submerge jars, if necessary. Return water to a boil; boil
10 minutes. Carefully remove jars from stockpot; cool on kitchen towel. Store sealed jars
at room temperature up to 1 year.
Page 27

Vanilla Berry Jam (Makes 3 (1⁄2-pint) jars)
3 pounds strawberries, hulled
11⁄2 cups sugar
4 teaspoons powdered pectin
1 vanilla bean, split and seeds removed
3⁄4 teaspoon lemon juice
3 (1⁄2-pint) canning jars
Assemble Russell Hobbs Slow Juicer with large pulp. Juice strawberries; reserve juice for
another use. Measure 3 cups pulp; place in 5-quart saucepan. Whisk sugar, pectin and
vanilla seeds in medium bowl; add to saucepan. Bring to a boil over high heat. Boil
10 minutes, stirring frequently. Stir in lemon juice; cook 5 minutes or until thickened. Jam is
done cooking when it forms thick layer on side of pan. Transfer jam to clean, hot jars. Wipe
off any jam from tops of jars; seal jars. Meanwhile, fill stockpot with enough water to cover
jars; bring to a boil over high heat. Reduce heat slightly to stop boiling; carefully lower jars
into water. Add additional water to fully submerge jars, if necessary. Return water to a
boil; boil 10 minutes. Carefully remove jars from stockpot; cool on kitchen towel. Store
sealed jars at room temperature up to 1 year.
Spicey Apple Sauce (Makes 4 cups)
1 pound pears, quartered
2 to 2 1⁄2 pounds apples, peeled, quartered and cored
1⁄4 cup packed brown sugar
1 teaspoon ground cinnamon
1⁄2 teaspoon ground nutmeg
1⁄4 teaspoon ground cloves
Assemble Russell Hobbs Slow Juicer. Juice pears and enough apples to yield 4 cups of
pulp. Combine pulp, brown sugar, cinnamon, nutmeg and cloves in medium saucepan.
Simmer over medium-low heat until thickened to desired consistency. Cool to room
temperature. Store in airtight jar or container in fridge 2 to 3 weeks.
Mango Curd (Makes 1 cup curd)
1 ripe mango, peeled, pitted and quartered
2 egg yolks
1 egg
1⁄3 cup sugar
3 tablespoons fresh lime juice
Pinch salt
3 tablespoons butter, cubed
Page 28

Assemble Russell Hobbs Slow Juicer. Juice mango. Measure 1⁄2 cup juice. Whisk egg
yolks, egg and sugar in top of double boiler until light and frothy. Whisk in mango juice,
lime juice, and salt. Cook over simmering water 12 to 15 minutes or until mixture thickens
enough to coat back of spoon (about 170°F), whisking occasionally. Remove top of
double boiler from simmering water. Gradually whisk in butter until well blended. Press
mixture through fine-mesh sieve into bowl. Press plastic wrap onto surface of curd;
refrigerate 1 to 2 hours or until set. Store in airtight jar or container in fridge for up to 2
weeks.
Berry Granita (Makes 4 servings)
12 ounces (3 cups) fresh or thawed frozen blackberries
1⁄2 orange, peeled
1 cup water
1⁄3 cup sugar
1 tablespoon orange-flavored liqueur
Assemble Russell Hobbs Slow Juicer. Juice blackberries and orange. Combine juice,
water and sugar in medium saucepan. Cook and stir over medium heat until sugar is
completely dissolved. Stir in liqueur. Pour mixture into 9-inch square metal or glass baking
dish. Freeze 4 hours, stirring and scraping with fork every 30 minutes, until mixture
resembles shaved ice.
Cara-pear Sauce (Makes 3⁄4 cup sauce)
3 pears, quartered
1⁄2 cup sugar
Pinch cream of tartar
2 tablespoons heavy cream
1 tablespoon butter
1⁄8 teaspoon salt
1 tablespoon pear-flavored vodka or liqueur
Assemble Russell Hobbs Slow Juicer screen. Juice pears. Strain juice through fine-mesh
sieve. Measure 1 cup juice. Pour juice into small saucepan. Cook over medium high
heat 10 minutes or until thickened and reduced to 1⁄4 cup, stirring occasionally. Set aside.
3 Combine sugar, 2 tablespoons water and cream of tartar in medium saucepan. Bring to
a boil over medium heat, stirring until sugar dissolves. When mixture boils, cover pan 2
minutes to dissolve sugar crystals on side of pan. Remove cover; cook without stirring 8 to
10 minutes or until mixture is light amber in color, swirling pan occasionally. Remove from
heat; carefully whisk in reduced pear juice, cream, butter and salt until smooth (mixture will
bubble vigorously). Stir in vodka; cool completely. Store in airtight jar or container in fridge
for up to 2 weeks.
Page 29

CLEANING AND MAINTENANCE
This appliance is for household use only and is not user-serviceable.
Do not open or change any parts by yourself. Please refer to a qualified electrical
service department or return to the supplier if servicing is necessary.
Always remember to unplug the unit from the electrical outlet when not in use and
before cleaning.
Do not use bleach or other abrasive substance or solvents to clean your appliance as
it can be damaging to the finish.
Do not immerse the motor unit in water or any other liquid, or hold it under a running
tap to clean.
Clean immediately after use so as to prevent residues settling inside the appliance.
Immediately after each use, use the nylon brush to thoroughly clean the fine mesh
holes of the strainer. Brush the inside of the strainer under running water, holding it up
towards the light to ensure the fine mesh holes are not blocked.
Use the filter brush provided with the juicer. This brush has been specially designed to
clean the strainer. Simply place the strainer inside the brush and under running water
twist the brush left and right to remove the pulp from the strainer. You will need to use
the small brush provided to clean the inside of the strainer, this should also be done
under running water.
If the holes are blocked, soak the filter basket in hot water with 10% lemon juice added
to the water so as to loosen the blocked holes.
If the strainer cannot be cleaned immediately after use, soak the filter basket in hot
soapy water immediately after juicing is complete. If pulp is left to dry on the strainer, it
may clog the fine mesh holes, thereby lessening the effectiveness of the juicer. Do not
soak the strainer in bleach.
Wash the juice bowl, auger, strainer holder, pulp cup and juicing cup in warm soapy
water with the small nylon brush or a soft cloth. Rinse and dry thoroughly.
Note:Do not place any part of the juicer in the dishwasher.
Discoloration of the plastic parts may occur with brightly coloured fruit and vegetables.
To help prevent this, wash parts immediately after use. If discoloration does occur, the
plastic parts can be soaked in 10% lemon juice and water or they can be cleaned with
a non-abrasive cleaner. Do not soak the filter basket in bleach. Do not soak the motor
base.
Page 30

Wipe the motor base with a soft damp cloth and dry thoroughly. Do not use abrasive
scouring pads or cleaners when cleaning the motor base as these may scratch the
surface.
Wipe any excess food particles from the power cord.
STORING THE APPLIANCE
Unplug the unit from the wall outlet and clean all the parts as instructed above.
Ensure that all parts are dry before storing.
Store the appliance in its box or in a clean, dry place.
Never store the appliance while it is still wet or dirty.
Never wrap the power cord around the appliance.
SERVICING THE APPLIANCE
There are no user serviceable parts in this appliance. If the unit is not operating correctly,
please check the following:
You have followed the instructions correctly
That the unit has been wired correctly and that the wall socket is switched on.
That the mains power supply is ON.
That the plug is firmly in the mains socket.
If the appliance still does not work after checking the above:
- Consult the retailer for possible repair or replacement. If the retailer fails to resolve the
problem and you need to return the appliance, make sure that:
The unit is packed carefully back into its original packaging.
Proof of purchase is attached.
A reason is provided for why it is being returned.
If the supply cord is damaged, it must be replaced by the manufacturer or an authorised
service agent, in order to avoid any hazard. If service becomes necessary within the
warranty period, the appliance should be returned to an approved Home Of Living Brands
(Pty) Limited service centre. Servicing outside the warranty period is still available, but will,
Page 31

however, be chargeable.
CHANGING THE PLUG
Should the need arise to change the fitted plug, follow the instructions below.
This unit is designed to operate on the stated current only. Connecting to other
power sources may damage the appliance. Connect a three-pin plug as follows:
The wires in this mains lead are coloured in accordance with the following code:
Green/Yellow = Earth
Blue = Neutral
Brown = Live
CORRECT DISPOSAL OF THIS PRODUCT
This marking indicates that this product should not be disposed with other household
waste. To prevent possible harm to the environment oR human health from uncontrolled
waste disposal, recycle it responsibly to promote the sustainable reuse of material
resources.
Page 32

IN THE EVENT OF A CLAIM UNDER WARRANTY THIS RECEIPT MUST BE
PRODUCED.
W A R R A N T Y
1. Home Of Living Brands (Pty) Limited warrants to the original purchaser of this
product (“the customer”) that this product will be free of defects in quality and
workmanship which under normal personal, family or household use and purpose
may manifest within a period of 1 (one) year from the date of purchase (“warranty
period”).
2. Where the customer has purchased a product and it breaks, is defective or does not
work properly for the intended purpose, the customer must notify the supplier from
whom the customer bought the product (“the supplier”) thereof within the warranty
period. Any claim in terms of this warranty must be supported by a proof of purchase.
If proof of purchase is not available, then repair, and/or service charges may be
payable by the customer to the supplier.
3. The faulty product must be taken to the supplier's service centre to exercise the
warranty.
4. The supplier will refund, repair or exchange the product in terms of this warranty
subject to legislative requirements. This warranty shall be valid only where the
customer has not broken the product himself, or used the product for something that
it is not supposed to be used for. The warranty does not include and will not be
construed to cover products damaged as a result of disaster, misuse, tamper, abuse
or any unauthorised modification or repair of the product.
5. This warranty will extend only to the product provided at the date of the purchase and
not to any expendables attached or installed by the customer.
6. If the customer requests that the supplier repairs the product and the product breaks
or fails to work properly within 3 (three) months of the repair and not as a result of
misuse, tampering or modification by or on behalf of the customer, then the supplier
may replace the product or pay a refund to the customer.
7. The customer may be responsible for certain costs where products returned are not
in the original packaging, or if the packaging is damaged. This will be deducted from
any refund paid to the customer.
HOME OF LIVING BRANDS (PTY) LTD
www.homeoflivingbrands.com
011 490-9600 (Jhb)
031 792-6000 (Dbn)
021 552-5161 (CT)
www.russellhobbs.co.za
www.facebook.com/RussellHobbsSA
 Loading...