

Page 1

RHJ3000_IB_FA_180820
Part No. T22-9001967
3-IN-1
JUICE & BLEND
2 YEAR WARRANTY
RHJ3000
INSTRUCTIONS & WARRANTY
1
Page 2

IMPORTANT SAFEGUARDS
When using this appliance, basic safety precautions should always be followed, including the following:
Read all instructions before, and follow whilst using this appliance.
1. To protect against electrical hazards, do not immerse the power cord, plug or appliance in water
or other liquid.
2. Do not use this appliance near bathtubs, showers, basins or other vessels containing
water.
3. Do not use outdoors.
4. Do not let cord hang over edge of table surfaces or counter.
5. Do not let cord contact hot surfaces, including the stove.
6. This appliance is not intended for use by persons (including children) with reduced physical,
sensory or mental capabilities, or lack of experience and knowledge, unless they have been given
supervision or instruction concerning use of the appliance by a person responsible for their
safety.
7. Do not use the appliance if the rotating sieve or the protecting cover is damaged or has visible
cracks
8. Do not put your fingers or other objects into the juicer opening while it is in operation. If food
becomes lodged in opening, use the food pusher or another piece of fruit or vegetable to push it
down. When this method is not possible, turn the motor off, remove the plug from the wall power
outlet and disassemble juicer to remove the remaining food.
9. Do not push the food into the 75mm wide feed chute with anything other than the food pusher
when the appliance is connected to a power source.
10. Always make sure the juicer jar lid is locked securely in place before motor is turned on. Do not
unfasten the locking plate while juicer is in operation.
11. DO NOT add hot ingredients/liquids to the blender as they may be ejected out of the appliance due
to sudden steaming.
12. Care should be taken when handling sharp components, during assembly, disassembly and when
cleaning.
13. Do not touch moving parts.
14. Ensure the switch is in the “OFF” position after each use of the juicer. Make sure the motor stops
completely before disassembling.
15. Keep the appliance and the power cord away from the edge of tables or countertops and out of
reach of children and persons with reduced physical, sensory and mental capabilities.
16. Always turn off and unplug the appliance from the power outlet when not in use, before fitting or
removing attachments, before approaching parts that move and before cleaning the appliance.
17. The use of filter attachments/accessories not recommended by the appliance manufacturer may
cause injuries or damage to the appliance and void warranty.
18. This appliance is NOT a toy. Children should be supervised to ensure they do NOT play with this
appliance.
19. Always follow the instructions when using this appliance.
20. Always clean the appliance after use.
21. Please ensure all detachable parts are completely dry after cleaning before re-assembling the
appliance for next use.
2
Page 3

22. If the power cord is damaged, it must be replaced by the manufacturer or similarly qualified
person in order to avoid hazard.
23. Do not operate this appliance with a damaged cord/plug or after the appliance has malfunctioned,
or been dropped or damaged in any manner. Contact Customer Service for examination,
adjustment, repair or replacement.
24. Care must be taken when handling filter attachments and when removing or fitting attachments
into the juicer.
25. To disconnect, ensure the appliance switch is set to Off, turn off wall power outlet, then grasp and
pull the plug from the wall outlet. Never pull by the cord.
26. Misuse may cause injury.
2 7. Do not attempt to defeat any safety interlock mechanisms.
28. Do not leave the appliance unattended when in use.
29. Do not use the appliance for other than its intended purpose.
30. Do not use on an inclined plane or unstable surface.
31. For added safety, electrical appliances should be connected to a power outlet that is protected by
a residual current device (RCD), also often referred to as a ‘Safety Switch’. Your switchboard may
already incorporate an RCD. If unsure, call an electrician for verification and fitting if necessary.
This appliance is intended to be used in household and similar applications such as:
• Staff kitchen areas in shops, offices and other working environments;
• Farm houses;
• By clients in hotels, motels, and other residential type environments;
• Bed & breakfast type environments.
SAVE THESE INSTRUCTIONS.
3
Page 4

Congratulations on the purchase of your new Russell Hobbs 3-in-1 Juice & Blend.
o
t
u
v
`
l
s
`
r
`
`
`
Each unit is manufactured to ensure safety and reliability. Before using the appliance
for the first time, please read this instruction booklet carefully and keep it for future
reference. Pass it on if you pass on the product.
When using this appliance, basic safety precautions should always be followed.
`
n
e
`
f
`
g
`
i
`
j
`
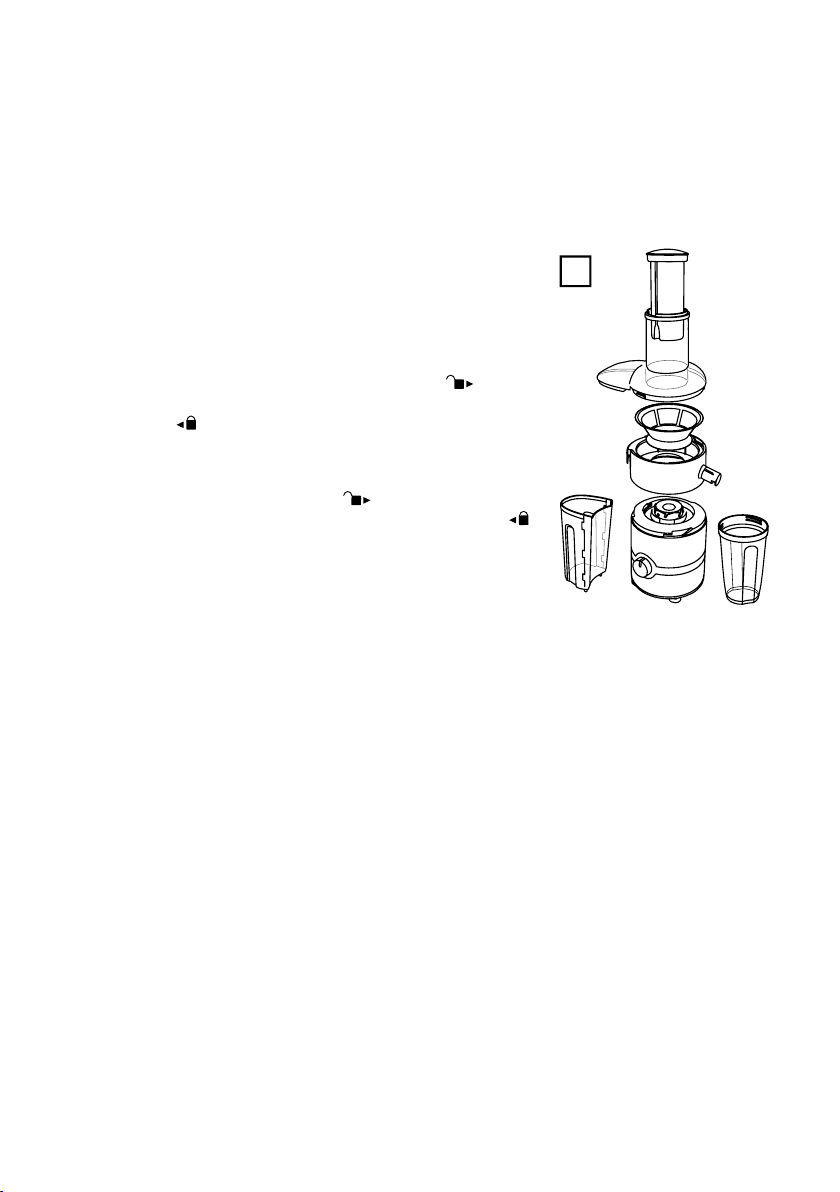
FEATURES
1. Pusher
2. Lid
3. Sieve
4. Juicer separator
5. Pulp container
6. Control
k
l
7. Spout
8. Motor base
9. Resealable lid
10. Cone
11. Strainer
12. Citrus separator
4
m
13. Coupling
14. Multi-purpose jar
15. Blade unit
`
Dishwasher safe
Page 5
GENERAL USE
B
C
k
l
o
t
u
v
`
m
l
s
`
r
`
n
`
`
`
BEFORE FIRST USE
• Remove any packaging material and labels.
• Wash the pusher, lid, sieve, separators, strainer, pulp container, cone, jar and blade
assembly in warm, soapy water. Rinse and dry.
• Wipe the motor base with a damp cloth.
• Place the appliance on a dry, firm, level surface, near a power socket.
JUICER (FIG A)
The juicer attachment can be used to extract juice from fruit,
vegetables and even leafy greens. The feed chute is 75mm
wide for whole fruit juicing.
ASSEMBLY
1. Line up the
motor base. Turn the separator clockwise to line up the
d
with the .
2. Put the sieve into the separator and press it down onto the
drive shaft.
3. Line up the
Turn the separator clockwise to line up the
4. Fit the pulp container under the left hand side of the lid.
5. Put the multi-purpose jar under the spout to collect the
juice.
6. Fit the pusher into the tube.
USING
1. Check that the appliance is switched off (
2. Put the plug into the power socket.
3. Turn the appliance on (
4. Remove the pusher and drop the ingredients down the feed chute.
5. The feed chute is wide enough for most whole fruits and vegetables but larger
ingredients may need to be cut to fit.
6. Replace the pusher and use it to push the ingredients gently down the feed chute.
7. Once finished, turn off your juicer (
8. The spout can be turned to face upwards to prevent dripping when you have finished
using the appliance.
9. You can fit the resealable top to the multi-purpose jar if desired for storage or to use the
jar as a drinking bottle.
TIPS
• Buy organically grown produce whenever you can.
• Remove stones from fruit like peaches, plums, mangoes, etc.
• Use good quality, fresh, ripe fruit and vegetables. Soft vegetables or overripe fruit can
make the juice thick and cloudy.
d
on the juicer separator with the on the
d
on the lid with the on the motor base.
I
).
O
).
d
with the .
O
).
A
5
Page 6

• Wash all fruit and vegetables. Use a brush on the harder ones. Remove the outer leaves
C
l
o
t
u
v
`
m
l
s
`
r
`
n
`
`
`
on non-organic produce. Peel any non-organic or waxed fruit or vegetables. Cut out and
discard bruises and blemishes as these may affect the taste of the juice.
• Don’t juice anything strong or pungent, like onions or garlic. No matter how well you clean
your juicer, you’ll never get rid of the taste.
• Bunch up leafy greens, parsley, wheat grass and beansprouts into a small tight ball and
push it down the tube with the pusher.
WARNING! Rhubarb leaves are poisonous, they contain oxalic acid. They mustn’t be juiced
or eaten.
CITRUS PRESS (FIG B)
The citrus press attachment can be used to press juice out of
oranges, grapefruit, lemons, limes, etc.
ASSEMBLY
1. Fit the coupling onto the drive shaft.
2. Line up the
motor base. Turn the separator clockwise to line up the
with the
3. Place the strainer into the citrus separator and fit the cone
onto the coupling.
4. Put the multi-purpose jar under the spout to collect the
USING
1. Check that the appliance is switched off (
2. Put the plug into the power socket.
3. Turn the appliance on (
4. Using one half-fruit at a time, place the cut (flesh) side on top of the cone and press it
5. Once finished, turn off your juicer (
6. The spout can be turned to face upwards to prevent dripping when you have finished
7. You can fit the resealable top to the multi-purpose jar if desired for storage or to use the
TIPS
• Use good quality, fresh, ripe, citrus fruit.
• Wipe the fruit. Turn the fruit on its side and cut in half with a sharp knife.
juice.
down.
using the appliance.
jar as a drinking bottle.
d
on the citrus separator with the on the
.
O
).
I
).
O
).
d
B
6
Page 7

BLENDER (FIG C)
o
t
u
v
`
l
s
`
r
`
`
`
The versatile blender attachment has a number of different
uses including blending soups, smoothies and purées.
ASSEMBLY
1. Add the ingredients to the jar. Do not fill past the max
mark.
2. Screw the blade unit on to the top of the multi-purpose jar.
3. Check that the appliance is switched off (O).
4. Turn the jar upside down then line up the
with the
clockwise to line up the
USING
1. Put the plug into the power socket.
2. Turn the appliance on (
Y
function.
3. Once finished turn the appliance off then twist the blade unit anti clockwise to line up the
d
on blade unit with the on the motor base and remove it.
4. Turn the jar the right way up and unscrew the blade unit.
5. You can fit the resealable top to the multi-purpose jar if desired for storage or to use the
jar as a drinking bottle.
on the motor base. Turn the blade unit
d
with the
d
on blade unit
I
). For precise control use the pulse
C
COMBINING USES
Because the multi-purpose jar is also used when juicing or citrus pressing, you can combine
these functions for increased versatility. For example, when making a smoothie:
• Use the citrus press or juicer attachment to extract juice into the jar.
• Add the rest of the smoothie ingredients to the jar.
• Fit the blade unit (see BLENDER section).
• Blend the ingredients to create a 100% natural, home-made smoothie.
• Most smoothie recipes require some liquid in the form of juice. By using your own home-
made juice you can ensure that your smoothies are 100% natural without any of the
additives or preservatives that could be found in commercially produced juices.
7
Page 8

CLEANING
Spectrum Brands Australia Pty Ltd
Locked Bag 3004 Braeside
Victoria 3195 Australia
Customer Service in Australia
TollFree: 1800 623 118
Email: info@spectrumbrands.com.au
Website: www.spectrumbrands.com.au
Spectrum Brands New Zealand Ltd
PO Box 9817 Newmarket
Auckland 1149 New Zealand
Customer Service in New Zealand
TollFree: 0800 736 776
Email: service@spectrumbrands.co.nz
Website: www.spectrumbrands.co.nz
Spectrum Brands Australia Pty Ltd and Spectrum Brands New Zealand Ltd
Warranty Against Defects
In this warranty:
Australian Consumer Law means the Australian consumer law set out in Schedule 2 to the
Competition and Consumer Act 2010;
CGA means the New Zealand Consumer Guarantees Act 1993;
Goods means the product or equipment which was accompanied by this warranty and
purchased in Australia or New Zealand, as the case may be;
Manufacturer, We or us means:
1. for Goods purchased in Australia, Spectrum Brands Australia Pty Ltd ABN, 78 007 070 573;
or
2. for Goods purchased in New Zealand, Spectrum Brands New Zealand Ltd, as the case
may be, contact details as set out at the end of this warranty;
Supplier means the authorised distributor or retailer of the Goods that sold you the Goods in
Australia or in New Zealand; and
You means you, the original end-user purchaser of the Goods.
1. Our goods come with guarantees that cannot be excluded under the Australian Consumer
Law, or the CGA. You are entitled to a replacement or refund for a major failure and
compensation for any other reasonably foreseeable loss or damage. You are also entitled
to have the goods repaired or replaced if the goods fail to be of acceptable quality and the
failure does not amount to a major failure.
2. The benefits provided by this Warranty are in addition to all other rights and remedies in
respect of the Goods which the consumer has under either the Australian Consumer Law
or the CGA. The original purchaser of the Goods is provided with the following Warranty
subject to the Warranty Conditions:
3. We warrant the Goods for all parts defective in workmanship or materials for a period of 2
years (Warranty Period) from the date of purchase.
If the Goods prove defective within the Warranty Period by reason of improper workmanship
or material, we may, at our own discretion, repair or replace the Goods without charge.
1. Switch the appliance off (O) and unplug it.
2. Disassemble the appliance.
3. To remove the sieve, first turn the separator anti clockwise to line up the
then tip the sieve out of the separator.
4. Wipe the outside of the motor unit with a clean damp cloth.
5. Wash the removable parts in warm soapy water, rinse well, drain, and air dr y.
6. If the sieve is clogged, hold it under a running tap and brush along the surface of the
mesh with a nylon washing up brush. Don’t try to poke the bristles through the mesh –
you’ll break it.
`
You may wash these parts in a dishwasher.
If you use a dishwasher, the harsh environment inside the dishwasher will affect the surface
finishes. Damage should be cosmetic only, and should not affect the operation of the
appliance.
Legislation in some localities mandates that e-waste (anything with a plug, battery or cord)
is disposed of through controlled recycling facilities and must not be disposed of in general
household waste. For more information about recycling of electrical and battery operated
appliances, please contact your local council or your local household waste disposal service.
d
with the
8
Page 9

Spectrum Brands Australia Pty Ltd
Locked Bag 3004 Braeside
Victoria 3195 Australia
Customer Service in Australia
TollFree: 1800 623 118
Email: info@spectrumbrands.com.au
Website: www.spectrumbrands.com.au
Spectrum Brands New Zealand Ltd
PO Box 9817 Newmarket
Auckland 1149 New Zealand
Customer Service in New Zealand
TollFree: 0800 736 776
Email: service@spectrumbrands.co.nz
Website: www.spectrumbrands.co.nz
Spectrum Brands Australia Pty Ltd and Spectrum Brands New Zealand Ltd
Warranty Against Defects
In this warranty:
Australian Consumer Law means the Australian consumer law set out in Schedule 2 to the
Competition and Consumer Act 2010;
CGA means the New Zealand Consumer Guarantees Act 1993;
Goods means the product or equipment which was accompanied by this warranty and
purchased in Australia or New Zealand, as the case may be;
Manufacturer, We or us means:
1. for Goods purchased in Australia, Spectrum Brands Australia Pty Ltd ABN, 78 007 070 573;
or
2. for Goods purchased in New Zealand, Spectrum Brands New Zealand Ltd, as the case
may be, contact details as set out at the end of this warranty;
Supplier means the authorised distributor or retailer of the Goods that sold you the Goods in
Australia or in New Zealand; and
You means you, the original end-user purchaser of the Goods.
1. Our goods come with guarantees that cannot be excluded under the Australian Consumer
Law, or the CGA. You are entitled to a replacement or refund for a major failure and
compensation for any other reasonably foreseeable loss or damage. You are also entitled
to have the goods repaired or replaced if the goods fail to be of acceptable quality and the
failure does not amount to a major failure.
2. The benefits provided by this Warranty are in addition to all other rights and remedies in
respect of the Goods which the consumer has under either the Australian Consumer Law
or the CGA. The original purchaser of the Goods is provided with the following Warranty
subject to the Warranty Conditions:
3. We warrant the Goods for all parts defective in workmanship or materials for a period of 2
years (Warranty Period) from the date of purchase.
If the Goods prove defective within the Warranty Period by reason of improper workmanship
or material, we may, at our own discretion, repair or replace the Goods without charge.
9
Page 10

Warranty Conditions
4. The Goods must be used in accordance with the manufacturer’s instructions. This
Warranty does not apply should the defect in or failure of the Goods be attributable
to misuse, abuse, accident or non-observance of manufacturer’s instructions on the
part of the user. As far as the law permits, the manufacturer does not accept liability
for any direct or consequential loss, damage or other expense caused by or arising
out of any failure to use the Goods in accordance with the manufacturer’s instructions.
5. Exhaustible components (such as batteries, filters and brushes) of the Goods are
included under this Warranty only where there is a defect in workmanship or materials
used.
6. The warranty granted under clause 3 is limited to repair or replacement only.
7. Any parts of the Goods replaced during repairs or any product replaced remain the
property of the manufacturer. In the event of the Goods being replaced during the
Warranty Period, the warranty on the replacement Goods will expire on the same
date as for the Warranty Period on the original Goods which are replaced.
8. In order to claim under the warranty granted under clause 3 you must:
(a) Retain this warranty with your receipt/proof of purchase; and
(b) Return the Goods to us at the relevant address or to the Supplier by prepaid
freight within the Warranty Period accompanied with (i) the legible and unmodified
original proof of purchase, which clearly indicates the name and address of the
Supplier, the date and place of purchase, the product name or other product serial
number and (ii) this warranty.
9. This warranty is immediately void if:
(a) Any serial number or appliance plate is removed or defaced;
(b) The Goods have been serviced or otherwise repaired by a person not authorised
to do so by us or where non approved replaced parts are used.
10. The Goods are designed for domestic use only. The Goods must be connected to the
electrical voltage requirements as specified in the ratings label located on the Goods.
11. This warranty does not cover the cost of claiming under the warranty or transport
of the Goods to and from the Supplier or us.
12. This warranty is only valid and enforceable in Australia against Spectrum Brands
Australia Pty Ltd and in New Zealand against Spectrum Brands New Zealand Ltd.
Contact us or the Supplier for further details.
Register your product online
If you live in Australia please visit: www.spectrumbrands.com.au/warranty
If you live in New Zealand Please visit: www.spectrumbrands.co.nz/warranty
Registration of your warranty is not compulsory, it gives us a record of your purchase
AND entitles you to receive these benefits: Product information; Hints and tips; Recipes
and news; Information on special price offers and promotions.
Any questions? Please contact Customer Service for advice.
10
Page 11

3-IN-1
JUICE & BLEND
2 YEAR WARRANTY
RHJ3000_IB_FA_180820
RHJ3000
RECIPE BOOK
1
Page 12

SPARKLING EYE POTION
JUICER RECIPES
In order to maintain healthy, shiny eyes our bodies require plenty of
B vitamins, as well as vitamins C and E and beta-carotene.
Try this juice drink now and again as a refreshing and tasty vitamin enriched drink.
Ingredients:
3 carrots
2 green apples
½ broccoli
½ red capsicum
APPLE AND STRAWBERRY
Ingredients:
250g strawberries
3 green apples
1 small piece ginger, peeled
Serve over ice.
ENERGY DRINK
Fruit and vegetables have natural sweetness and make excellent energy drinks.
Ingredients:
2 carrots
3 apricots, stone removed
2 apples
50ml milk
5g wheatgerm
5ml honey
Juice the fruit and vegetables. Stir in the milk, wheatgerm, and honey.
www.russellhobbs.com.au
www.russellhobbs.co.nz
RUSSELL HOBBS and logo are Trade Marks of Spectrum Brands, Inc., or one of its subsidiaries.
©2020 Spectrum Brands, Inc.
Recipes are to be used in conjunction with the RHJ3000 3-in-1 Juice & Blend by Russell Hobbs. All rights reserved. No part of this
publication may be reproduced, stored in a retrieval system or transmitted in any form or by any means, electronic, mechanical,
photocopying, recording or otherwise, without prior permission of the copyright owner.
2
Page 13

VITAMIN DRINK
This drink is high in B group vitamins, vitamin C, and the mineral
calcium.
Ingredients:
1 parsnip
½ green capsicum
1 broccoli
2 carrots
1 sweet potato
1 celery stick
For a sweeter taste, add more carrot or parsnip.
SUMMER DRINK
Ingredients:
3 tomatoes
½ cucumber
1 celery stick
1/8 lime
SAVOURY COCKTAIL
Ingredients:
2 carrots
1 handful watercress
3 tomatoes
1 bunch coriander or basil leaves
1 celery stick
½ red capsicum
A few drops of Tabasco or Worcestershire sauce (optional)
JUICER RECIPES
CARROT AND PARSLEY
Ingredients:
6 carrots
5 sprigs parsley
3
Page 14

CABBAGE, CELERY AND CARROT
Ingredients:
½ green cabbage
2 celery sticks
3 carrots
VEGETABLE TONIC
Ingredients:
1 handful spinach
4 sprigs parsley
4-6 carrots
SUNSHINE COCKTAIL
Ingredients:
2 apples
100g strawberries
PASSION COCKTAIL
Ingredients:
50g strawberries
¼ pineapple
1 bunch black grapes
JUICER RECIPES
PINEAPPLE AND GRAPEFRUIT
Ingredients:
½ grapefruit
¼ pineapple
LEMONADE
Ingredients:
4 apples
¼ lemon
Serve over ice.
PINEAPPLE, STRAWBERRY AND APPLE
Ingredients:
1 apple
¼ pineapple
100g strawberries
4
Page 15

LEEK AND POTATO SOUP
Ingredients:
75g leeks
75g potatoes
1 stock cube
400ml water
salt and pepper
Process the leeks and potatoes for 2 seconds. Transfer to a large pan. Add the water and
stock cube. Bring to the boil, stirring. Reduce the heat. Cover the pan. Simmer for 20 minutes.
Remove from the heat. Cool for 30 minutes. Process till smooth. Bring to serving temperature
(don’t let it boil). Adjust the seasoning. Serve with bread.
For Vichyssoise, add a couple of chives to the leeks and potatoes, add a knob of butter to the
pan before heating, cool the soup instead of re-heating it, and whisk in 75ml of cream before
serving it cold.
BLENDER RECIPES
SPICY PUMPKIN SOUP
Ingredients:
450g pumpkin
15ml vegetable oil
1 leek
1 garlic clove
450ml chicken/vegetable stock
2.5g ground ginger
15ml single cream/crème fraiche
2.5g ground coriander
1 bunch coriander leaves
salt and pepper
Peel, deseed, and cut the pumpkin into chunks. Heat the oil in a pan. Add the leeks, garlic and
spices. Stir for 3 minutes. Add the stock and pumpkin. Bring to the boil, stirring. Reduce the
heat. Cover the pan. Simmer for 20-30 minutes. Remove from the heat. Stir in the coriander
and cream. Cool for 30 minutes. Process till smooth. Bring to serving temperature (don’t let it
boil). Adjust the seasoning. Serve with bread.
5
Page 16

CORIANDER PESTO
Ingredients:
2 handfuls coriander leaves
2 garlic cloves
60g pine nuts
125ml olive oil
60g Parmesan, grated
Process the coriander, garlic, pine nuts and half the oil till smooth. Transfer to a large bowl. Stir
in the Parmesan. Add oil to adjust the consistency: For a dip: thick. For a topping: medium. For
pasta sauce: thin.
BLENDER RECIPES
FRUITY SMOOTHIES
Process everything till smooth.
Ingredients:
60ml yogurt
200ml milk
30g oatmeal
1 banana
30ml honey
2 apples, cored
Ingredients:
170g chocolate ice cream
300g orange juice
Ingredients:
150g hazelnut yogurt
1 banana
200ml milk
Ingredients:
300ml chocolate milk
2 pears, cored
Ingredients:
200ml yogurt
1 mango, stone removed
200ml milk
5ml honey
6
Page 17

Ingredients:
300ml milk
1 banana
12 strawberries
Ingredients:
360ml lemonade
125g vanilla ice cream
70g blueberries
Ingredients:
400ml milk
1 banana
20ml honey
10ml vanilla extract
Ingredients:
300ml orange juice
300ml cranberry juice
1 banana
Ingredients:
4 halves of tinned apricot
80ml apricot juice (from tin)
2 peaches, stone removed
60ml yogurt
200ml milk
10ml honey
BLENDER RECIPES
Ingredients:
600ml apple juice
1 mango, stone removed
7
Page 18

NOTES
8
Page 19

NOTES
9
Page 20

NOTES
10
 Loading...