

Page 1
INSTRUCTIONS AND WARRANTY
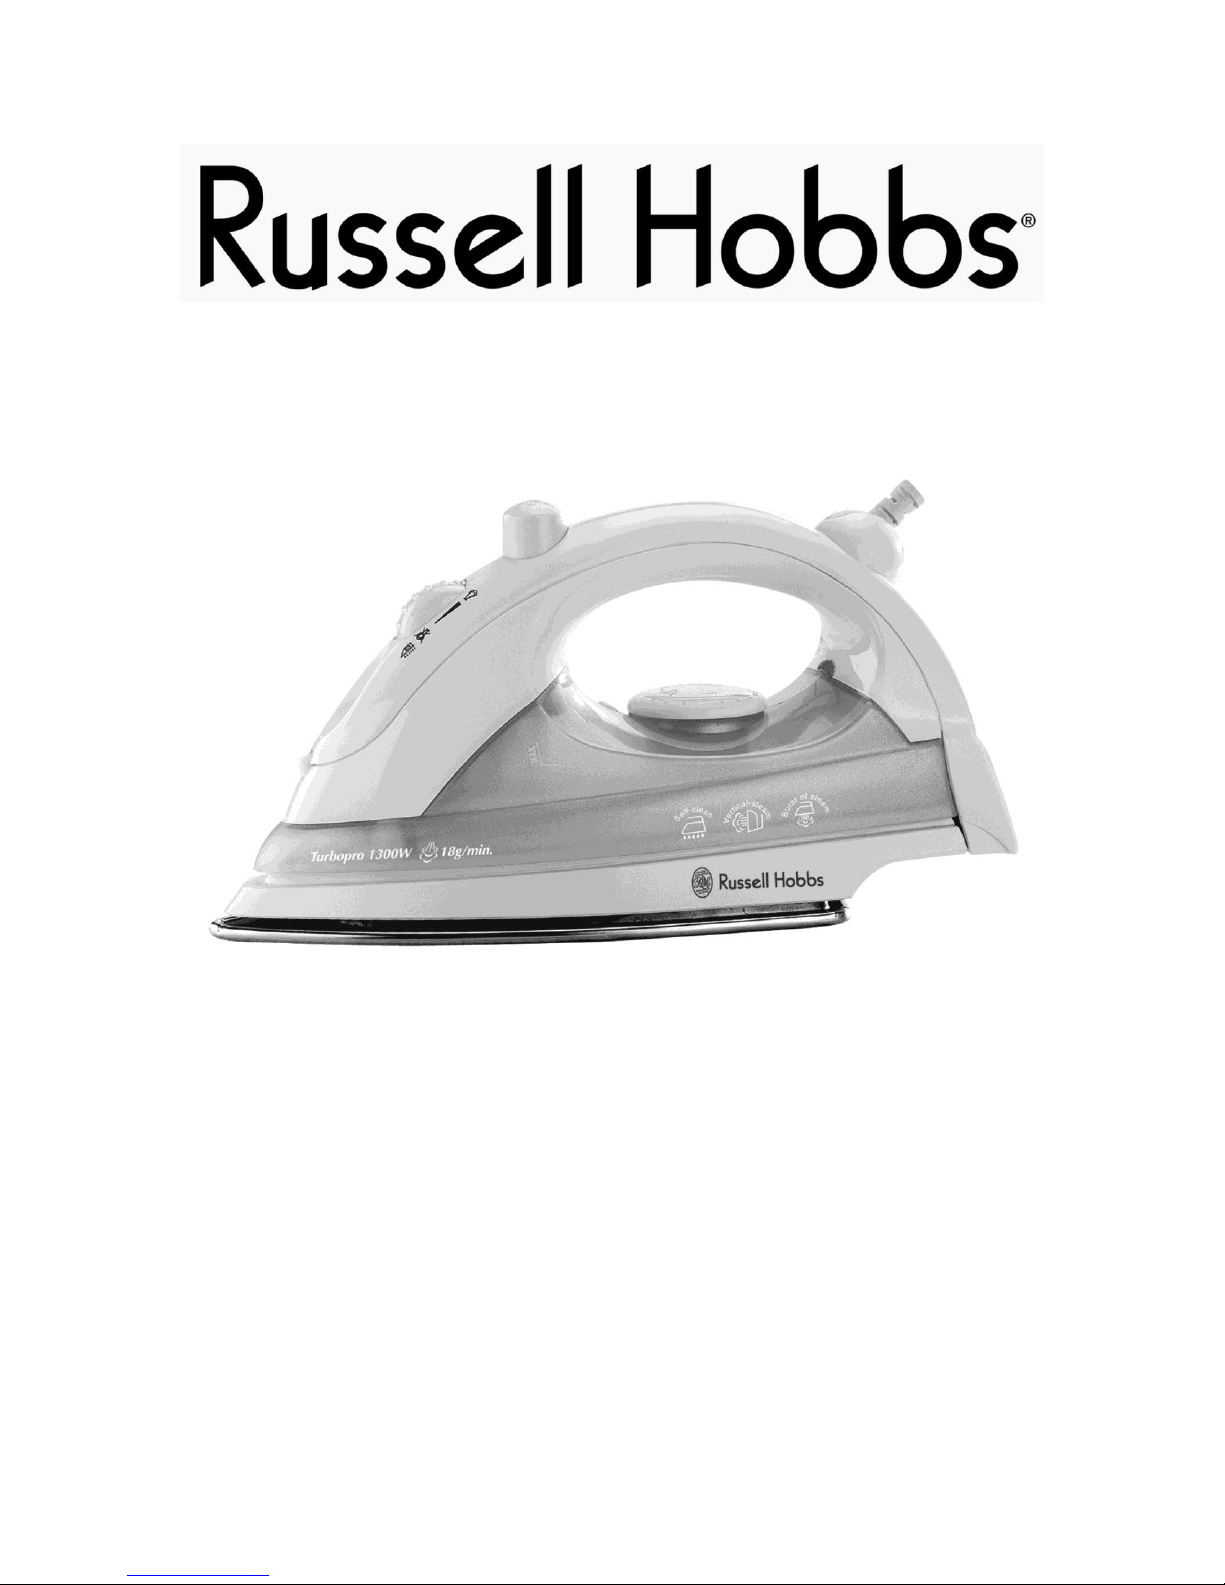
RUSSELL HOBBS STEAM, SPRAY AND SURGE IRON
MODEL NO. RHI102
Page 2

2
Congratulations on purchasing our RUSSELL HOBBS Steam, Spray and Surge Iron.
Each unit is manufactured to ensure safety and reliability. Before using this appliance for
the first time, please read the instruction manual carefully and keep it for future
reference.
IMPORTANT SAFEGUARDS
When using any electrical appliance, basic safety precautions should always be followed
including the following:
1. Please read the instructions carefully before using any appliance.
2. Always ensure that the voltage on the rating label corresponds to the mains
voltage in your home.
3. Incorrect operation and improper use can damage the appliance and cause injury
to the user.
4. The appliance is intended for household use only. Commercial use invalids the
warranty and the supplier can not be held responsible for injury or damage
caused when using the appliance for any other purpose than that intended.
5. Avoid any contact with moving parts.
6. This appliance is not intended for use by persons (including children) with
reduced physical, sensory or mental capabilities, or lack of experience and
knowledge, unless they have been given supervision or instruction concerning
use of the appliance by a person responsible for their safety.
7. Children should be supervised to ensure that they do not play with the appliance.
8. Check the power cord and plug regularly for any damage. If the cord or the plug
is damaged, it must be replaced by the manufacturer or a qualified person in
order to avoid an electrical hazard.
9. Do not use the appliance if it has been dropped or damaged in any way. In case
of damage, take the unit in for examination and/or repair by an authorised service
agent
10. To reduce the risk of electric shock, do not immerse or expose the motor
assembly, plug or the power cord to water or any other liquid.
11. Never immerse the unit in water or any other liquid for cleaning purposes.
12. Remove the plug from the socket by gripping the plug. Do not pull on the cord to
disconnect the appliance from the mains. Always unplug the unit when not in
use, before cleaning or when adding or removing parts.
Page 3

3
13. The use of accessory attachments that are not recommended or supplied by the
manufacturer may result in injuries, fire or electric shock.
14. A short cord is provided to reduce the hazards resulting from becoming
entangled in or tripping over a longer cord.
15. Do not let the cord hang over the edge of a table or counter. Ensure that the cord
is not in a position where it can be pulled on inadvertently.
16. Do not allow the cord to touch hot surfaces and do not place on or near a hot gas
or electric burner or in a heated oven.
17. Do not use the appliance on a gas or electric cooking top or over or near an open
flame.
18. Use of an extension cord with this appliance is not recommended. However, if it
is necessary to use an extension lead, ensure that the lead is suited to the power
consumption of the appliance to avoid overheating of the extension cord,
appliance or plug point. Do not place the extension cord in a position where it can
be pulled on by children or animals or tripped over.
19. This appliance is not suitable for outdoor use. Do not use this appliance for
anything other than its intended use.
20. DO NOT carry the appliance by the power cord.
21. Do not leave this appliance unattended during use. Always unplug the unit when
not in use or before cleaning.
22. Always operate the appliance on a smooth, even, stable surface. Do not place
the unit on a hot surface.
23. Ensure that the switch is in the “Off” position after each use.
24. The manufacturer does not accept responsibility for any damage or injury caused
by improper or incorrect use, or for repairs carried out by unauthorised
personnel.
25. In case of technical problems, switch off the machine and do not attempt to repair
it yourself. Return the appliance to an authorised service facility for examination,
adjustment or repair. Always insist on the use of original spare parts. Failure to
comply with the above mentioned pre-cautions and instructions, could affect the
safe operation of this machine.
Page 4
4
ADDITIONAL SAFEGUARDS
Always unwind and straighten the power cord before use.
Disconnect the iron from the mains supply outlet when filling with water.
Remove the water remaining in the water tank when finished using the iron. Be
careful, this water may be hot.
Do not leave the iron unattended when it is connected to the mains supply outlet.
Do not add perfumed, vinegar or other chemical liquids into the water tank, they
can damage the iron.
Do not roll the power cord around the iron for storage until it has cooled down
completely.
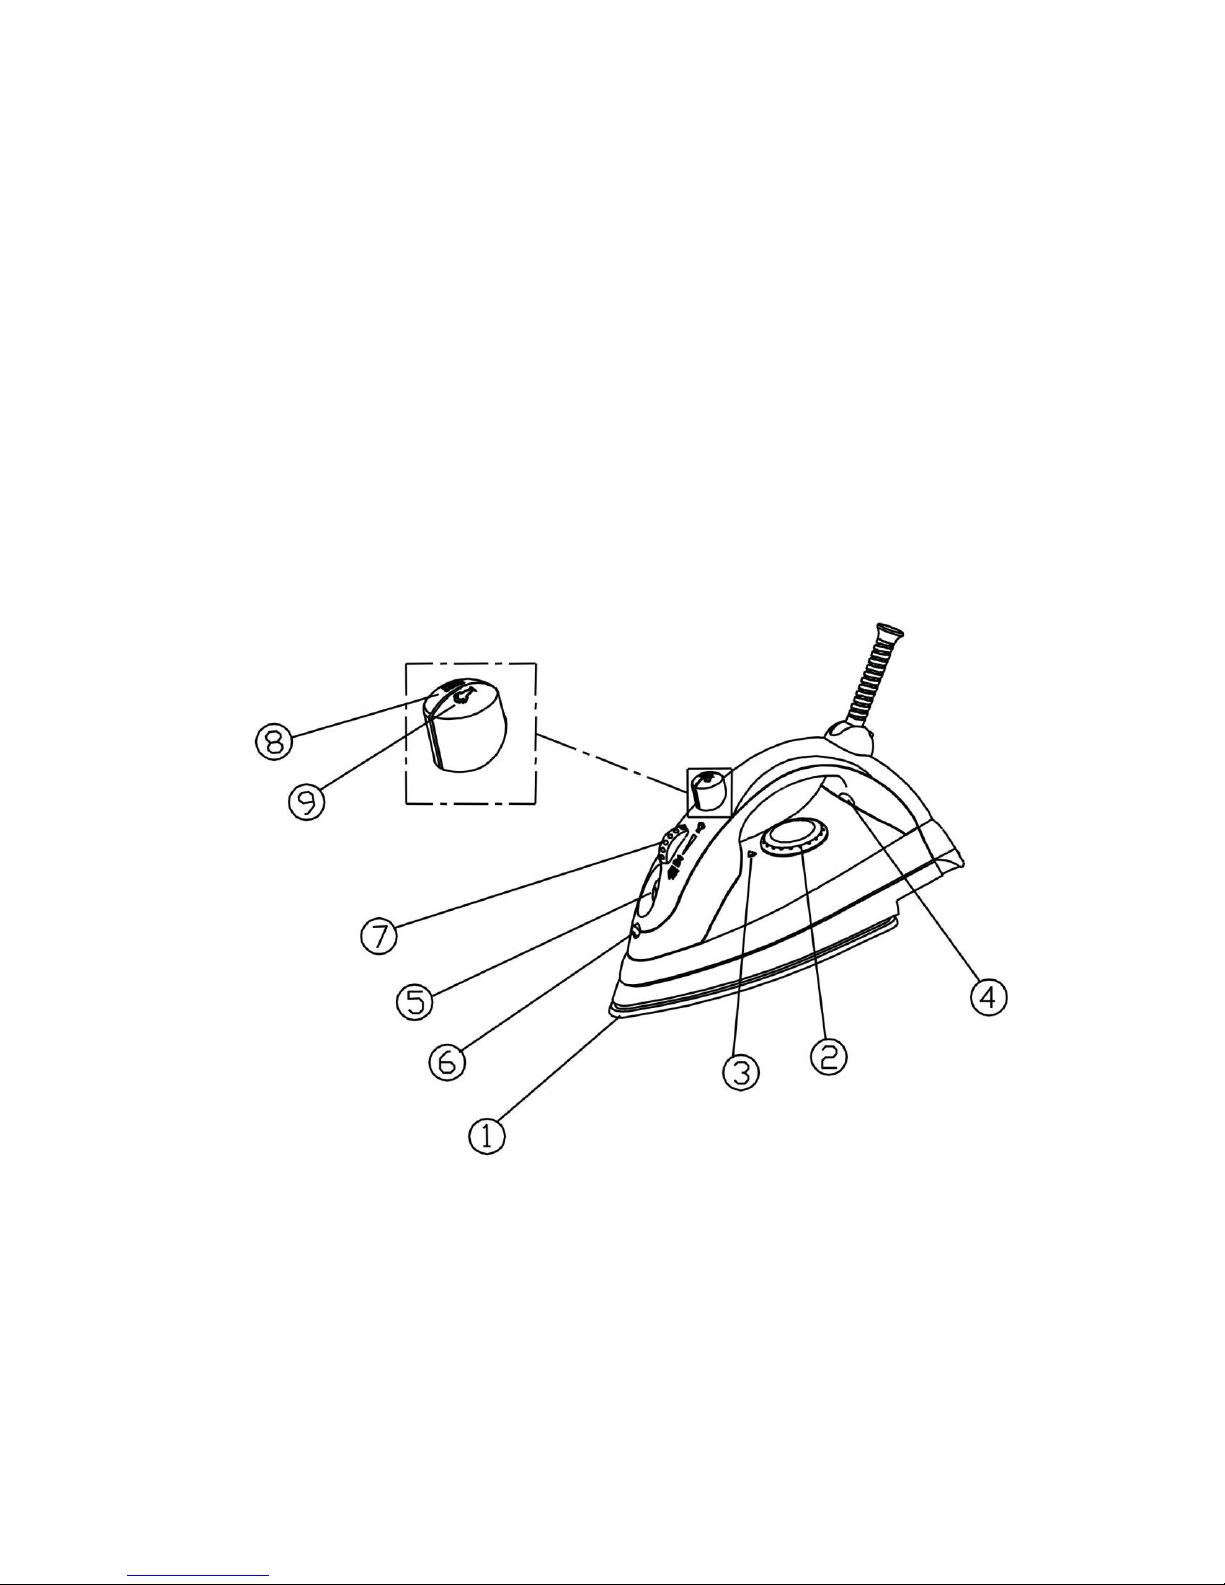
PARTS DIAGRAM
1. Soleplate
2. Temperature Dial
3. Temperature Dial Pointer
4. Pilot Light
5. Water Inlet Hole
6. Spray Nozzle
7. Steam Control/Self-Cleaning
Knob
8. Spray Button
9. Burst of Steam Button
Page 5
5
TEMPERATURE CONTROL SETTING
Acetate
Elastene
Polyamide
Polypropylene
Cupro
Polyester
Protein
Silk
Triacetate
Viscose
Wool
Cotton
Linen
OPERATING INSTRUCTIONS
HINTS FOR IRONING:
Sort out the articles to be ironed into groups according to the type of fabric. This
will minimise the frequency of temperature adjustment for different garments.
Test the iron on a small area or on the back or inside of the garment if you are
unsure about the type of fabric. Start with a low temperature and gradually
increase the temperature.
Wait for about three minutes after adjusting the temperature before ironing heat
sensitive fabrics. Temperature adjustments need a certain time to reach the
required level, no matter if it is lower or higher.
Delicate fabrics such as silk, wool, velour, etc are best ironed with an ironing
cloth cover to prevent shine marks.
You may need to press the spray button a few times in order to activate the spray,
burst and vertical burst functions.
Heating up is quicker than cooling down, so being ironing the clothes which
require a lower ironing temperature first (Synthetic fibre fabric and silk) and then
iron other clothes of different material that require a higher temperature in the
correct order (Wool, cotton and linen).
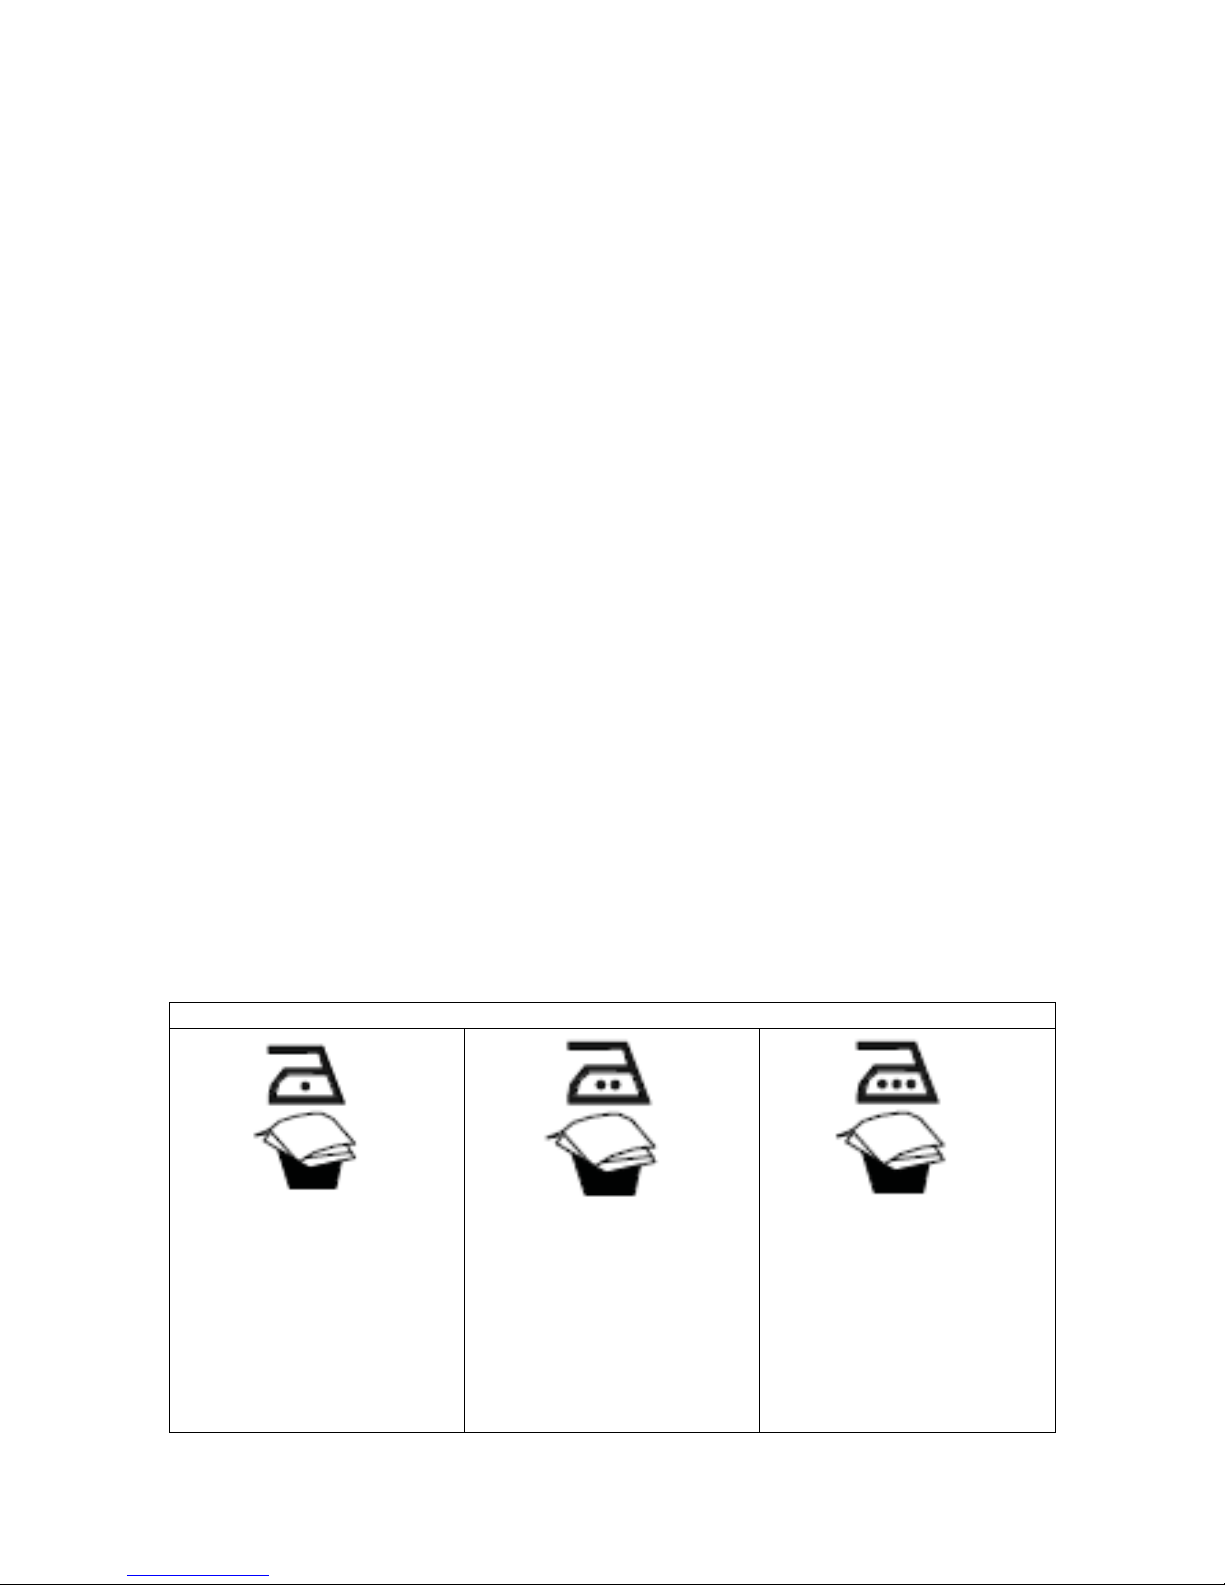
READ THE GARMENT LABELS AND FOLLOW THE MANUFACTURER’S IRONING
INSTRUCTIONS THAT ARE OFTEN SHOWN BY SYMBOLS SIMILAR TO THE
FOLLOWING:
Page 6
6
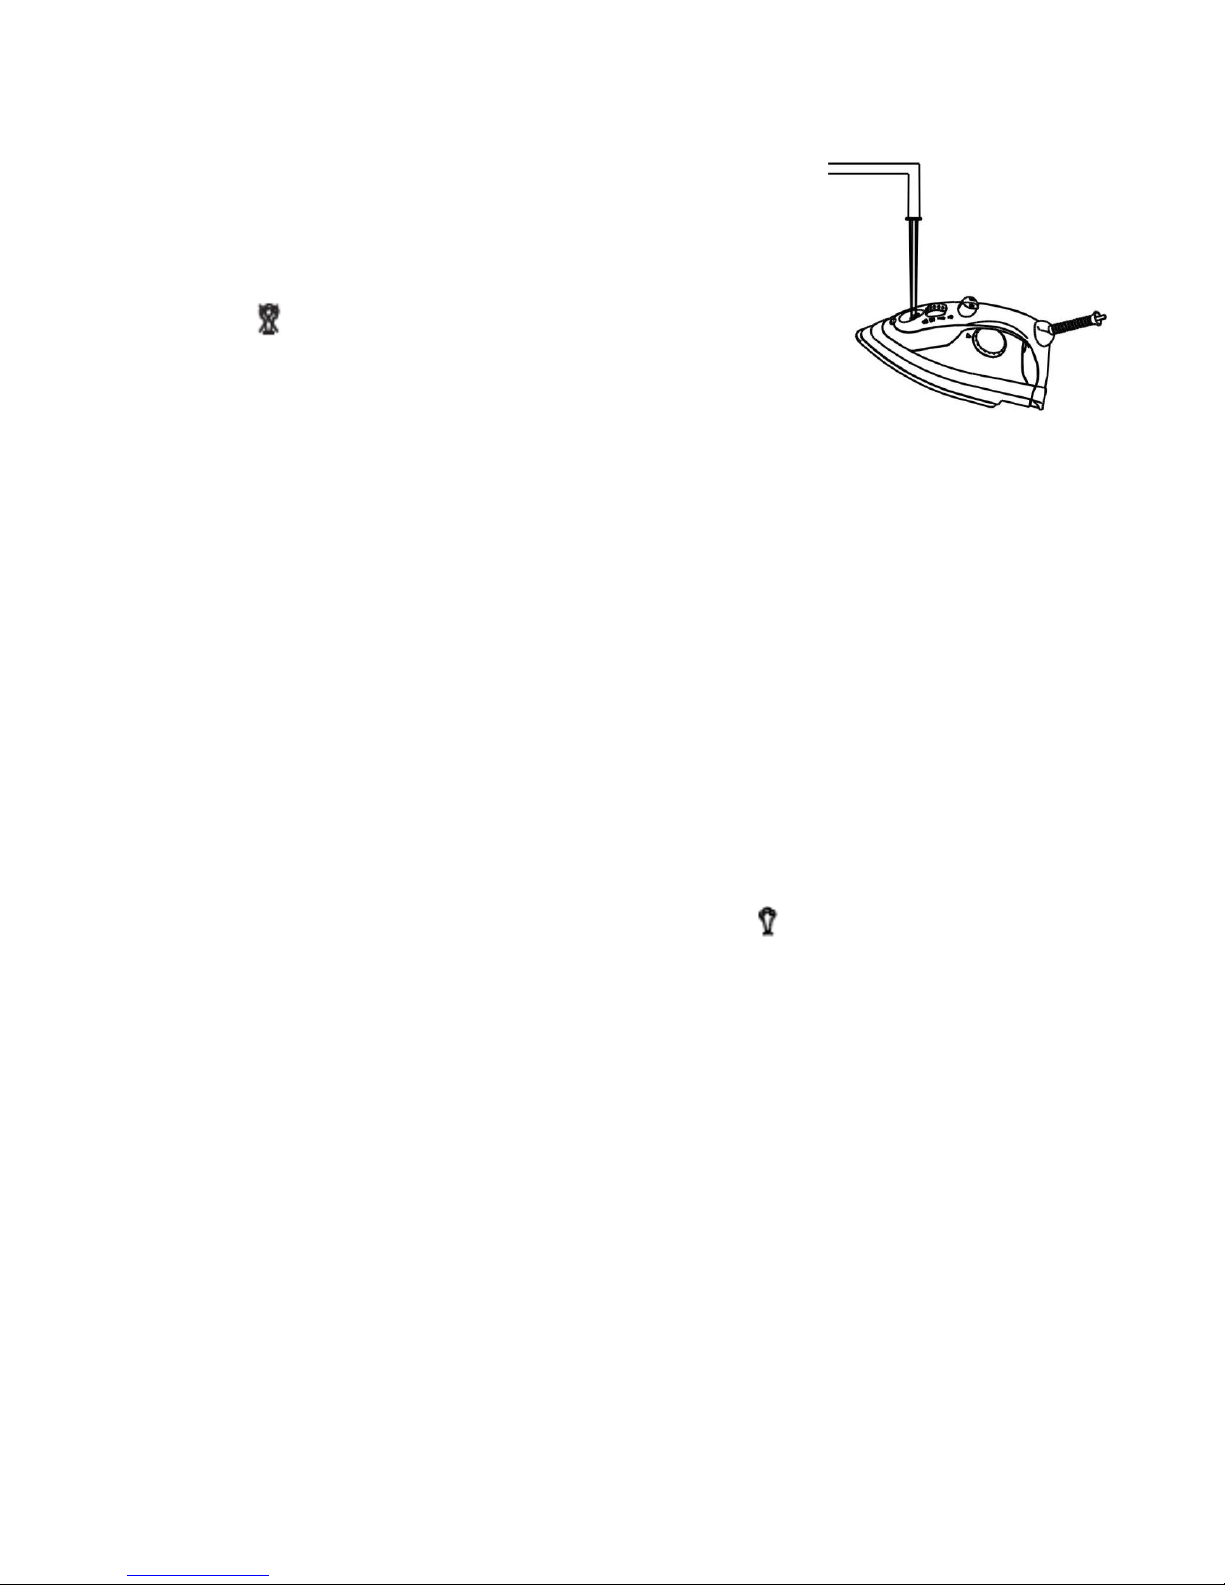
HOW TO FILL WITH WATER:
Note: It is recommended to use purified or mineral water.
Disconnect the iron from the mains supply outlet.
Turn the Steam Control / Self-Cleaning Knob to the
position.
Fill water through the Water Inlet Hole.
Fill up to the Max level of the water tank.
BEFORE USING YOUR IRON FOR THE FIRST TIME:
Clean the water tank and the steam vents on the soleplate to remove dust which
may have accumulated during the manufacturing process.
Some vapour may be given off when the iron is first used. This is safe and will
stop after a short time.
Remove protective wrappings and labels from the soleplate and clean it with a
soft, damp cloth.
Fill the iron as described in the HOW TO FILL WITH WATER section.
Place the iron on its heel and connect the iron to a suitable mains supply outlet.
Turn the Temperature Dial to the ‘●●●’ position – the pilot light will start to glow.
The pilot light goes off when the required temperature is reached.
Turn the Steam Control / Self-Cleaning Knob to the position. Steam will start
to come out of the holes in the soleplate.
Begin first time ironing with an old towel or old cotton garment.
When the water tank is empty and there is no more steam being produced then
the preparation work is complete and the iron is ready for proper use.
DRY IRONING:
Connect the iron to a suitable mains supply outlet.
Turn the Temperature Dial in a clockwise direction to select ‘●’, ‘●●’ or ‘●●●’
according to the recommendation of the garment label.
Move the Temperature Dial in an anti-clockwise direction to ‘Min’ when ironing is
complete to switch the iron off.
Disconnect the iron from the mains supply outlet.
Page 7
7
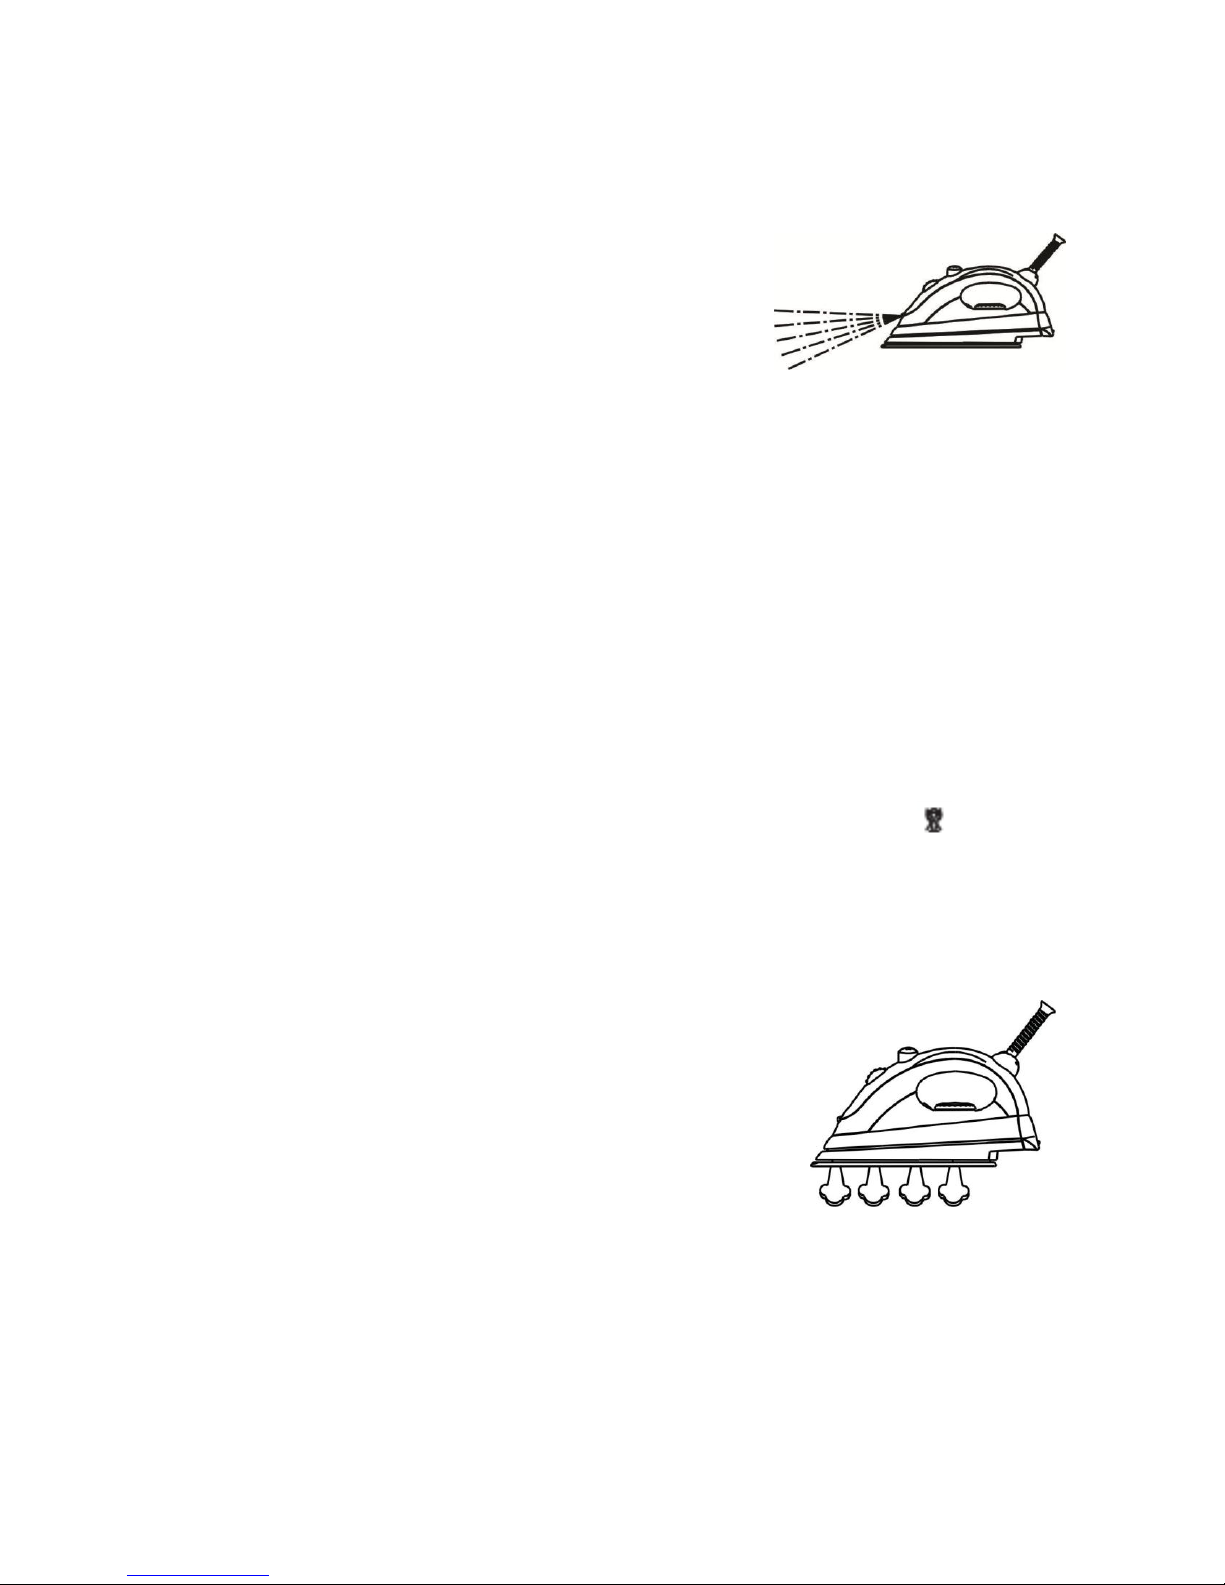
SPRAY FUNCTION:
This function can be used at any time and it does not affect the ironing
temperature.
Fill the iron as described in the HOW TO FILL
WITH WATER section.
Aim the nozzle at the garment.
Press the Spray Button.
Please Note: It may be necessary to press the spray button a few times to start this
function.
STEAM FUNCTION:
Fill the iron as described in the HOW TO FILL WITH WATER section.
Turn the Temperature Dial in a clockwise direction to the ‘●●●’ setting.
Please Note: Do not use the ‘●’ or ‘●●’ setting for steam ironing.
When the pilot light turns off the required temperature has been reached and the
iron is ready for use.
Rotate the Steam Control / Self-Cleaning Knob backwards for more steam or
rotate it forwards for less steam. Alternatively, rotate the knob to the position
for no steam.
BURST OF STEAM FUNCTION:
This function provides extra steam to remove stubborn
wrinkles.
Fill the iron as described in the HOW TO FILL WITH
WATER section.
Turn the Temperature Dial in a clockwise direction to
the ‘●●●’ setting.
Press the Burst of Steam Button once.
Steam will penetrate into the garment to remove the wrinkles.
Wait a few seconds before pressing the Burst of Steam Button again.
Usually all wrinkles can be removed within three presses.
Please Note: It may be necessary to press the Burst of Steam Button a few times to
start this function.
Page 8
8
Please Note: for optimum steam quality, do not operate the Burst of Steam Button
more than three times after the pilot light goes off.
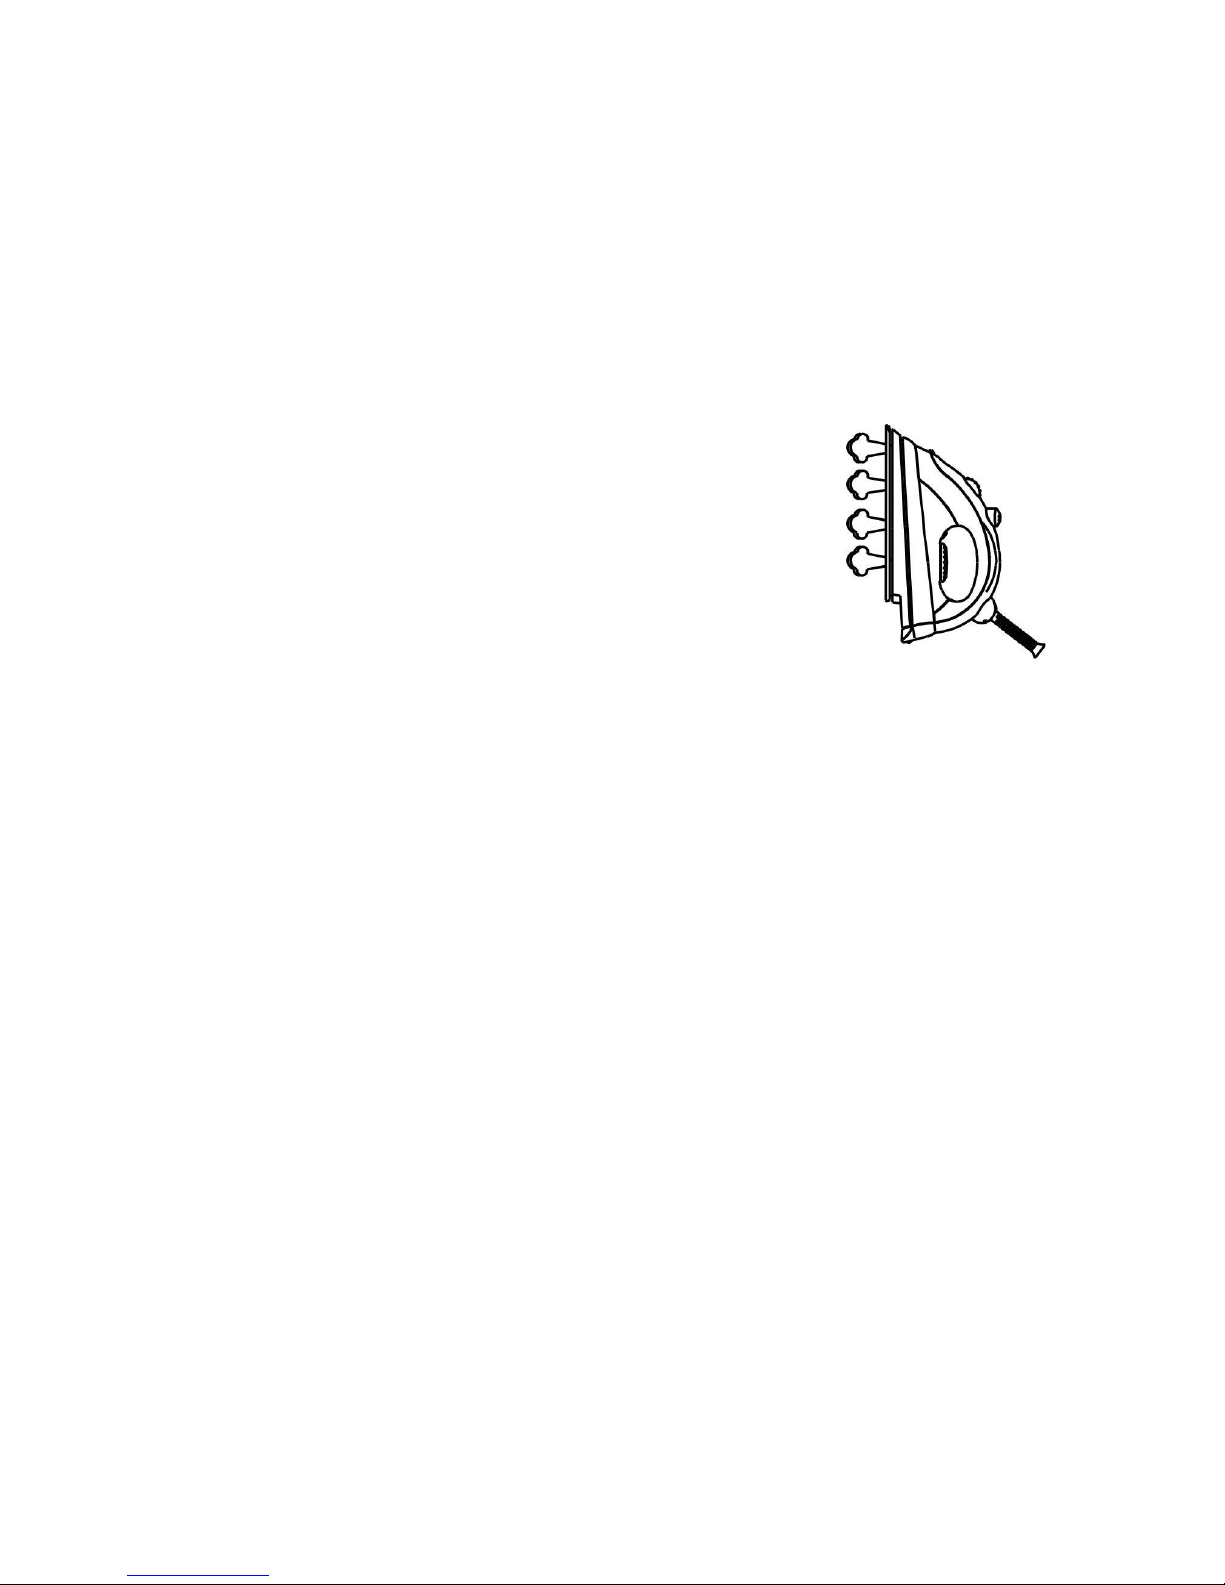
VERTICAL BURST OF STEAM FUNCTION:
Warning: Do not apply steam to any clothes or fabrics while they are being worn by
humans or pets. The temperature of the steam is very high and may cause burns.
This function provides extra steam to remove wrinkles from delicate garments in
a hanging position, hanging curtains or other hanging
fabrics.
Fill the iron as described in the HOW TO FILL WITH
WATER section.
Turn the Temperature Dial in a clockwise direction to the
‘●●●’ setting.
Hold the iron between 15 and 30 centimetres away from
the hanging garment or fabric.
Press the Burst of Steam Button once.
Steam will penetrate into the garment removing the wrinkles.
For stubborn wrinkles wait a few seconds before pressing the Burst of Steam
button again.
Usually all wrinkles can be removed within three presses.
Please Note: It may be necessary to press the Burst of Steam Button a few times to
start this function.
Please Note: for optimum steam quality, do not operate the Burst of Steam Button
more than three times after the pilot light goes off.
SELF CLEANING FUNCTION:
This function removes the scales and mineral build-up in the Steam Chamber.
The iron will remain in the best condition if this function is performed at least
once a month or more regularly, depending on the hardness of the water being
used.
Fill the iron as described in the HOW TO FILL WITH WATER section. Fill the
tank to halfway full.
Place the iron on a stable surface in an upright standing position.
Connect the iron to the mains supply outlet.
Page 9
9
Turn the Temperature Dial in a clockwise direction to the ‘●●●’ setting.
The pilot light will turn on to indicate that the iron is switched on. When the
required temperature is reached, the pilot light will turn off.
Wait for the pilot light to turn on and off once more.
Turn the Temperature Dial in an anti-clockwise direction to the Min mark.
Disconnect the iron from the mains supply outlet.
Hold the iron horizontally over a sink.
Rotate and hold the Steam Control / Self Cleaning Knob to the descaling
position.
Please Note: Steam and boiling hot water will emit from the holes in the soleplate
washing away the scales and minerals deposited in the Steam Chamber. Keep
skin/body away from the steam and hot water.
Gently move the iron back and forth until the water tank is empty.
When the Self-Cleaning is complete, release the Steam Control / Self-Cleaning
Knob and return it to the no steam position.
Place the iron on a stable surface in an upright standing position and allow the
iron to cool down completely.
Wipe the soleplate with a cool, damp cloth.
DRAINING THE WATER TANK:
Draining the water tank after ironing can prolong the life of your iron as it reduces
the build-up of calcification and lime in the steam chamber.
Disconnect the iron from the mains supply outlet.
Turn the Steam Control / Self-Cleaning Knob to the
position.
Press the Burst of Steam and Spray buttons to release
any reserve water.
Hold the iron upside down and gently shake it to
remove the water remaining in the water tank.
Please Note: Set the Steam Control Knob to the position before storing the iron.
Page 10

10
CLEANING AND MAINTENANCE
Disconnect the iron from the mains supply outlet.
Use a damp cloth or non-scratching cleaner to remove any deposits on the
soleplate or the cabinets
Never use sharp or rough objects to remove the deposits on the soleplate.
Never use any abrasive, vinegar or descaling agents to clean the iron.
It is recommended to store the iron in an upright position.
Use the Self-Cleaning function at least once a month.
Clean the Steam Valve regularly.
This appliance is for household use only and is not user-serviceable.
Do not open or change any parts by yourself. Please refer to a qualified electrical
service department or return to the supplier if servicing is necessary.
Always remember to unplug the unit from the electrical outlet when not in use
and before cleaning. Ensure that the speed control is set to “0”.
It is much easier to clean the accessories directly after they have been used.
Wash them in warm, soapy water, rinse and dry well.
The body of the appliance and the stand should be cleaned with a damp cloth.
Do not let water enter the appliance or the stand.
Do not use bleach or other abrasive substance or solvents to clean your
appliance as it can be damaging to the finish.
Do not immerse the appliance in water or any other liquid, or hold it under a
running tap to clean.
To remove stubborn spots/marks, wipe the surfaces with a cloth slightly
dampened in soapy water or mild non-abrasive cleaner. Rinse and dry a clean,
dry, soft cloth.
STORING THE APPLIANCE
Unplug the unit from the wall outlet and clean all the parts as instructed above.
Ensure that all parts are dry before storing.
Store the appliance in its box or in a clean, dry place.
Never store the appliance while it is still wet or dirty.
Never wrap the power cord around the appliance.
Page 11
11
SERVICING THE APPLIANCE
There are no user serviceable parts in this appliance. If the unit is not operating
correctly, please check the following:
You have followed the instructions correctly
That the unit has been wired correctly and that the wall socket is switched on.
That the mains power supply is ON.
That the plug is firmly in the mains socket.
If the appliance still does not work after checking the above:
- Consult the retailer for possible repair or replacement. If the retailer fails to resolve the
problem and you need to return the appliance, make sure that:
The unit is packed carefully back into its original packaging.
Proof of purchase is attached.
A reason is provided for why it is being returned.
If the supply cord is damaged, it must be replaced by the manufacturer or an authorised
service agent, in order to avoid any hazard. If service becomes necessary within the
warranty period, the appliance should be returned to an approved Tedelex Trading (Pty)
Limited service centre. Servicing outside the warranty period is still available, but will,
however, be chargeable.
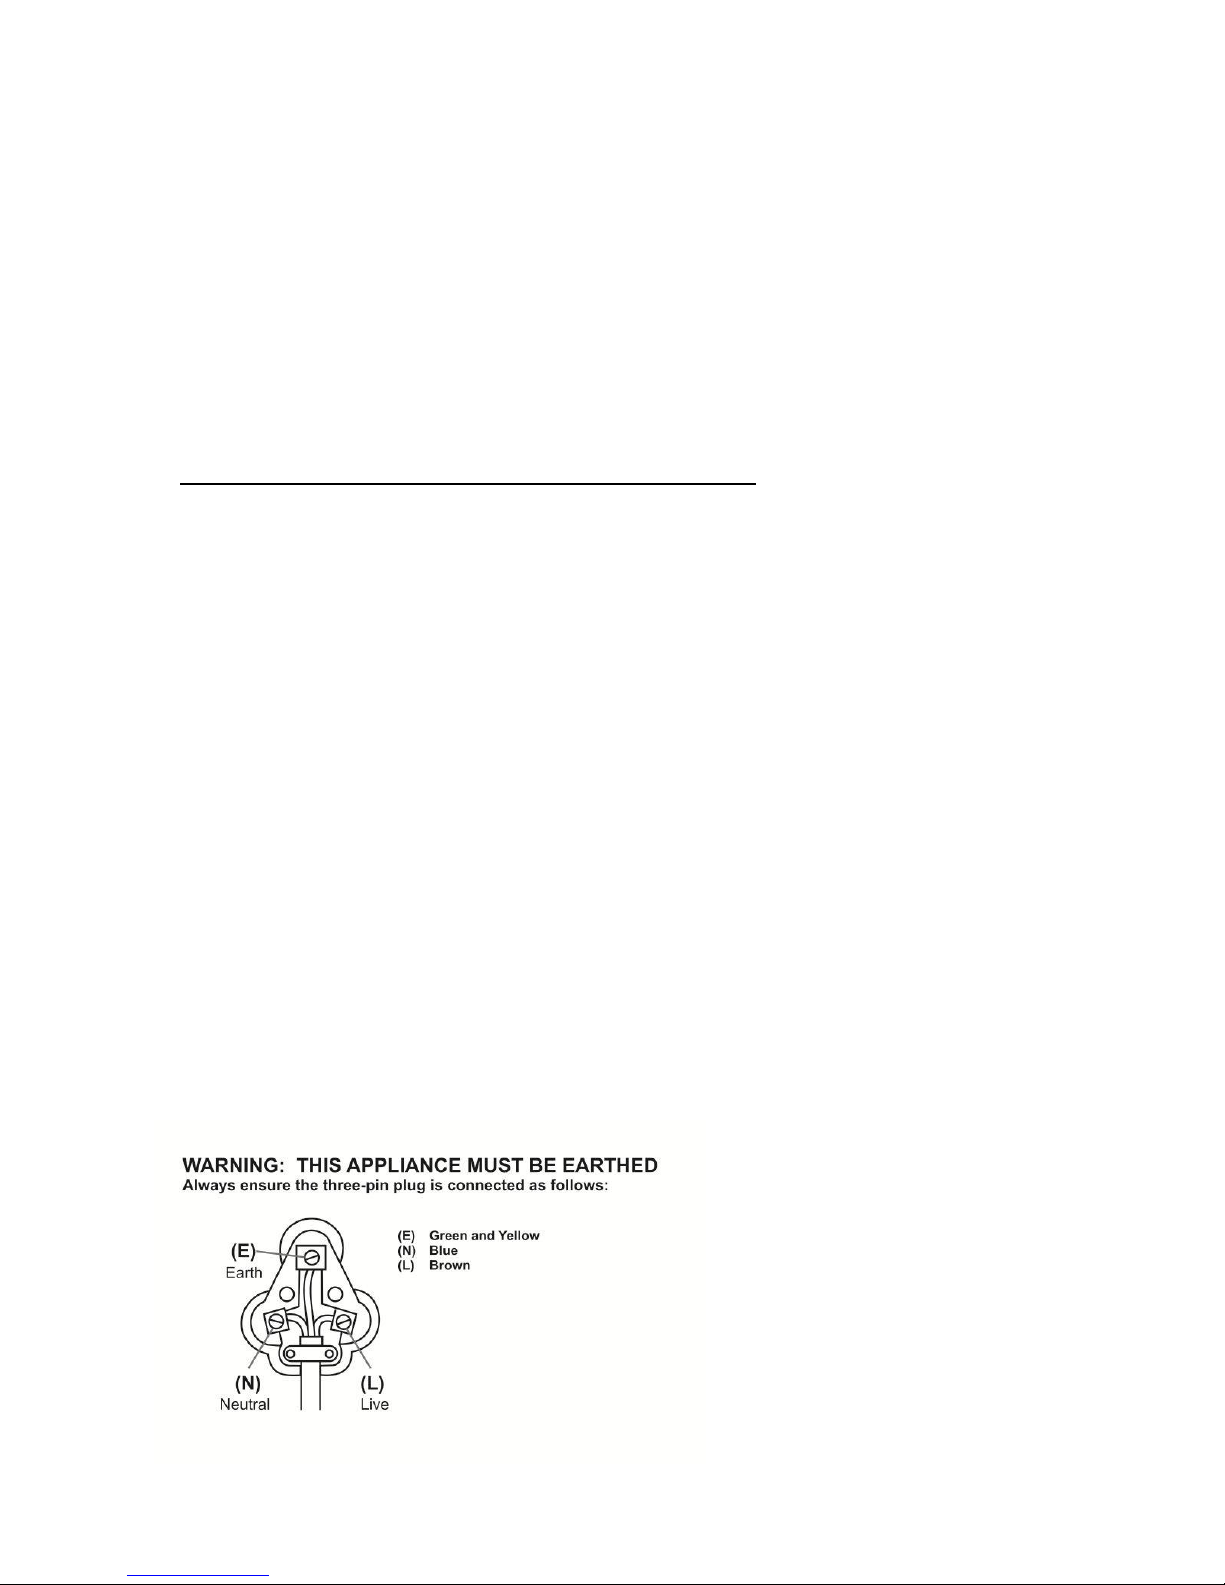
CHANGING THE PLUG
Should the need arise to change the fitted plug, follow the instructions below.
This unit is designed to operate on the stated current only. Connecting to other
power sources may damage the appliance. Connect a three-pin plug as follows:
The wires in this mains lead are coloured in accordance with the following code:
Page 12

12
PLEASE AFFIX YOUR PROOF OF PURCHASE/RECEIPT HERE
IN THE EVENT OF A CLAIM UNDER WARRANTY THIS RECEIPT MUST BE PRODUCED.
W A R R A N T Y
1. Tedelex Trading (Pty) Limited (“Tedelex”) warrants to the original purchaser of this product (“the
customer”) that this product will be free of defects in quality and workmanship which under normal
personal, family or household use and purpose may manifest within a period of 1 (one) year from
the date of purchase (“warranty period”).
2. Where the customer has purchased a product and it breaks, is defective or does not work
properly for the intended purpose, the customer must notify the supplier from whom the customer
bought the product (“the supplier”) thereof within the warranty period. Any claim in terms of this
warranty must be supported by a proof of purchase. If proof of purchase is not available, then
repair, and/or service charges may be payable by the customer to the supplier.
3. The faulty product must be taken to the supplier's service centre to exercise the warranty.
4. The supplier will refund, repair or exchange the product in terms of this warranty subject to
legislative requirements. This warranty shall be valid only where the customer has not broken the
product himself, or used the product for something that it is not supposed to be used for. The
warranty does not include and will not be construed to cover products damaged as a result of
disaster, misuse, tamper, abuse or any unauthorised modification or repair of the product.
5. This warranty will extend only to the product provided at the date of the purchase and not to any
expendables attached or installed by the customer.
6. If the customer requests that the supplier repairs the product and the product breaks or fails to
work properly within 3 (three) months of the repair and not as a result of misuse, tampering or
modification by or on behalf of the customer, then the supplier may replace the product or pay a
refund to the customer.
7. The customer may be responsible for certain costs where products returned are not in the original
packaging, or if the packaging is damaged. This will be deducted from any refund paid to the
customer.
TEDELEX TRADING (PTY) LTD (JOHANNESBURG)
JOHANNESBURG TEL NO. (011) 490-9600
CAPE TOWN TEL NO. (021) 552-5161
DURBAN TEL NO. (031) 792-6000
www.amap.co.za
Page 13

13
Félicitations pour l’achat de notre fer à repasser à vapeur, à pulvérisation et à jet de
vapeur RUSSELL HOBBS. Chaque unité est fabriquée avec un souci de sécurité et de
fiabilité. Avant d’utiliser cet appareil pour la première fois, merci de lire le manuel
d’instructions et de le conserver afin de pouvoir vous y reporter à l’avenir.
MESURES DE SECURITE IMPORTANTES
Lorsque vous utilisez n’importe quel appareil électrique, les précautions de sécurité de
base devraient toujours être suivies, y compris les points suivants :
1. Merci de lire les instructions avec attention avant d’utiliser un appareil quel qu’il
soit.
2. Toujours vous assurer que le voltage inscrit sur l’étiquette de classification
correspond aux voltages principaux de votre habitation.
3. Un mauvais fonctionnement et une utilisation inappropriée peuvent
endommager l’appareil et peuvent entraîner des blessures pour l’utilisateur.
4. L’appareil est uniquement destiné à un usage domestique. Une utilisation
commerciale annule la garantie et le fournisseur ne peut pas être tenu pour
responsable en cas de blessures ou de dommages causés lors d’une utilisation
différente de celle pour laquelle cet appareil est destiné.
5. Eviter tout contact avec les parties articulées.
6. Cet appareil n’est pas conçu pour être utilisé par des personnes (y compris les
enfants) dont les capacités physiques, sensorielles ou mentales sont déficientes,
ou bien, ne possédant pas assez d’expérience ou de connaissance, à moins
qu’elles n’aient été supervisées ou qu’elles aient reçu des instructions relatives à
l’utilisation de l’appareil, par une personne responsable de leur sécurité.
7. Les enfants devraient être supervisés afin de s’assurer qu’ils ne jouent pas avec
l’appareil.
8. Vérifier le cordon d’alimentation et le brancher régulièrement afin d’éviter tout
endommagement. Si le cordon ou la prise sont endommagés, ils doivent être
remplacés par le fabricant ou par une personne qualifiée, afin d’éviter un risque
électrique.
Page 14

14
9. Ne pas utiliser l’appareil dans le cas où il serait tombé ou s’il a été endommagé
de quelque manière que ce soit. En cas de dommage, vous devez apporter
l’unité à un agent d’entretien autorisé.
10. Afin de réduire le risque d’électrocution, ne pas immerger ou exposer le groupe
moteur, la prise ou le cordon d’alimentation dans et à l’eau ou dans tout autre
liquide.
11. Ne jamais immerger l’unité dans l’eau ou dans tout autre liquide pour le nettoyer.
12. Retirer la prise en l’empoignant. Ne pas tirer sur le cordon pour débrancher
l’appareil du réseau électrique. Toujours rebrancher l’unité lorsqu’elle n’est pas
utilisée, avant de la nettoyer ou lorsque vous ajoutez ou enlevez des pièces de
l’appareil.
13. L’utilisation d’attachements accessoires qui ne sont ni recommandés, ni fournis
par le fournisseur peut entraîner des blessures, des incendies ou bien encore
des électrocutions.
14. Un cordon court est fournit afin d’éviter les risques d’enchevêtrement ou bien de
trébuchement avec un cordon plus long.
15. Ne pas laisser le cordon suspendu sur le bord d’une table ou d’un comptoir.
S’assurer qu’on ne peut pas tirer dessus par inadvertance
16. Eviter que le cordon ne touche pas des surfaces chaudes et qu’il se trouve pas
sur ou à proximité d’un brûleur à gaz chaud ou d’un brûleur électrique, ou
encore d’un four chauffé.
17. Ne pas utiliser l’appareil sur une cuisinière à gaz ou électrique ou bien au-dessus
ou près d’une flamme.
18. L’utilisation d’un cordon prolongateur n’est pas recommandée avec cet appareil.
Cependant, dans le cas où il s’avérerait nécessaire d’utiliser un fil de
prolongation, s’assurer que ce dernier convient à la consommation électrique de
l’appareil, afin d’éviter de surchauffer le cordon prolongateur, l’appareil ou bien
les électrodes. Ne pas placer le cordon prolongateur de façon à ce que les
enfants ou les animaux puissent le tirer ou encore trébucher dessus.
19. Cet appareil ne convient pas à un usage à l’extérieur. Ne pas utiliser cet appareil
pour un usage autre que celui pour lequel il est destiné.
20. NE PAS porter l’appareil en le prenant par le cordon d’alimentation.
Page 15

15
21. Ne pas laisser cet appareil dans surveillance pendant son utilisation. Toujours
débrancher l’unité lorsqu’elle n’est pas utilisée ou avant de la nettoyer.
22. Faire toujours fonctionner l’appareil sur une surface lisse, égale et stable. Ne pas
placer l’unité sur une surface chaude.
23. S’assurer que l’interrupteur est en position « éteint » après chaque utilisation.
24. Le fabriquant n’accepte pas de porter la responsabilité de tout dommage ou
blessure qui serait cause par une utilisation inappropriée ou incorrecte, ou pour
des réparations qui n’auraient pas été faites par un personnel autorisé.
25. En cas de problèmes techniques, éteindre la machine et n’essayez pas de la
réparer vous-même. Rapportez l’appareil à un service d’entretien autorisé afin
qu’il soit examiné, ajusté ou bien réparé. Toujours insister pour que les pièces
détachées d’origine soient utilisées. Le manquement à suivre les précautions et
les instructions mentionnées ci-dessus, pourrait affecter le fonctionnement en
toute sécurité de cette machine.
MESURES DE SECURITE SUPPLEMENTAIRES
Déroulez et ajustez toujours le cordon d’alimentation pour qu’il soit droit avant
utilisation.
Débrancher le fer à repasser de la prise d’alimentation électrique lorsque vous le
remplissez d’eau.
Lorsque vous avez fini d’utiliser le fer à repasser, vider l’eau restant dans le
réservoir d’eau. Faites attention, cette eau peut être chaude.
Ne pas laisser le fer à repasser sans surveillance lorsqu’il est branché à la prise
d’alimentation électrique.
Ne pas ajouter des liquides parfumés, du vinaigre ou d’autres liquids chimiques
dans le réservoir d’eau, ils peuvent endommager le fer à repasser.
Ne pas enrouler le cordon d’alimentation autour du fer avant qu’il n’ait
complètement refroidi.
Page 16

16
SCHEMA DES PIECES
1. Semelle
2. Cadran de sélection de
température
3. Pointeur du cadran de sélection
de température
4. Témoin lumineux
5. Orifice de remplissage
6. Nez pulvérisateur
7. Bouton de contrôle de la
vapeur/Bouton d’auto-nettoyage
8. Bouton spray
9. Bouton de jet de vapeur
INSTRUCTIONS DE FONCTIONNEMENT
CONSEILS POUR LE REPASSAGE :
Trier les vêtements à repasser en différents groupes en fonction du type de tissu.
Cela réduira la fréquence des changements de température pour les différents
vêtements.
Essayer le fer à repasser sur une petite surface à l’envers ou à l’intérieur du
vêtement si vous n’êtes pas certain du type de tissu. Démarrez avec une
température basse et augmentez-la progressivement.
Page 17

17
Patientez environ trois minutes après avoir réglé la température, avant que la
PARAMETRES DE REGLAGE DE LA TEMPERATURE
Acétate
Elastène
Polyamide
Polypropylène
Cupro
Polyestère
Protéïne
Soie
Triacetate
Viscose
Laine
Coton
Lin
chaleur du repassage n’endommage des tissus fragiles. Les réglages de
température demandent un certain temps avant d’atteindre le niveau requis et
cela que la température soit plus basse ou plus élevée.
Il vaut mieux repasser les tissus fragiles comme la soie, la laine, le velours etc…
en utilisant une couverture de repassage, afin d’éviter les marques de brillances.
Vous aurez peut être besoin d’utiliser quelques fois les fonctions spray, bouffée
de vapeur et bouffée de vapeur verticale.
La mise à température est plus rapide que le refroidissement, commencez donc
en premier par repasser les vêtements qui requièrent une température de
repassage plus faible (les fibres synthétiques et la soie), puis repassez dans un
ordre correct les autres vêtements et les différents matériaux requérrant une
température plus élevée (laine, coton et lin).
LIRE LES ETIQUETTES DES VETEMENTS ET SUIVRE LES INSTRUCTIONS DE
REPASSAGE DU FABRIQUANT QUI SONT SOUVENT REPRESENTES PAR DES
SYMBOLES SEMBLABLES AUX SUIVANTS :
COMMENT REMPLIR D’EAU :
Note : Il est recommandé d’utiliser de l’eau purifiée ou bien de
l’eau minérale.
Débrancher le fer à repasser de la prise d’alimentation
électrique.
Page 18

18
Régler le bouton de contrôle de la vapeur / d’auto-nettoyage sur la position .
Remplir d’eau par l’orifice de remplissage.
Remplir jusqu’au niveau MAX du réservoir d’eau
AVANT D’UTILISER VOTRE FER A REPASSER POUR LA PREMIERE FOIS :
Nettoyer le réservoir d’eau et les évents à vapeur situé sur la semelle, afin
d’enlever la poussière qui aurait pu se déposer pendant le processus de
fabrication.
De la vapeur peut s’échapper du fer à repasser lorsqu’il est utilisé pour la
première fois. C’est sans danger et cela s’arrêtera rapidement.
Retirer les emballages de protection et les étiquettes de la semelle et la nettoyer
avec un chiffon doux et humide.
Remplir le fer à repasser ainsi qu’il l’est décrit dans la section COMMENT
REMPLIR D’EAU.
Placer le fer sur son talon et le brancher sur une prise d’alimentation électrique
adéquate.
Tournez le cadran de sélection de température sur la position « ●●● » – le
témoin lumineux s’allumera.
Le témoin lumineux s’éteint lorsque la température requise est atteinte.
Tournez le bouton de contrôle de la vapeur / d’auto-nettoyage sur la position .
De la vapeur commencera à s’échapper des trous de la semelle.
La première fois commencez par repasser une vieille serviette ou bien un vieux
vêtement en coton.
Lorsque le réservoir d’eau est vide et que le vapeur ne s’échappe plus, alors le
travail de préparation est terminé et le fer à repasser est prêt à être utiliser
correctement.
REPASSAGE A SEC :
Brancher le fer à repasser sur la prise d’alimentation électrique adéquate.
Tourner le cadran de sélection de température dans le sens des aiguilles d’une
montre pour sélectionner « ● », « ●● » ou « ●●● », en fonction des
recommandations de l’étiquette du vêtement.
Page 19

19
Lorsque le repassage est terminé, tournez le cadran de sélection de température
dans le sens inverse des aiguilles d’une montre vers « Min », pour éteindre le fer
à repasser.
Débrancher le fer à repasser de la prise d’alimentation électrique.
FONCTION SPRAY :
Cette fonction peut être utilisée a tout moment et elle ne doit pas affecter la
température de repassage.
Remplir le fer à repasser ainsi qu’il l’a été décrit
dans la section COMMENT LE REMPLIR D’EAU.
Viser le vêtement avec le nez du fer à repasser.
Appuyer sur le bouton spray.
Veuillez noter : il se peut qu’il soit nécessaire d’appuyer à plusieurs reprises sur le
bouton spray pour démarrer cette fonction.
FONCTION VAPEUR :
Remplir le fer à repasser ainsi qu’il l’est décrit dans la section COMMENT LE
REMPLIR D’EAU.
Tourner le cadran de sélection de température dans le sens des aiguilles d’une
montre sur la position « ●●● »
Veuillez noter : Ne pas utiliser la position « ● » or « ●● » pour le repassage à la
vapeur.
Lorsque le témoin lumineux s’éteint, la température requise a été atteinte et le fer
à repasser est prêt à l’emploi.
Faire pivoter le bouton de contrôle de la vapeur / d’auto-nettoyage vers l’arrière
pour obtenir plus de vapeur, ou le faire pivoter vers l’avant pour obtenir moins de
vapeur. En même temps, tourner le bouton sur la position afin de supprimer
la vapeur.
LA FONCTION JET DE VAPEUR :
Cette fonction fournit un surcroît de vapeur pour venir
à bout des faux plis récalcitrants.
Remplir le fer à repasser ainsi qu’il l’est décrit dans la
Page 20

20
section COMMENT LE REMPLIR D’EAU.
Tourner le cadran de sélection de température dans le sens des aiguilles d’une
montre sur la position « ●●● ».
Appuyer une fois sur le bouton de jet de vapeur.
La vapeur va imprégner le vêtement afin d’enlever les faux plis.
Patientez quelques secondes avant d’appuyer à nouveau sur le bouton de jet de
vapeur.
Normalement tous les faux plis disparaissent au bout de trois repassages.
Veuillez noter : Il se peut qu’il soit nécessaire d’appuyer plusieurs fois sur le bouton
de jet de vapeur pour démarrer cette fonction.
Veuillez noter : afin d’obtenir une qualité de vapeur optimale, ne faites pas
fonctionner le bouton de jet de vapeur plus de trois fois après que le témoin lumineux
ne se soit éteint.
FONCTION DE JET DE VAPEUR VERTICAL :
Avertissement : ne pas vaporiser de la vapeur sur des vêtements ou sur des tissus
lorsqu’ils sont portés par des personnes, ou bien ne pas la vaporiser sur des
animaux. La température de la vapeur est très élevée et pourrait entraîner des
brûlures.
Cette fonction fournit un surcroît de température afin d’enlever les faux plis
récalcitrants des vêtements fragiles lorsqu’ils sont
suspendus, des rideaux suspendus ou d’autres tissus
suspendus.
Remplir le fer à repasser ainsi qu’il l’est décrit dans la
section COMMENT LE REMPLIR D’EAU.
Tourner le cadran de sélection de température dans le
sens des aiguilles d’une montre sur la position « ●●● ».
Maintenir le fer à repasser à environ 15 et 30 centimètres du vêtement ou du
tissu qui est suspendu.
Appuyer une fois sur le bouton de jet de vapeur.
La vapeur va imprégner le vêtement afin d’enlever les faux plis.
Patientez quelques secondes avant d’appuyer à nouveau sur le bouton de jet de
vapeur.
Page 21

21
Normalement tous les faux plis disparaissent au bout de trois repassages.
Veuillez noter : Il se peut qu’il soit nécessaire d’appuyer plusieurs fois sur le bouton
de jet de vapeur pour démarrer cette fonction.
Veuillez noter : afin d’obtenir une qualité de vapeur optimale, ne faites pas
fonctionner le bouton de jet de vapeur plus de trois fois après que le témoin lumineux
ne se soit éteint.
FONCTION D’AUTO-NETTOYAGE :
Cette fonction enlèvera les dépôts de calcaire accumulé dans la chambre à
vapeur. Le fer à repasser restera en bon état si cette fonction est exécutée au
moins une fois par mois ou plus régulièrement, en fonction de la dureté de l’eau
qui est utilisée.
Remplir le fer à repasser ainsi qu’il l’est décrit dans la section COMMENT LE
REMPLIR D’EAU.
Placer le fer en position verticale sur une surface stable.
Brancher le fer à repasser sur la prise d’alimentation électrique.
Tourner le cadran de sélection de température dans le sens des aiguilles d’une
montre sur la position « ●●● ».
Le témoin lumineux s’allumera pour indiquer que le fer est allumé. Lorsque la
température requise est atteinte, le témoin lumineux s’éteindra.
Attendez que le témoin lumineux s’allume une fois de plus.
Tourner le cadran de sélection de température dans le sens inverse des aiguilles
d’une montre jusqu’à la marque Min.
Débrancher le fer à repasser de la prise d’alimentation électrique.
Maintenir le fer à repasser au-dessus d’un évier
Tourner et maintenir le bouton de contrôle de la vapeur / d’auto-nettoyage sur la
position détartrage.
Veuillez noter : de la vapeur et de l’eau chaude sortiront des trous de la semelle,
nettoyant les dépôts de calcaire de la chambre de vapeur. Tenir la peau / le corps à
l’écart de la vapeur et de l’eau chaude.
Manipuler doucement le fer à repasser de l’avant vers l’arrière, jusqu’à ce que le
réservoir d’eau soit vide.
Page 22

22
Lorsque l’auto-nettoyage est terminé, relâcher le bouton de contrôle de la
vapeur/d’auto-nettoyage et le remettre sur la position sans vapeur.
Placer le fer à repasser en position verticale et le laisser refroidir complètement.
Essuyer la semelle avec un chiffon.
VIDER LE RESERVOIR D’EAU :
Vider le réservoir d’eau après le repassage peut prolonger la durée de vie de
votre fer à repasser, puisque cela réduit l’accumulation des dépôts calcaire dans
la chambre à vapeur.
Débrancher le fer à repasser de la prise d’alimentation
électrique.
Tourner le bouton de contrôle de vapeur / d’auto-
nettoyage sur la position .
Appuyer sur les boutons de jet de vapeur et spray pour
relâcher toute réserve de vapeur.
Maintenir le fer à repasser à l’envers et l’agiter doucement afin de vider l’eau
restant dans le réservoir d’eau.
Veuillez noter : Régler le bouton de contrôle de la vapeur / d’auto-nettoyage sur la
position , avant de ranger le fer à repasser.
Page 23

23
NETTOYAGE ET MAINTENANCE
Débrancher le fer à repasser de la prise d’alimentation électrique.
Utiliser un chiffon humide ou bien un nettoyant anti-abrasif pour enlever tout
dépôt calcaire de la semelle ou des compartiments.
Ne jamais utiliser des objets coupant ou rugueux pour enlever les dépôts sur la
semelle.
Ne jamais utiliser d’agents abrasifs ou de détartrage ou bien de vinaigre pour
nettoyer le fer à repasser.
Il est recommandé de ranger le fer à repasser en position verticale.
Utiliser la fonction d’auto-nettoyage au moins une fois par mois.
Nettoyer régulièrement la valve de vapeur.
Cet appareil est uniquement destiné à un usage domestique et il ne peut pas
être réparé par l’utilisateur.
Ne pas ouvrir ou changer vous-même toute pièce que ce soit. Merci de vous
adresser au département de maintenance électrique compétent ou bien de
renvoyer l’appareil au fournisseur si une révision est nécessaire.
Rappelez-vous de toujours débrancher l’unité de la prise électrique lorsqu’elle
n’est pas utilisée ou bien avant de la nettoyer. S’assurer que la commande de
vitesse est réglée sur « 0 ».
Il est beaucoup plus facile de nettoyer les accessoires directement après leur
utilisation. Nettoyez-les dans une eau chaude et savonneuse, les rincer et bien
les sécher.
Le corps de l’appareil et son support devraient être nettoyés à l’aide d’un chiffon
humide. Ne pas laisser l’eau entrer dans l’appareil ou dans le support.
Ne pas utiliser d’eau de javel ou toute autre substance abrasive ou solvants pour
nettoyer votre appareil, car cela pourrait endommager le revêtement.
Ne pas plonger l’appareil dans l’eau ou dans tout autre liquide, ou bien ne pas le
maintenir sous un robinet ouvert pour le nettoyer.
Afin d’enlever les tâches ou les marques récalcitrantes, essuyer les surfaces
avec un chiffon légèrement humidifié dans une eau chaude et savonneuse, ou
bien avec un nettoyant doux non-abrasive. Le rincer et le sécher avec un chiffon
doux.
Page 24

24
LE RANGEMENT DE L’APPAREIL
Débrancher l’unité de la prise et nettoyer toutes les pièces en suivant les
instructions ci-dessus. S’assurer que toutes les pièces sont sèches, avant de les
ranger.
Ranger l’appareil dans sa boite ou bien dans un lieu propre et sec.
Ne jamais ranger l’appareil dans s’il est encore humide ou sale.
Ne jamais enrouler le cordon d’alimentation autour de l’appareil.
ENTRETIEN DE L’APPAREIL
Il n’existe pas dans cet appareil de pièces qui soient réparables par l’utilisateur. Si
l’unité ne fonctionne pas correctement, merci de bien vouloir vérifier les points suivants :
Vous avez suivit correctement les instructions.
Que l’unité est correctement câblée et que la prise est allumée.
Que le réseau d’alimentation électrique est allumé.
Que la prise est fermement branchée dans la prise du réseau.
Si l’appareil ne fonctionne toujours pas après avoir vérifié les points ci-dessus :
- Consulter le distributeur pour une réparation ou bien pour un remplacement possibles.
Dans le cas où le revendeur ne résoudrait pas le problème et que vous devez renvoyer
l’appareil, assurez-vous que :
L’unité est remballée avec soin dans son emballage d’origine.
La preuve d’achat est jointe.
La raison de son renvoi est fournie.
Si le cordon d’alimentation est endommagé, il doit être remplacé par un fabricant ou par
un agent d’entretien autorisé, afin d’éviter risqué. Si une révision s’avère nécessaire
Durant la période de garantie, l’appareil devrait être renvoyé à un centre d’entretien
approuvé par Tedelex Trading (Pty) Limited. Une révision en dehors de la période de
garantie est toujours possible, mais sera toutefois facturée.
Page 25

25
LE CHANGEMENT DE LA PRISE
Si la prise intégrée devait être change, suivez les instructions ci-dessous.
Cette unité est conçue pour fonctionner uniquement sur courant continu.
La connexion à d’autres sources d’alimentation pourrait endommager
l’appareil. Connecter la prise à trois chiffes de la manière suivante :
Les fils de ce réseau sont colorés selon le code suivant :
Page 26

26
MERCI D’ATTACHER VOTRE PREUVE D’ACHAT ICI
EN CAS DE RECLAMATION SOUS GARANTIE CE RECU DOIT ETRE PRESENTE.
GARANTIE
1. Tedelex Trading (Pty) Limited (« Tedelex ») garantie à l’acheteur d’origine de ce produit (« le
client ») que produit ne sera pas défectueux que ce soit en ce qui concerne sa qualité ou sa
fabrication, ce dernier dans le cas d’une utilisation personnelle normale, familiale ou
domestique, pourra se manifester à ce propos dans une période d’une (1) année à partir de la
date de l’achat (« période de garantie »).
2. Si le client a acheté un produit et qu’il se casse, qu’il est défectueux ou qu’il ne fonctionne pas
correctement, le client doit notifier cela au fournisseur auprès duquel il a acheté le produit
(« le fournisseur ») dans la période de garantie. Toute réclamation dans le cadre de cette
garantie doit être accompagnée d’une preuve d’achat. Si la preuve d’achat n’est pas
disponible, les frais de la réparation, et / ou de la révision peuvent être réglés par le client au
fournisseur.
3. Le produit défectueux doit être rapporté au centre d’entretien du fournisseur afin d’activer la
garantie.
4. Le fournisseur remboursera, réparera ou échangera le produit, selon les termes de cette
garantie, qui est soumise à des conditions juridiques. Cette garantie devrait être valide,
uniquement dans le cas où le client n’aurait pas cassé lui-même le produit, ou qu’il ne l’a pas
utilisé pour un usage autre que celui pour lequel il était destine. La garantie ne comprend pas
et ne sera pas interprétée de manière à couvrir les produits endommagés à la suite d’un
désastre, d’une mauvaise utilisation, d’un traficage, d’un abus ou de toute modification ou
d’une réparation non-autorisée du produit.
5. Cette garantie s’étendra uniquement au produit fournit à la date de l’achat et non à toute pièce
supplémentaire attachée ou installée par le client.
6. Si le client requiert que le fournisseur répare le produit et que le produit se casse, ou bien qu’il
ne fonctionne pas dans les 3 (trois) mois suivant la réparation, et que cela n’est pas le résultat
d’une mauvaise utilisation, d’une falsification ou d’une modification par ou bien au nom du
client, à ce moment là, le fournisseur devra remplacer le produit ou rembourser le client.
7. Le client peut être tenu responsable de certains frais, lorsque les produits renvoyés ne sont
pas dans leur emballage d’origine, ou bien si l’emballage est endommagé. Ceci sera déduit
de tout remboursement réglé au client.
TEDELEX TRADING (PTY) LTD (JOHANNESBURG)
JOHANNESBURG NO TEL. +2711 490-9600
CAPE TOWN NO TEL. +2721 552-5161
DURBAN NO TEL. +2731 792-6000
www.amap.co.za
Page 27

27
Obrigado por ter escolhido o Parabéns por ter comprado o nosso ferro de engomar
RUSSELL HOBBS com jacto de vapor e borrifador. Cada aparelho é fabricado com
vista a assegurar a segurança e a fiabilidade. Leia o manual de instruções
cuidadosamente e guarde-o para consulta futura antes de utilizar este aparelho
pela primeira vez.
MEDIDAS DE SEGURANÇA IMPORTANTES
Ao utilizar qualquer aparelho eléctrico, cumpra sempre com as precauções básicas de
segurança, incluindo o seguinte:
1. Leia as instruções cuidadosamente antes de utilizar qualquer aparelho.
2. Certifique-se sempre de que a voltagem indicada na etiqueta de classificação
corresponde à voltagem da corrente na sua residência.
3. O funcionamento incorrecto e a utilização indevida do aparelho podem-no
danificar e provocar lesões no utilizador.
4. O aparelho destina-se apenas para uso doméstico. O uso comercial do aparelho
invalida os termos da sua garantia e o fornecedor não poderá ser
responsabilizado por quaisquer lesões ou danos que tenham ocorrido na
sequência do uso do aparelho para qualquer outro fim que não o indicado.
5. Evite qualquer contacto com peças móveis.
6. Este aparelho não se destina a ser utilizado por pessoas (incluindo crianças)
com capacidades físicas, sensoriais ou mentais reduzidas ou falta de
experiência e conhecimento, excepto caso tenham supervisão ou recebido
instruções acerca do seu uso por uma pessoa responsável pela sua segurança.
7. As crianças devem ser supervisionadas para assegurar que não brincam com o
aparelho.
8. Inspeccione o fio e a tomada regularmente para detectar quaisquer sinais de
danos. Se o fio ou a tomada estiverem danificados, devem ser substituídos pelo
fabricante ou um técnico devidamente qualificado para evitar um risco eléctrico.
9. Não use o aparelho caso tenha caído ao chão ou sido danificado de qualquer
maneira. Caso ocorram quaisquer danos, o aparelho deve ser inspeccionado
e/ou reparado por um centro de assistência devidamente autorizado.
10. Para reduzir o risco de choque eléctrico, não submirja ou exponha o motor, ficha
ou fio a água ou qualquer outro líquido.
Page 28

28
11. Nunca submirja o aparelho em água ou qualquer outro líquido para fins de
limpeza.
12. Segure a ficha firmemente para a retirar da tomada. Nunca puxe o fio para retirar
a ficha da tomada e desligar o aparelho da corrente. Retire sempre a ficha da
tomada quando o aparelho não estiver em uso, antes de a limpar ou ao
adicionar ou remover peças.
13. O uso de acessórios que não sejam recomendados ou fornecidos pelo fabricante
pode originar lesões, incêndios ou choques eléctricos.
14. É fornecido um fio curto para reduzir os perigos resultantes de ficar emaranhado
ou tropeçar num fio mais comprido.
15. Não deixe o fio pendurado na extremidade de uma mesa ou balcão. Certifiquese de que o fio não está numa posição onde possa ser puxado inadvertidamente.
16. Não deixe o fio entrar em contacto com superfícies quentes e não o coloque
sobre ou perto de um fogão a gás ou eléctrico ou forno quente.
17. Não use o aparelho sobre um fogão a gás ou eléctrico ou sobre ou perto de
chamas vivas.
18. Não recomendamos o uso de uma extensão com este aparelho. Porém, se for
necessário usar uma extensão, certifique-se de que o terminal é adequado para
o consumo de electricidade do aparelho para evitar o sobreaquecimento da
extensão, aparelho ou tomada. Não coloque a extensão numa posição onde
possa ser puxada por crianças ou animais ou onde possa tropeçar nela.
19. Este aparelho não é adequado para uso no exterior. Não use este aparelho para
qualquer outro fim que não o previsto.
20. NÃO transporte o aparelho através do fio.
21. Não deixe este aparelho sem vigilância durante o seu uso. Retire sempre a ficha
da tomada quando o aparelho não estiver em uso ou ao limpar.
22. Utilize o aparelho sempre sobre uma superfície suave, uniforme e estável. Não o
coloque sobre uma superfície quente.
23. Após cada utilização, certifique-se de que o interruptor se encontra na posição
“Off” (Desligado).
24. O fabricante não aceita qualquer responsabilidade por quaisquer danos ou
lesões resultantes de um uso indevido ou incorrecto ou devido a reparações
efectuadas por pessoal não autorizado.
Page 29

29
25. Na eventualidade de quaisquer problemas técnicos, desligue o aparelho e não o
tente reparar sozinho. Devolva o aparelho a um centro de assistência autorizado
para fins de inspecção, ajuste ou reparação. Insista sempre na utilização de
peças sobresselentes originais. O não cumprimento das precauções e
instruções acima indicada poderá comprometer o funcionamento seguro deste
aparelho.
MEDIDAS DE SEGURANÇA ADICIONAIS
Desenrole e estique sempre o cabo de alimentação antes da utilização.
Desligue o ferro de engomar da tomada de alimentação quando encher o
reservatório com água.
Retire a água que resta no reservatório de água após ter utilizado o ferro de
engomar. Tenha cuidado, pois a água pode estar quente.
Não deixe o ferro de engomar sozinho quando estiver ligado à tomada de
alimentação.
Não adicione líquidos perfumados, vinagre ou outros químicos à água do
reservatório, pois podem danificar o ferro de engomar.
Não enrole o cabo de alimentação à volta do ferro de engomar para o arrumar
até este ter arrefecido completamente.
Page 30

30
DIAGRAMA DAS PEÇAS
1. Base
2. Botão da temperatura
3. Botão indicador da temperatura
4. Luz piloto
5. Orifício de entrada da água
6. Bico do borrifador
7. Botão de controlo do
vapor/limpeza automática
8. Botão do borrifador
9. Botão do jacto de vapor
INSTRUÇÕES OPERACIONAIS
INDICAÇÕES PARA ENGOMAR:
Separe as peças a serem engomadas por grupos, de acordo com o tipo de
tecido. Assim, minimizará a frequência do ajuste da temperatura para as
diferentes peças de roupa.
Faça um teste com o ferro de engomar sobre uma pequena área ou nas costas
ou no avesso das peças de roupa se não tiver a certeza do tipo de tecido.
Comece por uma temperatura baixa e aumente-a gradualmente.
Page 31

31
Aguarde cerca de três minutos após ajustar a temperatura antes de engomar
DEFINIÇÃO DO CONTROLO DA TEMPERATURA
Acetato
Elastano
Poliamida
Polipropileno
Cupro
Poliéster
Proteína
Seda
Triacetato
Viscose
Lã
Algodão
Linho
tecidos sensíveis ao calor. Os ajustes da temperatura necessitam de um certo
tempo para atingir o nível exigido, não importando se a temperatura está mais
baixa ou mais alta.
Os tecidos delicados, tais como a seda, a lã, o veludo, etc. ficam mais bem
engomados com um pano sobre as peças a engomar, evitando marcas
lustrosas.
Pode ser necessário pressionar o botão do borrifador algumas vezes de modo a
activar as funções do borrifador, do jacto e do jacto vertical.
O aquecimento ocorre mais rápido do que o arrefecimento, por isso comece a
engomar as roupas que exigem uma engomagem com uma temperatura mais
baixa em primeiro lugar (tecidos em fibra sintética e seda) e, depois outras
roupas de diferente material que exigem uma temperatura mais alta pela ordem
correcta (lã, algodão e linho).
LEIA AS ETIQUETAS DAS PEÇAS DE ROUPA E SIGA AS INSTRUÇÕES DE
ENGOMAGEM DO FABRICANTE MOSTRADAS FREQUENTEMENTE POR
SÍMBOLOS IDÊNTICOS AOS SEGUINTES:
COMO ENCHER O RESERVATÓRIO COM ÁGUA:
Nota: Recomenda-se que utilize água purificada ou mineral.
Desligue o ferro de engomar da tomada de alimentação.
Page 32

32
Rode o botão de controlo do vapor/limpeza automática para a posição
Encha o reservatório com água através do orifício de entrada da água.
Encha até ao nível Max indicado no reservatório da água.
ANTES DE UTILIZAR O FERRO DE ENGOMAR PELA PRIMEIRA VEZ:
Limpe o reservatório de água e os orifícios do vapor na base para remover pó
que possa ter ficado acumulado durante o processo de fabrico.
Pode ser libertado algum vapor quando o ferro de engomar é utilizado pela
primeira vez. Isto é normal e deixará de ocorrer após um curto período de
tempo.
Remova materiais de protecção e etiquetas da base e limpe-a com um pano
suave e húmido.
Encha o ferro de engomar com água conforme descrito na secção COMO
ENCHER O RESERVATÓRIO COM ÁGUA.
Coloque o ferro de engomar no seu suporte e ligue-o a uma tomada de
alimentação adequada.
Rode o botão da temperatura para a posição “●●●” – a luz piloto começará por
acender.
A luz piloto apaga-se quando é atingida a temperatura exigida.
Rode o botão de controlo do vapor/limpeza automática para a posição . O
vapor começará a sair dos orifícios da base.
Comece inicialmente por engomar uma toalha velha ou uma peça de roupa
velha em algodão.
Quando o reservatório de água estiver vazio e não for mais produzido vapor,
então o trabalho de preparação está terminado e o ferro de engomar está pronto
a ser utilizado totalmente.
ENGOMAGEM A SECO:
Ligue o ferro de engomar a uma tomada de alimentação adequada.
Rode o botão da temperatura no sentido dos ponteiros do relógio para
seleccionar “●”, “●●” ou “●●●” de acordo com o recomendado na etiqueta da
peça de roupa.
Page 33

33
Mova o botão da temperatura no sentido contrário ao dos ponteiros do relógio
para “MIN” quando terminar de engomar para desligar o ferro de engomar.
Desligue o ferro de engomar da tomada de alimentação.
FUNÇÃO DO BORRIFADOR:
Esta função pode ser utilizada a qualquer momento e não afecta a temperatura
da engomagem.
Encha o ferro de engomar com água conforme
descrito na secção COMO ENCHER O
RESERVATÓRIO COM ÁGUA.
Aponte o bico para a peça de roupa.
Pressione o botão do borrifador.
Nota: Pode ser necessário pressionar o botão do borrifador algumas vezes para
iniciar esta função.
FUNÇÃO DO VAPOR:
Encha o ferro de engomar com água conforme descrito na secção COMO
ENCHER O RESERVATÓRIO COM ÁGUA.
Rode o botão da temperatura no sentido dos ponteiros do relógio para a
definição “●●●”.
Nota: Não utilize a definição “●” ou “●●” para engomar com vapor.
Quando a luz piloto se apaga, a temperatura exigida foi atingida e o ferro de
engomar está pronto a ser utilizado.
Rode o botão de controlo do vapor/limpeza automática para trás para mais vapor
ou rode-o para a frente para menos vapor. Em alternativa, rode o botão para a
posição para parar o vapor.
FUNÇÃO DO JACTO DE VAPOR:
Esta função oferece vapor adicional para eliminar
vincos difíceis.
Encha o ferro de engomar com água conforme descrito
na secção COMO ENCHER O RESERVATÓRIO COM
ÁGUA.
Rode o botão da temperatura no sentido dos ponteiros
Page 34

34
do relógio para a definição “●●●”.
Pressione o botão do jacto de vapor uma vez.
O vapor penetrará na peça de roupa para eliminar os vincos.
Aguarde alguns segundos antes de pressionar o botão do jacto de vapor de
novo.
Normalmente, todos os vincos podem ser eliminados ao pressionar o botão três
vezes.
Nota: Pode ser necessário pressionar o botão do jacto de vapor algumas vezes para
iniciar esta função.
Nota: Para uma óptima qualidade de vapor, não accione o botão do jacto de vapor
mais de três vezes após a luz piloto se apagar.
FUNÇÃO DO JACTO DE VAPOR VERTICAL:
Aviso: Não aplique vapor a nenhuma peça de roupa ou tecido quando estiver a ser
usado por humanos ou animais de estimação. A temperatura do vapor é muito alta e
pode causar queimaduras.
Esta função oferece vapor adicional para eliminar vincos a peças de roupa
delicadas por estarem penduradas, a cortinas ou a outros
tecidos que se encontrem pendurados.
Encha o ferro de engomar com água conforme descrito na
secção COMO ENCHER O RESERVATÓRIO COM
ÁGUA.
Rode o botão da temperatura no sentido dos ponteiros do
relógio para a definição “●●●”.
Mantenha o ferro de engomar afastado entre 15 e 30 centímetros da peça de
roupa ou do tecido.
Pressione o botão do jacto de vapor uma vez.
O vapor penetrará na peça de roupa eliminando os vincos.
Para vincos difíceis aguarde alguns segundos antes de pressionar o botão de
jacto do vapor de novo.
Normalmente, todos os vincos podem ser eliminados ao pressionar o botão três
vezes.
Nota: Pode ser necessário pressionar o botão do jacto de vapor algumas vezes para
iniciar esta função.
Page 35

35
Nota: Para uma óptima qualidade de vapor, não accione o botão do jacto de vapor
mais de três vezes após a luz piloto se apagar.
FUNÇÃO DE LIMPEZA AUTOMÁTICA:
Esta função elimina o calcário e a formação de minerais na câmara do vapor. O
ferro de engomar permanecerá nas suas melhores condições se esta função for
executada pelo menos uma vez por mês ou mais regularmente, dependendo da
dureza da água que é utilizada.
Encha o ferro de engomar com água conforme descrito na secção COMO
ENCHER O RESERVATÓRIO COM ÁGUA. Encha o reservatório de água até
meio.
Coloque o ferro de engomar sobre uma superfície estável e na posição vertical.
Ligue o ferro de engomar à tomada de alimentação.
Rode o botão da temperatura no sentido dos ponteiros do relógio para a
definição “●●●”.
A luz piloto acenderá, indicando que o ferro de engomar está ligado. Quando a
temperatura exigida é atingida, a luz piloto apagar-se-á.
Aguarde que a luz piloto acenda e apague uma vez mais.
Rode o botão da temperatura no sentido contrário ao dos ponteiros do relógio
para a marca “MIN”.
Desligue o ferro de engomar da tomada de alimentação.
Mantenha o ferro de engomar na posição horizontal sobre uma banca.
Rode e mantenha pressionado o botão de controlo do vapor/limpeza automática
para a posição de eliminação do calcário .
Nota: Serão libertados dos orifícios da base vapor e água quente eliminando o
calcário e os minerais depositados na câmara do vapor. Mantenha o corpo e a pele
afastados do vapor e da água quente.
Mova o ferro de engomar devagar para a frente e para trás até esvaziar o
reservatório de água.
Quando a limpeza automática terminar, solte o botão de controlo do
vapor/limpeza automática e reponha-o na posição de parar o vapor .
Coloque o ferro de engomar sobre uma superfície estável e na posição vertical,
deixando que arrefeça completamente.
Page 36

36
Limpe a base com um pano frio e húmido.
ESVAZIAR O RESERVATÓRIO DE ÁGUA:
Esvaziar o reservatório de água após engomar pode prolongar a vida do ferro de
engomar à medida que reduz a formação de calcificação e calcário na câmara
de vapor.
Desligue o ferro de engomar da tomada de
alimentação.
Rode o botão de controlo do vapor/limpeza automática
para a posição .
Pressione os botões do jacto de vapor e do borrifador
para esvaziar qualquer água acumulada.
Mantenha o ferro de engomar virado para baixo e agite-o devagar para retirar a
água que resta no reservatório de água.
Nota: Defina o botão de controlo do vapor para a posição antes de arrumar o
ferro de engomar.
LIMPEZA E FUNCIONAMENTO
Desligue o ferro de engomar da tomada de alimentação.
Utilize um pano húmido ou um produto de limpeza anti-fricção para eliminar
qualquer depósito na base ou nos compartimentos.
Nunca utilize objectos pontiagudos ou duros para eliminar os depósitos na base.
Nunca utilize nenhum agente abrasivo, vinagre ou de eliminação do calcário
para limpar o ferro de engomar.
Recomenda-se que arrume o ferro de engomar na posição vertical.
Utilize a função de limpeza automática, pelo menos, uma vez por mês.
Limpe a válvula do vapor regularmente.
Este aparelho destina-se apenas para uso doméstico e não pode ser alvo de
assistência por parte do utilizador.
Page 37

37
Não abra o aparelho ou substitua quaisquer peças sozinho. Consulte um
departamento de assistência eléctrica devidamente qualificado ou devolva o
aparelho ao fornecedor caso seja necessário qualquer tipo de assistência.
Não se esqueça de retirar a ficha da tomada quando o aparelho não estiver em
uso e antes de o limpar. Certifique-se de que o controlo da velocidade está
definido para "0".
É mais fácil limpar os acessórios directamente depois de terem sido utilizados.
Lave-os com água quente e sabão e enxagúe-os bem e deixe-os secar
devidamente.
O corpo do aparelho e o suporte deve ser limpo com um pano húmido. Não
permita a entrada de água no aparelho ou suporte.
Não use lixívia ou qualquer outra substância abrasiva ou solventes para limpar o
aparelho visto que podem danificar o seu acabamento exterior.
Não submirja o aparelho em água ou qualquer outro líquido, ou mantenha-o
debaixo de água corrente para limpar.
Para remover quaisquer manchas/marcas resistentes, limpe as superfícies do
aparelho com um pano ligeiramente humedecido com água e detergente ou
utilize um agente de limpeza suave e não abrasivo. Enxagúe e seque o aparelho
com um pano macio, limpo e seco.
ARMAZENAMENTO DO APARELHO
Desligue a ficha da tomada e limpe todas as peças do aparelho conforme
indicado acima. Certifique-se de que todas as peças estão secas antes de as
armazenar.
Armazene o aparelho na sua embalagem original ou num local limpo e seco.
Nunca armazene o aparelho enquanto ele se encontra húmido ou sujo.
Nunca enrole o fio à volta do aparelho.
ASSISTÊNCIA DO APARELHO
Este aparelho não tem quaisquer peças que possam ser alvo de assistência por parte
do utilizador. Se o aparelho não estiver a funcionar correctamente, verifique o seguinte:
Cumpriu com as instruções correctamente.
O aparelho foi devidamente ligado à corrente e a tomada tem corrente.
Page 38

38
A alimentação está ligada.
A ficha está devidamente introduzida na tomada.
Se após a primeira inspecção, o aparelho continuar a não funcionar:
Consulte o revendedor com vista a uma possível reparação ou substituição. Se o
revendedor não resolver o problema e tiver de devolver o aparelho, certifique-se do
seguinte:
O aparelho é cuidadosamente colocado na sua embalagem original.
O recibo da compra é anexado.
É fornecido um motivo para a devolução do aparelho.
Se o fio estiver danificado, deverá ser substituído pelo fabricante ou um centro de
assistência devidamente autorizado, com vista a evitar quaisquer situações de risco. Se
o aparelho necessitar por algum motivo de assistência durante o período da garantia,
deve ser devolvido a um centro de assistência devidamente aprovado pela Tedelex
Trading (Pty) Limited. O aparelho poderá igualmente ser alvo de assistência fora do
período da garantia, porém, nesse caso tais tarefas serão cobradas.
SUBSTITUIÇÃO DA FICHA
Cumpra com as instruções seguintes caso seja necessário substituir a ficha.
Este aparelho foi concebido para funcionar apenas com a corrente indicada. A
ligação a outros fontes de alimentação poderá danificá-lo. Ligue uma ficha de
três pinos da seguinte maneira:
Os fios neste terminal de alimentação estão coloridos de acordo com o seguinte código:
Page 39

39
FIXE O RECIBO DA COMPRA AQUI
O RECIBO TEM DE SER FORNECIDO NA EVENTUALIDADE DE UMA RECLAMAÇÃO AO ABRIGO
DOS TERMOS DA GARANTIA
G A R A N T I A
1. A Tedelex Trading (Pty) Limited (“Tedelex”) garante ao comprador original deste produto (“o
cliente”) que este produto estará livre de defeitos de qualidade e mão-de-obra, os quais sob uso
pessoal, familiar ou doméstico normal se possam manifestar dentro de um período de 1 (um) ano a
partir da data de compra (“período de garantia”).
2. Quando o cliente compra um produto e ele se avaria, possui defeitos ou não funciona devidamente
para o fim previsto, deverá notificar o fornecedor a quem comprou o produto (“o fornecedor”) da
situação dentro do período de garantia. Qualquer reclamação no âmbito dos termos desta garantia
deve ser suportada por uma prova de compra. Na ausência de uma prova de compra, então os
serviços de reparação e/ou assistência poderão ser pagáveis pelo cliente ao fornecedor.
3. O produto defeituoso deverá ser devolvido ao centro de assistência do fornecedor com vista a
exercer os termos da garantia.
4. O fornecedor irá reembolsar, reparar ou trocar o produto no âmbito dos termos desta garantia,
sujeito aos requisitos legislativos. Esta garantia só é válida quando o cliente não avariou o produto
ele próprio ou o utilizou para qualquer outro fim que não o previsto. A garantia não inclui e não
será considerada como abrangendo outros produtos danificados devido a uma situação de
desastre, utilização indevida, manipulação, abuso ou qualquer outra modificação ou reparação não
autorizada do produto.
5. Esta garantia só se estende ao produto fornecido na data da compra e não a quaisquer outras
peças anexadas ou instaladas pelo cliente.
6. Se o cliente solicitar ao fornecedor a reparação do produto e este se avariar ou não funcionar
devidamente dentro de 3 (três) meses da reparação e não devido a uma situação de utilização
indevida, manipulação ou modificação efectuada por ou sob pedido do cliente, então o fornecedor
poderá substituir o produto ou reembolsar o cliente.
7. O cliente poderá ser responsável por determinados custos quando os produtos devolvidos não se
encontram na sua embalagem original ou esta se encontra danificada. Tais custos serão
deduzidos de qualquer reembolso pago ao cliente.
JOANESBURGO TEL. +2711 490-9600
CIDADE DO CABO TEL. +2721 552-5161
DURBAN TEL. +2731 792-6000
TEDELEX TRADING (PTY) LTD (JOANESBURGO)
www.amap.co.za
 Loading...