

Page 1

INSTRUCTIONS AND WARRANTY
MODEL NO. RHI101
RUSSELL HOBBS STEAM IRON
Page 2

Congratulations on purchasing our RUSSELL HOBBS STEAM IRON RHI101. Each
unit is manufactured to ensure safety and reliability. Before using this appliance for the
first time, please read the instruction manual carefully and keep it for future reference.
IMPORTANT SAFEGUARDS
When using any electrical appliance, basic safety precautions should always be
followed including the following:
1. Please read the instructions carefully before using any appliance.
2. Always ensure that the voltage on the rating label corresponds to the mains
voltage in your home.
3. Incorrect operation and improper use can damage the appliance and cause
injury to the user.
4. The appliance is intended for household use only. Commercial use invalids the
warranty and the supplier cannot be held responsible for injury or damage
caused when using the appliance for any other purpose than that intended.
5. Avoid any contact with moving parts.
6. Close supervision is required when any appliance is used near or by children or
invalids.
7. Check the power cord and plug regularly for any damage. If the cord or the plug
is damaged, it must be replaced by the manufacturer or a qualified person in
order to avoid an electrical hazard.
8. Do not use the appliance if it has been dropped or damaged in any way. In
case of damage, take the unit in for examination and/or repair by an authorised
service agent.
9. To reduce the risk of electric shock, do not immerse or expose the motor
assembly, plug or the power cord to water or any other liquid.
10. Never immerse the unit in water or any other liquid for cleaning purposes.
11. Remove the plug from the socket by gripping the plug. Do not pull on the cord
to disconnect the appliance from the mains. Always unplug the unit when not in
use, before cleaning or when adding or removing parts.
12. The use of accessory attachments that are not recommended or supplied by
the manufacturer may result in injuries, fire or electric shock.
13. A short cord is provided to reduce the hazards resulting from becoming
entangled in or tripping over a longer cord.
14. Do not let the cord hang over the edge of a table or counter. Ensure that the
cord is not in a position where it can be pulled on inadvertently.
15. Do not allow the cord to touch hot surfaces and do not place on or near a hot
gas or electric burner or in a heated oven.
16. Do not use the appliance on a gas or electric cooking top or over or near an
open flame.
17. Use of an extension cord with this appliance is not recommended. However, if it
is necessary to use an extension lead, ensure that the lead is suited to the
power consumption of the appliance to avoid overheating of the extension cord,
Page 3
appliance or plug point. Do not place the extension cord in a position where it
can be pulled on by children or animals or tripped over.
18. This appliance is not suitable for outdoor use. Do not use this appliance for
anything other than its intended use.
19. DO NOT carry the appliance by the power cord.
20. Do not leave this appliance unattended during use. Always unplug the unit
when not in use or before cleaning.
21. Always operate the appliance on a smooth, even, stable surface. Do not place
the unit on a hot surface.
22. Ensure that the switch is in the “Off” position after each use.
23. The manufacturer does not accept responsibility for any damage or injury
caused by improper or incorrect use, or for repairs carried out by unauthorised
personnel.
24. In case of technical problems, switch off the machine and do not attempt to
repair it yourself. Return the appliance to an authorised service facility for
examination, adjustment or repair. Always insist on the use of original spare
parts. Failure to comply with the above mentioned pre-cautions and instructions,
could affect the safe operation of this machine.
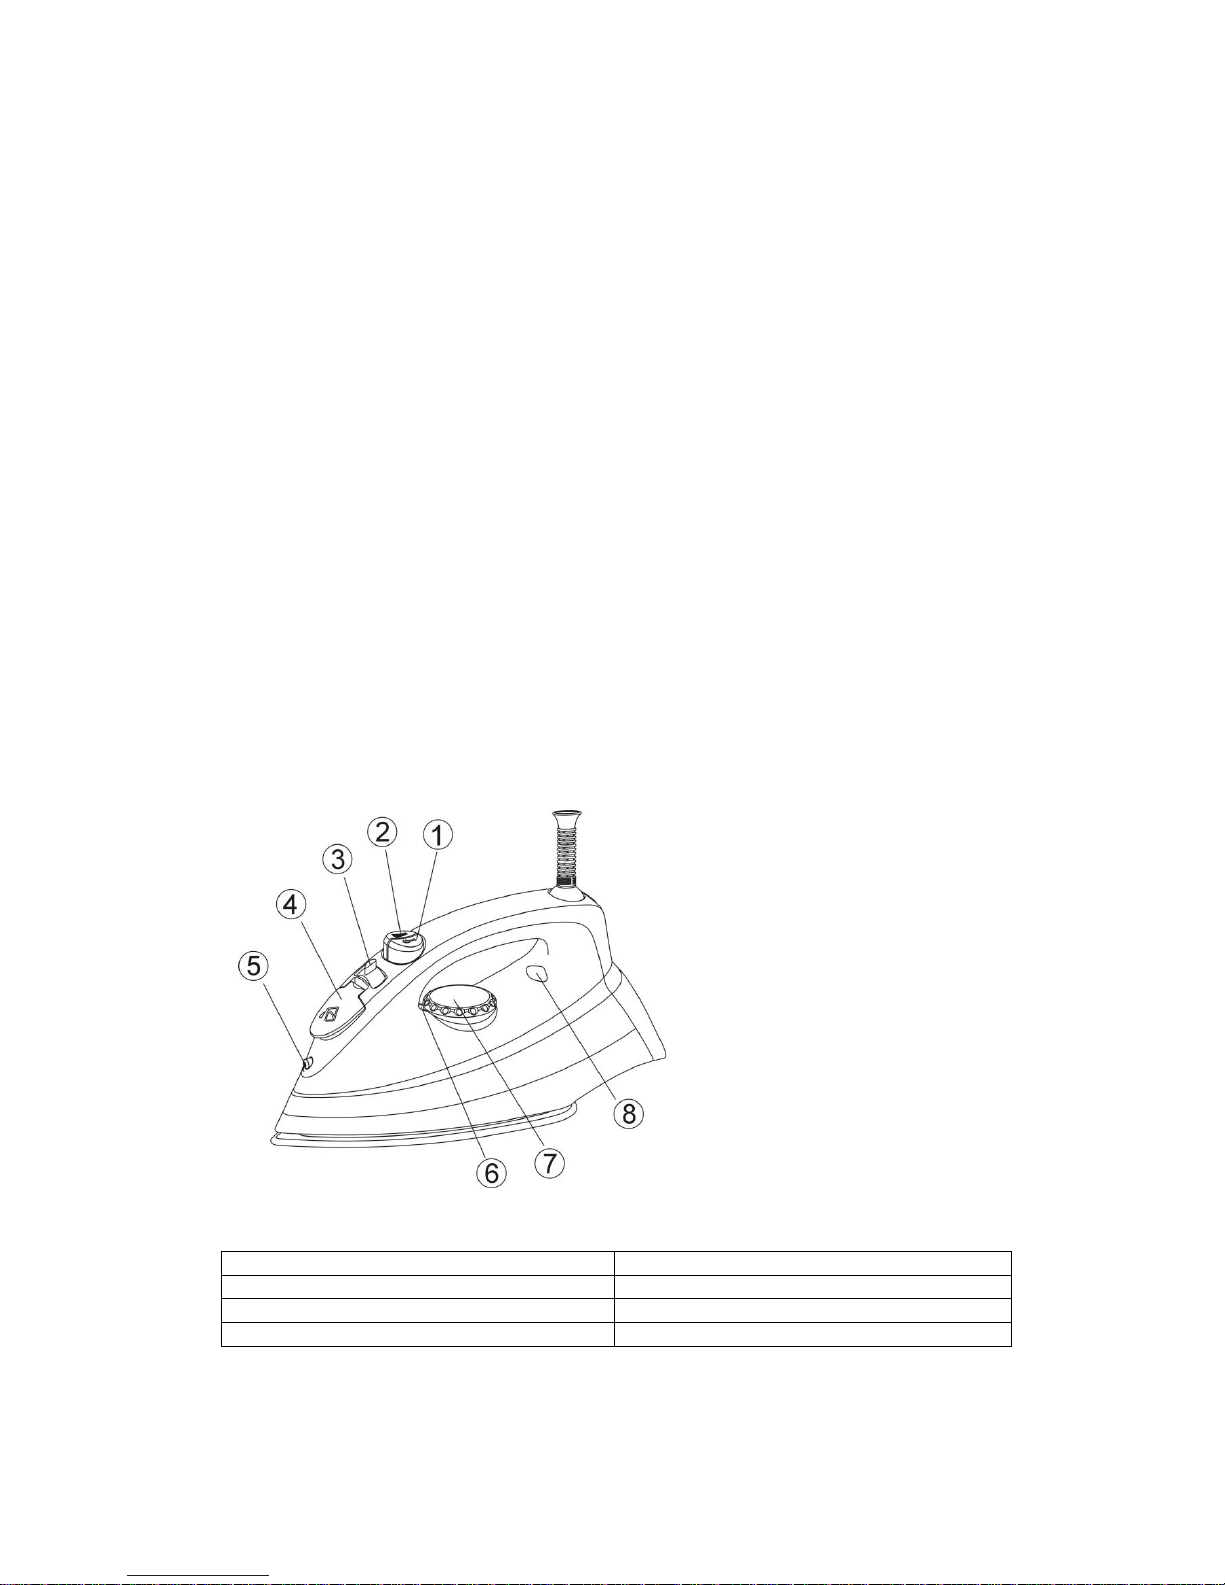
Get to know your iron
1. Burst of Steam Button
5. Spray Nozzle
2. Water Spray Button
6. Temperature Indicator
3. Steam Control Knob
7. Temperature Dial
4. Water Inlet Cover
8. Pilot light
Page 4

HINTS FOR IRONING
1. Sort out the articles to be ironed according to the type of fabric. This will minimize
the frequency of temperature adjustment for different garments.
2. Test ironing a small area on the backside or the inside of the garment if you are
unsure about the type of fabric. Start with a low temperature and increase
gradually.
3. Wait for about three minutes before ironing heat sensitive fabrics. Temperature
adjustment needs certain time to reach the required level no matter if it is higher
or lower.
4. Delicate fabrics such as silk, wool, velour, etc. are best ironed with an ironing
cloth to prevent shine marks.
5. You may need to press a few times to activate the spray, burst and vertically
burst functions.
Page 5
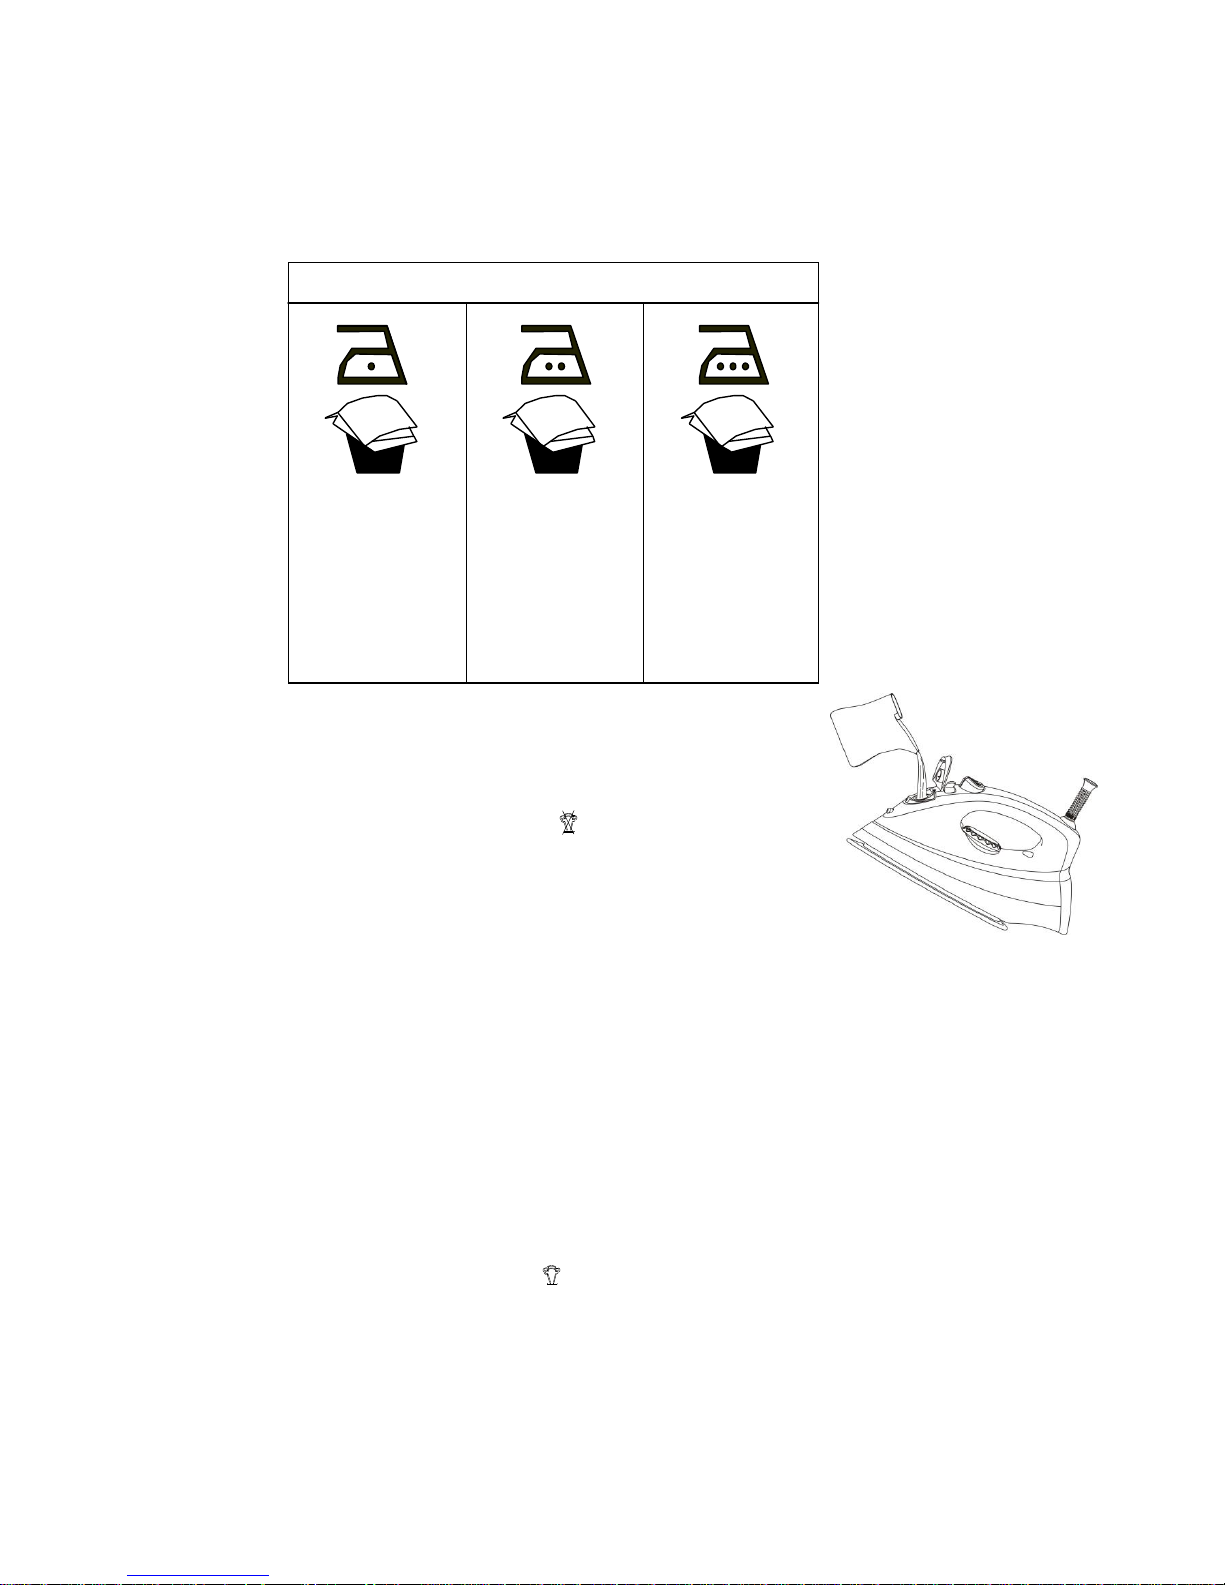
READ THE GARMENT LABELS AND FOLLOW THE MANUFACTURER’S IRONING
INSTRUCTIONS THAT ARE OFTEN SHOWN BY SYMBOLS SIMILIAR TO THE
FOLLOWING.
HOW TO FILL WATER
1. Disconnect the iron from the mains supply outlet.
2. Move the Steam Control Knob to position.
3. Open the Water Inlet Cover.
4. Pour water through the water inlet hole.
5. Fill up to the ‘Max’ level marked on the side of the water tank.
Note:
For best results, it is advisable to use demineralised water or distilled water.
Do not use chemically de-scaled water or any other liquids.
FIRST TIME IRONING
1. Remove any protective films or stickers from the soleplate and the cabinet, if any.
2. Unwind and straighten the power cord.
3. Fill the water tank, as described in “How to fill water”.
4. Connect the appliance to a suitable mains supply outlet.
5. Turn the Temperature Dial on the iron unit in a clockwise direction to the maximum
position, pilot light glows.
6. Pilot Light goes off when the required temperature is reached.
7. Move the steam control dial to position, steam starts coming out from the
holes in the soleplate.
8. Begin first time ironing with an old towel.
9. When the water tank is empty and there is no more steam produced, the
preparation work is complete. The iron is now ready for proper use.
Temperature Control Setting
. Acetate
. Elastane
. Polyamide
. Polypropylene
Polyester
Silk
Triacetate
Viscose
Wool
. Cotton
. Linen
Page 6

SPRAYING
1. This function can be used any time and does not affect
any setting.
2. Fill the water tank as described in “How to Fill Water”.
3. Aim the nozzle to the garment.
4. Press the Spray Button.
Note: It may be necessary to press the spray button a few times to start this function.
DRY IRONING
1. Unwind and straighten the power cord.
2. Connect the appliance to a suitable mains supply outlet.
3. Turn the Temperature Dial on the iron in a clockwise direction, select ‘ ( -1),
- -3) according to the recommendation of the garment
label.
4. The Pilot light glows indicating the iron is switched on.
5. The Pilot Light goes off when the required temperature for the iron is reached.
6. The appliance is now ready for use.
7. When finished with your ironing, turn the iron to the off position/MIN and
disconnect the power cord from the mains supply outlet.
8. When the appliance cools down completely, store it in a safe place.
9. Do not wrap the cord around the iron.
STEAM IRONING
1. Unwind and straighten the power cord.
2. Fill the water tank as described in “How to Fill Water”
3. Connect the appliance to a suitable mains supply outlet.
4. Turn the Temperature Dial in clockwise direction to ‘ ’ (3 dots)
setting or to ‘Max’ setting. (For optimum steam quality, do not use
1 dot or 2 dots setting for steam ironing); The Pilot light glows,
indicating the iron is switched on.
5. The Pilot light goes off when the required temperature is reached.
6. The appliance is now ready for use.
7. Move the Variable Steam Control to give the desired amount of steam.
8. Turn the Temperature Dial in an anti-clockwise direction to “Min”, and then the iron
will switch off.
9. Disconnect the iron from the mains supply outlet.
10. When the appliance cools down completely, store it in a safe place.
11. Do not wrap the cord around the iron.
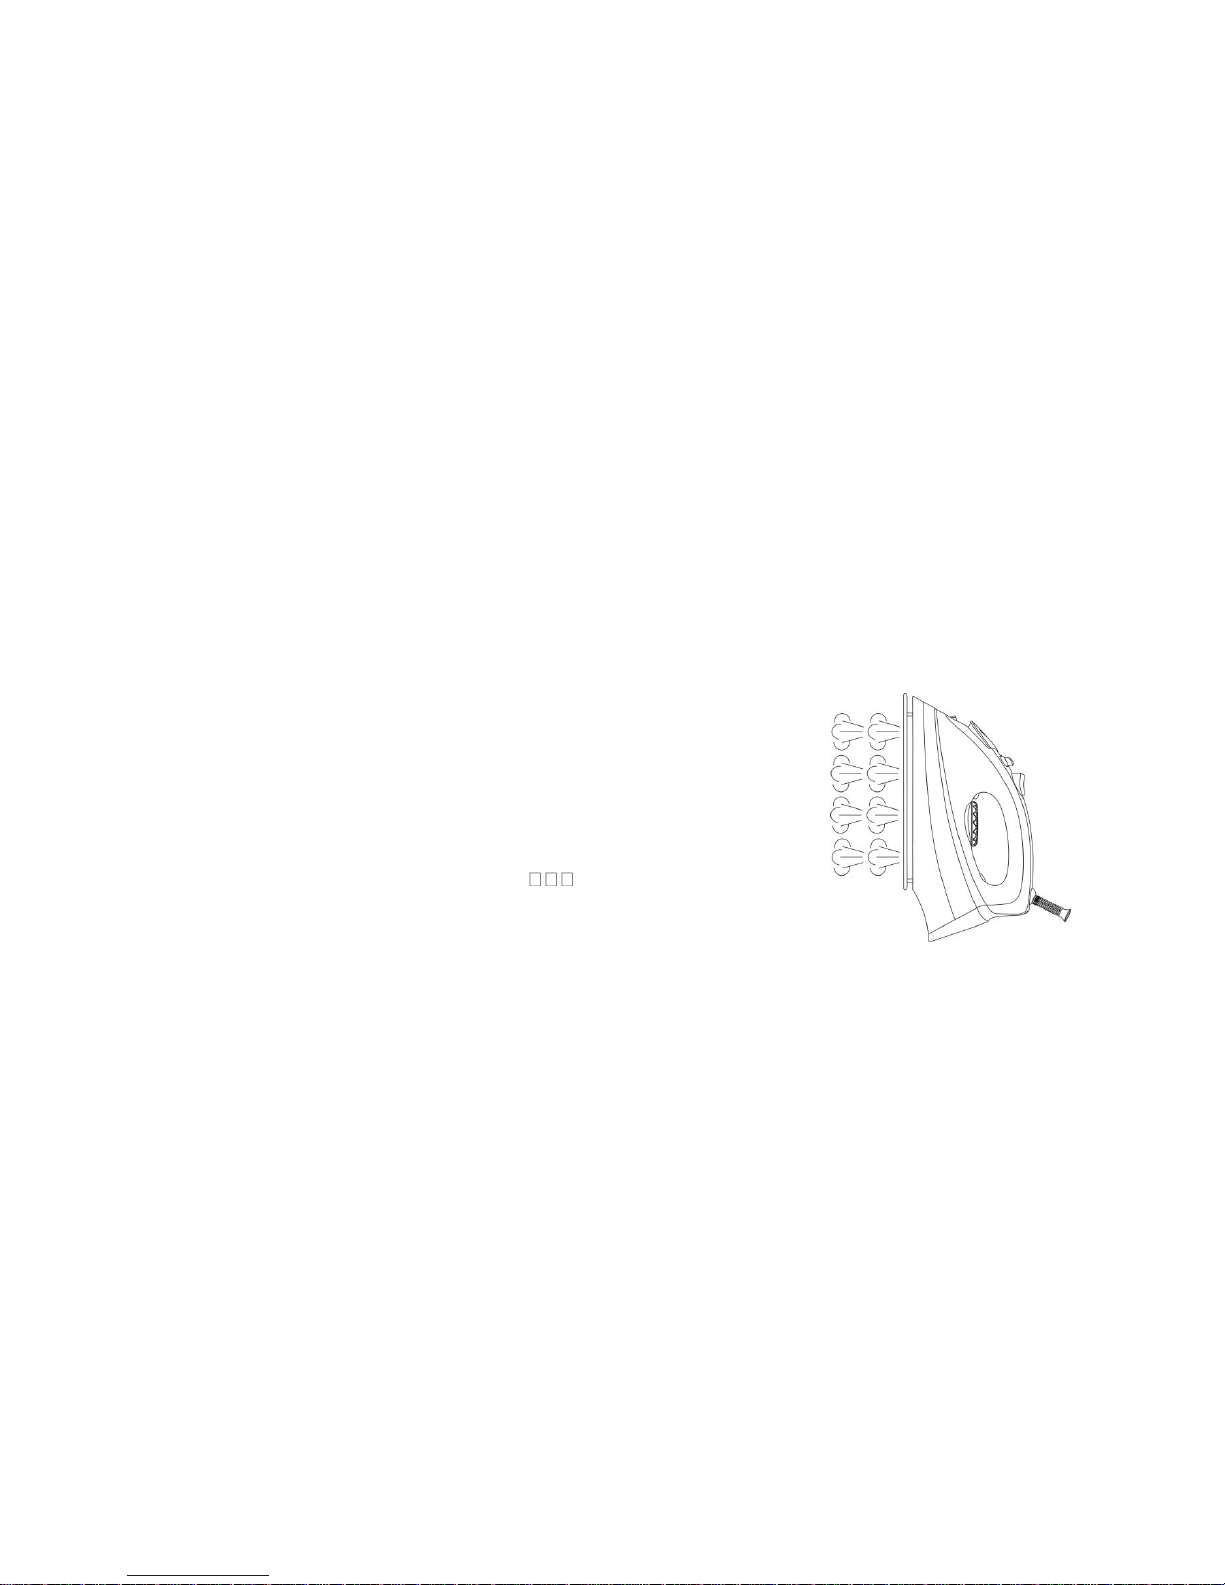
BURST OF STEAM
This function provides an extra amount of steam to remove
stubborn wrinkles.
1. Fill the water tank as described in “How to Fill Water”
2. Connect the appliance to a suitable mains supply outlet.
3. Turn the Temperature Dial to ‘ ’ (3 dots) setting or to ‘Max’
setting. The Pilot light glows, indicating the iron is switched on.
4. The Pilot light goes off when the required temperature is
Page 7
reached.
5. The appliance is now ready for use.
6. Press the Burst of steam button once.
7. Steam will shoot from the holes of the soleplate into the fabric being ironed and
remove wrinkles.
8. For stubborn wrinkles, wait a few seconds before pressing the burst of steam
button again. Most wrinkles can be removed within three presses.
9. Turn the Temperature Dial in an anti-clockwise direction to “Min”, and then the
iron will switch off.
10. Disconnect the iron from mains supply outlet.
10. When the appliance cools down completely, store it in a safe place.
11. Do not wrap the cord around the iron.
Note: It may be necessary to press the burst of steam button a few times to start this
function. For optimum steam quality, do not operate the Burst of Steam more than
three times after the pilot light goes off.
BURST OF STEAM IN VERTICAL POSITION
Warning:
Do not apply steam on any clothes or fabrics that are being worn by humans or pets.
The Temperature of the steam is very hot.
This function provides steam to remove wrinkles on delicate
garments in a hanging position, hanging curtains or other hanging
fabric.
1. Fill the water tank as described in “How to Fill Water”
2. Connect the iron to a suitable mains supply outlet.
3. Turn the Temperature Dial to ‘ ’ (3 dots) setting or to ‘Max’
setting. The Pilot light glows indicating the iron is switched on.
4. The Pilot light goes off when the required temperature is
reached. The appliance is ready for use.
5. Hold the iron between 15 and 30 centimeters away from the garment.
6. Press the Burst of Steam Button.
7. Steam will penetrate into the garment removing the wrinkles.
8. For stubborn wrinkles, wait a few seconds before pressing the Burst of Steam
button again.
9. Most wrinkles can be removed within three presses.
10. Turn the Temperature Dial in an anti-clockwise direction to “Min”, and then the iron
will switch off.
11. Disconnect the iron from mains supply outlet.
12. When the appliance cools down completely, store it in a safe place.
13. Do not wrap the cord around the iron.
Note:
1. Maintain a distance of a few centimeters from delicate fabric (Synthetics, silk,
velvet, etc.); otherwise the fabric could be damaged.
2. It may be necessary to press the burst of steam button a few times to start this
function. For optimum steam quality, do not operate the Burst of Steam more than
three times after the pilot light goes off.
Page 8
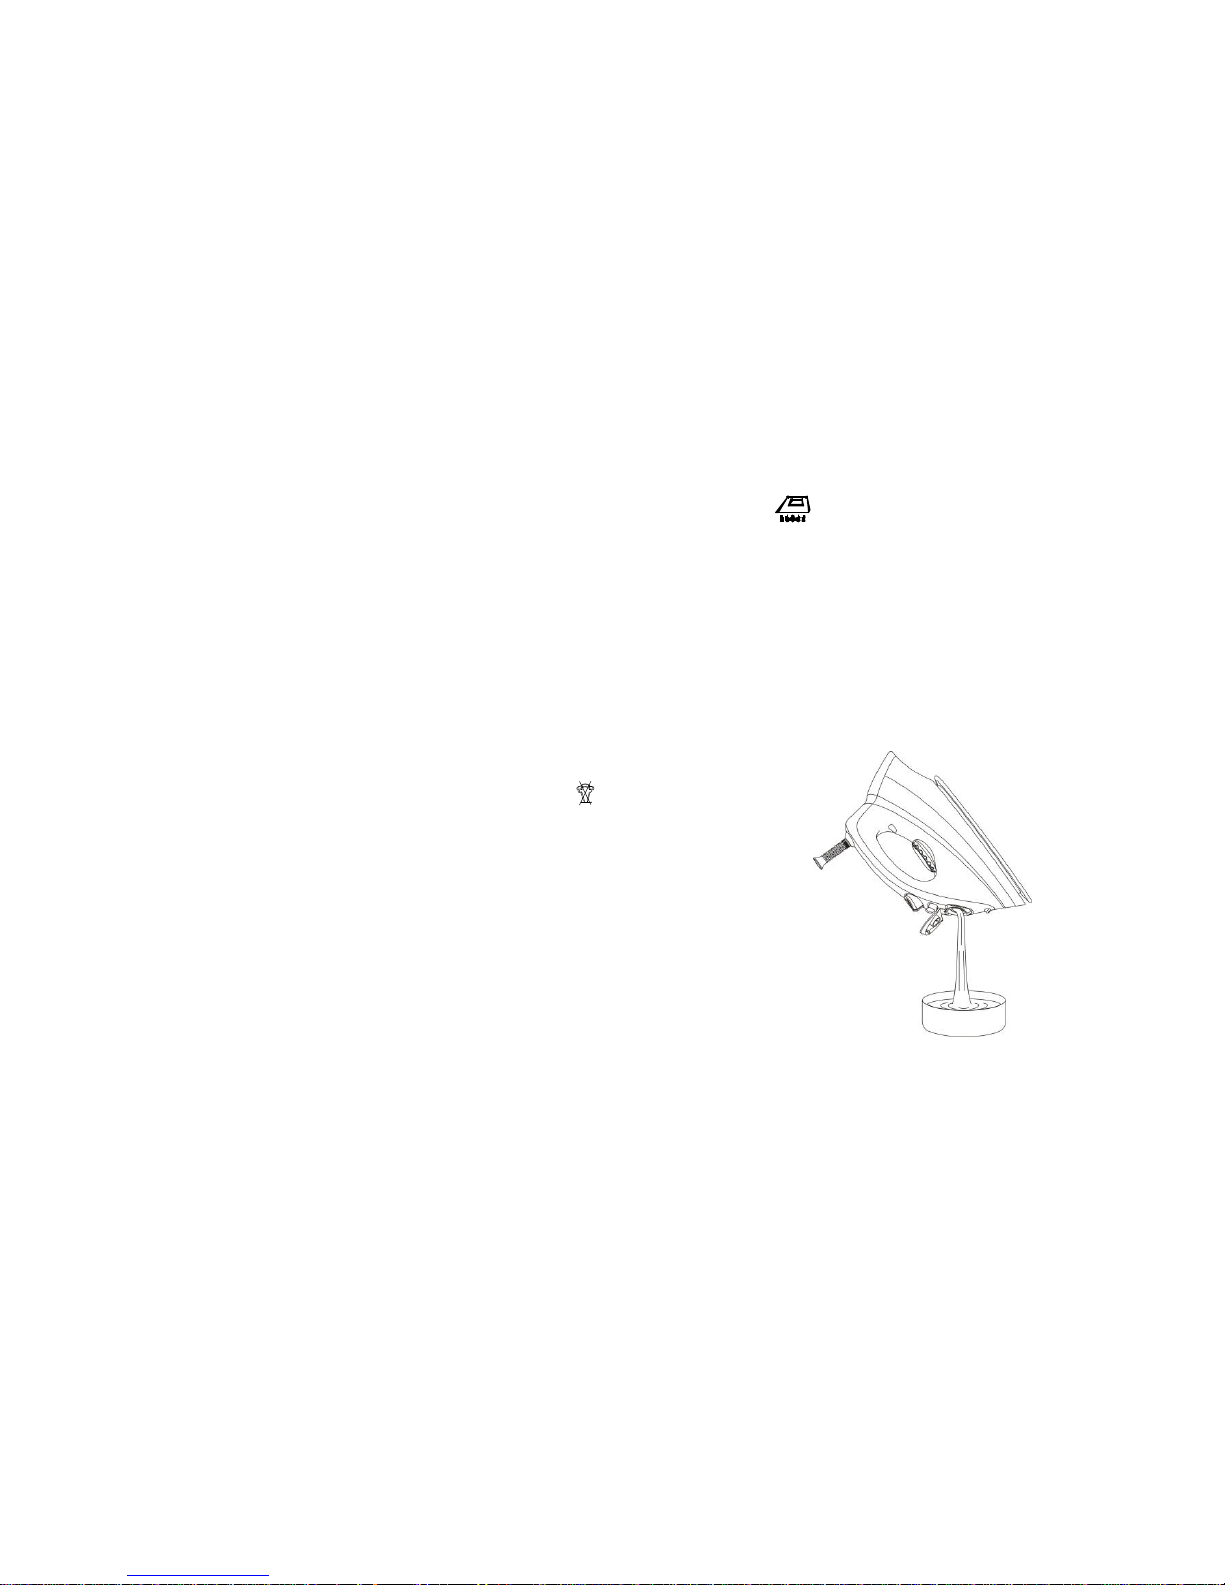
SELF-CLEANING
This function removes the scale and minerals built up in the Steam Chamber. The iron
will remain in good condition if this function is performed regularly, at least once a
month or more depending upon the hardness of the water used.
1. Fill the iron as described in How to Fill Water; fill the water tank up to half.
2. Connect to a mains supply outlet.
3. Turn the Temperature Dial in clockwise direction to ‘Max’ setting.
4. The Pilot light glows indicating the iron is switched on.
5. The Pilot light goes off when the required temperature is reached.
6. Wait for one more cycle; the pilot light glows and goes off.
7. Turn the Temperature Dial in an anti-clockwise direction to ‘Min’.
8. Disconnect the iron from the mains supply outlet.
9. Hold the iron horizontally over a sink.
10. Pull and hold the Steam Control/Self-Cleaning Knob to ‘ ’ (Descaling)
position.
11. Steam and boiling hot water will drain from the holes on the soleplate washing
away the scale and minerals that have built up inside the Steam Chamber.
12. Gently move the iron back and forth until the water tank is empty.
13. When Self-Cleaning is complete, release the Self-Cleaning button.
14. Rest your steam iron back on its heel rest and allow to fully cool down.
15. Wipe the soleplate with a cold damp cloth.
Caution: Keep skin/body away from the hot water.
EMPTYING AND STORING
1. Move the Steam Control Knob to position.
2. Disconnect the iron from the mains supply outlet.
3. Hold the iron upside down and gently shake it to remove the
remaining water.
4. When the iron gets cool completely, store it vertically in a
safe place.
CLEANING THE IRON
1. Disconnect the iron from the mains supply outlet.
2. Use a damp cloth to remove any deposits on the sole plate
or the cabinet.
Note:
Never use sharp or rough objects to remove the deposits on the sole plate.
Never use any abrasive agents, vinegar or other chemical agents to clean the iron.
Page 9
SERVICING THE APPLIANCE
There are no user serviceable parts in this appliance. If the unit is not operating
correctly, please check the following:
You have followed the instructions correctly.
That the unit has been wired correctly and that the wall socket is switched
on.
That the mains power supply is ON.
That the plug is firmly in the mains socket.
If the appliance still does not work after checking the above:
Consult the retailer for possible repair or replacement. If the retailer fails to resolve the
problem and you need to return the appliance, make sure that:
The unit is packed carefully back into its original packaging.
Proof of purchase is attached.
A reason is provided for why it is being returned.
If the supply cord is damaged, it must be replaced by the manufacturer or an
authorised service agent, in order to avoid any hazard. If service becomes necessary
within the warranty period, the appliance should be returned to an approved
Amalgamated Appliances / Tedelex Trading (Pty) Ltd service centre. Servicing outside
the warranty period is still available, but will, however, be chargeable.
CHANGING THE PLUG
Should the need arise to change the fitted plug, follow the instructions below.
This unit is designed to operate on the specified current (on the rating label of
the product) only. Connecting to other power sources may damage the
appliance. Connect a three-pin plug as follows:
The wires in this mains lead are coloured in accordance with the following code:
Green/Yellow = Earth
Blue = Neutral
Brown = Live
Page 10

PLEASE AFFIX YOUR PROOF OF PURCHASE/RECEIPT HERE
IN THE EVENT OF A CLAIM UNDER WARRANTY THIS RECEIPT MUST BE PRODUCED.
W A R R A N T Y
1. Tedelex Trading (Pty) Limited (“Tedelex”) warrants to the original purchaser of this product (“the
customer”) that this product will be free of defects in quality and workmanship which under
normal personal, family or household use and purpose may manifest within a period of 1 (one)
year from the date of purchase (“warranty period”).
2. Where the customer has purchased a product and it breaks, is defective or does not work
properly for the intended purpose, the customer must notify the supplier from whom the customer
bought the product (“the supplier”) thereof within the warranty period. Any claim in terms of this
warranty must be supported by a proof of purchase. If proof of purchase is not available, then
repair, and/or service charges may be payable by the customer to the supplier.
3. The faulty product must be taken to the supplier's service centre to exercise the warranty.
4. The supplier will refund, repair or exchange the product in terms of this warranty subject to
legislative requirements. This warranty shall be valid only where the customer has not broken the
product himself, or used the product for something that it is not supposed to be used for. The
warranty does not include and will not be construed to cover products damaged as a result of
disaster, misuse, tamper, abuse or any unauthorised modification or repair of the product.
5. This warranty will extend only to the product provided at the date of the purchase and not to any
expendables attached or installed by the customer.
6. If the customer requests that the supplier repairs the product and the product breaks or fails to
work properly within 3 (three) months of the repair and not as a result of misuse, tampering or
modification by or on behalf of the customer, then the supplier may replace the product or pay a
refund to the customer.
7. The customer may be responsible for certain costs where products returned are not in the
original packaging, or if the packaging is damaged. This will be deducted from any refund paid to
the customer.
TEDELEX TRADING (PTY) LTD (JOHANNESBURG)
JOHANNESBURG TEL NO. (011) 490-9600
CAPE TOWN TEL NO. (021) 535-0600
DURBAN TEL NO. (031) 792-6000
www.amap.co.za
Page 11

Parabéns por ter comprado o nosso FERRO A VAPOR RHI101 RUSSELL HOBBS.
Cada unidade é fabricada de forma a garantir segurança e fiabilidade. Antes de
utilizar este aparelho pela primeira vez, leia o manual de instruções atentamente e
guarde-o para futura referência.
SALVAGUARDAS IMPORTANTES:
Quando utilizar qualquer aparelho elétrico, deve seguir sempre as precauções de
segurança básicas, incluindo o seguinte:
25. Leia atentamente as instruções antes de utilizar qualquer aparelho.
26. Certifique-se sempre de que a tensão na etiqueta de classificação
corresponde à tensão da corrente elétrica na sua residência.
27. A operação incorreta e utilização imprópria podem danificar o aparelho e
causar lesões no utilizador.
28. O aparelho destina-se apenas a utilização doméstica. A utilização comercial
invalida a garantia e o fornecedor não pode ser responsabilizado por lesões ou
danos causados quando o aparelho for utilizado para qualquer outra finalidade
diferente da prevista.
29. Evite qualquer contacto com as peças em movimento.
30. É necessária uma supervisão de perto quando qualquer aparelho for utilizado
perto ou por crianças ou pessoas com incapacidades.
31. Verifique o cabo de alimentação e a ficha regularmente para verificar a
existência de quaisquer danos. Se o cabo ou a ficha estiverem danificados,
devem ser substituídos pelo fabricante ou por uma pessoa qualificada de
forma a evitar um perigo elétrico.
32. Não utilize o aparelho se este tiver sido deixado cair ou estiver danificado de
qualquer forma. Em caso de danos, devolva a unidade para verificação e/ou
reparação por parte de um agente de assistência autorizado.
33. Para reduzir o risco de choque elétrico, não mergulhe ou exponha o conjunto
do motor, ficha ou cabo de alimentação em água ou em qualquer outro líquido.
34. Nunca coloque a unidade dentro de água ou qualquer outro líquido para fins de
limpeza.
35. Remova a ficha da tomada ao agarrar na ficha. Não puxe pelo cabo para
desligar o aparelho da corrente elétrica. Desligue sempre a unidade quando
esta não estiver a ser utilizada, antes de limpar ou quando adicionar ou
remover peças.
36. A utilização de acessórios não recomendados ou fornecidos pelo fabricante
pode resultar em lesões, incêndios ou choque elétrico.
37. É fornecido um cabo pequeno para reduzir os riscos resultantes de ficar preso
ou de tropeçar num cabo maior.
38. Não deixe o cabo suspenso pela extremidade de uma mesa ou balcão.
Certifique-se de que o cabo não se encontra numa posição em que possa ser
puxado inadvertidamente.
Page 12

39. Não permita que o cabo toque em superfícies quentes e não o coloque sobre
ou perto de uma caldeira elétrica ou a gás quente ou num forno aquecido.
40. Não utilize o aparelho sobre uma superfície de cozimento a gás ou elétrica ou
sobre ou perto de uma chama.
41. A utilização de uma extensão com este aparelho não é recomendada. No
entanto, caso seja necessário utilizar uma ficha de extensão, certifique-se de
que a ficha é adequada para o consumo de energia do aparelho para evitar o
sobreaquecimento do cabo da extensão, aparelho ou tomada. Não coloque o
cabo da extensão numa posição em que possa ser puxada por crianças ou
animais ou que possibilite o tropeçamento.
42. Este aparelho não é adequado para ser utilizado no exterior. Não utilize este
aparelho para outra finalidade diferente da prevista.
43. NÃO transporte o aparelho pelo cabo de alimentação.
44. Não deixar este aparelho não supervisionado durante a utilização. Desligue
sempre a unidade quando não estiver a ser utilizada ou antes de limpar.
45. Utilize sempre o aparelho numa superfície suave, uniforme e estável. Não
coloque a unidade numa superfície quente.
46. Certifique-se de que o interruptor está na posição "Off" (desligado) após cada
utilização.
47. O fabricante não aceita responsabilidade por qualquer dano ou lesão
causados devido a uma utilização imprópria ou incorreta ou a reparações
realizadas por pessoal não autorizado.
48. Em caso de problemas técnicos, desligue a máquina e não tente repará-la
você próprio. Devolva o aparelho a um agente de assistência autorizado para
verificação, ajuste ou reparação. Insista sempre em utilizar peças
sobresselentes originais. O não cumprimento das precauções e instruções
acima poderá afetar o funcionamento seguro desta máquina.
Page 13

Conheça o seu ferro
1. Botão para jacto de vapor
5. Bocal de pulverização
2. Botão para pulverizar água
6. Indicador de temperatura
3. Botão de controlo de vapor
7. Marcador de temperatura
4. Tampa de entrada de água
8. Luz piloto
DICAS PARA PASSAR A FERRO
6. Separe os itens a serem passados a ferro de acordo com o tipo de tecido. Isto
irá minimizar a frequência do ajuste da temperatura para diferentes itens de
roupa.
7. Teste o ferro numa pequena área do lado do avesso da peça de roupa caso não
tenha a certeza sobre o tipo de tecido. Inicie com uma temperatura baixa e
aumente gradualmente.
8. Aguarde cerca de três minutos antes de passar a ferro tecidos sensíveis. O
ajuste da temperatura necessita de um determinado tempo para atingir o nível
necessário, independentemente se é mais elevada ou mais baixa.
9. Os tecidos delicados, como a seda, lã, veludo, etc., são passados a ferro de
melhor forma com um pano para passar a ferro por cima, para evitar marcas de
lustro.
10. Poderá ser necessário pressionar algumas vezes para activar as funções para
pulverizar água, vapor e função de jacto vertical.
Page 14

LEIA AS ETIQUETAS DAS PEÇAS DE ROUPA E SIGA AS INSTRUÇÕES DO
FABRICANTE RELATIVAS A COMO PASSAR A FERRO, FREQUENTEMENTE
APRESENT ADAS PELOS SÍMBOLOS SEMELHANTES AOS SEGUINTES.
COMO COLOCAR ÁGUA
6. Desligue o ferro da tomada eléctrica.
7. Mova o botão de controlo de valor para a posição
8. Abra a tampa de entrada de água.
9. Coloque água através do orifício de entrada de água.
10. Encha até ao nível ‘Máx’ indicado na parte lateral do depósito
de água.
Nota:
Para obter melhores resultados, é recomendável utilizar água desmineralizada ou
destilada.
Não utilize água quimicamente descalcificada ou quaisquer outros líquidos.
PASSAR A FERRO PELA PRIMEIRA VEZ
10. Remova quaisquer películas de protecção ou autocolantes da base e da câmara,
se existentes.
11. Desenrole e endireite o cabo de alimentação.
12. Encha o depósito de água, conforme descrito em “Como colocar água”.
13. Ligue o aparelho a uma tomada de alimentação adequada.
14. Rode o marcador da temperatura no ferro no sentido dos ponteiros do relógio até
à posição máxima, a luz piloto brilha.
15. A luz piloto desliga-se quando é atingida a temperatura necessária.
16. Mova o marcador de controlo de vapor para a posição , o vapor começa a sair
dos orifícios na base do ferro.
17. Quando passar a ferro pela primeira vez, passe uma toalha velha.
Definição de controlo da temperatura
. Acetato
. Elastano
. Poliamida
. Polipropileno
Poliéster
Seda
Triacetato
Viscose
Lã
. Algodão
. Linho
Page 15

18. Quando o depósito de água estiver vazio e não se produzir mais vapor, o trabalho
de preparação está concluído. O ferro está agora pronto a ser devidamente
utilizado.
PULVERIZAR
5. Esta função pode ser utilizada a qualquer altura e não
afecta nenhuma definição.
6. Encha o depósito de água, conforme descrito em
“Como colocar água”.
7. Aponte o bocal para a roupa.
8. Prima o botão de Pulverizar.
Nota: Poderá ser necessário pressionar o botão de pulverizar algumas vezes para
iniciar esta função.
PASSAR A FERRO A SECO
12. Desenrole e endireite o cabo de alimentação.
13. Ligue o aparelho a uma tomada de alimentação adequada.
14. Rode o marcador da temperatura no ferro no sentido dos ponteiros do relógio,
selecione ‘ ’ ( 1 ponto), ‘ ’ (2 pontos) ou ‘ ’ (3 pontos) de acordo com a
recomendação da etiqueta da peça de vestuário.
15. A luz piloto brilha, indicando que o ferro está ligado.
16. A luz piloto desliga-se quando é atingida a temperatura necessária do ferro.
17. O aparelho está agora pronto a ser utilizado.
18. Quando terminar de passar a ferro, coloque o ferro na posição off/MÍN e desligue
o cabo de alimentação da tomada eléctrica.
19. Quando o aparelho arrefecer completamente, guarde-o num local seguro.
20. Não enrole o cabo em redor do ferro.
PASSAR A FERRO A VAPOR
12. Desenrole e endireite o cabo de alimentação.
13. Encha o depósito de água, conforme descrito em “Como colocar
água”.
14. Ligue o aparelho a uma tomada de alimentação adequada.
15. Rode o marcador da temperatura no sentido dos ponteiros do
relógio para a definição ‘ ’ (3 pontos) ou MÁX. (Para uma
qualidade ideal ao passar a ferro a vapor, não utilize a definição de 1 ponto ou 2
pontos para passar a ferro a vapor); A luz piloto brilha, indicando que o ferro está
ligado.
16. A luz piloto desliga-se quando é atingida a temperatura necessária.
17. O aparelho está agora pronto a ser utilizado.
18. Mova o controlo de vapor variável para fornecer a quantidade desejada de vapor.
19. Rode o marcador da temperatura no sentido contrário ao dos ponteiros do relógio
até à posição “Mín” e depois o ferro desliga-se.
20. Desligue o ferro da tomada eléctrica.
21. Quando o aparelho arrefecer completamente, guarde-o num local seguro.
22. Não enrole o cabo em redor do ferro.
Page 16

JACTO DE VAPOR
Esta função fornece uma quantidade extra de vapor para remover
vincos difíceis.
1. Encha o depósito de água, conforme descrito em “Como
colocar água”.
2. Ligue o aparelho a uma tomada de alimentação adequada.
3. Rode o marcador da temperatura para a definição ‘ ’ (3
pontos) ou MÁX. A luz piloto brilha, indicando que o ferro está
ligado.
4. A luz piloto desliga-se quando é atingida a temperatura necessária.
5. O aparelho está agora pronto a ser utilizado.
6. Pressione o botão de Jacto de vapor uma vez.
7. O vapor sairá dos orifícios da base para o tecido que está a ser passado a ferro e
irá remover os vincos.
8. Para vincos difíceis, aguarde alguns segundos depois de pressionar novamente
o botão do jacto de vapor. A maioria dos vincos é removida após três pressões
do botão.
9. Rode o marcador da temperatura no sentido contrário ao dos ponteiros do
relógio até à posição “Mín” e depois o ferro desliga-se.
10. Desligue o ferro da tomada eléctrica.
21. Quando o aparelho arrefecer completamente, guarde-o num local seguro.
22. Não enrole o cabo em redor do ferro.
Nota: Poderá ser necessário pressionar o botão do jacto de vapor algumas vezes
para iniciar esta função. Para uma qualidade ideal do vapor, não utilize o botão de
jacto de vapor mais de três vezes depois de a luz piloto se desligar.
JACTO DE VAPOR NA POSIÇÃO VERTICAL
Aviso:
Não aplique vapor em quaisquer peças de vestuário ou tecidos que estão a ser
utilizados por humanos ou animais de estimação. A temperatura do vapor é muito
quente.
Esta função fornece vapor para remover vincos em peças de
vestuário delicadas numa posição vertical, em cortinas
penduradas ou outros tecidos que estejam na vertical.
14. Encha o depósito de água, conforme descrito em “Como
colocar água”.
15. Ligue o ferro a uma tomada de alimentação adequada.
16. Rode o marcador da temperatura para a definição ‘ ’ (3
pontos) ou MÁX. A luz piloto brilha, indicando que o ferro está
ligado.
17. A luz piloto desliga-se quando é atingida a temperatura necessária. O aparelho
está pronto para ser utilizado.
18. Mantenha o ferro entre 15 a 30 centímetros afastado do tecido.
19. Pressione o botão de jacto de vapor.
20. O vapor irá penetrar na roupa removendo os vincos.
21. Para vincos difíceis, aguarde alguns segundos depois de pressionar novamente o
botão do jacto de vapor.
Page 17

22. A maioria dos vincos é removida após três pressões do botão.
23. Rode o marcador da temperatura no sentido contrário ao dos ponteiros do relógio
até à posição “Mín” e depois o ferro desliga-se.
24. Desligue o ferro da tomada eléctrica.
25. Quando o aparelho arrefecer completamente, guarde-o num local seguro.
26. Não enrole o cabo em redor do ferro.
Nota:
3. Mantenha uma distância de alguns centímetros do tecido delicado (sintéticos,
seda, veludo, etc.); caso contrário, poderá danificar o tecido.
4. Poderá ser necessário pressionar o botão do jacto de vapor algumas vezes para
iniciar esta função. Para uma qualidade ideal do vapor, não utilize o botão de
jacto de vapor mais de três vezes depois de a luz piloto se desligar.
AUTO-LIMPEZA
Esta função remove incrustações e minerais acumulados na câmara de vapor. O
ferro permanecerá em boas condições se esta função for efectuada regularmente,
pelo menos, uma vez por mês ou mais dependendo da dureza da água utilizada.
16. Encha o ferro, conforme descrito em “Como colocar água”; encha o depósito de
água até meio.
17. Ligue o aparelho a uma tomada eléctrica.
18. Rode o marcador da temperatura no sentido dos ponteiros do relógio para a
definição ‘Máx’.
19. A luz piloto brilha, indicando que o ferro está ligado.
20. A luz piloto desliga-se quando é atingida a temperatura necessária.
21. Aguarde durante mais um ciclo; a luz piloto brilha e desliga-se.
22. Rode o marcador da temperatura no sentido contrário ao dos ponteiros do
relógio para a definição ‘Mín’.
23. Desligue o ferro da tomada eléctrica.
24. Agarre o ferro horizontalmente sobre uma pia.
25. Mova e mantenha o botão de controlo de vapor/auto-limpeza na
posição (Descalcificação).
26. O vapor e a água quente a ferver irão sair dos orifícios na base removendo as
incrustações e os minerais que se acumularam no interior da câmara de vapor.
27. Mova suavemente o ferro para trás e para a frente até que o depósito de água
esteja vazio.
28. Quando a auto-limpeza estiver concluída, solte o botão de Auto-limpeza.
29. Pouse o seu ferro a vapor sobre o apoio posterior e deixe arrefecer.
30. Limpe a base com um pano humedecido frio.
Cuidado: Mantenha a pele/corpo afastados da água quente.
ESVAZIAR E GUARDAR
5. Mova o botão de controlo de valor para a posição
6. Desligue o ferro da tomada eléctrica.
7. Segure o ferro virado ao contrário e agite suavemente para
remover a água restante.
8. Quando o ferro arrefecer completamente, guarde-o na vertical
num local seguro.
Page 18

LIMPAR O FERRO
3. Desligue o ferro da tomada eléctrica.
4. Utilize um pano humedecido para remover quaisquer depósitos na base ou
câmara.
Nota:
Nunca utilize objectos afiados ou ásperos para remover os depósitos na base.
Nunca utilize quaisquer agentes abrasivos, vinagre ou outros agentes químicos para
limpar o ferro.
REPARAÇÃO DO APARELHO
O aparelho não contém componentes que possam ser reparados pelo utilizador. Se a
unidade não estiver a funcionar corretamente, verifique o seguinte:
Se seguiu as instruções corretamente.
Se a unidade foi devidamente ligada e se a tomada de parede está ligada.
Se a fonte de alimentação elétrica está ligada.
Se a ficha está firmemente encaixada na tomada elétrica.
Se o aparelho continuar sem funcionar depois de verificar os itens acima:
Consulte o revendedor para uma possível reparação ou substituição. Se o
revendedor não for capaz de resolver o problema e necessitar de devolver o aparelho,
certifique-se de que:
A unidade está devidamente embalada na sua embalagem original.
Apresenta uma prova de compra.
É fornecida uma razão para a devolução.
Se o cabo de alimentação estiver danificado, deve ser substituído pelo fabricante ou
por um agente de assistência autorizado de forma a evitar qualquer perigo. Caso seja
necessário reparar o aparelho dentro do período de garantia, o aparelho deve ser
devolvido a um centro de assistência da Amalgamated Appliances / Tedelex Trading
(Pty) Ltd aprovado. A reparação fora do período de garantia continua a ser possível,
mas, contudo, será cobrada.
Page 19

SUBSTITUIÇÃO DA FICHA
Cumpra com as instruções seguintes caso seja necessário substituir a ficha.
Esta unidade destina-se a operar apenas na corrente especificada (na etiqueta
de classificação do produto). A ligação a outras fontes de alimentação
poderá danificar o aparelho. Ligue uma ficha de três pinos da seguinte
maneira:
Os fios neste terminal de alimentação estão coloridos de acordo com o seguinte
código:
Verde/Amarelo = Terra
Azul = Neutro
Castanho = Vivo
[Image]
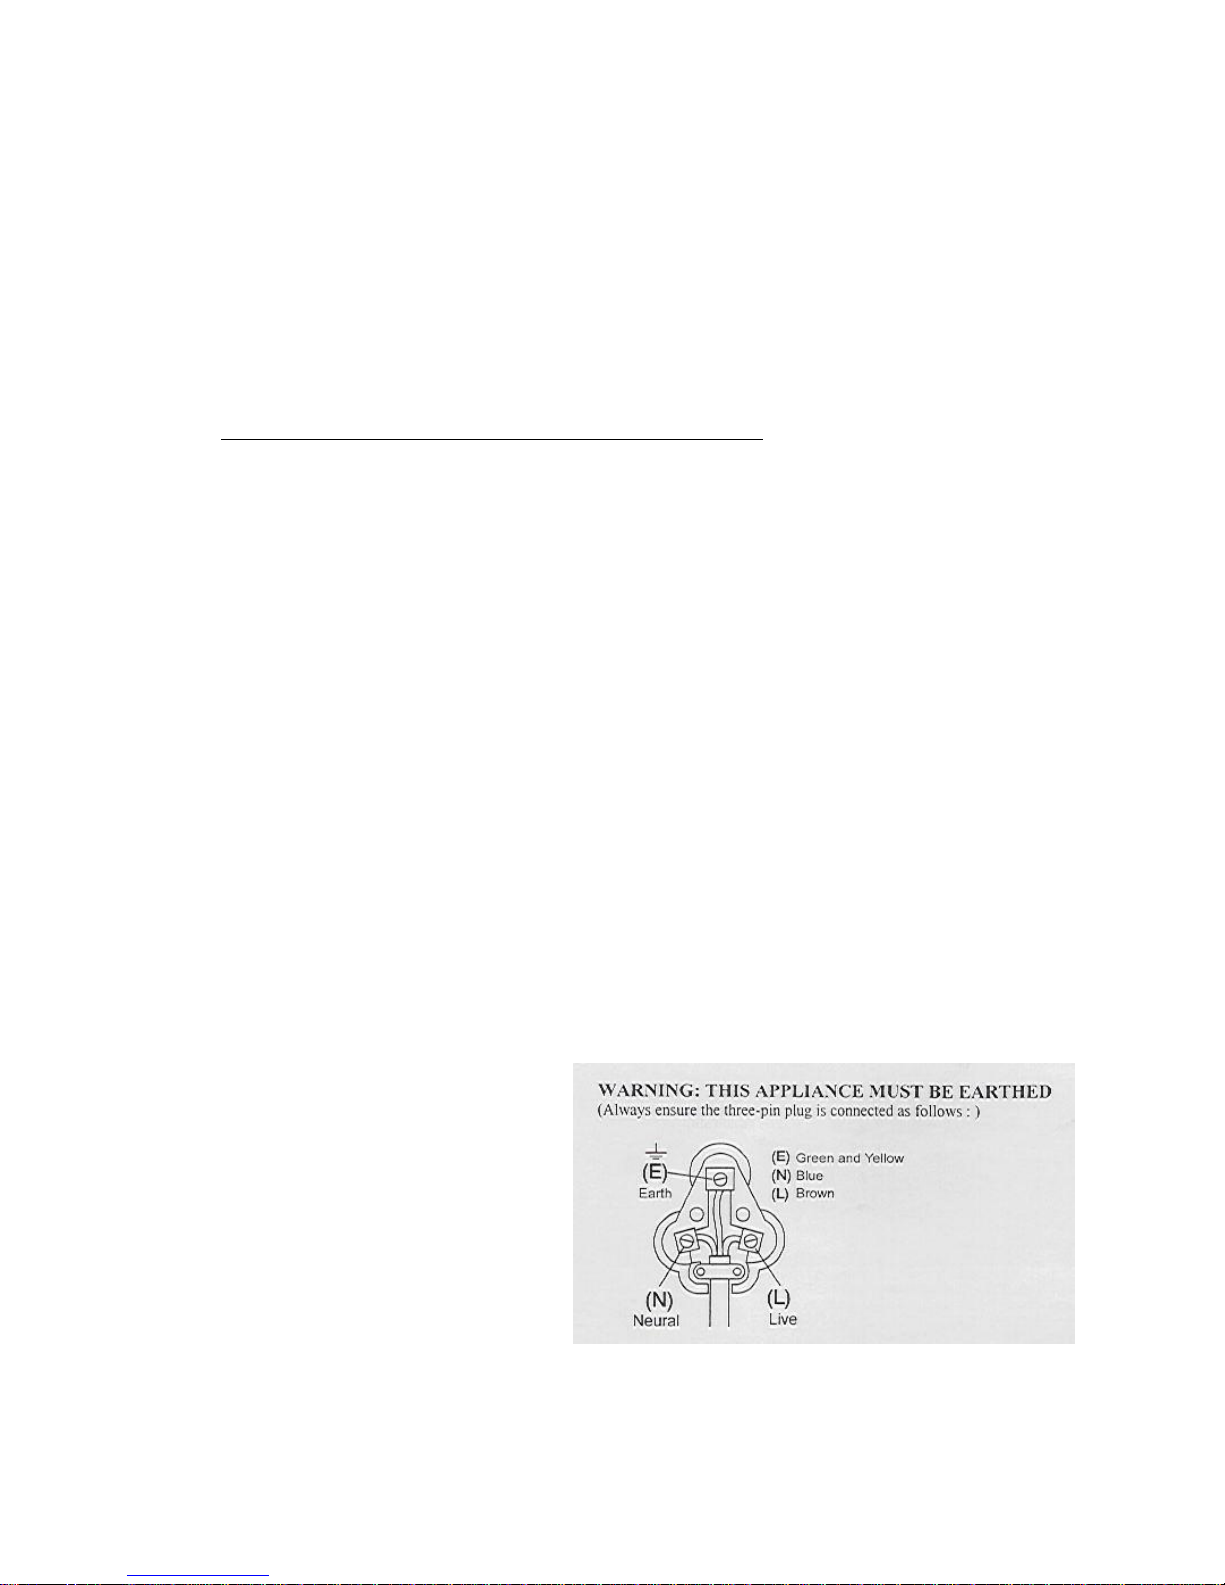
AVISO: ESTE APARELHO DEVE ESTAR LIGADO À TERRA
(Certifique-se sempre de que a ficha de três pinos está ligada da seguinte maneira:)
(E) (E) Verde e amarelo
Terra (N) Azul
(L) Castanho
(N) (L)
Neutro Vivo
Page 20

FIXE O RECIBO DA COMPRA AQUI
O RECIBO TEM DE SER FORNECIDO NA EVENTUALIDADE DE UMA RECLAMAÇÃO AO ABRIGO
DOS TERMOS DA GARANTIA
G A R A N T I A
1. A Tedelex Trading (Pty) Limited (“Tedelex”) garante ao comprador original deste produto (“o
cliente”) que este produto estará livre de defeitos de qualidade e mão-de-obra, os quais sob uso
pessoal, familiar ou doméstico normal se possam manifestar dentro de um período de 1 (um)
ano a partir da data de compra (“período de garantia”).
2. Quando o cliente compra um produto e ele se avaria, possui defeitos ou não funciona
devidamente para o fim previsto, deverá notificar o fornecedor a quem comprou o produto (“o
fornecedor”) da situação dentro do período de garantia. Qualquer reclamação no âmbito dos
termos desta garantia deve ser suportada por uma prova de compra. Na ausência de uma
prova de compra, então os serviços de reparação e/ou assistência poderão ser pagáveis pelo
cliente ao fornecedor.
3. O produto defeituoso deverá ser devolvido ao centro de assistência do fornecedor com vista a
exercer os termos da garantia.
4. O fornecedor irá reembolsar, reparar ou trocar o produto no âmbito dos termos desta garantia,
sujeito aos requisitos legislativos. Esta garantia só é válida quando o cliente não avariou o
produto ele próprio ou o utilizou para qualquer outro fim que não o previsto. A garantia não
inclui e não será considerada como abrangendo outros produtos danificados devido a uma
situação de desastre, utilização indevida, manipulação, abuso ou qualquer outra modificação
ou reparação não autorizada do produto.
5. Esta garantia só se estende ao produto fornecido na data da compra e não a quaisquer outras
peças anexadas ou instaladas pelo cliente.
6. Se o cliente solicitar ao fornecedor a reparação do produto e este se avariar ou não funcionar
devidamente dentro de 3 (três) meses da reparação e não devido a uma situação de utilização
indevida, manipulação ou modificação efectuada por ou sob pedido do cliente, então o
fornecedor poderá substituir o produto ou reembolsar o cliente.
7. O cliente poderá ser responsável por determinados custos quando os produtos devolvidos não
se encontram na sua embalagem original ou esta se encontra danificada. Tais custos serão
deduzidos de qualquer reembolso pago ao cliente.
TEDELEX TRADING (PTY) LTD (JOANESBURGO)
JOANESBURGO TEL. (011) 490-9600
CIDADE DO CABO TEL. (021) 535-0600
DURBAN TEL. (031) 792-6000
www.amap.co.za
Page 21

Félicitations pour l’achat de notre FER A REPASSER A VAPEUR RHI101 RUSSELL
HOBBS. Chaque unité est fabriquée afin de d’assurer la sécurité et la fiabilité. Avant
d’utiliser cet appareil pour la première fois, merci de lire le manuel avec soin et de le
garder à titre de référence.
GARANTIES IMPORTANTES
Lors de l’utilisation de n’importe quel appareil électrique, des précautions de
sécurité élémentaires devraient toujours être suivies, ainsi que les points suivants :
49. Merci de lire les instructions avec attention avant d’utiliser tout appareil quel
qu’il soit.
50. Toujours vous assurer que le voltage indiqué sur la plaque signalétique
correspond aux voltages principaux dans votre maison.
51. Une opération incorrecte et une utilisation inappropriée peuvent endommager
l’appareil et entraîner des blessures pour l’utilisateur.
52. L’appareil est destiné à uniquement à un usage domestique. Une utilisation
commerciale annule la garantie et le fournisseur ne peut pas être tenu pour
responsable des blessures ou des dommages causent lors de l’utilisation de
l’appareil pour tout autre usage que celui auquel il est destiné.
53. Eviter tout contact avec les parties mobiles.
54. Une surveillance étroite est requise lorsque tout appareil est utilisé près
d’enfants ou de personnes invalides.
55. Vérifier le cordon d’alimentation et brancher régulièrement pour éviter que le
cordon ne soit endommagé. Si le cordon ou la prise sont endommagés, ils
doivent être remplacés par le fabricant ou par une personne qualifiée afin
d’éviter un danger électrique.
56. Ne pas utiliser l’appareil s’il est tombé ou s’il a été endommagé de quelque
manière que ce soit. En cas de dommage, rapporter l’unité pour un examen et /
ou une réparation par un agent de maintenance agréé.
57. Pour éviter le risqué de choc électrique, ne pas immerger ou exposer
l’ensemble du moteur, la prise, ou le cordon d’alimentation dans l’eau ou bien
dans tout autre liquide.
58. Ne jamais immerger l’unité dans l’eau ou dans tout autre liquide pour le
nettoyer.
59. Retirer la fiche de la prise en tenant la fiche. Ne pas tirer sur le cordon pour
déconnecter l’appareil du secteur. Toujours débrancher l’unité lorsqu’elle n’est
pas utilisée, avant le nettoyage ou lors de l’ajout ou du retrait de parties.
60. L’utilisation d’accessoires se fixant à l’unité qui ne sont ni recommandés ou
fournis par le fabricant pourrait entraîner des blessures, un incendie ou un choc
électrique.
61. Un cordon court est fourni pour réduire les risques résultant d’un
entremêlement, ou de trébuchement sur ce dernier.
Page 22

62. Ne pas laisser le cordon dépasser du bord de la table ou du comptoir.
S’assurer que le cordon n’est pas dans une position ou il peut être tire par
inadvertance.
63. Ne pas laisser le cordon de toucher des surfaces chaudes et ne pas le placer
sur ou près d’un réchaud à gaz ou électrique ou d’un four chaud.
64. Ne pas utiliser l’appareil sur une plaque à gaz ou électrique ou au-dessus
d’une flamme.
65. L’utilisation d’un cordon d’extension avec cet appareil n’est pas recommandée.
Cependant, s’il s’avère nécessaire d’utiliser une rallonge électrique qui est
adaptée à la consommation d’énergie de l’appareil, afin d’éviter le
surchauffement du cordon d’extension, de l’appareil ou de la prise de courant.
Ne pas mettre la rallonge dans une position où elle peut être tirée par des
enfants, ou des animaux, ou bien où ils risquent de trébucher dessus.
66. Cet appareil n’est pas recommandé pour un usage extérieur. Ne pas utiliser cet
appareil pour quoique ce soit d’autre que l’utilisation à laquelle il est destiné.
67. NE PAS porter l’appareil en le prenant par le cordon d’alimentation.
68. Ne pas laisser cet appareil sans surveillance pendant son utilisation.
Débrancher toujours l’unité lorsqu’elle n’est pas utilisée, ou avant de la
nettoyer.
69. Faire toujours fonctionner l’appareil sur une surface régulière et stable. Ne pas
placer l’unité sur une surface chaude.
70. S’assurer que l’interrupteur est en position « ARRET » après chaque utilisation.
71. Le fabricant n’accepte de prendre aucune responsabilité pour tout dommage
ou blessure que ce soit, qui seraient dues à une utilisation incorrecte ou
inappropriée, ou celle de réparations exécutées par un personnel non-agréé.
72. En cas de problèmes techniques, éteindre la machine et ne pas essayer de la
réparer vous-même. Renvoyer l’appareil à un service de maintenance habileté
pour un examen, un ajustement ou pour une réparation. Insister toujours pour
que les pièces détachées d’origines soient utilisées. Le non-respect avec les
précautions et les instructions mentionnées ci-dessus pourrait empêcher le bon
fonctionnement de cette machine.
Page 23

Apprendre à connaître votre fer
1. Bouton de jaillissement de la vapeur
5. Nez vaporisateur
2. Bouton vaporisateur d’eau
6. Indicateur de température
3. Bouton de contrôle de la vapeur
7. Réglage de la température
4. Couvercle de l’entrée de l’eau
8. Témoin lumineux
CONSEILS POUR LE REPASSAGE
11. Trier les articles à repasser en fonction du type de tissus. Cela diminuera la
fréquence des ajustements de la température pour différents vêtements.
12. Testez le repassage sur une petite surface au dos ou à l’envers du vêtement, si
vous n’êtes pas certain du type de tissue. Commencez à une température faible
et augmentez-la progressivement.
13. Attendez environ 3 minutes avant de repasser des tissus fragiles. Les
ajustements de la température prennent un certain temps pour atteindre le
niveau requis, qu’il soit plus élevé ou plus faible.
14. Il est mieux de repasser les tissus fragiles comme la soie, la laine le velours etc.
avec un tissu de repassage afin d’éviter les marques de brillance.
15. Vous devrez peut-être appuyer plusieurs fois pour active le vaporiser, pour faire
jaillir la vapeur, et pour activer les fonctions permettant le repassage à la vapeur
en position verticale.
Page 24

LIRE LES ETIQUETTES DES VETEMENTS ET SUIVEZ LES INSTRUCTIONS DE
REPASSAGE DU FABRICANT QUI SONT SOUVENT REPRESENTEES PAR DES
SYMBOLES SEMBLABLES AUX SUIVANTS.
COMMENT REMPLIR LE FER AVEC DE L’EAU
11. Débranchez le fer de l’alimentation électrique.
12. Déplacez le bouton de contrôle de la vapeur sur la position
13. Ouvrir couvercle de l’entrée de l’eau.
14. Verser l’eau dans l’orifice d’entrée de l’eau.
15. Remplir jusqu’au niveau « Max » indiqué sur le côté du
réservoir d’eau.
Note :
Afin d’obtenir de meilleurs résultats, il est conseillé d’utiliser de l’eau déminéralisée ou
distillée.
Ne pas utiliser d’eau chimiquement détartrée ou n’importe quels autres liquides.
LE REPASSAGE POUR LA PREMIERE FOIS
19. Retirez tous les films de protection ou les autocollants de la semelle et du boîtier,
si besoin est.
20. Dérouler et cordon d’alimentation.
21. Remplir le réservoir d’eau, ainsi qu’il l’a été décrit dans « comment remplir le fer
avec de l’eau ».
22. Branchez l’appareil à sur une prise de courant adéquate.
23. Tournez le bouton de contrôle de la température sur le fer à repasser dans le sens
des aiguilles d’une montre jusqu’à la position maximale, le témoin lumineux
s’illumine.
24. Le témoin lumineux s’éteint lorsque la température requise est atteinte.
25. Déplacez le contrôle de la vapeur sur la position , la vapeur commence à
Réglage du contrôle de la température
. Acétate
. Elastine
. Polyamide
. Polypropylène
Polyester
Soie
Triacétate
Viscose
Laine
. Coton
. Lin
Page 25

s’échapper des trous de la semelle.
26. La première fois commencez par repasser avec une veille serviette.
27. Lorsque le réservoir d’eau est vide et que la vapeur ne s’échappe plus, le travail
de préparation est terminé. Le fer peut être alors utilisé pour une utilisation
appropriée.
VAPORISATION
9. Cette fonction peut être utilisée à n’importe quel
moment et elle n’affecte aucun réglage.
10. Remplissez le réservoir d’eau ainsi que cela est décrit
dans « comment remplir le fer avec de l’eau ».
11. Dirigez le nez vers le vêtement.
12. Appuyez sur le bouton vaporisateur.
Note : Il peut être nécessaire d’appuyer sur le bouton vaporisateur plusieurs fois, afin
de démarrer cette fonction.
REPASSAGE A SEC
23. Dérouler et cordon d’alimentation.
24. Branchez l’appareil à sur une prise de courant adéquate.
25. Tournez le bouton de la température du fer dans la direction du sens des aiguilles
d'une montre, sélectionnez « » ( point-1), « » (point-2) or « »
(point-3) en fonction des recommandations de l’étiquette du vêtement.
26. Le témoin lumineux s’illumine indiquant que le fer est allumé.
27. Le témoin lumineux s’éteint lorsque la température du fer requise est atteinte.
28. L’appareil est alors prêt à l’emploi.
29. Lorsque vous avez terminé votre repassage, tournez le fer sur la position d’arrêt /
MIN et débranchez le cordon d’alimentation du circuit d’alimentation.
30. Lorsque l’appareil a totalement refroidi, rangez-le dans un endroit sûr.
31. Ne pas enrouler le cordon autour du fer.
REPASSER A LA VAPEUR
23. Dérouler et cordon d’alimentation.
24. Remplissez le réservoir d’eau ainsi que cela est décrit dans
« comment remplir le fer avec de l’eau ».
25. Branchez l’appareil à sur une prise de courant adéquate.
26. Tournez le bouton de contrôle de la température dans la direction
des aiguilles d’une montre vers le réglage « » (3 points) ou
vers le réglage « Max ». (Pour une qualité de vapeur optimale, ne pas utiliser les
réglages d’un point ou de deux points pour le repassage à la vapeur); Le témoin
lumineux s’illumine indiquant que le fer est allumé.
27. Le témoin lumineux s’éteint lorsque la température requise est atteinte.
28. L’appareil est alors prêt à l’emploi.
29. Déplacez le contrôle variable de la vapeur pour obtenir la quantité de vapeur
souhaitée.
30. Tournez bouton de contrôle de la température dans le sens des aiguilles d’une
montre en direction de « Min », puis le fer est éteindra.
31. Débranchez le fer de l’alimentation électrique.
32. Lorsque l’appareil a totalement refroidi, rangez-le dans un endroit sûr.
Page 26

33. Ne pas enrouler le cordon autour du fer.
BOUFFEES DE VAPEUR
Cette fonction offre une quantité de vapeur supplémentaire pour
enlever les plis récalcitrants.
1. Remplissez le réservoir d’eau ainsi que cela est décrit dans
« comment remplir le fer avec de l’eau ».
2. Branchez l’appareil à sur une prise de courant adéquate.
3. Tournez le bouton de contrôle de la température sur le réglage
« » (3 points) ou sur le réglage « Max ». Le témoin
lumineux s’illumine indiquant que le fer est allumé.
4. Le témoin lumineux s’éteint lorsque la température requise est atteinte.
5. L’appareil est alors prêt à l’emploi.
6. Appuyez que le bouton du jaillissement de la vapeur une seule fois.
7. La vapeur jaillira des trous de la semelle vers le tissu qui est repassé et elle
enlève les plis.
8. Pour les plis récalcitrants, attendre quelques secondes avant d’appuyer encore
sur le bouton de jaillissement de la vapeur. La plupart des plis disparaissent
après trois pressions.
9. Tournez bouton de contrôle de la température dans le sens des aiguilles d’une
montre en direction de « Min », puis le fer est éteindra.
10. Débranchez le fer de l’alimentation électrique.
32. Lorsque l’appareil a totalement refroidi, rangez-le dans un endroit sûr.
33. Ne pas enrouler le cordon autour du fer.
Note : Il peut être nécessaire de presser sur le bouton de jaillissement de la vapeur
plusieurs fois pour démarrer cette fonction. Pour une qualité de vapeur optimale, ne
pas faire fonctionner le bouton de jaillissement de la vapeur plus de trois fois après
que le pilote lumineux se soit éteint.
JAILLISSEMENTS DE VAPEUR EN POSITION VERTICALE
Avertissement :
Ne pas utiliser la vapeur sur des vêtements ou sur des tissus qui sont portés par les
personnes ou par les animaux. La température de la vapeur est très chaude.
Cette fonction produit de la vapeur pour enlever les plis sur les
vêtements fragiles qui sont suspendus, sur des rideaux suspendus
ou sur des tissus suspendus.
27. Remplissez le réservoir d’eau ainsi que cela est décrit dans
« comment remplir le fer avec de l’eau ».
28. Branchez le fer sur une prise courant adéquate.
29. Tournez le bouton de la température vers le réglage « »
(3 points) ou sur le réglage « Max ». Le témoin lumineux
s’illumine indiquant que le fer est allumé.
30. Le témoin lumineux s’éteint lorsque la température requise est atteinte. L’appareil
est prêt à l’emploi.
31. Maintenir le fer à une distance de 15 à 30 cm du vêtement.
32. Appuyez sur le bouton de jaillissement de la vapeur.
Page 27

33. La vapeur va pénétrer dans le vêtement et enlever les plis.
34. Pour les plis récalcitrants, attendez quelques seconds avant d’appuyer encore sur
le bouton de jaillissement de la vapeur.
35. La plupart des plis disparaissent après trois pressions.
36. Tournez bouton de contrôle de la température dans le sens des aiguilles d’une
montre en direction de « Min », puis le fer est éteindra.
37. Débranchez le fer de l’alimentation électrique.
38. Lorsque l’appareil a totalement refroidi, rangez-le dans un endroit sûr.
39. Ne pas enrouler le cordon autour du fer.
Note :
5. Gardez une distance de quelques centimètres des tissus fragiles (synthétique,
soir, velours etc.) ; sinon, le tissue pourrait être endommagé.
6. Il peut être nécessaire de presser sur le bouton de jaillissement de la vapeur
plusieurs fois pour démarrer cette fonction. Pour une qualité de vapeur optimale,
ne pas faire fonctionner le bouton de jaillissement de la vapeur plus de trois fois
après que le pilote lumineux se soit éteint.
AUTO-NETTOYAGE
Cette fonction enlève le calcaire et les dépôts accumulés dans la chambre vapeur. Le
fer restera en bon état si cette fonction est exécutée de manière régulière, au moins
une fois par mois, en fonction de la dureté de l’eau utilisée.
31. Remplir le fer ainsi que le décrit « comment remplir le fer avec de l’eau » remplir
le réservoir jusqu’à la moitié.
32. Branchez le fer sur l’alimentation.
33. Tournez le bouton de la température dans le sens des aiguilles d’une monde
jusqu’au réglage « Max ».
34. Le témoin lumineux s’illumine indiquant que le fer est allumé.
35. Le témoin lumineux s’éteint lorsque la température requise est atteinte.
36. Attendez encore pendant un cycle de plus ; le témoin lumineux s’illumine puis
s’éteint.
37. Tournez bouton de contrôle de la température dans le sens des aiguilles d’une
montre en direction de « Min », puis le fer est éteindra.
38. Débranchez le fer de l’alimentation électrique.
39. Maintenir le fer en position horizontale au-dessus d’un évier.
40. Tirez et maintenez le bouton de contrôle de la vapeur/d’auto-nettoyage en
position (détartrage).
41. La vapeur et l’eau bouillante s’écouleront des trous de la semelle en nettoyant le
calcaire et les dépôts qui se sont accumulés dans la chambre vapeur.
42. Agitez doucement le fer de l’avant vers l’arrière jusqu’à ce que le réservoir d’eau
soit vide.
43. Lorsque l’auto-nettoyage est terminé, relâchez le bouton de l’auto-nettoyage.
44. Laissez reposer le fer à vapeur sur son talon et le laisser complètement refroidir.
45. Essuyez la semelle ave un chiffon humide.
Précaution : Tenir la peau/le corps à distance de l’eau chaude.
VIDER LE FER ET LE RANGER
9. Déplacez le bouton de contrôle de la vapeur sur la position
10. Débranchez le fer de l’alimentation électrique.
11. Maintenir le faire à l’envers et le secouer doucement pour vider
Page 28

l’eau restante.
12. Lorsque le fer a complètement refroidi le ranger verticalement dans un lieu sûr.
NETTOYAGE DU FER
5. Débranchez le fer de l’alimentation électrique.
6. Utilisez un chiffon humide pour retirer tous les dépôts se trouvant sur la semelle
ou sur le boîtier.
Note :
Ne jamais utilisé des objets pointus ou coupants pour retirer les dépôts sur la semelle.
Ne jamais utiliser des agents abrasifs, du vinaigre ou d’autres agents chimiques pour
nettoyer le fer.
MAINTENANCE DE L’APPAREIL
Il n’existe pas de pièces dans cet appareil, dont la maintenance puisse être faite par
l’utilisateur. Si l’unité ne fonctionne pas correctement, veuillez vérifier les points
suivants :
Vous avez correctement suivi les instructions.
Que l’unité a été correctement connectée et que toutes les prises murales
sont allumées.
Que l’alimentation secteur est sur MARCHE.
Que la fiche est solidement ancrée dans la prise de courant.
Si cet appareil ne fonctionne toujours pas après avoir vérifié les points énoncés
ci-dessus :
Consulter un détaillant pour la possibilité d’une réparation ou bien d’un replacement.
Si le détaillant ne réussit pas à résoudre le problème est que vous devez renvoyer
l’appareil, assurez-vous que :
L’unité est emballée avec soin dans son emballage d’origine.
La preuve d’achat est jointe.
La raison pour laquelle l’appareil est renvoyé.
Si le cordon d’alimentation est endommagé, il doit être remplacé par le fabriquant ou
par un agent de maintenance agréé, afin d’éviter tout danger. Si la maintenance
devient nécessaire pendant la durée de la garantie, l’appareil devrait être renvoyé à
un centre de maintenance agréé par Amalgamated Appliances / Tedelex Trading (Pty)
Ltd. La maintenance au-delà de la garantie est toutefois possible, mais elle sera
cependant facturée.
Page 29

LE CHANGEMENT DE LA PRISE
Si la prise intégrée devait être change, suivez les instructions ci-dessous.
Cette unité est destinée à fonctionner uniquement sur un courant spécifique
(sur la plaque signalétique du produit). La connexion à d’autres sources
d’alimentation pourrait endommager l’appareil. Connecter la prise à trois
chiffes de la manière suivante :
Les fils de ce réseau sont colorés selon le code suivant :
Vert/jaune = Terre
Bleu = Neutre
Marron = Actif
[Image]
AVERTISSEMENT : CET APPAREIL DOIT ÊTRE RACCORDE A UNE PRISE DE
TERRE
(Il faut toujours s’assurer que la prise à trois fiches est connectée de la manière
suivante :)
(T) (T) Vert et jaune
Terre (N) Bleu
(A) Marron
(N) (A)
Neutre Actif
Page 30

GARANTIE
1. Tedelex Trading (Pty) Limited (« Tedelex ») garantie à l’acheteur d’origine de ce produit (« le
client ») que produit ne sera pas défectueux que ce soit en ce qui concerne sa qualité ou sa
fabrication, ce dernier dans le cas d’une utilisation personnelle normale, familiale ou domestique,
pourra se manifester à ce propos dans une période d’une (1) année à partir de la date de l’achat
(« période de garantie »).
2. Si le client a acheté un produit et qu’il se casse, qu’il est défectueux ou qu’il ne fonctionne pas
correctement, le client doit notifier cela au fournisseur auprès duquel il a acheté le produit (« le
fournisseur ») dans la période de garantie. Toute réclamation dans le cadre de cette garantie doit
être accompagnée d’une preuve d’achat. Si la preuve d’achat n’est pas disponible, les frais de la
réparation, et / ou de la révision peuvent être réglés par le client au fournisseur.
3. Le produit défectueux doit être rapporté au centre d’entretien du fournisseur afin d’activer la
garantie.
4. Le fournisseur remboursera, réparera ou échangera le produit, selon les termes de cette garantie,
qui est soumise à des conditions juridiques. Cette garantie devrait être valide, uniquement dans
le cas où le client n’aurait pas cassé lui-même le produit, ou qu’il ne l’a pas utilisé pour un usage
autre que celui pour lequel il était destine. La garantie ne comprend pas et ne sera pas
interprétée de manière à couvrir les produits endommagés à la suite d’un désastre, d’une
mauvaise utilisation, d’un traficage, d’un abus ou de toute modification ou d’une réparation
non-autorisée du produit.
5. Cette garantie s’étendra uniquement au produit fournit à la date de l’achat et non à toute pièce
supplémentaire attachée ou installée par le client.
6. Si le client requiert que le fournisseur répare le produit et que le produit se casse, ou bien qu’il ne
fonctionne pas dans les 3 (trois) mois suivant la réparation, et que cela n’est pas le résultat d’une
mauvaise utilisation, d’une falsification ou d’une modification par ou bien au nom du client, à ce
moment là, le fournisseur devra remplacer le produit ou rembourser le client.
7. Le client peut être tenu responsable de certains frais, lorsque les produits renvoyés ne sont pas
dans leur emballage d’origine, ou bien si l’emballage est endommagé. Ceci sera déduit de tout
remboursement réglé au client.
TEDELEX TRADING (PTY) LTD (JOHANNESBURG)
JOHANNESBURG NO TEL. (011) 490-9600
CAPE TOWN NO TEL. (021) 535-0600
DURBAN NO TEL. (031) 792-6000
www.amap.co.za
MERCI D’ATTACHER VOTRE PREUVE D’ACHAT ICI
EN CAS DE RECLAMATION SOUS GARANTIE CE RECU DOIT ETRE
PRESENTE.
 Loading...