

Page 1

A
LEADING
BRAND IN THE UK
Hand Blender
®
OWNER’S MANUAL
Model RHHB3
Page 2

IMPORTANT SAFEGUARDS
When using electrical appliances, basic safety precautions should always
be followed including the following:
1. Read all instructions.
2. To protect against risk of electrical shock, do not put cord, plugs or
appliance in water or other liquid.
3. This appliance should not be used by children and care should be
taken when used near children.
4. Unplug from outlet when not in use, before putting on or taking off
parts, and before cleaning.
5. Avoid contacting moving parts.
6. Do not operate any appliance with a damaged cord or plug or after
the appliance malfunctions, or is dropped or damaged in any manner.
Contact Consumer Service.
7. The use of attachments, including canning jars, not recommended by
the manufacturer may cause a risk of injury to persons.
8. Do not use outdoors.
9. Do not let cord hang over edge of table or counter.
10. Do not let cord contact hot surface, including the stove.
11. Keep hands and utensils out of the container while blending to reduce
the risk of severe injury to persons or damage to the Blender. A
scraper may be used but must be used only when the Blender is not
running (does not apply to an acceptable scraper integral with the
appliance).
12. Keep hands, hair, clothing, as well as spatulas and other utensils
away from Beaters and out of the container during operation to
reduce the risk of injury to persons, and/or damage to the Blender.
13. Remove beaters, Dough Hooks, or Whisk from Gearbox before washing them.
14. Blades are sharp. Handle carefully.
15. Always operate Blender with cover in place.
16. Never add to Container while appliance is operating.
17. Keep hands and utensils away from moving Blades or discs while
processing food to reduce the risk of severe injury to persons or damage to the food processor. A scraper may be used but must be used
only when the food processor is not running.
18. Be certain cover is securely locked in place before operating appliance.
19. When mixing liquids, especially hot liquids, use a tall container or
make small quantities at a time to reduce spillage.
SAVE THESE INSTRUCTIONS
FOR HOUSEHOLD USE ONLY
2
Page 3

ADDITIONAL
IMPORTANT SAFEGUARDS
1. All users of this appliance must read and understand this Owner's
Manual before operating or cleaning this appliance.
2. The cord to this appliance should be plugged into a 120V AC
electrical outlet only.
3. Do not leave this appliance unattended during use.
4. If this appliance begins to malfunction during use, immediately turn
the unit OFF and unplug the cord. Do not use or attempt to repair
the malfunctioning appliance.
5. If this appliance falls or accidentally becomes immersed in water,
unplug it immediately. Do not reach into the water! Do not use
this appliance after it has fallen into or becomes immersed in
water.
6. To reduce the risk of injury to persons or property, never use this
appliance in an unstable position.
7. Do not use this appliance for other than its intended use.
8. Use extreme care when handling the Blade Attachment. Always
insert and remove Blade by using the Blade Holder. Do not touch
the Blades with your fingers. The Blades are very sharp and can
cause injury if touched.
9. This Chopper is intended for processing small quantities of food. It
is not intended to prepare large quantities of food at one time.
10. Never use for extended periods of time. The Chopper does its
work in seconds.
11. Do not operate the Chopper without food contents in Chopper
Container.
12. Do not use if the Container is cracked or chipped.
Polarized Plug
This appliance has a polarized plug (one blade is wider than the other).
To reduce the risk of electric shock, this plug will fit in a polarized outlet only one way. If the plug does not fit fully in the outlet, reverse the
plug. If it still does not fit, contact a qualified electrician. Do not modify
the plug in any way.
3
Page 4
Russell Hobbs®RHHB3
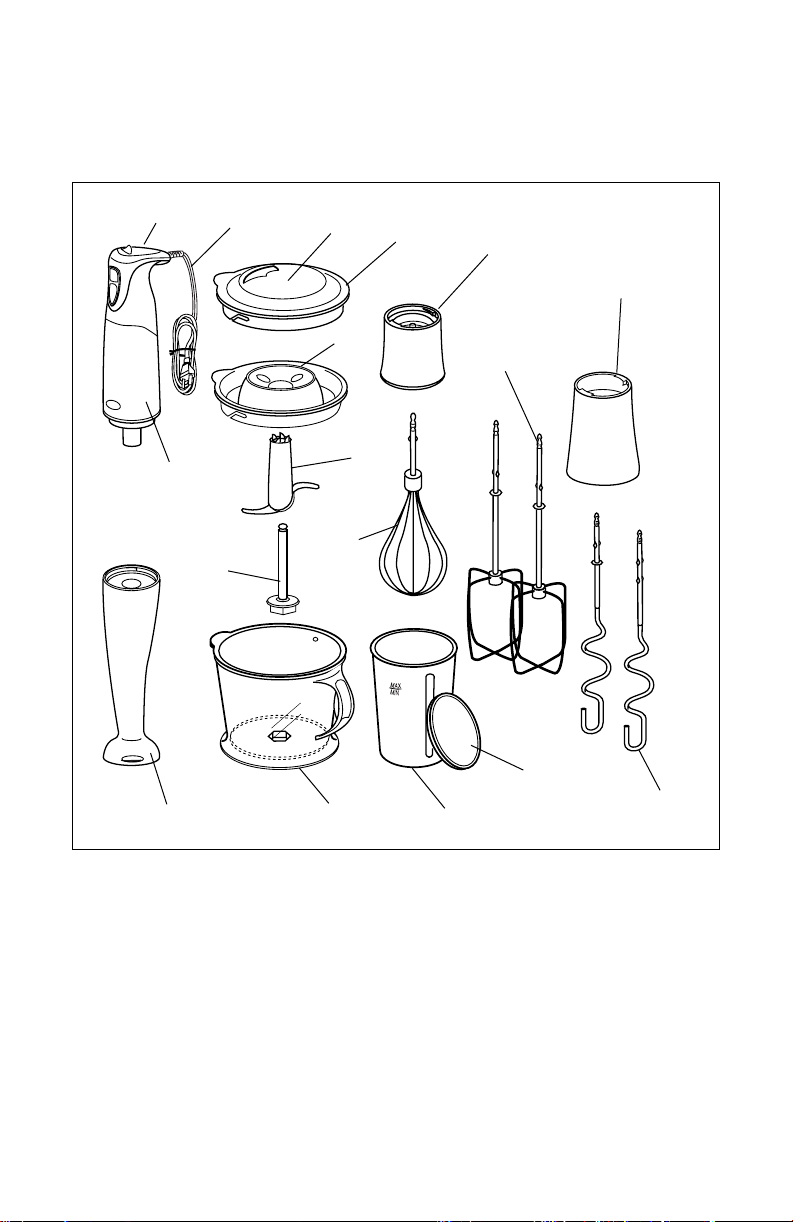
Hand Blender Features
3
2
1
4
9
5
13
10
6
7
8
11
14
16
15
12
17
1. Blending Foot (P/N 70932)
2. Blender Body
3. Electronic Control Panel
4. Power Cord
5. Chopper Container Lid Cover
(P/N 70806)
6. Chopper Container Lid
(P/N 70807)
7. Chopper Container Drive Lid
(P/N 70808)
8. Double Blade Knife Hub
(P/N 70809)
9. Blade Shaft (P/N 70943)
10. Chopper Container (P/N 70810)
11. Mixing Beaker (P/N 70953)
12. Mixing Beaker Lid (P/N 70954)
13. Balloon Whisk (P/N 70940)
14. Single Gearbox (Whisk,
Chopper Container) (P/N 70941)
15. Beater (2) (P/N 70595)
16. Double Gearbox (Beaters,
Dough Hooks) (P/N 70942)
17. Dough Hook (2) (P/N 70596)
4
Page 5

Introduction
Congratulations on your purchase of the Russell Hobbs®RHHB3 Hand
Blender. This versatile appliance quickly converts from blender to mixer
to chopper by removing and replacing attachments with just a twist.
The durable Stainless Steel Beaters, Dough Hooks, Balloon Whisk and
Blending Foot will give you years of use.
Before Using for the First Time
CAUTION: Use extreme care when handling the Double Blade
Knife. Do not touch the Blades with your fingers. The Blades
are very sharp and can cause injury if touched.
1. Carefully unpack the Hand Blender and all accessories.
2. Wash the Mixing Beaker and Lid, Chopper Container, Lid and
Cover, Double-Blade Knife, Stainless Steel Beaters, Dough Hooks
and Balloon Whisk in warm soapy water. Rinse and dry thoroughly.
3. Never immerse the Blender Body, Blending Foot or Single
and Double Gearboxes in water or any other liquid. If necessary, these attachments can be wiped clean with a moistened
cloth. The Blending Foot can be washed under running water; but
be careful not to allow water to enter the hollow shaft.
4. Always dry the Blender Foot thoroughly so that no water can enter
the Blender Body.
NOTE:
• Do not wash any of the parts in the dishwasher.
• Do not use harsh or abrasive cleaning agents or solvents.
• Store the appliance in its box in a cool, dry place and away from
the reach of children.
• Remove Double Blade Knife if you want to store the Chopper
Container in the refrigerator.
•Do not put any parts in the microwave oven.
5
Page 6
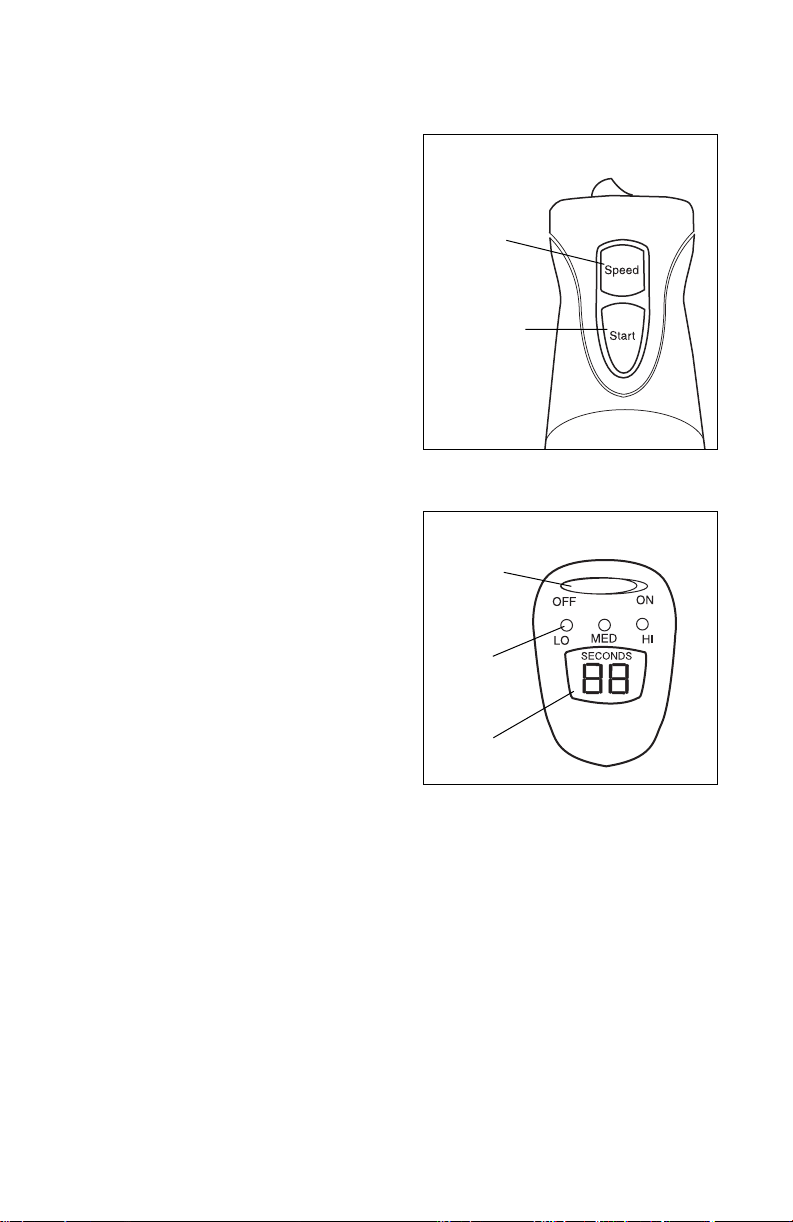
Electronic Controls
Speed Selector - This button allows
you to select one of three speeds;
LO, MED or HI. Press the Speed
Selector until the light above the
desired speed is illuminated. Note:
The default speed setting is LO.
Start Button - Press and hold the
Start Button to begin the blending
operation. Release the Start Button
to stop the operation.
ON/OFF Switch - This switch turns
power on or off to the Blender Body.
Speed Indicator - There are three
corresponding Speed Indicators, LO,
MED and HI. When the desired speed
has been selected, the corresponding
light will illuminate and flash above
the selected speed. See Figure 2.
Timer - Press and hold the Start
Button. The Timer Display will indicate the elapsed processing time.
When the desired processing time
has been reached, release the Start
button. The Timer will automatically
return to "00". To prevent overheating, the unit will automatically stop
operating when the Timer reaches
90 seconds.
Front of Blender Body
Speed
Selector
Operating
Button
Figure 1
Top of Blender Body
ON/OFF
Switch
Speed
Indicator
Timer
Figure 2
6
Page 7
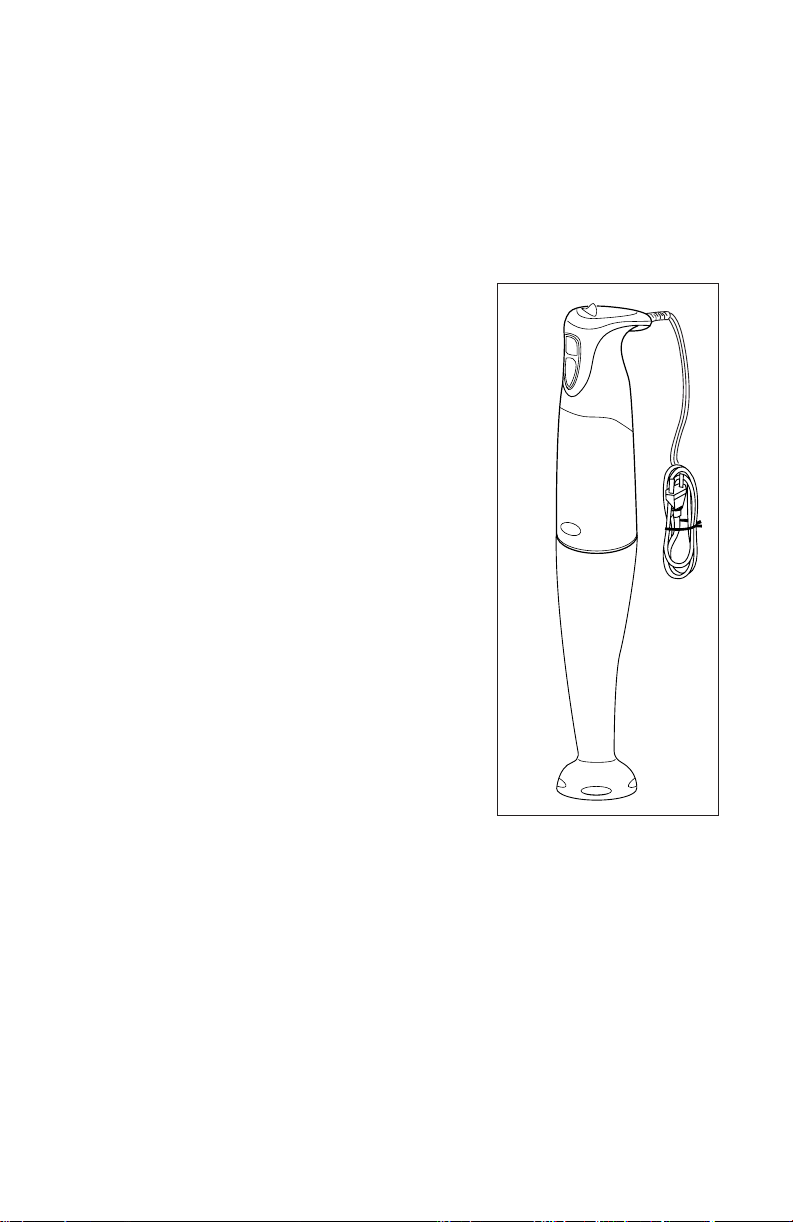
Operating Instructions
CAUTION: Always unplug Blender Body from outlet before
installing or removing attachments.
Do not operate the appliance continuously for more than one minute.
After operating for one minute, turn the appliance OFF, unplug the
Power Cord and let the unit cool before using it again.
When immersing the Blending Foot or
the Balloon Whisk into food or liquid,
make sure the Blender Body and
Gearbox does not contact the food or
liquid.
USING THE HAND BLENDER WITH
BLENDING FOOT
1. Place the Blender Body over the Blending
Foot. Carefully push down and turn the
Blending Foot counter-clockwise, until a
'click' sound is heard and the two parts
are locked together.
2. Place ingredients into the Mixing Beaker,
bowl or pan sufficiently tall to avoid
splashing.
3. Plug the Blender Body into a standard
120V AC electrical outlet.
4. Dip the Blending Foot as deeply as possible into the container. Turn on power to
the Blender Body, select the desired
speed then press in on the Start button.
Do not start the Hand Blender before
inserting into the container, as this may
cause splashing.
5. Work the Blending Foot through the ingredients with a gentle up
and down movement of the Hand Blender.
6. When blending is complete, release the Start Button and remove
the Power Cord from the electrical outlet.
7. Carefully remove the Blending Foot from the Blender Body by turning the Blending Foot clockwise.
8. Clean unit and attachments as instructed in the
Instructions.
Figure 3
User Maintenance
7
Page 8
Operating Instructions (Cont.)
USING THE DOUBLE GEARBOX (Used with Stainless Steel
Beaters or Dough Hooks)
NOTE: When using these accessories, do not operate the appliance
for more than one minute at a time,
after which it should be allowed to
cool down. These accessories are for
light duty mixing only.
1. Place the Blender Body over the
Double Gearbox. Carefully push
down and turn the Double
Gearbox counter-clockwise, until a
'click' sound is heard and the two
parts are locked together.
2. Insert the stems of the desired
attachment into the Gearbox
holes. Push and turn until they
'click' in place.
NOTE: The Stainless Steel Dough
Hooks must be attached only one
way. The Dough Hook with the metal
washer-ring on the stem must be
Bottom View - Double Gearbox
inserted into the larger hole of the
Gearbox. See Bottom View - Double
Gearbox, Figure 4. There are no
restrictions when inserting the Beaters.
3. After installing attachments, gently
tug each stem to be sure it's secure.
CAUTION: Use same type attachments only. Use either both
Beaters or both Dough Hooks. Do not attempt to mix Dough
Hooks, Beaters or Balloon Whisk. This could damage the Hand
Blender.
4. Plug the Blender Body into a standard 120V AC electrical outlet.
5. Turn on power to the Blender Body, select the desired speed, then
press in on the Start Button.
6. Work the Attachments through the ingredients.
7. When blending is complete, release the Start Button and remove
the Power Cord from the electrical outlet.
8. Pull the Attachments from the Gearbox then carefully remove the
Gearbox from the Blender Body by turning the Gearbox clockwise.
9. Clean unit and attachments as instructed in the User Maintenance
Instructions.
8
Dough Hook
with
Washer-Ring
Larger
Hole
Figure 4
Page 9

Operating Instructions (Cont.)
USING THE SINGLE GEARBOX (Used with Balloon Whisk
and Chopper Container)
NOTE: When using this accessory, do not operate the appliance for
more than one minute at a time, after which it should be allowed to
cool down. This accessory is for light duty mixing only.
1. Place the Blender Body over the
Single Gearbox. Carefully push down
and turn the Single Gearbox counterclockwise until a 'click' sound is
heard and the two parts are locked
together.
2. Insert the stem of the Balloon Whisk
into the Gearbox hole. Push and turn
until it 'clicks' in place.
3. After installing the Balloon Whisk,
GENTLY tug on the Whisk to be sure
it's secure.
4. Plug the Blender Body into a standard 120V AC electrical outlet.
5. Turn on power to the Blender Body,
select the desired speed then press in
on the Start Button.
6. Work the Whisk through the ingredients by gently moving it in a clockwise direction.
7. When blending is complete, release
the START Button and remove the
Power Cord from the electrical outlet.
8. Pull the Balloon Whisk from the
Gearbox then carefully remove the
Gearbox from the Blender Body by
turning the Gearbox clockwise.
9. Clean unit and attachments as
instructed in the User Maintenance Instructions.
Blending Tips When Using The Balloon Whisk
Figure 5
•When whisking egg whites, use a wider bowl to accommodate the
increase in volume.
•When foaming milk for Cappuccino, use heavy cream.
•Whipping cream must be chilled before whisking. Do not process
more than 12 oz. (400ml) at a time.
9
Page 10

Operating Instructions (Cont.)
DOUBLE BLADE KNIFE
The Double Blade Knife consists of two main parts; the Double Blade
Knife Hub and the Blade Shaft.
The two parts must always be assembled before using the Double
Blade Knife.
Assembly
Place the Blade Shaft on a flat, level surface. Slide the Blade Hub onto the shaft
and press down firmly until it clicks in
place.
CAUTION: Use extreme caution
when handling the Double Blade
Knife as the blades are very sharp.
When handling, use the Blade Hub.
Do not touch the Blades themselves.
Disassembly
Turn the Double Blade Knife Hub upside down and pull the Blade
Shaft out of the Hub.
USING THE CHOPPER CONTAINER
Use the Chopper Container to chop meat, vegetables and dried fruit.
CAUTION: Use extreme care when
handling the Double Blade Knife. Do
not touch the Blades with your fingers.
The Blades are very sharp and can
cause injury if touched.
1. Select a flat, stable surface for the
chopping operation.
2. Place the Double-Blade Knife into the
hexagonal opening in the bottom of the
Chopping Container. Make sure the
Knife is running smoothly by turning the
hub. Use care to avoid touching the
knife blade.
3. Add ingredients to the Chopper
Container. Pre-cut larger parts into
small pieces of even size.
10
Figure 6
Page 11

Operating Instructions
4. Place the Chopper Container Drive Lid on the Chopper Container
and turn the Lid counter-clockwise, making sure tabs and latches
are interlocked.
5. Place the Blender Body over the Single Gearbox. Carefully push
down and turn the Gearbox counter-clockwise until a 'click' sound
is heard and the two parts are locked together.
6. Place the Gearbox onto the Chopper Container Lid, making sure
all parts are properly aligned and connected.
7. Plug the Blender Body into a standard 120V AC electrical outlet.
8. Turn on power to the Blender Body and select the desired speed.
Firmly hold the Hand Blender then press in on the Start Button. If
you need to add extra liquid or oil during the process, pour the liquid through the small holes in the top of the Chopper Container
Lid.
9. When blending is complete, release the Start Button and remove
the Power Cord from the electrical outlet.
10. Lift the Gearbox from the Chopper Container. Remove the
Gearbox from the Blender Body by turning the Gearbox clockwise.
11. Remove the Chopping Container Lid by turning it clockwise and
lifting it from the Container.
12. Carefully grasp the Double Blade Knife by the hub and lift it from
the Container.
13. If you want to use the Chopper Container to store the processed
food, replace the Chopper Container Drive Lid with the Chopper
Container Lid and Cover. This is of great help for flavor protection
or for sprinkling chopped herbs or cheese over your favorite dishes
14. Clean unit and attachments as instructed in the User Maintenance
Instructions.
(Cont.)
11
Page 12

CHOPPING GUIDE (MED SPEED)
Approx.
Maximum Operation
Food Quantity Time (sec) Preparation
Carrots 3.5 oz. (100g) 15-20 Peel and cut into 3/4" (2cm)
pieces.
Apple 3.5 oz. (100g) 15-20 Peel, core and cut into 3/4"
(2cm) pieces.
Cheese 1 oz. (30g) 15-20 Cut into 3/4" (2cm) pieces.
Eggs 2 5-10 Hard-boil and peel. Cut into
quarters.
Meats 3.5 oz. (100g) 15-20 Cut into 3/4" (2cm) pieces.
(raw or Raw meat will take slightly
cooked) longer to process than
cooked meat.
Walnuts 1.75 oz. (50g) 10-15 Use halved or broken walnuts.
Scrape down sides of bowl to
ensure even processing.
Onions 3.5 oz. (100g) 10-15 Peel and cut into quarters.
Parsley A few Sprigs 10 To ensure successful results,
it is essential the bowl and
parsley are completely dry.
Remove any stalks.
Dough 5.25 oz. (150g) 15 Mix with 3 eggs on HI speed.
12
Page 13

User Maintenance Instructions
This Hand Blender requires little maintenance. It contains no user-serviceable parts. Contact qualified personnel if the product requires servicing.
CAUTION: Never immerse the Blender Body, Blending Foot or
Gearboxes in water or any other liquid.
1. Always unplug the unit before cleaning.
2. Remove attachments from Blender Body.
3. After the chopping process,
some food ingredients may
remain around the Double
Blade Knife. It should be
washed under running water.
If necessary, follow the disassembly instructions to separate the Blade Hub from the
Blade Shaft. Use a brush to
wash the blades and then
allow to air dry on a flat surface.
4. Wash the Mixing Beaker and Lid, Chopper Container, Lid and
Cover, Double-Blade Knife, Beaters, Dough Hooks and Balloon
Whisk in warm soapy water. Rinse and dry thoroughly.
5. Never immerse the Blender Body, Blending Foot or
Gearboxes in water or any other liquid. If necessary, wipe
exterior surface with a moist cloth or sponge and dry thoroughly.
6. The Blending Foot can be washed under running water. Be careful
not to allow water to enter the hollow shaft. Do not let the
Blending Foot stand in water for an extended period of time.
Always dry the Blending Foot thoroughly so that no water can
enter the Blender Body. The Blending Foot is not dishwasher-safe.
7. Store the Hand Blender in its original box in a cool, dry place.
13
Page 14

Recipes
Following are recipes that demonstrate the versatility of your Russell
Hobbs
®
Hand Blender.
STRAWBERRY SHAKE
1 cup vanilla ice cream
1 cup milk
1 cup frozen strawberries, slightly thawed
3 tablespoons powdered sugar
1. Attach Blending Foot to Blender Body.
2. Place ingredients into Mixing Beaker.
3. Blend on speed MED for 40-45 seconds or until smooth.
Makes 2 shakes.
ORANGE FROSTY
8 small ice cubes
2 ounces frozen orange juice concentrate, undiluted
2 tablespoons sugar
1/4 teaspoon vanilla
1/3 cup cold water
1/3 cup milk
1. Attach Single Gearbox to Blender Body.
2. Add ice cubes to Chopper Container. Make sure the container and
blades are dry.
3. Pulse on speed MED until ice cubes are chopped. Leave in container.
4. Add remaining ingredients and mix on speed MED for 20-30 seconds or until blended.
Makes 1 drink.
14
Page 15

BASIL VINAIGRETTE DRESSING
2 cloves garlic
1/2 cup packed fresh basil leaves
1 cup olive oil, preferably extra virgin
1/2 cup white balsamic or white wine vinegar
11/2 teaspoons sugar
1/2 teaspoon salt
1/2 teaspoon fresh ground black pepper
1. Attach Single Gearbox to Blender Body.
2. Place all the ingredients into the Chopper Container.
3. Blend the ingredients together on speed LO for 20-25 seconds or
until thoroughly mixed.
4. Refrigerate at least one hour or up to one week before serving.
Toss with salad greens.
Makes 11/2 cups.
FRESH SALSA
2 Roma tomatoes, 1-inch pieces, seeded and drained
1 green pepper, 1-inch cubes
1 small jalapeno pepper, 1-inch cubes
1 small onion, 1-inch cubes, separated into sections
1/4 cup cilantro leaves
2 tablespoons cider vinegar
8 ounces tomato sauce
salt and pepper
1. Attach Single Gearbox to the Blender Body.
2. Place all the ingredients into the Chopper Container.
3. Pulse the ingredients on speed MED until coarsely chopped.
4. Cover and refrigerate for 2 hours to enhance flavor.
Makes 21/2 cups.
15
Page 16

VEGETABLE PARTY STRUDEL
Crust: 8 ounce can crescent dinner rolls
Filling: 8 ounces cream cheese, softened
2 tablespoons milk
1/2 envelope dry vegetable soup mix
4 ounces Feta cheese, 1-inch cubes
Topping: 1/4 cup fresh parsley
1/4 small sweet onion, 1-inch cubes
1/4 small green pepper, 1-inch cubes
1/4 small red pepper, 1-inch cubes
2 ounces sliced pepperoni
2 ounces Cheddar cheese, 1-inch cubes
2 ounces Monterey Jack cheese, 1-inch cubes
4 ounces mushrooms, sliced
1. Preheat oven to crescent dinner roll package temperature.
2. Unroll dough into a 9x13-inch greased pan, seal seams. Bake as
directed on package and set aside to cool.
3. Attach Double Gearbox to Blender Body. Insert Wire Beaters.
Cream together filling ingredients in a medium size bowl on speed
LO for 1-2 minutes, set aside.
4. Attach Single Gearbox to Blender Body. Place parsley in Chopper
Container. Chop on speed LO for 5-10 seconds or until minced,
leave in container.
5. Add onion, green pepper and red pepper to Chopper Container
and pulse on speed MED until coarsely chopped. Place into a
small bowl.
6. Place pepperoni slices into Chopper Container and chop on speed
MED 3-5 seconds or until coarsely chopped. Add to onion mixture.
7. Add Cheddar and Monterey Jack cheese cubes to Chopper
Container and Chop on speed MED for 5-10 seconds or until
coarsely chopped.
8. Spread the cream cheese filling evenly over the cooked crust. Add
chopped toppings, cheese and sliced mushrooms.
9. Serve cold or warm. To serve warm, heat in the oven until the
cheeses partially melt.
Makes 12 pieces.
16
Page 17

FOCCACIA BREAD
Crust: 1 Jiffy®pizza crust mix
Topping: 2 cloves garlic
1 small onion, 1-inch pieces
¹⁄₄ cup fresh oregano leaves
¹⁄₄ cup olive oil
15 black olives
4 ounces Feta cheese, 1-inch cubes
¹⁄₄ teaspoon salt
1. Preheat oven to 425º F.
2. Place Jiffy
®
pizza mix into a small bowl. Follow package directions
by adding ¹⁄₂ cup HOT tap water and stir until moist. Stir vigorously
by hand about 25 strokes. Cover and let stand for 5 minutes in a
warm place (about 85º F).
3. Attach Double Gearbox to Blender Body and insert Dough Hooks.
Knead the dough on speed MED for 45-60 seconds.
4. Grease a 12-inch pizza pan. Grease fingers and press dough on
bottom and sides of pan. Place crust in a preheated 425º F oven
and bake for 2 to 3 minutes before adding toppings.
5. Attach Single Gearbox to Blender Body. Place garlic cloves in
Chopper Container. Mince on speed LO for 5-10 seconds. Leave
in container.
6. Add onion and oregano to Chopper Container and pulse on speed
LO until coarsely chopped, remove.
7. Heat olive oil in sauce pan, add garlic, onions, and oregano and
cook until soft but not brown, approximately 5 minutes.
8. Add olives to Chopper Container, pulse on speed LO until coarsely
chopped, remove.
9. Add feta cheese cubes to Chopper Container, pulse on speed LO
until coarsely chopped.
10. Carefully spread cooked onion mixture, olives and cheese over
partially baked pizza crust. Sprinkle with salt.
11. Return to hot oven and bake an additional 18 to 20 minutes or
until crust is golden brown.
Makes 8 slices.
17
Page 18

APPLE CINNAMON WAFFLES
1 cup dried apple slices
¹⁄₂ cup pecan halves
3 eggs
1¹⁄₂ cups milk
¹⁄₃ cup vegetable oil
1³⁄₄ cups all-purpose flour
2 teaspoons baking powder
1 tablespoon sugar
¹⁄₂ teaspoon salt
1 teaspoon cinnamon
1. Attach Single Gearbox to the Blender Body. Place the dried apples
and pecans into the Chopper Container. Chop on speed MED for
10 second, or until coarsely chopped. Set aside.
2. Separate egg whites into a small deep bowl and place egg yolks in
a large size bowl.
3. Attach the Single Gearbox to the Blender Body and insert the Wire
Whisk. Beat the egg whites on speed MED for 1-2 minutes or until
stiff.
4. Add milk and vegetable oil to the egg yolks. Use the Wire Whisk to
mix on speed LO for 5-10 seconds.
5. Stir the flour, baking powder, sugar, salt, and cinnamon together in
a small bowl.
6. Add the dry ingredients, fruit and nuts to the egg yolk mixture. Use
the Wire Whisk to mix on speed LO for 15-20 seconds or until
blended.
7. Carefully fold in egg whites with a spoon. Do not over mix.
8. Pour batter onto a preheated and conditioned waffle grid. Be sure
to dip down to the bottom of the bowl each time to get apples
and pecans. Close lid and bake until done.
Makes 6 7-inch round waffles.
18
Page 19

VEGETABLE OMELET
1 green onion with tops
2 small mushrooms
2 eggs
1 tablespoon water
dash of salt
dash of pepper
1 tablespoon butter
1 ounce shredded Cheddar cheese
1. Attach Single Gearbox to Blender Body.
2. Add onion and mushrooms to Chopper Container and pulse on
speed LO for 3-5 seconds or until chopped.
3. Add eggs, water, salt and pepper to Mixing Beaker. Attach
Blending Foot to Blender Body and mix on speed LO for 5-10 seconds.
4. Preheat a small frying pan over medium-high heat. Place butter in
pan, swirling it around until it stops foaming.
5. Pour egg mixture into pan. Allow eggs to set a few seconds. Using
spatula, gently pull egg mixture from outer edge towards center,
allowing the uncooked egg mixture to flow onto cooking surface.
Tipping the pan as you pull the egg mixture towards the center will
cause the uncooked mixture to flow more readily. Repeat on opposite sides of pan until all of the egg mixture has stopped flowing.
6. When eggs are almost set but still shiny and moist, add vegetable
mixture and cheese on half of the omelet. Slide spatula underneath
half the eggs and fold over.
7. Continue to cook another 1-1¹⁄₂ minutes, or until done.
Makes 1 serving.
19
Page 20

MEAT LOAF
2 slices, sourdough or white bread torn into 1-inch pieces
2 cloves garlic
1 small onion, 1-inch cubes
8 ounces tomato sauce
¹⁄₃ cup brown sugar
1 tablespoon Worcestershire
1 tablespoon soy sauce
1 egg
³⁄₄ teaspoon salt
¹⁄₂ teaspoon black pepper
2 pounds ground beef
1. Attach Single Gearbox to Blender Body. Place 1 slice of bread in
Chopper Container and process bread on speed MED for 5-10
seconds. Transfer crumbs to a large bowl. Repeat for other slice of
bread.
2. Place garlic into Chopper Container. Mince garlic cloves on speed
LO for 5-10 seconds, leave in container. Add onions and pulse on
speed LO until coarsely chopped. Add to bowl with bread crumbs.
3. Place tomato sauce, brown sugar, Worcestershire
sauce, egg, salt and pepper in the Mixing Beaker.
4. Attach Blending Foot to Blender Body. Process tomato mixture on
speed LO for 10-15 seconds or until thoroughly mixed.
5. Crumble ground beef into bowl with bread crumbs, garlic, and
onions. Add ¹⁄₂ cup of the tomato mixture.
6. Attach Double Gearbox to Blender Body and insert Wire Beaters.
Use speed LO to mix meat mixture for 1-2 minutes or until blended.
7. Grease an 11x7-inch baking pan and pat the meat mixture into a
loaf shape. Spread remaining sauce over meat loaf.
8. Bake at 375°F oven for 1¹⁄₄-1¹⁄₂ hours or until internal temperature
of meat loaf reaches 165°F. Let stand 5 minutes before slicing.
®
sauce
®
sauce, soy
Makes 8 servings.
20
Page 21

GERMAN CHOCOLATE FUDGE PIE
Filling: 4 ounces German’s®sweet chocolate bar,
break into pieces
11.5 ounces milk chocolate chips
1 cup sour cream
8 ounces cream cheese, softened 1-inch cubes
1 small box instant chocolate pudding & pie filling
1¹⁄₂ cups milk
¹⁄₂ cup pecan halves
Crust: 16 chocolate sandwich cream filled cookies
¹⁄₃ cup butter, melted
Topping: ¹⁄₄ cup pecan halves
1. Melt the German chocolate, chocolate chips and sour cream in
sauce pan over medium-low heat, stirring frequently. Remove from
heat and allow to cool.
2. Attach Single Gearbox to Blender Body.
3. Add one-half of the cookies to Chopper Container. Crush cookies
on speed MED for 20-25 seconds. Place into a deep, 10-inch
round, greased pie plate.
4. Chop other half of cookies and add to pie plate.
5. Melt butter and stir into the crushed cookies. Press into the bottom and sides of pie plate.
6. Add pecans to Chopper Container and pulse on speed HI until
coarsely chopped.
7. Place cream cheese, instant pudding and milk in medium sized
deep bowl.
8. Attach Double Gearbox to Blender Body and insert Wire Beaters.
Mix for 1 minute on speed LO. Scrape bowl and mix for another
1-2 minutes. Scrape bowl as necessary.
9. Add cooled chocolate mixture and ¹⁄₂ cup of chopped nuts to
pudding mixture. Blend together with Wire Beaters on speed LO
for 1 minute, scrape bowl and continue mixing for another 1-2
minutes or until blended.
10. Spread the mixture over the cookie crust and top with ¹⁄₄ cup
chopped pecans, chill.
Makes 10 slices.
21
Page 22

22
Page 23

23
Page 24

LIMITED ONE YEAR WARRANTY
Warranty: This Russell Hobbs®product is warranted by Salton, Inc. to be free from defects in
materials or workmanship for a period of (1) year from the original purchase date. This product
warranty covers only the original consumer purchaser of the product.
Warranty Coverage: This warranty is void if the product has been damaged by accident in shipment, unreasonable use, misuse, neglect, improper service, commercial use, repairs by unauthorized personnel, normal wear and tear, improper assembly, installation or maintenance abuse or
other causes not arising out of defects in materials or workmanship. This warranty is effective only
if the product is purchased and operated in the USA, and does not extend to any units which have
been used in violation of written instructions furnished with the product or to units which have
been altered or modified or to damage to products or parts thereof which have had the serial number removed, altered, defaced or rendered illegible.
Implied Warranties: ANY IMPLIED WARRANTIES WHICH THE PURCHASER MAY HAVE ARE LIMITED IN DURATION TO ONE (1) YEAR FROM THE DATE OF PURCHASE. Some states do not
tations on how long an implied warranty lasts, so the above limitation may not apply to you.
Warranty Performance: During the above one-year warranty period, a product with a defect will
be either repaired or replaced with a reconditioned comparable model (at our option) when the
product is returned to the Repair Center, or the purchase price refunded. The repaired or replacement product will be in warranty for the balance of the one-year warranty period and an additional
one-month period. No charge will be made for such repair or replacement.
Service and Repair: Should the appliance malfunction, you should first call toll-free 1 (800) 2339054 between the hours of 9:00 am and 5:00 pm Central Standard Time and ask for CONSUMER
SERVICE stating that you are a consumer with a problem. Please refer to model number RHHB3
when you call.
In-Warranty Service (USA): For an appliance covered under the warranty period, no charge is
made for service or postage. Call for return authorization (1 800 233-9054).
Out-of Warranty Service: A flat rate charge by model is made for out-of-warranty service. Include
$10.00 (U.S.) for return shipping and handling. We will notify you by mail of the amount of the
charge for service and require you to pay in advance for the repair or replacement.
For Products Purchased in the USA, but Used in Canada: You may return the product insured,
packaged with sufficient protection, and postage and insurance prepaid to the USA address listed
below. Please note that all customs duty / brokerage fees, if any, must be paid by you and we will
require you to pay the cost of customs duty / brokerage fees to us in advance of our performing
any service.
Risk During Shipment: We cannot assume responsibility for loss or damage during incoming shipment. For your protection, carefully package the product for shipment and insure it with the carrier.
Be sure to enclose the following items with your appliance: any accessories related to your problem, your full return address and daytime phone number, a note describing the problem you experienced, a copy of your sales receipt or other proof of purchase to determine warranty status. C.O.D.
shipments cannot be accepted.
To return the appliance, ship to: To contact us, please write to, call, or email:
Attn: Repair Center Salton, Inc.
Salton, Inc. P.O. Box 6916
708 South Missouri Street Columbia, MO 65205-6916
Macon, MO 63552 1 (800) 233-9054
Email: Salton@Saltonusa.com
Limitation of Remedies: No representative or person is authorized to assume for Salton, Inc. any
other liability in connection with the sale of our products. There shall be no claims for defects or
failure of performance or product failure under any theory of tort, contract or commercial law
including, but not limited to negligence, gross negligence, strict liability, breach of warranty and
breach of contract. Repair, replacement or refund shall be the sole remedy of the purchaser under
this warranty, and in no event shall Salton be liable for any incidental or consequential damages,
losses or expenses. Some states do not allow the exclusion or limitation of incidental or consequential damages, so the above limitation or exclusion may not apply to you.
Legal Rights: This warranty gives you specific legal rights, and you may also have other rights
which vary from state to state.
For more information on Salton products: Visit our website: http://www.eSalton.com
“© 2003 Salton, Inc. P/N 61121
All Rights Reserved” Printed in China
allow limi-
 Loading...