

Page 1

INSTRUCTIONS AND WARRANTY
RUSSELL HOBBS GAS HEATER
IMPORTANT: PLEASE READ BEFORE USE!
MODEL: RHG03
Page 2

Congratulations on purchasing your Russell Hobbs gas/electric fan heater. Each unit is
manufactured to ensure safety and reliability. Before using this appliance for the first time,
please read the instruction manual carefully and keep it for future reference.
IMPORTANT SAFEGUARDS
When using any electrical appliance, basic safety precautions should always be followed
including the following:
1. Please read the instructions carefully before using any appliance.
2. Always ensure that the voltage on the rating label corresponds to the mains voltage at
home.
3. Incorrect operation and improper use can damage the appliance and cause injury to the
user.
4. Use LPG (Liquid Petroleum Gas) only with this heater.
5. The heater must always be turned OFF at the gas cylinder.
6. Always ensure adequate ventilation for the safe and effective performance of the
appliance.
7. Children should be supervised to ensure that they do not play with the appliance.
8. Never attempt to open any part of the heater or dismantle the controls. The supplier
cannot accept responsibility for any possible unit failure should this instruction be
ignored.
9. The appliance is intended for household use only. Commercial use invalids the warranty
and the supplier cannot be held responsible for injury or damage caused when using the
appliance for any other purpose than that intended.
10. Close supervision is required when any appliance is used near or by children or invalids.
11. Do not use the appliance if it has been dropped or damaged in any way. In case of
damage, take the unit in for examination and/or repair by an authorised service agent
12. Never immerse the unit in water or any other liquid for cleaning purposes.
13. The use of accessory attachments that are not recommended or supplied by the
manufacturer may result in injuries, fire or electric shock.
14. Do not use the appliance on a gas or electric cooking top or over or near an open flame.
15. Always operate the appliance on a smooth, even, stable surface.
16. Ensure that the switch is in the “Off” position after each use.
17. The manufacturer does not accept responsibility for any damage or injury caused by
improper or incorrect use, or for repairs carried out by unauthorised personnel.
18. In case of technical problems, switch off the appliance and do not attempt to repair it
yourself. Return the appliance to an authorised service facility for examination,
adjustment or repair. Always insist on the use of original spare parts. Failure to comply
with the above mentioned pre-cautions and instructions, could affect the safe operation
of this machine.
19. If the hose needs to be replaced, ensure that the replacement hose is suitable for LPG.
Hoses should only be bought from certified gas dealers.
20. Do not use the heater to cook or to heat food or fats.
21. Always use the heater in an upright position.
22. Always face the heater to the centre of the room.
23. Do not leave the heater ON overnight.
24. Do not cover the heater with any type of cloth, clothing, or foreign object or block the
airflow in any way.
25. The gas cylinder must always be in an upright position. Do not turn the cylinder upside
down in order to empty it completely.
Page 3
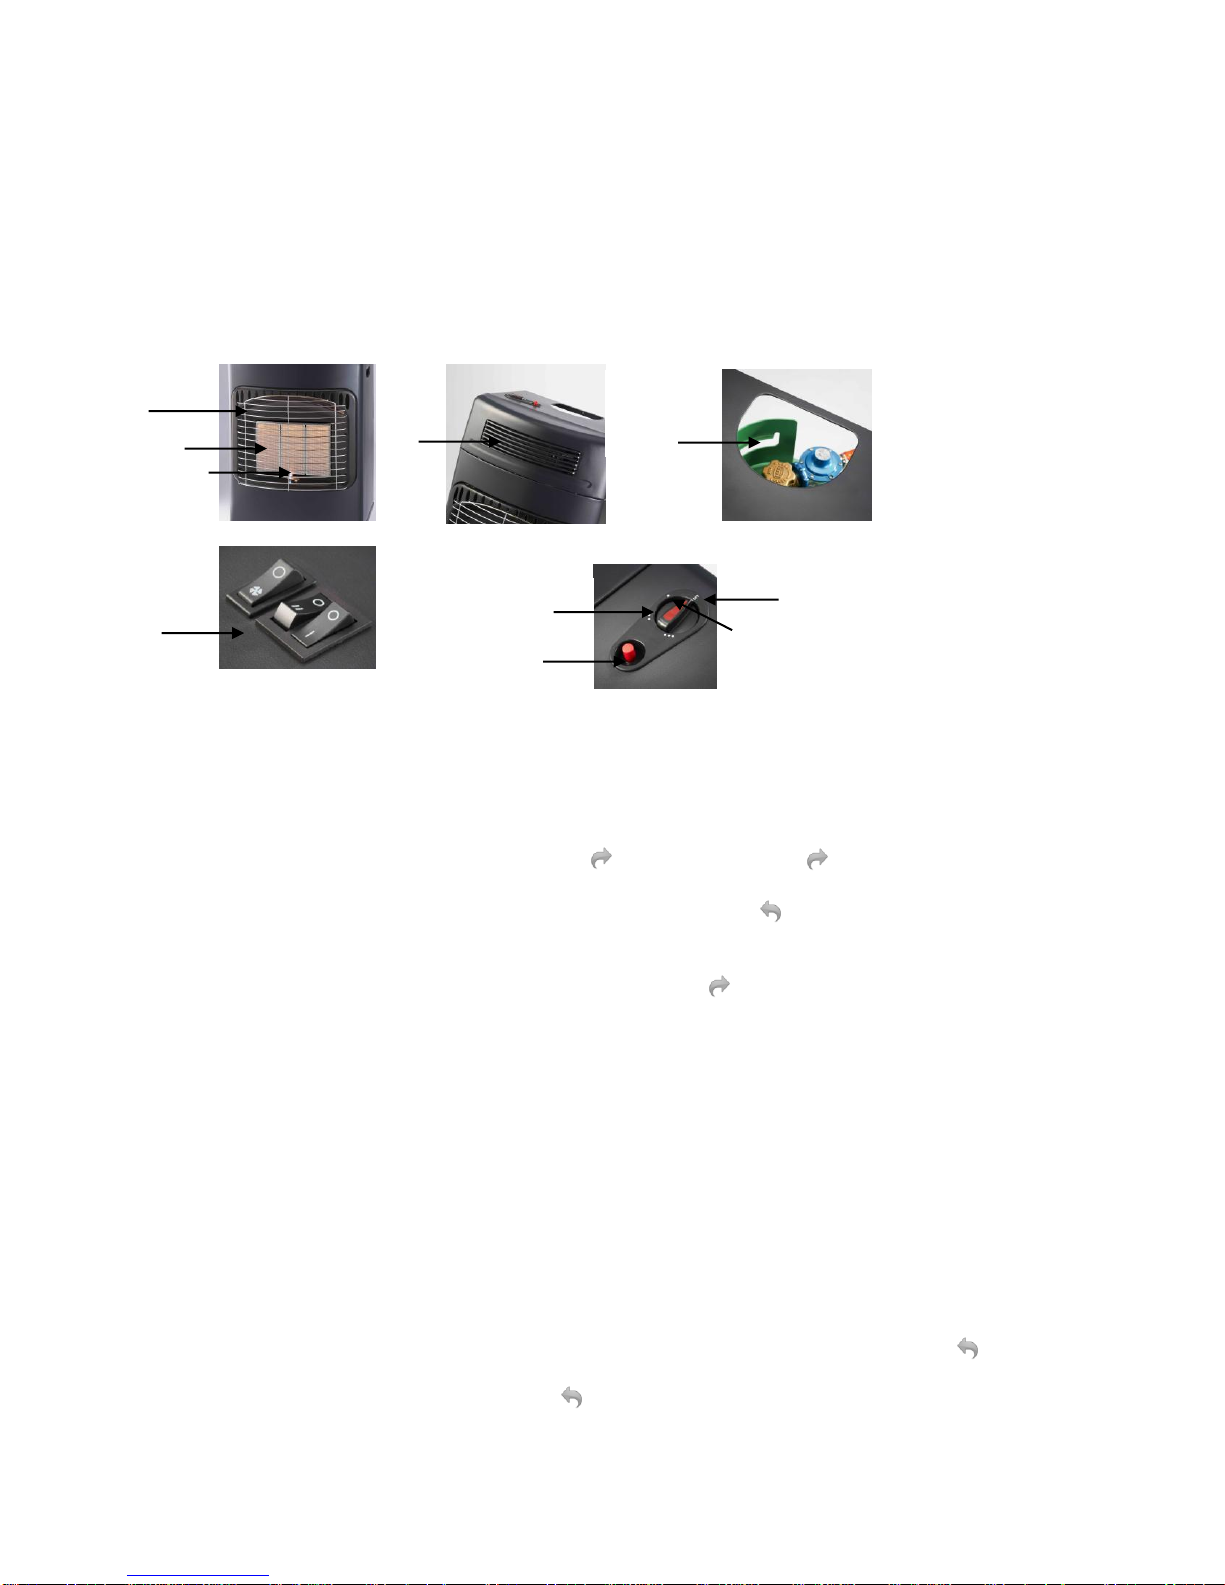
Fan
Heater
Grill
Pilot Flame
Fan Heater
Switches
Spark and 1
Flame Mark
26. Never use a naked flame (matches, lighter, candle) to test for gas leaks.
Heating Panel
Safety Guard
Gas Bottle
Access
Opening
Piezo Ignition
Button
Heat Selection
Knob
Zero/Off Position
27. Be aware that the appliance will remain hot for some time after use.
28. Household use only.
29. DO NOT COVER THE APPLIANCE.
PARTS DIAGRAM
TO TEST FOR GAS LEAKS
Extinguish all naked flames (open flames) and do not smoke or bring naked flames near the gas
heater whilst testing.
Take the heater outside.
Turn the heater OFF at the cylinder (clockwise ) and undo (clockwise ) the regulator.
Check all the hose connections and inspect the condition of the seal fitted on the regulator.
Refit the regulator and then slowly turn the gas ON (anticlockwise ) one and a half turns. Coat all
the connections with a cloth or brush moistened with soapy water or detergent.
A gas leak will form bubbles in the areas where the solution has been applied. If a gas leak is
detected, turn the gas cylinder control valve OFF (clockwise ). Inform the nearest service agent.
Do not use the heater again until an approved/authorised service agent has inspected it.
OPERATING INSTRUCTIONS
CAUTION!
Turn the gas ON and OFF at the Gas Cylinder Valve only.
A max 13.1 kg cylinder (includes max 9.0 kg gas) is suitable for use with this heater.
Unpack the heater and remove all protective wrapping.
Untie the regulator from its shipping location and ensure that the hose is in perfect condition
(fig. 3)
Unclip the gas cylinder retaining panel from the back of the heater body (fig. 3)
Place the full LPG cylinder beside the rear of the heater. Ensure that the valve is clean and
free of any obstructions or foreign matter and screw the regulator (anticlockwise ) onto the
cylinder valve. Turn by hand and do not use a spanner.
Turn the gas supply ON (anticlockwise ) one and half turns at the cylinder control valve.
Page 4
The regulator must be securely and fully fastened to the gas cylinder valve.
To turn the gas ON – carefully open the cylinder valve (anticlockwise ) to
a maximum of one and a half turns.
Turn the heat selection knob on the top panel of the heater to the first
position( 0 )
Push the heat selection knob down and hold it down for 10 seconds. The
gas will flow through the pipe to the heater.
While holding the selector knob down, depress the ignition button
repeatedly until the pilot flame ignites. Panel 1 will start. Release the
ignition button.
The heater is now turned onto Level 1, with one ceramic panel heating.
Select your required heating level by turning the heat selection knob:
o ( 0 ) : Level 1 – No panel Heating/Off Position
o ( ) : Level 2 – centre panel heating
o ( ) : Level 3 – two panels heating
o ( ) : Level 4 – three panels heating
Before first use it is advisable to check the connection between the gas cylinder and the
regulator for gas leaks as described above.
If there are no gas leaks, place the gas cylinder into the rear of the heater body making sure
that the cylinder is placed in such a manner that the hose is not trapped or blocked in any
way.
Fit the rear retaining panel back onto the body ensuring that it is clipped on to both sides of
the heater.
LIGHTING THE HEATER
Page 5

TURNING THE GAS HEATER “OFF”
Turn the heat control knob to ( 0 )
Turn OFF the gas clockwise at the gas cylinder’s control valve.
The flame at the bottom of the centre panel should automatically extinguish itself. Should
it not do so, check that the gas cylinder is OFF.
CHANGING THE GAS CYLINDER
Take the heater outside and remove the rear panel.
Remove the gas cylinder from the heater and place it on the floor next to the heater.
MAKE SURE THAT THE CYLINDER VALVE IS CLOSED BEFORE ATTEMPTING TO
DISCONNECT THE REGULATOR. Unscrew the regulator clockwise .
Before connecting the refilled cylinder, check that the nose seal on the regulator is not
damaged and is still in good condition. If in doubt, take the regulator to an authorised
dealer to be checked.
Screw the regulator anticlockwise onto the new cylinder and fit the cylinder into the
rear of the heater body. Ensuring that it is placed in such a manner that the hose is not
trapped or block in any way.
Fit the retaining panel back on to the body securing the clips on both sides.
MAINTENANCE AND SERVICING INSTRUCTIONS
Ensure that the voltage on the rating label corresponds to the mains voltage in your home.
Check the power cord and plug regularly for any damage. If the cord or the plug is damaged, it must
be replaced by the manufacturer or a qualified person in order to avoid electrical hazard.
Remove the plug from the socket by gripping the plug. Do not pull on the cord to disconnect the
appliance from the mains.
Always unplug the unit when not in use, before cleaning or when adding or removing parts.
Ensure that the cord is not in a position where it can be pulled on inadvertently.
Do not allow the cord to touch hot surfaces.
Use of an extension cord with this appliance is not recommended. However, if it is necessary to use
an extension cord, ensure that the lead is suited to the power consumption of the appliance to avoid
overheating of the extension cord, appliance or plug point. Always unwind the extension cord fully
before use. Do not place the extension cord in a position where it can be pulled on by children or
animals or tripped over.
DO NOT pull or move the appliance by the power cord.
Always unplug the unit when not in use and before cleaning.
Ensure the switch is in the “off” position after each use.
The manufacturer does not accept responsibility for any damage or injury caused by the improper or
incorrect use, or for repairs carried out by unauthorized personnel.
MAINTENANCE AND SERVICING INSTRUCTIONS
There is very little maintenance required on this appliance. Important points to remember are:
Always check that the regulator seal is undamaged when changing the gas cylinder.
Always check that the hose is in good condition before using, and that it is securely
clamped on to the appliance and the regulator.
Page 6
It is recommended that the hose be replaced every two years whether it has been used or
Problem
Possible cause and solution
Heater will not light or
runs poorly
Cylinder is empty. Replace with filled cylinder.
If the cylinder is new, it may not have been purged of air
properly.
Check that the regulator is properly attached and that the
cylinder valve is open (anticlockwise).
Heater components may be dust contaminated or dirty.
Have the heater serviced by an authorised service agent
Try another brand of gas.
not. When replacing the hose, ensure that the replacement hose is suitable for LPG. Hoses
should only be bought from certified gas dealers. Remember, when replacing the hose, to
replace the hose clamps at the same time.
With the exception of the hose and the regulator, there are no user fitted parts available for
this heater. Should the heater not be functioning properly, an authorised service agent must
check it, and if replacement parts are required, they will ensure that the correct parts are
supplied and fitted correctly.
It is recommended to have your heater checked at your local hardware store at the
beginning of every season.
CLEANING
Wipe the exterior of the heater with a soft cloth moistened with a mild detergent.
Do not use metal or furniture polish on the heater.
If the elements appear dusty then clean them using a soft brush or dry cloth.
Only clean the heater when it is cold and not in use.
Do not use abrasive cleaners, as these will damage the paint surface.
When not in use, store the heater by covering and placing it in a cool, dry and dust free
area.
WARNING
Never immerse the unit in water or let water come into contact with the burners.
If you need to return the appliance ensure that:
The unit is packed carefully back into its original packaging.
Proof of purchase is attached.
TROUBLE SHOOTING
Page 7

Heater cannot be
turned off
Cabinet heaters must always be turned OFF by closing
the gas cylinder valve (clockwise ). Note that it may be
in the fully open position and will require some effort to
Heater will not
remain alight when
the ignition button is
released
The Oxygen Depletion Sensor solenoid is not keeping
the control open. Have the heater serviced by an
authorised service agent.
Should this happen after storage, the components may
require cleaning.
Brand
Model
Rated Gas Consumption
Rated Power
Russell
Hobbs
RHG03
1 panel (ghr-1)
103
1 panel (W)
1 400
Operating Pressure
2 panel (ghr-1)
206
2 panel (W)
2 800
2.8 kPa
3 panel (ghr-1)
310
3 panel (W)
4 200
Electric Heater
Element 1
1000W 230V
Element 2
1000W 203V
TECHNICAL DATA
CHANGING THE PLUG
Should the need arise to change the fitted plug, follow the instructions below.
This unit is designed to operate on 230V current only. Connecting to other power
sources may damage the appliance. Connect a three-pin plug as follows:
The wires in this mains lead are coloured in
accordance with the following code:
Green/Yellow = Earth
Blue = Neutral
Brown = Live
Page 8

PLEASE AFFIX YOUR PROOF OF PURCHASE/RECEIPT HERE
IN THE EVENT OF A CLAIM UNDER WARRANTY THIS RECEIPT MUST BE PRODUCED.
W A R R A N T Y
1. Home of Living Brands (Pty) Limited warrants to the original purchaser of this product (“the customer”)
that this product will be free of defects in quality and workmanship which under normal personal, family
or household use and purpose may manifest within a period of 1 (one) year from the date of purchase
(“warranty period”).
2. Where the customer has purchased a product and it breaks, is defective or does not work properly for
the intended purpose, the customer must notify the supplier from whom the customer bought the
product (“the supplier”) thereof within the warranty period. Any claim in terms of this warranty must be
supported by a proof of purchase. If proof of purchase is not available, then repair, and/or service
charges may be payable by the customer to the supplier.
3. The faulty product must be taken to the supplier's service centre to exercise the warranty.
4. The supplier will refund, repair or exchange the product in terms of this warranty subject to legislative
requirements. This warranty shall be valid only where the customer has not broken the product himself,
or used the product for something that it is not supposed to be used for. The warranty does not include
and will not be construed to cover products damaged as a result of disaster, misuse, tamper, abuse or
any unauthorised modification or repair of the product.
5. This warranty will extend only to the product provided at the date of the purchase and not to any
expendables attached or installed by the customer.
6. If the customer requests that the supplier repairs the product and the product breaks or fails to work
properly within 3 (three) months of the repair and not as a result of misuse, tampering or modification by
or on behalf of the customer, then the supplier may replace the product or pay a refund to the customer.
7. The customer may be responsible for certain costs where products returned are not in the original
packaging, or if the packaging is damaged. This will be deducted from any refund paid to the customer.
HOME OF LIVING BRANDS (PTY) LTD (JOHANNESBURG)
JOHANNESBURG TEL NO. (011) 490-9600
CAPE TOWN TEL NO. (021) 552-5161
DURBAN TEL NO. (031) 792-6000
www.russellhobbs.co.za
Page 9

Parabéns por ter comprado o seu aquecedor a gás/de ventoinha eléctrica da Russell Hobbs.
Cada unidade é fabricada de forma a garantir segurança e fiabilidade. Antes de utilizar este
aparelho pela primeira vez, leia o manual de instruções atentamente e guarde-o para futura
referência.
SALVAGUARDAS IMPORTANTES:
Quando utilizar qualquer aparelho elétrico, deve seguir sempre as precauções de segurança
básicas, incluindo o seguinte:
1. Leia atentamente as instruções antes de utilizar qualquer aparelho.
2. Certifique-se sempre de que a tensão na etiqueta de classificação corresponde à tensão
da corrente elétrica na sua residência.
3. A operação incorreta e utilização imprópria podem danificar o aparelho e causar lesões
no utilizador.
4. Utilize apenas GPL (gás de petróleo liquefeito) com este aquecedor.
5. O aquecedor tem de ser DESLIGADO no cilindro de gás.
6. Certifique-se sempre de que existe uma ventilação adequada para o desempenho
seguro e eficaz do aparelho.
7. As crianças devem ser supervisionadas para garantir que não brincam com o aparelho.
8. Nunca tente abrir qualquer parte do aquecedor nem desmantelar os controlos. O
fornecedor não aceita responsabilidade por quaisquer possíveis falhas da unidade caso
esta instrução seja ignorada.
9. O aparelho destina-se apenas a utilização doméstica. A utilização comercial invalida a
garantia e o fornecedor não pode ser responsabilizado por lesões ou danos causados
quando o aparelho for utilizado para qualquer outra finalidade diferente da prevista.
10. É necessária uma supervisão de perto quando qualquer aparelho for utilizado perto ou
por crianças ou pessoas com incapacidades.
11. Não utilize o aparelho se este tiver sido deixado cair ou estiver danificado de qualquer
forma. Em caso de danos, devolva a unidade para verificação e/ou reparação por parte
de um agente de assistência autorizado
12. Nunca coloque a unidade dentro de água ou qualquer outro líquido para fins de limpeza.
13. A utilização de acessórios não recomendados ou fornecidos pelo fabricante pode
resultar em lesões, incêndios ou choque elétrico.
14. Não utilize o aparelho sobre uma superfície de cozimento a gás ou elétrica ou sobre ou
perto de uma chama.
15. Utilize sempre o aparelho numa superfície suave, uniforme e estável.
16. Certifique-se de que o interruptor está na posição "Off" (desligado) após cada utilização.
17. O fabricante não aceita responsabilidade por qualquer dano ou lesão causados devido a
uma utilização imprópria ou incorreta ou a reparações realizadas por pessoal não
autorizado.
18. Em caso de problemas técnicos, desligue o aparelho e não tente repará-lo você próprio.
Devolva o aparelho a um agente de assistência autorizado para verificação, ajuste ou
reparação. Insista sempre em utilizar peças sobresselentes originais. O não
cumprimento das precauções e instruções acima poderá afetar o funcionamento seguro
desta máquina.
19. Se for necessário substituir a mangueira, certifique-se de que a mangueira de
substituição é adequada para GPL. As mangueiras devem ser compradas em
distribuidores de gás certificados.
20. Não utilize o aquecedor para cozinhar ou aquecer alimentos ou gorduras.
21. Utilize o aquecedor sempre numa posição vertical.
Page 10

Chama-piloto
Interruptores
do
aquecedor
de
ventoinha
Marca de Chama 1
e Faísca
Grelha do
aquecedor
de
ventoinha
22. Direccione sempre o aquecedor para o centro do compartimento.
Painel de
aquecimento
Cobertura de
Abertura de
acesso à
botija de
gás
Botão de
ignição Piezo
Botão de
selecção de
temperatura
Posição
Zero/Desligado
23. Não deixe o aquecedor ligado durante a noite.
24. Não cubra o aquecedor com qualquer tipo de pano, tecido ou objecto estranho nem
bloqueie o fluxo de ar de qualquer forma.
25. O cilindro de gás tem de estar sempre na posição vertical. Não vire o cilindro ao
contrário para o esvaziar completamente.
26. Nunca utilize uma chama aberta (fósforos, isqueiro, vela) para testar fugas de gás.
27. Esteja ciente que o aparelho permanece quente durante algum tempo depois de utilizar.
28. Apenas para utilização doméstica.
29. NÃO CUBRA O APARELHO.
DIAGRAMA DE PEÇAS
PARA TESTAR FUGAS DE GÁS
Deixe extinguir todas as chamas abertas e mão fume nem aproxime chamas abertas do aquecedor a
gás durante o teste.
Leve o aquecedor para o exterior.
Desligue o aquecedor no cilindro (sentido dos ponteiros do relógio ) e desaperte o regulador
(sentido dos ponteiros do relógio ).
Verifique todas as ligações da mangueira e inspeccione a condição da vedação incorporada no
regulador.
Volte a inserir o regulador e depois ligue lentamente o gás (sentido contrário ao dos ponteiros do
relógio ) uma volta e meia de cada vez. Revista todas as ligações com água com sabão ou
detergente utilizando um pano ou escova humedecidos.
Uma fuga de gás forma bolhas nas áreas onde a solução foi aplicada. Caso detecta uma fuga de
gás, desligue a válvula de controlo do cilindro de gás (sentido dos ponteiros do relógio ). Informe o
agente de assistência mais próximo.
Não utilize o aquecedor novamente até que um agente técnico aprovado/autorizado o inspeccione.
Page 11

INSTRUÇÕES DE FUNCIONAMENTO
CUIDADO!
LIGUE e DESLIGUE o gás apenas na Válvula do cilindro de gás.
É adequado um cilindro com, no máximo, 13,1 kg (inclui no máximo 9,0 kg de gás) para
utilizar com este aquecedor.
Retire o aquecedor da embalagem e remova todas as películas protectoras.
Desembrulhe o regulador da sua embalagem e certifique-se de que o tubo está em
perfeitas condições (fig. 3).
Desengate o painel de retenção do cilindro de gás da parte posterior do corpo do
aquecedor (fig. 3).
Coloque o cilindro de GPL ao lado da parte posterior do aquecedor. Certifique-se de que a
válvula está limpa e sem quaisquer obstruções ou objectos estranhos e aperte o regulador
(sentido contrário ao dos ponteiros do relógio ) na válvula do cilindro. Rode manualmente
e não utilize uma chave.
Ligue a fonte de distribuição de gás (sentido contrário ao dos ponteiros do relógio ) uma
volta e meia de cada vez na válvula de controlo do cilindro.
Antes de o utilizar é recomendável verificar a ligação entre o cilindro de gás e o regulador
para verificar a existência de fugas de gás conforme descrito acima.
Se não ocorrerem fugas de gás, coloque o cilindro de gás na parte posterior do corpo do
aquecedor certificando-se de que o cilindro é colocado de tal forma que o tubo não fique
preso nem bloqueado de nenhuma forma.
Coloque o painel de retenção posterior novamente no corpo garantindo que está engatado
em ambos os lados do aquecedor.
Page 12

ACENDER O AQUECEDOR
O regulador tem de estar devidamente encaixado e apertado na válvula do
cilindro de gás.
Para LIGAR o gás – abra cuidadosamente a válvula do cilindro (no sentido
contrário ao dos ponteiros do relógio ) até um máximo de uma volta e
meia.
Rode o botão de selecção de temperatura no painel superior do
aquecedor para a primeira posição ( 0 )
Empurre o botão de selecção de temperatura para baixo e mantenha-o
nessa posição durante 10 segundos. O gás irá fluir através do cano para o
aquecedor.
Enquanto mantém o botão de selecção para baixo, pressione o botão de
ignição repetidamente até que a chama-piloto acenda. O Painel 1 inicia.
Solte o botão de ignição.
O aquecedor é agora rodado para o Nível 1, com o aquecimento de um
painel de cerâmica. Seleccione o seu nível de aquecimento necessário ao
rodar o botão de selecção da temperatura:
o ( 0 ) : Nível 1 – sem aquecimento dos painéis/desligado
o ( ) : Nível 2 – aquecimento do painel central
o ( ) : Nível 3 – aquecimento de dois painéis
o ( ) : Nível 4 – aquecimento de três painéis
DESLIGAR O AQUECEDOR DE GÁS
Rode o botão de controlo de temperatura para ( 0 )
DESLIGUE o gás no sentido dos ponteiros do relógio na válvula de controlo do
cilindro de gás.
A chama na parte inferior do painel central deve extinguir-se automaticamente. Caso
isso não aconteça, verifique se o cilindro de gás está DESLIGADO.
MUDAR O CILINDRO DE GÁS
Mova o aquecedor para o exterior e retire o painel posterior.
Retire o cilindro de gás do aquecedor e coloque-o no chão junto ao aquecedor.
CERTIFIQUE-SE DE QUE A VÁLVULA DO CILINDRO ESTÁ FECHADA ANTES DE
TENTAR DESLIGAR O REGULADOR. Desaperte o regulador no sentido dos ponteiros
do relógio .
Antes de ligar o cilindro reabastecido, verifique se a vedação do tubo no regulador não
está danificada e continua em boas condições. Em caso de dúvida, leve o regulador a
um distribuidor autorizado para ser verificado.
Aperte o regulador no sentido contrário ao dos ponteiros do relógio no novo cilindro e
encaixe o cilindro na parte posterior do corpo do aquecedor. Garanta que é colocado de
tal forma que o tubo não fique preso ou bloqueado de nenhuma forma.
Encaixe o painel de retenção novamente no corpo fixando os grampos em ambos os
lados.
Page 13

INSTRUÇÕES DE MANUTENÇÃO E REPARAÇÃO
Certifique-se de que a tensão na etiqueta de classificação corresponde à tensão da
corrente elétrica na sua residência.
Verifique o cabo de alimentação e a ficha regularmente para verificar a existência de
quaisquer danos. Se o cabo ou a ficha estiverem danificados, devem ser substituídos pelo
fabricante ou por uma pessoa qualificada de forma a evitar um perigo elétrico.
Remova a ficha da tomada ao agarrar na ficha. Não puxe pelo cabo para desligar o
aparelho da corrente elétrica.
Desligue sempre a unidade quando esta não estiver a ser utilizada, antes de limpar ou
quando adicionar ou remover peças.
Certifique-se de que o cabo não se encontra numa posição em que possa ser puxado
inadvertidamente.
Não permita que o cabo toque em superfícies quentes.
A utilização de uma extensão com este aparelho não é recomendada. No entanto, caso
seja necessário utilizar uma ficha de extensão, certifique-se de que a ficha é adequada para
o consumo de energia do aparelho para evitar o sobreaquecimento do cabo da extensão,
aparelho ou tomada. Desenrole sempre o cabo de extensão até ao fim antes de utilizar.
Não coloque o cabo da extensão numa posição em que possa ser puxada por crianças ou
animais ou que possibilite o tropeçamento.
NÃO puxe ou desloque o aparelho pelo cabo de alimentação.
Desligue sempre a unidade quando não estiver a ser utilizada e antes de limpar.
Certifique-se de que o interruptor está na posição "Off" (desligado) após cada utilização.
O fabricante não aceita responsabilidade por qualquer dano ou lesão causados devido a
uma utilização imprópria ou incorreta ou a reparações realizadas por pessoal não
autorizado.
INSTRUÇÕES DE MANUTENÇÃO E REPARAÇÃO
Existem poucos procedimentos de manutenção necessários neste aparelho. Os pontos
importantes a relembrar são:
Verifique sempre se a vedação do regulador está intacta quando mudar o cilindro de gás.
Verifique sempre se a mangueira está em boas condições antes de utilizar e se está
devidamente fixa no aparelho e regulador.
É recomendável que a mangueira seja substituída a cada dois anos quer tenha sido
utilizada ou não. Quando substituir a mangueira, certifique-se de que a mangueira de
substituição é adequada para GPL. As mangueiras devem ser compradas em distribuidores
de gás certificados. Lembre-se, quando substituir a mangueira, substitua também os
grampos de fixação da mangueira.
Com a excepção da mangueira e do regulador, não existem peças incorporadas pelo
utilizador disponíveis para este fogão. Caso o fogão não esteja a funcionar correctamente,
um agente técnico autorizado deverá verifica-lo e se forem necessárias peças de
substituição, o agente garantirá que as peças correctas são fornecidas e incorporadas
correctamente.
É recomendável que o seu aquecedor seja verificado na sua loja de ferragens local no
início de cada estação.
Page 14

Problema
Possível causa e solução
O aquecedor não acende
ou apresenta uma chama
fraca
O cilindro está vazio. Substitua por um cilindro cheio.
Se o cilindro é novo, o ar poderá não ter sido devidamente
purgado.
Verifique se o regulador está devidamente ligado e se a válvula do
cilindro está aberta (sentido contrário ao dos ponteiros do relógio).
Os componentes do aquecedor poderão estar contaminados com
pó ou sujos. Leve o aquecedor a um agente de assistência
autorizado.
Tente outra marca de gás.
Não é possível desligar o
aquecedor
Os aquecedores de armário têm de ser sempre DESLIGADOS ao
fechar a válvula do cilindro de gás (sentido dos ponteiros do relógio
). Observe que poderá estar na posição totalmente aberta e
irá exigir algum esforço para iniciar a operação de fecho.
LIMPEZA
Limpe o exterior do aquecedor com um pano humedecido suave em solução de detergente
suave.
Não utilize agentes de verniz para metal ou móveis no aquecedor.
Se os elementos parecerem poeirentos, limpe-os utilizando uma escova de cerdas macias
ou um pano seco.
Limpe o aquecedor apenas quando estiver frio e não estiver em utilização.
Não utilize agentes de limpeza abrasivos, uma vez que danificarão a superfície pintada.
Quando não estiver a ser utilizado, guarde o aquecedor ao cobri-lo e coloca-lo num local
fresco, seco e sem poeira.
AVISO
Nunca coloque a unidade dentro de água nem deixe que a água entre em contacto com os
bicos.
Se necessitar de devolver o aparelho, garanta que:
A unidade está devidamente embalada na sua embalagem original.
Apresenta uma prova de compra.
RESOLUÇÃO DE PROBLEMAS
Page 15

Marca
Modelo
Consumo de gás definido
Potência nominal
Russell
Hobbs
RHG03
1 painel (ghr-1)
103
1 painel (W)
1 400
Pressão de
funcionamento
2 painéis (ghr-1)
206
2 painéis (W)
2 800
2,8 kPa
3 painéis (ghr-1)
310
3 painéis (W)
4 200
Aquecedor eléctrico
Elemento 1
1000 W 230 V
Elemento 2
1000 W 203 V
O aquecedor não
permanece aceso quando
o botão de ignição é
libertado
O solenóide do Sensor de esgotamento de oxigénio não está a
manter o controlo aberto. Leve o aquecedor a um agente de
assistência autorizado.
Caso isto ocorra após o armazenamento, os componentes poderão
ter de ser limpos.
DADOS TÉCNICOS
SUBSTITUIÇÃO DA FICHA
Cumpra com as instruções seguintes caso seja necessário substituir a ficha.
Esta unidade destina-se a operar apenas na corrente indicada. A ligação a outras fontes
de alimentação poderá danificar o aparelho. Ligue uma ficha de três pinos da seguinte
maneira:
Os fios neste terminal de alimentação estão coloridos de acordo com o seguinte código:
Verde/Amarelo = Terra
Azul = Neutro
Castanho = Vivo
Page 16

EM CASO DE RECLAMAÇÃO AO ABRIGO DE GARANTIA, É NECESSÁRIO PRODUZIR
ESTE RECIBO.
GARANTIA
1. Home of Living Brands (Pty) Limited garante ao comprador original deste produto (“o cliente") que este
produto não apresenta defeitos de material e fabrico que se manifestam na utilização normal pessoal,
familiar ou doméstica num período de 1 (um) ano desde a data de compra (“período de garantia”).
2. No caso de um cliente comprar um produto e este se quebrar, apresentar defeitos ou não funcionar
corretamente para a finalidade prevista, o cliente tem de notificar o fornecedor ao qual comprou o
produto ("o fornecedor") desse fato dentro do período de garantia. Qualquer reclamação nos termos da
garantia deve ser acompanhada por uma prova de compra. Caso não esteja disponível uma prova de
compra, então as despesas da reparação e/ou manutenção poderão ter de ser pagas pelo cliente ao
fornecedor.
3. O produto avariado tem de ser devolvido ao centro de assistência do fornecedor para aplicar a garantia.
4. O fornecedor irá reembolsar, reparar ou trocar o produto nos termos desta garantia, sujeito aos
requisites legislativos. Esta garantia será válida apenas quando o cliente não tiver quebrado ele próprio
o produto ou utilizado o produto para outro fim que não o previsto. A garantia não inclui e não será
interpretada como abrangendo produtos danificados como resultado de um desastre, utilização
imprópria, manipulação, abuso ou qualquer modificação não autorizada ou reparação do produto.
5. Esta garantia aplicar-se-á apenas ao produto fornecido na data de compra e não a quaisquer
acessórios incluídos ou instalados pelo cliente.
6. Se o cliente solicitar que o fornecedor repare o produto e o produto se quebrar ou não funcionar
corretamente nos 3 (três) meses após a reparação, considerando que não seja resultado de utilização
imprópria, manipulação ou modificação por ou em nome do cliente, então o fornecedor poderá
substituir o produto ou pagar um reembolso ao cliente.
7. O cliente poderá ser responsável por certos custos quando os produtos devolvidos não estiverem na
embalagem original, ou caso a embalagem esteja danificada. Este custo será deduzido de qualquer
reembolso pago ao cliente.
HOME OF LIVING BRANDS (PTY) LTD (JOHANESBURGO)
JOANESBURGO N.º TEL. (011) 490-9600
CIDADE DO CABO N.º TEL. (021) 552-5161
DURBAN N.º TEL. (031) 792-6000
www.russellhobbs.co.za
Page 17

Félicitations pour l'achat de votre radiateur soufflant à gaz/électrique Russell Hobbs. Chaque
unité est fabriquée afin de d’assurer la sécurité et la fiabilité. Avant d’utiliser cet appareil pour la
première fois, merci de lire le manuel avec soin et de le garder à titre de référence.
GARANTIES IMPORTANTES
Lors de l’utilisation de n’importe quel appareil électrique, des précautions de sécurité
élémentaires devraient toujours être suivies, ainsi que les points suivants :
1. Merci de lire les instructions avec attention avant d’utiliser tout appareil quel qu’il soit.
2. Toujours vous assurer que le voltage indiqué sur la plaque signalétique correspond aux
voltages principaux dans votre maison.
3. Une opération incorrecte et une utilisation inappropriée peuvent endommager l’appareil
et entraîner des blessures pour l’utilisateur.
4. Utilisez du GPL (gaz de pétrole liquéfié) uniquement avec ce radiateur.
5. Le radiateur doit toujours être ÉTEINT au niveau de la bouteille de gaz.
6. Afin de permettre une performance à la fois sûre et efficace de l’appareil, assurez-vous
toujours que la ventilation est adéquate.
7. Les enfants devraient être surveillés pour s’assurer qu’ils ne jouent pas avec l’appareil.
8. N’essayez jamais d’ouvrir toute partie quel qu’elle soit du radiateur ou de démonter les
contrôles. Le fournisseur ne peut pas accepter la responsabilité de toutes pannes
possibles de l’unité, dans le cas où cette instruction a été ignorée.
9. L’appareil est destiné à uniquement à un usage domestique. Une utilisation commerciale
annule la garantie et le fournisseur ne peut pas être tenu pour responsable des
blessures ou des dommages causent lors de l’utilisation de l’appareil pour tout autre
usage que celui auquel il est destiné.
10. Une surveillance étroite est requise lorsque tout appareil est utilisé près d’enfants ou de
personnes invalides.
11. Ne pas utiliser l’appareil s’il est tombé ou s’il a été endommagé de quelque manière que
ce soit. En cas de dommage, rapporter l’unité pour un examen et / ou une réparation par
un agent de maintenance agréé.
12. Ne jamais immerger l’unité dans l’eau ou dans tout autre liquide pour le nettoyer.
13. L’utilisation d’accessoires se fixant à l’unité qui ne sont ni recommandés ou fournis par
le fabricant pourrait entraîner des blessures, un incendie ou un choc électrique.
14. Ne pas utiliser l’appareil sur une plaque à gaz ou électrique ou au-dessus d’une flamme.
15. Faire toujours fonctionner l’appareil sur une surface régulière et stable.
16. S’assurer que l’interrupteur est en position « ARRÊT » après chaque utilisation.
17. Le fabricant n’accepte de prendre aucune responsabilité pour tout dommage ou
blessure que ce soit, qui seraient dues à une utilisation incorrecte ou inappropriée, ou
celle de réparations exécutées par un personnel non-agréé.
18. En cas de problèmes techniques, éteindre l’appareil et ne pas essayer de la réparer
vous-même. Renvoyer l’appareil à un service de maintenance habileté pour un examen,
un ajustement ou pour une réparation. Insister toujours pour que les pièces détachées
d’origines soient utilisées. Le non-respect avec les précautions et les instructions
mentionnées ci-dessus pourrait empêcher le bon fonctionnement de cette machine.
19. Si le tuyau doit être remplacé, assurez-vous que le tuyau de remplacement convient au
GPL. Les tuyaux devraient être uniquement achetés auprès de fournisseurs de gaz
certifiés.
20. N’utilisez pas le radiateur pour cuisiner ou pour chauffer de la nourriture ou des
graisses.
21. Utilisez toujours le radiateur en position verticale.
Page 18

Grille du
radiateur
soufflant
Flamme pilote
Interrupteurs
du radiateur
Marque de
l'étincelle et de
la flamme 1
22. Orientez toujours le radiateur vers le centre de la pièce.
Panneau chauffant
Grille de sécurité
Ouverture
d’accès à la
bouteille de
gaz
Allumage
piézo
Bouton de
sélection de la
Position zéro/Arrêt
23. Ne laissez pas le radiateur allumé pendant la nuit.
24. Ne couvrez pas le radiateur avec quelque type de tissu que ce soit, avec des objets
étrangers ou ne bloquez en aucune manière la circulation d’air.
25. La bouteille de gaz doit toujours se trouver en position verticale. Ne renversez pas la
bouteille pour la vider complètement.
26. N’utilisez jamais une flamme nue (des allumettes, un briquet, une bougie) pour tester les
fuites de gaz.
27. Souvenez-vous que le réchaud restera chaud pendant un certain temps, une fois que
vous aurez terminé de l’utiliser.
28. Utilisation domestique uniquement.
29. NE PAS COUVRIR L’APPAREIL.
SCHÉMA DES PIÈCES
POUR TESTER LES FUITES DE GAZ
Éteignez toutes les flammes nues (les flammes ouvertes) et ne fumez pas ou n’approchez pas les
flammes nues près du radiateur à gaz pendant l’essai.
Mettez le radiateur à l’extérieur.
Éteignez le radiateur au niveau de la bouteille de gaz (dans le sens des aiguilles d’une montre ) et
démontez le régulateur (dans le sens des aiguilles d’une montre ).
Vérifiez toutes les connexions des tuyaux et inspectez l’état des verrouillages qui sont ajustés sur le
régulateur.
Réajustez le régulateur, puis ouvrez lentement le gaz d’un tour et demi (dans le sens contraire des
aiguilles d’une montre ). Recouvrez toutes les connexions avec de l’eau savonneuses ou du
détergent en utilisant un chiffon ou une brosse humide.
Une fuite de gaz forme des bulles dans les zones où la solution a été appliquée. Si une fuite de gaz
est détectée, FERMEZ la valve de contrôle de la bouteille de gaz (dans le sens des aiguilles d’une
montre ). Informez l’agent de service le plus proche.
N’utilisez pas le radiateur avant qu’un agent d’entretien approuvé/autorisé ne l’ai inspecté.
Page 19

INSTRUCTIONS D’UTILISATION
ATTENTION !
Tournez le gaz sur MARCHE et ARRÊT uniquement au niveau de la vanne de la bouteille
de gaz.
Une bouteille d’un maximum de 13,1 kg (elle comprend un max de 9,0 kg de gaz) convient
pour l’utilisation de ce radiateur.
Déballez le radiateur et retirez tous les emballages de protection.
Enlevez le régulateur de son emballage d’origine et assurez-vous que le tuyau soit en
parfait état (fig. 3)
Enlevez le panneau de retenue de a bouteille de gaz de l’arrière du radiateur (fig. 3)
Placez la bouteille pleine de GPL à côté de l’arrière du radiateur. Assurez-vous que la
vanne soit propre et dégagée de toutes obstructions par des corps étrangers et vissez le
régulateur (dans le sens contraire des aiguilles d’une montre ) sur la vanne de la
bouteille. Tournez- la manuellement et n’utilisez pas de clé.
Tournez l’alimentation de gaz d’un tour et demi sur OUVERT (dans le sens contraire des
aiguilles d’une montre ) au niveau de la valve de contrôle.
Avant la première utilisation, il est conseillé de vérifier la connexion entre la bouteille de gaz
et le régulateur, pour les cas de fuites de gaz, telles qu’elles ont été décrites ci-dessus.
S’il n’y a pas de fuites de gaz, placez la bouteille à l’arrière du radiateur en vous assurant
qu’elle soit placée de manière à ce que le tuyau ne soit pas coincé ou bloqué de quelque
manière que ce soit.
Ajustez le panneau de retenue à l’arrière du radiateur en vous assurant qu’il soit attaché aux
deux côtés du radiateur.
Page 20

ALLUMAGE DU RADIATEUR
Le régulateur doit être complètement attaché de manière sûre à la vanne de
la bouteille de gaz.
Pour tourner le gaz sur MARCHE - ouvrez prudemment la vanne de la
bouteille (dans le sens contraire des aiguilles d’une montre ) jusqu’au
maximum d’un tour et demi.
Tournez le bouton de sélection de la température situé sur le panneau
supérieur du radiateur, sur la première position ( 0 )
Poussez le bouton de sélection de la température vers le bas et maintenez-
le pendant 10 secondes. Le gaz circulera à travers le tuyau vers le
radiateur.
Tout en maintenant le bouton de sélection vers le bas, abaissez le bouton
d’allumage de manière répétitive, jusqu’à ce que la flamme de la veilleuse
s’allume. Le panneau 1 démarrera. Relâchez le bouton d’allumage.
Le radiateur est maintenant tourné sur le Niveau 1, avec un panneau en
céramique qui chauffe. Sélectionnez votre niveau de chauffage requis en
tournant le bouton de sélection de la température :
o ( 0 ) : Niveau 1 – aucun panneau de chauffage/Position ARRÊT
o ( ) : Niveau 2 – panneau de chauffage du centre
o ( ) : Niveau 3 – deux panneaux de chauffage
o ( ) : Niveau 4 – trois panneaux de chauffage
TOURNEZ LE RADIATEUR A GAZ SUR « ARRÊT »
Tournez le bouton de contrôle de la température sur ( 0 )
Tournez le gaz sur « ARRÊT » au niveau de la vanne de contrôle de la bouteille de
gaz.
La flamme située à la base du panneau du centre devrait s’éteindre automatiquement
d’elle-même. Si cela n'était pas le cas, vérifiez que la bouteille de gaz est FERMÉE.
CHANGER LA BOUTEILLE DE GAZ
Mettez le radiateur dehors et retirez le panneau arrière.
Retirez la bouteille de gaz du radiateur et placez-la sur le sol à côté du radiateur.
ASSUREZ-VOUS QUE LA VANNE DE LA BOUTEILLE SOIT FERMÉE AVANT
D’ESSAYER DE DÉCONNECTER LE RÉGULATEUR. Dévissez le régulateur dans le
sens des aiguilles d’une montre .
Avant de connecter la bouteille à nouveau remplie, vérifiez que le joint de la valve sur le
régulateur n’est pas endommagé et qu’il est encore en bon état. En cas de doute,
apportez le régulateur chez un fournisseur agréé, afin qu’il soit vérifié.
Vissez le régulateur dans le sens contraire des aiguilles d’une montre sur la nouvelle
bouteille de gaz et ajustez la bouteille à l’arrière du radiateur. Assurez-vous qu’elle soit
placée de manière à ce que le tuyau ne soit ni coincé, ni bloqué de quelque manière que
ce soit.
Ajustez le panneau de retenue à l’arrière du radiateur en sécurisant les clips des deux
côtés.
Page 21

INSTRUCTION RELATIVES A LA MAINTENANCE ET A L’ENTRETIEN
Toujours vous assurer que le voltage indiqué sur la plaque signalétique correspond aux
voltages principaux dans votre maison.
Vérifier le cordon d’alimentation et brancher régulièrement pour éviter que le cordon ne soit
endommagé. Si le cordon ou la prise sont endommagés, ils doivent être remplacés par le
fabricant ou par une personne qualifiée afin d’éviter un danger électrique.
Retirer la fiche de la prise en tenant la fiche. Ne pas tirer sur le cordon pour déconnecter
l’appareil du secteur.
Toujours débrancher l’unité lorsqu’elle n’est pas utilisée, avant le nettoyage ou lors de l’ajout
ou du retrait de parties.
S’assurer que le cordon n’est pas dans une position ou il peut être tire par inadvertance.
Ne laissez pas la corde toucher les surfaces chaudes.
L’utilisation d’un cordon d’extension avec cet appareil n’est pas recommandée. Cependant,
s’il s’avère nécessaire d’utiliser une rallonge électrique qui est adaptée à la consommation
d’énergie de l’appareil, afin d’éviter le surchauffement du cordon d’extension, de l’appareil
ou de la prise de courant. Déroulez toujours la rallonge complètement avant utilisation. Ne
pas mettre la rallonge dans une position où elle peut être tirée par des enfants, ou des
animaux, ou bien où ils risquent de trébucher dessus.
NE tirez PAS ou ne déplacez pas l’appareil avec le cordon d’alimentation.
Débrancher toujours l’unité lorsqu’elle n’est pas utilisée, et avant de la nettoyer.
S’assurer que l’interrupteur est en position « ARRÊT » après chaque utilisation.
Le fabricant n’accepte de prendre aucune responsabilité pour tout dommage ou blessure
que ce soit, qui seraient dues à une utilisation incorrecte ou inappropriée, ou celle de
réparations exécutées par un personnel non-agréé.
INSTRUCTION RELATIVES A LA MAINTENANCE ET A L’ENTRETIEN
Cet appareil ne demande que très peu d’entretien. Les points importants, dont il faut se
souvenir sont les suivants :
Lorsque vous changez la bouteille de gaz, vérifiez toujours que le verrouillage du régulateur
n’est pas endommagé.
Avant de l’utiliser, vérifiez que le tuyau est en bon état, et qu’il est fermement fixé à
l’appareil et au régulateur.
Il est conseillé de remplacer le tuyau tous les deux ans, qu’il ait été utilisé ou non. Lorsque
vous remplacez le tuyau, assurez-vous que le tuyau de remplacement convient pour le
GPL. Les tuyaux devraient être uniquement achetés auprès de fournisseurs de gaz
certifiés. Au moment du remplacement du tuyau, souvenez-vous de remplacer en même
temps les colliers de serrage.
Il n’existe pas de pièces qui soient ajustables par l’utilisateur, mis à part le tuyau et le
régulateur. Dans le cas où le réchaud ne fonctionnerait pas correctement, un agent
d’entretien doit le vérifier et si le remplacement de pièces est nécessaire, les agents
d’entretien s’assureront que les pièces adéquates sont fournies et correctement ajustées.
Il est recommandé que votre radiateur soit vérifié à votre quincaillerie locale au début de
chaque saison.
Page 22

Problème
Cause possible et solution
Le radiateur ne
s’allumera pas ou
fonctionne mal
La bouteille est vide. Remplacez-la avec une bouteille
pleine.
Si la bouteille est nouvelle, elle pourrait ne pas avoir été
purgée de l’air correctement.
Vérifiez que le régulateur est correctement attaché et que
la vanne de la bouteille est ouverte (dans le sens contraire
des aiguilles d’une montre).
Les composants du radiateur peuvent être contaminés par
de la poussière ou sales. Faites entretenir le radiateur par
un agent de service agréé.
Essayez une autre marque de gaz.
Le radiateur ne peut
pas être éteint
Les chauffages d’armoire doivent toujours être sur ARRÊT
en fermant la vanne de la bouteille de gaz ( dans le sens
des aiguilles d’une montre). Notez qu’elle peut être en
position complètement ouverte et qu’elle requerra des
efforts certains pour commencer la manœuvre de
fermeture.
NETTOYAGE
Essuyez l’extérieur du radiateur avec un chiffon doux humidifié avec un détergent doux.
N’utilisez pas de métal ou un produit d’entretien pour meubles sur le radiateur.
Si les éléments semblent être poussiéreux, alors nettoyez-le en utilisant avec une brosse
souple ou avec un chiffon sec.
Nettoyez le radiateur uniquement lorsqu’il est froid et lorsqu’il ne fonctionne pas.
N’utilisez pas de nettoyants abrasifs, car ils endommageraient la surface peinte.
Lorsqu’il n’est pas utilisé, rangez le radiateur en le couvrant et en le plaçant dans un endroit
frais, sec et exempt de poussières.
AVERTISSEMENT
N’immergez jamais l’unité dans l’eau ou ne laissez pas d’eau entrer dans les brûleurs.
Si vous devez renvoyer l’appareil, assurez-vous que :
L’unité est emballée avec soin dans son emballage d’origine.
La preuve d’achat est jointe.
DÉPANNAGE
Page 23

Le radiateur ne
restera pas allumé
lorsque le bouton
d’allumage est relâché
L’électrovanne du capteur de la diminution de l’oxygène ne
maintient pas le contrôle ouvert. Faites entretenir le
radiateur par un agent de service agréé.
Si cela devait avoir lieu après le rangement, les
composants pourraient nécessiter un nettoyage.
Marque
Modèle
Taux de consommation de
gaz
Puissance nominale
Russell
Hobbs
RHG03
1 panneau (ghr-1)
103
1 panneau (W)
1 400
Pression de
fonctionnement
2 panneaux (ghr-1)
206
2 panneaux (W)
2 800
2,8 kPa
3 panneaux (ghr-1)
310
3 panneaux (W)
4 200
Radiateur électrique
Élément 1
1000 W 230 V
Élément 2
1000 W 203 V
DONNÉES TECHNIQUES
LE CHANGEMENT DE LA PRISE
Si la prise intégrée devait être change, suivez les instructions ci-dessous.
Cette unité est uniquement conçue pour fonctionner au courant indiqué. La connexion à
d’autres sources d’alimentation pourrait endommager l’appareil. Connecter la prise à
trois chiffes de la manière suivante :
Les fils de ce réseau sont colorés selon le code suivant :
Vert/jaune = Terre
Bleu = Neutre
Marron = Actif
Page 24

VEUILLEZ APPOSER VOTRE PREUVE D’ACHAT / REÇU ICI
EN CAS DE RÉCLAMATION PENDANT LA PÉRIODE DE GARANTIE CE REÇUS DOIT
ÊTRE PRÉSENTE.
GARANTIE
1. Home of Living Brands (Pty) Limited garantie à l’acheteur d’origine de ce produit (« le client »), que ce
dernier ne présentera pas de défauts de qualité, ni de fabrication qui dans le cadre d’une utilisation
normale, familiale ou domestique pourrait apparaître en l’espace d’1 (d’une) année suivant la date
d’achat (« période de garantie »).
2. Lorsque le client a acheté un produit qui se casse, présente des défauts ou qui ne fonctionne pas
correctement pour l’utilisation pour laquelle il était destiné, le client doit signaler cela au fournisseur
auprès duquel il a acheté le produit (« le fournisseur ») durant la période de garantie. Toute réclamation
selon les conditions de la garantie doit être accompagnée d’une preuve d’achat. Si la preuve d’achat,
n’est pas disponible, à ce moment-là, les frais de réparation et / ou d’entretien peuvent être à la charge
du client vis-à-vis du fournisseur.
3. Un produit défectueux doit être rapporté au centre d’entretien du fournisseur pour faire jouer la garantie.
4. Le fournisseur remboursera, réparera ou échangera le produit selon les termes de cette garantie qui est
assujettie aux exigences légales. Cette garantie devrait être valable uniquement quand le client n’a pas
cassé lui-même l’appareil, ou utilisé ce dernier pour faire quelque chose pour lequel il n’était pas
destiné. La garantie ne comprend pas et ne peut pas être saurait être considérée comme couvrant les
dommages affectant l’appareil, qui seraient le résultat d’un accident, d’une mauvaise utilisation, d’une
modification, d’un abus ou de toute modification ou réparation non-autorisée de l’appareil.
5. La garantie couvrira uniquement le produit fournit à la date d’achat et elle ne s’appliquera pas à toute
pièces ajoutée ou installée par le client.
6. Si le client demande au fournisseur de réparer le produit et si le produit casse ou ne fonctionne pas
correctement dans les 3 (trois) mois de la réparation, et si ceci n’est pas le résultat d’une mauvaise
utilisation, à ce moment-là le fournisseur pourrait remplacer le produit ou rembourser le client.
7. Le client pourrait être tenu pour responsable de certains frais lorsque les produits ne sont pas renvoyés
dans leur emballage d’origine, ou si l’emballage est endommagé. Ceci sera déduit de tout
remboursement fait au client.
HOME OF LIVING BRANDS (PTY) LTD (JOHANNESBURG)
JOHANNESBURG TEL NO. (011) 490-9600
CAPE TOWN TEL NO. (021) 552-5161
DURBAN TEL NO. (031) 792-6000
www.russellhobbs.co.za
Page 25

 Loading...