

Page 1
INSTRUCTIONS AND WARRANTY
MODEL NO. RHFP900
RUSSELL HOBBS ELECTRIC CASSEROLE FRYING PAN
Page 2

2
Congratulations on purchasing our Russell Hobbs Electric Casserole Frying Pan. Each unit
is manufactured to ensure safety and reliability. Before using this appliance for the first time,
please read the instruction manual carefully and keep it for future reference.
FEATURES OF THE RUSSELL HOBBS ELECTRIC CASSEROLE FRYING
PAN
1500W
Die-cast aluminium construction
Oversized 30 x 38cm pan
Versatile Cooking: Roast, Grill, Bake, Simmer, Stir-Fry
Cooks from simmer to 220ºC
Toughened glass lid with steam vent
Easy-to-read, adjustable thermostat control with 5 heat settings for precision cooking
Deep 8cm interior
Convenient for serving – select setting “1” to serve directly from the pan
Premium non-stick interior for quick and easy cleaning
Heat resistant handles and non-slip feet
Stylish and ergonomic design
With power indicator light for that perfect temperature convenience
For domestic use only
TECHNICAL SPECIFICATIONS
Rated Voltage: 220-240V~
Rated Frequency: 50/60Hz
Rated Power: 1260-1500W
IMPORTANT SAFEGUARDS
When using any electrical appliance, basic safety precautions should always be followed
including the following:
1. Please read the instructions carefully before using any appliance.
2. Always ensure that the voltage on the rating label corresponds to the mains voltage in
your home.
Page 3

3
3. Incorrect operation and improper use can damage the appliance and cause injury to
the user.
4. The appliance is intended for household use only. Commercial use invalids the
warranty and the supplier cannot be held responsible for injury or damage caused
when using the appliance for any other purpose than that intended.
5. Avoid any contact with moving parts.
6. This appliance is not intended for use by persons (including children) with reduced
physical, sensory or mental capabilities, or lack of experience and knowledge, unless
they have been given supervision or instruction concerning use of the appliance by a
person responsible for their safety.
7. Children should be supervised to ensure that they do not play with the appliance.
8. Check the power cord and plug regularly for any damage. If the cord or the plug is
damaged, the manufacturer or a qualified person must replace it in order to avoid an
electrical hazard.
9. Do not allow this appliance to touch curtains, wall coverings, clothing, dishtowels or
other flammable materials during use. Caution is required on surfaces where heat
may cause damage -an insulated heat pad is recommended. Never place the
appliance on a plastic, fabric or carpeted surface while cooking.
10. The appliance is not intended to be operated by means of an external timer or
separate remote-control system.
11. Do not touch hot surfaces – use handles.
12. Always lift the lid away from your face as escaping steam may cause injury or
scalding.
13. Keep hands, arms, face etc clear from the escaping steam when opening the lid.
14. DO NOT place the product near flammable materials.
15. The frying pan boasts a premium non-stick surface. To ensure longevity of your
electric frying pan and to avoid scratching this non-stick surface, please use wooden
or plastic utensils only.
16. Food should not be kept warm for more than 4-6 hours in order to maintain the
continued freshness of the food.
17. Let the frying pan cool down completely before you clean it or put it away.
18. Extreme caution must be used when moving a frying pan containing hot liquids. It is
recommended that you do not move the appliance when it is full, when switched on or
before it has cooled down.
19. Do not use the appliance if it has been dropped or damaged in any way. In case of
damage, take the unit in for examination and/or repair by an authorised service agent.
20. Do not use harsh abrasives, caustic cleaners or oven cleaners when cleaning this
appliance.
Page 4

4
21. To reduce the risk of electric shock, do not immerse or expose the appliance, plug or
the power cord to water or any other liquid.
22. Never immerse the unit in water or any other liquid for cleaning purposes.
23. The appliance cannot be partially or fully immersed in water for cleaning.
24. Only the appropriate probe supplied by the manufacturer must be used.
25. The probe must be removed before the appliance is cleaned.
26. The appliance power inlet must be dried before the appliance is used again.
27. Remove the plug from the socket by gripping the plug. Do not pull on the cord to
disconnect the appliance from the mains. Always unplug the unit when not in use,
before cleaning or when adding or removing parts.
28. The use of accessory attachments that are not recommended or supplied by the
manufacturer may result in injuries, fire or electric shock.
29. A short detachable cord is provided to reduce the hazards resulting from becoming
entangled in or tripping over a longer cord.
30. Do not let the cord hang over the edge of a table or counter. Ensure that the cord is
not in a position where it can be pulled on inadvertently.
31. Do not allow the cord to touch hot surfaces and do not place on or near a hot gas or
electric burner or in a heated oven.
32. Do not use the appliance on a gas or electric cooking top or over or near an open
flame.
33. Use of an extension cord with the appliance is not recommended. However, if it is
necessary to use an extension lead, ensure that the lead is suited to the power
consumption of the appliance to avoid overheating of the extension cord, appliance or
plug point. Do not place the extension cord in a position where it can be pulled on by
children or animals, or tripped over.
34. This appliance is not suitable for outdoor use. For household use only. Do not use
this appliance for anything other than its intended use.
35. DO NOT carry the appliance by the power cord.
36. Do not leave the appliance unattended during use. Always unplug the unit when not in
use or before cleaning.
37. Always operate the appliance on a smooth, even, stable surface. Do not place the unit
on a hot surface.
38. Ensure that the switch is in the “Off” or “O” position after each use.
39. The manufacturer does not accept responsibility for any damage or injury caused by
improper or incorrect use, or for repairs carried out by unauthorised personnel.
40. In case of technical problems, switch off the machine and do not attempt to repair it
yourself. Return the appliance to an authorised service facility for examination,
adjustment or repair. Always insist on the use of original spare parts. Failure to
Page 5
5
comply with the above mentioned pre-cautions and instructions, could affect the safe
operation of this machine.
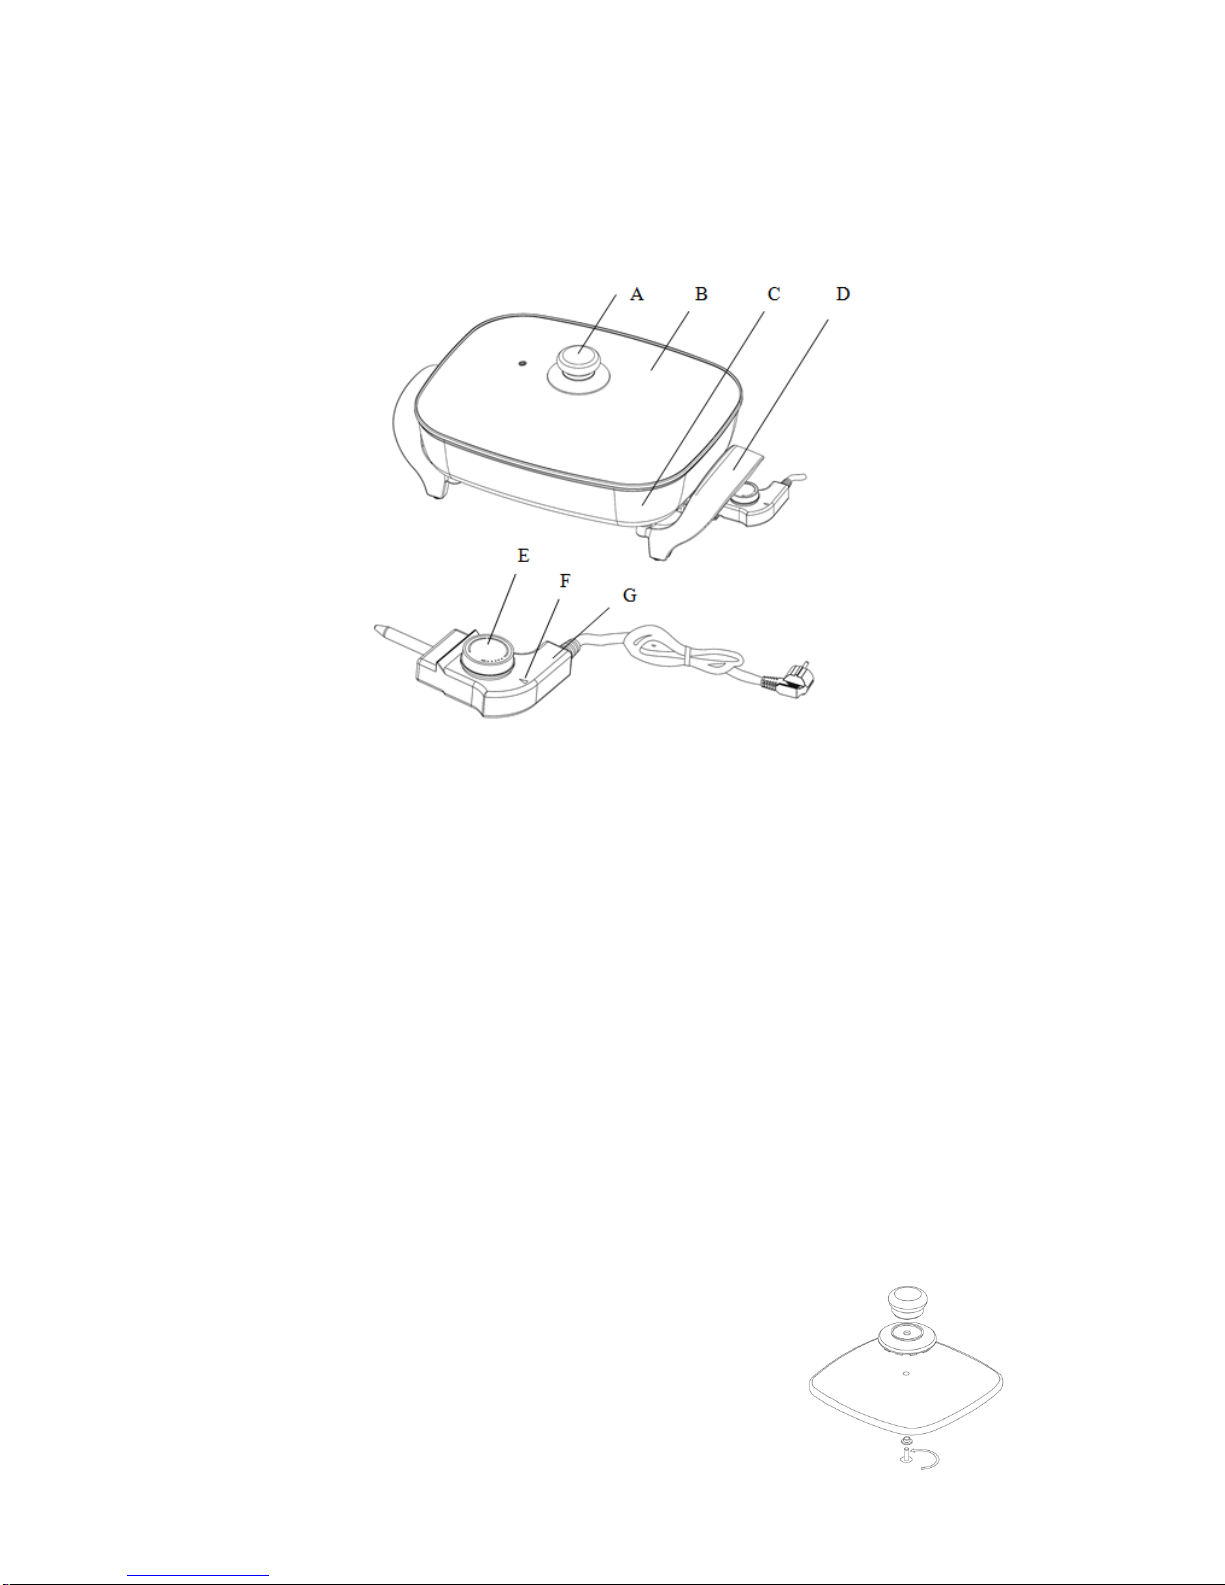
PARTS DIAGRAM
A. Glass Lid knob
B. Glass Lid with Steam Vent
C. Pan
D. Cool touch easy grip handles
E. Variable thermostat control
F. Indicator light
G. Removable probe
BEFORE FIRST USE
Before using the unit for the first time, carefully clean the frying pan and glass lid.
Do not use any aggressive detergents, brushes with metal or nylon bristles or sharp
objects such as knives or spatulas for cleaning the unit.
Avoid damaging the non-stick coating.
Always dry the unit thoroughly after cleaning it.
ASSEMBLING THE GLASS LID
Screw and assemble the plastic vented knob to the glass
lid.
Page 6

6
CONNECTING THE UNIT
Connect the probe to the power inlet of the frying pan.
Make sure that the probe is connected properly.
If the probe is not completely inserted, abnormal heating
may occur, resulting in accident or damage.
Set the thermostat control to heat level "0".
PREPARING FOOD
Plug the cord into the wall outlet. Be careful not to drop
the probe from a high surface as this will result in damage.
Pour a little salad or vegetable oil into the pan together with
half a pot of water and bring to the boil. This will eliminate any
manufacturing odours.
To use: select the required temperature that is suitable for the
type of food to be cooked. Turn the thermostat control in a
clockwise direction to select your cooking heat.
It takes approximately 5 -10 minutes to heat up.
The power indicator light will turn off. This signifies that the pan is at the right
temperature to start the cooking process.
When cooking is completed, remember to turn the unit to the “Off” or “0” position.
As a general tip: low settings are ideal for casseroles, stews, steaming and other
slow cooking. High settings are used for browning, shallow frying and grilling.
Should you wish to let the food simmer, turn the temperature to its lowest setting.
Never turn the unit on with no food and/ or liquid in the pan.
USING THE GLASS LID
Use the glass lid where possible and when you are cooking all food types. The lid prevents
heat from escaping and reduces cooking time, saving you time and money.
The knob on the glass lid is designed with vents all the way around. It allows condensation
from the steam and water and prevents build up of dirt and grease in this otherwise difficult
area. It will be necessary to unscrew and disassemble the knob occasionally for easy
cleaning and hygienic maintenance.
Page 7

7
NOTE:
The glass lid has a vent through which hot steam can escape!
Avoid contact with escaping steam.
The lid can become extremely hot during operation therefore we recommend the use of
oven gloves, etc. where possible and when removing the lid to avoid burns or scalding.
Following a few general tips can prolong the life of your frying pan:
1. Always wash the pan and cover as soon as possible after each use.
2. DO NOT pour cold water into a hot pan.
3. Never scrape with hard or sharp utensils when cleaning.
4. DO NOT place the temperature control probe on the pan surface. It may scratch or
damage the non-stick coating.
5. DO NOT wash the pan with the temperature control probe connected.
6. Wash the frying pan after each use to avoid stains caused by a build-up of food or
grease residues. Never leave food in the pan overnight.
7. Hold the unit at a 45° angle, socket side facing upwards so as to wash. This will
prevent or at-least minimize the likelihood of water getting into the socket.
COOKING TIPS
Foods which overcook easily should be removed from the frying pan as soon as
cooking has been completed.
Try to dry meat, fish, poultry, etc. before adding to hot oil to prevent unnecessary
splattering.
Do not fry too much food at a time in order to prevent the oil temperature from
dropping too dramatically.
RECIPES
Important: Temperature settings as given in recipes are approximate. Due to personal
differences in taste, some foods may be desired more or less crisp, more or less done,
especially in the case of meats. Therefore, heat settings may be increased, decreased or
varied in any way to suit individual preference.
Page 8

8
CHINESE MEAT BALLS
500g minced beef 5ml salt
250g cabbage 15ml soy sauce
2 onions 30ml shortening or cooking oil
1.5ml ginger
METHOD: Preheat the frying pan to about 150°C. Put meat, cabbage and onions through
meat grinder using coarse cutter, or place in a food processor. Combine ginger, salt and soy
sauce and add to meat mixture. Mix well. Shape into balls about 2.5 – 3 cm in diameter. Fry
in melted shortening until done, browning well on all sides.
PORK CHOPS PAPRIKA
4 to 6 pork chops Pepper
Paprika 3ml Sage
Salt 300ml Milk
METHOD: Preheat the frying pan to setting 4 or 5 (dependent on personal preference).
Sprinkle chops with paprika, salt, pepper and sage. Grease the frying pan lightly and brown
the chops on both sides. Reduce the heat setting to 2 or 3. Add milk gradually as needed.
Cover and braise until done.
ROAST CHICKEN WITH ROAST POTATOES
1 x 1.5kg chicken 60g butter
7ml mixed dried herbs 6 medium sized potatoes, peeled
3ml tumeric Salt and pepper
1 large onion, quartered Flour
60ml oil
METHOD: Wash and dry chicken inside and out. Mix salt, pepper, herbs and tumeric and
sprinkle over chicken. Place onion inside cavity of chicken and tie legs. Heat oil and butter in
frying pan to about 180°C until butter begins to foam. Fry chicken until nicely browned all
over. Turn heat down to approximately 120°C. Cover and roast chicken for about 1 hour,
turning every 15 minutes. Season potatoes and sprinkle with flour. Add potatoes to frying
pan for the last 30 minutes of cooking. Roast with the chicken, turning regularly.
Page 9

9
SAVOURY LAMB STEW
750g lamb shoulder 300ml water
cut in 2.5cm pieces 5ml salt
30ml cooking oil 8 to 10 small whole onions
1 x 300ml can condensed 300ml canned peas
tomato soup
METHOD: Preheat frying pan. Heat the cooking oil and brown the meat. Skim off the excess
fat as it accumulates. Combine the tomato soup, water and salt and pour over the meat. Add
the onions. Reduce the heat. Cover and cook for 1 hour or until the meat is tender. Add peas
just before serving and reheat. Serve hot from the frying pan.
BEEF STROGANOFF
750g round steak cut into strips 300ml sour cream
Flour, salt and pepper 1can tomato soup
30ml shortening 15ml Worcestershire sauce
150ml chopped onions 6 to 8 drops Tabasco sauce
1 clove garlic, minced 2.5ml salt
1 x 200g can mushrooms 1ml pepper
METHOD: Preheat the frying pan to 180°C. Dredge meat in seasoned flour. Melt shortening
and brown meat well. Add onions, garlic and mushrooms and sauté lightly. Reduce heat to
100°C. Combine cream, tomato soup, Worcestershire sauce, tobasco sauce, salt and
pepper and pour over meat. Cover and braise 1 ½ hours or until tender. Serve over hot
spaghetti or rice. Sprinkle with parmesan cheese.
SCRAMBLED EGGS
6 Eggs slightly beaten 100ml cream or milk
Salt and pepper 30ml butter
METHOD: Preheat the frying pan. Combine the eggs, salt, pepper and milk. Melt the butter
in the pan and add the eggs. Stir the eggs as they become firm. Serve when firm but not dry.
Variations:
• Curried – Add 5 to 10ml curry powder
• Dried Beef – Add 230ml shredded dried beef
Page 10

10
• Ham or Bacon – Add sautéed cubed ham or bacon.
• Onion and Parsley – Add chopped onion and parsley
• Chives – Add chopped chives
• Mushrooms – Add sliced canned or fresh mushrooms
CLEANING AND MAINTENANCE
Disconnect the plug from the wall outlet and remove the probe together with power
cord from the appliances power inlet.
Allow the unit to cool.
Clean the frying pan while still warm after use. Wipe the frying pan with warm soapy
water using a sponge or dishcloth only. Normal dish washing liquid should be
sufficient. For excess soiling, after the unit is cool, wash the frying pan with a soft
sponge moistened with a non-abrasive kitchen cleaner.
Use a non-abrasive sponge or damp dish cloth to clean the exterior of the pan.
Wipe the pan thoroughly to remove soap residue.
Always unplug the frying pan and allow it to cool before starting to clean.
Do not use bleach, solvents, abrasive cleaners or scouring pads to clean your
appliance as it can be damaging to the finish.
If cleaning is necessary of the control probe, wipe over with a damp cloth. Do not put
the probe or power cord in the dishwasher.
Never immerse the cord, plug or probe in any liquid.
Do not soak the frying pan in water.
The probe must be removed before the appliance is cleaned.
The power inlet must be dried before the appliance is used again.
This appliance is for household use only and is not user-serviceable.
Do not open or change any parts by yourself. Please refer to a qualified electrical
service department or return to the supplier if servicing is necessary.
Let parts dry completely before reassembling.
STORING THE APPLIANCE
Unplug the unit from the wall outlet and clean all the parts as instructed above.
Ensure that all parts are dry before storing.
Store the appliance in its box or in a clean, dry place.
Never store the appliance while it is still wet or dirty.
Never wrap the power cord around the appliance.
Page 11
11
SERVICING THE APPLIANCE
There are no user serviceable parts in this appliance. If the unit is not operating correctly,
please check the following:
You have followed the instructions correctly
That the unit has been wired correctly and that the wall socket is switched on.
That the mains power supply is ON.
That the plug is firmly in the mains socket.
If the appliance still does not work after checking the above:
- Consult the retailer for possible repair or replacement. If the retailer fails to resolve the
problem and you need to return the appliance, make sure that:
The unit is packed carefully back into its original packaging.
Proof of purchase is attached.
A reason is provided for why it is being returned.
If the supply cord is damaged, it must be replaced by the manufacturer or an authorised
service agent, in order to avoid any hazard. If service becomes necessary within the
warranty period, the appliance should be returned to an approved Tedelex Trading (Pty)
Limited service centre. Servicing outside the warranty period is still available, but will,
however, be chargeable.
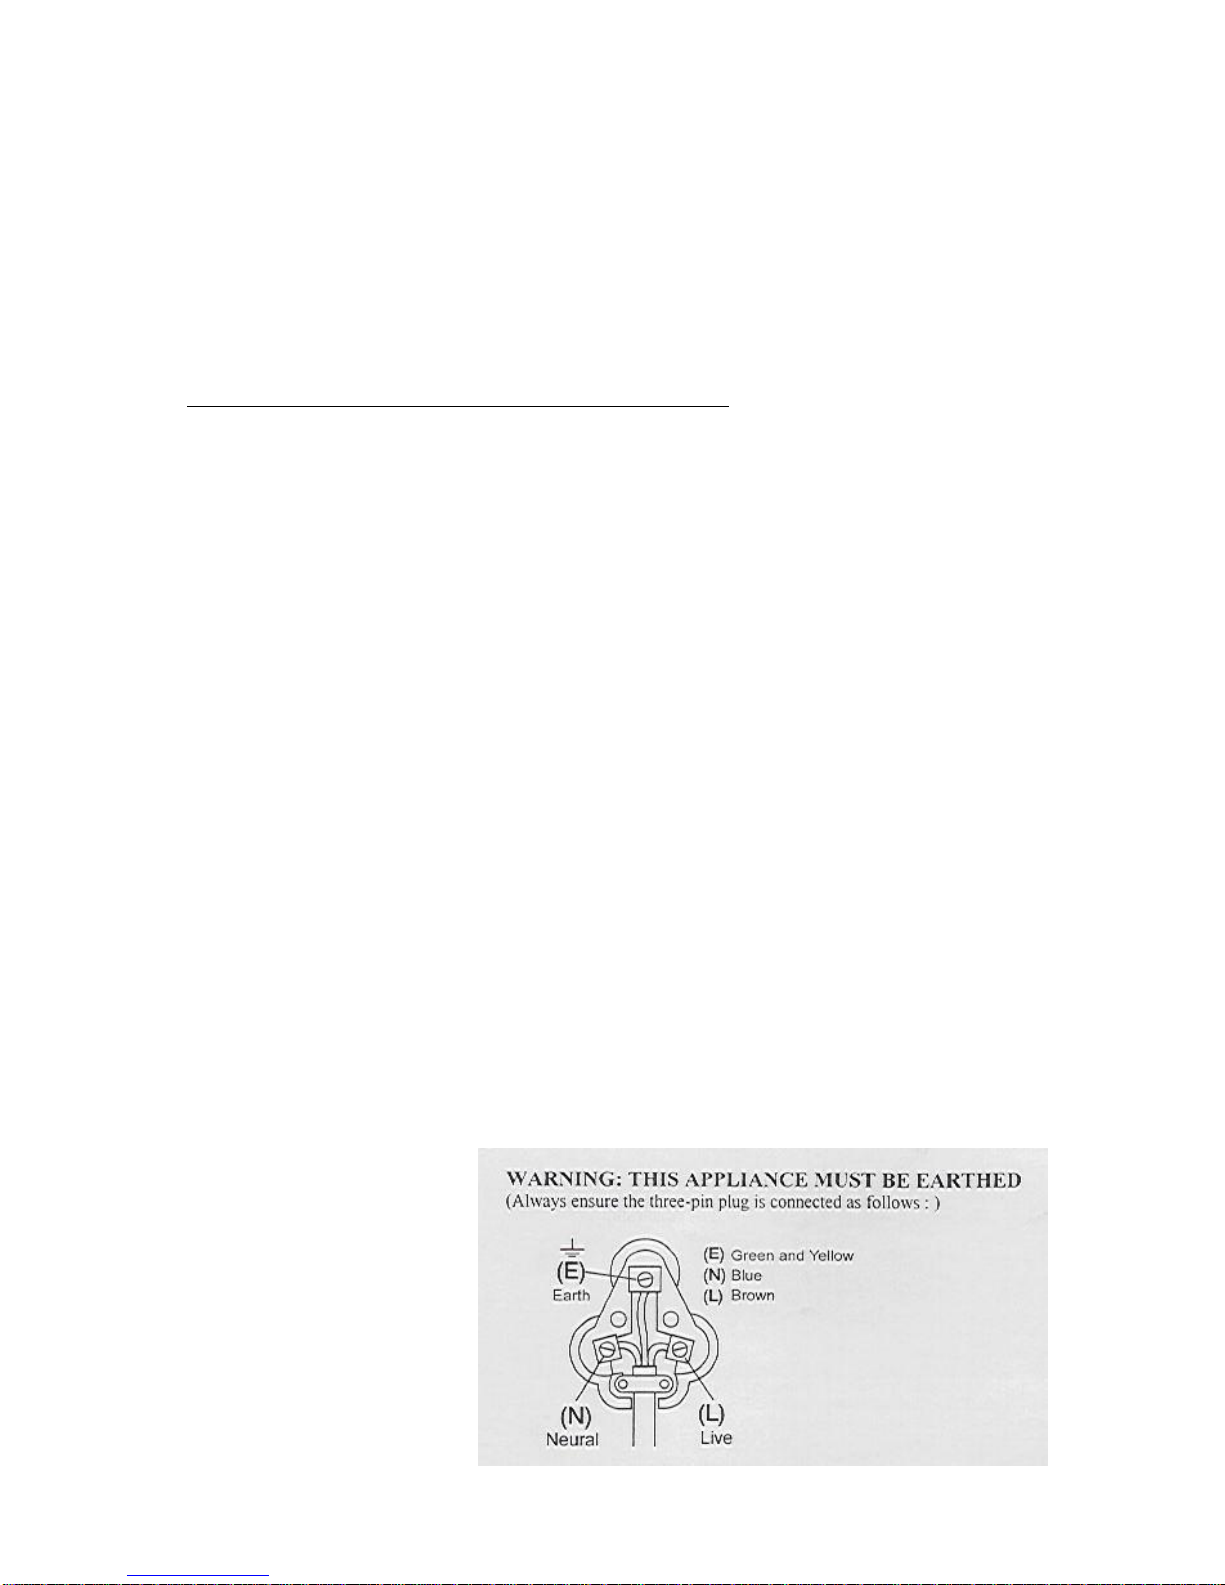
CHANGING THE PLUG
Should the need arise to change the fitted plug, follow the instructions below.
This unit is designed to operate on the stated current only. Connecting to other power
sources may damage the appliance. Connect a three-pin plug as follows:
The wires in this mains lead are coloured in accordance with the following code:
Green/Yellow = Earth
Blue = Neutral
Brown = Live
Page 12

12
PLEASE AFFIX YOUR PROOF OF PURCHASE/RECEIPT HERE
IN THE EVENT OF A CLAIM UNDER WARRANTY THIS RECEIPT MUST BE
PRODUCED.
W A R R A N T Y
1. Tedelex Trading (Pty) Limited (“Tedelex”) warrants to the original purchaser of
this product (“the customer”) that this product will be free of defects in quality and
workmanship which under normal personal, family or household use and purpose
may manifest within a period of 1 (one) year from the date of purchase (“warranty
period”).
2. Where the customer has purchased a product and it breaks, is defective or does
not work properly for the intended purpose, the customer must notify the supplier
from whom the customer bought the product (“the supplier”) thereof within the
warranty period. Any claim in terms of this warranty must be supported by a proof
of purchase. If proof of purchase is not available, then repair, and/or service
charges may be payable by the customer to the supplier.
3. The faulty product must be taken to the supplier's service centre to exercise the
warranty.
4. The supplier will refund, repair or exchange the product in terms of this warranty
subject to legislative requirements. This warranty shall be valid only where the
customer has not broken the product himself, or used the product for something
that it is not supposed to be used for. The warranty does not include and will not
be construed to cover products damaged as a result of disaster, misuse, tamper,
abuse or any unauthorised modification or repair of the product.
5. This warranty will extend only to the product provided at the date of the purchase
and not to any expendables attached or installed by the customer.
6. If the customer requests that the supplier repairs the product and the product
breaks or fails to work properly within 3 (three) months of the repair and not as a
result of misuse, tampering or modification by or on behalf of the customer, then
the supplier may replace the product or pay a refund to the customer.
7. The customer may be responsible for certain costs where products returned are
not in the original packaging, or if the packaging is damaged. This will be
deducted from any refund paid to the customer.
TEDELEX TRADING (PTY) LTD (JOHANNESBURG)
JOHANNESBURG TEL NO. (011) 490-9000
CAPE TOWN TEL NO. (021) 552-5161
DURBAN TEL NO. (031) 792-6000
www.amap.co.za
www.russellhobbs.co.za
www.facebook.com/RussellHobbsSA
Page 13

13
Parabéns pela aquisição da Caçarola Elétrica para Frituras Russell Hobbs! Cada unidade é
fabricada para dar segurança e confiabilidade. Antes de usar o aparelho pela primeira vez,
leia cuidadosamente o manual de instrução e guarde-o para futuras referências.
CARACTERÍSTICAS DA CAÇAROLA ELÉTRICA PARA FRITURAS
RUSSELL HOBBS
1500W
Em alumínio fundido
Panela tamanho gigante, 30 x 38 cm
Versatilidade de Cozimento: Assar, Grelhar, Cozer no forno, Cozer em fogo lento,
Saltear
Opção de cozimento: desde a fervura até 220ºC
Tampa a vapor de vidro resistente
Controle termostático ajustável, de leitura fácil, com 5 ajustes de aquecimento para
um cozimento preciso
Profundidade: 8 cm
Conveniente para servir – selecione “1” para servir diretamente da panela
Interior antiaderente para uma limpeza mais rápida
Cabos resistentes ao calor e pés antiderrapantes
Design ergonômico e de estilo
Luz indicadora de energia para controle perfeito da temperatura
Apenas para uso doméstico
ESPECIFICAÇÕES TÉCNICAS
Voltagem: 220-240V~ Frequência: 50/60Hz Energia: 1260-1500W
PRECAUÇÕES IMPORTANTES
Ao usar um aparelho elétrico, devem-se tomar precauções básicas de segurança, incluindo
o seguinte:
1. Leia as instruções cuidadosamente antes de usar qualquer aparelho.
2. Sempre se certifique se a voltagem na etiqueta de classificação corresponda à
voltagem principal da sua casa.
3. O uso incorreto ou impróprio pode danificar o aparelho e causar danos ao usuário.
Page 14

14
4. O aparelho é para uso doméstico apenas. O uso comercial invalida a garantia e o
fornecedor não será responsável por danos ou prejuízos causados pelo uso
inapropriado do aparelho.
5. Evite qualquer contato com as partes removíveis.
6. Este aparelho não deve ser usado por pessoas com capacidade física, sensorial ou
mental reduzida (inclusive crianças) ou por pessoas com falta de experiência e
conhecimento, a menos que elas tenham supervisão ou recebam instruções
concernente ao uso do aparelho por uma pessoa responsável pela segurança delas.
7. As crianças devem ser supervisionadas para que não brinquem com o aparelho.
8. Verifique regularmente o fio e a tomada. Se o fio ou a tomada estiverem danificados,
o fabricante ou uma pessoa qualificada deverá substituí-los para evitar problemas
elétricos.
9. Não deixe este aparelho encostar em cortinas, papel de parede, roupas, panos de
prato ou outros materiais inflamáveis durante o uso. Requer-se cautela nas
superfícies que podem ser danificadas pelo calor – recomenda-se uma almofada
térmica. Nunca coloque o aparelho numa superfície de plástico, tecido ou acarpetada
enquanto estiver cozinhando.
10. Este aparelho não foi projetado para funcionar com um timer externo ou um sistema
separado de controle remoto.
11. Não toque nas superfícies quentes – use as alças.
12. Sempre levante a tampa para longe de seu rosto, pois o vapor pode causar danos ou
queimaduras.
13. Mantenha as mãos, braços, rosto, etc., longe do vapor ao abrir a tampa.
14. NÃO coloque o produto perto de materiais inflamáveis.
15. A caçarola possui superfície antiaderente. Para que ela dure e para evitar riscos na
superfície, use utensílios de madeira ou de plástico somente.
16. Não deixe a comida quente na panela por mais de 4 -6 horas para que não perca
seus nutrientes.
17. Deixe a caçarola esfriar completamente antes de limpá-la e guardá-la.
18. Muito cuidado ao manusear a caçarola contendo líquidos quentes. Recomenda-se
não manusear o aparelho enquanto ele estiver cheio, ligado ou antes de ter esfriado.
19. Não use o aparelho se ele tiver caído ou danificado de algum modo. Em caso de
dano, leve o aparelho para exame e/ou conserto a um agente de serviço autorizado.
20. Não use abrasivos, limpadores cáusticos ou limpadores de forno na limpeza deste
aparelho.
21. Para reduzir o risco de choque elétrico, não mergulhe ou exponha o aparelho,
tomada ou fio na água ou em qualquer outro líquido.
22. Nunca mergulhe o aparelho na água ou noutro líquido para limpá-lo.
Page 15

15
23. O aparelho não pode ser mergulhado, parcial ou completamente, na água para ser
limpo.
24. Só use a sonda apropriada fornecida pelo fabricante.
25. A sonda deve ser retirada antes de limpar o aparelho.
26. A entrada de energia do aparelho deve estar seca antes de usá-lo de novo.
27. Retire o fio da tomada pegando pelo plugue. Não puxe o fio ou desconecte o
aparelho pela fiação. Sempre desconecte o aparelho quando não estiver em uso,
antes de limpá-lo ou de colocar ou retirar as peças removíveis.
28. O uso de acessórios que não são recomendados ou fornecidos pelo fabricante
podem causar danos ou prejuízos, ou choque elétrico.
29. Fornecemos um fio curto a fim de reduzir as chances de enrolar ou de se tropeçar
num fio comprido.
30. Não deixe o fio pendurado na beirada da mesa ou do balcão. Certifique-se que o fio
não esteja numa posição onde possa ser puxado inadvertidamente.
31. Não deixe o fio em cima de superfícies quentes e não o coloque perto do queimador
de gás ou elétrico do fogão ou sobre o fogão quente.
32. Não use o aparelho na chama do gás ou de fogão elétrico ou próximo a chamas.
33. Não se recomenda o uso de extensões neste aparelho. Contudo, se for necessário
usar uma extensão, certifique-se que o fio seja apropriado para o consumo de
energia do aparelho para evitar superaquecimento do fio, do aparelho ou da tomada.
Não coloque a extensão numa posição onde possa ser puxada por crianças ou por
animais, ou se possa tropeçar nela.
34. Este aparelho não é apropriado para uso ao ar livre, apenas para uso doméstico. Não
use o aparelho para outros fins.
35. NÃO carregue o aparelho segurando-o pelo fio.
36. Não deixe o aparelho sem supervisão enquanto em uso. Sempre o desconecte
quando não estiver eu uso ou antes de limpá-lo.
37. Sempre use o aparelho numa superfície lisa, plana e estável. Não o coloque numa
superfície quente.
38. Certifique-se que o interruptor esteja na posição ”Off” ou “O” depois de cada uso.
39. O fabricante não será responsabilizado por quaisquer danos ou prejuízos causados
pelo uso impróprio ou incorreto, ou por consertos feitos por pessoas não autorizadas.
40. No caso de problemas técnicos, desligue o aparelho não tente consertá-lo você
mesmo. Leve-o a um serviço autorizado para exame, ajuste ou conserto. Sempre
insista no uso de peças originais. O descumprimento das precauções e instruções
mencionadas acima pode afetar o uso seguro do aparelho.
Page 16

16
DIAGRAMA DAS PEÇAS
A. Puxador da Tampa de Vidro
B. Tampa de Vidro com Saída para Vapor
C. Panela
D. Alças ergonômicas
E. Controle de termostato variável
F. Luz indicadora
G. Sonda removível
ANTES DO PRIMEIRO USO
Antes de usar o aparelho pela primeira vez, limpe cuidadosamente a caçarola para
frituras e a tampa de vidro.
Não use detergentes agressivos, escovas com fios de metal ou náilon ou objetos
pontudos tais como facas ou espátulas para limpar o aparelho.
Evite danificar a cobertura antiaderente.
Sempre seque o aparelho completamente depois de limpá-lo.
MONTAGEM DA TAMPA DE VIFRO
Atarraxe e monte o puxador de plástico na tampa de
vidro.
Page 17

17
AO CONECTAR A PANELA
Conecte a sonda à entrada de energia da caçarola
para frituras.
Certifique-se de que a sonda esteja apropriadamente
conectada.
Se a sonda não estiver completamente inserida, poderá
haver um aquecimento anormal, resultando num acidente
ou em dano.
Ajuste o controle do termostato no nível "0" para esquentar.
PREPARANDO SUA COMIDA
Ligue a tomada na parede. Cuidado para não deixar cair a sonda de um lugar alto,
pois o tombo pode danificá-la.
Coloque um pouco de óleo de salada ou vegetal na panela com meio pote de água e
deixe ferver. Isso elimina quaisquer odores de fabricação.
Para o uso: selecione a temperatura exigida para o tipo de alimento escolhido. Vire o
controle do termostato no sentido horário para selecionar a quentura.
Leva aproximadamente de 5-10 minutos para esquentar.
A luz indicadora de energia apagará. Isso significa que a caçarola está na
temperatura certa para começar o processo de cozimento.
Quando a comida estiver pronta, lembre-se de colocar o aparelho na posição “Off”
ou “0”.
Dica geral: ajustes baixos são ideais para cozidos, guisados, vapor e outros tipos de
cozimento lento. Ajustes altos são usados para dourar, fritar e grelhar.
Se desejar preparar a comida no fogo lento, vire a temperatura para o ajuste mais
baixo.
Nunca ligue a caçarola sem comida ou líquido dentro.
USO DA TAMPA DE VIDRO
Use a tampa de vidro quando possível e para todos os tipos de alimentos. A tampa impede
o calor de escapar e reduz o tempo de cozimento, economizando tempo e dinheiro.
O puxador na tampa de vidro é projetado com ventilação para todos os lados. Isso permite a
condensação do vapor e da água e impede a formação de sujeira e de gordura nesta área
difícil. Será necessário desatarraxar e desmontar o puxador ocasionalmente para limpeza e
manutenção da higiene.
Page 18

18
NOTA:
A tampa de vidro tem ventilação pela qual o vapor quente sai!
Evite contato com o vapor.
A tampa pode ficar extremamente quente quando em uso, portanto, recomendamos o
uso de luvas protetoras, etc., sempre que possível e ao retirar a tampa para evitar
queimaduras.
Seguir algumas dicas gerais pode prolongar o tempo de vida útil da sua caçarola para
frituras:
1. Sempre lave a panela e cubra-a assim que possível após cada uso.
2. NÃO despeje água fria na panela quente.
3. Nunca raspe com utensílios duros ou pontudos ao limpar.
4. NÃO coloque a sonda de controle de temperatura na superfície da panela. Ela pode
arranhar ou estragar o acabamento antiaderente.
5. NÃO lave a panela com a sonda de controle de temperatura conectada.
6. Lave a caçarola para frituras após cada uso para evitar manchas causadas pelo
acúmulo de comida ou resíduos gordurosos. Nunca deixe a comida na panela de um
dia para o outro.
7. Segure o aparelho num ângulo de 45o., com o soquete virado para cima para laválo. Isso impedirá ou minimizará a possibilidade de entrar água no soquete.
DICAS DE CULINÁRIA
Os alimentos que desmancham quando muito cozidos podem ser tirados da
caçarola assim que estiverem prontos.
Tente secar carne, peixe, aves, etc., antes de colocá-los no óleo quente para impedir
que espirrem.
Não frite muita comida de uma só vez para que a temperatura do óleo não caia
dramaticamente.
RECEITAS
Importante: Os ajustes de temperatura das receitas são aproximados. Devido a diferenças
de gostos individuais, alguns alimentos podem ser mais ou menos crocante, mais ou menos
Page 19

19
cozido, especialmente no caso de carnes. Portanto, os ajustes de aquecimento devem ser
aumentados, diminuídos ou variados de acordo com a preferência individual.
ALMÔNDEGAS CHINESAS
500g da carne moída 5ml sal
250g repolho 15ml molho de soja
2 cebolas 30ml gordura vegetal ou óleo
1.5ml gengibre
MODO DE FAZER: Aqueça a caçarola a 150º.C. Coloque a carne, o repolho, as cebolas no
moedor ou num processador. Junte o gengibre, alho e molho de soja e acrescente a carne à
mistura. Misture bem. Modele bolas de 2.5 – 3 cm de diâmetro. Frite em gordura vegetal até
que estejam dourados em todos os lados.
COSTELINHAS DE PORCO COM PÁPRICA
4 a 6 costelas de porco Pimenta
Páprica 3ml sálvia
Sal 300ml leite
MODO DE FAZER: Aqueça a caçarola ajustando em 4 ou 5 (dependendo da preferência
pessoal). Salpique as costelinhas com páprica, sal, pimenta e sálvia. Unte a caçarola
levemente e doure as costelinhas em ambos os lados. Reduza a temperatura para 2 ou 3.
Acrescente leite gradualmente conforme necessário. Cubra e refogue até estarem no ponto.
FRANGO ASSADO COM BATATAS ASSADAS
1 x 1.5kg frango 60g manteiga
7ml ervas mistas secas 6 batatas medianas sem casca
3ml curcuma Sal e pimenta
1 cebola grande, em quatro Farinha
60ml óleo
MODO DE FAZER: Lave e seque o frango por dentro e por fora. Misture sal, pimenta, ervas
e curcuma e polvilhe sobre o frango. Coloque uma cebola dentro do frango e amarre as
pernas, aqueça o óleo e a manteiga na caçarola até 180º.C até que a manteiga comece a
espumar. Frite o frango até que fique todo douradinho. Abaixe a temperatura para mais ou
Page 20

20
menos 120º.C. Tampe e asse o frango por 1 hora, virando-o a cada 15 minutos. Tempere
as batatas e polvilhe com farinha. Acrescente as batatas à panela para fritar nos últimos 30
minutos. Asse-a com o frango, virando-as regularmente.
ENSOPADO SABOROSO DE CARNEIRO
750g de pá de carneiro 300ml água
cortados em pedaços de 2.5cm 5ml sal
30ml óleo 8 to 10 cebolas pequenas
1 x 300ml lata de extrato de 300ml ervilhas em lata
tomate
MODO DE FAZER: Aqueça a caçarola. Esquente o óleo e doure a carne. Retire o excesso
de gordura que acumula. Misture extrato de tomate, água e sal e coloque sobre a carne.
Acrescente as cebolas. Reduza a quentura. Cubra e cozinhe por 1 hora ou até que a carne
esteja macia. Coloque ervilhas pouco antes de servir e esquente de novo. Sirva quente,
direto da caçarola.
STROGANOFF
750g bife cortado em tirinhas 300ml creme azedo
Farinha, sal e pimenta 1lata de extrato de tomate
30ml gordura vegetal 15ml molho Worcestershire
150ml cebolas picadas 6 to 8 gotas de molho de Tabasco
1 dente de alho amassado 2.5ml sal
1 x 200g lata de cogumelos 1ml pimenta
MODO DE FAZER: Aqueça a caçarola a 180o.C. Polvilhe a carne com a farinha temperada.
Esquente a gordura vegetal e doure a carne. Acrescente cebolas, alho e cogumelos e
refogue-os ligeiramente. Reduza para 100º.C. Misture creme, extrato de tomate o molho de
Worcestershire e o tabasco, sal e pimenta e despeje sobre a carne. Tampe e refogue 1 ½
horas ou até que fique macia. Sirva sobre espaguete ou arroz. Polvilhe com queijo
parmesão.
OVOS MEXIDOS
6 ovos ligeiramente batidos 100ml creme ou leite
Sal e pimenta 30ml manteiga
Page 21

21
MODO DE FAZER: Esquente a panela. Misture os ovos, sal, pimenta e leite. Derreta a
manteiga na panela e acrescente os ovos. Mexa os ovos até ficarem firmes. Sirva-os
quando firmes, mas não secos.
Variações:
• Com curry – Coloque de 5 a 10ml curry em pó
• Carne seca – Coloque 230ml tiras de carne seca
• Presunto ou Bacon – Acrescente presunto ou bacon sauté
• Cebolas e cebolinhas – Acrescente cebola e cebolinhas picadas
• Cebolinha-capim – Acrescente a cebolinha picada
• Cogumelos – Acrescente fatias de cogumelos enlatados ou frescos
LIMPEZA E MANUTENÇÃO
Desconecte o plugue da parede e retire a sonda junto com o fio da entrada de
energia do aparelho.
Espere o aparelho esfriar.
Limpe a caçarola enquanto ainda quente depois do uso. Esfregue a caçarola com
água morna ensaboada usando uma esponja ou um pano de parto somente. O
detergente normal de lavar louças deve ser o suficiente. Para sujeira agarrada,
depois da panela esfriar, lave a panela com uma esponja macia umedecida num
pouco de detergente de cozinha não abrasivo.
Use uma esponja não abrasiva ou um pano úmido para limpar o exterior da panela.
Seque a panela cabalmente para remover resíduos de sabão.
Sempre desconecte a panela e permita que ela esfrie antes de começar a limpá-la.
Não use alvejante, solventes, limpadores abrasivos ou esponjas de aço para limpar
o aparelho, pois podem danificar o acabamento.
Se for necessário limpar a sonda de controle, esfregue-a com um pano úmido. Não
coloque a sonda ou o fio no lava-louças.
Nunca mergulhe o fio, o plugue ou a sonda em quaisquer líquidos.
Não deixe a caçarola para frituras de molho na água.
A sonda deve ser retirada antes de limpar o aparelho.
A entrada de energia deve estar seca antes de usar o aparelho de novo.
Este aparelho é para uso doméstico apenas e não pode ser consertado pelo usuário.
Não abra ou mude as peças você mesmo. Leve o aparelho a um departamento de
serviços elétricos qualificado ou devolva ao fornecedor se for necessário algum
conserto.
Page 22

22
Deixe as peças secarem completamente antes de montá-las.
AO GUARDAR O APARELHO
Desconecte a panela da tomada na parede e limpe todas as peças como instruído
acima. Certifique-se de todas as peças estejam secas antes de guardar.
Guarde o aparelho na sua caixa ou num lugar limpo e seco.
Nunca guarde o aparelho enquanto ele estiver molhado ou sujo.
Nunca enrole o fio em volta do aparelho.
CONSERTO DO APARELHO
Não existem peças que possam ser consertadas pelo usuário neste aparelho. Se a panela
não estiver funcionando corretamente, verifique o seguinte:
Se você seguiu as instruções corretamente.
Se o aparelho foi instalado corretamente e se a tomada está ligada na parede.
Se o aparelho está ligado na energia /ON.
Se o plugue está firme na tomada.
Se o aparelho ainda assim não funcionar após a verificação acima:
- Consulte o varejista para conserto ou substituição. Se o varejista não puder resolver o
problema e você necessitar devolver o aparelho, certifique-se que:
O aparelho esteja cuidadosamente embalado na sua embalagem original.
O recibo de compra esteja anexado.
O motivo pelo qual o aparelho está sendo devolvido.
Se o fio estiver estragado, deverá ser substituído pelo fabricante ou pelo agente de serviço
autorizado a fim de evitar quaisquer danos. Se for necessário algum conserto dentro do
tempo da garantia, o aparelho deverá ser devolvido para um centro de serviço do Tedelex
Trading (Pty) Limited. Consertos fora do período de garantia também estão disponíveis,
mas serão cobrados.
SUBSTITUIÇÃO DA FICHA
Cumpra com as instruções seguintes caso seja necessário substituir a ficha.
Page 23

23
Esta unidade destina-se a operar apenas na corrente indicada. A ligação a outras
fontes de alimentação poderá danificar o aparelho. Ligue uma ficha de três pinos da
seguinte maneira:
Os fios neste terminal de alimentação estão coloridos de acordo com o seguinte código:
Verde/Amarelo = Terra
Azul = Neutro
Castanho = Vivo
Page 24

24
NO CASO DE RECLAMAÇÃO SOB GARANTIA, DEVE-SE TER ESTE RECIBO.
GARANTIA
1. Tedelex Trading (Pty) Limited (“Tedelex”) garante ao comprador original deste
produto (“o cliente”) que o produto está sem defeitos de qualidade e manufatura que
sob uso normal pessoal, familiar ou domiciliar e propósito pode manifestar dentro do
período de 1 (um) ano da data de compra (“período da garantia”).
2. Se o cliente tiver comprador um produto e ele quebrar, estiver com defeito ou não
funcionar adequadamente pelo período devido, o cliente deve notificar o fornecedor
de quem comprou o produto (‘’o fornecedor”) dentro do período de garantia.
Qualquer reclamação nos termos desta garantia devem ser acompanhadas pelo
recibo de compra. Se não possuir o recibo, então a cobrança do conserto, e/ou do
serviço deverá ser pago pelo cliente ao fornecedor.
3. O produto defeituoso deve ser levado ao centro de serviço do fornecedor
representante para ter direito à garantia.
4. O fornecedor reembolsará, consertará ou trocará o produto nos termos desta
garantia sujeita a requerimentos legislativos. Esta garantia será válida somente se o
cliente não tiver quebrado ele mesmo o produto, ou usado de modo inapropriado. A
garantia não inclui e não será usada para cobrir produtos danificados por causa de
desastre, mau uso, falsificação, abuso ou modificação não autorizada ou conserto
do produto.
5. Esta garantia somente será estendida ao produto fornecido na data da compra e não
valerá para nenhuma das extensões anexadas ou instaladas pelo cliente.
6. Se o cliente solicitar que o fornecedor conserte o produto e o produto quebrar ou não
funcionar apropriadamente dentro de 3 (três) meses do conserto e não devido ao
uso errado, falsificação ou modificação por ou da parte do cliente, então o
fornecedor pode substituir o produto ou reembolsar o cliente.
7. O cliente poderá ser responsabilizado por certos custos se os produtos devolvidos
não estiverem na embalagem original ou se a embalagem estiver danificada. Isso
será deduzido de qualquer reembolso pago ao cliente.
TEDELEX TRADING (PTY) LTD
JOANESBURGO N.º TEL. +2711 490-9600
CIDADE DO CABO N.º TEL. +2721 552-5161
DURBAN N.º TEL. +2731 792-6000
www.amap.co.za
www.russellhobbs.co.za
www.facebook.com/RussellHobbsSA
Page 25

25
Félicitations pour l'achat de notre poêlon électrique Russell Hobbs. Chaque unité est
produite pour garantir un maximum de sécurité et de fiabilité. Avant d'utiliser cet ustensile
pour la première fois, veuillez lire attentivement le manuel d'utilisation et le conserver pour
toute référence future.
CARACTERISTIQUES DU POÊLON ELECTRIQUE RUSSELL HOBBS
1500W
Réalisation en aluminium moulé sous pression
Poêlon de grande dimension 30cm x 38cm
Cuisson polyvalente : Rôtir, Griller, Cuire au four, Mijoter, Faire sauter à feu vif
Peur mijoter à feu doux ou cuire à une température de 220ºC
Couvercle en verre recuit avec évent
Thermostat réglable facile à lire avec 5 réglages de températures pour une cuisson
précise
Profondeur intérieure 8cm
Pratique pour servir à table - choisir le réglage «1» pour servir directement du poêlon
Revêtement super antiadhésif pour un nettoyage rapide et facile
Poignées résistantes à la chaleur et pieds antidérapants
Conception élégante et ergonomique
Témoin d'alimentation pour obtenir la parfaite température souhaitée
Réservé à l'usage domestique
CARACTERISTIQUES TECHNIQUES
Valeurs nominales de tension : 220-240V~Fréquence nominale : 50/60Hz Puissance
nominale : 1260-1500W
MESURES DE PROTECTION IMPORTANTES
Lorsqu'on utilise un appareil électrique, il est toujours important de suivre les consignes de
sécurité y compris ce qui suit :
1. Avant d'utiliser un appareil électrique lire attentivement les instructions.
2. S'assurer que le voltage indiqué sur l'étiquette corresponde au voltage de la maison.
3. Une utilisation incorrecte ou non appropriée peut endommager l'appareil et provoquer
des blessures à l'usager.
Page 26

26
4. Cet appareil est conçu uniquement pour l'utilisation domestique. L'utilisation à des fins
commerciales de cet appareil annule la garantie et le fournisseur ne pourra être tenu
responsable de tout dommage ou accident causé par l'appareil lorsque son usage
diffère de celui prévu.
5. Eviter tout contact avec les parties en mouvement.
6. Cet appareil ne doit pas être utilisé par des personnes (y compris les enfants) à
mobilité réduite, dont les capacités sensorielles ou mentales sont amoindries, ou
manquant de l'expérience ou des connaissances nécessaires, à moins qu'elles ne
soient sous la surveillance d'une personne responsable de leur sécurité ou qu'elle
aient reçu de cette dernière des instructions d'utilisation de l'appareil.
7. Les enfants devraient être toujours surveillés afin qu'ils ne jouent pas avec l'appareil.
8. Inspecter et brancher régulièrement le fil électrique pour vérifier qu'il ne soit pas
endommagé. Si le fil ou la prise sont endommagés, leur substitution sera faite par le
producteur ou par une personne qualifiée afin d'éviter tout risque d'accident
électrique.
9. Faites attention que l'appareil en fonction ne soit pas en contact avec rideau,
revêtements muraux, vêtements, torchons de cuisine ou autres matériels
inflammables. Lorsque vous travaillez sur des surfaces qui craignent la chaleur, il est
conseillé d'utiliser un tapis isolant. Lorsque l'unité est en fonction ne pas la déposer
sur des surfaces en plastique, en tissu ou sur du tapis.
10. L'appareil n'est pas conçu pour être utilisé avec un minuteur externe ou par un
système de commande à distance.
11. Ne pas toucher les surfaces chaudes, utiliser les poignées.
12. Soulever toujours le couvercle en l'éloignant du visage, la vapeur qui ressort pourrait
causer des brûlures ou des blessures.
13. Éloigner les mains, les bras, le visage, etc. des sources de vapeur lors de l'ouverture
du couvercle.
14. NE PAS positionner le produit près de matériaux inflammable.
15. Le poêlon a un revêtement non adhésif. Pour éviter de griffer ce revêtement
antiadhésif et pour assurer une durée de vie à votre poêlon électrique veillez à utiliser
uniquement des ustensiles en bois ou en plastique.
16. Les aliments ne devraient pas être gardées chaudes pendant plus de 4-6 heures pour
en garantir la fraîcheur.
17. Avant de nettoyer ou de ranger le poêlon électrique s'assurer qu'il soit complètement
froid.
18. Déplacer le poêlon contenant des liquides chauds avec une attention extrême. Il est
recommandé de ne pas déplacer l'unité lorsqu'elle est complètement pleine,
lorsqu'elle est en fonction ou avant qu'elle ne soit refroidie.
Page 27

27
19. Ne pas utiliser l'appareil s'il a été endommagé d'une manière quelconque ou en cas
de chute. En cas de dommage, faire examiner et/ou réparer l'unité par un agent
agréé.
20. Ne pas utiliser des agents abrasifs agressifs, des produits de nettoyage caustiques ou
des produits pour four.
21. Afin de réduire les risques d'électrocution, ne pas immerger ou exposer à l'eau ou à
tout autre liquide l'appareil, le fil ou la prise.
22. Ne pas immerger l'unité dans l'eau ou dans tout autre liquide pour la nettoyer.
23. L'unité ne peut pas être immergée dans l'eau complètement ou partiellement.
24. Utiliser uniquement le câble fourni par le producteur.
25. Avant de nettoyer l'appareil enlever le câble.
26. Avant d'utiliser à nouveau l'appareil, essuyer le point d'entrée de la prise
d'alimentation.
27. Pour enlever la prise la tenir fermement. Ne pas tirer le fil pour déconnecter l'appareil
de la prise de courant. Déconnecter l'unité lorsqu'elle n'est pas en fonction ou lors du
nettoyage ou du démontage.
28. L'utilisation d'accessoires qui ne sont pas recommandés ou fournis par le producteur
pourrait provoquer des accidents, des incendies ou des électrocutions.
29. Le fil fourni est court et amovible afin d'éviter tout risque de suffocation ou de blessure
suite au trébuchement sur un fil plus long.
30. Ne pas laisser le fil pendre d'une table ou d'un plan de travail. S'assurer que le fil ne
soit pas en une position où il pourrait être tiré par mégarde.
31. Ne pas laisser le fil en contact avec des surfaces chaudes et ne pas placer sur ou
près d'un réchaud au gaz ou électrique ou dans un four chaud.
32. Ne pas utiliser l'appareil sur une taque ou gaz ou près d'une flamme libre.
33. L'utilisation d'une rallonge électrique n'est pas recommandée. Cependant si
l'utilisation d'une rallonge s'avère nécessaire, s'assurer qu'elle soit adaptée à la
consommation de courant de l'appareil afin d'éviter tout risque de surchauffe de la
rallonge, de l'appareil ou de la prise. Ne pas placer la rallonge dans un endroit où elle
peut facilement être tirée par un enfant ou un animal ou où elle peut provoquer des
trébuchements.
34. Cet appareil ne convient pas à l'utilisation à l'extérieur. Uniquement pour usage
domestique. Ne pas utiliser cet appareil pour tout autre but sauf celui pour lequel il a
été conçu.
35. NE PAS transporter l'appareil en le soulevant par le fil d'alimentation.
36. Pendant l'utilisation ne pas laisser l'appareil sans surveillance. Débrancher toujours
l'appareil lorsqu'il n'est pas en fonction ou avant le nettoyage.
37. Poser toujours l'appareil sur une surface lisse, égale et stable. Ne pas placer l'unité
sur une surface chaude.
Page 28

28
38. Après chaque usage, s'assurer que le bouton soit en position « Off » ou « O ».
39. Le producteur n'est pas responsable de dommages ou accidents causés par une
utilisation incorrecte du produit ou suite à des réparations effectuées par un agent non
agréé.
40. En cas de problèmes techniques, éteindre la machine et ne pas essayer de la réparer
soi-même. Rapporter l'appareil à un agent agréé pour qu'il soit examiné, réglé ou
réparé. Insister pour que les pièces utilisées soient des originaux. Le manque de
respect de ces précautions et instructions pourrait compromettre le fonctionnement de
la machine.
SCHEMA DES ELEMENTS
A. Poignée du couvercle en verre
B. Couvercle en verre avec évacuation de la vapeur
C. Poêlon
D. Poignées isolées faciles à empoigner
E. Commande thermostat variable
F. Voyant lumineux
G. Sonde amovible
AVANT LA PREMIERE MISE EN FONCTION
Avant la première mise en fonction nettoyer soigneusement le poêlon et le couvercle.
Page 29

29
Ne pas utiliser d'agents corrosifs, de brosses en métal ou en nylon ou des objets
pointus comme des couteaux ou des spatules.
Évitez d'endommager le revêtement antiadhésif.
Après l'avoir nettoyée, sécher l'unité soigneusement.
ASSEMBLAGE DU COUVERCLE EN VERRE
Vissez et assemblées la poignée à évacuation en
plastique sur le couvercle en verre.
CONNEXION DE L'UNITE
Connectez le câble d'alimentation à la prise d'entrée sur
le poêlon.
Assurez-vous que le câble soit bien inséré.
Si le câble n'est pas convenablement inséré, il pourrait
se vérifier un réchauffement inhabituel qui pourrait causer
des accidents.
Régler le thermostat au niveau « 0 ».
PREPARATION DES ALIMENTS
Branchez l'unité à une prise électrique. Faites attention à ne pas faire tomber
le câble d'une surface haute puisque cela pourrait l'endommager.
Verser un peu d'huile végétale dans le poêlon
et le remplir à moitié d'eau et porter à ébullition. Ceci éliminera toutes
les odeurs de fabrication.
Pour l'utilisation : sélectionner la température voulue selon
le type d'aliment à cuire. Tourner le thermostat de commande en
sens horaire pour sélectionner la température de cuisson.
L'unité nécessite de 5 à 10 minutes pour arriver à température.
Le voyant lumineux va alors s'éteindre. Ceci veut dire que le poêlon est à la
température voulue et que le processus de cuisson peut commencer.
A la fin de la cuisson n'oubliez pas de remettre le bouton en position « Off » ou « 0 ».
En règle générale : les paramètres plus bas sont idéaux pour plats mijotés, ragoûts,
plats à la vapeur et autres plats à cuire à feu doux. Les paramètres plus élevés sont
indiqués pour brunir, frire et griller.
Si vous voulez faire mijoter les aliments réglez la température au minimum.
Ne pas allumer l'unité sans que dans le poêlon il y ait des aliments ou du liquide.
Page 30

30
UTILISATION DU COUVERCLE EN VERRE
Utilisez le couvercle chaque fois que cela est possible et avec tous les types d'aliments. Le
couvercle évite la perte de chaleur et réduit le temps de cuisson, en vous faisant économiser
du temps et de l'argent.
La poignée sur le couvercle de verre est conçue avec des trous d'évacuation tout autour.
Ceci permet la condensation de vapeur et d'eau en évitant ainsi des accumulation de saleté
et de graisse dans cette zone. Il sera parfois nécessaire de dévisser et de démonter la
poignée pour bien nettoyer cette partie.
NOTE :
Le couvercle en verre est doté d'un point d'évacuation qui fait sortir de la vapeur chaude!
Évitez tout contact avec la vapeur.
Pendant la cuisson le couvercle peut devenir très chaud, il est donc conseillé d'utiliser
des gants de four etc. lorsque vous enlevez le couvercle afin d'éviter des brûlures.
En suivant ces quelques conseils généraux vous pourrez prolonger la durée de votre
poêlon :
1. Laver le poêlon et le couvercle immédiatement après l'emploi.
2. NE PAS verser de l'eau froide dans un poêlon chaud.
3. Ne jamais gratter le fond avec des ustensiles pointus ou durs.
4. NE PAS mettre la sonde de commande de température sur la surface du poêlon,
cela risque de griffer ou d'endommager le revêtement antiadhésif.
5. NE PAS laver le poêlon lorsque la sonde de température est encore branchée.
6. Laver le poêlon après chaque usage pour éviter la formation de tâches après une
accumulation d'aliments ou des résidus de graisse. Ne jamais laisser des aliments
dans le poêlon pendant la nuit.
7. Pour laver l'unité la maintenir à un angle de 45° avec la prise vers le haut. Ceci évite
ou minimise la possibilité que l'eau entre dans la prise.
CONSEILS DE CUISSON
Les aliments qui sont très vite trop cuits doivent être enlevés du poêlon dès que leur
cuisson est terminée.
Page 31

31
Bien essuyer viande, poisson, volaille, etc. avant de les verser dans de l'huile chaude
afin de prévenir les éclaboussements.
Ne pas frire de grandes quantités d'aliments en une fois afin de prévenir la chute
drastique de température de l'huile.
RECETTES
Important : Les températures indiquées dans les recettes sont approximatives. Selon les
goûts de chacun certains aliments peuvent être préférés plus ou moins croquants, plus ou
moins cuits, surtout dans le cas des viandes. Il sera donc nécessaire d'ajuster, d'augmenter
ou de diminuer les températures selon les préférences individuelles.
BOULETTES CHINOISES
500g haché de bœuf 5ml sel
250g chou 15ml sauce de soja
2 ognons 30ml de graisse végétale ou d'huile de cuisson
1.5ml de gingembre
METHODE : Réchauffez préalablement le poêlon à une température de 150°C. Verser la
viande, le choux et les ognons dans un hachoir à viande pour une coupe grossière, ou
mettez les ingrédients dans un robot de cuisine. Mélangez le gingembre, le sel et la sauce
de soja et ajoutez-le au mélange de viande. Mélangez soigneusement. Formez des
boulettes de 2,5 - 3 cm de diamètre. Faites frire dans de la graisse végétale fondue en
faisant bien brunir de tous les côtés.
CÔTES DE PORC AU PAPRIKA
De 4 à 6 côtes de porc Poivre
Paprika 3ml de Sauge
Sel 300ml de Lait
METHODE : Réchauffez préalablement le poêlon au paramètre 4 ou 5 (selon les
préférences personnelles). Saupoudrez les côtes avec le paprika, le sel, le poivre et la
sauge. Graissez le poêlon légèrement et faites brunir les côtes des deux côtés. Réduire la
température à 2 ou 3. Ajoutez le lait lentement. Couvrez et laissez braiser jusqu'à cuisson.
Page 32

32
POULET RÔTI AVEC POMMES DE TERRES RÔTIES
1 poulet d'1.5kg 60g de beurre
7ml de fines herbes 6 pommes de terres moyennes pelées
3ml de curcuma Sel et poivre
1 grand ognon en quartiers Farine
60ml d'huile
METHODE : Lavez et séchez le poulet dehors et dedans. Mélangez le sel, les herbes et la
curcuma et saupoudrez le poulet. Mettez l'ognon dans le ventre du poulet et liez les pilons.
Réchauffez l'huile et le beurre dans le poêlon à 180°C jusqu'à ce que le beurre commence à
faire des bulles. Frire le poulet jusqu'à ce qu'il soit bien bruni. Baissez la température à
environ 120°C. Couvrir et rôtir le poulet pendant une heure en le tournant toutes les 15
minutes. Assaisonnez les pommes de terre et les saupoudrer de farine. Ajoutez les pommes
de terre au poêlon pendant les 30 dernières minutes de cuisson. Les faire rôtir avec le
poulet en les tournant régulièrement.
RAGOÛT D'AGNEAU SAVOUREUX
750g d'épaule d'agneau 300ml d'eau
en morceau de 2,5 cm 5ml de sel
30ml d'huile de cuisson 8 à 10 petits ognons entiers
1 boîte de 300ml 300ml de pois en conserve
de soupe de tomate condensée
METHODE : Préchauffez le poêlon. Chauffez l'huile de cuisson et faites brunir la viande.
Éliminez la graisse en excès au fur et à mesure. Mélangez la soupe de tomate, l'eau et le
sel et versez le mélange sur la viande. Ajoutez les ognons. Réduisez le feu. Couvrez et
laissez cuire pendant 1 heure ou jusqu'à ce que la viande soit tendre. Ajoutez les petits pois
avant de servir et réchauffez. Servez chaud dans le poêlon même.
BŒUF STROGANOFF
750g de steak de ronde coupé en lamelles 300ml crème fraîche sûre
Farine, sel et poivre 1 boîte de soupe de tomate
30ml de graisse végétale 15ml de sauce Worcestershire
150ml d'ognons émincés 6 à 8 gouttes de sauce Tabasco
1 gousse d'ail émincée 2.5ml de sel
1 boîte de 200g de champignons 1ml de poivre
Page 33

33
METHODE : Préchauffez le poêlon à 180°C. Passez la viande dans la farine assaisonnée.
Faites fondre la graisse végétale et faites brunir la viande. Ajoutez les ognons, l'ail et les
champignons et sautez légèrement. Réduisez la température à 100°C. Mélangez crème,
soupe de tomate, sauce Worcestershire, sauce Tabasco, sel et poivre et versez le tout sur la
viande. Couvrez et laisser braiser pendant 1 heure 1/2 ou jusqu'à ce que la viande soit
tendre. Servez chaud avec des spaghettis ou du riz. Saupoudrez avec du fromage
Parmesan.
ŒUFS BROUILLES
6 légèrement battus 100ml de crème fraîche ou de lait
Sel et poivre 30ml de beurre
METHODE : Préchauffez le poêlon. Mélangez les œufs, le sel, le poivre et le lait. Faites
fondre le beurre et ajoutez-y les œufs. Mélangez jusqu'à ce que leur consistance soit ferme.
Servez fermes mais pas secs.
Variations :
• Au curry – Ajoutez 5-10 ml de curry en poudre
• Au bœuf séché – Ajoutez 230ml de viande séchée en lamelles
• Au jambon ou au Lardons – Ajoutez des dès de jambons ou de lardon sautés
• A l'ognon et persil – Ajoutez de l'ognon et du persil hachés
• A la ciboulette – Ajoutez de la ciboulette hachée
• Au champignons – Ajoutez des champignons émincés en boîte ou frais
NETTOYAGE ET ENTRETIEN
Déconnecter la prise du mur et enlever la sonde avec le câble d'alimentation de
l'entrée de l'appareil.
Laissez refroidir l'unité.
Nettoyez le poêlon après l'usage lorsqu'il est encore chaud. Nettoyez le poêlon avec
de l'eau tiède savonneuse en utilisant uniquement une éponge ou un torchon. Le
liquide vaisselle ordinaire devrait suffire. Si l'unité est très sale, attendre qu'elle
refroidisse, laver avec une éponge humide et avec un détergent non abrasif.
Utilisez une éponge non abrasive ou un torchon humide pour nettoyer la partie
extérieure du poêlon.
Passez un torchon partout pour éliminer tout résidu de savon.
Avant de commencer à nettoyer le poêlon toujours débrancher et laisser refroidir.
Page 34

34
Ne pas utiliser eau de javel, solvants, détergent abrasifs ou éponges à récurer pour
nettoyer l'appareil, ces produits pourraient endommager la finition.
S'il s'avère nécessaire de nettoyer la sonde de commande passer un torchon
humide. Ne pas mettre la sonde ou le câble d'alimentation dans le lave-vaisselle.
Ne pas immerger le câble, la prise ou la sonde dans des liquides.
Ne pas tremper le poêlon dans l'eau.
Avant de nettoyer l'appareil enlever la sonde.
Avant d'utiliser à nouveau l'appareil, essuyer le point d'entrée de la prise
d'alimentation.
Cet appareil est destiné uniquement à un usage domestique et son entretien ne peut
être effectué par l'usager.
Ne pas ouvrir ni remplacer des pièces soi-même. Si un entretien s'avérait
nécessaire, s'adresser à un service électrique qualifié ou rapporter l'appareil au
fournisseur.
Avant de réassembler l'unité assurez-vous que toutes les parties soient bien sèches.
RANGEMENT DE L'APPAREIL
Débrancher l'appareil de la prise de courant et nettoyer tous les éléments suivant les
indications plus haut. Avant de ranger l'appareil s'assurer que toutes ses parties
soient bien sèches.
Ranger l'appareil dans sa boîte ou dans un endroit propre et sec.
Ne jamais ranger l'appareil quand il est encore mouillé ou sale.
Ne jamais enrouler le câble d'alimentation autour de l'appareil.
ENTRETIEN DE L'APPAREIL
Aucun élément de cet appareil ne peut être entretenu par l'usager. Si l'unité ne fonctionne
pas correctement vérifier ce qui suit :
Les instructions ont été suivies correctement
L'unité a été branchée correctement et la prise de courant est bien allumée.
L'alimentation générale de courant est ALLUMEE.
La prise est bien insérée.
Si l'appareil ne marche toujours pas après ces vérifications :
- Consulter le revendeur pour qu'il répare ou remplace l'appareil. Si le revendeur ne parvient
pas à résoudre le problème et le retour de l'appareil s'avère nécessaire, s'assurer que :
L'unité soit emballée avec soin dans son emballage d'origine.
Page 35

35
La preuve d'achat soit jointe.
Il y ait une explication des raisons du retour.
Si le câble d'alimentation est endommagé il doit être remplacé par le producteur ou par un
agent agréé afin d'éviter tout accident. Si pendant la période couverte par la garantie il est
nécessaire d'effectuer un entretien, l'appareil devrait être apporté chez un centre d'entretien
approuvé par Tedelex Trading (Pty) Limited. En dehors de la période couverte par la
garantie il est possible d'effectuer les entretiens mais au frais du client.
LE CHANGEMENT DE LA PRISE
Si la prise intégrée devait être change, suivez les instructions ci-dessous.
Cette unité est conçue pour fonctionner uniquement sur un courant continu de 230V-
240V. La connexion à d’autres sources d’alimentation pourrait endommager
l’appareil. Connecter la prise à trois chiffes de la manière suivante :
Les fils de ce réseau sont colorés selon le code suivant :
Vert/jaune = Terre
Bleu = Neutre
Marron = Actif
Page 36

36
DANS LE CAS D'UTILISATION DE LA GARANTIE CE RECU DOIT ÊTRE FOURNI.
G A R A N T I E
1. Tedelex Trading (Pty) Limited ("Tedelex") garantit à l'acheteur original de ce produit ("le
client") que ce produit n'a aucun défaut de qualité et de manufacture qui pourrait apparaître
en 1 (un) an d'utilisation ordinaire, personnelle, familiale ou domestique du produit, à partir
de la date d'achat ("période de garantie").
2. Si le client a acheté un produit et ce dernier se casse, est défectueux ou ne fonctionne pas
correctement par rapport à son usage prévu, le client doit le communiquer au fournisseur
aurpès duquel il a effectué son achat ("le fournisseur") dans les délais imposés par la
période de garantie. Toute déclaration selon les termes de la garantie doit être supportée
par la preuve d'achat. Si cette preuve n'est pas disponible, la réparation et/ou les frais
d'entretien seront à charge du client et payable au fournisseur.
3. Le produit défectueux doit être remis au centre d'entretien du fournisseur afin de pouvoir
utiliser la garantie.
4. Le fournisseur va rembourser, réparer ou échanger le produit selon les termes de la
garantie assujettie aux provisions de loi. Cette garantie est valable uniquement si le client
n'a pas cassé le produit lui-même ou n'a pas utilisé le produit à des fins non prévues. Cette
garantie n'inclut pas et ne couvrira pas les dommages provoqués par des calamités,
mauvaise utilisation, manipulation, abus ou modification non autorisée ou réparation du
produit.
5. Cette garantie s'applique uniquement au produit fourni à la date d'achat et pas aux matériels
consommables joints ou installés par le client.
6. Si le client demande au fournisseur de réparer le produit et le produit se casse ou ne
fonctionne pas correctement endeans les 3 (trois) mois de la réparation sans pour autant
avoir fait l'objet d'une mauvaise utilisation, de manipulation ou de modification par ou pour
compte du client, alors le fournisseur pourra remplacer le produit ou rembourser le client.
7. Le client pourra devoir prendre en charge certains coûts lorsque les produits retournés ne
sont pas dans leur emballage d'origine, ou si l'emballage est endommagé. Ceci sera déduit
de tout remboursement fait au client.
TEDELEX TRADING (PTY) LTD
www.amap.co.za
011 490-9600 (Jhb)
031 792-6000 (Dbn)
021 552-5161 (CT)
www.amap.co.za
www.russellhobbs.co.za
www.facebook.com/RussellHobbsSA
 Loading...