

Page 1
Single Cavity Electric Cooker
Instruction Manual
Model number: RHEC1
For Customer Services & Spare Parts please call 0845 208 8750
Opening times: Monday - Friday 8am – 6pm & Saturday 9am – 1pm or visit
us at www.productcareuk.com
Page 2

Contents
Safety Instructions
Before using the appliance
Installation
How to use
Maintenance
Trouble shooting
Transportation
Specification
Spare parts
…………………………………………………………………… 3 - 4
…………………………………………………………………… 5 - 6
…………………………………………………………………… 7 - 10
…………………………………………………………………… 11 - 18
…………………………………………………………………… 19
…………………………………………………………………… 20
…………………………………………………………………… 21
…………………………………………………………………… 22
…………………………………………………………………… 23
Opening times: Monday - Friday 8am – 6pm & Saturday 9am – 1pm or visit us at
For Customer Services & Spare Parts please call 0845 208 8750
www.productcareuk.com
Page 3

Safety Instructions
• Please comply with these instructions. If you do not, any damage resulting from
improper, incorrect or negligent use or improper connection or installation is not
covered by the manufacturer’s guarantee.
• Electric oven and hobs must be connected to an electrical cooker powerpoint - consult
a qualified electrician. Products must be installed in accordance with the
manufacturer's safety recommendations.
• This appliance must only be used for the purpose of heating or cooking food, any other
use, for example heating rooms, working surface or storage surface is dangerous and
will void the manufacturer’s guarantee.
• Additions or modifications to the appliance are not permitted.
• Do not place or store flammable liquids, highly inflammable materials or fusible objects
on or near the appliance.
• Small children must be kept away from the appliance.
• The electrical safety of this cooker is guaranteed only if it is connected to a properly
earthed system, which complies with the electrical safety standards.
• Before changing the oven’s lamp, disconnect the appliance from the power supply.
• Do not put pressure on the power supply cable while fitting the cooker.
• Power supply cable length should not exceed 2m for isolation safety.
• If the power supply cord is damaged, it must be replaced by the manufacturer, it’s
service agent or similar qualified persons in order to avoid damage.
• Repairs to the appliance must only be carried out by authorised service personal.
• Make sure all the packaging has been removed before you use the appliance.
• Cables from electrical appliances must not touch the hot surface of the appliance or hot
cookware.
• Be careful when using small household appliances, such as irons, near the elements.
• Do not use the hotplates with empty cookware or without cookware.
• Make sure all the controls are in the off position when not in use.
• Some parts of the appliance may hold heat for a long time, you are required to wait for
it cool before touching or cleaning any areas are exposed to the heat directly.
• For cleaning, the appliance must be switched off and cooled down.
• For safety reasons, the cleaning of the appliance with steam jet or high pressure
cleaning equipment is not permitted.
• During use the appliance will get hot, you must take care not to touch the elements
inside the oven cavity
• During grill mode the oven door should be closed.
For Customer Services & Spare Parts please call 0845 208 8750
Opening times: Monday - Friday 8am – 6pm & Saturday 9am – 1pm or visit us at
www.productcareuk.com
3
Page 4
Safety Instructions
• Use only stable flat-based pans.
• This appliance is not intended for use by persons (including children) with reduced
physical, sensory or mental capabilities, or lack of experience and knowledge, unless
they have been given supervision or instruction concerning use of the appliance by a
person responsible for their safety.
• Children should be supervised to ensure that they do not play with the appliance.
• If the supply cord is damaged, it must be replaced by the manufacturer, its service agent
or similarly qualified persons in order to avoid a hazard.
• Do not use harsh abrasive cleaners or sharp metal scrapers to clean the oven door glass
or oven cavity as they can scratch the surface which may result in scratches or shattering
of the glass.
WARNING:
In order to avoid a hazard due to inadvertent resetting of the thermal cut out. This
appliance must not be supplied through an external device, such as a timer, or connected
to a circuit that is frequently switched on and off.
WARNING:
Accessible parts may become hot during use. Young children should be kept away.
Important note
Electric oven and hobs must be connected to an electrical cooker powerpoint - consult a
qualified electrician. Products must be installed in accordance with the manufacturer's
safety recommendations.
For Customer Services & Spare Parts please call 0845 208 8750
Opening times: Monday - Friday 8am – 6pm & Saturday 9am – 1pm or visit us at
www.productcareuk.com
4
Page 5
Before using the appliance
• Electric oven and hobs must be connected to an electrical cooker powerpoint - consult
a qualified electrician. Products must be installed in accordance with the
manufacturer's safety recommendations.
• This appliance must only be used for its intended purpose, domestic cooking. Any
other form of usage is to be considered as inappropriate, dangerous and will void the
manufacturer’s guarantee
• The manufacturer declines all responsibility in the event of damage caused by
improper or incorrect use or installation of the appliance.
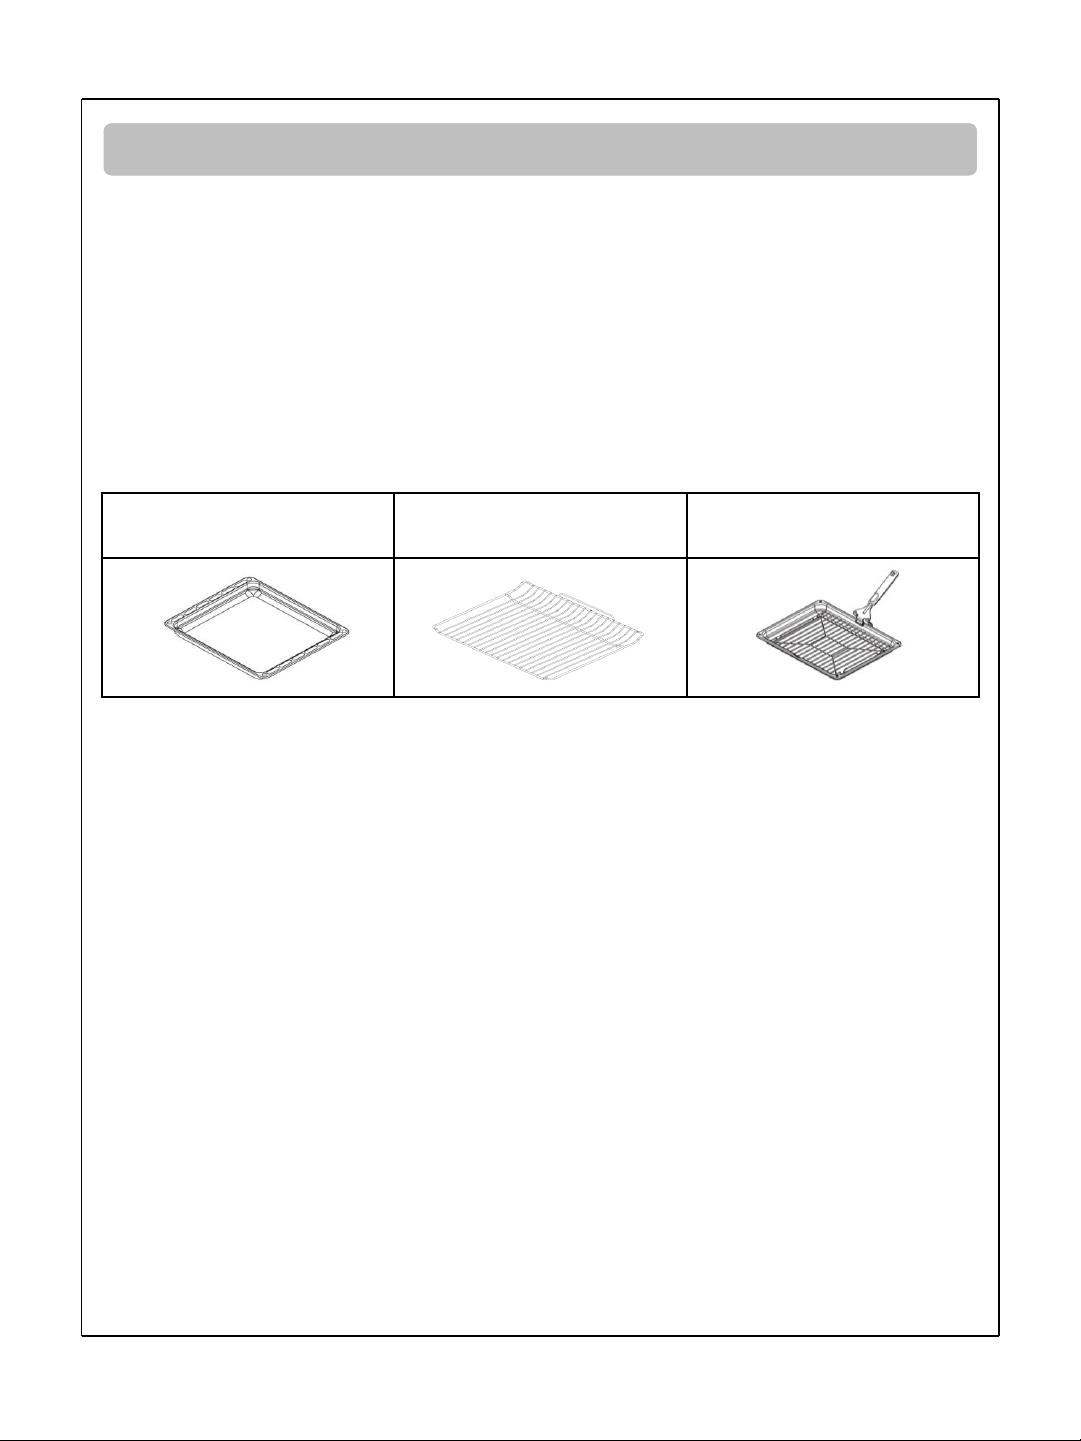
• Before installation, check that all parts listed below are present. If any parts are
missing, please contact the product care service team on 0845 208 8750.
Oven tray Wire grid Grill pan & handle set
For Customer Services & Spare Parts please call 0845 208 8750
Opening times: Monday - Friday 8am – 6pm & Saturday 9am – 1pm or visit us at
www.productcareuk.com
5
Page 6
Before using the appliance
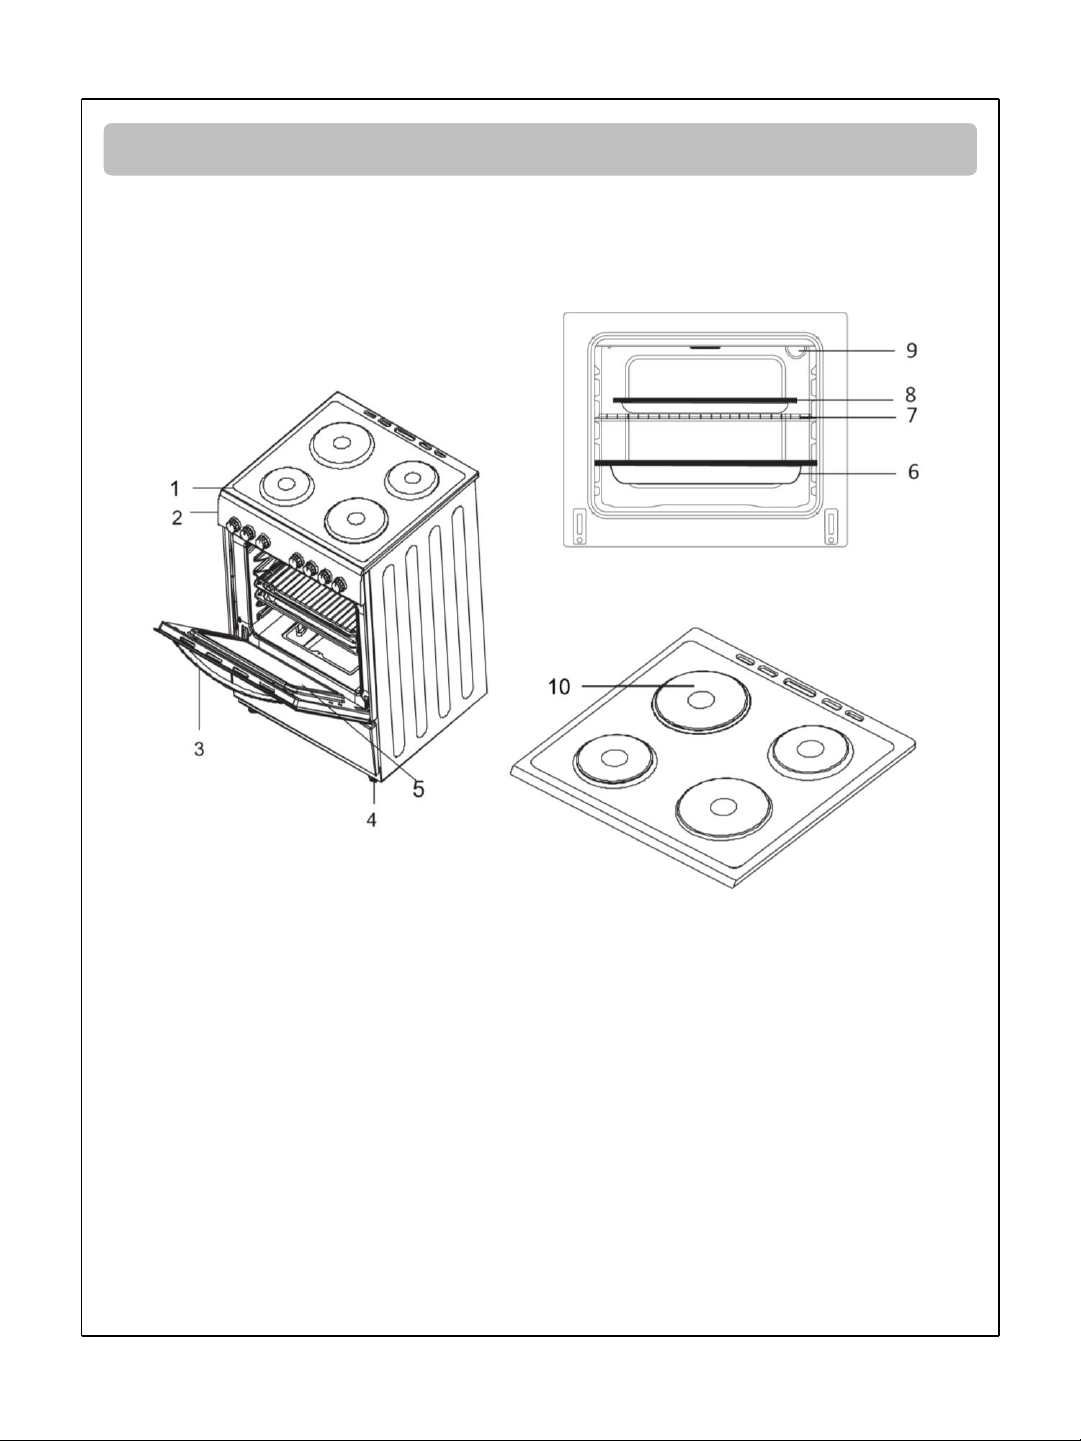
Note
The drawings in the book may vary from your cooker model. They are designed to show
the different features of all models covered by this book. Your model may not include all
features.
List of components
1. Cooker top
2. Control panel
3. Oven door handle
4. Adjustable feet
5. Oven door
6. Oven tray
7. Wire grid
8. Grill pan & handle set
9. Oven lamp
10. Hotplate
Opening times: Monday - Friday 8am – 6pm & Saturday 9am – 1pm or visit us at
For Customer Services & Spare Parts please call 0845 208 8750
www.productcareuk.com
6
Page 7
Installation
Electric oven and hobs must be connected to an electrical cooker powerpoint - consult a
qualified electrician. Products must be installed in accordance with the manufacturer's
safety recommendations, in accordance to the instructions in this guide and in
compliance with the current regulations. Failure to do so will void the manufacturer’s
guarantee.
• Before connecting your appliance to the mains at home, make sure to check the
conformity of the voltage settings. These are specified on the information sticker
attached to the appliance and/or packaging, with the usage conditions.
• The laws, ordinances, directives and standards in force in the country of use are to be
followed (safety regulations, proper recycling in accordance with the regulations, etc.)
• After removing the packaging material from the appliance and its accessories, ensure
that the hob is not damaged. If you suspect any damage, do not use the appliance and
contact an authorised service personal, qualified electrician or Product Care, (0845 208
8750), immediately.
Environment where the appliance is to be installed
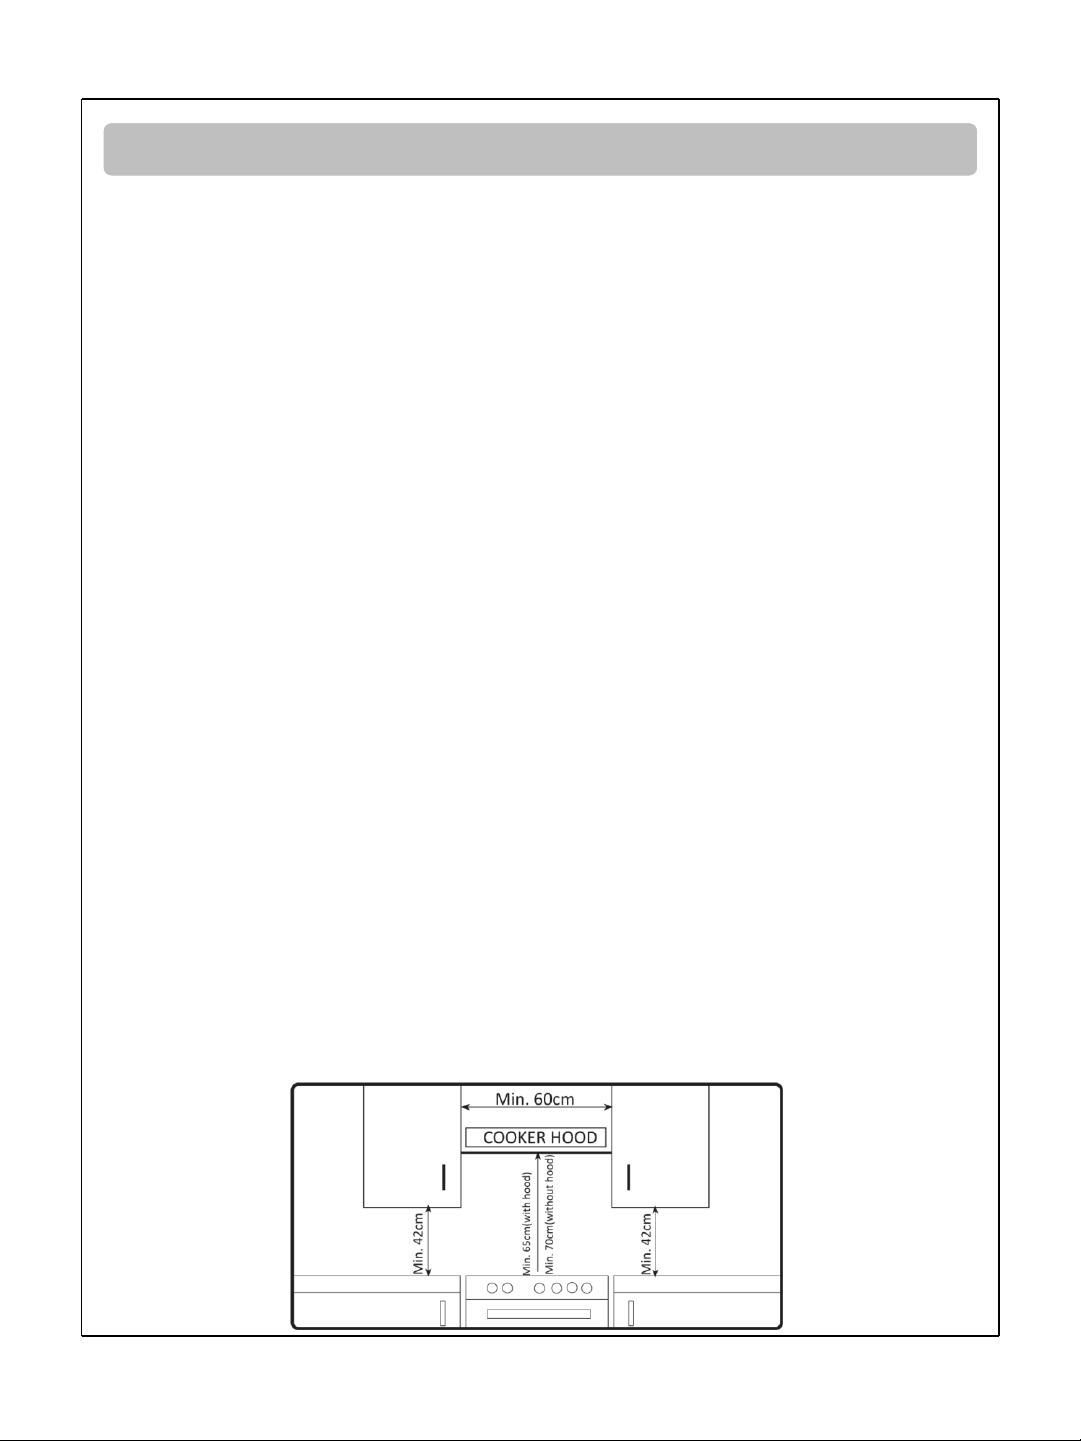
To install the cooker correctly, the following precautions must be taken:
• The appliance can be installed directly next to kitchen/furniture units/cabinets that are
not higher or taller than the top of the cooker’s hob.
• If the Kitchen units/cabinets that will be next to the cooker are higher or taller than the
cooker, then they must be at least 200mm from edge of cooker’s hob.
• If a cooker hood is installed above the cooker, it must be a minimum distance of 650mm
above the top of the cooker. The hood itself must be installed in accordance to the
instructions/requirements of the cooker hood.
• Wall cabinets that are adjacent to a cooker hood must be a minimum distance of
420mm from the cooker’s hob.
• If the cooker is installed beneath a wall cabinet, then the wall cabinet must be at least a
minimum distance of 700mm away from the cooker’s hob.
• The cut-out or space required for the cooker is shown in the below image.
7
Page 8

Installation
The distance between the rear edge of the hob and any adjacent wall is dependent on the
wall surface.
The cooker must not be placed next to or near a refrigerator.
Easily combustible material like curtains, paper, clothes, etc. should not be located near the
hob.
Kitchen cabinets/units or other furniture that is close/near to the cooker must be heat
resistant to more than 50°C.
The appliance must be installed direct on the floor and not on a base.
Installation of the appliance
• The earth cable must connected to the terminal.
• You must ensure the insulated cable is connected to the power source during the
connection of the cable. If there isn’t an appropriate earthed electrical outlet, (in
accordance with the regulations of where the appliance is being installed), immediately
contact a qualified professional.
• The earthed electrical outlet must be close to the appliance, (an extension cannot be
used).
• The power cable must not touch any hot surface of the product. It must not touch the
back part of the appliance or it could be damaged, this may cause the product to short
circuit and stop working.
• If the power cable is damaged, do not use the appliance and contact an authorised
service personal, qualified electrician or Product Care, (0845 208 8750), immediately.
• The wrong electric connection may damage your appliance and such damage is not
cover by the manufacturer and will void the guarantee.
• The appliance is rated as 230-240 volts.
• The manufacturer bears no responsibility or liability for damages or losses caused from
incorrect installation of the appliance.
• The appliance has been produced for a fixed connection to the power supply.
• For a fixed connection use H05VV, H05V2V2 or H05RR type supply cord.
• For a fixed connection use 3x2,5mm2 or 3x4mm2 sized cable according to appliance
power and terminal box label.
For Customer Services & Spare Parts please call 0845 208 8750
Opening times: Monday - Friday 8am – 6pm & Saturday 9am – 1pm or visit us at
www.productcareuk.com
8
Page 9

Installation
Adjustment of the feet
• The cooker must be switched off before the feet are adjusted or the product moved.
• The product has 4 adjustable feet
• When the product is placed where it is to be used, check if the product is balanced. If it
isn’t, you can adjust any of the feet by turning them clockwise.
• It is possible to raise the appliance by a maximum of 300mm by the adjustable feet.
• If the feet are adjusted do not move the appliance by dragging it. It must be moved by it
being lifted by 2 or more persons.
General warnings and measures
• Your appliance is produced in accordance with the related security, regulation and
standards associated with the appliance.
• The maintenance and repair must be carried out by a qualified electrician or
professional. If they are not then the manufacturer’s guarantee will be made void and
the appliance could become unsafe.
• The outside surfaces of the appliance will heat up while it is in operation.
• The outside surfaces of the appliance will hold some heat even after the appliance has
been turned off – do not touch any hot surface and keep children away from the
appliance.
• The interior surfaces of the oven will heat up and will hold the heat even after the
appliance has been turned off - – do not touch any hot surface and keep children away
from the appliance.
• The cooker should not be left unattended while cooking solid or liquid oils. The may
catch fire when heated to very high temperatures.
For Customer Services & Spare Parts please call 0845 208 8750
Opening times: Monday - Friday 8am – 6pm & Saturday 9am – 1pm or visit us at
www.productcareuk.com
9
Page 10

Installation
• Never pour water on the flames of a fire that has been started from any oils, cover the
cookware with its lid or cover to choke the fire. Turn off the cooker and contact the
emergency services immediately.
• The cooker’s clock must be set and the oven and temperature dials must be adjusted
otherwise the oven does not operate.
• Do not leave anything on the oven door when it is open or the appliance may become
unbalanced. The door may also break.
• Unplug or switch of the appliance when it is not in use for long periods of time.
• Unplug or switch of the appliance before cleaning it.
• Protect your appliance against atmospheric conditions – do not leave it to the affects of
the sun, rain, snow, etc.
For Customer Services & Spare Parts please call 0845 208 8750
Opening times: Monday - Friday 8am – 6pm & Saturday 9am – 1pm or visit us at
www.productcareuk.com
10
Page 11

How to use
Control panel
Hotplates
Each hotplate dial has 6 heat levels:
0 Off
1 Keep warm
2 & 3 Low heat
4,5 & 6 Cooking, roasting & boiling
To turn on a required hotplate turn the appropriate dial in a clockwise direction to the
necessary heating level. To turn off a required cooking zone turn the appropriate dial in an
anti-clockwise direction to the 0 mark.
Important note
The surface of the hotplate(s) will still be hot/warm even when it has been turned off
and will be for some time after.
For Customer Services & Spare Parts please call 0845 208 8750
Opening times: Monday - Friday 8am – 6pm & Saturday 9am – 1pm or visit us at
www.productcareuk.com
11
Page 12
How to use
The top part of the hotplates are coated/covered by a protective heat resistant material.
Turn the dial(s) of a hotplate or hotplates to 3 and leave on for 5 minutes in order to burn
off an toughen the protective layer before using with cookware.
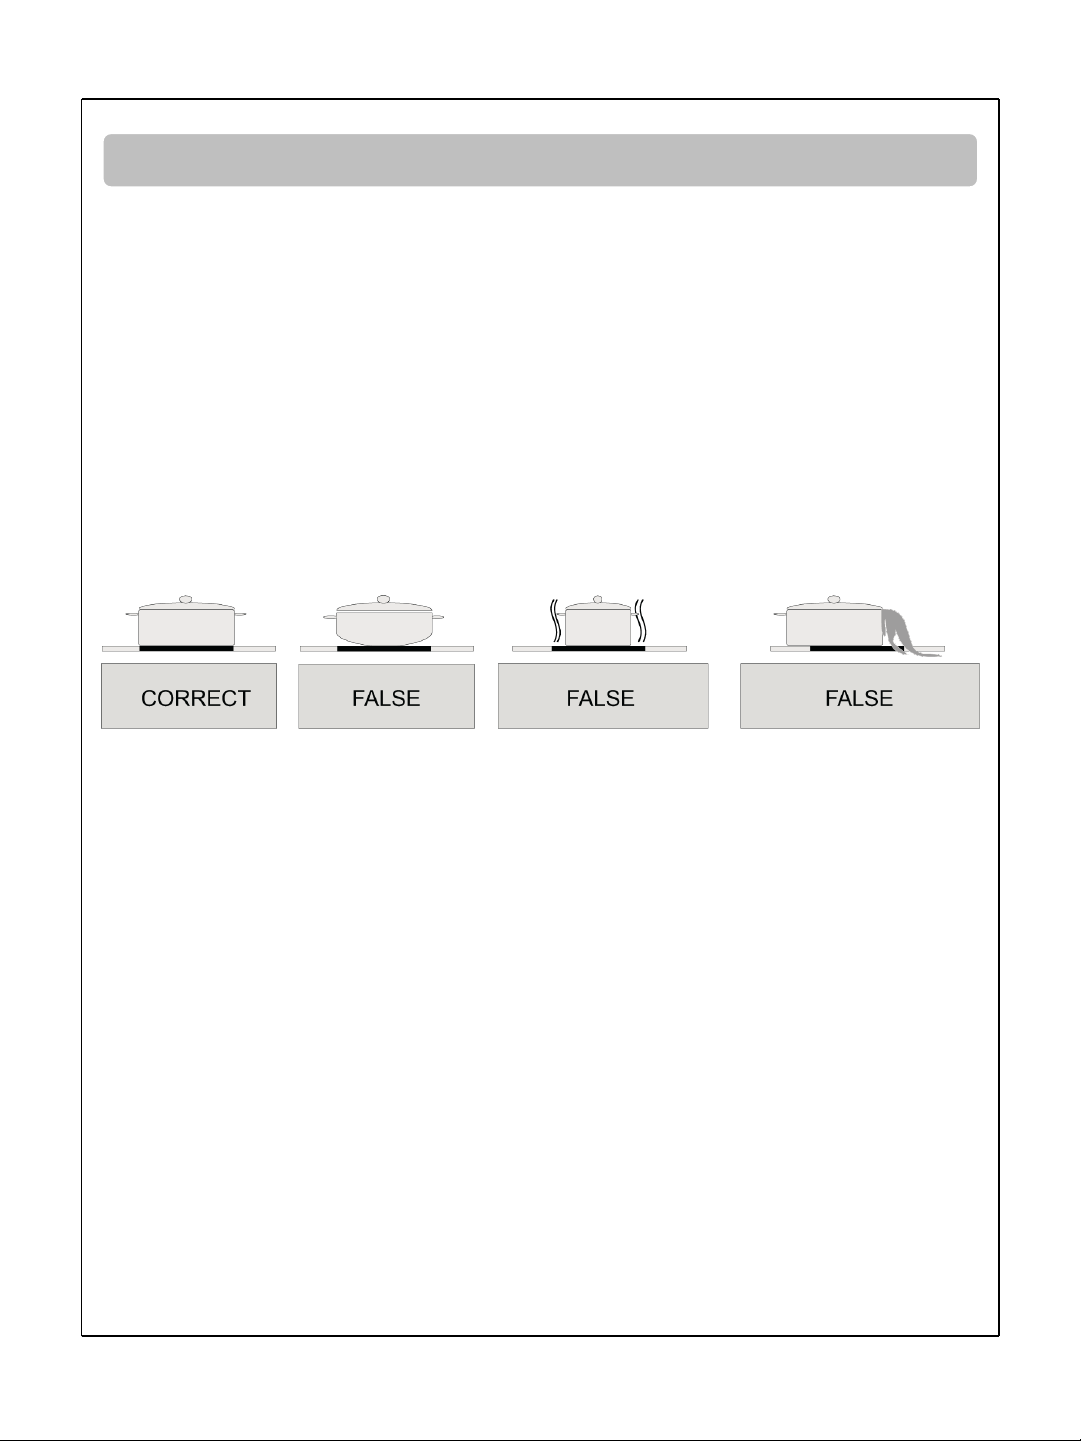
• Cookware with rough bottoms should not be used since these can scratch the ceramic
glass surface. The bottom of the good cookware should be as thick and as flat as
possible.
• Before using any cookware with hob, make sure that the bottoms of the cookware are
clean and dry.
• Always place the cookware on the cooking zone before it is switched on. If possible,
always place the lids on the cookware, (this will ensure energy is not wasted).
• The bottom of cookware must not be smaller or larger than the cooking zones, they
should of the correct size as indicated below, (this will ensure energy is not wasted).
• You must ensure that when you have finished using the hotplates that they are turned
off, (in the 0 position).
Important note
The surface of the hotplate(s) will still be hot/warm even when it has been turned off
and will be for some time after
For Customer Services & Spare Parts please call 0845 208 8750
Opening times: Monday - Friday 8am – 6pm & Saturday 9am – 1pm or visit us at
www.productcareuk.com
12
Page 13

How to use
Oven & Grill
Oven & Grill function switch
This switch allows you to select oven and grill functions. The explanation of each function
is detailed below and detailed instructions of each function on the following pages:
Important note
The oven can not be operated when the timer is in the ‘0’ position and no temperature is
selected on the thermostat dial.
Important note
You have to adjust the thermostat switch to get the required temperature for cooking, as
well as having to adjust the timer dial to the required time or the ‘M’ position, (the oven
can be used continuously when the timer dial is in the ‘M’ position).
Oven lamp will start operating
Oven’s upper and lower heating elements start operating
Oven’s lower heating element start operating
Oven’s upper heating element start operating
Oven’s grill heating element start operating
Oven’s upper heating element and the grill heating elements start operating
13
Page 14

How to use
Important note
The oven can not be operated when the timer is in the ‘0’ position and no temperature is
selected on the thermostat dial.
Important note
With all the below functions you have to adjust the thermostat switch to get the
required temperature for cooking, as well as having to adjust the timer dial to the
required time or the ‘M’ position, (the oven can be used continuously when the timer
dial is in the ‘M’ position).
Upper and lower heating element function (static cooking)
This function is defined as the traditional method of cooking, the heat is spread
equally from the lower and upper heating elements in the oven. This ensures
that the top and bottom of the oven is heated equally so food is cooked evenly.
It is recommended to pre-heat the oven for 10 minutes before putting your in it,
as this enables the oven to be reach the required temperature before the food is
put in. Once the oven is preheated put you food inside the oven and close the
door.
This function should be used to cook meats, lasagnes, pizzas, cakes, etc.
When your food is cooked, turn the oven and grill dial to the off position, along
with the temperature and timer dials. Remove the food from the oven, (use
appropriate heat resistant oven gloves), and put in a safe place. Leave the oven
door open to ensure that the oven completely cools down. As the oven will be
hot for a period of time after it has been switched off keep children away from
the oven.
Lower heating element function
The heat is spread from the lower heating element and this function should be
used for heating food instead of cooking it
Upper heating element function
The heat is spread from the upper heating element and this function should be
used for heat or grill the side of food that is already cooked. It can also be used to
heat food.
For Customer Services & Spare Parts please call 0845 208 8750
Opening times: Monday - Friday 8am – 6pm & Saturday 9am – 1pm or visit us at
www.productcareuk.com
14
Page 15

How to use
Grill function
This function is used to grill.
Pre-heat the grill for 5 minutes, then place the food on the grill pan and then
place this on the shelf at the highest level.
When your food is cooked, turn the oven and grill dial to the off position, along
with the temperature and timer dials. Remove the food from the oven, (use
appropriate heat resistant oven gloves), and put in a safe place. Leave the oven
door open to ensure that the oven completely cools down. As the oven will be
hot for a period of time after it has been switched off keep children away from
the oven.
Upper heating element and grill function
This function is used to grill rapidly.
Pre-heat the grill for 5 minutes, then place the food on the grill pan and then
place this on the shelf at the highest level.
When your food is cooked, turn the oven and grill dial to the off position, along
with the temperature and timer dials. Remove the food from the oven, (use
appropriate heat resistant oven gloves), and put in a safe place. Leave the oven
door open to ensure that the oven completely cools down. As the oven will be
hot for a period of time after it has been switched off keep children away from
the oven.
Important note
Maximum setting of the thermostat is 190°C
For Customer Services & Spare Parts please call 0845 208 8750
Opening times: Monday - Friday 8am – 6pm & Saturday 9am – 1pm or visit us at
www.productcareuk.com
15
Page 16

How to use
Mechanical timer
Manual operation - when timer dial is turned to the ‘M’ position, (illustrated in the picture
below), the oven can be used continuously when the timer dial is in the ‘M’ position). The
oven can never be operated when the timer is in the ‘0’ position and no temperature is
selected on the thermostat dial.
Operation with the timer set - turn the timer dial in a clockwise direction in order to set
the time between 0 – 100 minutes, (illustrated in the image below). When the adjusted
time ends, the oven is turned of and a warning sound is heard.
Energy saving
• The bottom of cookware should be as thick and as flat as possible.
• Choose cookware of the correct size.
• Using a lid with cookware will reduce cooking times.
• Minimise the amount of liquid or fat used to reduce cooking times.
• When liquid starts boiling, reduce the temperature setting.
• The oven should not be opened frequently during cooking.
For Customer Services & Spare Parts please call 0845 208 8750
Opening times: Monday - Friday 8am – 6pm & Saturday 9am – 1pm or visit us at
www.productcareuk.com
16
Page 17

How to use
for stews and
Oven accessories
Is to be used
roasts.
It can be located in any
rack
• To locate the wire grid correctly in the cavity, put it on any rack and push it to the end.
• The pan anti-tilting wire must be place on the inside/back of the cavity
Oven tray Wire grid Grill pan & handle set
Is to be used to place
different cookware's on it.
It can be located in any
rack.
For Customer Services & Spare Parts please call 0845 208 8750
Opening times: Monday - Friday 8am – 6pm & Saturday 9am – 1pm or visit us at
www.productcareuk.com
Is to be used for grilling.
It has a detachable handle
and you must ensure it is
centralised and secure
before lifting or removing
from the oven.
Do not leave the handle in
position while grilling as it
will become very hot.
17
Page 18

How to use
Accessories used in the oven
• You can use glass dishes, cake moulds, special oven trays and silicon bake ware that
adhere to the require standards and regulations appropriate to the country of use.
• All glass dishes, cake moulds, special oven trays and silicon bake ware that used with the
cooker must be placed in the middle of wire tray.
• Roasting dishes/trays can when used in the oven can change shape/form during
cooking, however the dish/tray will return to is original form when it has cooled. This is
normal occurrence during heat transfer.
• Do not put hot trays/dishes that are made from metal or glass in cold water or a cold
environment immediately after cooking. As the dish or tray could become warped and
the glass could shatter. They should be placed on a cooling rack or kitchen/dish cloth to
ensure they cool down slowly.
• If you use the grill function of the oven, it is recommended that you use the grill pan
that is supplied with the product. As the oils and fats that spatter and flow from the
food are collected and do not dirty the inside of the oven.
For Customer Services & Spare Parts please call 0845 208 8750
Opening times: Monday - Friday 8am – 6pm & Saturday 9am – 1pm or visit us at
www.productcareuk.com
18
Page 19

Maintenance
Hotplate cleaning
• Before cleaning the oven should be unplugged or turned off at the plug and cool.
• Wipe the hob with a suitable washing up liquid and a clean damp cloth.
• To dry the hob rub the appliance using a clean dry cloth.
• If aluminium foil or plastic items have accidentally melted on the hob surface, they
should be immediately removed from the hot cooking area with a scraper. This will
avoid any possible damage to the surface. This also applies to sugar or food containing
sugar that may have been spilt on the hob.
• If any other food or liquid has been spilt on the hob surface, remove the dirt when the
appliance has cooled down.
• Do not use a dishcloth or abrasive sponge to clean the hotplate/hob surface. These
materials may damage the surface.
• Do not use chemical detergents, sprays or stain removers on the hotplate/hob. These
materials may cause fire or hotplate/hob fade. Clean with water and washing up liquid.
Oven cleaning
• Before cleaning the oven should be unplugged or turned off at the plug and cool.
• Check whether the cleaning materials you are going to use are appropriate and
recommended by the manufacturer, as they may cause damage to the surfaces.
• Do not use caustic creams, abrasive cleaning powders, thick wire wool or hard tools.
• If any other food or liquid has been spilt on the oven surface, remove the dirt when the
appliance has cooled down.
• Wipe the oven with a suitable washing up liquid and a clean damp cloth.
• To dry the oven rub the appliance using a clean dry cloth.
Changing the oven lamp
The changing of the oven lamp must be done by an qualified electrician or professional.
The rating of the lamp should be 230V, 25Watt, Type E14, T300. Before changing the lamp
the oven should be unplugged or turned off at the plug and cool.
For Customer Services & Spare Parts please call 0845 208 8750
Opening times: Monday - Friday 8am – 6pm & Saturday 9am – 1pm or visit us at
www.productcareuk.com
19
Page 20

Trouble shooting
• Electric oven and hobs must be connected to an electrical cooker powerpoint - consult
a qualified electrician. Products must be installed in accordance with the
manufacturer's safety recommendations.
• All repairs must be carried out by an authorised service personal or a qualified
electrician.
• If the cooker does not operate – The cooker may be unplugged or switch off at the plug
socket or there has been a power failure and the fuse box/switch needs to be checked.
• If the oven does not heat – the temperature dial may not have been adjusted.
• If the interior light does not light – the bulb needs to be replaced.
• If the lower and upper heating elements do not cook equally – check the shelf locations,
the cooking time and the heat valves.
• If you still have any problem with your product, please call Product Care on 0845 208
8750 or a qualified electrician.
For Customer Services & Spare Parts please call 0845 208 8750
Opening times: Monday - Friday 8am – 6pm & Saturday 9am – 1pm or visit
us at www.productcareuk.com
20
Page 21

Transportation
• If you think you will need to transport the cooker at any point you must keep the
original packaging and only transport the product fully packaged.
• Follow the transport signs on the packaging and tape the loose cooker parts to the
surfaces of the cooker.
• Place paper between the upper cover and cooking panel, cover the upper cover and
then tape it to the side surfaces of the cooker.
• Tape cardboard or paper onto the front cover on the interior glass of the oven, as it
could be damaged by wire grill or trays during transportation.
• Tape the oven door to the side panels of the cooker.
• If you do not have the original packaging, prepare a cardboard box that fits over the
appliance to protect the external surfaces of the cooker during transportation.
For Customer Services & Spare Parts please call 0845 208 8750
Opening times: Monday - Friday 8am – 6pm & Saturday 9am – 1pm or visit
us at www.productcareuk.com
21
Page 22

Specification
Model RHEC1
Dimension (cm) (H)90.0 X (W)50.0 X (D)60.0
Hotplate features
Ø145mm hotplate (W) 1000
Ø180mm hotplate (W) 1500
Ø145mm rapid hotplate (W) 1500
Ø180mm rapid hotplate (W) 2000
Hotplate operation indicator light Standard
Oven features
Oven type Electric
Oven volume (without fan) (lt) 52.5
Cavity dimensions (without fan) (mm) (H)330 x (W)370 x (D)430
Oven light (25W) Yes
Easy to clean Enamel Standard
Electric oven functions 6
Top heating element (W) 1000
Bottom heating element (W) 1000
Thermostat Standard
Electric single grill (W) 1600
Electric double grill (W) 2600
Mechanical timer Yes
Oven tray 1
Grill pan & handle 1
Wire grid 1
Full outer glass & inner metal door (small glass) oven door Standard
Removable oven door Standard
Thermostat operation indicator light Standard
Oven operation indicator light Standard
Others
Maximum total power (depends on model) (kW) 8,6
Voltage (V) 230/ 400V 3N~
Energy consumption according to the EN50304 standards (depends on model) (kW) 0.79
Electric cooker energy rating A
RoHS compliance Standard
CE compliance Standard
Depth with door open (cm) 106
22
Page 23

Spare parts
or
or
or
or
or
Spare part Contact details
Oven tray Available at www.productcareuk.com
call 0845 208 8750
Wire grid Available at www.productcareuk.com
call 0845 208 8750
Grill pan & handle set Available at www.productcareuk.com
call 0845 208 8750
Dial Available at www.productcareuk.com
call 0845 208 8750
Other Available at www.productcareuk.com
call 0845 208 8750
For Customer Services & Spare Parts please call 0845 208 8750
Opening times: Monday - Friday 8am – 6pm & Saturday 9am – 1pm or visit
us at www.productcareuk.com
23
Page 24

For Customer Services & Spare Parts
please call
0845 208 8750
Opening times: Monday - Friday
8am – 6pm & Saturday 9am –1pm
or visit us at
www.productcareuk.com
Revision 1
This symbol is known as the 'Crossed-out wheelie bin Symbol'. When this symbol is
marked on a product/batteries, it means that the product/batteries should not be
disposed of with your general household waste. Only discard electrical/electronic/battery
items in separate collection schemes, which cater for the recovery and recycling of
materials contained within. Your co-operation is vital to make sure the success of these
schemes and for the protection of the environment. For your nearest disposal facility, visit
www.recycle-more.co.uk or ask in store for details.
We reserve the right due to possible changes to design to alter the instruction manual
without prior notice.
For Customer Services & Spare Parts please call 0845 208 8750
Opening times: Monday - Friday 8am – 6pm & Saturday 9am – 1pm or visit
us at www.productcareuk.com
 Loading...