

Page 1
RHDW14SS
14place settings
Hal f-loa d f unct ion
Page 2

Witheachwashcycle.
Compartment
For programmes with pre-wash only.
(Follow the user instructions!)
Electric indicator on controlpanel(ifprovided).
Check the rinse aid level
(On models with water softener system only.)
Electric indicator on control panel (if provided).
If there is no salt warning light in the control panel
(for some models), you can estimate when to fill the salt into
the softener by the number of cycles the dishwasher has run.
Checkthe regeneration
salt level
Load the baskets
Select a program
Turn on the water tap and press the . The machine will start working
after about 10 seconds.
Start/Pause Button
Running the dishwasher
Switch off the appliance
Fill the detergent dispenser
Changingtheprogram
Add forgottendishes in the
dishwasher.
Scrapeoff any largeamountof leftover food. Soften remnants ofburnt food in pans,
thenl oad the baskets. Refer to the dishwasher loadinginstructions.
Close the door, Press the Program Button until the selected program lights up.
( See the section entitled Operationinstruction )“”
When the working cycle has finished, the buzzer of the
dishwasher will sound 8 times, then stop.
Turn off the appliance using the On/Off Button.
If the appliance is switched
off during a wash cycle.
Open th e door car efull y.
Hotsteam may escape
when the door is opened!
If the appliance is switched off during a wash cycle, when switched
on again, please re-select the washing cycle and operate the dishwasher
according to the original Power-on state ).
Switch on the appliance Press the On/Off button to switch on the appliance, Open the door.
Fordetailedoperatingmethodreadthe correspondingcontentonthe instructionmanual.
1.A runningcycle can only be modified ifit has been running for a short time.Otherwisethedetergent
may have already been released and the water already drained. If this is the case, the detergent
dispenser mustbe refilled.
2. Press the Start/Pause button, themachinewill be in standby state, press the program
button morethan 3 secondsthen you can changethe programtothedesired cyclesetting
3. Press the Start/Pause Button, thedishwasherwill run after10 seconds
Turn off the water tap,
unload the baskets
Warning: wait a few minutes (about 15 minutes) before unloading the dishwasher to avoid handling
the dishes and utensils while they are still hot and more susceptible to break.
They will alsodry better.Unloadtheappliance, startingfrom the lowerbasket.
1.Press the Start/Pause Button to stop the washing.
2.Open the door a little .
3.After the spray arms stop working, you can open the door
completely .
4.Add forgotten dishes.
5.Close the door
6.Press the Start/Pause Button, the dishwasher will run
after 10 seconds.
Page 3
Toreview the section on t roublesho oting Tips
willhelp youtosolve somecommonproblems
byyourself .
Dear Cus to m er ,
Pleasecarefully read this manualbeforeusing the
dishwasher, it willhelpy outouseand maintainthe
dishwasherproperly.
Passit ontoanysubsequent ownerofthe appliance.
Thismanualcontains sectionsonsafetyInstructions,
Operating I nstructions,Installation I nstructions an d
Troubles ho o tin g Tip s, etc.
The manufactu rer,following apolicy of c onstant
development a nd u pdating of the produc t, may
make modificatio ns witho ut gi ving prior notice.
Keep it as a ref er in t he late r days .
Ifyou can not solve the problems b y you rself ,
please ask fo r the help of professional technicians.
This appli ance isintended t o be used in h ousehold
andsimilarapplicationssuch as:
-staff kitch en a reas inshops, offices and othe r
working enviro nme nts;
-farm houses;
-by cli ents inhotels, mo tels and other res idential
ty pe e nv ir o nments ;
-bed andbreakfast type environments.
DishwasherFeatures.......................................3
A WaterSoftener...... ...... ...... ...... ... ...... ..... .....4、
AttentionbeforeorafterloadingtheDishwasher
Baskets............... ...........................................9
Filtering S ystem........................................... ..13
CaringfortheDishwasher..................... .........14.
B LoadingtheSaltintothe Softener.................5、
C Fillthe RinseAid Dispenser........... ........ ......5、
D Functionof Detergent.................................6
、
Loading the upper .............. ........ ........ .10Basket
Loadingthe Lower ...............................10Basket
WashCyc leTable........ ......... ............... ...........11
Turnin g on theAppliance.......... ..................... .11
Change the Programme.............. ................12....
At theEnd ofthe WashCycle............... ............1 2
ControlPanel........ .......................... .................3
Positi oningthe Appliance................... ..........15..
Water Con nec tio n.... .... ... .. .... ... .. . ..... ... . .. ..... .. 16.
AboutPower Connection...................... .. .......15.
Startof dishwasher................................ ......17..
Beforecallingfor service.............. ........ ..... .....18.
Error c odes.................................... ..............19.
Technicalinformation......................... ..... .....20..
Page 4
This appliance must be grounded. In the event of a
malfunction or breakdown, grounding will reduce
the risk of anelectric shock by providing a path of
least resistance of electric current. This appliance
is equipped with a cord having an equipmentgrounding conductor and a grounding plug.
The plug must be plugged into an appropriate outlet
that is installed and grounded in accor dance with
all local codes and or dinances.
Keep children away from detergent and rinse aid, keep
child away from the open door of the dishwasher,
there could still be some detergent left inside.
ren
Donotabuse,siton,orstandonthedoorordish
rack of the dishwasher.
Do not touch the heating element during or
immediately after use.
(This instruction is only applicable to machines
with a visual heating element.)
Do not wash plastic items unless they are marked
dishwasher safe or the equivalent. For plastic items
n
ot s o marked, check the manufacturer's
recommendations.
Use only detergent and rinse additives
design ed for an a ut omati c dishwas her.
Never use so ap, laun dry de tergent, or hand
washing dete rgent in your dishwasher. Keep
these pro d u cts ou t of th e re ach of children.
During installat ion, the power suppl y must n ot
be exces sively or dangerously be nt or flattened.
Do not tamper with controls.
Do not place any heavy objects the
door when it is open. The appliance could tip
forward.
on or stand on
When loadin g ite ms to be washed:
1) Locate sharp items sothat theyare not likel y
to damage the door seal;
2 Warni ng: Knives and other utensils with
sharp poin ts must be loade d in the basket
with their points down orplaced in a
horizontalposition.
)
When using your di shwasher, you shoul d
pr ev ent plastic ite m s fr o m c omin g in t o co ntac t
with the h e ating el ement.(This instruction is onl y
applicable to machines with a visual heatin g
element. )
Ifthe supply cordisdamaged,itmustbereplaced
bythemanufactureroritsserviceagentora
similar ly q uali fi ed person i n or der to av oid a
hazard.
Pleasedispose ofpacking m aterials properly.
Use the dishwasher only for its intended function.
Remove the door to the washing compartment when
removing an old dishwasher from service or discarding it.
Dishwasher de tergents ar e stro ngly al kaline, they
can be extr emely da ngerous if swallowed. Avoid
contact with skin and eyes and keep ch ildren away
from the dishwasher when t he door is open.
Check that th e detergent com parm ent isempt y
after complet ion o f the wa sh cycle .
The applian ce is to be conn ected to the water
mains us ing new hose sets and that old hose-sets
should not be reused.
The maximum number of place settings to be
washed is 14 .
The maximum permissible i nlet wa ter pressur e is
1Mpa.
The minimum permissible i nlet w ater press ure i s
0.04Mpa.
Children should be supervised to ensure that they do
not play with the appliance.
This appliance is not intended for use by persons
(including children with reduced physical, sensory or
mental capabilities, or lack of experience and
knowledge ,unless they have been given supervision
or instruction concerning use of the appliance by a
person responsible for their safety.
)
When using y our dis hwas he r, fo l low the precauti ons list ed below:
The door should not be left o pen,
since this could increase t he ris k of tripping.
Improper connection of the equipment-grounding
conductor can result in the risk of an electric shock.
Check with a qualified electrician or service
representative if you are in doubt whether the
appliance is properly grounded. Do not modify the
plug provided with the appliance; If it does not fit
the outlet. Have a proper outlet installed by a
qualified electrician.
Do not operate your dishwasher unless all
enclosure panels are properly in place. Open
the door very carefully if the dishwasher is
operating, there is a risk of water squirting out.
Page 5
Dispose o f the dishwasher pac kaging m aterial c orrectly.
All packagi ng mate rials ca n be recycled.
Plastic pa rts a re marked w ith t he s tandard international a bbreviation s:
PE for polyethylene, e.g. s heet wrapping materia l
PS forpolystyrene,e.g.padding m aterial
POM polyoxymethylene, e.g. plastic clips
PP polypropylene , e.g. Salt fill er
ABS Acrylonitri le Bu tadiene St yrene, e.g. Contro l Pa nel .
Packaging material could bedangerous forchildren!
For di sposing ofpackage an d theappliance please go t o a recycling cen tre. There fore cut
offthe power supply cableand makethedoor closing device unusable.
Cardboardpackagingismanufactured fromrecycledpaper andshould be disposed in the
waste p aper c ollection for recycling .
By ensurin g thi s produ ct is disposed of correctly,you will helpprevent po tential n egati ve
consequences for the e nvironment and human h ealth, w hich could otherwise be caused
byinappropriate wastehan dling of thisproduct.
For m ore deta iled information about recycling o f t his prod uct, please contact your loca l
city office and your hou sehold w aste dis posal se rvice.
DISPOSAL: Do not dispose this product as unsorted municipal waste . Collect ion of such
waste separa tely forspecial tr eatment is necessary.
Page 6
before using itfor the firsttime.
To g etthe bestperformance from your dishwasher,r ead all operatingins tructions
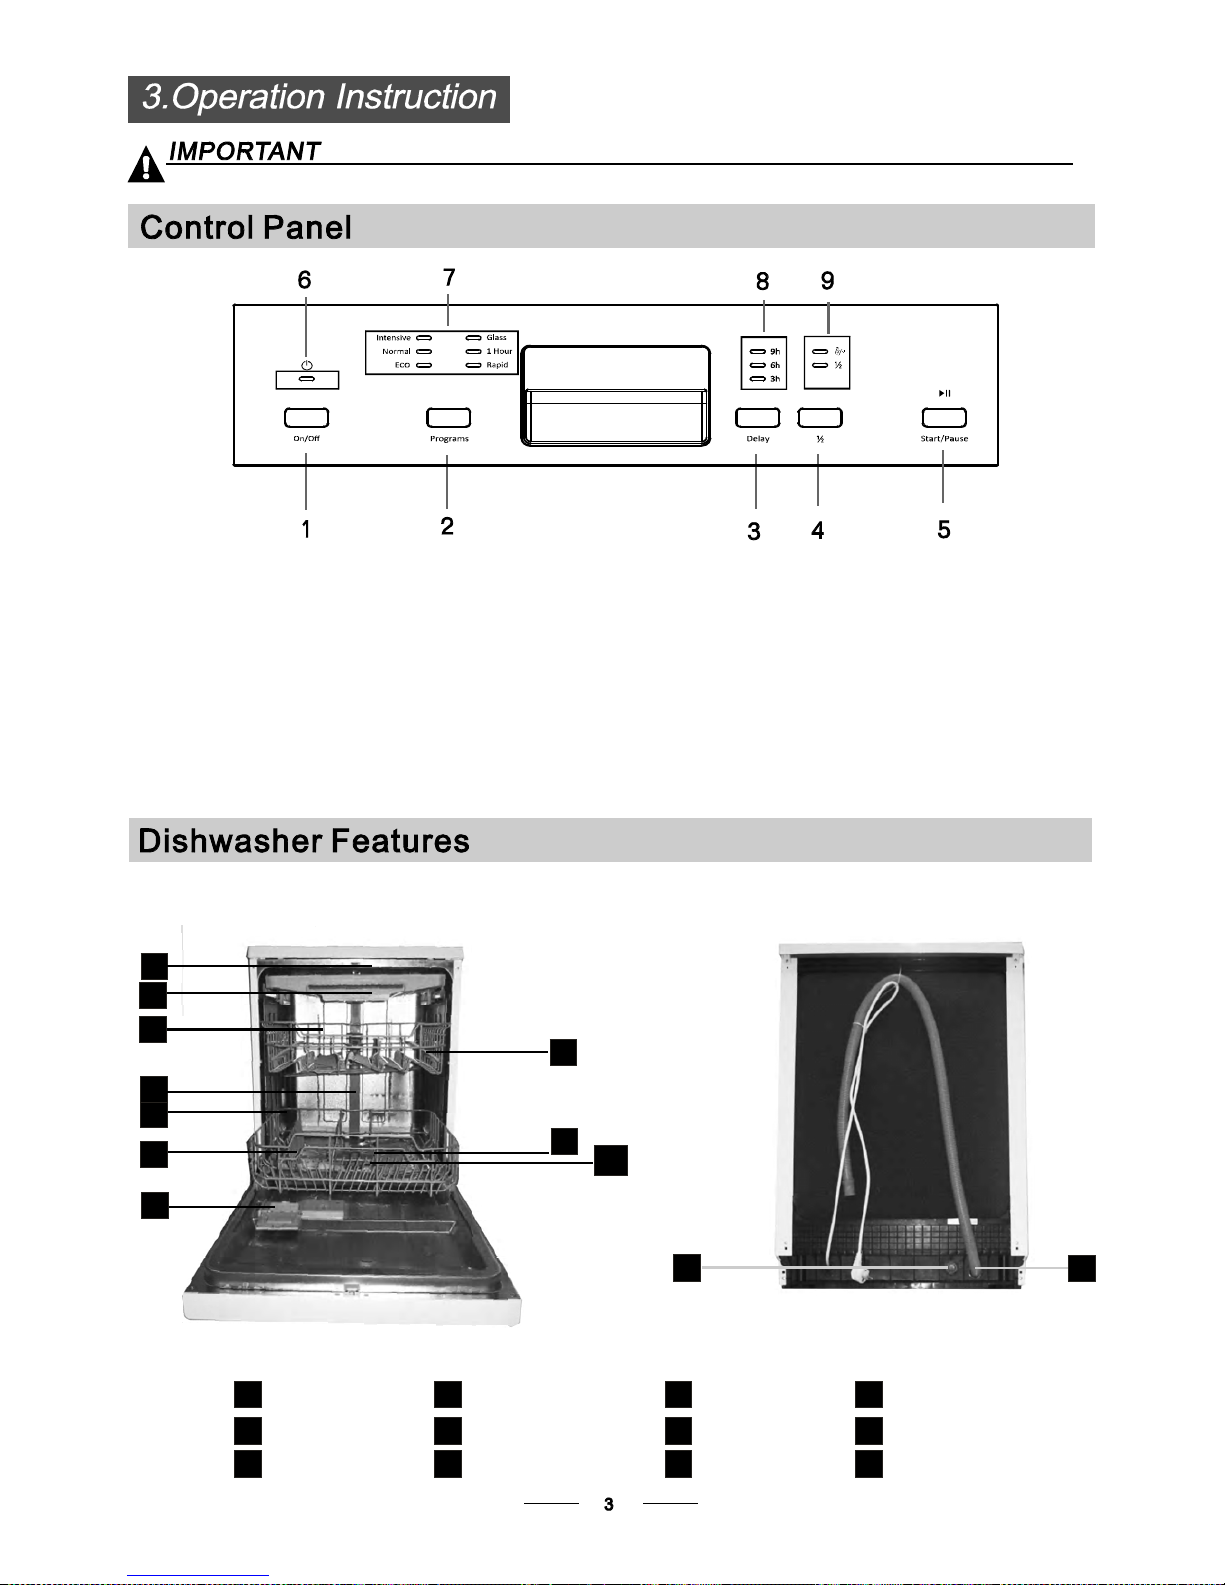
1.On/Off Butto n: To turn on /off the p ower supply.
2. Program Button :To Press the bu tton to select a
wash Prog ra m.
5..Start/Pausebutton:To start the selected
washing program or pa use the was hin g p rogr am
when th e machin e is working .
4.H alf load fun c tions B utton: To s el ect Ha l f load
functions.
3.Delay B u tton : To Press th e butt on to d e lay.
6.Power ind icator: To s how when the power on
7.Program in dicators : to show which program
you have ch ose;
8.Dela y indicators: t o s ho w th e de la y time
(3h/ 6h/9h )
9.Half load/ indicators:when you choose
Half loa d,the Ha lf load i ndicator ;whenthe
salt wa rning
light saltwarning
light thesalt co ntainer m ust onl y be refi lled
11
12
Back Vie w
1
2
3
4
5
7
8
9
10
Front view
Lower basket
Salt contain er
Dispenser
Cup shelf
Spra y arm s
Filter assembly
Inlet pi pe conne cto r
Drainpipe
Upper basket
Cutleryrack
Top spray arm
1
Inner pipe
5
6
7
8
9
10
12
11
3
2
4
6
Page 7
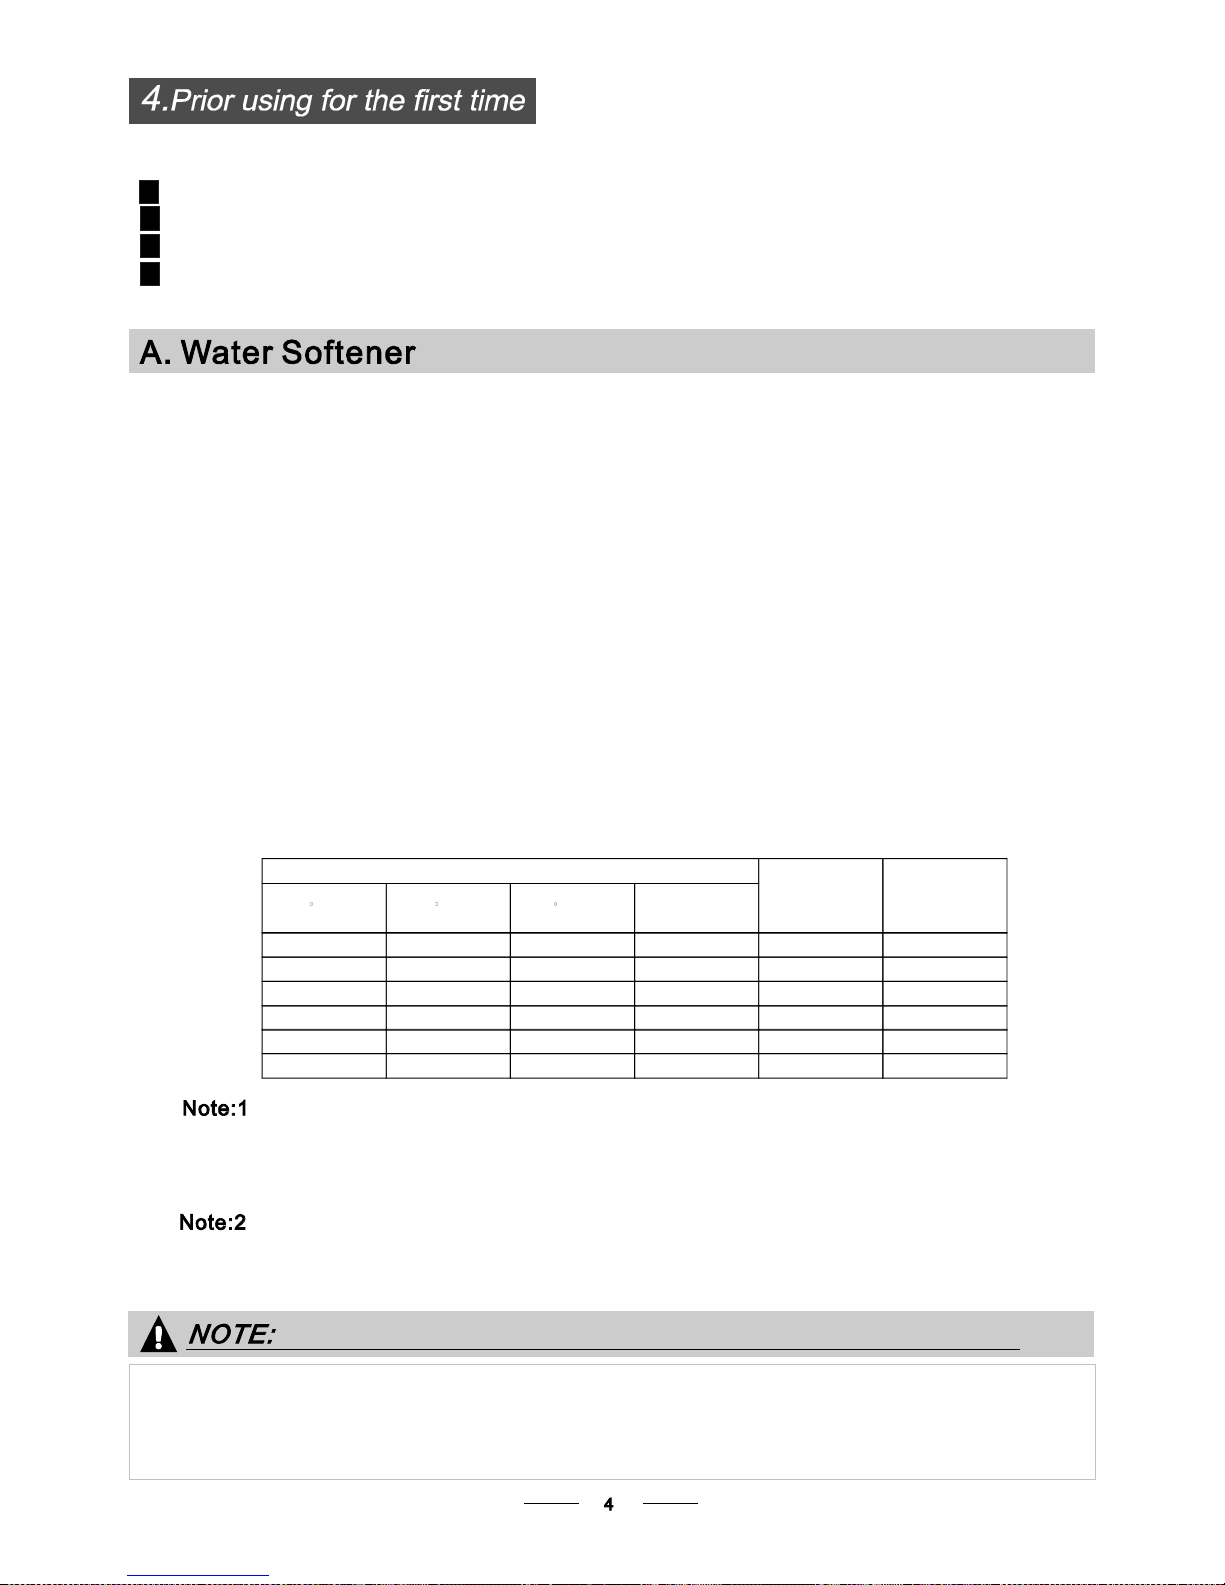
The water so ftener m ust beset manu ally, using the w ater ha rdness di al.
The water soften er is designed to remove minera ls an d salts from the wat er,which woul d ha ve
a detrimental o r adverse effect on the operation of the appliance.
The higher the content of these miner als and salts, the h ar der your w ater i s.
The softener sho uld beadjusted acco rding t o thehardness of t he wa ter in your area. Yourlocal WaterAuthority
canadvise you onthehardness o fthe waterin your area.
Adjusting SaltConsumption
The dishwasher is designed to allow for adjustment in the amount of sa lt co nsumed based o n the ha rdness of
the waterused. Thisisintended tooptimiseandcustomise the level o f salt consumption.
1. Open the door ,Switch on the applia nce;
2. Press for more than 5 se conds t o start the wate r softe ner
set model within60seconds after the appliance was switched on( The Salt a nd
Rinse aid w arninglig hts w ill be on periodi cally when it get in the se t model );
3. Press the to select the proper s et according to y our l ocal e nvironment ,
the sets w ill chang e in the follo wing sequen ce: H1- >H2->H3- >H4->H5->H6 ;
4. Press the Powerbutton to end the set up model.
Start /Pa use butt on
Start /Pau se b utton
WATER SOFTENER
Thehardness o f the water varie s from p lace to place. If hard water i s used inthe dis hwasher, deposits w ill
form on the dishes and utensils.
Theappliance i s eq uipped with a special softener that uses a salt container spe cifically designed to el iminate
lime an d mi nera ls from the wate r.
Contact your local water board for i nformat ion on the hardness of your wat er suppl y.
Please follow thesteps belowforadjustm entin saltconsumption.
If yo ur m odel doesno t hav e a nyw ater softener,you maysk ip this section.
Before using you r dis hwasher for the first time:
A. Set the wate r so ft ener
B. Add 1.5Kg d ishwasher salt and t hen f ull fil l the salt con tainer w ith w ater
C. Filltherinseaiddispenser
D. Fill in d etergen t
Contact your local water board for i nformat ion on the hardness of your wat er suppl y.
Clark: British degree
fH: Frenchdegree
DH: G erman degre e
dH=1.25Clarke=1.78 fH =0.178mmol/l
1
The manufa ctory setting: H4 (EN 50242)
dH
mmol/l
0~90~5 0~0.94
H1
0
10-20
6-11
1.0-2.0 H2 9
21-30
12-17 2.1-3.0
H3
12
H4
20
fH
0~6
7-14
15-21
Clarke
WATERHA R DNE SS
Selector Position
Saltconsumption
(gr am/cycle)
18-22 31-40 22-28 3.1-4.0
41-60
23-34 4.1-6.0
H5
30
H6
60
29-42
35-55 61-98 43-69 6.1-9.8
Page 8
1.The salt con tainer must only be refilledwhen the salt warning light in the control panel comes on.
Depending on how well the salt dissolves, th e sa lt warnin g light may still be on eventhough the
salt container is filled.
If there i s no sa lt w arning light in the control panel (for some M ode ls),you c an estimate when to f ill
the salt i nto the softener by the cycles that the dishwasher has run.
2. Ifthereare spills of the salt, a soak or a rapid program should be run t o remove the excessive salt.
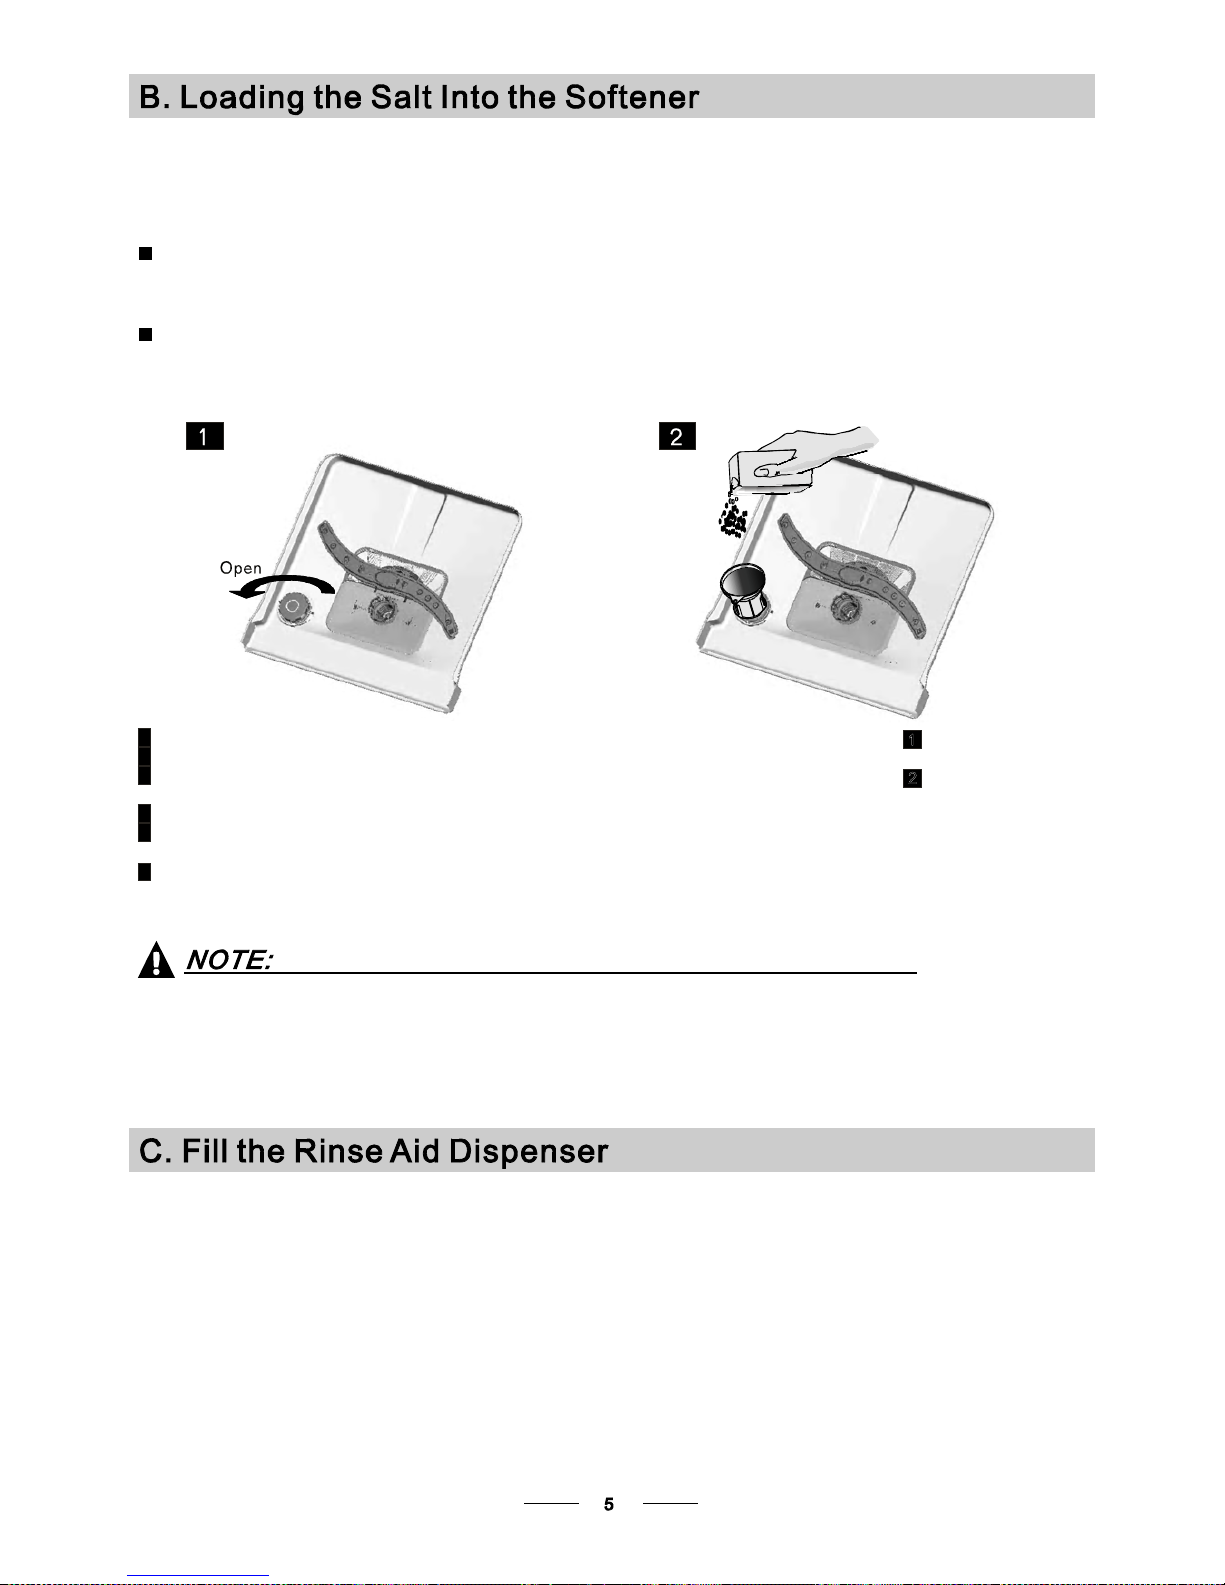
Always use the salt i ntende d for u se w ith di shwasher.
The salt c ontain er i s locat ed ben eath the lower basket and sh ould b e fill ed a s e xplained
inthe following:
Attention!
Only use salt specifically designed for t he usein dishwash ers! Every other type of
salt not specifically de signed for the use in a dishwa sher, especially t able salt, will
damage the w ater softener.In case of damages caused by the use of unsuitable
salt the manufacturer doe s notgive any wa rranty nor is liable for a ny damages caused.
Only fill wi th sal t just b efore starting one of the co mplete washingprograms.
This will prevent any g rains ofsalt or salty wate r,which may have b een spi lled,
remaining on the bottom ofthe machine for any period of time, which may c ause
corros io n.
The ri nse aid is rel eas ed d u ring t he final rin se to preve nt water fro m forming droplets on yo ur dis he s, w hich can
leave spots andstreaks. It also improve s drying by allowing wate r to r oll off t he dishes. Your dishwasher is
designed touseliquidrinse aids.The rinse a iddispenserislocatedinside thedoornext tothe detergent dispenser.
To fi l l the dispens er, open the c ap a nd pour the rinse aid i nto the d ispens er until t he l ev el i ndi cator turns c om pletel y
black. The vol ume of the rinse ai dcontain er is about 110ml.
RinseAid D ispenser
Function of Rinse Aid
Rinse aid is automa tically added duri ng t he las t ri nse, ensuring thorough rinsing, and spot an d s treak fr ee drying.
Attention!
Only use branded rinse aidfordishwasher.Never fillthe rinseaiddispenser withany o ther substances
(e.g. Dishwasher cleaning agent, liquid d eterg ent). Th is would damage the app liance.
Fullfillthesalt container withwater,Itis normal for a smallam ount of waterto comeoutofthe
salt c ontainer.
A Af ter the lower ba sket has been removed, unscrew and remove the cap from the salt conta iner.
C
D Afterfilling the co ntainer , screw the cap t igh tly bac k clockwise.
E Thesalt warning lightwill stopbeing after thesalt container has been filled with salt.
F Immediat ely a fter f illin g t he s alt into the sa lt co ntain er, a washin g program should be s tarted
program Ot herwise the filt er sy stem, pump or other im portant parts ofthe ma chine m ay b e dam aged
bysalty water.This isoutof warranty.
(Wesu ggest tousea short
).
B Place the end o f th e funn el ( supp lied) i nto t he ho le and introd uce about 1.5 kg o f dis hwasher salt.
Page 9

Toop en th e d i spenser, t urn t he cap to the "open" ( left ) ar row and l ift i t out.
Pour t he rinse ai d into th e dispenser, be ing careful not to overfi ll .
Replace the capby inserting it a ligned with "open" arrow and turnin g it tothe closed (right) arrow.
Adjusti ng RinseAid Dispenser
The rinse aid dispe nser ha s six or four settings. Always start with the dispens er
set on " 4". I f spots and poor drying are a problem, increa se the amount of r inse
aid dispensed by remov ing thedispenser lid and r otating the dial to "5". If the
dishes st ill are not drying properly o r ar e show spots, adj ust the dial to the next
higher lev er un til your dishes a re sp ot-free. The recommend ed set ting is "4".
(Factoryvalueis"4".)
Increasethedose if there aredrops of water or lime spotsonthedishes afterwashing.
Reduce i tifthereare sticky whitishstainson yourdish esorabluishfilm on glassware or
knifeblades.
1
2
3
Asthe ri nse aid d imin ishes, th e siz e of the black do t
on the rinse aid levelindicator changes, as illustratedb elow.
Full
3/4full
1/2full
1/4full - Should refill to eliminate spotting
Emp ty
Whento Refill the RinseAid Dispenser
Ifthere i s no rinse-aid warnin g ligh t in thecontrol p anel, you can estimate the am ount f rom the colour
ofthe opt ical l evel indi cator C located next to the cap. When the rinse-aid conta iner i s ful l, the whole
indicator will be dark .As the rinse -aid di minishes, t he size of the dark dot decr eases. Youshould never let
the ri ns e aid level fal l 1 / 4 ful l.
during the next wash.
Don't for get to replace the cap before you close dis hwa sher door.
Cl ean up a n y r inse aid spil l ed w hi le during filling with a n absorbe nt cloth t o avoid excess ive fo amin g
Detergents with its chem ic al ingred ients are ne cessary to remove dirt, c rush dir t an d tr ansport it out of the di shw asher.
Mostof th ecommerci alquality detergentsare suitable for thispurpose.
""
Proper UseofDetergent
Useonly det ergent s pecifical ly made for the u se in d ishwa shers. K eep yourdetergent f resh and dry.
Don't putpowdereddetergentintothe dispenseruntil you'reready towash dishes.
Attention!
Page 10

Amountof Detergentto Use
Dishwasher de tergent i s corrosi ve! Ta ke c are to keep it out of reach ofchildren.
Based on their chem ical composition,det erge nts canbesplit in twobasic types:
Detergent tabletsof different brands dissolve at different speeds. Forthis reasonsome
detergent tablets cannot dissolve and dev elop the ir full cl eaning po wer dur ing s hort
programs. There fore please use l ong program s wh en usin g deterg ent t ablets, t o
ensure the c om pl et e re mov a l of de ter g e n t resi du als.
The dispenser m ust b e refille d before the start of each was h cycle f ollowing the instructi ons
provided in t he w ash cycletable . Your dis hwa sher uses less detergent and rinse aid than
Conventiona ldishwasher. Generally, onlyonetablespoon of detergent is neededfor
anormal washload. Moreheavilysoileditems needmore detergent.Always addthe
detergen t j ust before starting the dishwas her, othe rwis e it coul d ge t da mp and w ill not
dissol v e pr oper ly.
Concentr ated Detergent
DetergentTablets
Detergent Dispenser
conventional, alkalinedete rgentswith caustic components
lo w al k aline conc entrated detergen t s wi t h nat ura l en zym es
Normally new pu lverised detergent is without phos phate. T hus the water softener function of
phosphate is not give n. In this cas e we recommen d to fil l sa l t in the sa lt contain er even when
the hardness o f water is only 6 dH.I f detergents witho ut phosphate are used in the case of hard wat er
often white s pots appear on d ishes an d glasse s. In this case pl ease add more d etergent toreach
better re sults. Det e rgen ts wit h o ut chl or ine do only bleach a little. S tr o ng an d col o u red s p o ts w i ll not
beremoved completely.Inthis ca se p lease ch oose a p rogram with a hi gher temperature.
°
Deterg ents
There are 3 sor ts of dete rgents
1.With phosphate and withchlorine
2.Withphosphate and wit hout c hlorine
3.Withoutphosphate and without chlo rine
Always add thedetergent just before start ing each wash cycle.
Only usebranded detergent aidfordishwasher.
If the lid is closed: press release button.The li d wi ll spring open.
Detergenttablet
Detergent powder
Page 11

Fillthe de tergent dispenser with d etergen t.
The marki ng in dic ate s the do s ing le vels , a s
illus t rated on t he righ t:
The place o f main wash cycle dete rgent placed.
The place o f pr e-wash cycle detergent place d.
Pleaseobserve t he manu facturer s dosing and storage
Recommendationsasstated onthe detergent pac kaging.
Closethelidandpres s untilit locksinplace.
If the dis hes are heav i ly soil ed, place an ad di tiona l
detergent do se in the pre-wash detergent chamber.Thisdetergent will take effe ct durin g the pre-wash phas e.
A
B
Fillin Detergent
Youfi nd in formation about the amount of de tergent for the si ngle programme on t he last page .
Please aw are, tha t accord ing t o the level soiling and the specific hardnes s of water d ifference sare po ssible.
Please observe themanufacturer's recommendationsonthe detergentpackaging.
Page 12

Cutlery with wooden, horn china or
mother-of-pearl handles
Plastic ite ms t hat are n ot heat resist ant
Older cutl ery with glued parts t hat arenot
temperature resistant
Bonded cutl ery ite ms or dishes
Pewter or cooper ite ms
Crystal glass
Steel items subject t o rusti ng
Wooden platters
Items madefrom synthetic fibres
Some types ofglasses c an becom e
dull after a large number of washes
Silver an d a l uminum part s ha ve a
tendencytodiscolourduring washing
Glazed patterns mayfade if machine
washed frequent ly
Are not suitable
Are of limited suitability
Dishes anditems of cutlery must not lieins ide one another,orcover eachoth er.
To avoid dama ge to glasses, th ey mus t n ot touc h.
Load large items w hich are most difficult to clean in to the lower bask et.
The upper basket is de signed to hold m ore delicate and lighter dishware such as glasses , coffee
and t eacups
Long bladedknives stored in a n upr ight po sition are a potent ial haza rd!
Long and/or sharp itemsof cutlery such as carving knives must bepositioned
horizon tally in the upp er b asket.
Please do not ove rload your dishwashe r. T his is importan t for g ood results and for
reasonab le consu mption o f en ergy.
Load hollow it ems such as cup s, glasses, pans etc. With the opening facing downwards so that
wat er c anno t co lle c t in the conta iner or a deep b ase.
Consider buying utensils whichareidentified asdishwasher-proof.
Use a mild detergentthat is describedas'kind to dishes'. If necessary, seekfurther
informationfromthe detergent manufacturers.
Forparticular items,select a program withas low a temperatureas possible.
Topr even t da ma ge, do not take glass a nd c utler y out of the dis hwas he r i mmed iatel y
after the pr ogram me h as ended.
(For best per formance of the di shwasher, follow t he se loading gu ide lines.
Features and appearance ofbaskets and cutlery ba skets may v ary from your mod el.)
Scrape off any large amount s o f left over foo d. Soften remnants o f burnt food in pa ns.
It is no t necess ary torinse t he dishes under running water.
Place obje cts in the dishwasher in followi ng way:
1.Itemssuch as cups, g lasses, pots/pans, etc. a re fa ced downwards.
2.Curveditems, or ones with reces ses, sh ould be loaded asla nt so th at w ater can run off.
3.Allutensils are stacked securely and can not tip ov er.
4.Allutensils are placed in t he way that the spray arms can rotate fr eely during washin g.
Ve ry sm all it ems sho uld not b e washe d in the dishwas her as they could eas ily fall out of the basket.
To prevent water dripping fr om the upper basket into the lower basket, we rec ommend tha t you
empty the lower basket first and t he n the upp er ba sket.
Page 13

The u pper basket is designed to hol d more delicate
and lighter di shware s uch as g lasses, coffee and
teacups andsaucers, aswell as plates, small bowls
and s hallow pans(as longas they are nottoo dirty).
Positionthed ishes andcookwareso th attheywill
notget movedby t hespray of water.
We sugges t that yo u pl a ce l arge items and t he m o st
difficult to clean items are to be placed intothe lower
basket: suchas pots, pans, lids, serving dishes and
bowls, as sh own i n t h e figure b elow. It is prefer ab le t o
pla ce s er vi n g dishe s an d lids o n the s i d e of the r ack s
in order to avoid blocki ng the rotation of the top spray
arm .
Pots,servingbowls,etc,mustalwaysbeplacedtopdown.
D eep pots sh ould b e slante d t o allow wat er to flow out .
Please be r eminded that:
The B otto m B ask et f eatur es foldin g sp ikes so tha t l arg er or more pots a nd pans c an be loade d.
Foldin g Spike s of Lower Bask et
For better stacking ofpots and pans,
the spi kes can b e folded down a s
show in the p ictu re right.
Adju sting the Upper Basket
The heigh t of the upper ba sket can be adjusted in order to
create mo re space for large uten sils b oth for the upper
/lower basket. The height of the up per basketcan b e
adjusted by placing the wheels on different heightof the
rails. Long items, serving cutlery,salad servers and knives
should be placed on the shelf so that they donot obstruct
therotationofthesprayarms..
Foldin g bac k the cup sh elives
For better s tacking ofpots and p ans,
the spikes can be f olde d down as
show in the pict u re righ t .
Cutlery should be placed inthe cutlery rack separately
from each other in the ap propriate positions, and do
make sure the utensils d o not nest tog ether,this may
cause badperformance.
The u pper basket is designed to hol dmore delicate
and lighter di shware s uch as g lasses, coffee and
teacups andsaucers, aswell as plates, small bowls
and shallow pans (asl ongas theyare not toodirty).
Positionthed ishes andcookwareso th attheywill
notget movedby t hespray of water.
We sugges t that yo u pl a ce l arge items and t he m o st
difficult to clean items are to beplacedintothelower
basket: suchas pots, pans, lids, serving dishes and
bowls, as sh own i n t h e figure b elow. It is prefer ab le t o
pla ce s er vi n g dishe s an d lids o n the s i d e of the r ack s
in order to avoid blocki ng the rotation of the top spray
arm .
Pots,servingbowls,etc,mustalwaysbeplacedtopdown.
D eep pots sh ould b e slante d t o allow wat er to flow out .
Please be r eminded that:
The B otto m B ask et f eatur es foldin g sp ikes so tha t l arg er or more pots a nd pans c an be loade d.
Foldin g Spike s of Lower Bask et
For better stacking ofpots and pans,
the spi kes can b e folded down a s
show in the p ictu re right.
Adju sting the Upper Basket
The heigh t of the upper ba sket can be adjusted in order to
create mo re space for large uten sils b oth for the upper
/lower basket. The height of the up per basketcan b e
adjusted by placing the wheels on different heightof the
rails. Long items, serving cutlery,salad servers and knives
should be placed on the shelf so that they donot obstruct
therotationofthesprayarms..
Foldin g bac k the cup sh elives
For better s tacking ofpots and p ans,
the spikes can be f olde d down as
show in the pict u re righ t .
Cutlery should be placed inthe cutlery rack separately
from each other in the ap propriate positions, and do
make sure the utensils d o not nest tog ether,this may
cause badperformance.
Page 14

*EN 50242 : This pro gramme i s the test cycle. T he infor mation for comparabili ty test
in accordance with EN 502 42, as follows:
Capacity: 14 setting
Position Upper basket: upper wheels on r ails
Rinse aid setti ng: 6
Pl:0.49w;Po: 0.45w.
Startin g a cycl e wash
Draw out the lowe r and up per bask et, l oad the d ishes a nd push them back.
It is c ommended to load t he lo wer bask et fi rst, then the uppe r one (see the section entitle d
Loading the Dishwasher ).
Pour in the deterg ent (see the section e ntit led Salt, Detergent and RinseAid ).
Insert the plug into the socket. The power supp ly is 220-240 VAC/50 Hz, the specification
of th e socket is10A 250VAC. Make su re that the water supply is tu rned on to full pressure.
Close the door, press t he ON/OFF Button, and the ON/OFF light w ill turn on.
“”
“”
Press theprogram Button, the wash programwill bechanged as follows directio n:
If aprogram is s elected, theresponse ligh t wil l light. Then close the d oor a nd
Intensive- >Normal-> ECO->Glass ->1Hour ;->Rapid
1
2
3
4
5
Press theStart /Pause
Button,t he dish was her be g i ns to start .
Means:needtofill rinseintotheRinse-AidDispenser.
()
ECO
Intensive
Normal
(*EN 50242)
5/25g
5/25g
5/25g
Rapid
Pre-wash(50 )
Wash (65 )
Rinse
Rinse
Rinse(55 )
Drying
℃
℃
℃
Pre-wash(45 )
Wash (55 )
Rinse
Rinse(65 )
Drying
℃
℃
℃
Wash (50 )
Drying
Pre-wash
Rinse
Rinse(60 )
℃
℃
Wash (40 )
Rin se
Rin se (4 5 )
℃
℃
160
170
140
40
1.35
1.02
1.45
0.6
19
15
12
11.5
1Hour
Wash( 6 0 )
Rinse( 55 )
Drying
Pre - wa sh (50 )℃
℃
℃
60
10
1
5/25g
20g
Glass
Rinse
Drying
Pre-wash
wash(40 )
Rinse(60 )
℃
℃
120
0.85
15
5/25g
For normallysoiledloads,
suchas , plates,glasse s
andlightly soiled pans.
pots
For heaviest soiled crockery,
andnormally soiled pots
pans dishesetcwithdried
onsoiling.
、
、
Ashorter washfor lightly
soiledloadsthatdo not
needdrying.
For l ightly s o il ed load s t h at
do not needexcellentdry ing
efficiency.
Forlightly so iledcrocker y
and gla ss.
(or )3in1
(or )3in1
(or )3in1
This is Standard programme,
it is suitable to clean normally
soiled tableware and it is the
most efficient programmein
teams of its combined energy
and water consumption for
that type of tabl eware.
Page 15

When t h e working cycle has fini s hed, the b u z zer of the dishw a sher wi ll sound for 8 sec o n d s , th en s top . Turn off
the appli ance usi ng the ON/OFF butto n, shut off the wa ter s upply and open the door of th e di shwashe r.
Wait for a few minutes bef ore unloading th e dishwashe r to a voi d handlin g the di shes and utensils w hile th ey
are still hot and m ore susceptible to br eakage. Theywill als o dry be tter.
SwitchOff the Dishwasher
1.Switchoff the di shwasher by pressing the ON/OFF button.
2.Turn off thewatertap!
The program light is on but is n ot blin king, only in this case the programme has e nded.
Openthe door carefully.
Hot dishes are sensitive to knocks. The dishes should therefore be a llowed t o cool down arou nd 15 minutes
before removingfrom the appliance.
Open the d ishwasher 's door, leave it ajar and wait afew minut es befor e remov ing t he dis hes. In this way they
will be cooler and the drying will be improved.
Unloadingthedishwasher
Itis norm al that the dishwashe r is wet inside.
Empty the l ower ba sket f irst and then the upperone. Thi s will avoid water dripping fro m the upper Basket onto
the dishes in the low er one.
Aforgottendish can be added any time before the detergent cup opens.
Add forgotten dishes.
Close the door
After the spray arms stop working, you can open the door
completely.
2
3
Open the door a little .
1
4
5
The dishwasherwill run after 10 seconds.
Washthe arms in soapy a nd warm water an d u se a sof t bru sh t o
clean thejets. Replace them after rinsing themthoroughly.
When following this procedure from step1 to step 3, the filter system will be removed;
when following it fromStep 3 to Step 1, the filter system will be installed.
It is dan gero u s to open th e door when was hi ng, beca us e the hot water may scald y ou.
Ifyou open the door ,the machinewillpause. Theprogramlightwill
stopblinkingand the buzzer will mooingeveryminuteunlessyou close the door.After
you c lose the door ,the machin e will keep o n worki ng after 10 seconds.
duringawash cycle
Premise:
Acycle that is underway ca n on ly be modified if it has only been r unning for a short time. Otherwise, the
detergent may have a lread y be en releas ed, a nd the appliance m ay have alre ady dr ained the wash wa ter.
If t his is t he case , th e dete rgent d ispenser must be refilled (see the section ent itled " Loading t he
Detergent " ).
Then you c an change t he progr am to the desired cycle s etting,
(see the sect ion en titled " St arting a wash cycle. . ." ).
Press theStar t/Pause Button tostopwashing , Then press programme butto n after 3 seconds, the programme will cancel
Press the Start/Pause Butto n, the dish washer will run
after 10 seconds.
1
2
Whe n you pres s th e Star t /Pause bu tt on to paus e dur in g was h ing , th e will
stopblinkingandthe dishwasherwill mooingeveryminuteunless you press the
Start/Pausebuttontostart.
runningindicator
Ifyour model has b roken rememberfunction,themachine will go on to finish theselected
program .
after th e pow er cut
Page 16

The filter prevents lar ger remnants of food or ot her objects from getting inside th e pu m.
Theresiduesmayblockthe filter, inthis casetheymustberem oved .
The filter syst em consists of a coar se filter,a flat (Main f ilter)
And a mi c rofilt e r( F i ne fil ter).
Foodand soil particlestrapped inthisfilter are pulverizedby a
special jet on the l ower spray arm an d washe d down todrain.
Larger i tems, such as pi e c es o f bone s or glass, tha t could b lock
the drain are trapped inthe coarsefilter. To remove the items
caught by the fil ter,gently sque eze the tap on th e top of this
filter andlift out.
This filterholdssoil andfood residues in the sump areaand
preve nts it frombeing redeposit on thedishes during washcycle.
Main filter
1
Coarse filter
2
Fine filter
3
2
3
1
Filterassembly
Thefilter efficiently
For best performance and results, the filter must be cle aned re gular ly. t his reaso n, it is a goodidea to
remove th e lar ger foodparticles tr apped in the filte r aft er e ach was h cyc le by rin sing the semicirc ular filter and
cup unde r runnin g wat er.To re move th e filter d evice , pull t he cu p handle in the u pward d irection.
removes food particles fro m the wash water, allowing it to be recycled dur ing the cycle.
For
The d i sh was her mus t ne ver be us ed w it ho ut the fil t er s.
Improper replacement of the filter may reduce the performanc e level of the appliance
anddamagedishes andutensils.
1
2
Step 1 Turn the filter in anti-clockwise d irection,:
Step 2 lift the filter assy up:
When following this procedure from step1 to step 2, the filter system will be removed;
when following it fromStep 2 to Step 1, the filter system will be installed.
Page 17

The control p anel can be cleaned by using a lightly dampened cloth .
After cleaning, make sure to dry it t horoug hly.
For the exterior, use a go od a pp liance po lis h wax.
Neveruse sharp objects, sco uring pa ds or h arsh cleaners on a ny p art of the dishwasher.
Protec tAgain st Freezing
1.Cut offthe electrical power to thedishwasher.
2.Turnoffthe water supply and d isconnec t the water inlet pipe from the water val ve.
3.Drain the wat er from the inlet pipe and w ater va lve. (Use a pan to gather th e water )
4.Reconnect the water inlet pi pe t o the water valve.
5.Remove the fil ter at the bottom o f thetub and use a spong e to soak up wate r in the sump.
please t ake fros t protect ion meas ures o n the dishwasher in winter.Every fter washing cycles,
please op erate as follows
timea
:
Cleaning th eFilter
Cleaning The Door
To cl ean the co a rse fi l ter and the f i n e fi lter, use a cl eani n g b ru sh. Re as sem ble th e fi l ter par t s as s ho wn in the fi gures
on the last pa ge a nd reinsert the e nti re assemb ly in the dishwasher, positio ning it in its seat and pressing downwa rds .
Whencleaningthefilters,don'tknockon them. O therwise, the filters could be
contorted and theperformanceof the dishwasher could bedecreased.
To clean the e dge around the door, you sho uld u se only a soft warm, damp cl oth.
To avoid penetrati onof water into t he door lock and el ectrical components, do not
usea spray cleaner ofany kind.
Never use a spray cl eaner t o clean t he d oor panelas it m ay dam age the door loc k
andelectrical components.
Abrasive agent sor somepaper towels should not b e use d b ecause of therisk of
scra t ching or l eaving sp ot s on th e stain less st eel su r fa ce.
Cleani ng th e Sp rayArms
If your dishwasher cannot work because of t he ice,
please con tact professional ser vice pe rsons.
It is neces s ary to cle an t h e sp ray arm s regul arl y fo r ha r d
wate r chemicalswill clogthesprayarm jetsandbearings.
- Inspect the filters for blocking a fter e very time the dis hwasher has been used .
- By uns crewing thecoarse fi lter, you can remove the filter syst em. Re move any f oo dremna nts and
clean the filters under running water.
Remarks:
Theentire filterassemblyshould be cleanedoncea week.
To remove thelower sprayarm,pull out thesprayarm u pwa rd.
Tor e mo v e the upper spr a y a rm , hold t he nut, rot ate th e arm
clockwiseto remove it.
Washthe arms in soapy and warm water and use a soft brush t o
clean the j ets. R eplace th em aft er rinsin g the m thorough ly.
Page 18

It isrecommend that yourun a wash cycle with the
dishwasher empt y and the n remov e th e plug fro m the
socket, turn o ff the wa ter supply and l eave the door of
the app lia n c e sl i ght ly ope n. This wil l h el p t h e d oo r
seals to lastl onger andprevent odours fromforming
withinthe appliance.
If the appliance must be moved, tr y to keep it in the
vertical position. Ifabsolutelynecessary, itcan be
positioned on its back.
Oneofthefactorsthatcauseodourstoforminthe
dishwasher is f ood th at re mains tr apped in the seals .
Periodic cleaning with adamp sponge will prev ent t his
fro m occu rr ing.
Before cleani ng or performing maintenance, alw ays
remove the p lug from the socket.
To clean theexterior and rubber parts of the dishwasher,
donotuse solvents or abrasive cleani ngproducts.
Only use a clo th with warm soapy wate r.
Toremove sp ots or st a ins from the surf ace of th e
interi or, use a clot h da mpe ned with wa ter an a little
vinegar,or a c leaning pro duct mad e sp ecifically f or
dishw ashers.
Removethe Plug
No Solv ent s or Abrasiv e Cl eanin g
Moving theAp plia nce
Seals
After ever y wash, turn off t he wa ter supp ly to the
appliance and leave th e doo r slight ly op en so th at
moisture a nd odou rs a re no t trapped inside.
AfterEvery Wash
Whennotin Use fora LongTime
Ensure the v oltage and frequency o f thepower being correspond s to
those on the rating pl ate. Onlyinsert the plug into an electrical so cket whichis earthed
properly.Ifthe el ectrical socketto whi ch the a pplianc e mu st be c onnected is not
appropriate f or the plug , replace thesocket, rather thanusingaadaptors ort helike as
theycould cause overheating andburns.
Please look at therating label to know the r at ing voltage and conn ect the d ishwasher to the appropriate powersupply.
Use the r equired fuse 10 amp, time d elay f use orcircuit bre aker r ecommended and prov ide sepa rate circ uit s erving
only this appliance.
Position theappliance i n t he desired location. T he back should r est ag ainst t he w all behin d it, and the sides,
along the adjacent ca binets or walls. The dishwasher is equipped wi th water supply a nd drain hoses th at can
be positio ned ei ther to the righ t or the left s ides to facilitate p roper in stallatio n.
Once the appliance is positioned for levelling, t he height of the di shwashe r
may bealtered vi a adjust ment of the screwing level of the feet. In any case,
the applia nce should notbe inclin ed more than 2 .
For personal safety:
DO NOT USE AN EXTENSION CORD OR AN ADAPTER PLUG WITH THIS APPLIANCE.
DONOT, UNDERANY CIRCUMSTANCES,CUTOR REMOVETHE EARTHING
CONNECTION FROM THE POWER CORD.
This appliance must be earthed. In the event of a malfunction or breakdown, earthing will reduce the risk of
electric shock by providing a path of least resistance for the electric current. This appliance is equipped with a
cord havingan equipment-earthing conductor and an earthing plug.The plug mustbe plugged into an
appropriate outlet that is installed and earthed in accordance with all local standards and requirements.
Page 19

Connect thecold w ater supp ly hose to a t hreaded 3/4(inch) conne ctor an d make sure
that it isfastened tightly in place.
If the water pipe s are n ew o r have n ot been used f or anextended pe riod of time, let the
water r un to make sure th at the water is clear.Thi s pre caution i s need ed to avoid the
risk of the water inlet to be blocked an d dam age th e applian ce.
Please close the h ydrant after us ing.
for personal safety:
DO NOT USE AN EXTENSION CORD OR AN ADAPTER PLUG WITH THIS APPLIANCE.
DO NOT, UNDER ANY CIRCUMSTANCES, CUT OR REMOVE THE
FROM THE POWER CORD.
EARTHING
CONNECTION
Improper connection of the equipment earthing conductor can result in the risk of an
electric shock.
Check with a qualified electrician or service representative if you are in doubt whether the
appliance is properly earthed.
Do not modify the plug provided with the appliance. If the plug does not fit properly to the
outlet, please have a qualified electrician to install a proper outlet.
Insert the drainhose into a dra in pipe with a m inimum diam eter of 40mm, or letit run into the sink , mak ing sur e to
avoid bending or crimping it.The top of thehose mustbelessthan1000mm.
A
Counter
Front
Drain pipe
NOTE
The top of the hose
must be l ess than
1000mm.
φ 40m m
B
Page 20

Thefollowingthings shouldbe checked beforestartingthe dishwasher.
The conten t of this manual is veryhe lpfulto the users.
After installation, please make sure to keep this manual.
1
Thedishwasheris level andfixed properly
2
The i nlet valv e is open
3
Thereis a leakageat the connections of the conducts
4
Thewires aretightlyconnected
5
The poweris switched on
6
The inl et and drai n ho ses a re kno tte d
7
Allpacking materials and printingsshouldbe taken outfrom the dishwasher
Extension Hose
Ifyou needa drain hoseextension, makesure touse a similar drainhose.
It must be no longer t han 4 metres; otherw ise t he clean ing effectof the dishwasher could be reduced .
Wat e r Ou t l e t
Connect the water d rain h ose. The dr ain hose must be correctly fit ted t o av oid wate r lea ks.
Ensure that the water drain hose is not kinked or s quashed .
If the sink is 1 000 hig her fr om t he f l oor, t he exc ess water in hos e s c anno t be draine d directl y
into the sink. Itwill be necessary todrain excess waterfrom hosesinto a bowlo r suitable
container that is held outside and low er th an the s ink.
How to DrainExcessWate rFromHoses
Syphon Connection
The waste co nn ec ti on mus t be at a height les s t han 100 0 mm (m axim u m) from t he bot to m of t he d is h.
The water dr ain h ose should be fix ed .
Page 21

Fuse blown, or the
circuit breakeracted
Replace fuse or reset circuit breaker. Remove any other
appliances sharing the same circu it with the dishwasher
Spilled rinse-aid
Always wipe up rinse-aid spills immediately.
Hard water minerals
The affected items are
notcorrosion resistant.
The lid of the softer
is loose
Aspayarmis
knocking against
an itemina basket
r
Items of crockery
are loose in the
wash cabinet
This may be caused
by on-site installation
or the cross-section of
the piping.
A programme was not
run after dishwasher
salt wasadded.
Traces of salt have
gotten into the wash cycle.
To clean the interior, use a damp sponge with
dishwasher detergent and wear rubber gloves.
Never use any other cleaner than dishwasher
detergent for the risk of foaming or suds.
Always run the quick wash programme .
without any crockery in the dishwasher and
without selecting the Turbo function (if present),
after adding dishwasher salt.
Check the lip .Ensure the fix is fine.
Interrupt the programme, and rearrange the items
which are obstructing the sp ay arm.r
Interrupt the programme,
and rearrange the items of crockery.
This has no influence on the dishwasher function.
if in doubt, contact a suitably qualified plumber.
Detergent with
colourant was used
Make sure that the detergent is the one without
colourant.
Improper detergent
Make sure the dishwasher is turned on and the door is
closed securely.
Check that the water supply is connected prope rly and
the water is turned on.
Make sure to close the door properly and latch it.
Make sure the power cord is properly plugged into the
wall socket.
Power supplyis not
turned on
Water pressure is low
Door of dishwasher
not properly closed.
Kink in drain hose
Filter clogged
Kitchen sink clogged
Check drain hose.
Check coarse the filter
(see section titled )" Cleaning The Filter "
Check the kitchen sink to make sure it is draining well.
If the problem is the kitchen sink not draining ,you may
need a plumber rather than a serviceman for dishwashers.
Use only the special dishwasherdetergent to avoid suds.
If this occurs, open the dishwasher and let suds evaporate.
Add 1 gallon of cold water to the tub. Close and latch the
dishwasher,then select anycycle. Dishwasher willdrain
outthewater at the first step.Openthe doorafter draining
is stop and check if the suds is disappeared.
Repeat if necessary.
Page 22

Overflow.
When some malfunctions come on, the appliance will display error codes to warn you:
Longer inlet time.
Faucets is not opened, or water intake is
restricted, orwater pressure is too low.
Some element of dishwasher leaks .lem
The R ap id light fl i cke r fleetly
The ECO ligh t f lic ker fleetly
The dishes were not
loaded correctly.
See notes in " Loading the DishwasherBaskets ".
Select a more intensive programme.
See" Wash Cycle Table ."
Use more detergent, or change your detergent.
Rearrange the items so that the sp ay can rotate freely.r
Clean and/or fit the filter combination correctly.
Clean the sp ay arm jets. See "Cleaning the Spray
Arms".
r
Use less detergent if you have soft water and select
a shortestcycle to wash the glassware and to get
them clean.
Use a mild abrasive cleaner to eliminate those marks.
Re-loading the dishes properly.
Load the dishwasher as suggested in the directions.
Increase the amount of rinse-aid/refill the rinse-aid
dispenser.
Do not empty your dishwasher immediately after
washing. Open the door slightly so that the steam can
escape. Begin unloadingthe dishwasher only once t
he dishes are barely warm to the touch. Empty the low
basket first. This prevents water form dropping off
dishes in the upper basket.
In short program the washing temperatureis lower.
This also lowers cleaning performance. Choose
a program with a long washing time.
Water drainage is more difficult with these items.
Cutlery or dishes of this type are not suitable for
washing in the dishwasher.
Theprogramme was
notpowerful enough.
Not enough detergent
wasdispensed.
Items are blocking
the path of sp ay arms.r
The filter combination
inthebaseofwash
cabinet is not clean or
is not correctly fitted.
This may cause
the sp ay arm jets
to get blocked.
r
Combination of soft
water and too much
detergent.
Aluminum utensils
have rubbed against
dishes.
Dishes block
detergent cups.
Improper loading
Too little rinse-aid
Dishes are removed
too soon
Wrong program
has been selected
Use of cutlery with
a low-quality coating
Opencircuit or break of distributaryvalve.
Failure of orientationofdistributary valve.
TheGlass light flicker fleetly
Page 23

If overflow occurs, turn off the main water supply before calling a service.
If there is water in the base pan because of an overfill or small leak,
the water should be removed before restarting the dishwasher.
Height: 845mm
Width : 598mm
Depth: 600mm
(with the door closed)
Water press ur e: 0.04- 1.0M Pa
Pow er s upp l y: see r at in g la bel
Capacity: 14place settings
Page 24

 Loading...