

Page 1
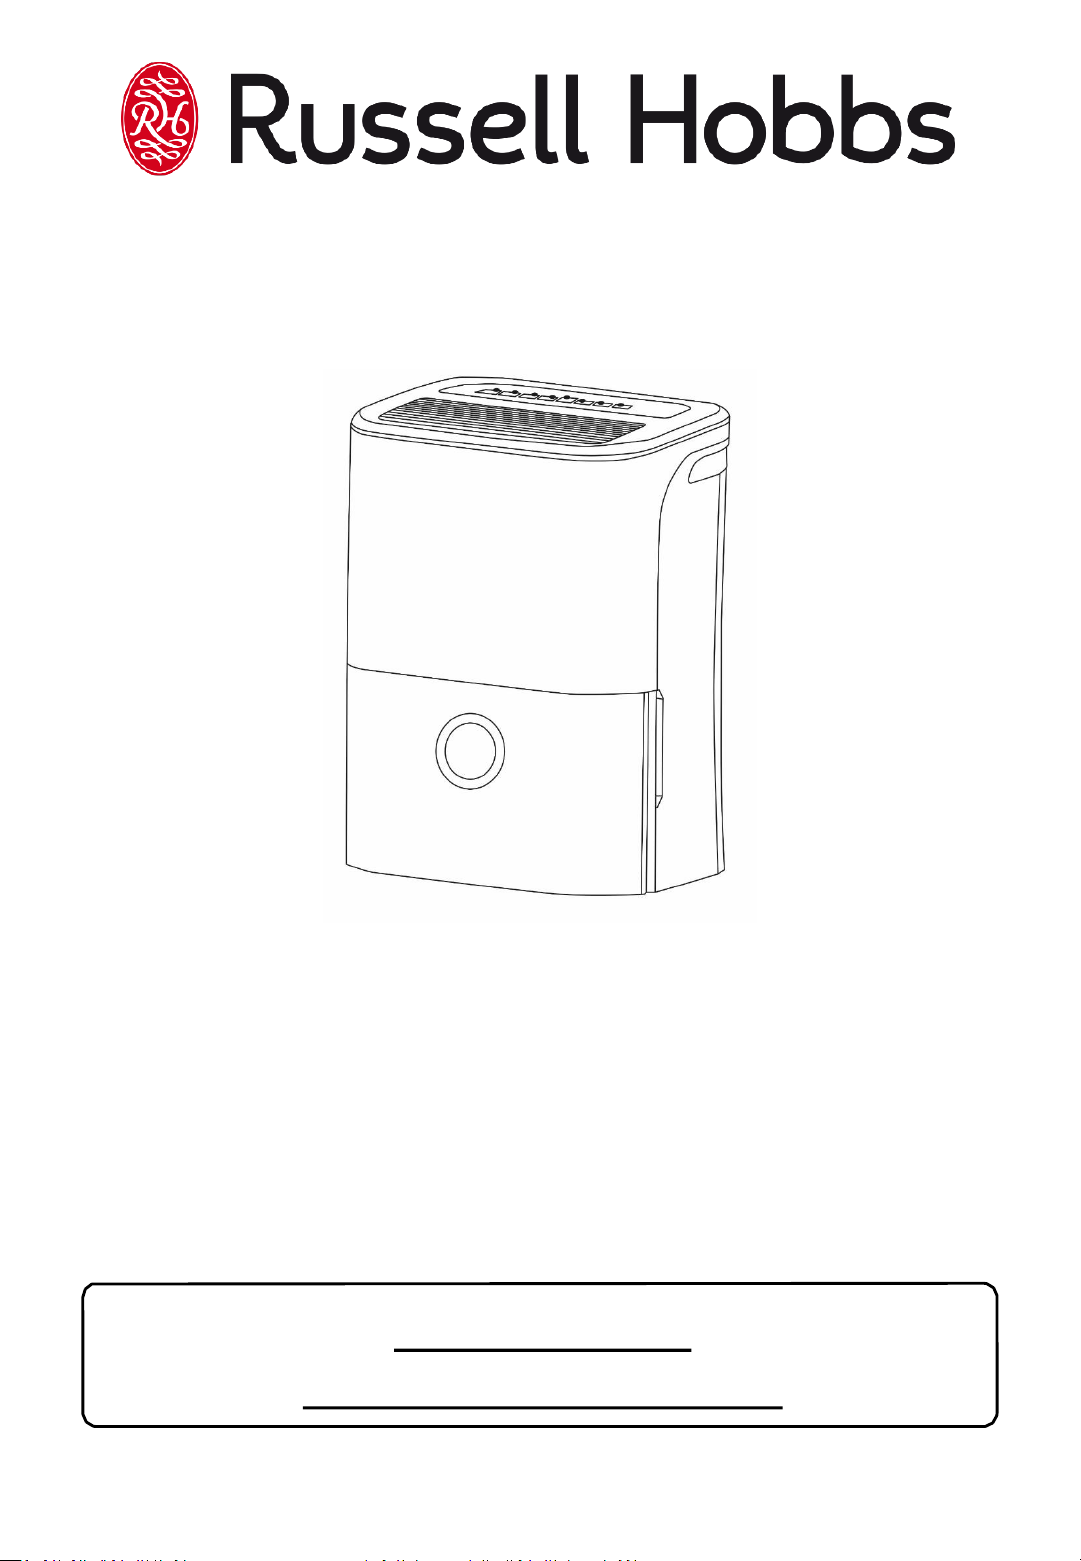
20L Dehumidifier
For Customer Services & Spare Parts please call 0345 209 7461
Or visit us at https://mda.russellhobbs.com
PLEASE RETAIN
FOR FUTURE REFERENCE
Model Number: RHDH2002
220-240V AC 50Hz 440W
Page 2

Page(s)
Safety Instructions and Electrical Safety
3 - 4
Feature
Diagram
5
Control Panel
Diagram
6
Positioning your Dehumidifier
7
Using your
Dehumidifier
8 - 14
Emptying
your Dehumidifier
14 - 15
Cleaning and Care
16 – 17
Troubleshooting
18
Guarantee and Customer
Services
19
Spare
Parts
20
Connection to the Mains Supply
21
Notes
22
Specification
23
CONTENTS
Page 2
Page 3

Safety Instructions
Important note: Please read this booklet before installing and switching on this
appliance. The manufacturer assumes no responsibility for incorrect installation and
usage as described in this booklet.
• This model uses natural refrigerant gas as part of its cooling system. This gas
is known as R290 (Propane) and is environmentally friendly but can be
combustible. Care should therefore be taken when handling or transporting the
product to ensure that none of the refrigeration circuit components are
damaged,
• Do not obstruct ventilation openings in the appliance.
• Do not cover the appliance or place any object on the control panel
• The appliance must not be placed or rested on its power cord.
• Do not use adaptors or extension leads when connecting the appliance to the
electrical power supply
• Do not plug in if the plug is damaged.
• Do not pull, twist or damage the power cable.
• Do not plug-in or un-plug the appliance with wet hands to prevent electrical
shock.
• Always store the unit in an upright position in order to maintain the compressor
working in a proper condition.
• Never insert your finger or any other object into the air outlet
• This appliance can be used by children aged from 8 years and above and
persons with reduced physical, sensory or mental capabilities or lack of
experience and knowledge if they have been given supervision or instruction
concerning use of the appliance in a safe way and understand the hazards
involved. Children should not play with the appliance.
• This appliance is designed to be used by adults, do not allow children to play
with the appliance.
• The appliance is intended for residential use only.
Page 3
Page 4
Safety Instructions
• Do not use in the following locations:-
Next to a source of fire.
An area where oil is likely to splash.
An area exposed to direct sunlight.
An area where water is likely to splash.
Near a bath, shower or a swimming pool.
In a greenhouse.
An area where flammable gasses or liquids are present.
Electrical Safety
THIS APPLIANCE MUST BE PLUGGED INTO AN EARTHED SOCKET
• Before switching on, make sure that the voltage of your electricity supply is the
same as that indicated on the rating plate. This product is designed to operate
on 220 – 240V AC; 50Hz. Connection to any other power source may damage the
unit.
• This product may be fitted with a non re-wireable plug. If it is necessary to
change the fuse in the plug, the fuse cover must be refitted. If the fuse cover
becomes lost or damaged, the plug must not be used until a suitable
replacement is obtained.
• If the plug has to be changed because it is not suitable for your socket, or
becomes damaged in any way, it should be cut off and an appropriate plug fitted.
This should be carried out by a qualified electrician. The plug removed must be
disposed of safely, as insertion into a 13 Amp socket is likely to cause an
electrical hazard.
Page 4
Page 5
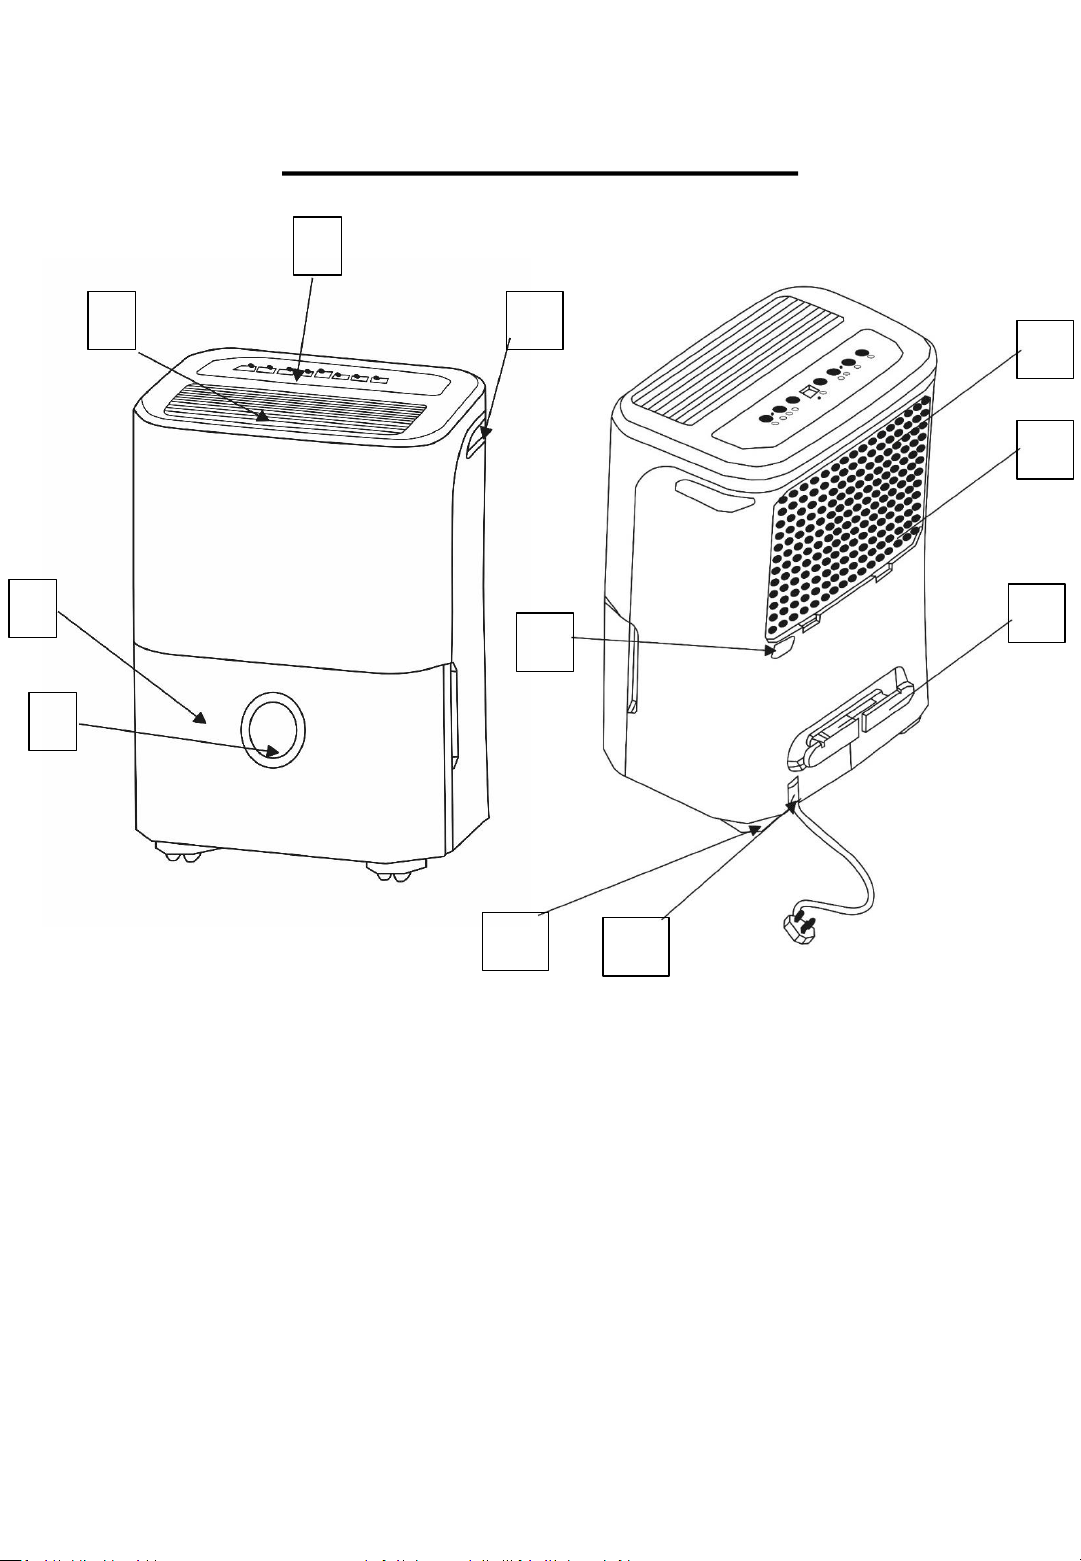
FEATURE DIAGRAM
For Customer Services & Spare Parts please call 0345 209 7461
Or visit us at https://mda.russellhobbs.com
Front
1. Control panel
2. Air outlet grille
3. Water tank
4. Water tank window
5. Handle
1
2
3
5
7
10
8
Rear
6. Drain hose outlet
7. Air inlet grille
8. Air filter (behind the air
intake grille)
9. Power cord buckle
10. Power cord
11. Castor
Page 5
4
9
6
11
Page 6
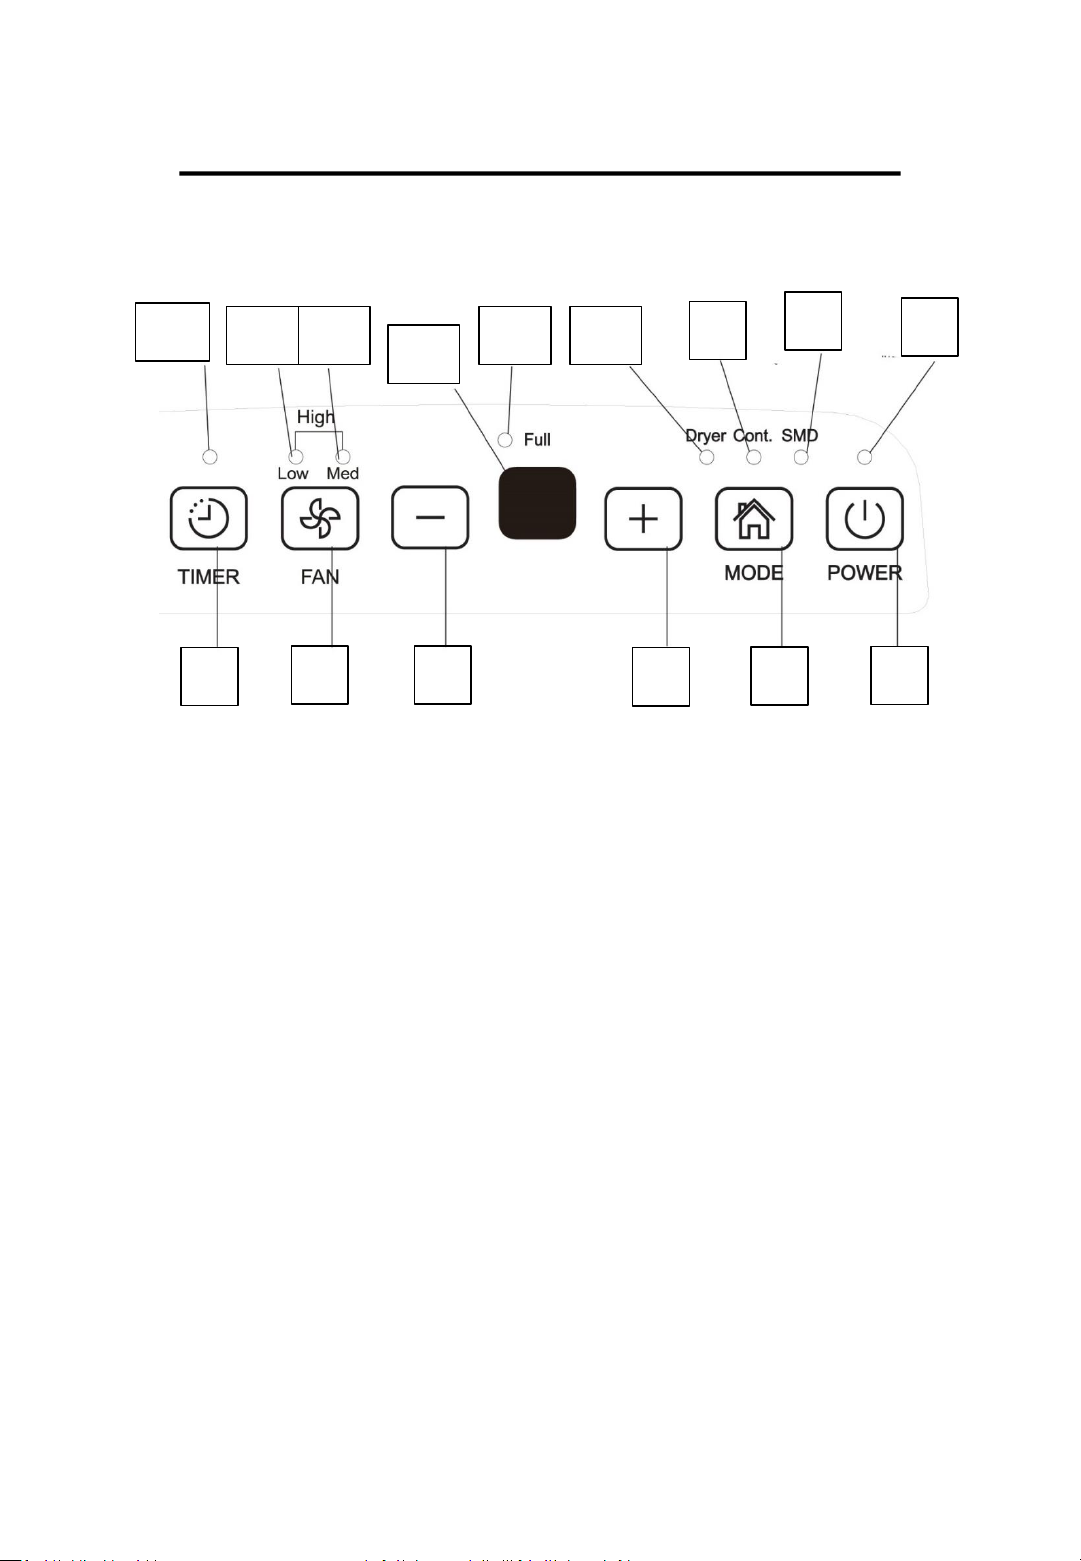
CONTROL PANEL DIAGRAM
1. Power
2. Mode selection button
3. Up control button
4. Down control button
5. Fan button
6. Timer button
7. Power indicator light
8. SMD/Smart dehumidifying
(extraction) mode indicator
light
1
2
3
4
5
6
7
8
Page 6
10
9. Continuous dehumidifier
(extraction) mode indicator
light
10. Dryer mode indicator light
11. Water tank full indicator light
12. LED Display
13. Medium fan speed indicator
light*
14. Low fan speed indicator light*
15. Timer indicator light
15
9
11
12
1314
*when both indicator lights are illuminate then the High fan speed has
been selected
Page 7
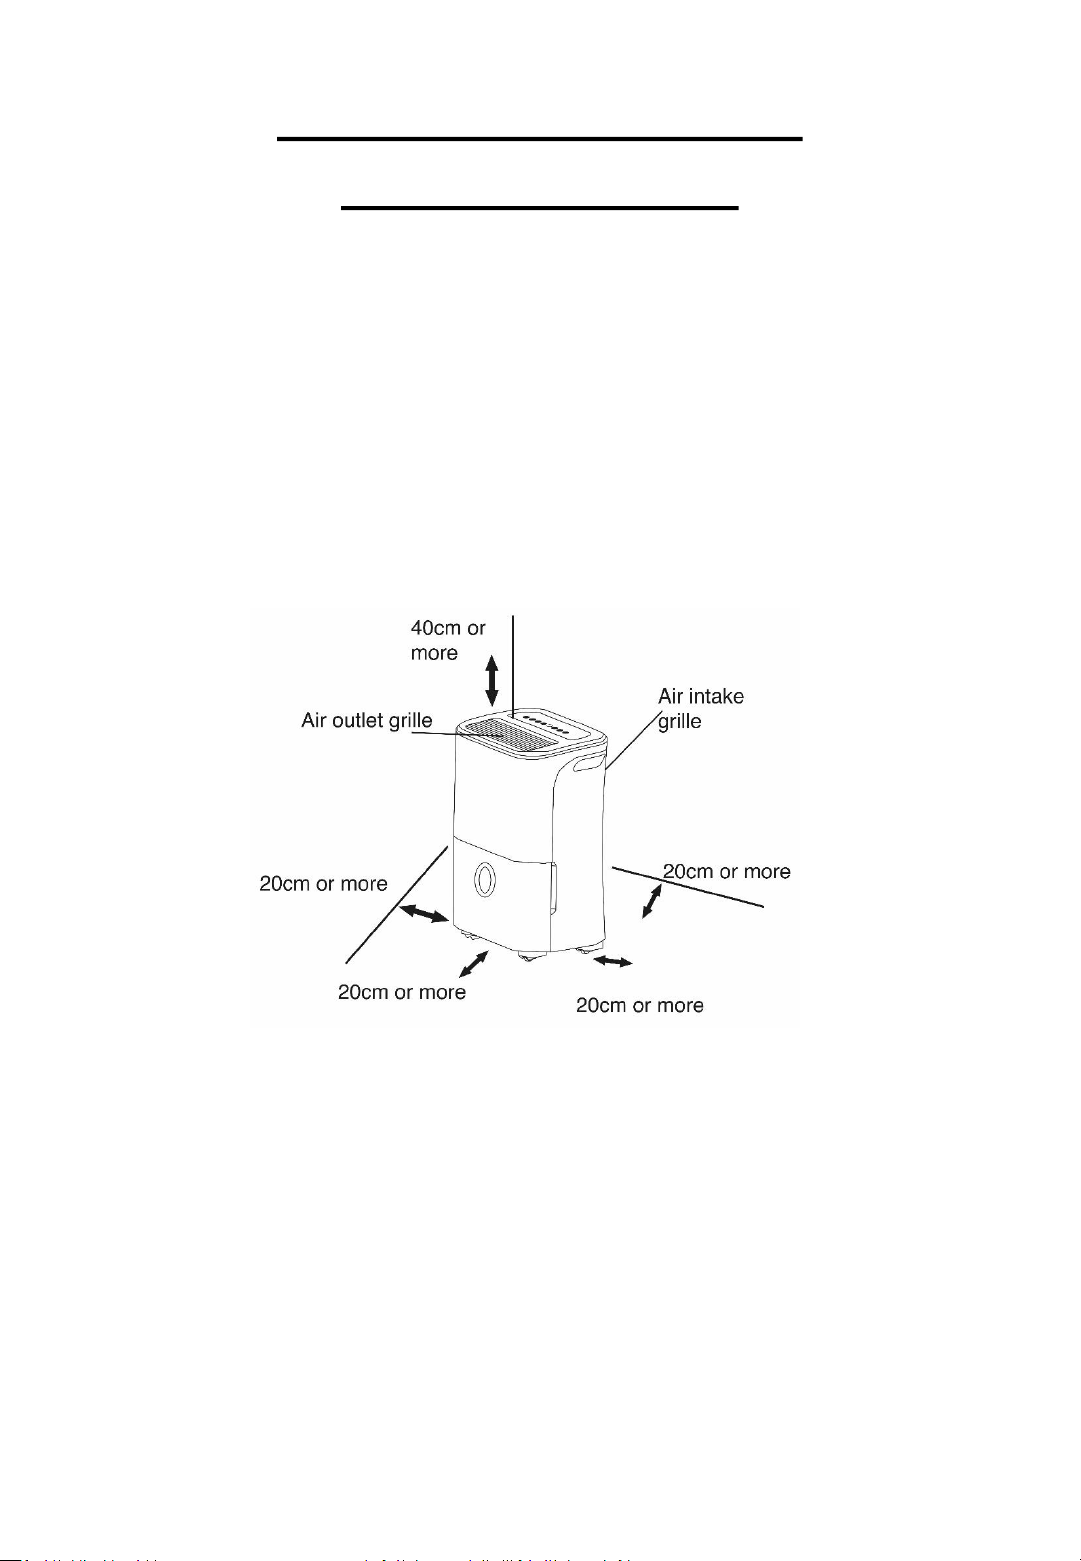
• This dehumidifier is intended for indoor residential applications
only. This dehumidifier should not be used for commercial or
industrial applications.
• Place the dehumidifier on a smooth, level floor strong enough to
support the unit with a full drawer of water.
• Allow at least 20cm of air space on all sides of the unit for good air
circulation.
• Allow at least 40cm of air space above the unit for good air
circulation.
• Place the unit in an area where the temperature will not fall below
5⁰C (41 ⁰ F). The coils can become covered with frost at
temperatures below 5⁰C (41 ⁰ F), which may reduce performance.
• Place the unit away from clothes dryers, heaters or radiators.
• The dehumidifier must be operated in an enclosed area to be most
effective.
• Close all doors, windows and other outside openings
• Do not use outdoors.
POSITIONING YOUR
DEHUMIDIFIER
Page 7
Page 8

When using the dehumidifier for the first time, run the unit in
continuous mode for 24 hours
When the water tank is full the unit will automatically shut off or
when the tank is removed. The fan motor may continue for a period
of 30 seconds after shut off, this is normal
After the unit has stopped, the unit cannot be restarted for 3 minutes.
This is a safety feature to protect the appliance. If the unit is not
turned off then unit will automatically start after 3 minutes.
The unit has frost protection, this means that when frost builds up
inside the unit the compressor with turn off and the fan will continue
to run to remove the frost. Once the frost is removed the compressor
will operate again.
If power to the unit is broken unexpectedly (power cut), once power is
restored the unit will restart on the function it was running prior to
the power being broken.
Turning the Unit On
• Remove all packaging and plug the unit into a socket.
• Ensure the water tank is correctly positioned, the drain plug is in
place in the back of the unit if you are using the tank to collect the
water.
• Press the Power button to turn the dehumidifier on and off. The
power indicator light will illuminate when the unit is turned on.
• When the unit is first switched on, the display shows the actual
room % humidity level (within 5% accuracy).
• The humidity level can be set using the instructions for “Setting the
Humidity”.
USING YOUR DEHUMIDIFIER
Page 8
Page 9

Continuous Dehumifier (Extraction) Mode
• For maximum extraction rate, the Continuous Dehumidifier
(Extraction) mode should be used.
• Press the Mode button on the control panel until the Continuous
Dehumidifier indicator light is illuminated
• The unit will continue to run at the maximum extraction rate until
the water tank reaches the max fill level.
• Press the Power button or Mode button to cancel the Continuous
Dehumidifier (Extraction) mode
Note: The humidity cannot be set when the unit is operating in
Continuous Dehumidifier (Extraction) Mode
SMD/Smart Dehumidifying (Extraction) Mode
• In the SMART dehumidifying mode, the unit will automatically
control room humidity in a comfortable range 45%~55% according
to the room temperature.
• Press the Mode button until the SMART indicator light is
illuminated.
• Press the Power button or Mode button to cancel the Smart
Dehumidification (Extraction) Mode.
Note: The humidity cannot be set when the unit is operating Smart
Dehumidification (Extraction) Mode.
Dryer Mode
• For maximum extraction rate when drying clothing, use the Dryer
Mode.
• The Dryer mode functions like the Continuous Extraction mode but
with the additional boost of the Turbo Function. The humidity level
is automatically controlled according to the actual room humidity.
The unit will run in Drying mode for a maximum of 10 hours, or until
the water tank is full.
USING YOUR DEHUMIDIFIER
Page 9
Page 10

• Press the Mode button until the Dryer indicator light is illuminated
• Press the Power button or Mode button to cancel the dryer
function.
Note:
• The humidity cannot be set when the unit is operating in Dryer
Mode.
• The dryer mode must be operated in a closed room. Do not
operate with a door or window open.
• Place clothes 30-50cm from the unit for best drying results.
Caution:
Do not cover the air outlet with wet clothing, or do not place wet
clothing above the unit.
Setting the Humidity
• The desired humidity level can be set within a range of 35% to 85%
Relative Humidity in 5% increments / decrements by pressing the
+ and – keys.
• To select the desired humidity level ensure the unit is not on the
continuous mode. This can be done by checking the CONT.
indicator is not illuminated. If it is then simply press the CONT
button to de-activate the continuous mode and the CONT.
indicator will switch off.
• Use the Up and Down control buttons to select the desired
humidity. The display will flash while the humidity is being set.
• For drier air, press the pad and set to a lower percent value(%).
• For damper air, press the pad and set a higher percent value(%).
Note: The humidity cannot be set when the unit is operating in
Continuous Dehumidifier (Extraction) Mode, SMART Dehumidifier
(Extraction) Mode or Dryer Mode.
USING YOUR DEHUMIDIFIER
Page 10
Page 11

USING YOUR DEHUMIDIFIER
Page 11
Setting the Timer
Delayed Start
• The unit must be switched OFF for the Auto Start function to be
programmed.
• With the unit switched off, press the Timer button until the Timer
indicator light is illuminated. “0.0” will be displayed on the LED display.
• Use the up and down control buttons to select the desired delayed
start time.
• The delayed start time can be adjusted in 0.5 hour increments up to 10
hours, and then in 1 hour increments up to 24 hours.
• The selected time will stay on the display for 5 seconds, and will then
disappear. The countdown to the start time can be viewed by pressing
the Timer button again.
Auto Stop
• The Auto Stop function can only be set when the unit is ON.
• Press the Timer button until the Timer Off indicator is illuminated.
• Use the up and down controls to select the desired end time.
• The stop time can be adjusted in 0.5 hour increments up to 10 hours,
and then in 1 hour increments up to 24 hours.
• The selected time will stay on the display for 5 seconds, and will then
disappear. The Auto Stop time can be viewed by pressing the Timer
button again.
• Both the Delayed Start and Auto Stop functions can be initiated in the
same sequence. In this instance, both Timer On and Off indicators will
be illuminated.
Note: Turning the unit On or Off at any time will cancel the Delayed Start
or Auto Stop functions and the unit can take 2 minutes to restart.
If the time is adjusted to “0.0” this will also cancel the Timer function.
If the water drawer is full or “P2” is displayed, the Delayed Start and Auto
Stop functions will be cancelled.
Page 12

USING YOUR DEHUMIDIFIER
Page 12
Fan
• Control the fan speed by pressing the fan speed button and select from
Low, Medium and High fan speed settings.
• Set the fan speed to High to obtain the maximum moisture removal.
• When the humidity has been reduced and quiet operation is preferred
(night time for example), you can set the fan control to Medium or
Low.
• The humidity level can be set when the fan speed has been selected,
however the extraction rate will be lower if Low or Medium fan speed
has been selected
Page 13

Other features
Auto Shut Off
The dehumidifier will shut off automatically under the following
conditions:
• When the water tank is full
• When the water tank is removed
• When the water tank is not replaced in the proper position
• When the selected humidity level is reached
Water Drawer Full Indicator light
• The indicator light will illuminate under the following conditions:
• When the water tank is full
• When the water tank is removed
• When the water tank is not replaced in the proper position
3 Minute Restart
After the unit has stopped, it cannot be restarted for 3 minutes. This is
to protect the unit. Operation will automatically start after 3 minutes.
Auto Defrost
When frost builds up on the evaporator coils, the compressor will cycle
off and the fan will continue to run until the frost disappears.
Auto-Restart
If the unit turns off unexpectedly due to a power cut, it will restart with
the previous function setting automatically when the power resumes.
USING YOUR DEHUMIDIFIER
Page 13
Page 14

Error Codes
AS – Humidity Sensor Error. Unplug the unit and plug it back in. if the
error continues, call customer service.
ES – Temperature Sensor Error – Unplug the unit and plug it back in. If
error continues, call customer service.
P1 – Unit is defrosting. Allow the unit time to automatically defrost. The
error code will disappear once the unit has defrosted.
P2 – Water drawer is full or drawer is not in the right position. Empty
the drawer and replace in the correct position.
E3 – Unit malfunction – unplug the unit and plug back in. If the error
repeats, call customer service.
EC -Refrigerant leakage detection. With this new technology, the display
area will appear EC when the unit detects refrigerant leakage, call
customer service.
EMPTYING YOUR DEHUMIDIFIER
There are two ways to remove collected water:
Collection in the Water Tank
• When the water tank is full, the unit will automatically stop running,
and the Full indicator light will illuminate.
• Slowly pull out the tank and grip the left and right handles securely
and carefully. Pull out the water tank straight so the water in the
tank does not spill. Do not put the tank down because the bottom of
the drawer is uneven.
• Empty the water and replace the tank. The tank must be correctly
inserted for the dehumidifier to restart operation.
• The machine will restart operation after 3 minutes
USING YOUR DEHUMIDIFIER
Page 14
Page 15

• When you remove the water tank, do not touch any parts inside of
the unit. Doing so may damage the product.
• Be sure to push the water tank gently all the way into the unit.
Banging the tank against anything or failing to push it in securely
may cause the unit not to operate.
• When you remove the water tank, if there is some water in the unit
you must dry it .
Continuous Draining
• Water can be automatically emptied into a floor drain by attaching
the unit with a inner diameter 13.5mm hose .
• Remove the rubber bung from the Drain Hose Outlet on the back of
the unit.
• Attach the hose into the Drain Hose Outlet in the back of the unit as
shown below.
• Lead the water hose to a suitable drainage facility. The drainage
facility should be lower than the drain outlet of the unit.
• Be sure to run the water hose sloping downward and let the water
to flow out smoothly.
• NOTE: When the continuous drain feature is not being used, remove
the drain hose from the outlet and attach the rubber plug back to
the drain outlet.
EMPTYING YOUR DEHUMIDIFIER
Page 15
Drain
hose
Page 16

Cleaning the Air Filter
The air filter is located behind the air intake grill on the rear of the
appliance and should be checked and cleaned at least every 30 days or
more often if necessary.
NOTE: DO NOT PUT THE FILTER IN AN AUTOMATIC DISHWASHER
To Remove the Air Filter:
• Push both tabs on the Air Inlet Grille upwards.
• Clean the filter with warm, soapy water. Rinse and let the filter dry
before replacing it. Do not clean the filter in a dishwasher.
To Replace the Air Filter
• Insert the top of the Air Inlet Grille/Filter into the unit, then click the
bottom tabs into place.
CAUTION:
DO NOT operate the dehumidifier without a filter. This will cause dirt
and lint to build up and clog the unit and will reduce performance.
CLEANING AND CARE
Air Filter
Tabs
Page 16
Page 17

Turn the dehumidifier off and remove the plug from the wall outlet
before cleaning.
Cleaning the Grille and Case
• Use water and a mild detergent. Do not use bleach or abrasives.
• Do not splash water directly onto the main unit. Doing so may
cause an electrical shock, cause the insulation to deteriorate, or
cause the unit to rust.
• The air intake and outlet grilles get soiled easily, so use a vacuum
attachment or brush to clean.
Cleaning the Water Tank
• Every few weeks, clean the tank to prevent growth of mould,
mildew and bacteria. Partially fill the tank with clean water and add
a little mild detergent. Swish it around in the tank, empty and rinse.
NOTE: Do not use a dishwasher to clean the tank. After clean, the
tank must be in place and securely seated for the dehumidifier to
operate.
When not using the unit for long time periods
• After turning off the unit, wait 24 hours before emptying the
drawer.
• Clean the main unit, drawer and air filter.
• Wrap the cord and bundle it with the band and cover the unit with
a plastic bag.
• Store the unit upright in a dry, well-ventilated place.
CLEANING AND CARE
Page 17
Page 18

TROUBLE SHOOTING
Problem
What to check
Unit does
not start
•
Make sure the dehumidifier’s plug is pushed
completely into the socket outlet.
•
Check the house fuse/circuit breaker box.
•
Dehumidifier has reached its preset level or
drawer is full.
•
Drawer is not in the proper position.
•
If the unit is being restarted there is a 3 min
delay before the unit will start running.
•
Ensure the unit is not set on delayed start
function.
• Ensure the room humidity is not lower than 35%.
Dehumidifier does not dry
the air as it should
•
Did not allow enough time to remove the
moisture.
•
Make sure there are no curtains, blinds or
furniture blocking the front or back of the
dehumidifier.
•
The humidity selector may not be set low
enough.
•
Check that all doors, windows and other
openings are securely closed.
•
Room temperature is too low, below 50C(410F).
•
There is a kerosene heater or something giving
off water vapour in the room.
The unit makes a loud
sound when operating
•
The air filter is clogged.
•
The unit is tilted instead of upright as it should
be.
•
The floor surface is not level.
Frost
appears on the coils
•
This is normal. The unit has Auto defrost feature.
Water on the floor
•
Hose to connector or hose connection may be
loose.
• Intend to use the drawer to collect water, but the
back drain plug is removed.
ES, AS, P1
or P2, E3, EC,
appear on the display
•
These are Error/Protection codes. Refer to page
12 of the instruction manual.
Page 18
Page 19

GUARANTEE AND CUSTOMER SERVICES
At Russell Hobbs, we take all our customer feedback seriously.
Feel free to contact our Product Care Team, on 0345 209 7461
who will be more than happy to assist you.
This product is guaranteed for 12 months from the date of the
original purchase. If any defect arises due to faulty materials or
workmanship, the faulty product must be returned to the place of
purchase.
Refund or replacement is at the discretion of the retailer.
The following conditions apply:
• The product must be returned to the retailer with the original
proof of purchase.
• The product must be installed and used in accordance with the
instructions contained in this instruction guide and any other
instructions for use which are supplied.
• It must be used for domestic purposes only and for its intended
use.
• This warranty does not cover wear and tear, damage, misuse
or consumable parts.
This does not affect your statutory rights.
For Customer Services & Spare Parts please call 0345 209 7461
Or visit us at https://mda.russellhobbs.com
Page 19
Page 20

SPARE PARTS
For Customer Services & Spare Parts please call 0345 209 7461
Or visit us at https://mda.russellhobbs.com
To check the availability of the following spare parts, simply contact
our friendly Customer Services team using the details provided at the
bottom of this page.
Air Filter
Drain Hose Bung
Page 20
Page 21

CONNECTION TO THE MAINS SUPPLY
This appliance is designed to operate from a mains supply of
220-240V~ 50Hz.
Check that the voltage marked on the product corresponds
with your supply voltage.
How to change the fuse
1. Slot the end of a screwdriver into the
recess in the fuse holder of the plug.
2. Pull the fuse holder upwards until free
of the plug and slide the fuse out.
3. Replace the fuse and replace fuse
holder, pushing down until locked into
place.
Important: Only ever use a 13 amp fuse.
Page 21
Page 22

NOTES
Page 22
Page 23

Specification
Page 23
Model
RHDH2002
Voltage
220
– 240V 50Hz
Power
Input
440W
Moisture Removal
20L per day (DB 30
0
C RH = 80%)
Refrigerant
R290/75g
Overall Size (D x W x H)
24.5cm
35cm 51cm
Operating Temperature
5
0
C - 350C
Weight
15Kg
Page 24

Revision 1
Model: RHDH2002
This symbol is known as the 'Crossed-out wheelie bin Symbol'.
When this symbol is marked on a product/batteries, it means that
the product/batteries should not be disposed of with your general
household waste. Only discard electrical/electronic/battery items
in separate collection schemes, which cater for the recovery and
recycling of materials contained within. Your co-operation is vital
to ensure the success of these schemes and for the protection of
the environment. For your nearest disposal facility, visit
www.recycle-more.co.uk or ask in store for details.
We reserve the right, due to possible changes to design, to alter
the instruction manual without prior notice.
For Customer Services & Spare
Parts please call
0345 209 7461
Or visit us at
https://mda.russellhobbs.com
Made by G2S Ltd
under license.
G2S Limited, Wigan,
WN2 4AY
 Loading...