

Page 1
3L
DEEP FRYER
2 YEAR WARRANTY
RHDF3000_IB_FA_171117 Part No. T22-5004093
INSTRUCTIONS & WARRANTY
RHDF3000
1
Page 2

IMPORTANT SAFEGUARDS
When using electrical appliances, basic safety precautions should always be followed, including but not limited to
the following:
1. To protect against electrical hazards do not immerse the power cord, plug or appliance in water or any other
liquid.
2. Do not use in the bathroom or near any source of water. Do not use outdoors.
3. Always use the appliances handles as some parts will be hot.
4. The temperature of accessible surfaces/parts may become very hot when the appliance is operating.
5. This appliance is not intended for use by persons (including children) with reduced physical, sensory or
mental capabilities, or lack of experience and knowledge, unless they have been given supervision or
instruction concerning use of the appliance by a person responsible for their safety.
6. Unplug the appliance when not in use, before moving and before cleaning, let it cool down fully before
cleaning or storing away.
7. Do not operate this appliance with a damaged cord/plug or after the appliance has malfunctioned, or been
dropped or damaged in any manner. Contact Customer service for replacement, examination, repair or
adjustment.
8. There are no serviceable parts. If the power cord or appliance is damaged, it must be replaced by the
manufacturer or similarly qualified person in order to avoid a hazard.
9. Do not use on an inclined plane or unstable surface.
10. Do not move the appliance when in use.
11. Do not cover the appliance when in use.
12. Do not cook food items too large for the appliance.
13. Take care when opening the lid of the appliance, as hot oil can spatter and there may be some steam.
14. Always take care when removing food after cooking as it is hot.
15. Do not use the appliance near or below any curtains or other combustible materials.
16. Keep the appliance and the power cord away from the edge of tables or countertops and out of reach of
children and persons with disabilities.
17. To disconnect, turn off the wall power outlet, then grasp the plug and remove from wall power socket. Never
pull by the cord.
18. Always clean the appliance after use.
19. Do not place on or near any heat sources.
20. Do not leave the appliance unattended when in use.
21. Follow the instructions when cleaning this appliance.
22. Do not use appliance for other than its intended purpose.
23. This appliance is not a toy. Children should be supervised to ensure they do not play with the appliance.
24. Cleaning and user maintenance shall not be made by children without supervision.
25. Do not use the fryer without first filling with good quality cooking oil between the MIN and MAX marks inside
the bowl. If the oil level is below the MIN mark, you may damage the fryer. If above the MAX mark, hot oil
may escape, causing damage and injury.
26. Do not try to move or carry the fryer if it contains hot oil. Let it cool down fully first.
27. Do not lean or reach over the fryer while the oil is hot.
28. Do not carry or pass anything through the space over or near the fryer- if anything drops into the fryer, hot oil
will splash out.
2
Page 3

29. This appliance is not intended to be operated by means of an external timer or separate remote control
system.
30. For added safety, electrical appliances should be connected to a power outlet that is protected by a residual
current device (RCD), also often referred to as a ‘Safety Switch’. Your switchboard may already incorporate an
RCD. If unsure, call an electrician for verification and fitting if necessary.
This appliance is intended to be used in household and similar applications such as:
- Staff kitchen areas in shops, offices and other working environments;
- Farm houses;
- By clients in hotels, motels, and other residential type environments;
- Bed & breakfast type environments.
SAVE THESE INSTRUCTIONS.
3
Page 4

QUICK START GUIDE
This is a quick guide on how to use the Russell Hobbs Deep Fryer. Before
first use, please read entire instruction booklet for detailed instructions.
1) Lift the basket handle until it clicks and press lid button to open the lid.
2) Remove basket from fryer.
3) Fill fryer with suitable cooking oil (ensure oil is lled between the MIN &
MAX markings) and close lid.
4) Plug fryer into wall socket and turn on socket switch.
5) Select desired temperature using temperature control.
6) When green thermostat light turns off, the oil has reached temperature
and you can start cooking.
7) Fill basket with food.
8) Open lid by pressing lid button.
9) Ret the basket onto the fryer. Align the tab in front of the handle with
the slot in the front of the fryer (to avoid spatter do not lower basket
into oil until lid is closed).
10) Close fryer lid.
11) Unlock the handle and lower the basket into oil.
12) Set desired time on timer if required.
13) Once timer goes off, press + or - button to stop beeping and turn off
tim e r.
14) Lift the basket handle until it clicks and raise basket from oil.
15) Open fryer lid.
16) Remove basket from fryer and place food onto paper towel using
tongs.
17) Ret basket onto fryer.
18) When nished using fryer, unplug fryer and allow to cool before
removing oil and storing.
4
Page 5
Congratulations on the purchase of your Russell Hobbs appliance. Each unit is manufactured
to ensure safety and reliability. Before using the appliance for the first time, please read the
instruction booklet carefully and keep it for future reference. Pass it on if you pass on the
appliance.
When using electrical appliances, basic safety precautions should always be followed.
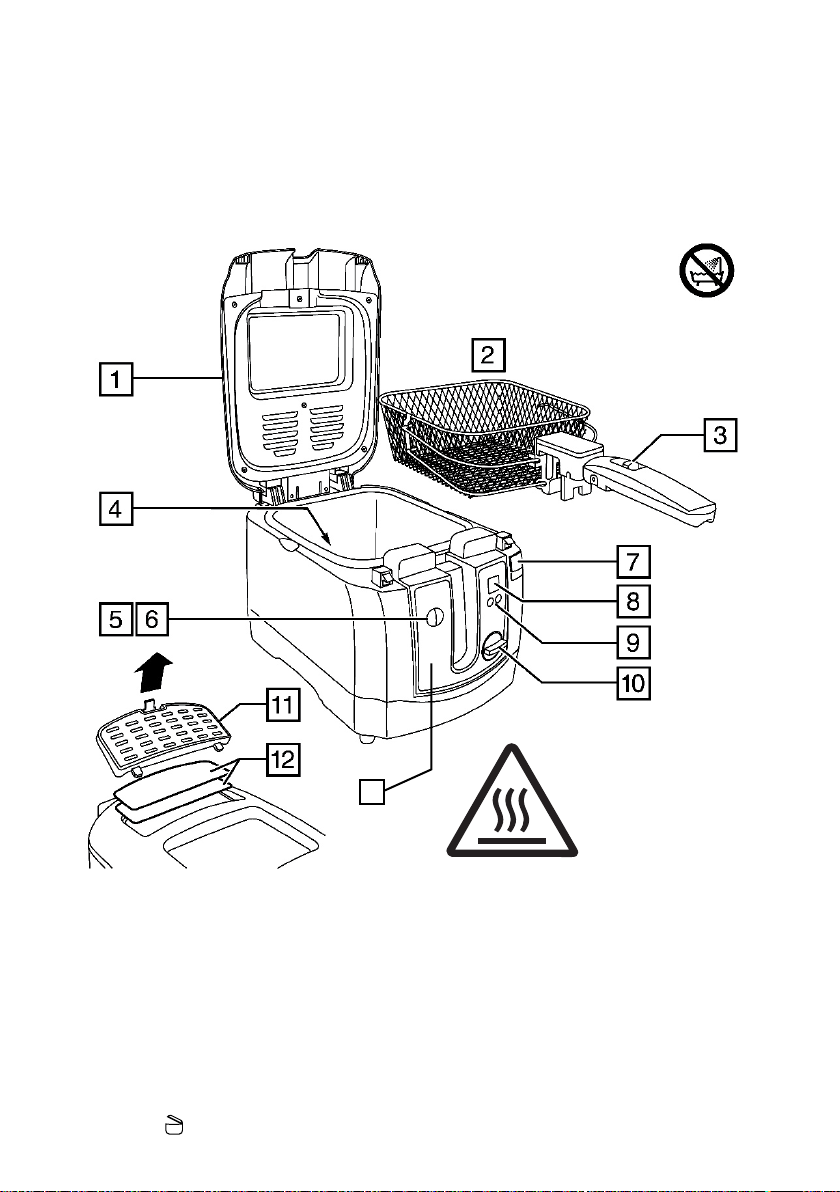
1. Lid
2. Basket
3. Basket handle release button
4. MIN/MAX marks
5. Power light (red)
6. Thermostat light (green)
7. Lid button
13
CAUTION: The surfaces of the appliance will get hot.
8. Timer display
9. Timer buttons
10. Temperature control
11. Filter compartment lid
12. Filters (white and black)
13. Reset Button (located behind control panel,
not shown in image)
5
Page 6

BEFORE FIRST USE
Clean the fryer, to remove manufacturing dust, etc. see CLEANING section for more instructions.
IMPORTANT: Ensure all packaging, labels and tags have been removed before connecting
to the power for the first time.
PREPARATION
1. Sit the fryer on a stable, level, heat-resistant surface, with at least 5cm space all round it.
2. Keep it away from cupboards, curtains, anything combustible, and anything that might be
damaged by heat or steam.
3. Position the fryer so the basket handle, when in the raised position, doesn't extend beyond
the edge of the work surface where it might be caught or knocked accidentally.
4. Line a colander or plate with paper towel, to drain the food after frying.
5. When using your fryer, always use oven gloves. They don't just protect your hands from heat,
they protect them from drips and splashes too.
CAUTION: When raising and lowering the basket, keep lid closed to avoid splashes and
splattering.
FILLING WITH OIL
1. Press the lid button to open the lid and remove basket.
2. If the bowl is empty, fill with good quality liquid cooking oil, to between the MIN and MAX
marks. If it already contains oil, check the level, and top up as necessary.
NOTE:
• Do not use solid cooking oil, fat, butter, margarine, or olive oil. Olive oil generally contains too
much water, and can be too smoky. Buy a good quality liquid cooking oil suitable for deep
frying, like sunower or corn oil.
• Do not mix oils of different types, as different oils have different temperature characteristics.
USING YOUR FRYER
1. Put the plug into a wall power outlet and switch the outlet on. The power light will come on.
2. Turn the temperature control to the temperature you need. The range is 80°C to 190°C.
3. The green thermostat light will come on to show that the fryer is heating up. The light will go
out when the correct temperature is reached, then cycle on and off as the thermostat works
to maintain the temperature.
4. When the green thermostat light goes out, you can start frying.
Prepare the food
• Cut food into uniformly sized pieces.
• Coat wet food (e.g. sh, fruit) with our, crumbs, batter, etc.
• Do not try to defrost food in the fryer. Any food other than pre-cooked, quick-frozen foods
(e.g. frozen chips, prawns in breadcrumbs, chicken pieces in batter) must be fully defrosted
before putting into the fryer.
• When frying pre-packed or pre-cooked frozen foods, follow the instructions on the packet.
• When frying raw vegetables (e.g. chips), dry them with paper towel or a tea towel before
placing them into the basket.
6
Page 7

Prepare the food (cont.)
1. Whilst lid is closed, lift up the basket handle until it clicks (Fig A).
This will raise the basket out of the oil. Open lid by pressing lid
button
2. Put the prepared food pieces in the basket. Try not to put more
than two layers of food in the basket. If you need to fry more, do
it in batches.
3. Place basket back into position on fryer and close the lid.
Unlock the basket handle release button and slowly lower the
handle. This will lower the basket into the oil.
4. The oil will foam as it comes into contact with water from the
food. As long as the foam doesn't threaten to overflow the bowl,
this shouldn't be a cause for alarm.
5. If the foam threatens to overflow the bowl, raise the handle to lift the basket out of the oil.
See HINTS AND TIPS for possible solutions.
Setting the timer
IMPORTANT: The timer does not switch the fryer on or off. You do not have to set the timer
in order to use your fryer.
1. Press the + button. The display will flash.
2. Press the + button until the number of minutes you want to fry is shown on the display. To
decrease the time, use the - button.
3. The timer can be set between 1 and 60 minutes in one minute increments.
4. Once the display shows the time you want, stop pressing the + button. After a short time,
the display will stop flashing, beep once, and then start to count down.
5. The display will count down in minutes until it reaches the last minute when it will then count
down in seconds.
6. When it reaches zero, the timer will beep. To stop the beep, press either the + or - button.
7. If you do not press the + or - button to stop timer, the beeping will continue in intervals of
15 seconds of beeping and 30 second pause until timer is stopped.
and remove basket to fill.
Frying the food
1. Stay in the kitchen and keep an eye on the frying process.
2. Do not lean or reach over the fryer while the oil is hot.
3. When the food is cooked, lift up the basket handle until it clicks to raise the basket out of the
oil.
4. Stand back, and press the lid button
5. Put on an oven glove, then use the handle to lift the basket straight up out of its mounts on
the front of the fryer.
6. Empty the food into the lined colander or plate to drain before serving.
7. Refit the empty basket onto the fryer. Align the tab in front of the handle with the slot in the
front of the fryer, close lid and slide the basket down into its mounts on the front of the fryer.
• If you have nished cooking, rotate the temperature control to the minimum position and
switch off and remove the plug from the wall power outlet. Leave the fryer to cool down
before cleaning.
• If you want to fry another batch of food, check the oil level and top up as necessary.
to open the lid. Beware of escaping steam.
7
Page 8

COATINGS AND BATTERS
Coat all foods, except those high in starch like potatoes and doughnuts. The coating protects the
food, helps prevent juices leaking into the oil and gives a crisp tasty result. Generally, coatings will
not stick to frozen foods.
Seasoned flour
Thicker coatings do not stick well to wet/damp foods, so coat them first in seasoned flour. Use
on its own to coat small whole oily fish like whitebait.
Egg and breadcrumbs
Popular on fish, chicken, and scotch eggs, it gives an attractive, crisp, crunchy exterior.
Ideal for foods that are to be served cold, as it stays crisp for hours.
1. Coat in seasoned flour, to dry the food. Dip in beaten egg, then breadcrumbs, repeat till fully
coated. Press well, then shake off any excess.
2. Fresh breadcrumbs give a rough appearance. Make dry breadcrumbs or raspings by baking
scraps of bread till golden, then crush or process to a fine crumb.
Basic batter
• 100g self raising our
• pinch of salt
Just before it's needed, mix the salt and flour with enough water to form a smooth cream that will
coat the back of a spoon.
Basic fritter batter
• 100g self-raising our
• pinch of salt
Sift the flour and salt into a bowl. Stir in the oil. Just before it's needed, stir in enough water to
form a smooth batter.
• cold water
• 5ml (1tsp) cooking oil
• cold water
Fritter batter with egg white
• 100g plain our
• 1 egg, separated
• 150ml liquid (cold water, milk, beer)
Sift the flour and salt into a bowl. Stir in the egg yolk, then the liquid. Beat in the oil. Just before
it's needed, whisk the egg white and fold into the batter.
Crispy Chinese batter
• 75g cornour
• 5ml (1tsp) cooking oil
• 1 large egg good
Mix the egg, cornflour, salt, oil, and enough cold water to form a creamy base on which to add
either egg and breadcrumbs or batter. It holds the other coatings on the food.
Note: If using a liquid batter for coating food, ensure that you lower the empty basket into
pre-heated oil first then gently lay batter coated food into the oil. This will avoid the
batter from sticking on or dripping through the basket when cooking.
• 15ml (1tbsp) cooking oil
• pinch of salt
• pinch of salt
• 10ml (2tsp) baking powder
• cold water
8
Page 9

FRYING TIMES
Use these times purely as a guide. Check that food is cooked through before serving. If in doubt,
cook it a bit more. Chips and other vegetables should be crisp. Cook meat, poultry, and any
derivatives (mince, burgers, etc.) until the juices run clear. Cook fish until the flesh is opaque
throughout.
Chips (french fries)
• Use a chipping potato, like King Edward or Desiree.
• Peel, cut, rinse, drain, and dry thoroughly. Do not put more than two layers of chips in the
basket at a time. For best results, fry in two stages:
Stage 1: Fry for 5-10 minutes (depending on quantity) at 170°C. When the chips reach pale gold,
and the outside is firm, lift the basket out of the oil, and let the chips drain and cool.
Stage 2: Fry for 2-4 minutes at 190°C. When golden brown and crisp, remove from the oil, and
drain in a colander lined with paper towel.
Frozen chips (french fries)
Follow the directions on the package.
Other vegetables
Many vegetables may be deep fried - (onion rings, mushrooms, cauliflower florets). They can be
fried from fresh or frozen, and should be coated.
Frozen food (small pieces in batter, breadcrumbs, etc.)
• Frozen food cools oil quickly, so fry a single layer at a time.
• Keep the pieces apart, or they'll stick together.
• Shake off excess ice or water before adding the food to the oil.
• Use the highest temperature setting, and lower the basket slowly into the oil, to reduce
foaming.
• For pre-packed food, follow the instructions on the package.
Fish - frozen
You may fry pre-coated fish - follow the directions on the package.
Type Temperature
(°C)
Fillets 170 10 - 15
Strips 190 3
Prawns 170 3 - 5
Fish cakes - small 170 3
Fish cakes -medium/large 170 4 - 5
Whitebait 190 2 - 3
9
Time(mins)
Page 10

Fish - fresh
Fish has a high water content. Dry with paper towel, and coat before frying. Use whole, or cut
into fillets, cutlets or strips.
Type Temperature
(°C)
Fillets, strips, prawns, fish cakes 190 3 - 4
Whitebait 190 1 - 2
Meat
Ensure fresh and thawed meat are coated in egg and breadcrumbs or batter when frying. Follow
directions on the package for pre-packaged frozen meat products.
Type Temperature
(°C)
Strips 190 3
Chops/cutlets - small/large 170 10 - 15
Scotch eggs 170 10
Rissoles, meat balls 190 6
Wiener schnitzel (depending on thickness) 170 3 - 8
Poultry
Ensure fresh and thawed poultry are coated in egg and breadcrumbs or batter when frying.
Remove the skin for better results. Allow time for poultry to cook to the centre. A crisp golden
exterior doesn't necessarily denote this, so test before serving. Follow directions on the package
for pre-packaged frozen poultry products.
Type Temperature
(°C)
Strips 170 4
Drumsticks 170 14 - 15
Croquettes 190 2 - 3
Chicken in breadcrumbs - small 170 15 - 20
Chicken in breadcrumbs - large 170 20 - 30
Time(mins)
Time(mins)
Time(mins)
Bread, cakes, fritters
Type Temperature
(°C)
Ring doughnuts 190 2
Pineapple, banana or apple fritters 190 2 - 3
Croutons (diced bread) 190 1
10
Time(mins)
Page 11

HINTS AND TIPS
• Adding food to the oil reduces the temperature of the oil.
• If you add a little food, the temperature will recover quickly, and the food will be cooked
properly.
• When you put food into the oil, you should see bubbles given off. This is steam, formed when
the moisture inside the food heats up.
• The steam coming out of the food prevents oil from soaking into the food and the food cooks
uniformly - rm and crisp.
• If you add too much food, the temperature will not recover and your food will absorb oil.
• If the oil foams and threatens to overow, there's too much food in the basket (take some
out), the food is too moist (dry the food with paper towel and try again), or the oil is old or
contaminated (replace it).
• Every time oil is heated, it deteriorates.
• Every time food is put into it, moisture, particles of food and fat, our and spices from
coatings, water from frozen foods, cause further deterioration.
• Particles blacken, burn, and stick to the next batch of food, altering its look and taste.
Filtering the oil can alleviate this a little.
• Pre-cooked and oven chips have a coating of oil from the pre-cooking process. This will
thicken and discolour the oil in your fryer.
• If you fry coated foods often, it's worth keeping two lots of oil, one for coated foods and one
for "oil-friendly" foods. Keep them in separate, labelled containers.
• Even ltered oil will be past its best after 10 to 12 uses. It may look OK, but it'll already have
affected the quality and taste of your food.
• As a rough guide, if you notice a marked improvement in avour after changing the oil, you
should have changed it earlier.
• Do not top up oil that's past its best. You're just wasting new oil.
11
Page 12

CARE AND MAINTENANCE
• Unplug the fryer, and leave it to cool down fully.
• If you intend to move the fryer without emptying it, take
care, it will be heavy.
• Do not put the fryer in water or any other liquid.
• Do not put the fryer in a dishwasher.
• Do not use harsh or abrasive cleaning agents or
solvents.
• Cover the work surface generously with paper towel (at
least three layers thick).
• You will need a suitable container for the used cooking
oil. If the container doesn't have a wide opening, use a
funnel.
• If you want to lter the oil at the same time, support a
ne sieve over a wide necked container, or t the funnel
with a lter paper.
• The control panel is removable for easy cleaning. To
remove it, pull it straight upwards out of the two slots
(Fig B). Do not imerse the control panel in liquid.
• The lid is removable for easy cleaning. Open the lid, and
lift it straight upwards and out of its mounts (Fig C). To
ret the lid, lower it into its mounts on the rear of the fryer
body.
• Use the handle to lift the basket straight up out of its
mounts on the front of the fryer.
Emptying the bowl
• The bowl can be lifted out of the fryer body for easy
emptying/cleaning. Remove the control panel rst.
• If you are using a funnel, t it to the oil container.
• Pour the oil from the side or rear of the bowl into the
container or funnel.
• If you are ltering at the same time, you'll need to pour
the oil a little at a time, waiting till the last lot has ltered
through before adding the next lot.
12
Page 13

CLEANING
To avoid the build up of jelly-like deposits, it's best to clean the
deep fryer after every few uses. If you leave it too long, solid layers
of oil will build up.
• Wash the basket in warm soapy water, rinse thoroughly and
leave to air dry.
• Wipe all other surfaces with a damp cloth.
• With use, the basket and bowl will discolour. This is inevitable,
harmless, and won't affect the operation of the fryer.
Cleaning the filters
1. Press the tab on the filter compartment lid and remove the lid (Fig D).
2. Remove the two filters.
3. Wash the filters in warm soapy water. Allow them to air dry thoroughly then refit them.
D
THERMAL SAFETY CUT·OUT
The cut-out operates to protect the element from overheating. If the fryer stops working:
1. Switch off, unplug, and let the fryer cool down.
2. Check the oil level.
3. If the oil level is below the MIN mark, reset the thermal safety cut-out and refill oil above MIN
mark.
4. If the oil level isn't too low, and the thermal safety cut-out has operated for some other
reason, ring Customer Service Department.
To reset the thermal safety cut-out
The deep fryer is fitted with a thermal safety cut-out. If the deep fryer overheats, the thermal
safety cut-out will cut the power to the element. This is not self-resetting.
• The thermal safety cut-out RESET button is inside the access hole located on the rear of the
control panel.
• If the thermal safety cut-out operates, switch the deep fryer off at the wall power outlet and
allow it to fully cool.
• Once cool, remove the control panel to gain access to the thermal cut-out RESET button.
• Press the RESET button using a pointed tool such as a cocktail stick or wooden skewer.
• Reassemble the unit, check the oil level is correct, plug the fryer in and switch on.
• If the unit does not heat up after following the above procedure, call Customer Service.
13
Page 14

Spectrum Brands Australia Pty Ltd
Locked Bag 3004 Braeside
Victoria 3195 Australia
Customer Service in Australia
TollFree: 1800 623 118
Email: info@spectrumbrands.com.au
Website: www.spectrumbrands.com.au
Spectrum Brands New Zealand Ltd
PO Box 9817 Newmarket
Auckland 1149 New Zealand
Customer Service in New Zealand
TollFree: 0800 736 776
Email: service@spectrumbrands.co.nz
Website: www.spectrumbrands.co.nz
Spectrum Brands Australia Pty Ltd and Spectrum Brands New Zealand Ltd
Warranty Against Defects
In this warranty:
Australian Consumer Law means the Australian consumer law set out in Schedule 2 to the
Competition and Consumer Act 2010;
CGA means the New Zealand Consumer Guarantees Act 1993;
Goods means the product or equipment which was accompanied by this warranty and
purchased in Australia or New Zealand, as the case may be;
Manufacturer, We or us means:
1. for Goods purchased in Australia, Spectrum Brands Australia Pty Ltd ABN, 78 007 070 573;
or
2. for Goods purchased in New Zealand, Spectrum Brands New Zealand Ltd, as the case
may be, contact details as set out at the end of this warranty;
Supplier means the authorised distributor or retailer of the Goods that sold you the Goods in
Australia or in New Zealand; and
You means you, the original end-user purchaser of the Goods.
1. Our goods come with guarantees that cannot be excluded under the Australian Consumer
Law, or the CGA. You are entitled to a replacement or refund for a major failure and
compensation for any other reasonably foreseeable loss or damage. You are also entitled
to have the goods repaired or replaced if the goods fail to be of acceptable quality and the
failure does not amount to a major failure.
2. The benefits provided by this Warranty are in addition to all other rights and remedies in
respect of the Goods which the consumer has under either the Australian Consumer Law
or the CGA. The original purchaser of the Goods is provided with the following Warranty
subject to the Warranty Conditions:
3. We warrant the Goods for all parts defective in workmanship or materials for
a (Warranty Period) period of 2 years from the date of purchase.
If the Goods prove defective within the Warranty Period by reason of improper workmanship
or material, we may, at our own discretion, repair or replace the Goods without charge.
14
Page 15

Warranty Conditions
4. The Goods must be used in accordance with the manufacturer’s instructions. This
Warranty does not apply should the defect in or failure of the Goods be attributable
to misuse, abuse, accident or non-observance of manufacturer’s instructions on the
part of the user. As far as the law permits, the manufacturer does not accept liability
for any direct or consequential loss, damage or other expense caused by or arising
out of any failure to use the Goods in accordance with the manufacturer’s instructions.
5. Exhaustible components (such as batteries, filters and brushes) of the Goods are
included under this Warranty only where there is a defect in workmanship or materials
used.
6. The warranty granted under clause 3 is limited to repair or replacement only.
7. Any parts of the Goods replaced during repairs or any product replaced remain the
property of the manufacturer. In the event of the Goods being replaced during the
Warranty Period, the warranty on the replacement Goods will expire on the same
date as for the Warranty Period on the original Goods which are replaced.
8. In order to claim under the warranty granted under clause 3 you must:
(a) Retain this warranty with your receipt/proof of purchase; and
(b) Return the Goods to us at the relevant address or to the Supplier by prepaid
freight within the Warranty Period accompanied with (i) the legible and unmodified
original proof of purchase, which clearly indicates the name and address of the
Supplier, the date and place of purchase, the product name or other product serial
number and (ii) this warranty.
9. This warranty is immediately void if:
(a) Any serial number or appliance plate is removed or defaced;
(b) The Goods have been serviced or otherwise repaired by a person not authorised
to do so by us or where non approved replaced parts are used.
10. The Goods are designed for domestic use only. The Goods must be connected to the
electrical voltage requirements as specified in the ratings label located on the Goods.
11. This warranty does not cover the cost of claiming under the warranty or transport
of the Goods to and from the Supplier or us.
12. This warranty is only valid and enforceable in Australia against Spectrum Brands
Australia Pty Ltd and in New Zealand against Spectrum Brands New Zealand Ltd.
Contact us or the Supplier for further details.
Register your product online
If you live in Australia please visit: www.spectrumbrands.com.au/warranty
If you live in New Zealand Please visit: www.spectrumbrands.co.nz/warranty
Registration of your warranty is not compulsory, it gives us a record of your purchase
AND entitles you to receive these benefits: Product information; Hints and tips; Recipes
and news; Information on special price offers and promotions.
Any questions? Please contact Customer Service for advice.
15
Page 16

www.russellhobbs.com.au
www.russellhobbs.co.nz
RUSSELL HOBBS and logo are Trade Marks of Spectrum Brands, Inc., or one of its subsidiaries.
Manufactured in China to Spectrum Brands specifications. ©2017 Spectrum Brands, Inc.
16
 Loading...