

Page 1
Model Number: RHCV2002
Turbo Cyclonic Pro
Bagless Cylinder Vacuum Cleaner
For Customer Services & Spare Parts please call 0345 209 7461
Opening times: Monday - Friday 8am – 8pm & Saturday 9am – 1pm
Or visit us at www.productcareuk.com
PLEASE RETAIN FOR FUTURE
REFERENCE
Page 2
Page(s)
Safety instructions
3-6
Energy
performance label
7
Vacuum
feature diagram
8
Vacuum cleaner
assembly
9-10
Using your vacuum
cleaner
11-13
Cleaning and care
14-16
Problem solving
17
Guarantee and customer services
18
Spare
parts
19
Connection to the mains supply
20-21
Disposal information
24
CONTENTS
2
For Customer Services & Spare Parts please call 0345 209 7461
Opening times: Monday - Friday 8am – 8pm & Saturday 9am – 1pm
Or visit us at www.productcareuk.com
Thank you for purchasing your Russell Hobbs Turbo Cyclonic Pro Bagless
Cylinder Vacuum Cleaner.
To get the best from your new cleaner, take a few moments to read these
instructions and keep them in a safe place for future reference.
Should you require any further assistance, our friendly Product Care team will
be happy to help.
Page 3

3
SAFETY INSTRUCTIONS
IMPORTANT SAFETY INSTRUCTIONS
READ CAREFULLY AND KEEP FOR FUTURE REFERENCE
WARNING:
• It is hazardous for anyone other than a competent person
to carry out any service or repair operation that involves
the removal of a cover which gives protection against
exposure to electrical parts.
• If the supply cord is damaged, it must be replaced by the
manufacturer, its service agent or similarly qualified
persons in order to avoid a hazard.
• This product is intended for household use only.
Do not use outdoors.
• This appliance can be used by children aged from 8 years
and above and persons with reduced physical, sensory or
mental capabilities or lack of experience and knowledge
IF they have been given supervision or instruction
concerning use of the appliance in a safe way and
understand the hazards involved. Children shall not play
with the appliance. Cleaning and user maintenance shall
not be made by children unless they are older than 8 and
supervised. Keep the appliance and its’ cord out of reach
of children less than 8 years.
• Do not operate this appliance for anything other than its
intended use. This product is intended for household use
only. Do not use outdoors.
• Do not immerse in water or other liquids for cleaning.
Page 4
4
SAFETY INSTRUCTIONS
IMPORTANT SAFETY INSTRUCTIONS
READ CAREFULLY AND KEEP FOR FUTURE REFERENCE
• Do not direct at people, animals, electrical outlets, or
equipment containing electrical components.
• Unplug from outlet when not in use. Do not leave the
cleaner unattended while plugged in.
• Do not use with damaged cord or plug.
• Do not use vacuum cleaner if it has been dropped,
damaged, left outdoors or dropped into water.
• Keep the vacuum cleaner away from water; do not allow
it to get wet. If unit is wet, do not plug unit into wall
socket or turn unit on.
• Do not handle the vacuum cleaner with wet hands.
• Do not pull or carry by cord, use cord as a handle, close
door on cord, pull cord around sharp corners or edges, or
expose cord to heated surfaces.
• Do not unplug by pulling on cord.
• To protect against electrical shock do not immerse cord,
plug, or appliance in water or other liquid.
• Unplug from the mains outlet when not in use, before
putting on and taking off parts, and before cleaning.
• The use of accessory attachments not recommended by
the appliance manufacturer may cause fire, electric shock
or injury. Only use the accessories supplied by the
manufacturer.
Page 5

5
SAFETY INSTRUCTIONS
IMPORTANT SAFETY INSTRUCTIONS
READ CAREFULLY AND KEEP FOR FUTURE REFERENCE
WARNING:
• Do not let the cord hang over the edge of the worktop, or
touch hot surfaces.
• This cleaner is intended for internal household use only,
do not use outside or for anything other than its’
intended purpose.
• Do not use this vacuum to pick up water or any other
liquids, combustible substances or hot/burning objects.
• Only use the unit when fully assembled.
• Never place your fingers or other objects into any part of
the cleaner. Be aware that loose clothing or hair may
become trapped in the cleaner if improperly used.
• Before use, ensure that all of the air vents of the cleaner
are clear and there is no restriction of air flow.
• When cleaning stairs, ensure the cleaner is on a step
below you. NEVER place the cleaner above.
• Caution: Exhaust air discharged from the rear of the
cleaner may extinguish a gas fire, pilot light, or disturb
ashes in an open fire. Always avoid directing the cleaner
toward naked flames.
Page 6

6
SAFETY INSTRUCTIONS
IMPORTANT SAFETY INSTRUCTIONS
READ CAREFULLY AND KEEP FOR FUTURE REFERENCE
• Important: This cleaner has a thermal safety device which
automatically cuts off the power supply in case of over
heating. If the safety device has switched the cleaner off,
unplug from the mains, allow the cleaner to cool down
and check for any blockages. Once the cleaner has cooled
it can be plugged back in to the mains and used as
normal.
For Customer Services & Spare Parts please call 0345 209 7461
Opening times: Monday - Friday 8am – 8pm & Saturday 9am – 1pm
Or visit us at www.productcareuk.com
Page 7
7
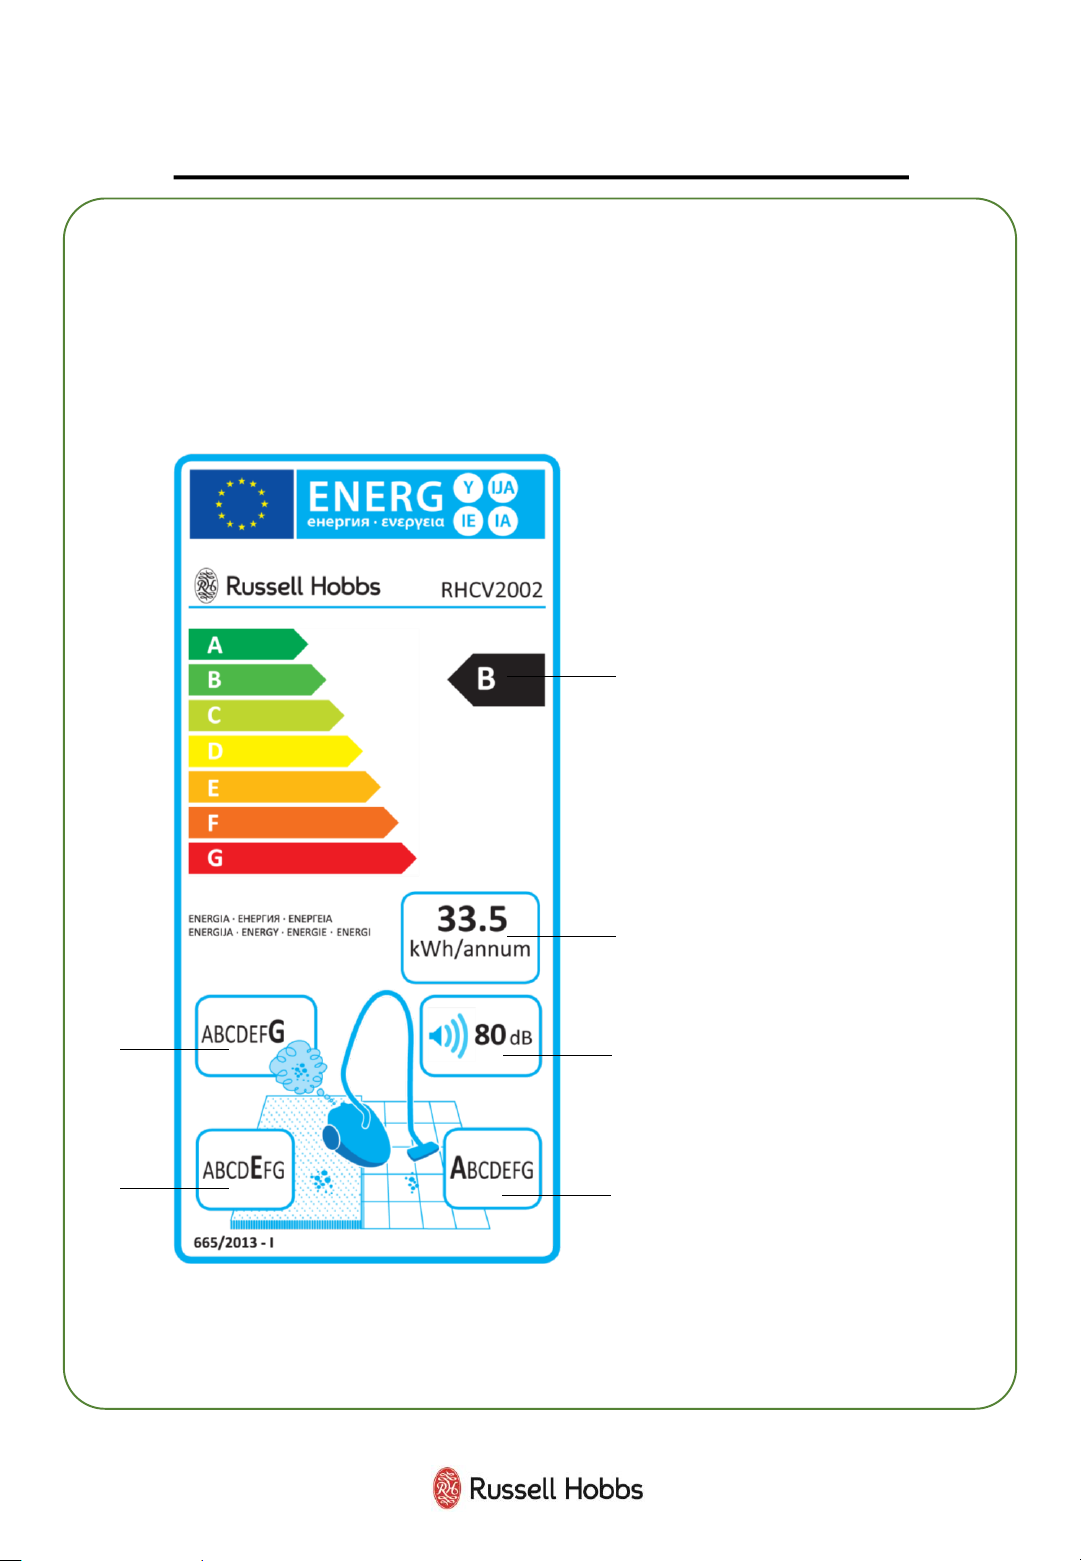
ENERGY PERFORMANCE LABEL
The purpose of the energy label is to help you understand a
vacuum cleaner’s energy efficiency performance.
1. Energy rating –
based primarily on
energy consumption
and pick-up.
2. Annual energy
usage – the amount of
energy used over a
year.
3. Emissions – the
amount of dust in the
air emitted from the
machine’s exhaust.
4. Noise – the noise
level produced by the
machine, measured in
decibels.
5. Pick up (carpets) –
the rating of how much
dust the machine picks
up from carpets.
6. Pick-up (hard
floors/crevices) – the
rating of how much
dust the machine picks
up from hard floors and
crevices.
1
3
2
4
5
6
Page 8
8
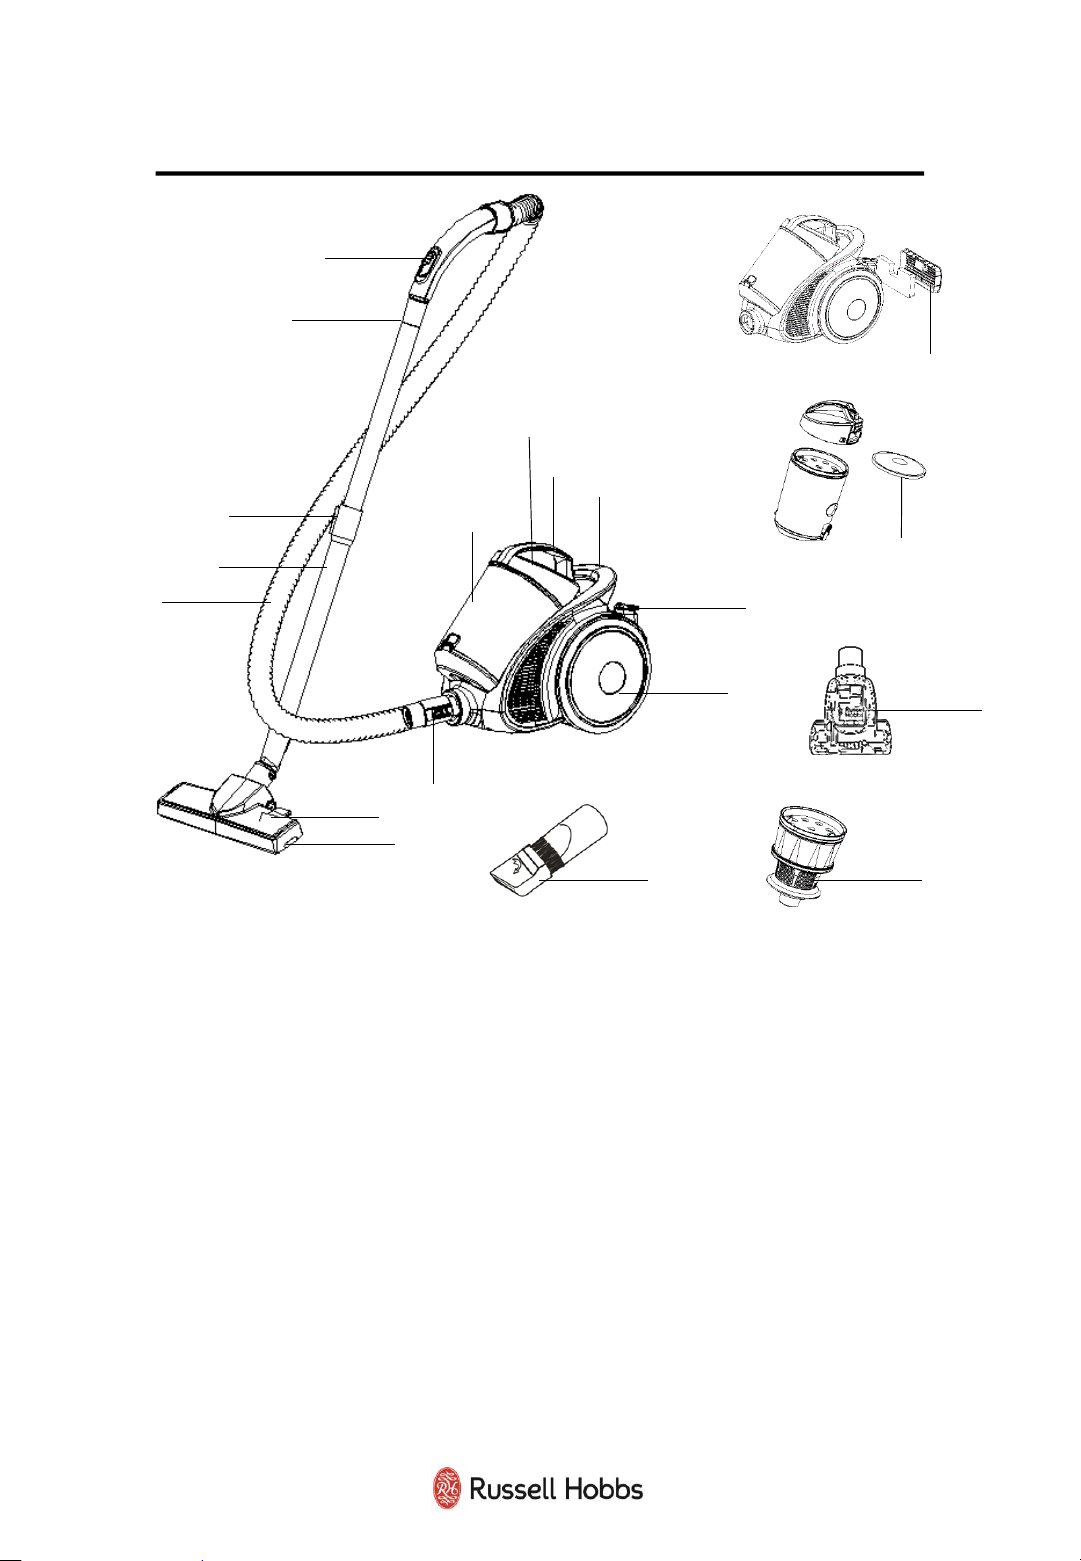
VACCUM FEATURE DIAGRAM
1 Hose suction control 7 Floor head 13 Power button
2 Hose connector 8 Hose attachment clip 14 Wheel
3 Extension lock 9 Dust container 15 2 in 1 crevice tool
4 Extension tube 10 Cord release button 16 External filter and
cover
5 Hose 11 Container release
button
17 Dust container filter
6 Floor surface selector 12 Carry handle 18 Turbo brush tool
19 Multi cyclonic filter
(Not visible on
diagram)
1
3
2
5
7
8
9
10
11
12
13
14
6
4
15
19
16
17
For Customer Services & Spare Parts please call 0345 209 7461
Opening times: Monday - Friday 8am – 8pm & Saturday 9am – 1pm
Or visit us at www.productcareuk.com
18
Page 9

9
VACUUM CLEANER ASSEMBLY
Before using your vacuum cleaner
Remove all packaging and lay out the separate components.
Check the unit after unpacking for any visual damage such as:
• Misaligned or damaged parts
• Damage to the main body and separate components
• Damage to the plug or cable.
If you can see any damage do not use the vacuum cleaner and
contact customer services.
For Customer Services & Spare Parts please call 0345 209 7461
Opening times: Monday - Friday 8am – 8pm & Saturday 9am – 1pm
Or visit us at www.productcareuk.com
Page 10

10
VACUUM CLEANER ASSEMBLY
Ensure the unit is unplugged before assembling.
1. Place the dust container onto the unit, base first, then tilt forward
to engage the top.
Note: Do not carry the unit with the dust container.
2. Insert the hose connector into the hose outlet, aligning the
grooves in the outlet with the clips on the connector. Push in until it
‘clicks’ to secure.
3. Insert the extension tube into the hose connector and push
together.
4. Insert the extension tube into the floor head and rotate if
necessary.
1 2
3 4
Page 11

11
USING YOUR VACUUM CLEANER
1 2
3
4
Once assembled:
1. The cord is stored inside the unit. Pull the power cord out of the
machine to as long as you require and stop when you see the yellow
tab. Do not over-extend. If the red tab is visible, then wind the cord
back until only the yellow tab is visible.
2. Plug the cable into a wall socket and press the switch on.
3. Press the power button to start vacuuming.
4. Move the vacuum cleaner floor head in a forwards and backwards
motion over the areas you would like to clean.
Note: Large items can get trapped in the brush/floor head which
could cause the unit to overheat. Make sure you pick up larger items
that could get trapped before vacuuming.
Page 12

12
USING YOUR VACUUM CLEANER
7
9
a)
b)
8
5
6
10
5. You can adjust the extension tube length to a comfortable cleaning
height. To alter the length of the telescopic handle,
a) Press and hold the extension lock in the direction indicated.
b) Slide the steel pole, up or down, to the correct length.
6. Another adjustment you can make is to the suction power of the floor
head. To use less suction power, move the suction control tab in the
direction indicated. For maximum suction power, close the tab.
* The 2 in 1 crevice/brush tool is for narrow gaps and hard to reach places.
* The turbo brush is for use on upholstery and is also ideal for the retrieval
of pet material or human hair across wide areas of carpet.
7. Both attach to either the extension tube or the hose connector in the
same manner as the floor head.
8. To adapt the tool for use as a brush on delicate surfaces, rotate the head
of the tool in the direction indicated until it extends out.
9. When using the floor head you can adapt the brush depending on floor
type. To clean on hard floors, push the surface selector in so the icon
shows a brushed head (refer to diagram.)
10. To clean on carpets, push the surface selector down so the icon shows
a smooth head (refer to diagram.)
Page 13

13
USING YOUR VACUUM CLEANER
1 2
3 4
Emptying the dust container
When the dust container starts to fill it will need to be emptied.
1. To remove the dust container, press the release button located at
the top of the lid handle.
2. Lift the container away from the unit base.
3. Locate the bin release button on the cover at the back of the
container.
4. Over a bin, push the release button to open the base of the
container. You may need to tap the sides to empty all of the dirt. Close
the base to secure.
Important:
You may wish to empty the dust container outdoors as emptying may
create a dust cloud.
Place the dust container onto the unit, base first, then tilt forward to
engage the top.
Page 14

14
CLEANING AND CARE:
CLEANING THE FILTER
Before you clean the appliance, disconnect the mains plug from the
wall socket.
Remove the filter cover on the back of the cleaner by pushing the
tab downwards and pulling the cover away.
Pull the filter out of the cover and tap over a bin to remove any
excess dust. Wash in warm water and allow to dry for 24 hours.
Once dried, put the filter back into the cover and refit the assembly
on the back of the vacuum cleaner by pushing inwards until secure.
Page 15

15
CLEANING AND CARE:
CLEANING THE FILTER
1. Remove the dust container and rotate the lid anti clockwise so that the
arrow is pointing to the unlock symbol.
2. Remove the dust container filter and get rid of excess dirt over a bin.
3. Wash in warm water. Allow to dry for 24 hours before reinserting.
4. Once the dust container lid and filter are removed, lift out the multi
cyclonic filter from the container. This comes apart further into 3 parts.
5. To remove the bottom part, turn it anticlockwise and lift off.
6. The middle part will lift off. Wash all parts including the container in
water and allow to thoroughly dry before reusing.
7. To reassemble the multi cyclonic filter, lower the middle assembly onto
the base and align the ribs with the grooves so that it sits in place. Lower
the bottom assembly onto the middle assembly with the top assembly lip
facing upwards. Align the ribs with the grooves so that it sits in place and
turn clockwise to secure the assembly together.
Note: The filter assembly fits back into the container with the rib of the
assembly slotting into the groove of the container (refer to diagram.)
Make sure the dust container filter is fitted back into the top of the
assembly with the lip facing downwards.
Reinsert the lid onto the container with the arrow pointing to the unlock
symbol. To secure, turn clockwise so the arrow points to the lock symbol.
5
1
2
7
6
3
4
Page 16

16
CLEANING AND CARE
Disassembly
To clean the exterior of the device, use a damp, soft cloth and mild detergent.
NEVER IMMERSE THE VACUUM IN WATER.
Wash non-electrical removable accessories in warm soapy water and allow to
dry thoroughly before next use.
If the vacuum is damaged, contact the customer service helpline using the
details at the bottom of this page.
Storage
Store in a clean and dry environment.
For Customer Services & Spare Parts please call 0345 209 7461
Opening times: Monday - Friday 8am – 8pm & Saturday 9am – 1pm
Or visit us at www.productcareuk.com
1 2 3 4
Before you clean the appliance, disconnect the mains plug
from the wall socket.
1. Press the cord rewind button to automatically bring the cord back inside
the unit for storage.
2. To remove the extension hose, manoeuvre it away from the hose
connector.
3. To remove the floor head/accessory, pull the extension tube/hose
connector away from the head/accessory – you may need to ease it off.
4. To remove the hose, press the tabs on the sides of the hose attachment
clip and pull the hose away from the unit.
Page 17

17
PROBLEM SOLVING
PROBLEM
POSSIBLE PROBLEM POSSIBLE SOLUTION
The vacuum cleaner is
plugged in but does
not work
Power cord/plug damage
Check the
power cord and plug for signs of damage.
Fuse is damaged
Check and replace the fuse in the plug.
The suction
is
decreasing and the
vacuum is not picking
up dirt
Dust container
Check if
the dust container is full, if so, empty it.
Filters are dirty
Clean the filters.
Hose/head blockages
Check that there are no blockages in the hose or cleaning
head.
Vacuum cleaner is
over heating
Filters are dirty
Check that the filters are not blocked,
if so, clean them
following the instructions in this booklet.
Automatic power cord
rewind does not fully
rewind the power
cord
Pull the power cord fully out and press the rewind button
again.
Dust is coming out of
the vacuum cleaner
Dust container fitting
The dust container has not been fitted correctly. Refit the
container following the instructions in this booklet.
The air coming out of
the vacuum cleaner
smells
Filters are dirty
Clean the filters. Also clean the
hose and dust container
Filters are not dry
Ensure the filters have been left to dry for 24 hours before
refitting back into the vacuum cleaner and using.
We’re here should you need us.
For Customer Services & Spare Parts please call 0345 209 7461
Opening times: Monday - Friday 8am – 8pm & Saturday 9am – 1pm
Or visit us at www.productcareuk.com
Page 18

18
GUARANTEE AND CUSTOMER SERVICES
At Russell Hobbs, we take all our customer feedback seriously.
Feel free to contact our Product Care Team, on 0345 209 7461
Monday – Friday: 8am-8pm & Saturday: 9am – 1pm,
who will be more than happy to assist you.
This product is guaranteed for 12 months from the date of the
original purchase. If any defect arises due to faulty materials or
workmanship, the faulty product must be returned to the place of
purchase.
Refund or replacement is at the discretion of the retailer.
The following conditions apply:
• The product must be returned to the retailer with the original
proof of purchase.
• The product must be installed and used in accordance with the
instructions contained in this instruction guide and any other
instructions for use which are supplied.
• It must be used for domestic purposes only and for its intended
use.
• This warranty does not cover wear and tear, damage, misuse
or consumable parts.
This does not affect your statutory rights.
For Customer Services & Spare Parts please call 0345 209 7461
Opening times: Monday - Friday 8am – 8pm & Saturday 9am – 1pm
Or visit us at www.productcareuk.com
Page 19

19
SPARE PARTS
For Customer Services & Spare Parts please call 0345 209 7461
Opening times: Monday - Friday 8am – 8pm & Saturday 9am – 1pm
Or visit us at www.productcareuk.com
To check the availability of the following spare parts, simply contact
our friendly Customer Services team using the details provided at the
bottom of this page.
1
Hose
6
Turbo brush
2
Extension
tube
7
Multi cyclonic filter
3
Floor
head
8
External
filter and cover
4
Dust container
9
Dust
container filter
5
2 in 1 crevice tool
1
2
4
3
7
8 9
5
6
Page 20

20
CONNECTION TO THE MAINS SUPPLY
WARNING- THIS APPLIANCE MUST BE EARTHED
This appliance is designed to operate from a mains supply of
220-240V~ 50Hz.
Check that the voltage marked on the product corresponds
with your supply voltage.
This product is fitted with a 13A plug complying with BS1363.
If this plug is unsuitable or needs to be replaced, refer to customer
services.
Important: The wires in the mains lead are coloured in
accordance with the following code:
GREEN/YELLOW – EARTH
BLUE - NEUTRAL
BROWN – LIVE
Page 21

21
CONNECTION TO THE MAINS SUPPLY
For UK use only – PLUG
• As the colours of the wires in the mains lead of this appliance
may not correspond with the coloured markings identifying the
terminals in your plug, proceed as follows:
• The GREEN/YELLOW wire is the EARTH and must be connected
to the terminal which is marked with the letter E or by the earth
symbol or coloured GREEN or GREEN/YELLOW.
• The BLUE wire is the NEUTRAL and must be connected to
• the terminal marked with the letter N or coloured BLACK.
• The BROWN wire is the LIVE wire and must be connected to
• the terminal marked with the letter L or coloured RED.
• Always ensure that the plug cord grip is fastened correctly.
• If a 13A (BS1363) fused plug is used it must be fitted with a
• 13amp fuse conforming to BS1362 and be BSI or ASTA approved.
If the fuse cover is lost the plus must not be used until a
replacement is obtained from an electrical supplier.
If you need to remove the plug, cut it from the mains lead and
dispose of it. NEVER attempt to re-use this plug or insert it into a
socket outlet, as there is a very great risk of electrical shock.
Page 22

22
NOTES
Page 23

23
NOTES
Page 24

24
Revision 1a
Model: RHCV2002
This symbol is known as the 'Crossed-out wheelie bin Symbol'.
When this symbol is marked on a product/batteries, it means that
the product/batteries should not be disposed of with your general
household waste. Only discard electrical/electronic/battery items
in separate collection schemes, which cater for the recovery and
recycling of materials contained within. Your co-operation is vital
to ensure the success of these schemes and for the protection of
the environment. For your nearest disposal facility, visit
www.recycle-more.co.uk or ask in store for details.
We reserve the right, due to possible changes to design, to alter
the instruction manual without prior notice.
For Customer Services & Spare
Parts please call
0345 209 7461
Opening times: Monday - Friday
8am – 8pm & Saturday 9am –1pm
Or visit us at
www.productcareuk.com
Produced for:
G2S Ltd,
Wigan,
WN2 4AY
 Loading...