

Page 1
INSTRUCTIONS AND WARRANTY
MODEL NO. RHCM47
RUSSELL HOBBS CAFFÈ MILANO
ONE TOUCH ESPRESSO AND CAPSULE MACHINE
Page 2

Congratulations on purchasing your Russell Hobbs One Touch Espresso and Capsule Machine.
Each unit is manufactured to ensure safety and reliability. Before using this appliance for the first
time, please read the instruction manual carefully and keep it for future reference.
FEATURES OF THE RUSSELL HOBBS ONE TOUCH ESPRESSO AND CAPSULE
MACHINE
The Russell Hobbs One Touch Espresso and Capsule Machine is a barmen style coffee maker
which lets you prepare coffee with flair and just the way you like it. It is very easy to use and will
give you perfect results time and time again!
o 1360 Watts of power
o Drop down drip tray for smaller cups
o 20 bar Defond pump
o Innovative Capsule portafilter adaptor
o Flow meter to ensure an accurate coffee flow.
o Illuminated one touch operation for single cup espresso, double cup espresso,
cappuccino, latte, milk foam and self-cleaning
o Detachable milk frothing machine and transparent milk tank for easy cleaning and
storage
o 1.2L detachable transparent water tank.
o Removable drip tray with Stainless Steel cover for easy cleaning.
o Overheating and over-pressure protection.
o 1 cup and 2 cup Stainless steel coffee sieve, coffee spoon with tamper.
o For domestic use only
o 2 year warranty (1 year retail • 1 year extended upon online registration of product •
visit www.russellhobbs.co.za)
IMPORTANT SAFEGUARDS
When using any electrical appliance, basic safety precautions should always be followed including
the following:
1. Please read the instructions carefully before using any appliance.
2
Page 3

2. Always ensure that the voltage on the rating label corresponds to the mains voltage in your
home.
3. Incorrect operation and improper use can damage the appliance and cause injury to the
user.
4. This appliance is intended for household use only. Commercial use invalidates the warranty
and the supplier cannot be held responsible for injury or damage caused when using the
appliance for any other purpose than that intended.
5. Avoid any contact with moving parts.
6. This appliance is not intended for use by persons (including children) with reduced physical,
sensory or mental capabilities, or lack of experience and knowledge, unless they have been
given supervision or instruction concerning use of the appliance by a person responsible for
their safety.
7. Children should be supervised to ensure that they do not play with the appliance.
8. Check the power cord and plug regularly for any damage. If the cord or the plug is
damaged, the manufacturer or a qualified person must replace it in order to avoid an
electrical hazard.
9. Do not use the appliance if it has been dropped or damaged in any way. In case of damage,
take the unit in for examination and/or repair to an authorised service agent
10. To reduce the risk of electric shock, do not immerse or expose the unit, plug or the power
cord to water or any other liquid. Do not use it with wet hands.
11. Never immerse the unit in water or any other liquid for cleaning purposes.
12. Remove the plug from the socket by gripping the plug. Do not pull on the cord to disconnect
the appliance from the mains. Allow the unit to cool and unplug it when not in use, before
cleaning or when adding or removing parts.
13. Insert and use only original parts.
14. The use of accessory attachments that are not recommended or supplied by the
manufacturer may result in injuries, fire or electric shock.
15. A short cord is provided to reduce the hazards resulting from becoming entangled in or
tripping over a longer cord.
16. Do not let the cord hang over the edge of a table or counter. Ensure that the cord is not in a
position where it can be pulled on inadvertently.
17. Do not allow the cord to touch hot surfaces and do not place on or near a hot gas or electric
burner or in a heated oven.
18. Keep the appliance and cord away from direct radiant heat from the sun, from damp, from
sharp edges and other dangers.
19. Do not use the appliance on a gas or electric cooking top or over or near an open flame.
3
Page 4

20. Use on a hard, flat level surface only, to avoid interruption of airflow underneath the
appliance.
21. Use of an extension cord with this appliance is not recommended. However, if it is
necessary to use an extension cord, ensure that the cord is suited to the power
consumption of the appliance to avoid overheating of the extension cord, the appliance or
plug point. Do not place the extension cord in a position where it can be pulled on by
children or animals or tripped over.
22. This appliance is not suitable for outdoor use. Do not use this appliance for anything other
than its intended use.
23. This appliance is intended to be used in household and similar applications such as:
o Staff kitchen areas in shops, offices and other working environments;
o Farm houses;
o By clients in hotels, motels and other residential type environments;
o Bed and breakfast type environments.
24. Do not operate this appliance by means of an external timer or separate remote control
system.
25. Always be sure to place the water reservoir tightly back in the unit with its lid closed and fill
with water at or above the minimum level marking before turning the appliance ON.
26. Do not remove the porta-filter while brewing coffee. Caution should also be taken while
removing the porta-filter since the metal parts will be hot. There may also be hot water
floating on the top of the filter. Hold it only by its handle.
27. Caution should be taken when moving any appliance containing or in contact with hot
liquids.
28. Do not remove the water reservoir until the unit is turned OFF.
29. Do not remove the porta-filter at any time during the brewing process.
30. DO NOT carry any appliance by the power cord.
31. Do not leave this appliance unattended during use. Always unplug the unit when not in use
or before cleaning.
32. Do not place the unit on a hot surface.
33. It is absolutely necessary to keep this appliance clean at all times as it comes into direct
contact with food.
34. Do not touch any hot surfaces, use handles or knobs.
35. Ensure that the machine is switched off after each use
36. The manufacturer does not accept responsibility for any damage or injury caused by
improper or incorrect use, or for repairs carried out by unauthorised personnel.
4
Page 5

37. In case of technical problems, switch off the machine and do not attempt to repair it yourself.
Return the appliance to an authorised service facility for examination, adjustment or repair.
Always insist on the use of original spare parts. Failure to comply with the above mentioned
pre-cautions and instructions, could affect the safe operation of this machine.
38. While in use keep hands and utensils out of container to avoid injury and damage to the
frother.
39. Only fill the reservoir with clean and cold water. Never fill it with mineral water, milk or other
liquids.
40. Do not let the coffee maker operate without water to avoid damaging the heating element.
41. Never insert finger into capsule holder, to avoid injury.
5
Page 6
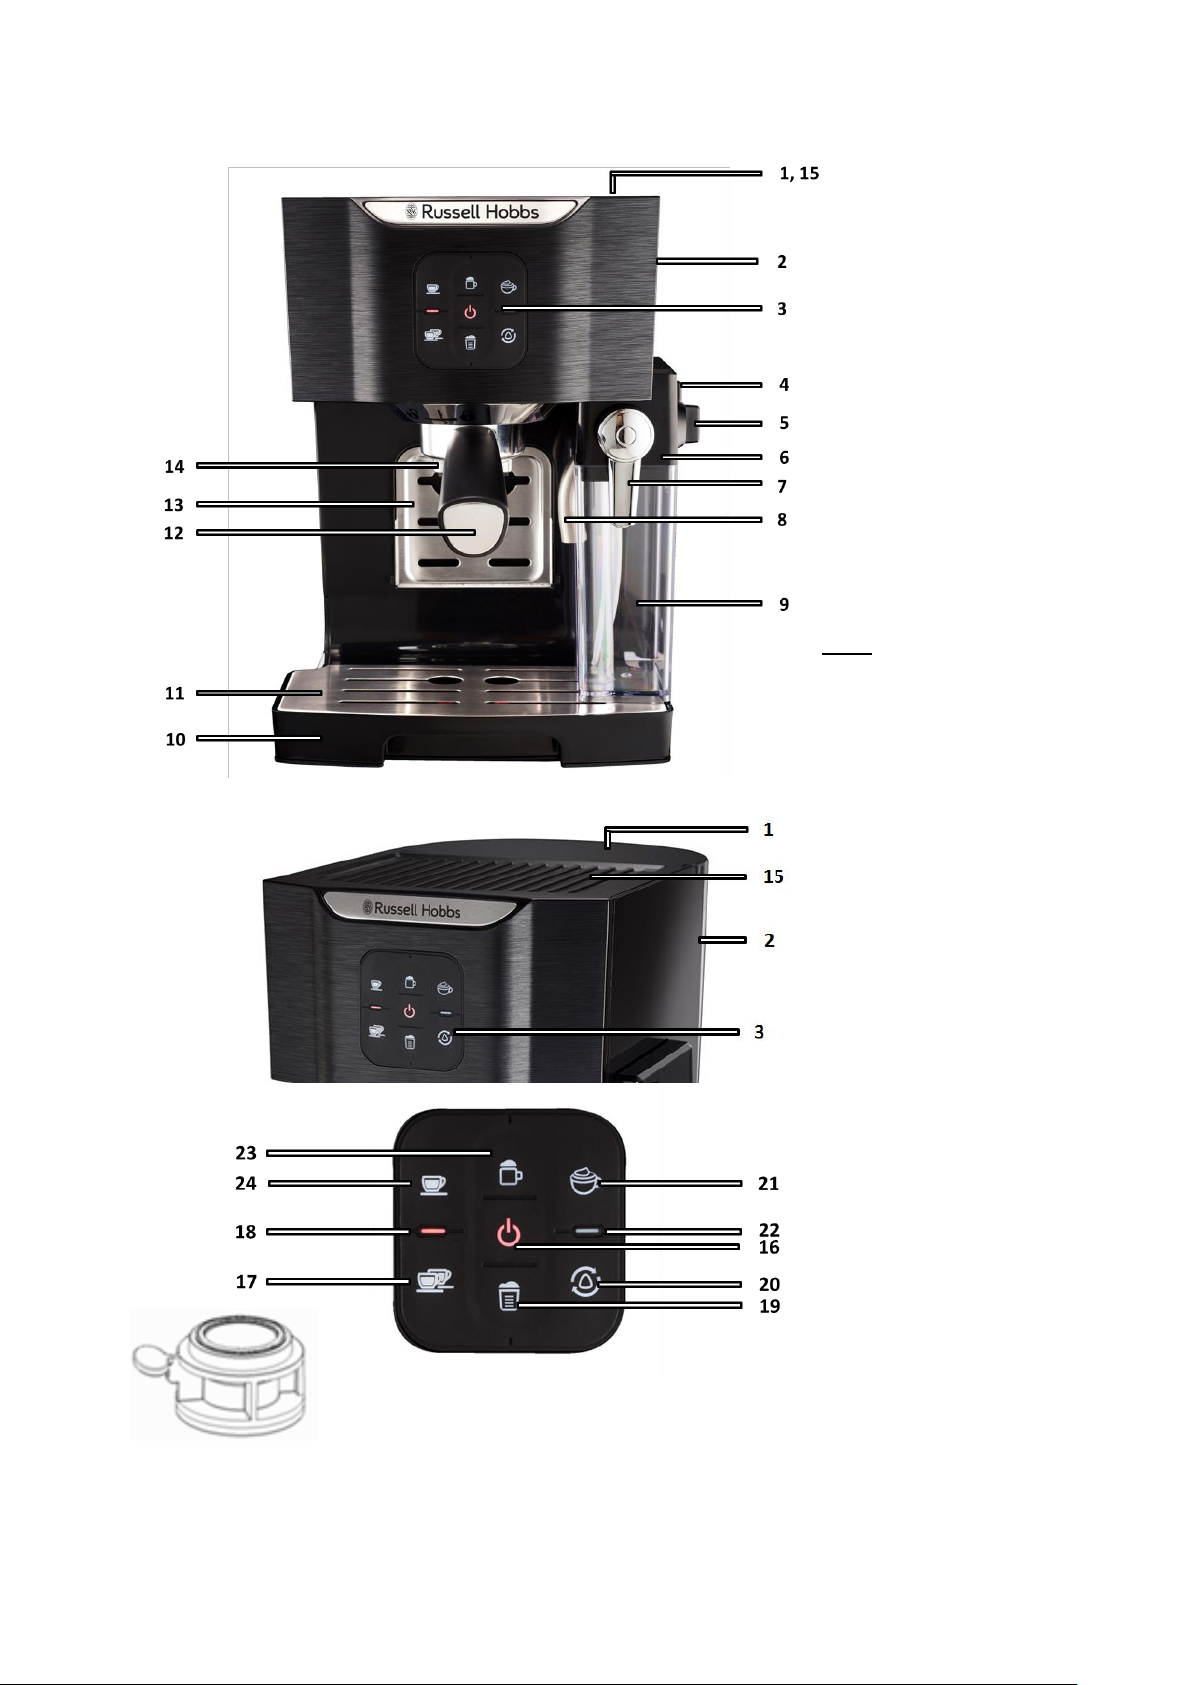
PARTS DIAGRAM
Capsule Adapter
to be placed into
the portafilter
KEY:
1. Water tank lid
2. Water tank
3. Control panel
4. Release button for milk tank
5. Milk froth dial
6. Milk tank cover
7. Lever for milk nozzle
8. Milk nozzle
9. Milk container
10. Drip tray
11. Cover for drip tray
12. Portafilter
13. Drop down tray for smaller cups
14. Coffee outlet
15. Cup warmer
16. On/Off button
17. Double espresso button
18. Red indicator light
19. Latte macchiato button
20. Self-cleaning button
21. Warm milk froth button
22. Yellow indicator light
23. Cappuccino button
24. Espresso button
Not shown:
Small filter (1 cup of
espresso)
Large filter (2 cups of
espresso)
Measuring spoon/stamper
6
Page 7

INTRODUCTION
BEFORE FIRST USE
1. Before using your appliance for the first time, take the coffee maker out of the box and take off
any protective wrappings. REMEMBER: DO NOT LEAVE PROTECTIVE PACKAGING LYING
AROUND, AS IT COULD BE DANGEROUS AROUND INFANTS AND/OR ANIMALS.
2. Place the appliance on a dry, level surface.
3. Please refer to the “PARTS DIAGRAM” section to familiarize yourself with the coffee maker
and identify all parts of the machine.
4. Please make sure the unit is switched OFF by pressing the power button. Make sure that it is
unplugged from the electrical outlet.
5. Wipe down the machine with a damp cloth.
6. Rinse the water tank, milk container, the portafilter, the two (2) filters and the capsule adapter,
the cover and the measuring spoon.
7. Before enjoying your first cup of coffee, run the coffee making process, with coffee grounds to
clean out any residues in the machine. Do this twice.
8. DO NOT drink the coffee.
9. When the machine is first used, residual oils from production may cause the machine to
smoke or an odour to be released. This is normal and not a machine defect.
10. Clean out the machine as per the instructions in “Cleaning”
OPERATING INSTRUCTIONS
NOTE:
Do not fill the water tank with any liquid other than water as this
will damage the machine.
Do not fill the milk tank with any liquids other than milk or water
(Cleaning) as this will damage the machine.
Never over fill the portafilter.
7
Page 8

INSERTING THE DRIP TRAY
The drip tray can only be inserted/ removed from the machine when the milk tank is not
inserted on the machine.
Place the cover on the drip tray, make sure that it is fitted properly.
Slide the drip tray into the designated point on the machine.
FILLING THE WATER TANK
Open the water tank lid (1)
Remove the water tank using its handle
Fill the desired amount of water (NOTE: Do not exceed the MAX mark)
Reinsert the water tank. Ensure that the water tank is fitted correctly
Flip the handle down.
Close the water tank lid
FILLING THE MILK TANK
Remove the milk tank from the machine. This is done by pushing the release button and
pulling the milk tank to the side at the same time.
Remove the milk tank cover. This is done by pressing the release button on the side of the
milk tank cover.
Pour the desired quantity of milk into the tank (NOTE: Do not exceed the MAX mark)
Place the milk tank cover back in place. Make sure to hear the cover lock in place.
Insert the milk tank back into the machine. Make sure to hear it click into place and ensure
that it is fitted correctly.
FILLING THE FILTER WITH COFFEE POWDER
Insert the filter into the portafilter, the filter should be fitted securely into the portafilter.
Use the measuring spoon to fill the desired amount of coffee powder into the filter.
Press down the coffee powder using the stamper provided
NOTE: Do not use coffee substitutes or coffee extract as this will block the sieves.
8
Page 9

INSERTING/ REMOVING THE PORTAFILTER
Step 1: Place the capsule into the capsule holder
Step 2: Fit the capsule holder with the capsule into the portafilter
Step 3: Install the portafilter as per instructions above
Insert the portafilter into the machine so that the two (2) locking lugs on the portafilter sit in
the recesses which are provided for them on the machine. Twist the portafilter
anticlockwise to secure it.
To remove the portafilter from the machine, turn it in a clockwise direction. Then pull
downwards.
To remove the used coffee powder, tap the portafilter against the edge of a dustbin or bowl.
The compressed powder should fall out. Dispose of the used coffee grounds in an
environmentally friendly manner.
Remember not to throw the filter/sieve away
USING THE CAPSULE ADAPTER
CUP WARMER
The machine features a cup warmer which is heated
automatically when the machine is switched on.
Place the cups that need to be warmed onto the cup warmer for
approx. 5 -10 min.
SWITCH ON
9
Page 10

Press the power button (16) to switch on the machine and preheat the water. The control
panel flashes during the heating process.
When the machine is first switched on, the red control lamp (18) flashes and you will hear
two beeps several times in succession to indicate that the machine is not yet ready for
operation.
PREPARATION
NOTE:
Do not operate the machine without water. If this does happen, the
machine issues an error message (several beeps in succession)
(see the “Troubleshooting” chapter).
Never use the machine without a suitable container below the
coffee outlet and the milk nozzle.
Espresso / Double Espresso
Fill the water tank (2) as described above.
Insert the desired filter/sieve (1cup or 2 cups) into the portafilter (12) as described above.
Fill the filter with coffee powder
Insert the portafilter into the machine
Press the power button (16) to switch on the machine and preheat the water. The control
panel flashes during the heating process.
If the milk tank is not inserted, only the espresso button (24) and the double espresso
button (17) can be selected.
Place one or two suitable cup(s) under the coffee outlet (14).
For small cups, the machine has a fold-down deposit surface (13) on the housing. Simply
flip this down.
As soon as the machine has heated up, the control panel stops flashing. Press the button
for an espresso or the button for a double espresso.
10
Page 11

A beep sounds, the brewing process starts and the chosen button flashes. At the end of the
brewing process, a beep sounds, the control panel is fully lit up again and the machine
automatically switches to stand-by mode.
The perfect amount of espresso to suit your own taste can be programmed in the machine.
See Programing quantities.
Cappuccino / Latte Macchiato
Fill the water tank (2) as described above.
Fill the milk tank (9) as described above.
Insert the desired filter into the portafilter (12) as described above.
Fill the filter with coffee powder
Insert the portafilter into the machine
Push out the milk nozzle (8) using the lever (7)
If necessary, select the setting you want using the dial for the milk froth (5). See Setting
the Milk Froth Quantity
Press the power button (16) to switch on the machine and preheat the water. The control
panel flashes during the heating process.
Place a suitable cup below the coffee outlet (14) and the milk nozzle.
As soon as the machine has heated up, the control panel stops flashing. Press the
cappuccino button (23) or the latte macchiato button (19)
A beep sounds, the brewing process starts and the chosen button flashes. At the end of the
brewing process, a beep sounds, the control panel is fully lit up again and the machine
automatically switches to stand-by mode.
The perfect amount of espresso and milk to suit your own taste can be programed in the
machine. See Programing quantities
Milk Froth
Fill the water tank (2) as described above.
Fill the milk tank (9) as described above.
Push out the milk nozzle (8) using the lever (7)
Select the setting you want using the dial for the milk froth (5)
11
Page 12

Press the power button (16) to switch on the machine and preheat the water. The control
panel flashes during the heating process.
Place a suitable cup below the milk nozzle.
As soon as the machine has heated up, the control panel stops flashing. Press the milk
froth button (21).
A beep sounds, the brewing process starts and the chosen button flashes. At the end of the
brewing process, a beep sounds, the control panel is fully lit up again and the machine
automatically switches to stand-by mode.
The perfect amount of milk to suit your own taste can be programed in the machine
The machine automatically switches off after 30min of being unused. Press the power button to
switch the machine on again.
If the brewing process is to be aborted prematurely, press the chosen button again. You will hear
a beep, and the control panel is fully lit up again. The machine is now in stand-by mode.
PROGRAMING QUANTITIES
Both the quantity of espresso and the quantity of milk can be programed for each function. This
allows you to set the perfect quantity of espresso and milk to suit your own taste.
The set quantities are saved until a new quantity is set.
Espresso, Double Espresso, Milk Froth
Fill water tank
Fill milk tank if necessary
If necessary, fold out the milk nozzle (8) using the lever (7)
Place a suitable cup below the coffee outlet (14) or the milk nozzle.
Select the function that is to be programed. Press the appropriate button (a beep sounds)
and keep it held down (another beep sounds).
The machine starts to prepare espresso or make milk froth.
Only let go of the button once the quantity of milk or espresso that you want has passed
through.
12
Page 13

Once you release the button you will hear three beeps. This quantity is now saved under
the corresponding function.
Cappuccino and Latte Macchiato
Fill water tank
Fill milk tank if necessary
If necessary, fold out the milk nozzle (8) using the lever (7)
Place a suitable cup below the coffee outlet (14) and the milk nozzle.
Select the function that is to be programmed. Press the appropriate button (a beep sounds)
and keep it held down (another beep sounds).
Milk froth will be released. Release the button when the desired amount of milk froth has
passed through.
Press and hold the function button once again
This time the coffee brewing process will take place.
Release the button when the desired amount of coffee has passed through.
You will hear 3 beeps; this indicates that the function has been programmed.
Now both the quantity of milk and the quantity of espresso are saved under the appropriate
function.
Setting the Milk Froth Quantity
On the milk tank cover (6) there is a dial (5) which can be used to set whether more milk froth or
more hot milk should be added to the coffee.
For more milk froth: Turn the dial to the top right. For more hot milk: Turn the dial to the bottom left.
Reset to Factory Settings
If the amount of espresso and amount of milk are to be reset to the amounts preset in the factory,
proceed as follows:
Switch off the machine via the power button (16).
Press the espresso button (24) and the double espresso button(17) simultaneously and
keep them held down.
13
Page 14

Switch the machine back on via the power button. The control panel (3) flashes 5 times and
5 beeps are heard.
Let go of the espresso and double espresso buttons. The amounts have now been reset to
the factory settings.
CLEANING AND CARE
NOTES
Before commencing the cleaning process, note the safety
instructions.
Do not use any toxic, corrosive or abrasive cleaning agents or
scouring sponges to clean the machine. These can damage the
surface.
Clean the milk container (9) and the filters after every use with mild detergent and warm
water or in the dishwasher.
Rinse through the tube in the milk tank with clear hot water to remove milk residues after
every use.
If necessary, clean the water tank (2) and the drip tray (10) and the cover (11) with mild
detergent and warm water or in the dishwasher.
Regularly run the cleaning program (see “Self-Cleaning”) to clean the milk tank system as
well as the coffee outlet (14) and the portafilter (12).
Wipe down the housing with a damp cloth. If necessary, use a little mild detergent to
remove more stubborn stains.
Thoroughly dry the machine and all accessories before assembling it again.
Check the mains cable regularly for any damage.
Self-Cleaning
Quick Clean of the Milk Tank System
The quick clean of the milk tank system should be carried out after every use so that no milk
residue remains in the system and goes mouldy.
14
Page 15

Fill the milk tank with water
Push out the milk nozzle (8) using the lever (7)
Press the power button (16) to switch on the machine and preheat the water. The
control panel flashes during the heating process.
Place a suitable cup below the milk nozzle.
As soon as the machine has heated up, the control panel stops flashing. Press the self-
cleaning button (20). A beep sounds, the self-cleaning starts and the self-cleaning
button flashes.
Run the program and pour away the contents of the cup after the self-cleaning finishes.
Repeat this process if necessary.
Intensive Clean of the Portafilter and Milk Tank System
During the intensive clean, the portafilter is also thoroughly rinsed through in addition to the milk
tank system. This allows coffee residues which are stuck on to be rinsed out of the portafilter and
the filters if applicable.
Fill the water tank (2) with water
Also fill the milk tank with water
Push out the milk nozzle (8) using the lever (7)
Press the power button (16) to switch on the machine and preheat the water. The
control panel flashes during the heating process.
Place a suitable cup below the coffee outlet (14) and the milk nozzle.
As soon as the machine has heated up, the control panel stops flashing. Press the self-
cleaning button (20) for approx. 5 seconds. A beep sounds, the self-cleaning starts and
the button flashes.
If you want to stop the cleaning, press the button (20) again. The machine switches to
stand-by mode.
Dispose of the water in the cup.
Repeat this process if necessary.
15
Page 16

Descaling
Limescale deposits have an adverse effect not only on the quality of the espresso and the water,
but they also cause power losses and shorten the lifespan of the machine. The thicker a limescale
layer is, the more difficult it is to remove.
We therefore recommend regularly removing limescale deposits with a descaling agent in
accordance with the water quality in your area and how often the machine is used (ap- prox. every
2 – 6 weeks).
The first indications that descaling is required are a large amount of steam being produced and
slower brewing of the espresso.
The machine indicates at regular intervals that it needs to be descaled! When the yellow control
lamp (22) is lit, a descaling process should be performed. The control lamp goes out as soon as a
cleaning or descaling process has been performed.
STORAGE
Disconnect the machine from the mains power when it is not going to be used for a prolonged
period. Clean the machine again if necessary (see Cleaning and Care) and let it dry completely.
Store the machine and all accessories in a dry and clean place that is protected from direct
sunlight and cannot be accessed by children or animals.
16
Page 17

The mains plug is not
inserted correctly in the
plug socket.
Insert the mains plug.
The plug socket is defective. Try another plug socket.
No mains voltage is present.
Check the fuse of the mains
connection.
The control panel lighting is
defective.
Contact our customer
service department.
Too many devices
connected to the same
circuit.
Reduce the number of
devices in the circuit.
No error can be identified.
Contact our customer
service department.
There is too much water in
the water tank (2).
Do not overfill the water
tank!
The water tank is not placed
in its mount correctly.
Correctly fit the water tank.
1. Detach the water tank
from the device and fill it
with water (see the
“Handling and Operation”
chapter | “Filling the Water
Tank”).
2. Place a cup underneath.
3.Then press any button.
Some water will run through
the water system into the
cup. The device will stop
beeping, the red indicator
light goes out and the
device can be restarted.
4. Select the function you
want again.
Problem
Possible cause
Fix
The control panel (3) does
not light up / the device
cannot be switched on.
The fuse in the fuse box is
triggered.
Water runs out of the
device.
A function has been
selected, but the device
beeps constantly and the
red indicator light (18)
flashes. The control panel
does not light up.
There is no water in the
water tank.
TROUBLE SHOOTING
17
Page 18

The coffee outlet (14) or the
filter is clogged.
Clean the portafilter (12)
and the filter.
The device has lime scale.
Descale the device (see the
“Cleaning and Care” chapter
| “Descaling”).
There is not enough coffee
powder in the filter.
Pour the right quantity of
coffee powder into the
respective filter (see the
“Handling and Operation”
chapter | “Filling the Filter
With Coffee Powder”).
The set espresso quantity is
too much for the quantity of
coffee powder in the filter.
The perfect amount of
espresso to suit your own
taste can be programd in
the device (see the
“Handling and Operation”
chapter | “Programming
Quantities”).
The device has lime scale.
Descale the device (see the
“Cleaning and Care” chapter
| “Descaling”).
Cappuccino, latte macchiato
or milk froth has been
selected, but there is no
milk in the milk tank.
Wait until the program has
run through. Allow the
device to cool down a little.
Remove the milk tank from
the device and fill it (see the
“Handling and Operation”
chapter | “Filling the Milk
Tank”). Then run the
program again.
Is the device being used for
the first time?
A smell often develops
when new devices are first
used. The smell should
disappear once the device
has been used several
times.
Has the device just been
descaled?
Rinse out the device with
clean water.
Problem
Possible cause
Fix
The espresso runs very
slowly into the cup.
The espresso is too weak.
A large amount of steam is
produced in the brewing
process.
During use, an unpleasant
smell is detected.
The device is defective.
The red indicator light lights
up constantly.
The device has lime scale.
The yellow indicator light
(22) flashes.
Contact the customer
service department via our
Descale the device (see the
“Cleaning and Care” chapter
| “Descaling”).
18
Page 19

RECIPES TO GET YOU STARTED
“Iced” Latte
Double shot of espresso
90ml fruit flavoured syrup
Cold Milk
Ice
Begin by filling up a 355ml (12-ounce) glass with ice. Then add the espresso, syrup and cold milk.
# This is a great alternative to hot drinks for summer time.
Café Breva
Double shot espresso
90ml half and half, steamed
90ml half and half, frothed
The Café Breva looks like a Cappuccino but it uses half and half.
#Remember it takes practice to get a good froth with half and half but it is achievable.
Café Macchiato
Double shot espresso
Dollop of frothed milk
With this drink the ratio of espresso to milk is usually 80:20. The best way to serve this coffee
drink is in a demitasse cup because it is just one shot of espresso with a small amount of frothed
milk added to the top.
19
Page 20

Café Latte
Double shot espresso
118-148ml steamed milk
A café latte has no frothed milk, just velvety smooth steamed milk. Flavours can be added to vary
the taste.
# In the summer, you may want to add raspberry syrup, while caramel or hazelnut flavours may be
a nice addition for a cup of latte on a wintery day.
Café Mocha
Double shot espresso
177ml steamed milk
15ml chocolate syrup
Whipped cream (optional)
Chocolate sprinkles (optional)
This drink will please your sweet tooth and you can adjust the amount of syrup depending on your
preference. Add the syrup, espresso and steamed milk to a cup, then top it off with a little whipped
cream and chocolate sprinkles
20
Page 21

PLEASE AFFIX YOUR PROOF OF PURCHASE/RECEIPRT HERE IN THE EVENT OF A
CLAIM UNDER WARRANTY THIS RECEIPT MUST BE PRODUCED.
WARRANTY AND EXTENDED WARRANTY
1. Home of Living Brands (Pty) Limited ("Home of Living Brands ") warrants to the
original purchaser of this
product ("the customer") that this product will be free of defects in quality and
workmanship which under normal personal, family or household use and purpose may
manifest within a period of 1 (one) year from the date of purchase ("warranty period").
2. Home of Living Brands shall extend the warranty period for a further period of 1 (one)
year (“extended warranty period”), on condition that the purchaser registers the product
on the website, within 12 months from the date of purchase of the product. The website
address for registration is as follows: http://russellhobbs.co.za/info-pages/warranty-
info.aspx. The extended warranty period only applies to products purchased on or after
1 October 2017.
3. Where the customer has purchased a product and it breaks, is defective or does not
work properly for the intended purpose, the customer must notify the supplier from
whom the customer bought the product ("the
supplier") thereof within the warranty period or if applicable, the extended warranty
period. Any claim in terms of this warranty must be supported by a proof of
purchase. If proof of purchase is not available, then repair, and/or service charges may
be payable by the customer to the supplier.
4. The faulty product must be taken to the supplier's service centre to exercise th
e warranty.
5. The supplier will refund, repair or exchange the product in terms of this warranty
subject to legislative requirements. This warranty shall be valid only where the
customer has
not broken the product themselves, or used the product for something that it is
not supposed to be used for. The warranty does not include and will not be construed
to cover products damaged as a result of disaster, misuse, tamper, abuse or any
unauthorised modification or repair of the product.
6. This warranty will extend only to the product provided at the date of the purchase and
not to any expendables attached or installed by the customer.
7. If the customer requests that the supplier repairs the product and the product breaks or
fails to work properly within 3 (three) months of the repair and not as a result of misuse,
tampering or modification by or on behalf of the customer, then the supplier ma
y replace the product or pay a refund to the customer, subject to the supplier’s
discretion.
8. The customer may be responsible for certain costs where products returned are not in
the original packaging, or if the packaging is damaged. This will be deducted from any
refund paid to the customer.
9.
HOME OF LIVING BRANDS (PTY) LTD (JOHANNESBURG)
JOHANNESBURG TEL NO. (011) 267 3300
CAPE TOWN TEL NO. (021) 552 5161
DURBAN TEL NO. (031) 303 1163
21
 Loading...