

Page 1
Blender
RHBL1
RHBL1_IB_RB_FA_280515
Page 2

Spectrum Brands Australia Pty Ltd
Warranty Conditions
4. The Goods must be used in accordance with the manufacturer’s instructions. This
Warranty does not apply should the defect in or failure of the Goods be attributable
to misuse, abuse, accident or non-observance of manufacturer’s instructions on the
part of the user. As far as the law permits, the manufacturer does not accept liability
for any direct or consequential loss, damage or other expense caused by or arising
out of any failure to use the Goods in accordance with the manufacturer’s instructions.
5. Exhaustible components (such as batteries, filters and brushes) of the Goods are
included under this Warranty only where there is a defect in workmanship or materials
used.
6. The warranty granted under clause 3 is limited to repair or replacement only.
7. Any parts of the Goods replaced during repairs or any product replaced remain the
property of the manufacturer. In the event of the Goods being replaced during the
Warranty Period, the warranty on the replacement Goods will expire on the same
date as for the Warranty Period on the original Goods which are replaced.
8. In order to claim under the warranty granted under clause 3 you must:
(a) Retain this warranty with your receipt/proof of purchase; and
(b) Return the Goods to us at the relevant address or to the Supplier by prepaid
9. This warranty is immediately void if:
(a) Any serial number or appliance plate is removed or defaced;
(b) The Goods have been serviced or otherwise repaired by a person not authorised
10. The Goods are designed for domestic use only. A limited 90-day Warranty applies to
any industrial or commercial use of the Goods. The Goods must be connected to the
electrical voltage requirements as specified in the ratings label located on the Goods.
11. This warranty does not cover the cost of claiming under the warranty or transport
of the Goods to and from the Supplier or us.
12. This warranty is only valid and enforceable in Australia against Spectrum Brands
Australia Pty Ltd and in New Zealand against Spectrum Brands New Zealand Ltd.
Contact us or the Supplier for further details.
Register your product online
If you live in Australia please visit: www.spectrumbrands.com.au/warranty
If you live in New Zealand Please visit: www.spectrumbrands.co.nz/warranty
Registration of your warranty is not compulsory, it gives us a record of your purchase
AND entitles you to receive these benefits: Product information; Hints and tips; Recipes
and news; Information on special price offers and promotions.
Any questions? Please contact Customer Service for advice.
Locked Bag 3004 Braeside
Victoria 3195 Australia
Customer Service in Australia
TollFree: 1800 623 118
Email: info@spectrumbrands.com.au
Website: www.spectrumbrands.com.au
Spectrum Brands New Zealand Ltd
PO Box 9817 Newmarket
Auckland 1149 New Zealand
Customer Service in New Zealand
TollFree: 0800 736 776
Email: service@spectrumbrands.co.nz
Website: www.spectrumbrands.co.nz
Spectrum Brands Australia Pty Ltd and Spectrum Brands New Zealand Ltd
W
0911
In this warranty:
Australian Consumer Law means the Australian consumer law set out in Schedule 2 to the
Competition and Consumer Act 2010;
CGA means the New Zealand Consumer Guarantees Act 1993;
Goods means the product or equipment which was accompanied by this warranty and
purchased in Australia or New Zealand, as the case may be;
Manufacturer, We or us means:
1. for Goods purchased in Australia, Spectrum Brands Australia Pty Ltd ABN, 78 007 070 573;
or
2. for Goods purchased in New Zealand, Spectrum Brands New Zealand Ltd, as the case
may be, contact details as set out at the end of this warranty;
Supplier means the authorised distributor or retailer of the Goods that sold you the Goods in
Australia or in New Zealand; and
You means you, the original end-user purchaser of the Goods.
1. Our goods come with guarantees that cannot be excluded under the Australian Consumer
Law, or the CGA. You are entitled to a replacement or refund for a major failure and
compensation for any other reasonably foreseeable loss or damage. You are also entitled
to have the goods repaired or replaced if the goods fail to be of acceptable quality and the
failure does not amount to a major failure.
2. The benefits provided by this Warranty are in addition to all other rights and remedies in
respect of the Goods which the consumer has under either the Australian Consumer Law
or the CGA. The original purchaser of the Goods is provided with the following Warranty
subject to the Warranty Conditions:
3. We warrant the Goods for all parts defective in workmanship or materials for a period of
2 years from the date of purchase (Warranty Period).
If the Goods prove defective within the Warranty Period by reason of improper workmanship
or material, we may, at our own discretion, repair or replace the Goods without charge.
Warranty Against Defects
Page 3

Warranty Conditions
4. The Goods must be used in accordance with the manufacturer’s instructions. This
Warranty does not apply should the defect in or failure of the Goods be attributable
to misuse, abuse, accident or non-observance of manufacturer’s instructions on the
part of the user. As far as the law permits, the manufacturer does not accept liability
for any direct or consequential loss, damage or other expense caused by or arising
out of any failure to use the Goods in accordance with the manufacturer’s instructions.
5. Exhaustible components (such as batteries, filters and brushes) of the Goods are
included under this Warranty only where there is a defect in workmanship or materials
used.
6. The warranty granted under clause 3 is limited to repair or replacement only.
7. Any parts of the Goods replaced during repairs or any product replaced remain the
property of the manufacturer. In the event of the Goods being replaced during the
Warranty Period, the warranty on the replacement Goods will expire on the same
date as for the Warranty Period on the original Goods which are replaced.
8. In order to claim under the warranty granted under clause 3 you must:
(a) Retain this warranty with your receipt/proof of purchase; and
(b) Return the Goods to us at the relevant address or to the Supplier by prepaid
freight within the Warranty Period accompanied with (i) the legible and unmodified
original proof of purchase, which clearly indicates the name and address of the
Supplier, the date and place of purchase, the product name or other product serial
number and (ii) this warranty.
9. This warranty is immediately void if:
(a) Any serial number or appliance plate is removed or defaced;
(b) The Goods have been serviced or otherwise repaired by a person not authorised
to do so by us or where non approved replaced parts are used.
10. The Goods are designed for domestic use only. A limited 90-day Warranty applies to
any industrial or commercial use of the Goods. The Goods must be connected to the
electrical voltage requirements as specified in the ratings label located on the Goods.
11. This warranty does not cover the cost of claiming under the warranty or transport
of the Goods to and from the Supplier or us.
12. This warranty is only valid and enforceable in Australia against Spectrum Brands
Australia Pty Ltd and in New Zealand against Spectrum Brands New Zealand Ltd.
Contact us or the Supplier for further details.
Register your product online
If you live in Australia please visit: www.spectrumbrands.com.au/warranty
If you live in New Zealand Please visit: www.spectrumbrands.co.nz/warranty
Registration of your warranty is not compulsory, it gives us a record of your purchase
AND entitles you to receive these benefits: Product information; Hints and tips; Recipes
and news; Information on special price offers and promotions.
Any questions? Please contact Customer Service for advice.
Page 4
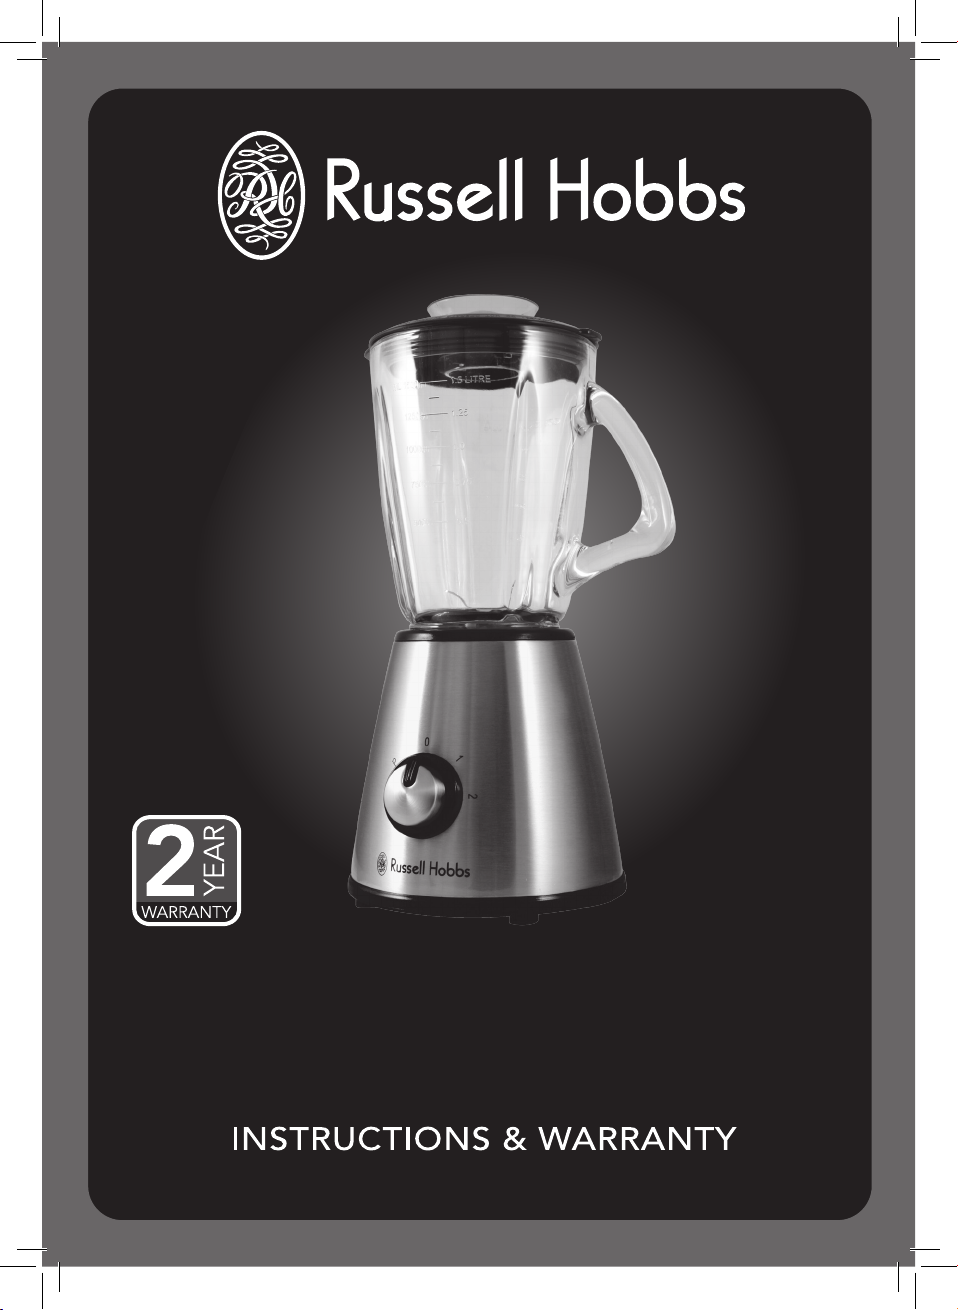
Congratulations on the purchase of your new Russell Hobbs appliance. Each unit is manufactured
to ensure safety and reliability. Before using the Blender for the first time, please read this
instruction booklet carefully and keep it for future reference. Pass it on if you pass on the appliance.
When using this appliance, basic safety precautions should always be followed.
1
12
13
14
15
3
2
4
5
6
7
8
9
10
11
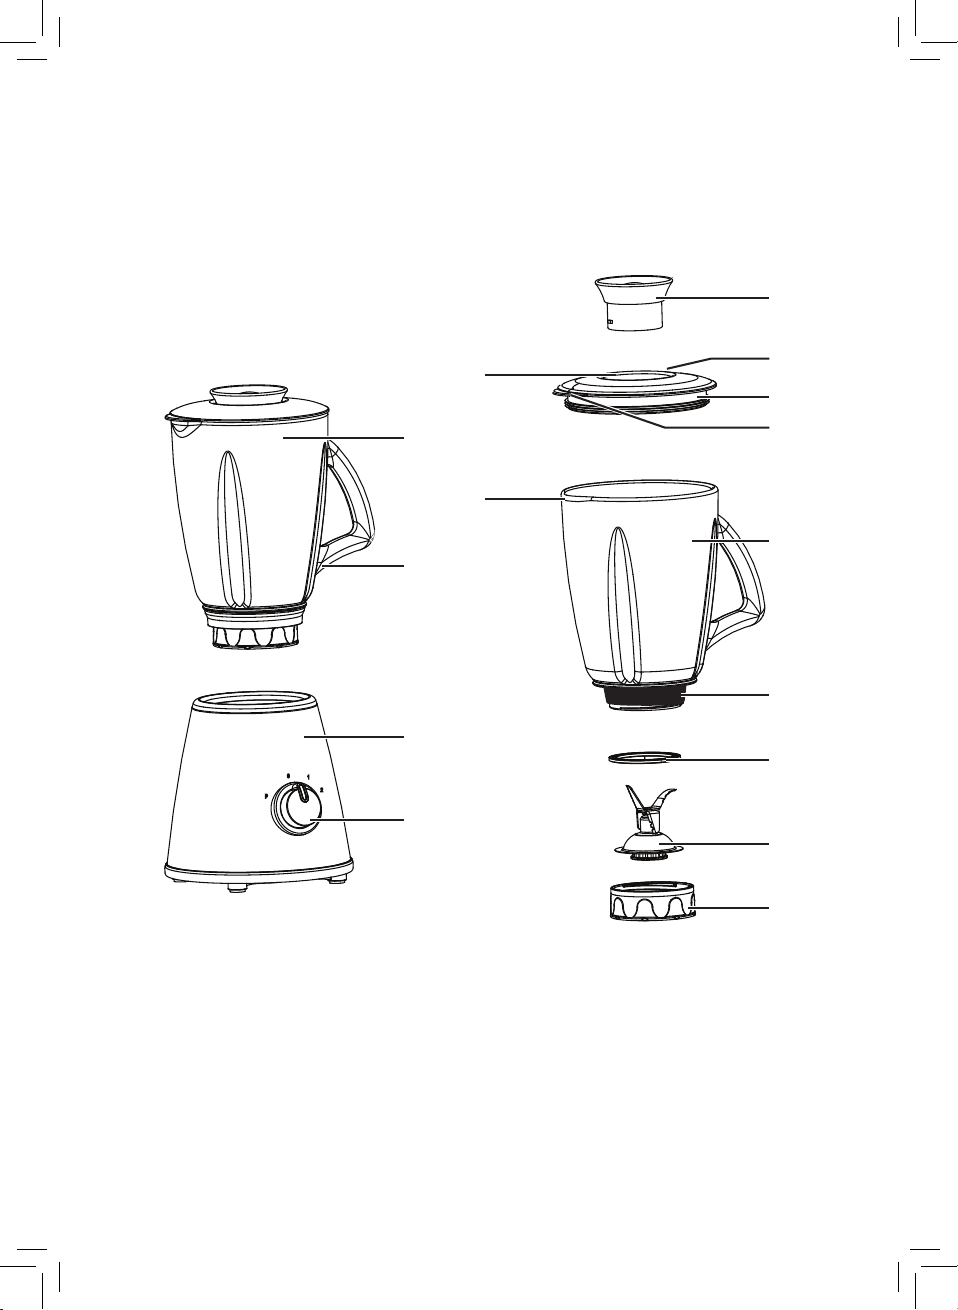
FEATURES
1. Measuring cap
2. Square tab
3. Lid opening
4. Lid
5. Round tab
6. Pouring spout
7. Glass jug
8. Press ring (Not removable)
9. Sealing ring (Double layered)
10. Blade assembly
11. Jug base
12. Jug assembly
13. Handle
14. Motor unit
15. Speed selector dial
Page 5

BEFORE FIRST USE
• All parts of the blender need to be thoroughly cleaned before being used for the rst time
(see “cleaning” section).
ASSEMBLY OF THE GLASS JUG
• Turn the glass jug upside down on a at bench or table.
CAUTION: Be careful when handling the blade assembly.
• Attach the sealing ring to the blade assembly. Gently open the double layered sealing ring.
Then slot over and all the way around the rim of the blade assembly base.
• Place the blade assembly (with sealing ring tted) onto the opening at the base of the jug
with the blades pointing to the inside of the jug.
• Mount the jug base onto the glass jug and turn the jug base unit in a clockwise direction
until it is tightly xed.
• Turn the jug right way up.
INSERTING THE GLASS JUG
• Check that the speed selector dial is set to ‘0’ off.
• Place the jug assembly onto the motor unit, ensuring it is seated correctly.
OPERATING THE BLENDER
• Place the ingredients you wish to blend into the glass jug.
• Fit the lid onto the jug, aligning the square tab with the handle and round tab with the
pouring spout. Press down rmly.
• Insert the measuring cap into the opening of the lid, and turn it in a clockwise direction until
it locks.
• Place your hand on top of the blender jug lid to hold the jug steady. Switch the motor unit on
to the desired speed or pulse setting using the speed selector dial.
NOTE: Always place your hand on top of the blender jug lid to hold the jug steady when you are
operating the device.
SPEED SELECTOR DIAL
‘1’ Position - For light usage with liquids
‘2’ Position - For more solid consistency (E.g. mixing liquids and solid foodstuffs)
‘P’ Position - For ice crushing & short pulses at high speed.
NOTE: You have to turn the ‘P’ pulse switch repeatedly
‘0’ Position - Off.
USEFUL TIPS
• When pureeing solid ingredients, place and blend small portions in the glass jug at a time,
gradually adding more ingredients.
• When processing solid ingredients, cut them into small pieces (2-3cm) rst.
• When blending liquids into solid ingredients, start off rst with a small amount of liquid,
gradually adding more liquid through the lid opening.
• Always place your hand on top of the blender jug lid to hold the jug steady when you are
operating the appliance.
• Be careful when processing hot liquids.
Page 6

• For stirring solid or very thick liquid ingredients it is recommended that you use the blender
set to ‘P’ pulse setting mode to prevent the blades from becoming stuck.
AFTER USE
• Turn the speed selector dial to the ‘0’ off position and wait until the blades stop moving.
• Switch the power off and remove the plug from the wall power outlet.
• Lift the glass jug up to remove it from the motor unit.
CLEANING
Rinsing out the assembled glass jug:
• Empty the glass jug and ll it with water.
• Place the glass jug on the motor unit and turn the dial to pulse several times.
• Empty the glass jug and rinse until clean.
Thorough cleaning of the dismantled glass jug:
• Ensure that the glass jug is completely empty before you unscrew the jug base.
• Turn the glass jug upside down on a at bench or table. Unscrew the jug base.
CAUTION: Be careful when handling the blade assembly.
• Remove the blade assembly, together with the sealing ring.
• Wash the glass jug ,blade assembly and sealing ring in warm soapy water, rinse and dry
thoroughly.
• Ret the sealing ring onto the rim of the blade assembly.
• Place the blade assembly on the jug, with the blades to the inside of the jug.
• Mount the jug base onto the glass jug and turn the jug base unit in a clockwise direction
until it is tightly xed.
• Turn the jug right way up.
• All removable parts are dishwasher safe.
NOTE: Do not attempt to remove press ring. Attempting to remove the press ring may result in
breakage of the glass jug and/or press ring.
Page 7

BLENDING SPEED SELECTION GUIDE
ACTION SUGGESTED FOOD TYPE SPEED SETTING
Aerating Milkshakes 2
Thickshakes 2
Blending Fruit smoothies 2
Cocktails 2
Soups 2
Curry pastes 1
Chopping Chocolate P
Dried herbs P
Nuts P
Coffee beans P
Seeds 2
Combining Marinades 1
Mayonnaise 1
Dressing and Sauces 1
Creaming Butter and Sugar 1
Crumbing Breadcrumbs P
Biscuits P
Crushing Ice cubes P
Pureeing Vegetables 2
Fruits 2
Refining Sugar 2
Page 8

IMPORTANT SAFEGUARDS
When using this appliance, basic safety precautions should always be followed, including but not limited
to the following:
1. Read all instructions before, and follow whilst using this appliance.
2. To protect against electric shock DO NOT immerse cord, plug or motor unit in water or any other
liquid.
3. Do not use in the bathroom or near any source of water.
4. Do not use outdoors.
5. This product is not intended for use by persons (including children) with reduced physical, sensory or
mental capabilities, or lack of experience and knowledge, unless they have been given supervision or
instruction concerning use of the product by a person responsible for their safety.
6. This appliance is not a toy. Children should be supervised to ensure they do not play with this
appliance.
7. Always turn off and unplug from the power outlet when not in use and before cleaning.
8. To disconnect, set the controls to off. Turn off the wall power outlet, then grasp the plug and remove
from the wall power outlet. Never pull by the cord.
9. Do not operate any appliance with a damaged cord or plug or after the appliance has malfunctioned,
or has been dropped or damaged in any manner. Contact customer service for replacement,
examination, repair or adjustment.
10. There are no user serviceable parts. If the power cord is damaged, it must be replaced by the
manufacturer or similarly qualified person in order to avoid a hazard.
11. The motor must always be switched off before connecting to the mains supply.
12. Cutting blades are very sharp. Handle the blender and blade assembly with extreme care and
caution when empting the jug and during cleaning.
13. The motor will only operate if the glass jug has been fully inserted into the motor unit.
14. Before switching on, make sure that the glass jug has been assembled correctly and has been
seated into the motor unit with the lid attached.
15. The blender is not to be operated with an empty glass jug.
16. Allow boiling liquids to cool before you pour them into the blender jug. Pouring boiling liquids into a
cold glass jug could cause the jug to crack.
17. Switch off and unplug the appliance before changing accessories or touching parts that move whilst
in use.
18. Average operating time is approximately 1 minute. If further blending is required, allow a rest/cooling
period of 1-2 minutes between operations.
19. Do not use on an inclined plane or unstable surface.
20. Keep the blender and the power cord away from the edges of benches and countertops.
21. Do not place the blender on or near any heat sources.
22. Do not use appliance for other than intended purpose.
23. This appliance is not intended to be operated by means of an external timer or separate remote
control system.
24. For added safety, electrical appliances should be connected to a power outlet that is protected by a
residual current device (RCD), also often referred to as a ‘Safety Switch’. Your switchboard may
already incorporate an RCD. If unsure, call an electrician for verification and fitting if necessary.
SAVE THESE INSTRUCTIONS
THIS APPLIANCE IS FOR HOUSEHOLD USE ONLY
Page 9

NOTES
Page 10

7
then high speed for 10 seconds.
cubes last. Blend at low speed for 10 seconds,
1. Put all ingredients into the Blender jug, ice
then high speed for 10 seconds.
cubes last. Blend at low speed for 10 seconds,
1. Put all ingredients into the Blender jug, ice
3 ice cubes
Irish cream liqueur
40mL Baileys or
½ tsp instant coffee
40g vanilla ice cream
100mL milk
INGREDIENTS
Serves 2
IRISH CREAM COCKTAIL
5 ice cubes
6 strawberries
1 tsp lemon juice
60mL gin
100mL lemonade
INGREDIENTS
Serves 2
STRAWBERRY GIN FIZZ
5 ice cubes
3 tbsp natural yoghurt
40mL rum
chopped
1 small banana, roughly
peeled and roughly chopped
then high speed for 10 seconds.
cubes last. Blend at low speed for 10 seconds,
1. Put all ingredients into the Blender jug, ice
½ ripe mango, stone removed,
100mL pineapple juice
INGREDIENTS
Serves 2
MANGO & RUM COCKTAIL
Page 11

6
until smooth.
at low speed for 15 seconds, then high speed
1. Put all ingredients into the Blender jug. Blend
for 5 seconds.
at low speed for 10 seconds, then high speed
1. Put all ingredients into the Blender jug. Blend
3 ice cubes
60mL coconut cream
(White rum)
60mL Malibu
250mL pineapple juice
INGREDIENTS
Serves 2
PINA COLADA
3 ice cubes
50mL brandy
300mL chocolate milk
INGREDIENTS
Serves 2
LA MUMBA
5 ice cubes
for 10 seconds
at low speed for 10 seconds, then high speed
2. Put all ingredients into the Blender jug. Blend
1. Roughly chop the melon.
40mL rum
150g melon flesh
200mL ginger beer
INGREDIENTS
Serves 2
TROPICAL COCKTAIL
Page 12

5
for 10 seconds.
at low speed for 10 seconds, then high speed
1. Put all ingredients into the Blender jug. Blend
4 tbsp chocolate syrup
cream
2 scoops chocolate ice
400mL milk
INGREDIENTS
Serves 2
CHOCOLATE SHAKE
6 ice cubes
2 tsp vanilla essence
4 tsp honey
chopped
for 10 seconds.
at low speed for 10 seconds, then high speed
1. Put all ingredients into the Blender jug. Blend
1 large banana, roughly
400mL milk
INGREDIENTS
Serves 2
BANANA, VANILLA & HONEY SMOOTHIE
Page 13

4
for 5 seconds.
at low speed for 10 seconds, then high speed
2. Put all ingredients into the Blender jug. Blend
stone and chop the esh roughly.
1. Peel the mango, remove the esh from the
10 ice cubes
2 tsp honey
200mL milk
1 ripe mango
200mL natural yoghurt
INGREDIENTS
Serves 2
MANGO LASSI
6 ice cubes
200mL milk
chopped
then high speed for 5 seconds.
cubes last. Blend at low speed for 10 seconds,
1. Put all ingredients into the Blender jug, ice
1 large banana, roughly
150g hazelnut yoghurt
INGREDIENTS
Serves 2
BANANA NUT SMOOTHIE
Page 14

3
for 15 seconds.
at low speed for 15 seconds, then high speed
1. Put all ingredients into the Blender jug. Blend
4 ice cubes
12 strawberries
90g raspberries
300mL apple juice
INGREDIENTS
Serves 2
BERRY FRUIT SMOOTHIE
dried fruits.
5. Serve on a platter with crackers, grapes and
in chopped nuts.
4. Roll into walnut sized balls and then roll each
handle easily.
3. Scoop into a bowl and chill until rm enough to
smooth.
to lighten mixture. Blend at low speed until
2. Blend lightly at low speed and add sour cream
chilli and pepper to the Blender jug.
Worcestershire sauce, lemon juice, herbs,
Add parmesan cheese, spring onion,
1. Scoop cheese into the Blender jug.
Chopped mixed nuts, toasted
1 tbsp sour cream
Pepper, to taste
½ tsp chilli flakes
1 tbsp mixed herbs
1 tbsp lemon juice
1 tbsp Worcestershire sauce
2 tbsp spring onion, chopped
grated
½ cup parmesan cheese
250g soft cream cheese
INGREDIENTS
Makes 20
SAVOURY CHEESE BALLS
Page 15

Photography: Salton Australia - Designed in Australia
without prior permission of the copyright owner.
stored in a retrieval system or transmitted in any form or by any means, electronic, mechanical, photocopying, recording or otherwise,
Recipes are to be used in conjunction with the Blender by Russell Hobbs. All rights reserved. No part of this publication may be reproduced,
©2011 Spectrum Brands, Inc.
RUSSELL HOBBS and logo are Trade Marks of Spectrum Brands, Inc., or one of its subsidiaries.
3. Serve tossed through warm pasta, or as a dip.
salt and pepper.
2. Mix in the Parmesan cheese and season with
been blended through.
until combined. Repeat until all the oil has
Blender jug. Add a tablespoon of oil, and pulse
1. Put the coriander, garlic and pine nuts into the
120g grated parmesan cheese
80g pine nuts
4 cloves fresh garlic
250mL olive oil
4 handfuls fresh coriander
INGREDIENTS
Makes approx. 2 cups
CORIANDER PESTO
200mL virgin olive oil
Salt & pepper, to taste
the rest of the oil and process until smooth.
sides of the bowl if necessary. Gradually add
2. Process until just blended, scraping down the
⅓ of the olive oil.
add to the olives with tuna, capers and approx
speed, chop coarsely. Chop anchovies and
1. Place olives into the Blender jug and at low
1 tbsp capers
1 tbsp Dijon mustard
100g tuna, flaked
6 bottled anchovies
100g pitted olives
INGREDIENTS
Makes approx. 2 cups
TAPENADE
Page 16

RHBL1
Blender
Recipes
 Loading...