

Page 1
instructions 2
mode d’emploi 8
instrucciones 14
1
Page 2

Please Read and Save this Use and Care Book.
IMPORTANT SAFEGUARDS
When using electrical appliances, basic safety precautions should always be
followed, including the following:
• Read all instructions.
• Do not touch hot surfaces. Use handles or knobs.
• To protect against fire, electric shock and injury to persons do not
immerse cord, plugs or appliance in water or other liquid.
• Close supervision is necessary when any appliance is used by or near children.
• Unplug appliance from outlet when neither the appliance nor display
clock is in use, and before cleaning.
• Allow to cool before putting on or taking off parts, and before cleaning
the appliance.
• Do not operate any appliance with a damaged cord or plug, or after the
appliance malfunctions or has been damaged in any manner. Contact
Consumer Support at the number listed in this manual. This appliance
has important markings on the plug blade. The attachment plug or entire
cordset (if plug is molded onto cord) is not suitable for replacement. If
damaged, the appliance must be replaced.
• The use of accessory attachments not recommended by the appliance
manufacturer may result in fire, electric shock or injury to persons.
• Do not use outdoors.
• Do not let cord hang over edge of table or counter, or touch hot surfaces.
• Do not place on or near a hot gas or electric burner, or in a heated oven.
• To disconnect while brewing or keeping warm, press the
remove plug from wall outlet. To disconnect while neither brewing nor
keeping warm, just remove plug from wall outlet.
• Do not use this appliance for other than intended use.
• Keep lid on the carafe when in use.
• Scalding may occur if the lid is removed during the brewing cycles.
• The carafe is designed for use with this appliance. It must never be used
on a range top.
• Do not set a hot carafe on a wet or cold surface.
• Do not use a cracked carafe or a carafe having a loose or weakened handle.
• Do not clean carafe with cleansers, steel wool pads or other abrasive material.
• This appliance is not intended for use by persons (including children) with
reduced physical, sensory or mental capabilities, or lack of experience
and knowledge, unless they have been given supervision or instruction
concerning use of the appliance by a person responsible for their safety.
• Children should be supervised to ensure that they do not play with
the appliance.
button, then
SAVE THESE INSTRUCTIONS.
This product is for household use only.
2
Page 3
POLARIZED PLUG
This appliance has a polarized plug (one blade is wider than the other). To
reduce the risk of electric shock, this plug is intended to fit into a polarized
outlet only one way. If the plug does not fit fully into the outlet, reverse the
plug. If it still does not fit, contact a qualified electrician. Do not attempt to
modify the plug in any way.
TAMPER-RESISTANT SCREW
Warning: This appliance is equipped with a tamper-resistant screw to
prevent removal of the outer cover. To reduce the risk of fire or electric shock,
do not attempt to remove the outer cover. There are no user-serviceable
parts inside. Repair should be done only by authorized service personnel.
ELECTRICAL CORD
a) A short power-supply cord is provided to reduce the risks resulting from
becoming entangled in or tripping over a longer cord.
b) Extension cords are available and may be used if care is exercised in
their use.
c) If an extension cord is used:
1) The marked electrical rating of the extension cord should be at least as
great as the electrical rating of the appliance;
2) If the appliance is of the grounded type, the extension cord should be
a grounding-type 3-wire cord; and
3) The cord should be arranged so that it will not drape over the counter
top or tabletop where it can be pulled on by children or tripped over.
Note: If the power cord is damaged, please contact the warranty department
listed in these instructions.
WARNING
The lightning symbol refers to “dangerous voltage”; the exclamation symbol refers
to maintenance instructions. See below.
Warning: To reduce the risk of fire or electric shock, do not remove the cover of the
coffeemaker. There are no user-serviceable parts inside. Repair should be done by
authorized service personnel only.
RISK OF FIRE OR ELECTRIC SHOCK. DO NOT OPEN.
3
Page 4
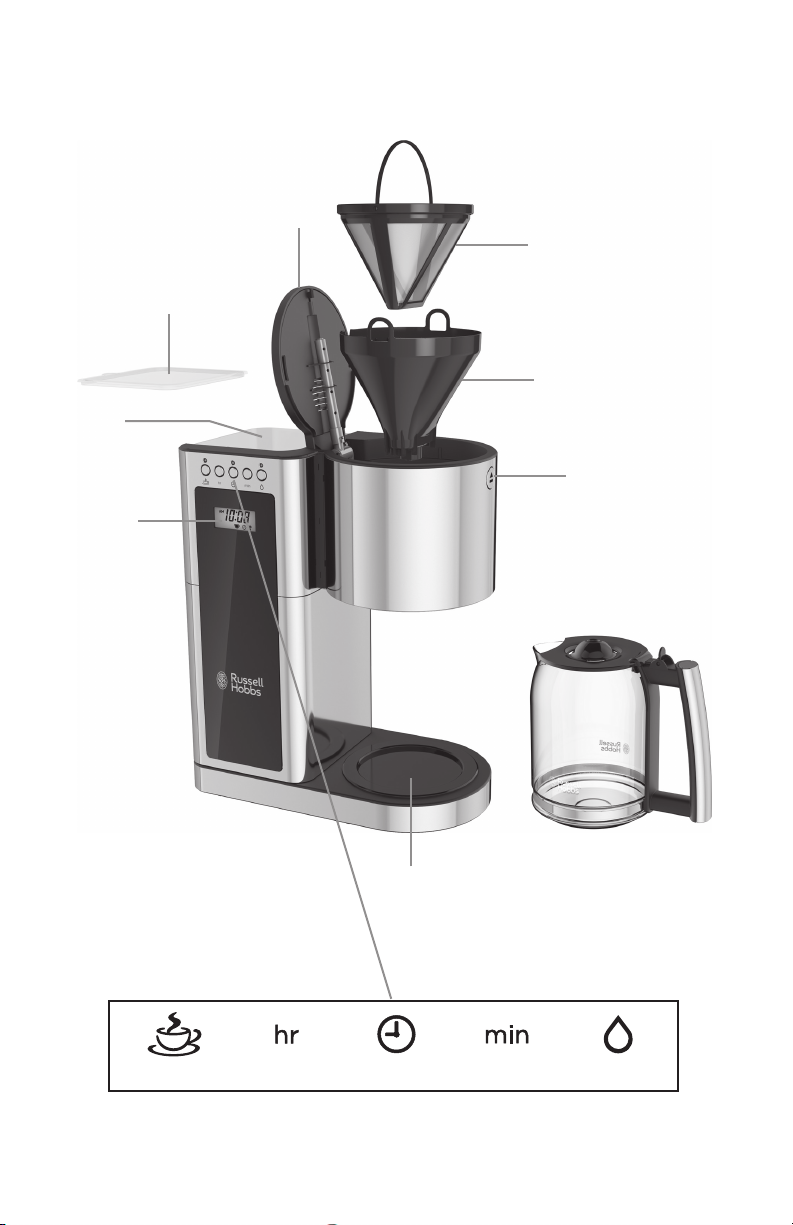
BUTTON FUNCTIONS
brew now/o hour program minute auto clean
Product may vary slightly from what is illustrated.
4
Page 5

How to Use
This appliance is for household use only.
GETTING STARTED
• Remove all packing materials, any stickers and the plastic band around the power plug.
• To register your product, go to www.prodprotect.com/russellhobbs.
• Wash all parts as instructed in CARE and MAINTENANCE section.
• Select a level surface where this unit is to be used allowing enough space for
steam to escape without damage to counters, cabinets and walls.
PARTS
1. Reservoir lid (part no. CM8100-01)
2. Filter compartment lid
3. Reservoir
4. Display
5. Reusable lter (part no. CM8100- 04)
BEFORE USING FOR THE FIRST TIME
• Fill the reservoir to the max mark, and run the appliance without coee.
• Let it cool, discard the water, and then use it normally.
SET THE CLOCK
1. Put the plug into the power outlet.
2. Use the hr and min buttons to set the correct time.
• The clock will retain its settings until the coee maker is unplugged.
FILLING
1. Lift the lid o the reservoir.
2. Fill with water to at least the 2 mark (0.25 L) but not above the max mark (1.25 L).
The reservoir holds enough water for 8 servings at 5.0 oz. (148 ml) each.
3. Press the lid lock to open the lter compartment lid.
4. Put the reusable lter into the lter holder.
5. For each serving, add 7.5 g (1/ Tbsp.) of ground coee.
6. Close the lid, and press down to lock it.
7. Put the carafe on the hotplate.
MAKING COFFEE
1. Press the button – the e icon will appear on the display.
2. Shortly afterwards, coee will start to drip into the carafe.
3. When it’s done, the hotplate will keep the carafe warm for 40 minutes.
4. If you want to stop the coee maker while it’s brewing, press the button.
USING THE TIMER
5. Set the clock to the correct time. Use the hr and min buttons.
6. To set the timer to the time you want to start brewing:
a) Press the T button .
7. b) Use the hr and min buttons to set the time you want brewing to start.
If you don’t press either the hr or min buttons within 5 seconds, the coee
maker will revert to “normal”, and the current time will show. Press the T
button to start programming process again.
8. When the time is programmed, press the button. The light above the T
button will come on and the T icon will appear on the display. Your coee
maker is now set to make coee at the selected time.
6. Filter holder (part no. CM8100-02)
7. Lid lock
8. Carafe with lid (part no. CM8100-03)
9. Hotplate
5
Page 6

9. To check the programmed time, press the T button. The programmed time will
show for 3 seconds and then return to the time of day.
10. To cancel the timer before brewing has started or stop the coee maker while
it’s brewing, press the
button.
KEEP WARM/AUTO SHUT OFF
1. The coee maker will keep the coee warm for about 40 minutes and 40:00
will be displayed and will count down in 1 minute increments.
2. 40 minutes after brewing, the icon will go out and the coee maker will shut
down and only the time of day will be displayed.
3. To wake the appliance, press any button.
4. For best avour, coee should be consumed within 40 minutes.
PAUSE AND POUR FEATURE
If you want a quick cup of coee before the brewing cycle has nished:
1. You can remove the carafe at any time. The non-drip valve will prevent coee
dripping on to the hotplate.
2. To prevent the lter holder overowing, replace the carafe on the hotplate
within about 20 seconds.
3. When you replace the carafe the coeemaker resumes brewing.
CARE AND MAINTENANCE
1. Unplug the appliance and let it cool.
2. Dispose of used coee grounds.
3. Clean the outside surfaces of the appliance with a damp cloth.
4. Hand wash the carafe, reservoir lid, and lter holder.
SELF CLEAN
After 60 brewing cycles, the clean icon will appear on the display. This is to remind
you to activate your coee maker’s self cleaning feature.
This operation will take approximately 45 minutes.
1. Pour 500ml (16 oz.) of white vinegar and 500ml (16 oz.) of water into the
reservoir.
2. Close the lid.
3. Place the carafe on the hotplate.
4. Press the
will appear on the display.
5. After the self clean cycle, empty carafe and replace it on the hotplate.
6. Fill reservoir with cold water to max line. Turn on coeemaker for a complete brew
cycle to ush out remaining cleaning solution. You may wish to repeat this step.
7. Hand wash the removable parts.
button. The light above the button will come on and the e icon
6
Page 7

NEED HELP?
Warranty Information
(Applies only in the United States and Canada)
For service, repair or any questions regarding your appliance, please call our
Customer Service Line at 1-800-947-3744. Please DO NOT return the product to the place
of purchase. Also, please DO NOT mail product back to manufacturer, nor bring it to a
service center. You may also want to consult www.prodprotect.com/russellhobbs.
What does it cover?
• Any defect in material or workmanship provided; however, the liability of Spectrum
Brands, Inc. will not exceed the purchase price of product.
How long is the warranty valid?
• In the United States: Two years from the date of original purchase with proof of such
purchase.
• In Canada: Two years from the date of original purchase with proof of such purchase.
Canadian residents can register online for an extra year of warranty at:
www.prodprotect.com/russellhobbs.
What will we do to help you?
• Provide you with a reasonably similar replacement product that is either new or
factory refurbished.
How do you get service?
• Save your receipt as proof of date of sale.
• Visit the online service website at www.prodprotect.com/russellhobbs, or call tollfree 1-800-947-3744, for general warranty service.
• If you need parts or accessories, please call 1-800-738-0245.
What does your warranty not cover?
• Damage from commercial use
• Damage from misuse, abuse or neglect
• Products that have been modied in any way
• Products used or serviced outside the country of purchase
• Glass parts and other accessory items that are packed with the unit
• Shipping and handling costs associated with the replacement of the unit
• Consequential or incidental damages (Please note, however, that some states do
not allow the exclusion or limitation of consequential or incidental damages, so this
limitation may not apply to you.)
How does state law relate to this warranty?
• This warranty gives you specic legal rights. You may also have other rights that vary
from state to state or province to province.
7
Page 8

Veuillez lire et conserver ce guide d’entretien et d’utilisation.
IMPORTANTES MISES EN GARDE
Lors de l'utilisation de tout appareil électroménager, il faut toujours observer des
précautions de base, y compris ce qui suit :
• Lisez toutes les instructions avant utilisation.
• Ne pas toucher aux surfaces chaudes. Prendre l’appareil par les poignées ou les boutons.
• Afin d’éviter les risques d’incendie, de choc électrique et de blessures, ne pas immerger
le cordon, la fiche ou l’appareil dans l’eau ou dans d’autres liquides.
• Exercer une étroite surveillance lorsque l’appareil est utilisé à proximité d’un enfant ou
que ce dernier s’en sert.
• Débrancher l’appareil lorsque l’appareil et l’horloge ne sont pas utilisés, et avant le nettoyage.
• Ne pas utiliser un appareil dont la fiche ou le cordon sont abîmés, qui présente un
problème de fonctionnement, ou qui est endommagé de quelque façon que ce soit.
Retourner l’appareil au centre de service autorisé le plus près pour la vérification, la
réparation ou le réglage. D’importantes indications sont inscrites sur la lame de la fiche
de cet appareil. La fiche de branchement ou l’ensemble du cordon (si la fiche est moulée
à même le cordon) ne peuvent pas être remplacés. S’ils sont endommagés, l’appareil
doit être remplacé.
• L’utilisation d’accessoires non recommandés par le fabricant de l’appareil présente des
risques d’incendie, de choc électrique ou de blessures.
• Ne pas utiliser l’appareil à l’extérieur.
• Ne pas laisser le cordon pendre du rebord d’une table ou d’un comptoir, ou toucher une
surface chaude.
• Ne pas placer l’appareil sur un brûleur au gaz ou électrique, ou à proximité, ni dans un
four chaud.
• Pour débrancher l’appareil lors de l’infusion ou du maintien au chaud, appuyer sur
le bouton (infusion/arrêt), puis retirer la fiche de la prise de courant murale. Pour
débrancher l’appareil lorsqu’il n’est pas en marche, retirer simplement la fiche de la prise
de courant murale.
• N’utiliser cet appareil que pour les fonctions auxquelles il est destiné.
• Garder le couvercle sur la carafe lors de l’utilisation de l’appareil.
• Le retrait du couvercle pendant les cycles d’infusion peut causer des brûlures.
• La carafe est conçue pour être utilisée avec cet appareil. Elle ne doit jamais être utilisée
sur une table de cuisson.
• Ne pas déposer la carafe chaude sur une surface froide ou mouillée.
• Ne pas se servir de la carafe si le verre en est fêlé ou si la poignée est lâche ou affaiblie.
• Ne pas nettoyer la carafe avec des produits nettoyants, des tampons en laine d’acier, ou
tout autre produit abrasif.
• Cet appareil n’est pas conçu pour être utilisé par des personnes (notamment des
enfants) dont les capacités physiques, sensorielles ou mentales sont réduites ou qui
manquent d’expérience ou de connaissances, à moins qu’elles ne soient supervisées ou
dirigées par une personne responsable de leur sécurité pendant l’utilisation.
• Les enfants doivent être supervisés afin d’éviter qu’ils ne jouent avec l’appareil.
8
Page 9

CONSERVER CES MESURES.
Cet appareil est conçu pour un usage domestique seulement.
FICHE POLARISÉE
L’appareil est muni d’une fiche polarisée (une lame plus large que l’autre). Afin de minimiser
les risques de secousses électriques, ce genre de fiche n’entre que d’une façon dans une
prise polarisée. Lorsqu’on ne peut insérer la fiche à fond dans la prise, il faut tenter de le
faire après avoir inversé les lames de côté. Si la fiche n’entre toujours pas dans la prise, il faut
communiquer avec un électricien certifié. Il ne faut pas tenter de modifier la fiche.
VIS INDESSERRABLE
AVERTISSEMENT : L’appareil est doté d’une vis indesserrable empêchant l’enlèvement
du couvercle extérieur. Pour réduire les risques d’incendie ou de secousses électriques, ne
pas tenter de retirer le couvercle extérieur. L’utilisateur ne peut pas remplacer les pièces de
l’appareil. En confier la réparation seulement au personnel des centres de service autorisés.
CORDON
1. Le cordon d’alimentation de l’appareil est court afin de minimiser les risques
d’enchevêtrement ou de trébuchement.
2. Lorsqu’on utilise un cordon d’alimentation amovible ou de rallonge plus long, il faut
s’assurer que :
a.) la tension nominale du cordon d’alimentation amovible ou de rallonge soit au moins
égale à celle de l’appareil, et que;
b.) lorsque l’appareil est de type mis à la terre, il faut utiliser un cordon de rallonge mis
à la terre à trois broches, et;
c.) le cordon plus long soit placé de sorte qu’il ne soit pas étalé sur le comptoir ou
la table d’où des enfants pourraient le tirer, ni placé de manière à provoquer un
trébuchement.
Remarque : Si le cordon d’alimentation est endommagé, veuillez communiquer avec le
Service de la garantie dont les coordonnées figurent dans les présentes instructions.
Le symbole clignotant indique que la « tension est dangereuse »; le point
RISQUES D'INCENDIE OU DE CHOC ÉLECTRIQUE NE PAS OUVRIR
d'exclamation fait référence aux instructions d'entretien. Voir ci-dessous.
Avertissement : Pour réduire les risques d'incendie ou de choc électrique, ne pas
retirer le couvercle de la cafetière. L'appareil ne contient aucune pièce réparable
par l'utilisateur. Les réparations doivent être effectuées par un technicien autorisé
seulement.
AVERTISSEMENT
9
Page 10

FONCTIONS DES BOUTONS
Infusion/arrêt Heure Programmation Minute Nettoyage
automatique
Le produit peut différer légèrement de celui illustré.
10
Page 11

Utilisation
Cet appareil est destiné à une utilisation résidentielle uniquement.
POUR COMMENCER
• Retirer tout matériau d’emballage, toute étiquette et la bande de plastique entourant la che.
• Aller à www.prodprotect.com/russellhobbs pour enregistrer votre produit.
• Bien nettoyer la bouilloire avant de l'utiliser pour la première fois. Laver l'intérieur de la
bouilloire en suivant les directives de la section SOINS ET ENTRETIEN.
• Choisir une surface de niveau où placer l’appareil en laissant susamment d’espace pour
permettre à la vapeur de s’échapper sans endommager les comptoirs, les armoires et les murs.
PIÈCES
1. Couvercle du réservoir
(no de pièce CM8100-01)
2. Couvercle du compartiment pour le
ltre
3. Réservoir
4. Acheur
5. Filtre réutilisable (no de pièce CM8100-04)
AVANT LA PREMIÈRE UTILISATION
• Remplir le réservoir jusqu’à la marque max, puis faire fonctionner l’appareil sans mettre
de café.
• Laisser refroidir, jeter l’eau, puis utiliser normalement.
RÉGLAGE DE L’HORLOGE
1. Insérer la che dans la prise de courant.
2. Utiliser les boutons hr et min pour régler la bonne heure.
• Les réglages de l’horloge seront conservés jusqu’à ce que la cafetière soit débranchée.
REMPLISSAGE
1. Soulever le couvercle du réservoir.
2. Remplir d’eau jusqu’à la marque 2 (0,25 l), au minimum, mais ne pas dépasser la marque max
(1,25 l). Le réservoir contient susamment d’eau pour 8 tasses de 5 oz (148 ml) chacune.
3. Appuyer sur le bouton du dispositif de verrouillage pour ouvrir le couvercle du
compartiment pour le ltre.
4. Placer le ltre réutilisable dans le support du ltre.
5. Pour chaque tasse, ajouter 7,5 g (1 1/2 c. à table) de café moulu.
6. Fermer le couvercle et appuyer sur celui-ci pour le verrouiller.
7. Placer la carafe sur le réchaud.
PRÉPARATION DE CAFÉ
1. Appuyer sur le bouton – l’icône e apparaîtra sur l’acheur.
2. Peu de temps après, le café commencera à s’égoutter dans la carafe.
3. Une fois terminé, le réchaud gardera le contenu de la carafe au chaud pendant 40 minutes.
4. Pour arrêter la cafetière pendant l’infusion, appuyer sur le bouton .
6. Support du ltre
(no de pièce CM8100-02)
7. Bouton du dispositif de verrouillage
du couvercle
8. Carafe avec couvercle
(no de pièce CM8100-03)
9. Réchaud
11
Page 12

UTILISATION DE LA MINUTERIE
1. Régler l’horloge à la bonne heure. Utiliser les boutons hr et min.
2. Pour régler la minuterie à l’heure à laquelle vous souhaitez commencer l’infusion :
a) Appuyer sur le bouton T .
b) Utiliser les boutons hr et min pour régler l’heure à laquelle vous souhaitez
commencer l’infusion.
Si vous n’appuyez pas sur les bouton hr ou min dans les 5 secondes, la cafetière reviendra
en mode « normal » et l’heure actuelle s’achera. Appuyer de nouveau sur le bouton T
pour recommencer le processus de programmation.
3. Une fois l’heure programmée, appuyer sur le bouton Le voyant situé au-dessus du
bouton T s’allume et l’icône T apparaît sur l’acheur. Votre cafetière est maintenant
programmée pour préparer du café au moment choisi
4. Pour vérier l’heure programmée, appuyer sur le bouton T . L’heure programmée
s’achera pendant 3 secondes, puis l’heure actuelle s’achera de nouveau.
5. Pour annuler la minuterie avant le début de l’infusion ou pour arrêter la cafetière pendant
l’infusion, appuyer sur le bouton .
RÉCHAUD/ARRÊT AUTOMATIQUE
1. La cafetière garde le café chaud pendant environ 40 minutes. L’icône. et 40:00
s’achent, puis le décompte est eectué par tranche d’une minute.
2. 40 minutes après l’infusion, l’icône disparaît et la cafetière s’arrête. Seule l’heure
actuelle est achée.
3. Pour remettre l’appareil en marche, appuyer sur n’importe quel bouton.
4. Pour une saveur optimale, le café devrait être consommé dans les 40 minutes.
FONCTION DE PAUSE POUR VERSER
Si vous souhaitez boire une tasse de café avant la n du cycle d’infusion :
1. Il est possible de retirer la carafe en tout temps. La soupape anti-égouttement empêchera
le café de s’égoutter sur le réchaud.
2. Pour éviter que le support du ltre ne déborde, replacer la carafe sur le réchaud dans les
20 secondes environ.
3. L’infusion reprendra une fois la carafe replacée sur le réchaud.
ENTRETIEN ET NETTOYAGE
1. Débrancher l’appareil et le laisser refroidir.
2. Jeter le marc de café.
3. Nettoyer les surfaces extérieures de l’appareil à l’aide d’un linge humide.
4. Laver à la main la carafe, le couvercle du réservoir et le support du ltre.
NETTOYAGE AUTOMATIQUE
Après 60 cycles d’infusion, l’icône de nettoyage apparaît sur l’acheur. Celle-ci vise à vous
rappeler d’activer la fonction de nettoyage automatique de votre cafetière.
L’opération prend environ 45 minutes.
1. Verser 500 ml (16 oz) de vinaigre blanc et 500 ml (16 oz) d’eau dans le réservoir.
2. Fermer le couvercle.
3. Replacer la carafe sur le réchaud.
4. Appuyer sur le bouton . Le voyant situé au-dessus du bouton s’allume et l’icône e
apparaît sur l’acheur.
5. À la n du cycle de nettoyage automatique, vider la carafe et la replacer sur le réchaud.
6. Remplir le réservoir d’eau froide jusqu’à la ligne du maximum. Mettre la cafetière en
marche pour un cycle d’infusion complet an d’éliminer le reste de la solution nettoyante.
Il faudra peut-être recommencer cette étape.
7. Laver à la main les pièces amovibles.
12
Page 13

BESOIN D’AIDE?
Pour obtenir du service et faire réparer l’appareil, ou si vous avez des questions à propos
de votre produit, veuillez communiquer avec notre Service à la clientèle au 1 800 947-3744.
Prière de NE PAS retourner l’appareil à l’endroit où il a été acheté. De plus, prière de NE
PAS envoyer l’appareil par la poste au fabricant, ni l’apporter à un centre de service. Il est
également possible de consulter le site www.prodprotect.com/russellhobbs.
Quelle est la couverture?
• Tout défaut de main-d’oeuvre ou de matériau; toutefois, la responsabilité de la société.
Spectrum Brands, Inc. se limite au prix d’achat du produit.
Quelle est la durée de la garantie?
• Aux États-Unis : Deux ans à compter de la date d’achat originale, preuve d’achat à l’appui.
• Au Canada : Deux ans à compter de la date d’achat originale, preuve d’achat à l’appui. Les
résidents du Canada peuvent enregistrer leur produit en ligne pour obtenir une année
supplémentaire de garantie : www.prodprotect.com/russellhobbs.
Quelle aide orons nous?
• Remplacement par un produit raisonnablement semblable nouveau ou réusiné.
Comment se prévaut-on du service?
• Conserver son reçu de caisse comme preuve de la date d’achat.
• Visiter notre site web au
1-800 -947-3744, pour obtenir des renseignements généraux relatifs à la garantie.
• On peut également communiquer avec le service des pièces et des accessoires au
1-800 738-0245.
Qu’est-ce que la garantie ne couvre pas?
• Des dommages dus à une utilisation commerciale.
• Des dommages causés par une mauvaise utilisation ou de la négligence.
• Des produits qui ont été modiés.
• Des produits utilisés ou entretenus hors du pays où ils ont été achetés.
• Des pièces en verre et tout autre accessoire emballés avec le produit.
• Les frais de transport et de manutention reliés au remplacement du produit.
• Des dommages indirects (il faut toutefois prendre note que certains états ne permettent pas
l’exclusion ni la limitation des dommages indirects).
Quelles lois régissent la garantie?
• Les modalités de la présente garantie donnent des droits légaux spéciques. L’utilisateur peut
également se prévaloir d’autres droits selon l’état ou la province qu’il habite.
www.prodprotect.com/russellhobbs
, ou composer sans frais le
13
Page 14

Por favor lea este instructivo antes de usar el producto.
INSTRUCCIONES IMPORTANTES DE SEGURIDAD
Cuando se utilizan aparatos eléctricos, siempre se debe respetar ciertas
medidas de seguridad a fin de reducir el riesgo de un incendio, un choque
eléctrico y (o) lesiones a las personas, incluyendo las siguientes:
• Por favor lea todas las instrucciones.
• No toque las superficies calientes. Use las asas o las perillas.
• A fin de protegerse contra un incendio, descarga eléctrica y lesiones a las personas,
no sumerja el cable, los enchufes ni el aparato en agua ni en ningún otro líquido.
• Todo aparato eléctrico utilizado cerca de la presencia de los niños o por ellos
mismos, requiere la supervisión de un adulto.
• Desenchufe el aparato del tomacorriente cuando ni el aparato ni el reloj de la
pantalla esté en uso y antes de limpiarlo.
• Espere a que el aparato se enfríe antes de instalarle o retirarle piezas y antes de limpiarlo.
• No opere ningún aparato eléctrico que tenga el cable o el enchufe averiado, que
presente un problema de funcionamiento o que esté dañado. Devuelva el aparato al
centro de servicio autorizado más cercano para que lo examinen, reparen o le hagan
los ajustes necesarios. Este aparato tiene marcas importantes en la clavija del enchufe.
Ni el enchufe accessorio ni el conector del cable (si el enchufe está moldado en el
cable) son aptos para reemplazo. Si están dañados, el aparato debe ser reemplazado.
• El uso de accesorios no recomendados por el fabricante para ser utilizados con este
aparato puede ocasionar incendio, descarga eléctrica o lesiones a las personas.
• No utilice este aparato a la intemperie.
• No permita que el cable cuelgue del borde de la mesa o del mostrador ni que
entre en contacto con las superficies calientes.
• No coloque el aparato sobre ni cerca de una hornilla de gas o eléctrica ni adentro
de un horno caliente.
• Para desconectar durante el ciclo de preparación o mientras mantiene caliente
el café, presione el botón , luego retire el enchufe del tomacorriente. Para
desconectar cuando el ciclo de preparación o la función de mantener caliente no
estén activados, simplemente retire el enchufe del tomacorriente.
• Este aparato se debe usar únicamente con el fin previsto.
• La tapa debe mantenerse sobre la jarra cuando el aparato está en uso.
• El retirar o abrir la tapa durante el ciclo de colado puede ocasionar quemaduras.
• La jarra está diseñada para ser utilizada con este aparato. Jamás se deberá utilizar
sobre una estufa.
• Nunca coloque una jarra caliente sobre una superficie fría ni mojada.
• No utilice la jarra si el vidrio se ha rajado o si el asa está floja o débil.
• No limpie la jarra con limpiadores abrasivos, con almohadillas de fibra de metal ni
demás limpiadores abrasivos.
• Este aparato no está diseñado para ser usado por personas (incluyendo los niños)
con su capacidad física, psíquica o sensorial reducida, o con falta de experiencia o
sabiduria, a menos que sean supervisadas o instruidas acerca del uso del aparato
por una persona responsable de su seguridad.
• Los niños deben ser supervisados para asegurar que no jueguen con el aparato.
14
Page 15

CONSERVE ESTAS INSTRUCCIONES.
PRECAUCIÓN
RIESGO DE INCENDIO O DE CHOQUE ELÉCTRICO. NO ABRA.
El símbolo de un rayo indica voltaje peligroso. El signo de exclamación
indica importantes instrucciones de mantenimiento. Consulte a
continuación:
Precaución: Para reducir el riesgo de incendio o de choque eléctrico,
no retire la cubierta de la cafetera. No contiene por dentro partes
reparables por el consumidor. Cualquier reparación deberá ser
efectuada únicamente por personal autorizado.
Este aparato eléctrico es para uso doméstico solamente.
ENCHUFE POLARIZADO
Este aparato cuenta con un enchufe polarizado (un contacto es más ancho
que el otro). A fin de reducir el riesgo de un choque eléctrico, este enchufe
encaja en un tomacorriente polarizado en un solo sentido. Si el enchufe no
entra en el tomacorriente, inviértalo y si aun así no encaja, consulte con un
electricista. Por favor no trate de alterar esta medida de seguridad.
TORNILLO DE SEGURIDAD
Advertencia: Este aparato cuenta con un tornillo de seguridad para
evitar la remoción de la cubierta exterior del mismo. A fin de reducir el riesgo
de incendio o de choque eléctrico, por favor no trate de remover
la cubierta exterior. Este producto no contiene piezas reparables por el
consumidor. Toda reparación se debe llevar a cabo únicamente por personal
de servicio autorizado.
CABLE ELÉCTRICO
a) Un cable de alimentación corto es provisto para reducir los riesgos de
enredarse o tropezar con un cable más largo.
b) Existen cables de extensión disponibles y estos pueden ser utilizados si
se toma el cuidado debido en su uso.
c) Si se utiliza un cable de extensión:
1) La clasificación eléctrica marcada del cable de extensión debe ser,
como mínimo, igual a la clasificación eléctrica del aparato;
2) Si el aparato es del tipo de conexión a tierra, el cable de extensión
debe ser un cable de tres alambres de conexión a tierra; y
3) El cable debe ser acomodado de manera que no cuelgue del
mostrador o de la mesa para evitar que un niño tire del mismo o que
alguien se tropiece sin darse cuenta.
Nota: Si el cable de alimentación está dañado, por favor llame al número del
departamento de garantía que aparece en estar instrucciones.
15
Page 16

FUNCIONES DE LOS BOTONES
preparar ahora/apagado hora programar minuto autolimpieza
El producto puede variar ligeramente del que aparece ilustrado.
16
Page 17

Como Usar
Este producto es para uso doméstico solamente.
PRIMEROS PASOS
• Retiere todo material de empaque, etiquetas y la tira plástica alrededor del enchufe.
• Por favor, visite www.prodprotect.com/russellhobbs para registrar su garantía.
• Lave todas las piezas según las instrucciones en la sección de CUIDADO Y
MANTENIMIENTO.
• Escoja una supercie nivelada donde la unidad va a ser utilizada, dejando suciente
espacio para que el vapor escape sin dañar los mostradores, gabinetes o las paredes.
PIEZAS
1. Tapa del tanque de agua
(pieza no. CM8100-01)
2. Tapa del compartimento del ltro
3. Tanque de agua
4. Pantalla
ANTES DE UTILIZAR POR PRIMERA VEZ
• Llene el tanque de agua hasta la marca "max" y haga funcionar el aparato sin café.
• Deje enfriar, deseche el agua y luego utilícelo normalmente.
AJUSTE LA HORA EN EL RELOJ
1. Inserte el enchufe en el tomacorriente.
2. Utilice los botones hr y min para ajustar la hora correcta.
• El reloj mantendrá los ajustes hasta que la cafetera es desenchufada.
LLENADO
1. Levante la tapa del tanque de agua para abrirla.
2. Llene con agua hasta por lo menos la marca 2 (0.25 L), pero no por encima de la
marca "max" (1.25 L). El tanque contiene suciente agua para 8 tazas de 5 oz. (148 ml)
cada una.
3. Presione el cierre de la tapa para abrir la tapa del compartimento del ltro.
4. Coloque el ltro reusable en la cesta del ltro.
5. Para cada taza, añada 7.5 g (11/2 cucharadas) de café molido.
6. Cierre la tapa y presione hacia abajo para asegurarla.
7. Coloque la jarra en la placa de calentamiento.
PREPARACIÓN DE CAFÉ
1. Presione el botón - el icono e aparecerá en la pantalla.
2. Poco después, el café comenzará a gotear dentro de la jarra.
3. Cuando el café esté listo, la placa de calentamiento mantendrá la jarra caliente
por 40 minutos.
4. Si desea detener el funcionamiento de la cafetera durante el ciclo de preparación,
presione el botón .
USO DEL RELOJ AUTOMÁTICO
1. Ajuste el reloj a la hora correcta. Utilice los botones hr y min.
2. Para jar el reloj automático en la hora deseada para comenzar la preparación:
a) Presione el botón T .
5. Filtro reusable (pieza no. CM8100-04)
6. Cesta del ltro (pieza no. CM8100-02)
7. Cierre de la tapa
8. Jarra con tapa (pieza no. CM8100-03)
9. Placa de calentamiento
17
Page 18

b) Utilice los botones hr y min para jar la hora que desea que comience la
preparación. Si no presiona el botón hr o min en 5 segundos, la cafetera
regresará al modo "normal" y mostrará la hora actual. Presione el botón T
para comenzar de nuevo el proceso de programación.
3. Cuando la hora esté programada, presione el botón
T se iluminará y el icono T aparecerá en la pantalla. Su cafetera ahora está
programada para preparar café a la hora seleccionada.
4. Para vericar la hora programada, presione el botón T . La hora programada será
mostrada por 3 segundos y después regresará a la hora actual del día.
5. Para cancelar la programación del reloj automático antes de que comience el
ciclo de preparación o para detener el funcionamiento de la cafetera durante el
ciclo de preparación, presione el botón .
. La luz arriba del botón
MANTENER CALIENTE/APAGADO AUTOMÁTICO
1. La cafetera mantendrá caliente el café por aproximadamente 40 minutos y
40:00 aparecerán y un conteo regresivo comenzará en incrementos de 1 minuto.
2. Después de 40 minutos de la preparación, el icono desaparecerá y la cafetera
se apagará, solamente se mostrará la hora del día.
3. Para activar el aparato, presione cualquier botón.
4. Para obtener el mejor sabor, el café debe ser consumido como máximo en 40
minutos.
DISPOSITIVO DE PAUSA Y SERVIR
Si desea una rápida taza de café antes de que termine el ciclo de preparación:
1. Puede retirar la jarra en cualquier momento. La válvula antigoteo impedirá que el
café caiga en la placa de calentamiento.
2. Para evitar que la cesta del ltro se desborde, coloque de nuevo la jarra en la
placa de calentamiento en aproximadamente 20 segundos.
3. Cuando coloque de nuevo la jarra, la cafetera reanudará el proceso de
preparación.
CUIDADO Y MANTENIMIENTO
1. Desenchufe el aparato y deje que se enfrie.
2. Deseche el café molido utilizado.
3. Limpie las supercies exteriores del aparato con un paño húmedo.
4. Lave a mano la jarra, la tapa del tanque de agua y la cesta del ltro.
FUNCIÓN DE AUTOLIMPIEZA
Después de 60 ciclos de preparación, el icono de limpieza aparecerá en la pantalla.
Esto es para recordarle que debe activar la función de autolimpieza de su cafetera.
Este proceso tomará aproximadamente 45 minutos.
1. Vierta 500 ml (16 oz.) de vinagre blanco y 500 ml (16 oz.) de agua en el tanque.
2. Cierre la tapa.
3. Coloque la jarra en la placa de calentamiento.
4. Presione el botón . La luz arriba del botón se iluminará y el icono e aparecerá
en la pantalla.
5. Después que termine el ciclo de autolimpieza, vacíe la jarra y colóquela de nuevo
en la placa de calentamiento.
6. Llene el tanque con agua fría hasta la marca “max”. Encienda la cafetera y deje
que realice un ciclo de preparación completo para eliminar el resto de la solución
de limpieza. Si lo desea, puede repetir este paso.
7. Lave a mano las piezas desmontables.
18
Page 19

NECESITA AYUDA?
(Solamente aplica en los Estados Unidos y el Canadá).
Para servicio, reparación o cualquier pregunta en relación a su aparato, por favor
llame a nuestra línea de Servicio al Cliente al 1-800-947-3744. Por favor NO devuelva
el producto al lugar donde lo compró. Además, por favor NO devuelva por correo el
producto al fabricante, ni lo lleve a un centro de servicio. También puede consultar
www.prodprotect.com/russellhobbs.
¿Qué cubre mi garantía?
• Su garantía cubre cualquier defecto de material o de mano de obra, siempre y
cuando la responsabilidad de Spectrum Brands, Inc. no exceda el precio de compra
del producto.
¿Por cuánto tiempo es valida la garantía?
• En los Estados Unidos: Dos años a partir de la fecha original de compra mientras
tenga una prueba de la compra.
• En Canadá: Dos años a partir de la fecha original de compra mientras tenga una
prueba de la compra. Los residentes de Canadá pueden registrarse en línea para
recibir un año más de garantía a: www.prodprotect.com/russellhobbs.
¿Qué tipo de asistencia provee mi garantía?
• Su garantía le brinda un producto de reemplazo similar que sea nuevo o que ha sido
restaurado de fábrica.
¿Cómo se puede obtener asistencia?
• Conserve el recibo original de compra.
• Para servicio al cliente y para registrar su garantía, visite www.prodprotect.com/
russellhobbs, o llame al número
• Por favor llame al número del centro de servicio autorizado.
¿Qué no cubre mi garantía?
• Los productos que han sido utilizados en condiciones distintas a las normales.
• Los daños ocasionados por el mal uso, el abuso o negligencia.
• Los productos que han sido alterados de alguna manera.
• Los daños ocasionados por el uso comercial del producto.
• Los productos utilizados o reparados fuera del país original de compra.
• Las piezas de vidrio y demás accesorios empacados con el aparato.
• Los gastos de tramitación y embarque asociados al reemplazo del producto.
• Los daños y perjuicios indirectos o incidentales.
¿Cómo afecta a mi garantía la ley estatal?
• Esta garantía le otorga derechos legales especícos y el consumidor podría tener
otros derechos que varían de una región a otra.
1-800-947-374 4
, para servicio al cliente
1-800-738-0245.
19
Page 20

1600W 120V 60Hz
RUSSELL HOBBS and the RH logo are Trademarks of Spectrum Brands, Inc. or one of its subsidiaries.
All rights reserved.
RUSSELL HOBBS et le logo RH sont des marques de commerce de Spectrum Brands, Inc. ou de l’une de ses
filiales. Tous droits réservés.
RUSSEL HOBBS y el logotipo RH son marcas registradas de Spectrum Brands, Inc. o de una de sus compañias
subsidiarias. Todos los derechos reservados.
Made in China.
Fabriqué en Chine.
Fabricado en China.
© 2017 Spectrum Brands, Inc., Middleton, WI 53562
CM8100BKR, CM8100GYR
18170 -0 0
20
T22-5004054
 Loading...