

Page 1
CORDLESS KETTLE
MODEL RHK8
Instructions & Warranty
RHK8_IB_010710
Page 2
2
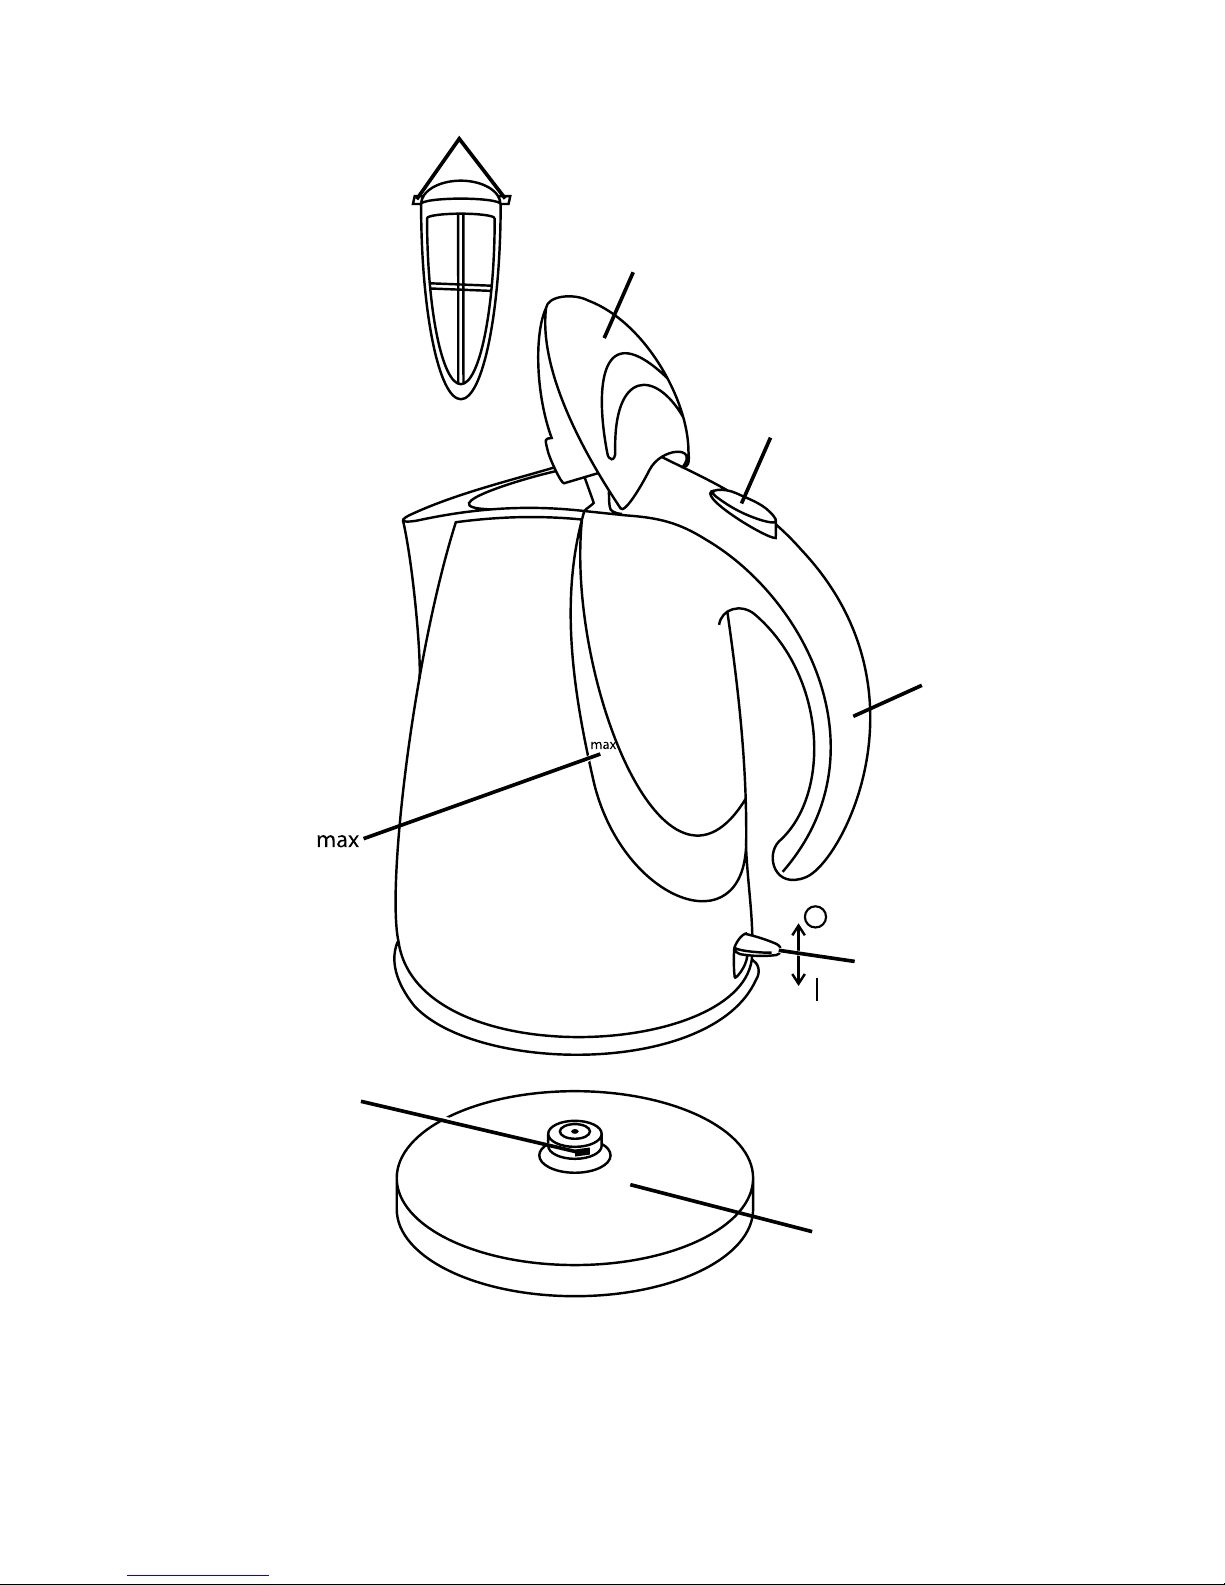
FILTER
TABS
HANDLE
OFF
SWITCH
ON
CONNECTOR
POWER
BASE
LID
LID RELEASE
BUTTON
Page 3

3
Congratulations on the purchase of your Russell Hobbs Kettle. Each unit is manufactured
to ensure safety and reliability. Before using this appliance for the rst time, please read
this instruction booklet carefully and keep it for future reference. Pass it on if you pass on
the appliance.
When using electrical appliances, basic safety precautions should always be followed,
including but not limited to the following:
IMPORTANT SAFEGUARDS
1. To protect against electrical hazards do not immerse the power cord, plug,
power base, or kettle in water or any other liquid.
2. Do not use in the bathroom or near any source of water. Do not use outdoors.
3. Always use the appliance handles as some parts may be hot.
4. This appliance is not intended for use by persons (including children) with reduced
physical, sensory or mental capabilities, or lack of experience and knowledge, unless
they have been given supervision or instruction concerning use of the appliance by a
person responsible for their safety.
5. Always turn off and unplug from the wall power outlet before cleaning the appliance.
6. Turn the power off at the wall power outlet when not in use.
7. To disconnect, turn off the wall power outlet, then grasp and pull the plug from the wall
outlet. Never pull by the cord.
8. Do not operate this appliance with a damaged cord/plug or after the appliance has
malfunctioned, or been dropped or damaged in any manner.
Contact Customer Service for replacement, examination, repair or adjustment.
9. There are no user serviceable parts. If power cord is damaged, it must be replaced by
the manufacturer or similarly qualied person in order to avoid a hazard.
10. Do not use on an inclined plane or unstable surface.
11. Do not move the kettle while it is switched on.
12. Ensure the lid is properly closed when in use.
13. Do not open the lid while the water is heating or boiling.
14. Always take care when pouring. Pour slowly, do not over-tilt the kettle.
15. The scalding hazard remains long after the water has boiled. Keep the kettle, power
base, and the power cord away from the edge of tables or countertops and out of
reach of children or inrm persons.
16. Only use the kettle with the power base provided and vice versa.
17. Wind excess cable beneath the power base.
18. Do not place on or near any heat sources.
19. Do not use this appliance for other than its intended purpose of heating water.
20. Do not switch on the kettle unless there is at least two cups of water.
21. Do not ll past ‘max’, otherwise boiling water may spit from the spout.
22. Do not use without lter tted.
23. Do not leave the product unattended when in use or where it may be touched by
children or inrm persons.
24. Do not use alkaline cleaning agents or harsh abrasives when cleaning this appliance.
Follow the instructions in the ‘Care and maintenance’ section when cleaning this
appliance.
25. This appliance is not a toy. Children should be supervised to ensure they do not play
with the appliance.
26. This appliance is not intended to be operated by means of an external timer or
separate remote control system.
27. De-scale the kettle regularly to ensure proper operation.
SAVE THESE INSTRUCTIONS
THIS APPLIANCE IS FOR HOUSEHOLD USE ONLY
Page 4

4
BEFORE USING FOR THE FIRST TIME
Fill to ‘max’, boil, discard the water, and then rinse. Do this three times to remove any dust,
residues, etc., from the kettle.
POSITIONING
• Put the power base on a stable, level surface.
• Route the cable so it does not overhang and cannot be caught or tripped over.
• Wind excess cable beneath the power base.
FILLING
Caution: If the kettle has just boiled it will be full of steam. Keep hands clear as
steam will escape from the kettle when opening the lid.
• Remove the kettle from the power base.
• Press the lid release button to open the lid.
• Fill the kettle with at least 2 cups of water. Do not ll above the ‘max’ line.
• If overlled, the kettle may spit boiling water.
• Press the lid down to close it.
• Check the lid is fully closed or the kettle won’t switch off when it boils.
SwITCHING ON
• Plug the power base into a wall power outlet.
• Place the kettle on the power base – take care not to spill any water.
• Press the switch down – the water window will illuminate and the kettle will heat up.
Caution: Keep clear, as steam will escape from the spout when boiling.
SwITCHING OFF
• When the water boils, the kettle will switch itself off.
• To switch off manually, lift the switch or lift the kettle off the power base.
GENERAL
• Lift the kettle by the handle to pour.
• To avoid the risk of splashing, pour slowly and do not over-tilt the kettle.
• Do not tilt the kettle backwards – water might get into the control area. If this happens,
let the kettle dry before use – sit it somewhere warm for 12 hours.
• When you lift the kettle, you may see moisture on the power base. This is the steam
used to switch the kettle off automatically, which then condenses and escapes via
vents under the kettle. This is normal.
• There may be some discolouration on the oor of the kettle. This is due to the bonding
of the element to the kettle oor.
Page 5

5
USING wITH INSUFFICIENT wATER
• Using the kettle with insufcient water will shorten the life of the element.
• If the kettle is accidently switched on when it does not contain sufcient water,
a boil-dry cut-out will switch the kettle off.
• To prevent the kettle cycling on and off, remove it from the power base.
• Sit the kettle on a stable heat resistant surface until it has fully cooled down.
• Do not ll the kettle with water until it is cold or it may spit.
CARE AND MAINTENANCE
• Check that the kettle is switched off by lifting the switch.
• Unplug the power base from the wall power outlet.
• Let the kettle cool down fully.
• Wipe over the outside of the kettle and power base with a damp cloth.
A mild (dishwashing) detergent may be used if required.
• Keep all connectors and sockets dry.
• Do not put the kettle or power base in liquid.
• Do not use harsh or abrasive cleaning agents or solvents.
DE-SCALE REGULARLY – EVEN IN SOFT wATER AREAS
Limescale may be white, coloured, even rusty-looking, but it’s normally visible. Phosphate
scale isn’t generally visible, but it is present, even in soft water areas.
When water is heated the minerals solidify. This makes the water appear cloudy. It may
form a lm on the surface of the water or on the walls and oor of the kettle. It may look like
thin pieces of plastic in the water. All scale causes overheating, reduces the kettle’s life,
and may trigger the boil-dry cut-out.
Even in soft water areas de-scale regularly to help keep your kettle in good working order
• Use a de-scaler suitable for plastic products (most kettles have some plastic parts).
Follow the instructions provided with the de-scaler.
• Alternatively, you may use white vinegar. Fill the kettle with half a litre of vinegar and
leave it to stand for 1 hour without heating.
• Citric acid can also be used. Boil a litre of water, add 25g of citric acid and leave it to
stand for 15 minutes.
• After de-scaling, rinse several times, ll, boil and discard the water to remove all
chemical residues.
NOTE: Products returned under warranty with faults due to scale will be subject to a
repair charge.
Page 6

6
wATER FILTER
Tap water contains minerals that can result in scale particles suspended in the water in
your kettle. The lter will prevent these particles going into your drink. Clean the lter periodically or as required.
CLEANING THE FILTER
• Check your hands are free from soap, hand cream, or anything which may
leave a taint.
• Switch the kettle off, and let it cool.
• Open the lid.
• Gently push the top of the lter down and away from the spout to release the tabs on
the top of the lter.
• Slide the lter up and out of its housing in the kettle.
• Rinse the lter under a running tap while brushing with a soft brush.
• Rinse out the kettle, in case scale particles have fallen inside.
• Lower the lter into its housing in the kettle.
• Gently press the top of the lter down and towards the spout until the lter
clicks into place.
• Close the lid.
Page 7
Limited 2 year warranty
Limited 2 year warranty
Nothing in this warranty or the instructions relating to the product excludes, restricts or otherwise
affects your statutory rights under the Trade Practices Act 1974 and other relevant legislation.
In addition to your statutory rights, Salton (Aust) Pty Ltd and Salton NZ Ltd (hereafter referred to as
“Salton”) provide a LIMITED 2 YEAR WARRANTY for this product. Salton warrants this product free from
defects in material and workmanship for two (2) years from the date of purchase. Within this warranty
period Salton will repair or replace defective parts at no charge. Defective products may be returned
to Salton or the place of purchase. Salton recommends you keep your receipt as proof of purchase. If
distance prevents you from taking the product to the place of purchase, please call the Salton
customer service department freecall within Australia 1800 427 842, or freecall within New Zealand
0508 629 777.
The warranty does not cover improper installation, misuse, abuse or neglect of the product. This
warranty also does not cover any product taken apart, altered or serviced by an unauthorised repairer.
Registration of your warranty card is not compulsory, but entitles you to receive these benefits:
• Information on special price offers and promotions,
• Notification of any issues concerning your product.
You can register your product online:
• If you live in Australia please visit www.salton.com.au
• If you live in New Zealand please www.salton.co.nz
OR Fill in the warranty card below and send it to the relevant address shown on the back.
Please fill in your warranty card and send to the relevant address shown on the back.
Name: _ _ _ _ _ _ _ _ _ _ _ _ _ _ _ _ _ _ _ _ _ _ _ _ _ _ _ _ _ _ _ _ _ _ _ _ _ _ _ _ _ _ _ _ _ _ _
Address: _ _ _ _ _ _ _ _ _ _ _ _ _ _ _ _ _ _ _ _ _ _ _ _ _ _ _ _ _ _ _ _ _ _ _ _ _ _ _ _ _ _ _ _ _ _
State: _ _ _ _ _ _ _ _ _ Postcode: _ _ _ _ _ Country: _ _ _ _ _ _ _ _ _ _ _ _ _ _ _ _ _ _ _ _
Phone: _ _ _ _ _ _ _ _ _ _ _ _ _ _ _ _ _ _ _ _ Email: _ _ _ _ _ _ _ _ _ _ _ _ _ _ _ _ _ _ _ _ _
Model No: _ _ _ _ _ _ _ _ _ _ _ _ _ _ _ _ _ _ _ Product: _ _ _ _ _ _ _ _ _ _ _ _ _ _ _ _ _ _ _ _
Purchased From: _ _ _ _ _ _ _ _ _ _ _ _ _ _ _ _ _ _ _ _ _ _ _ _ Date of Purchase: _ _ _ _ _ _
(email address must be supplied)
Received as a gift
Prior experience with Salton
Prior experience with Russell Hobbs
Recommendation of family/friend
Recommendation of Salesperson
Product features
Salton reputation
Russell Hobbs reputation
Ease of operation
Seen in store
Seen on television
Seen in newspaper/magazine
In store demo
Special offer
RH_WC_130510
Page 8

AUSTRALIAN CUSTOMER SERVICE
Salton (Aust) Pty. Ltd.
P.O. Box 683
Braeside Victoria 3195
Australia
Freecall: 1800 427 842
Hours: 9am-5pm (EST) Mon-Fri
www.salton.com.au
For the latest information on our exciting range of innovative
products for a healthy today and tomorrow visit our website.
NEW ZEALAND CUSTOMER SERVICE
Salton NZ Ltd.
P.O. Box 300 201
Albany Auckland 0752
New Zealand
Freecall: 0508 629 777
Hours: 9am-5pm Mon-Fri
www.salton.co.nz
 Loading...